retain manager manual - retain-software.ru · 1.2 about retain manager ... (dbi) .nsf files are ......
TRANSCRIPT

M
Retain Manager Manual
www.retaininternational.com
Contents
2
Table of Contents
1 Introduction 4
...................................................................................................................... 41.1 Introduction
...................................................................................................................... 41.2 About Retain Manager
...................................................................................................................... 51.3 About Retain
...................................................................................................................... 51.4 How to use this guide
...................................................................................................................... 51.5 Installing Retain
...................................................................................................................... 51.6 Initial tasks
...................................................................................................................... 51.7 Conventions
...................................................................................................................... 61.8 Where to get support
2 Using Retain Manager 7
...................................................................................................................... 72.1 Starting Retain Manager
...................................................................................................................... 72.2 The Retain Manager interface
...................................................................................................................... 72.3 Exiting Retain Manager
3 Setting up the Retain database 8
...................................................................................................................... 83.1 Opening a Retain database file
...................................................................................................................... 83.2 Saving the Retain database file
4 Set-up options 9
...................................................................................................................... 104.1 Display diary
...................................................................................................................... 114.2 Calculation diary
...................................................................................................................... 124.3 Colour codes
...................................................................................................................... 134.4 Selecting colours
...................................................................................................................... 134.5 Charge rates............................................................................................................................................................. 14The charge rates dialog
............................................................................................................................................................. 15Defining charge rate date ranges
............................................................................................................................................................. 15Defining charge rate grades
............................................................................................................................................................. 16Defining charge rate codes
............................................................................................................................................................. 16Defining charge rates
...................................................................................................................... 174.6 Extra settings............................................................................................................................................................. 17More flexible utilisation and availibility calculations
............................................................................................................................................................. 19Option to adjust starter/leaver time in reports
............................................................................................................................................................. 19Warning message for overbookings
............................................................................................................................................................. 19Option to 'fix' bookings of a certain priority (colour)
............................................................................................................................................................. 20Different ways to display time on booking bars/tips
............................................................................................................................................................. 20Bookings shown in days or hours
............................................................................................................................................................. 20Selected records in booking dialog
...................................................................................................................... 204.7 Statutory Holidays
...................................................................................................................... 214.8 INI file setup options............................................................................................................................................................. 21Ability to hide bookings from chart viewers
............................................................................................................................................................. 21Change priority palette to colour palette
............................................................................................................................................................. 22List all tasks in small tables
............................................................................................................................................................. 22Restrict displayed records (view selection)
............................................................................................................................................................. 22Server name
............................................................................................................................................................. 22INI file definitions
5 Setting up the data 24
6 Database administration and backup 26
...................................................................................................................... 266.1 Purging
...................................................................................................................... 266.2 Updating bookings
...................................................................................................................... 286.3 Checking the database
...................................................................................................................... 286.4 Making backups of your data
7 Reference 29
8 Support 30
...................................................................................................................... 308.1 Support services

Contents
3
Index 31

Introduction
4
1 Introduction
1.1 Introduction
Retain Manager Manual
Retain Planner editionRetain Corporate edition
www.retaininternational.com
© 2007 ... Retain International Limited
1.2 About Retain Manager
Retain Manager is the administration module for Retain. Retain Manager is used for initial set up tasks and forthe subsequent administration of Retain data files.
Set up tasks performed within Retain Manager include:
specifying database names and locations
defining display and calculation calendars (e.g. standard working days);
defining statutory holidays;
defining priority colour codes and descriptions;
setting up charge rates and charge rate periods;
Administration functions include looking after the data files and performing database consistency checks.
Introduction
5
1.3 About Retain
Retain is a flexible planning tool for viewing and manipulating staff and job allocations through a user friendlygraphical interface. It has been designed to resemble the manual "wall chart" booking system, but it is muchmore versatile than any manual booking system.
1.4 How to use this guide
Refer to this Manager Guide if you are doing any of the following:
setting Retain up for the first time;
performing database administration tasks; or
Refer to the separate User Guide if you are using Retain to make bookings or view staff plans or reports.
1.5 Installing Retain
Retain should already be installed on your PC and network. For full installation instructions and allowablechanges, please see the separate implementation guide.
1.6 Initial tasks
After installing the software you should configure Retain to your organization's requirements by carrying outsome initial set-up tasks as follows:
specifying the location of the data files;
setting up initial charge rates and charge periods;
defining standard working diaries, for both calculation and display purposes;
setting up priority colours and defining colour conventions and descriptions; and
Note: You can amend these settings later if desired (see Set-up options) but it can save considerable effortlater on if you are able to set up these areas before making bookings in Retain.
1.7 Conventions
The following conventions are used throughout this user guide:
Data file types are referred to as follows:.RDB files are referred to as Retain database configuration files.
.RTN files are referred to as notebooks.
The collection of data files that make up the database:.DBF files are referred to as data files. (Standard)Linked to the database via BDE. (DBI).NSF files are referred to as data files. (Notes)Linked to the database via Retain Server application. (Client/Server)
Details you must enter from the keyboard are in bold typeface, for example:
Type C: as the run command.
Menu options and options within dialog boxes are expressed in single quotes, for example:
Introduction
6
Select 'Data', 'Edit' from the menus.
Keyboard strokes are represented by capitals, for example:
ENTER represents the Enter or carriage return key (also referred to as the RETURN key in somecomputer manuals).
ESC represents the Escape key.
F1, F2 etc., represent the function keys.
SHIFT represents the Shift key.
CTRL represents the Control key.
ALT represents the Alt key.
A plus sign between two key presses indicates a combination of key presses. For example CTRL+Srepresents the action of holding down the Control key and pressing the S key.
You can use full UNC names to describe the location of files, in addition to being able to use mapped driveletters. This allows you to set up Retain in a standard way where different drive mappings are used on eachPC.
1.8 Where to get support
If you have a problem with Retain which you are unable to resolve through this user guide or through your localsupport contacts, please contact your Support Service Provider.
Using Retain Manager
7
2 Using Retain Manager
A number of set-up functions are highly sensitive in terms of their impact on your database. They are thereforeconsigned to a separate Retain Manager module so that access may be restricted to specific users if desired.
2.1 Starting Retain Manager
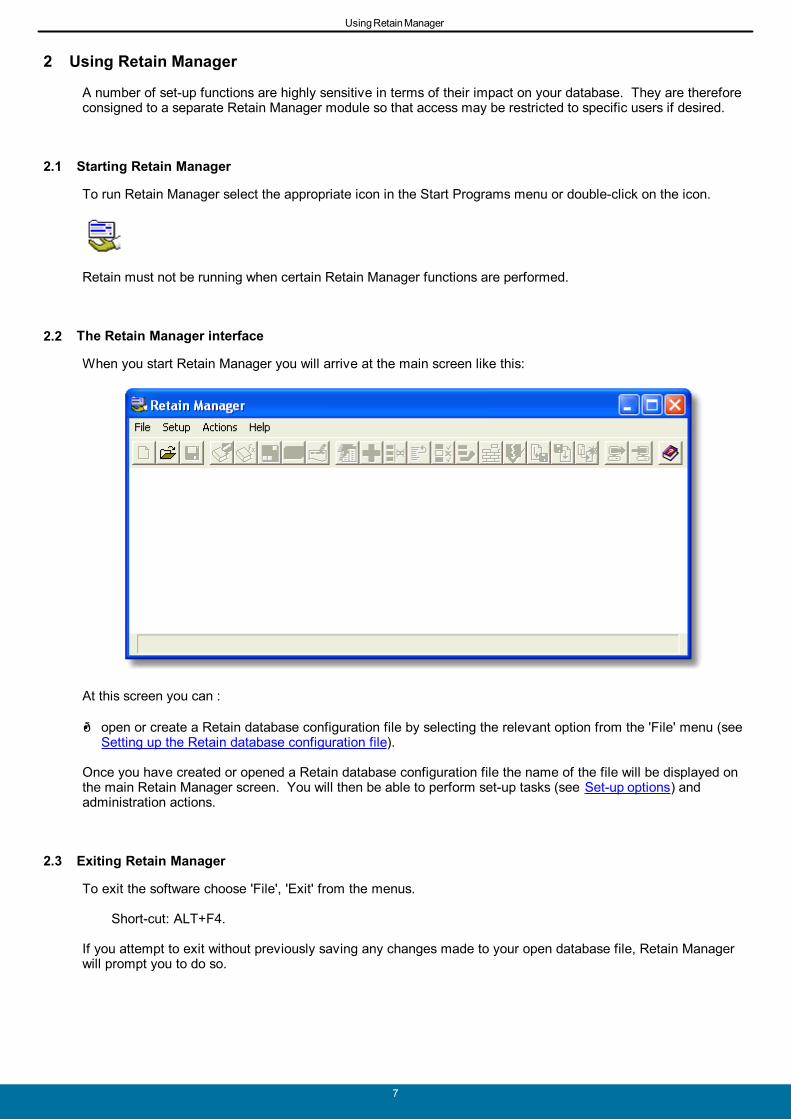
To run Retain Manager select the appropriate icon in the Start Programs menu or double-click on the icon.
Retain must not be running when certain Retain Manager functions are performed.
2.2 The Retain Manager interface
When you start Retain Manager you will arrive at the main screen like this:
At this screen you can :
open or create a Retain database configuration file by selecting the relevant option from the 'File' menu (seeSetting up the Retain database configuration file).
Once you have created or opened a Retain database configuration file the name of the file will be displayed onthe main Retain Manager screen. You will then be able to perform set-up tasks (see Set-up options) andadministration actions.
2.3 Exiting Retain Manager
To exit the software choose 'File', 'Exit' from the menus.
Short-cut: ALT+F4.
If you attempt to exit without previously saving any changes made to your open database file, Retain Managerwill prompt you to do so.

Setting up the Retain database
8
3 Setting up the Retain database
Retain Manager can be used to set up the following options:
charge rates and charge periods;
calculation and display diaries; and
priority colours and priority colour descriptions.
3.1 Opening a Retain database file
In Retain Manager, to open an existing Retain database configuration file:
1. Select 'File', 'Open' from the menus.
Short-cut: Open file icon, CTRL+O.
The name of the opened database file will be displayed at the main Retain Manager screen to indicate that ithas been opened.
3.2 Saving the Retain database file
To save changes to the current database file select 'File', 'Save' from the menus.
Short-cut: Save database icon.
Set-up options
9
4 Set-up options
Once you have created or opened a Retain database configuration file, the various set-up options can beamended by selecting the desired item from the 'Setup' menu or by clicking on the appropriate icon.
Set-up options are displayed in a tabbed dialog screen entitled 'Retain Database Properties', with the selecteditem to the front.
Enter details as desired and click on the tab headings to navigate between the various set-up areas. Then clickon OK when done.
The following setup areas are available:
Display diary - the standard working day as displayed on the screen, default for a new notebook (page).
Calculation diary - the working day as used for all time and revenue calculations.
Colour codes - priority colour descriptions of bookings, associated with booking colours displayed in thewallchart.
Charge rates - for specific jobs and resource grades, used for calculating revenue.
Extra settings - mainly how different job groups are used in calculations.
Statutory Holidays - set-up statutory holidays to be excluded from calculations.
There are other options, which are only available in the INI file that belongs to the .RDB file.
Set-up options
10
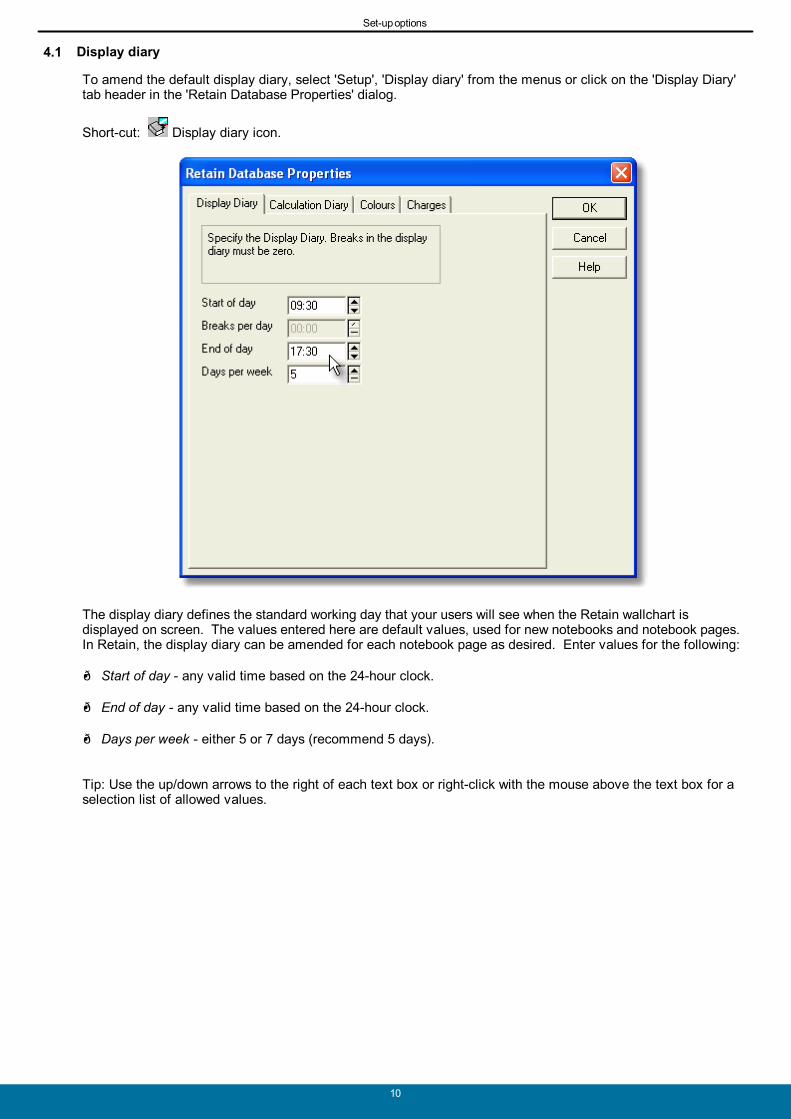
4.1 Display diary
To amend the default display diary, select 'Setup', 'Display diary' from the menus or click on the 'Display Diary'tab header in the 'Retain Database Properties' dialog.
Short-cut: Display diary icon.
The display diary defines the standard working day that your users will see when the Retain wallchart isdisplayed on screen. The values entered here are default values, used for new notebooks and notebook pages.In Retain, the display diary can be amended for each notebook page as desired. Enter values for the following:
Start of day - any valid time based on the 24-hour clock.
End of day - any valid time based on the 24-hour clock.
Days per week - either 5 or 7 days (recommend 5 days).
Tip: Use the up/down arrows to the right of each text box or right-click with the mouse above the text box for aselection list of allowed values.
Set-up options
11
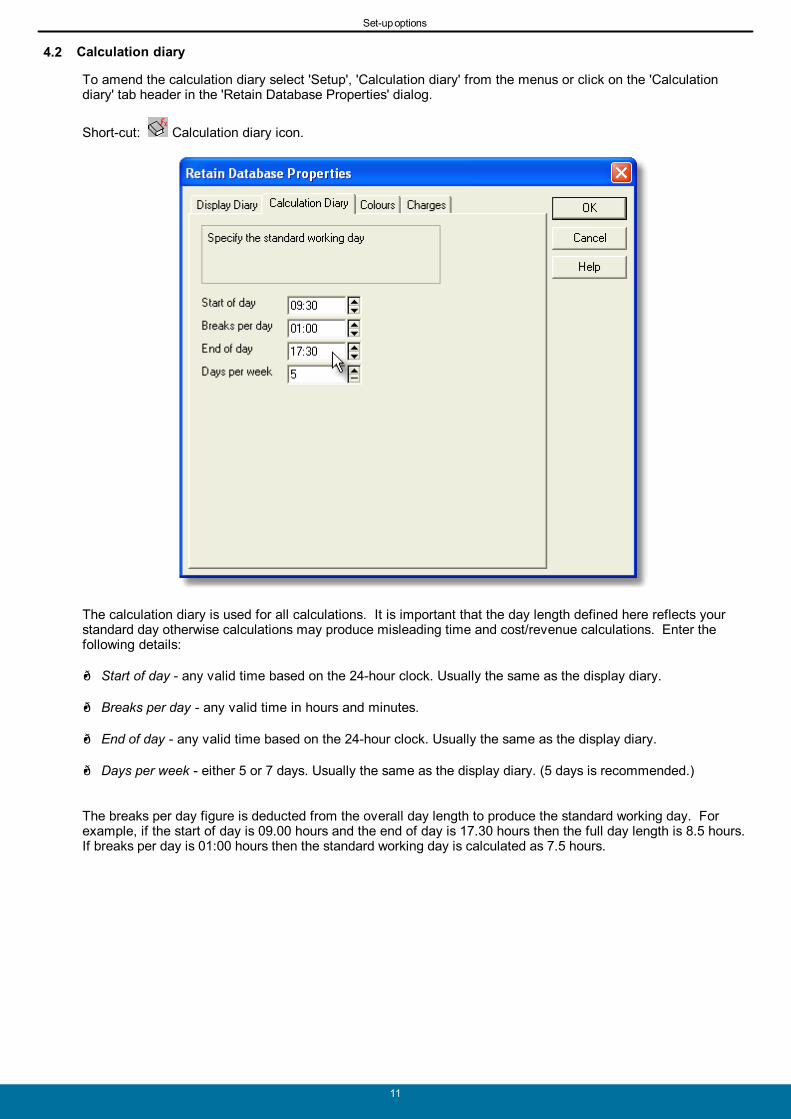
4.2 Calculation diary
To amend the calculation diary select 'Setup', 'Calculation diary' from the menus or click on the 'Calculationdiary' tab header in the 'Retain Database Properties' dialog.
Short-cut: Calculation diary icon.
The calculation diary is used for all calculations. It is important that the day length defined here reflects yourstandard day otherwise calculations may produce misleading time and cost/revenue calculations. Enter thefollowing details:
Start of day - any valid time based on the 24-hour clock. Usually the same as the display diary.
Breaks per day - any valid time in hours and minutes.
End of day - any valid time based on the 24-hour clock. Usually the same as the display diary.
Days per week - either 5 or 7 days. Usually the same as the display diary. (5 days is recommended.)
The breaks per day figure is deducted from the overall day length to produce the standard working day. Forexample, if the start of day is 09.00 hours and the end of day is 17.30 hours then the full day length is 8.5 hours.If breaks per day is 01:00 hours then the standard working day is calculated as 7.5 hours.
Set-up options
12
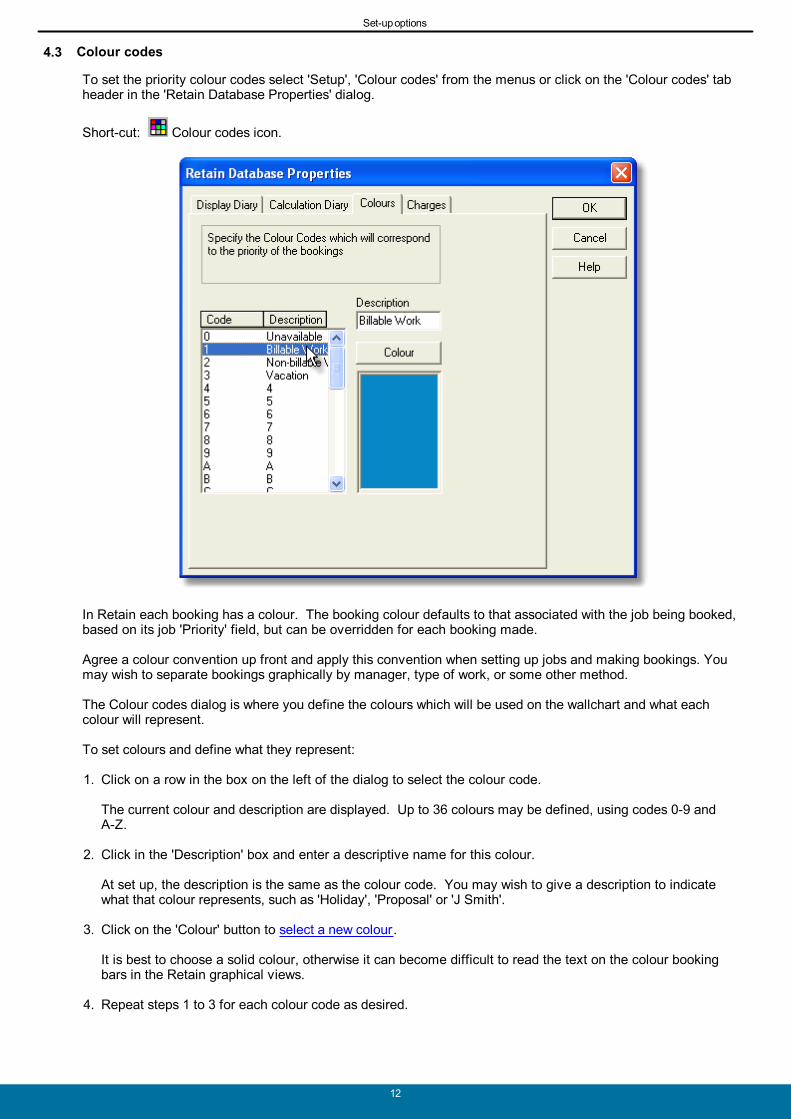
4.3 Colour codes
To set the priority colour codes select 'Setup', 'Colour codes' from the menus or click on the 'Colour codes' tabheader in the 'Retain Database Properties' dialog.
Short-cut: Colour codes icon.
In Retain each booking has a colour. The booking colour defaults to that associated with the job being booked,based on its job 'Priority' field, but can be overridden for each booking made.
Agree a colour convention up front and apply this convention when setting up jobs and making bookings. Youmay wish to separate bookings graphically by manager, type of work, or some other method.
The Colour codes dialog is where you define the colours which will be used on the wallchart and what eachcolour will represent.
To set colours and define what they represent:
1. Click on a row in the box on the left of the dialog to select the colour code.
The current colour and description are displayed. Up to 36 colours may be defined, using codes 0-9 andA-Z.
2. Click in the 'Description' box and enter a descriptive name for this colour.
At set up, the description is the same as the colour code. You may wish to give a description to indicatewhat that colour represents, such as 'Holiday', 'Proposal' or 'J Smith'.
3. Click on the 'Colour' button to select a new colour.
It is best to choose a solid colour, otherwise it can become difficult to read the text on the colour bookingbars in the Retain graphical views.
4. Repeat steps 1 to 3 for each colour code as desired.
Set-up options
13
4.4 Selecting colours
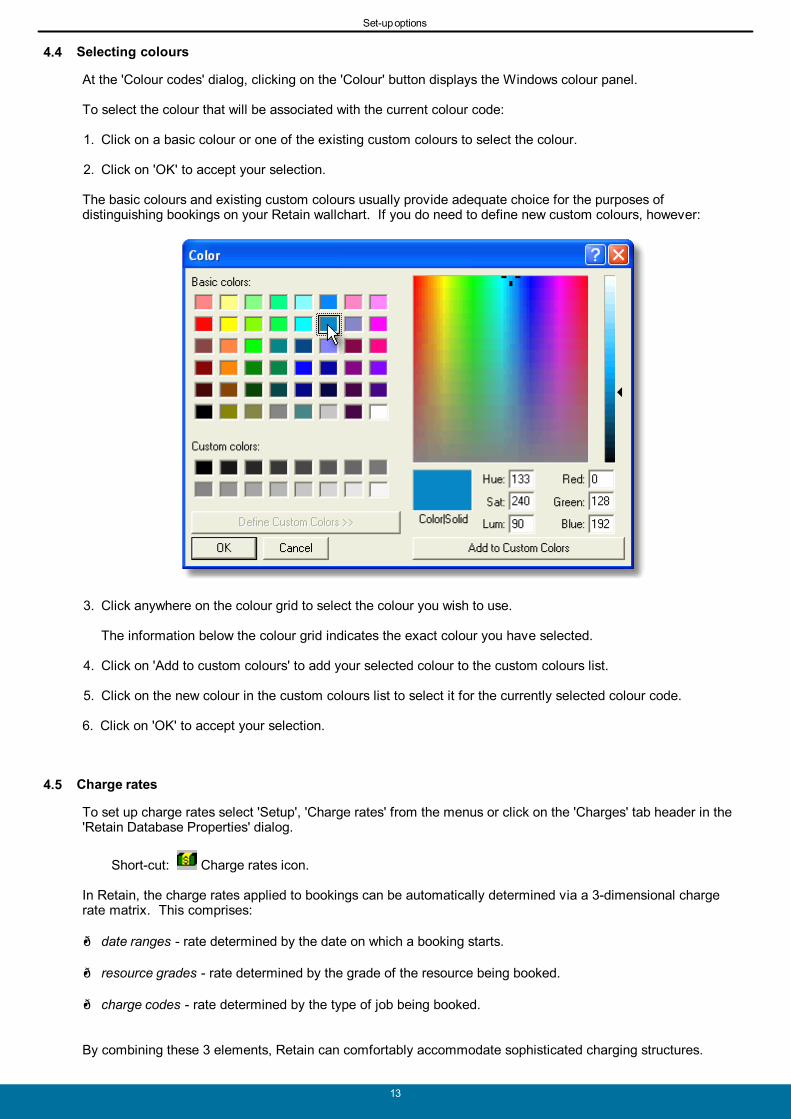
At the 'Colour codes' dialog, clicking on the 'Colour' button displays the Windows colour panel.
To select the colour that will be associated with the current colour code:
1. Click on a basic colour or one of the existing custom colours to select the colour.
2. Click on 'OK' to accept your selection.
The basic colours and existing custom colours usually provide adequate choice for the purposes ofdistinguishing bookings on your Retain wallchart. If you do need to define new custom colours, however:
3. Click anywhere on the colour grid to select the colour you wish to use.
The information below the colour grid indicates the exact colour you have selected.
4. Click on 'Add to custom colours' to add your selected colour to the custom colours list.
5. Click on the new colour in the custom colours list to select it for the currently selected colour code.
6. Click on 'OK' to accept your selection.
4.5 Charge rates
To set up charge rates select 'Setup', 'Charge rates' from the menus or click on the 'Charges' tab header in the'Retain Database Properties' dialog.
Short-cut: Charge rates icon.
In Retain, the charge rates applied to bookings can be automatically determined via a 3-dimensional chargerate matrix. This comprises:
date ranges - rate determined by the date on which a booking starts.
resource grades - rate determined by the grade of the resource being booked.
charge codes - rate determined by the type of job being booked.
By combining these 3 elements, Retain can comfortably accommodate sophisticated charging structures.
Set-up options
14
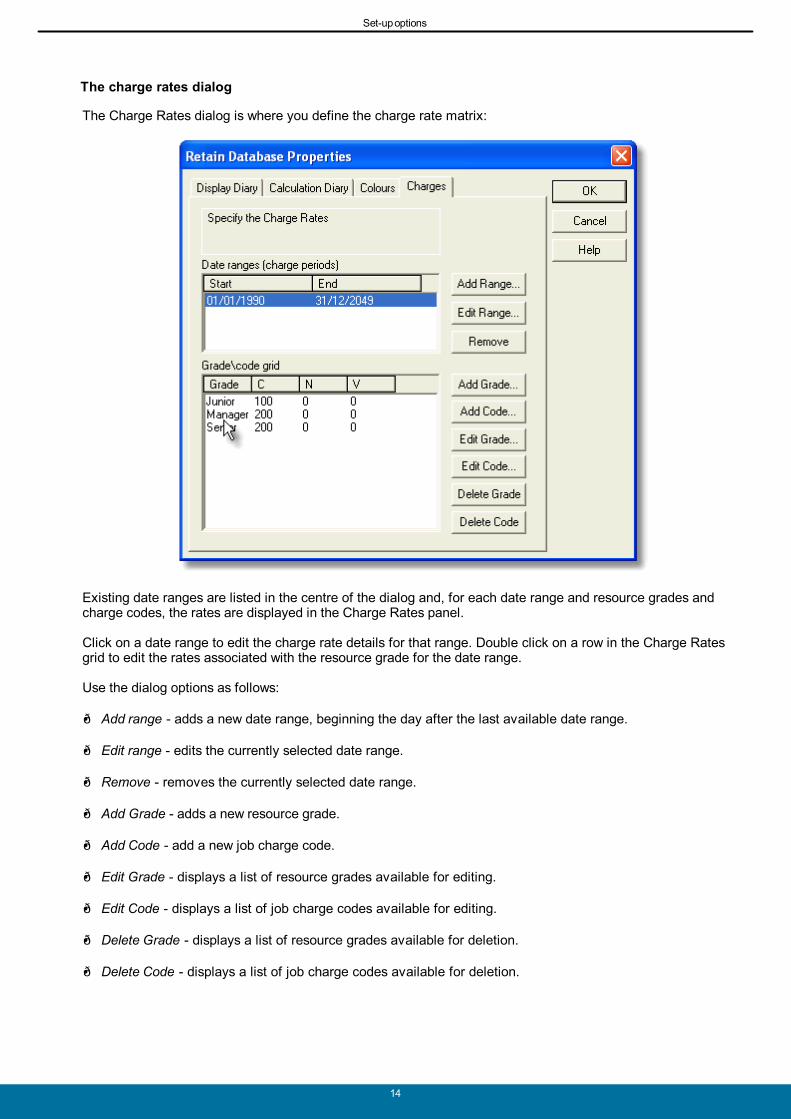
The charge rates dialog
The Charge Rates dialog is where you define the charge rate matrix:
Existing date ranges are listed in the centre of the dialog and, for each date range and resource grades andcharge codes, the rates are displayed in the Charge Rates panel.
Click on a date range to edit the charge rate details for that range. Double click on a row in the Charge Ratesgrid to edit the rates associated with the resource grade for the date range.
Use the dialog options as follows:
Add range - adds a new date range, beginning the day after the last available date range.
Edit range - edits the currently selected date range.
Remove - removes the currently selected date range.
Add Grade - adds a new resource grade.
Add Code - add a new job charge code.
Edit Grade - displays a list of resource grades available for editing.
Edit Code - displays a list of job charge codes available for editing.
Delete Grade - displays a list of resource grades available for deletion.
Delete Code - displays a list of job charge codes available for deletion.
Set-up options
15
Defining charge rate date ranges
Charge rates can be defined for one or more date ranges. The date ranges usually reflect periodic adjustmentsto your organization's charging structure, such as the annual increase in charge rates. At least one date rangemust be specified. You can add or amend the date ranges as and when changes in your organization's chargerates are announced.
To define charge rate date ranges make sure you are in the Charge Rates dialog and then:
Highlight an existing date range and click on the 'Edit range...' button to amend the start and end dates.
Click on the 'Add range...' button to add a new date range, beginning the day after the end date of the lastdate range in the list.
Highlight an existing date range and click on the 'Remove' button to remove that date range and allassociated charge rates.
When you amend date ranges the adjacent ranges are automatically adjusted so that there are no gaps oroverlaps between the date ranges.
Once you are satisfied with the date ranges, grades and charge codes you should define the charge ratesapplying for each date range you have specified.
Defining charge rate grades
Defining charge rate grades allows you to set up charge rates which will be picked up automatically in Retainevery time a booking is made against a resource with a corresponding resource grade. It is essential that thegrades defined here correspond exactly to the grades defined against resources set up in Retain.
To define charge rate grades, make sure you are in the Charge Rates dialog and then:
1. Click on the 'Add Grade...' button to add a new grade.
2. Type in the new grade name.
Remember that these should correspond exactly to the grades that you will store against resources in Retain.
3. Click on 'OK' to accept the new grade.
The new grade will appear in the left hand column of the charge rate grid.
4. Repeat steps 1 to 3 for each new grade as desired.
You should normally set up a charge rate grade for each resource grade set up in your resources database.
To remove a charge rate grade:
1. At the 'Charge Rates' dialog, click on the 'Delete Grade' button.
2. At the 'Delete Grade' dialog , select the grade you wish to delete.
3. Click on 'OK' to delete the selected charge rate grade.
Deleting a charge rate grade removes the grade and associated charge rates from the charge rates matrix, butit does not affect the grades of resources in the resource database or the charge rates applied to existingbookings of that grade. See Update bookings for more information.
Set-up options
16
Defining charge rate codes
Charge rate codes allow you to set up rates which will be picked up automatically in Retain every time abooking is made against a job with a corresponding job analysis code. For example, you might use codes of 'N'for non-chargeable jobs and 'C' for chargeable jobs.
The codes you define here must correspond exactly to the analysis codes defined against jobs set up in Retain.
To define charge rate codes, make sure you are in the Charge Rates dialog and then:
1. Click on the 'Add Code...' button to add a new code.
2. Type in the new code name.
Remember that these should correspond exactly to the analysis codes that you will store against jobs inRetain.
3. Click on 'OK' to accept the new code.
The new code will appear in the top row of the charge rate grid.
4. Repeat steps 1 to 3 for each new charge rate code as desired.
You should normally set up a charge rate code for each job analysis code set up in your jobs database.
To remove a charge rate code:
1. At the 'Charge Rates' dialog, click on the 'Delete Code' button.
2. At the 'Delete Charge Code' dialog, select the code you wish to delete.
3. Click on 'OK' to delete the selected charge rate code.
Deleting a charge rate code removes the code and associated charge rates from the charge rates matrix, but itdoes not affect the analysis codes of jobs in the jobs database or the charge rates applied to existing bookingsof that code. See Update bookings for more information.
Defining charge rates
Define charge rates in units per hour. These rates are applied to each booking and evaluated against thenumber of hours in the booking to arrive at a booking cost. These booking costs can also be aggregated invarious ways, to produce cost figures by job or resource group, for example.
You can enter a charge rate for every combination of date range, resource grade and job code defined in yourcharge rates matrix. As a minimum, you would normally define rates against each resource grade covering atleast one time period.
To enter charge rates, make sure you are in the Charge Rates dialog and then:
1. Select the date range for which you want to enter charge rates.
2. Select a grade by double-clicking on the row.
3. Enter the new charge rates for each combination with a code in the row window.
Enter a value in units per hour.
4. Repeat steps 2 and 3 for each grade within the selected date range as desired. Repeat steps 1 to 3 for eachdate range as desired.
Charge rate amendments are applied to all new bookings made in Retain but do not affect any existingbookings. See Update bookings for guidance on updating existing bookings for changes in charge rates.
Set-up options
17
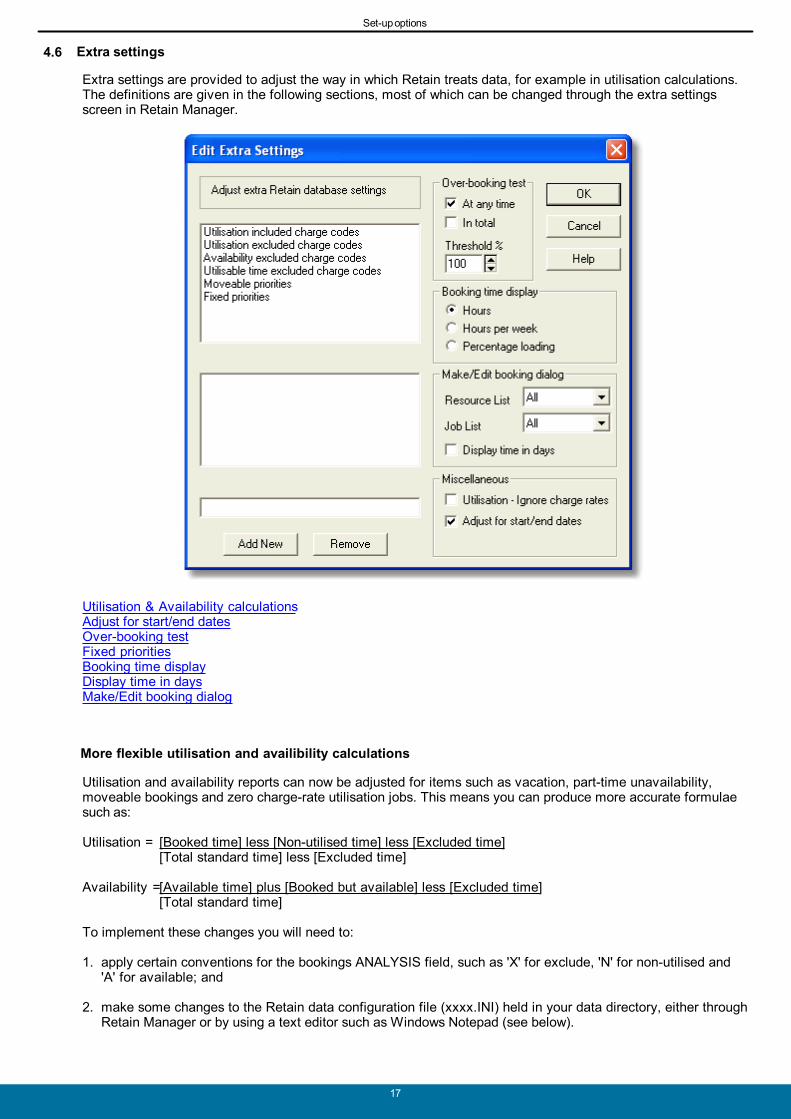
4.6 Extra settings
Extra settings are provided to adjust the way in which Retain treats data, for example in utilisation calculations. The definitions are given in the following sections, most of which can be changed through the extra settingsscreen in Retain Manager.
Utilisation & Availability calculationsAdjust for start/end datesOver-booking testFixed prioritiesBooking time displayDisplay time in daysMake/Edit booking dialog
More flexible utilisation and availibility calculations
Utilisation and availability reports can now be adjusted for items such as vacation, part-time unavailability,moveable bookings and zero charge-rate utilisation jobs. This means you can produce more accurate formulaesuch as:
Utilisation = [Booked time] less [Non-utilised time] less [Excluded time][Total standard time] less [Excluded time]
Availability =[Available time] plus [Booked but available] less [Excluded time][Total standard time]
To implement these changes you will need to:
1. apply certain conventions for the bookings ANALYSIS field, such as 'X' for exclude, 'N' for non-utilised and'A' for available; and
2. make some changes to the Retain data configuration file (xxxx.INI) held in your data directory, either throughRetain Manager or by using a text editor such as Windows Notepad (see below).
Set-up options
18
It is important to assess the impact your changes could have on other areas of the software. For example, theANALYSIS field is also used for job-based charge rates, so you may need to update your charge rates matrix. Also, if you want to apply the changes to your existing plans you will need to (a) update your jobs for the newanalysis codes and (b) run the 'Update bookings' feature in Retain Manager to apply these new codes to existingbookings.
To implement these features, either make the relevant changes in Retain Manager (select 'Setup', 'Extrasettings') or directly edit the .INI configuration file in your data directory. Example entries in the INI file are asfollows:
[UtilisationIncludedChargeCodes]IncludeAllChargeRates=0 When OFF (0), this forces all bookings with a non-zero charge rate to be included in utilisation report
calculations (i.e. the current default) and you can specify individual charge codes to be treated asutilised using the following format. When ON (1) all bookings are included in the calculations by default,unless excluded by the [UtilisationExcludedChargeCodes] section. Alternatively, this option can be setby ticking 'Utilisation - Ignore charge rates' in 'Setup', 'Extra Settings...'.
ChargeCode0=CChargeCode1=S This example treats bookings with codes of 'C' or 'S' as utilised (i.e. it includes them in the numerator of
utilisation calculations), even if they have a zero charge rate. The number after ChargeCode shouldincrement.
[UtilisationExcludedChargeCodes]ChargeCode0=NChargeCode0=X This excludes bookings with the specified codes from the utilisation calculation. This example treats
bookings with codes of 'N' or 'X' as non-utilised even if they have a non-zero charge rate (i.e. it excludesthem from the numerator of utilisation calculations).
[AvailabilityExcludedChargeCodes]ChargeCode0=AChargeCode1=X This excludes bookings with the specified codes from the availability calculation. This example treats
bookings with codes of 'A' and 'X' as available (i.e. it adjusts the numerator of availability calculations).
[AvailableTimeExcludedChargeCodes]ChargeCode0=X This excludes time from the calculated total time used for utilisation calculations (i.e. it adjusts the
denominator of utilisation calculations). You might use this setting to adjust for non-statutory holidays orpart-time unavailability. The example excludes bookings with a code of 'X' from the total time figure. Inprevious editions of Retain, these charge codes were also excluded from availability calculations. Byadding charge code '<', the program reverts to these old settings.
Note: You must ensure that codes specified here are also specified in the earlier sections, otherwiseunexpected results may occur.
[MoveablePriorities]Priority0=9 This excludes bookings with the specified priorities (colours) from the availability calculation on the
basis that they can be moved. This example treats all bookings with a priority of '9' as available (i.e. itadjusts the numerator of availability calculations). Note: This setting relates to the booking PRIORITYfield, whereas the other settings relate to the ANALYSIS field.
To make these changes in Retain Manager:
1. Make sure the 'Setup', 'Extra Settings...' menu is displayed.
2. In the top list box select the type of charge codes or priorities to be changed. The current charge codesassigned are displayed in the second list box.
3. Type the charge code you want to add in the edit box below the listboxes. Click 'Add New' to add the chargecode.
4. To remove one of the codes, select the code in the list box and click the 'Remove' button.
Set-up options
19
Option to adjust starter/leaver time in reports
Utilisation reports can also be adjusted to exclude both the period of time prior to a resource starting or afterthey have left. This gives a truer account of the resource's time.
This feature is activated by default. To disable it through Retain Manager, uncheck the 'Adjust for start/enddates' option in 'Setup', 'Extra settings...'.
Note: If the start and end fields are not included in the database, this setting has no meaning.
Warning message for overbookings
Users can be warned if, by making a booking, they will exceed the maximum time in a resource's day. They willbe prompted to either continue or cancel. This can be set to warn either 'at any time' (over-allocation at anypoint) or 'in total' (total time in a specified date range).
To implement this feature, either make the relevant changes in Retain Manager, in the 'Setup', 'Extra settings...'menu by checking the appropriate checkboxes in the 'Over-booking test' group, or by editing the .INIconfiguration file. Example entries are as follows:
[Overallocation]DoTest=0/1/2 Threshold=100
These settings apply as follows:
DoTest=0Switches overallocation test off (default is off).
DoTest=1 Checks for overallocation at any single point.
DoTest=2Checks the total time available against the total time booked in the date range specified.
Threshold=100 The threshold is a percentage value which can be set. It is the point at which the over-allocation test
will display a warning and ask for confirmation.
Option to 'fix' bookings of a certain priority (colour)
Designated bookings can be fixed so that users cannot move them inadvertently. Bookings are fixed withrespect to their priority (colour) so the user can amend the colour and hence move the booking if desired.
By adding the relevant priority numbers in the configuration settings in the .INI file held in your Retain datadirectory the rules can be set that fix the bookings. This can be done in Retain Manager as well, in the 'Setup','Extra Settings...' menu. An example entry would be as follows:
[FixedPriorities] Priorities=9A
In this example bookings with priority colours of '9' and 'A' would be fixed.
Set-up options
20
Different ways to display time on booking bars/tips
The booking bar, together with the pop-up tips field can be configured to display the 'Time' field, which displayseither (a) the total amount of time of the job, (b) the hours per week, or (c) the % loading. This is an old feature,retained for backward compatibility. It is recommended that you use calculated fields for these purposes(calculated.bookingTime, calculated.HoursPerWeek and calculated.bookingLoading).
If needed, implement this through Retain Manager by ticking the required box in 'Setup', 'Extra settings...', or byediting the .INI file directly. An example of the changes to the configuration file is as follows:
[Display] ShowHoursPerWeek=0/1/2
ShowHoursPerWeek=0 Shows the total hours booked.
ShowHoursPerWeek=1 Shows the hours/week booked.
ShowHoursPerWeek=2 Shows the percentage loading over the entire booking.
Bookings shown in days or hours
The length of time of the booking can now be shown in either hours or days in the 'Make/Edit booking' dialog.
Implement this feature through Retain Manager by ticking the 'Display time in days' in 'Setup', 'Extra settings...'.
Selected records in booking dialog
For large numbers of jobs or resources, it can be cumbersome to have all jobs or resources listed in theMake/Edit booking dialog. In case a selection on resources or jobs is currently active in the wallchart, it ispossible to limit the jobs or resources shown in the dialog to the currently selected records.
This can be implemented in Retain Manager in the 'Setup', 'Extra Settings...' menu by selecting either'Selection' or 'All' for the Resource List and Job List in the 'Edit booking form' section.
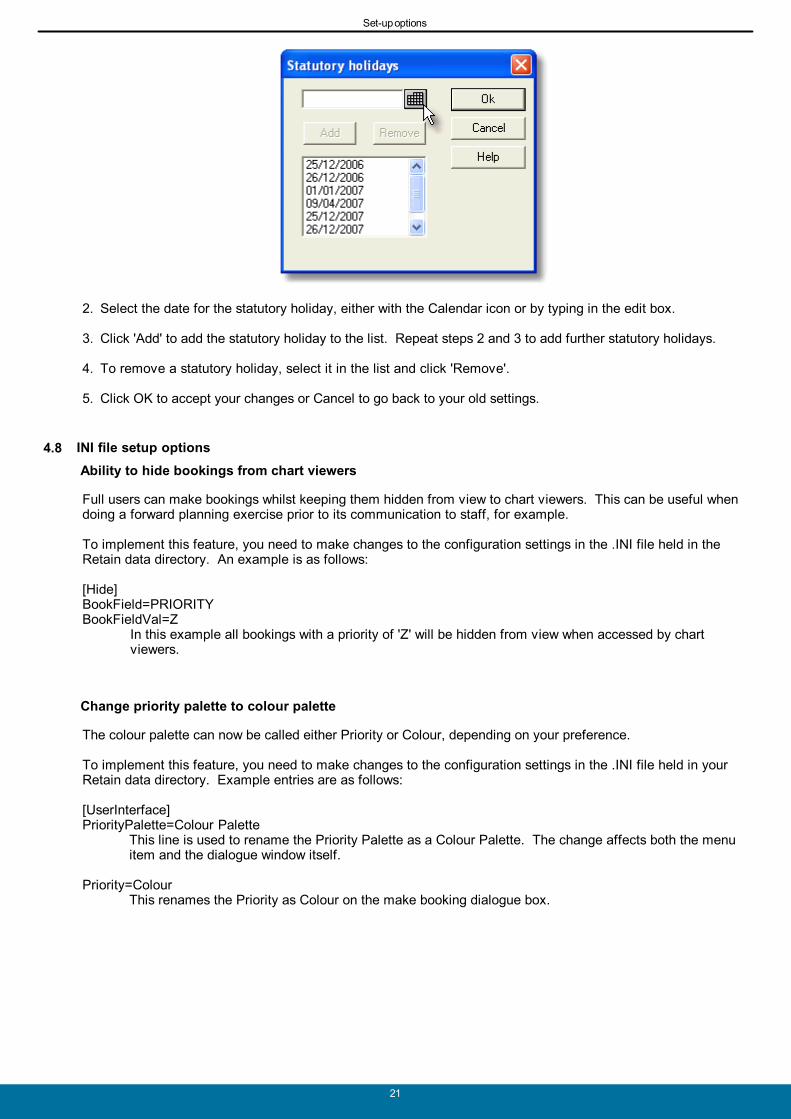
4.7 Statutory Holidays
A new feature in version 3.5 is the possibility of adding statutory (or public) holidays to the wallchart. Not onlyare they clearly marked in the wallchart, they are also excluded from calculations and accounted for in bookingoperations, rather like weekends. Statutory holidays are visible in the wallchart as a hatched-out day, similar tothe period before a resource's start date or after a resource's end date. Consult the Retain User Guide for moreinformation.
Statutory holidays are added in Retain Manager as follows:
1. Select 'Setup', 'Statutory Holidays...' from the menu.
Set-up options
21
2. Select the date for the statutory holiday, either with the Calendar icon or by typing in the edit box.
3. Click 'Add' to add the statutory holiday to the list. Repeat steps 2 and 3 to add further statutory holidays.
4. To remove a statutory holiday, select it in the list and click 'Remove'.
5. Click OK to accept your changes or Cancel to go back to your old settings.
4.8 INI file setup options
Ability to hide bookings from chart viewers
Full users can make bookings whilst keeping them hidden from view to chart viewers. This can be useful whendoing a forward planning exercise prior to its communication to staff, for example.
To implement this feature, you need to make changes to the configuration settings in the .INI file held in theRetain data directory. An example is as follows:
[Hide] BookField=PRIORITY BookFieldVal=Z
In this example all bookings with a priority of 'Z' will be hidden from view when accessed by chartviewers.
Change priority palette to colour palette
The colour palette can now be called either Priority or Colour, depending on your preference.
To implement this feature, you need to make changes to the configuration settings in the .INI file held in yourRetain data directory. Example entries are as follows:
[UserInterface] PriorityPalette=Colour Palette This line is used to rename the Priority Palette as a Colour Palette. The change affects both the menu
item and the dialogue window itself.
Priority=ColourThis renames the Priority as Colour on the make booking dialogue box.
Set-up options
22
List all tasks in small tables
If your job table is not large (perhaps less than 1000 names), you can use a setting in the .INI file to display thestandard Retain dialog box instead of having to do a character search on the jobs. This setting is:
[MakeBookingDialog]FullTaskList=1 (default = 0)
This setting causes the Make/Edit Booking Dialogue window to list all jobs, rather than only the partiallists required for very large databases.
Restrict displayed records (view selection)
The new view selection can be used to restrict what records are seen in each table. It requires the field nameand table name in order to set up the global filter.
[Task]ViewSelection=restask.office='London'
(this will show only those jobs where the office field equals London)
[Resource]ViewSelection=resres.group='London'
(this will show only those resources where the group field equals London)
[Booking]ViewSelection=resbook.priority='1'
(this will only show those bookings that have a priority of 1)
Server name
Retain now needs to pick up the correct server for an RDB file, so this new setting specifies a server name, setup in the SERVERS.INI file, from which the data will be used.
[TOM]ServerString=TestServer
(name of the server alias as specified in the [SERVER_ALIAS] section of the SERVERS.INI file.)
INI file definitions
LICENCE.INI (Local licence sub-directory)
SETTING USAGE
Licence directory This .INI file can be created in the local Retain licence sub-directory pointing to thelicence directory on the server, to speed up running time over a WAN. Defines thedirectory where the licence files can be found on the server, e.g. [Licence directory]Licence directory=F:\Retain2\Mylicdir
RETAIN.INI (Software directory, program definitions)
SETTING USAGE
[CloseDelay]Delay Determines the length of inactive time in minutes before the dbase data files are closed in
Retain. If (delay<=0) then this feature is disabled.
[logoff]time=0 Disables checking of the LOGOFF.RNT, reducing network traffic. The default setting is
checking every 60 seconds. All timings are in seconds.
[Dbase]CloseDelay Note: This feature has been replaced by [CloseDelay] and has only been included for backward

Set-up options
23
compatibility. This determines the length of inactive time in seconds before the dbase data filesare closed in Retain. If (delay<=0) then this feature is disabled.
Setting up the data
24
5 Setting up the data
General guidance
Before using Retain on a daily basis, it is useful to capture the information you need and set up permanentinformation, such as staff names and names of recurring jobs or assignments, so that this information will bereadily available when you need to use it. If you wish to tailor your database by adding and changing the fields,refer to the Implementation Guide.
You should also think through the way in which you are going to structure your data files and then collecttogether the raw material in readiness for input. This process is likely to include:
Preparing a schedule of staff details to add to the Resource data file.
Preparing a schedule of recurring or forthcoming assignments to add to the Task data file.
Preparing a schedule of generic sub-jobs to add to the 'Components' data file.
You may prefer to implement Retain starting with blank databases, allowing users to add records as and whenthey are needed. However, dealing with the set-up of data files as an 'up-front' exercise has severaladvantages:
Conventions for usage of the different fields can be firmly established on set-up and are therefore less likelyto be ignored.
Data can be collated and checked centrally from other sources, such as staff and client systems, thereforereducing the risk of error.
There may be scope to transfer this data automatically from other systems.
Those people doing the planning can see who is available and what assignments need to be planned fromday 1.
Manual or automated data file set-up
Once you have agreed the structure of your data files and collected the information, your data files can be setup quickly in Retain. Most organizations should be able to set up their entire Retain databases in under half aday, simply by adding records manually using the features available within Retain.
However, if you have particularly large databases to set up, and if this data exists in other software applicationswithin your organization, such as your personnel records, you may wish to consider automatic population of yourRetain data files.
To populate the data files automatically you will need to create source files and import them into the Retain datafiles held in the appropriate dBase format. In particular, the following rules must be observed:
General
The data imported must match the field names and types of the Retain data files.
No records should contain data exceeding their corresponding Retain field lengths.
Resources
Name (and Initials) - a unique name (and initials combination for Retain Standard) is required for each recordin RESRES without trailing spaces.
Grade - this should match the grades defined in the charge rates matrix.
Jobs
Setting up the data
25
Name - a unique job name is required for each record in RESTASK without trailing spaces.
Priority - this defines the default colour of job bookings. You may wish to develop a rule for importing data tothis field, conforming to your agreed conventions for the use of colours.
Analysis - this is used for picking up charge rates based on job codes. You may wish to develop a rule forimporting data to this field, such as 'C' for chargeable jobs and 'N' for non-chargeable jobs.
Recovery - this is a percentage applied to cost, expressed as a number (1.00 represents 100%). You maywish to develop a rule for importing data to this field, perhaps depending on the type of job.
Components
A unique name is required for each record.
The component is not associated with a particular job, but with all jobs. It is normally a general description,applicable to most jobs, rather than very specific activities.
Contact your supplier for guidance on importing data to the Retain data files, or if you would like your supplier toperform a data import on your behalf.
Database administration and backup
26
6 Database administration and backup
Retain Manager provides a number of database administration functions to help you keep control over yourRetain data files. Most of these functions apply to the Standard edition which has direct access to the data files.
Other editions of Retain use an external database platform. As the underlying database is a full large-scalesystem, database administration is not performed within Retain Manager. Administration is now carried outfrom within the chosen database solution.
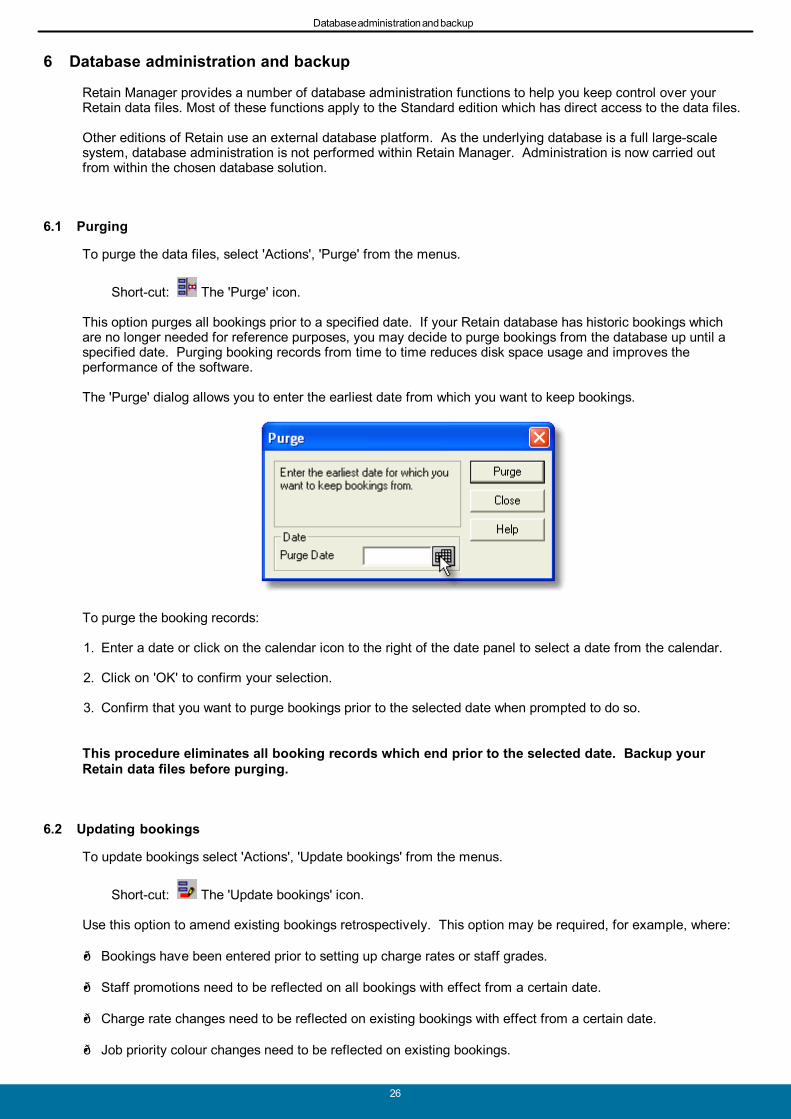
6.1 Purging
To purge the data files, select 'Actions', 'Purge' from the menus.
Short-cut: The 'Purge' icon.
This option purges all bookings prior to a specified date. If your Retain database has historic bookings whichare no longer needed for reference purposes, you may decide to purge bookings from the database up until aspecified date. Purging booking records from time to time reduces disk space usage and improves theperformance of the software.
The 'Purge' dialog allows you to enter the earliest date from which you want to keep bookings.
To purge the booking records:
1. Enter a date or click on the calendar icon to the right of the date panel to select a date from the calendar.
2. Click on 'OK' to confirm your selection.
3. Confirm that you want to purge bookings prior to the selected date when prompted to do so.
This procedure eliminates all booking records which end prior to the selected date. Backup yourRetain data files before purging.
6.2 Updating bookings
To update bookings select 'Actions', 'Update bookings' from the menus.
Short-cut: The 'Update bookings' icon.
Use this option to amend existing bookings retrospectively. This option may be required, for example, where:
Bookings have been entered prior to setting up charge rates or staff grades.
Staff promotions need to be reflected on all bookings with effect from a certain date.
Charge rate changes need to be reflected on existing bookings with effect from a certain date.
Job priority colour changes need to be reflected on existing bookings.
Database administration and backup
27
The calculation diary is changed or statutory holidays are added.
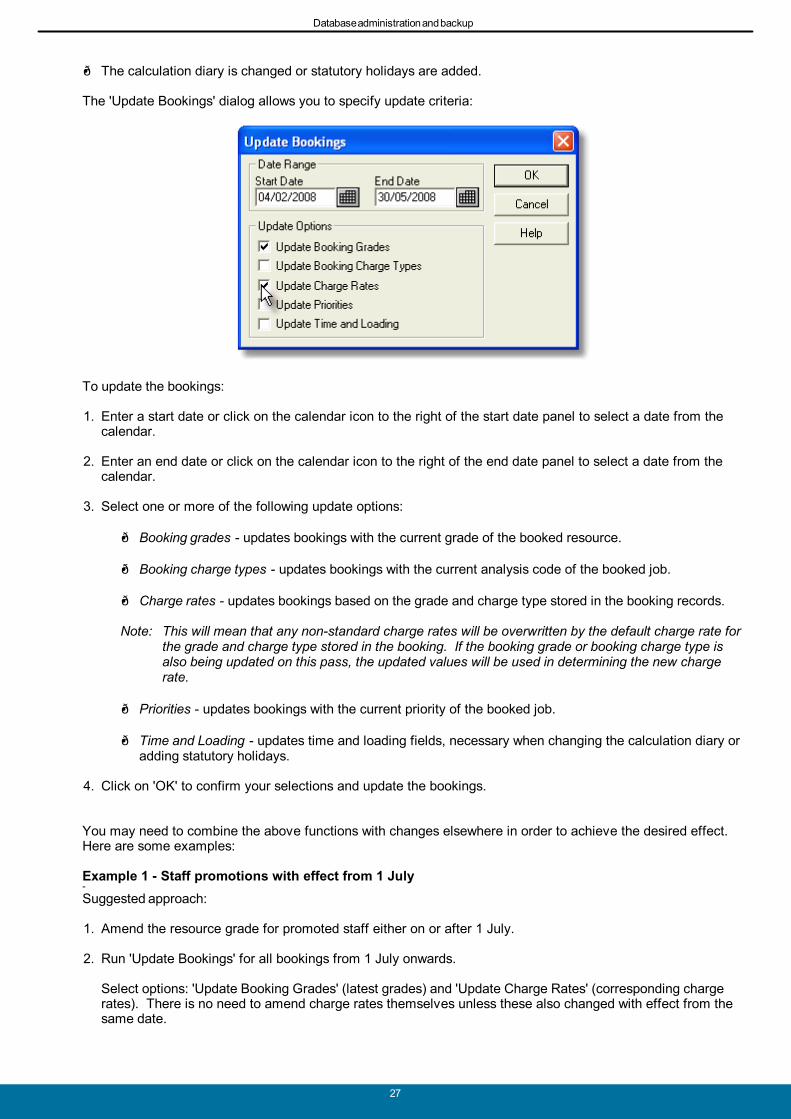
The 'Update Bookings' dialog allows you to specify update criteria:
To update the bookings:
1. Enter a start date or click on the calendar icon to the right of the start date panel to select a date from thecalendar.
2. Enter an end date or click on the calendar icon to the right of the end date panel to select a date from thecalendar.
3. Select one or more of the following update options:
Booking grades - updates bookings with the current grade of the booked resource.
Booking charge types - updates bookings with the current analysis code of the booked job.
Charge rates - updates bookings based on the grade and charge type stored in the booking records.
Note: This will mean that any non-standard charge rates will be overwritten by the default charge rate forthe grade and charge type stored in the booking. If the booking grade or booking charge type isalso being updated on this pass, the updated values will be used in determining the new chargerate.
Priorities - updates bookings with the current priority of the booked job.
Time and Loading - updates time and loading fields, necessary when changing the calculation diary oradding statutory holidays.
4. Click on 'OK' to confirm your selections and update the bookings.
You may need to combine the above functions with changes elsewhere in order to achieve the desired effect. Here are some examples:
Example 1 - Staff promotions with effect from 1 July
Suggested approach:
1. Amend the resource grade for promoted staff either on or after 1 July.
2. Run 'Update Bookings' for all bookings from 1 July onwards.
Select options: 'Update Booking Grades' (latest grades) and 'Update Charge Rates' (corresponding chargerates). There is no need to amend charge rates themselves unless these also changed with effect from thesame date.
Database administration and backup
28
Example 2 - New charge rates with effect from 1 October
Suggested approach:
1. Set up a new charge rate date range at the 'Charge Rates' dialog, covering the period from 1 October untilthe next anticipated change.
2. Set up the corresponding charge rates for each resource grade and/or job code as necessary.
3. Run 'Update Bookings' to update all existing bookings from 1 October onwards.
Select option: 'Update Charge Rates'. No need to update the booking grades or charge types unless thecharge rate structure has changed or there are staff promotions to be dealt with from the same date.
Example 3 - Using new features of Retain 3.5 with existing bookings
Suggested approach:
1. Add the required fields to RESBOOK (see the separate 'Upgrade to 3.5 guide').
2. Use Retain Manager to add any future statutory holidays to be included.
3. Run 'Update Bookings' to update all bookings for which you want to use the new features. This is likely to beall bookings from the current day onwards that have already been planned.
Select option: 'Update Time and Loading'.
6.3 Checking the database
To check the structure of the data files select 'Actions', 'Check structure' from the menus.
Short-cut: The 'Check structure' icon.
This checks that the data structure of the files is consistent for use by Retain. If you have changed the structureof the data files use this function to ensure you have not introduced database integrity problems. If there areproblems with the structure, this function will gives details of the inconsistencies.
6.4 Making backups of your data
It is essential to make regular backups of your Retain data. For maximum security backups should be made ona separate storage device from the live data. If you store your live data on the hard disk, store your backups onfloppy disk, tape or another storage medium.
For all Retain editions except Standard, there are utilities provided with the chosen database solution. The onlyfiles outside the database that need backing up are the Retain notebooks (RTN files) .
Reference
29
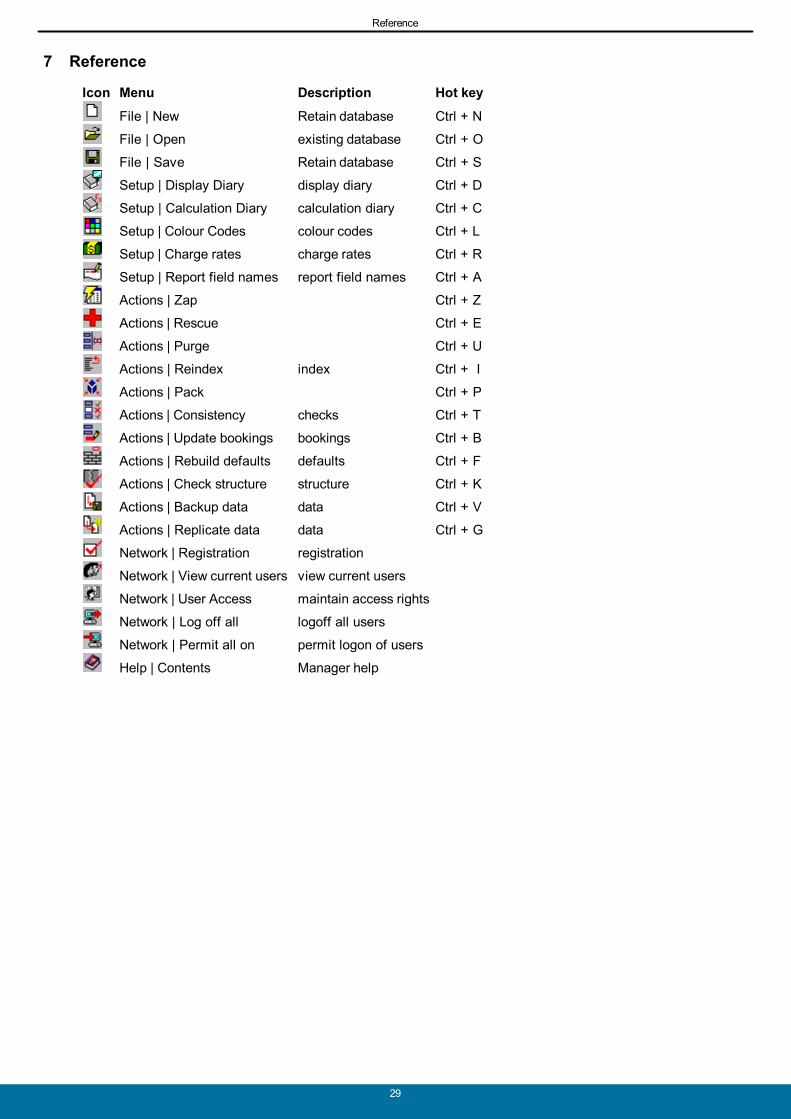
7 Reference
Icon Menu Description Hot key
File | New Retain database Ctrl + N
File | Open existing database Ctrl + O
File | Save Retain database Ctrl + S
Setup | Display Diary display diary Ctrl + D
Setup | Calculation Diary calculation diary Ctrl + C
Setup | Colour Codes colour codes Ctrl + L
Setup | Charge rates charge rates Ctrl + R
Setup | Report field names report field names Ctrl + A
Actions | Zap Ctrl + Z
Actions | Rescue Ctrl + E
Actions | Purge Ctrl + U
Actions | Reindex index Ctrl + I
Actions | Pack Ctrl + P
Actions | Consistency checks Ctrl + T
Actions | Update bookings bookings Ctrl + B
Actions | Rebuild defaults defaults Ctrl + F
Actions | Check structure structure Ctrl + K
Actions | Backup data data Ctrl + V
Actions | Replicate data data Ctrl + G
Network | Registration registration
Network | View current users view current users
Network | User Access maintain access rights
Network | Log off all logoff all users
Network | Permit all on permit logon of users
Help | Contents Manager help
Support
30
8 Support
8.1 Support services
Support for Retain is available worldwide. This topic is linked to your support provider's information: SupportService Provider
retaininternational
USA: 1 877 819 8820 (toll free) UK: 0845 458 8660 World: +44 20 7538 4774 USA fax: 1 928 563 5137 World fax: +44 (0)845 458 8661 E-mail: [email protected]
Support: [email protected] Address: 33 Beaufort Court
Admirals WayLondonE14 9XLUnited Kingdom
Index
31
Index
- A -About
Retain 5
Retain Manager 4
Administration
database 26
Aliases
colour codes 12
Availability calculation 17
- B -Backup 28
Bank holidays 20
Bookings
bar fields 20
bar tips 20
days/hours 20
fix priority colour 19
hide 21
priority colour 19
time display 20
updating 26
- C -Calculated fields 17
Calculation diary 11
Charge rates 13
codes 16
date range 15
define 16
dialog 14
grade 15
Chart viewer
hide bookings 21
Checks
database structure 28
Codes
charge rate 16
colour 12
Colour
codes 12
fix bookings 19
instead of priority 21
priority codes 12
select 13
Configuration
Retain database 8
Conventions 5
- D -Data
backup 28
preparing 24
Database
administration 26
backup 28
purging 26
structure check 28
Database configuration
file 8
Date range
charge rate 15
Days
bookings 20
Definitions
licence.ini 22
Retain.ini 22
Diary
calculation 11
display 10
Disk
letters 5
mapping 5
Display
days/hours 20
diary 10
restriction 22
Drive
letters 5
mapping 5
- E -Exit
Retain Manager 7
Extra
settings 17
- F -Field
calculated 17
time display 20
Fix
booking priority colour 19
- G -Grade
charge rates 15
Guide
how to use this guide 5
- H -Help 30
Hide
bookings 21
Holidays
bank 20
national 20
statutory 20
Hot keys 29
Hours
bookings 20
How to use this guide 5
- I -Icons 29
Implementation 5
INI
file definitions 22
Initial tasks 5
Installing
Retain 5
- K -Keys
hot 29
- L -Leaver time 19
Licence.ini 22
Index
32
- M -Making backups of your Retain data 28
Manager
exiting 7
interface 7
starting 7
using 7
- N -Name
server 22
National holidays 20
Network 5
- O -Open Retain database configuration file 8
Options
setup 9
Overbooking
warning 19
- P -Palette
change to colour 21
Preparing your data 24
Priority
change to colour 21
colour codes 12
fix bookings 19
Purging
database 26
- R -Rates 13
codes 16
date range 15
define 16
dialog 14
grade 15
Reference 29
Reports
leaver time 19
starter time 19
Restrict
displayed records 22
Retain 5
database configuration file 8
Manager 7
Manager interface 7
Retain Manager 4
using 7
Retain.ini 22
- S -Save Retain database configuration file 8
Select
colour 13
Selection view 22
Server
name 22
Settings
extra 17
Setup
options 9
Starter time 19
Starting Retain Manager 7
Statutory holidays 20
Structure
database 28
Support 6, 30
- T -Table
list all tasks 22
Tasks
list all 22
small table 22
Time
booking bars 20
booking tips 20
leaver 19
starter 19
Tips
time display 20
- U -UNC names 5
Updating bookings 26
Using Retain Manager 7
Utilisation calculation 17
- V -View
selection 22
Viewer
hide bookings 21
- W -Warning
overbooking 19
What is a Retain database configuration file? 8
Where to get support 6

© 2007 ... Retain International Limited
retaininternational33 Beaufort Court
Admirals WayLondonE14 9XL
United Kingdom
1 877 819 8820 toll free (USA)0845 458 8660 (UK)
+44 20 7538 4774 (World)