responsible persons register (rpr)
TRANSCRIPT
Responsible Persons Register (RPR)
A step-by-step guide to using RiskNET to manageyour Departmental Responsible Persons Register.
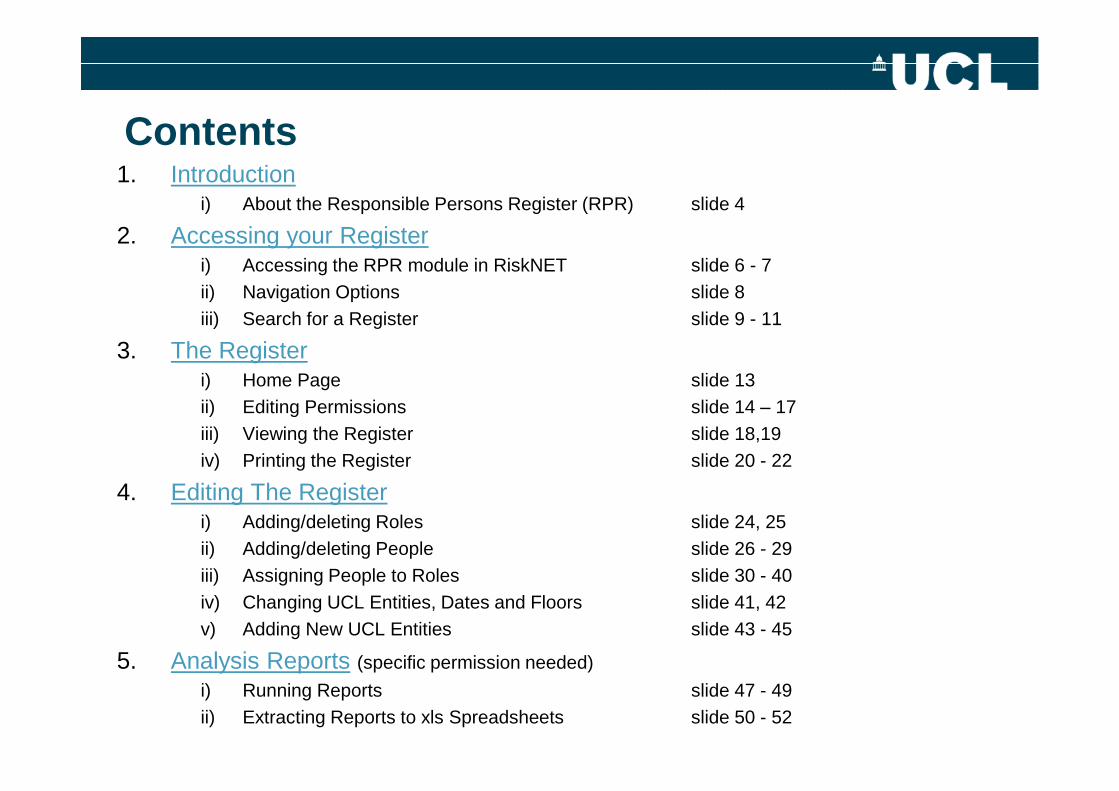
Contents1. Introduction
i) About the Responsible Persons Register (RPR) slide 4
2. Accessing your Registeri) Accessing the RPR module in RiskNET slide 6 - 7
ii) Navigation Options slide 8
iii) Search for a Register slide 9 - 11
3. The Registeri) Home Page slide 13
ii) Editing Permissions slide 14 – 17
iii) Viewing the Register slide 18,19
iv) Printing the Register slide 20 - 22
4. Editing The Registeri) Adding/deleting Roles slide 24, 25
ii) Adding/deleting People slide 26 - 29
iii) Assigning People to Roles slide 30 - 40
iv) Changing UCL Entities, Dates and Floors slide 41, 42
v) Adding New UCL Entities slide 43 - 45
5. Analysis Reports (specific permission needed)
i) Running Reports slide 47 - 49
ii) Extracting Reports to xls Spreadsheets slide 50 - 52

INTRODUCTION
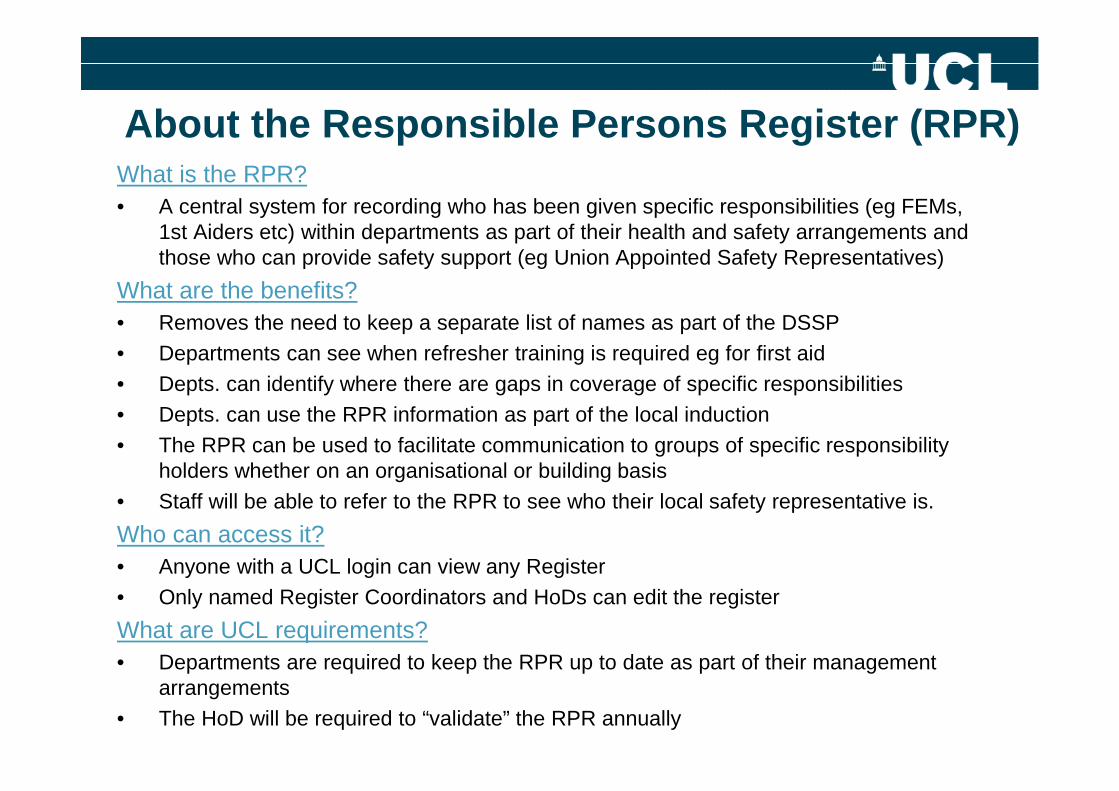
About the Responsible Persons Register (RPR)What is the RPR?
• A central system for recording who has been given specific responsibilities (eg FEMs,1st Aiders etc) within departments as part of their health and safety arrangements andthose who can provide safety support (eg Union Appointed Safety Representatives)
What are the benefits?
• Removes the need to keep a separate list of names as part of the DSSP
• Departments can see when refresher training is required eg for first aid
• Depts. can identify where there are gaps in coverage of specific responsibilities
• Depts. can use the RPR information as part of the local induction
• The RPR can be used to facilitate communication to groups of specific responsibilityholders whether on an organisational or building basis
• Staff will be able to refer to the RPR to see who their local safety representative is.
Who can access it?
• Anyone with a UCL login can view any Register
• Only named Register Coordinators and HoDs can edit the register
What are UCL requirements?
• Departments are required to keep the RPR up to date as part of their managementarrangements
• The HoD will be required to “validate” the RPR annually

ACCESSING YOUR REGISTER
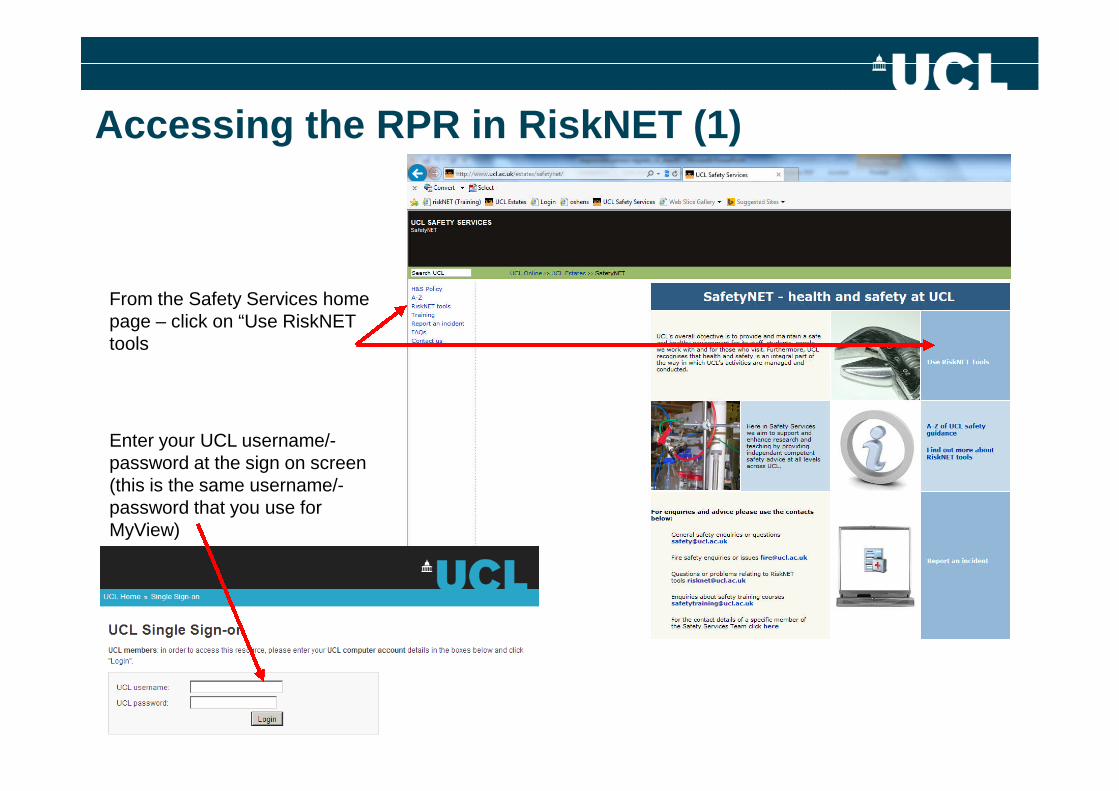
Accessing the RPR in RiskNET (1)
From the Safety Services homepage – click on “Use RiskNETtools
Enter your UCL username/-password at the sign on screen(this is the same username/-password that you use forMyView)
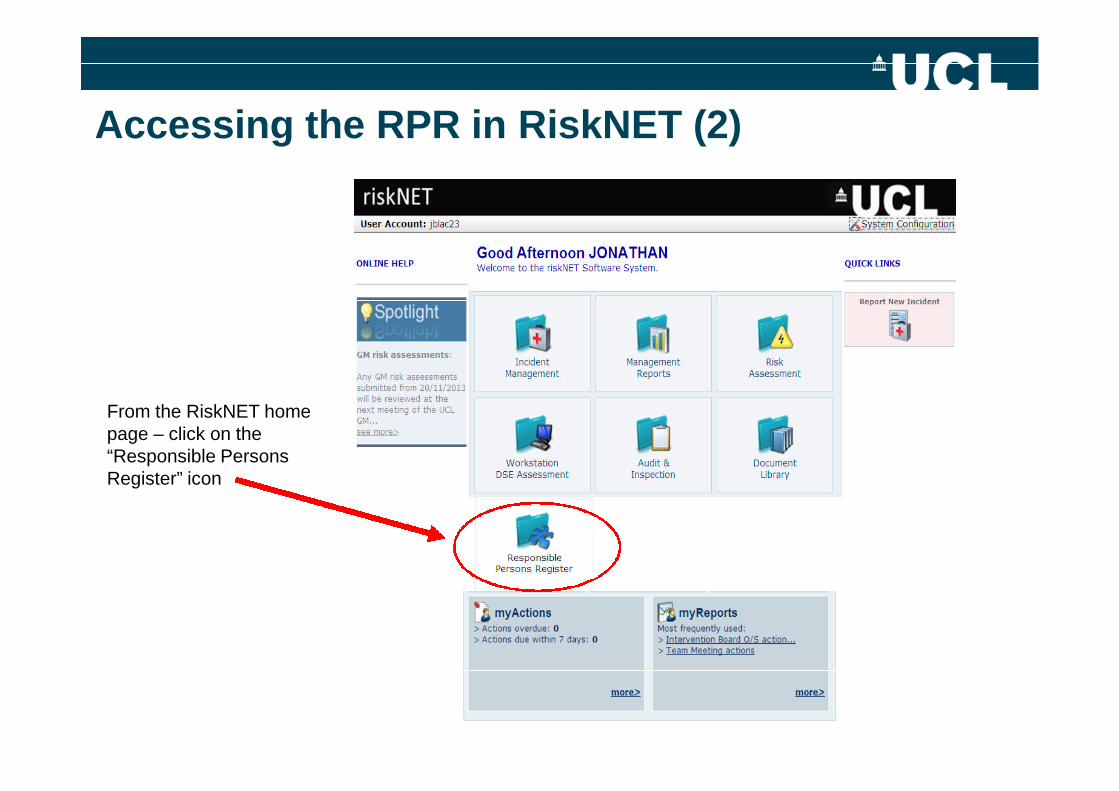
From the RiskNET homepage – click on the“Responsible PersonsRegister” icon
Accessing the RPR in RiskNET (2)
Navigation options
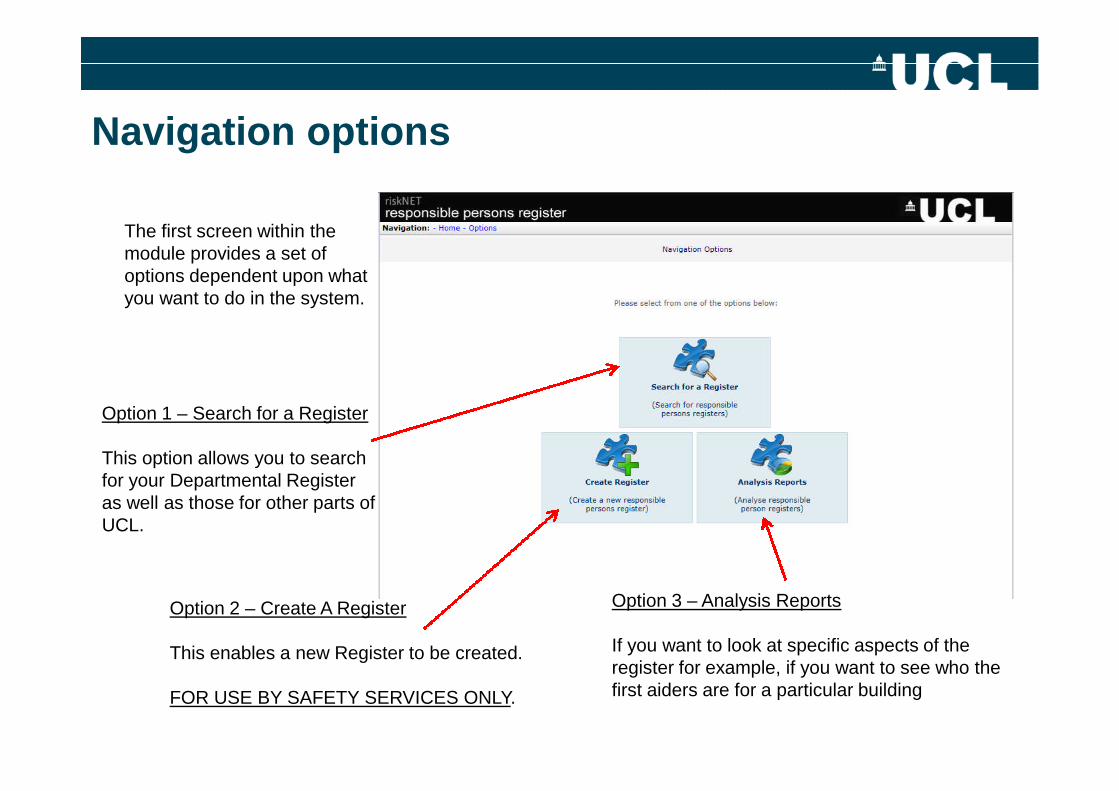
The first screen within themodule provides a set ofoptions dependent upon whatyou want to do in the system.
Option 1 – Search for a Register
This option allows you to searchfor your Departmental Registeras well as those for other parts ofUCL.
Option 2 – Create A Register
This enables a new Register to be created.
FOR USE BY SAFETY SERVICES ONLY.
Option 3 – Analysis Reports
If you want to look at specific aspects of theregister for example, if you want to see who thefirst aiders are for a particular building
Search for a Register (1)
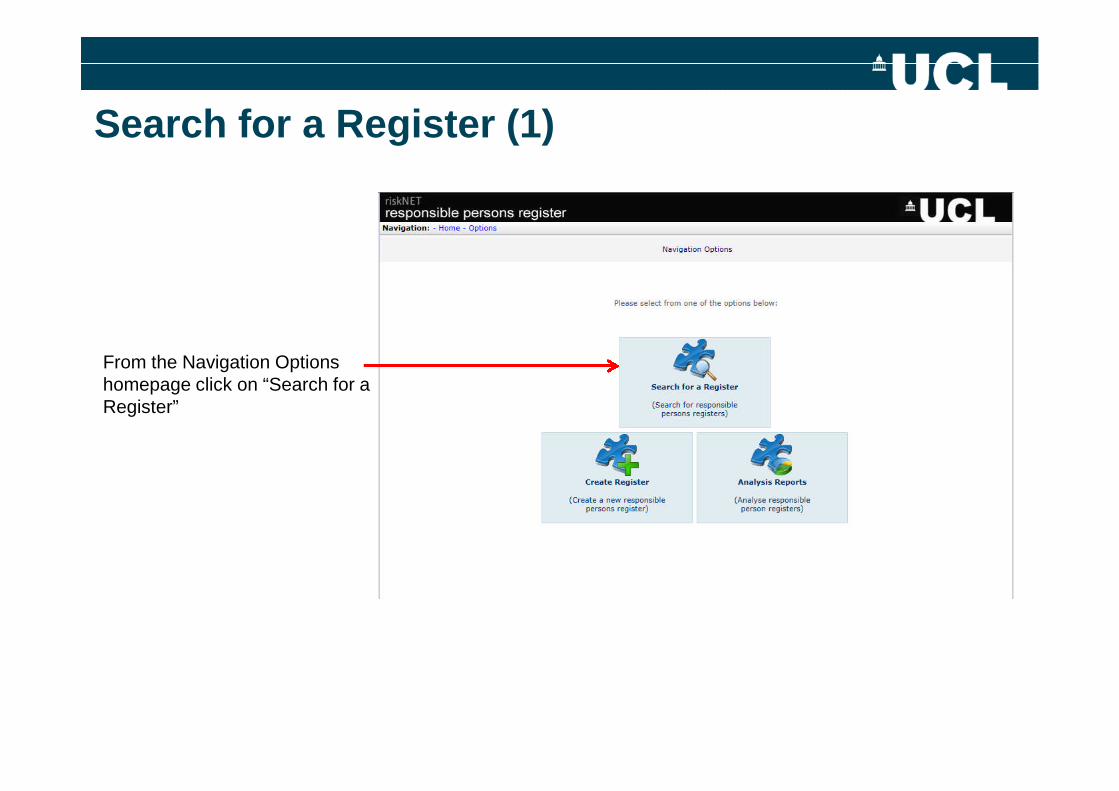
From the Navigation Optionshomepage click on “Search for aRegister”

Search for a Register (2)
In Filter Items, click on dropdown andchoose “Title”.
If you know the number of the register you want thenchoose “Reference No.”
Search for a Register (3)
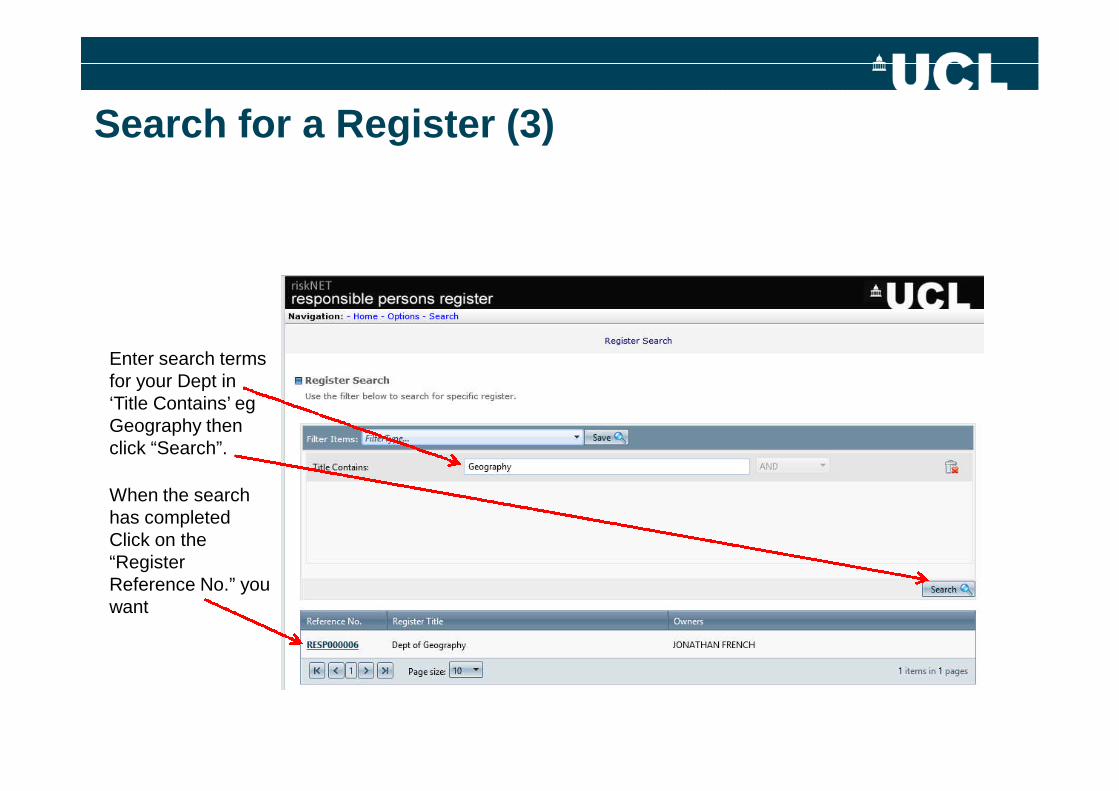
Enter search termsfor your Dept in‘Title Contains’ egGeography thenclick “Search”.
When the searchhas completedClick on the“RegisterReference No.” youwant

THE REGISTER
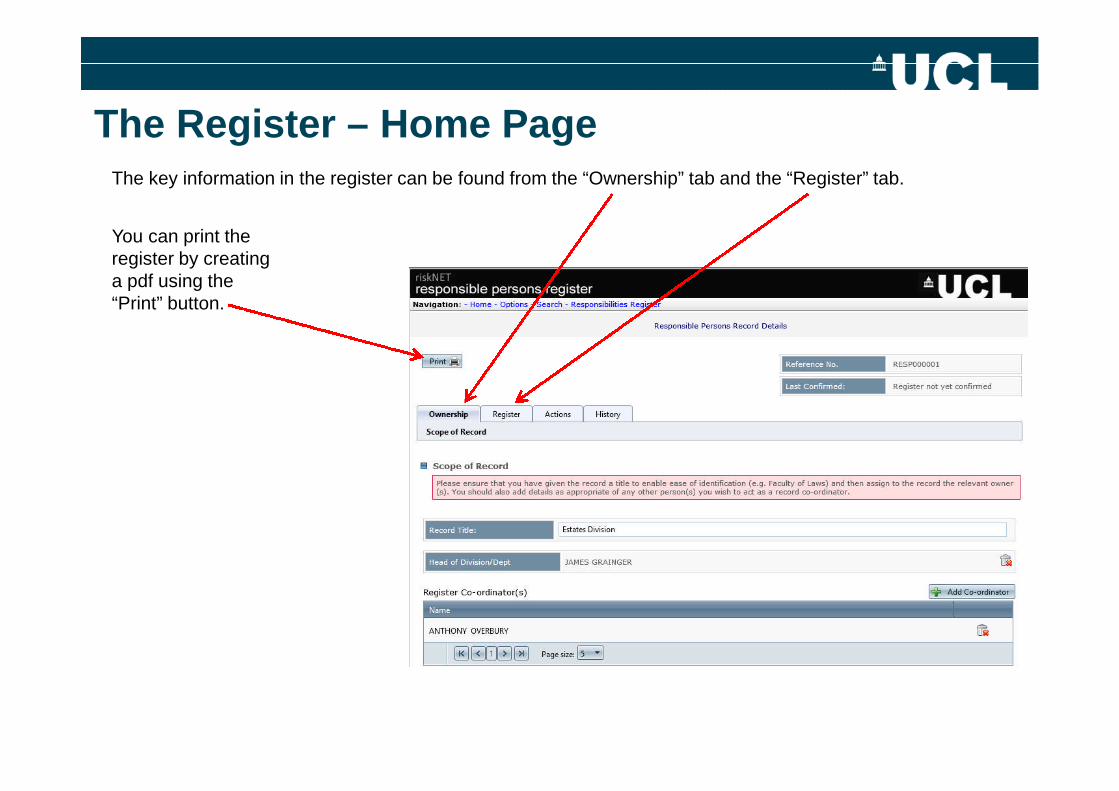
The Register – Home PageThe key information in the register can be found from the “Ownership” tab and the “Register” tab.
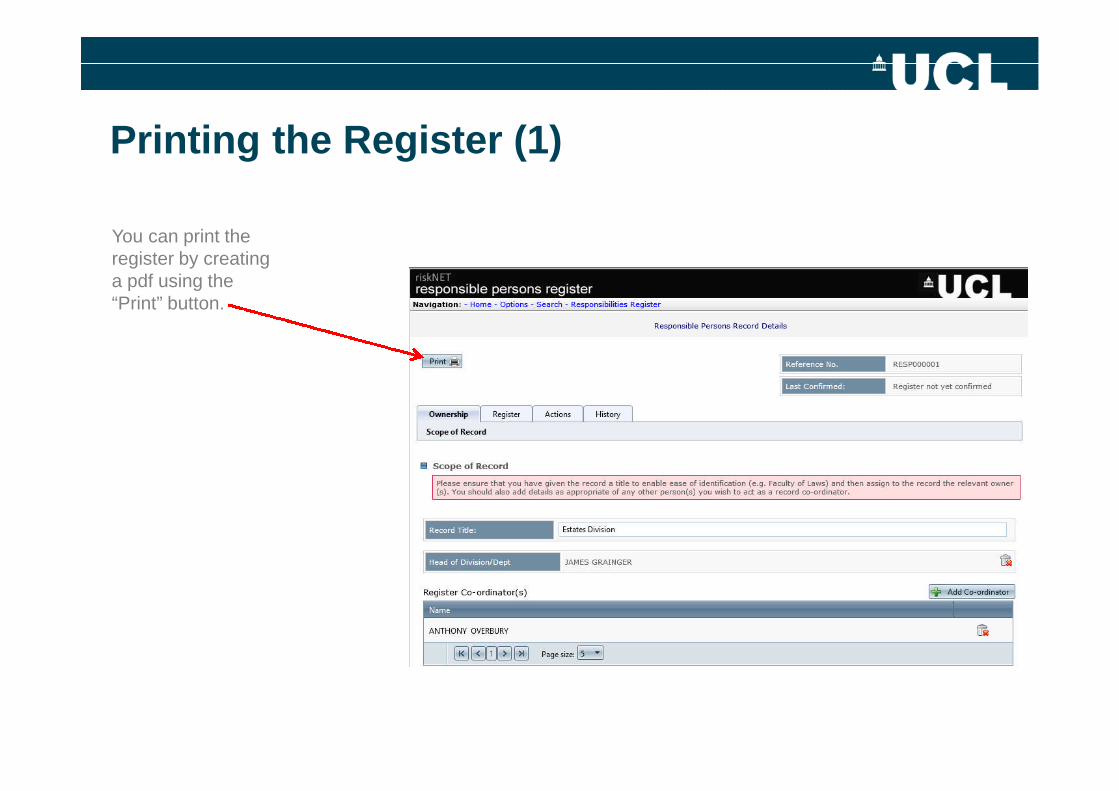
You can print theregister by creatinga pdf using the“Print” button.

Editing Permissions (1)Only the Head of Division/Dept and the Register Co-ordinator(s)entered on the “Ownership” tab page have permission to edit theRegister. WARNING – do not delete yourself as RegisterCoordinator until you have added a new register coordinator asyou will then be locked out from the edit permissions.
To add new RegisterCoordinators (a department candecide on how many they needand who they are) click on “AddCo-ordinator”
Delete existing co-ordinator byclicking on dustbin/red crossicon
The Head of Division/Dept canbe managed in the same wayexcept you will have to deletefirst. Once deleted you canthen add a new Head.
Editing Permissions (2)
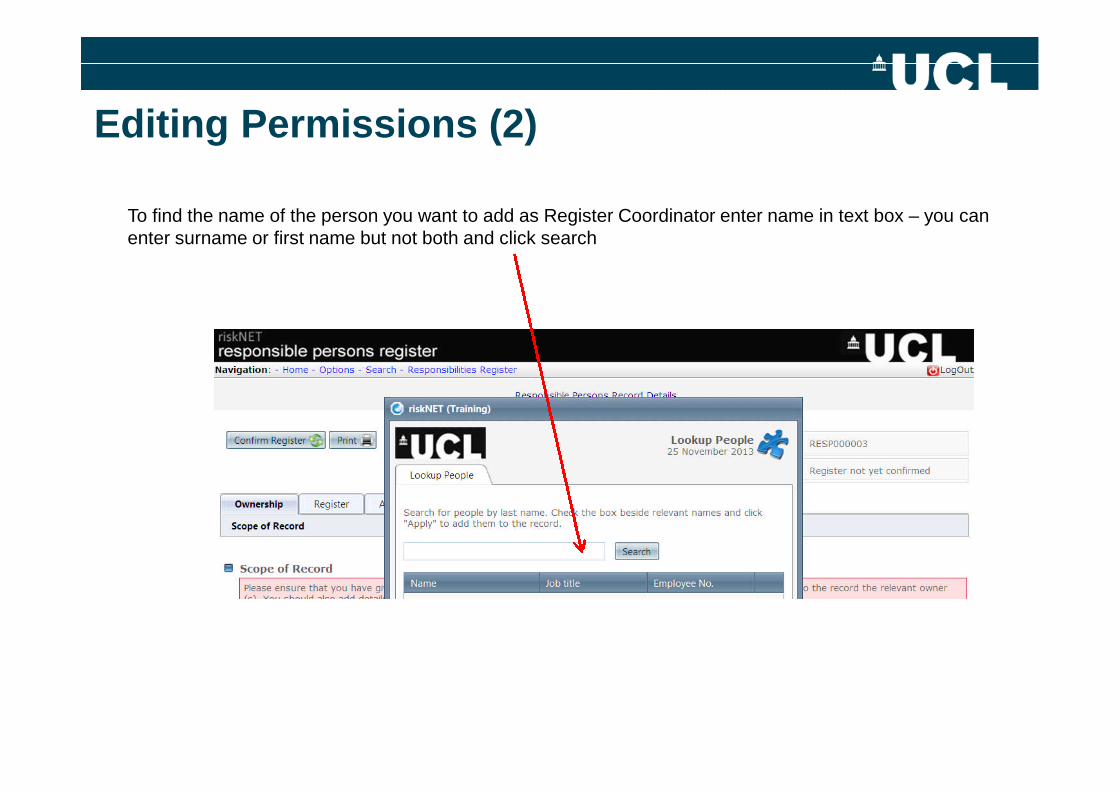
To find the name of the person you want to add as Register Coordinator enter name in text box – you canenter surname or first name but not both and click search

Locate the nameand tick the box atthe end of that rowand click on Apply
Editing Permissions (3)
Editing Permissions (4)
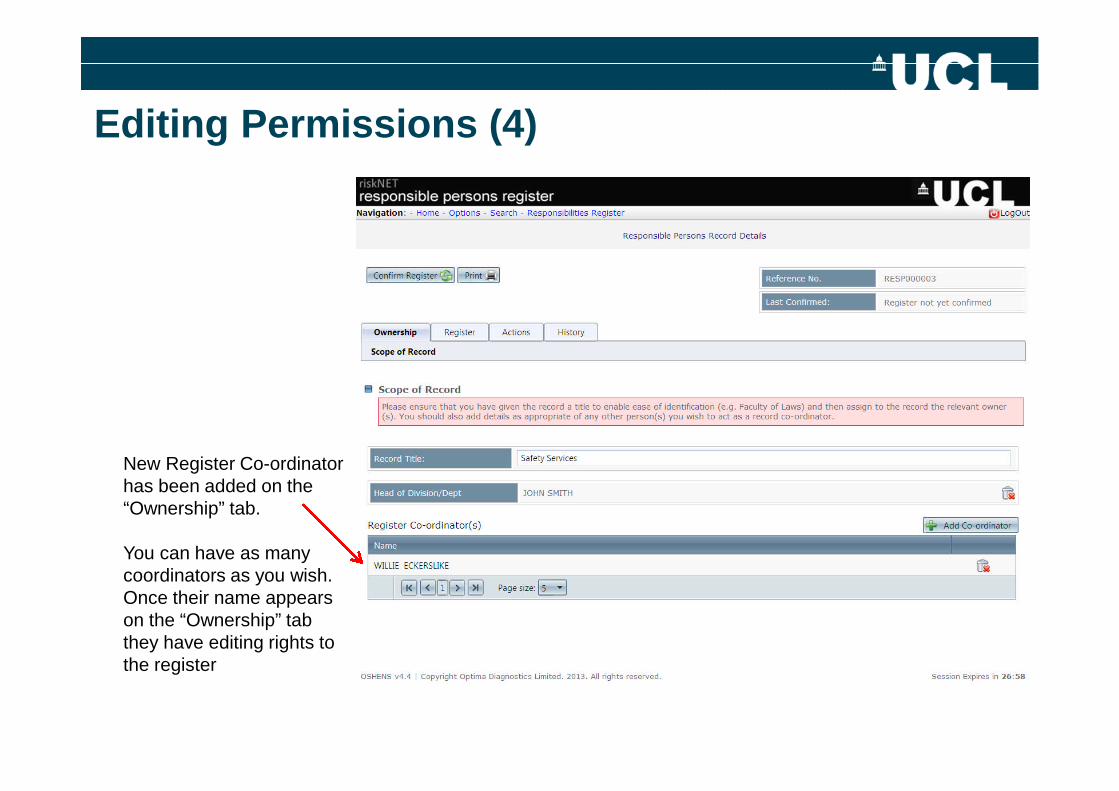
New Register Co-ordinatorhas been added on the“Ownership” tab.
You can have as manycoordinators as you wish.Once their name appearson the “Ownership” tabthey have editing rights tothe register
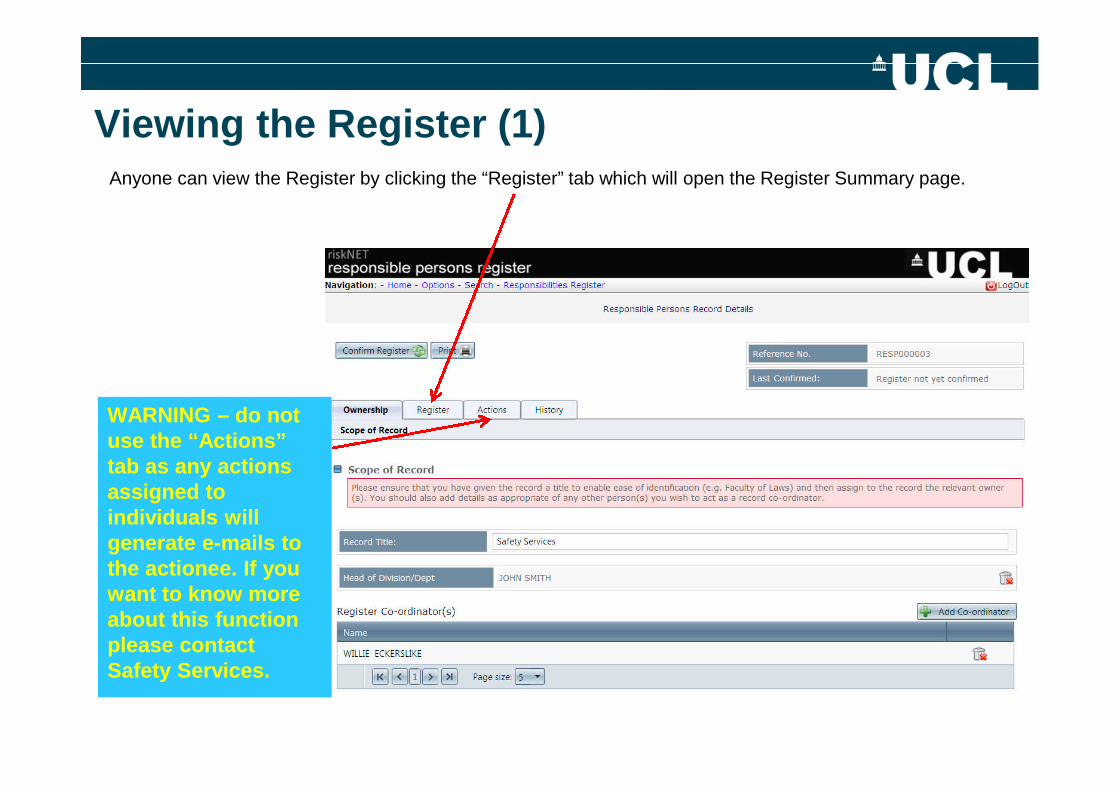
Viewing the Register (1)Anyone can view the Register by clicking the “Register” tab which will open the Register Summary page.
WARNING – do notuse the “Actions”tab as any actionsassigned toindividuals willgenerate e-mails tothe actionee. If youwant to know moreabout this functionplease contactSafety Services.

Viewing the Register (2)
The Register Summary lets you seethe responsible person roles
By clicking and expanding the rolesyou can see who has been assignedto the roles and where.
You can print theregister by creatinga pdf using the“Print” button.
Printing the Register (1)
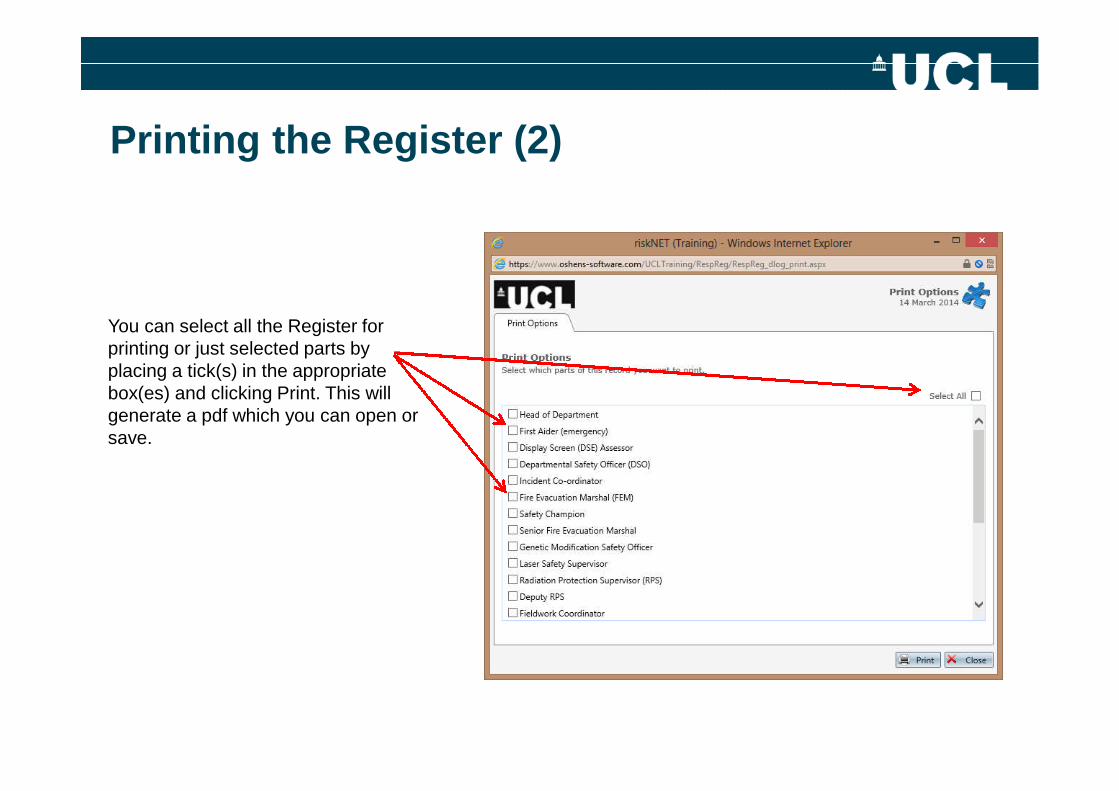
Printing the Register (2)
You can select all the Register forprinting or just selected parts byplacing a tick(s) in the appropriatebox(es) and clicking Print. This willgenerate a pdf which you can open orsave.
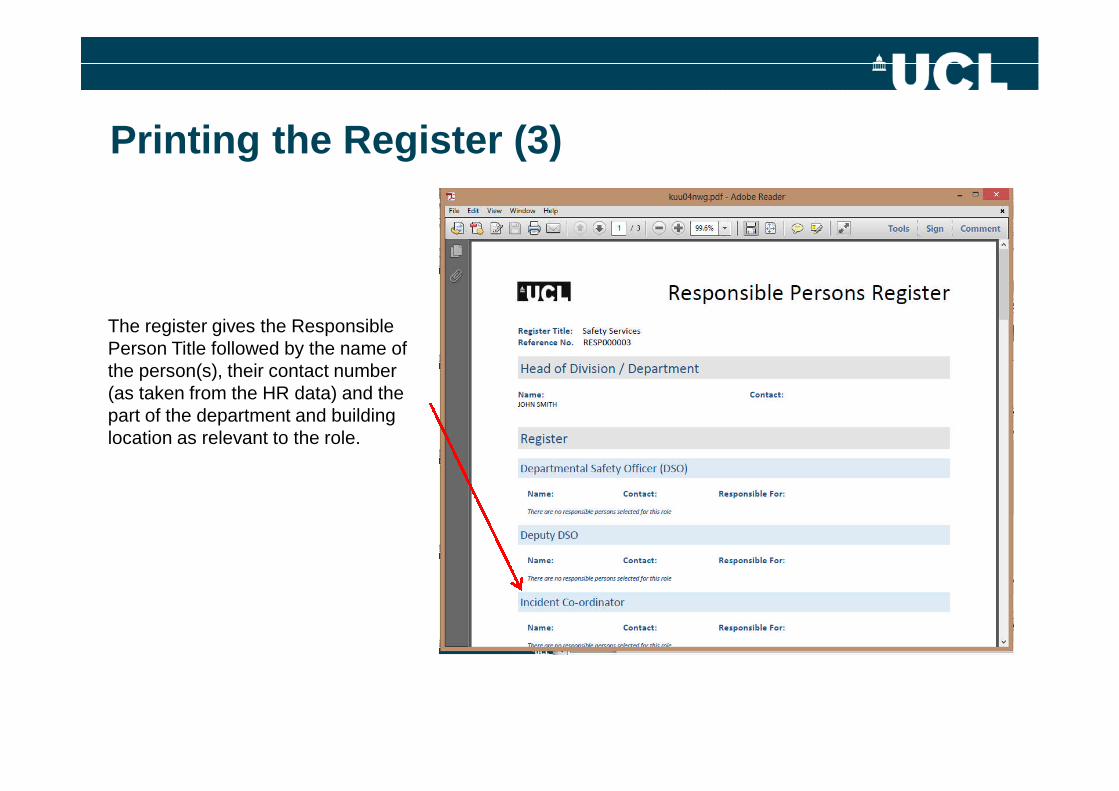
Printing the Register (3)
The register gives the ResponsiblePerson Title followed by the name ofthe person(s), their contact number(as taken from the HR data) and thepart of the department and buildinglocation as relevant to the role.

EDITING THE REGISTER

Editing the Register – Adding Roles (1)
As a Register Coordinator/HoD you will be able to add/delete responsible person roles, assign people tothe roles and define which part of the organisation and building location they perform their role.
The Register Summary willautomatically contain those roleswhich are mandatory eg DSO,Incident Coordinator etc.
Other roles can be added from adefined list by clicking the “EditResponsibility List” button.

Editing – Adding Roles (2)
Select the role(s) you want to add toyour register by ticking the box(es)and clicking the “Apply” button.Several boxes can be ticked at once.
The selected role(s) appears in theRegister Summary.
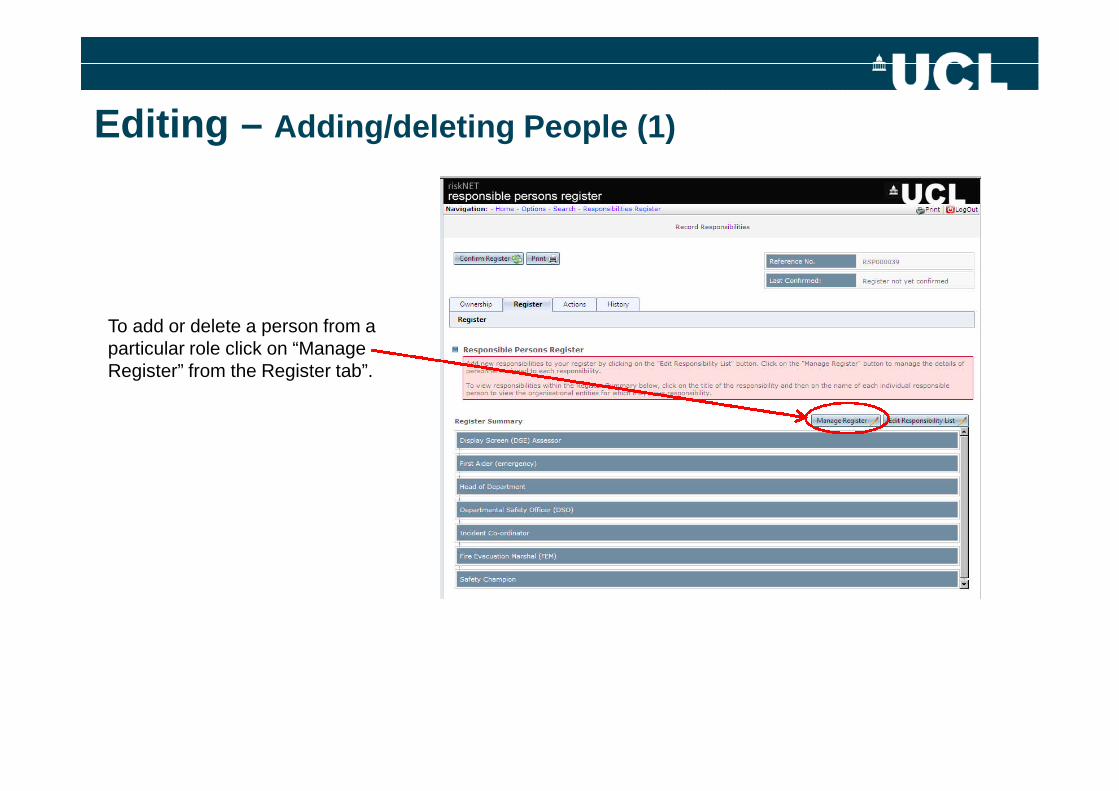
Editing – Adding/deleting People (1)
To add or delete a person from aparticular role click on “ManageRegister” from the Register tab”.
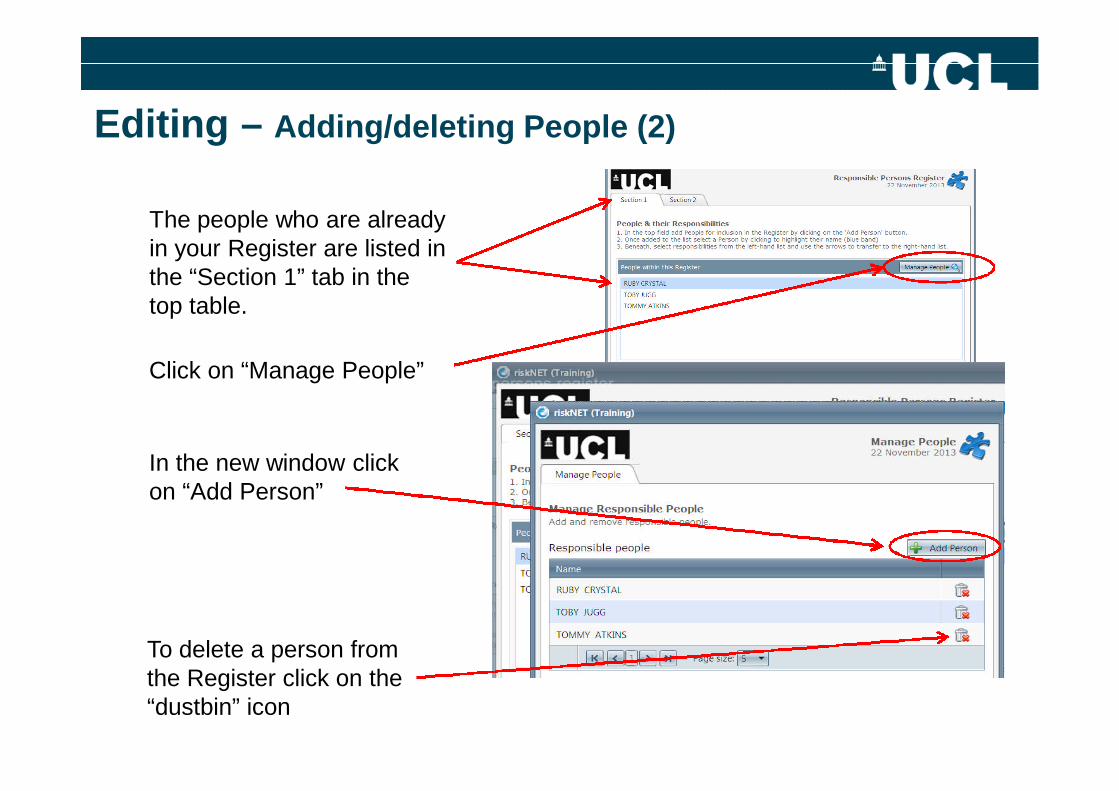
Editing – Adding/deleting People (2)
Click on “Manage People”
In the new window clickon “Add Person”
To delete a person fromthe Register click on the“dustbin” icon
The people who are alreadyin your Register are listed inthe “Section 1” tab in thetop table.
Editing – Adding/deleting People (3)
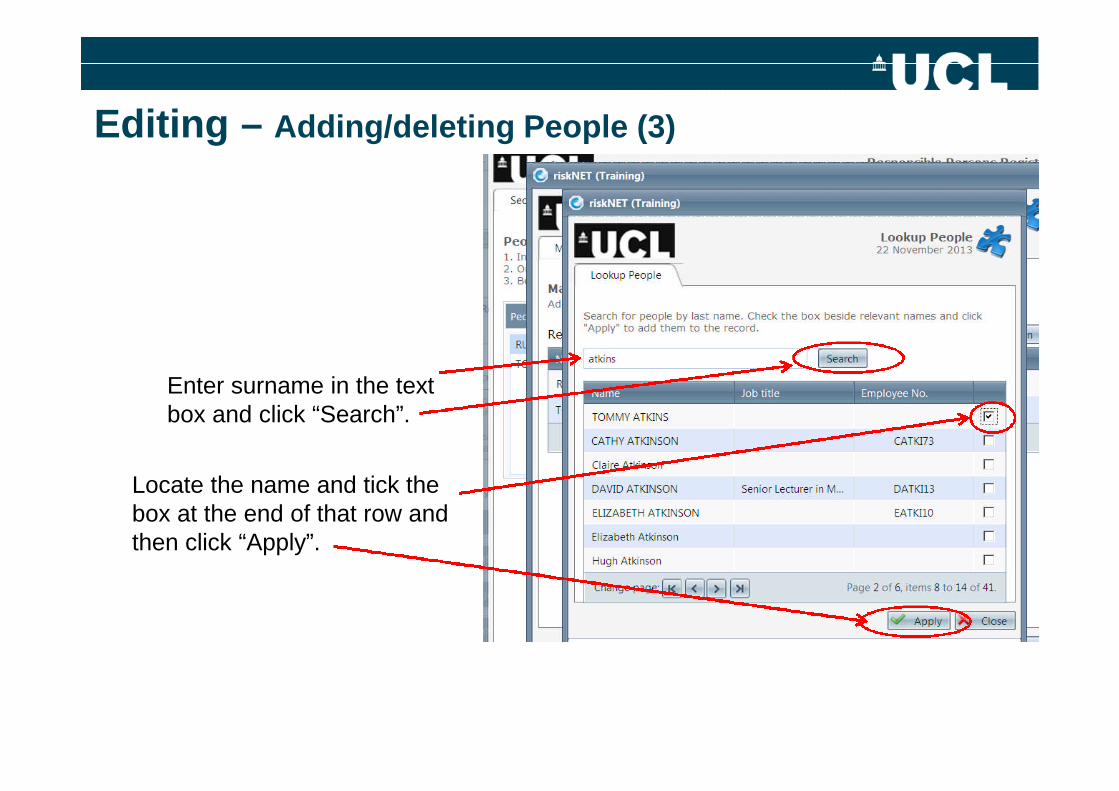
Enter surname in the textbox and click “Search”.
Locate the name and tick thebox at the end of that row andthen click “Apply”.
Editing – Adding/deleting People (4)
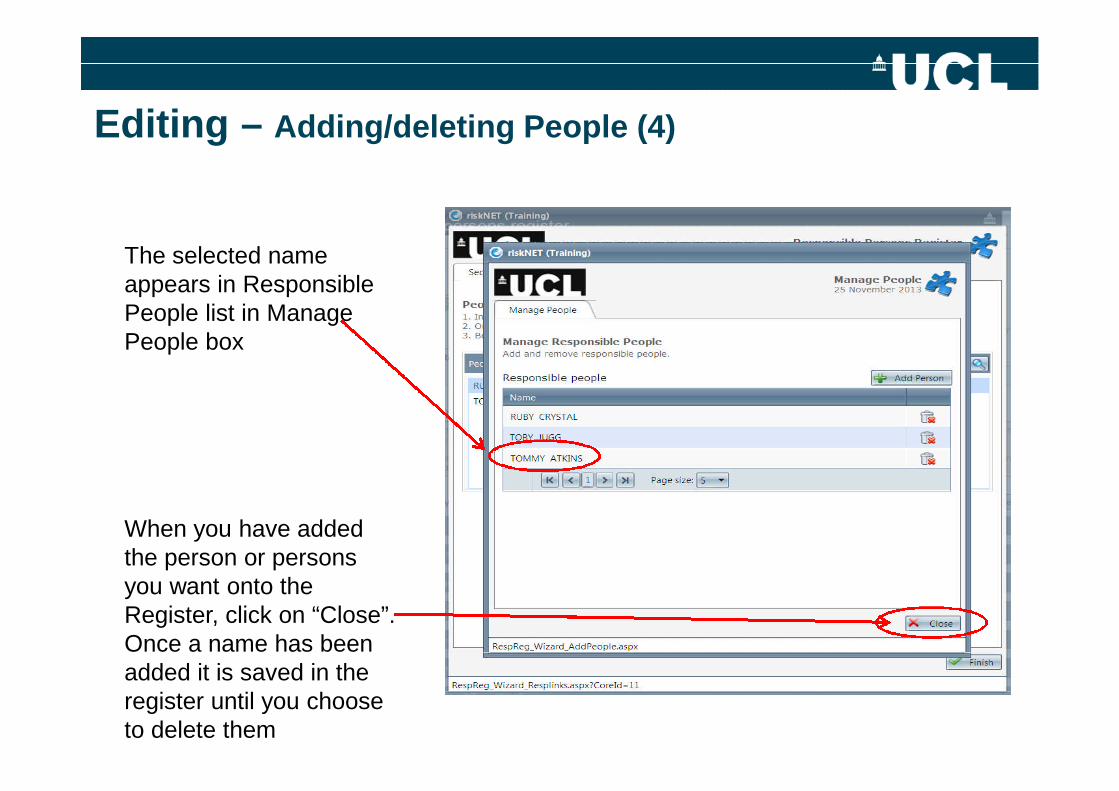
The selected nameappears in ResponsiblePeople list in ManagePeople box
When you have addedthe person or personsyou want onto theRegister, click on “Close”.Once a name has beenadded it is saved in theregister until you chooseto delete them

Editing – Assigning People to Roles (1)
Click on “Manage Register” from theRegister tab”.
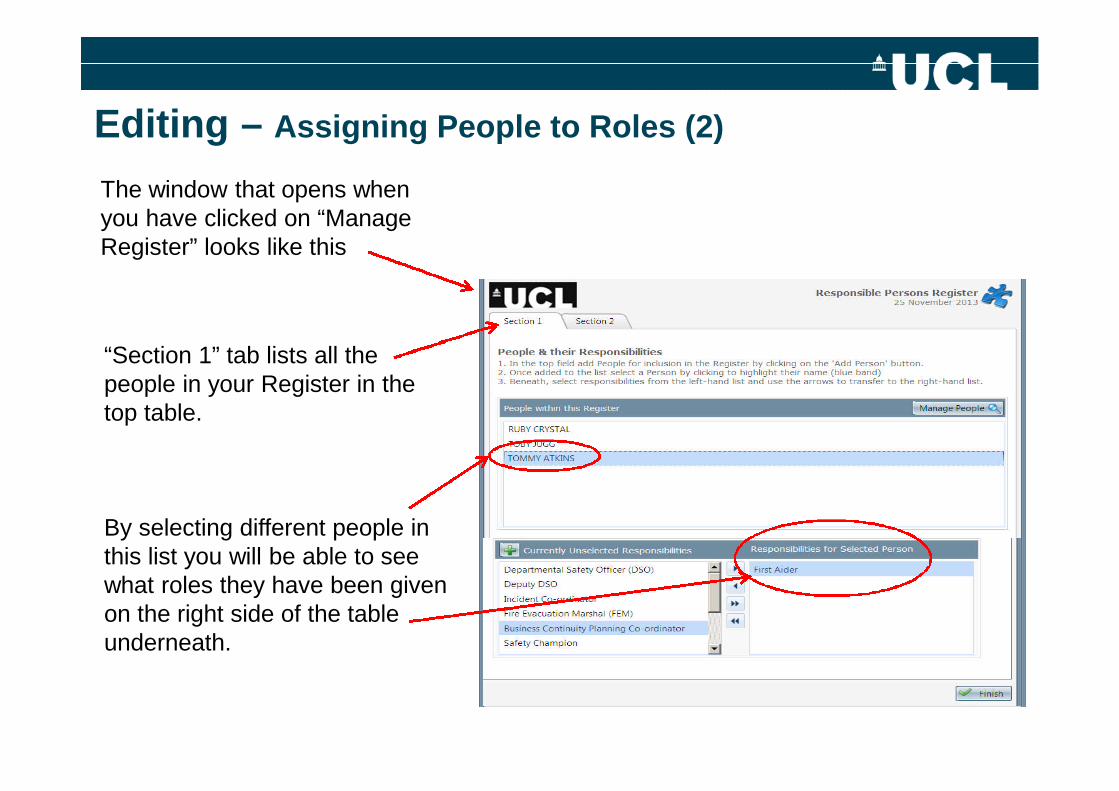
The window that opens whenyou have clicked on “ManageRegister” looks like this
“Section 1” tab lists all thepeople in your Register in thetop table.
By selecting different people inthis list you will be able to seewhat roles they have been givenon the right side of the tableunderneath.
Editing – Assigning People to Roles (2)
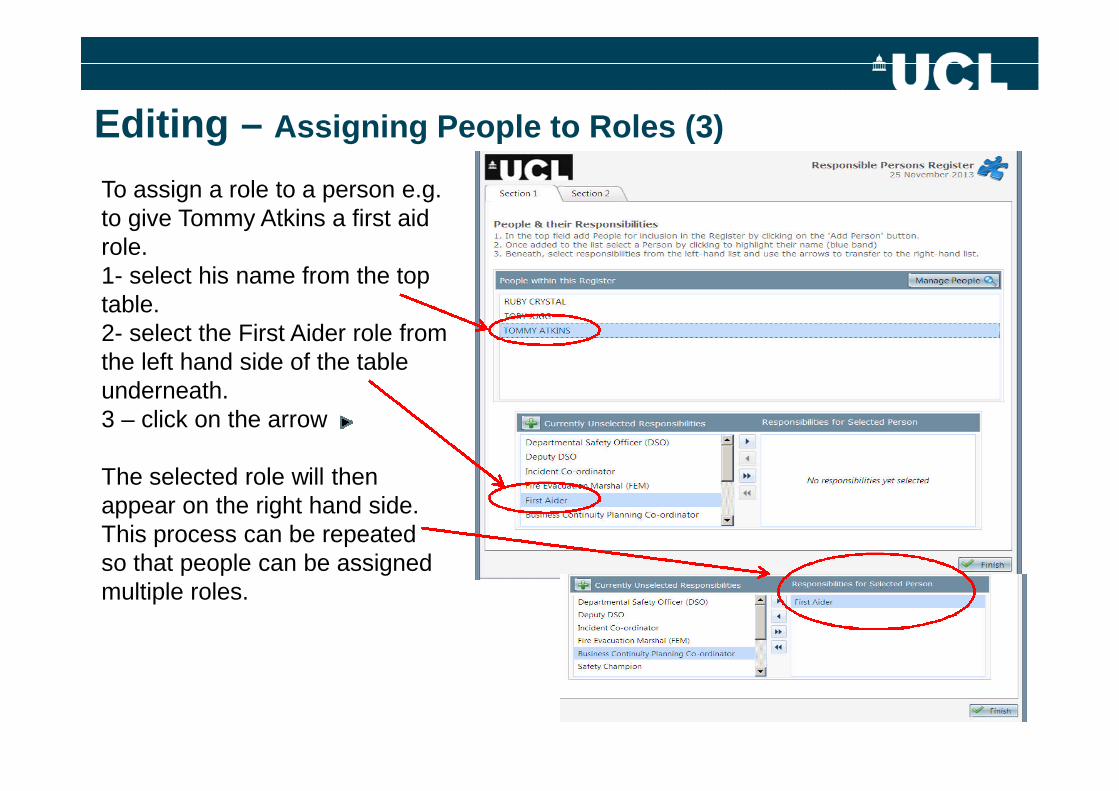
To assign a role to a person e.g.to give Tommy Atkins a first aidrole.1- select his name from the toptable.2- select the First Aider role fromthe left hand side of the tableunderneath.3 – click on the arrow
The selected role will thenappear on the right hand side.This process can be repeatedso that people can be assignedmultiple roles.
Editing – Assigning People to Roles (3)

The first thing you need to dois select the person you areinterested in from “Section1”. When you click on“Section 2” their name willappear at the top.
Check that the UCL entitiesyou want to link to are listedin the top half of the table
Now you have given people specific roles you can now link the roles of an individualto specific business units and locations within UCL (these are referred to as UCLentities). This is done in the “Section 2” tab for each person.
If you need to add a newentity (eg department orbuilding) then click on “AddNew Entity” (see “AddingNew Entities”.
Editing – Assigning People to Roles (4)
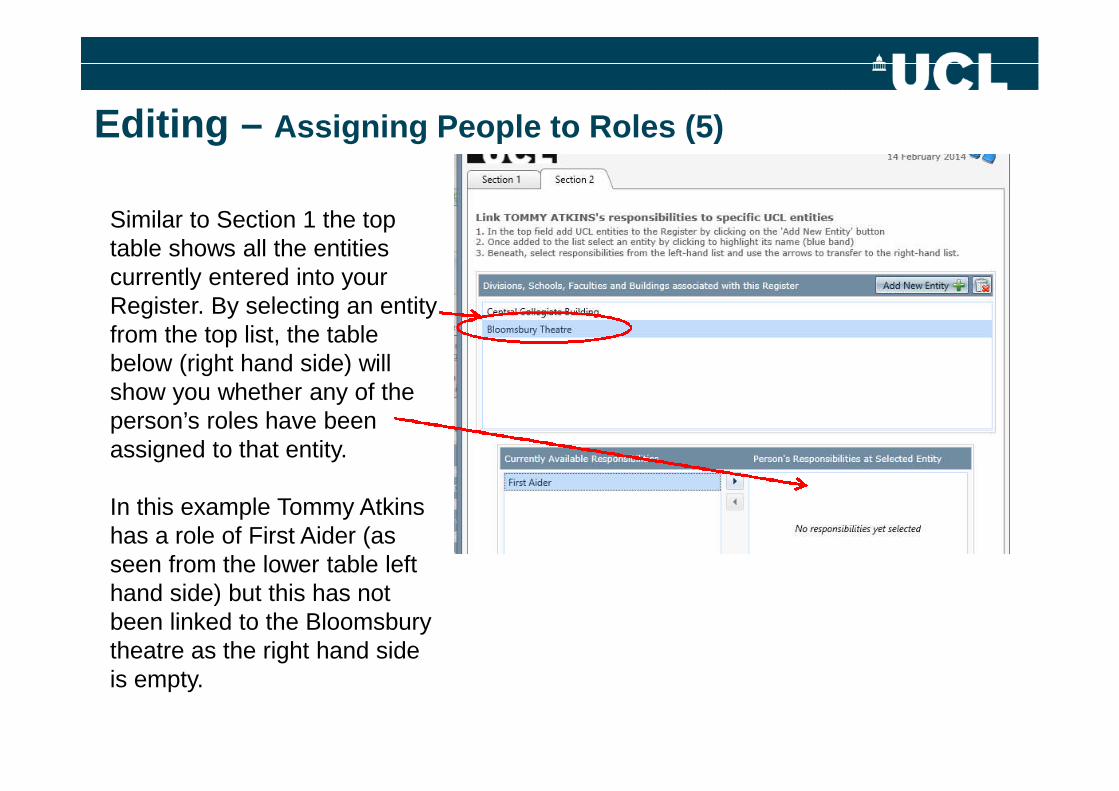
Similar to Section 1 the toptable shows all the entitiescurrently entered into yourRegister. By selecting an entityfrom the top list, the tablebelow (right hand side) willshow you whether any of theperson’s roles have beenassigned to that entity.
In this example Tommy Atkinshas a role of First Aider (asseen from the lower table lefthand side) but this has notbeen linked to the Bloomsburytheatre as the right hand sideis empty.
Editing – Assigning People to Roles (5)
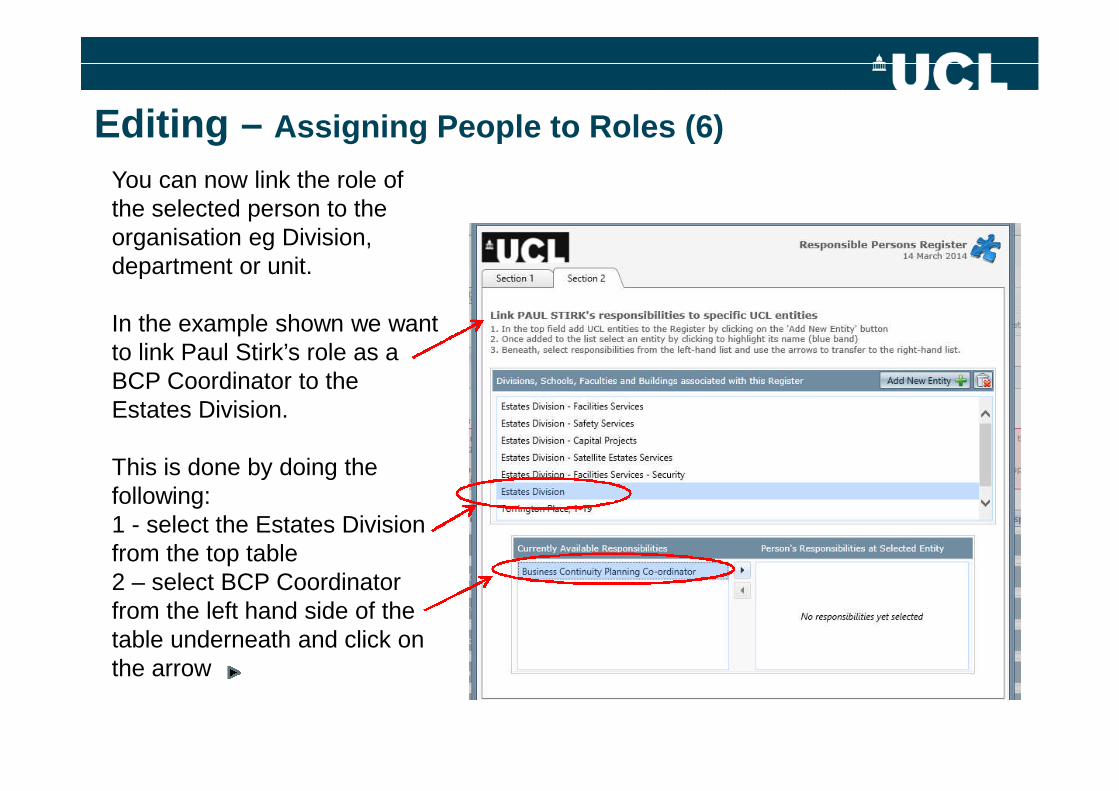
You can now link the role ofthe selected person to theorganisation eg Division,department or unit.
In the example shown we wantto link Paul Stirk’s role as aBCP Coordinator to theEstates Division.
This is done by doing thefollowing:1 - select the Estates Divisionfrom the top table2 – select BCP Coordinatorfrom the left hand side of thetable underneath and click onthe arrow
Editing – Assigning People to Roles (6)

‘Period of Responsibility’box appears.
Enter the dates you wishthe person’s role to bevalid (in format eg: 12 Nov2013) or use calendarbox. For first aiders thiswill be their certificationdates.
Click “Apply”
Editing – Assigning People to Roles (7)
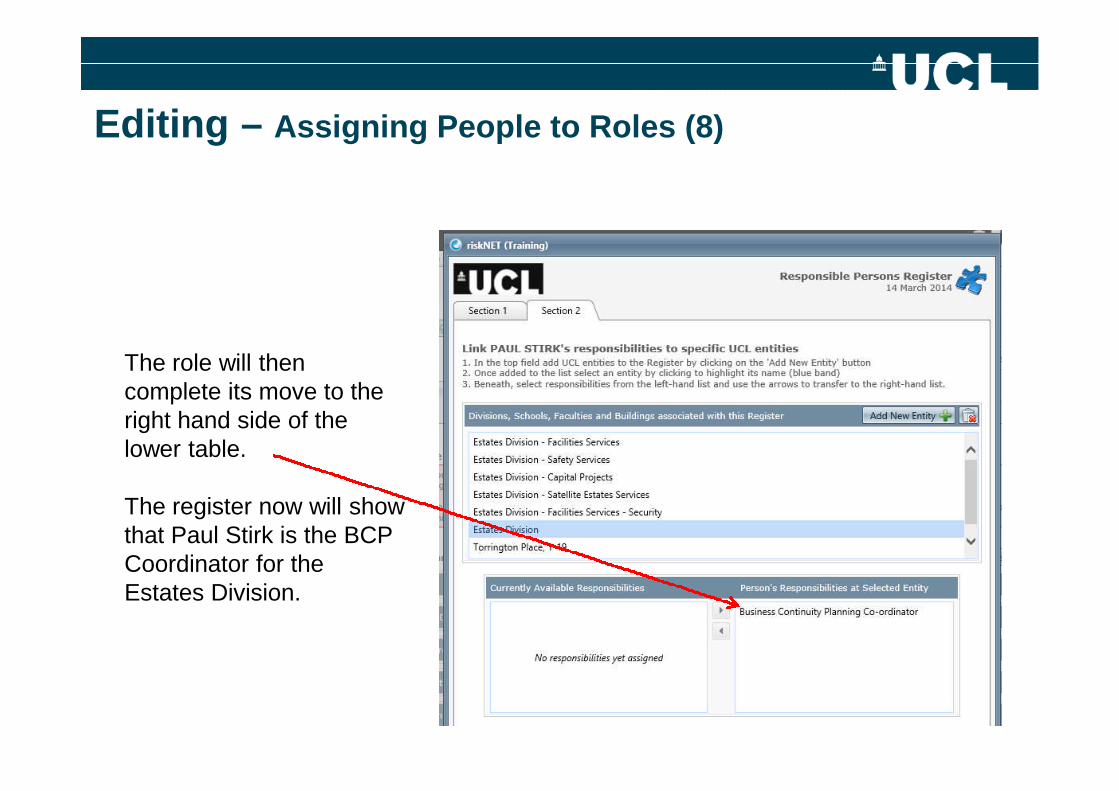
The role will thencomplete its move to theright hand side of thelower table.
The register now will showthat Paul Stirk is the BCPCoordinator for theEstates Division.
Editing – Assigning People to Roles (8)
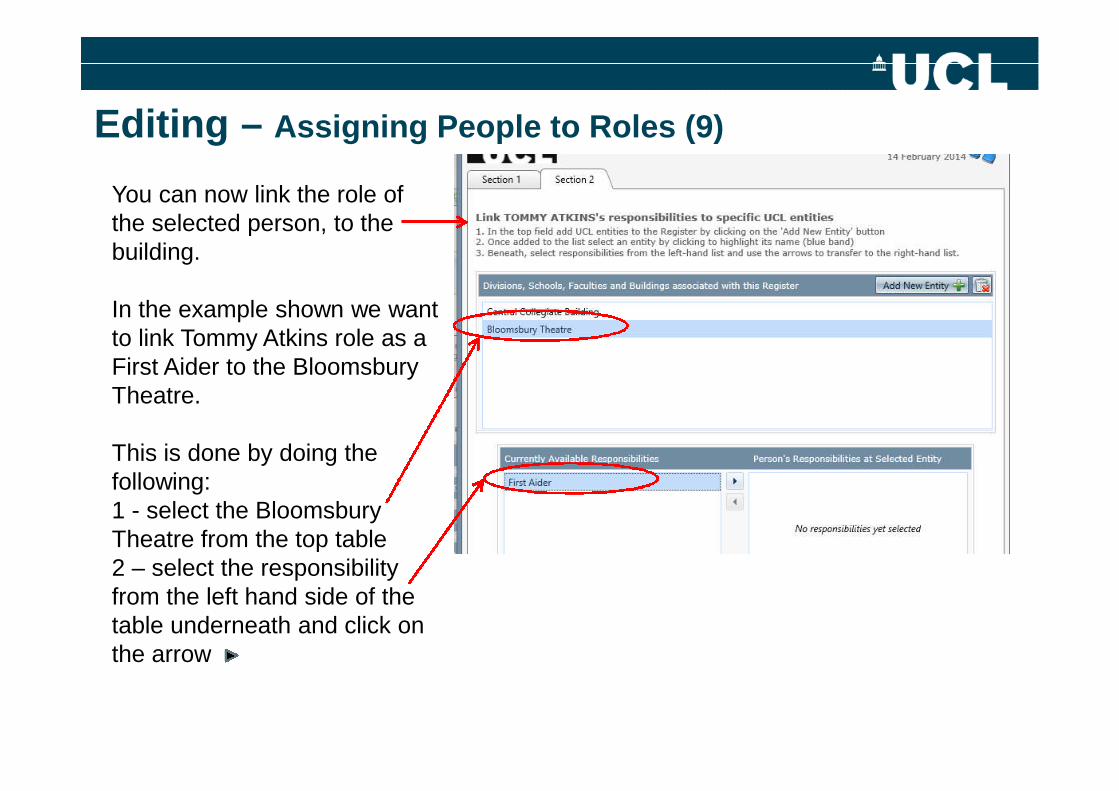
You can now link the role ofthe selected person, to thebuilding.
In the example shown we wantto link Tommy Atkins role as aFirst Aider to the BloomsburyTheatre.
This is done by doing thefollowing:1 - select the BloomsburyTheatre from the top table2 – select the responsibilityfrom the left hand side of thetable underneath and click onthe arrow
Editing – Assigning People to Roles (9)
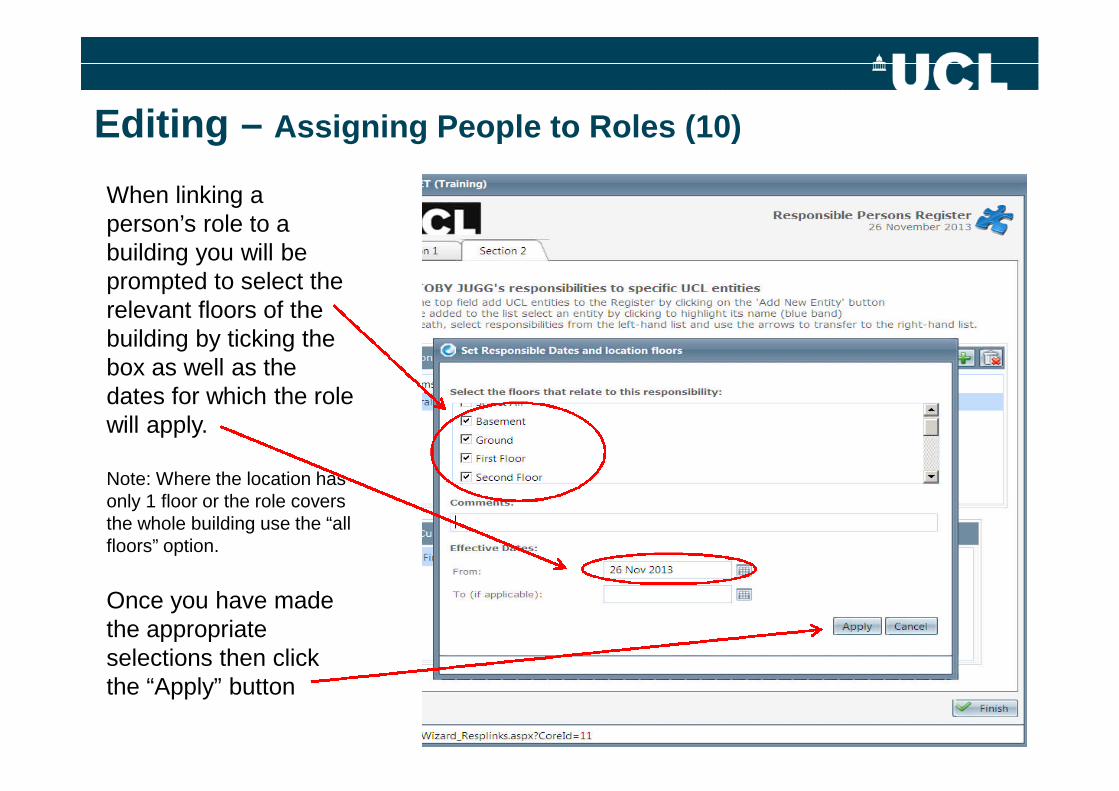
When linking aperson’s role to abuilding you will beprompted to select therelevant floors of thebuilding by ticking thebox as well as thedates for which the rolewill apply.
Note: Where the location hasonly 1 floor or the role coversthe whole building use the “allfloors” option.
Once you have madethe appropriateselections then clickthe “Apply” button
Editing – Assigning People to Roles (10)
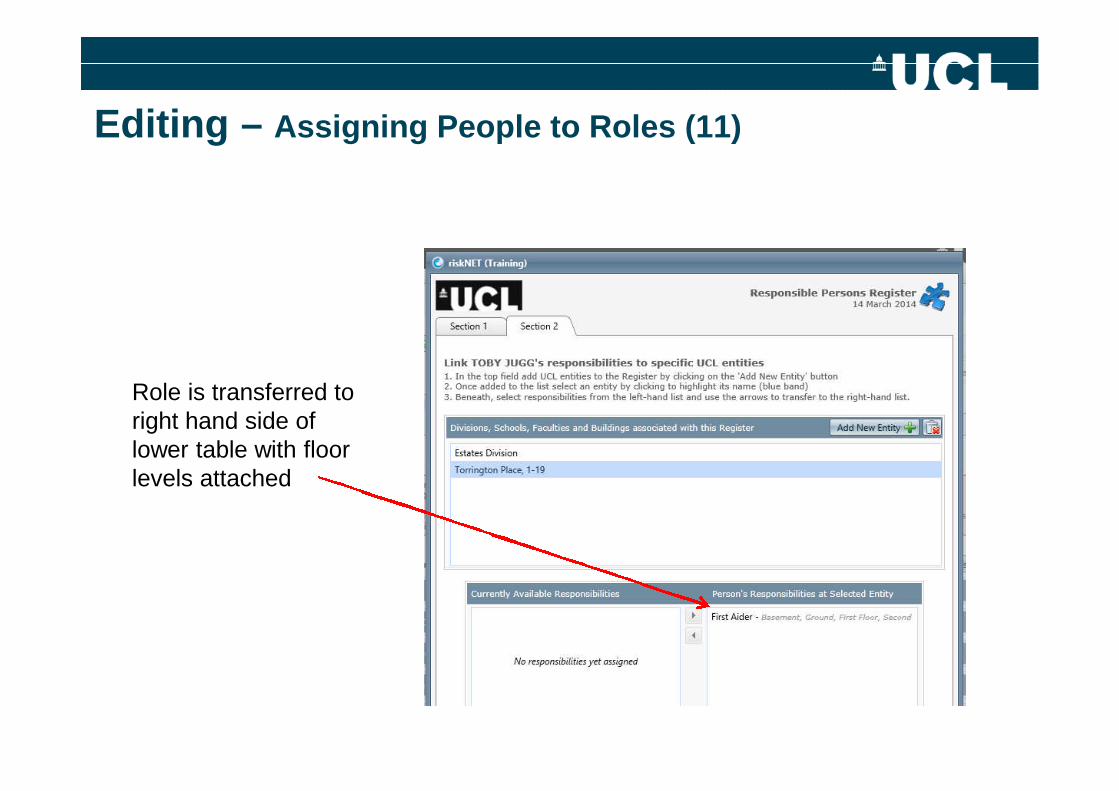
Role is transferred toright hand side oflower table with floorlevels attached
Editing – Assigning People to Roles (11)

Editing – Changing Links to Entities, Dates or Floors (1)
Having selected the personyou want to make changesto in Section 1, click onSection 2 and select fromthe top table the entity youwish to change which willhighlight in blue.
WARNING – do not deletethe entity from the toptable unless you want toremove it completelyfrom your register.

Editing – Changing Links to Entities, Dates or Floors (2)
To remove this associationselect the FEM entry on theright hand side and click onthe lower arrow.The FEM role will thenmove to the left and TobyJugg will no longer berecorded as being the FEMat this entity.
To change dates or floorsfollow the same steps butthen move the role backwhen the prompt for floorand date selection willappear.
In this example Toby Jugg is recorded as being the FEM at the Central CollegiateBuilding.
Editing – Adding New Entities (1)
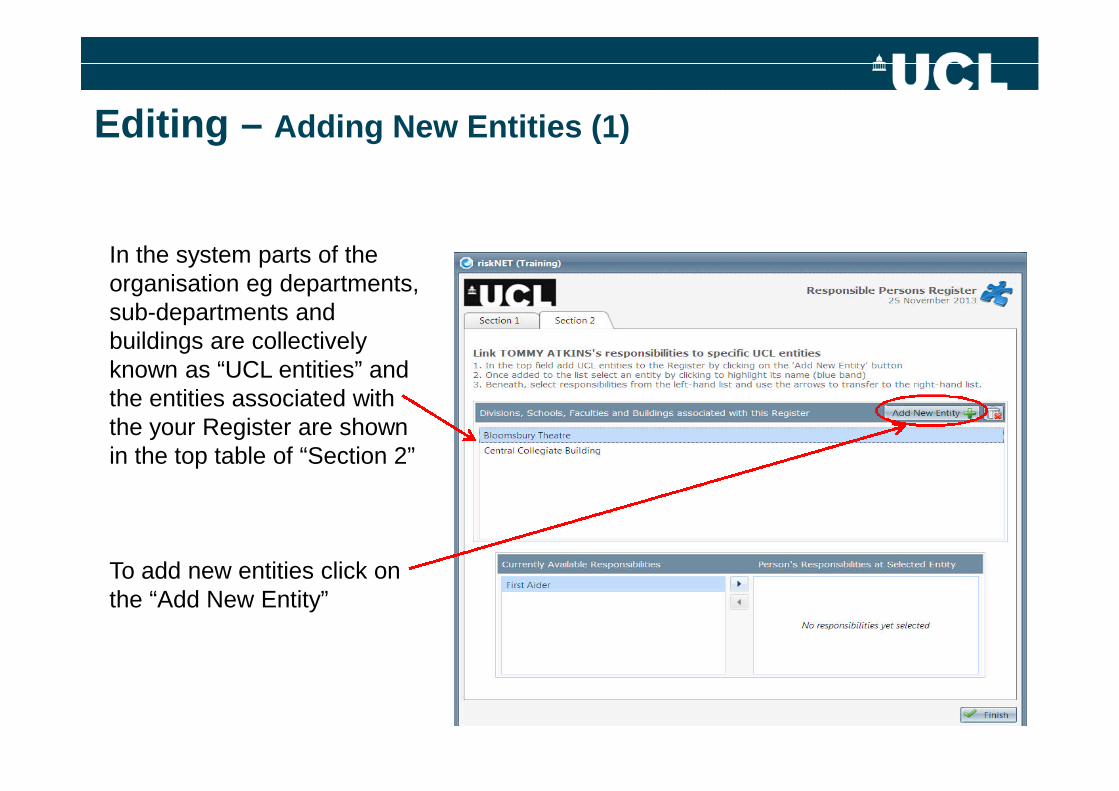
In the system parts of theorganisation eg departments,sub-departments andbuildings are collectivelyknown as “UCL entities” andthe entities associated withthe your Register are shownin the top table of “Section 2”
To add new entities click onthe “Add New Entity”

Editing – Adding New Entities (2)
Click on the drop down arrowfor the type of entity (eitherorganisational or buildingrelated) that you want to add.
Editing – Adding New Entities (3)
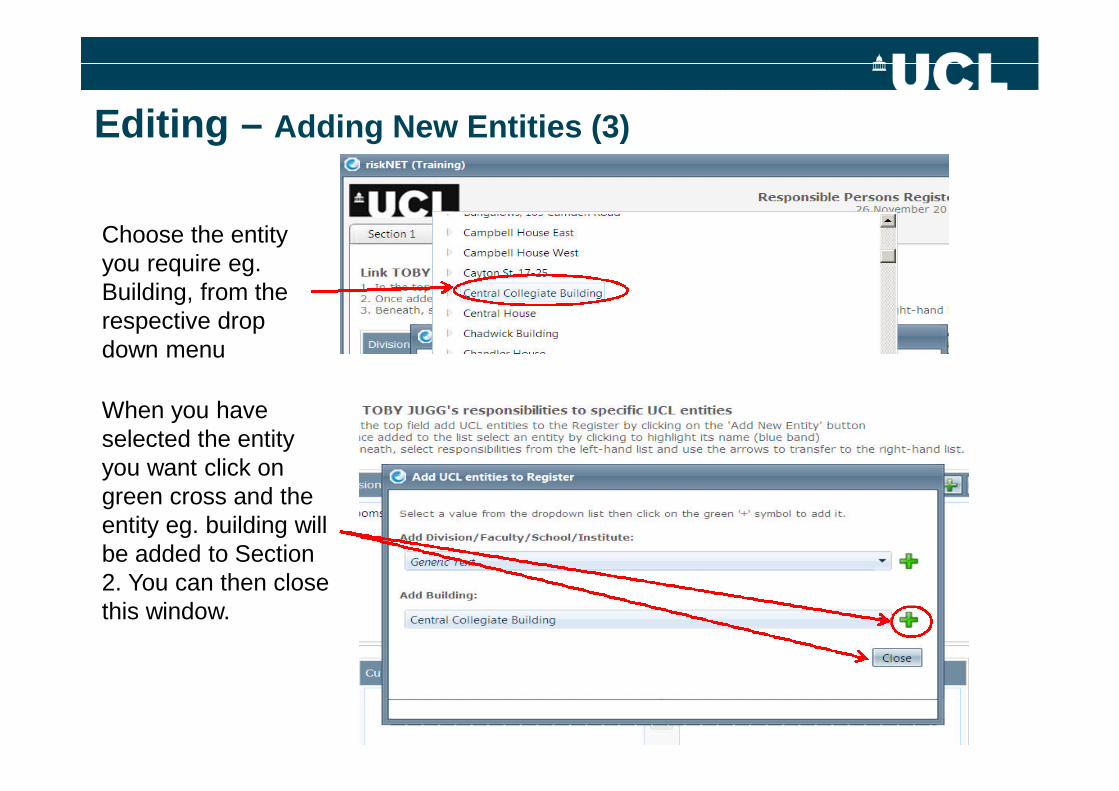
Choose the entityyou require eg.Building, from therespective dropdown menu
When you haveselected the entityyou want click ongreen cross and theentity eg. building willbe added to Section2. You can then closethis window.

ANALYSIS REPORTS

Analysis Reports – Running Reports (1)
To run a report click on “Analysis Reports” fromthe Navigation options screen.
NOTE - You will not be able to access thisunless you have been given the permissionrights by Safety Services
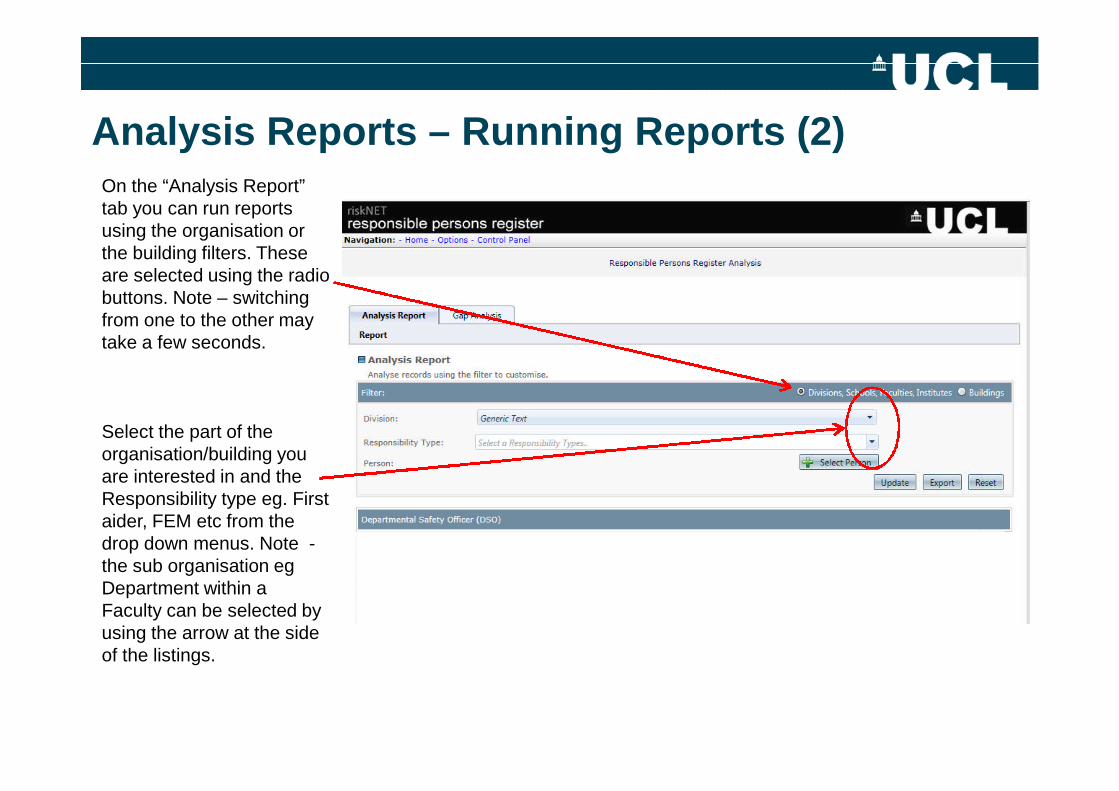
Analysis Reports – Running Reports (2)On the “Analysis Report”tab you can run reportsusing the organisation orthe building filters. Theseare selected using the radiobuttons. Note – switchingfrom one to the other maytake a few seconds.
Select the part of theorganisation/building youare interested in and theResponsibility type eg. Firstaider, FEM etc from thedrop down menus. Note -the sub organisation egDepartment within aFaculty can be selected byusing the arrow at the sideof the listings.
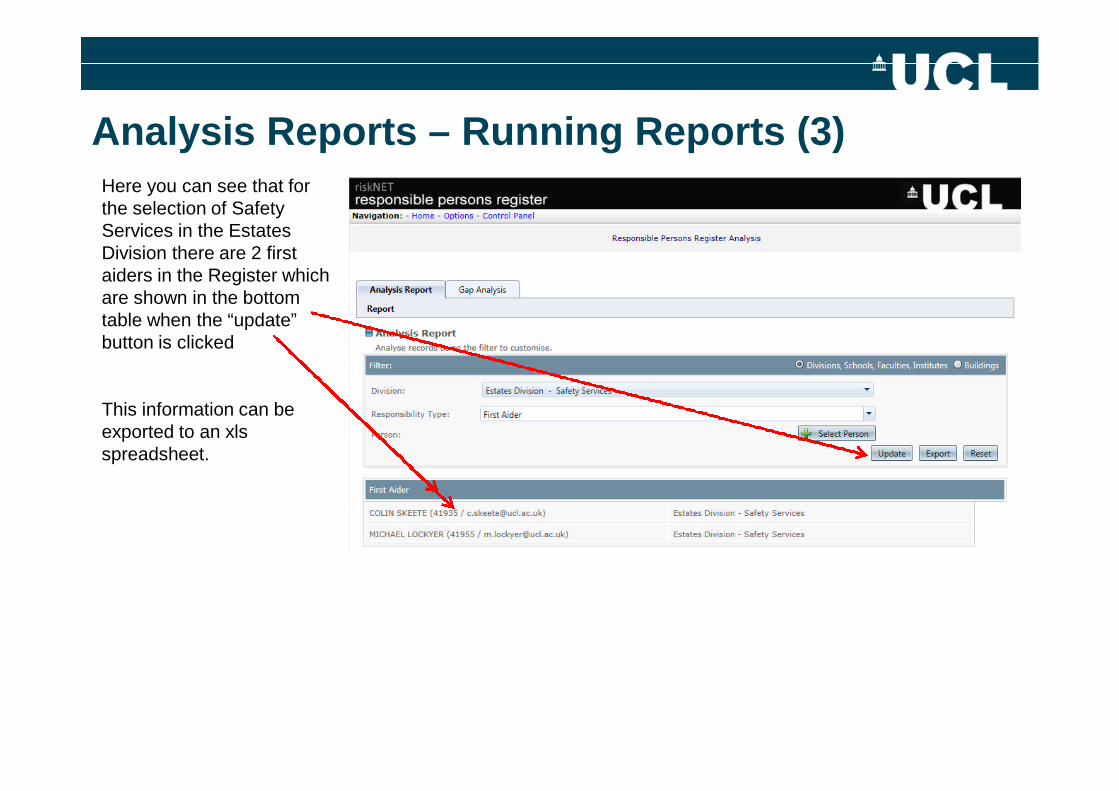
Analysis Reports – Running Reports (3)Here you can see that forthe selection of SafetyServices in the EstatesDivision there are 2 firstaiders in the Register whichare shown in the bottomtable when the “update”button is clicked
This information can beexported to an xlsspreadsheet.

Analysis Reports – Extracting Reports (1)To extract the report to anxls spreadsheet click on the“Export” button.
You should be then giventhe choice to open or savethe spreadsheet as shownbelow.
Analysis Reports – Extracting Reports (2)
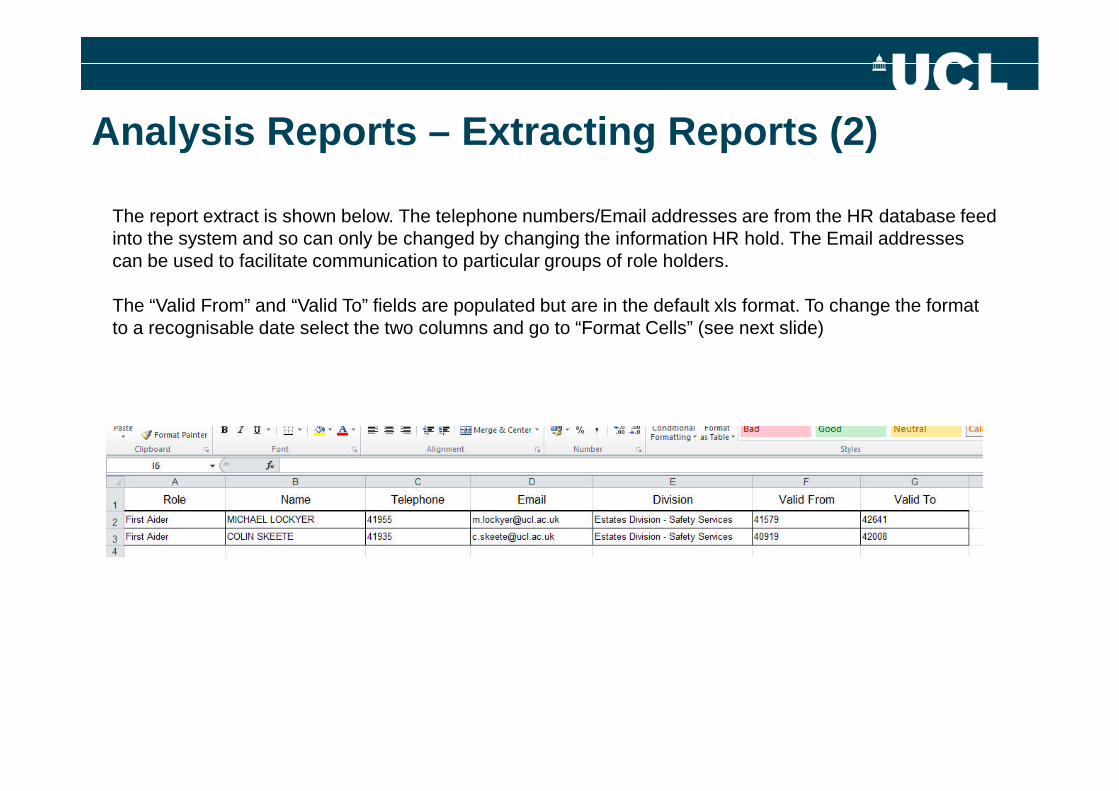
The report extract is shown below. The telephone numbers/Email addresses are from the HR database feedinto the system and so can only be changed by changing the information HR hold. The Email addressescan be used to facilitate communication to particular groups of role holders.
The “Valid From” and “Valid To” fields are populated but are in the default xls format. To change the formatto a recognisable date select the two columns and go to “Format Cells” (see next slide)
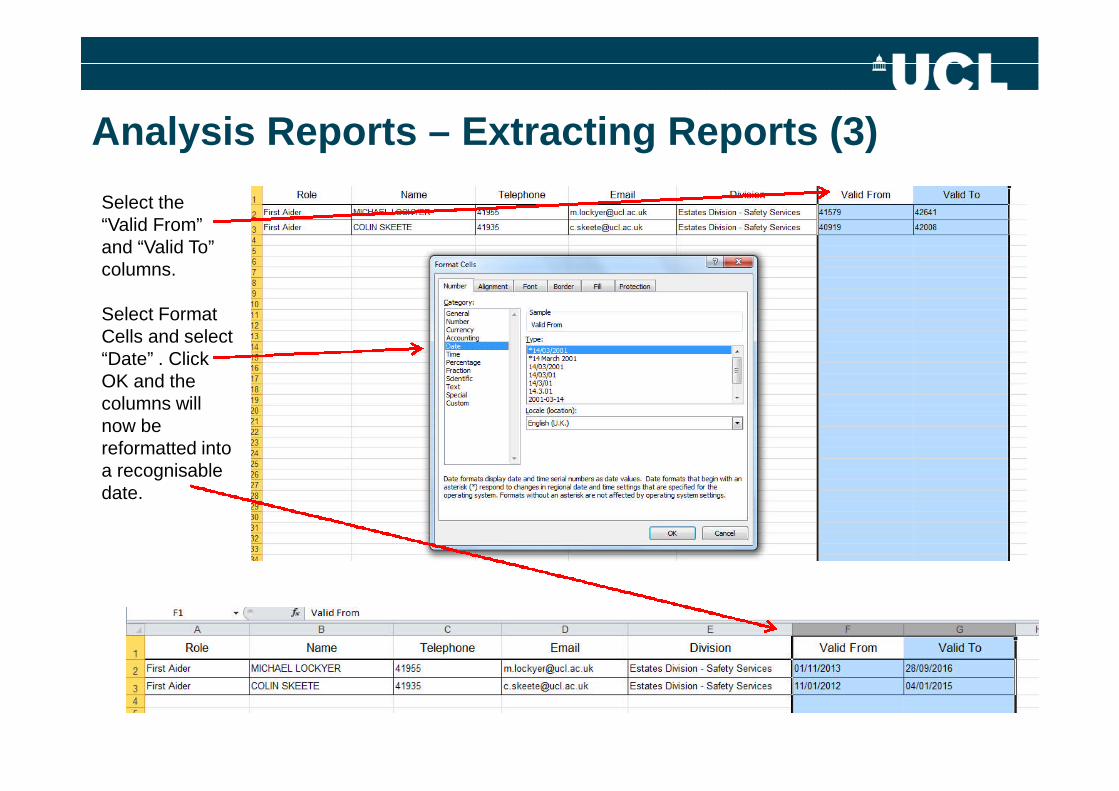
Analysis Reports – Extracting Reports (3)
Select the“Valid From”and “Valid To”columns.
Select FormatCells and select“Date” . ClickOK and thecolumns willnow bereformatted intoa recognisabledate.