research electronic data capture (redcap) -...
TRANSCRIPT

Research Electronic Data Capture (REDCap)
Kenna WhitleyCenter for Research Methods and Data Analysis
An Introduction and Training Seminar

What is REDCap?
A secure, web‐based electronic data capture system for building and managing HIPAA‐compliant online surveys and databases
Advantages to REDCap:• Secure and web‐based• Database Flexibility • Bulk Data Import
• Export Data to Common Data Analysis Packages
• Accessibility

Disadvantages to REDCap:
Disadvantages to REDCap:

REDCap SupportHave an issue? Notify the REDCapAdministrator or the CRMDA, and you won’t for long!• I live in the CRMDA• The CRMDA lives in Watson
CRMDA support:• Create REDCap accounts• Prevent security issues• Keep our servers and service from catching metaphorical or literal fire
• Fee‐for‐service survey creation and management

REDCap at KUProduction server
https://redcap.ittc.ku.edu• HIPAA‐compliant, secure storage environment.
Testing serverhttp://freecap.ku.edu
• Non‐HIPAA‐compliant, non‐secure environment

Protected Health Information (PHI)• Name• Fax number• Phone number• E‐mail address• Account numbers• Social Security number• Medical Record number• Health Plan number• Certificate/license numbers• URL• IP address• Vehicle identifiers
• Device ID• Biometric ID• Full face/identifying photo• Other unique identifying
number, characteristic, or code• Postal address (geographic
subdivisions smaller than state)• Date precision beyond year

Data Entry vs Surveys
Data EntryInstruments used by workers to input collected data
SurveysInstruments sent to participants to collect data
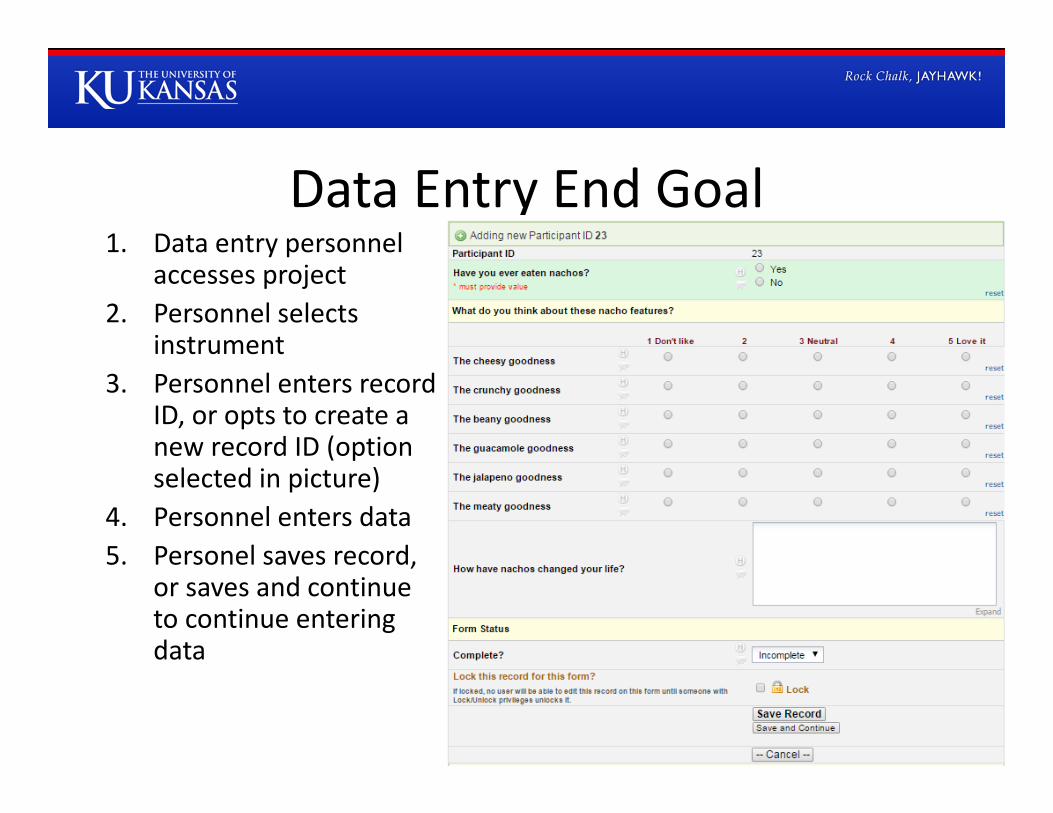
Data Entry End Goal1. Data entry personnel
accesses project2. Personnel selects
instrument3. Personnel enters record
ID, or opts to create a new record ID (option selected in picture)
4. Personnel enters data5. Personel saves record,
or saves and continue to continue entering data

Survey End Goal1. REDCap server sends
email invitation2. Respondent follows
link3. Respondent
completes survey4. Response is securely
transferred to database
5. Response data easily accessible in REDCap

Your RolePI (Principal Investigator)
• Completes agreement with CRMDA when setting up projects
• Assigns research team members and regulates their roles
• Liable for maintaining security of project
• Ensures appropriate use of REDCap
Research Assistant• Must read instructions and
certify agreement to terms of service to request creation of account
• Added in a specific capacity by PI to a project
• Keeps PI informed of project activities
The role of maintaining the REDCap project can be delegated to an RA, however the PI will still be held responsible for data security

Building a Project

Steps to Build a Project
• Create or access your account• Create or access project• Build your instrument• Test instrument• Move project to production• Collect data

Create your account
• Link to the REDCap ID Request Form: https://redcap.ittc.ku.edu/surveys/?s=TRoP4n
OR• Email the REDCap
Administrator at: [email protected]
REDCap User ID
Freecap User ID• Link to the Freecap ID Request
Form: https://dept.ku.edu/~crmdadep/freecap/surveys/?s=2ZIiHtY4IG
OR• Email the REDCap
Administrator at: [email protected]
Both ID Request forms can be found at http://crmda.ku.edu/redcap

ID Request Survey

ID Survey Complete
• Following completion of the ID Request Survey, an email with your responses is sent to the REDCap Administrator
• The REDCap Administrator then creates a user account based on your responses

ID Survey Complete• After your user account is created, an email will be sent to you with a link to set your new REDCap password
Follow the link to set your new password

Setting Your New Password

Password Submitted
• Congratulations! Your new REDCap account is set‐up, and you may now access your account

Access your account
Access REDCap
Access Freecap
https://redcap.ittc.ku.edu/
https://dept.ku.edu/~crmdadep/freecap/


Shocked to see a KU log‐in page? Don’t panic!
• Dual log‐in process– Shibboleth– REDCap
• Non‐KU researchers can gain access through a sponsored temporary account– KU Account Management creates temporary accounts: http://technology.ku.edu/sponsored‐temporary‐accounts


Set Up Password Recovery• After clicking on around for a bit in REDCap, this screen will pop up.
• Set up your security question and answer

Creating a New Project
Testing Server(Freecap)
Production Server Projects are Created by REDCap Admin


• Longitudinal Data Collection
• Surveys
• Modify project title, purpose, etc.
Main Project Settings


• Online Designer
• Data Dictionary
Design Instruments

Online Designer: Build Your Instrument
Data Entry Forms and Surveys

Creating a Data Entry Form

The Online Designer

Renaming your Instrument
• The option to rename your instrument is found under “Instrument actions” in the Online Designer.
• Select “rename”, then press when you are happy with your instrument’s new name.

• Selecting your instrument brings you here
• Here you may add, edit, and delete instrument fields
Editing your Instrument

Adding a Field

All Fields Have:• Field Label – The question/instruction displayed on the form: shown to respondents
• Variable Name – How the field appears in the data set: not shown to respondents. Useful for piping
• Required: Mark whether question must be answered if data collection is to continue
• Identifier: Mark whether field contains PHI• Custom Alignment• Field Note: Shown to respondents• Field Annotation: Not shown to respondents

Text Fields• Two text fields: Text Box, and Notes Box• Only the Text Box field offers validation options
• Let’s make a new text field

Our Instrument So Far• After saving the field, we return to the Online Designer page. We can see our instrument’s new field:

Let’s change:• The Field Type from Notes Box to
Text Box
• The Variable Name
• The Validation
Now let’s our new field

Our Instrument So Far

Yes – No, and True – False

Multiple Choice and Checkboxes
• Multiple Choice: Single‐answers via Drop‐down List or Radio Buttons
• Checkboxes: Multiple‐answers

Begin New Section

Descriptive Text

Slider Scale

Calculated Fields

File Upload

Signature

Branching Logic
• Used to show questions under certain conditions
• This branching logic states the field will only show if the email2 variable field is not null (aka it has something in it)

Adding a New Record

Data Entry
• This is what our newly created data collection instrument looks like to data entry personnel.

Incomplete, Unverified, Complete

Creating a Survey
Let’s turn that data entry form we just created into a survey!

Return to Project Setup
And then back to the Online Designer:

Enable Instrument as Survey
You’ll be taken to the “Set Up My Survey” page, where you can choose the:• Survey Design Options• Survey Customizations• Survey Access• Survey Termination Options

Survey Design Options
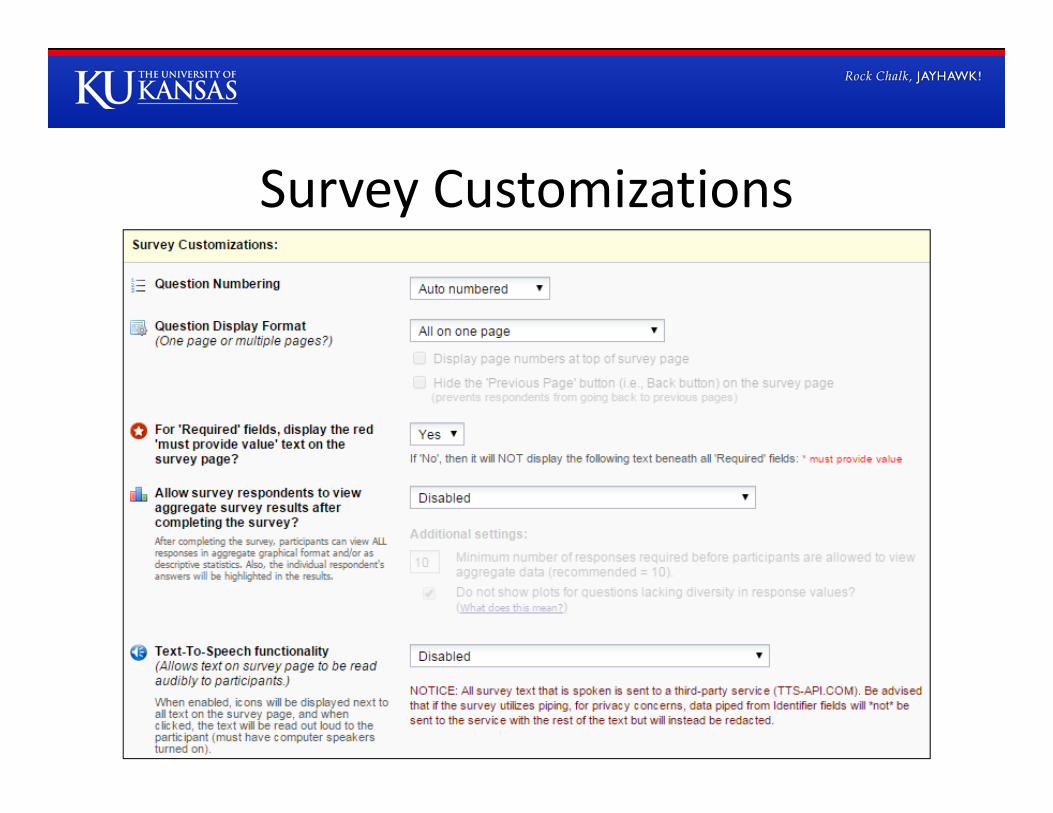
Survey Customizations

Survey Access

Survey Termination Options

Enabled as Survey
• If you would like to disable the instrument as a survey, go to Survey settings, and select “Delete Survey”

Survey Participants• Let’s take a look at our newly‐created survey.

Our Survey

Access Your Survey
There are many ways to provide access to your survey

Composing Invites


Applications
Many different features available for REDCap projects

The Calendar

Applications

Data Exports

Reports
• Pick and choose fields from an instrument to generate a report
• Can be used to filter and sort data

Applications

Data Import
• Download Data Import Template
• Fill in Template• Upload Data
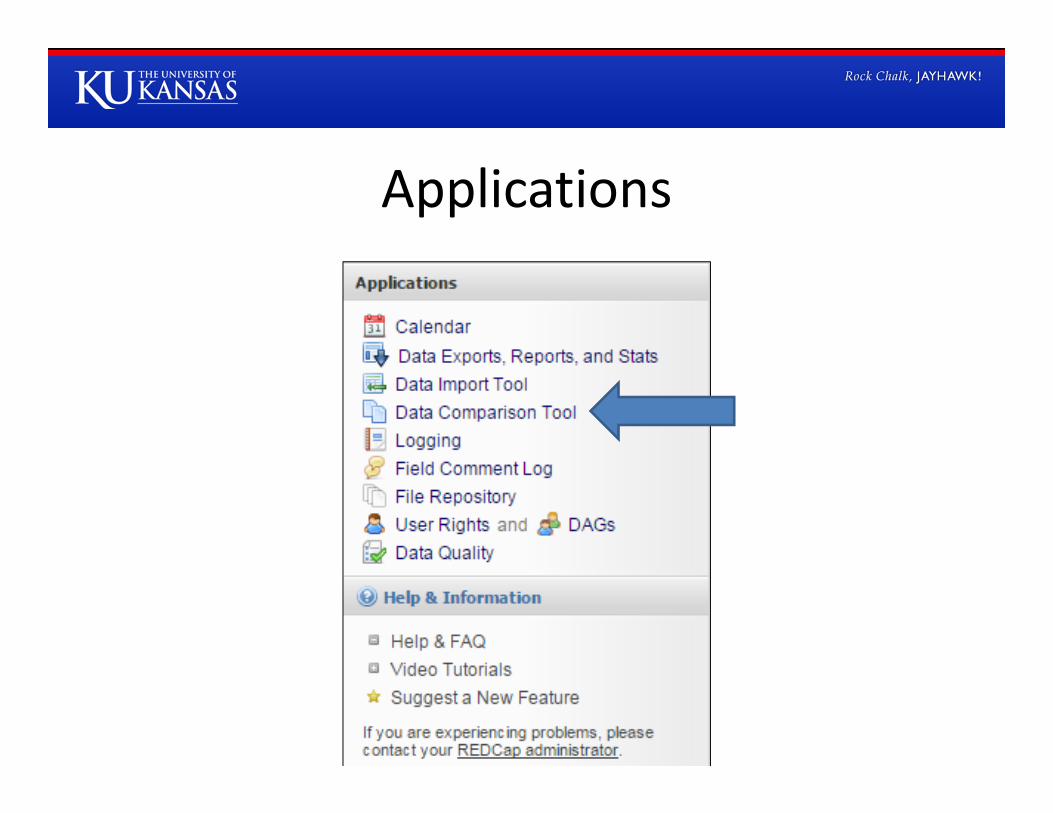
Applications

Data Comparison Tool
Compare two records currently in the project

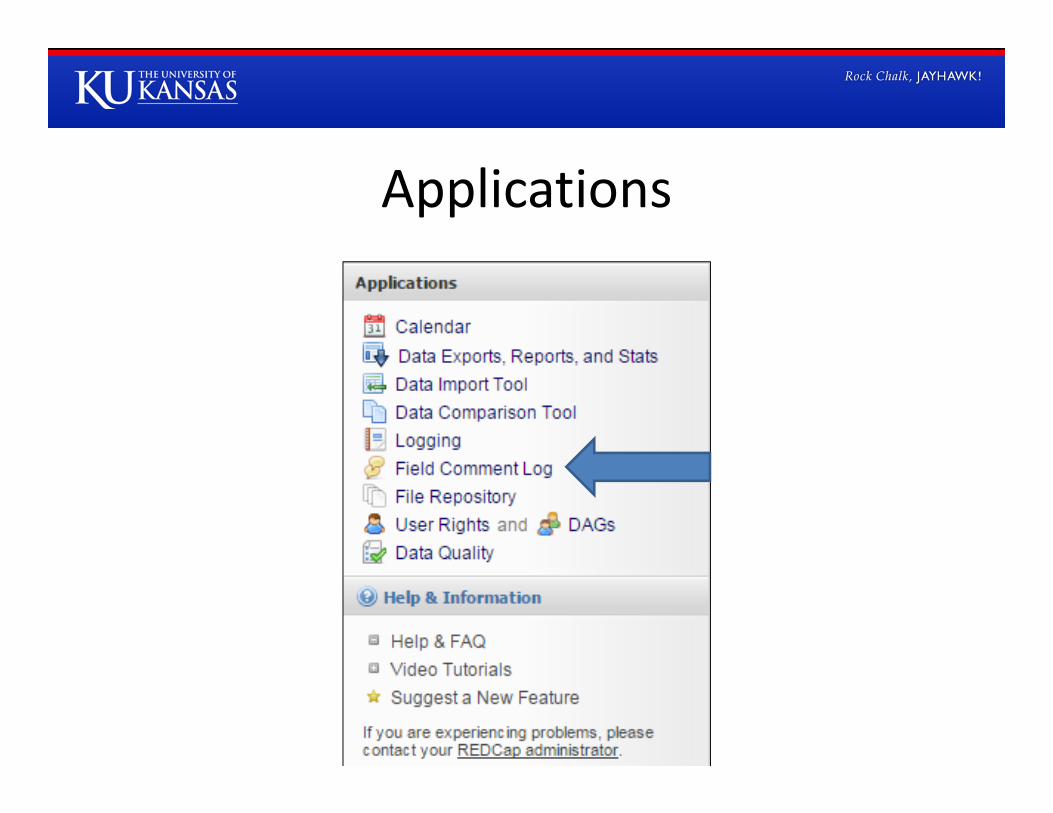
Applications

Logging
• Log of events in a project– Update Record– Create Record– Manage/Design– Data Export
• Log of event time• Username• List of Data Changes
Applications

Applications

File Repository
• All uploaded files can be found here• Can upload file• Can export uploaded files

Applications

User Rights

Applications

Data Access Groups (DAGs)• Assign users to Data Access Groups– Users in a data access group will only be able to see project records created by themselves or other members of their group

Applications

Data Quality

Data Quality

Back to Project Setup

Longitudinal Data Collection

Longitudinal Data Collection
• After enabling Longitudinal Data Collection, you’ll see a new section appear in your main project settings.

Define Events
• Events– Able to define unlimited number of events per project
• Arms– Able to group events into arms

Designate Instruments for My Events
• After you save, the selected instrument will be utilized for the event “Event 1”

Optional Modules and Customizations
• Scheduling Module: enables auto‐generated project calendar scheduling based on project‐defined events
• Randomization Module: Allows you to define randomization parameters to randomize subjects (i.e. records in a project)
• Designate an email field: Populate participant list through a data collection instrument

Designating an Email Field• After enabling the
“designate an email field” setting, this screen will pop‐up allowing you to select the field which will gather emails.
• This field can only be a text‐box field, that is email‐validated. No other field will work with this setting.
• In our case, it is the field with the “email2” variable.

Successful Email Designation
• Success! • Now emails entered into this field will populate your participants list.
• It does not matter if the field exists in a survey or data entry form.

Randomization Modules
• Another new section will appear after enabling randomization modules

Setting Up Randomization ModulesStep One
• Stratified randomization:– Ensures equal treatment among a number of factors
• By Group:– Randomize via group
• Choose Field

Setting Up Randomization ModulesStep Two
What Example #3 Looks Like for our Nachos Question

Setting Up Randomization ModulesStep Three
Upload your Allocation Table to complete randomization

Randomization Dashboard

Project Setup

Project Setup

Setup Project Bookmarks
Create bookmarks to websites

Project Setup

User Rights and Permissions
Another route of assigning User Rights and DAGs in a project

Project Setup

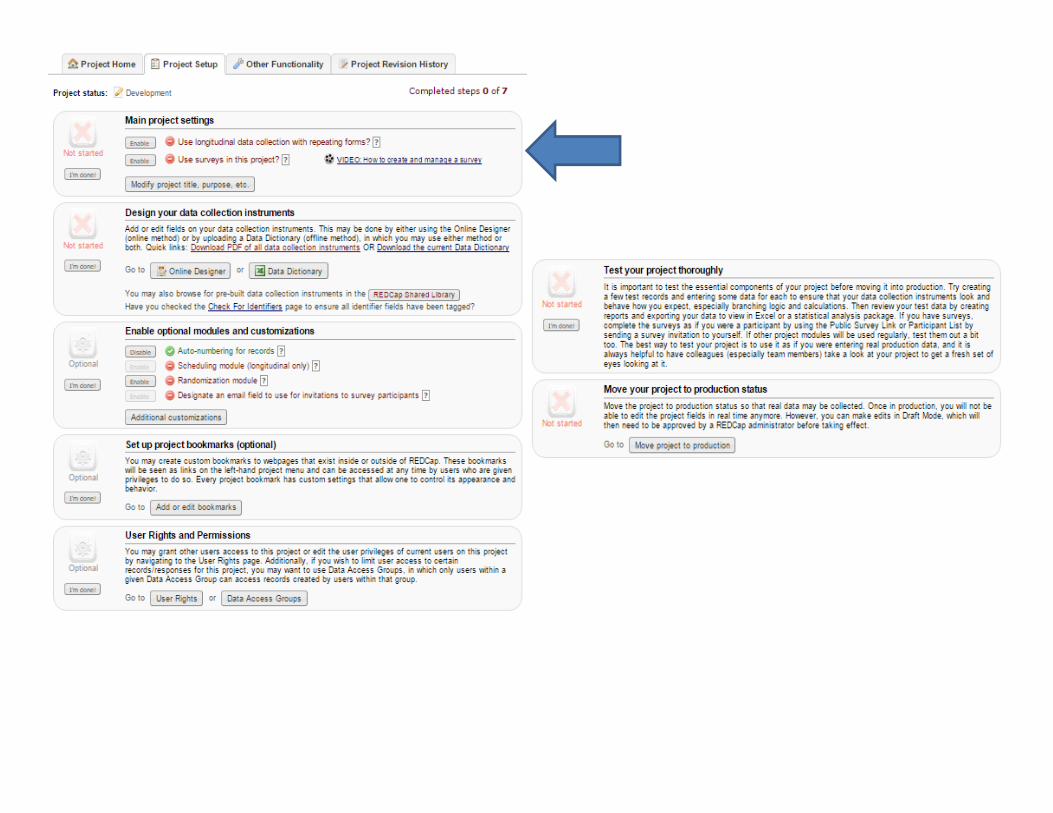
Before Moving Project to Production
• Check sections as they are completed• Test your project thoroughly
– Edits made in production must be reviewed and approved by me before taking effect in your project

Moving Projects to Production
If using randomization, make sure you also uploaded an allocation table for use in production. It cannot be a duplicate of the table used for development.

Congratulations!
• Your project is now in production, which means you can start collecting real data for your project!

Advanced FeaturesThese are some features REDCap Administrators can enable for your survey:• Double Data Entry (DDE):
– Have someone enter data, and then have it be double checked for errors before it is officially a part of your data‐set
• API:– “Application Programming Interface”, allows external software to
programmatically download and upload data into REDCap Projects• REDCap Mobile:
– App that can be used without wireless or internet connectivity to collect data on device, and send data back to project on REDCapserver once the device is back online

New Features
• Improved Data Import Tool– Allow blank values to overwrite existing saved values
• REDCap Mobile• Instrument ZIP Download and Upload• Field Annotation• Project Notes