res it store integration guide - microsoft office...
TRANSCRIPT
1 RES IT Store Integration Guide: Office365
RES IT Store Integration Guide: Office 365

2 RES IT Store Integration Guide: Office365
Disclaimer
Whilst every care has been taken by RES Software to ensure that the information contained in this document is correct and complete, it is possible
that this is not the case. RES Software provides the information "as is", without any warranty for its soundness, suitability for a different purpose or
otherwise. To the maximum extent permitted by applicable law, RES Software is not liable for any damage which has occurred or may occur as a
result of or in any respect related to the use of this information. RES Software may change or terminate this document at any time without further
notice and shall not be responsible for any consequence(s) arising there from. Subject to this disclaimer, RES Software is not responsible for any
contributions by third parties to this information.
Copyright Notice
Copyright © on software and all Materials 1998-2014 Real Enterprise Solutions Development B.V., P.O. Box 33, 5201 AA `s-Hertogenbosch, The
Netherlands. RES and the RES Software Logo are either registered trademarks or service marks of Real Enterprise Solutions Nederland B.V. in
Europe, the United States and other countries. RES Automation Manager, RES Workspace Manager, RES Suite, RES Virtual Desktop Extender,
RES IT Store and RES VDX are trade names of Real Enterprise Solutions Nederland B.V. in Europe, the United States and other countries. All
other product and company names mentioned may be trademarks and/or service marks of their respective owners. Real Enterprise Solutions
Development B.V., The Netherlands has the following patents: U.S. Pat. "US 7,433,962", "US 7,565,652", "US 7,725,527", other patents pending or
granted.
3 RES IT Store Integration Guide: Office365
TABLE OF CONTENTS:
Introduction ....................................................................................................................................................... 4
Use Case Overview ........................................................................................................................................ 5
Configuring RES IT Store Integration – Step by step ................................................................................ 7
Prerequisites .................................................................................................................................................... 8
Global Variables .............................................................................................................................................. 9
Modules .......................................................................................................................................................... 10
Run Books ...................................................................................................................................................... 13
Organizational Context ................................................................................................................................. 17
Organizational Attributes .............................................................................................................................. 18
Service Catalog ............................................................................................................................................. 20
Organizational Attributes – Setup Plans .................................................................................................... 25
Service Catalog…continues ........................................................................................................................ 26
More information............................................................................................................................................ 39

4 RES IT Store Integration Guide: Office365
Introduction
This document describes how you can manage Microsoft Office 365 services for your users by configuring
integration with RES IT Store.
RES IT Store uses existing automation functionality in RES Automation Manager to provide three layers of
interaction with Office 365 cloud service: Auto Provisioning, Self-Servicing and Administration.
Office 365 is a subscription-based online office and software plus services suite which offers access to
various services and software built around the Microsoft Office platform.
The service is designed to provide hosted e-mail, social networking and collaboration, and cloud storage to
teams and businesses. It includes hosted versions of Exchange, Lync, SharePoint, Office Web Apps, along
with access to the Microsoft Office desktop applications. Office 365 is available in a number of different
subscription plans aimed at different needs and market segments, providing different sets of features.
The key benefits of the integration are:
Advanced Admin Features: Permanently remove deleted users
Seamless automated user on-board/off-board process for Office 365
Automated Office 365 user account enable/disable process.
Automated Office 365 user’s plan management tailored to your enterprise
Self-Service Office 365’s plans tailored to your end-user needs
Set geographical user location for compliancy
This document assumes that you have basic knowledge of RES IT Store 2014, RES Automation Manager
2014 and Office 365.

5 RES IT Store Integration Guide: Office365
Use Case Overview
Auto Provisioning
Use Case 1: Office 365 Account
This RES IT Store service automatically creates users in Office 365. The process first checks if an account
is found against its email address. If an account is found among the deleted users, it will recover the user
account restoring its original configuration. If an account is found among the active users, it will unlock
access to the account.
If no account is found, the process will create a new Office 365 user account and assign a license to it.
A temporary password is sent to the newly created user via the RES IT Store web portal and/or e-mail.
When people no longer qualify for this service, its return can automatically lock access to the Office 365
account, or delete the user account with a retention policy of 30 days.
Use Case 2: Geographical Usage Location
This RES IT Store service set an existing Office 365 User account to a specific worldwide location, based
on an RES IT Store user Organizational context and Organizational attribute.
The new geographical usage location is notified to the user via the RES IT Store web portal and/or e-mail.
Use Case 3: Disable Office 365 Account Access
This RES IT Store service locks access to the Office 365 account, based on an RES IT Store
Organizational context.
When a user no longer qualifies for this service, its return will unlock access to the user’s Office 365
account.
Use Case 4: Online Plans (Exchange, Lync, Office Professional, Office Web Apps, SharePoint)
These RES IT Store services automatically assign their named Office 365 service plan to an Office 365
account based on pre-configured RES IT Store Organizational contexts.
When a user no longer qualifies for these services, the return of the service will remove their named service
plan from a user’s Office 365 account.
Self-Servicing
Use Case 5: Office 365 Account On-Demand
This RES IT Store self-service creates a user account into Office 365 for the subscriber. The process
follows the same logic as the Office 365 Account service in use case 1.
A temporary password is sent to the service’s subscriber via the RES IT Store web portal and/or e-mail.
When this service is returned, it can lock access to the subscriber’s Office 365 account, or delete the user
account with a retention policy of 30 days.

6 RES IT Store Integration Guide: Office365
Use Case 6: On-Demand Plans (Exchange, Lync, Office Professional, Office Web Apps, SharePoint)
These RES IT Store self-services assign on demand, their named Office 365 service plan to the subscriber
Office 365 account.
When these services are returned, their named service plan is removed from the subscriber’s Office 365
account.
7 RES IT Store Integration Guide: Office365
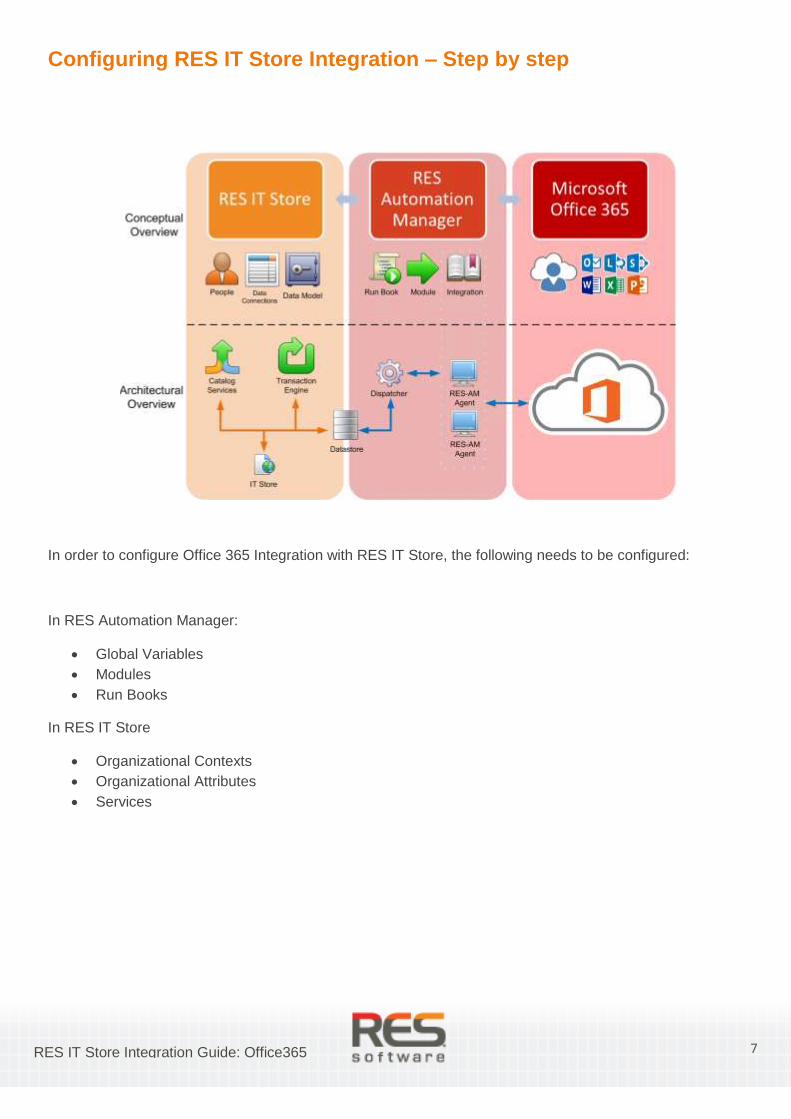
Configuring RES IT Store Integration – Step by step
In order to configure Office 365 Integration with RES IT Store, the following needs to be configured:
In RES Automation Manager:
Global Variables
Modules
Run Books
In RES IT Store
Organizational Contexts
Organizational Attributes
Services
8 RES IT Store Integration Guide: Office365
Prerequisites
RES IT Store 2014
RES Automation Manager 2014
Microsoft Windows PowerShell 3.0 installed on the RES Automation Manager Agent(s) that will
interact with Office 365
(http://www.microsoft.com/en-gb/download/details.aspx?id=34595)
Windows Azure Active Directory Module for Windows PowerShell installed on the RES Automation
Manager Agent(s) that will interact with Office 365
32bit (http://go.microsoft.com/fwlink/p/?linkid=236298)
64bit (http://go.microsoft.com/fwlink/p/?linkid=236297)
Microsoft Online Services Sign-In Assistant for IT Professionals RTW installed on the RES
Automation Manager Agent(s) that will interact with Office 365
(http://www.microsoft.com/en-us/download/details.aspx?id=28177)
You need the BETA version at: http://www.microsoft.com/en-us/download/details.aspx?id=39267. If
you would use the RTW version, the PowerShell Modules used in this document will not install.
Office 365 Global Administrator Role account
Administrative knowledge about Office 365
9 RES IT Store Integration Guide: Office365
Global Variables
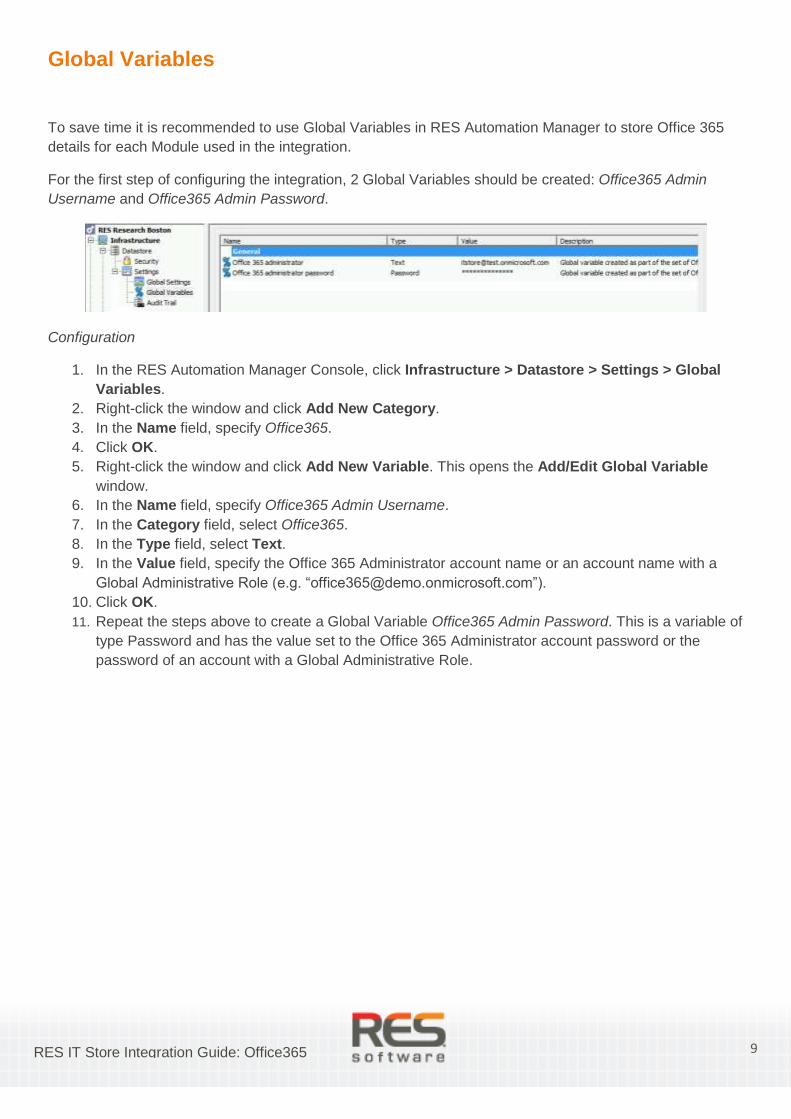
To save time it is recommended to use Global Variables in RES Automation Manager to store Office 365
details for each Module used in the integration.
For the first step of configuring the integration, 2 Global Variables should be created: Office365 Admin
Username and Office365 Admin Password.
Configuration
1. In the RES Automation Manager Console, click Infrastructure > Datastore > Settings > Global
Variables.
2. Right-click the window and click Add New Category.
3. In the Name field, specify Office365.
4. Click OK.
5. Right-click the window and click Add New Variable. This opens the Add/Edit Global Variable
window.
6. In the Name field, specify Office365 Admin Username.
7. In the Category field, select Office365.
8. In the Type field, select Text.
9. In the Value field, specify the Office 365 Administrator account name or an account name with a
Global Administrative Role (e.g. “[email protected]”).
10. Click OK.
11. Repeat the steps above to create a Global Variable Office365 Admin Password. This is a variable of
type Password and has the value set to the Office 365 Administrator account password or the
password of an account with a Global Administrative Role.
10 RES IT Store Integration Guide: Office365
Modules
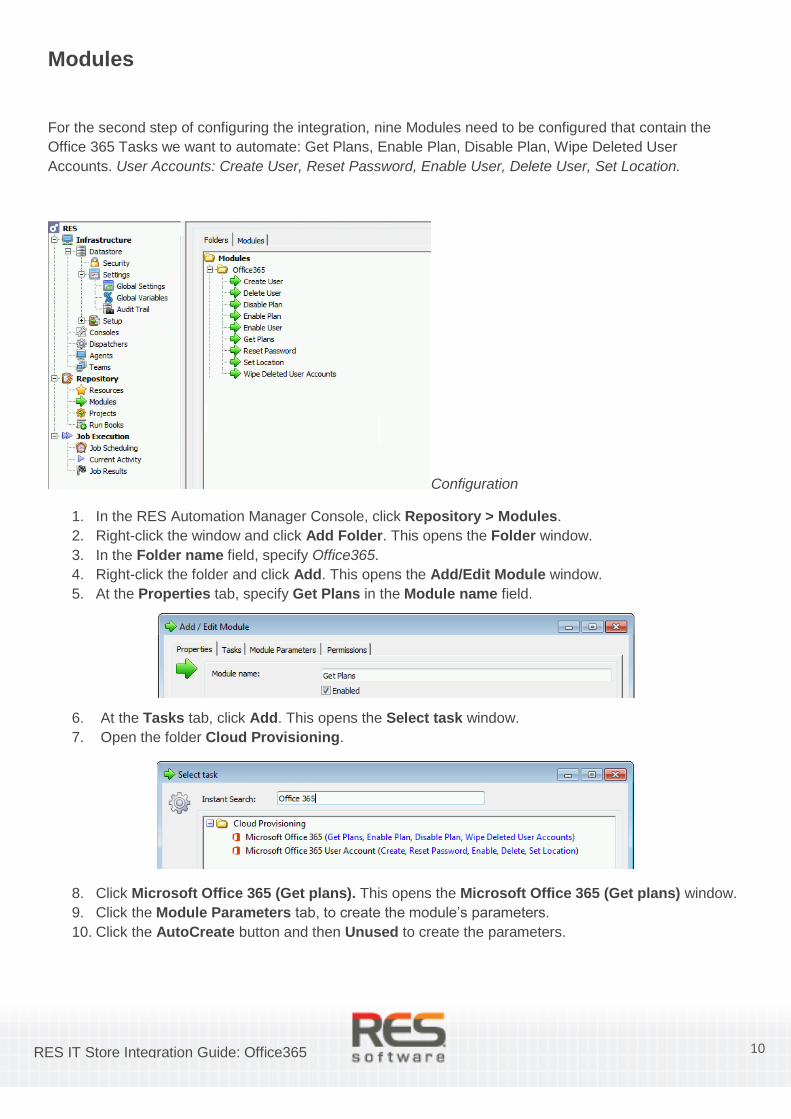
For the second step of configuring the integration, nine Modules need to be configured that contain the
Office 365 Tasks we want to automate: Get Plans, Enable Plan, Disable Plan, Wipe Deleted User
Accounts. User Accounts: Create User, Reset Password, Enable User, Delete User, Set Location.
Configuration
1. In the RES Automation Manager Console, click Repository > Modules.
2. Right-click the window and click Add Folder. This opens the Folder window.
3. In the Folder name field, specify Office365.
4. Right-click the folder and click Add. This opens the Add/Edit Module window.
5. At the Properties tab, specify Get Plans in the Module name field.
6. At the Tasks tab, click Add. This opens the Select task window.
7. Open the folder Cloud Provisioning.
8. Click Microsoft Office 365 (Get plans). This opens the Microsoft Office 365 (Get plans) window.
9. Click the Module Parameters tab, to create the module’s parameters.
10. Click the AutoCreate button and then Unused to create the parameters.
11 RES IT Store Integration Guide: Office365
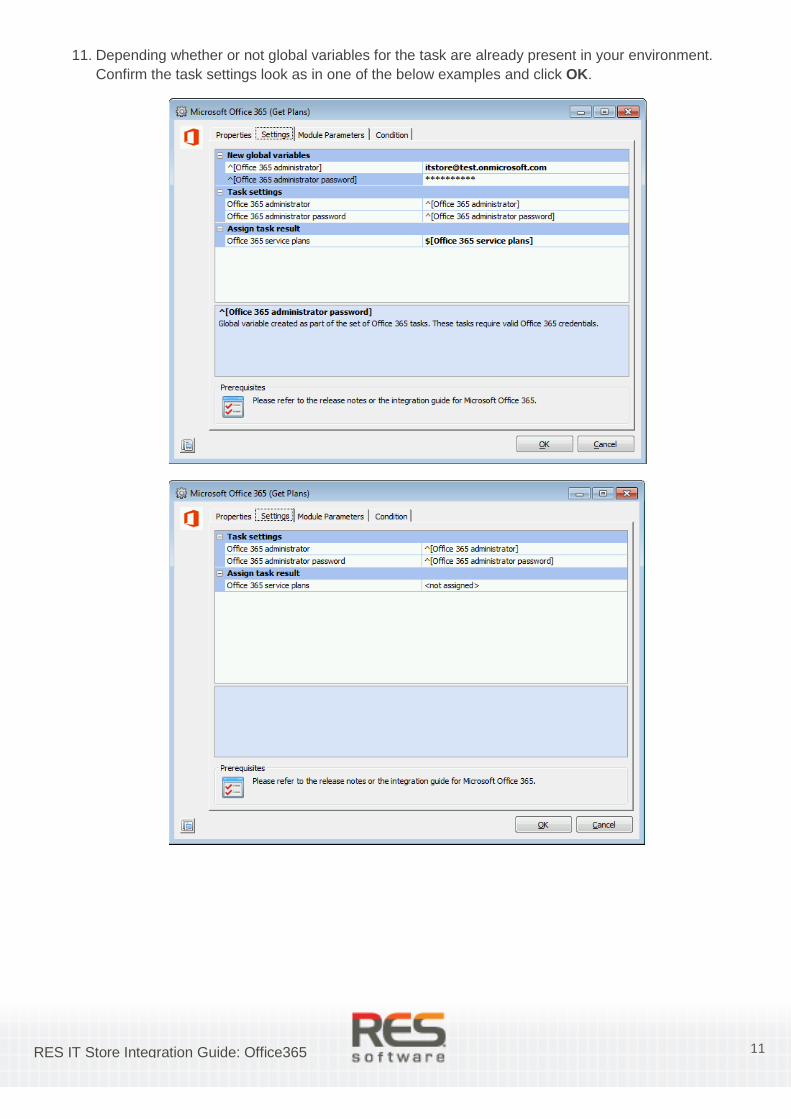
11. Depending whether or not global variables for the task are already present in your environment.
Confirm the task settings look as in one of the below examples and click OK.
12 RES IT Store Integration Guide: Office365
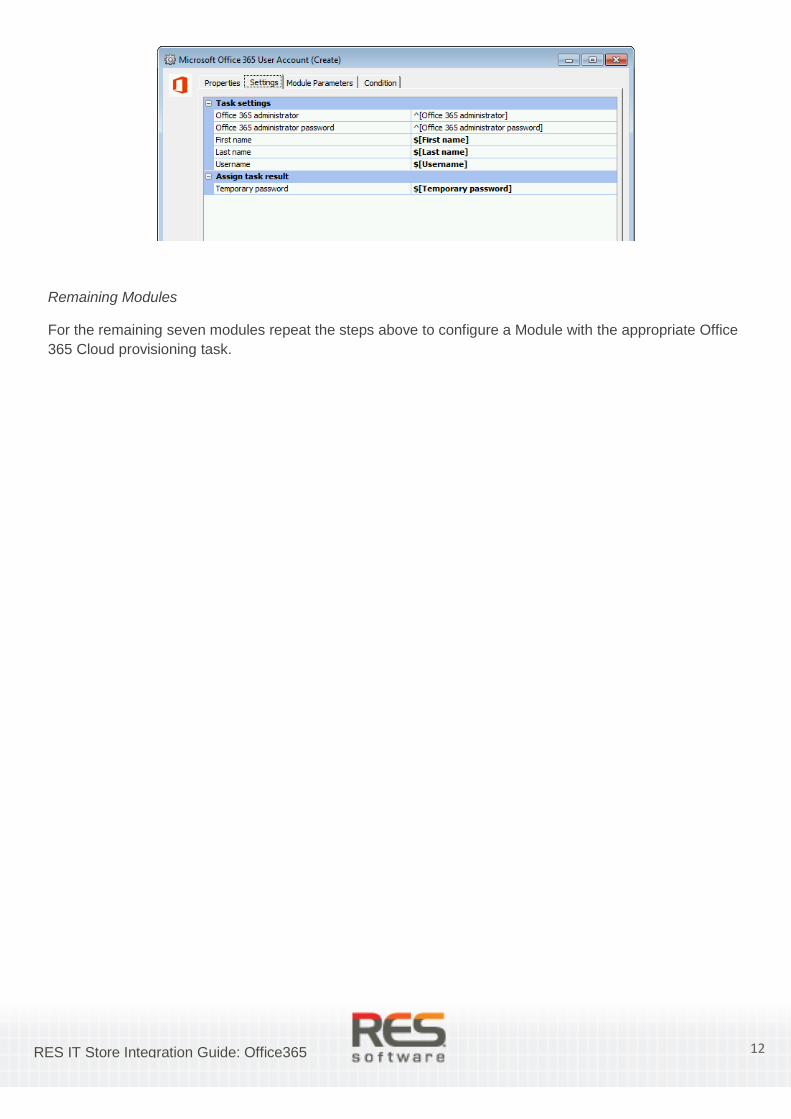
Remaining Modules
For the remaining seven modules repeat the steps above to configure a Module with the appropriate Office
365 Cloud provisioning task.
13 RES IT Store Integration Guide: Office365
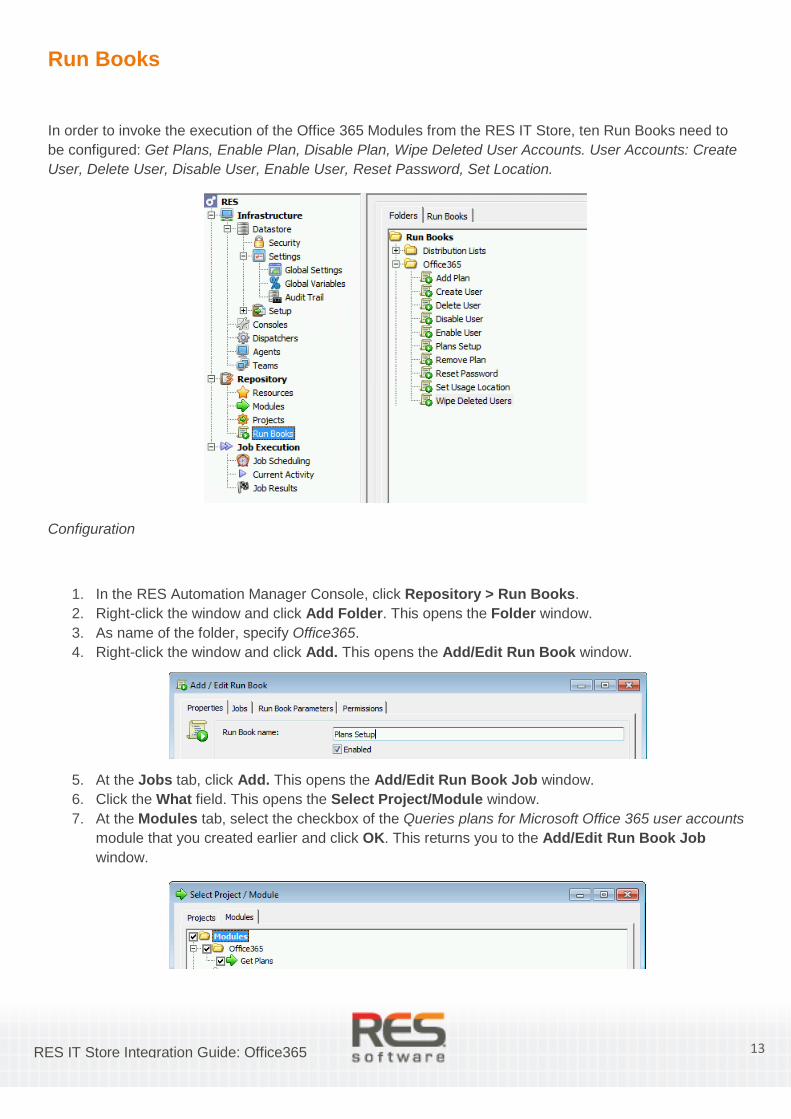
Run Books
In order to invoke the execution of the Office 365 Modules from the RES IT Store, ten Run Books need to
be configured: Get Plans, Enable Plan, Disable Plan, Wipe Deleted User Accounts. User Accounts: Create
User, Delete User, Disable User, Enable User, Reset Password, Set Location.
Configuration
1. In the RES Automation Manager Console, click Repository > Run Books.
2. Right-click the window and click Add Folder. This opens the Folder window.
3. As name of the folder, specify Office365.
4. Right-click the window and click Add. This opens the Add/Edit Run Book window.
5. At the Jobs tab, click Add. This opens the Add/Edit Run Book Job window.
6. Click the What field. This opens the Select Project/Module window.
7. At the Modules tab, select the checkbox of the Queries plans for Microsoft Office 365 user accounts
module that you created earlier and click OK. This returns you to the Add/Edit Run Book Job
window.
14 RES IT Store Integration Guide: Office365
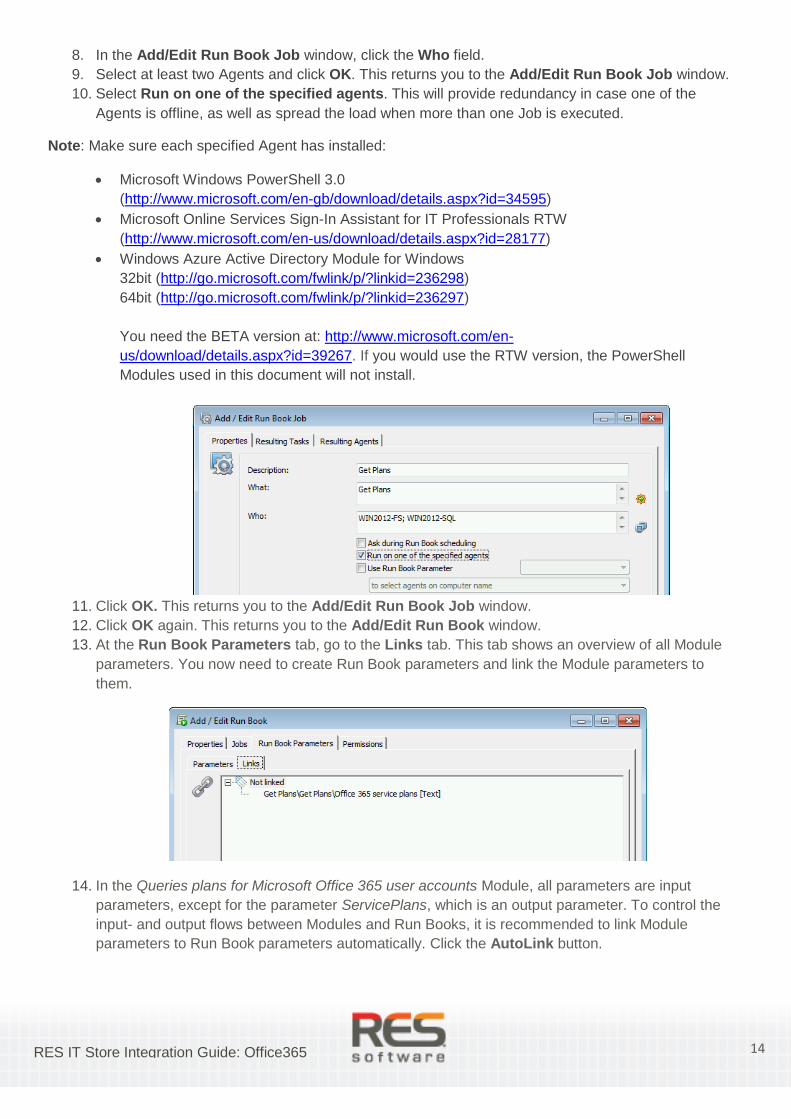
8. In the Add/Edit Run Book Job window, click the Who field.
9. Select at least two Agents and click OK. This returns you to the Add/Edit Run Book Job window.
10. Select Run on one of the specified agents. This will provide redundancy in case one of the
Agents is offline, as well as spread the load when more than one Job is executed.
Note: Make sure each specified Agent has installed:
Microsoft Windows PowerShell 3.0
(http://www.microsoft.com/en-gb/download/details.aspx?id=34595)
Microsoft Online Services Sign-In Assistant for IT Professionals RTW
(http://www.microsoft.com/en-us/download/details.aspx?id=28177)
Windows Azure Active Directory Module for Windows
32bit (http://go.microsoft.com/fwlink/p/?linkid=236298)
64bit (http://go.microsoft.com/fwlink/p/?linkid=236297)
You need the BETA version at: http://www.microsoft.com/en-
us/download/details.aspx?id=39267. If you would use the RTW version, the PowerShell
Modules used in this document will not install.
11. Click OK. This returns you to the Add/Edit Run Book Job window.
12. Click OK again. This returns you to the Add/Edit Run Book window.
13. At the Run Book Parameters tab, go to the Links tab. This tab shows an overview of all Module
parameters. You now need to create Run Book parameters and link the Module parameters to
them.
14. In the Queries plans for Microsoft Office 365 user accounts Module, all parameters are input
parameters, except for the parameter ServicePlans, which is an output parameter. To control the
input- and output flows between Modules and Run Books, it is recommended to link Module
parameters to Run Book parameters automatically. Click the AutoLink button.

15 RES IT Store Integration Guide: Office365
15. When prompted whether also to create Run Book parameters automatically, click Yes. This
automatically creates all necessary Run Book parameters and links the corresponding Module
parameters. By default, all Module parameters will be linked to the Run Book parameters as input
parameters. Please note that the Office 365 Admin Username and Password need to be
unlinked.
16. Select the Module parameter ServicePlans and click Action > Get final value. Notice that the
direction of the link arrow will change and now points to the left:
17. Click OK.

16 RES IT Store Integration Guide: Office365
.
Remaining Run Books
For the remaining Run Books, Create User, Add Plan, Delete User, Disable User & Enable User,
Password, Remove Plan, Set Usage Locations and Wipe Deleted Users, repeat the previous steps to
configure a Run Book with a Module Enable Plan, a Run Book with a Module Delete User Account, two
Run Books with a Module Enable User Account, a Run Book with a Module User Account Password, a Run
Book with a Module Disable Plan, a Run Book with a Module User Location and a Run Book with a Module
Wipe Deleted User Accounts. Link the input parameters in these Run Books in the same manner as
described above. Only the Password Run Book will have an output parameter which is Temporary
Password.

17 RES IT Store Integration Guide: Office365
Organizational Context
Before you can proceed to build Office 365 services in the RES IT Store catalog, new or existing
organizational contexts have to be created or adapted to comply with the Office 365 integration.
Organizational Contexts will be mainly two: Locations and Office 365 Services.
Location will have a list of Countries and each country a list of cities.
Office 365 Services will have a list of services.
Below is an example of organization that we are going to use as an example.
Create new organizational contexts or adapt existing ones accordingly.
Office 365 Services will need seven sub-contexts to control the integration.
Location can contain as many Countries and Cities as needed.

18 RES IT Store Integration Guide: Office365
Organizational Attributes
Organizational attributes are needed by the Office 365 services in the RES IT Store catalog, to comply with
the Office 365 integration services.
The attributes needs to match the ones details in this document and need to be created as new attributes.
Each Attribute will be assigned to an Organizational Context you have created before or to an adapted one.
1. In the RES IT Store Console, click the menu bar Setup section. Select Data Model and click
Organizational Attributes. This opens the Organizational Attributes window.
2. Click Add.
3. In the Name field, specify Country Code.
4. In the Organizational Context field, choose Location or the root of an existing context organizing
countries and cities.
5. Click OK.
Repeat the same procedure for the remaining organizational attributes: Exchange Code, Lync Code, Office
Professional Code, Office Web Apps Code, SharePoint Code, and assign them to the Office 365 Services
organization.
19 RES IT Store Integration Guide: Office365
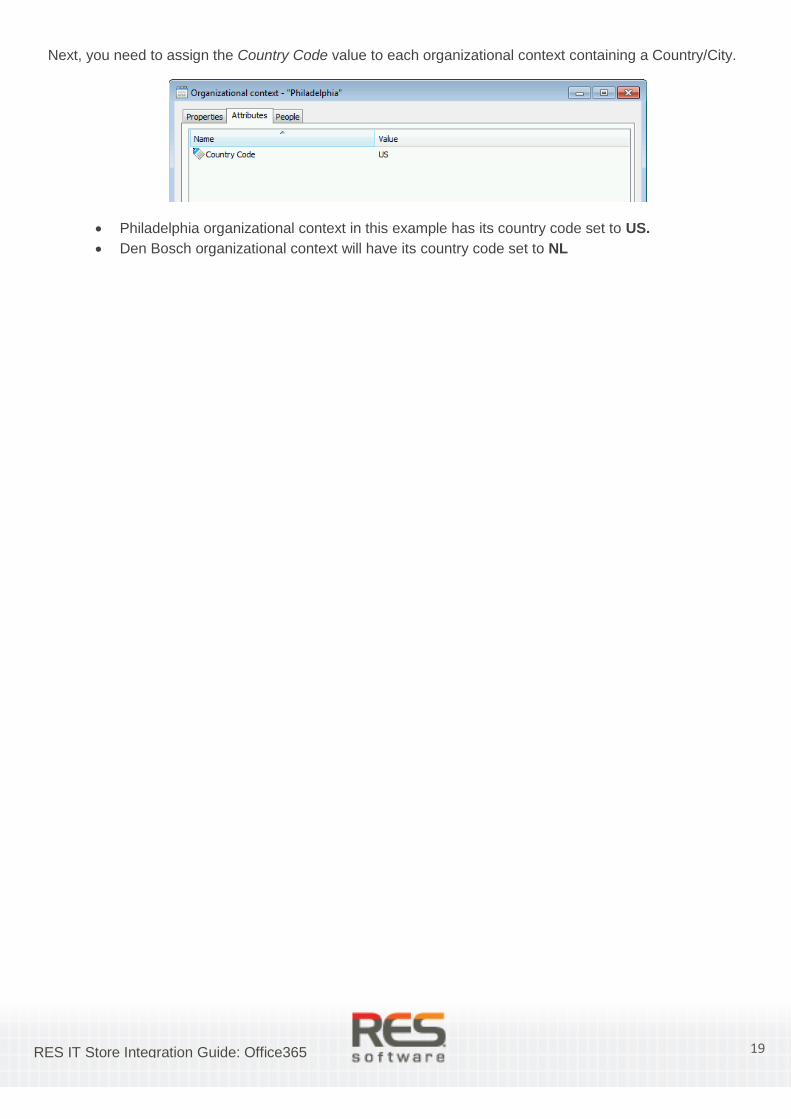
Next, you need to assign the Country Code value to each organizational context containing a Country/City.
Philadelphia organizational context in this example has its country code set to US.
Den Bosch organizational context will have its country code set to NL
20 RES IT Store Integration Guide: Office365
Service Catalog
Seventeen services in three categories need to be configured in RES IT Store to support Office 365:
Administration: Empty Deleted Users, Office365 Plans – Setup.
Auto Provisioning, Account: Disable Account Access, Geographical Usage Location, User Account.
Auto Provisioning, Plans: Exchange Online, Lync Online, Office Professional Online, Office Web Apps
Online and SharePoint Online.
Self-Servicing, Account: User Account On-Demand, Password.
Self-Servicing Plans: Exchange On-Demand, Lync On-Demand, Office Professional On-Demand, Office
Web Apps On-Demand and SharePoint On-Demand.
Before you configure services, make sure RES Automation Manager Integration is enabled (in the RES
IT Store Console at Setup > RES Automation Manager).
Administration: Plans Setup
1. In the RES IT Store Console, click the Service Catalog section.
Before you configure services, it is recommended to create a category for it, to help users to easily
classify services within their RES IT Store portal page.
2. Click Add category. This opens the Category window.
3. In the Name field, specify Office365.
4. Click OK.
5. Right-click the folder you just created and click Add category. This opens the Category window.
6. In the Name field, specify Administration.
7. Click OK.
8. Right-click the Office365 folder again and click Add category. This opens the Category window.
9. In the Name field, specify Auto Provisioning.
10. Click OK.
11. Right-click the Office365 folder one last time and click Add category. This opens the Category
window.
12. In the Name field, specify Self Servicing.
13. Click OK.
14. Right-click the Office365/Administration folder and click Add service. This opens the Service
window.
15. At the Properties tab, specify Plans Setup in the Name field.
16. In the Description field, specify a description for the service.
17. Leave the other settings as they are. If necessary, you can always change these settings at a later
stage.

21 RES IT Store Integration Guide: Office365
18. Optionally, add screenshots of the Office365 Plans Setup on the Screenshots tab. These
screenshots allow you to provide more detailed information on the service in the RES IT Store.
19. At the Qualification tab, specify which criteria a person must meet before this person qualifies to
the service. In the example below, only the administrator has access to the service, but you can also
give specific people access. This service is however just used to discover the available Office 365
plans in the company, so only Office 365 administrators or administrative group should qualify for
this service.

22 RES IT Store Integration Guide: Office365
20. At the Attributes tab, add the following service attribute. This attribute is needed later on for the
Return Parameter in the Invoke Run Book workflow action:
Service Plans. Type: List.
o Add one value: None with description None
o In the Display field, select None.
o In the Initial value field, select None –.
The Attributes tab should now contain the following:
Next, you need to configure the workflow of the service. The delivery or return of a service happens
according to a sequence of actions: the workflow. Each workflow starts with a trigger that specifies
when a service should be delivered or returned.
1. At the tab Workflow > Delivery, double-click the Start Delivery trigger. This opens the Delivery
triggers window.
2. Select the options that are relevant to your situation. In this service, the trigger has to be set to self-
servicing only:
3. When you have configured the delivery trigger, click Add. This opens the Select action window.

23 RES IT Store Integration Guide: Office365
4. Select Invoke Run Book and click OK. This opens the Action “Plans Setup\Invoke Run Book”
window.
5. At the Properties tab, click the browse button in the Run Book field. This opens the Select RES
Automation Manager Run Book window.
6. Select the Run Book Office365 – Plans Setup and click OK.
7. At the Run Book Results tab, assign the return value ServicePlans to the Service attribute Service
Plans:
8. Click OK to close the Action “Invoke Run Book” window. Next, you need to add a Provide
Information action to the delivery workflow before the Invoke Run Book action.
9. Right-click the Start Delivery trigger and click Add. This opens the Select action window.
10. Select Provide Information and click OK. This opens the Action “Plans - Setup\Provide
Information” window.
11. At the Properties tab, leave all settings as they are and click the Service attributes tab.
12. Select the following service attributes Service Plans. Click OK to close the Action “Provide
Information” window.
13. In the delivery workflow, make sure the End Workflow action below the Provide Information
action that you just configured sets the transaction state to Successfully. The delivery workflow
should now contain the following:
When you have configured the delivery workflow, you need to configure the return workflow.
1. On the tab Workflow > Return, double-click the Start Return trigger. This opens the Return
triggers window.
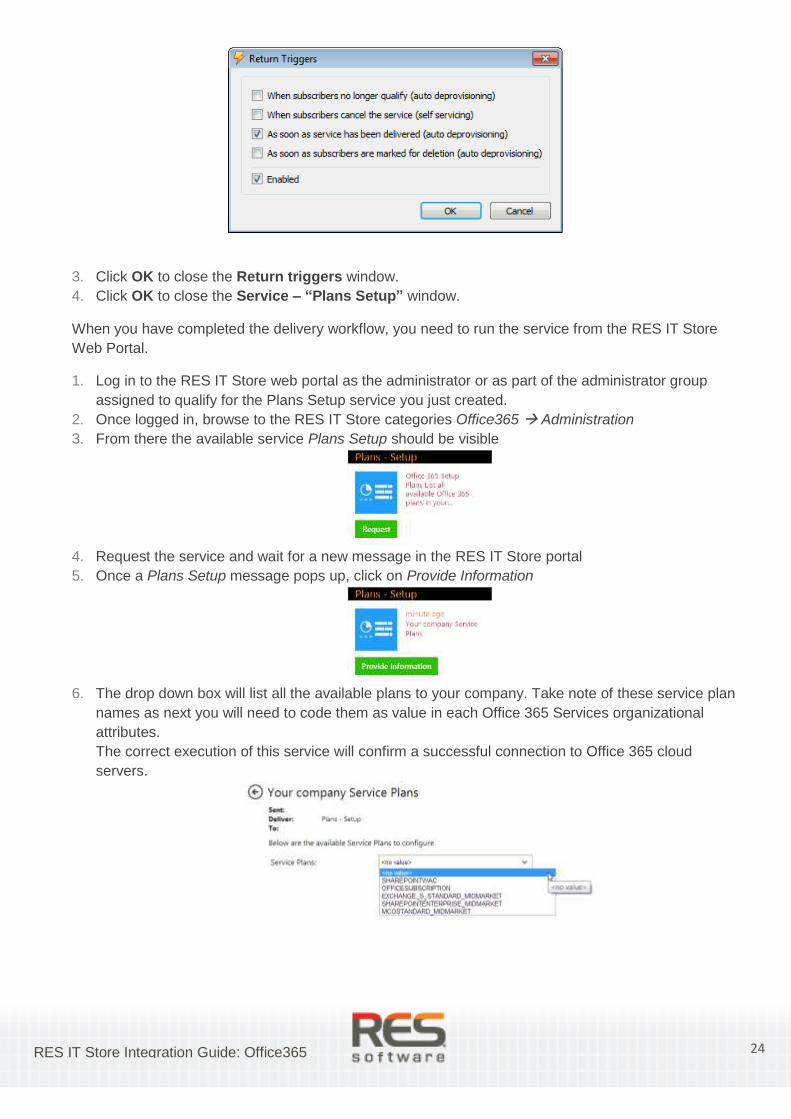
2. Select the options that are relevant to your situation. In this service the trigger has to be set to auto
de-provisioning only:
24 RES IT Store Integration Guide: Office365
3. Click OK to close the Return triggers window.
4. Click OK to close the Service – “Plans Setup” window.
When you have completed the delivery workflow, you need to run the service from the RES IT Store
Web Portal.
1. Log in to the RES IT Store web portal as the administrator or as part of the administrator group
assigned to qualify for the Plans Setup service you just created.
2. Once logged in, browse to the RES IT Store categories Office365 Administration
3. From there the available service Plans Setup should be visible
4. Request the service and wait for a new message in the RES IT Store portal
5. Once a Plans Setup message pops up, click on Provide Information
6. The drop down box will list all the available plans to your company. Take note of these service plan
names as next you will need to code them as value in each Office 365 Services organizational
attributes.
The correct execution of this service will confirm a successful connection to Office 365 cloud
servers.
25 RES IT Store Integration Guide: Office365
Organizational Attributes – Setup Plans
Now that we have all the Office 365 Plans codes, you need to configure each Office 365 Services
Organizational attribute with the right value.
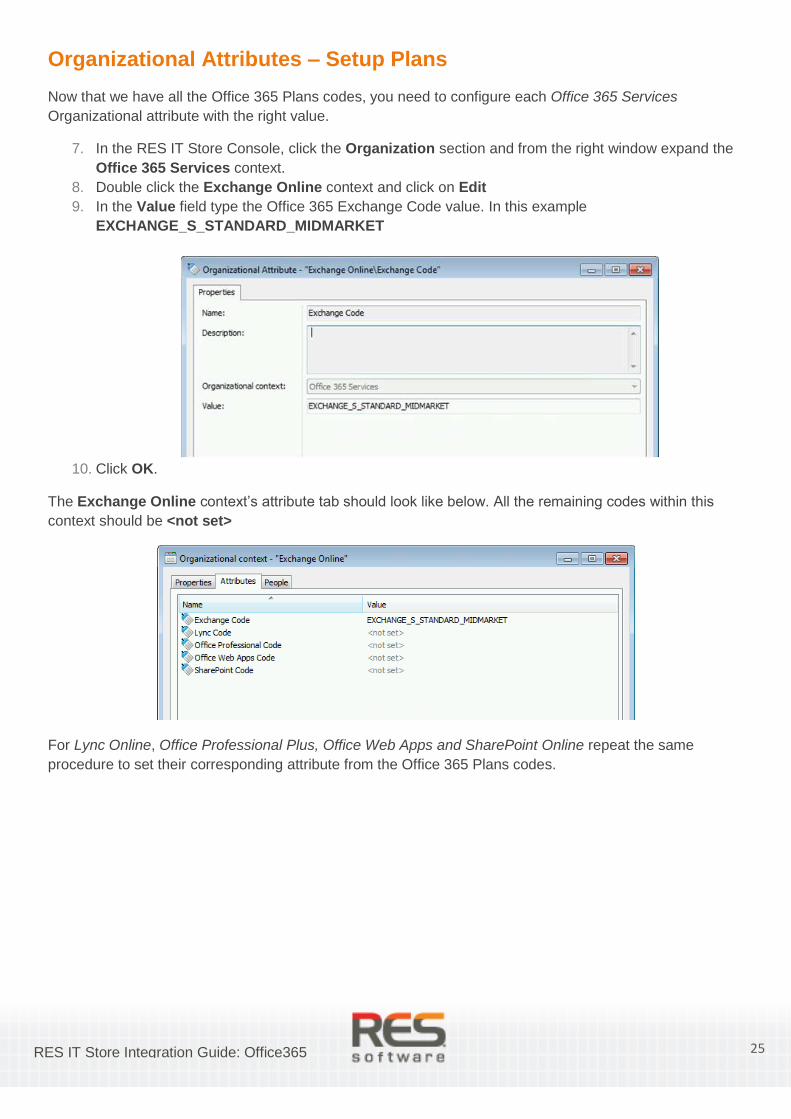
7. In the RES IT Store Console, click the Organization section and from the right window expand the
Office 365 Services context.
8. Double click the Exchange Online context and click on Edit
9. In the Value field type the Office 365 Exchange Code value. In this example
EXCHANGE_S_STANDARD_MIDMARKET
10. Click OK.
The Exchange Online context’s attribute tab should look like below. All the remaining codes within this
context should be <not set>
For Lync Online, Office Professional Plus, Office Web Apps and SharePoint Online repeat the same
procedure to set their corresponding attribute from the Office 365 Plans codes.
26 RES IT Store Integration Guide: Office365
Service Catalog…continues
Auto Provisioning: User Account
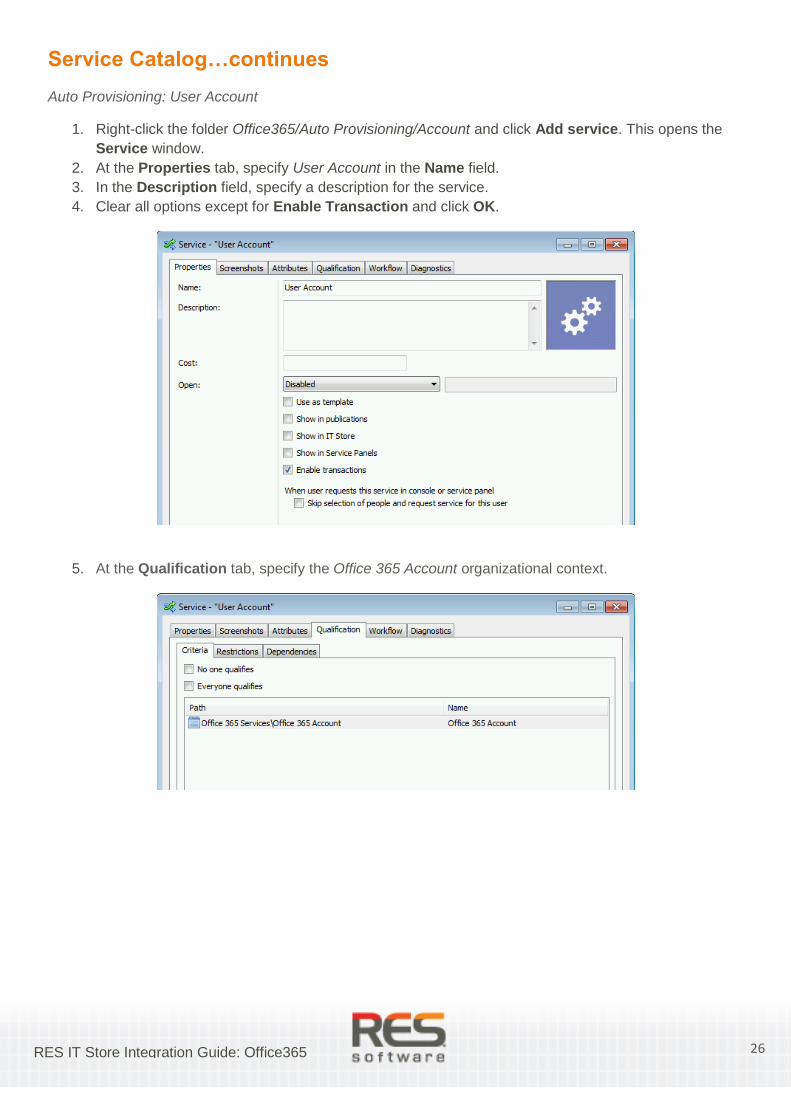
1. Right-click the folder Office365/Auto Provisioning/Account and click Add service. This opens the
Service window.
2. At the Properties tab, specify User Account in the Name field.
3. In the Description field, specify a description for the service.
4. Clear all options except for Enable Transaction and click OK.
5. At the Qualification tab, specify the Office 365 Account organizational context.
27 RES IT Store Integration Guide: Office365
Next, you need to configure the workflow of the service. The delivery or return of a service happens
according to a sequence of actions: the workflow. Each workflow starts with a trigger that specifies
when a service should be delivered or returned.
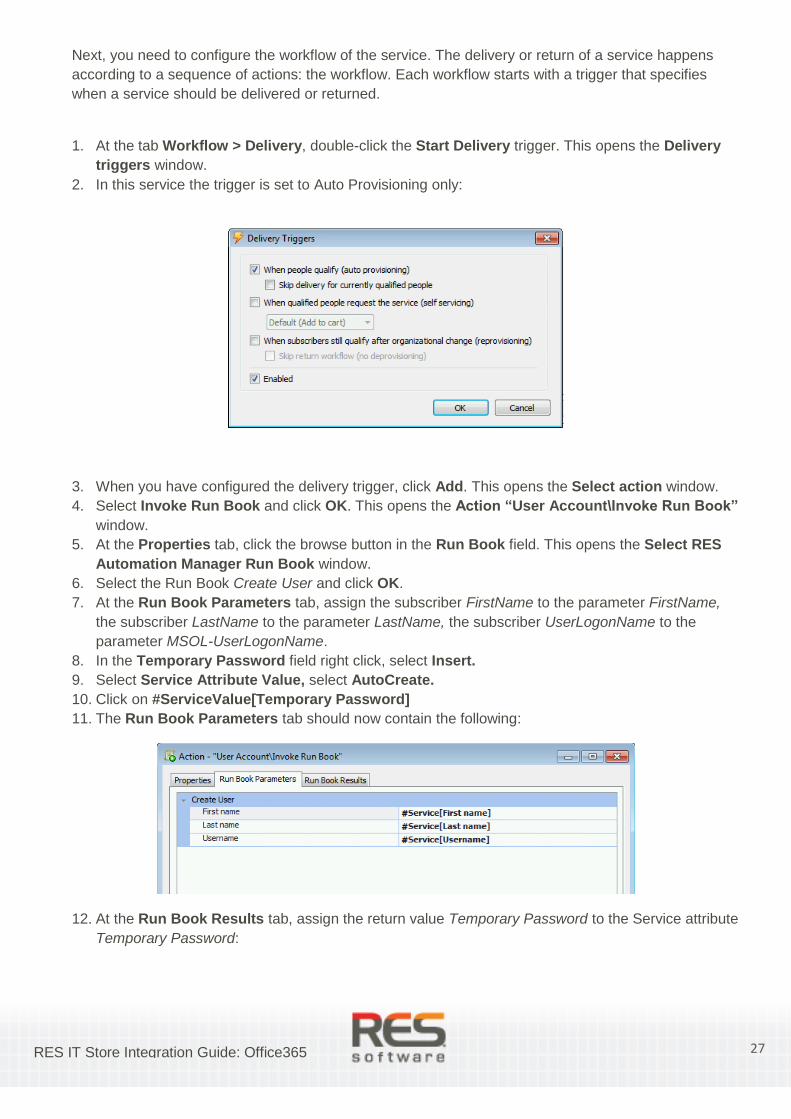
1. At the tab Workflow > Delivery, double-click the Start Delivery trigger. This opens the Delivery
triggers window.
2. In this service the trigger is set to Auto Provisioning only:
3. When you have configured the delivery trigger, click Add. This opens the Select action window.
4. Select Invoke Run Book and click OK. This opens the Action “User Account\Invoke Run Book”
window.
5. At the Properties tab, click the browse button in the Run Book field. This opens the Select RES
Automation Manager Run Book window.
6. Select the Run Book Create User and click OK.
7. At the Run Book Parameters tab, assign the subscriber FirstName to the parameter FirstName,
the subscriber LastName to the parameter LastName, the subscriber UserLogonName to the
parameter MSOL-UserLogonName.
8. In the Temporary Password field right click, select Insert.
9. Select Service Attribute Value, select AutoCreate.
10. Click on #ServiceValue[Temporary Password]
11. The Run Book Parameters tab should now contain the following:
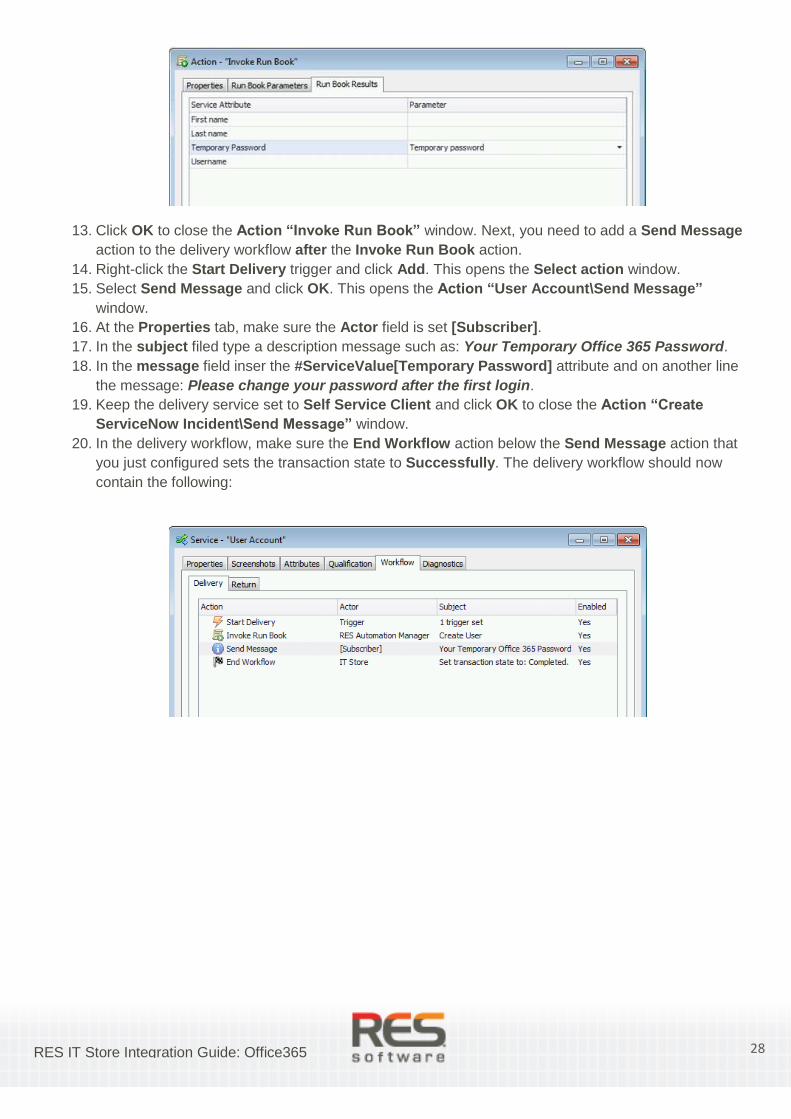
12. At the Run Book Results tab, assign the return value Temporary Password to the Service attribute
Temporary Password:
28 RES IT Store Integration Guide: Office365
13. Click OK to close the Action “Invoke Run Book” window. Next, you need to add a Send Message
action to the delivery workflow after the Invoke Run Book action.
14. Right-click the Start Delivery trigger and click Add. This opens the Select action window.
15. Select Send Message and click OK. This opens the Action “User Account\Send Message”
window.
16. At the Properties tab, make sure the Actor field is set [Subscriber].
17. In the subject filed type a description message such as: Your Temporary Office 365 Password.
18. In the message field inser the #ServiceValue[Temporary Password] attribute and on another line
the message: Please change your password after the first login.
19. Keep the delivery service set to Self Service Client and click OK to close the Action “Create
ServiceNow Incident\Send Message” window.
20. In the delivery workflow, make sure the End Workflow action below the Send Message action that
you just configured sets the transaction state to Successfully. The delivery workflow should now
contain the following:
29 RES IT Store Integration Guide: Office365
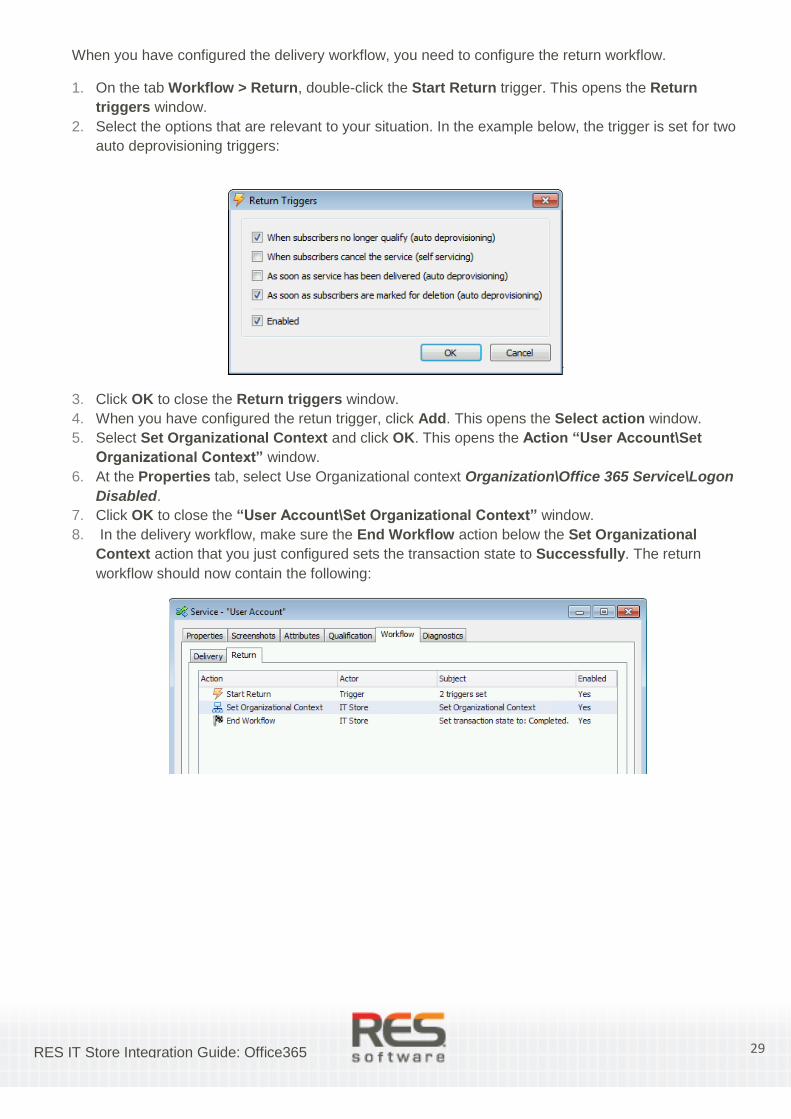
When you have configured the delivery workflow, you need to configure the return workflow.
1. On the tab Workflow > Return, double-click the Start Return trigger. This opens the Return
triggers window.
2. Select the options that are relevant to your situation. In the example below, the trigger is set for two
auto deprovisioning triggers:
3. Click OK to close the Return triggers window.
4. When you have configured the retun trigger, click Add. This opens the Select action window.
5. Select Set Organizational Context and click OK. This opens the Action “User Account\Set
Organizational Context” window.
6. At the Properties tab, select Use Organizational context Organization\Office 365 Service\Logon
Disabled.
7. Click OK to close the “User Account\Set Organizational Context” window.
8. In the delivery workflow, make sure the End Workflow action below the Set Organizational
Context action that you just configured sets the transaction state to Successfully. The return
workflow should now contain the following:

30 RES IT Store Integration Guide: Office365
Self-Servicing: User Account On-Demand
1. Right-click the folder Office365/Self Servicing/Account and click Add service. This opens the
Service window.
2. At the Properties tab, specify User Account On-Demand in the Name field.
3. In the Description field, specify a description for the service.
4. Leave the other settings as they are and click OK.
5. At the Qualification tab, specify the Office 365 Account organizational context, NOT to be part of.
Next, you need to configure the workflow of the service. The delivery or return of a service happens
according to a sequence of actions: the workflow. Each workflow starts with a trigger that specifies
when a service should be delivered or returned.
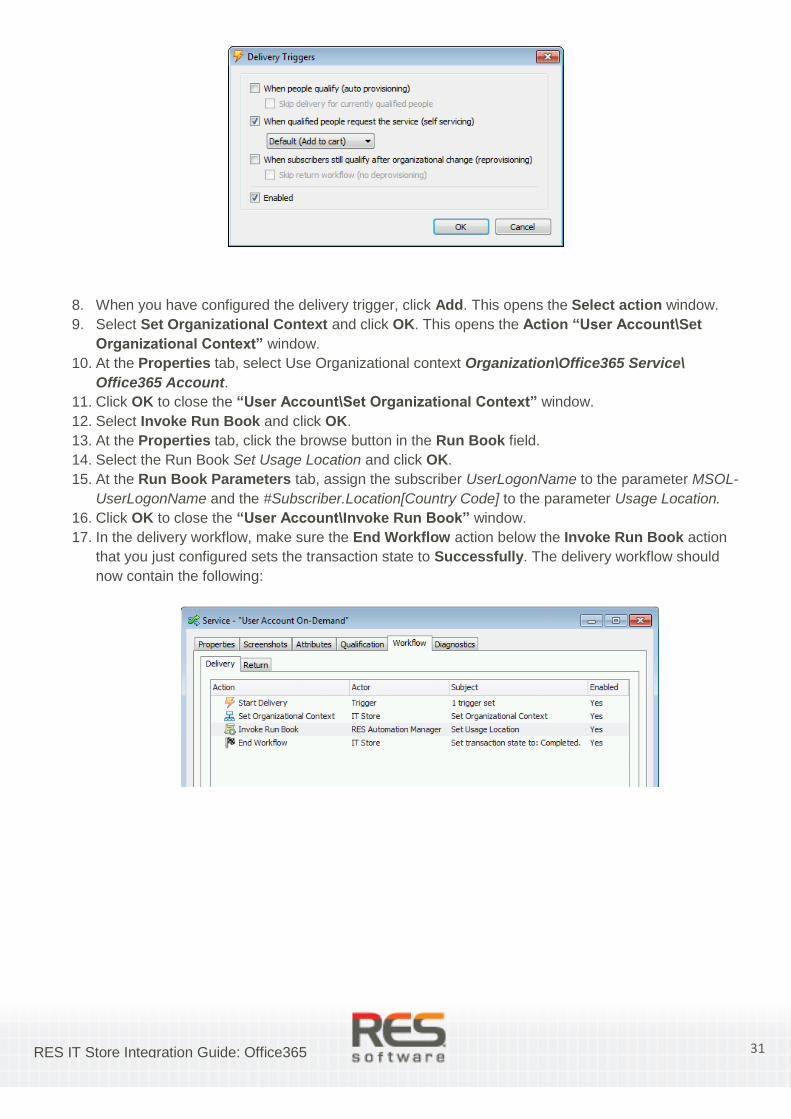
6. At the tab Workflow > Delivery, double-click the Start Delivery trigger. This opens the Delivery
triggers window.
7. In this service the trigger is set to Self Servicing only:
31 RES IT Store Integration Guide: Office365
8. When you have configured the delivery trigger, click Add. This opens the Select action window.
9. Select Set Organizational Context and click OK. This opens the Action “User Account\Set
Organizational Context” window.
10. At the Properties tab, select Use Organizational context Organization\Office365 Service\
Office365 Account.
11. Click OK to close the “User Account\Set Organizational Context” window.
12. Select Invoke Run Book and click OK.
13. At the Properties tab, click the browse button in the Run Book field.
14. Select the Run Book Set Usage Location and click OK.
15. At the Run Book Parameters tab, assign the subscriber UserLogonName to the parameter MSOL-
UserLogonName and the #Subscriber.Location[Country Code] to the parameter Usage Location.
16. Click OK to close the “User Account\Invoke Run Book” window.
17. In the delivery workflow, make sure the End Workflow action below the Invoke Run Book action
that you just configured sets the transaction state to Successfully. The delivery workflow should
now contain the following:
32 RES IT Store Integration Guide: Office365
When you have configured the delivery workflow, you need to configure the return workflow.
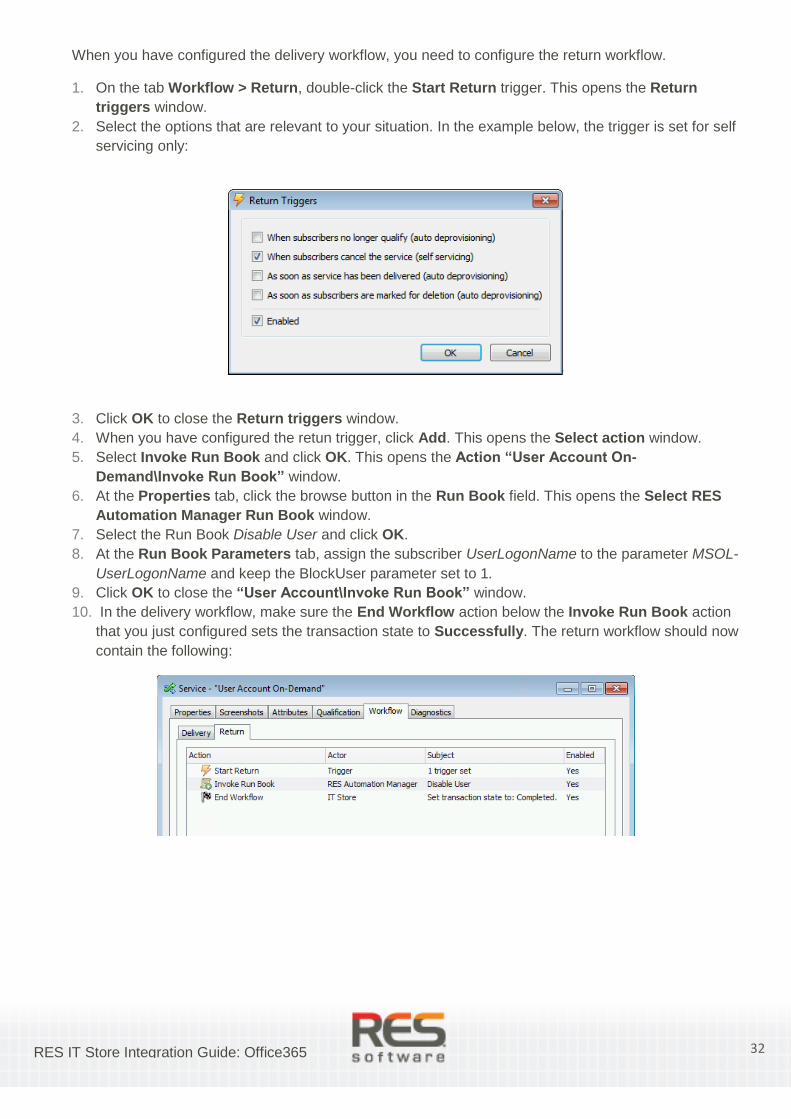
1. On the tab Workflow > Return, double-click the Start Return trigger. This opens the Return
triggers window.
2. Select the options that are relevant to your situation. In the example below, the trigger is set for self
servicing only:
3. Click OK to close the Return triggers window.
4. When you have configured the retun trigger, click Add. This opens the Select action window.
5. Select Invoke Run Book and click OK. This opens the Action “User Account On-
Demand\Invoke Run Book” window.
6. At the Properties tab, click the browse button in the Run Book field. This opens the Select RES
Automation Manager Run Book window.
7. Select the Run Book Disable User and click OK.
8. At the Run Book Parameters tab, assign the subscriber UserLogonName to the parameter MSOL-
UserLogonName and keep the BlockUser parameter set to 1.
9. Click OK to close the “User Account\Invoke Run Book” window.
10. In the delivery workflow, make sure the End Workflow action below the Invoke Run Book action
that you just configured sets the transaction state to Successfully. The return workflow should now
contain the following:
33 RES IT Store Integration Guide: Office365
Remaining Services
Because of the logic behind the Office 365 RES IT Store integration, each service configuration setting will
be described below highlighting the differences between each service.
Repeat the previous steps to configure:
Administration: Empty Deleted Users.
Auto Provisioning, Account: Disable Account Access, Geographical Usage Location.
Auto Provisioning, Plans: Exchange Online, Lync Online, Office Professional Online, Office Web Apps
Online, SharePoint Online.
Self-Servicing, Account: Password.
Self-Servicing, Plans: Exchange On-Demand, Lync On-Demand, Office Professional On-Demand, Office
Web Apps On-Demand, SharePoint On-Demand.
Each service should invoke the corresponding Run Book.
The final workflows and the service configuration settings:
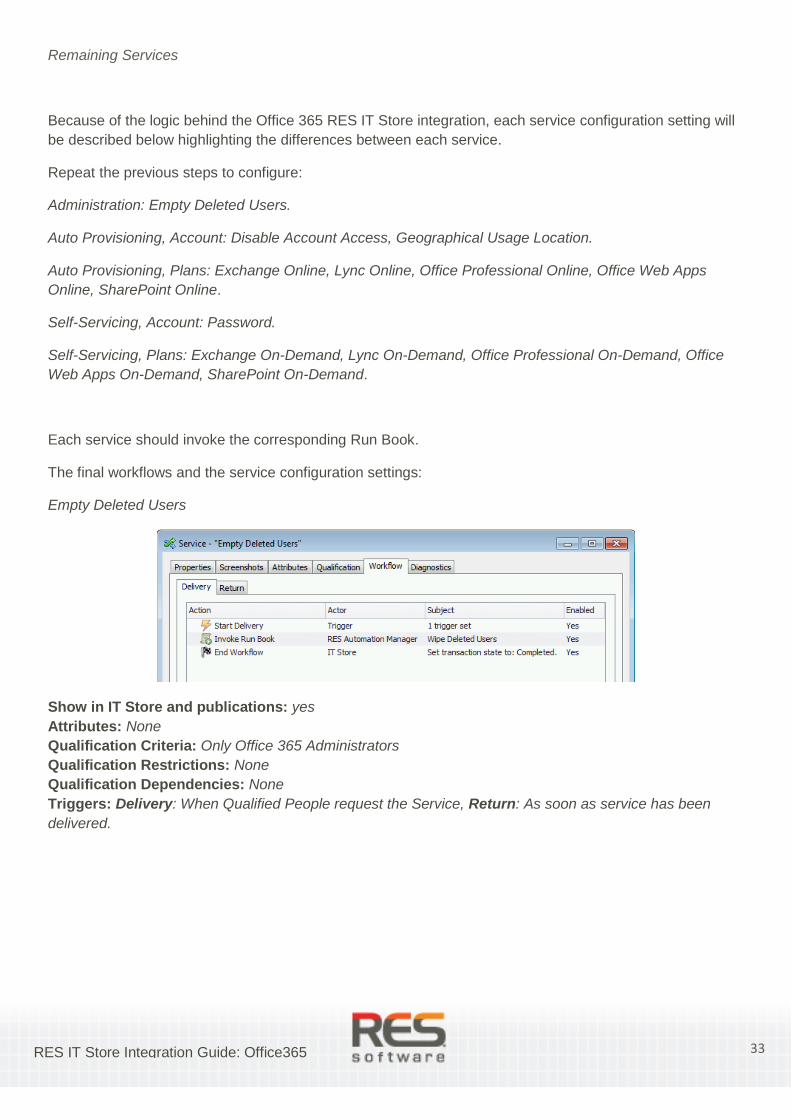
Empty Deleted Users
Show in IT Store and publications: yes
Attributes: None
Qualification Criteria: Only Office 365 Administrators
Qualification Restrictions: None
Qualification Dependencies: None
Triggers: Delivery: When Qualified People request the Service, Return: As soon as service has been
delivered.
34 RES IT Store Integration Guide: Office365
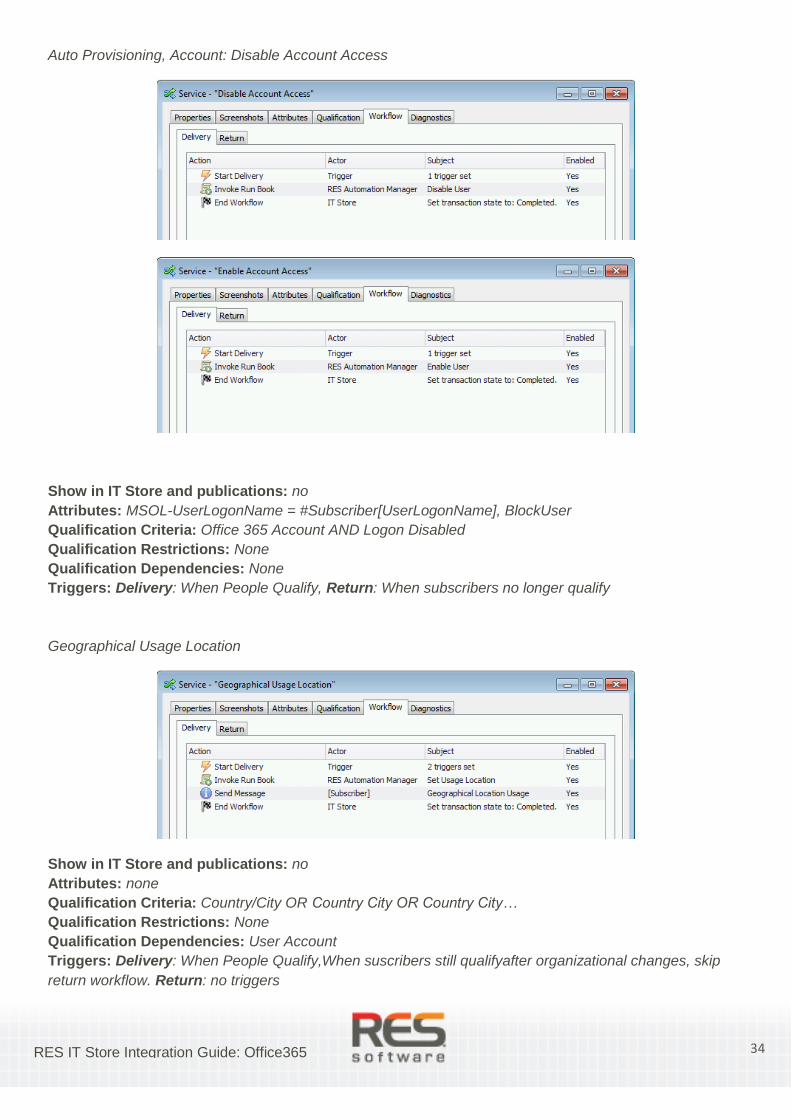
Auto Provisioning, Account: Disable Account Access
Show in IT Store and publications: no
Attributes: MSOL-UserLogonName = #Subscriber[UserLogonName], BlockUser
Qualification Criteria: Office 365 Account AND Logon Disabled
Qualification Restrictions: None
Qualification Dependencies: None
Triggers: Delivery: When People Qualify, Return: When subscribers no longer qualify
Geographical Usage Location
Show in IT Store and publications: no
Attributes: none
Qualification Criteria: Country/City OR Country City OR Country City…
Qualification Restrictions: None
Qualification Dependencies: User Account
Triggers: Delivery: When People Qualify,When suscribers still qualifyafter organizational changes, skip
return workflow. Return: no triggers

35 RES IT Store Integration Guide: Office365
Auto Provisioning, Plans: Exchange Online, Lync Online, Office Professional Online, Office Web Apps
Online and SharePoint Online. (Workflows are the same for all the service plans)
Exchange Online
Show in IT Store and publications: no
Attributes: MSOL-UserLogonName = #Subscriber[UserLogonName], Enabled Plan = #Subscriber.Office
365 Services[Exchange Code]
Qualification Criteria: Exchange Online
Qualification Restrictions: None
Qualification Dependencies: User Account AND User Account On-Demand
Triggers: Delivery: When People Qualify, Return: When subscribers no longer qualify
Lync Online - same as Exchange Online except for:
Attributes: MSOL-UserLogonName = #Subscriber[UserLogonName], Enabled Plan = #Subscriber.Office
365 Services[Lync Code]
Qualification Criteria: Lync Online
Office Professional Online - same as Exchange Online except for:
Attributes: MSOL-UserLogonName = #Subscriber[UserLogonName], Enabled Plan = #Subscriber.Office
365 Services[Office Professional Code]
Qualification Criteria: Office Professional Plus
SharePoint Online - same as Exchange Online except for:
Attributes: MSOL-UserLogonName = #Subscriber[UserLogonName], Enabled Plan = #Subscriber.Office
365 Services[SharePoint Code]
Qualification Criteria: SharePoint Online
Office Web Apps Online - same as Exchange Online except for:
Attributes: MSOL-UserLogonName = #Subscriber[UserLogonName], Enabled Plan = #Subscriber.Office
365 Services[Office web Apps Code]
Qualification Criteria: Office Web Apps
Qualification Dependencies: SharePoint On-Demand AND SharePoint Online

36 RES IT Store Integration Guide: Office365
Self-Servicing, Account: Password
Show in IT Store and publications: yes
Attributes: MSOL-UserLogonName = #Subscriber[UserLogonName], Temporary Password (for RunBook
Results)
Qualification Criteria: Office 365 Account
Qualification Restrictions: None
Qualification Dependencies: None
Triggers: Delivery: When People Qualify, Return: As soon as service has been delivered

37 RES IT Store Integration Guide: Office365
Self Servicing Plans: Exchange On-Demand, Lync On-Demand, Office Professional On-Demand, Office
Web Apps On-Demand and SharePoint On-Demand. (Workflows are the same for all the service plans)
Exchange On-Demand
Show in IT Store and publications: yes
Attributes: MSOL-UserLogonName = #Subscriber[UserLogonName], Enabled Plan = #Subscriber.Office
365 Services[Exchange Code]
Qualification Criteria: Office 365 Account, NOT Exchange Online
Qualification Restrictions: None
Qualification Dependencies: User Account, User Account On-Demand
Triggers: Delivery: When Qualified People Request the Service, Return: When subscribers cancel the
service
Lync On-Demand - same as Exchange On-Demand except for:
Attributes: MSOL-UserLogonName = #Subscriber[UserLogonName], Enabled Plan = #Subscriber.Office
365 Services[Lync Code]
Qualification Criteria: Office 365 Account, NOT Lync Online
Office On-Demand - same as Exchange On-Demand except for:
Attributes: MSOL-UserLogonName = #Subscriber[UserLogonName], Enabled Plan = #Subscriber.Office
365 Services[Office Professional Code]
Qualification Criteria: Office 365 Account, NOT Office Professional Online
SharePoint On-Demand - same as Exchange On-Demand except for:
Attributes: MSOL-UserLogonName = #Subscriber[UserLogonName], Enabled Plan = #Subscriber.Office
365 Services[SharePoint Code]
Qualification Criteria: Office 365 Account, NOT SharePoint Online
Office Web On-Demand - same as Exchange On-Demand except for:
Attributes: MSOL-UserLogonName = #Subscriber[UserLogonName], Enabled Plan = #Subscriber.Office
365 Services[Office Web Apps Code]
Qualification Criteria: Office 365 Account, NOT Office Web Apps, SharePointOnline
38 RES IT Store Integration Guide: Office365
To download RES IT Store Building Blocks related to Microsoft Office 365, please visit the RES Support
portal at http://support.ressoftware.com.
39 RES IT Store Integration Guide: Office365
More information
You can find more documentation at http://support.ressoftware.com at the Library section and at the
Downloads section. Useful reading includes:
RES Automation Manager 2014 Administration Guide: this document provides detailed
information about the installation and configuration of RES Automation Manager 2014 features and
components. The online version of this document can be accessed from the Help menu in the
Console, and is available at http://support.ressoftware.com/automationmanageradminguide2014.
RES IT Store 2014 Administration Guide: this document provides detailed information about the
installation and configuration of RES IT Store 2014 features and components. The online version of
this document is available at http://support.ressoftware.com/itstoreadminguide2014/.
RES Software
Support
Europe and Asia
Monday - Friday 08:00
18:00 CET
Belgium
Denmark
France
Germany
Netherlands
Norway
Sweden
UK
All other countries
0800-753-12 (Toll Free)
8088-6779 (Toll Free)
0800-911178 (Toll Free)
0800-182-7475 (Toll Free)
+31 (0)73 622 8900
800-10-731 (Toll Free)
020-791-079 (Toll Free)
0-800-520-0427 (Toll Free)
+44 (0) 845 838 5550
+31 (0)73 622 8900
US and Canada
Monday - Friday 08:00
18:00 EST
+1 800-580-0786 (Toll Free)
E-mail:
Support Portal:
http://support.ressoftware.com
Support can also be reached on
Twitter: @ressoftware
About RES Software
RES Software manages and secures the key elements of a user’s computing experience, independent of
work styles and devices. By automating how IT services are delivered to virtual workspaces and providing a
user-friendly “IT Store,” RES Software helps IT professionals master the impacts of IT consumerization,
increasingly sophisticated corporate users, bring-your-own-device initiatives and cloud technologies. RES
Software patented technologies are used by a global customer base, and include superior customer
support. For more information, follow updates on Twitter @ressoftware or visit http://www.ressoftware.com.