helloworld
TRANSCRIPT
helloworld发布 0.1.1
2019 年 06 月 03 日


Contents:
1 helloworld 11.1 你好,Read the Docs . . . . . . . . . . . . . . . . . . . . . . . . . . . . . . . . . . . . . . . . 1
2 Read the Docs 32.1 what is Read the Docs? . . . . . . . . . . . . . . . . . . . . . . . . . . . . . . . . . . . . . . . 32.2 what is the use of Read the Docs? . . . . . . . . . . . . . . . . . . . . . . . . . . . . . . . . . 42.3 how to use Read the Docs? . . . . . . . . . . . . . . . . . . . . . . . . . . . . . . . . . . . . . 42.4 注册账号 . . . . . . . . . . . . . . . . . . . . . . . . . . . . . . . . . . . . . . . . . . . . . . . 42.5 环境搭建 . . . . . . . . . . . . . . . . . . . . . . . . . . . . . . . . . . . . . . . . . . . . . . . 42.6 构建 Read the Docs 项目 . . . . . . . . . . . . . . . . . . . . . . . . . . . . . . . . . . . . . . 52.7 关联 github . . . . . . . . . . . . . . . . . . . . . . . . . . . . . . . . . . . . . . . . . . . . . . 102.8 关联 Read the Docs . . . . . . . . . . . . . . . . . . . . . . . . . . . . . . . . . . . . . . . . . 102.9 文档本地化 . . . . . . . . . . . . . . . . . . . . . . . . . . . . . . . . . . . . . . . . . . . . . . 162.10 Read the Docs 关联 github . . . . . . . . . . . . . . . . . . . . . . . . . . . . . . . . . . . . . 272.11 结束语 . . . . . . . . . . . . . . . . . . . . . . . . . . . . . . . . . . . . . . . . . . . . . . . . 29
3 Indices and tables 31
i

ii
CHAPTER 1
helloworld
1.1 你好,Read the Docs
1

helloworld, 发布 0.1.1
2 Chapter 1. helloworld

CHAPTER 2
Read the Docs
• Read the Docs 官网:https://readthedocs.org
• Read the Docs 使用手册:https://docs.readthedocs.io/en/stable/intro/getting-started-with-sphinx.html
• Read the Docs 源码:https://github.com/rtfd/readthedocs.org
• Sphinx 官网:http://www.sphinx-doc.org
• Sphinx 源码:https://github.com/sphinx-doc/sphinx
• Python 官网:http://www.python.org
• demo 源码:https://github.com/darwindu/readthedocs-demo
2.1 what is Read the Docs?
Read the Docs是什么?看看官方怎么解释:Read the Docs simplifies software documentation by automatingbuilding, versioning, and hosting of your docs for you;
它是一个自动化构建的软件系统,可以进行版本管理、文件托管,从而简化文档管理;
它是基于 Sphinx 的在线文档托管系统, 接受一个 Git Repository 或 SVN 仓库作为文档来源。也就是说,Read the Docs 是一个文件托管系统。那 Sphinx 又是什么?
Sphinx 是一个基于 SQL 的全文检索引擎,可以结合 MySQL,PostgreSQL 做全文搜索,它可以提供比数据库本身更专业的搜索功能,使得应用程序更容易实现专业化的全文检索。也就是说,Sphinx 是文件检索引擎。
3
helloworld, 发布 0.1.1
2.2 what is the use of Read the Docs?
Read the Docs 有什么用呢?好吧,这也是我写这篇文章的原因,无论是行内,还是业内,现在开源盛行,我们的代码基本上都上传到 github,代码管理用 github,但是文档管理用啥?我只能告诉你,最佳实践是 Readthe Docs。
2.3 how to use Read the Docs?
如何使用 Read the Docs 呢?
• 首先,你需要个 github 账号;
有需求才有存在的价值;当你拥有 github 账号后,你会想着上传你的代码和文档,文档怎么管理、维护,以及方便自己、别人的使用。
• 然后,你需要个 Read the Docs 账号;
注册 Reda the Docs 账号后,你会发现满脸懵逼,这玩意怎么用?耐心的同学会发现,官方会指导你跳转到Read the Docs 使用手册,但是跳转到 Read the Docs 使用手册,会直接来个命令:pip install sphinx,why?
• 接着,搭建 python;
搭建 python 都是为了 pip 命令,pip 是 python 的一个工具;
• 接着,搭建 Sphinx
想必大家都知道,搭建 sphinx 就是为了 Read the Docs;
• 最后,使用 Read the Docs
这是我们的终极目标。
下面我们会按照这些步骤来进行讲解如何开始我们的 Read the Docs。
2.4 注册账号
• 1. 注册 github 账号,略;不用我说,你也会;
• 2. 注册 Read the Docs 账号,略;不用我说,你也会;
2.5 环境搭建
解释一下:由于大部门同学用 windows 开发,所以环境搭建基于 windows。周边用 Mac、Linux 的同学可以参考 Sphinx 官网。
• 1. 搭建 python;
4 Chapter 2. Read the Docs
helloworld, 发布 0.1.1
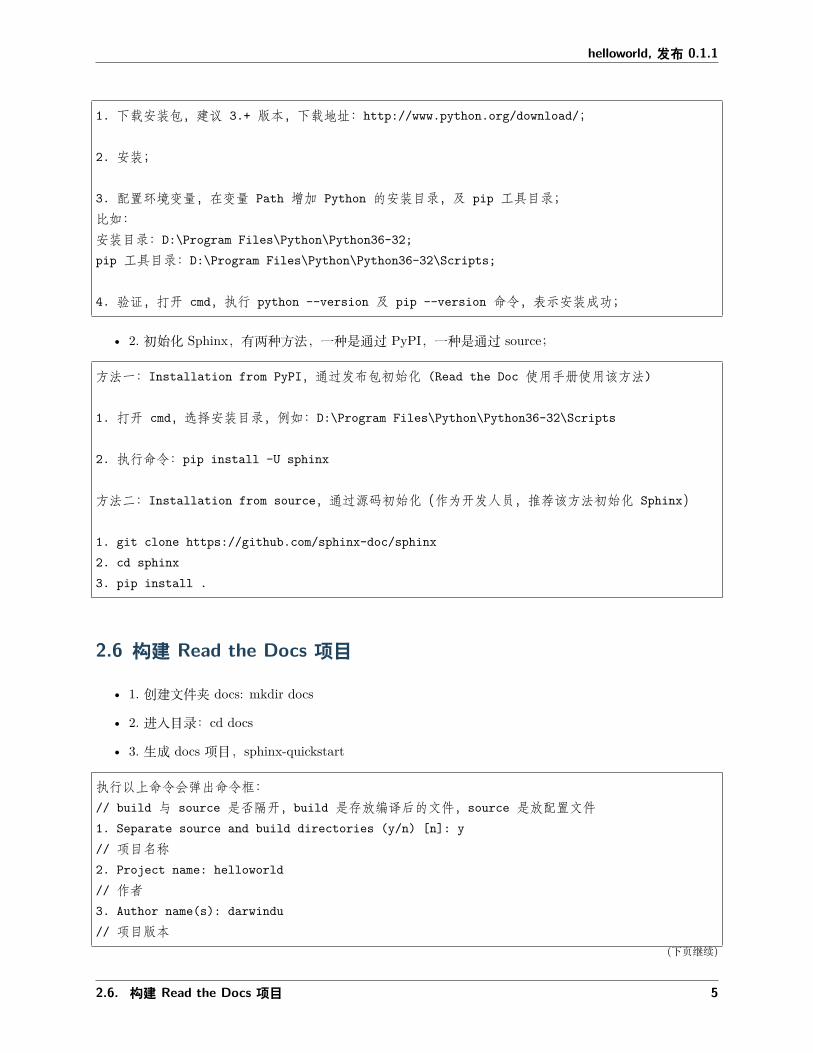
1. 下载安装包,建议 3.+ 版本,下载地址:http://www.python.org/download/;
2. 安装;
3. 配置环境变量,在变量 Path 增加 Python 的安装目录,及 pip 工具目录;比如:安装目录:D:\Program Files\Python\Python36-32;pip 工具目录:D:\Program Files\Python\Python36-32\Scripts;
4. 验证,打开 cmd,执行 python --version 及 pip --version 命令,表示安装成功;
• 2. 初始化 Sphinx,有两种方法,一种是通过 PyPI,一种是通过 source;
方法一:Installation from PyPI,通过发布包初始化 (Read the Doc 使用手册使用该方法)
1. 打开 cmd,选择安装目录,例如:D:\Program Files\Python\Python36-32\Scripts
2. 执行命令:pip install -U sphinx
方法二:Installation from source,通过源码初始化(作为开发人员,推荐该方法初始化 Sphinx)
1. git clone https://github.com/sphinx-doc/sphinx2. cd sphinx3. pip install .
2.6 构建 Read the Docs 项目
• 1. 创建文件夹 docs: mkdir docs
• 2. 进入目录:cd docs
• 3. 生成 docs 项目,sphinx-quickstart
执行以上命令会弹出命令框:// build 与 source 是否隔开,build 是存放编译后的文件,source 是放配置文件1. Separate source and build directories (y/n) [n]: y// 项目名称2. Project name: helloworld// 作者3. Author name(s): darwindu// 项目版本
(下页继续)
2.6. 构建 Read the Docs 项目 5

helloworld, 发布 0.1.1
(续上页)
4. Project release []: 0.1.1// 语言,英语:en5. Project language [en]: zh_CN
执行完之后生成项目目录:|--build 编译后文件|--source|-------|--_static 存放静态文件,比如样式|-------|--_templates|-------|--conf.py 项目配置文件|-------|--index.rst 首页|--make.bat 执行命令|--Makefile
• 4. 编译:make html
执行命令后:
D:\sphinx-doc>make htmlRunning Sphinx v3.0.0+loading translations [zh_CN]... donemaking output directory... donebuilding [mo]: targets for 0 po files that are out of datebuilding [html]: targets for 1 source files that are out of dateupdating environment: 1 added, 0 changed, 0 removedreading sources... [100%] indexlooking for now-outdated files... none foundpickling environment... donechecking consistency... donepreparing documents... donewriting output... [100%] indexgenerating indices... genindexwriting additional pages... searchcopying static files... donecopying extra files... donedumping search index in Chinese (code: zh) ... donedumping object inventory... donebuild succeeded.
The HTML pages are in build\html.(下页继续)
6 Chapter 2. Read the Docs
helloworld, 发布 0.1.1
(续上页)
生成 html 页面:build\html
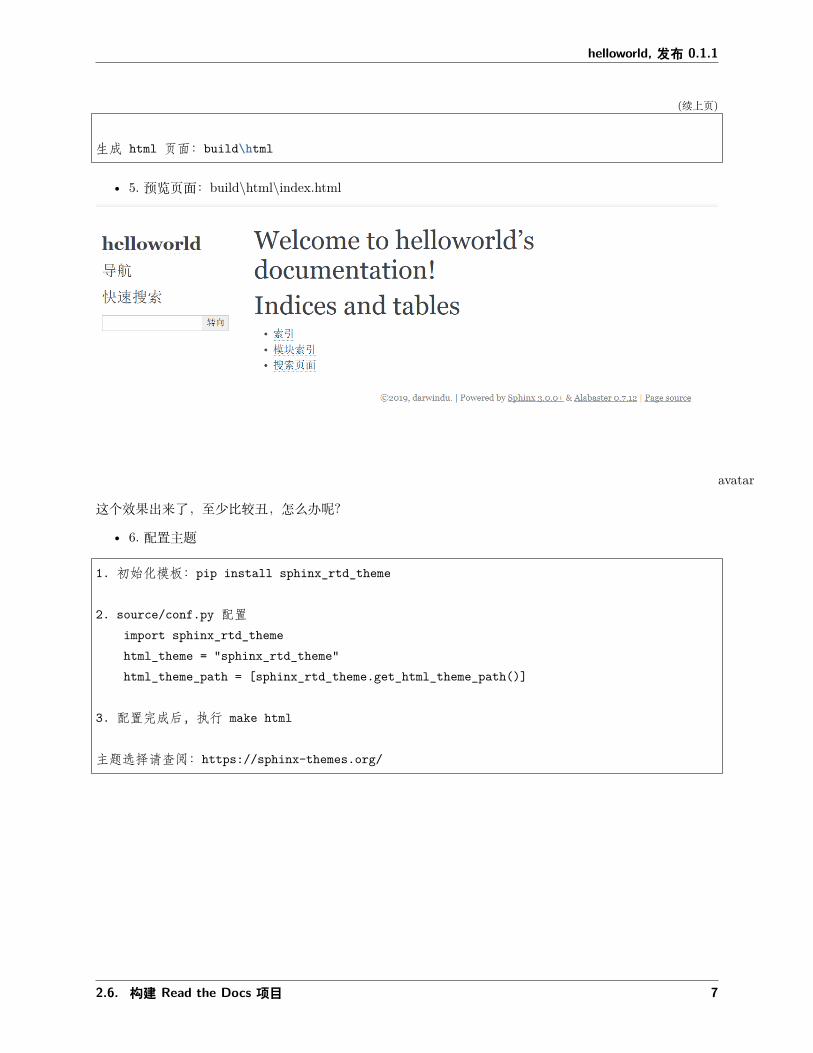
• 5. 预览页面:build\html\index.html
avatar
这个效果出来了,至少比较丑,怎么办呢?
• 6. 配置主题
1. 初始化模板:pip install sphinx_rtd_theme
2. source/conf.py 配置import sphinx_rtd_themehtml_theme = "sphinx_rtd_theme"html_theme_path = [sphinx_rtd_theme.get_html_theme_path()]
3. 配置完成后,执行 make html
主题选择请查阅:https://sphinx-themes.org/
2.6. 构建 Read the Docs 项目 7

helloworld, 发布 0.1.1
重新打开 build\html\index.html,是不是好看多了: avatar
配置完主题之后,很快你就会发现,Read the Docs 编辑文本是使用.rst(reStructuredText) 语法,平时我们用 markdown 比较多,一下子更改会不会项目进度有影响?好吧,我的理解是,让.rst 作为文件跳转,另外文档编辑用 markdown。
另外想学习.rst语法的可以参考:http://www.sphinx-doc.org/en/master/usage/restructuredtext/index.html
• 7. 配置 markdown
1.pip install recommonmark
2.source/conf.py 配置增加:extensions = ['recommonmark']
3. 增加 README.md 文档***************************************# helloworld
## 你好,Read the Docs***************************************
4. 修改 source/index.rst,如下:***************************************
.. helloworld documentation master file, created bysphinx-quickstart on Sat Jun 1 13:29:49 2019.You can adapt this file completely to your liking, but it should at leastcontain the root `toctree` directive.
(下页继续)
8 Chapter 2. Read the Docs

helloworld, 发布 0.1.1
(续上页)
Welcome to helloworld's documentation!======================================
.. toctree:::maxdepth: 2:caption: Contents://增加配置,这行注释请去除README.md
Indices and tables==================
* :ref:`genindex`* :ref:`modindex`* :ref:`search`
***************************************
重新打开 build\html\index.html,如下: avatar
2.6. 构建 Read the Docs 项目 9

helloworld, 发布 0.1.1
以上内容貌似完成了我们的需求,那怎么用起来,和 github 关联呢?
2.7 关联 github
• 1. 打开 github.com, 创建一个工程 readthedocs-demo;
• 2. 在本地电脑上,创建 readthedocs-demo 文件夹;
• 3. 进入 readthedocs-demo 目录,创建 docs 文件夹;
• 4. 进入 docs 文件夹,将开始通过 sphinx-quickstart 命令生成的文件和文件夹拷贝到改目录;
• 5. 返回 readthedocs-demo 这个目录;
• 6. 增加.gitignore 文件,忽略 docs/build/文件夹内容,这个文件夹不用上传;
• 7. 上传至 github
git initgit add .git commit -m "first commit"git remote add origin https://github.com/darwindu/readthedocs-demo.gitgit push -u origin master
执行完成后,打开 github的 readthedocs-demo浏览,如下: avatar
docs 文件已经上传了,如何关联 Read the Docs 呢?
2.8 关联 Read the Docs
• 1. 打开网址:https://readthedocs.org/
10 Chapter 2. Read the Docs
helloworld, 发布 0.1.1
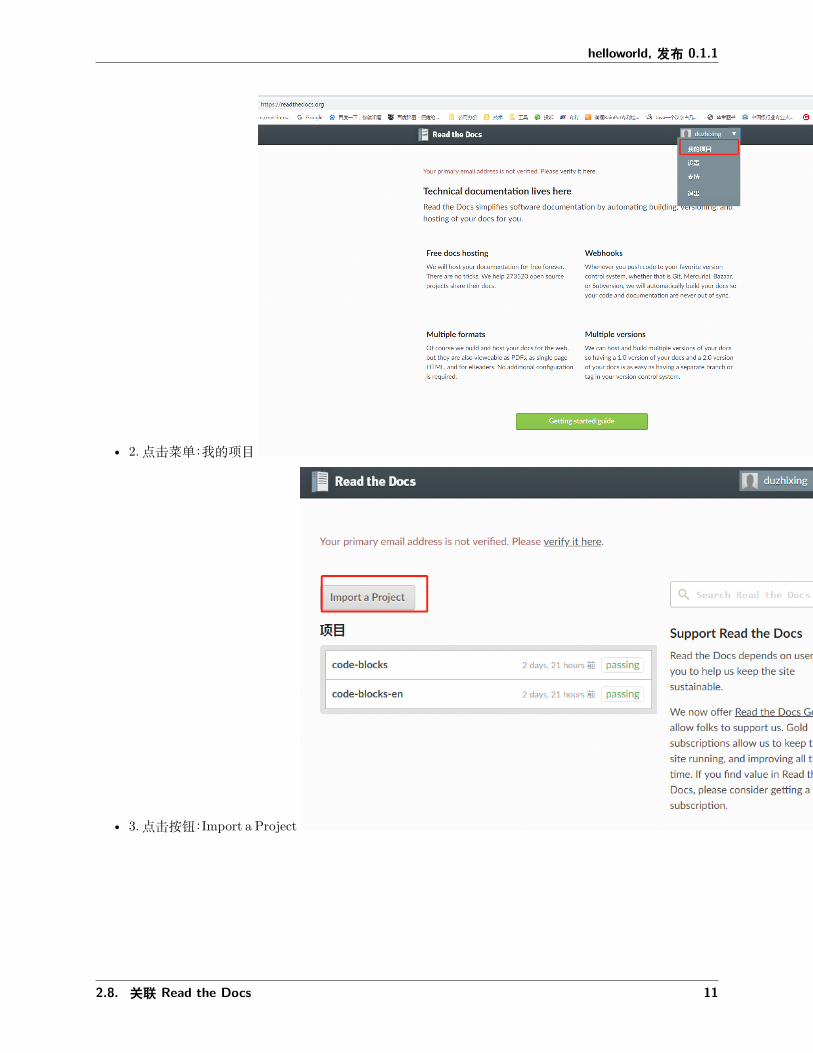
• 2.点击菜单:我的项目 avatar
• 3.点击按钮:Import a Project avatro
2.8. 关联 Read the Docs 11

helloworld, 发布 0.1.1
• 4.选择项目:readthedocs-demo avatar
• 5.选择之后,会弹出界面,然后点击下一步,如果提示:项目已经存在的话,将项目名:readthedocs-demo改成 readthedocs-demo-zh;如果没有提示,忽略,直接点击下一步
12 Chapter 2. Read the Docs
helloworld, 发布 0.1.1
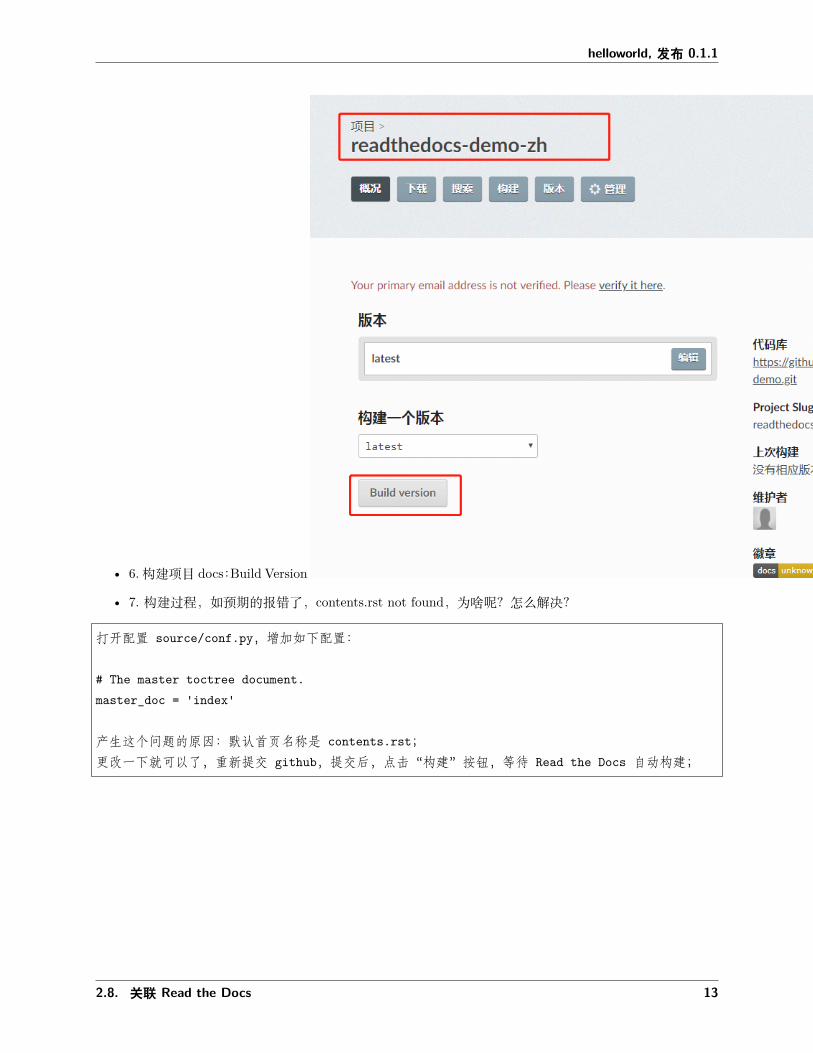
• 6.构建项目 docs:Build Version avatar
• 7. 构建过程,如预期的报错了,contents.rst not found,为啥呢?怎么解决?
打开配置 source/conf.py,增加如下配置:
# The master toctree document.master_doc = 'index'
产生这个问题的原因:默认首页名称是 contents.rst;更改一下就可以了,重新提交 github,提交后,点击“构建”按钮,等待 Read the Docs 自动构建;
2.8. 关联 Read the Docs 13
helloworld, 发布 0.1.1
avator
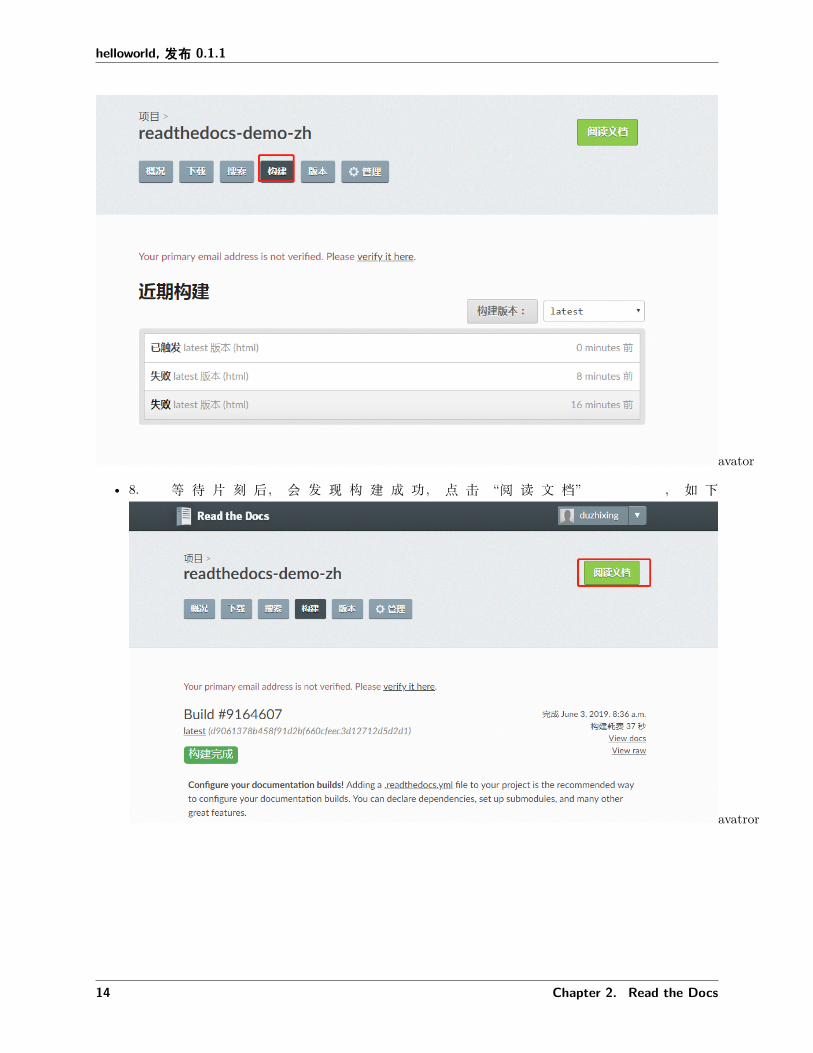
• 8. 等 待 片 刻 后, 会 发 现 构 建 成 功, 点 击 “阅 读 文 档” , 如 下
avatror
14 Chapter 2. Read the Docs

helloworld, 发布 0.1.1
avatror
goods,是不是很开心,这下好像真的搞定的了;但是,假如⋯我们需要多语言文档呢?赶紧看看官方文档⋯
2.8. 关联 Read the Docs 15
helloworld, 发布 0.1.1
avatar
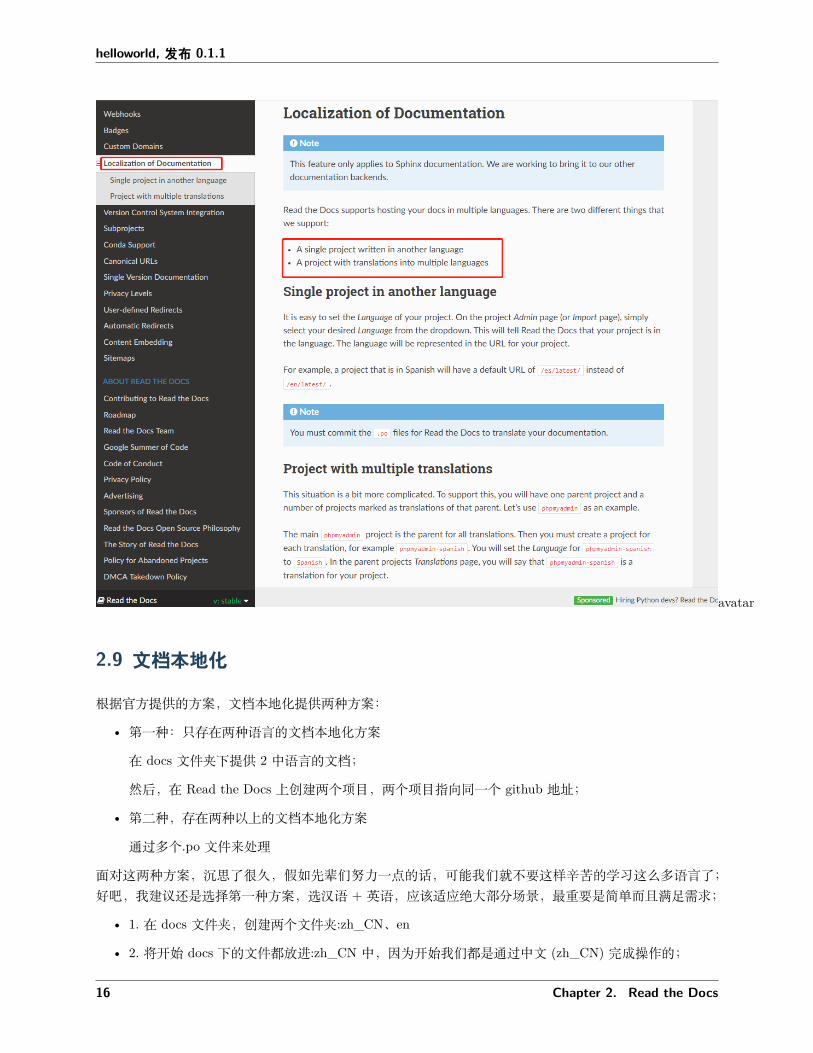
2.9 文档本地化
根据官方提供的方案,文档本地化提供两种方案:
• 第一种:只存在两种语言的文档本地化方案
在 docs 文件夹下提供 2 中语言的文档;
然后,在 Read the Docs 上创建两个项目,两个项目指向同一个 github 地址;
• 第二种,存在两种以上的文档本地化方案
通过多个.po 文件来处理
面对这两种方案,沉思了很久,假如先辈们努力一点的话,可能我们就不要这样辛苦的学习这么多语言了;好吧,我建议还是选择第一种方案,选汉语 + 英语,应该适应绝大部分场景,最重要是简单而且满足需求;
• 1. 在 docs 文件夹,创建两个文件夹:zh_CN、en
• 2. 将开始 docs 下的文件都放进:zh_CN 中,因为开始我们都是通过中文 (zh_CN) 完成操作的;
16 Chapter 2. Read the Docs
helloworld, 发布 0.1.1
项目结构如下:|--en|--zh_CN
|--build 编译后文件|--source|-------|--_static 存放静态文件,比如样式|-------|--_templates|-------|--conf.py 项目配置文件|-------|--index.rst 首页|--make.bat 执行命令|--Makefile
• 3. 进入文件夹 en,构建 en 版本的 Read the Docs,执行命令:sphinx-quickstart
执行以上命令会弹出命令框:// build 与 source 是否隔开,build 是存放编译后的文件,source 是放配置文件1. Separate source and build directories (y/n) [n]: y// 项目名称2. Project name: helloworld// 作者3. Author name(s): darwindu// 项目版本4. Project release []: 0.1.1// 语言,英语:en5. Project language [en]: en
• 4. 修改 docs/en/source/conf.py,根据 docs/zh_Cn/source/conf.py 修改
• 5. 增加 README.md,修改 index.rst
README.md***************************************# helloworld
## hi, Read the Docs***************************************
index.rst:***************************************
.. helloworld documentation master file, created by(下页继续)
2.9. 文档本地化 17
helloworld, 发布 0.1.1
(续上页)
sphinx-quickstart on Sat Jun 1 13:29:49 2019.You can adapt this file completely to your liking, but it should at leastcontain the root `toctree` directive.
Welcome to helloworld's documentation!======================================
.. toctree:::maxdepth: 2:caption: Contents://增加配置,这行注释请去除README.md
Indices and tables==================
* :ref:`genindex`* :ref:`modindex`* :ref:`search`
***************************************
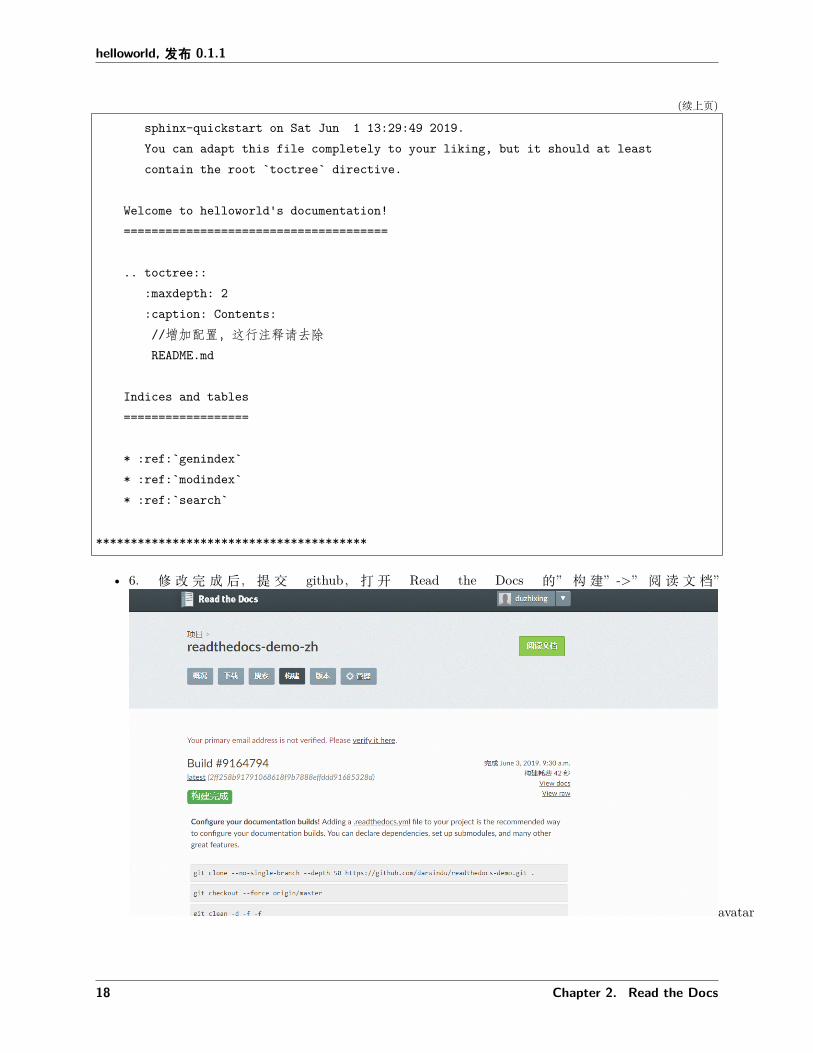
• 6. 修改完成后,提交 github,打开 Read the Docs 的”构建”->”阅读文档”
avatar
18 Chapter 2. Read the Docs

helloworld, 发布 0.1.1
avatar
如上图,你会发现 readthedocs-zh 的项目关联的文档变成英文了,如何变成双语呢?
• 7.选择 readthedocs-demo-zh项目,点击“管理”->”设置”,修改语言“Simplified”,点击保存,等待构建完
2.9. 文档本地化 19
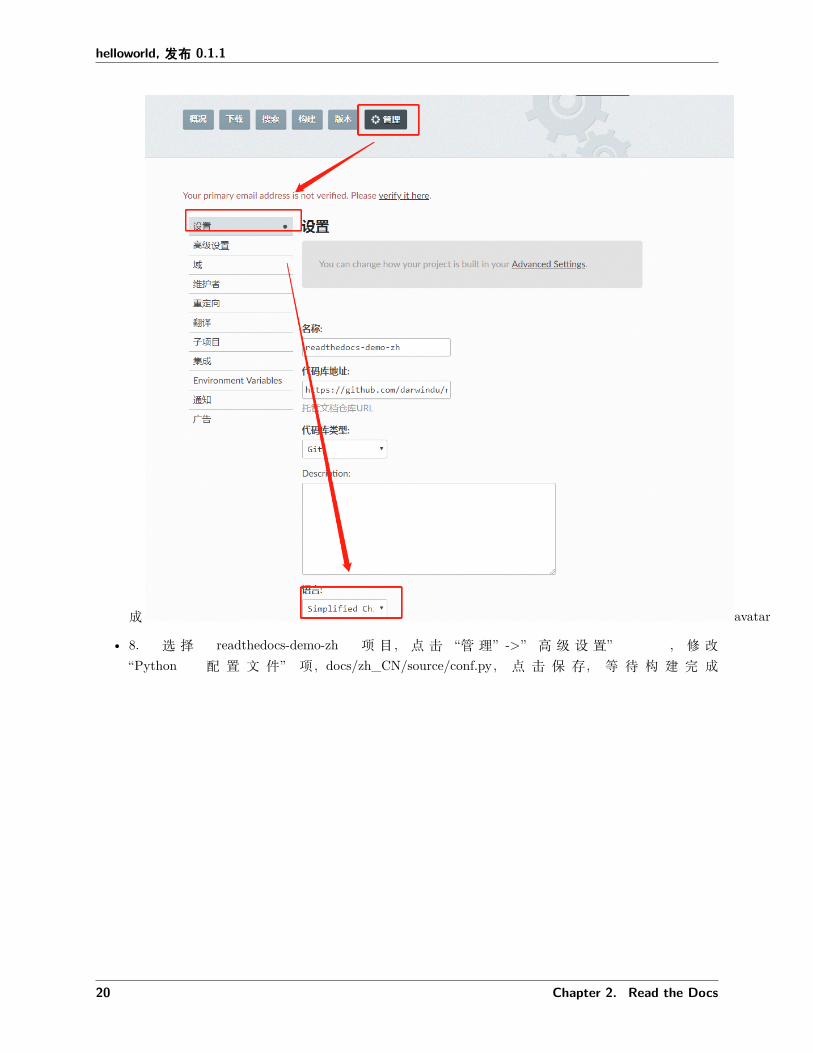
helloworld, 发布 0.1.1
成 avatar
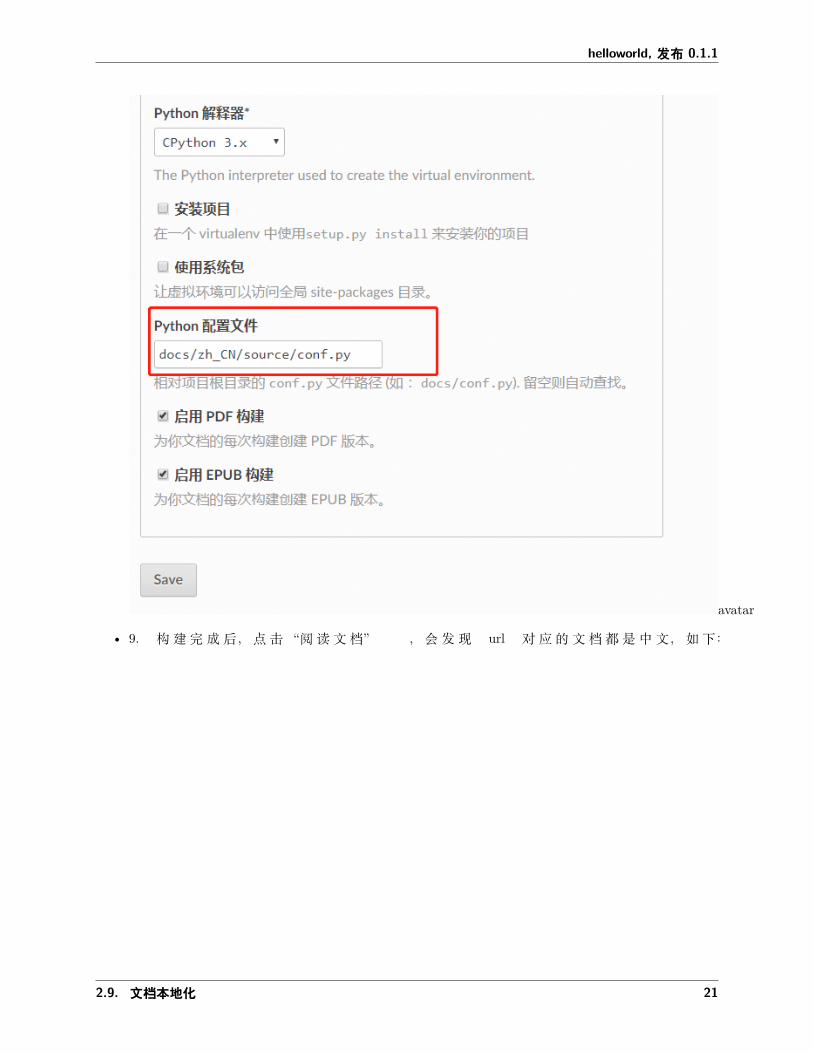
• 8. 选 择 readthedocs-demo-zh 项 目, 点 击 “管 理”->” 高 级 设 置” , 修 改“Python 配 置 文 件” 项,docs/zh_CN/source/conf.py, 点 击 保 存, 等 待 构 建 完 成
20 Chapter 2. Read the Docs
helloworld, 发布 0.1.1
avatar
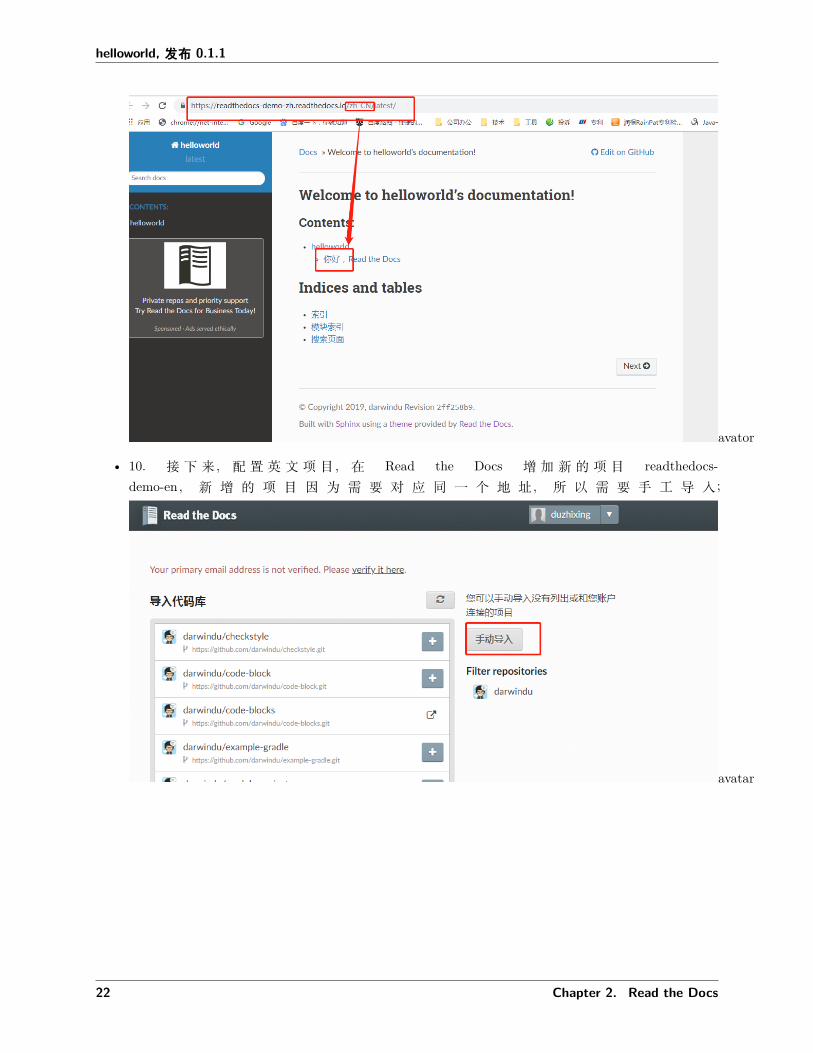
• 9. 构建完成后,点击“阅读文档” ,会发现 url 对应的文档都是中文,如下:
2.9. 文档本地化 21
helloworld, 发布 0.1.1
avator
• 10. 接 下 来, 配 置 英 文 项 目, 在 Read the Docs 增 加 新 的 项 目 readthedocs-demo-en, 新 增 的 项 目 因 为 需 要 对 应 同 一 个 地 址, 所 以 需 要 手 工 导 入;
avatar
22 Chapter 2. Read the Docs

helloworld, 发布 0.1.1
• 11.导入完成后,重新执行第 8步和第 9步 avatar
2.9. 文档本地化 23

helloworld, 发布 0.1.1
avatar
24 Chapter 2. Read the Docs

helloworld, 发布 0.1.1
avatar
• 12.完成后,选择 readthedocs-demo-en项目,点击“阅读文档”,会发现 url对应的文档都是英文,如下:
avatar
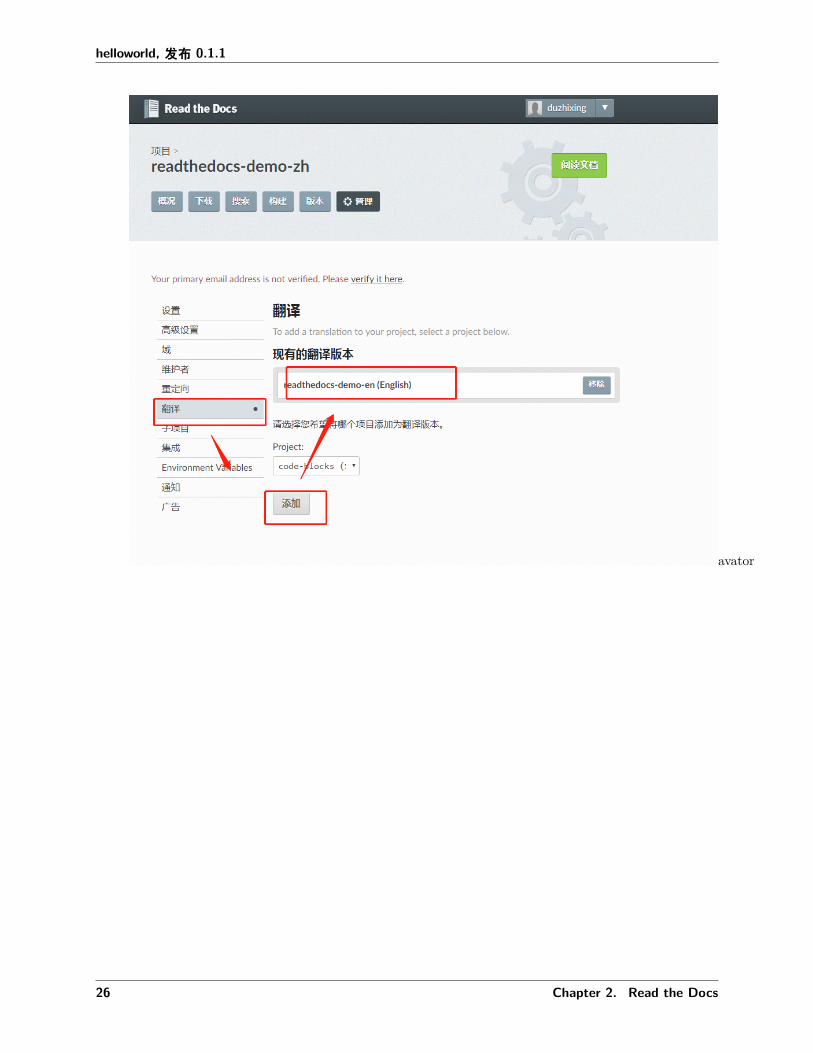
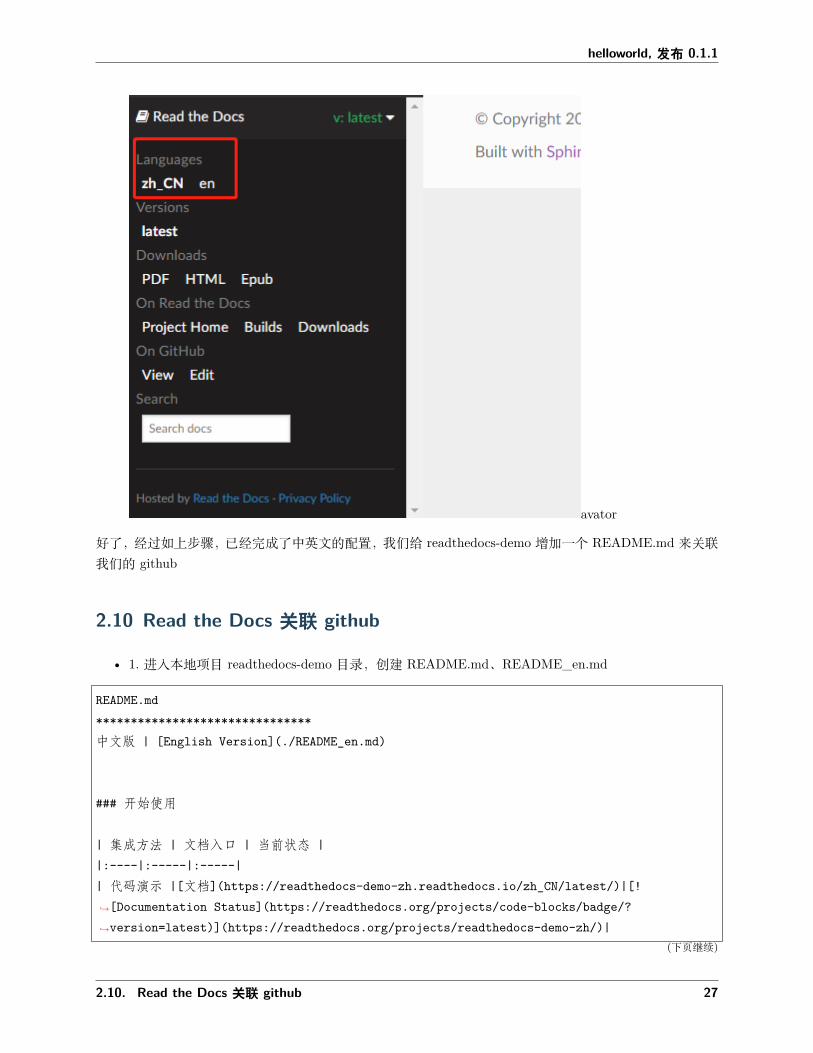
• 13. 接下来配置语言切换,选择 readthedocs-demo-zh, “管理”->“翻译”-“添加” ,选择readthedocs-demo-en 进行添加,添加完成后,点击“阅读文档” ,会出现语言切换,如下:
2.9. 文档本地化 25
helloworld, 发布 0.1.1
avator
26 Chapter 2. Read the Docs
helloworld, 发布 0.1.1
avator
好了,经过如上步骤,已经完成了中英文的配置,我们给 readthedocs-demo 增加一个 README.md 来关联我们的 github
2.10 Read the Docs 关联 github
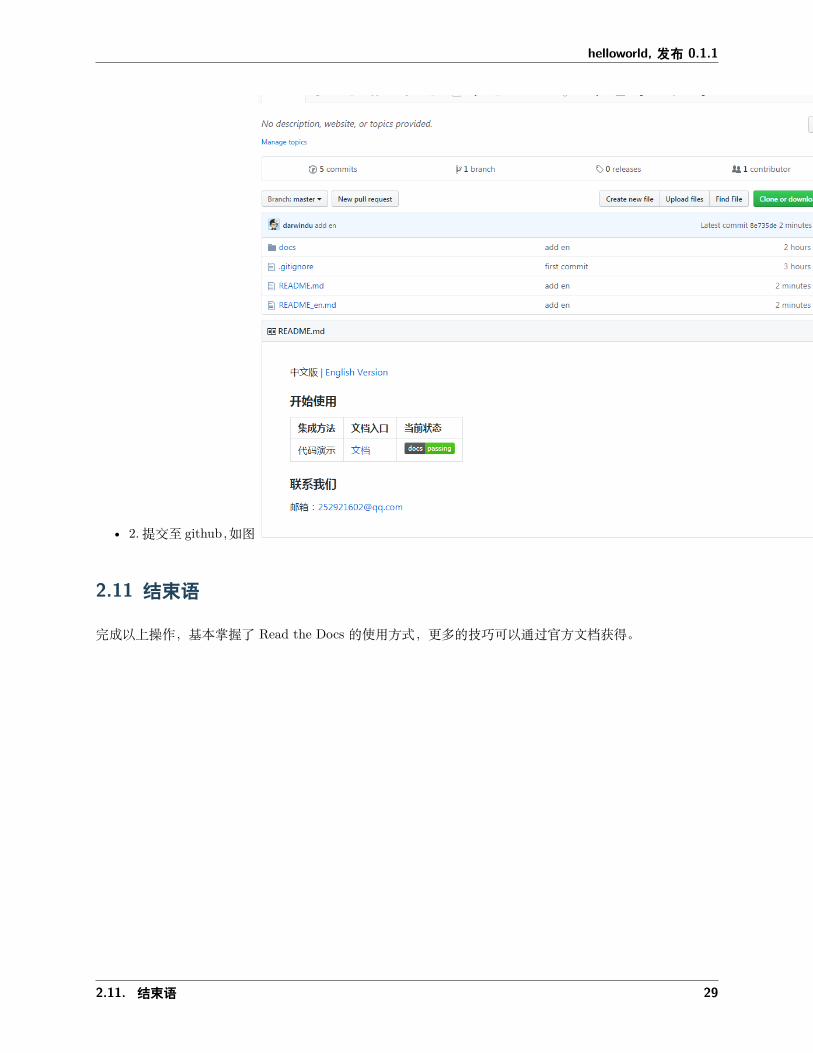
• 1. 进入本地项目 readthedocs-demo 目录,创建 README.md、README_en.md
README.md*******************************中文版 | [English Version](./README_en.md)
### 开始使用
| 集成方法 | 文档入口 | 当前状态 ||:----|:-----|:-----|| 代码演示 |[文档](https://readthedocs-demo-zh.readthedocs.io/zh_CN/latest/)|[!↪→[Documentation Status](https://readthedocs.org/projects/code-blocks/badge/?↪→version=latest)](https://readthedocs.org/projects/readthedocs-demo-zh/)|
(下页继续)
2.10. Read the Docs 关联 github 27

helloworld, 发布 0.1.1
(续上页)
### 联系我们邮箱:[email protected]*******************************
README_en.md*******************************[中文版](./README.md) | English Version
### start using
|Integration Method|Document Entry|Current Status||:----|:-----|:-----||Code Demo |[Documents](https://readthedocs-demo-en.readthedocs.io/en/latest/)|[!↪→[Documentation Status](https://readthedocs.org/projects/code-blocks-en/badge/?↪→version=latest)](https://readthedocs.org/projects/readthedocs-demo-en/)|
### contact usEmail:[email protected]*******************************
28 Chapter 2. Read the Docs
helloworld, 发布 0.1.1
• 2.提交至 github,如图 avatar
2.11 结束语
完成以上操作,基本掌握了 Read the Docs 的使用方式,更多的技巧可以通过官方文档获得。
2.11. 结束语 29
helloworld, 发布 0.1.1
30 Chapter 2. Read the Docs

CHAPTER 3
Indices and tables
• genindex
• modindex
• search
31