reporting server for qlik v1.1.83 - instructions and
TRANSCRIPT

Reporting Server for Qlik V1.1.83 - INSTRUCTIONS and SETTINGS
1 / 72
NPQ-Reports-Server is a reporting platform for Qlik, with which all QlikView® and sense objects can be individually compiled in a
web interface, printed, output as PDF, PowerPoint®, Word document, SVG file, PNG, Html page and automatically sent by email to
a selected group of customers or made available in the NPQ-Reports warehouse.
Simple installation, clear operation and design of reports, security and fast processing of the created reports were the goals of
the development.
Extensive setting options meet all safety criteria and allow flexible adaptation of the platform to operational conditions and
requirements. Even with the standard settings, attractive reports can be created with drag and drop.
NPQReports can use all Qlik objects, of course external extensions can be printed in the same report (map extensions, all other
extensions). Multiple Qlik applications can be used as data sources within the same report.
Extensive filter functions ensure that the report recipient receives exactly the data to which he is entitled on the basis of his rights.
The filter function works at all levels: Report, object, job, recipient and is comparable to the normal Qlik selection - so called wildcard
selections, calculated filters (e.g.: > year 2015,...), specification of multiple values per data field (month: 01;02;03;...) and even top
and Pareto filters (exception for Sense objects) work.

Reporting Server for Qlik V1.1.83 - INSTRUCTIONS and SETTINGS
2 / 72
Installation of NPQ-Reports Server
Extract NPQReport to the desired drive (local, on any server, on the same server where Sense Server is running), the optimal location for installation depends on the particular configuration of the Qlik environment on the network. If the Qlik server(s) are heavily loaded (many users, large Qlik documents) and many reports are retrieved at the same time, it is useful to install NPQ-Reports Server on a different PC/server than the one used for the Qlik installation in the network. Server requirements: .NET Framework 4.6.1 or higher, Visual C++ 2015 Runtime: https://www.microsoft.com/en-
US/download/confirmation.aspx?id=48145
Quick start (for test purposes, start only when needed,..)
Start npqReportServer.exe as administrator, the service is started and the NPQ Reports icon is displayed in the task bar (depending on the Windows version):
or here:

Reporting Server for Qlik V1.1.83 - INSTRUCTIONS and SETTINGS
3 / 72
Start browser and enter URL and port or right click on server icon (only when running on same PC as NPQ server) and click "Open server in browser". By specifying the URL and port 41000 (e.g.: localhost:41000 or IP address and port: 213.200.100.171:41000 or NPGeoMap.info:41000) the web interface is started, default standard user is "admin" with default password "admin". Please change this password immediately to prevent misuse. For Https the port 41001 is preset, the port can be set to any port (if free and accessible) in the file "C:\npqreports\npqReportServer.exe.config" (<setting name="httpPort" serializeAs="String"> <value>41000</value> </setting> <setting name="httpsPort" serializeAs="String"> <value>41001</value> </setting>) Attention: with this method, NPQReports Server is terminated when the user concerned logs off. For testing purposes, this method is well suited and can be installed without much effort. Attention: delete browser cache after update (Chrome: F12, „Disable Cache“)
Due to the Sense February 2020 API changes, an extension must be
installed (NPQReportsServer.zip) to ensure secure communication
between Sense and NPQ reports.
o Important: Sense 2020 Patch 1, Februar 2020 is
important because of a Sense Bug:
JIRA Issue: QB-454 Printing service fails to render
images on recent Windows versions

Reporting Server for Qlik V1.1.83 - INSTRUCTIONS and SETTINGS
4 / 72
Installation of updates:
After installation and first start, directories are created as shown. The data directory contains all data (sources, reports,...) and settings. For an update of the software, stop the NPQReports service or, if you call it via *.exe, the program, delete all directories except the "data" directory and insert the new version (unpack). If the *.config files contain settings that differ from the default, these settings must also be saved beforehand and then restored. Since version 1.1.78 it is also possible to define the database folder freely, so data and program can be separated. The entry: <setting name="databasepath" serializeAs="String"> <value> c:\npqreports\data</value> in the file "npqReportServer.config" would have to be adjusted to the appropriate path.

Reporting Server for Qlik V1.1.83 - INSTRUCTIONS and SETTINGS
5 / 72
Start as a user other than the logged on user or as a service (allow user to run http/https services)
If you want to start NPQ reports as another user or as a service, you must allow the user to run http/https services. 1. open the cmd (command shell) as ADMINISTRATOR 2. Enter "whoami" and press Enter to obtain your fully qualified user name. 3. type the following netsh command and replace your fully qualified user name netsh http add urlacl url=http://*:41000/user=FullyQualifiedUserName 4. repeat for https netsh http add urlacl url=https://*:41001/ user=vollqualifizierterBenutzername This allows you to run NPQReportsServer.exe as an independent user, in case your own user might be logged off automatically after a longer period of inactivity (Windows Server settings!). If the PC on which NPQReportsServer.exe is started is restarted, the NPQReports server must also be restarted!
Due to the Sense February 2020 API changes, an extension must be
installed (NPQReportsServer.zip) to ensure secure communication
between Sense and NPQ reports.
o Important: Sense 2020 Patch 1, Februar 2020 is
important because of a Sense Bug:
JIRA Issue: QB-454 Printing service fails to render
images on recent Windows versions

Reporting Server for Qlik V1.1.83 - INSTRUCTIONS and SETTINGS
6 / 72
Start as service (Windows Service, for continuous operation):
Before you install the service, you must allow the Windows user to log on as a service: 1. Log on with administrator privileges to the computer from which you want to grant the accounts the "Log on as service" privilege. 2. open Control Panel/Administrative Tools, click Local Security Policy Expand Local Policy, click Assign User Rights. 3. In the right pane, right-click Log on to Service and select Properties. 4. add the user and save. Install the NPQ Reports server service. Run the file "npqReportService.exe" as ADMINISTRATOR (right-click the file and select "Run as Administrator"). 2. enter the user name as above: domain\user name or .\user name 3. enter password 4. click on OK. !Important! If you want to use QlikView objects in reports, the user under which the service runs must have an installed QlikView license: Locate the QlikView executable file, usually located at C:\Programs\QlikView\Qv.exe. Right-click on this file while holding down the SHIFT and CTRL key combination and select "Run as a different user". Enter the credentials of the Windows user associated with the NPQ Reports service and verify that QlikView Desktop is enabled.
This will also restart the service with the assigned user credentials even if the PC/server is restarted.
In Sense muss die Extension NPQReportsServer.zip installiert werden – siehe auch bei vorher angeführten Installationsarten!
Please also read the file \npqreports\npqReadme.txt, which contains further details about the installation!

Reporting Server for Qlik V1.1.83 - INSTRUCTIONS and SETTINGS
7 / 72
Licensing
The licensing is done for the device/PC/server where NPQReports Server is installed. NPQReports reads a "Serial Number" which you copy into a mail to [email protected] to request the license. For a time limited demo license the transmission of the "Serial Number" is not necessary, it can be requested by simple mail, or the demo license will be automatically sent to the given company email address after download from the website.
The license code contained in the license file (license-7-1.npls for server license, or license-7-1.npld for demo license) has to be copied to the "License" field.

Reporting Server for Qlik V1.1.83 - INSTRUCTIONS and SETTINGS
8 / 72
Clicking on "Save" saves the license and displays whether the license is valid and updates further information.

Reporting Server for Qlik V1.1.83 - INSTRUCTIONS and SETTINGS
9 / 72
Security and User (report author/creator)
NPQReports offers the possibility to create users (administrators, creators and administrators of sources, reports, etc.). Users have access to the Management Console, in contrast to "Recipients", by which the recipients of the reports are meant, these are to be created under the menu item "Recipients" and after creation as "Recipient", have the possibility to see only the area "MyReports" in the reporting warehouse/portal and from there to see the reports saved for the respective Recipient, to move them within a folder structure, or to download and print them.
With the button "New" a new "Role" can be created and rights can be assigned to it. If a user group exists in the Windows Server ActiveDirectory, which is identical with the name of the role, the members of this group can automatically log on when the "Accept Active Directory Logins" switch is activated.

Reporting Server for Qlik V1.1.83 - INSTRUCTIONS and SETTINGS
10 / 72
The role "User" (but could also be named "Report Designer", "Developer", ...) could have the following rights: with the settings in the example the user could see/read sources, but not edit them, because sources (data sources) might be created and maintained centrally only by the administrator. The user in the example screenshot could create reports and also connect them to a source in read-only mode, that means that he cannot change the source. Attention: Choose permissions for roles in such a way that security settings and access rights defined in the Sense QMC will not be overridden!

Reporting Server for Qlik V1.1.83 - INSTRUCTIONS and SETTINGS
11 / 72
With "+New" a new user (report creator) can be created and assigned to a role. After saving with "Save" a user password can be set and the user (report creator) can change it after the first login.
If Section Access is used, the access data for the respective user can be defined (for the printout from "Design Reports"). State" defines whether the user is active or "On Demand User" defines whether this user is an "OnDemand" user.

Reporting Server for Qlik V1.1.83 - INSTRUCTIONS and SETTINGS
12 / 72
Administration
SMTP settings for sending mails are entered in the "Settings", similar to many email clients. Under "Recipient Message" a standard mail text with access data is defined, which report recipients ("Recipients") receive after adding a recipient. Within the message text, NPQ variables like: [#Recipient#], [#Password#], [#Attachment#], [#User#] , allow personalization of the mail. ATTENTION: Please note that specifying the personal email address as the sender's email may cause the email address to be recognized as a SPAM distributor if large amounts of reports are sent to many recipients in a short time. Check the settings of your mail server! Maybe you distribute the reports only via the Export Folder, or use Mass Email Services (e.g.: SendInBlue, Mailjet, ..) for sending!
The item "Mail Messages" defines mails that are sent as standard when creating reports for recipients and simultaneously storing them in "MyExports". "Attachment Message" defines the standard mail that appears when sending a PDF report (or PPT) to the recipient. Both texts can be overwritten by job-specific texts.

Reporting Server for Qlik V1.1.83 - INSTRUCTIONS and SETTINGS
13 / 72
Under "Running Tasks", all processes are displayed and can be used to check whether any tasks (connection to the database, loading metadata, printing reports, etc.) are still unfinished, or how long they have taken. Tasks can be terminated with "Cancel Current Task"! With "Download Log File" the log file can be downloaded from the server, which documents all activities and possible errors.

Reporting Server for Qlik V1.1.83 - INSTRUCTIONS and SETTINGS
14 / 72
Recipients
"Recipients" are the report recipients, which can be created manually or imported (from Excel lists, etc.). The relationship to the job/report is established by the mail address and, once created, a mail is also sent to the "Recipient" informing him/her of the receipt. The "Recipient" can be added to a group and with the button "Notifications" it can be defined whether the recipient should receive a message after a job has been executed (... that there is a new report in his export folder). In jobs, you can also specify whether the message should be sent with an attachment (PDF report, etc).

Reporting Server for Qlik V1.1.83 - INSTRUCTIONS and SETTINGS
15 / 72
Search function: In the areas Recipients, Jobs, Sources, Reports, search and filter functions are available by selecting the respective search field. The respective field is displayed below the search field (in this example: "Search Recipient Groups"). The table below can be sorted in ascending or descending order by clicking the arrow.
Click on the down arrow in the search field to select the search field in which to search or filter. The search starts by typing a letter.

Reporting Server for Qlik V1.1.83 - INSTRUCTIONS and SETTINGS
16 / 72
All entries in areas (Reports, Sources, Jobs, Recipients where useful) can be assigned to a "Manager". New entries (Reports,...) are automatically assigned to the creating user for the time being, this can be changed by authorized users at any time (in case of a change of employees, etc.). Existing reports (Sources, Jobs,..), which do not yet have an entry for managers, must be assigned to a manager by an administrator. Sources are only displayed to administrators and the respective manager. Reports are also only displayed to administrators and managers (if the report has the appropriate authorization) or to all with the "Shared" setting. Only authorized persons (rights defined under "Role") can change or delete the entry for the manager; access to reports, sources, jobs is controlled by group membership in the "Access" field; if this field is empty, all users have access according to their roles. Users cannot be deleted if they are assigned as managers in one or more records.

Reporting Server for Qlik V1.1.83 - INSTRUCTIONS and SETTINGS
17 / 72
Under "Details" various details about the recipient can be inserted, which can then also be used as filters in the jobs (e.g. in the field "Custom 1" an entry for the sales territory of the recipient, see instructions on filters).
Under "Address" - if desired - address data of the recipient are entered, which can then be used again for filtering in jobs.
By clicking on "Save", the data is saved and the recipient receives a mail with his access data for the export folder (reporting warehouse). Clicking on the button "Send Login Data" triggers this process manually (in case the recipient has deleted the mail by mistake, etc.).

Reporting Server for Qlik V1.1.83 - INSTRUCTIONS and SETTINGS
18 / 72
Recipients receive this mail after creating and can log in by clicking on the URL (please pay attention to spelling as link) and the access data. Afterwards you might have to change the password in your profile on the top right.
By clicking on the link in the e-mail and entering the access data (e-mail and password), the report recipient can access the report portal (reports warehouse). The report recipient can organize his reports there, can create new folders (the basic folder "My Exports" cannot be changed!), can rename reports, move them to new folders or delete them.

Reporting Server for Qlik V1.1.83 - INSTRUCTIONS and SETTINGS
19 / 72
Import recipients
Any number of Recipients can be imported from an Excel file. A corresponding template can be loaded onto the local PC with "Import" -> "Get Template". This template contains all the fields that can be filled in when creating a Recipient as column headers. Not all fields have to be filled, mandatory fields are "Mail" and "Name", whereas the field "Mail" has to be unique.
Important: with "Notification" = True you define that a mail with the access data for the "export area" of NPQReports will be sent immediately when importing; with a very large number of Recipients this can lead to overload of the mail server! Important: If recipients belong to more than one group, they could be separated by semicolons (e.g.: "Sales;Administration"!

Reporting Server for Qlik V1.1.83 - INSTRUCTIONS and SETTINGS
20 / 72
When the Excel file is ready for import, the import can be started.
Afterwards, the import can be checked with "Show Log". The import can be started several times and only the fields changed in the import list (e.g.: change in the membership of a group) are corrected in the case of recipients already existing in the database.

Reporting Server for Qlik V1.1.83 - INSTRUCTIONS and SETTINGS
21 / 72
Create a Recipient Group:
„+New“ adds a new group and will be activated with „Active“.

Reporting Server for Qlik V1.1.83 - INSTRUCTIONS and SETTINGS
22 / 72
Creating a source (connection to a Qlik app):
To connect reports/reports to a Qlik application, a source must be defined. With "+ New" a new source can be created. Virtual Proxy Prefix is supported since version 1.1.60. The manager for the respective source (entry in the upper right corner) is preset with the active user for new sources, but can be changed by authorized users at any time.

Reporting Server for Qlik V1.1.83 - INSTRUCTIONS and SETTINGS
23 / 72
With "Caption" a description for the source can be given. This is only for better differentiation, internally the "Source ID" is used in the report database, which is automatically entered when saving. The ID can be changed and copied with these icons. The "Import ID" is especially important when importing and exporting reports -> See "Import/Export" of reports. "Type" defines the type of source, possible are QlikView, Qlik Sense Server and Sense Desktop Apps. Objects of several types can be used simultaneously in the reports. "Server" has to be entered in Sense Desktop with the local call of Sense Desktop via the browser (http://localhost:4848). "Path" is the path and file name of the respective sense app. "Access" defines which roles have access to this source - if the field is empty, all roles have access, whereas a fine tuning can again be controlled within the roles by the Admin.
When connecting to a sense server, enter the URL of the sense server under "Server" and the domain under "Domain". Alternatively, IP addresses can also be used. "App ID" can be seen most easily when calling the respective app from the sense server - the marked position is to be entered in "App ID".
"Access" defines which roles have access to this source - if the field is empty, all roles have access, although a fine tuning can again be controlled within the roles by the Admin. With "Application List" a list of available apps can be called up.

Reporting Server for Qlik V1.1.83 - INSTRUCTIONS and SETTINGS
24 / 72
Sources based on QlikView apps are opened with local QlikView, therefore a local, licensed QlikView desktop must be installed on the PC where NPQ-Reports Server is installed. With "Document requires authentication" you can enter "User" and "Password" if necessary to open the document. "Path" specifies the path and file name of the QlikView document/app.
"Document Information" shows information about the status of the app, "File Size" shows the file size, "Last Reload" shows the time of the last reload, "Last Cached" shows the time of the last execution of "Load Metadata" (loads all objects of the app as thumbnails - not the data! )
After saving the source (the source ID is filled with it), "Load Metadata" can be used to load thumbnails of the individual Qlik objects available in the application together with their description (and worksheet name), which are available when inserting the objects into a report. After successful loading of the thumbnails a success message is displayed from version 1.72 on.
Reporting Server for Qlik V1.1.83 - INSTRUCTIONS and SETTINGS
25 / 72
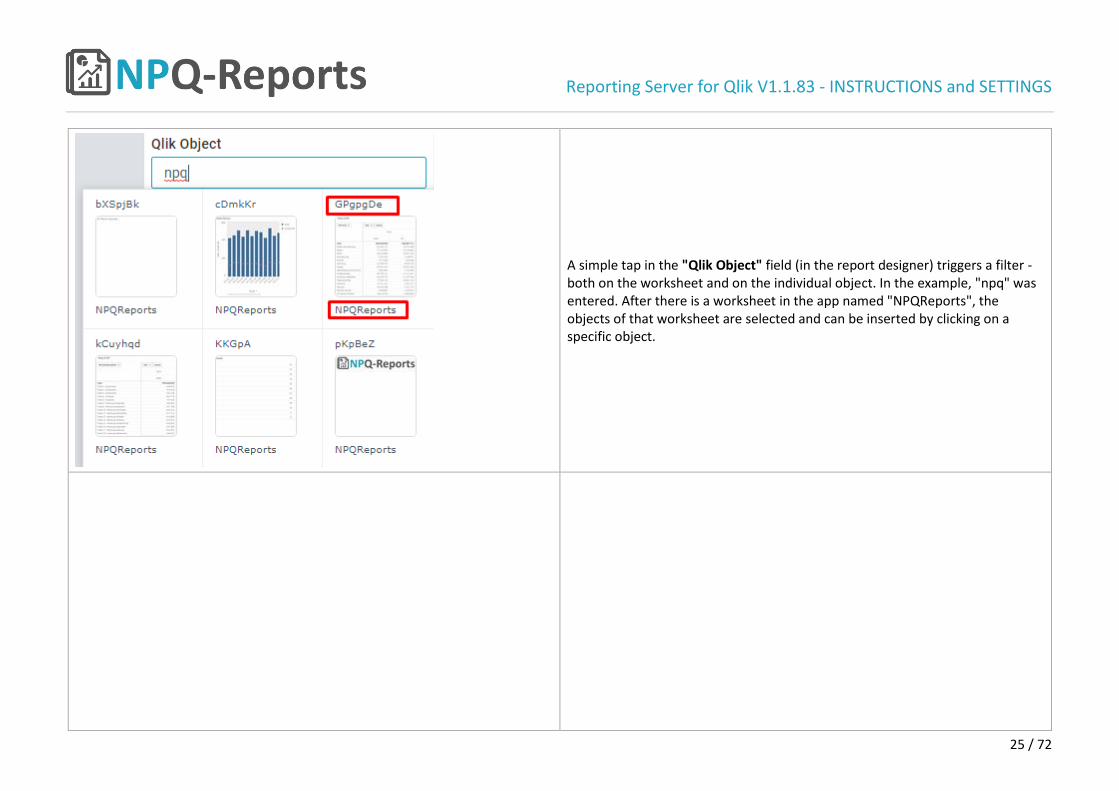
A simple tap in the "Qlik Object" field (in the report designer) triggers a filter - both on the worksheet and on the individual object. In the example, "npq" was entered. After there is a worksheet in the app named "NPQReports", the objects of that worksheet are selected and can be inserted by clicking on a specific object.

Reporting Server for Qlik V1.1.83 - INSTRUCTIONS and SETTINGS
26 / 72
Creation of reports with NPQ-Reports Server
Under "Reports" all already existing reports are listed. Depending on the security settings of the "Role" assigned to your user, you may only see the reports that are assigned to you.
With "+ New" you can create a new report, "Duplicate" copies an existing report. It is possible that a report has already been created which serves as a template for new reports (header, footer settings,...) and which can be used with "Duplicate" to create a new report so that not all settings have to be repeated.

Reporting Server for Qlik V1.1.83 - INSTRUCTIONS and SETTINGS
27 / 72
Under "Caption" the report can be named, whereby the name is not used internally as a reference to a specific report, but rather an ID (report number) is assigned when the report is created. Therefore the plain text designation of the report can be changed at any time. Under "Source", one or more Qlik Apps can be specified as the source for the respective report (also QlikView and Sense Apps mixed). Although the source is also displayed in full text, all relations are created in the background using the assigned source ID. "Select" confirms the selected sources.

Reporting Server for Qlik V1.1.83 - INSTRUCTIONS and SETTINGS
28 / 72
With "Share" (Private, Public) you can determine whether other users can see or change the report. Administrators may view and edit all reports. As long as the report is not set to "Published for Jobs" = Yes, automated jobs cannot be executed, so that incorrect delivery of incomplete reports is avoided. "Show Preview" shows a preview with the objects on the individual sheets of the report, if any are already available. It is also possible to create reports without "Sources", but these can then only contain text and other objects that do not show any data or formulas from Qlik Apps (headers, lines, page numbers, ... - possibly as a template!). Reports can only be deleted by the administrator and/or owner/manager!
The report is then saved with "Save" and the user can switch to the design interface with "Design Report".

Reporting Server for Qlik V1.1.83 - INSTRUCTIONS and SETTINGS
29 / 72
Reportdesign – WYSIWYG
The design interface: the most left column (1) shows the created pages; creating, duplicating and deleting new pages are additional functions. Important: a second page is always a separate area in a report, i.e.: if a table with e.g.: 300 rows is displayed on the first page, the space for the table is automatically enlarged downwards so that the table can then span several pages. Only after the entire table has been displayed will the contents of the second page be output. With the icons in column (2), you can add Qlik and other design objects (text, lines, rectangles) and insert objects into the clipboard. With the icons (3), objects already in the report can be duplicated, cut, arranged, deleted and further changes of position can be blocked. The worksheet (4) shows a preview of the objects already added and is used to position and align them. In section "Report" (5) global settings for the whole report are defined (sheet size, alignment, ...) and in section (6) the settings for the currently activated report object are displayed and can be changed there.

Reporting Server for Qlik V1.1.83 - INSTRUCTIONS and SETTINGS
30 / 72
"Report Format" defines the format (A4, A3, B4, B3, ...). „Report Unit“ defines the unit of measurement "Grid Snap Size" is the point spacing of the virtual grid on the Report Design sheet on which the objects snap. The smaller the value, the more detailed the arrangement, although "SnapToGrid" can also be overwritten with numerical information about the position and the object may then lose its connection to the grid. "Culture" sets the default for country-specific number and date formatting

Reporting Server for Qlik V1.1.83 - INSTRUCTIONS and SETTINGS
31 / 72
"Portrait" or "Landscape" define portrait or landscape format. "Page Margins" define the respective distances to the page margin. "Header" and "Footer" define whether a header or footer is used, which are repeated on each page. "Height" defines the respective height of these.

Reporting Server for Qlik V1.1.83 - INSTRUCTIONS and SETTINGS
32 / 72
After specifying the source ("Report Filter by Source"), filters can be set for the entire source and therefore for all objects of the report that originate from the selected source. A mouse click in the "Field" field opens the filter dialog and the data field to be filtered can be searched. Filters correspond to selections in Qlik and can be used in the same way e.g.: Bayern; Hamburg; Saarland >2015 <2019 More detailed instructions and examples are available by clicking the "Help?" button at the bottom left! Attention: "Report filters" are processed first, object filters follow! In order to provide different data for different recipients (e.g. sales areas, etc = recipient dependent selection) during the execution of a job and therefore to provide each recipient with the exact data for his or her responsibility, the values entered under "Details" and "Address" (in recipient settings) can be used as so-called job variables. If, for example, User is responsible for the federal state "Bavaria", the field "Custom 1" could be filled with the value “Bayern” and User1 would then only receive the values for Bayern throughout the entire report or – if filter set in an object -> the objects data will be reduced to Bayern. By clicking on "Set Job Filter Variable" the variables can be selected and inserted.
"Page Loop" is the possibility of outputting individual reports for all values of a field with selection on the respective field. In this case, one report for each state/Province.

Reporting Server for Qlik V1.1.83 - INSTRUCTIONS and SETTINGS
33 / 72
"Page Objects" lists all objects placed in the report. "Off Screen" shows whether an object extends beyond the selected page margin. By double-clicking on the respective object, the object is activated and the properties can be edited.
A condition can be set for the entire report, which causes the report to be executed only if the condition is true. The condition is queried after all existing filters are taken into account. This feature can be used for alerting/notification of certain conditions.

Reporting Server for Qlik V1.1.83 - INSTRUCTIONS and SETTINGS
34 / 72
Operation with mouse and keyboard:
If an object has been inserted (see below), it can be enlarged, reduced, moved, etc. with the mouse. Alternatively, the object can also be edited with keyboard commands: "Ctrl & >" moves the object, "Ctrl & +-" expands the object, similar to drawing programs.
Inserting Qlik objects (charts, tables, ...)
After dragging an object to the blank page, the object settings dialog appears:

Reporting Server for Qlik V1.1.83 - INSTRUCTIONS and SETTINGS
35 / 72
In the "Content" section, an object description can be entered under "Title"; if nothing is specified, the Qlik object ID is output.
"Qlik Source" - Selection of the source for the selected object (important, because there is also the possibility to specify multiple sources for a report). Clicking on "Qlik Object" opens a window that shows all objects of the respective source (app) as thumbnails. By clicking on an object, the ID is inserted into the field "Qlik Object" and ID and thumbnail appear in the report sheet. In "Qlik Object" the QlikID can also be entered directly (if a thumbnail is not yet available -> see "Load Metadata"). If the object ID in the "Title" is overwritten with a description of the object (e.g.: sales history), it will be displayed in the object on the report page (only for orientation, not in the printout).

Reporting Server for Qlik V1.1.83 - INSTRUCTIONS and SETTINGS
36 / 72
A simple tap in the "Qlik Object" field (in the report designer) triggers a filter - both on the worksheet and on the individual object. In the example, "npq" was entered. Because there is a worksheet in the app named "NPQReports", the objects of that worksheet are selected and can be inserted by clicking on a specific object.

Reporting Server for Qlik V1.1.83 - INSTRUCTIONS and SETTINGS
37 / 72
If the object ID in the "Title" is overwritten with a name of the object (e.g.: SalesByMonth), this name is displayed in the object on the report page (not in the printout).
Additional filter conditions can be inserted for each object, a mouse click in the "Field" field opens the filter dialog and the data field to be filtered can be searched. Filters correspond to selections in Qlik and can be used in the same way e.g.: Bayern; Hamburg; Saarland >2015 <2019 More detailed instructions and examples are available by clicking the "Help?" button at the bottom left! Attention: "Report filters" are processed first, object filters follow! In order to provide different data for different recipients (e.g. sales areas, etc = recipient dependent selection) during the execution of a job and therefore to provide each recipient with the exact data for his or her responsibility, the values entered under "Details" and "Address" (in recipient settings) can be used

Reporting Server for Qlik V1.1.83 - INSTRUCTIONS and SETTINGS
38 / 72
as so-called job variables. If, for example, User is responsible for the federal state "Bavaria", the field "Custom 1" could be filled with the value “Bayern” and User1 would then only receive the values for Bayern throughout the entire report or – if filter set in an object -> the objects data will be reduced to Bayern. By clicking on "Set Job Filter Variable" the variables can be selected and inserted.
Detailed instructions with examples for the filters are available by clicking on "Help?
"Top" is the distance of the container containing the object from the sheet edge, which, however, depends on the size (contents of the data field or the formula result to be displayed) of the preceding object and is therefore variable. "Fixed" fixes the object at the specified position - however, previous objects whose size cannot be predicted and are related to the amount of data may overwrite this object. "Left" is the distance from the left edge. "Width" and "Height" indicate the size of the container in which the object is displayed, with "Rotation" the object can be rotated. "Scale" allows the object to be scaled steplessly, so that the object can be adapted to the container size in such a way that, for example: all bars of a bar chart can be accommodated, displayed and will fit into the container.

Reporting Server for Qlik V1.1.83 - INSTRUCTIONS and SETTINGS
39 / 72
"Opacity" sets the opacity of the object, with values between 0 (transparent) and 100 (fully opaque). "Border Color” and “Border Width” define the frame color and thickness. "Cell Padding" sets the distance to the edge/frame of the object.
More detailed instructions for "Set Column Styles" including example in appendix 1!
If the object to be displayed is a table (Table, Pivottable), there are additional settings for this: "Print as Image" sets whether the table should be printed as an image, i.e.: it will look exactly like in Sense. In this case, either the size of the container must be adjusted so that all columns and rows fit into the container, or an appropriate scale factor is entered under "Size & Position". All following settings for fonts, etc. are not applicable for "Print as Image", because the appearance of the image is defined by Sense. "Show Caption" indicates whether the title of the object defined in Sense or QlikView should be printed. If “Print as Image” is not used, "Font", "Font Size", "Cell Border Color", "Cell Border Width" define font, font size, border color and width. "Max Rows" defines how many rows of the table are printed, which allows to print e.g.: only the top 20 rows in descending order (in reports that have QlikView as source, a "Top" filter could be used at this point, in Sense this function does not exist but tables can be sorted decending related to KPI's ). "Set Column Styles" activates an extensive settings dialog, which can be used to perfectly format a table, even a multi-page table (if "Print as Image" is not activated). The advantage of NPQReports internal table display is that fonts and all other design options are printed in perfect resolution at any enlargement. With "Column Settings" (this setting is only for backwards compatibility, all settings can also be made with "Set Column Styles") the individual columns of the table (not in "Print as Image") can be changed in terms of width, number format, line break. Under "Col" the column name has to be entered (look at the

Reporting Server for Qlik V1.1.83 - INSTRUCTIONS and SETTINGS
40 / 72
table header in Sense), "Width" determines the width of the column in millimeters (all other columns are adjusted so that they fit into the container again), "Num" determines whether a numeric value is to be displayed in the column, "Wrap" determines whether - if the field value does not fit into the column - a line break is to be made, otherwise parts of the field value are cut off.
New/additional settings for charts and "Tables as Images": The setting "HTML2Canvas" means that the NPQ's own rendering engine is used, which is very fast, but can in some cases display details (legend,...) incorrectly in multidimensional charts. In this case, "Qlik Printing" should be set, this method is slower but charts are displayed with all details. For almost all sense objects it is possible to display them in high resolution, the maximum resolution is 384 dpi. To display the fonts for legend, etc. contained in charts in the correct proportion, the setting "Size & Position" -> "Scale" must be adjusted if necessary. In this context it is important to deactivate the setting "Chart Suggestions" in Sense, otherwise the object will not be displayed in High DPI mode (in HTML2Canvas it is):
ATTENTION: if Qlik objects access external sources that require Internet access (background maps like Google, OSM or Vizlib objects) for display, Internet access must be available on the server that prepares the reports, otherwise these objects cannot be printed!

Reporting Server for Qlik V1.1.83 - INSTRUCTIONS and SETTINGS
41 / 72
Inserting text objects:
Text objects are objects that are not present in Sense and are defined in NPQ reports. Text can be typed in directly, or the result of Qlik field contents, variables and formulas can be displayed.
"Title" describes the object and, if nothing is entered in the expression field, is used as the text to be printed. This text is visible on the report sheet and can be used to determine the necessary field width, depending on the font size, etc. If the result of Qlik fields and formulas is to be displayed, a "Qlik Source" must be specified. NPQ reports internal variables for page number, date, time and report title can be added with the icons above the expression (fx) field. In the expression field ("Use any QlikView Expression/Variable to replace Title by Expression") all Qlik expressions and variables can be used to display the desired contents. In the example, concat() is used to display all provinces. When using Qlik formulas, it is important that the "Qlik Source" must be specified (also for expressions and Qlik functions, such as today(), which seem to be independent of an app, but are still calculated by the app).

Reporting Server for Qlik V1.1.83 - INSTRUCTIONS and SETTINGS
42 / 72
Filters are to be used as described in "Inserting Qlik objects".
"Top" refers to the position starting from the top edge of the sheet. This is variable, depending on whether a preceding text object is enlarged downwards due to large content. "Left" specifies the distance to the left edge of the sheet, "Width" specifies the width of the object. "Fixed" can fix the object at the inserted position - possibly it will be overwritten by the preceding object if the content of the preceding object is larger than expected. "Overflow" can have three settings: "No Linebreak" means that no line break is made and therefore the object is displayed as a single line. If the content exceeds the object width, "..." indicates that additional information is available. "Linebreak by Word" specifies that NPQ reports always try to make a line break after a whole word. "Linebreak by Character" indicates that a line break can be made after every letter, i.e.: it will be separated at any position, even within a word - depending on the space available. "Rotation" specifies that the text box is rotated at the specified angle.

Reporting Server for Qlik V1.1.83 - INSTRUCTIONS and SETTINGS
43 / 72
"Appearance" is used to design the text object, "Background Color" defines the fill color, "Opacity" sets the transparency, "Border Color" and "Border Width" define the frame color and thickness. "Padding" specifies the inner distance of the text to the object frame.
Settings for font, font size, color and other font attributes.

Reporting Server for Qlik V1.1.83 - INSTRUCTIONS and SETTINGS
44 / 72
Inserting line objects:
Line objects serve design purposes (delimitation header,...) and have no connection to the data model.
Information on size and position. "Fixed" fixes the line at the desired position, the extension of the previous object is not taken into account.
Information about transparency, color and width of the line (line is actually a color filled rectangle, therefore the name "border")

Reporting Server for Qlik V1.1.83 - INSTRUCTIONS and SETTINGS
45 / 72
Inserting rectangular objects:
Rectangles serve design purposes, optical summaries of several objects, etc. and have no connection to the data model.
Information on size and position. "Fixed" fixes the rectangle at the desired position, the extension of the previous object is not taken into account.
Information about fill color, transparency, frame color and frame width.

Reporting Server for Qlik V1.1.83 - INSTRUCTIONS and SETTINGS
46 / 72
The search function is also available for reports and allows searching/filtering in all relevant fields.

Reporting Server for Qlik V1.1.83 - INSTRUCTIONS and SETTINGS
47 / 72
File format, output, save, export and import of reports:
Reports can be output in the formats shown, click on the respective format to output the report and download it in the desired format with "Show Exports" and view it with "Show". "Delete" deletes all existing downloads. Changes can be undone or later changes can be made visible again and reports can be saved. Saving is not necessary for the preview. Important: When exporting to Excel, a new sheet describes a new worksheet in Excel! The name of the worksheet is defined by the "Page Title". Note:
deactivate “Header” in report settings, if you export to Excel or PPT, better define page headers inside your Excel or PPT template.
Templates can be defined for Excel and PowerPoint so that the objects are always transferred according to the template.

Reporting Server for Qlik V1.1.83 - INSTRUCTIONS and SETTINGS
48 / 72
Reports can be exported and re-imported, which is especially important if several people are not developing on the same NPQ Reports Server.
When exporting, the "file name" can be specified (default is the report name), the "import ID" can be overwritten with the import ID of the target if the same app exists as source on the target system but the "import ID" is different, so that the report can then be imported without an intermediate step. Important: If possible, the import ID of the leading system (production system,...) should not be changed. Instead, external editors/report developers should specify the import ID of the leading system during the export, so that the report can be imported there again after completion.

Reporting Server for Qlik V1.1.83 - INSTRUCTIONS and SETTINGS
49 / 72
If the source in question does not exist in the target system, it should be created first and then the import ID should be adjusted to the target systems ID when exporting from the source system. Reports without a source can also be imported without an import ID.

Reporting Server for Qlik V1.1.83 - INSTRUCTIONS and SETTINGS
50 / 72
Shipping to individual Recipients:
From the list "Show Exports" you can now - after marking a certain report - send it to an already created "Recipient" via mail as PDF, etc. (if SMTP settings are available) or save the report in "MyExports". The recipient will receive a mail with either the report as attachment or as notification that a new report is available in "MyReports". With the access data transmitted after the creation of the recipient, it can then be viewed in “MyReports”.

Reporting Server for Qlik V1.1.83 - INSTRUCTIONS and SETTINGS
51 / 72
JOBS, Scheduler
"Jobs" are used for processing, sending as email attachments or for provision in all export areas. With "+New" a new job is created and can be activated with the button "Active". "Access" defines which user has access to the respective job.
In the section "Reports" already defined reports are added with "Add". If reports are to be stored on hard disk, FTP, Dropbox, the file name for the respective user can be created dynamically using the available job variables (entry: "Filename"). If nothing is entered in this field, the name used in the report under "Caption" is used as the file name. The following variables are available:
• [#date] • [#year] • [#month] • [#day] • [#dayofweek] • [#dayofyear]

Reporting Server for Qlik V1.1.83 - INSTRUCTIONS and SETTINGS
52 / 72
• [#hour] • [#minute] • [#second] • [#job.recipient.Email] • [#job.recipient.Name] • [#job.recipient.Country] • [#job.recipient.State] • [#job.recipient.City] • [#job.recipient.Zip] • [#job.recipient.Company] • [#job.recipient.Department] • [#job.recipient.Office] • [#job.recipient.Custom1] • [#job.recipient.Custom2] • [#job.recipient.Custom3]
The setting "All filters must apply" is used to trigger sending only if all filters apply and is e.g.: useful to send reports only if values defined in the filter are exceeded (Alerting!)

Reporting Server for Qlik V1.1.83 - INSTRUCTIONS and SETTINGS
53 / 72
With activation of "Cycle", a report can be processed and saved individually for each value of a dimension. In addition to specifying the source (a report can contain several "sources"), the dimension from the data model must be specified -> in the example opposite, the report with the data for province should be output individually. To avoid unintentional overload (e.g. a field date could be used unintentionally, which would lead to thousands of reports) of the server, the maximum number is preset to 100, but this specification can be changed arbitrarily. For the file name you can also use so called NPQ variables (click on ? for instructions). Attention: the use of "Cycle" is recommended only for the storage of reports, for the email dispatch the use of so-called job filters is recommended, so that each recipient receives the report with the data belonging to it.

Reporting Server for Qlik V1.1.83 - INSTRUCTIONS and SETTINGS
54 / 72
Recipients or whole groups are added with "Add".
In section "Mail", the switch "Send Mail" = “YES” determines that the report is sent as a mail attachment. The prerequisite for this is that the "Notification" button is activated for the recipient. If "Send Mail" is confirmed with "NO", but "Notification" is activated for the recipient (within recipient settings), the recipient will not receive an attachment, but only a notification that a new report is available in his export area. If both are deactivated, the report will be placed in the export area at the defined time whithout any notification of the recipient, which is useful for reports that are always executed at the same time, because the recipient knows anyway that e.g. the sales report is available for him in the export area at 5 p.m. every day. This also avoids an unnecessary load on the mail server. The email can be modified and variables like [#User#] can be used. With the button "Run Job now" the job can also be triggered manually for tests.

Reporting Server for Qlik V1.1.83 - INSTRUCTIONS and SETTINGS
55 / 72
"Embed PNG Reports in Mail" inserts the individual objects of the report into the respective email, the position of the object can be defined by the variable [#png].
There are several ways to distribute reports. These can be sent as email ("Send Mail" in Mail settings), additionally reports can be stored in the recipient report kiosk ("Recipient Storage"), on a "FTP Storage", on a shared network drive ("Network Share") or on "Dropbox". For all storage targets, settings for the root folder can also be set with the job variables. With the setting shown on the left, for example, a separate directory with the name of the Recipient would be created for each Recipient and the report associated with the Recipient would be stored in this directory. The setting can be checked with "Test Settings".

Reporting Server for Qlik V1.1.83 - INSTRUCTIONS and SETTINGS
56 / 72
In the area "Schedule" you define the time(s) of execution, with the button "Active" the execution planning is set active. Attention: The used report has to be set: “Published for Jobs” = “ON”, otherwise the job will not work!

Reporting Server for Qlik V1.1.83 - INSTRUCTIONS and SETTINGS
57 / 72
"Beginning on" defines the start and with the time switch the execution time can be set. If you want to run a report several times a day, separate jobs have to be created for each execution time (“Duplicate” and change execution time).

Reporting Server for Qlik V1.1.83 - INSTRUCTIONS and SETTINGS
58 / 72
This setting specifies, for example, that the report is sent every Monday and additionally on the 1st of every month. With "execute every" you can determine that with setting "2" the report is only processed on every 2nd Monday and additionally every second month on the first day of the month. With the "Interval" setting you can additionally set the processing in an interval of XXX minutes (also useful for "Alerting" - only notification when data changes). In the example on the left, the job is executed every day from 06.15h to 18.15h every three hours.

Reporting Server for Qlik V1.1.83 - INSTRUCTIONS and SETTINGS
59 / 72
On Demand Reports:
With "ON Demand Reports", reports can be printed "OnDemand" by persons previously created as users - i.e.: an OnDemand user can call up a report via a link or directly in the OnDemand menu of NPQReports, set previously defined filters (in addition to any filters already defined in the report), print them out and also send them by email to recipients in the system or to any person.
On Demand Reports – Roles and users:
In the "Security Settings" an "OnDemand" role must be defined, which ideally only allows read access to the "OnDemand" part.

Reporting Server for Qlik V1.1.83 - INSTRUCTIONS and SETTINGS
60 / 72
"OnDemand Users" must be specially marked and assigned to a previously defined role. An OnDemand User can also be used by several people to log in without login, print and send. In any case, it is important to ensure that the company's security guidelines are not ignored.
All fields in "Details" can be used as variable filters in the OnDemand dialog.

Reporting Server for Qlik V1.1.83 - INSTRUCTIONS and SETTINGS
61 / 72
On Demand Reports - Define OnDemand Reports:
With "+New" an already existing report is added as "OnDemand Report". In addition to the already existing filters, so-called runtime filters can be defined.
These additional filters can be preassigned and it must be decided whether a filter should always apply ("Locked" = not changeable by the user), or whether the user may enter a filter value ("Edit"). With the setting "Keep", "Clear", "Replace" the already existing report or object filters can be switched on or off for the OnDemand Report, or they can be deleted or replaced by new filters ("Replace"). "Save" saves the settings.

Reporting Server for Qlik V1.1.83 - INSTRUCTIONS and SETTINGS
62 / 72
In the "Settings" detailed parameters can be set for execution.
"Show Login" determines whether the OnDemand user must log in with his User.Login when the report is executed or whether the user is preset and the report can be opened with this user data without further login dialog. With a click on "Click here to open ..." a link is created with the settings made and opened in the browser. Under "Access" you can specify which roles have access to the respective OnDemand report. This can be used to control which reports appear in the OnDemand user dialog - depending on the respective user.

Reporting Server for Qlik V1.1.83 - INSTRUCTIONS and SETTINGS
63 / 72
This link can be sent to the user, who can then open the OnDemand dialog in the browser and - depending on the settings - see the dialog opposite, which allows the user to enter filters, execute the report and send it.
"Execute Exports - Settings" define details about the execution. "Report" - determines whether a different basic report can be used/selected within OnDemand. "Export Type" - User can specify at runtime in which format the report is output (PDF, Excel, ...) "Clear Report Filter" - User can switch off filters already defined in the report "Add/Remove Filter" - allows the user to add more filters (but for this purpose the user must know the field names in the data model)

Reporting Server for Qlik V1.1.83 - INSTRUCTIONS and SETTINGS
64 / 72
"E-Mail Message Settings" allow settings for e-mail transmission. Recipients can be preset, can be selected by the user at runtime or any mail address can be typed in at runtime.
"E-Mail Message Settings" sets parameters for access and settings for mail, recipients, message content and subject.

Reporting Server for Qlik V1.1.83 - INSTRUCTIONS and SETTINGS
65 / 72
Ausführung Endbenutzer:
When the link is called up, the end user receives the following dialog depending on the settings made for this OnDemand Report. With this dialog the user can start, view and, if required, send the report.
Performance:
The speed at which reports are processed, sent and stored in the various destinations always depends on the respective sense configuration, the complexity and size of the app, the hardware used and the network performance. Sending emails to hundreds of recipients is determined by the email server used and may take some time. Saving a 30-page report on hard disk or in the report kiosk for 500 Recipients with filters on 16 sales territories takes between 2 and 3 minutes. In general: if many files are created (jobs), deactivate npqReportServer.exe in Windows Defender! Defender checks every single PDF for viruses on execution and that costs time!
Reporting Server for Qlik V1.1.83 - INSTRUCTIONS and SETTINGS
66 / 72
Appendix 1:
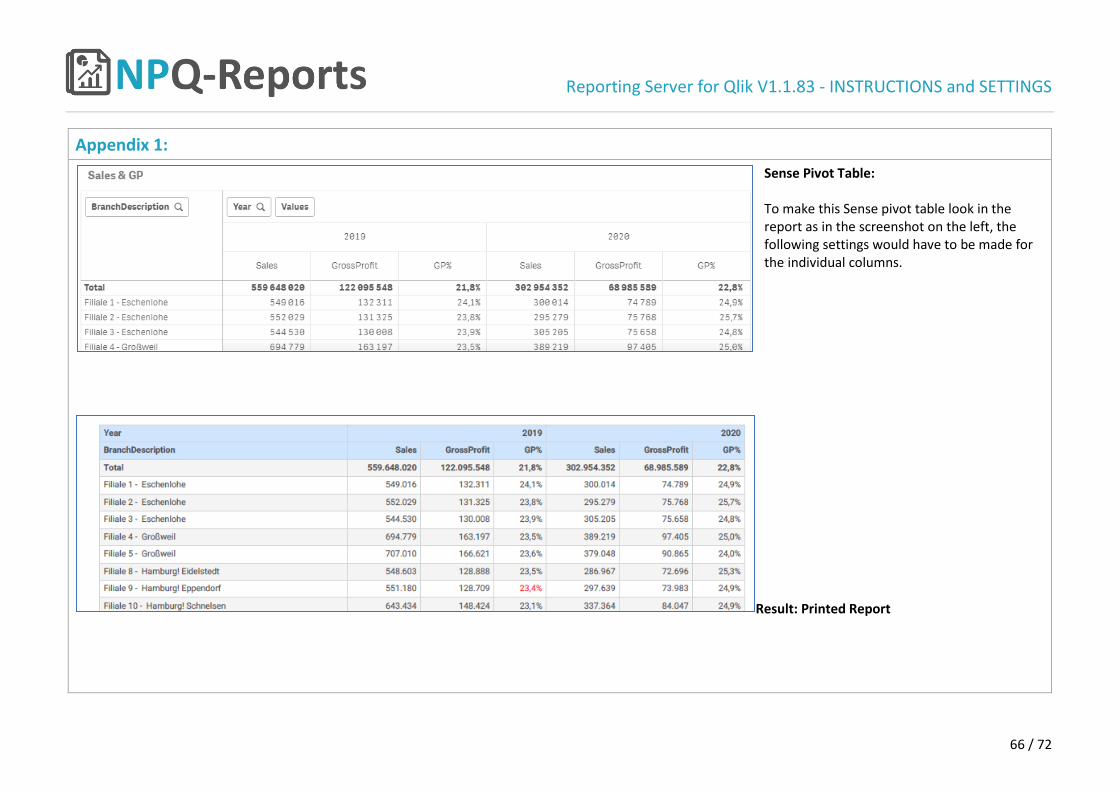
Sense Pivot Table: To make this Sense pivot table look in the report as in the screenshot on the left, the following settings would have to be made for the individual columns.
Result: Printed Report

Reporting Server for Qlik V1.1.83 - INSTRUCTIONS and SETTINGS
67 / 72
The following explanations will show the necessary settings for getting the table output on page 62: Each column can be defined either with the column caption (“Column Name”) or with the column number (“Column Start/End”). For orientation, a freely selectable name can be defined for each column style. Styles for header and body are defined separately and the respective dialog appears only after activating "Show header style" or "Show body style". This screenshot formats the first column, (Column Start 1, Column End 1), the column width is set to 71 mm, the header should have a blue background, should be left-aligned - like all other values in the column because text is expected from data - and should be printed in Bold. Alternatively, only specific header rows can be formatted with "Header row(s)". The "Column Body Styles" should only apply to "None Total Values" and be printed "Normal".

Reporting Server for Qlik V1.1.83 - INSTRUCTIONS and SETTINGS
68 / 72
Columns 2 and 3 (Sales, GrossProfit) should have the same width ("Column Width": 21), header settings as in previous column, exception: "Align" right, because of numbers. Body also "Align" right.

Reporting Server for Qlik V1.1.83 - INSTRUCTIONS and SETTINGS
69 / 72
Column 4 (GP%) should - because only %values are expected - be narrower ("Column width" = 15), header like previous column, body should - if values below 23.5% ("Condition Value", "Condition <=") are displayed - be colored red.

Reporting Server for Qlik V1.1.83 - INSTRUCTIONS and SETTINGS
70 / 72
Same settings as Col2,3, but „Column Start“ 5 and „Column End“ 6

Reporting Server for Qlik V1.1.83 - INSTRUCTIONS and SETTINGS
71 / 72
Same settings as Col4, but „Column Start“ 7 and „Column End“ 7

Reporting Server for Qlik V1.1.83 - INSTRUCTIONS and SETTINGS
72 / 72
Causes every 2nd row of the value range to be highlighted in light gray for better readability. Valid for all columns ("Column Start" 1, "Column End" Blank for all), enable only "Show Body Style" (previous Header settings will not be overwritten , “Valid for” None Total Values, enable all "Odd Rows" and set gray fill color, set "Align" to "Automatically by Content" (text left, numbers right aligned) .