remote tech 14 - eci software solutions · pdf fileremote tech 14.6 (compatible with e...
TRANSCRIPT
Remote Tech 14.6 (Compatible with e-automate 8.5 and 8.7 SP 1)
Installation & Configuration Guide
Revised: 11/19/2015 ©2015 ECi Software Solutions, Inc. - All rights reserved Confidential and Proprietary
Page 1
TABLE OF CONTENTS INSTALLATION ...................................................................................................................................................................... 3
NETWORK PREREQUISITES....................................................................................................................................................... 3 INSTALLING INTERNET INFORMATION SERVICES ........................................................................................................................... 3 BARCODE APPLICATIONS ......................................................................................................................................................... 5 ACQUIRING REMOTE TECH INSTALLATION FILES........................................................................................................................... 5 SUPPORT ............................................................................................................................................................................. 6
Installation ................................................................................................................................................................... 6 Product ......................................................................................................................................................................... 6
REMOTE TECH DEPLOYMENT ................................................................................................................................................... 6 64 BIT OPERATING SYSTEMS ................................................................................................................................................... 6 INSTALLING REMOTE TECH ...................................................................................................................................................... 6 DATABASE CONNECTION FAILURE ........................................................................................................................................... 14 WORKING WITH LICENSE KEYS ............................................................................................................................................... 18 INSTALLING A LICENSE KEY .................................................................................................................................................... 18 MOVING SERVERS ............................................................................................................................................................... 20 MULTIPLE COMPANY SITES ................................................................................................................................................... 21
TURNING ON REMOTE TECH .............................................................................................................................................. 22
CREATING REMOTE TECH USERS IN E-ADMIN................................................................................................................... 24
LINKING EMPLOYEES TO E-AUTOMATE USERS ................................................................................................................. 26
CONFIGURING TIME CARD ENTRY ..................................................................................................................................... 28
CREATING PAYROLL GROUP ................................................................................................................................................... 29 CREATING PAY PERIODS ....................................................................................................................................................... 30 CUSTOMER RECORD ............................................................................................................................................................ 32 ACTIVITY CODE CATEGORIES .................................................................................................................................................. 33 ACTIVITY CODES .................................................................................................................................................................. 36
ON HOLD CODES ................................................................................................................................................................ 38
DELAY CODES ..................................................................................................................................................................... 42
SETTING THE REQUIRE DELAY CODE OPTION ............................................................................................................................ 42 CREATING DELAY CODES....................................................................................................................................................... 44
CONFIGURING SERVICE MANAGERS ................................................................................................................................. 46
MARKING A TECHNICIAN AS A MANAGER ................................................................................................................................. 47 IDENTIFYING SERVICE TECHNICIAN’S MANAGER......................................................................................................................... 48
CREATING CUSTOMER ONSITE WAREHOUSES .................................................................................................................. 49
CREATING A CUSTOMER ONSITE WAREHOUSE .......................................................................................................................... 50
INVENTORY ITEM CROSS REFERENCE ................................................................................................................................ 53
CURRENT ITEM NUMBER ...................................................................................................................................................... 54 CURRENT AND HISTORICAL VENDOR NUMBERS ......................................................................................................................... 55
EMAIL AND FAX INVOICE INFO .......................................................................................................................................... 56
Revised: 11/19/2015 ©2015 ECi Software Solutions, Inc. - All rights reserved Confidential and Proprietary
Page 2
Installation
Network Prerequisites In order for your network environment to support Remote Tech you must configure your network appropriately as well as meet the minimum system requirements. The following is a list of network Remote Tech prerequisites. While we offer programs to run on your network, you are responsible to configure your network. We recommend you work with a competent network professional to accomplish the network requirements. • Windows 7 Professional • Windows Server 2008 R2 • SQL Server 2008 and SQL Server 2012 • ASP .Net 4.0 • E-automate 8.5 or higher • Must have network set up so that the web server can see the data server over TCP/IP • Web server and e-automate data server should be two different machines • Must have at least one external IP address • Recommend the setup of a sub-domain DNS entry that resolves both internally and externally.
Such as service.mycompany.com/RTS • Recommend a knowledgeable IT professional assist with DNS mapping and installation • e-info server software can inhabit the same server as Remote Tech’s server software
Installing Internet Information Services In order for Remote Tech to work on the server in which you install Remote Tech Server, you must have Microsoft Internet Information Services (IIS) installed and running. If you proceed with the installation of Remote Tech Server without IIS installed, the installation will stop and you will be directed to install IIS before installing Remote Tech Server. We recommend you consult with a qualified IT resource to ensure IIS is running properly before you install Remote Tech. The following image shows you the recommended IIS settings.
Revised: 11/19/2015 ©2015 ECi Software Solutions, Inc. - All rights reserved Confidential and Proprietary
Page 3

Revised: 11/19/2015 ©2015 ECi Software Solutions, Inc. - All rights reserved Confidential and Proprietary
Page 4

If you have configured these settings as shown in the above image and you are still having trouble, you may contact ECi e-automate customer care at [email protected].
Barcode Applications Using your smart phone or tablet, RemoteTech provides the ability to scan the barcode on a piece of equipment to record your arrival and departure as well as verify the equipment being serviced. Upon arriving at a location you scan the barcode on the piece of equipment you are servicing and RemoteTech automatically records the current date and time as the arrival date and time, and verifies you are at the correction location and servicing the correct piece of equipment. When you are done servicing the equipment, you can scan the barcode label again and RemoteTech automatically records the date and time of the scan as the departure time. To be able to use the scanning functionality you must have a barcode application installed on your smartphone or tablet.
If you are using an Android device, you need to install the Barcode Scanner app. The Barcode Scanner app works for both scanning QR codes for automatically entering arrival and departure times and scanning standard UPC barcodes to add materials to a call.
There is currently not an iOS barcoding application that is compatible with RemoteTech.
Acquiring Remote Tech Installation Files The installation files for Remote Tech as well as the documentation can be acquired by contacting e-automate Customer Care at [email protected]. You will be directed on how to download and access the installation files.
Revised: 11/19/2015 ©2015 ECi Software Solutions, Inc. - All rights reserved Confidential and Proprietary
Page 5

Support When installing and working with Remote Tech there are a few different kinds of support you may need.
Installation If you need installation assistance, contact e-automate Customer Care at [email protected].
Product If you need software product support you can contact e-automate Customer Care team at [email protected].
Remote Tech Deployment When using Remote Tech, you use an internet browser to access the Remote Tech Server. Because Remote Tech runs in a browser window you only need to install Remote Tech Server and Remote Tech can work through virtually all internet browsers whether on a smart phone or internet capable laptop, currently Remote Tech works through following smart phone operating system browsers: • iOS • Android • Blackberry
64 Bit Operating Systems If you are using a 64 bit operating system in order to run Remote Tech you are required to allow your operating system to run 32 bit applications. For additional information contact e-automate customer care at [email protected] to make the necessary adjustment to your system.
Installing Remote Tech Once IIS has been installed you can then install you new version of Remote Tech. Remote Tech Server must be installed on a web server that is accessible to your technicians based on your method of deployment.
Revised: 11/19/2015 ©2015 ECi Software Solutions, Inc. - All rights reserved Confidential and Proprietary
Page 6

In order to install Remote Tech you will need to access the installation files you obtained from e-automate customer care. The installer for Remote Tech must be run as an administrator. However, Microsoft does not provide the option in the right-click menu to run an .msi file as an administrator. Therefore, you must run the installer using a command prompt. 1 In your Start menu search field, enter cmd. Your search field differs depending on which
version of Windows you are using.
Windows 7 Search field
Windows 8 Search field
2 Right click on the cmd option and select Run as administrator. A command prompt opens as an administrator.
3 Type in the full path to where you saved the Remote Tech installer including the file name. If there are any spaces in the path make sure to include the path in quotes. For example, “C:\Users\username\My Documents\RemoteTech.msi” Hit ENTER.
Revised: 11/19/2015 ©2015 ECi Software Solutions, Inc. - All rights reserved Confidential and Proprietary
Page 7

4 The installer displays the Welcome window.
To continue the installation, click [Next] to continue.
5 The End-User License Agreement window displays.
Read through the license agreement and check the I accept the terms in the License Agreement checkbox. Click [Next].
Revised: 11/19/2015 ©2015 ECi Software Solutions, Inc. - All rights reserved Confidential and Proprietary
Page 8

6 The Web Application Settings window displays.
You use this window to indicate under which website you would like to install your Virtual Directory and to name your website’s virtual directory. In the Web site field, use the drop down window to select the website under which you would like to install your Virtual Directory. We recommend you select, Default Web Site. In most server installations, you only get the one choice. In the Application name field, enter the name you want to give the virtual directory. The installer suggests you name the virtual directory, RTS, but you can select a new name if necessary. We recommend you leave the naming as suggested by the installer.
Revised: 11/19/2015 ©2015 ECi Software Solutions, Inc. - All rights reserved Confidential and Proprietary
Page 9

7 The Destination Folder window displays.
While you can change the installation location, we recommend that you leave the default installation location. To change installation locations, click [Change…]. In the Change destination folder window that displays identify the location and click [OK]. Back in the Destination Folder window, click [Next] to continue the installation.
Revised: 11/19/2015 ©2015 ECi Software Solutions, Inc. - All rights reserved Confidential and Proprietary
Page 10

8 The Database Connection Information window displays.
• In the SQL Server name field, enter the name of your SQL server including instance name if any.
• In the Full Access System password field, enter your full access system password. Note: This password is set using e-admin.
• In the Company ID field, enter the name of the e-automate company to which you want Remote Tech to connect. Note: This tells the Remote Tech installer on which company you want to run the Remote Tech script. The Remote Tech script prepares the e-automate database to interact with the Remote Tech application. If you decide you want to allow Remote Tech to interact with other databases you will need to run the script on those databases using either e-admin or SQL tools. See the Multiple Company Sites topic.
With the fields populated, click [Next] to continue.
Revised: 11/19/2015 ©2015 ECi Software Solutions, Inc. - All rights reserved Confidential and Proprietary
Page 11
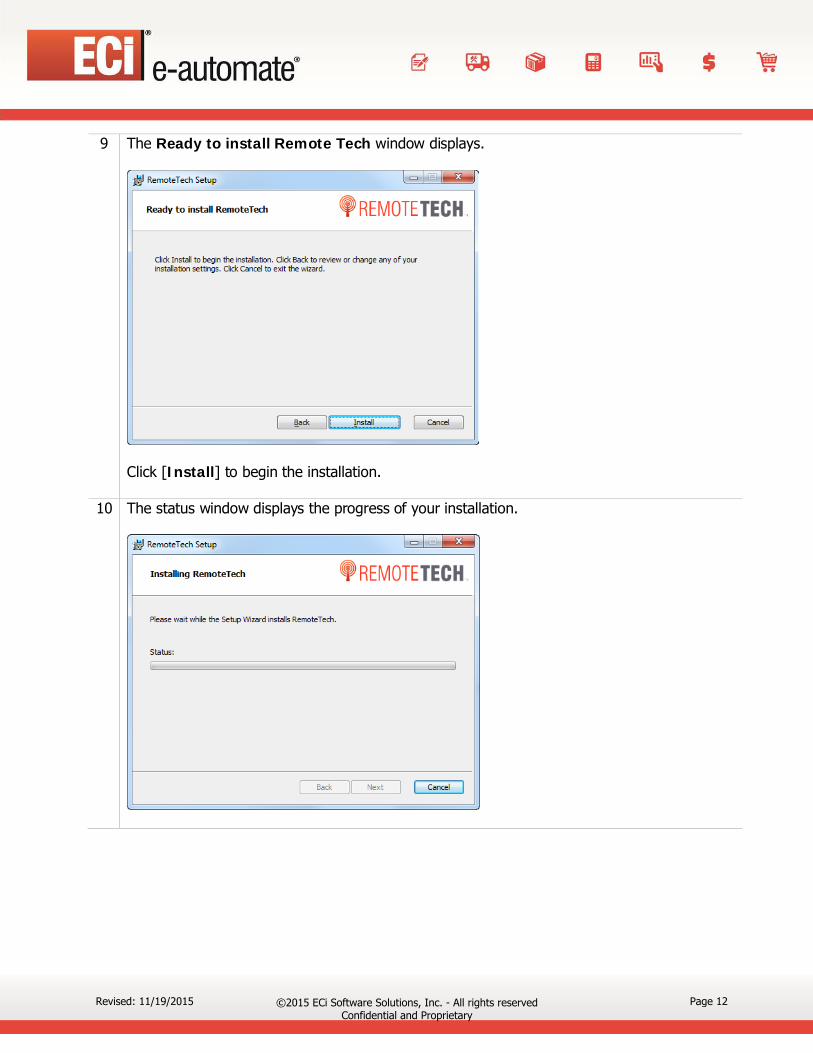
9 The Ready to install Remote Tech window displays.
Click [Install] to begin the installation.
10 The status window displays the progress of your installation.
Revised: 11/19/2015 ©2015 ECi Software Solutions, Inc. - All rights reserved Confidential and Proprietary
Page 12
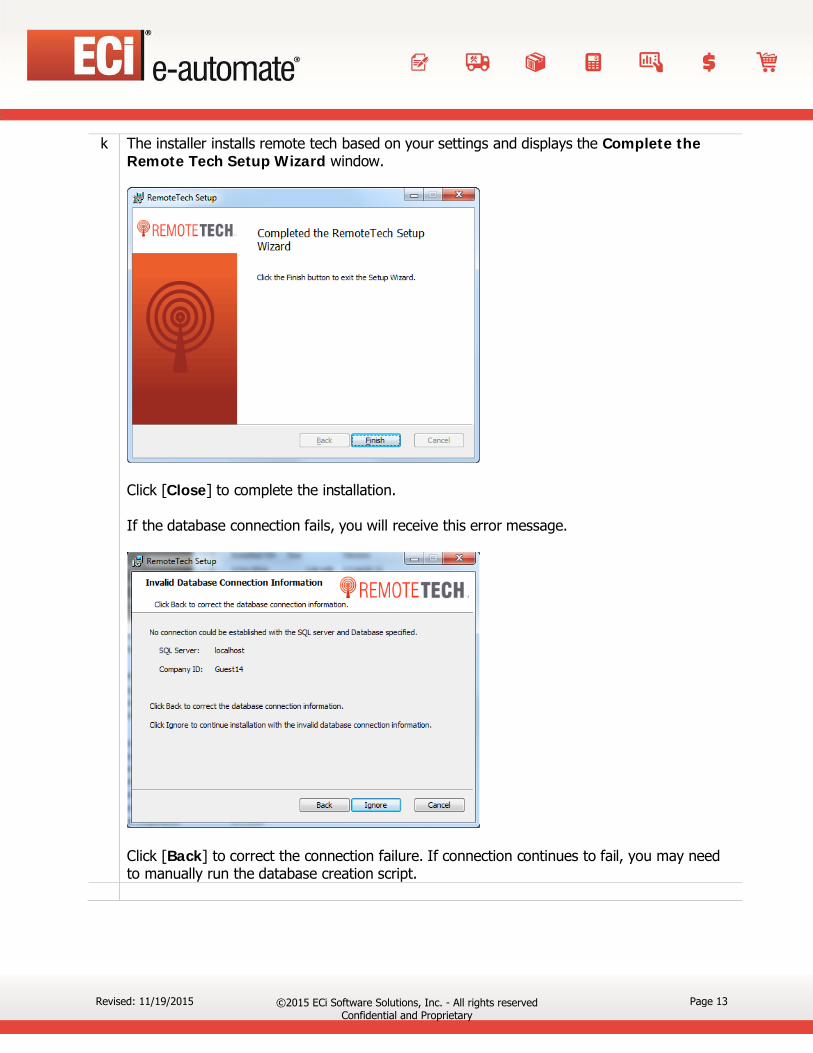
k The installer installs remote tech based on your settings and displays the Complete the Remote Tech Setup Wizard window.
Click [Close] to complete the installation. If the database connection fails, you will receive this error message.
Click [Back] to correct the connection failure. If connection continues to fail, you may need to manually run the database creation script.
Revised: 11/19/2015 ©2015 ECi Software Solutions, Inc. - All rights reserved Confidential and Proprietary
Page 13
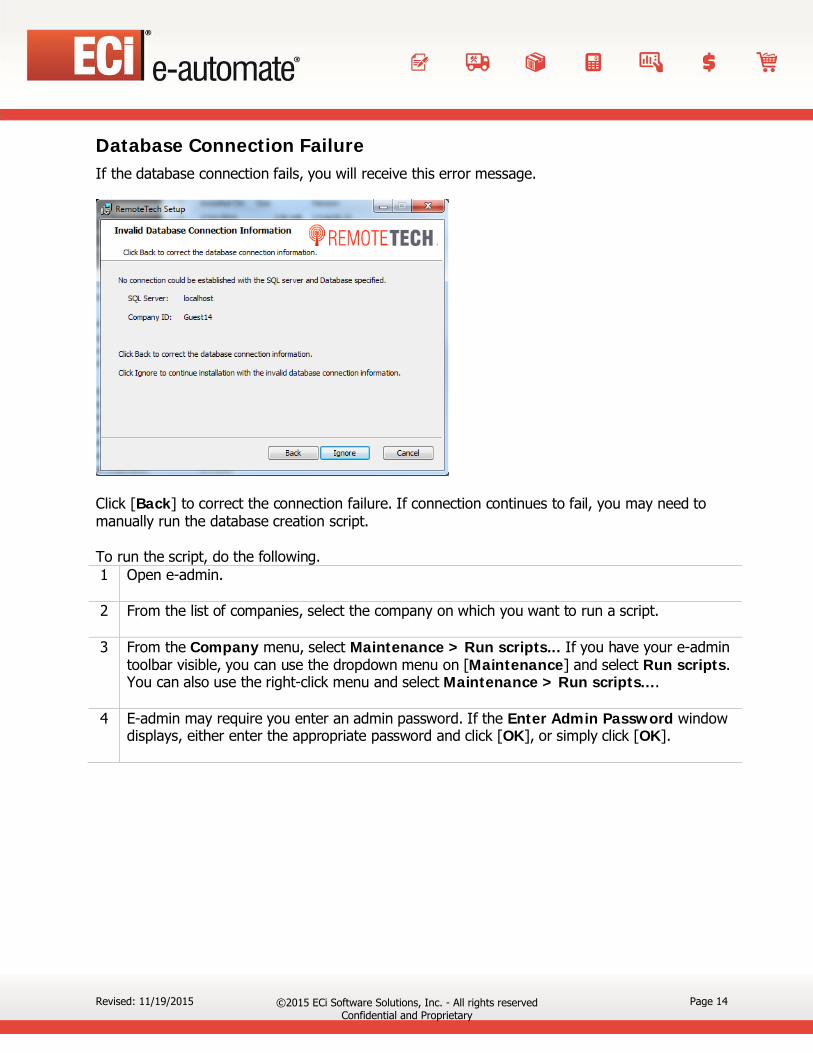
Database Connection Failure If the database connection fails, you will receive this error message.
Click [Back] to correct the connection failure. If connection continues to fail, you may need to manually run the database creation script. To run the script, do the following. 1 Open e-admin.
2 From the list of companies, select the company on which you want to run a script.
3 From the Company menu, select Maintenance > Run scripts... If you have your e-admin
toolbar visible, you can use the dropdown menu on [Maintenance] and select Run scripts. You can also use the right-click menu and select Maintenance > Run scripts....
4 E-admin may require you enter an admin password. If the Enter Admin Password window displays, either enter the appropriate password and click [OK], or simply click [OK].
Revised: 11/19/2015 ©2015 ECi Software Solutions, Inc. - All rights reserved Confidential and Proprietary
Page 14
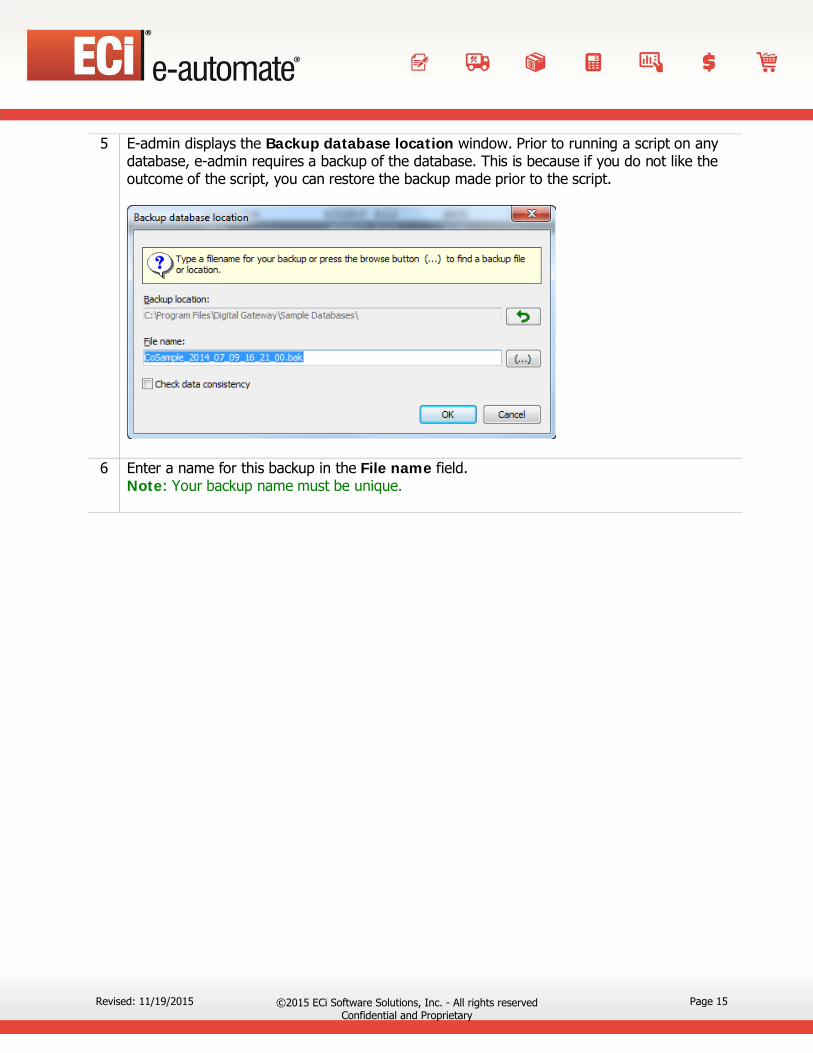
5 E-admin displays the Backup database location window. Prior to running a script on any database, e-admin requires a backup of the database. This is because if you do not like the outcome of the script, you can restore the backup made prior to the script.
6 Enter a name for this backup in the File name field. Note: Your backup name must be unique.
Revised: 11/19/2015 ©2015 ECi Software Solutions, Inc. - All rights reserved Confidential and Proprietary
Page 15
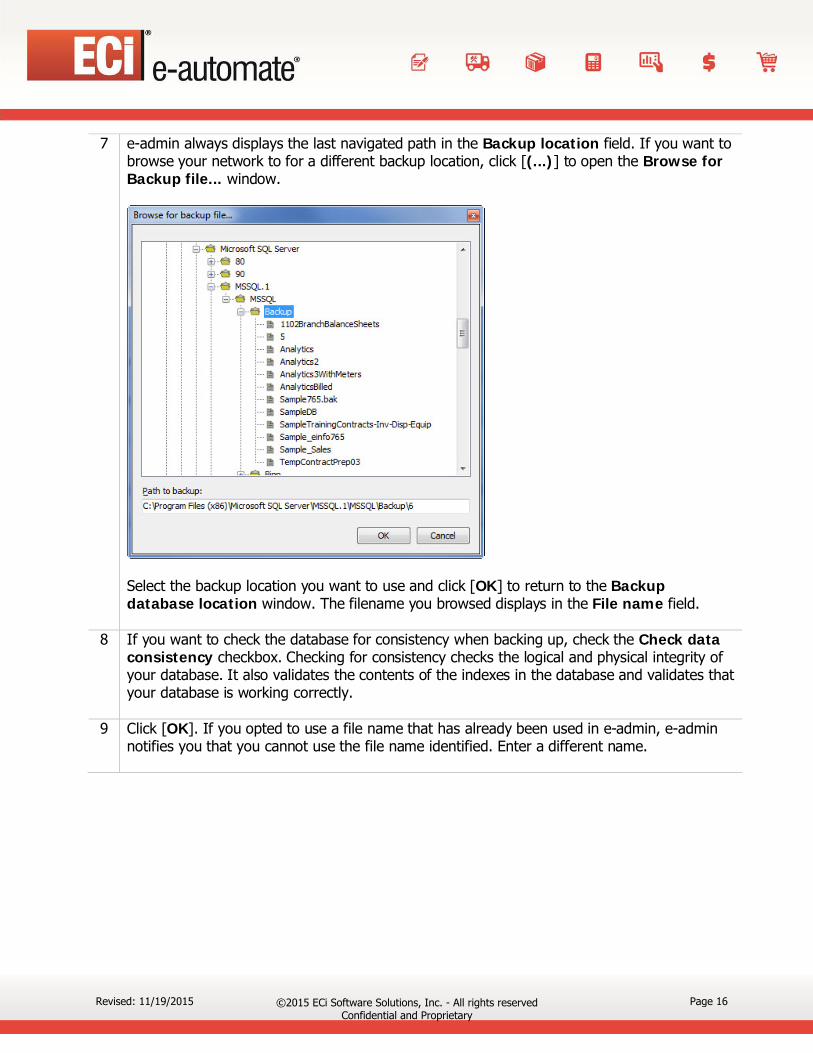
7 e-admin always displays the last navigated path in the Backup location field. If you want to browse your network to for a different backup location, click [(...)] to open the Browse for Backup file... window.
Select the backup location you want to use and click [OK] to return to the Backup database location window. The filename you browsed displays in the File name field.
8 If you want to check the database for consistency when backing up, check the Check data consistency checkbox. Checking for consistency checks the logical and physical integrity of your database. It also validates the contents of the indexes in the database and validates that your database is working correctly.
9 Click [OK]. If you opted to use a file name that has already been used in e-admin, e-admin notifies you that you cannot use the file name identified. Enter a different name.
Revised: 11/19/2015 ©2015 ECi Software Solutions, Inc. - All rights reserved Confidential and Proprietary
Page 16

10 After the database is backed up, acknowledge the backup by clicking [OK] in the Backup complete dialogue and e-admin displays the Run SQL Script window.
11 Click [Browse] to locate ServerDatabaseCreationScript.sql. The script is located in the _dbupdate directory under the virtual directory in which you install RemoteTech. e-admin displays the script in the window and activates the [Execute] button.
Revised: 11/19/2015 ©2015 ECi Software Solutions, Inc. - All rights reserved Confidential and Proprietary
Page 17

12 Click [Execute] to run the script on the database. e-admin runs the script. If the script runs successfully, e-admin displays Script executed successfully, if not see Script Ran with Errors below. Successfully Ran Script If the script ran successfully, e-admin displays the successful message. To close the Run SQL Script window, click [Close]. If you want to run additional scripts, click [Browse] and select a different script to run. Script Ran with Errors If the script executes with errors, e-admin displays the Errors region of the Run SQL Script window and activates the [Restore] button. You use the Errors region to display the errors that occurred during the script execution. Use the up and down arrows to navigate through the errors so you can report them to your e-automate Customer Care technician. You can also maximize the Run SQL Script window and resize the regions by hovering your mouse over the horizontal line between the Script region and the Errors region. When hovering over the line, your cursor will turn to a double arrow and you can then resize. To restore the backup created before the script ran, click [Restore] and e-admin restores the original company database. If you choose to close the Run SQL Scripts window without restoring, a dialogue box displays verifying you want to close the window. Clicking [Yes] closes the Run SQL Scripts window and leaves your script executed with errors. Clicking [No] closes the warning window and allows you to restore the database.
Working with License Keys The use of Remote Tech is governed by a software license agreement and the access to the software is controlled by a license key. After you have installed Remote Tech and before you can use Remote Tech you must first acquire a license key. Use the following steps to acquire your license key and install it in your installation of Remote Tech.
Installing a License Key 1 Once Remote Tech is installed, contact e-automate customer care at
[email protected] for your customer number and a product key.
Revised: 11/19/2015 ©2015 ECi Software Solutions, Inc. - All rights reserved Confidential and Proprietary
Page 18
2 With your customer number and product key available, login into the administration area of Remote Tech to access the license key features. • From an internet accessible computer, go to http://yourdomain/RTS/login.aspx. Where
yourdomain is your actual domain. This assumes you installed Remote Tech in the default web location. If your location is different, make adjustments accordingly.
• In the User name field, enter Admin. • In the Password field, enter the password associated with your Admin user. • In the Company field, enter the e-automate database name to which you have connected
Remote Tech. • Click [Login].
3 Access the licensing features by clicking [Licensing].
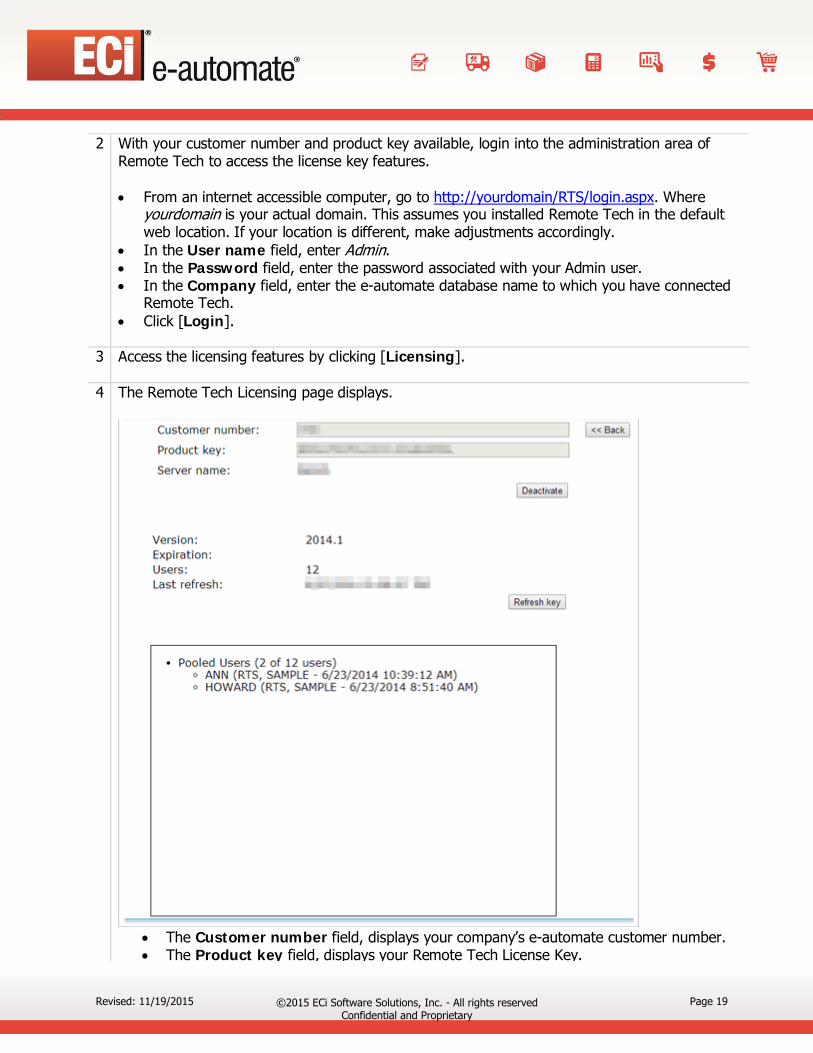
4 The Remote Tech Licensing page displays.
• The Customer number field, displays your company’s e-automate customer number. • The Product key field, displays your Remote Tech License Key.
Revised: 11/19/2015 ©2015 ECi Software Solutions, Inc. - All rights reserved Confidential and Proprietary
Page 19

• Click [Activate] to communicate with ECi Software Solutions servers to validate your key and activate your installation of Remote Tech. If you have already activated your product key, the button displays [Deactivate]. You use this button to deactivate the product key.
• If it is successful click [OK] to acknowledge. If it fails contact [email protected]. Note: Once the server is activated, Remote Tech displays the customer number, product key, server name assocaited with this installation of Remote Tech, version, number of users and the last time the license key was refreshed. Periodically Remote Tech communicates with the Digital Gateway servers to assure your installation is updated and current.
• You can refresh your license key by clicking [Refresh key]. This updates your key based on any changes you my have made to your account, for example purchasing additional Remote Tech licenenes.
5 Return to the menu by clicking [<<Back].
Moving Servers This section only applies to moving SQL from one server to another. In the case that the Remote Tech installation is moved from one IIS server to another, there is nothing that needs to be done, aside from re-installing Remote Tech. Remote Tech is licensed to the SQL server on the backend. If you need to move web servers you can deactivate a server for Remote Tech so you can activate a new server. Prior to deactivating, you should prepare your new server by setting it up to meet the Remote Tech installation requirements as well as have IIS configured and running. 1 Login to the license administration area.
• From an internet accessible computer, go to http://yourdomain/RTS/login.aspx. Where
yourdomain is your actual domain. This assumes you installed Remote Tech in the default web location. If your location is different, make adjustments accordingly.
• In the User name field, enter Admin. • In the Password field, enter the password associated with your Admin user. • In the Company field, enter the e-automate database name to which you have
connected Remote Tech. • Click [Login].
Revised: 11/19/2015 ©2015 ECi Software Solutions, Inc. - All rights reserved Confidential and Proprietary
Page 20
2 Access the licensing features.
• Click [Licensing] to open the Remote Tech Licensing page.
3 • Click [Deactivate] to remove the Remote Tech license from this server. Note: To activate a new server, contact e-autamate customer care at [email protected].
Multiple Company Sites During the installation of Remote Tech you identify the company on which you are running Remote Tech. This tells the installation to run the server database creation script on the company identified during the installation. If you intend to run Remote Tech on multiple companies, you will need to run the script on your other companies manually. You can use SQL script tools to run this script on your other company databases. This instruction set is written around Microsoft SQL Express Management Studio Express. If you are running full SQL Server, use Microsoft Query Analyzer to run the script. 1 Before running the script, use e-admin to backup the e-automate databases on which you
intend to run the script. 2 Navigate to the downloaded installation files for Remote Tech. The installation files need to
be with navigational reach of the SQL Server.
3 On the e-automate server, open Microsoft SQL Server Management Studio Express or Query Analyzer.
4 Open the script, ServerDatabaseCreationScript.sql by navigating to the downloaded files. The script is located inside the _dbupdate directory under the ‘virtual’ directory in which you install RemoteTech.
5 Verify you are running the script on the correct database and that the database has been backed up prior to running the script.
6 Run the script on the database. Note: If you have multiple databases repeat running the script on each database you intend to use Remote Tech. Running the script on the database inadvertently again, does not cause damage. Note: If you receive errors when running the script, restore the database backup and contact ECi Software Solutions Customer Care at [email protected].
Revised: 11/19/2015 ©2015 ECi Software Solutions, Inc. - All rights reserved Confidential and Proprietary
Page 21

Turning on Remote Tech In order for Remote Tech to function in conjunction with e-automate your system administrator must first enable remote tech features. 1. On an e-automate client computer, click [Start] > Programs > e-automate > e-automate
to open the e-automate client program. Note: You must have administrative rights to access company options.
2. Enter your User ID, Password and login to e-automate. 3. From the Tools menu, select Options… to open the Options window.
4. In the left pane of the window, double-click on Service Calls to expand the Service Calls section, click on Dispatch Console to display Dispatch Console options.
Revised: 11/19/2015 ©2015 ECi Software Solutions, Inc. - All rights reserved Confidential and Proprietary
Page 22

5. In the Remote Tech region, check Enable remote tech features. When checked, e-automate allows Remote Tech to interact with the Dispatch Console.
6. If you want to protect calls that are remotely checked out, check Protect calls that are remotely checked out.
Revised: 11/19/2015 ©2015 ECi Software Solutions, Inc. - All rights reserved Confidential and Proprietary
Page 23
7. Click [OK] to save your changes.
Creating Remote Tech Users in e-admin Before your technicians can login to Remote Tech you must first create a User ID for them in e-admin and then link that User ID to their technician/employee profile in e-automate. You create a user in e-admin so you have a location to store a password and a User ID. The users that you create for Remote Tech do not have to have any e-automate rights, they can simply be a user without any rights and an associated password. 1. On your e-automate server, click [Start] > Programs > e-automate > e-admin to open the
e-admin program. 2. e-admin opens the e-admin login screen. In the Profile field, verify the server to which you will
login. If necessary, use the down arrow to select a different profile. Click [OK] to login. Note: e-admin uses Windows authentication to verify your permissions to be in e-admin.
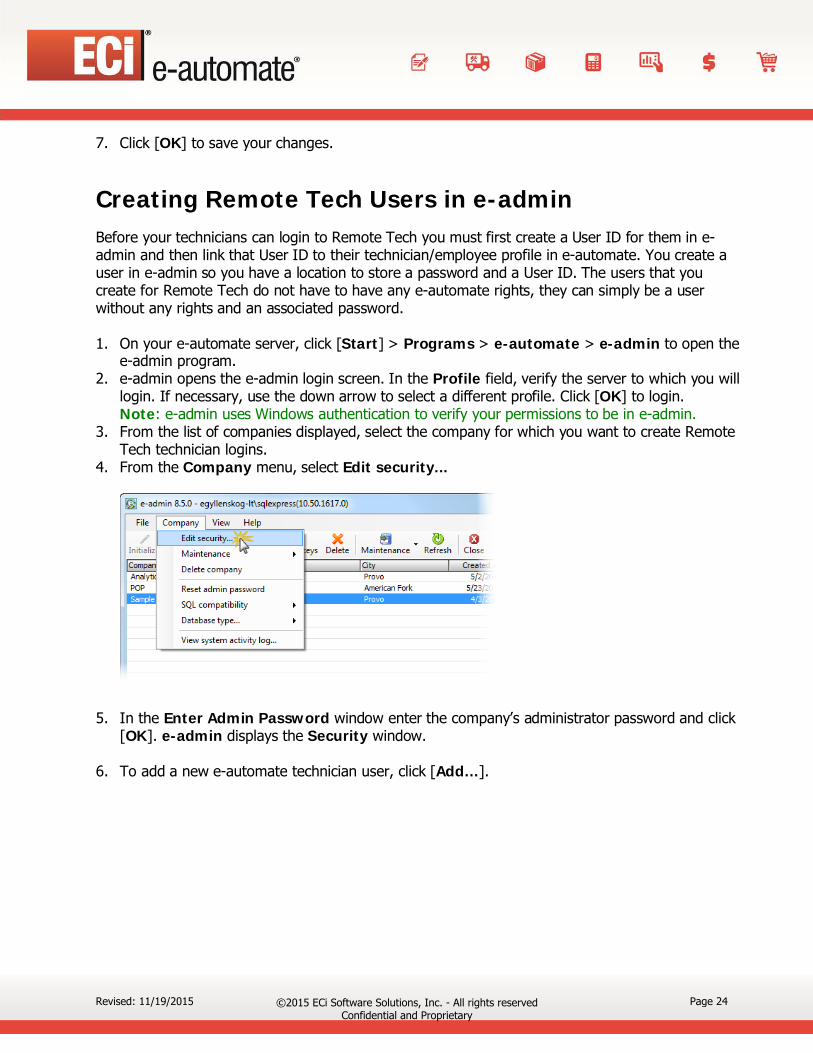
3. From the list of companies displayed, select the company for which you want to create Remote Tech technician logins.
4. From the Company menu, select Edit security...
5. In the Enter Admin Password window enter the company’s administrator password and click [OK]. e-admin displays the Security window.
6. To add a new e-automate technician user, click [Add…].
Revised: 11/19/2015 ©2015 ECi Software Solutions, Inc. - All rights reserved Confidential and Proprietary
Page 24
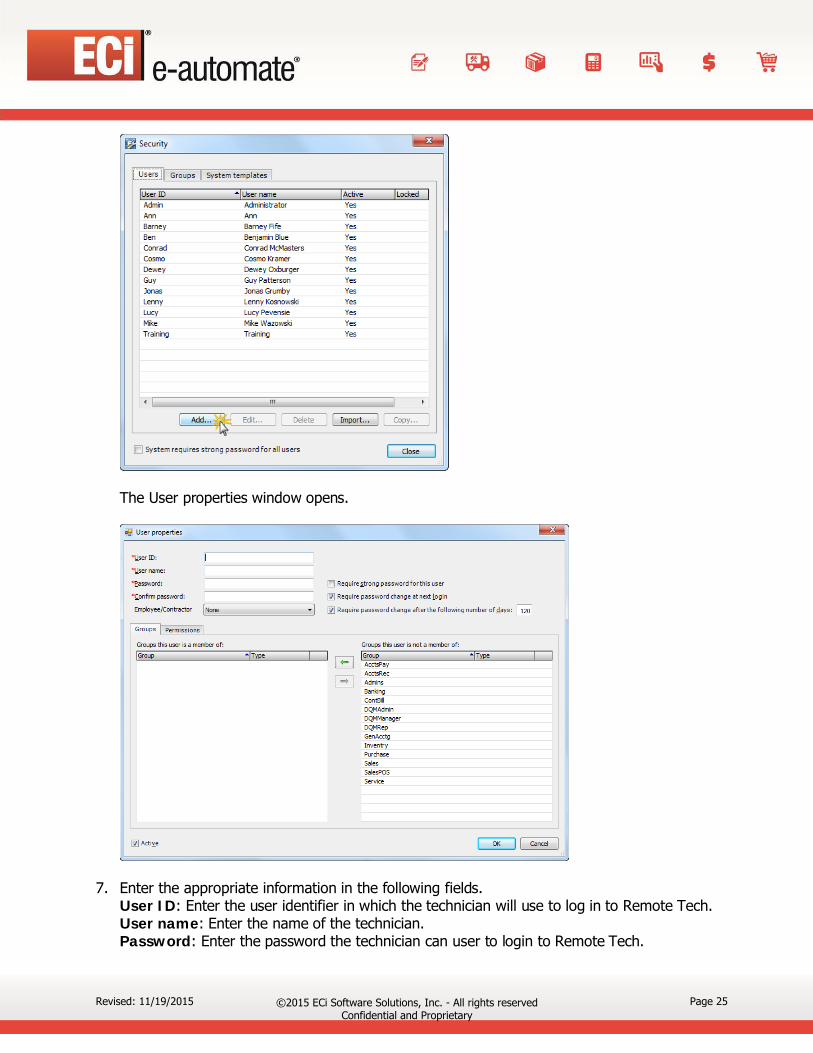
The User properties window opens.
7. Enter the appropriate information in the following fields. User ID: Enter the user identifier in which the technician will use to log in to Remote Tech. User name: Enter the name of the technician. Password: Enter the password the technician can user to login to Remote Tech.
Revised: 11/19/2015 ©2015 ECi Software Solutions, Inc. - All rights reserved Confidential and Proprietary
Page 25
Confirm password: Enter the password again in the confirm password field. 8. If your technician has already been created in the e-automate employee list, in the
Employee/Contractor field use the down arrow and select the employee from the list. If you have not created the employee in e-automate, skip this step and complete Linking Employees to e-automate Users.
9. Click [OK] to save the e-automate user settings. 10. Repeat steps 6 – 9 to add additional users.
Linking Employees to e-automate Users These instructions assume that you already have created employees in your e-automate database for your service technicians. If you have not created service technician employees in your e-automate database, see Creating an Employee/Contractor Record in e-automate help in the People section for detailed instructions. You should only complete these steps if you have already created your service technicians as employees AND have created e-automate users for your technicians in e-admin. 1. On an e-automate client computer, click [Start] > Programs > e-automate > e-automate
to open the e-automate client program. Note: You must have appropriate rights to employees to access the people menu. The e-admin right is listed as P/R Employees in e-admin. You should have Create and Edit rights.
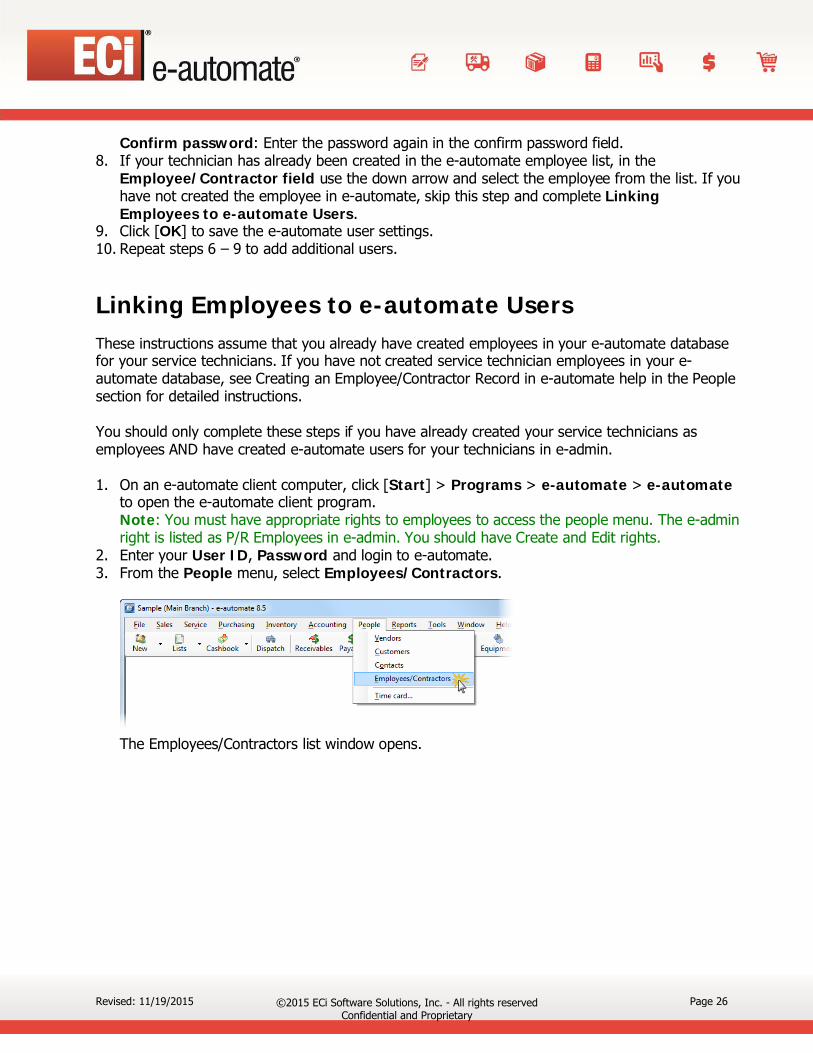
2. Enter your User ID, Password and login to e-automate. 3. From the People menu, select Employees/Contractors.
The Employees/Contractors list window opens.
Revised: 11/19/2015 ©2015 ECi Software Solutions, Inc. - All rights reserved Confidential and Proprietary
Page 26

4. From the list of service technician employees, select the service technician and click [Edit] to open the Edit employee window.
5. In the Login user ID field, use the lookup to select the e-automate user ID you created in e-admin. Note: This links the service technician user ID to the employee record, allowing Remote Tech to know the technician’s warehouse and other employee settings.
Revised: 11/19/2015 ©2015 ECi Software Solutions, Inc. - All rights reserved Confidential and Proprietary
Page 27

6. Click [OK] to save your changes.
Configuring Time Card Entry If you want to use the time card entry feature offered through Remote Tech, you will need to complete the following sections to provide for the necessary pre-requisites.
• Creating Pay Periods • Payroll Groups • Activity Codes • Activity Code Categories
In order for the time card entry to work, you must have created and/or configured these areas. The Time Card entry feature allows you to create a company or technician schedule and then when the technicians are working on calls through Remote Tech, it can track their time. When the technician dispatches themselves and arrive at a call, the time card module, logs the time as technician travel time on the time card. From when the technician arrives on the service call until they depart, the time card module logs their time as service labor. The time card module monitors travel and labor time throughout each day logging their time and then allows the technician to categorize and fill in any gaps that occur as well as lunch and breaks through the time card module. The categories available to the technician for gap time are determined by your system administrator and the activity codes they make available to the technicians in Remote Tech.
Revised: 11/19/2015 ©2015 ECi Software Solutions, Inc. - All rights reserved Confidential and Proprietary
Page 28

Creating Payroll group Before you can create a pay period you must first create Payroll Groups to associate with your pay periods. You can organize your employees based on the role they pay in your organization. For example you can create a group for standard repair on your equipment and then a group for specialized repair, like IT repair. Having these groups allows you reporting flags for your payroll expenses and system. 1. On an e-automate client computer, click [Start] > Programs > e-automate > e-automate
to open the e-automate client program. Note: You must have administrative rights to access Lists and Codes.
2. Enter your User ID, Password and login to e-automate. 3. On the Tools menu, select Lists and Codes.
The Lists and codes window opens.
4. In the Select a list or code type field, use the dropdown menu to select Payroll groups.
Revised: 11/19/2015 ©2015 ECi Software Solutions, Inc. - All rights reserved Confidential and Proprietary
Page 29
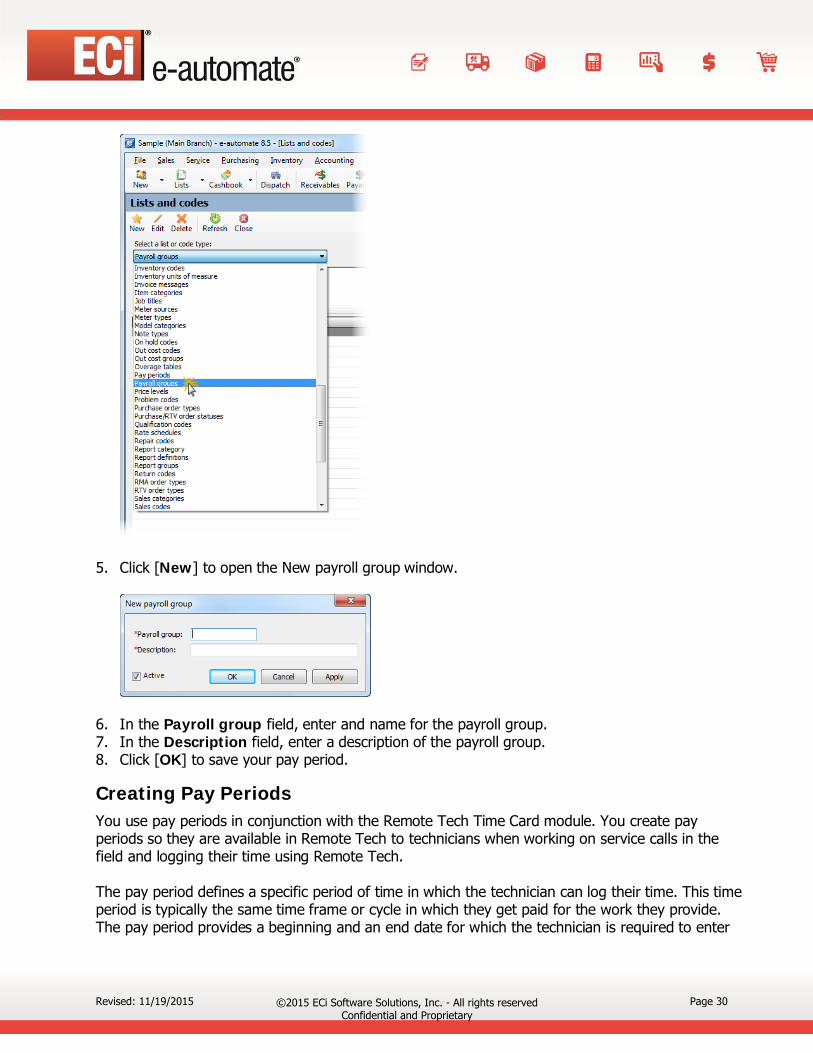
5. Click [New] to open the New payroll group window.
6. In the Payroll group field, enter and name for the payroll group. 7. In the Description field, enter a description of the payroll group. 8. Click [OK] to save your pay period.
Creating Pay Periods You use pay periods in conjunction with the Remote Tech Time Card module. You create pay periods so they are available in Remote Tech to technicians when working on service calls in the field and logging their time using Remote Tech. The pay period defines a specific period of time in which the technician can log their time. This time period is typically the same time frame or cycle in which they get paid for the work they provide. The pay period provides a beginning and an end date for which the technician is required to enter
Revised: 11/19/2015 ©2015 ECi Software Solutions, Inc. - All rights reserved Confidential and Proprietary
Page 30

and submit their time. When the technician has recorded time for the bounds defined by the pay period, the technician can submit his or her time for payroll payment. To use the Time Card feature in Remote Tech you must have your pay period defined in e-automate. 1. From the e-automate Tools menu, select Lists and codes.
Note: You must have administrative rights to access Lists and codes.
The Lists and codes window opens.
2. In the Select a list or code type field, use the dropdown menu to select Pay periods.
Revised: 11/19/2015 ©2015 ECi Software Solutions, Inc. - All rights reserved Confidential and Proprietary
Page 31

3. Click [New] to open the New pay period window.
4. In the Payroll group field, use the lookup to select a payroll group to associate with this pay period.
5. In the Pay from field, use the down arrow (calendar control) to select the start of the pay period you are creating.
6. In the Pay to field use the down arrow to select the end date of the pay period. 7. Click [OK] to save your pay period.
Customer Record Once you have the payroll groups and pay periods set up that you want to use for your technicians, you must verify you have the same payroll group you assigned to the pay period also assigned to the technician. Only the pay periods that are assigned the same payroll group as is assigned to the technician will display in Remote Tech.
Revised: 11/19/2015 ©2015 ECi Software Solutions, Inc. - All rights reserved Confidential and Proprietary
Page 32

Activity Code Categories You use Activity code categories to define the rules associated with Activity codes. While you identify an Activity code in e-automate, the Activity code category controls the use of the Activity code. The category tells e-automate and Remote Tech when the activity code associated with the category is available for selection. The settings on the Activity code category also allow e-automate the proper categorization of time on the Time Card Entry report. 1. On an e-automate client computer, click [Start] > Programs > e-automate > e-automate
to open the e-automate client program. Note: You must have administrative rights to access Lists and Codes.
2. Enter your User ID, Password and login to e-automate. 3. On the Tools menu, select Lists and codes.
Revised: 11/19/2015 ©2015 ECi Software Solutions, Inc. - All rights reserved Confidential and Proprietary
Page 33
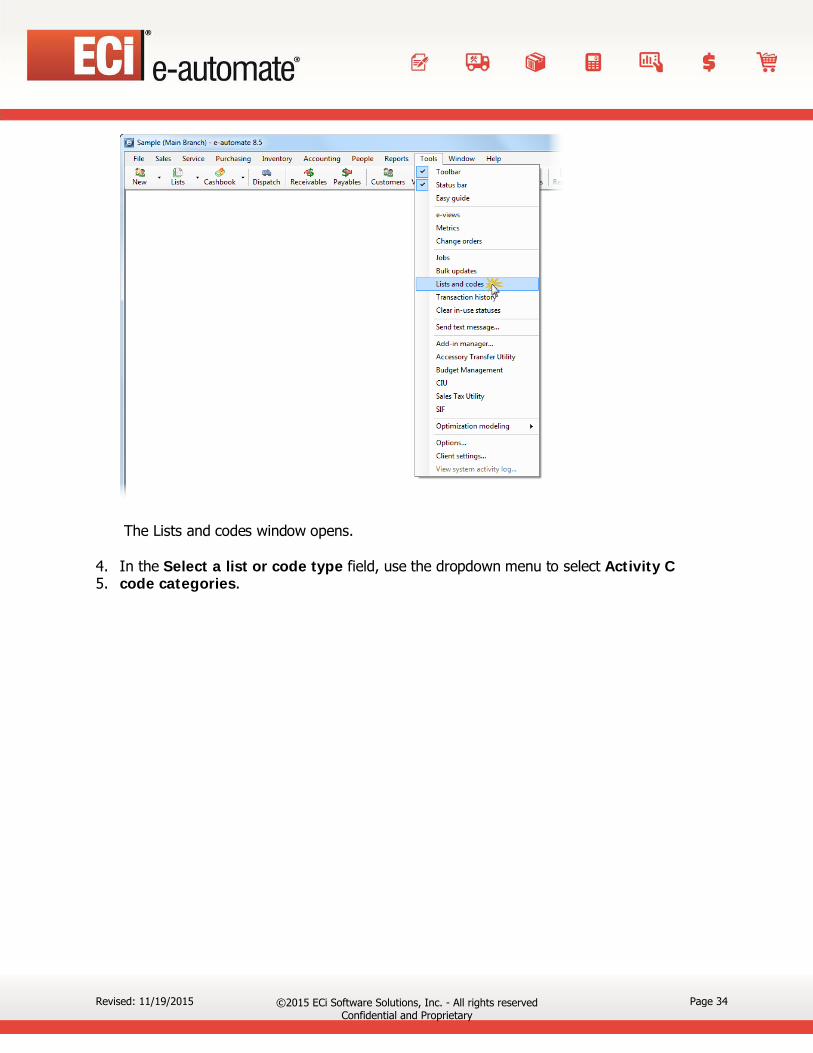
The Lists and codes window opens.
4. In the Select a list or code type field, use the dropdown menu to select Activity C 5. code categories.
Revised: 11/19/2015 ©2015 ECi Software Solutions, Inc. - All rights reserved Confidential and Proprietary
Page 34
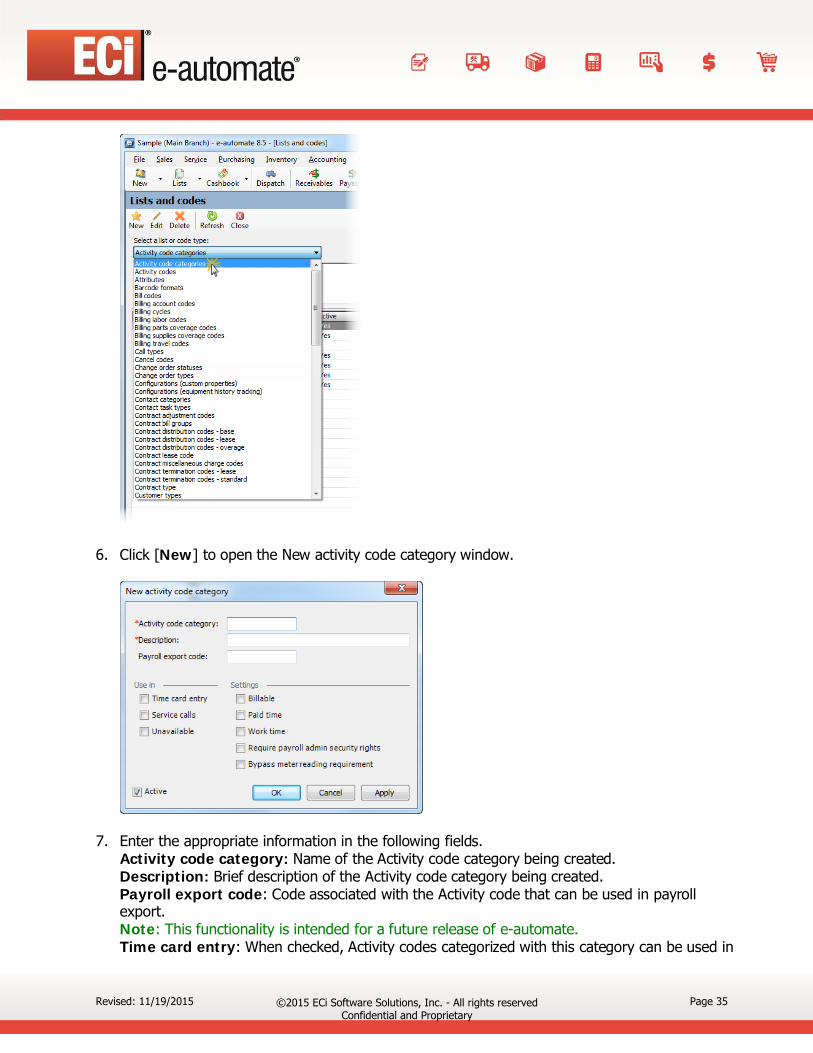
6. Click [New] to open the New activity code category window.
7. Enter the appropriate information in the following fields. Activity code category: Name of the Activity code category being created. Description: Brief description of the Activity code category being created. Payroll export code: Code associated with the Activity code that can be used in payroll export. Note: This functionality is intended for a future release of e-automate. Time card entry: When checked, Activity codes categorized with this category can be used in
Revised: 11/19/2015 ©2015 ECi Software Solutions, Inc. - All rights reserved Confidential and Proprietary
Page 35

the Remote Tech time card tool as well as in the e-automate time card entry system. Service calls: When checked, Activity codes with this category can be associated with a service call. Unavailable: When checked, Activity codes associated with this category will be available in the service technician unavailable time. Billable: When checked, Activity codes associated with this category are billable to your customers. Paid time: When checked, Activity codes associated with this category are paid to the technician. Work time: When checked, Activity codes associated with this category are attributed to work time for the technician. Work time is time paid but not necessarily working. Require payroll admin security rights: When checked on the Activity code category and associated with Activity codes, only users with the appropriate security rights can use this Activity code. Bypass meter reading requirement: When checked meter readings are not required meter readings associated with this activity code category.
8. Click [OK] to save the Activity code category.
Activity Codes You use Activity codes to define the kinds of activities that technicians can perform on service calls, record on time cards and record as unavailable time on the employee record. The Activity code category associated with the Activity code controls where the Activity code can be used. 1. On an e-automate client computer, click [Start] > Programs > e-automate > e-automate
to open the e-automate client program. Note: You must have administrative rights to access Lists and Codes.
2. Enter your User ID, Password and login to e-automate. 3. On the Tools menu, select Lists and codes.
Revised: 11/19/2015 ©2015 ECi Software Solutions, Inc. - All rights reserved Confidential and Proprietary
Page 36
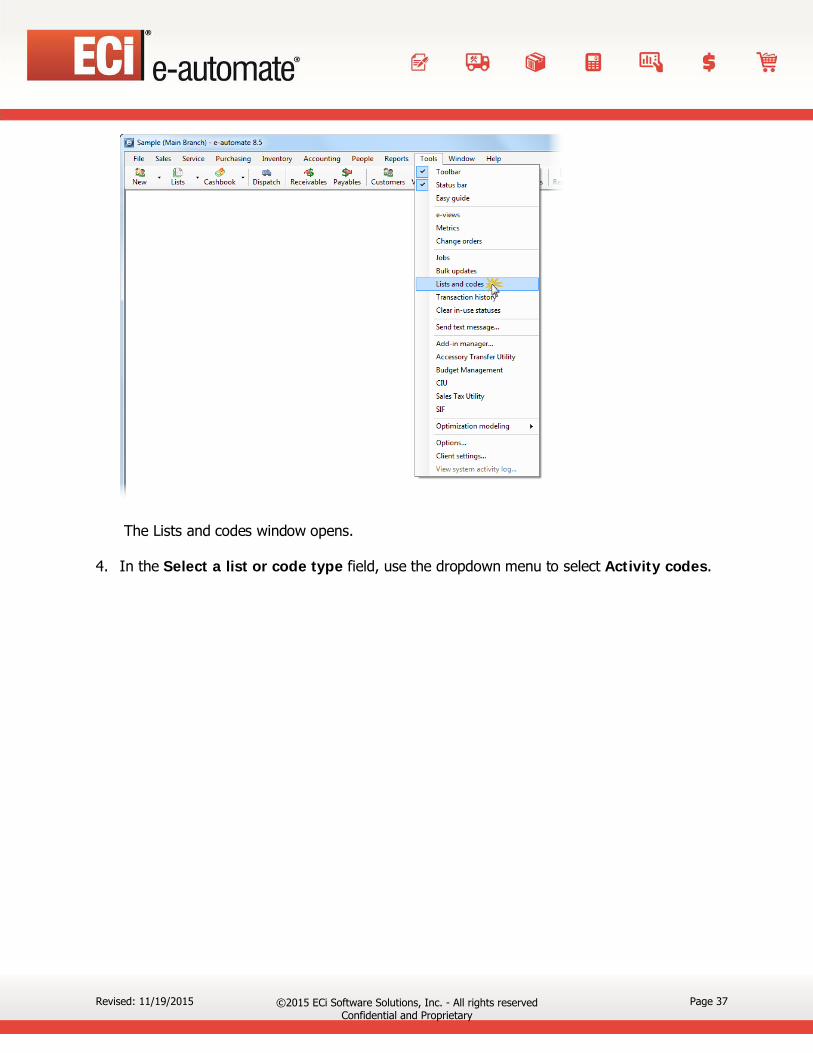
The Lists and codes window opens.
4. In the Select a list or code type field, use the dropdown menu to select Activity codes.
Revised: 11/19/2015 ©2015 ECi Software Solutions, Inc. - All rights reserved Confidential and Proprietary
Page 37

5. Click [New] to open the New activity code window.
6. Enter the appropriate information in the following fields. Activity code: Name of the Activity code being created. Description: Brief description of the Activity code being created. Category: Use the dropdown menu to select the category for this Activity code. The Activity code defines the kinds of activities in e-automate with which you can associate an Activity code. Tax as: Use the Lookup to identify how this activity is taxed.
7. Click [OK] to save the Activity code.
On Hold Codes You can create on-hold codes that can be associated with:
Revised: 11/19/2015 ©2015 ECi Software Solutions, Inc. - All rights reserved Confidential and Proprietary
Page 38
• Sales Orders • Customers • Service Calls • Accounts Payable Invoices • RTV orders • RMA orders When creating the code, you determine where you will be able to use the on hold code. When service calls are on hold you cannot dispatch either in e-automate or Remote Tech. When sales orders or RMA orders are on hold you cannot ship or fulfill. When customers are on hold, all transactions associated with that customer are automatically flagged as on hold. When accounts payable invoices are on hold they are not presented for payment in the Pay Vendors activity. All on-hold codes are created in Lists and Codes. You can associate a reason with each on hold code. The on hold codes that are shipped with e-automate are CH (Credit Hold), WP (Waiting for Parts), PA (Parts Available), BadSync (Bad Data from Remote Client), and WAuth (Waiting Authorization). When creating an on hold code you determine where the on hold code can be used and if the on hold code can be used in Remote Tech by technicians. When you allow Remote Tech use, the on hold code can be set by technicians in the field. You can also determine if the on hold code can be released by technicians in the field. For example, when a call is on hold and waiting for parts and the parts for the call are received, e-automate can change the on hold code from Waiting for Parts to Parts Available when the parts are available. This functionality is only available when users are taking advantage of e-automate’s tools for transaction linking. When the parts are available, it would make sense to allow the technician to release the call from Parts Available so they can complete the call. You can configure on hold codes to be controlled by security rights or not. When an on hold code is controlled by security rights, users must have the right, Set/Release On Hold Transactions, in e-admin security to place and release transactions that are on hold. You can use service on hold codes to recalculate response time from when a call is released from hold to arrival instead of call received to arrival. This is especially needed when calls are on credit hold and you do not want these calls to adversely affect your response time. 1. On an e-automate client computer, click [Start] > Programs > e-automate > e-automate
to open the e-automate client program. Note: You must have administrative rights to access Lists and Codes.
2. Enter your User ID, Password and login to e-automate. 3. On the Tools menu, select Lists and Codes.
Revised: 11/19/2015 ©2015 ECi Software Solutions, Inc. - All rights reserved Confidential and Proprietary
Page 39
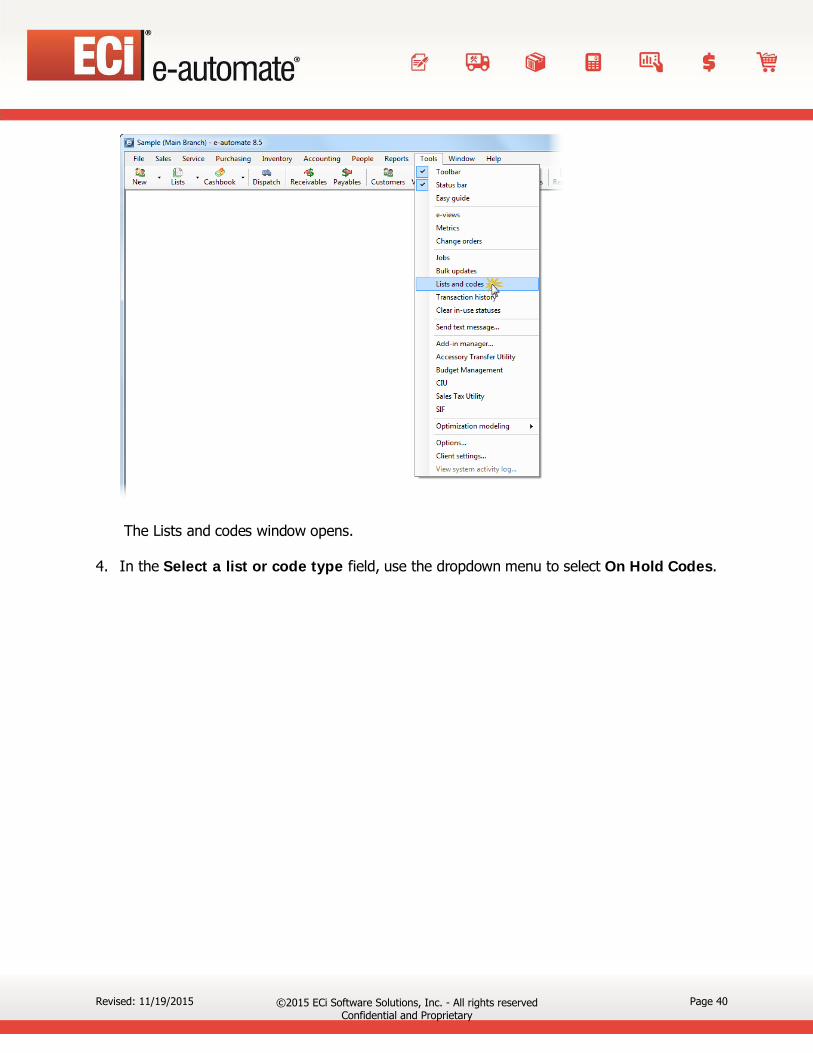
The Lists and codes window opens.
4. In the Select a list or code type field, use the dropdown menu to select On Hold Codes.
Revised: 11/19/2015 ©2015 ECi Software Solutions, Inc. - All rights reserved Confidential and Proprietary
Page 40
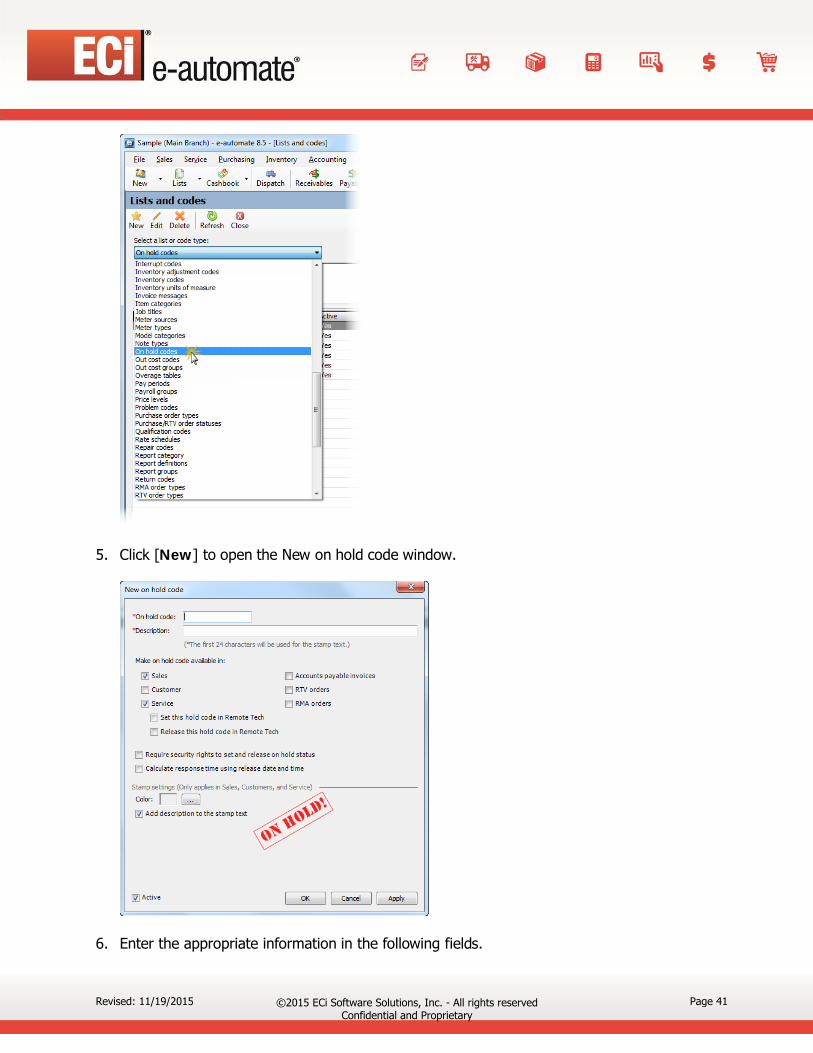
5. Click [New] to open the New on hold code window.
6. Enter the appropriate information in the following fields.
Revised: 11/19/2015 ©2015 ECi Software Solutions, Inc. - All rights reserved Confidential and Proprietary
Page 41

On hold code: Name of the on hold code. Description: Brief description of the on hold code. Make on hold code available in: Sales: When checked, this on hold code can be used on sales orders. Customer: When checked, this on hold code can be associated with a customer. Service: When checked, this on hold code can be used on service calls. Set this hold code in Remote Tech: When checked, this on hold code can be used in Remote Tech by technicians. Release this hold code in Remote Tech: When checked, this on hold code can be released by technicians in the field. Accounts Payable Invoices: When checked, this on hold code can be used to place accounts payable invoices on hold or vendors. RTV orders: When checked, this on hold code can be used to place RTV orders on hold. RMA orders: When checked, this on hold code can be used to place RMA orders on hold. Require security rights to set and release on hold status : When checked, users must have the Set/Release On Hold Transactions right to place and release this on hold code from a transaction. Calculate response time using release date and time: When checked, e-automate uses the release date and time for response time calculations. Note: This removes time spent on hold from the response time calculations.
7. In the Color field click the […] button to select a different color for the On Hold stamp. 8. If you want to include description of your on hold code on the On-hold stamp, check the Add
description to the stamp text checkbox. 9. Click [OK] to save the on hold code.
Delay Codes You can configure Remote Tech to require technicians to supply a delay code when they do not meet the response guidelines identified in e-automate. In order to require these things in remote tech your e-automate administrator must set the option to require a delay code as well as create delay codes for use within Remote Tech.
Setting the Require Delay Code Option 1. From the Tools menu, select Options…
Revised: 11/19/2015 ©2015 ECi Software Solutions, Inc. - All rights reserved Confidential and Proprietary
Page 42

2. On the left side of the Options window, click on Service Calls to display service call options.
3. On the right, click [Additional options…] located at the bottom of the Options window to open the Additional service call options.
Revised: 11/19/2015 ©2015 ECi Software Solutions, Inc. - All rights reserved Confidential and Proprietary
Page 43
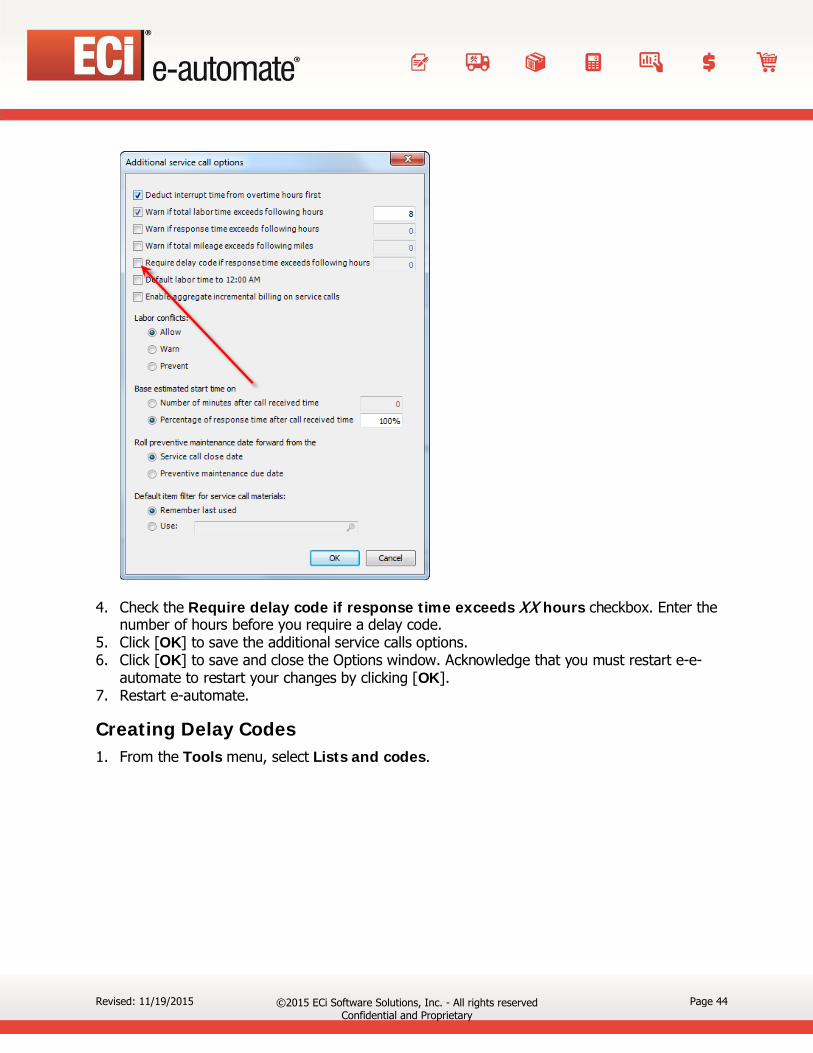
4. Check the Require delay code if response time exceeds XX hours checkbox. Enter the number of hours before you require a delay code.
5. Click [OK] to save the additional service calls options. 6. Click [OK] to save and close the Options window. Acknowledge that you must restart e-e-
automate to restart your changes by clicking [OK]. 7. Restart e-automate.
Creating Delay Codes 1. From the Tools menu, select Lists and codes.
Revised: 11/19/2015 ©2015 ECi Software Solutions, Inc. - All rights reserved Confidential and Proprietary
Page 44

The Lists and codes window opens.
2. In the Select a list or code type field, use the drop down menu to select Delay codes.
Revised: 11/19/2015 ©2015 ECi Software Solutions, Inc. - All rights reserved Confidential and Proprietary
Page 45

3. Click [New] to open the New delay code window.
4. In the Delay code field, type the name of the delay code. 5. In the Description field, enter a description of the delay code 6. Click [OK] to save the code for use in Remote Tech.
Configuring Service Managers You can configure employees in e-automate to be flagged as managers. Once an employee is flagged as a manager, you can then specify a manager for other employees. The list of manager employees comes from the list of employees with the Manager field checked. When you flag a service technician as a manager, the service tech could have additional functionality in Remote Tech. The additional functionality is determined by the system administrator and the options set when installing Remote Tech. See Remote Tech Installation Guide. The system administrator can configure Remote Tech to allow call re-assignment only by managers or allow call re-assignment by
Revised: 11/19/2015 ©2015 ECi Software Solutions, Inc. - All rights reserved Confidential and Proprietary
Page 46
any service tech. When only manager call re-assignment is enabled, then only service technicians with the manager flag checked on their employee profile can re-assign service calls. In addition to call re-assignment the system administrator can also configure Remote Tech to only allow technicians that have the manager flag checked allowed to perform service call searches. Remote Tech can allow technicians from Remote Tech to view service calls. Technicians can look at any service call in your system whether they are still open or invoiced. They can filter those calls using a variety of filters. One filter that the technician can use is the Technician filter. When filtering by technician the technician can select a specific individual technician or they can choose technicians in their management group. The filter, Techs in Management Group is a filter that delivers all technicians that share the same manager as the currently logged in technician.
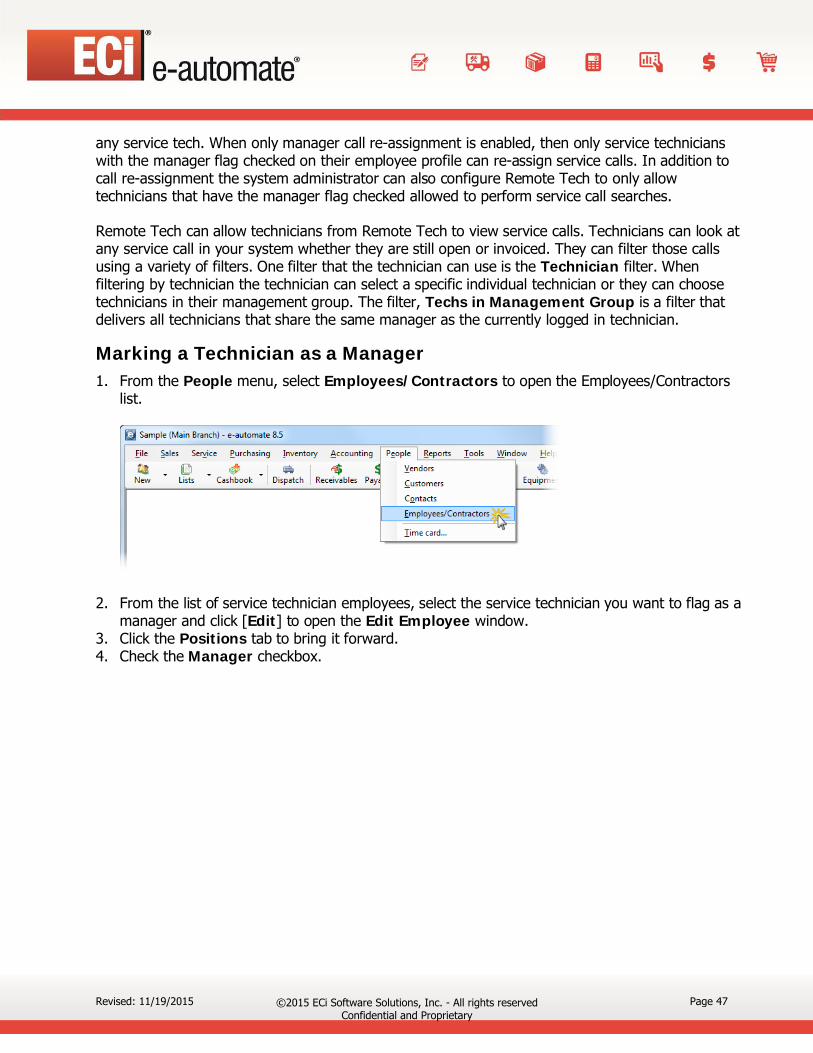
Marking a Technician as a Manager 1. From the People menu, select Employees/Contractors to open the Employees/Contractors
list.
2. From the list of service technician employees, select the service technician you want to flag as a manager and click [Edit] to open the Edit Employee window.
3. Click the Positions tab to bring it forward. 4. Check the Manager checkbox.
Revised: 11/19/2015 ©2015 ECi Software Solutions, Inc. - All rights reserved Confidential and Proprietary
Page 47

5. Click [OK] to save your changes.
Identifying Service Technician’s Manager 1. From within e-automate, select the People menu and select Employees/Contractors.
The Employees/Contractors list displays.
2. To filter your employee list by active technicians, do the following: a. Under QuickSearch, in the field labeled, 1., use the down arrow to select Is Technician. b. In the field adjacent, verify the operator is Equals. c. Verify the radio button, Yes is selected. d. On the unlabeled button on the current QuickSearch row, click the down arrow and
choose AND to display row 2. e. In field, 2., use the down arrow to select Active. f. In the field adjacent, verify the operator is Equals. g. Verify the radio button, Yes is selected. h. Click [Go] to display the list of active technician employees.
Revised: 11/19/2015 ©2015 ECi Software Solutions, Inc. - All rights reserved Confidential and Proprietary
Page 48

3. From the list of active technician employees, select the employee to which you want to assign a manager and click [Edit] to open the Edit employee window.
4. Click the Positions tab to bring it forward. 5. In the Manager field, use the lookup to select this technician’s manager.
6. Click [OK] to save your changes. 7. Repeat steps 3 – 6 to assign additional technician managers.
Creating Customer Onsite Warehouses With onsite warehouse created and assigned to equipment and customers, you can configure Remote Tech to allow your technicians to transfer items from the customer’s on site warehouse to the technician as needed. Remote Tech only allows a technician to transfer from a customer’s onsite warehouse when the technician is dispatched to a service call with that customer. Remote Tech allows technicians to select any warehouses matching the following criteria when attempting to transfer from a customer onsite warehouse. First it checks to see if the equipment on the service call has a customer onsite warehouse, second, it looks to see if the customer identified in the equipment location field has a customer onsite warehouse; third, it looks to see if the customer identified as a customer on the equipment has an onsite customer warehouse, finally it looks for a customer onsite warehouse associated with the customer on the service call. If you want to allow your technicians to use onsite warehouses, use these instructions to configure a customer onsite warehouse. You can use the following instructions to create a company onsite warehouse. Once you have identified a company onsite warehouse on the customer record, e-automate will use the warehouse on service calls instead of the technician warehouse. You can remove the customer onsite
Revised: 11/19/2015 ©2015 ECi Software Solutions, Inc. - All rights reserved Confidential and Proprietary
Page 49

warehouse from equipment if you do not want it used on service calls in lieu of the technician’s warehouse.
Creating a Customer Onsite Warehouse 1. From the Inventory menu, select Warehouses to open the Inventory warehouses list
window.
2. Click [New] to open the New inventory warehouse window.
Revised: 11/19/2015 ©2015 ECi Software Solutions, Inc. - All rights reserved Confidential and Proprietary
Page 50
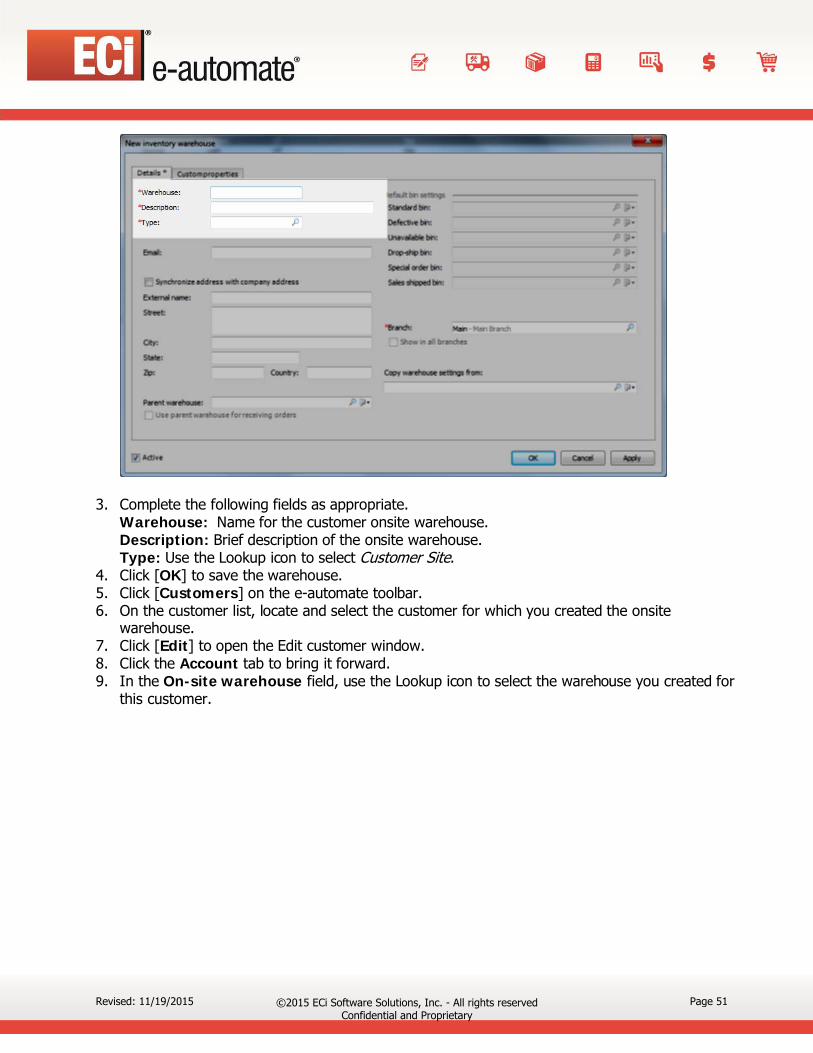
3. Complete the following fields as appropriate. Warehouse: Name for the customer onsite warehouse. Description: Brief description of the onsite warehouse. Type: Use the Lookup icon to select Customer Site.
4. Click [OK] to save the warehouse. 5. Click [Customers] on the e-automate toolbar. 6. On the customer list, locate and select the customer for which you created the onsite
warehouse. 7. Click [Edit] to open the Edit customer window. 8. Click the Account tab to bring it forward. 9. In the On-site warehouse field, use the Lookup icon to select the warehouse you created for
this customer.
Revised: 11/19/2015 ©2015 ECi Software Solutions, Inc. - All rights reserved Confidential and Proprietary
Page 51
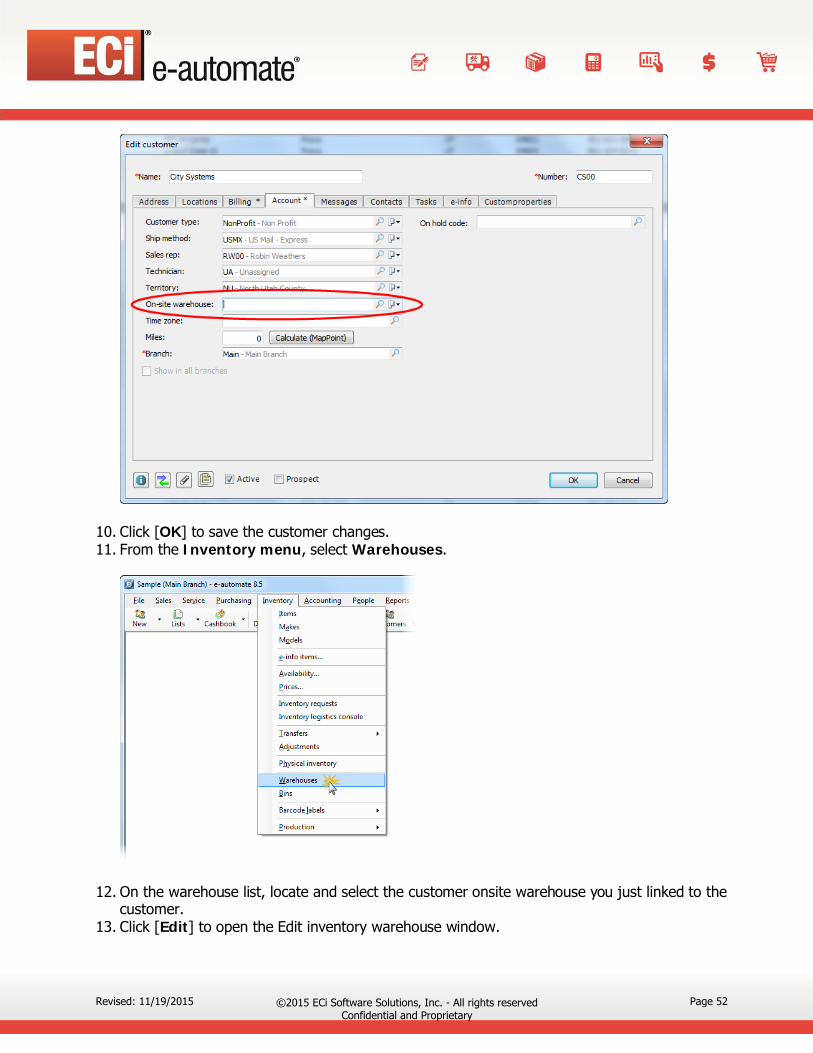
10. Click [OK] to save the customer changes. 11. From the Inventory menu, select Warehouses.
12. On the warehouse list, locate and select the customer onsite warehouse you just linked to the customer.
13. Click [Edit] to open the Edit inventory warehouse window.
Revised: 11/19/2015 ©2015 ECi Software Solutions, Inc. - All rights reserved Confidential and Proprietary
Page 52

14. In the Customer field, use the Lookup icon to select the customer associated with the warehouse.
15. If the warehouse is physically located at the same address as the customer, check the Synchronize address with customer address checkbox.
16. Select the warehouse you just created from the list and click [Edit] to configure the warehouse. 17. In the Standard bin field, use the down arrow menu to select New. This opens the New
inventory bin window. Enter the information as appropriate. 18. In the Description field, type a brief description of the bin. 19. Click [OK] to save the bin and return to the Edit Inventory Warehouse window.
Note: You can add additional bins as necessary.
Inventory Item Cross Reference When using Remote Tech, technicians can look up information about inventory items in e-automate. To learn information about an item, the technicians can lookup information using a variety of numbers. The following is a list of number that can be used as a lookup in Remote Tech. • Current item number • Current vendor number for the inventory item. • Historical vendor number for the item, one or many. Remote tech allows this flexibility so technicians have a high probability of finding information about inventory items regardless of the item number they use to lookup the information. e-automate expects that technicians in the field may not have the most recent item number but they
Revised: 11/19/2015 ©2015 ECi Software Solutions, Inc. - All rights reserved Confidential and Proprietary
Page 53
may have an equipment manual with a historical number that they can use to lookup the information that they need. If the inventory personnel that use e-automate had populated this information, the technician has a more reasonable expectation of being able to find information about an item while in the field. This instruction set is to identify where the above item numbers are in –automate and how to change or update these numbers.
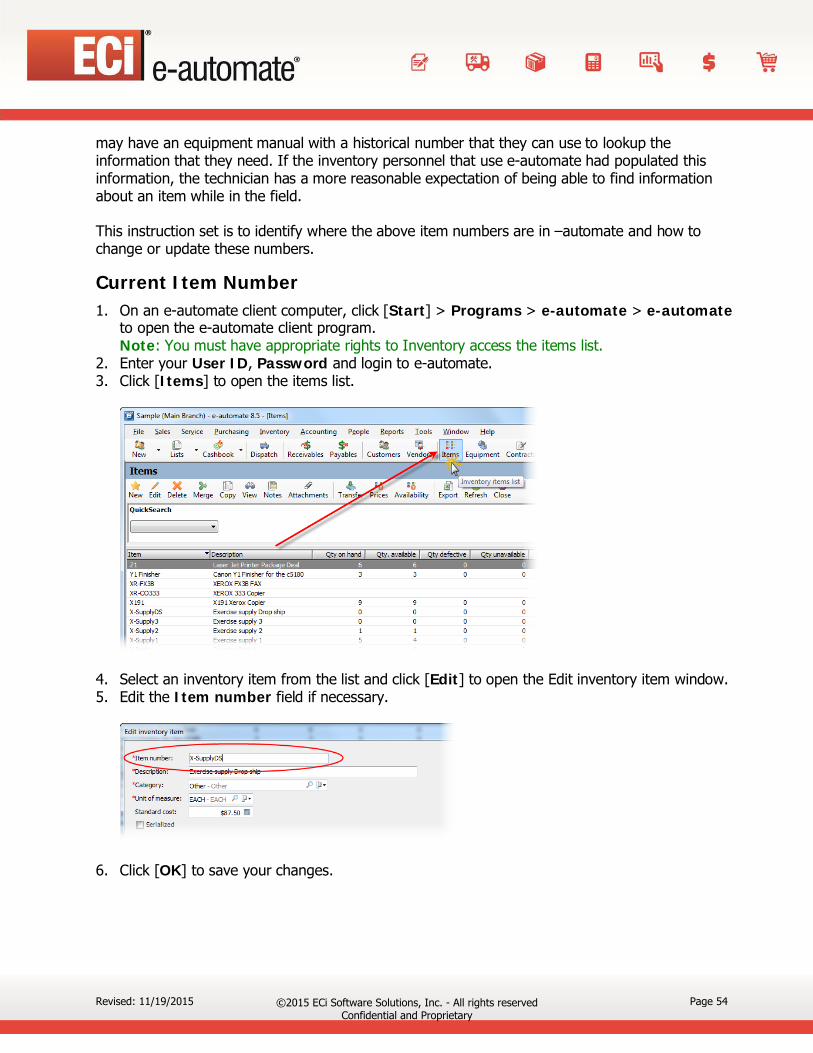
Current Item Number 1. On an e-automate client computer, click [Start] > Programs > e-automate > e-automate
to open the e-automate client program. Note: You must have appropriate rights to Inventory access the items list.
2. Enter your User ID, Password and login to e-automate. 3. Click [Items] to open the items list.
4. Select an inventory item from the list and click [Edit] to open the Edit inventory item window. 5. Edit the Item number field if necessary.
6. Click [OK] to save your changes.
Revised: 11/19/2015 ©2015 ECi Software Solutions, Inc. - All rights reserved Confidential and Proprietary
Page 54
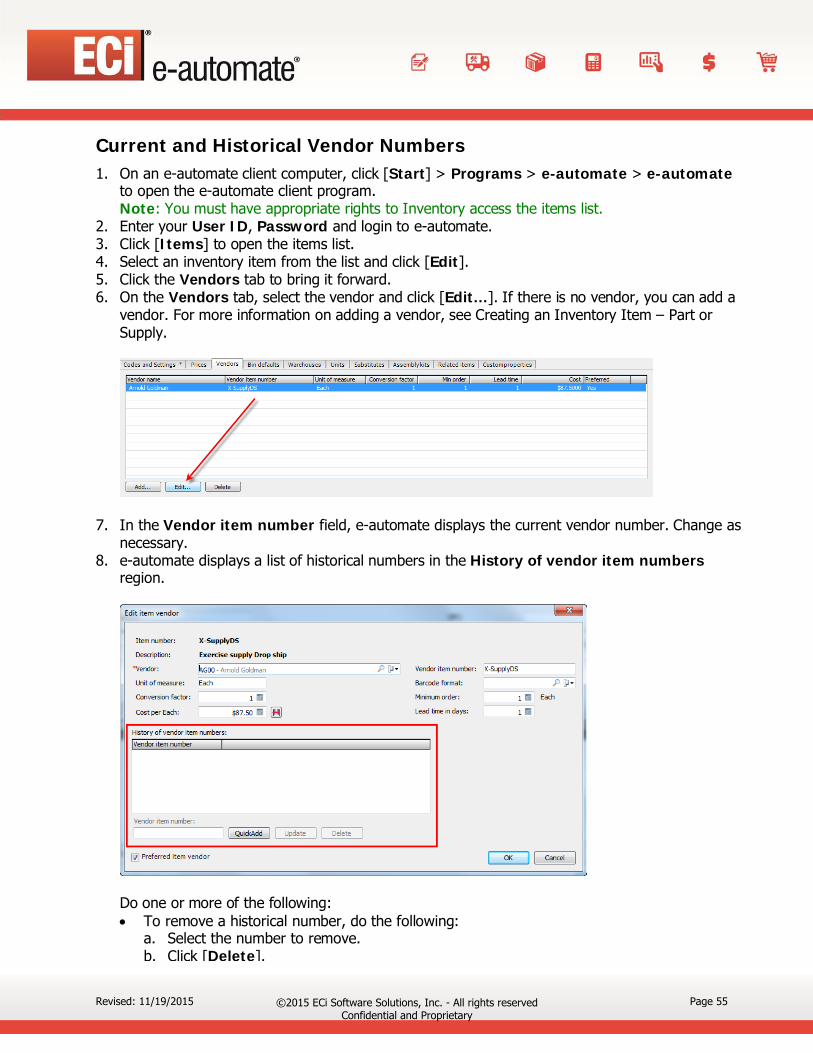
Current and Historical Vendor Numbers 1. On an e-automate client computer, click [Start] > Programs > e-automate > e-automate
to open the e-automate client program. Note: You must have appropriate rights to Inventory access the items list.
2. Enter your User ID, Password and login to e-automate. 3. Click [Items] to open the items list. 4. Select an inventory item from the list and click [Edit]. 5. Click the Vendors tab to bring it forward. 6. On the Vendors tab, select the vendor and click [Edit…]. If there is no vendor, you can add a
vendor. For more information on adding a vendor, see Creating an Inventory Item – Part or Supply.
7. In the Vendor item number field, e-automate displays the current vendor number. Change as necessary.
8. e-automate displays a list of historical numbers in the History of vendor item numbers region.
Do one or more of the following: • To remove a historical number, do the following:
a. Select the number to remove. b. Click [Delete].
Revised: 11/19/2015 ©2015 ECi Software Solutions, Inc. - All rights reserved Confidential and Proprietary
Page 55
• To add a new number to the history, do the following: a. In the History of vendor item numbers region, in the Vendor item number field,
enter a historical number that has been used to reference the item. b. Click [QuickAdd] to add your number to the list.
9. Click [OK] to close the Edit item vendor window. 10. Repeat steps 6 – 9 to change information for additional vendors. 11. Click [OK] to save your changes. 12. Repeat steps 4 - 11 to change additional items.
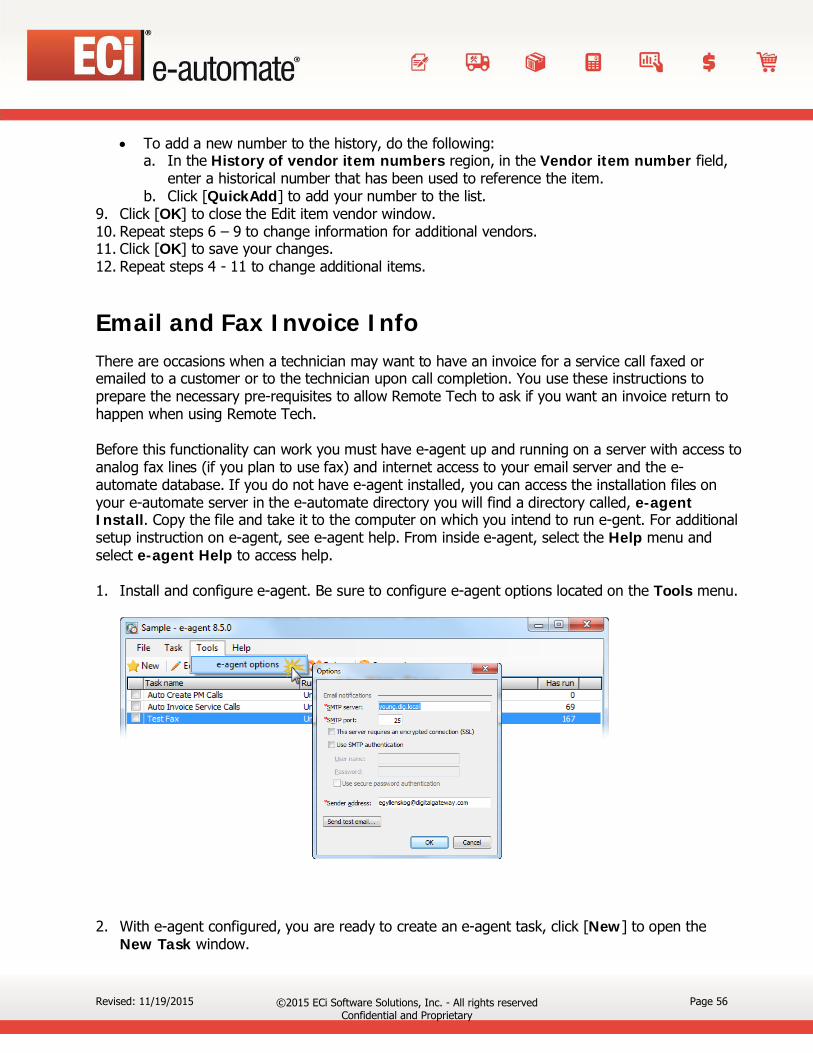
Email and Fax Invoice Info There are occasions when a technician may want to have an invoice for a service call faxed or emailed to a customer or to the technician upon call completion. You use these instructions to prepare the necessary pre-requisites to allow Remote Tech to ask if you want an invoice return to happen when using Remote Tech. Before this functionality can work you must have e-agent up and running on a server with access to analog fax lines (if you plan to use fax) and internet access to your email server and the e-automate database. If you do not have e-agent installed, you can access the installation files on your e-automate server in the e-automate directory you will find a directory called, e-agent Install. Copy the file and take it to the computer on which you intend to run e-gent. For additional setup instruction on e-agent, see e-agent help. From inside e-agent, select the Help menu and select e-agent Help to access help. 1. Install and configure e-agent. Be sure to configure e-agent options located on the Tools menu.
2. With e-agent configured, you are ready to create an e-agent task, click [New] to open the
New Task window.
Revised: 11/19/2015 ©2015 ECi Software Solutions, Inc. - All rights reserved Confidential and Proprietary
Page 56

3. In the Type region, select Auto invoice service calls and click [OK].
The Auto invoice service calls window displays.
4. In the Name field enter an appropriate name to identify the task as the task used to auto return service invoices. Note: All tasks in e-agent must have a unique name.
5. If you only want to process calls from Remote Tech and auto-schedule this task to execute every minute, check the Process requests only from Remote Tech checkbox. Checking this checkbox displays two additional tabs, Email settings and Fax settings allowing technicians in the field using Remote Tech the ability to auto return the service invoices to the customer via fax or email. Note: For this functionality to work you must have email settings configured as well as a fax service installed and running on your e-agent server.
Revised: 11/19/2015 ©2015 ECi Software Solutions, Inc. - All rights reserved Confidential and Proprietary
Page 57

6. If you want the service invoice created to include service invoice details (exact date, time and hours for labor, mileage amounts, and a listing of specific items on the call), check the Show details on service invoice checkbox
7. To prevent e-agent from invoicing service calls that have warnings, check the Do not invoice if warnings exist checkbox.
8. If you are processing requests from Remote Tech only you cannot choose other options associated with this task, You can create a second task to handle other service calls not processed through Remote Tech and set the other options associated with this task.
9. In the Notification email: field, enter the e-mail address(es) of the person or persons you want notified. To notify multiple recipients, separate each e-mail address by a semi-colon or a comma. Use the delimiter associated with your email program. For example, [email protected]; [email protected]; [email protected].
10. Click the Email Settings tab to bring it forward. Note: Be sure to configure both the Email and the Fax tabs.
11. In the E-mail from address field, enter the email address from which you want service invoices emailed. Most email programs will use this email address if the recipient replies to the email. In the Send bcc to field, enter an email address or addresses if you want to send a blind carbon copy of the invoices to a specific email address. If you enter more than one email address be sure to separate each address with an appropriate delimiter, for example, Microsoft Outlook uses the semi-colon.
12. If you want e-agent to pause as it sends service invoices, check the Wait X second(s) before sending each email checkbox and enter the number of seconds you want it to pause.
13. Click the Fax Settings tab to bring it forward. Be sure to configure both the Email and the Fax tabs.
14. In the Fax application region, use the radio buttons to select the appropriate fax sending choice.
15. Fax options changes based on the Fax applications selected. For your specified fax application complete the appropriate options. Note: Cover pages options are not available on all fax application choices. If you want to import your own personal cover page, click [Import personal cover pages]. Use the Open window to navigate to your saved cover page file (.cov), select the file and click [Open]. Select your cover pages as appropriate in the Cover Pages region. Note: Attaching an image is not available on all fax application choices. If you want to attach an image (company logo) to your faxes, click the [...] adjacent to the Attach Image field. Use the Open window to navigate to your saved cover logo file (.bmp, .jpg, .jpeg, .tif, gif), select the file and click [Open].
16. Click [OK] to save your task settings. 17. You should have checked Process requests only from Remote Tech so you do not have the
options of scheduling this task. This task by checking Process requests only from Remote Tech is configured to automatically run every minute.
Revised: 11/19/2015 ©2015 ECi Software Solutions, Inc. - All rights reserved Confidential and Proprietary
Page 58