remote initial program load for ibm os/2 vi.3, v2.0, and … · 2013-01-11 · remote initial...
TRANSCRIPT

Remote Initial Program Load for
IBM OS/2 VI.3, V2.0, and Netware
GGl4-3892-00

Remote Initial Program Load for
IBM OS/2 V1.3, V2.0, and NetWare
Document Number GG24-3892-00
October 1992
International Technical Support Center Austin

Take Note! --------------------------------------------------------------------------~
Before using this information and the product it supports, be sure to read the general information under "Special Notices" on page xiii.
First Edition (October 1992)
This edition applies to Remote Initial Program Load of DOS V3.x, DOS V4.x, DOS V5.0, OS/2 V1.30.2, and OS/2 V2.0 from IBM OS/2 LAN Server V2.0, NetWare V3.11, NetWare V2.2, and NetWare Lite.
Order publications through your IBM representative or the IBM branch office serving your locality. Publications are not stocked at the address given below.
An ITSC Technical Bulletin Evaluation Form for readers' feedback appears facing Chapter 1. If the form has been removed, comments may be addressed to:
IBM Corporation, International Technical Support Center Dept. 948S, Building 821 Internal Zip 2834 11400 Burnet Road Austin, Texas 78758
When you send information to IBM, you grant IBM a non-exclusive right to use or distribute the information in any way it believes appropriate without incurring any obligation to you.
© Copyright International Business Machines Corporation 1992. All rights reserved. Note to U.S. Government Users - Documentation related to restricted rights - Use, duplication or disclosure is subject to restrictions set forth in GSA ADP Schedule Contract with IBM Corp.

Abstract
This document describes the different ways that the Remote Initial Program Load (RIPL) facility may be configured on the various IBM-supplied file server platforms. It provides information on how DOS and OS/2 images may be RIPLed from an IBM OS/2 LAN Server V1.3 and V2.0, a NetWare V3.11 server, a NetWare V2.2 server or external router, and a NetWare Lite server.
This document is intended for use as a reference to assist those who need to know how to set up a RIPL facility for medialess workstations. A knowledge of DOS, NetWare, and OS/2 installation is assumed.
PS (130 pages)
© Copyright IBM Corp. 1992 iii

iv OS/2 and Netware RIPL
Contents
Abstract ....
Special Notices
Preface
Related Publications Prerequisite Publications Additional Publications
Acknowledgements
Chapter 1. Introduction 1.1 Remote Program Load Overview 1.2 Initial Program Load and Remote Initial Program Load
Chapter 2. Boot ROM Overview 2.1 BIOS ....... . 2.2 IBM Boot ROM 2.3 NetWare Boot ROM 2.4 Boot ROM Detail
2.4.1 What is a Boot ROM? 2.4.2 Why Use Boot ROMs? 2.4.3 How Does the Boot ROM Work? 2.4.4 What Goes On Underneath 2.4.5 Boot ROM Entry ........ . 2.4.6 Boot ROM Initialization ..... . 2.4.7 IPL from the RPL Bootstrap Code 2.4.8 The IPX Connection . 2.4.9 Terminating Service 2.4.10 Batch File Not Found 2.4.11 Custom Disk Image Files 2.4.12 IBM Network Adapters
Chapter 3. RIPL from OS/2 LAN Server V2.0 3.1 Remote IPL Requirements ....... . 3.2 Installation of the RIPL Service - OS/2 V1.3 3.3 Installation of the RI PL Service - OS/2 V2.0 3.4 Installing LAN Server 2.0 Entry on OS/2 2.0 3.5 The GETRPL Utility .............. .
3.5.1 Using the GETRPL Program ...... . 3.6 Defining RIPL Workstations Using the LAN Requester FSI
3.6.1 Defining OS/2 RIPL ................... . 3.6.2 Using the FSI to Create Machines from a Model Machine 3.6.3 The File Index Table (FIT) ..... . 3.6.4 Automatic NET SHARE by the Server 3.6.5 The RPL.MAP File ........ . 3.6.6 The Boot Block Configuration File 3.6.7 Directory Structure ....... . 3.6.8 Considerations When Using the LAN Requester FSI 3.6.9 Missing Windows ................... .
© Copyright I BM Corp. 1992
iii
xiii
. xv
xvii xvii xvii
xix
1 1 2
3 3 3 4 4 4 4 5 6 6 7 8 8 9 9
10 10
13 13 14 15 16 17 17 18 18 20 21 22 23 23 25 27 27
v

3.6.10 Changing the Workstation Configuration ..... . 3.6.11 Creating a Default ST ARTU P.CMD File ...... . 3.6.12 Giving Default Files to All New RIPL Workstations 3.6.13 Enabling the IBM 8514/ A Adapter - OS/2 2.0 3.6.14 Enabling the IBM XGA Display Adapter - OS/2 2.0 3.6.15 Enabling AT Bus Machines for OS/2 2.0 RIPL 3.6.16 Systems with Serial Mice ...... .
3.7 Guidelines for Installing Applications .. , 3.8 Disk Space Requirements for RIPL Server 3.9 Multiple Adapters and RIPL Support 3.10 IBMLAN.INI Entries for the RIPL Service 3.11 Problem Determination ....... .
Chapter 4. RIPL using NetWare from IBM 4.1 NetWare RPL Boot ROMs versus IBM RPL Boot ROMs
4.1.1 NetWare RIPL using a NetWare Boot ROM 4.1.2 NetWare RIPL using an IBM Boot ROM
4.2 Contents of the LOGIN Directory 4.2.1 TOKEN.RPL 4.2.2 ETHER.RPL 4.2.3 PCN2L.RPL 4.2.4 1M L Files
4.3 RIPL from a NetWare 3.11 Server 4.3.1 The NetWare 3.11 RPL-Server 4.3.2 Features of RPL.nlm 4.3.3 Loading RPL.nlm on the NetWare Lite RPL-Server 4.3.4 Binding RPL.nlm to the 802.2 Board 4.3.5 Unique Boot Sequences using RPL.nlm 4.3.6 BOOTCONF.sys Extensions ...... . 4.3.7 Changing BOOTCONF.sys ....... .
4.4 RIPL from a NetWare 2.2 Server or a NetWare External Router 4.4.1 The NetWare 2.2 and External Router RPL-Server 4.4.2 Features of RPL.vp1 4.4.3 Installing RPL.vp1 ..... . 4.4.4 RPCONFIG.COM Utility .. .
4.5 RIPL from a NetWare Lite Server 4.5.1 The NetWare Lite RPL-Server 4.5.2 Features of RPL.com ..... . 4.5.3 Loading RPL.com on the NetWare Lite RPL-Server 4.5.4 Creating and using NET.CFG ..... . 4.5.5 Unique Boot Sequences using RPL.com 4.5.6 BOOTCONF.SYS Extensions 4.5.7 Changing BOOTCONF.SYS .... . 4.5.8 Memory Considerations .... .
4.6 The BOOTCONF.SYS File ........ . 4.6.1 Using Wildcard Characters in BOOTCONF.SYS 4.6.2 More than ONE Disk Image File per Node Address 4.6.3 Multiple Lines per Node Address ...... . 4.6.4 BOOTCONF.SYS BIND Override Parameters 4.6.5 Changing BOOTCONF.SYS
Chapter 5. NetWare RIPL of DOS Images 5.1 What you need ............ . 5.2 DOSGEN ................ . 5.3 Creating a Single Remote Boot Image File
vi OS/2 and Netware RIPL
29 31 31 32 33 34 35 35 35 36 36 37
39 40 40 41 41 42 43 43 44 44 45 45 46 46 47 47 48 48 49 49 49 50 51 52 53 53 55 57 57 57 57 58 58 58 59 59 61
63 63 63 64

5.4 Creating Several Remote Boot Image Files 5.5 Using Locally Administered Addresses 5.6 Bridging Considerations ...... . 5.7 Troubleshooting Tips ........ . 5.8 Examples of the Basic DOS Image
5.8.1 RIPL of 001 Drivers ...... . 5.8.2 RI PL of Standard I PX .. ... .
5.9 Examples of Images using DOS with LAN Support Program 5.9.1 RI PL of 001 Drivers ......... . 5.9.2 RIPL of Standard IPX ........ .
5.10 Dual DOS RI PL Requester Environment
Chapter 6. NetWare RIPL of 05/2 V1.30.2 Images 6.1 Setting up an OS/2 RIPL Image on a NetWare Server
6.1.1 RI PL of OS/2 V1.30.2 from a NetWare Server .. . 6.2 Installing OS/2 V1.30.2 on a Workstation ....... . 6.3 Updating the NetWare Requester for OS/2 V1.3 Diskette 6.4 Installing the NetWare Requester on the Workstation
6.4.1 Specify Program-File Directories .......... . 6.4.2 Modifying CONFIG.SYS ................ . 6.4.3 Copy the Requester Program Files to Your Hard Drive 6.4.4 Starting the Requester .................. . 6.4.5 Installing NetWare Utilities For OS/2 on the File Server
6.5 Copying OS/2 to the File Server 6.6 Preparing the File Server 6.7 NetWare Rights ......... . 6.8 Finishing Off ........... . 6.9 Setting up Multiple OS/2 Images 6.10 Using Locally Administered Addresses 6.11 Bridging Considerations ........ . 6.12 Known Restrictions to OS/2 V1.30.2 RIPL 6.13 Troubleshooting
Chapter 7. NetWare RIPL of 05/2 V2.0 Images 7.1 Setting up an OSI2 RIPL Image on a NetWare Server
7.1.1 RIPL of OS/2 V2.0 from a NetWare Server 7.2 Installing OS/2 V2.0 on a Workstation ........ . 7.3 Installing the NetWare Requester on the Workstation
7.3.1 The OS/2 V2.0 NetWare Installation Utility 7.3.2 Select Target and Source Drives for Requester Files 7.3.3 Edit CONFIG.SYS and Copy Files ..
7.4 Installing the OS/2 Image on the Server ..... . 7.4.1 Install Procedure ................ . 7.4.2 The OS/2 V2.0 RPL2 Image on the File Server
7.5 NetWare Rights .... . 7.6 Finishing Off ...... . 7.7 File Server Connections 7.8 Bridging Considerations
Appendix A. Software Revision List A.1 IBM LAN Servers ..... A.2 NetWare 3.11 File Server A.3 NetWare 2.2 File Servers A.4 NetWare Lite File Server A.5 DOS RI PL Workstation Clients
65 67 67 68 68 69 70 71 71 73 75
79 79 79 80 80 81 82 82 84 84 85 86 86 88 89 89 90 90 90 91
93 93 93 94 94 94 96 96
102 102 109 109 110 111 111
113 113 113 114 114 115
Contents vii

A.6 OS/2 V1.3 RI PL Workstation Clients A.7 OS/2 V2.0 RIPL Workstation Clients
Appendix B. BIOS Patch Files Used by OS/2
Appendix C. Abbreviations
Glossary
Index ..
viii OS/2 and Netware RIPL
115 116
117
121
123
131
Figures
1. The RIPLINST Program ............. 16 2. Message Box Displayed for OS/2 2.0 Support 17 3. Remote IPL Requester Definition ........ 19 4. Remote IPL Requester Definition and FIT Entry 19 5. Remote IPL Server Records 20 6. The RIPL Program Flow ........... 25 7. The RIPL Directory Structure ........ 26 8. Missing Windows - VGA Display 640 x 480 28 9. Missing Windows - XGA Display 1024 x 768 29
10. Display Profiles by Server ........ 30 11. Access Control Profile User List ...... 31 12. Equivalent NetWare RIPL Combinations 39 13. Initial Screen Presented by RPCONFIG.com Utility 51 14. Screen Presented by RPCONFIG.com Utility .... 51 15. NetWare NSD004 Requester Installation: Initial Window 81 16. NetWare NSD004 Requester Installation: Target Directories 82 17. NetWare NSD004 Requester Installation: Modify CONFIG.SYS 83 18. NetWare NSD004 Requester Installation: LAN Driver Selection 83 19. NetWare NSD004 Requester Installation: File Transfer 84 20. NetWare NSD004 Requester Installation: Exit Screen 84 21. The RIPL Directory Structure on a NetWare Server . . 89 22. NetWare Requester Installation ............. 94 23. OS/2 V2.0 NetWare Requester Installation: Target Directories 96 24. OSI2 v2.0 NetWare Requester Installation Selection 97 25. OS/2 v2.0 Select Options for CONFIG.SYS ........ 98 26. NetWare Requester NIC Drivers Available for OS/2 V2.0 98 27. OSI2 V2.0 NetWare Requester CONFIG.SYS Name 99 28. OS/2 V2.0 NetWare Requester Target Directory Confirmation 100 29. NetWare Folder Contents 102 30. Remote Workstation Installation 103 31. Available File Servers ..... 104 32. Attach to a New File Server .. 104 33. RPL Install - First Confirmation 105 34. RPL Install - File Server Confirmation 105 35. Install PS/2 Support .......... 106 36. Insert OS/2 Install Diskette ...... 106 37. Select Servers to Set Up for Remote Boot of Workstations 107 38. Add Remote Boot Workstation 108 39. NetWare OSI2 V2.0 RPL Drivers ........... 108 40. Example of CONFIG.WSS . . . . . . . . . . . 109 41. The RI PL Directory Structure on a NetWare Server 110 42. Model, Submodel, and BIOS Revision Levels of PS/2 Systems 118 43. Model, Submodel, and BIOS Revision Levels of PS/55 Systems 119 44. ABIOS.SYS File of a PS/2 Model 60 Running OS/2 V1.3 ..... 119
© Copyright I BM Corp. 1992 ix

X OS/2 and Netware RIPL

Tables
1. NetWare Media RPL Bootstrap Code Modules - Overview 2. NetWare RPL Bootstrap Code Modules - Detail 3. RPL Frame Types Responded to by RPL.nlm 4. Modules Replaced by RPL.nlm ....... . 5. RPL.nlm BIND Time Parameters ...... . 6. RPL Frame Types Responded to by RPL.vp1 7. RPL Frame Types Responded to by RPL.com 8. Programs to be Executed on NetWare Lite RPL Server 9. RPL.com Command Line Parameters .
10. NET.CFG Protocol Section Statements 11. Wildcard Characters in BOOTCONF.sys 12. BOOTCONF.SYS BIND Override Parameters 13. Batch File Missing Error Causes ...... . 14. Versions of NetWare for OS/2 Requester Guide 15. Directory Usage for RIPL Support 16. BIOS Patch Files Introduced by CSD5050 ....
© Copyright IBM Corp. 1992
41 42 44 44 46 48 52 52 53 55 58 59 68 79 82
119
xi

xii OS/2 and Netware RIPL
Special Notices
This publication is intended to help customers and systems engineers to understand the RIPL process and successfully implement RIPL features on IBM LAN file server platforms. The information in this publication is not intended as the specification of any programming interfaces that are provided by IBM OS/2 LAN Server V2.0, NetWare from IBM V3.11, NetWare from IBM V2.2, or PC-DOS. See the PUBLICATIONS section of the IBM Programming Announcement for IBM OS/2 LAN Server V2.0, Novell NetWare V3.11, Novell NetWare V2.2, and PC-DOS for more information about what publications are considered to be product docu mentation.
References in this publication to IBM products, programs, or services do not imply that IBM intends to make these available in all countries in which IBM operates. Any reference to an IBM product, program, or service is not intended to state or imply that only IBM's product, program, or service may be used. Any functionally equivalent program that does not infringe any of IBM's intellectual property rights may be used instead of the IBM product, program or service.
References in this publication to IBM products, programs or services do not imply that IBM intends to make these available in all countries in which IBM operates. Any reference to an IBM product, program, or service is not intended to state or imply that only IBM's product, program, or service may be used. Any functionally equivalent program that does not infringe any of IBM's intellectual property rights may be used instead of the IBM product, program or service.
Information in this book was developed in conjunction with use of the equipment specified, and is limited in application to those specific hardware and software products and levels.
IBM may have patents or pending patent applications covering subject matter in this document. The furnishing of this document does not give you any license to these patents. You can send license inquiries, in writing, to the IBM Director of Commercial Relations, IBM Corporation, Purchase, NY 10577.
The information contained in this document has not been submitted to any formal IBM test and is distributed AS IS. The use of this information or the implementation of any of these techniques is a customer responsibility and depends on the customer's ability to evaluate and integrate them into the customer's operational environment. While each item may have been reviewed by IBM for accuracy in a specific situation, there is no guarantee that the same or similar results will be obtained elsewhere. Customers attempting to adapt these techniques to their own environments do so at their own risk.
The following document contains examples of data and reports used in daily business operations. To illustrate them as completely as possible, the examples contain the names of individuals, companies, brands, and products. All of these names are fictitious and any similarity to the names and addresses used by an actual business enterprise is entirely coincidental.
The following terms, which are denoted by an asterisk (*) in this publication, are trademarks of the International Business Machines Corporation in the United States and/or other countries:
© Copyright IBM Corp. 1992 xiii
ACF/VTAM AT Common User Access CUA IBM IBMLink Micro Channel Operating System/2 OS/2 Personal Computer AT Personal Computer XT Personal System/2 Presentation Manager PS/2 RISC System/6000 VTAM XGA XT
The following terms, which are denoted by a double asterisk (* *) in this publication, are trademarks of other companies:
286, 386, 486, SX are trademarks of Intel Corporation. Epson is a trademark of Epson Corporation. HP and Hewlett Packard are trademarks of Hewlett Packard Corporation. Intel is a trademark of Intel Corporation. Microsoft is a trademark of Microsoft Corporation. NetWare, 001, VAP and NLM are trademarks of Novell Corporation. UNIX is a trademark of UNIX System Laboratories, Inc.
xiv OS/2 and Netware RIPL
Preface
This document is intended to be a reference document for those who are involved in implementing diskless workstations in a NetWarefrom IBM or IBM OS/2 LAN Server V2.0 environment.
It contains information relating how DOS and OS/2 images may be RIPLed from an IBM OS/2 LAN Server V2.0, a NetWare V3.11 Server, a NetWare V2.2 Server or external router, and a NetWare Lite Server.
This document is intended to be a "how to" guide for persons requiring information on setting up the RIPL feature on the current LAN file server platforms IBM offers.
This document is organized as follows:
• Chapter 1, "Introduction"
• Chapter 2, "Boot ROM Overview"
This provides a description of how the RPL module or Boot ROM manages to load an operating system into a workstation.
• Chapter 3, "RI PL from OS/2 LAN Server V2.0"
This chapter describes how to set up an IBM OS/2 LAN Server to provide DOS and OS/2 RI PL services.
• Chapter 4, "RIPL using NetWare from IBM"
This chapter describes the different NetWare platforms that can be set up to provide RIPL services. It also discusses the various options available on the platforms.
• Chapter 5, "NetWare RIPL of DOS Images"
This chapter describes how to set up various DOS configurations that can be RIPLed from a NetWare server. It also details setting up an image to access to both NetWare and IBM OS/2 LAN Servers.
• Chapter 6, "NetWare RIPL of OS/2 V1.30.2 Images"
This chapter describes how to set up a NetWare server to provide RIPL of OS/2 V1.30.2.
• Chapter 7, "NetWare RIPL of OS/2 V2.0 Images"
This chapter describes how to set up a NetWare server to provide RIPL of OS/2 V2.0.
© Copyright I BM Corp. 1992 xv

xvi OS/2 and Netware RIPL
Related Publications
The following publications are considered particularly suitable for a more detailed discussion of the topics covered in this document.
Prerequisite Publications • IBM OS/2 LAN Server V2.0 Network Administrator's Reference Volume 1:
Planning and Installation, S04G-1032
• IBM OS/2 LAN Server V2.0 Network Administrator's Reference Volume 2: Performance Tuning, S04G-1033
• IBM OS/2 LAN Server V2.0 Network Administrator's Reference Volume 3: Network Administrator Tasks, S04G-1034
• Novell NetWare Version 3.11 Installation, Novell # 183-000298-001
• Novell NetWare Requester for OS/2, Novell # 100-001157-002
• Novell NetWare 001 Shell for DOS, Novell # 100-000871-001
• Novell NetWare Version 2.2 Installing/Maintaining the Network, Novell # 183-000265-001.
Additional Publications • IBM Token-Ring Network Remote Program Load User's Guide, SK2T-03333
• IBM Local Area Network Technical Reference, SC30-3383-3
• IBM Token-Ring Network Architecture Reference, SC30-3374-02
• Implementing the NetView DM/2 LAN Download Utility, GG24-3678.
© Copyright IBM Corp. 1992 xvii

xviii OS/2 and Netware RIPL

Acknowledgements
This publication is the result of a residency conducted at the International Technical Support Center, Austin.
The participants in the residency were:
Bob Ballantyne Urspeter Haerri Ricardo Haragutchi Berit Kragas Robin McKinnon Manfred Schneider Gary Waldhart
The project advisor was:
IBM United Kingdom IBM Switzerland IBM Brazil ITSC Austin IBM Australia IBM Germany IBM Australia
AI Pate - International Technical Support Center, Austin
Thanks to the following people for the invaluable advice and guidance provided in the production of this document:
© Copyright IBM Corp. 1992
Barry Saunders IBM South Africa Stephen Peters IBM Australia Marcio Almeida IBM Brazil Thierry Bailon IBM France John Poston IBM United Kingdom Dallas National Technical Support Center
Brendan Paget Elke Janke John Divers Trevor Davies
Bill Blackett Adam B. Jerome David Wagstaff
IBM U.S.A. IBM New Zealand IBM Germany IBM United Kingdom IBM United Kingdom
Novell Novell Novell
xix

XX OS/2 and Netware RIPL

Chapter 1. Introduction
Local Area Networks (LANs) allow computers to communicate with one other. Most computers gain access to the network by loading an operating system and adapter support code from their fixed disk or diskette drive. A Remote Program Load (RPL) module makes it possible for a personal computer or IBM* Personal System/2* computer to gain access to the network and request operating system code and applications to be downloaded, even though it may not have a hard disk or diskette drive.
The requesting device, called the workstation or requester,' does this by asking a loading device to send it a bootstrap program. The loading device is another computer that has a hard disk and is called the file server or RPL server. The RPL server uses a loader program to send the bootstrap program to the workstation. Once the workstation has a bootstrap program, it is then equipped to request an operating system, which in turn can request and use application programs. An application program is one written for or by a user that applies to the user's work.
A special ROM must be installed on a token-ring, Ethernet, or IBM PC Network adapter. This adapter must be installed in the workstation in order to make it a requester. This special ROM is also known as a Boot ROM or RPL Module.
1.1 Remote Program Load Overview For the RPL function to be operational on a network, the network must have a RPL server and one or more workstations with the necessary boot ROM module on their Network Interface Card (NIC). The RPL server and the workstation do not need to be on the same LAN segment. They can be on different LAN segments connected with bridges.
Both the RPL server and the workstations must be on the same logical network ID. That is, a workstation can operate across a bridge, but it cannot operate across a router.
The following descriptions differentiate the RPL server and the workstation:
• RPL server
© Copyright IBM Corp. 1992
The RPL server must have a fixed disk or diskette drive. Its purpose is to supply files to the workstations. Also, both the RPL server and the workstations must have the same type of LAN adapter installed.
• Workstation
The workstation does not need a fixed disk or diskette drive. It receives the operating system and programs it needs from the RPL server. The workstation needs a network adapter with a boot ROM module installed.
1
1.2 Initial Program Load and Remote Initial Program Load Initial Program Load (IPL) is the process of loading an operating system into a workstation from a local diskette or hard disk. Remote Initial Program Load (RIPL) on the other hand is the process of loading an operating system into a workstation from a location that is remote to the workstation.
When a PC or PS/2 is powered on or rebooted, it goes through Power-On-Self-Test (POST) routines. During this phase, it determines which hard disks and floppy drives it has configured from its CMOS setup or from its motherboard switches.
• If there is a floppy disk drive, it checks for the presence of a diskette in the drive. If one is found, it attempts to load the operating system from the diskette.
• If there is a hard disk drive, it checks for the presence of an active primary partition on the disk. If one is found, it loads the operating system from the hard disk.
Once the operating system has loaded, drivers must be loaded to allow the network interface card to communicate on the network, either to a file server or to other workstations.
On a medialess workstation, or a workstation set up to IPL from a RPL server, the IPL code comes from a boot image on the RPL server. This process is termed Remote Initial Program Load.
In this case, when the workstation boots and goes through its Power-On-Self-Test (POST) routines, it detects the presence of a BIOS extension at the start of the boot ROM containing the requester code. The POST routines then branch to this code, tricking the BIOS into thinking that the NIC is actually a floppy drive. The workstation attempts to IPL from a pseudo-diskette contained within this pseudo-drive.
On a machine that already has a floppy drive, this process prevents the use of the floppy drive until after the RIPL process has completed. After the workstation has logged into the network, the floppy drive is returned to its proper status and becomes accessible once again. With a medialess workstation, this setup is ideal as it fools the workstation into thinking it has a floppy drive until the RIPL process has completed. After this, the workstation has all 26 drives, A through to Z, available for mapping as network drives.
The main differences between a drive the NIC emulates and a proper floppy drive is that the emulated drive is both faster and read only.
In order to truly emulate a floppy drive, all of the diskette information must be passed to the NIC, so the boot ROM may truly emulate a drive. This includes the system sectors, the FAT table, the directory structure and all of the files. This information is gathered together in the form of a Boot Image File.
2 OS/2 and Netware RIPL
Chapter 2. Boot ROM Overview
2.1 BIOS
This chapter discusses how the RPL module or boot ROM loads operating system code into a workstation.
All personal computers have Basic Input/Output Services (BIOS) chips (for example, Phoenix, AMI American, Quadtel, etc.). The BIOS consists of simple routines, that:
• Display information onto the screen
• Send information to a printer (including print screen)
• Floppy disk interface.
The BIOS is also used to "bootstrap" the computer. This bootstrap is referred to as the Power-On-Self-Test (POST) program. The POST program consists of several routines which are executed during power-up. Some of these routines are initializing memory and performing a brief system diagnostic test.
The POST routine searches for optional ROMs that reside in memory at addresses between OxC8000 and OxF4000. These ROMs must be located on a 2KB boundary. Optional ROM blocks are identified by a signature of OxAA55h contained in the first word of the ROM block. Optional ROMs include:
• Floppy disk controller
• Fixed disk controller
• BASIC language ROM
• NetWare** boot ROM
• IBM RPL boot ROM.
If POST locates an optional ROM, it jumps or far calls into the ROM's entry point. This gives the optional ROM control to initialize itself. Normally, the optional ROM returns control to the POST routine, and the next optional ROM is located.
2.2 IBM Boot ROM IBM boot ROMs for the IBM Token-Ring, IBM Ethernet and IBM PC Network adapters can only be used in an IBM LAN environment. IBM Boot ROMs do not operate in the same fashion as NetWare boot ROMs.
When the POST routine jumps to the IBM Boot ROM entry point, the ROM attaches the workstation to the network and broadcasts a FIND frame on the network. This is repeated periodically until a RPL server responds with a FOUND frame to the issuing workstation. The workstation then transmits a SEND.FILE.REQUEST frame to the RPL server, which sends the RIPL image file TOKEN.RPL, ETHER.RPL or PCN2L.RPL back to the requesting workstation.
The IBM boot ROM accepts the appropriate *.RPL program from the file server and executes it. Once loaded, the node completes its bootstrap process. The *.RPL code is the same code as that used by the NetWare boot ROM.
© Copyright IBM Corp. 1992 3

Note: Certain IBM microchannel computers, such as the IBM PS/2 Models 56 and 57 SLC, have a BIOS image file associated with them. During cold boot, the BIOS update process looks for files with an extension of .IML to update the motherboard BIOS before the bootstrap loader routine is called. These .IML files come on the reference diskette for the computer. You MUST create a directory called \LOGIN\IBMLAN\DCDB\IMAGES and install ALL .IML files in this directory. After loading the IML files, the computer does another reboot.
On a RIPL workstation this means the IML files are loaded from the RIPL server during the first reboot, then the RIPL image is loaded during the second reboot!
2.3 NetWare Boot ROM When POST jumps to the NetWare boot ROM's entry point, the ROM hooks itself into the BIOS routines, imitating a floppy disk drive. It accepts calls from POST as though it were a floppy drive controller. The media for this pseudo disk drive is generally a boot image file created by the NetWare DOSGEN utility. This file must be located in the SYS:LOGIN directory.
The boot image file is read, as required by POST, through the services provided by the NetWare boot ROM.
2.4 Boot ROM Detail The following is a technical explanation of how the RIPL process from a NetWare RPL server is performed. It is geared toward people who understand NetWare well and have a good working knowledge of DOS.
2.4.1 What is a Boot ROM? As the name implies, a boot ROM is a ROM that boots a computer. The ROM itself is an integrated circuit that plugs into the network interface card (NIC) of a workstation on the network. Booting usually refers to loading DOS from a floppy or hard disk, but when booting from ROM, it comes across the network.
The code in the ROM is executed during the boot sequence on the workstation. The ROM is responsible for establishing a communications session with the file server and getting the correct information back to the workstation.
2.4.2 Why Use Boot ROMs? The advantages of using a boot ROM over a disk drive are as follows:
4 OS/2 and Netware RIPL
1. Cost Advantage
With a boot ROM in a workstation, a disk drive is unnecessary. A ROM chip is much less expensive than a disk drive.
2. Physical Size Advantage
A computer that boots from a network can be physically much smaller than a computer that must contain either a hard disk and a floppy disk drive.
3. Security Advantage
This is possibly the most important and common use for medialess machines. If there is no floppy disk drive, information may be viewed on the
workstation, but it may not be copied onto diskette and taken out of the system. Also, there is no chance of introducing viruses into the system.
2.4.3 How Does the Boot ROM Work? Basically, the boot ROM emulates a floppy drive. It takes over the floppy drive interrupt (INT 13h). As far as the workstation is concerned, it then has an A drive with a write-protected boatable disk in it.
Since the workstation thinks it has a floppy drive, it requires all of the low-level data on a floppy disk. This includes the system sectors, FAT table and directory tables. The boot ROM obtains this information from a boot image file, created by the system supervisor using the DOSGEN utility. In order to create the boot image file, a diskette is set up with the necessary files required to perform whatever is required of the workstation. The NetWare DOSGEN utility is used to read all of the information from the diskette and transfer it to a boot image file.
The diskette consists of CONFIG.SYS and the necessary device drivers that are required for the desired configuration. It will also include AUTOEXEC.BAT and whatever terminate-and-stay-resident (TSR) programs are required. The network shell programs that allow the workstation to log into the file server will also be included. The AUTOEXEC.BAT file may also execute the LOGIN program.
This strategy gives a lot of flexibility. Whatever environment can be set up from a floppy can also be set up by the boot ROM. Also, on machines which only have 360KB floppy drives, the boot ROM can still use an image generated from a 1.44MB diskette drive. The workstation that boots from ROM does not necessarily have to be the same machine that created the boot image. This point is more obvious when considering medialess machines like the IBM PS/2 Model 8555-L TO and the IBM PS/2* Model 8555-LEO, which have no means to create a diskette image in the first place.
The boot image file is an exact image of the floppy that the workstation believes is in drive A. In order for the boot ROM to access this file at boot time, it must be stored on the network in the SYS:LOGIN directory.
With the boot disk image file in the proper directory, the boot ROM is ready to perform the function of remote initial program load. It broadcasts a message to find the nearest server. The reply may indeed come from the physically nearest server, however, the workstation attaches to the first server that actually replies. After attaching to the file server, a media-specific remote program load file is transmitted to the workstation. This file allows the workstation to request the relevant contents of the BOOTCONF.SYS file in the SYS: directory of the file server.
One of several things can then happen, depending on the revision of files being used, and the particular setup involved. In all cases, the workstation attempts to read a boot image file from the file server. Then, whenever a floppy read request is issued in the workstation, the boot ROM intercepts the request and converts it into a network read request. Instead of reading data from the floppy, it comes from the boot image file.
Chapter 2. Boot ROM Overview 5

2.4.4 What Goes On Underneath Perhaps the easiest way to understand the workings is to compare the diskless boot image with the already familiar boot from the floppy or hard disk.
• The following procedure describes a floppy disk boot sequence:
Initialize BIOS vectors Scan for Boot ROMs (and execute their functions) INT 19h Load and Execute Boot Sector
Load DOS Execute CONFIG.SYS Commands Execute AUTOEXEC.BAT Commands
Execute LSL.com Execute MUD Execute IPXODI.com Execute NETX.com Execute LOGIN.exe
Execute Login Script DOS Prompt>
• The following procedure describes a boot ROM sequence:
Initialize BIOS vectors Scan for Boot ROMs (and execute their functions) INT 19h (hooked by Boot ROM)
Initialize Boot ROM Initialize Network Interface Card Attach to nearest file server Find and Open the boot image file Load and Execute Boot Sector Load DOS Execute CONFIG.SYS Commands Execute AUTOEXEC.BAT Commands
Execute LSL. com Execute MUD Execute IPXODI.com Execute NETX.com Execute LOGIN.exe
Execute Login Script DOS Prompt>
As can be seen, the boot ROM has to do everything that the floppy did, as well as handling the NIC. The differences are in the boot ROM initialization routines and exit routines.
2.4.5 Boot ROM Entry The boot ROM entry is actually within the real mode addressable memory space of the workstation. Unless the boot ROM is built into the BIOS of the machine, it should be readable at some address between OxCOOO:Oh and OxEEOO:Oh. The exact address depends on the configuration of the workstation and its NIC settings. Looking at the beginning of the boot ROM address in memory using DEBUG or a similar program, the foilowing might be seen:
D288:8888 55 AA 18 58 86 33 ce BE C8 26 A1 84 83 3D 6E 6A
The first two bytes, "55 AA", at the beginning is the "Optional ROM" stamp or signature. The next byte is the size byte. It denotes the number of 512 byte
6 OS/2 and Netware RIPL

pages the ROM occupies. An 8KB ROM, for example has a size of Ox10h. The next byte is the entry point of the ROM. The very last byte on the ROM is the checksum byte. If the sum of all the bytes on the ROM is not the same as the checksum byte, then the POST issues a warning message.
2.4.6 Boot ROM Initialization When the BIOS executes INT 19h, the boot ROM has total control. First it checks to see if there is a real floppy, and if there is, it checks to see if it contains a diskette. Next it checks to see if there is a hard disk present, and if there is, it checks for an active partition on the hard disk.
If there is no floppy, and the workstation does not boot from a hard disk, the boot ROM replaces the original INT 19h vector, then jumps to the replaced vector.
2.4.6.1 NetWare Boot ROM Initialization NetWare Boot ROMs first relocate their RPL bootstrap code to RAM. Since DOS is not loaded when INT 19h is executed, DOS function calls cannot be used to allocate any memory. This leaves 20KB at the top of memory for the resident portion of COMMAND.COM. NetWare Boot ROMs locate their code 16KB below this. (These values have caused some problems with DOS 5.0, and have since been increased.)
Next, the RPL bootstrap code initializes the NIC. The 001 shells have not been loaded, so the RPL bootstrap code has to talk directly to the card. When the 001 shells have loaded, they take over the hardware, and the RPL bootstrap code has to communicate through the IPX stack instead of talking directly to the board. Until then, there is a small IPX emulator in the RPL bootstrap code with just enough functionality to complete the boot process.
The RPL bootstrap code then attempts to communicate through the LAN and establish a connection with a file server. To do this, the RPL bootstrap code broadcasts a GET.NEAREST.SERVER request (GNS request) and uses the source address from the first response that comes back.
If there are multiple servers on the same LAN, the NetWare RPL bootstrap code file normally has to be installed on all the servers the workstation may attach to. This is in the event that one server may respond faster than others. Because of the possibility that the workstation may connect to another file server at some time, it is important to have the RPL bootstrap code file on all relevant file servers.
There are currently some developments which simplify this situation and allow the workstation to connect to a particular server.
2.4.6.2 IBM Boot ROM Initialization IBM boot ROMs first initialize the NIC, so they can broadcast a "FIND frame" request on the LAN. (This is normally done using the IEEE 802.2 protocoL) This is repeated periodically, until an RPL Server responds with a "FOUND frame" to the issuing workstation. The workstation then transmits a SEND.FILE.REQUEST frame to the RPL server, which sends a media-specific RPL bootstrap code file (TOKEN.RPL, ETHER.RPL or PCN2L.RPL) back to the requesting workstation containing the IBM boot ROM.
When the workstation receives the RPL bootstrap code, it is loaded into RAM and executed. Most of this code is relocated to near the top end of RAM. Since
Chapter 2. Boot ROM Overview 7
DOS is not loaded when INT 19h is executed, DOS function calls cannot be used to allocate any memory. This leaves 20KB at the top of memory for the resident portion of COMMANO.COM. The RPL bootstrap code locates its code 16KB below that. (These values have caused some problems with DOS 5.0, and have since been increased.)
Since the 001 shells have not been loaded, the RPL bootstrap code has to talk directly to the card. When the 001 shells have loaded, they take over the hardware, and the RPL bootstrap code has to communicate through the IPX stack instead of talking directly to the board. Until then, there is a small IPX emulator in the RPL bootstrap code with just enough functionality to complete the boot process.
2.4.7 IPL from the RPL Bootstrap Code After the RPL bootstrap code gets a valid attachment, it attempts to open the boot disk image file from which it can perform an IPL. If the system supervisor has not set up a BOOTCONF.SYS file (this is discussed later), the default name is assumed. This is NET$OOS.SYS (or IBM$OOS.SYS for NetWare 2.0a Boot ROMS). Since the RPL bootstrap code has connected, but has not logged in to the file server, the only place that it has access rights is in the SYS:LOGIN directory. That is why all boot image files must be located in the SYS:LOGIN directory.
Now the RPL bootstrap code intercepts the floppy disk interrupt INT 13h. While it is hooking into the interrupt vector table, it puts the "NetW" stamp in the INT F1h, so that the network shells wi" know they have been booted from ROM. Also, the old INT 13h vector is placed at INT F2h, the new INT 13h is placed at INT F3h, and the RPL bootstrap code disconnect vector is placed at INT F4h. The RPL bootstrap code then loads in the boot sector from the boot image file (just as the floppy boot would have done from the floppy disk) and executes it.
At this point, the RPL bootstrap code is a backdrop routine. It is only active when POST makes a call to the floppy drive. It reads the data image file and returns data to the requesting process, just as an operating floppy drive normally would. As far as DOS is concerned, it is illega"y in memory, but DOS is not aware of this.
As long asno other processes disrupt the RPL bootstrap code's trapped interrupt vectors, do not try to use the "illegal" memory location, and do not try to access the NIC, the boot process handles most disk image file configurations. The boot process can also withstand a limited amount of interference from programs that access the NIC or reassign interrupt vectors.
2.4.8 The IPX Connection The NIC is reset when either the MUD is executed (using 001 shells) or when IPX.COM is executed. After resetting, the RPL bootstrap code does not talk to the hardware directly. The boot ROM expects this, and is prepared. It stops talking directly to the NIC and starts talking through the newly installed code.
8 OSI2 and Netware RIPL
2.4.9 Terminating Service When NETX.com is executed, it establishes its own connection with the server. Since the workstation now has real NetWare drives mapped to the file server, the boot process can be completed from a network drive. The RPL bootstrap code is no longer needed. In order to do this, three things need to happen:
1. NETX.com sees the" NetW" stamp in the INT F1 h vector. This indicates that the node has been booted from a RPL bootstrap code.
2. NETX.com executes INT F4h, which cause the RPL bootstrap code to terminate its connection with the file server.
3. NETX.com replaces the INT 13h vector with the original. This allows the floppy drive to be used now RIPL has completed.
The RPL bootstrap code is no longer used. The executable image stays in memory, but no more calls are issued to that code. The memory occupied by the executable RPL bootstrap code image is now owned by DOS and is overwritten by DOS when the memory is allocated to an application.
2.4.10 Batch File Not Found One of the common errors reported by COMMAND.COM during the boot phase is the error message "Batch File Not Found". This occurs when COMMAND.COM is processing a batch file, and after executing some program, the batch file no longer exists. This can happen when the ODI shells, standard shells, or LOGIN are executed from the AUTOEXEC.BAT batch file.
Whenever DOS is executing a batch file, it keeps a small block of memory with important data it needs to remember. This includes the name of the batch file, and the byte offset in that file, of the next command to execute.
In the case of AUTOEXEC.BAT, since DOS thinks it's booting from a floppy disk, the current batch file name is A:\AUTOEXEC.BAT. When NETX.COM is executed, the RPL bootstrap code's drive A connection to the boot disk image is terminated. This would cause the "Batch File Not Found" error if the RPL bootstrap code did not change the batch file name to be F:\AUTOEXEC.BAT. It does this by searching the DOS memory chain for the current batch file record, which it then changes. When NETX.COM completes executing, DOS resumes processing the AUTOEXEC.BAT batch file. It thinks it is executing the batch file from the SYS:LOGIN directory on the file server.
It is important when setting up the system for DOS RIPL, that a copy of the AUTOEXEC.BAT is placed in the SYS:LOGIN directory, so that these errors can be prevented.
If the login script also maps the current drive, a copy of the AUTOEXEC.BAT file must be placed at the newly mapped drive in order to prevent the same error occurring again,
If everything is done properly, DOS starts executing AUTOEXEC.BAT from the disk boot image file, transfers to executing it from the SYS:LOGIN directory, and possibly finishes executing it from the user's home directory.
Chapter 2. Boot ROM Overview 9

2.4.11 Custom Disk Image Files NetWare boot ROMs have the ability to select a customized boot disk image file for every workstation. Not every site has a need for this kind of configuration, but many do. There are various reasons why this may be an advantage.
For example:
• It may be necessary to boot using LAN Support Program for certain applications, while it is not required for others
• Access to the reference disk may be required
• A user may wish to choose between booting DOS or OS/2*
• Some application may require a Locally Administered Address (LAA), while with others, a Universally Administered Address (UAA) is preferred.
All of these options can be accommodated by specifying multiple boot images in a list which the user may choose from when he reboots his workstation.
The boot ROM handles this by way of a configuration file called BOOTCONF.SYS. This is simply a list of network and node addresses, coupled with the names of their respective image files. When the boot ROM attaches to the file server, it requests the current list of boot image files associated with the workstation node. If none is available, it tries the default boot image filename of NET$OOS.SYS. If that is not present, it looks for the file IBM$OOS.SYS.
2.4.12 IBM Network Adapters IBM network adapters, such as IBM Token-Ring and IBM Ethernet, IBM PC Network II, have optional boot ROMs and operate differently from NetWare Boot ROMs. First of all, the IBM Boot ROMs are produced by IBM and are not NetWare specific. Instead of attaching to a NetWare file server, it simply sends out a special packet on the network requesting anyone who is listening to respond with an executable file. Pre-2.15 versions of the NetWare token-ring driver running on the file server were not designed to respond to this request.
Currently there are several N LMs for the NetWare 3.x file server, and a VAP for the NetWare 2.15 file server, NetWare 2.2 file server, and external routers that respond to this request. In either case, a RPL bootstrap code file, either TOKEN.RPL, ETHER.RPL or PCN2L.RPL, is sent to the requesting IBM adapter. This file basically contains the code from the NetWare Boot ROM that is copied into the workstation RAM during the POST phase of booting the workstation.
2.4.12.1 IBM Token-Ring IBM Token-Ring Adapters present another situation when the IBM LAN Support Program drivers are used. When attaching to the server with a token-ring card and the LAN Support drivers are required (compared with native mode 001 or IPX shells), another step is introduced into the boot process.
• First the boot ROM talks directly to the card and the TOKEN.RPL module is loaded into memory. This then talks directly to the card.
• Next the DXMCxMOD.SYS opens the card, and the TOKEN.RPL must talk through the DXMCxMOD.SYS moduie.
• Lastly, when the IPX stack is loaded, TOKEN.RPL must use this to talk to the card.
10 OS/2 and Netware RIPL
Loading the LAN Support drivers can cause the RIPL sequence to be quite slow.
2.4.12.2 IBM Ethernet Similar to the token-ring, the IBM Ethernet card broadcasts a generic file request. The file server responds with the ETHER.RPL remote program load file. The remote boot ROM on the Ethernet card and the ETHER.RPL file both talk to the file server using ETHERNET _802.2 frame types. This is different from standard 001 shells or IPX but is the same as LAN Support on Ethernet. This requires that support for both frame types be loaded on a NetWare 3.11 file server. The RPL.vp1 module for the NetWare 2.2 file server and external router automatically provide this support.
Chapter 2. Boot ROM Overview 11

12 OS/2 and Netware RIPL
Chapter 3. RIPL from OS/2 LAN Server V2.0
OS/2 LAN Server V2.0 can remotely load an operating system into a workstation on a LAN. The workstations can be DOS or OS/2 workstations. Many versions of DOS can be initial program loaded, as well as OS/2 V1.3, and OSI2 V2.0.
To IPL a DOS workstation, the server sends down an "electronic diskette" containing the IBM LAN Support Program, DOS, and the DOS LAN Requester 2.0. This electronic diskette is created when you install the LAN Server program and configure for DOS RIPL support.
The IPL of an OS/2 workstation is different from the IPL of a DOS workstation. A minifile system is created and loaded into the OS/2 workstation.
3.1 Remote IPL Requirements To run the RIPL service, OS/2 1.30.2 or OSI2 2.0 (only LAN Server Entry is supported) is required as the base operating system to install the server.
In addition, the following software is required:
• IBM LAN Server V2.0 Entry or Advanced
• For DOS RIPL support you require:
DOS
Note: If you choose to use PC DOS 5.0, you need to create the DOS diskettes from the DOS installation disk. This process creates the following diskettes:
1. Startup/Support
2. Shell/Help
3. Basic/Edit/Utility
4. Supplemental
DOS LAN Requester V2.0 (included in LAN Server 2.0)
• OS/2 1.3 diskettes for OS/2 1.3 RI PL
• OS/2 2.0 diskettes for OS/2 2.0 RIPL
• LAN Support Program V1.25 (included in LAN Server 2.0)
Note: The LAN Support Program is required for both DOS and OS/2 RIPL.
The hardware requirements for the RIPL server are:
• 80386** or 80486** based PS/2
© Copyright IBM Corp. 1992
• A minimum of 8MB of memory
• A minimum of 120MB disk space
• One of the following LAN adapters:
Token-Ring Adapter/ A
Token-Ring 16/4 Adapter/A
Token-Ring 16/4 Busmaster Adapter/ A
13

IBM PC Network Adapter/ A (Broadband or Baseband)
IBM PS/2 Adapter/A for Ethernet
Western Digital EtherCard PLUS/ A **
3COM Etherlink**/MC Adapter.
The hardware requirements for the workstation are:
• 8088-based workstation (DOS only)
• 80286**, 80386, 80486 based workstation
• 6MB memory for OS/2 workstation (8MB is better)
• One of the following LAN adapters:
Token-Ring Adapter/A (with RIPL ROM)
Token-Ring Adapter (with RIPL ROM)
Token-Ring 16/4 Adapter/A (with RIPL ROM)
Token-Ring 16/4 Adapter (with RIPL ROM)
IBM PC Network Adapter II
IBM PC Network Adapter/ A (Broadband or Baseband)
IBM PS/2 Adapter/ A for Ethernet.
3.2 Installation of the RIPL Service - OS/2 V1.3 This installation assumes OS/2 V1.3.2 is the operating system installed on the server.
1. Install LAN Server 2.0 using the Advanced option
2. Configure "OS/2 Remote IPL Service"
• When asked if you want to copy OSI2 1.3, select Yes
Note: You are asked if you want to use the version of OS/2 1.3 that has already been installed on your drive C. If you answer Yes to this question, the LAN Server installation program makes a copy of the OS/2 1.3 that exists on your drive C. If you answer No then you have to install OS/2 1.3 later.
3. Configure "LAN Adapter and Protocol Support"
• You need to install IEEE 802.2 for RIPL support
• NetBIOS is required for the standard LAN Server functions
4. Complete the installation.
If your server is already installed and you want to add the RIPL support for OS/2:
1. Run the "OS/2 LAN Services Installation/Configuration" from the LAN Services Group
2. Choose "Install or Remove a component"
3. Select "OS/2 Remote IPL Service" and "Install"
4. Configure "OS/2 Remote IPL Service"
5. When asked if you want to copy OS/2 1.3, select Yes
14 OS/2 and Netware RIPL

Note: You are asked if you want to use the version of OS/2 1.3 that has already been installed on your drive C. If you answer Yes to this question, the LAN Server installation program makes a copy of the OS/2 1.3 that exists on your drive C. If you answer No, then you have to install OS/2 1.3 later.
6. Configure "LAN Adapter and Protocol Support"
• You need to install IEEE S02.2 for RIPL support
• NetBIOS is required for the standard LAN Server functions
7. Apply the changes
Note: If your server is running, this process stops the server service.
S. Follow the instructions on the screen.
3.3 Installation of the RIPL Service - 05/2 V2.0 To support OSI2 2.0 RIPL from a server machine, you need to install OSI2 2.0 from the OS/2 2.0 diskettes. OSI2 2.0 diskette 7 contains a program RIPLINST that unpacks, installs, and sets up the RIPL subdirectories for OS/2 2.0 RIPL.
Since the diskette files are packed, you need to copy the UNPACK program from OSI2 2.0 diskette 2, unpack the RIPLINST program from diskette 7, and then run it.
1. Install LAN Server 2.0 using the Advanced path
2. Configure "OS/2 Remote IPL Service"
• When asked if you want to copy OS/2 V1.3, select No
3. Configure "LAN Adapter and Protocol Support"
• You will need to install IEEE S02.2 for RIPL support
• NetBIOS is required for the standard LAN Server functions
4. Complete the installation
5. Make a temporary directory for the UNPACK program, because OS/2 1.3 also has an UNPACK command which is different from the OS/2 2.0 version
MD C:\TEMP CD C:\TEMP
6. Insert diskette 2 of the OS/2 2.0 diskettes and type:
COpy A:UNPACK.EXE C:\TEMP
7. Insert diskette 7 of the OS/2 2.0 diskettes and unpack the RIPLINST program:
C:\TEMP\UNPACK A:RIPLINST
S. This will unpack two programs - RIPLINST.EXE and RIPLINST.HLP - into the C:\OS2\INST ALL directory
9. Run the RIPLINST program
Chapter 3. RIP L from OS/2 LA N Server V2.0 15

Source Directory .............................. " ......... ,' .................................................. " ............................ _ .......... " ......... " ............... ,
A:\
["OS/2 Remote IPL Directory"
I C;\IBMLAN\RPUOS2.20
! !(~!~2!J1E~ : ................................................................................................................................................................................................................................ :
Figure 1. The RIPLINST Program
This program prompts you to insert the OS/2 2.0 diskettes.
Note ------------------------------------------------~
If you run the RIPLINST program and the program stops copying files from the OS/2 2.0 diskettes, appearing to hang, you may need to use the OS/2 1.3 UNPACK command. RPLINST internally uses OS/2 2.0 version of UN PACK command. From the OS/2 1.3 task list, select "End task" for the RIPLINST program, and start again. Make sure you are using the UNPACK.EXE from the OS/2 2.0 diskette.
10. When all the diskettes have been copied, see Section 3.5, "The GETRPL Utility". move on to the GETRPL section.
3.4 Installing LAN Server 2.0 Entry on OS/2 2.0 The installation of LAN Server Entry on OS/2 2.0 is the same as installing on OS/2 1.3.
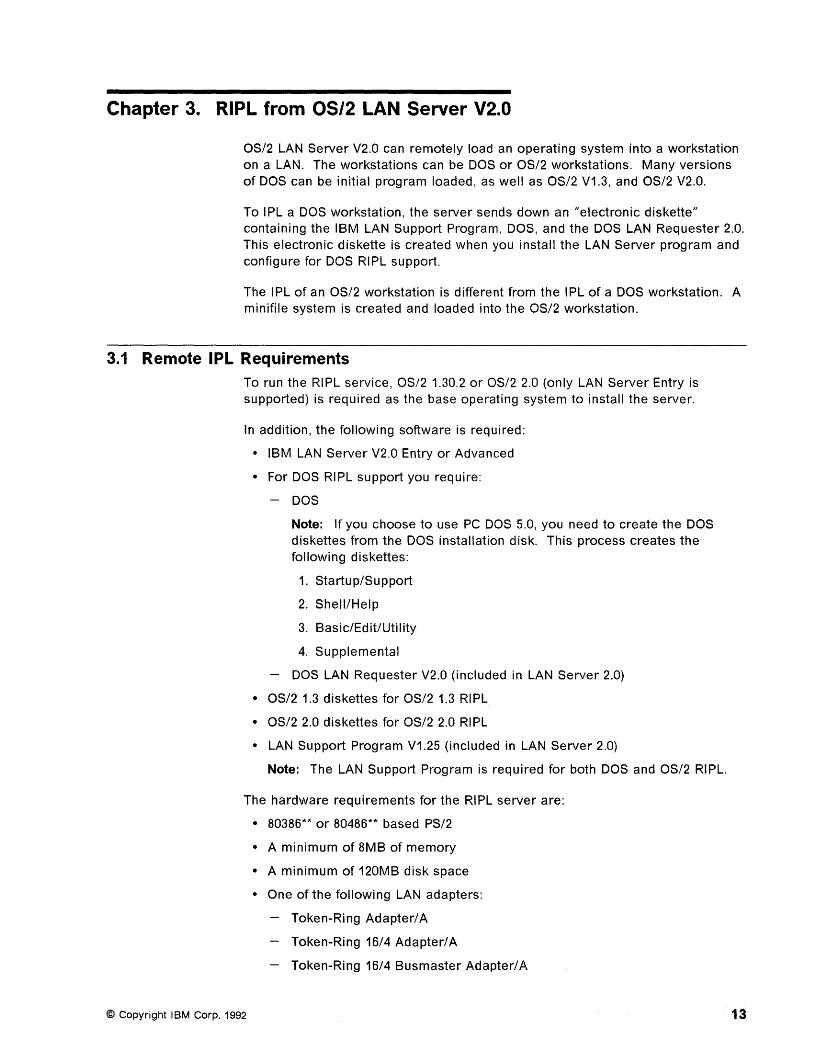
During the configuration process of the LAN Server installation, if you select OS/2 RIPL support, you see the following message box:
16 OS/2 and Netware RIPL
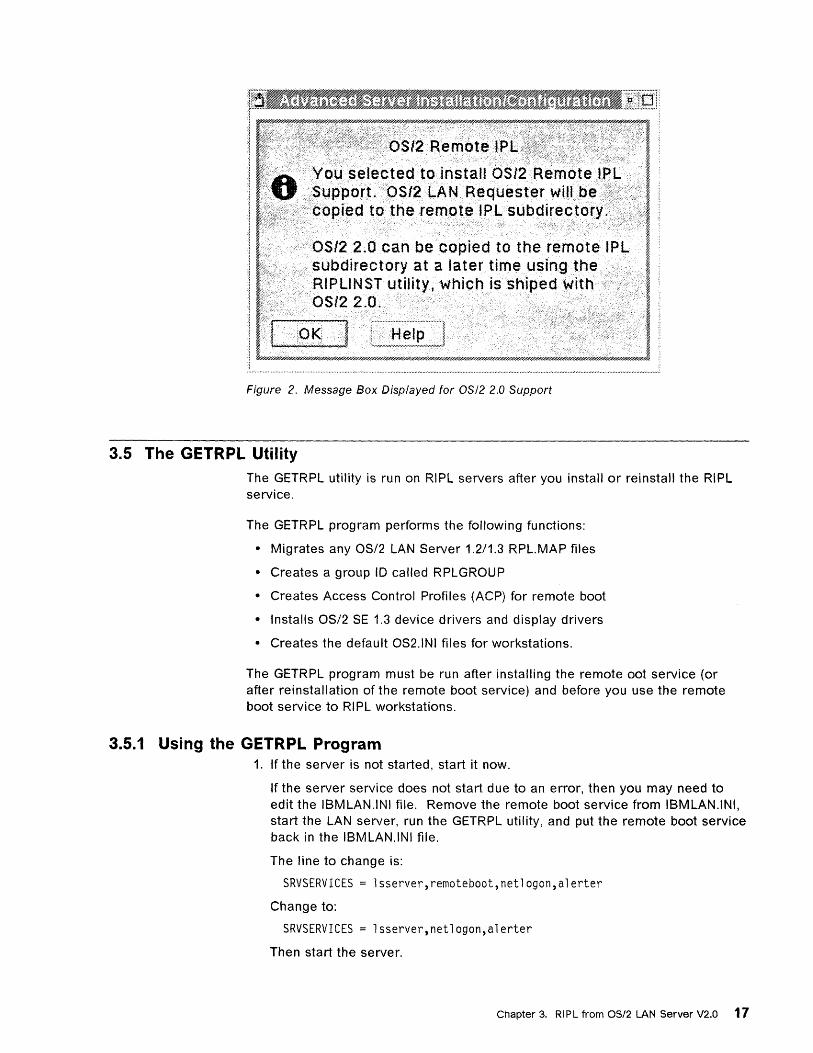
Figure 2. Message Box Displayed for OS/2 2.0 Support
3.5 The GETRPL Utility The GETRPL utility is run on RIPL servers after you install or reinstall the RIPL service.
The GETRPL program performs the following functions:
• Migrates any OSI2 LAN Server 1.2/1.3 RPL.MAP files
• Creates a group 10 called RPLGROUP
• Creates Access Control Profiles (ACP) for remote boot
• Installs OS/2 SE 1.3 device drivers and display drivers
• Creates the default OS2.INI files for workstations.
The GETRPL program must be run after installing the remote oot service (or after reinstallation of the remote boot service) and before you use the remote boot service to RIPL workstations.
3.5.1 Using the GETRPL Program 1. If the server is not started, start it now.
If the server service does not start due to an error, then you may need to edit the IBMLAN.INI file. Remove the remote boot service from IBMLAN.INI, start the LAN server, run the GETRPL utility, and put the remote boot service back in the IBMLAN.INI file.
The line to change is:
SRVSERVICES = lsserver,remoteboot,netlogon,alerter
Change to:
SRVSERVICES = lsserver,netlogon,alerter
Then start the server.
Chapter 3. RIPL from OS/2 LAN Server V2.0 17

2. If the remote boot service is running, then stop it as GETRPL won't run if the RIPL service is running.
To see if the remote boot service is running, type:
NET START
This displays the running services. To stop the remote boot service, type:
NET STOP RPL
Note: Some NET commands do not work if the LAN Requester full screen interface (FSI) is running.
3. Log on to the server with an administrator's 10.
4. Run GETRPL from an OS/2 command line.
The GETRPL program asks you to insert the diskettes for OS/2 1.3. This copies over any missing files that you don't have installed on your server (for example, different mouse drivers and printer drivers).
5. If OS/2 1.3 RIPL is required, insert the OS/2 1.3 diskettes as requested.
If only OS/2 2.0 RIPL support is required, select Cancel if the GETRPL program asks for the OS/2 1.3 diskettes.
3.6 Defining RIPL Workstations Using the LAN Requester FSI The LAN Requester full screen interface (FSI) is used to define:
• DOS diskette boot images
• RIPL servers
• RIPL workstations
• What each RI PL workstation can use
3.6.1 Defining 05/2 RIPL With the LAN Server program installed, the OS/2 RIPL configured, and the GETRPL program completed, you can define the OS/2 RIPL for the OS/2 workstations. This is done using the LAN Requester FSI.
1. In the LAN Requester FSI, choose Definitions then Machine Parameters
2. Select --New--, Actions, Create, then Remote IPL Workstation.
18 OS/2 and Netware RIPL
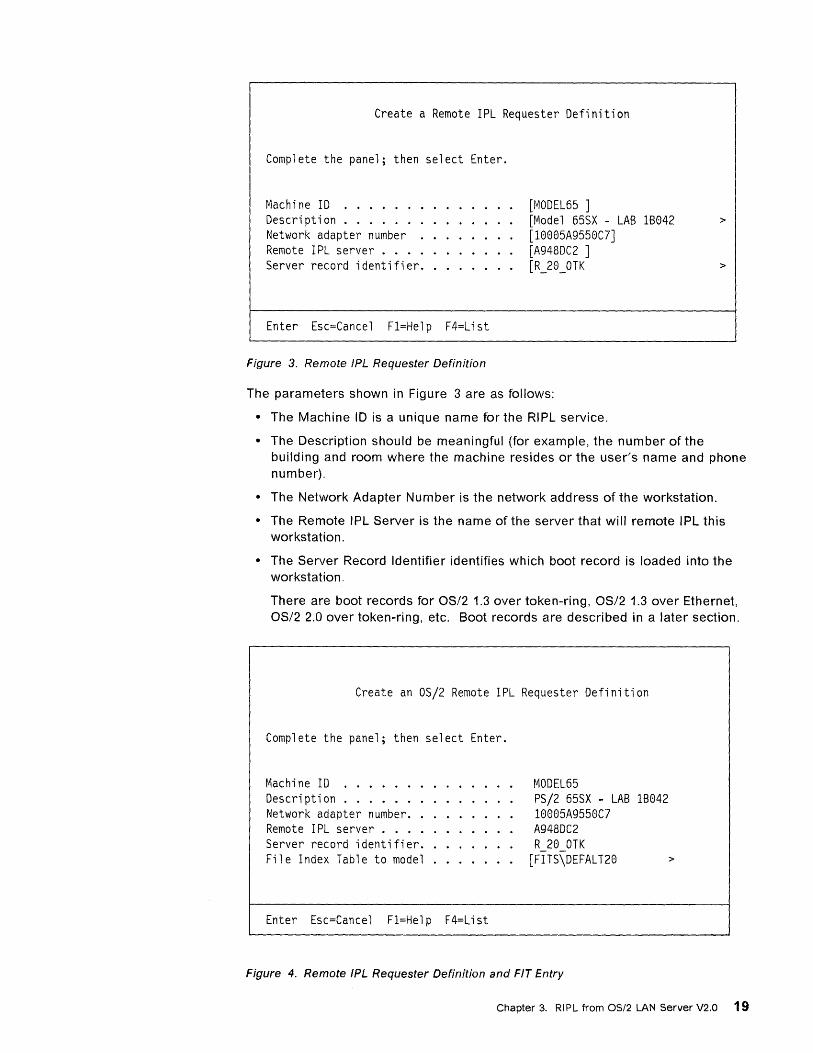
Create a Remote IPL Requester Definition
Complete the panel; then select Enter.
Machine 10 ..... . Description ..... . Network adapter number Remote 1PL server . . . . . Server record identifier.
Enter Esc=Cancel F1=Help F4=List
Figure 3. Remote IPL Requester Definition
[MODEL65 ] [Model 65SX - LAB 1B042 [18885A9558C7] [A948DC2 ] [R_28_0TK
The parameters shown in Figure 3 are as follows:
• The Machine 10 is a unique name for the RIPL service.
>
>
• The Description should be meaningful (for example, the number of the building and room where the machine resides or the user's name and phone number).
• The Network Adapter Number is the network address of the workstation.
• The Remote IPL Server is the name of the server that will remote IPL this workstation.
• The Server Record Identifier identifies which boot record is loaded into the workstation.
There are boot records for 0812 1.3 over token-ring, OS/2 1.3 over Ethernet, OS/2 2.0 over token-ring, etc. Boot records are described in a later section.
Create an OS/2 Remote IPL Requester Definition
Complete the panel; then select Enter.
Machine 10 ...... . Description ....... . Network adapter number .. Remote 1PL server . . . . Server record identifier .. File Index Table to model
Enter Esc=Cance 1 Fl=He 1 p F4=L i st
MODEL65 PS/2 65SX - LAB 1B042 10085A9550C7 A948DC2 R 28 OTK
[FITS\DEFALT20 >
Figure 4. Remote IPL Requester Definition and FIT Entry
Chapter 3. RIPL from OS/2 LAN Server V2.0 19
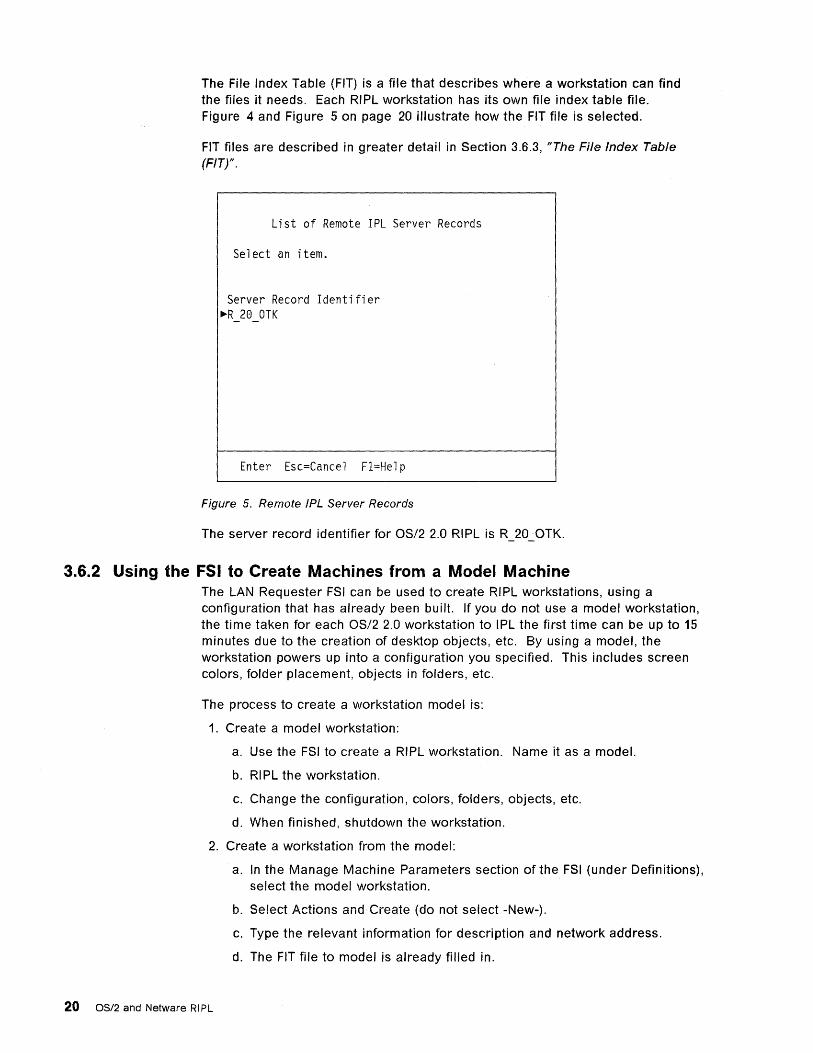
The File Index Table (FIT) is a file that describes where a workstation can find the files it needs. Each RIPL workstation has its own file index table file. Figure 4 and Figure 5 on page 20 illustrate how the FIT file is selected.
FIT files are described in greater detail in Section 3.6.3, "The File Index Table (FIT)".
List of Remote IPL Server Records
Select an item.
Server Record Identifier ~R 28 OTK
Enter Esc=Cancel n=Help
Figure 5. Remote IPL Server Records
The server record identifier for OS/2 2.0 RIPL is R 200TK.
3.6.2 Using the FSI to Create Machines from a Model Machine The LAN Requester FSI can be used to create RIPL workstations, using a configuration that has already been built. If you do not use a model workstation, the time taken for each OS/2 2.0 workstation to IPL the first time can be up to 15 minutes due to the creation of desktop objects, etc. By using a model, the workstation powers up into a configuration you specified. This includes screen colors, folder placement, objects in folders, etc.
The process to create a workstation model is:
1. Create a model workstation:
a. Use the FSI to create a RIPL workstation. Name it as a model.
b. RIPL the workstation.
c. Change the configuration, colors, folders, objects, etc.
d. When finished, shutdown the workstation.
2. Create a workstation from the model:
a. In the Manage Machine Parameters section of the FSI (under Definitions), select the model workstation.
b. Select Actions and Create (do not select -New-).
c. Type the relevant information for description and network address.
d. The FIT file to model is already filled in.
20 OS/2 and Netware RIPL

e. Press Enter to create the workstation.
This gives the new workstation the same configuration as the model. In this manner, OS/2 2.0 RIPL workstations can be created quickly and configured in the same step.
3.S.3 The File Index Table (FIT) The remote IPL of a DOS workstation is straightforward. An electronic diskette is passed down to the workstation and loaded.
OS/2 remote IPL (RIPL) requires a different mechanism to load the operating system since a complete working OS/2 system cannot be stored on one diskette. Instead, a mini file system is loaded, complete with CONFIG.SYS and all other files necessary for an OS/2 workstation.
The sequence of events that occur to RIPL an OS/2 workstation are:
• The workstation sends the RIPL request via the 802.2 layer.
• The server validates the workstation 10.
• The server then sends an OS/2 boot record to the workstation via 802.2.
This sets up a NetBIOS session to the server using the LAN Support Program.
• Control is transferred to the OS/2 loader, OS2LDR.
• The OS/2 loader loads the OS/2 kernel, OS2KRN L.
• The OS/2 kernel then loads the LAN transport drivers.
• The normal IPL sequence continues.
A workstation normally loads OS/2 from the primary partition (although OS/2 2.0 can load off an extended partition). This is generally drive C. The OS/2 RIPL procedure gives the workstation a redirected drive C over the network to the RIPL server.
A local hard disk has its drive letters "pushed up" by one by the RIPL procedure. So what was the local drive C becomes drive C during RIPLing.
Note: The file SWAPPER.DAT can be located on the RIPL server or on the local workstation's drive D.
The File Index Table (FIT) maps workstation files and subdirectories to files and subdirectories on the RIPL server. When OS/2 references a file using open, close, read, or write commands, the LAN redirector uses the FIT file to translate the reference to the appropriate file or directory on the server. The LAN redirector than routes the request to the server using the FIT translated file name. Using this technique, the workstation treats the server as a single logical drive. The workstation requires no knowledge of the server drive and directory structure.
Below is an example of part of a FIT file:
Chapter 3. RIPL from OS/2 LAN Server V2.0 21

; Read-only configuration files. (by workstation) C:\CONFIG.SYS MACHINES\MODEL80\CONFIG.20
; These OS/2 files must be writeable. C:\AUTOEXEC.BAT \\A948DC2\WRKFI LES\MODEL80\AUTOEXEC. 20 C:\OS2\OS2.INI \\A948DC2\WRKFILES\MODEL80\OS2\OS2INI.20 C:\OS2\OS2SYS.INI \\A948DC2\WRKFILES\MODEL80\OS2\OS2SYINI.20 C:\OS2\OS2.DTP \\A948DC2\WRKFILES\MODEL80\OS2\OS2.DTP C:\OS2\SYSTEM\SWAPPER.DAT \\A948DC2\WRKFILES\MODEL80\OS2\SYSTEM\SWAPPER.DAT
This is part of the OS/2 2.0 RIPL FIT file. The left side is the file that we need to load (for example C:\AUTOEXEC.BAT). The right part is where the file actually gets loaded from. So the C:\AUTOEXEC.BAT file gets mapped to \ \servername \ WRKFI LES\MODEL80\AUTOEXEC.20.
The OS2.INI file is unique to each workstation, and the user is able to make changes to this file by performing actions such as changing the screen colors with the OS/2 control panel. As a result, each workstation has its own set of files that are changeable by the user, most indirectly, like the OS2.INI file.
3.6.4 Automatic NET SHARE by the Server Two automatic NET SHARE commands are issued by the RIPL server at startup. These are for:
• The common code for all RIPL workstations (such as OS/2, LAN Requester):
RPLFILES C:\IBMLAN\RPL
• The specific files for each workstation (such as OS2.INI, CONFIG.SYS):
WRKFILES C:\IBMLAN\RPLUSER Share for RIPL read/write area
These network names, WRKFILES and RPLFILES, are used in the FIT file to specify the location of the RIPL subdirectories.
As well as mapping specific files like CONFIG.SYS, the FIT file can also map entire subdirectories.
C:\SPOOL C:\OS2 C:\IBMLAN C:\IBMCOM C:\
\\A948DC2\WRKFILES\MODEL80\SPOOL OS2.20\OS2 IBt~LAN
IBMCOM \\A948DC2\WRKFILES\MODEL80
Wildcards are also supported in the FIT file.
C:\*.8IO OS2.20\OS2 C:\OS2\*.INI \\A948DC2\WRKFILES\MODEL80\OS2 C:\OS2\APPS\*.TMP \\A948DC2\WRKFILES\MODEL80\OS2 C:\CMLIB\*.CFG \\A948DC2\WRKFILES\MODEL80\CMLIB
The search order for finding files is:
1. Look for a specific match of the file that you want in the FIT file.
2. If no specific match is found, search the appropriate directory entry in the FIT file.
For example, if the following is typed:
DIR C:\
22 OS/2 and Netware RIPL

the FIT line used for the search is:
C:\ \\A948DC2\WRKFILES\MODEL65
If the following is typed:
DIR C:\CONFIG.SYS
the FIT line used for this specific file search is:
C:\CONFIG.SYS MACHINES\MODEL65\CONFIG.20
But how does the LAN Server program know what FIT file to load to a particular workstation?
3.6.5 The RPL.MAP File The RPL.MAP file is a central file in the RIPL process. It resides in the C:\IBMLAN\RPL directory, and is responsible for ensuring the correct images are loaded to individual workstations.
RPL.MAP is created by the installation of the RIPL service. Like the FIT file, the RPL.MAP file is a plain ASCII file. The following example shows part of the RPL.MAP file:
; default workstation records 100FFFFFFFFF DEFAULT -1000FFFFFFFF DEFAULT 10005A9550C7 MODEL65 10005A22AA5A MODEL80
imagefile A948DC2 A948DOM2 - - - '" Z R_DTK FITS\DEFAULT A948DCZ - '" - R OTK - -FITS\MODEL65 A948DC2 - '" - R 20 OTK -FITS\MODEL80 A948DCZ - '" - R 20 OTK -
The first field contains the network address of the workstation. The second field is the machine name you entered using the LAN Requester FSI. The fourth field contains the location and name of the FIT file for the machine.
In this example, you can see that the machine MODEL65 has a FIT file associated to it of FITS\MODEL65.
When the workstation puts its network address on the network, and the server machine identifies the address as one it needs to IPL, the server sends down this FIT file to the workstation aloowing it to IPL the operating system.
The server cannot load a file to a workstation until a network interface has been loaded.
3.6.6 The Boot Block Configuration File When a RIPL workstation is set up using the LAN Requester FSI (see Figure 5 on page 20), a server record identifier is specified. This identifies the boot block configuration file. In our example in Figure 5 on page 20, the server record identifier was R_20_ OTK. The boot block configuration file boots the RIPL workstation and loads the LAN Support Program.
Looking at a different section of the RPL.MAP file:
; server records for OS/2 YYYYYYYYYYYY osZbbtr.cnf 3 10 N - OSZ-TOKR YYYYYYYYYYYY os2bbpc.cnf 3 10 N - OS2-PCNET YYYYYYYYYYYY os2bbpc.cnf 3 10 N - OSZ-PCNETA YYYYYYYYYYYY osZbbet.cnf 3 10 N - OSZ-ETHRNET YYYYYYYYYYYY osZZ0tr.cnf 3 10 N - OSZ-Z0-TOKR
, " - R OTK - -, " - R OPC - -'" - R OPCA - -, " - 'l{ OET - -'" - R 20 OTK - -
Chapter 3. RIPL from OS/2 LAN Server V2.0 23

yyyyyyyyyyyy os220pc.cnf 3 10 N - OS2-20-PCNET yyyyyyyyyyyy os220pc.cnf 3 10 N - OS2-20-PCNETA yyyyyyyyyyyy os220et.cnf 3 10 N - OS2-20-ETHRNET
'" - R 20 OPC - -'" - R 20 OPCA - -'" - R 20 OET - -
This shows that R_20_ OTK points to the file, OS220TR.CNF. This file is the boot block configuration file. This ASCII file contains the network drivers to load into the workstation - the LAN Support Program. This is loaded onto the workstation to enable communication at the 802.2 level between the workstation and the server.
Below is an example of a boot block configuration file:
; OS/2 Boot Block Configuration (IBM Token-Ring) ; RPL DOS\RPLBOOT.SYS DAT OS2\MFSD20.SYS ORG 1000H LDR OS2.20\OS2LDR - OS2LDR UFSD.SYS MFD20.SYS DAT OS2\UFSD.SYS DRV C:\IBMLAN\DOSLAN\LSP\DXMT0MOD.SYS O=Y - -DRV C:\IBMLAN\DOSLAN\LSP\DXMC0MOD.SYS - - M DRV C:\IBMLAN\DOSLAN\LSP\DXMA0MOD.SYS - - M
To summarize:
1. The workstation is powered on, inserts its token-ring address on the network and issues a FIND frame request.
2. The RIPL Server identifies the address and looks into the RPL.MAP file to see what operating system the workstation requires:
10005A9550C7 t~ODEL65 -- FITS\MODEL65 A948DC2 - - - - '" -- R_20_0TK - - -
3. The RIPL server looks at the end of the appropriate record entry to see what server record relates to that workstation. In this example, R_20_0TK is used.
4. The RI PL server then relates the server record to the boot block configuration file. In our example:
YYYYYYYYYYYY os220tr. cnf 3 10 N - OS2-20-TOKR
R 20 OTK relates to the file OS220TR.CNF.
5. The RIPL server reads the boot block configuration file to determine what configuration of the LAN Support Program to load to the workstation, and thus establish a low level of communication between the server and the workstation at an 802.2 level. This is why you need to select both NetBIOS and 802.2 interfaces during the LAN Server installation.
The FIT file is automatically packaged as part of the boot record even though it is not defined in the .CNF file.
In our example, the RIPL server packages the MODEL65 FIT into the boot record.
6. After the LAN Support Program is loaded into the workstation, the operating system is loaded, locating the files it needs through the FIT entries.
Figure 6 on page 25 illustrates this process:
24 OS/2 and Netware RIPL

Jzl (j) LSP /C:===-"'---' " ~- --- -- - ---- - - - - -- -- - - - - - - - - -- - - --- - - --- --- - - -- - - -- - - -- -- - - - - --- - -- - - - - - -- -- - - - - - - - - --- - - - - -- - - - --,
eYJ' @)j
®j m · I :
--------------------~
•
Figure 6. The RIPL Program Flow
3.6.7 Directory Structure
RPL.MAP @)
....... Server Record I !
C!l (R_20_0TK) I •
:-.. Boot Block Config File 1--; (os22otr. cnf)
I
I@) FIT File
(MODEL65)
The following diagram shows the main directory structure for the RIPL support. This directory structure shown is that of the C:\IBMLAN directory.
Chapter 3. RIPL from OS/2 LAN Server V2.0 25

~!'u"Ii"L!. ---------- RPL.MAP
CJ DOS CJ FITS -------- ALL FIT Files
E:J IBM CO M Shared I BMCOM
(£:] I BM LAN Shared IBMLAN
E:J MACH I N ES
~(£:] ATBUS (£:] DEFAL T20 EJ DEFAULT (£:] MODEL65 E:J MODEL80 LCJ IBMLAN
(£:] MUGLIB
1--__ One dire::tory per RI PL 'I/\lwkstation
I£J OS2 -------- Shared OS/2 1.3
(£:] OS2.20 Shared OS/2 2.0
E:J RPLUSER
~(£:] ATBUS E:J DEFALT20 (£:] DEFAULT (£:] MODEL65 E:J MODEL80
CJ DELETE EJ DESKTOP (£:] DESKTOPl CJ IBMCOM (£:] IBMLAN CJ NOWHERE (£:] OS2 (£:] SPOOL
1--__ One Dire:::tory per RIPL w orkst at i on
Spe::ific RI PL worr..station files for OS/2
Figure 7. The RIPL Directory Structure
Each of the directories and their contents are described below:
• RPL contains the RPL.MAP file and the boot block configuration files.
• RPL \FITS contains the default FIT files, and the machine-specific FIT files.
• RPL \IBMCOM contains the shared communications drivers that the workstations use.
• RPL\IBMLAN contains the shared LAN requester code that the workstations use.
• RPL \MACHINES contains subdirectories for each machine that is defined using the LAN Requester FSI, and the default files for OSI2 2.0 (MACHINES\DEFAL T20) and OS/2 1.3 (MACHINES\DEFAUL T).
• RPL \MACHINES\machinename contains default read-only files for the workstation, like CONFIG.20 (CONFIG.SYS).
• RPL\MACHINES\machinename\IBMLAN contains the IBMLAN.INI file for the specific machine. This is a default IBMLAN.INI file, with the computername parameter set to the machine name.
• RPL \MUGLIB contains the shared User Profile Management.
• RPL \OS2 contains (if installed) the default shared copy of OS/2 1.3 for OS/2 1.3 RI PL workstations.
26 OS/2 and Netware RIPL
• RPL \OS2.20 contains (if installed) the default shared copy of OS/2 2.0 for OS/2 2.0 RI PL workstations.
• RPLUSER is the directory structure for individual RIPL workstations. Each workstation has a directory here, with read/write files for that workstation that may be modified (such as OS2.INI).
When a RIPL workstation is created using the FSI, LAN Server creates the specific directory, and copies relevant files from the C:\IBMLAN\RPL\ directory structure.
• RPLUSER\DEFAL T20 contains standard files which all OS/2 2.0 RIPL workstations require (such as OS2.INI and OS2SYS.INI). A" files in this directory are copied to the RPLUSER\machinename directory by the LAN server when you create an OSI2 2.0 RIPL workstation.
• RPLUSER\DEFAULT contains standard files which all OS/2 1.3 RIPL workstations require (such as OS2.INI and OS2SYS.INI). All files in this directory are copied to the RPLUSER\machinename directory by the LAN Server when an OS/2 1.3 RIPL workstation is created.
3.6.8 Considerations When Using the LAN Requester FSI The LAN Requester FSI should really only be used to create RIPL workstation definitions and not to modify them.
When a RIPL workstation definition is created, the system creates the C:\IBMLAN\RPLUSER\machinename directory structure (see Figure 7 on page 26). Any files that existed previously are overwritten. If unique OS2.INI files or CONFIG.SYS files were created, they are lost.
If the FSI is used to set up a machine for OS/2 1.3 RIPL, the directory structure is created for the machine, and files such as CONFIG.13, OS2.INI, etc., are copied to the machine's subdirectory. If the FSI is then used to set up the same machine for OS/2 2.0 RIPL, unique subdirectories are created for OS/2 2.0 files (CONFIG.20, OS2.INI, etc.). When the machine configuration is updated, the information is written to the RPL.MAP file so LAN Server can pass them to the workstation.
If the machine configuration is then updated to go back to OS/2 1.3 RIPL, the files that were copied earlier are not re-used but re-copied as if this was the first time you had set them up. So if specific CONFIG.SYS or OS2.INI files for a RIPL workstation had been created, they are lost when you update the machine configuration using the FSI.
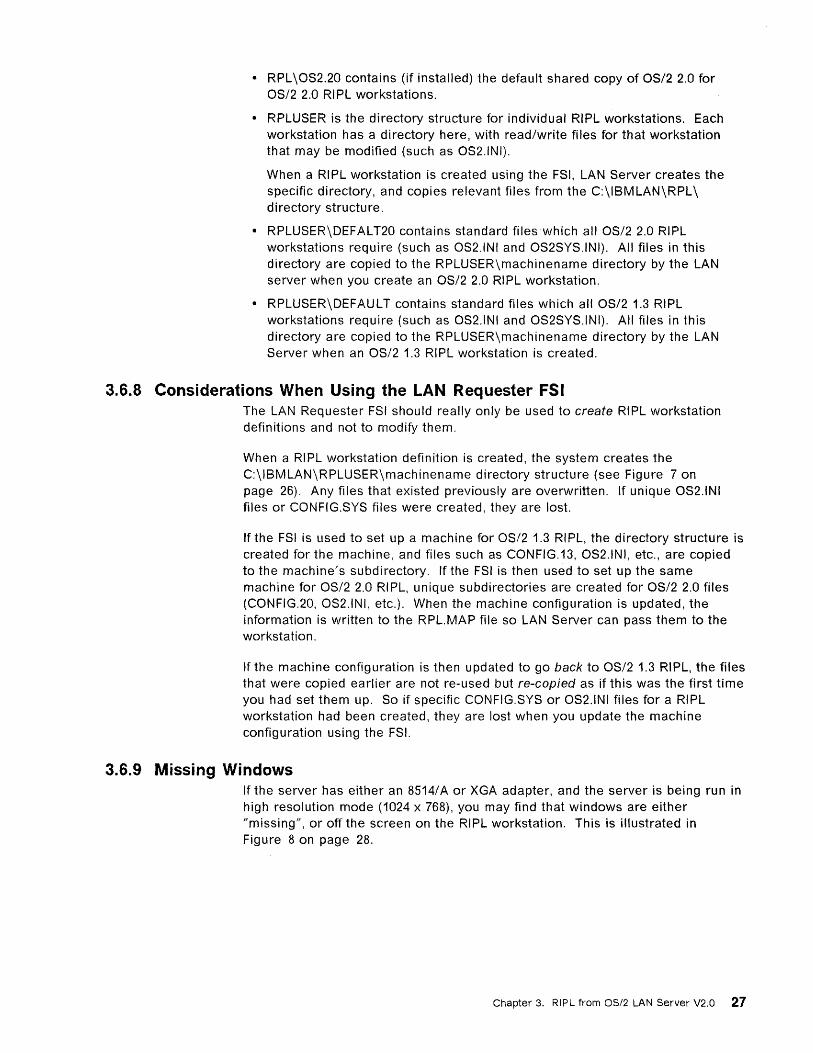
3.6.9 Missing Windows If the server has either an 8514/ A or XGA adapter, and the server is being run in high resolution mode (1024 x 768), you may find that windows are either "missing", or off the screen on the RIPL workstation. This is illustrated in Figure 8 on page 28.
Chapter 3. RIPL from OS/2 LAN Server V2.0 27

0,0
Figure 8. Missing Windows - VGA Display 640 x 480
This occurs because when OS/2 1.3 was copied from the server to the RIPL directory, the OS2.INI file was also copied. This file contains, among other things, the positions of the windows. On a high resolution monitor, if the windows are at the top of the screen, they may not completely display on a VGA workstation. Since the Presentation Manager coordinates start at the bottom left of the screen, a window at the top of an XGA screen is outside the coordinate space of a VGA display.
28 OS/2 and Netware RIPL
0,0
~~--~~~~--------~----~~, 1024,768
:----- --- --- -----CJ : I
I
I
VGA - 640 x 480
Figure 9. Missing Windows - XGA Display 1024 x 768
When an OSI2 workstation is RIPLed, if you find that upon opening a window it either does not display or the window border is not visible:
1. Press Ctrl + Esc to go to the Task List. Make sure the window you want is selected.
2. Select "Switch to" or double-click on the window/program you want to see.
3. Press Alt + F7. This is the window-move key sequence.
4. With either the mouse or the cursor keys, move the window down until you can see it.
3.6.10 Changing the Workstation Configuration There are times when the hardware in a RIPL workstation needs to be changed (for example, users may put a different mouse on their workstation). This requires a change in the mouse driver that gets loaded into the workstation.
Changing device drivers requires three things:
• Making sure the physical driver exists on the RIPL server
• Making the driver available to the workstation
• Updating the CONFIG.SYS file for the workstation.
The CONFIG.SYS file by default has an access permission of read-only for the workstation. This can cause problems if the user installs software that needs to access the CONFIG.SYS file to change the LlBPATH or DPATH, or to install other device drivers.
Chapter 3. RIPL from OS/2 LAN Server V2.0 29

3.6.10.1 Giving the User Access to CONFIG.SYS The access to the CONFIG.SYS file can be changed in two ways:
• Copy the CONFIG.SYS file to the user's WRKFILES directory on the server and change the FIT file to reflect the new location (which has an access profile of Read/Write), or
• Change the Access Control Profile for the directory that contains the CONFIG.SYS file.
To change the Access Control Profile for the workstation:
1. Using the LAN Requester FSI, select Definitions then Access Control.
2. As this is not an alias, select Servers and Display Profiles by Server.
Actions Servers Exit
Create... ntrol - Non-alias Update ... Delete... an action. User list. .. Group 1 i st. .. Apply ...
Esc=Cance 1 Fl=He 1 p
C:\IBMLAN\RPL\MACHINES C:\IBMLAN\RPL\MACHINES\DEFALT28 C:\IBMLAN\RPL\MACHINES\DEFALT28\IBMLAN C:\IBMLAN\RPL\MACHINES\DEFAULT C:\IBMLAN\RPL\MACHINES\DEFAULT\IBMLAN
~C:\IBMLAN\RPL\MACHINES\MODEL65 C:\IBMLAN\RPL\MACHINES\MODEL65\IBMLAN C:\IBMLAN\RPL\MACHINES\MODELB8 C:\IBMLAN\RPL\MACHINES\MODELB8\IBMLAN C:\IBMLAN\RPL\MUGLIB
Figure 10. Display Profiles by Server
A94BDC2
Type Files Files Files Files Files Fil es Fil es Fil es Files Files
More:
3. The profile name you want to select contains the machine name. For example, C:\IBMLAN\RPL \MACHINES\machine name. See Figure 10.
4. At the Manage Access Control screen select Actions then User List.
5. Change the permissions for the machine name, MODEL65 as an example, to RW. See Figure 11 on page 31.
30 OS/2 and Netware RIPL
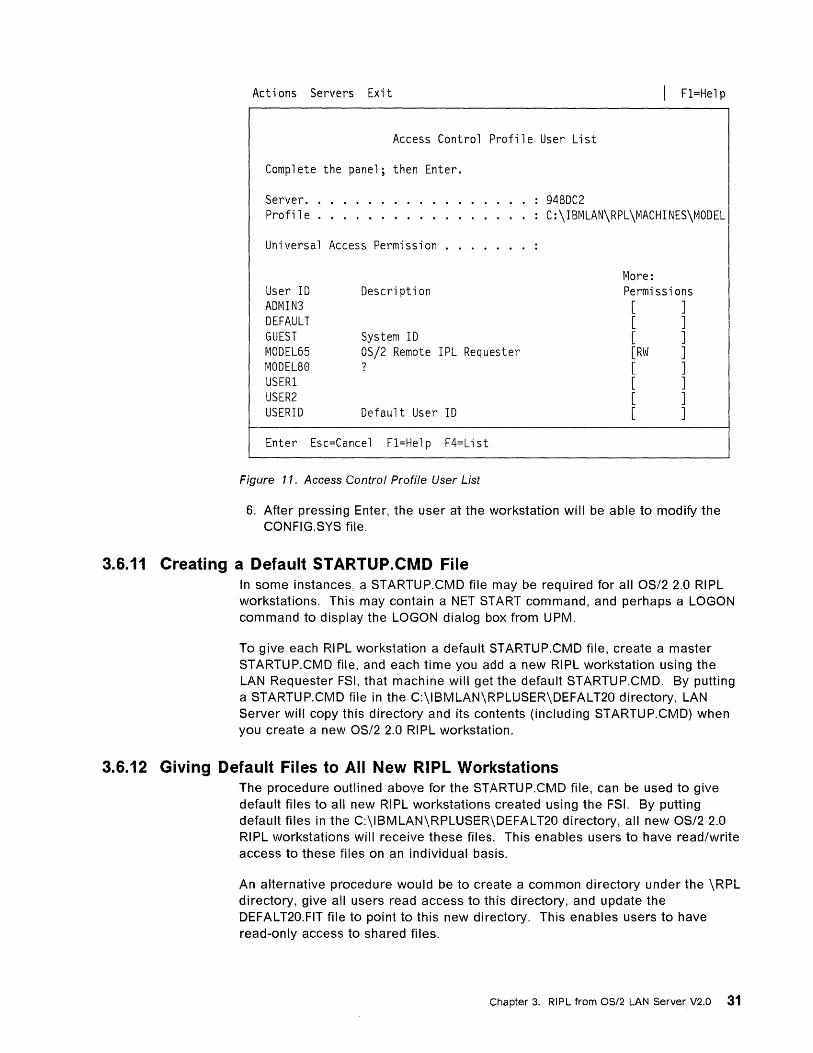
Actions Servers Exit I Fl=Help
Access Control Profile User List
Complete the panel; then Enter.
948DC2 Server. Profile .. C:\1BMLAN\RPL\MACH1NES\MODEL
Universal Access Permission
User 1D ADM1N3 DEFAULT GUEST MODEL65 MODEL80 USERl USER2 USER1D
Description
System 1D OS/2 Remote 1PL Requester ?
Default User 1D
Enter Esc=Cancel Fl=Help F4=List
Figure 11. Access Control Profile User List
More: Permissions [ ] [ ] [ ] [RW ] [ ] [ ] [ ] [ ]
6. After pressing Enter, the user at the workstation will be able to modify the CONFIG.SYS file.
3.6.11 Creating a Default STARTUP .CMD File In some instances, a STARTUP.CMD file may be required for all OS/2 2.0 RIPL workstations. This may contain a NET START command, and perhaps a LOGON command to display the LOGON dialog box from UPM.
To give each RIPL workstation a default STARTUP.CMD file, create a master STARTUP.CMD file, and each time you add a new RIPL workstation using the LAN Requester FSI, that machine will get the default STARTUP.CMD. By putting a STARTU P.CMD file in the C:\IBMLAN\RPLUSER\DEFAL T20 directory, LAN Server will copy this directory and its contents (including STARTUP.CMD) when you create a new OS/2 2.0 RIPL workstation.
3.6.12 Giving Default Files to All New RIPL Workstations The procedure outlined above for the STARTUP.CMD file, can be used to give default files to all new RIPL workstations created using the FSI. By putting default files in the C:\IBMLAN\RPLUSER\DEFALT20 directory, all new OS/2 2.0 RIPL workstations will receive these files. This enables users to have read/write access to these files on an individual basis.
An alternative procedure would be to create a common directory under the \RPL directory, give all users read access to this directory, and update the DEFAL T20.FIT file to point to this new directory. This enables users to have read-only access to shared files.
Chapter 3. RIPL from OS/2 LAN Server V2.0 31
Note: The appropriate access control profile would have to be created for the new directory before it is usable.
3.6.13 Enabling the IBM 8514/A Adapter - OS/2 2.0 The following procedure should be followed to allow access to an 8514/A adapter with the additional video RAM. This will allow the RIPL workstation to use the full 1024 x 768 resolution when using high resolution displays such as the 8514 and 8515.
Two areas need to be changed:
1. The driver statements in the CONFIG.20 file for the workstation
2. The FIT file to point to the correct DLL file
Note: When the RIPLINST program was run, all the drivers were already loaded on the server disk. No further unpacking of files is necessary.
The default display driver portion of the CONFIG.20 file in the \RPL\MACHINES\machine name directory is as follows:
DEVINFO=SCR,VGA,C:\OS2\VIOTBL.DCP
REM Use the following 2 statements for workstations with VGA displays: SET VIDEO DEVICES=VIO VGA - -SET VIO_VGA=DEVICE(BVHVGA)
DEVICE=C:\OS2\MDOS\VVGA.SYS
This needs to be changed to:
DEVINFO=SCR,BGA,C:\OS2\VIOTBL.DCP
REM Use the following 2 statements for workstations with 8514 displays: SET VIDEO DEVICES=VIO 8514A - -SET VIO_8514A=DEVICE(BVHVGA,BVH8514A)
DEVICE=C:\OS2\MDOS\VVGA.SYS
Some of the statements in the FIT file for this workstation need to be changed so that the operating system can find the correct display.DLL file. A partial representation of the default FIT file for the workstation is:
; VGA Display support (default) ; C: \OS2\DLL \DISPl_AY . DLL OS2. 28\OS2\DLL \ VGA. DLL ; C: \OS2\DLL \HELV. FON . OS2. 28\OS2\DLL \HELV. VGA ;C:\OS2\DLL\COURIER.FON OS2.28\OS2\DLL\COURIER.VGA ;C:\OS2\DLL\TIMES.FON OS2.28\OS2\DLL\TIMES.VGA
You can see that the DISPLA Y.DLL points to ... \ VGA.DLL. Since there is no entry for the 8514 DLL file, it must be added manually as shown:
; 8514/A Display Support C:\OS2\DLL\DISPLAY.DLL OS2.20\OS2\DLL\8514.DLL C:\OS2\DLL\HELV.FON OS2.20\OS2\DLL\HELV.BGA C:\OS2\DLL\COURIER.FON OS2.20\OS2\DLL\COURIER.BGA C:\OS2\DLL\TIMES.FON OS2.20\OS2\DLL\TIMES.BGA
The HELV, COURIER, and TIMES lines can be copied from the XGA section.
Make sure you comment out (;) the VGA display support driver.
32 OS/2 and Netware RIPL

3.6.14 Enabling the IBM XGA Display Adapter - OS/2 2.0 The CONFIG.20 file has the XGA commands included, but remarked out. To enable XGA support, in the FIT file for the machine, change:
REM Use the following 4 statements for workstations with XGA displays: REM DEVICE=C:\OS2\XGARING0.SYS REM DEVICE=C:\OS2\MDOS\VXGA.SYS REM SET VIDEO DEVICES=VIO XGA - -REM SET VIO_XGA=DEVICE(BVHVGA,BVHXGA)
REM Use the following 2 statements for workstations with VGA displays: SET VIDEO DEVICES=\,' VGA - . SET VIO_VGA=DEVICE~_ .HVGA)
to:
REM Make sure VVGA.SYS comes BEFORE VXGA.SYS DEVICE=C:\OS2\MDOS\VVGA.SYS REM Use the following 4 statements for workstations with XGA displays: DEVICE=C:\OS2\XGARING8.SYS DEVICE=C: \OS2\~1DOS\ VXGA. SYS SET VIDEO DEVICES=VIO XGA - -SET VIO_XGA=DEVICE(BVHVGA,BVHXGA)
REM Use the following 2 statements for workstations with VGA displays: REM SET VIDEO DEVICES=VIO VGA - -REM SET VIO_VGA=DEVICE(BVHVGA)
The FIT file needs changing as well to allow XGA support.
Change:
; VGA Display support (default) C:\OS2\DLL\DISPLAY.DLL OS2. 20\OS2\DLL\VGA. DLL C:\OS2\DLL\HELV.FON OS2.20\OS2\DLL\HELV.VGA C:\OS2\DLL\COURIER.FON OS2.20\OS2\DLL\COURIER.VGA C:\OS2\DLL\TIMES.FON OS2.20\OS2\DLL\TIMES.VGA
to:
; XGA Display support ; C:\OS2\DLL\DISPLAY.DLL ; C:\OS2\DLL\HELV.FON ; C:\OS2\DLL\COURIER.FON ; C:\OS2\DLL\TIMES.FON
OS2. 20\OS2\DLL\XGA. DLL OS2.20\OS2\DLL\HELV.BGA OS2.20\OS2\DLL\COURIER.BGA OS2.20\OS2\DLL\TIMES.BGA
; VGA Display support (default) C: \OS2\DLL \DISPLAY .OLL
; C:\OS2\DLL\HELV.FON ; C:\OS2\DLL\COURIER.FON ; C:\OS2\DLL\TIMES.FON ; XGA Display support C:\OS2\Dll\DISPlAY.Dll C:\OS2\Dll\HElV.FON C:\OS2\Dll\COURIER.FON C:\OS2\Dll\TIMES.FON
OS2. 28\OS2\DLL\VGA. DLL OS2.20\OS2\DLL\HELV.VGA OS2. 20\OS2\DLL\COURIER. VGA OS2. 20\OS2\DLL\TIMES. VGA
OS2.28\OS2\Dll\XGA.Dll OS2.28\OS2\Dll\HElV.BGA OS2.28\OS2\Dll\COURIER.BGA OS2.28\OS2\Dll\TIMES.BGA
This is to allow the correct display DLL and font files to be loaded.
Chapter 3. RIPL from OS/2 LAN Server V2.0 33

3.6.15 Enabling AT Bus Machines for OS/2 2.0 RIPL The CONFIG.20 file that gets created for an OS/2 2.0 RIPL workstation has the base device drivers for Micro Channel* systems enabled. The base device drivers for AT machines are remarked out in the CONFIG.20 file.
After creating the RIPL machine definition using the LAN Requester FSI, you will need to edit the CONFIG.20 in the C:\IBMLAN\RPL\MACHINES\machine name directory.
Change:
REM Select either the Famliy 1 or PS/2 Base Device Drivers, but not both. REM Base Device Driver Statements for IBM Family 1 and compatible computers: REM BASEDEV=PRINT01.SYS REM BASEDEV=IBMIFlPY.ADD REM BASEDEV=IBM1S506.ADD
REM Base Device Driver Statements for IBM PS/2 computers only: BASEDEV=PRINT82.SYS BASEDEV=IBM2FlPY.ADD BASEDEV=IBM2ADSK.ADD BASEDEV=IBM2SCSI.ADD /lED
to:
REM Select either the Famliy 1 or PS/2 Base Device Drivers, but not both. REM Base Device Driver Statements for IBM Family 1 and compatible computers: BASEDEV=PRINT81.SYS BASEDEV=IBM1FlPY.ADD BASEDEV=IBM1SS86.ADD
REM Base Device Driver Statements for IBM PS/2 computers only: REM BASEDEV=PRINT82.SYS REM BASEDEV=IBM2FlPY.ADD REM BASEDEV=IBM2ADSK.ADD REM BASEDEV=IBM2SCSI.ADD /lED
This will change the base device drivers from Micro Channel to PC/AT* drivers.
A line in the FIT file for the AT bus machine must be changed to point to the correct virtual DMA driver.
Change:
; PS/2 Machines C:\OS2\MDOS\VDMA.SYS OS2.28\OS2\MDOS\VDMAPS2.SYS
AT Machines C:\OS2\MDOS\VDMA.SYS OS2. 28\OS2\MDOS\VDMAAT. SYS
to:
PS/2 Machines C:\OS2\MDOS\VDMA.SYS OS2.28\OS2\MDOS\VDMAPS2.SYS
; AT Machines C:\OS2\MDOS\VDMA.SYS OS2.28\OS2\MDOS\VDMAAT.SYS
Note that you must comment out (;) the PS/2 DMA driver line.
34 OS/2 and Netware RIPL
3.6.16 Systems with Serial Mice The mouse driver for OS/2 2.0 supports PS/2 mouse port mice and serial type mice without changing the CONFIG.20 file. With the OSI2 2.0 mouse driver support for serial mice, you may get an error on IPL because the serial COM driver and the virtual COM driver (VCOM) are unable to load. If this is the case, then remark out (REM) the COM and VCOM device drivers in the CONFIG.20 file (C:\IBMLAN\RPL \machinename\CONFIG.20). This error may occur if you run out of serial ports on your machine.
The statements you may need to remark out in the CONFIG.20 file are:
DEVICE=C:\OS2\COM.SYS DEVICE=C:\OS2\MDOS\VCOM.SYS
3.7 Guidelines for Installing Applications Due to the secure nature of the RIPL process, there are some guidelines for installing applications from workstations to the server.
• Installing applications on the server:
If at all possible, install applications at the server machine. This should be possible for most OSI2 applications. Logging on as an administrator will remove access problems to the server disk.
• Installing applications from a standard LAN requester workstation:
Applications can be installed from an OS/2 workstation (not a RIPL workstation). Logging on as an administrator, you can access a shared disk on the server and install applications to the server.
• Installing applications from a RIPL workstation:
Installing applications from a RIPL workstation can present problems. If applications try to change the CONFIG.SYS, they are unable to do so, as the CONFIG.SYS file is read-only to the workstation. The administrator can change this access profile however. Applications that try to copy files to the read-only directories on the server will fail. Some applications try to copy files to the \OS2\DLL directory. This is a read-only directory in the FIT file. Applications that create temporary files in directories may fail. Some applications create temporary files, install the application, and then erase the temporary files. If the files can not be mapped by the FIT file, then the installation programs will probably fail. To allow access to the Windows INI files and any other files the application needs to use for Windows applications, you can give the RIPL group RWCD permissions to the C:\OS2\MDOS\WINOS2 directory.
The best method of installing applications is on the server. The next best method is to install from an OS/2 (non-RIPL) requester.
3.8 Disk Space Requirements for RIPL Server In addition to the disk space requirements for the LAN Server itself, there are disk space requirements when you RIPL OS/2 2.0 and 1.3. When installing RIPL support for OS/2 1.3, you have an entire copy of OS/2 1.3 in the C:\IBMLAN\RPL\OS2 directory structure. This one copy is shared between all OS/2 1.3 RIPL workstations. If you use the RIPLINST utility to install OS/2 2.0 on the server to support OS/2 2.0 RIPL, you install an entire copy (including all
Chapter 3. RIPL from OS/2 LAN Server V2.0 35
printer and device drivers) into the C:\IBMLAN\RPL\OS2.20 directory structure. This one copy is shared between all OS/2 2.0 RIPL workstations.
Each workstation has private files (OS2.INI, SWAPPER.DAT, etc.). So there is an overhead for each workstation configured. These figures provided below are approximate, and are based on current levels of operating system code.
Disk requirement for OS/2 1.3 shared code (one copy):
• 13MB
Disk requirement for each OS/2 1.3 RIPL workstation (one copy per workstation):
• 160KB (approx)
Note: This figure does not include the SWAPPER.DAT file which may be on the RI PL workstation itself.
Disk requirement for OS/2 2.0 shared code (one copy):
• 34MB
Disk requirement for each OS/2 2.0 RIPL workstation (one copy per workstation):
• 160KB (approx)
Note: This figure does not include the SWAPPER.DAT file which may be on the RIPL workstation itself.
There are also shared copies of the LAN Requester, and the LAN Transport for all OS/2 RI PL workstations:
Disk requirement for shared copy of IBM LAN (one copy):
• 5.6MB
Disk requirement for shared copy of IBMCOM (one copy):
• 1.0MB
3.9 Multiple Adapters and RIPL Support Multiple adapters are supported in both servers and workstations. At server installation time, you specify the adapter(s) used to support RIPL to workstations.
For the RIPL workstation, multiple adapters are supported. However, only adapter 0 is used for the RIPL service.
3.10 IBMLAN.lNI Entries for the RIPL Service The following statements are the RIPL section of an IBMLAN.INI file:
[remoteboot] rpll=rplnetl.dll rplnet2.dll rploem.dll 0 maxthreads=6 rpldir=C:\IBMLAN\RPL
Each statement is discussed as follows:
• RPL 1 = RPLNET1.DLL RPLNET2.DLL RPLOEM.DLL 0
36 OS/2 and Netware RIPL
This line is used to specify the DLL files used to support the RIPL adapter. There is one line per RIPL adapter installed in the server.
• RIPLDIR = C:\IBMLAN\RPL
This specifies the directory where key RIPL files are located. The RPL.MAP file must reside in this directory.
• MAXTHREADS = 6
The MAXTHREADS parameter can be used to tune RIPL performance. This parameter specifies how many threads are used by the remote boot service to do asynchronous reading of the configuration files. The default is 6, and the maximum is the maximum number of threads the system allows.
Note: The default of 6 is the recommended value. Values larger than 10 can impact RIPL performance.
The remote boot service is listed in the services section of the IBMLAN.INI file.
REMOTEBOOT = SERVICES\RPLSERVR.EXE
3.11 Problem Determination This section is not designed to replace the manuals provided with the LAN Server 2.0 product, but rather offer some assistance in fault finding. As with all fault finding, start from a working base first, and resolve the problems sequentially. For example, if the RIPL workstation fails to boot, is the server functioning? Is the LAN Server running? It's no good checking the FIT file if the server can't start due to a fault in the system configuration.
3.11.1.1 Can't start Remote Boot Service • Use NET ERROR command and check the error log.
• Check the RPL.MAP file for errors. The remote boot service does not start if errors exist in the RPL.MAP file:
Make sure network adapter IDs are comprised of 12 digits
Make sure there are enabled records in RPL.MAP
Make sure there are server records in RPL.MAP
• Check the remote boot portion of the IBMLAN.INI file.
3.11.1.2 SYSxxxx Errors on an AT Bus RIPL Workstation • Check the CONFIG.20 file to make sure the PS/2 DMA drivers are remarked
out, and the AT DMA drivers are enabled.
• If the RI PL workstation is an AT bus machine, are the correct base device drivers enabled in the CONFIG.20 file?
3.11.1.3 RIPL Workstation Will Not Boot Make sure the RIPL ROM is plugged correctly into the token-ring adapter.
If the RIPL workstation displays the RIPL information on its display, but will not boot:
• Is there an error displayed (flashing or in a highlighted field)?
• Check the network adapter address with the machine definitions in the LAN Requester FSI
• Check the network adapter address in the RPL.MAP file
Chapter 3. RIPL from OS/2 LAN Server V2.0 37

Note: This needs to be checked if you have changed the network adapter in the RIPL workstation.
• Has the RIPL server done a NET SHARE of the following resources:
RPLFILES
WRKFILES
IMAGES
• Check cabling and connections
• Is the remote boot service running in the server?
• Is the network adapter a supported type?
3.11.1.4 The Workstation Gets Part Way Through the Boot If the workstation gets part of the way through the boot, and stops, check the stop point.
• Did the LAN Support Program load?
If not, check the boot block file area:
Is there a workstation record defined in the FSI?
Is there a workstation record defined in the RPL.MAP file?
Does the RPL.MAP file point to a valid boot block configuration file?
Is the boot block configuration file present in the RPL directory?
• Does OS/2 start to load (do you see the logo?) and stop?
38 OS/2 and Netware RIPL
Check the FIT file for the workstation
Check the CONFIG.20 file for the workstation
Does the workstation have enough memory?
If you have the SWAPPER.DAT file on the local workstation disk, is there enough space on the disk? Is the disk accessible?

Chapter 4. RIPL using NetWare from IBM
There are several RIPL configurations which NetWare supports. These include using the IBM RIPL Boot ROM. The following list provides the equivalent components to perform RIPL of a workstation with a token-ring NIC, up to the point of accessing the boot image file on a file server:
• Non-IBM Token-Ring NIC with a NetWare boot ROM
• IBM Token-Ring Adapter with IBM boot ROM plus TOKENRPL.nlm
• IBM Token-Ring Adapter with IBM boot ROM plus the TOKEN.RPL module from the SYS:LOGIN directory, plus RPL.nlm
• IBM Token-Ring Adapter with IBM boot ROM plus the TOKEN.RPL module from the SYS:LOGIN directory, plus RPL.vp1.
Each of the above configurations performs slightly different tasks in order to get the code necessary to IPL from a boot image on the file server. Once this RPL bootstrap code is addressable in the workstation memory, the RIPL process proceeds in the same manner, irrespective of the original configuration. These equivalences are shown in Figure 12. There are also similar sets of equivalent modules for Ethernet and PC-Network topologies.
RIPL Workstation
o
Netware 3.11 Fileserver
IPM$WS.8YB OOg Brx·t ~ma9.e
~n SY$:LOGIN dJ.rect;.or~
OOS Boot Images J.n SYS:LOGIN
RPl, NLM boun~ to adapter
TOKEN.RPL in SYS:LOGIN
~-----.--~.
Figure 12. Equivalent NetWare RIPL Combinations
Since the beginning of 1991, many improvements have been made in the way in which the NetWare RPL server, running on a NetWare 3.11 file server provides RIPL capability. The most obvious of these have been to the NLM module(s) for the NetWare V3.11 file server. A generic RPL server NLM, IRPL.nlm" has been developed which supports RPL on all LAN media attached to the NetWare 3.11 file server. Also, the RPL.nlm now accepts command line parameters from the
© Copyright I BM Corp. 1992 39

"BIND RPL to Driver_name" command at the NetWare 3.11 file server console, as well as taking parameter overrides from the SYS:LOGIN\BOOTCONF.SYS file.
Also, the SYS:LOGIN\BOOTCONF.SYS file accepts multiple images for each address, wildcards in the address fields and on-the-fly update of file server memory whenever the BOOTCONF.SYS file is modified.
4.1 NetWare RPL Boot ROMs versus IBM RPL Boot ROMs Unlike NetWare boot ROMs, the IBM Token-Ring RPL ROM is not NetWare specific. In order to be able to boot from various systems, it uses a "Staged Boot" system. That means it sends out a generic "Find Frame" packet, and expects whichever kind of system it is on to be able to interpret and respond. It then asks for a file to be downloaded. On a NetWare network, this file (TOKEN.RPL, PCN2L.RPL, ETHER.RPL, etc.) will be the NetWare specific file that contains code to boot from a NetWare network.
In the past, the only way to get NetWare to respond to the RPL packets was to make the driver capable of recognizing these packets, and responding accordingly. This was mostly because the find frame is sent to a multicast address, and NetWare 286 didn't support multicast addressing.
With the advent of AppleTalk Phase II drivers, VAPs can receive and respond to multicast addresses, making this the preferred way of doing things on NetWare 2.2 servers. Since NetWare 3.x servers use 001, the NIC can support the multiple protocol stacks necessary to communicate with IPX packets and to receive and respond to multicast addresses.
When the workstation is connected to the network, it can either connect to a NetWare RPL server or to an OS/2 LAN Server. The following section describes how each of the various forms of RIPL are set up in a networking environment consisting of a NetWare file server, an OS/2 LAN Server, or both.
4.1.1 NetWare RIPL using a NetWare Boot ROM When a non-IBM Network Interface Card, consisting of a NetWare Boot ROM is used in a workstation, the boot ROM will accept disk 1/0 calls from the workstation BIOS. These calls are then translated into network requests which access the SYS:LOGIN directory of the nearest file server for the boot image files. At this point the workstation has no way of knowing which file server will service its requests.
For this reason, all file server on the same local network as the workstation must be set up with each of the boot images required by all of the workstations capable of RIPL. This creates considerable redundancy as the same files must reside on each file server. It also creates considerably more administrative work maintaining this setup.
It is likely that this situation will change, and that Novell will provide a module which will make the NetWare boot ROMs appear to behave in a manner similar to the IBM boot ROMs.
40 OS/2 and Netware RIPL
4.1.2 NetWare RIPL using an IBM Boot ROM IBM Network Interface Cards do not conform to the NetWare specification for Boot ROMs. This is due to the fact that they are required to RIPL in a variety of other Network environments besides NetWare.
Initially Novell extracted the card-specific code used by their boot ROMs, and coded this into the TOKEN.RPL, ETHER.RPL and PCN2L.RPL files, with some hooks to allow these files to be released from memory.
For NetWare V3.11, these were then incorporated into three separate NLMs, TOKENRPL.nlm, ETHERRPL.nlm and PCN2LRPL.nlm. At about the time DOS 5.0 was introduced, Novell introduced a field test version of the RPL.nlm which had the code common to each of the previous NLM modules, but did not have any of the media-specific code.
Table 1. NetWare Media RPL Bootstrap Code Modules - Overview
Filename Used in following type of RIPL
TOKEN.RPL Supports IBM RIPL over a token-ring
ETHER.RPL Supports IBM RIPL over Ethernet
PCN2L.RPL Supports IBM RIPL over PC Network
IBM network cards are able to RI PL from either a NetWare server or an OS/2 LAN Server. When an IBM Network Interface Card containing a RIPL ROM is used on a network with NetWare Servers, at least one of the NetWare file servers must be set up as a RPL server:
• If a NetWare 3.11 file server is set up to supply the boot image, it must have the RPL.nlm module loaded. Alternately, it may be set up with one of the older NLMs containing media-specific RPL bootstrap code.
• If a NetWare 2.2 file server,is set up to supply the boot image, it must have the RPL.vp1 in the SYS:LOGIN directory of the file server.
• If an external (stand-alone) print server or an external router is set up to supply the boot image it must have the RPL.vp1 in the same directory as the ROUTER.EXE program file.
• If a NetWare Lite Server is set up to supply the boot image, it must have the RPL.com program resident in memory.
Also, the RPL bootstrap code file(s) must be loaded on the file server SYS:LOGIN directory alongside the boot image files.
4.2 Contents of the LOGIN Directory This directory contains the following files:
• A media-specific RPL bootstrap program file
• A DOS image file if DOS RIPL is required
• Optionally a BOOTCONF.sys file
• Optionally .IML files (necessary for RIPL of certain IBM microchannel computer models).
Chapter 4. RIPL using NetWare from IBM 41

These files are summarized in Table 2 on page 42.
Table 2. NetWare RPL Bootstrap Code Modules - Detail
TOKEN.RPL if RIPL is across token-ring using one of the following IBM Token-Ring cards in the workstation:
· IBM Token-Ring Network PC Adapter
· IBM Token-Ring Network PC Adapter II (long card)
· IBM Token-Ring Network PC Adapter II (short card)
· IBM Token-Ring Network 16/4 Adapter - with A33861C or higher
· IBM Token-Ring Network Adapter/A - with A33861A or higher
· IBM Token-Ring Network 16/4 Adapter/A - with A33861 C or higher
ETHER.RPL if RIPL is across Ethernet using an IBM Ethernet/A adapter
PCN2L.RPL if RIPL is across IBM PC Network using an IBM PC Network adapter
BOOTCONF,SYS: If multiple images are supported, it is recommended that this file be used rather than using the default "NET$DOS.SYS" image file.
RIPL Image Files: This will be the DOS image files created using the DOSGEN utility or TOKENRPL.SYS if OS/2 RIPL V1.3 is required, or TOKEN.200 if OS/2 RIPL V2.0 is required.
IML Files: If the RIPL workstation is an IBM microchannel computer with BIOS image (.IML) files associated with it (such as the IBM PS/2 Models 56 and 57 SLC), then the .IML files must be copied to SYS:\LOGIN\IBMLAN\DCDB\IMAGES.
4.2.1 TOKEN.RPL This is used for token-ring remote program load. This file is downloaded to the workstation after the IBM RPL boot ROM has issued a SEND.FILE.REQUEST frame to the NetWare RPL server. This file contains the RPL bootstrap code which is executed by the IBM boot ROM.
TOKEN.RPL must reside in the LOGIN directory!
When a file server or external router boots, and loads the RPL server code, this file is read into an area of RAM owned by the RPL server. This file is maintained in the RAM area of the RPL server, which can be any of the following:
• A NetWare 3.11 Server running the RPLnlm.
RPL.nlm connects internally to its host file server to search for SYS:LOGIN\ TOKEN.RPL.
• A NetWare 2.2 Server running the RPLvp1 value-added process.
RPL.vp1 connects internally to its host file server to search for SYS:LOGIN\ TOKEN.RPL.
• An external NetWare router running the RPLvp1 value-added process.
42 OS/2 and Netware RIPL
RPL.vp1 connects externally (out on the wire) to a server to find TOKEN.RPL. The first server on the wire to respond to RPL.vp1s connect request must have TOKEN.RPL in the SYS:LOGIN directory. The server can either be
4.2.2 ETHER.RPL
NetWare V3.1x or V2.x and need not itself be a RPL server. TOKEN.RPL is then uploaded to the external router from the responding file server.
• A NetWare Lite file server running the RPL.com program.
RPL.com searches the C:\LOGIN directory for the TOKEN.RPL file.
This is used for IBM Ethernet remote program load. This file is downloaded to a workstation after the IBM RPL boot ROM has issued a SEND.FILE.REQUEST frame to the NetWare RPL server. This file contains the RPL bootstrap code which is executed by the IBM boot ROM.
ETHERRPL must reside in the LOGIN directory!
When a file server or external router boots and loads the RPL server code, this file is read into an area of RAM owned by the RPL server. This file is maintained in the RAM area of the RPL server, which can be any of the following:
4.~ PCN2L.RPL
• A NetWare 3.11 Server running the RPL.nlm.
RPL.nlm connects internally to its host file server to search for SYS: LOGIN\ETHERRPL.
• A NetWare 2.2 Server running the RPL.vp1 value-added process.
RPL.vp1 connects internally to its host file server to search for SYS: LOGIN\ETHERRPL.
• An external NetWare router running the RPL.vp1 value-added process.
RPL.vp1 connects externally (out on the wire) to a server to find ETHERRPL. The first server on the wire to respond to RPL.vp1s connect request must have ETHERRPL in the SYS:LOGIN directory. The server can be NetWare V3.1x or V2.x and need not itself be a RPL server. ETHERRPL is then uploaded to the external router from the responding file server.
• A NetWare Lite file server running the RPL.com program.
RPL.com searches the C:\LOGIN directory for the ETHERRPL file.
This is used for IBM PC Network remote program load. This file is downloaded to a workstation after the IBM RPL boot ROM has issued a SEND.FILE.REQUEST frame to the NetWare RPL server. This file contains the RPL bootstrap code which is executed by the IBM boot ROM.
PCN2L.RPL must reside in the LOGIN directory!
When a file server or external router boots, and loads the RPL server code, this file is read into an area of RAM owned by the RPL server. This file is maintained in the RAM area of the RPL server, which can be any of the following:
• A NetWare 3.11 Server running the RPL.nlm.
RPL.nlm connects internally to its host file server to search for SYS: LOGIN\PCN2L.RPL.
• A NetWare 2.2 Server running the RPL.vp1 value-added process.
Chapter 4. RIPL using NetWare from IBM 43

4.2.4 IML Files
RPL.vp1 connects internally to its host file server to search for SYS:LOGIN\PCN2L.RPL.
• An external NetWare router running the RPL.vp1 value-added process.
RPL.vp1 connects externally (out on the wire) to a server to find PCN2L.RPL. The first server on the wire to respond to RPL.vp1's connect request, must have PCN2L.RPL in the SYS:LOGIN directory. The server can be NetWare V3.1x or V2.x and need not itself be a RPL server. PCN2L.RPL is then uploaded to the external router from the responding file server.
• A NetWare Lite file server running the RPL.com program.
RPL.com searches the C:\LOGIN directory for the PCN2L.RPL file.
Certain IBM microchannel computers, such as the IBM PS/2 Models 56 and 57 SLC, have a BIOS image file associated with them. During cold boot, the BIOS update process looks for files with an extension of .IML to update the motherboard BIOS before the bootstrap loader routine is called. These .IML files come on the reference diskette for the computer. You MUST create a directory called \LOGIN\IBMLAN\DCDB\IMAGES and install ALL .IML files in this directory. After loading the IML files, the computer does another reboot.
On a RIPL workstation this means the IML files are loaded from the RIPL server during the first reboot, then the RIPL image is loaded during the second reboot!
4.3 RIPL from a NetWare 3.11 Server The RPL server function is performed by the RPL.nlm module on a NetWare V3.11 file server. RPL.nlm is a NetWare loadable module that acts as a protocol stack and responds to the IBM architected remote program load frames as defined in the IBM Remote Program Load User's Guide. RPL.nlm responds the IEEE_B02.2 frame type packets transmitted by the IBM Boot ROMs on IBM Ethernet, IBM Token-Ring, and IBM PCN2 adapters. It is used in networks that have diskless workstations installed with the RPL BIOS Module. Currently, this is supported on the following network adapters:
IBM Ethernet Adapters
IBM PC Network Adapters
IBM Token-Ring Network Adapters.
Specifically, RPL.nlm will respond to the following frames:
Table 3. RPL Frame Types Responded to by RPL.nlm
FIND RPL.nlm will respond with a FOUND frame
SEND.FILE.REQUEST RPL.nlm will respond with a FILE.DATA.RESPONSE frame
RPL.nlm is intended to be a replacement for the following NetWare V3.11 modules:
Table 4 (Page 1 of 2). Modules Replaced by RPL.nlm
PCN2LRPL.nlm For networks using the IBM PC Network Adapter
ETHERRPL.nlm For networks using the IBM Ethernet Adapter
44 OS/2 and Netware RIPL

Table 4 (Page 2 of 2). Modules Replaced by RPL.nlm
TOKENRPL.nlm I For networks using the IBM Token-Ring Adapter
4.3.1 The NetWare 3.11 RPL-Server In order to implement a RPL server on a NetWare 3.11 file server, the SYS:LOGIN directory must be set up as described in 4.2, "Contents of the LOGIN Directory" on page 41, and the RPL.nlm module must reside in the SYS:SYSTEM directory. The RPL.nlm module must be loaded either by the AUTOEXEC.NCF file at startup, or from the system console. After it has been loaded on the file server, it must be bound to the LAN drivers configured to support the IEEE 802.2 protocol. This provides the connection via the LAN to workstations which require attachment to a RPL server.
4.3.2 Features of RPL.nlm RPL.nlm supports all of the BOOTCONF.sys extensions mentioned in 4.6, "The BOOTCONF.SYS File" on page 58. These include:
• Wildcard characters (* and ?) when specifying node addresses
• More than one disk image file I)ame is allowed per node address
• Parsing BOOTCONF.sys at the NetWare Lite RPL server to minimize the amount of network traffic.
RPL.nlm also supports RPL of images using the IBM LAN Support Program, as well as allowing RPL across source routing bridges.
RPL.nlm will only work on a NetWare V3.11 Server. When RPL. nlm loads, it searches SYS:LOGIN for TOKEN.RPL, ETHER.RPL, PCN2L.RPL, and BOOTCONF.SYS files and copies them into file server RAM. These must be copied into the SYS:LOGIN directory prior to loading RPL.nlm.
RPL is allowed across a maximum of seven IBM bridges. As of September, 1991, RPL.nlm auto-updates the BOOTCONF.SYS image in RAM without unloading and reloading the RPL.nlm file.
RPL.nlm is capabie of loading on a V3.10 NetWare server. This means that the modules TOKENRPL.nlm, ETHERRPL.nlm, and PCN2LRPL.nlm are no longer required.
The ability to RIPL across an IBM 8209 Ethernet to Token-Ring Bridge is also a feature of RPL.nlm. The NetWare File Server and RPL workstation can be on either side of the 8209 bridge. TOKEN.RPL and ETHER.RPL RPL bootstrap files will be properly downloaded to the Ethernet or token-ring RPL workstation from the NetWare File Server.
RPL.nlm also allows source-routing information to be enabled inside of TOKEN.RPL. This allows TOKEN.RPL to direct-connect across an IBM Source Routing Bridge to the NetWare Server with the IPX protocol.
Chapter 4. RIPL using NetWare from IBM 45
4.3.3 Loading RPL.nlm on the NetWare Lite RPL·Server To use RPL.nlm, the RPL boot ROM module must be installed on the network adapter board in the workstation. This module must be capable of sending the IBM architected RPL frame sequence. See the IBM Remote Program Load User's Guide for information on this architecture.
Implementing the RPL function consists of creating a disk image file and storing it in the SYS:LOGIN directory. (The disk image is created using the NetWare DOSGEN utility. A description of this process is given in 5.2, "DOSGEN" on page 63, as well as in the NetWare Version 3.11 Installation manual.) The SYS:LOGIN directory must also have the necessary RPL bootstrap code file(s) (see 4.2, "Contents of the LOGIN Directory" on page 41).
PL.nlm should be installed in the SYS:SYSTEM directory of the file server. It is loaded the same as any NetWare NLM:
LOAD RPL
at the file server command prompt. There are no parameters associated with loading RPL.nlm.
4.3.4 Binding RPL.nlm to the 802.2 Board Since RPL.nlm is a protocol stack, it must be bound to any and all boards that have RPL clients attached to them:
BIND RPL to board [GNS],[NODEFAULT],[PROTECT],[TRO]
where board is the name of any NetWare LAN driver that is configured for IEEE 802.2 frame type.
The parameters specified by [ .. ] are optional, not case sensitive, separated by blanks or commas, and may be entered in any order. They are described as follows:
Table 5 (Page
ACK
GNS
46 OS/2 and Netware RIPL
of 2). RPL.nlm BIND Time Parameters
Use this parameter if you wish to configure the RPL boot ROM module to acknowledge FILE. DATA. RESPONSE frames sent by RPL.nlm. By DEFAULT, RPL.nlm will send FILE.DATA.RESPONSE frames in a burst mode. This parameter allows pacing by the workstation if the adapter on the workstation cannot keep up with RPL.nlm. This parameter specifies that you wish the workstation to do a Get Nearest Server request when the appropriate bootscrap program is downloaded. Normally, RPL.nlm will fill in the bootstrap program with the file server information, so that it does not need to do a Get Nearest Server request. Using this parameter may cause the workstation to find a server other than the one where RPL.nlm is located.
Table 5 (Page 2 of 2). RPL.nlm BIND Time Parameters
NODEFAULT
PROTECT
TRO
This parameter tells RPL.nlm not to respond to a find frame unless the node address of the workstation is found in the BOOTCONF.sys file. This is provided for security reasons. The workstation will not boot until the system administrator inserts into the BOOTCONF.sys file the node address and associated disk image file name(s) to use when booting the workstation. A further description of BOOTCONF.sys is given in 4.6, "The BOOTCONF.SYS File" on page 58.
This parameter can also be used very effectively for load balancing purposes, so that not all workstations are accessing the same RPL server. It can also simplify system administration by only requiring that images are kept on the actual RPL server to which a workstation is going to attach.
Note: At this time the workstation will try up to a maximum of five RPL servers when attempting to find its correct RPL server. This parameter tells RPL.nlm to configure the bootstrap program so that it will protect itself in the workstation memory. It does this by adjusting the memory size variable in the BIOS data area (40:13) to reflect the amount of memory that it uses. Using this parameter will reduce the amount of memory that the workstation has available for DOS by about 12KB. It is recommended that this parameter not be used unless absolutely necessary. This parameter specifies that you wish the bootstrap program to do a This Ring Only count of 3 on all broadcast frames. It is useful in a source routing environment and servers are available on the local ring.
4.3.5 Unique Boot Sequences using RPL.nlm BOOTCONF.sys is an ASCII text file that allows you to specify a unique disk image file for each workstation that needs access to different files. You can create BOOTCONF.sys using your favorite text editor. The process of creating unique disk image files is given in 5.2, "DOSGEN" on page 63, as well as in the NetWare Version 3.11 Installation manual.
RPL.nlm parses the node address line of BOOTCONF.sys looking for these keywords. If an entry if found, but does not match one of the keywords, it is assumed to be a disk image file name. Therefore, you should not have a disk image file named the same as any of these keywords. Note that these parameters are optional and not case sensitive. They are separated by blanks, and may be entered in any order.
An example of a BOOTCONF.sys line using this parameters is:
8x*1234 = NET$DOS.sys gns protect rep NODE=AAAAAINODE=67898
In this case, gns, protect and rep will be interpreted as keywords and not boot image file names. In addition, the string "NODE = """""" will be replaced with "NODE = 67890" wherever it occurs in the disk image file.
4.3.6 BOOTCONF.sys Extensions When RPL.com loads it will search the C:\LOGIN directory of the current drive for a BOOTCONF.sys file. If it finds it, it will read it into a memory buffer so that it can parse it when a find frame is received from a workstation. Note that the parsing of BOOTCONF.sys is done by RPL.com and not the bootstrap program to minimize the amount of traffic on the network during the RPL process. The
Chapter 4. RIPL using NetWare from IBM 47
extensions to BOOTCONF.sys are given in 4.6, "The BOOTCONF.SYS File" on page 58.
4.3.7 Changing BOOTCONF.sys RPL.nlm reads BOOTCONF.sys into a memory buffer at load time. If the user changes it after BOOTCONF.sys is loaded, RPL.nlm will detect the change and re-Ioad it automatically. There may be a five second delay from the time the changes are saved and the time RPL.nlm invokes the changes.
RPL.nlm will suspend processing of frames while BOOTCONF.sys is being loaded into memory.
4.4 RIPL from a NetWare 2.2 Server or a NetWare External Router The RPL server function on a NetWare 2.2 Server or a NetWare External Router is provided by the RPL.vp1 module. RPL.vp1 is a value-added process that acts as a protocol stack and responds to the IBM-architected remote program load frames as defined in the IBM Remote Program Load User's Guide. RPL.vp1 responds the IEEE_802.2 frame type packets transmitted by the IBM boot ROMs on IBM Ethernet, IBM Token-Ring, and IBM PCN2 adapters. It is used in networks that have diskless workstations installed with the RPL BIOS module. Currently, this is supported on the following network adapters:
IBM Ethernet Adapters
IBM PC Network Adapters
IBM Token-Ring Network Adapters.
Specifically, RPL.vp1 will respond to the following frames:
Table 6. RPL Frame Types Responded to by RPL.vpl
FIND RPL.vp1 will respond with a FOUND frame.
SEND.FILE.REQUEST RPL.vp1 will respond with a FILE.DATA.RESPONSE frame.
On IBM Token-Ring LANs, where source routing is implemented, the source routing VAP (ROUTE.VPO) must be loaded first and the RPL.vp1 must be loaded next. That is why these files are named ROUTE.VPO and RPL.vp1. Both external routers and NetWare 2.x file server load VAPs in an order dictated by the VAP's file extension.
The program RPCONFIG.COM is used to configure RPL.vp1 when it is used on a file server or router which has been confi'gured for multiple types of Network I nterface Cards.
Because each type of NIC requires a different RPL bootstrap code file in the SYS: LOGIN directory of the attached file server, this utility tells RPL.vp1 which file to load on each NIC. If the RPL.vp1 file is not configured with RPCONFIG.COM, it will use the first RPL bootstrap code file it finds in the SYS:LOGIN directory. This can cause a number of problems.
Similarly, if the RPL.vp1 file has been configured for one type of NIC and the file server or router configuration is changed, you must remember to reconfigure RPL.vp1.
48 OSI2 and Netware RIPL
4.4.1 The NetWare 2.2 and External Router RPL-Server The RPL.vp1 module is required in order to implement a RPL server on a NetWare 2.2 file server or external router.
This is the remote program load VAP for the NetWare V2.x operating system or external router. To load properly, AppleTalk Phase-II LAN drivers must be linked into the 2.x server or external router. Before Novell developed the AppleTalk Phase-II drivers, the NIC could not respond to the "FIND frame" broadcast by the IBM boot ROM modules.
RPL.vp1 must be copied into the SYS:SYSTEM directory on a server, or, for external routers, the VAP may be copied onto the same directory where ROUTER.EXE resides.
RPL.vp1 requires that the SYS:LOGIN directory is set up with the appropriate bootstrap RPL code files as described in 4.2, "Contents of the LOGIN Directory" on page 41.
When RPL.vp1 loads (either in an external router, or on a NetWare 2.x file server), it sends out a request to "Get Nearest Server". The physically nearest server may be busy at this time, and another NetWare file server may reply quicker. The RPL.vp1 attaches, without logging in, to the first file server to reply to the Get Nearest Server Request. Because of this, it has read-only rights in the SYS:LOGIN directory, and therefore the *.RPL files are expected to be located in that directory. In the case of a NetWare v2.2 file server, this attachment occurs internally.
4.4.2 Features of RPL.vp1 RPL.vp1 (or RPL.VAP) supports RPL of images using the IBM LAN Support Program, as well as allowing RPL across source routing bridges.
RPL.vp1 does not fill in the file server information in the bootstrap program downloaded to the workstation. This forces the RPL bootstrap programs to use GNS calls. For this reason, on a network on which a NetWare 2.2 and external router RPL server is installed, all file servers must have their SYS:LOGIN directory set up as described in 4.2, "Contents of the LOGIN Directory" on page 41.
RPL.vp1 does not support any of the BOOTCONF.sys extensions mentioned in 4.6, "The BOOTCONF.SYS File" on page 58.
4.4.3 Installing RPL.vp1 RPL.vp1 must be loaded after ROUTE.VPO, if source routing is to be supported. RPL.vp1 supports three RPL bootstrap download files: TOKEN.RPL, ETHER.RPL, AND PCN2L.RPL.
In order to work with multiple LAN drivers, or multiple RPL bootstrap files, the RPL VAP must be configured. This is done by running RPCONFIG. RPCONFIG prints out a help screen and prompts for inputs.
When the RPL.vp1 comes up, it will load specified RPL bootstrap files, and connect them with specified LAN drivers. Then, when the VAP receives a find frame request, and subsequent SEND.FILE.REQUEST from a given IBM RPL boot ROM, it will respond with the proper RPL bootstrap file.
Chapter 4. RIPL using NetWare from IBM 49
Since the VAP attaches without logging in, it only has read rights in the SYS:LOGIN sUbdirectory. Therefore, THE RPL bootstrap file must be located in SYS:LOGIN.
If RPL.vp1 hasn't been configured by RPCONFIG, it will default when it comes up. It will go out to SYS:LOGIN, find the first ?????RPL file it can, and connect it with the first LAN driver available. This is generally not reliable for more than one RPL bootstrap file or more than one LAN driver. If in doubt, run RPCONFIG.
The server that responds to the find frame, and downloads the RPL bootstrap file, is not guaranteed to be the server that the workstation will attach to during the RPL sequence. This means that the BOOTCONF.SYS files, and boot disk image files (NET$DOS.SYS, etc.) will still need to be in SYS:LOGIN of every server that could respond to the Get Nearest Server request, not just the servers with RPL.vp1 loaded.
At this stage, RPL.vp1 does not support the BOOTCONF.sys file extensions mentioned in 4.6, "The BOOTCONF.SYS File" on page 58, nor does it support any runtime bind parameters as do RPL.nlm on the NetWare 3.11 server or RPL.com on the NetWare Lite server.
4.4.4 RPCONFIG.COM Utility RPCONFIG.com is used to configure the RPL.vp1 VAP on file servers or external routers which possess multiple LAN drivers, or which have multiple media-specific RPL bootstrap loader (*.RPL) files in the SYS:LOGIN directory.
It may be run inside the SYS:SYSTEM directory where the RPL.vp1 file resides, or any other directory or on diskette as long as RPL.vp1 resides in the same directory as RPCONFIG.COM.
This utility configures two parameters on RPL.vp1:
1. To enable RPL on LAN A,B,C, or D, or any combination of these. Default: RPL is enabled on A,B,C, and D.
2. To set the name of the RPL file that is downloaded by the RPL VAP to the workstation.
This file is not the NET$DOS.SYS file. It is the remote program load file (for example, TOKEN.RPL). The default name is: *.RPL.
RPCONFIG.COM is menu driven. Just type RPCONFIG and it will help you along. ("*.rpl" refers to any file with a .rpl extension.) A sample of the screen presented by RPCONFIG.com is given in Figure 13 on page 51.
50 OS/2 and Netware RIPL

Novell Remote Program Load VAP Configuration Utility V1.88 (C) Copyright 1998 Novell Inc. All Rights Reserved.
Valid Parameters are: VOL=vol,A,B,C,D
VOL=vol The DRIVE, VOLUME, and DIRECTORY where RPL.VAP is located. If NOT entered, the Current VOLUME is ASSUMED. A Specify Remote Program Load File for LAN Driver A. If NOT entered, LAN Dri ver II A II Remote Program Load wi 11 be 01 SABLED. B Specify Remote Program Load File for LAN Driver B. If NOT entered, LAN Driver "BII Remote Program Load will be DISABLED. C Spec ify Remote Program Load Fil e for LAN Dri ver C. If NOT entered, LAN Driver "C" Remote Program Load will be DISABLED. o Specify Remote Program Load File for LAN Driver D. If NOT entered, LAN Driver "0" Remote Program Load will be DISABLED.
At Least ONE LAN Driver (A,B,C, or D) MUST be Entered.
ALL Parameters are separated by COMMAs or BLANKS, are OPTIONAL, are NOT case sensitive, and may be entered in ANY order. Enter? to display this Panel.
Enter Parameters:
Figure 13. Initial Screen Presented by RPCONFIG.com Utility
After a parameter has been entered, the RPCONFIG.com utility responds with another prompt. This time, it is requesting the name of the RPL bootstrap code file which it will download to the workstation via the LAN connected to the selected NIC. This screen is shown in Figure 14.
Enter Parameters: a
The Fi 1 e Name is the fil e you wi sh to have the VAP DovJNLOAD to the WORKSTATION in response to a request from the RPL Boot ROM on the WORKSTATION Adapter Card. It is NOT the file you created with DOSGEN. It is a MAXIMUM of ELEVEN (11) characters long and MUST be located in the SYS:LOGIN directory of the OS. WILDCARD characters (*,?) are ALLOWED, which will cause the VAP to find the FIRST file in SYS:LOGIN that matches the specification. If NOTHING is entered for the LAN Driver, *.RPL is ASSUMED.
Enter File Name for LAN Driver "A":
Figure 14. Screen Presented by RPCONFIG.com Utility
After the name of a RPL bootstrap code file has been entered, the RPCONFIG.com utility reconfigures the RPL.vp1 module as requested, and displays the following:
Enter File Name for LAN Driver "A": TOKEN.RPL RPL.vpl has been SUCCESSFULLY Configured.
4.5 RIPL from a NetWare Lite Server The programs, RPL.com and BOOTNCP.com, in combination with the 001 drivers which support the IEEE 802.2 frame type, implement the RPL server function on any workstation on which they are executed. It is primarily for use in the NetWare Lite environment.
Chapter 4. RIPL using NetWare from IBM 51
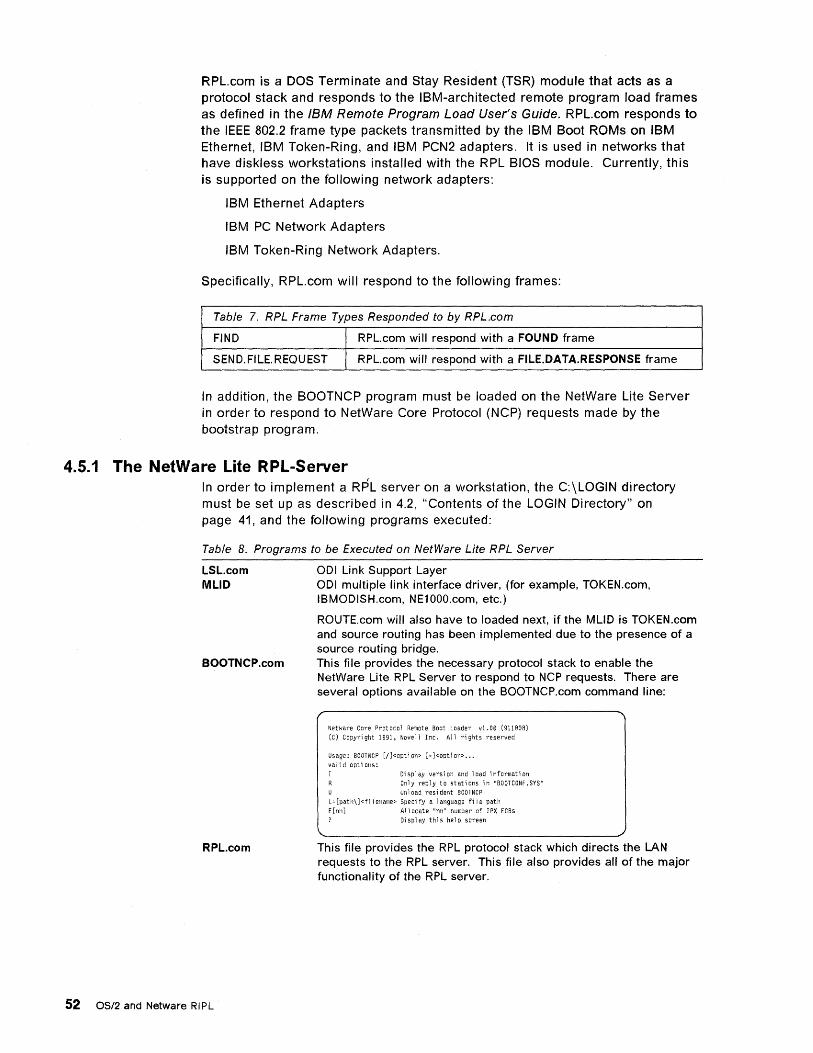
RPL.com is a DOS Terminate and Stay Resident (TSR) module that acts as a protocol stack and responds to the IBM-architected remote program load frames as defined in the IBM Remote Program Load User's Guide. RPL.com responds to the IEEE 802.2 frame type packets transmitted by the IBM Boot ROMs on IBM Ethernet, IBM Token-Ring, and IBM PCN2 adapters. It is used in networks that have diskless workstations installed with the RPL BIOS module. Currently, this is supported on the following network adapters:
IBM Ethernet Adapters
IBM PC Network Adapters
IBM Token-Ring Network Adapters.
Specifically, RPL.com will respond to the following frames:
Table 7. RPL Frame Types Responded to by RPL.com
FIND RPL.com will respond with a FOUND frame
SEND.FILE.REQUEST RPL.com will respond with a FILE.DATA.RESPONSE frame
In addition, the BOOTNCP program must be loaded on the NetWare Lite Server in order to respond to NetWare Core Protocol (NCP) requests made by the bootstrap program.
4.5.1 The NetWare Lite RPL-Server In order to implement a RPL server on a workstation, the C:\LOGIN directory must be set up as described in 4.2, "Contents of the LOGIN Directory" on page 41, and the following programs executed:
Table B. Programs to be Executed on NetWare Lite RPL Server
LSL.com MLID
BOOTNCP.com
RPL.com
52 OS/2 and Netware RIPL
001 Link Support Layer 001 multiple link interface driver, (for example, TOKEN.com, IBMOOISH.com, NE1000.com, etc.)
ROUTE.com will also have to loaded next, if the MUD is TOKEN.com and source routing has been implemented due to the presence of a source routing bridge. This file provides the necessary protocol stack to enable the NetWare Lite RPL Server to respond to NCP requests. There are several options available on the BOOTNCP.com command line:
Netware Core Protocol Remote Boot Loader v1.00 (911008) (Cl Copyright 1991, Novell Inc. All rights reserved
Usage: BOOTNCP lIJ<option> [·J<option> ••• valid opti 011S:
I Display version and load information Only reply to stations in "BOOTCONF.SYS" Un 1 oad resident BOOTNCP
L= [path\J<fi i ename> Speci fy a 1 anguage fi i e path E [n11J Ai i ocate "nn" number of IPX ECBs
Display this help screen
This file provides the RPL protocol stack which directs the LAN requests to the RPL server. This file also provides all of the major functionality of the RPL server.
4.5.2 Features of RPL.com RPL.com supports all of the BOOTCONF.sys extensions mentioned in 4.6, "The BOOTCONF.SYS File" on page 58. These include:
• Wildcard characters (* and ?) when specifying node addresses
• More than one disk image file name is allowed per node address
• Parsing BOOTCONF.sys at the NetWare Lite RPL Server to minimize the amount of network traffic.
RPL.com also supports RPL of images using the IBM LAN Support Program, as well as allowing RPL across source routing bridges.
4.5.3 Loading RPL.com on the NetWare Lite RPL-Server To use RPL.com, the RPL boot ROM module must be installed on the network adapter board in the workstation. This module must be capable of sending the IBM architected RPL frame sequence. See the IBM Remote Program Load User's Guide for information on this architecture.
Implementing the RPL function consists of creating a disk image file and storing it in the C:\LOGIN directory. (The disk image is created using the NetWare DOSGEN utility. A description of this process is given in 5.2, "DOSGEN" on page 63, as well as in the NOVELL NetWare Version 3.11 Installation manual.) The C:\LOGIN directory must also have the necessary RPL bootstrap code file(s) (see 4.2, "Contents of the LOGIN Directory" on page 41).
To start the NetWare Lite Server, the AUTOEXEC.BAT contains the following (for a token-ring LAN using source routing):
PATH=C: \NETVJARE LSL TOKEN ROUTE IPXODI SERVER
To start the NetWare Lite RPL Server, the following needs to be appended to the AUTOEXEC.BAT:
BOOTNCP RPL [ACK] [BIND board] [BUFFERS=nn]
[CACHE SIZE=dd] [DEFAULT] [GNS] [NOACK] [NODEFAULT] [NOGNS] [NOPROTECT] [NOTRO] [PROTECT] [TRO] [U] [UNBIND board] [?]
where each of the parameters on the RPL.com command line are optional BINDing parameters for the RPL server. The parameters specified by [ .. ] are optional, not case sensitive, separated by blanks or commas, and may be entered in any order. They are described as follows:
Table 9 (Page
ACK
of 3). RPL.com Command Line Parameters
Use this parameter if you wish to configure the RPL boot ROM module to acknowledge FILE.DATA.RESPONSE frames sent by RPL.com. By default, RPL.com will send FILE.DATA.RESPONSE frames in a burst mode. This parameter allows pacing by the workstation, if the adapter on the workstation cannot keep up with RPL.com.
Chapter 4. RIPL using NetWare from IBM 53

Table 9 (Page 2 of 3). RPL.com Command Line Parameters
BIND Use this parameter to bind RPL to a specific NetWare 001 board that is configured for the IEEE 802.2 frame type. Board may be specified by name, or optionally, by MUD board number (for example, BIND #n), where n is a decimal number.
BUFFERS=nn
CACHE SIZE=dd
DEFAULT
GNS
NOACK
NODEFAULT
NOGNS
NOPROTECT
NOTRO
PROTECT
54 OS/2 and Netware RIPL
If multiple boards are to be bound, specify the bind parameter multiple times.
If bind is not specified on the command line or in the NET.cfg file, RPL.com will search for the first 802.2 board that is installed and use it. nn is a decimal number specifying the number of receive buffers to configure. The DEFAULT is 5. dd is a decimal number specifying the maximum size of BOOTCONF.sys to load. If BOOTCONF.sys is larger than this value, RPL.com will not cache it. The bootstrap program will then request it over the network when it loads.
Use this parameter when you wish to limit the resident memory size of RPL.com. This parameter will override the NODEFAULT parameter if it is specified on the bind command in NET.cfg. This parameter specifies that you wish the workstation to do a get nearest server request when the appropriate RPL bootstrap program is downloaded. Normally, RPL.com will fill in the bootstrap program with the NetWare Lite Server information, so that it does not need to do a get nearest server request. Using this parameter may cause the workstation to find a server other than the one where RPL.com is located. This parameter will override the ACK parameter if it is specified on the bind command in NET.cfg. T1is parameter tells RPL.com to not respond to a find frame request unless the node address of the workstation is found in the BOOTCONF.sys file. It is provided for security reasons. The workstation will not boot until the system administrator inserts into the BOOTCONF.sys file the node address and associated disk image file name(s) to use when booting the workstation. A further description of BOOTCONF.sys is given in 4.6, "The BOOTCONF.SYS File" on page 58.
This parameter can also be used very effectively for load balancing purposes, so that not all workstations are accessing the same RPL server. It can also simplify system administration by only requiring that images are kept on the actual RPL server which a workstation is going to attach.
Note: At this time the workstation will try up to a maximum of five RPL servers when attempting to find its correct RPL server. This parameter will override the GNS parameter if it is specified on the bind command in NET.cfg. This parameter will override the PROTECT parameter if it is specified on the bind command in NET.cfg. This parameter will override the TRO parameter if it is specified on the bind command in NET.cfg. This parameter tells RPL.com to configure the RPL bootstrap program so that it will protect itself in the workstation memory. It does this by adjusting the memory size variable in the BIOS data area (40:13) to reflect the amount of memory that it uses. Using this parameter will reduce the amount of memory that the workstation has available for DOS by about 12KB. It is recommended that this parameter not be used unless absolutely necessary.
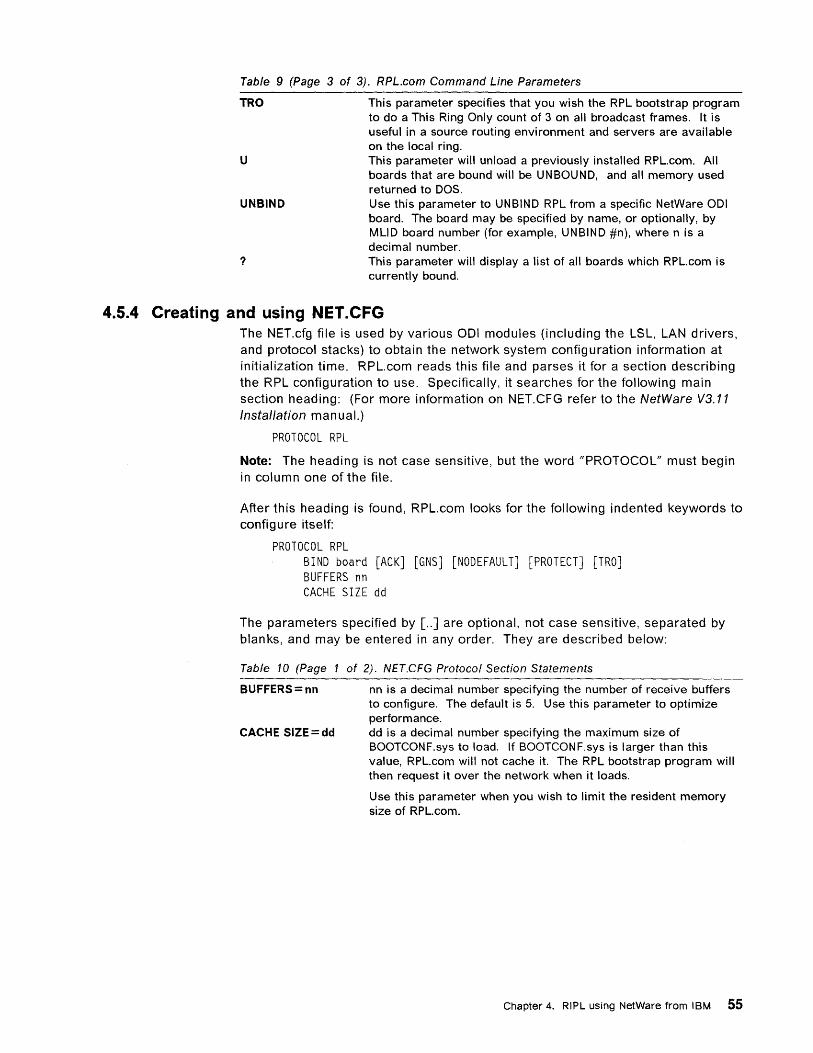
Table 9 (Page 3 of 3). RPL.com Command Line Parameters
TRO This parameter specifies that you wish the RPL bootstrap program to do a This Ring Only count of 3 on all broadcast frames. It is useful in a source routing environment and servers are available on the local ring.
U This parameter will unload a previously installed RPL.com. All boards that are bound will be UNBOUND, and all memory used returned to DOS.
UNBIND
?
Use this parameter to UNBIND RPL from a specific NetWare 001 board. The board may be specified by name, or optionally, by MUD board number (for example, UNBIND #n), where n is a decimal number. This parameter will display a list of all boards which RPL.com is currently bound.
4.5.4 Creating and using NET.CFG The NET.cfg file is used by various ODI modules (including the LSL, LAN drivers, and protocol stacks) to obtain the network system configuration information at initialization time. RPL.com reads this file and parses it for a section describing the RPL configuration to use. Specifically, it searches for the following main section heading: (For more information on NET.CFG refer to the NetWare V3.11 Installation manual.)
PROTOCOL RPL
Note: The heading is not case sensitive, but the word "PROTOCOL" must begin in column one of the file.
After this heading is found, RPL.com looks for the following indented keywords to configure itself:
PROTOCOL RPL BIND board [ACK] [GNS] [NODEFAULT] [PROTECT] [TRO] BUFFERS nn CACHE SIZE dd
The parameters specified by [ .. ] are optional, not case sensitive, separated by blanks, and may be entered in any order. They are described below:
Table 10 (Page
BUFFERS=nn
CACHE SIZE = dd
of 2). NET.CFG Protocol Section Statements
nn is a decimal number specifying the number of receive buffers to configure. The default is 5. Use this parameter to optimize performance. dd is a decimal number specifying the maximum size of BOOTCONF.sys to load. If BOOTCONF.sys is larger than this value, RPL.com will not cache it. The RPL bootstrap program will then request it over the network when it loads.
Use this parameter when you wish to limit the resident memory size of RPL.com.
Chapter 4. RIPL using NetWare from IBM 55
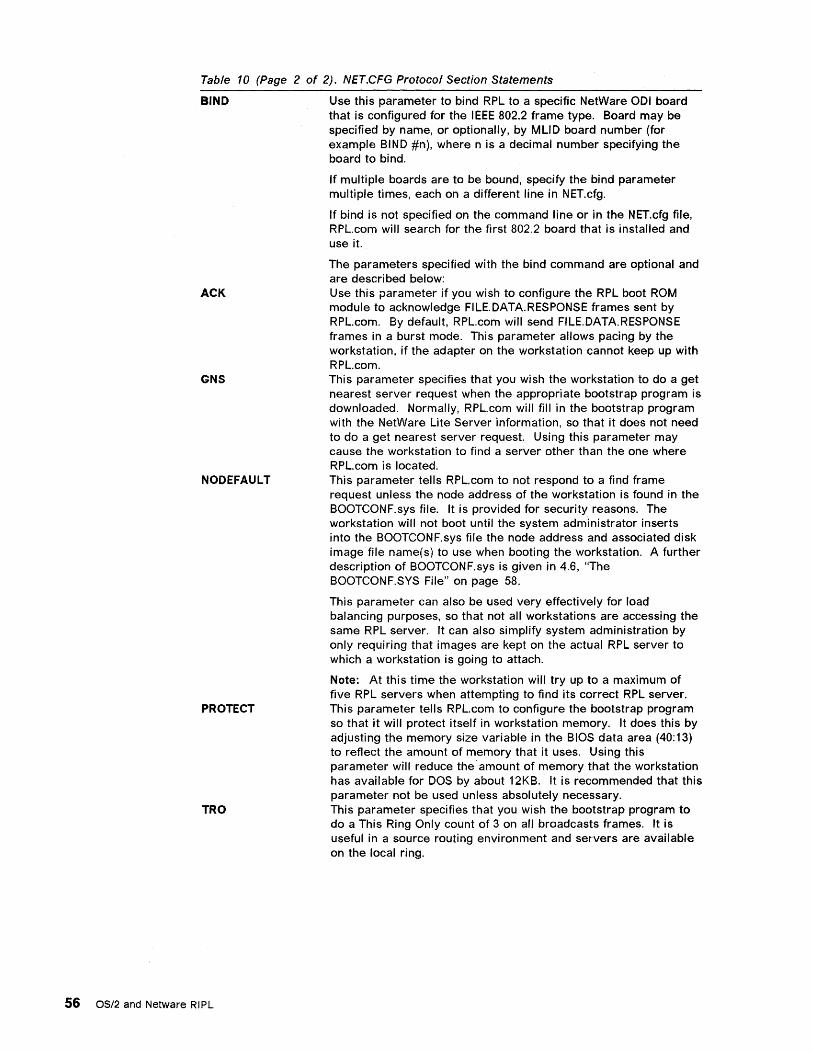
Table 10 (Page 2 of 2). NET.CFG Protocol Section Statements
BIND
ACK
GNS
NODEFAULT
PROTECT
TRO
56 OS/2 and Netware RIPL
Use this parameter to bind RPL to a specific NetWare 001 board that is configured for the IEEE 802.2 frame type. Board may be specified by name, or optionally, by MUD board number (for example BIND #n), where n is a decimal number specifying the board to bind.
If multiple boards are to be bound, specify the bind parameter multiple times, each on a different line in NET.cfg.
If bind is not specified on the command line or in the NET.cfg file, RPL.com will search for the first 802.2 board that is installed and use it.
The parameters specified with the bind command are optional and are descri bed below: Use this parameter if you wish to configure the RPL boot ROM module to acknowledge FILE. DATA. RESPONSE frames sent by RPL.com. By default, RPL.com will send FILE.DATA.RESPONSE frames in a burst mode. This parameter allows pacing by the workstation, if the adapter on the workstation cannot keep up with RPL.com. This parameter specifies that you wish the workstation to do a get nearest server request when the appropriate bootstrap program is downloaded. Normally, RPL.com will fill in the bootstrap program with the NetWare Lite Server information, so that it does not need to do a get nearest server request. Using this parameter may cause the workstation to find a server other than the one where RPL.com is located. This parameter tells RPL.com to not respond to a find frame request unless the node address of the workstation is found in the BOOTCONF.sys file. It is provided for security reasons. The workstation will not boot until the system administrator inserts into the BOOTCONF.sys file the node address and associated disk image file name(s) to use when booting the workstation. A further description of BOOTCONF.sys is given in 4.6, "The BOOTCONF.SYS File" on page 58.
This parameter can also be used very effectively for load balancing purposes, so that not all workstations are accessing the same RPL server. It can also simplify system administration by only requiring that images are kept on the actual RPL server to which a workstation is going to attach.
Note: At this time the workstation will try up to a maximum of five RPL servers when attempting to find its correct RPL server. This parameter tells RPL.com to configure the bootstrap program so that it will protect itself in workstation memory. It does this by adjusting the memory size variable in the BIOS data area (40:13) to reflect the amount of memory that it uses. Using this parameter will reduce the amount of memory that the workstation has available for DOS by about 12KB. It is recommended that this parameter not be used unless absolutely necessary. This parameter specifies that you wish the bootstrap program to do a This Ring Only count of 3 on all broadcasts frames. It is useful in a source routing environment and ser-vers are available on the local ring.

4.5.5 Unique Boot Sequences using RPL.com BOOTCONF.sys is an ASCII text file that allows you to specify a unique disk image file for each workstation that needs access to different files. BOOTCONF.sys is created using your favorite text editor. The process of creating unique disk image files is given in 5.2, "DOSGEN" on page 63, as well as in the NOVELL NetWare Version 3.11 Installation manual.
RPL.com parses the nde address line of BOOTCONF.sys looking for these keywords. If an entry if found, but does not match one of the keywords, it is assumed to be a disk image file name. Therefore, you should not have a disk image file named the same as any of these keywords. Note that these parameters are optional, not case sensitive, separated by blanks, and may be entered in any order.
An example of a BOOTCONF.sys line using this parameters is:
0x*1234 = NET$DOS.sys gns protect rep NODE=AAAAAINODE=67890
In this case, gns and protect will be interpreted as keywords and not disk image file names. In addition, the string "NODE = AAAANf will be replaced with "NODE = 67890" wherever it occurs in the disk image file.
4.5.6 BOOTCONF.SYS Extensions When RPL.com loads it will search the C:\LOGIN directory of the current drive for a BOOTCONF.sys file. If it finds it, it will read it into a memory buffer so that it can parse it when a find frame is received from a workstation. Note that the parsing of BOOTCONF.sys is done by RPL.com. and not the bootstrap program to minimize the amount of traffic on the network during the RPL process. The extensions to BOOTCONF.sys are given in 4.6, "The BOOTCONF.SYS File" on page 58.
4.5.7 Changing BOOTCONF.SYS RPL.com reads BOOTCONF.sys into a memory buffer at load time. If the user changes BOOTCONF.sys after RPL.com is loaded, it must be unloaded by specifying:
RPL u
on the DOS command line. When RPL.com is loaded again, it will read the new copy of BOOTCONF.sys.
4.5.8 Memory Considerations RPL.com will read all bootstrap programs with a .RPL extension it finds in the C:\LOGIN directory and caches them into memory when it loads. It is designed to provide multivendor support with any and all boards that use the IBM RPL architecture. Each RPL bootstrap program consumes anywhere from 10 to 15KB of memory.
To reduce the amount of resident memory RPL.com consumes, it is suggested that only the bootstrap programs that will actually be used are placed in the C:\LOGIN directory.
BOOTCONF.sys is the only other file that is cached during initialization time. This file is optional, so if it is not needed there is no reason to define it. It does,
Chapter 4. RIPL using NetWare from IBM 57
however, offer some powerful configuration options, so when and if you do define it, it is suggested that it be made as small as possible.
4.6 The BOOTCONF.SYS File After a RPL server loads and connects to a file server, it will search the LOGIN directory of the file server for a BOOTCONF.sys file. If it finds BOOTCONF.SYS, it will read it into a memory buffer ready for parsing when a "find frame" is received from a workstation.
Note: Parsing of BOOTCONF.sys is done by the RPL server and not the bootstrap (*.RPL) program. This minimizes the amount of traffic on the network during the RPL process.
The extensions to BOOTCONF.sys are given in the following section.
4.6.1 Using Wildcard Characters in BOOTCONF.SYS Wildcards are only recognized by the following RPL servers:
• RPL.nlm running on a NetWare 3.x file server
• RPL.com running on a NetWare Lite file server.
Wildcard characters (* and ?) are allowed in the line specifying the node address of the workstation. This will allow the system administrator more flexibility in building the BOOTCONF.sys file. The rules for these wildcard characters are:
Table 11. Wildcard Characters in BOOTCONF.sys
? Use the question mark character to specify any digit in the node address. In the example above, the node address could be specified as Ox??????123456 which is equivalent to Ox*123456. Use the asterisk character to specify a range of digits in the node address. For example, if the node address of the workstation is 1 0005A 123456, it may be specified as Ox*123456 in BOOTCONF.sys. In this example, the RPL server will match the node address with any node address that ends in 123456.
Note: Only one asterisk (*) may appear in the node address.
You may use wildcard characters to specify a default disk image file for all workstations on the network that do not have a specific disk image file. You do this by placing the line:
0x* = DEFAULT.sys or 0x???????????? = DEFAULT.sys
as the last line in BOOTCONF.sys. Either one of these lines will match on all workstation node addresses. The DEFAUL T.sys (or any name you desire) disk image file is generated by DOSGEN, the same as any disk image file.
4.6.2 More than ONE Disk Image File per Node Address Each line in BOOTCONF.sys that contains a node address may specify more than one disk image file name, separated by one or more blank characters. In this case, the bootstrap program will present the workstation user with a list of disk image files. He must then use the cursor to highlight the one he wishes to boot from.
For example, if a workstation's node address is 10005A123456, the line in BOOTCONF .SYS:
58 OS/2 and Netware RIPL

0x10005a123456 = D5TOKEN.sys D5LANSUP.sys D5DSLNRQ.dos
will cause the bootstrap program to present on the workstation screen:
Place CURSOR on DISK IMAGE file; Hit ENTER when Ready:
D5TOKEN.sys D5LANSUP.sys D5DSLNRQ.dos
The bootstrap program will then use NCP calls to open the selected disk image file. If it does not exist, it will display the following message:
Unable to OPEN Disk Image File
and redisplay the list of images specified in BOOTCONF.SYS.
Up to 10 disk image file names may be entered for each node address in BOOTCONF .sys.
Note: They must be separated by one or more blank characters, and they must all fit on one line.
4.6.3 Multiple Lines per Node Address The ASCII colon (:) can be used to allow for multiple lines when specifying a particular node address in BOOTCONF.sys. It is provided for convenience when specifying multiple parameters on the node address line.
To use this feature, place the ASCII colon (:) at the end of the line. Note that is must be preceded by at least one ASCII blank:
0x10005a460025 = D5TOKEN.sys D5LANSUP.sys D5DSLNRQ.sys
4.6.4 BOOTCONF.SYS BIND Override Parameters When a RPL server parses BOOTCONF.sys, it allows the user to override the RPL server bind time parameters with parameters specific to a particular workstation that is being booted. By default, the parameters that were entered at bind time apply to all workstations that are attached to the particular board specified in the bind command. The following commands are allowed on a per node basis, which, if used, will override the bind time parameters:
Table 12 (Page 1 of 2). BOOTCONF.SYS BIND Override Parameters
ACK
GNS
Use this parameter if you wish to configure the RPL boot ROM module to acknowledge "FILE.DATA.RESPONSE'" frames sent by the RPL server. By default, a RPL server will send FILE.DATA.RESPONSE frames in a burst mode. This parameter allows pacing by the workstation, if the adapter on the workstation cannot keep up with the RPL server. This parameter specifies that you wish the workstation to do a Get Nearest Server (GNS) request when the appropriate bootstrap program is downloaded. Normally, the RPL server will fill in the bootstrap program with the file server information, so that it does not need to do a get nearest server request. Using this parameter may cause the workstation to find a server other than the one where the RPL server is located.
Chapter 4. RIPL using NetWare from IBM 59

Table 12 (Page 2 of 2). BOOTCONF.SYS BIND Override Parameters
NOACK
NOGNS
NOPROTECT
NOTRO
PROTECT
REP
TRO
This parameter will override the ACK parameter specified on the bind command. This parameter will override the GNS parameter specified on the bind command. This parameter will override the PROTECT parameter specified on the bind command. This parameter will override the TRO parameter if specified on the bind command. This parameter tells the RPL server to configure the bootstrap program so that it will protect itself in the workstation memory. It does this by adjusting the memory size variable in the BIOS data area (40:13) to reflect the amount of memory that it uses. Using this parameter will reduce the amount of memory that the workstation has available for DOS by about 12KB. It is recommended that this parameter not be used unless absolutely necessary. string11string2 allows you to replace all occurrences of string1 with string2 in the disk image file. The T (ASCII 7Ch) delimiter is required to delimit the string values.
Use this parameter to dynamically re-configure a disk image file during the RPL process. It is useful for tailoring files such as AUTOEXEC.BAT or CONFIG.SYS to a specific workstation.
The rules for using REP are given as follows:
1. The search is case sensitive. The bootstrap program will search for string1 exactly as it is entered in BOOTCONF.sys.
2. All occurrences of string1 will be replaced with string2 in the disk image file.
3. string2 must be equal to or shorter than string1.
4. If string2 is shorter than string1, the disk image file will be padded with ASCII blanks when the substitution is made.
5. string2 must contain no embedded ASCII blanks. The first blank that is encountered is interpreted as the end of the string.
This parameter specifies that you wish the bootstrap program to do a This Ring Only count of 3 on all broadcast frames. It is useful in a source routing environment and servers are available on the local ring.
A RPL server parses the node address line of BOOTCONF.sys looking for these keywords. If an entry if found, but does not match one of the keywords, it is assumed to be a disk image file name. Therefore, you should not have a disk image file named the same as any of these keywords. Note that these parameters are optional, not case sensitive, separated by blanks, and may be entered in any order.
An example of a BOOTCONF.sys line using this parameters is:
0x*1234 = NET$DOS.sys gns protect rep NODE=AAAAA/NODE=67S90
In this case, gns and protect will be interpreted as keywords and not as disk image file names. In addition, the string "NODE =AAAANI will be replaced with "NODE=67890" where ever it occurs in the disk image file.
60 OS/2 and Netware RIPL
4.6.5 Changing BOOTCONF.SYS The RPL server reads BOOTCONF.sys into a memory buffer at load time. If the user changes it after BOOTCONF.sys is loaded, the RPL server must be unloaded then reloaded.
The exception to this is when RPL.nlm is running on a NetWare 3.11 file server. RPL.nlm will detect the change and reload it automatically. There may be a five second delay from the time the changes are saved to the time the RPL server invokes the changes.
The RPL.nlm will suspend processing of frames while BOOTCONF.sys is being loaded into memory.
Chapter 4. RIPL using NetWare from IBM 61

62 OS/2 and Netware RIPL

Chapter 5. NetWare RIPL of DOS Images
In recent discussions with Novell, it has been made clear that they intend to phase out their original IPX shell (IPX.COM), in favor of their newer Open Data-Link Interface (001) shells. At this time, both shells are still common, and hence both types of setup are discussed. Generation of the older IPX program is not covered here due to Novell's intentions. There is also sufficient documentation elsewhere on this subject.
5.1 What you need
5.2 DOSGEN
1. If you are installing r:iiskless workstations on a network, you must install at least one workstation (temporarily) that boots from floppy diskette in order to generate the remote boot image file on the server.
2. To install remote boot image files on the server, you need:
• The workstation configuration worksheet to record settings
• A station with a floppy diskette drive
• The boot diskettes for each remote boot station
3. Once the network board is ready for "Remote Reset", run DOSGEN on the station with a diskette drive and upload the required DOS boot image file to the host server.
4. If you have several servers on your network, and RIPL load balancing has not been implemented, copy the remote boot image files onto each server that may come up as the remote boot station's default server. For more information on load balancing, refer to the RPL-Server BIND parameters in Chapter 4, "RIPL using NetWare from IBM" on page 39.
5. If the default server is busy when a remote boot station boots, the next available server becomes the default server.
6. Just as you must create different boot diskettes for each network board configuration and DOS version used, you must create different boot image files on the server for each remote boot station that has different boot file requirements.
Purpose: Allows workstations to boot from remote boot image files stored on the server's hard disk.
Usage: This is split into two different sections:
• Create one remote boot image file • Create several remote boot image files
Prior to running DOSGEN, the diskette is set up to allow a regular workstation to boot up and perform all of the functions which will ultimately be performed by the medialess workstation. All of the information is then read from the diskette, using DOSGEN and is placed into the DOS image file. This includes the boot sector, the FAT and root directory, the boot files and all of the other files placed in the root directory of the diskette.
© Copyright IBM Corp. 1992 63
Note: DOSGEN cannot read single-sided disks. All images created by DOSGEN, must be created from double-sided 5.25 inch disks or 3.5 inch diskettes.
Also, There must be no subdirectories on the diskettes. DOSGEN is unable to process subdirectories and will report an error if it detects that the diskette it is processing contains subdirectories. All files must be in the root directory of the diskette.
At this time, only the root directory is supported for DOS images. Therefore a setup which requires the existence of subdirectories cannot be set up within the boot image and some sort of work-around must be employed. The boot image is read from an actual diskette using the DOSGEN utility.
5.3 Creating a Single Remote Boot Image File Note: If the server already has a remote boot image file (NET$DOS.SYS) in SYS:LOGIN that is being used by someone else, you cannot create a new single remote boot image file. (See 5.4 "Create Several Remote Boot image files" on page 61.)
1. Boot a station from floppy or hard disk, and log in as supervisor
2. Insert the boot diskette for the remote boot station into drive A
3. Map drive F to SYS:SYSTEM. Type:
MAP F:=SYS:SYSTEM
4. Map drive G to SYS:LOGIN. Type:
MAP G:=SYS:LOGIN
5. Change to SYS:LOGIN. Type G:
6. Run DOSGEN (DOS Remote Image File GENeration):
F:DOSGEN
Note: DOSGEN creates a boot image file called NET$DOS.SYS (a copy of the files on the boot diskette) in the SYS:LOGIN directory.
Your screen will look similar to the following:
Floppy Type f9 = Quad Density, 15 Sectors per track Total Floppy Space 2400 Sectors Setting Up System Block. Setting Up FAT Tables. Setting Up Directory Structures. Traversing Directory Structures. Processing IBMBIO COM Processing IBMDOS COM Processing COMMAND COM Processing IPX COM Processing NETX COM Processing AUTOEXECBAT Transferring Data to "NET$DOS.SYS"
7. Copy the AUTOEXEC.BAT file from the boot diskette in drive A into the SYS:LOGIN directory
8. Copy the AUTOEXEC.BAT file from the boot diskette to the default directory specified in the user's login script (typically the user's home directory). If the default directory is SYS:LOGIN, you have already completed this step
64 OS/2 and Netware RIPL
Note: You may get a "Batch File Missing" error when you log in if the AUTOEXEC.BAT file isn't copied to SYS:LOGIN and the default directory.
9. Flag the NET$DOS.SYS file in SYS: LOGIN as shareable. Type:
FLAG NET$DOS.SYS S
10. Grant the modify right to the remote boot user in SYS:LOGIN. Example: from SYS:LOGIN, type:
GRANT M TO A USER
5.4 Creating Several Remote Boot Image Files 1. Boot a station from floppy or hard disk, and log in as supervisor
2. Rename the AUTOEXEC.BAT file on the boot diskette:
a. Insert a boot diskette for one of the remote boot workstations into drive A
b. Rename the AUTOEXEC.BAT file on the diskette
c. Give the AUTOEXEC.BAT file on each boot diskette a unique name and a .BAT extension
For example, name the batch file A_USER.BAT for a workstation that A USER will use
d. For each renamed .BAT file (A_USER.BAT in our example), list the network addresses and node addresses for the workstations that will use it on the Workstation Configuration Worksheet
e. You use this information when you create the BOOTCONF.SYS file
3. Copy the renamed .BAT file (A_USER.BAT, in this example) from the boot diskette to SYS:LOGIN
4. Copy the renamed .BAT file (A_USER.BAT) into the default directory specified in the login script:
a. Typically this directory is the user's home directory
b. If the default directory is SYS:LOGIN, you have already completed this step
c. You may get a "Batch File Missing" error when you log in if the AUTOEXEC.BAT file is not copied to both the SYS:LOGIN directory and the default directory
5. Create a new AUTOEXEC.BAT file on the boot diskette that consists of the renamed batch file: (A_USER.BAT)
• When each remote boot workstation boots, the operating system reads the AUTOEXEC.BAT file and goes to the renamed batch file (A_USER.BAT) to execute the boot commands
6. Map drives to the directories that DOSGEN writes to:
a. Map drive F to SYS:SYSTEM. Type:
MAP F:=SYS:SYSTEM
b. Map drive G: to SYS:LOGIN. Type:
MAP G:=SYS:LOGIN
c. Change to the SYS:LOGIN directory. Type:
G:
Chapter 5. NetWare RIPL of DOS Images 65

7. Run DOSGEN (DOS Remote Image File GENeration) and indicate the new name for the image file:
a. From drive G (and with the boot diskette in drive A), type F:DOSGEN A: A_USER.SYS. Leave a space between A: and the name of the file.
b. DOSGEN creates the new remote boot image file in SYS:LOGIN
Your screen will look similar to the following:
Floppy Type f9 = Quad Density, 15 Sectors per track Total Floppy Space 2488 Sectors Setting Up System Block. Setting Up FAT Tables. Setting Up Directory Structures. Traversing Directory Structures. Processing IBMBIO COM Processing IBMDOS COM Processing COMMAND COM Processing IPX COM Processing NETX COM Processing AUTOEXECBAT Processing A_USER BAT Transferring Data to "A_USER.SYS"
c. Record the network number and node address of the station that will use the remote boot image file you just created
d. You use this information when you create the BOOTCONF.SYS file
For example, when you have finished running DOSGEN for two boot diskettes, your list would look similar to the following:
RED.SYS: Network#=DOC20 Node=5a003b77 JANE.SYS: Network#=DOC20 Node=lb0276a3
e. Repeat Steps 7a and 7b for each boot diskette
8. Create the BOOTCONF.SYS file
66 OS/2 and Netware RIPL
Note: If the server already has a BOOTCONF.SYS file in SYS: LOGIN, you can't create another one. New entries can be added to the existing file using a DOS text editor.
a. When you create multiple remote boot image files, you also need a BOOTCONF.SYS file in the SYS:LOGIN directory that lists:
• All custom remote boot image files (not including the default NET$DOS.SYS file)
• The network address and node address of each station that uses the customized boot image files
b. Move to the SYS:LOGIN directory
c. Use a DOS text editor to create the BOOTCONF.SYS file in the SYS: LOGIN directory. Include a line for each remote boot image file you created, using an entry format containing the following:
• Ox (the number zero plus x)
• The network address
• A comma (,)
• The node or station address
• An equal sign (=)
• The boot disk image filename
Our example for two boot diskettes looks like this:
8xDOC28,5a883b77=A_USER.SYS 8xDOC28,lb8276a3=JANE.SYS
9. Flag the .SYS files in SYS:LOGIN as shareable.
Type commands such as those as follows:
FLAG *.SYS S FLAG *.BAT S
10. Grant the modify right to the remote boot users in SYS:LOGIN.
Move to the SYS:LOGIN directory and type a command similar to the following:
GRANT M TO A USER <Enter>
5.5 Using Locally Administered Addresses Locally Administered Addresses (LAAs) are specified by parameters either in the NET.CFG file (001 drivers) or within the CONFIG.SYS file (LSP drivers). Both of these files reside within the DOS image. When the RPL workstation initially attaches to a file server to download the RPL bootstrap code and then to download a particular DOS image, it has no way of knowing that it will eventually be using LAAs.
From this it is obvious that only the Universally Administered Addresses should be specified within the BOOTCONF.SYS file, because neither the RPL server, nor the workstation, are aware of anything else when the RPL server scans this file.
Also, this means that the RPL bootstrap program must be able to communicate with the RPL server before and after the workstation connection changes its address (from universal to local).
5.6 Bridging Considerations Currently there are no problems with RIPL across IBM source routing bridges as long as source routing has been loaded on the token-ring side of the bridge. This includes:
• The 8209 Token-Ring to TOken-Ring Bridge
• The 8209 Token-Ring to Ethernet-Ring Bridge
(Must have ECA 001 applied to allow IPX to cross the bridge)
• The IBM Bridge Program V2.2.
(If a remote bridge setup is being used, some timing problems may be experienced due to transmission delays)
A workstation will RI PL from a NetWare RPL server, when the bridge is on the same network. The RI PL workstation does not need to be on the same side of the bridge as the RPL server. The RIPL function will cross a maximum of seven bridges.
Chapter S. NetWare RIPL of DOS Images 67

5.7 Troubleshooting Tips 1. If you get the error message "Error opening boot disk image file" or "Unable
to open NET$DOS.SYS" you are probably attaching to another file server that does not contain the remote boot image file.
Either log in to the other possible default file servers as supervisor and run DOSGEN on each, or copy the .SYS and .BAT files from the default file server to the other file servers on the network.
2. If you get the error "Batch file missing", make sure the AUTOEXEC.BAT file is in:
Table 13. Batch File Missing Error Causes
SYS:LOGIN For every file server you could possibly attach to
Default (or first) For the file server you normally log in to mapped drive
3. If one user can log in but other users are unsuccessful when trying at the same time, make sure the .SYS files are flagged shareable.
4. If you are using a remote reset ROM on a token-ring network board and you can't boot a workstation, ensure that you have loaded the RPL loadable module (LOAD RPL.NLM) at the file server console before booting the workstation.
5. Use "Track On" at the server console and watch for get nearest server requests from the workstation.
This will give you an idea whether the boot ROM on the workstation is sending packets.
6. Load "Monitor" at the server console and watch to see if the workstation opens the BOOTCONF.SYS file, the NET$DOS.SYS file, or other boot disk image files.
7. If a station using the boot ROM doesn't boot, and you have another station with a diskette drive configured the same as the first station (has the same type of network board using the same configuration options), see if the second station will boot with the boot diskette you used with DOSGEN.
With the boot diskette on the second machine, it should be the same as booting from the server on the RPL workstation.
5.8 Examples of the Basic DOS Image This section aims to provide a reference for those wishing to put together a DOS RI PL image. The following examples have been fully tested and are known to RIPL successfully.
Note: In all the token-ring examples, the ROUTE.COM module has been loaded. This was because in the testing environment, there was an IBM source routing bridge. If the LAN segment consisting of the workstation and RPL server does not connect to any IBM source routing bridges, ROUTE.COM may be omitted from the DOS image and the AUTOEXEC.BAT.
68 OS/2 and Netware RIPL
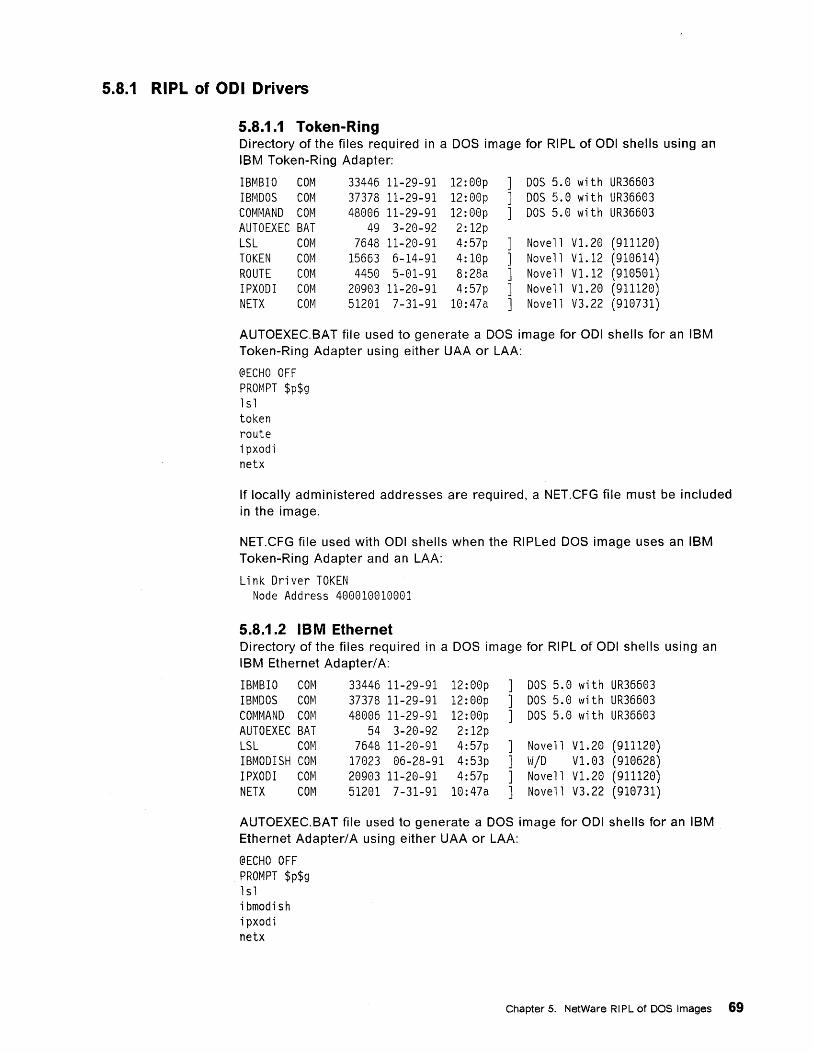
5.8.1 RIPL of 001 Drivers
5.8.1.1 Token-Ring Directory of the files required in a DOS image for RIPL of 001 shells using an IBM Taken-Ring Adapter:
IBMBIO COM 33446 11-29-91 IBMDOS COM 37378 11-29-91 COMMAND COM 48006 11-29-91 AUTOEXEC BAT 49 3-20-92 LSL COM 7648 11-20-91 TOKEN COM 15663 6-14-91 ROUTE COM 4450 5-01-91 IPXODI COM 20903 11-20-91 NETX COM 51201 7-31-91
12:00p 12:00p 12:00p 2:12p 4:57p 4:10p 8:28a 4:57p
10:47a
DOS 5.0 with UR36603 DOS 5.0 with UR36603 DOS 5.0 with UR36603
Novell Novell Novell Novell Novell
Vl. 20 Vl.12 Vl.12 V1.20 V3.22
(911120) (910614) (910501 ) (911120) (910731)
AUTOEXEC.BAT file used to generate a DOS image for 001 shells for an IBM Token-Ring Adapter using either UAA or LAA:
@ECHO OFF PROMPT $p$g 1 sl token route ipxodi netx
If locally administered addresses are required, a NET.CFG file must be included in the image.
NET.CFG file used with 001 shells when the RIPLed DOS image uses an IBM Token-Ring Adapter and an LAA:
Link Driver TOKEN Node Address 408818818881
5.8.1.2 IBM Ethernet Directory of the files required in a DOS image for RIPL of 001 shells using an IBM Ethernet Adapter/A:
IBMBIO COM 33446 11-29-91 IBMDOS COM 37378 11-29-91 COMMAND COM 48886 11-29-91 AUTOEXEC BAT 54 3-28-92 LSL COM 7648 11-28-91 IBMODISH COM 17023 86-28-91 IPXODI COM 20903 11-20-91 NETX COM 51281 7-31-91
12:80p 12:08p 12:88p 2:12p 4:57p 4:53p 4:57p
10:47a
DOS 5.0 with UR36603 DOS 5.0 with UR36683 DOS 5.0 with UR36603
] Novell V1.28 (911128) ] WID V1.03 (910628) ] Novell V1.20 (911128) ] Novell V3.22 (918731)
AUTOEXEC.BAT file used to generate a DOS image for 001 shells for an IBM Ethernet Adapter/ A using either UAA or LAA:
@ECHO OFF PROMPT $p$g 1 s 1 ibmodish i pxodi netx
Chapter 5. NetWare RIPL of DOS Images 69
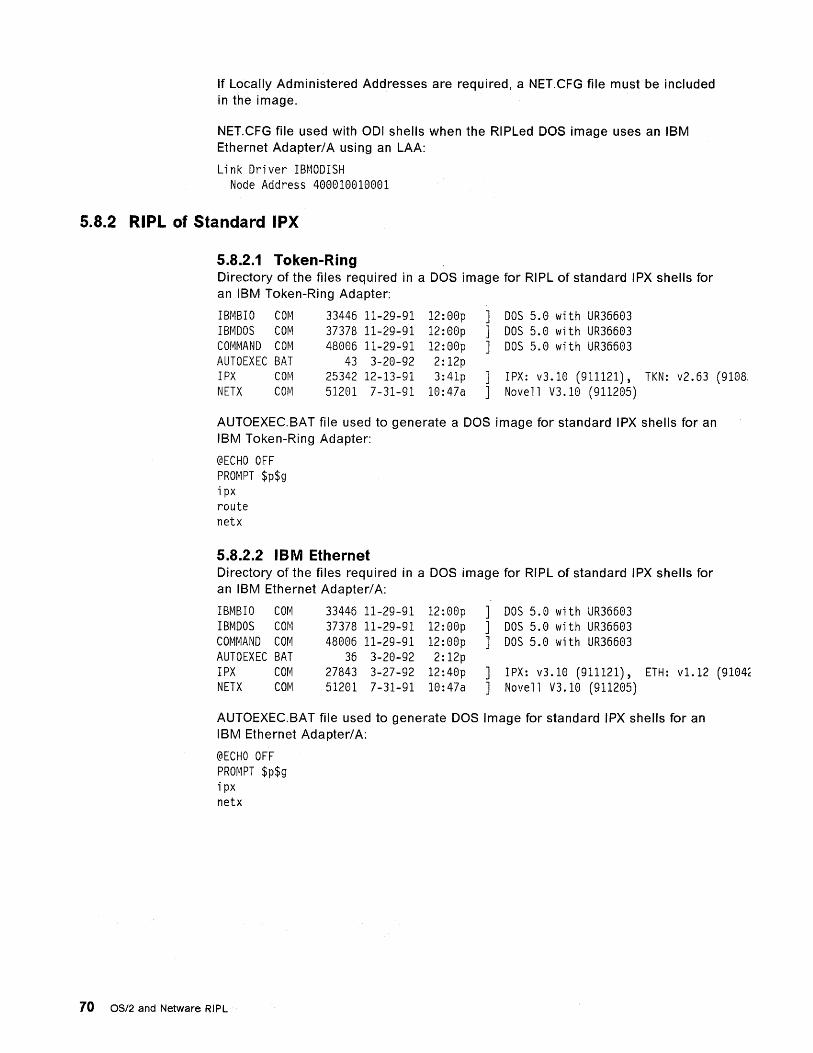
If Locally Administered Addresses are required, a NET.CFG file must be included in the image.
NET.CFG file used with 001 shells when the RIPLed DOS image uses an IBM Ethernet Adapter/A using an LAA:
Link Driver IBMODISH Node Address 488818818881
5.8.2 RIPL of Standard IPX
5.8.2.1 Token-Ring Directory of the files required in a DOS image for RIPL of standard I PX shells for an IBM Token-Ring Adapter:
IBMBIO COM 33446 11-29-91 IBMDOS COM 37378 11-29-91 COMMAND COM 48086 11-29-91 AUTOEXEC BAT 43 3-28-92 IPX COM 25342 12-13-91 NETX COM 51281 7-31-91
12:88p 12:00p 12:88p 2:12p 3:41p
18:47a
DOS 5.8 with UR36683 DOS 5.8 with UR36683 DOS 5.8 with UR36683
IPX: v3.10 (911121), TKN: v2.63 (910S: Novell V3.10 (911285)
AUTOEXEC.BAT file used to generate a DOS image for standard IPX shells for an IBM Taken-Ring Adapter:
@ECHO OFF PRO~1PT $p$g ipx route netx
5.8.2.2 IBM Ethernet Directory of the files required in a DOS image for RIPL of standard IPX shells for an IBM Ethernet Adapter/A:
IBMBIO COM 33446 11-29-91 IBMDOS COM 37378 11-29-91 COMMAND COM 48886 11-29-91 AUTOEXEC BAT 36 3-28-92 IPX COM 27843 3-27-92 NETX COM 51281 7-31-91
12:80p 12:88p 12:88p 2:12p
12:48p 10:47a
] DOS 5.0 with UR36603 ] DOS 5.0 with UR36603 ] DOS 5.8 with UR36683
IPX: v3.18 (911121), ETH: v1.12 (9104, Novell V3.18 (911285)
AUTOEXEC.BAT file used to generate DOS Image for standard IPX shells for an IBM Ethernet Adapter/A:
@ECHO OFF PROMPT $p$g i px netx
70 OS/2 and Netware RIPL
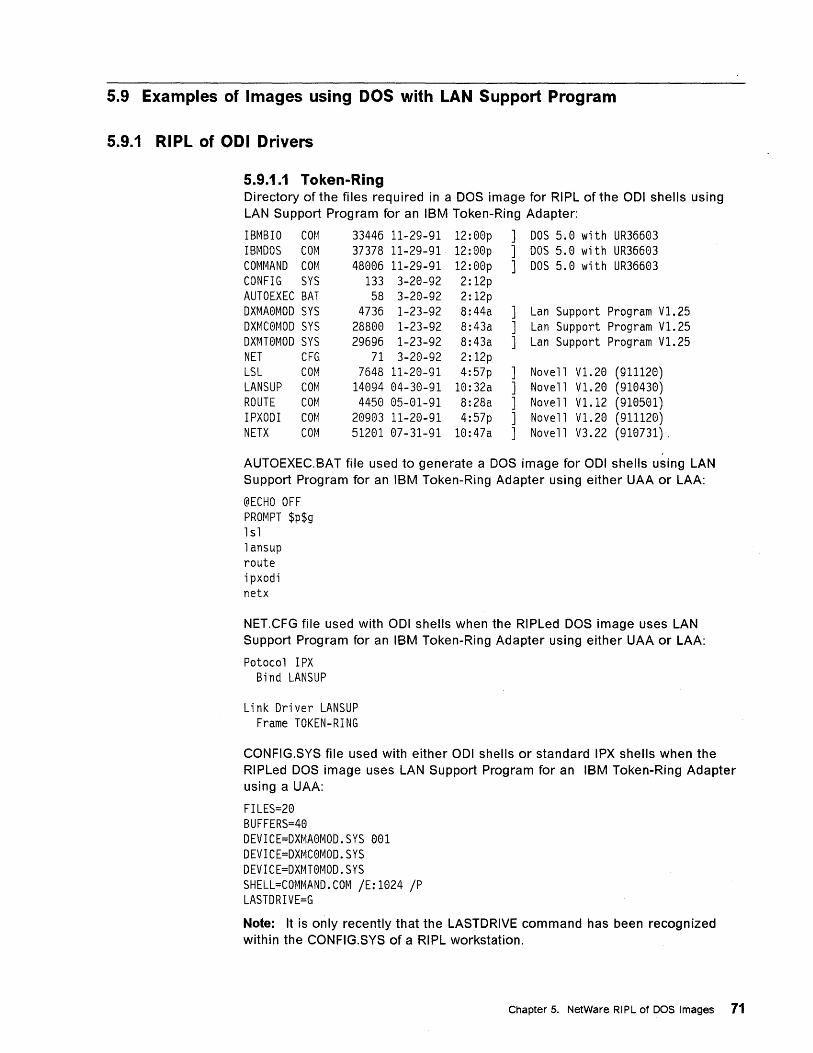
5.9 Examples of Images using DOS with LAN Support Program
5.9.1 RIPL of 001 Drivers
5.9.1.1 Token-Ring Directory of the files required in a DOS image for RIPL of the 001 shells using LAN Support Program for an IBM Token-Ring Adapter:
IBMBIO COM 33446 11-29-91 12:00p ] DOS 5.0 with UR36603 IBMDOS COM 37378 11-29-91 12:00p ] DOS 5.0 with UR36603 COMMAND COM 48006 11-29-91 12:00p ] DOS 5.0 with UR36603 CONFIG SYS 133 3-20-92 2:12p AUTOEXEC BAT 58 3-20-92 2:12p DXMA0MOD SYS 4736 1-23-92 8:44a DXMC0MOD SYS 28800 1-23-92 8:43a DXMT0MOD SYS 29696 1-23-92 8:43a NET CFG 71 3-20-92 2:12p LSL COM 7648 11-20-91 4:57p LANSUP COM 14094 04-30-91 10:32a ROUTE COM 4450 05-01-91 8:28a IPXODI COM 20903 11-20-91 4:57p NETX COM 51201 07-31-91 10:47a
Lan Support Program V1.25 Lan Support Program V1.25 Lan Support Program V1.25
Novell Novell Novell Novell Novell
V1.20 Vl. 20 Vl.12 Vl. 20 V3.22
(911120) (910430) (910501 ) (911120) (910731) .
AUTOEXEC.BAT file used to generate a DOS image for 001 shells using LAN Support Program for an IBM Token-Ring Adapter using either UAA or LAA:
@ECHO OFF PROMPT $p$g 1 s 1 lansup route ipxodi netx
NET.CFG file used with 001 shells when the RIPLed DOS image uses LAN Support Program for an IBM Token-Ring Adapter using either UAA or LAA:
Potocol IPX Bind LANSUP
Link Driver LANSUP Frame TOKEN-RING
CONFIG.SYS file used with either 001 shells or standard IPX shells when the RIPLed DOS image uses LAN Support Program for an IBM Token-Ring Adapter using a UAA:
FILES=20 BUFFERS=40 DEVICE=DXMA0MOD.SYS 001 DEVICE=DXMC0MOD.SYS DEVICE=DXMT0MOD.SYS SHELL=COMMAND.COM jE:1024 jP LASTDRIVE=G
Note: It is only recently that the LASTDRIVE command has been recognized within the CONFIG.SYS of a RIPL workstation.
Chapter 5. NetWare RIPL of DOS Images 71
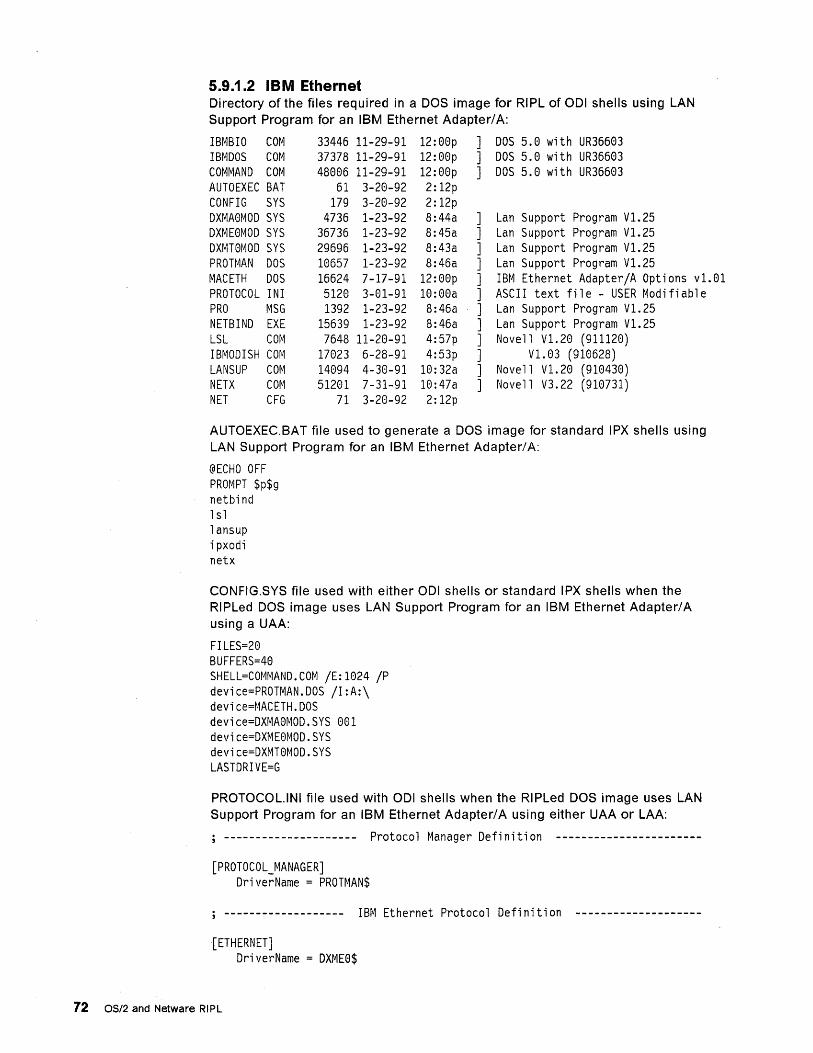
5.9.1.2 IBM Ethernet Directory of the files required in a DOS image for RIPL of 001 shells using LAN Support Program for an IBM Ethernet Adapter/A:
IBMBIO COM 33446 11-29-91 12:00p DOS 5.0 with UR36603 IBMDOS COM 37378 11-29-91 12:00p DOS 5.0 with UR36603 COMMAND COM 48006 11-29-91 12:00p DOS 5.0 with UR36603 AUTOEXEC BAT 61 3-20-92 2:12p CONFIG SYS 179 3-20-92 2:12p DXMA0MOD SYS 4736 1-23-92 8:44a ] Lan Support Program V1.25 DXME0MOD SYS 36736 1-23-92 8:45a ] Lan Support Program V1.25 DXtH0MOD SYS 29696 1-23-92 8:43a ] Lan Support Program V1.25 PROTr~AN DOS 10657 1-23-92 8:46a ] Lan Support Program V1.25 MACETH DOS 16624 7-17-91 12:00p ] IBM Ethernet AdapterjA Options v1.01 PROTOCOL INI 5120 3-01-91 10:00a ] ASCII text file - USER Modifiable PRO MSG 1392 1-23-92 8:46a ] Lan Support Program V1.25 NETBIND EXE 15639 1-23-92 8:46a ] Lan Support Program V1.25 LSL COM 7648 11-20-91 4:57p ] Novell V1.20 (911120) IBMODISH COM 17023 6-28-91 4:53p ] V1. 03 (910628) LANSUP COM 14094 4-30-91 10: 32a ] Novell V 1. 20 (910430) NETX COM 51201 7-31-91 10:47a ] Novell V3.22 (910731) NET CFG 71 3-20-92 2:12p
AUTOEXEC.BAT file used to generate a DOS image for standard IPX shells using LAN Support Program for an IBM Ethernet Adapter! A:
@ECHO OFF PROMPT $p$g netbind 1 s 1 lansup i pxodi netx
CONFIG.SYS file used with either 001 shells or standard IPX shells when the RI PLed DOS image uses LAN Support Program for an IBM Ethernet Adapter/ A using a UAA:
FILES=20 BUFFERS=40 SHELL=COMMAND.COM jE:1024 jP device=PROTMAN.DOS jI:A:\ devi ce=MACETH. DOS device=DXMA0MOD.SYS 001 device=DXME0MOD.SYS device=DXMT0MOD.SYS LASTDRIVE=G
PROTOCOL.INI file used with 001 shells when the RIPLed DOS image uses LAN Support Program for an IBM Ethernet Adapter/A using either UAA or LAA:
; --------------------- Protocol Manager Definition -----------------------
[PROTOCOL_MANAGER] DriverName = PROTMAN$
IBM Ethernet Protocol Definition --------------------
[ETHERNET] DriverName = DXME0$
72 OS/2 and Netware RIPL

; -------------- IBM PS/2 Adapter for Ethernet Networks -----------------
[IBMAC] DriverName = MACETH$
The following 3 parameters are read from the POS registers on the adapter. Therefore, they are not needed and will be ignored.
IRQ = 3 RamAddress = 0xC800 IOBase = 0x200 ReceiveBuffers = 16 ReceiveChains = 16 MaxRequests = 10 MaxTransmits = 10 ReceiveBufSize = 256
NET.CFG file used with 001 shells when the RIPLed DOS image uses LAN Support Program for an IBM Ethernet Adapter/ A using either UAA or LAA:
Pataca 1 I PX Bind LANSUP
Link Driver LANSUP Frame TOKEN-RING
Note: Even though the workstation is using Ethernet, the fact that the LAN Support drivers are loaded means that the frame type must be specified as token-ring in the NET.CFG file.
If locally administered addresses are required, the "device = DXMEOMOD.SYS" line in the CONFIG.SYS file must be changed. If the trailing ",,1" parameter is omitted, the address bits will be swapped around.
device=DXME0MOD.SYS 400010010001,,1
5.9.2 RIPL of Standard IPX
5.9.2.1 Token-Ring Directory of the files required in a DOS image for RIPL of standard IPX shells using LAN Support Program for an IBM Token-Ring Adapter:
IBMBIO COM 33446 11-29-91 12:00p DOS 5.0 with UR36603 IBMDOS COM 37378 11-29-91 12:00p DOS 5.0 with UR36603 COMMAND COM 48006 11-29-91 12:00p DOS 5.0 with UR36603 CONFIG SYS 133 3-20-92 2:12p AUTOEXEC BAT 43 3-20-92 2:12p DXMA0MOD SYS 4736 1-23-92 8:44a DXMC0MOD SYS 28800 1-23-92 8:43a DXMT0MOD SYS 29696 1-23-92 8:43a IPX COM 24520 03-02-92 9:10a ROUTE COM 4450 05-01-91 8:28a NETX COM 51201 07-31-91 10:47a
] Lan Support Program Vl.25 ] Lan Support Program Vl.25 ] Lan Support Program Vl.25 ] IPX: v3.10 (911121), LSP: ] Novell Vl.12 (910501) ] Novell V3.22 (910731)
v2.62 (910415)
AUTOEXEC.BAT file used to generate a DOS image for standard IPX shells using LAN Support Program for an IBM Token-Ring Adapter:
Chapter 5. NetWare RIPL of DOS Images 73

@ECHO OFF PROMPT $p$g ipx route netx
CONFIG.SYS file used with either 001 shells or standard IPX shells when the RIPLed DOS image uses LAN Support Program for an IBM Token-Ring Adapter using an LAA:
FILES=20 BUFFERS=40 DEVICE=DXMA0MOD.SYS 001 DEVICE=DXMC0MOD.SYS 400010010001 DEVICE=DXMT0MOD.SYS SHELL=COMMAND.COM /E:1024 /P LASTDRIVE=G
Note: It is only recently that the LASTDRIVE command has been recognized within the CONFIG.SYS of a RIPL workstation.
5.9.2.2 IBM Ethernet Directory of the files required in a DOS image for the RIPL of standard IPX shells using LAN Support Program for an IBM Ethernet Adapter/A
IBMBIO COM 33446 11-29-91 12:00p DOS 5.0 with UR36603 IBMDOS COM 37378 11-29-91 12:00p DOS 5.0 with UR36603 COMMAND COM 48006 11-29-91 12:00p DOS 5.0 with UR36603 AUTOEXEC BAT 61 3-20-92 2:12p CONFIG SYS 179 3-20-92 2:12p DXMA0MOD SYS 4736 1-23-92 8:44a ] Lan Support Program Vl.25 DXME0MOD SYS 36736 1-23-92 8:45a ] Lan Support Program Vl.25 DXMT0MOD SYS 29696 1-23-92 8:43a ] Lan Support Program Vl.25 PROTMAN DOS 10657 1-23-92 8:46a ] Lan Support Program Vl.25 MACETH DOS 16624 7-17-91 12:00p ] IBM Ethernet Adapter/A Options vl.01 PROTOCOL INI 5120 3-01-91 10:00a ] ASCII text file - USER Modifiable PRO MSG 1392 1-23-92 8:46a ] Lan Support Program Vl.25 NETBIND EXE 15639 1-23-92 8:46a ] Lan Support Program Vl.25 IPX cor~ 24520 3-02-92 9:10a ] IPX: v3.10 (911121), LSP: v2.62 (91041 NETX COM 51201 7-31-91 10:47a ] Novell V3.10 (911205)
AUTOEXEC.BAT file used to generate a DOS image for 001 shells using LAN Support Program for an IBM Ethernet Adapter/A using either UAA or LAA:
@ECHO OFF PROMPT $p$g netbind i px netx
CONFIG.SYS file used with either 001 shells or standard IPX shells when the RIPLed DOS image uses LAN Support Program for an IBM Ethernet Adapter/A using a UAA:
FILES=20 BUFFERS=40 SHELL=COMMAND.COM /E:1024 /P device=PROTMAN.DOS /I:A:\ devi ce=MACETH. DOS device=DXMA0MOD.SYS 001 device=DXME0MOD.SYS
74 OS/2 and Netware RIPL

device=DXMT0MOD.SYS LASTDRIVE=G
PROTOCOL.INI file used with 001 shells when the RIPLed DOS image uses LAN Support Program for an IBM Ethernet Adapter/ A using a UAA or LAA:
; --------------------- Protocol Manager Definition -----------------------
[PROTOCOL_MANAGER] DriverName = PROTMAN$
IBM Ethernet Protocol Definition --------------------
[ETHERNET] DriverName = DXME0$
-------------- IBM PS/2 Adapter for Ethernet Networks -----------------
[IBt~AC] DriverName = MACETH$
The following 3 parameters are read from the POS registers on the adapter. Therefore, they are not needed and will be ignored.
IRQ = 3 RamAddress = 0xC800 IOBase = 8x200 ReceiveBuffers = 16 ReceiveChains = 16 MaxRequests = 18 MaxTransmits = 10 ReceiveBufSize = 256
If locally administered addresses are required, the "device = DXMEOMOD.SYS" line in the CONFIG.SYS file must be changed. If the trailing ",,1" parameter is omitted, the address bits will be swapped around.
device=DXME0MOD.SYS 400010010001,,1
5.10 Dual DOS RIPL Requester Environment It is possible to set up a DOS image containing both NetWare and DOS LAN requesters. The following points describe this process.
1. On the NetWare server, set up a DOS image which contains the LAN Support Program. An example of this is shown in 5.9.1.1, "Token-Ring" on page 71.
2. Bring up the workstation using the diskette version of this image.
The image should be tested to ensure they RIPL correctly. At this point, do not RIPL the workstation. Use the diskette that the image was DOSGENed from.
3. Login to the NetWare server.
The user 10 used at this point must have sufficient access rights to set up applications on the NetWare server.
4. Determine the drive letter a RAMDISK would use and map this drive to the NetWare server. This drive will be the target for installation of the DOS LAN Requester and must be mapped as a root drive.
Chapter 5. NetWare RIPL of DOS Images 75

The range of local drives is defined by the "LASTDRIVE" statement in the CONFIG.SYS. (In the above examples, LASTDRIVE = G, and therefore the local drives are A: through G:.)
MAP ROOT C:=SYS:APPS
5. The system will issue a warning which should be ignored.
Drive C is in use by a local drive. Do you want to assign it as network drive? (YIN) Y
6. Install the DOS LAN Requester from OS/2 LAN Server V2.0 diskettes on to the NetWare drive (drive C: in this example).
7. Once the DLR installation is complete, copy the following files from the C:\DOSLAN directory to the boot diskette.
INITFSI BAT 596 3-24-92 8:40a NETWORK1 CMD 12451 3-14-92 11:04a NETWORK2 CMD 15907 3-14-92 11:04a NETWORK3 CMD 3427 3-14-92 11:04a NET COM 13568 3-14-92 11:04a MSGPOPUP EXE 8671 3-14-92 11:04a MSGSRVR EXE 51591 3-14-92 11:04a REDIR33 EXE 103564 3-14-92 11:04a REDIR40 EXE 104476 3-14-92 11:04a XSI1 EXE 6901 2-12-92 7:30a XSI2 EXE 43451 3-14-92 11:04a XSI3 EXE 3265 3-14-92 11:04a NETWORK MSG 24540 3-14-92 11:04a DOSLAN INI 152 4-15-92 2:54p
8. Copy the DOS "RAMDRIVE.SYS" RAM-disk device driver to the boot diskette and add a line to the CONFIG.SYS on the boot diskette, so as to create a RAMDISK of SOOKS in extended memory.
DEVICE=RAMDRIVE.SYS 500 Ie This is required as a workaround, since DOSGEN cannot generate subdirectories within the DOS boot image file. The DLR files will be copied to this by the AUTOEXEC.BAT file.
9. Create a new AUTOEXEC.BAT file on the boot diskette as follows:
@ECHO OFF
76 OS/2 and Netware RIPL
PROMPT $p$g SET RI PL=YES if exist a:doskey.com DOS KEY md c:\doslan cd c:\doslan rem copy a:. c:\doslan > nul copy a:command.com c:\ > nul set comspec=c:\command.com copy net. com c:\doslan > nul copy network?* c:\doslan > nul copy msg*.exe c:\doslan > nul copy redir*.exe c:\doslan > nul copy xsi?exe c:\doslan > nul copy doslan.ini c:\doslan > nul copy initfsi.bat c:\doslan > nul copy netin.bat c:\ c: net start call initfsi

a: 1 s 1 a:lansup a:route a:ipxodi c:\netin
From this AUTOEXEC.BAT file, it can be seen that the DOSLAN directory is created from the root on the RAMDISK. All the DLR files contained in the DOS image, are then copied to that directory. The DLR is also started from this directory, and finally, the NetWare requester is started.
10. Create a special NETIN.BAT file to avoid problems with the DOS error "Batch File not found". DOS transfers to this batch file from the AUTOEXEC.BA T.
As can be seen in the AUTOEXEC.BAT above, the very last statement is NETIN.BAT. In the following example which lists NETIN.BAT, it is assumed that the NetWare user ID is USER1 and that the login script maps drive Z: to a directory on the same NetWare volume that the DOS LAN Requester was installed (in step 5 above).
Also, the following example assumes that the DLR was installed off the SYS:\APPS directory on that volume.
@ECHO OFF a:netx h:login userl z:\apps\c_root
11. Copy NETIN.BAT to the boot diskette.
12. Create the C ROOT batch file which branches from the NETIN.BAT batch file. This batch file performs the final step of replacing the temporary DLR files on the RAM DISK, with the actual files installed previously. The following shows the contents of the C_ROOT.BAT file:
@ECHO OFF MAP ROOT C:;Z:\APPS C: cd \doslan
13. Lastly use the DOSGEN utility to generate an image from the boot diskette used throughout this procedure. Store this image in the SYS:LOGIN directory, make it read-only and shareable.
You should now be able to RIPL from the newly created image and log on to the OS/2 LAN Server, then to the NetWare server.
If more than one user requires this functionality, the REP statement (4.6, "The BOOTCONF.SYS File" on page 58) can be used to modify the machine name within the DOSLAN.INI file. The REP statement forces the RIPL DOS Image to be modified as it is downloaded to the workstation.
Chapter 5. NetWare RIPL of DOS Images 77

78 OS/2 and Netware RIPL
Chapter 6. NetWare RIPL of OS/2 V1.30.2 Images
This chapter discusses how to set up a NetWare server to RIPL an OS/2 V1.30.2 image.
6.1 Setting up an OS/2 RIPL Image on a NetWare Server The method of setting up RIPL for OS/2 V1.30.2 is quite different from that used to set up RIPL for OS/2 V2.0. The final results, in terms of file server directory structure and the files set up on the file server, are very similar. The main difference between the two procedures is that with the RIPL of OS/2 V1.30.2, all the setting up is done manually. For the RIPL of OS/2 V2.0, the set up procedure has been completely automated.
Note: There are currently several restrictions associated with RIPL of OS/2 V1.30.2 from a NetWare server. For more information on these, refer to 6.12, "Known Restrictions to OS/2 V1.30.2 RIPL" on page 90.
6.1.1 RIPL of OS/2 V1.30.2 from a NetWare Server There are two versions of the Novell NetWare for OS/2 Requester Guide. The instructions for setting up remote boot are different in each.
Table 14. Versions of NetWare for OS/2 Requester Guide
100-000921-002 April 1991 Edition This manual contains good information, much of which is repeated in the following section.
183-000287 -001 March 1991 Edition This manual contains information which does not permit OS/2 to successfully RIPL.
The remote initial program load capability is designed for NetWare networks that have diskless DOS or OS/2 workstations. It also operates successfully on normal workstations which have a hard disk that is not the active partition, as set by FDISK.
In order to set up remote program load, you must first install the requester on a workstation and the OS/2 NetWare utilities on the file server. Each step is detailed in the following sections.
Plan ahead: The OS/2 Utilities occupy about 3.5MB of disk space on the SYS: volume. The files which comprise the RIPL OS/2 image fill about another 20MB of the SYS: volume. The SWAPPER.DAT files are also created by OS/2 remote boot users on the SYS: volume.
Be sure to allow for plenty of room on the SYS volume for all these files. If a small local hard disk is available which is large enough for the SWAPPER.DAT file, it could be used rather than the SYS: volume on the network. This would also help to cut down network traffic.
The following gives the prerequisites for a token-ring workstation using RIPL:
• IBM Token-Ring Adapter (AT bus or Micro Channel)
• The universal adapter address of the TOken-Ring Adapter
© Copyright IBM Corp. 1992 79

• IBM Token-Ring RIPL ROM.
The software used must be OS/2 V1.30.2 or a previous version of OS/2 V1.3 which has had CSD5050 applied. Also, the NetWare requester for OS/2 should have been installed and the NetWare Service Diskette, NSD004, should have been applied.
When these requirements have been met, the steps that must be followed to install the RI PL procedure are as follows. (Detailed procedures for each of these follows in the respective sections.)
1. Install OS/2 1.30.2 on the workstation 2. Install the NetWare OS/2 Requester on workstation and apply NSD004 3. Install the OS/2 Utilities on the file server 4. Copy OS/2 to the file server 5. Prepare the OS/2 RIPL image on the file server.
6.2 Installing OS/2 V1.30.2 on a Workstation Using the instructions supplied with OS/2 V1.30.2, install OS/2 on the workstation. You may also install an earlier version of OS/2 V1.3 and apply CSD WR05050.
Note: Do not install Communications Manager or LAN Requester.
Follow the prompts in the install program to install OS/2 Standard Edition V1.30.2.
6.3 Updating the NetWare Requester for OS/2 V1.3 Diskette In order to install the NetWare requester for OS/2 on the workstation, the following steps must be completed.
Note: It is not necessary to install the NetWare OS/2 Requestor code from the original NetWare diskettes. Instead, an updated NetWare Requester diskette can be made:
1. Make a diskcopy of the original diskette. This copy must have the volume label "Requester".
2. Obtain a copy of the packed NSD004.zip or NSD004.exe (or later) file from Netwire or HONE Library.
3. Unpack the NSD004 file over the copy of the NetWare OS/2 Requester diskette using the DOS command:
C:\>PKUNZIP -ad NSD884.zip a:\ *.* or
C:\>NSD884.exe -ad a:\ *.*
Note: There are spaces between the a:\ and the *.* in both commands.
This procedure creates an updated NetWare requester for OS/2 diskette or NSD004 Requester diskette.
80 OS/2 and Netware RIPL
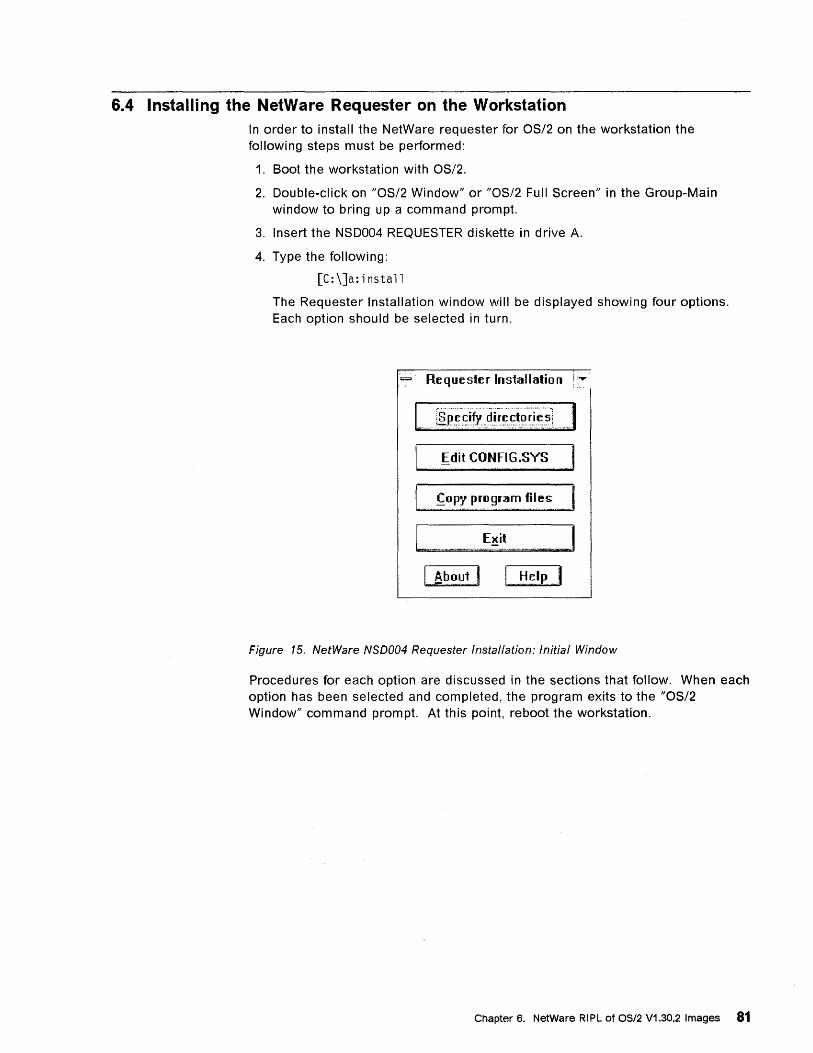
6.4 Installing the NetWare Requester on the Workstation In order to install the NetWare requester for OS/2 on the workstation the following steps must be performed:
1. Boot the workstation with OS/2.
2. Double-click on "OS/2 Window" or "OS/2 Full Screen" in the Group-Main window to bring up a command prompt.
3. Insert the NSD004 REQUESTER diskette in drive A.
4. Type the following:
[C:\Ja:install
The Requester Installation window will be displayed showing four options. Each option should be selected in turn.
~ Requester Insial/fllion i ~
I fdit CONFIG.SYS I I ~opy program files I I E~it _I .. 1'¥::I:l:lil;2 zz:::.:::~;llt;0' iI:;=l3~ I ", Oli=;S:;;'~Iil:W·Bl~i.ti·_
I ,Aboui I Help
Figure 15. NetWare NSD004 Requester Installation: Initial Window
Procedures for each option are discussed in the sections that follow. When each option has been selected and completed, the program exits to the "OS/2 Window" command prompt. At this point, reboot the workstation.
Chapter 6. NetWare RIPL of OS/2 V1.30.2 Images 81

6.4.1 Specify Program-File Directories
Specify Directories
Driver directory I C:\NElWARE ~==============~
DLL directory I C:\NElWARE ~==============~
Program directory IL-C_:\_N_E_lW_A_R_E ______ ---I
Source drive ~
OK I I Cancel I I Help
Figure 16. NetWare NSD004 Requester Installation: Target Directories
The target directories specified during the installation are created if they do not already exist. The directory C:\NETWARE is the default, and must be used if RIPL is to be supported. The normal usage of each of these directories is shown in the following table:
Table 15. Directory Usage for RIPL Support
Directory Usage
Driver Directory The NetWare requester device drivers (*.SYS) are placed in this directory. All NetWare Device Driver statements added to CONFIG.SYS have this as their path.
DLL Directory The NetWare DLL files are placed in this directory. This is automatically appended to the LlBPATH statement in the CONFIG.SYS.
Program Directory All of the NetWare requester *.EXE files are placed in this directory. It is automatically appended to the DPATH statement in the CONFIG.SYS. All NetWare Program daemons run by the CONFIG.SYS have this as their path.
6.4.2 Modifying CONFIG.SYS The following steps must be completed to modify the CONFIG.SYS:
The directories you specified in the previous section (see 6.4.1, "Specify Program-File Directories") are automatically added to the .DLL path (LlBPATH) and Data path (DPATH). A device driver must be selected, and the CONFIG.SYS saved by clicking on the "OK" button.
82 OS/2 and Netware RIPL
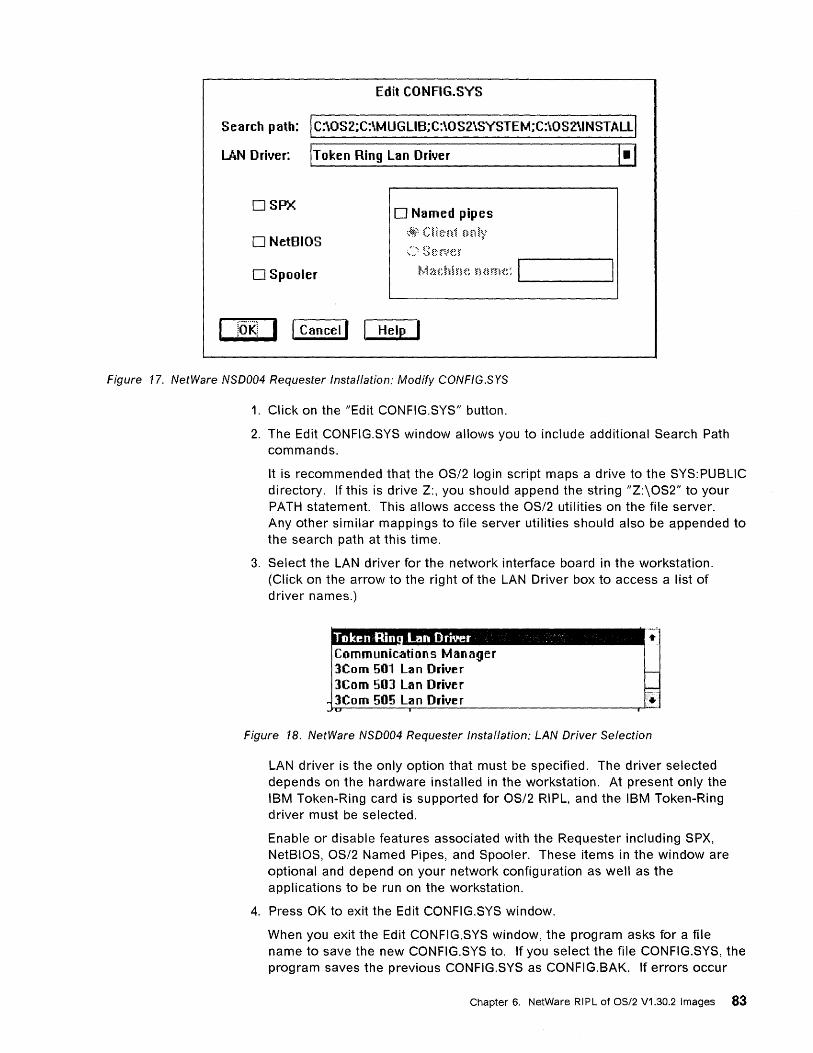
Edit CONFIG.SYS
Search path: I C:\OS2;C:\MUGLlB;C:\OS2\SYSTEM;C:\OS2\INSTALll
LAN Driver: IToken Ring Lan Driver [-,
DSPX
o NetBIOS
o Spooler
D Named pipes
:..W\ CPe·ni nrdy
fO'Kj I I Cancel I Help
Figure 17. NetWare NSD004 Requester Installation: Modify CONFIG.SYS
1. Click on the "Edit CONFIG.SYS" button.
2. The Edit CONFIG.SYS window allows you to include additional Search Path commands.
It is recommended that the OS/2 login script maps a drive to the SYS:PUBLIC directory. If this is drive 2:, you should append the string "2:\OS2" to your PATH statement. This allows access the OS/2 utilities on the file server. Any other similar mappings to file server utilities should also be appended to the search path at this time.
3. Select the LAN driver for the network interface board in the workstation. (Click on the arrow to the right of the LAN Driver box to access a list of driver names.)
Communications Manager lCom 501 L3n Driver 3Com 503 Lan Driver lCom 50!) L3n Driver
Figure 1 B. NetWare NSD004 Requester Installation: LAN Driver Selection
LAN driver is the only option that must be specified. The driver selected depends on the hardware installed in the workstation. At present only the IBM Token-Ring card is supported for OS/2 RIPL, and the IBM TOken-Ring driver must be selected.
Enable or disable features associated with the Requester including SPX, NetBIOS, OS/2 Named Pipes, and Spooler. These items in the window are optional and depend on your network configuration as well as the applications to be run on the workstation.
4. Press OK to exit the Edit CONFIG.SYS window.
When you exit the Edit CONFIG.SYS window, the program asks for a file name to save the new CONFIG.SYS to. If you select the file CONFIG.SYS, the program saves the previous CONFIG.SYS as CONFIG.BAK. If errors occur
Chapter 6. NetWare RIPL of OS/2 V1.30.2 Images 83

during processing of the new CONFIG.SYS, during reboot of the system, this backup copy may be used to bring up the system in its state, prior to loading the NetWare requester.
6.4.3 Copy the Requester Program Files to Your Hard Drive To complete installing the requester code on your workstation, select "Copy Program Files" from the installation main menu, and start copying the files.
The installation program prompts with a confirmation screen prior to actually copying the requester files.
Copy Program Files
Copy Drivers to: Copy DLLs to:
Copy Programs to:
C:\NET¥lARE
C:\NET¥lARE
C:\NETWARE
Help
Figure 19. NetWare NSD004 Requester Installation: File Transfer
1. Click on the "Copy program files" button
2. Click on "Start" to begin copying the requester files to the specified destination at the workstation
3. Follow the prompts until installation is complete.
Exit Install
Machine must be
rebooted for changes
to take effect.
I [ok] I I Cancel I
Figure 20. NetWare NSD004 Requester Installation: Exit Screen
6.4.4 Starting the Requester The first step is to reboot the workstation. This ensures that:
a. The NetWare requester has been properly configured
b. To allow access to a NetWare server.
84 OS/2 and Netware RIPL

6.4.5 Installing NetWare Utilities For 05/2 on the File Server The procedure in this section explains how to install NetWare OSI2 utilities on the file server so that they can be accessed by the workstation.
Each workstation must be able to access the OS/2 compatible NetWare utilities. You can copy these utilities to your hard disk, but we recommend you put them on the file server. Use the preferred server option in your NET.CFG so the file server you first attach to will have these utilities installed. After the utilities have been installed, copy the utilities from the SYS:LOGIN\OS2 directory to your C:\NETWARE directory.
OS/2 cannot use DOS utilities. Consequently, NetWare utilities written for DOS do not work for a workstation running OS/2.
1. Boot the OS/2 workstation if necessary
2. Double-click on "Main" in the Desktop Manager window
3. Double-click on "OS/2 Full Screen" in the Group-Main window.
A prompt similar to the following appears:
[C:]
4. Insert the OS2UTIL-1 diskette in drive A. If you have already installed the NetWare for OS/2 utilities in a directory on another file server or hard disk, you can also map a drive to that directory.
5. Type the command as follows:
A:LOGIN server_name\supervisor
Replace server_name with the name of the file server on which you want to install the NetWare utilities for OS/2. For example, if the name of the server were "NETWARE-311_SERVER", you would type the following:
A:LOGIN NETWARE-311_SERVER\superv;sor
The default LOGIN SCRIPT maps drive 0: to the SYS: volume.
6. Create a SYS:LOGIN/OS2 directory on the file server by typing:
md D:\login\os2
7. Create a SYS:PUBLIC/OS2 directory on the file server by typing:
md D:\public\os2
8. Map drive L to SYS:LOGIN/OS2 by typing:
MAP L:=SYS:LOGINjOS2
9. Map drive P to SYS:PUBLIC/OS2 by typing:
MAP P:=SYS:PUBLICjOS2
10. Change to the A drive containing the OS2UTIL-1 diskette and type the following:
servinst
11. Follow the prompts to install the OS/2 utilities.
12. Assign shareable and read-only rights to the utilities in SYS:LOGIN/OS2 by typing the following command:
fl ag L: *. * sro
Chapter 6. NetWare RIPL of OS/2 V1.30.2 Images 85
13. Assign shareable and read-only rights to the utilities inSYS:PUBLIC/OS2 by typing the following command: "
f1 ag P:*. * sro
14. Use the SYSCON utility to add the following mapping to the system login script to provide access to the OS/2 utilities for anyone who uses OS/2 workstations on the server:
map L:=sys:public
6.5 Copying OS/2 to the File Server Use the following steps to copy OS/2 from the workstation where you just installed it, to the file server:
1. Use File Manager to clear the "HRS" flags on the copy OS2KRNL and OS2LDR files
2. Boot the workstation from a DOS diskette
3. Load the DOS NetWare requester shells (lPX.com, and NETX.com)
4. Log in to the file server as supervisor
5. From the DOS prompt, map a drive to the SYS: volume by typing a command similar to the following:
map N:= server_name\sys:
6. Create an RPL directory on the file server by typing a command similar to the following:
md N: rpl
Note: During the requester's installation on the hard disk, program files must have been copied to the default C:\NETWARE directory. If the program files were copied to a destination other than the C:\NETWARE directory, the RIPL of the OS/2 image does not work.
7. Copy all the files (and subdirectory structure) from the workstation's root directory (C:) to the file server's SYS:RPL directory.
xcopy C:\*.* N:\RPL Isle 8. From the OS/2 Installation Diskette, coPy the ABIOS.SYS file and all the files
with the extension of *.BIO.
COpy A:\ABIOS.SYS N:\RPL COPY A:\*.BIO N:\RPL
6.6 Preparing the File Server 1. Map a drive to the SYS:LOGIN directory on the file server by typing a
command similar to the following:
map 0:= server_name\sys:log,in
2. Insert the NSD004 Requester diskette in the A: drive and type the following:
copy a:\rpl\tokenrpl.sys 0: copy a:\rpl\mini.ifs n:\rpl
3. Create a RPL \COMPUTER directory .on the >file server by typing the following:
md n:rpl\computer
86 OS/2 and Netware RIPL
4. In SYS:RPL \COMPUTER, create a subdirectory for each workstation using RIPL.
The name of each subdirectory must be based on the node address. For example, if a workstation has an address of 10005A123456, you would type a command as follows:
md n:rpl\computer\0005A123.456
The "1" in the address is omitted so that the name conforms to the 8-character limit for directory names.
5. In the subdirectory for each station, create an ASCII text file named CONFIG.WSS. The purpose of this file is to specify a user name and provide file location information.
The following is an example of a CONFIG.WSS file:
USERNAME RPLUSER c:\config.sys c:\user\rpluser\config.sys c:\os2\os2.ini c:\user\rpluser\os2.ini c:\os2\os2sys.ini c:\user\rpluser\os2sys.ini
Note: USER NAME RPLUSER is case sensitive.
The first line in CONFIG.WSS specifies the user name. Each station has a user name associated with it. In our example, it's RPLUSER. The remaining lines specify the location of the files listed. This ensures that each workstation accesses the desired files, such as those constituting the workstation's OS/2 environment.
6. For each station/user, create a directory for the files referenced in the CONFIG.WSS file:
md n:\rpl\user md n:\rpl\user\rpluser
If at some later time, some other application requires non-sharable rights to some files or directories, these may also be added to CONFIG.WSS. The CONFIG.WSS acts as a general-purpose redirection specification.
7. Copy the files into that directory by typing a command as follows:
copy n:\rpl\config.sys n:\rpl\user\rpluser copy n:\rpl\os2\o*.ini n:\rpl\user\rpluser
8. Edit the CONFIG.SYS file in the user subdirectory. Change the SWAPPATH statement to reference the user subdirectory:
SWAPPATH=C:\USER\RPLUSER 512
Note: Do not include the SYS:\RPL in the SWAPPATH statement.
9. Move to the SYS:LOGIN directory
10. Use a text editor to create the BOOTCONF.SYS file in the SYS:LOGIN directory.
The BOOTCONF.SYS file, located in the SYS:LOGIN directory, provides the file name of the boot image for each station that remote boots. For each station, a line should exist containing the LAN address (network number) and the station address (universal address). Any station not listed in the BOOTCONF.SYS file will default to the file NET$OOS.SYS.
IMPORTANT: The boot image for OS/2 is TOKENRPL.SYS. You do not create this file; it was copied from the requester diskette. For example, station 10005A123456, requires a LAN address. Since this number comes
Chapter 6. NetWare RIPL of OS/2 V1.30.2 Images 87
from the server connected to the station, see the configuration information about the file server for this number. In this example, the network number bound with IPX to the TOKEN driver is 00001 BOO. The line in the BOOTCONF.SYS is:
0x00001B00,10005A123456=TOKENRPL.SYS
Note: If you have multiple file servers on your network, copy the remote boot image files onto each file server that may come up as the remote boot workstation's default server. If the default server is busy when a remote boot workstation boots, the next available file server becomes the default server.
If the file server already has a BOOTCONF.SYS file in SYS:LOGIN, you can't create another one. Add the new entries to the existing file through your text editor.
In BOOTCONF.SYS, include a line for each remote boot station that you have, using a entry format consisting of the following:
• Ox (the number zero plus x)
• The network address
• A comma (,)
• The node or station address
• An equal sign (=)
• The boot disk image file name (TOKENRPL.SYS).
A line for a token-ring remote boot image file looks similar to the following:
Ox00001B00,10005a123456=TOKENRPL.SYS
11. At the file server console, type the following:
load rpl.nlm bind rpl to token
6.7 NetWare Rights 1. Flag the *.SYS files in SYS:LOGIN as shareable by typing the following
command:
FLAG *.SYS S
2. Use SYSCON to create a user account named RPL. Grant RF rights to the RPL user name for the SYS:RPL directory:
SYS: RPL (R F)
3. Use SYSCON to create a user ID for each user name in the CONFIG.WSS files. There is a CONFIG.WSS file for each station. For each user, grant the following rights:
88 OS/2 and NetwareRIPL
SYS:RPL\USER\user_name (ALL RIGHTS) SYS:RPL (R F) SYS:RPL\COMPUTER\0005A123.456 (ALL RIGHTS)
etc ...
Replace User_name with the workstation's user name specified in the CONFIG.WSS file.
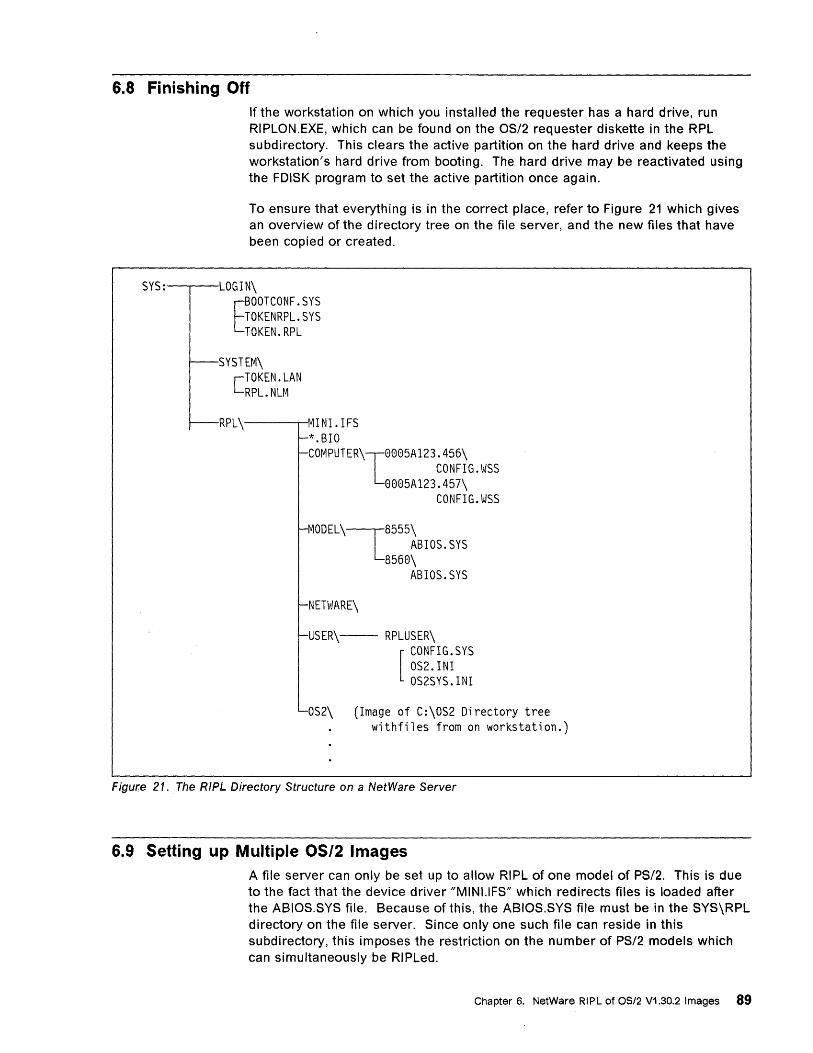
6.8 Finishing Off If the workstation on which you installed the requester has a hard drive, run RIPLON.EXE, which can be found on the OS/2 requester diskette in the RPL subdirectory. This clears the active partition on the hard drive and keeps the workstation's hard drive from booting. The hard drive may be reactivated using the FOISK program to set the active partition once again.
To ensure that everything is in the correct place, refer to Figure 21 which gives an overview of the directory tree on the file server, and the new files that have been copied or created.
SYS: LOGIN\
EBOOTCONF.SYS TOKENRPL.SYS TOKEN.RPL
r--SYSTEM\
[ TOKEN. LAN RPL.NLM
~RPL\---r-IMINI. IFS --*.BIO --COMPUTER\18885A123.456\
CONFIG.WSS 8885A123.457\
CONFIG. \JJSS
~MODEL\L8555\ ABIOS.SYS
8568\ ABIOS.SYS
~NETWARE\
--USER\-- RPLUSER\
[ CONFIG. SYS OS2.INI OS2SYS.INI
--OS2\ (Image of C:\OS2 Directory tree withfiles from on workstation.)
Figure 21. The RIPL Directory Structure on a NetWare Server
6.9 Setting up Multiple OS/2 Images A file server can only be set up to allow RIPL of one model of PS/2. This is due to the fact that the device driver "MINI.IFS" which redirects files is loaded after the ABIOS.SYS file. Because of this, the ABIOS.SYS file must be in the SYS\RPL directory on the file server. Since only one such file can reside in this subdirectory, this imposes the restriction on the number of PS/2 models which can simultaneously be RIPLed.
Chapter 6. NetWare RIPL of OS/2 V1.30.2 Images 89

To set up the file server to RIPL different models of PS/2, all of the BIOS patch files must be copied to the SYS:RPL from the OS/2 installation diskettes and CSD install diskettes. The ABIOS.SYS file can then be edited for the required PS/2 model.
Refer to Appendix B, "BIOS Patch Files Used by OS/2" on page 117 for a table which shows which modules are listed in each of the ABIOS.SYS files for each IBM system.
6.10 Using Locally Administered Addresses The OS/2 RIPL image uses two connections to the file server. The first connection always uses the universally administered address. This is the connection the RIPL process starts from. Once the RIPL process has completed, and the workstation is operating, ? user can log in using the second connection.
According to Novell, locally administered addresses are supported on this second connection. It has been found that this feature depends on the versions of LAN drivers, RPL bootstrap code, and TOKENRPL.SYS modules in use. It has been shown to work.
With the revisions of code quoted in Appendix A, "Software Revision List" on page 113 however, this feature does not work.
The LAA is set by specifying a node address parameter in the link driver section within the SYS:RPL \NET.CFG. file.
Link Driver TOKEN NODE ADDRESS 400010010001
6.11 Bridging Considerations There is currently a fault with the ROUTE.SYS module which prevents it from being loaded on a RIPLed workstation. Because of this, RIPL of an OS/2 V1.30.2 image cannot be carried out across an IBM source routing bridge.
6.12 Known Restrictions to OS/2 V1.30.2 RIPL The following list gives the currently known restrictions on RIPL of OS/2 V1.30.2 from a NetWare server. This list is likely to change as more restrictions become known, or as Novell fixes some of these problems:
• Only OS/2 V1.30.2 Standard Edition with the "NSD003" or later, NetWare requester (or later) for OS/2 is supported. Nothing else works, as yet.
• All NetWare requester drivers, DLLs and programs must be installed in the default C:\NETWARE drive.
• Source routing is not supported.
• IBM Ethernet cards are not supported.
• Only one model of PS/2 may be RIPLed at a time. Multiple PS/2s can simultaneously RIPL OS/2, but they must all be of the same type. Only one ABIOS.SYS file is accessible.
• If SPX connections are required, the SPS.SYS device driver must be loaded after the NWREQ.IFS device driver.
90 OS/2 and Netware RIPL

This restriction is due to the fact that the PSX.SYS driver has similar problems as the ROUTE.SYS driver when they are used in a RIPL workstation.
6.13 Troubleshooting Occasionally, if you have an older version of OS/2, some files (such as NETAPI.DLL) may not copy during installation. If this happens, you may need to boot up DOS and copy the file or files manually. If your workstation will only boot in OS/2, then delete the LlSPATH references to the requester in the CONFIG.SYS file, reboot the machine, and install the requester again.
You may want to copy the ATTACH, LOGIN, MAP, and SLiST utilities to your hard disk in case you attach to a server that does not have OS/2 utilities. If you want to use only one server, install the OS/2 utilities on that server and set up the preferred server option on your workstation (see page 32 of the NetWare Requester for OS/2 manual).
There are several ways in which problems can arise when attempting to RIPL OSI2 V1.3. The first item to check is that all of the pieces used in the RI PL process are at the correct revisions to allow the operation to be carried out.
Appendix A, "Software Revision List" on page 113 gives the current known revisions of each of the components which are known to work.
Chapter 6. NetWare RI PL of OS/2 V1.30.2 Images 91

92 OS/2 and Netware RIPL
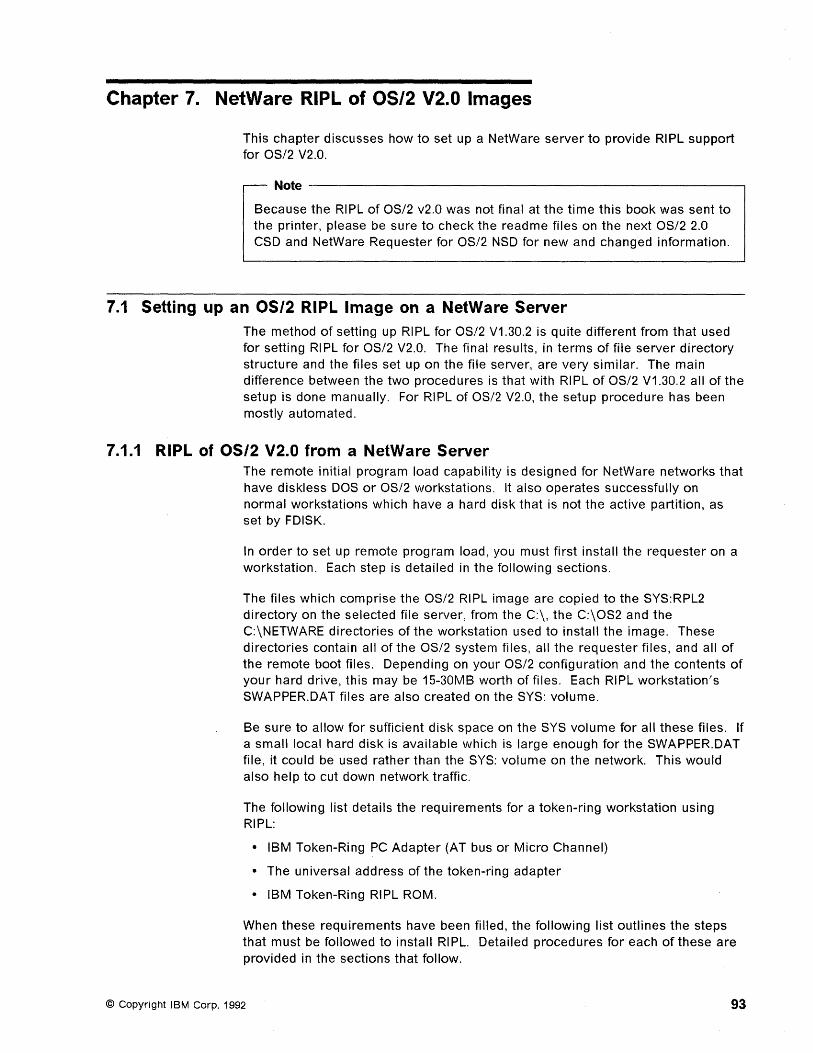
Chapter 7. NetWare RIPL of OS/2 V2.0 Images
This chapter discusses how to set up a NetWare server to provide RIPL support for OS/2 V2.0.
Note ----------------------------------------------------~
Because the RIPL of OS/2 v2.0 was not final at the time this book was sent to the printer, please be sure to check the readme files on the next OS/2 2.0 CSD and NetWare Requester for OS/2 NSD for new and changed information.
7.1 Setting up an OS/2 RIPL Image on a NetWare Server The method of setting up RIPL for OS/2 V1.30.2 is quite different from that used for setting RIPL for OS/2 V2.0. The final results, in terms of file server directory structure and the files set up on the file server, are very similar. The main difference between the two procedures is that with RIPL of OS/2 V1.30.2 all of the setup is done manually. For RIPL of OS/2 V2.0, the setup procedure has been mostly automated.
7.1.1 RIPL of OS/2 V2.0 from a NetWare Server The remote initial program load capability is designed for NetWare networks that have diskless DOS or OS/2 workstations. It also operates successfully on normal workstations which have a hard disk that is not the active partition, as set by FDISK.
In order to set up remote program load, you must first install the requester on a workstation. Each step is detailed in the following sections.
The files which comprise the OS/2 RIPL image are copied to the SYS:RPL2 directory on the selected file server, from the C:\, the C:\OS2 and the C:\NETWARE directories of the workstation used to install the image. These directories contain all of the OS/2 system files, all the requester files, and all of the remote boot files. Depending on your OS/2 configuration and the contents of your hard drive, this may be 15-30MB worth of files. Each RIPL workstation's SWAPPER.DAT files are also created on the SYS: volume.
Be sure to allow for sufficient disk space on the SYS volume for all these files. If a small local hard disk is available which is large enough for the SWAPPER.DAT file, it could be used rather than the SYS: volume on the network. This would also help to cut down network traffic.
The following list details the requirements for a token-ring workstation using RIPL:
• IBM Token-Ring PC Adapter (AT bus or Micro Channel)
• The universal address of the token-ring adapter
• IBM Token-Ring RIPL ROM.
When these requirements have been filled, the following list outlines the steps that must be followed to install RI PL. Detailed procedures for each of these are provided in the sections that follow.
© Copyright IBM Corp. 1992 93
1. Install OS/2 V2.0 on workstation 2. Install the NetWare Requester for OS/2 V2.0 on the workstation 3. Copy OS/2 to the file server 4. Prepare the OS/2 RIPL image on the file server.
7.2 Installing OS/2 V2.0 on a Workstation Using the instructions supplied with OS/2 V2.0, install OS/2 on the workstation.
7.3 Installing the NetWare Requester on the Workstation
7.3.1 The OS/2 V2.0 NetWare Installation utility In order to install the NetWare Requester for OS/2 V2.0 on the workstation all steps in this section must be completed.
1. Boot the workstation with OS/2
2. Open an "OS/2 Window" or "OS/2 Full Screen" to bring up a command prompt
3. Insert the NetWare Requester for OS/2 V2.0 diskette in drive A
4. Type the following:
[C:\Ja:install
The install utility will then bring up the installation main menu screen as shown in Figure 22.
~ HetWare'RequesterforOSlllnstallation Utility II Installation Confi uratiun ReadMe! Help
The NetWare Requester for OS/2 has been installed on th~s workstation and is currently running.
* To reinstall the Requester, select "Requester on workstation" from the "Installation" menu
* To configure the Requester, select ''This workstation" from the "Configuration" menu
* To install NetWare utilities for OS/2 on the file server, select "Utilities on server" from the IIlnstaliation" menu
* To install remote initial program load (RIPL) files for workstations without hard disks, select "Remote workstations" from the "Installation" menu
* To configure the Requester for workstations without hard disks. select "Remote workstations" from the "Configuration" menu
NOTE: You can click on Readme! in the menu at the top of this screen to display any Readme files that were shipped with this version uf the Requester.
Figure 22. NetWare Requester Installation
5. From this screen, select the "Installation" item from the action bar to obtain a pull-down menu of selection options:
• Requester on workstation
94 OS/2 and Netware RIPL

• NSD on workstation • Remote workstations ... • NetWare for OSI2
6. The installation program will guide you through the steps required to install the requester on the workstation. Installing the requester requires three steps:
a. Select the target and source drives for the requester files as described in 7.3.2, "Select Target and Source Drives for Requester Files" on page 96.
b. Edit CONFIG.SYS and copy files, described in 7.3.3, "Edit CONFIG.SYS and Copy Files" on page 96.
In the CONFIG.SYS file, you specify NIC drivers, select protocols, and construct the search path.
c. Copy the requester files.
All requester files are copied to the destination you specified. The files for the NetWare user tools and the RPRINTER utility are also copied to this destination.
When the requester is installed, its core components and LAN drivers are automatically loaded in the CONFIG.SYS file. The CONFIG.SYS, LlBPATH and DPATH and PATH variables are also modified to include the directory containing requester files. You can customize the installation to load "Non-Core Components".
Non-Core Components of NetWare Requester
• Network Interface Card driver:
Click on the arrow at the right of the LAN driver box and select a driver with the same name as the network interface card in your workstation. To install a third-party driver not shipped with the requester, click in the LAN driver text entry field and type the file name of the driver. You will be prompted for a location to install the driver from.
• SPX support:
Click on this box if you want to use network printing, named pipes, or applications that use the SPX protocol.
• NetBIOS support:
Click on this box if you want to use applications that use the NetBIOS protocol. Do not click on this box if you are already running IBM NetBIOS on this workstation.
• MVDM support:
Click on this box if you want to access a NetWare network from a virtual DOS or Windows session. Also click on this box if you want support for the IPX protocol in a virtual DOS or Windows session.
• Named Pipes support:
Click on this box if you want to use applications that use the named pipes protocol. Click on the client-only box if you want your workstation to be a named pipes client. Click on server box and type a 1-16 character name if you want your workstation to be a named pipes server.
Chapter 7. NetWare RIPL of OS/2 V2.0 Images 95·

After the code has been installed, the program returns to the Install Utility main menu screen. From here you may return to the "OS/2 Window" command prompt, and then reboot the workstation.
7.3.2 Select Target and Source Drives for Requester Files 1. Select the "Installation" item from the action bar of the main installation
menu to obtain a pull-down menu of selection options.
2. Select "Requester on Workstation ... " from the pull-down menu.
The installation utility displays the following screen:
Set Target Directory
Target directory for the Requester files:
IC:\NETWARE
Source drive:
Cancel Help
Figure 23. OS/2 V2.0 NetWare Requester Installation: Target Directories
3. Accept the default target directory of C:\NETWARE.
By default, requester files are copied to the C:\NETWARE directory.
Note: Because the remote initial program load files are being installed from this workstation, the default target directory (C:\NETWARE) for the requester files must be selected.
4. Make sure the source drive shown is the one you want to copy from. If the source drive is not correct, type a new drive letter.
If the source you are installing from is a network drive: the directory structure of the network drive must be exactly the same as the directory structure on the requester and utilities diskettes. Specify the network drive as the source drive.
7.3.3 Edit CONFIG.SYS and Copy Files After selecting the target and source directories, the install program will display a menu asking for the type of installation required (see Figure 24 on page 97).
96 OS/2 and Netware RIPL
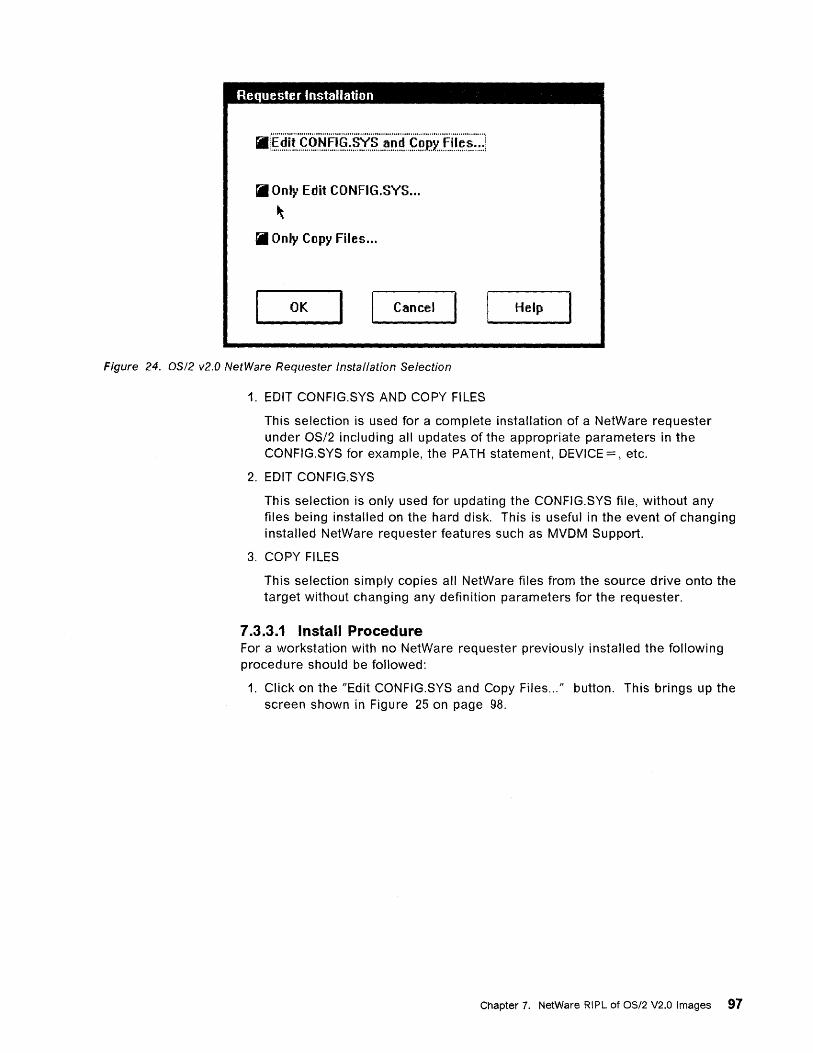
Requester Installation
iii Only Edit CONFIG.SYS ...
~
iii Only Copy Files ...
OK Cancel
Figure 24. OS/2 v2.0 NetWare Requester Installation Selection
Help
1. EDIT CONFIG.SYS AND COpy FILES
This selection is used for a complete installation of a NetWare requester under OSI2 including all updates of the appropriate parameters in the CONFIG.SYS for example, the PATH statement, DEVICE =, etc.
2. EDIT CONFIG.SYS
This selection is only used for updating the CONFIG.SYS file, without any files being installed on the hard disk. This is useful in the event of changing installed NetWare requester features such as MVDM Support.
3. COpy FILES
This selection simply copies all NetWare files from the source drive onto the target without changing any definition parameters for the requester.
7.3.3.1 Install Procedure For a workstation with no NetWare requester previously installed the following procedure should be followed:
1. Click on the "Edit CONFIG.SYS and Copy Files ... " button. This brings up the screen shown in Figure 25 on page 98.
Chapter 7. NetWare RIPL of OS/2 V2.0 Images 97

Select Options For CONFIG.SYS
Network Interface Card driver: II te) 3 i ~1:«1' ........................................................ , .. , '11
III SPX Support for OS/2 Sessions
III NetBIOS Emulation for OS/2 Sessions
[II NetWare Support for Virtual DOS Sessions
!iii Remote Named Pipes Support
Save ... Cancel Help
Figure 25. OS/2 v2.0 Select Options for CONFIG.SYS
2. Select the TOKEN.SYS LAN driver as the network interface card driver for the workstation. (Click on the arrow to the right of the LAN Driver box to access a list of driver names. See Figure 26.)
3C501.SYS 3C503.SYS 3C505.SYS 3C523.SYS EXOS205T.SYS EXOS215T.SYS LANSHARE.SYS NE2-32.SYS NE2.SYS NE1000.SYS NE1500T.SYS NE2000.SYS NE2100.SYS NE3200.SYS PCN2L.SYS TOKEN.SYS TRXNET.SYS TRXNET2.SYS
Figure 26. NetWare Requester NIC Drivers Available for OS/2 V2.0
98 OS/2 and Netware RIPL
Network interface card driver is the only option that must be specified. The driver selected depends on the hardware installed in the workstation. At
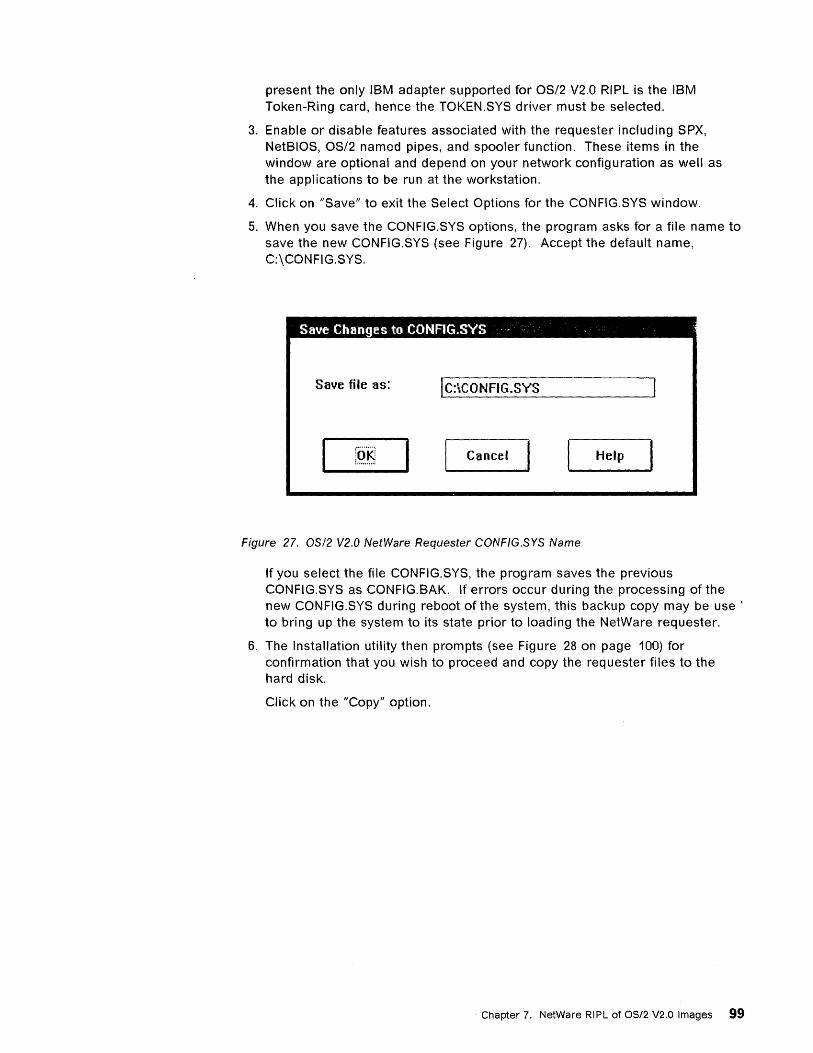
present the only IBM adapter supported for OS/2 V2.0 RIPL is the IBM TOken-Ring card, hence the TOKEN.SYS driver must be selected.
3. Enable or disable features associated with the requester including SPX, NetBIOS, OS/2 namod pipes, and spooler function. These items in the window are optional and depend on your network configuration as well as the applications to be run at the workstation.
4. Click on "Save" to exit the Select Options for the CONFIG.SYS window.
5. When you save the CONFIG.SYS options, the program asks for a file name to save the new CONFIG.SYS (see Figure 27). Accept the default name, C:\CONFIG.SYS.
Save Changes to CONFIG.SYS "
Save file as: IC:\CONFIG.SYS
Cancel Help
Figure 27. OS/2 V2.0 NetWare Requester CONFIG.SYS Name
If you select the file CONFIG.SYS, the program saves the previous CONFIG.SYS as CONFIG.BAK. If errors occur during the processing of the new CONFIG.SYS during reboot of the system, this backup copy may be use I
to bring up the system to its state prior to loading the NetWare requester.
6. The Installation utility then prompts (see Figure 28 on page 100) for confirmation that you wish to proceed and copy the requester files to the hard disk.
Click on the "Copy" option.
Chapter 7. NetWare RIPL of OS/2 V2.0 Images 99

Copy Requester Files
Requester files will copy to:
C:\NETWARE
Cancel Help
Figure 2B. OS/2 V2.D NetWare Requester Target Directory Confirmation
The installation program then copies all of the files from the source to the target directory.
7. The workstation must now be rebooted. This ensures that:
a. The NetWare requester has been properly configured
b. Access is allowed to a NetWare server.
7.3.3.2 Installation Hints 1. Install NetWare Requester for OS/2.
2. Check that the following changes have been made to your CONFIG.SYS file:
100 OS/2 and Netware RIPL
• The UBPATH statement points to the directory where the NetWare requester has been installed (Default = C:\NETWARE).
• The PATH statement points to the L:\OS2 subdirectory. The L: drive is the default drive where the NetWare OS/2 utilities are installed on the NetWare server.
The following is a modified and annotated CONFIG.SYS file used for a NetWare requester under OS/2 V2.0.
LIBPATH=.;C:\OS2\DLL;C:\OS2\MDOS;C:\;C:\OS2\APPS\DLL;C:\NETWARE;
SET PATH=C:\OS2;C:\OS2\SYSTEM;C:\OS2\MDOS\WINOS2;C:\OS2\INSTALL; : \; C: \OS2\MDOS;C: \OS2\APPS; L: \OS2; C: \NETVJARE;
REM --- NetWare Requester statements BEGIN ---
DEVICE=C:\NETWARE\LSL.SYS
The LSL driver lays the foundation for the other 001 drivers and must be loaded before any other NetWare driver.
RIJN=C: \NETVJARE\DDAEMON. EXE DEVICE=C:\NETWARE\TOKEN.SYS

The TOKEN.SYS is the LAN device driver and must match the installed LAN adapter.
DEVICE;C:\NETWARE\ROUTE.SYS
ROUTE.SYS is the driver used in conjunction with the token-ring driver to allow access to servers via a bridge.
DEVICE=C:\NETWARE\IPX.SYS
This IPX driver must be loaded right after the 001 LAN driver.
DEVICE=C:\NETWARE\SPX.SYS
This SPX.SYS driver is optional, but must be loaded if you want to use LAN printing facilities and named pipes.
RUN=C:\NETWARE\SPDAEMON.EXE rem DEVICE=C:\NETWARE\NMPIPE.SYS
This is the named pipe driver for client only. It must be loaded directly after the SPX driver.
rem DEVICE=C:\NETWARE\NPSERVER.SYS
This is the driver for named pipe servers. It is loaded together with the NMPIPE.SYS driver.
rem RUN=C: \NETIIJARE\NPDAEMON. EXE NP _ COMPUTERNAME
The NPOAEMON.EXE must be run for the configuration of named pipes. If it is configured as a named pipes server, specify a server name.
DEVICE=C: \NEnJARE\NWREQ. SYS
This NWREQ.SYS is the NetWare requester driver and must be loaded after IPX, SPX and named pipes.
IFS=C:\NETWARE\NWIFS.IFS
NWIFS.IFS is the installable file system for NetWare and must be loaded after the NWREQ driver.
RUN=C: \ NEnJARE\ NWDAEMON. EXE rem DEVICE=C:\NETWARE\NETBIOS.SYS
This is the NetSIOS driver for NetWare. Do not load this driver if you are running in an Extended Services or OS/2 LAN Server environment.
rem RUN=C:\NETWARE\NBDAEMON.EXE rem DEVICE=C:\NETWARE\VIPX.SYS
This VIPX.SYS driver is optional and must be loaded if the DOS shell is required in a DOS session.
RUN=C:\NETWARE\NWSPOOL.EXE
Chapter 7. NetWare RIPL of OS/2 V2.0 Images 101
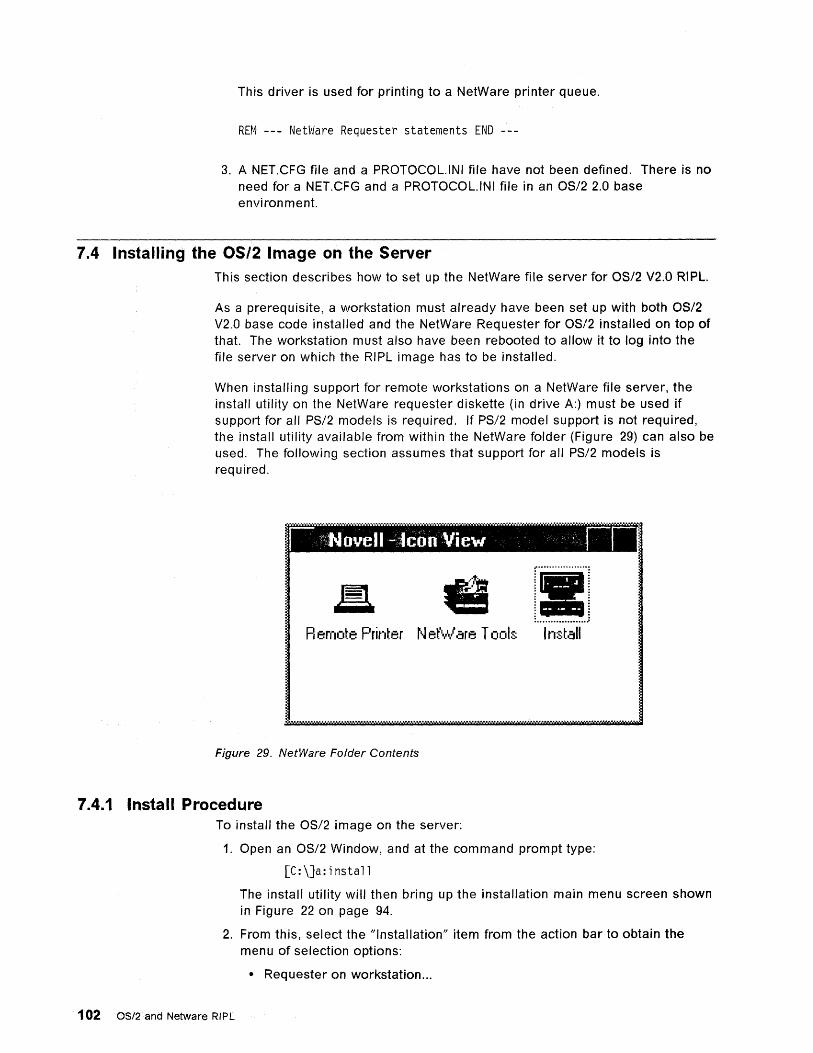
This driver is used for printing to a NetWare printer queue.
REM --- NetWare Requester statements END ---
3. A NET.CFG file and a PROTOCOL.INI file have not been defined. There is no need for a NET.CFG and a PROTOCOL.INI file in an OS/2 2.0 base environment.
7.4 Installing the OS/2 Image on the Server This section describes how to set up the NetWare file server for OS/2 V2.0 RIPL.
As a prerequisite, a workstation must already have been set up with both OS/2 V2.0 base code installed and the NetWare Requester for OS/2 installed on top of that. The workstation must also have been rebooted to allow it to log into the file server on which the RIPL image has to be installed.
When installing support for remote workstations on a NetWare file server, the install utility on the NetWare requester diskette (in drive A:) must be used if support for all PS/2 models is required. If PS/2 model support is not required, the install utility available from within the NetWare folder (Figure 29) can also be used. The following section assumes that support for all PS/2 models is required.
:-•................. ~
1 .................. j R emote Printer N et'v/ are T eels Install
Figure 29. NetWare Folder Contents
7.4.1 Install Procedure To install the OS/2 image on the server:
1. Open an OS/2 Window, and at the command prompt type:
[C:\]a:install
The install utility will then bring up the installation main menu screen shown in Figure 22 on page 94.
2. From this, select the "Installation" item from the action bar to obtain the menu of selection options:
• Requester on workstation ...
102 OS/2 and Netware RIPL
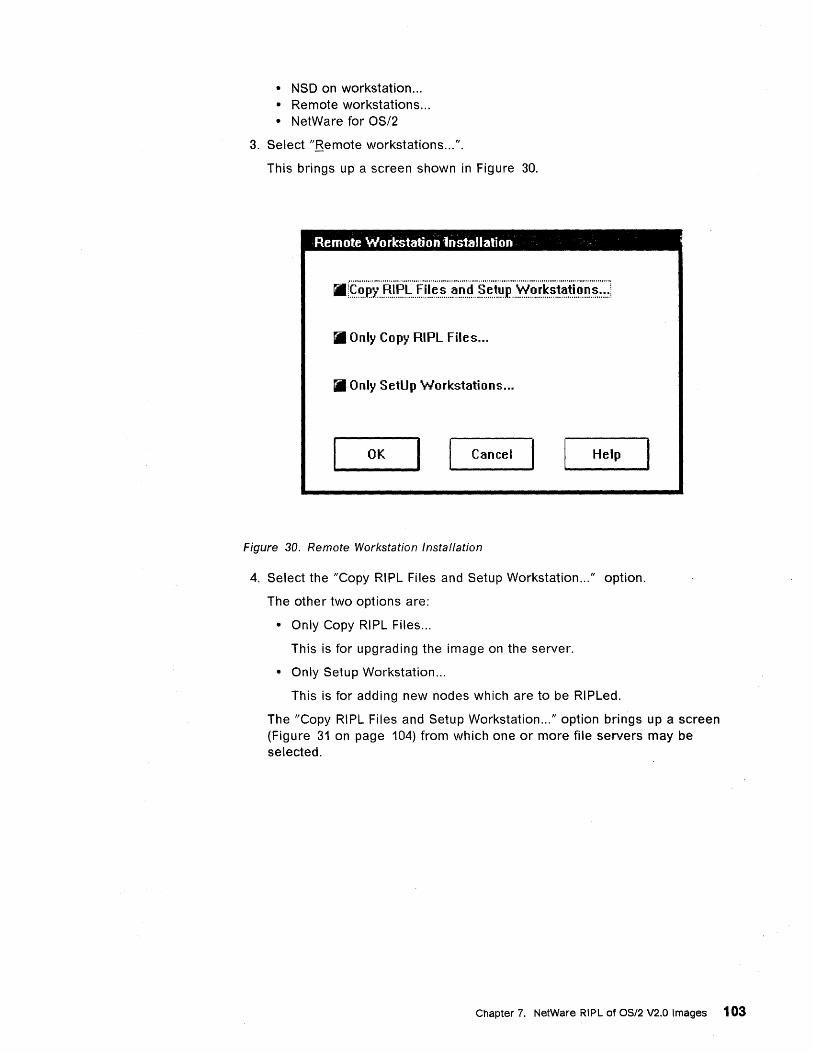
• NSD on workstation .. . • Remote workstations .. . • NetWare for OS/2
3. Select "Bemote workstations ... ".
This brings up a screen shown in Figure 30.
Remote Workstation Installation . .
II Only Copy RIPL Files ...
til Only SetUp Workstations ...
OK Cancel Help
Figure 30. Remote Workstation Installation
4. Select the "Copy RIPL Files and Setup Workstation ... " option.
The other two options are:
• Only Copy RIPL Files ...
This is for upgrading the image on the server.
• Only Setup Workstation ...
This is for adding new nodes which are to be RIPLed.
The "Copy RIPL Files and Setup Workstation ... " option brings up a screen (Figure 31 on page 104) from which one or more file servers may be selected.
Chapter 7. NetWare RIPL of OS/2 V2.0 Images 103

Select 1 'or More Rle Servers
Select Server(s) to copy RIPl files
OK I I Cancel I I ~ttach... I I Help
Figure 31. Available File Servers
Each file server selected will have the OS/2 V2.0 image installed on it in the SYS:RPL2 directory. If the desired file server is not shown, it is possible to attach to it from this window. To do this, double click on the" Attach" button and the screen illustrated in Figure 32 is shown.
Attach to a NetWare file Server :'
Server name: n",illl·'········,···,·,·,·,·,·,·,·,·····'··'·'11
User name: ISUPERVISOR
Password:
Figure 32. Attach to a New File Server
104 OS/2 and Netware RI PL
If you do not know the exact name of the file server, the pull-down button may be used to provide a list of all file servers on your network. From this you may select the required server by double clicking on its name, or by highlighting its name and pressing Enter. The program automatically fills in the user's name in Figure 32 as "Supervisor". It is best to leave it as this, because of the rights required to perform the install, and also to mark the owner of the files within the image as the supervisor.

In Figure 31, if more than one file server has to have the OS/2 image installed on it, then the space bar or mouse right button may be used to toggle which servers are selected.
5. After selecting the required file server{s), click on the "OK" button to continue.
6. The Installation program displays a conformation screen (Figure 33 ) from which it is possible to back out of the procedure.
Help for Copying RlPL and OS12 Files .
WARNING: You ~re ~bout to copy all files from the root of your II C:\ drive. from the \OS2 subdirectory and its subdirectories. and from the \NETWARE subdirectory. These directories contain all of the OS/2 system files. all the Requester files. and all of the remote boot files. Depending on your OS/2 configuration and the contents of your hard drive. this may be 15-30 MB worth of files.
Before continuing. please make sure that you really do want all these files copied to ALL the servers you selected. 11 you want to make a change now. click OK and then Cancel. Ii you want to continuing installing Requester for remote workstations. click OK and continue with the copy procedure.
Figure 33. RPL Install - First Confirmation
a ••
It then verifies the servers that have been selected for the installation to take place (Figure 34).
Copy RIPL and OS/2 Files "
Copy files to these servers:
NETWARE-AIX_SERVER
III
Cancel Help
Figure 34. RPL Install - File Server Confirmation
7. Select "OK" to start the actual installation of the files on the file server.
The installation utility now creates the SYS:RPL2 directory on the selected file server then copies all of the files from the directories:
c:\ C:\OS2
Chapter 7. NetWare RIPL of OS/2 V2.0 Images 105

C:\NETWATE
to the SYS:RPL2 directories on the selected file server. This can take some time.
8. The installation procedure now asks if PS/2 model support is required (see Figure 35). If RIPL of more than one type of PS/2 is required, PS/2 support must be installed.
System Message
Install support for PS/2s?
Figure 35. Install PS/2 Support
If PS/2 model support is required, the OS/2 V2.0 Install diskette must be placed in the drive. This is the drive that the installation utility was started from. This is the reason why the install utility must be started from the A: drive.
System Message
Insert the OS/2 2.0 installation diskette in the source drive.
OK I Cancel I
Figure 36. Insert OS/2 Install Diskette
The BIOS patch files for all PS/2 models will be copied from the OSI2 V2.0 Install diskette to the SYS:RPL2\OS2 sUbdirectory.
7.4.1.1 Adding Remote Boot Workstation Before a workstation can remote boot OS/2 V2.0 from a NetWare file server, the server must be made aware of the node address of the workstation, the NIC it will use to attach to the file server and the user name that will be used to log in at the remote workstation.
The installation utility displays the list of currently attached file servers (Figure 37 on page 107) from which one or more may be selected.
106 OS/2 and Netware RIPL
Select 1 or More file Servers .
Select Server(s) to Setup Remote Boot Workstations
____ o_K_ ..... 1 I Cancel I I Attach... I _1 __ H_e_IP_.....J
Figure 37. Select Servers to Set Up for Remote Boot of Workstations
Each file server selected will have the remote boot facility installed on it. If the desired file server is not shown, it is possible to attach to it from this window. To do this, double click on the" Attach" button and the screen shown in -- Fig 'BNC5D16' unknown -- is shown.
If you do not know the exact name of the file server, the pulldown button may be used to provide a list of all the file servers on your network. From this you may select the required server by double clicking on its name, or by highlighting its name and pressing Enter. The program automatically fills in the user's name in -- Fig 'BNC5D16' unknown -- as "Supervisor". It is best to leave it as this, because of the rights required to perform the install, and also to mark the owner of the files on the file server as the supervisor.
In -- Fig 'BNC5D26' unknown --, if more than one file server has to have the ~emote boot facility installed on it, then the space bar or mouse right button may be used to toggle which servers are selected.
Select the required file server(s) and click on the "OK" button to continue.
The install utility displays the screen shown in Figure 38 on page 108 requesting the information required to make the file server(s) aware of the workstation.
Note: These details are only valid for OS/2 V2.0.
Chapter 7. NetWare RIPL of OS/2 V2.0 Images 107
Add Remote Boot Workstation
• Setup THIS machine as a remote boot workstation
II Setup Another machine as a remote boot workstation
Network address: 100009634
Node address: 11 0005a1 Bcf26
Driver: l!foK"E·Nj~oo··· ....................................... "II
User name: IUSERl
Logical name: IRPLull
Add Cancel Help
Figure 38. Add Remote Boot Workstation
For each workstation which is to boot remotely:
1. If the present workstation is to be the RPL workstation, click on "This Workstation" .
2. If the present workstation is not the one being set up to boot remotely, click on "Other Workstation".
3. Check the network address to make sure it is correct. If it is not correct, enter the network address of the RPL workstation.
4. Type in the node address of the RPL workstation.
5. Click the arrow to the right of the driver field, and select the RI PL driver which matches the NIC installed in the RPL workstation. The available RIPL drivers are shown in Figure 39.
NE2.200 NE1000.200 NE2000.200 PCN2L.200 TOKEN.200
Figure 39. NetWare OS/2 V2.0 RPL Drivers
6. Type the user name of the person using the RPL workstation. (After exiting the installation utility, make sure the users specified here have accounts on the file server targeted for remote boot installation. Also, grant read and filescan rights in the SYS:RPL2 directory to these users and to the RPL user name.)
7. Optionally, type an alphanumeric logical name.
108 OS/2 and Netware RIPL

A logical name is necessary if you have more than one workstation logged in under the same user name.
8. Click on "Add".
To add another workstation, repeat steps 1-8.
7.4.2 The OS/2 V2.0 RPL2 Image on the File Server Each time a RPL workstation is added to the file server, the installation program performs the following tasks:
1. It creates the SYS:RPL2\COMPUTER directory, unless it already exists
2. It creates a SYS:RPL2\COMPUTER\nodeJd directory on the file server
The node ID of the directory created under the SYS:RPL2\COMPUTER\ directory directly corresponds to the node address specified on the screen shown in Figure 38 on page 108. If the node address is 10005A123456, the directory created would be 0005A123.456.
3. It creates an ASCII text file, CONFIG.WSS in the SYS:\RPL2\COMPUTER\node_id directory. This file is used as a redirection file and contains the specific directories and files which OS/2 requires non-sharable access to.
Figure 40 shows an example of CONFIG.WSS file. Paths are enclosed in quotation marks to allow long file name paths.
USERNAME rpluser DIRECTORIES "C:\DESKTOP" IC:\USER\rpluser\DESKTOP" "C:\SPOOL" IC:\USER\rpluser\SPOOL" FILES "C:\CONFIG.SYS" IC:\USER\rpluser\CONFIG.SYS" IC:\OS2\OS2.INI" "C:\USER\rpluser\OS2.INI" "C:\OS2\OS2SYS.INI" IC:\USER\rpluser\OS2SYS.INI"
Figure 40. Example of CONFIG.WSS
If at some later stage, some other application requires nonsharable rights to some files or directories, these may also be added to CONFIG.WSS. The CONFIG.WSS acts as a general-purpose redirection specification.
As can be seen the file has three sections. The restrictions which must be observed when altering this file are:
• Keywords are always in capitals • Protected mode drivers cannot be redirected from the NetWare • New paths must include quotation marks directory.
7.5 NetWare Rights 1. Use SYSCON to create a user account named RPL. Grant RF rights to the
RPL user name for the SYS:RPL directory:
SYS: RPL2 (R F)
Chapter 7. NetWare RIPL of OS/2 V2.0 Images 109

2. Use SYSCON to create a user 10 for each user name in the CONFIG.WSS files. There is a CONFIG.WSS file for each station. For each user, grant the following rights:
7.6 Finishing Off
SYS:RPL2\USER\user_name (ALL RIGHTS) SYS: RPL2 (R F) SYS:RPL2\COMPUTER\0005A123.456 (ALL RIGHTS) etc.
Replace user_name with the workstation's user name specified in the CONFIG.WSS file.
If the workstation on which you installed the requester has a hard drive, run RIPLON.EXE, which can be found on the OS/2 requester diskette in the RPL subdirectory. This clears the active partition on the hard drive and keeps the workstation's hard drive from booting. The hard drive may be reactivated using the FOISK program to set the active partition back.
To help check that everything is in the correct place, refer to Figure 41 which gives an overview of the directory structure on the file server, and the new files that have been copied or created.
SYS: LOGIN\
t BOOTCONF.SYS TOKEN.200 TOKEN.RPL
r---SYSTEM\
[ TOKEN. LAN RPL.NLM
r---RPL2\---.-MINI. IFS -COMPUTER\10005A123.456\
CONFIG. \JJSS 0085A123.457\
CONFIG. \JJSS
r---NETWARE\
f-USER\---RPLUSER\----Lr--OS!2_2.0_D\
[
EP\JJ.INI SPOOL\ OS2.INI OS2SYS.INI VPD.INI CONFIG.SYS
-OS2\ (Image of C:\OS2 Directory tree with files from workstation.)
Figure 41. The RIPL Directory Structure on a NetWare Server
110 OS/2 and Netware RIPL

7.7 File Server Connections The OS/2 RIPL image uses two connections to the file server. The first connection always uses the universal adapter address. This is the connection the RIPL process starts from. Once the RIPL process has completed, and the workstation is operating, a user can log in using the second connection.
According to Novell, locally administered addresses are supported on this second connection. This depends on the versions of LAN drivers, RPL bootstrap code, and TOKEN.200 modules in use. It has been shown to work.
The LAA is set by specifying a node address parameter in the link driver section within the aliased SYS:RPL2\NET.CFG file.
Link Driver TOKEN NODE ADDRESS 400010010001
7.8 Bridging Considerations It is not yet known if OS/2 V2.0 can successfully RIPL across a source routing bridge.
Chapter 7. NetWare RIPL of OS/2 V2.0 Images 111

112 OS/2 and Netware RIPL
Appendix A. Software Revision List
This Appendix lists all of the software used while testing the RIPL functions described in this manual. For the NetWare products, the general revision has been given, as well as a" file date/size information of updated files. These files were obtained either directly or indirectly from Novell, and have been placed on various tools disks (depending on whether the files are general reiease, or still in field test).
A.1 IBM LAN Servers Operating System: IBM OS/2 V2.0
IBM LAN Server V2.0
--------------------------------_._-_.-A.2 NetWare 3.11 File Server
Operating System: NetWare V3.11
LAN Drivers and NLMs
RPL NLM 4953 03-06-92 10:51a I Novell V3.x FT IBMETHR LAN 15890 06-28-91 4:40p I WID V2.06 (910628)
I from IBM Ethernet Adapter/A Options V1.01 TOKEN LAN 10324 09-09-91 11:30a I Novell V3.16 (910909) TOKENDMA LAN 9170 09-16-91 10:12a I V3.11 (910916)
© Copyright IBM Corp. 1992 113
A.3 NetWare 2.2 File Servers Operating System: NetWare V3.11
LAN Drivers
IBM Token-Ring w/AT 2 V2.63 (918731) IBM Personal System/2 Adapter for Ethernet V1.12 (918426)
Value Added Processes (VAPs)
ROUTE VP8 3896 85-81-91 1:53p RPL VP1 1856 85-83-91 2:31p
RPL.Vp1 Configuration Utility
RPCONFIG COM 2726 6-88-98 5:15p
Novell V1.82 (918583) Novell V1.81 (918583)
Novell V1.88 (988688)
Note: The External Routers also used the same LAN drivers and VAPs as the NetWare 2.2 File Server.
A.4 NetWare Lite File Server Operating System: IBM PC-DOS VS.O with UR36603 applied
LAN Drivers for NetWare Lite Server
IBMODISH COM 17823 86-28-91 4:53p IPXODI COM 20983 11-28-91 4:57p LSL COM 7648 11-28-91 4:57p NETX COM 51201 07-31-91 10:47a ROUTE COM 4458 85-81-91 8:28a TOKEN COM 15663 86-14-91 4:18p
RIPL Drivers for NetWare Lite RPL-Server
RPL COM BOOTNCPL COM
114 OS/2 and Netware RIPL
5744 11-27-91 2:29p 5136 18-88-91 3:48p
WID V.183 (918628) Nove 11 V3.18 (911128) Novell V3.18 (911128) Novell V3.10 (918731) Novell V3.18 (910501) Novell V3.18 (918614)
Novell V1.88 (911127) Novell V1.88 (911888)

A.S DOS RIPL Workstation Clients
A.6
Operating System: IBM PC-DOS V5.0 with UR36603 applied
IBMBIO COM 33446 11-29-91 12:88p DOS 5.8 with UR36683 IBMDOS COM 37378 11-29-91 12:88p DOS 5.8 with UR36683 COMMAND COM 48886 11-29-91 12:88p DOS 5.8 with UR36683
LAN Drivers for DOS LAN Requester
DXMA8MOD SYS 4736 81-23-92 8:44a DXMC8MOD SYS 28888 81-23-92 8:43a DXME8MOD SYS 36736 81-23-92 8:45a DXMT8MOD SYS 29696 81-23-92 8:43a
LAN Support Program V1.25 LAN Support Program V1.25 LAN Support Program V1.25 LAN Support Program V1.25
MACETH DOS 16624 87-17-91 12:88p NDIS Ethernet Driver V1.16 (918625) from IBM Ethernet Adapter/A Options V1.81
LAN Support Program V1.25 LAN Support Program V1.25 LAN Support Program V1.25
NETBIND EXE PROTMAN DOS PRO MSG PROTOCOL INI
15639 81-23-92 8:46a 18657 81-23-92 8:46a
1392 1-23-92 8:46a 5128 83-81-91 18:88a ASCII text file - USER Modifiable
NET COM 13568 83-14-92 11:84a DLR: IBM LAN OS/2 Server V2.8
LAN Drivers for NetWare Requester
IBMODISH COM 17823 86-28-91 4:53p I WID Vl. 83 (918628) I PX ETH COM 27843 83-27-92 12:48p I IPX: V3.18 (911121), ETH: V1.12 IPX LSP COM 24528 83-82-92 9:18a I IPX: V3.18 (911121), LSP: V2.62 IPX TKN COM 25342 12-13-91 3:41p I IPX: V3.18 (911121), TKN: V2.63 IPXODI COM 28983 11-28-91 4:57p I Novell V3.18 (911128) LANSUP COM 14894 84-38-91 18:32a I Novell V3.18 (918438) LSL COM 7648 11-28-91 4:57p I Novell V3.18 (911128) NETX COI~ 51281 87-31-91 18:47a I Novell V3.18 (918731) ROUTE COM 4458 85-81-91 8:28a I Novell V3.18 (918581) TOKEN COM 15663 86-14-91 4:18p I Novell V3.18 (918614)
NetWare RPL BootStrap Code Files:
ETHER RPL 15772 12-85-91 9:25a Novell V3.18 (911285) PCN2L RPL 18187 12-85-91 9:25a Novell V3.18 (911285) TOKEN RPL 12143 83-27-92 12:35p Novell V4.18 (928327)
05/2 V1.3 RIPL Workstation Clients IBM OS/2 V.1.30.2 (equivalent to IBM OSI2 V1.3 with CSD 5050 applied)
NetWare Requester for OS/2 V1.3 with NSD004 applied
RPL Bootstrap Image
TOKENRPL SYS 16661 84-81-92 2:33p I Novell Field Test Module
(918426) (918415) (918823)
Appendix A. Software Revision List 115

A.7 OS/2 V2.0 RIPL Workstation Clients IBM OS/2 V2.0 (920401)
Pre-Release NetWare Requester for OS/2 V2.0 (Level 006)
116 OS/2 and Netware RIPL
Appendix B. BIOS Patch Files Used by OS/2
This chapter provides the relationship between the various PS/2 models and the *.810 files that are supplied with OS/2 1.2 and OS/2 1.3.
It is possible to determine which *.BIO files should be installed on a particular machine by use of the reference diskette. The filename is composed of three two-digit hexadecimal numbers corresponding to model, submodel, and ROM revision of the machine it should be applied to. For example, if a machine has a model byte of F8h, submodel of 04h, and ROM revision 02h, A:\F80402.BI0 should be installed.
ABIOS.SYS is a text file that has the names of all *.810 patch files installed.
The model, submodel and ROM revision level of a system can be found by running the latest level of the hardware reference diskette on that system and selecting the option "Display Revision Levels".
© Copyright I BM Corp. 1992 117
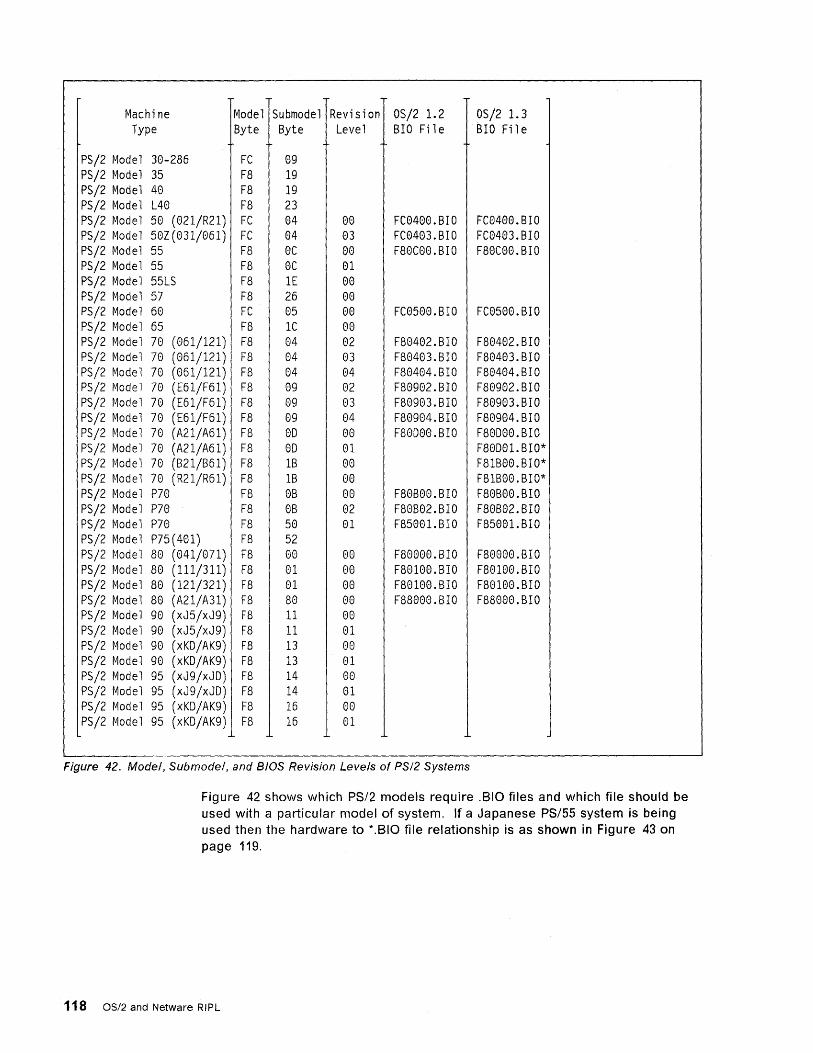
Machine Model Submodel Revision DS/2 1.2 OS/2 1. 3 Type Byte Byte Level BIO Fil e BID File
PS/2 Model 30-286 FC 09 PS/2 Model 35 F8 19 PS/2 Model 40 F8 19 PS/2 Model L40 F8 23 PS/2 Model 50 (021/R21) FC 04 00 FC0400.BIO FC0400.BIO PS/2 Model 50Z(031/061) FC 04 03 FC0403.BID FC0403.BIO PS/2 Model 55 F8 0C 00 F80C00.BID F80C00.BID PS/2 Model 55 F8 0C 01 PS/2 Model 55LS F8 1E 00 PS/2 Model 57 F8 26 00 PS/2 Model 60 FC 05 00 FC0500.BIO FC0500.BID PS/2 Model 65 F8 1C 00 PS/2 Model 70 (061/121) F8 04 02 F80402.BID F80402.BIO PS/2 Model 70 (061/121) F8 04 03 F80403.BIO F80403.BID PS/2 Model 70 (061/121) F8 04 04 F80404.BIO F80404.BIO PS/2 Model 70 (E61/F61) F8 09 02 F88902.BIO F80982.BIO PS/2 Model 78 (E61/F61) F8 89 03 F80903.BIO F88903.BIO PS/2 Model 78 (E61/F6I) F8 89 04 F80904.BIO F80904.BID PS/2 Model 78 (A21/A6I) F8 80 08 F80000.BIO F80000.BID PS/2 Model 78 (A21/A61) F8 00 81 F88081.BIO* PS/2 Model 70 (B21/B6l) F8 lB 88 F81B88.BIO* PS/2 ~1ode 1 78 (R21/R61) F8 IB 88 F81B00.BID* PS/2 Model P78 F8 8B 88 F88B88.BIO F88B88.BIO PS/2 Model P78 F8 0B 82 F88B82.BIO F88B82.BIO PS/2 Model P70 F8 58 01 F8500l. BIO F85001.BIO PS/2 Model P75(481) F8 52 PS/2 Model 80 (841/071) F8 88 88 F88800.BIO F80008.BIO PS/2 Model 80 (111/311) F8 81 88 F80180.BIO F88l88.BIO PS/2 Model 88 (121/321) F8 01 08 F80180.BIO F88188.BID PS/2 Model 80 (A21/A31) F8 88 88 FSS888.BIO F8S800.BIO PS/2 Model 98 (xJ5/xJ9) F8 11 80 PS/2 Model 90 (xJ5/xJ9) F8 11 81 PS/2 Model 98 (xKO/AK9) F8 13 88 PS/2 Model 98 (xKO/AK9) F8 13 81 PS/2 Model 95 (xJ9/xJD) F8 14 80 PS/2 Model 95 (xJ9/xJO) F8 14 01 PS/2 Model 95 (xKO/AK9) F8 16 80 PS/2 r~ode 1 95 (xKD/AK9) F8 16 81
Figure 42. Model, Submodel, and BIOS Revision Levels of PS/2 Systems
Figure 42 shows which PS/2 models require .BIO files and which file should be used with a particular model of system. If a Japanese PS/55 system is being used then the hardware to *.BIO file relationship is as shown in Figure 43 on page 119.
118 OS/2 and Netware RIPL
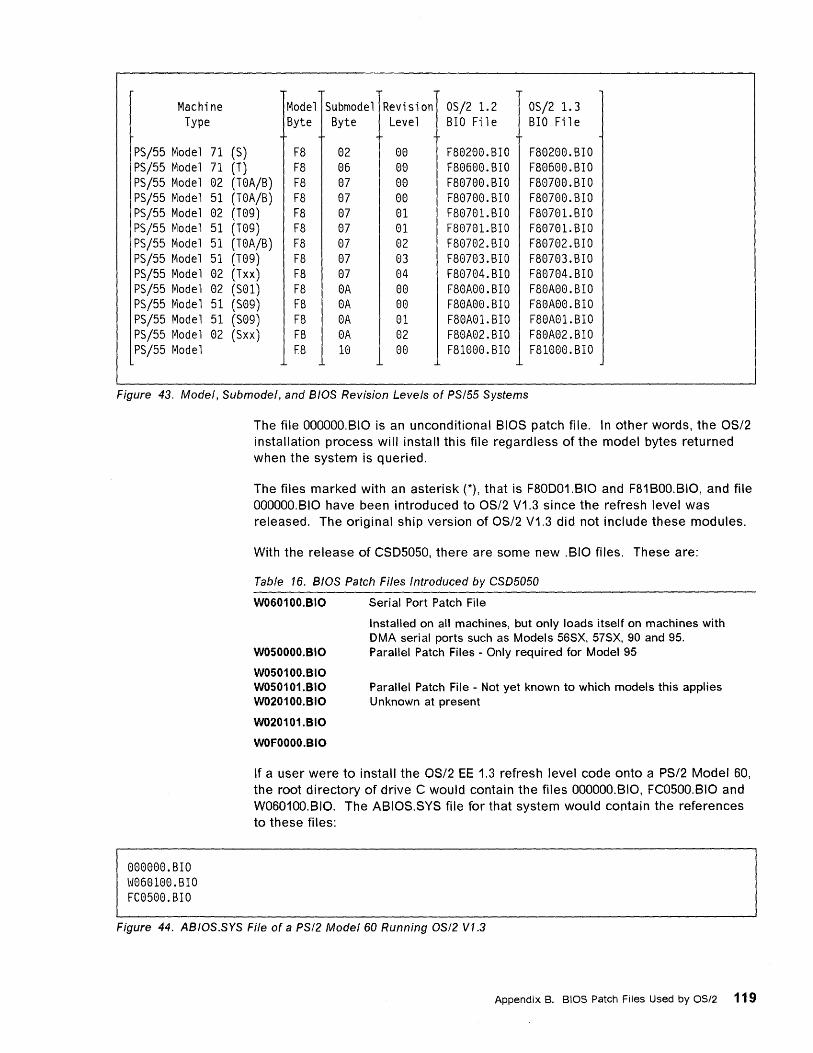
Machine Model Submodel Revision OS/2 1. 2 OS/2 1. 3 Type Byte Byte Level BIO Fil e BIO Fil e
PS/55 Model 71 (S) F8 02 00 FS0200.BIO F80200.BIO PS/55 Model 71 (T) F8 06 00 F80600.BIO F80600.BIO PS/55 Model 02 (T0A/B) F8 07 00 F80700.BIO F80700.BIO PSj55 Model 51 (T0A/B) F8 07 00 F80700.BIO F80700.BIO PSj55 Model 02 (T09) F8 07 01 F80701.BIO F80701.BIO PSj55 Model 51 (T09) F8 07 01 F80701. BIO FS0701. BIO PSj55 Model 51 (T0A/B) F8 07 02 F80702.BIO F80702.BIO PS/55 Model 51 (T09) F8 07 03 F80703.BIO F80703.BIO PSj55 Model 02 (Txx) F8 07 04 F80704.BIO F80704.BIO PSj55 Model 02 (S01) F8 0A 00 F80A00.BIO F80A00.BIO PSj55 Model 51 (S09) F8 0A 00 F80A00.BIO F80A00.BIO PSj55 Model 51 (S09) F8 0A 01 F80A01. BIO F80A01. BIO PS/55 Model 02 (Sxx) F8 0A 02 F80A02.BIO F80A02.BIO PS/55 Model F8 10 00 F81000.BIO F81000.BIO
Figure 43. Model, Submodel, and BIOS Revision Levels of PS/55 Systems
000000.BIO W060100.BIO FC0500.BIO
The file OOOOOO.BIO is an unconditional BIOS patch file. In other words, the OSI2 installation process will install this file regardless of the model bytes returned when the system is queried.
The files marked with an asterisk (*), that is F80D01.B10 and F81 BOO.BIO, and file OOOOOO.BIO have been introduced to OS/2 V1.3 since the refresh level was released. The original ship version of OS/2 V1.3 did not include these modules.
With the release of CSD5050, there are some new .BIO files. These are:
Table 16. BIOS Patch Files Introduced by CSD5050
W060100.BIO Serial Port Patch File
W050000.BIO
W050100.BIO W050101.BIO W020100.BIO
W020101.BIO
WOFOOOO.BIO
Installed on all machines, but only loads itself on machines with DMA serial ports such as Models 56SX, 57SX, 90 and 95. Parallel Patch Files - Only required for Model 95
Parallel Patch File - Not yet known to which models this applies Unknown at present
If a user were to install the OS/2 EE 1.3 refresh level code onto a PS/2 Model 60, the root directory of drive C would contain the files OOOOOO.BIO, FC0500.B10 and W060100.BI0. The ABIOS.SYS file for that system would contain the references to these files:
Figure 44. ABIOS.SYS File of a PS/2 Model 60 Running OS/2 V1.3
Appendix B. BIOS Patch Files Used by OS/2 119

120 OS/2 and Netware RIPL

Appendix C. Abbreviations
ABBREVIATION
APA
BIOS
DOSGEN
FAT
FIT
IPL
ITSC
LAA
LAN
MUD
NLM
NIC
POST
RAM
RIPL
ROM
RPL
TSR
UAA
VAP
~ Copyright I BM Corp. 1992
MEANING
all points addressable
Basic Input/Output Services
DOS Remote Image File GENeration
File Allocation Table
File Index Table
Initial Program Load
International Technical Support Center
Locally Administered Address
Local Area Network
Multiple Link Interface Device Driver
NetWare Loadable Module
Network Interface Card
Power-On-Self-Test
Random Access Memory
Remote Initial Program Load
Read Only Memory
Remote Program Load
Terminate and Stay Resident
Universal Adapter Address
Value Added Process
121

122 OS/2 and Netware RIPL

Glossary
A
Abend. Abnormal termination of an operation due to a detected fault.
Access Control List (ACL). In computer security, a list associated with an object that identifies all the subjects, that can access the object and their access rights.
Acces Control Profile. A list of the access privileges assigned to users and groups for a particular network resource in a domain.
ACL. See access control list
Active session. The session in which the user is currently interacting with the workstation.
adapter address. The address of the media access control point.
Additional Server. A server other than the domain controller ina domain. There can be multiple additional servers on a domain. Each additional server receives a copy of the user and group definition file from the domain controller.
administrator. The person responsible for the designing, planning, instlling, configuring, controlling, managing and maintaining of a network, system or resource.
action bar. The area on top of a panel that contains the choices currently available in the applicaion program.
Access control. The means by which network administrators restrict access to network resources and user programs and data.
access mode. A method of operation used to obtain a specific logical record from, or to place a specific logical record into, a file assigned to a mass storage device.
Access priority. In the IBM Token-Ring Network, the maximum priority a token can have for the adapter to use for transmission.
Access procedure. In a local area network (LAN), the procedure or protocol used to gain access to the transmission medium.
active monitor. A function in a single adapter that initiates the transmission of tokens and provides token error recovery facilities. Any active adapter on
© Copyright IBM Corp. 1992
the ring has the ability to provide the active monitor function if the current active monitor fails. Synonymous with token monitor.
Adapter. The circuit card with a communicating device and its associated software that enable the device to be attached to a network.
adapter address. The address of the Medi a Access Control Service Access Point (MSAP).
adapter number. A specific number that identifies an adapter when more than one adapter is used in a workstation.
additional server. A server in a domain other than the domain controller. See server. See also domain and controller.
address. A value that identifies the location of a register, a particular part of storage, or a network node.
alert. (1) In communications, an error message sent to the system services control point (SSCP) at the host system. (2) In OS/2 LAN Server, an error or warning specified in the IBMLAN.INI file that is sent to the user. See also system services control point. See problem management focal point.
alias. (1) An alternative name used to identify an object or a database. (2) A nickname set up by the network administrator for a file, printer, or serial device. (3) A name used to identify a network resource to a domain. Aliases are similar to network names but can be used only through the full-screen interface. See also network name.
allocate. (1) To assign a resource to perform a specific task. (2) In Advanced Program-to-Program Communications (APPC), a verb used to assign a session to a conversation for its use.
application program. (1) A collection of software components, such as Communications Manager and Database Manager that a user installs to perform particular types of work, or applications, on a computer. (2) A program written for or by a user to perform the user's work on a computer.
application program interface (API) trace. A method used to trace points of the interface where user programs interact with an API.
application programming interface (API). A formally-defined programming language interface which is between an IBM system control program or a licensed program and the user of a program.
123
Asynchronous Communications Device Interface (ACDI). An application programming interface (API) for asynchronous communications provided by Communications Manager.
ASCII. American Standard Code for Information Interchnage
B baud. The unit of modulation rate of an analog signal transmitted between data circuit-terminating equipment (DCE). In data communications each baud can encode one or more binary bits of computer data. Typically one, two, or four bits are encoded.
beacon. In the IBM Token-Ring Network, a frame sent by an adapter indicating a serious network problem, such as a broken cable.
binary synchronous communication (BSC). A form of telecommunication line control that uses a standard set of transmission control characters and control characters sequences, for binary synchronous transmission of binary-coded data between stations. Contrast with Synchronous Data Link Control (SOLC).
bridge. In LAN, a device that connects IBM Token-Ring and PC Network together. See gateway.
bridge number. In LAN, a number that distinguishes parallel bridges (that is, bridges spanning the same two rings).
broadcast. A message sent to all computers on a network, rather than to specific users or groups.
Broadcast frame. A frame that is to be fowarded by all bridges, unless otherwise restricted.
c CCITT (Co mite Consultatif International Telegraphique et Telephonique). See the International Telegraph and Telephone Consultative Committee.
clear to send (CTS). A signal that is raised by the data circuit-terminating equipment (DCE) when it is ready to accept data, usually in response to request to send (RTS) being raised. ACDI will not transmit data without this circuit being raised. If this circuit is lowered and remains lowered for more than 30 seconds, ACDI will assume the connection is lost and will bring the connection down.
clipboard. In Presentation Interface, an area of memory that holds data being passed from one program to another.
COM. A representation of one of the asynchronous serial communications ports, (COM1, COM2, and COM3), supported by the OS/2 program.
124 OS/2 and Netware RIPL
Communications Manager. A component of the OS/2 program that lets a workstation connect to a host computer and use the host resources as well as the resources of other personal computers to which the workstation is attached, either directly or through a host. Communications Manager provides application programming interfaces (APls) so that users can develop their own applications.
CONFIG.SYS. A file that contains configuration options for an OS/2 program installed on a workstation. See also configuration file.
configuration file. The collective set of item definitions, that describe a configuration.
configure. (1) To prepare a workstation component or program for operational use. (2) To describe to a system the devices, optional features, and programs installed on the system.
Corrective Service diskette. A diskette provided by IBM to registered service coordinators for resolving user-identified problems. This diskette includes program updates designed to resolve problems. See also program updates.
CSMA/CD. Carrier Sense Multiple Access with Collision Detection. A network media protocol for managing collision of data packets.
custom install diskette. A diskette created using the custom build feature of the OS/2 installation program. A custom install diskette contains the specific features and device drivers needed for installing Database Manager, Communications Manager, and LAN Requester on one or more computers.
D data carrier detect (DCD). This signal is raised by the data circuit-terminating eqUipment (DCE) when it and the remote DCE have recognized each other's carrier signal and have synchronized themselves. If this circuit is lowered and remains lowered for more than 30 seconds, ACDI will assume the connection is lost and will bring the connection down.
data circuit·terminating equipment (DCE). (1) The equipment installed at the user's premises that provides all the functions required to establish, maintain, and end a telephone connection for data transmission, and which does the signal conversion and coding between the data terminal equipment (DTE) and the line. See also modem. (2) For an X.25 packet switching network, the equipment in a data station that provides the signal conversion and coding between the data terminal equipment (DTE) and the line.

data link layer. In Open Systems Interconnection architecture, the layer that provides the functions and procedures used to provide error-free, sequential transmission of data units over a data link.
data set ready (DSR). This signal is raised by the data circuit-terminating (DCE) to indicate it is on-line and ready to begin communicating. Some DCEs use this signal as a power-on. indicator. ACDI expects this signal to be lowered after every connection take down for a minimum of 100ms. Failure to do so may cause a warning message to be displayed instructing the user to insure the DCE has, in fact, gone on-hook.
data terminal equipment (DTE). The equirment that sends or receives data, or both.
data terminal ready (DTR). The on condition of the circuit connected to the RS232C modem indicating that the terminal is ready to send or receive data.
database. (1) A systematized collection of data that can be accessed and operated upon by an information processing system. (2) In Database Manager, a collection of information such as tables, views, and indexes. With Query Manager, a database can also include such other information as report forms, queries, panels, menus, and procedures. network layer of the adapter protocol. When a message is sent as a
Datagram. When data is sent as a datagram, the receiver of the message sends no acknowledgement for its receipt.
dedicated server. A personal computer on a network that functions only as a server, not as a requester and a server.
device driver. The executable code needed to attach and use a device such as a display, printer, plotter, or communications adapter.
disk operating system (DOS). An operating system for computer systems that use disks and diskettes for auxiliary storage of programs and data.
Diskette image. A representation of a diskette containing files and programs. The image resides in computer storage and is used by the computer as though if were a physical diskette.
domain. A set of servers that allocates shared network resources within a single logical system.
domain control database (DCDB). A database that resides on the domain controller and contains files that describe the current domain.
domain controller. A server within the domain that provides details of the OS/2 LAN Server to all other servers and requesters 01') the domain. The domain
controller is responsible for coordinating and maintaining activities on the domain.
domain definition. A list of network resources and users that can be printed out by the network administrator.
DOS. See disk operating system.
drive. (1) The device used to read and write data on disks or diskettes. (2) In the OS/2 program, a diskette (created using the CREATEDD command) that contains the contents of storage at a specified point in time.
duplex. Pertaining to communication in which data can be sent and received at the same time. Synonymous with full-duplex. Contrast with half-duplex.
dynamic link library. A module containing a dynamic link routine (DLR) that is linked at load or run time.
E
Emulator High-Level Language Application Programming Interface (EHLLAPI). A Communications Manager Application Programming Interface that provides a way for users and programmers to access the IBM 3270, IBM AS/400, or System/36 host presentation space.
end user. The ultimate source or destination of data flowing through an SNA network. An end user can be an application program or a workstation operator.
error log. A file that stores error information for later access. See log.
Ethernet. A Data Link Layer protocol jointly developed by INTEL, XEROX, and DEC and subsequently adopted by the IEEE as a standard.
extended binary-coded decimal interchange code (EBCDIC). A coded character set consisting of 8-bit coded characters used by host computers.
external resource. A file, printer, or serial device resource supplied by a server outside the current domain.
external server. A server outside the domain that defines and controls domain resources.
F
frame. (1) In high level data link control (HDLC), the sequence of contiguous bits bracketed by and including the opening and closing flag (01111110). Frames are used to transfer data and control information across a data link. (2) A data structure that consists of fields predetermined by a protocol for
Glossary 125
the transmission of user data and control data. Synonymous with data frame.
G gateway. In communications, a functional unit that connects two computer networks of different network architectures. Contrast with bridge.
H
half-duplex. In two-way communication, where only one user transmits at a time. Contrast with full-duplex.
Hard error. An error occuring that makes it inoperative. See beaconing.
Hop count. The number of bridges through which a frame has passed on the way to its destination.
host computer. (1) In a computer network, a computer providing services such as computation, database access, and network control functions. (2) The primary or controlling computer in a multiple computer installation.
IBM Operating System/2 LAN Server. A program that allows resources to be shared with other computers on the network. See also server.
IBM Token-Ring Network. IBM Token-Ring Network is a high speed, star-wired local area network to which a variety of IBM products can be connected.
IEEE 802.2 interface. An interface adhering to the 802.2 logical link control (LLC) Standard of the Institute of Electrical and Electronics Engineers (IEEE). This standard is one of several standards for local area networks approved by the IEEE.
image. In OS/2 LAN Server, a binary file that is structured to look like the files used during a normal machine initial program load (IPL). Images are used to load software on machines that are not loaded from their own fixed disk or diskette drives. Synonymous with IPL image.
initial program load (IPL). (1) The initialization procedure that starts an operating system. (2) The process of loading programs and preparing a system to run jobs.
International Organization for Standardization (ISO). An organization of national standards bodies from various countries established to promote development of standards to facilitate international exchange of goods and services, and develop
126 OS/2 and Netware RIPL
cooperation in intellectual, sci~ntific, technological, and economic activity.
International Telegraph and Telephone Consultative Committee (CCITT). An international organization that recommends and publishes standards for the interconnection of communications equipment.
interprocess communication. The exchange of information between processes.
interrupt. A suspension of a process such as the execution of a computer program caused by an event external to that process, performed in such a way that the process can be resumed.
K
kernel. (1) The part of an operating system that performs basic functions such as allocating hardware resources.
kilobyte (KB). A term meaning 1024 bytes.
L
LAN. See Local Area NetWork
Local Area Network. A network, in which communications are limited such as an office building etc .. A LAN depends upon a communications medium capable of moderate high rate and normally operates with a consistently low error rate.
LAN adapter. A card which is installed in a Personal Computer and is used to attach this device to a local area network.
LAN segment. Any portion of a local area network that can operate independently, but is connectetd to the establishment network via routers, bridges or gateways.
LAN Requester. A component of the OS/2 program that allows users to access shared network resources made available by OS/2 LAN Servers. See requester.
link. (1) The physical medium of transmission, the protocol, and associated devices and programming used to communicate between computers. (2) To interconnect items of data or portions of one or more computer programs, for example, the linking of object programs by a linkage editor, or the linking of data items by pointers.
link station. (1) In Systems Network Architecture (SNA), the combination of hardware and software that allows a node to attach to and provide control for a link. (2) On a local area network (LAN), part of a service access point (SAP) that enables an adapter to communicate with another adapter.

Lobe. The section of cable in a Token-Ring network, that connects a device to an access unit.
local area network (LAN). (1) Two or more computing units connected for local resource sharing. (2) A network in which communications are limited to a moderate-sized geographic area such as a single office building, warehouse, or campus, and that do not extend across public rights-of-way.
Local bridge. A function in a single personal computer oder Personal System, that connects two LAN segments without using a telecomminucations link.
logical device. (1) An input/output (I/O) device identified in a program by a label or number that corresponds to the actual label or number assigned to the device. Contrast with physical device. (2) In the OS/2 program, a redirected disk, file, printer, or other specific device.
logical link control (LLC). The DLC.LAN sub-layer that provides two types of Data Link Control (DLC) operation. The first type is connectionless service, which allows information to be sent and received without establishing a link. The LLC sub-layer does not perform error recovery or flow control for connectionless service. The second type is connection-oriented service, which requires the establishment of a link prior to the exchange of information. Connection-oriented service provides sequenced information transfer, flow control, and error recovery.
logical unit (LU). In Systems Network Architecture (SNA), a port through which an end user accesses the SNA network in order to communicate with another end user and through which end users access the functions provided by system services control points (SSCPs).
logical unit 6.2 (LU 6.2). A particular type of Systems Network Architecture (SNA) logical unit (LU) that provides a connection between resources and transactions programs running on different network nodes. See Advanced Program-to-Program Communications (APPC).
M
Media Access Control Service Access Point (MSAP). In the IBM Token-Ring Network, the logical point at which an entity in the medium access control (MAC) sublayer provides services to the logical link control sublayer.
medialess requester. A requester without a disk drive.
medium access control (MAC). In local area network (LAN), the sUb-component of IEEE 802.2 application
programming interface (API) that supports medium-dependent functions and uses the services of the physical layer to provide services to logical link control. Medium access control (MAC) includes the medium access port.
medium access control (MAC) frame. The frame that controls the operation of the IBM Token-Ring Network and any ring station operations that affect the ring.
medium access control (MAC) protocol. In a local area network (LAN), the part of the protocol that governs access to the transmission medium independently of the physical characteristics of the medium, but taking into account the topological aspects of the network in order to enable the exchange of data between data stations.
megabyte (MB). 1,048,576 bytes
Micro Channel. The architecture used by IBM Personal System/2. Synonymous with advanced 110 channel.
multistation access unit (MAU). In the IBM Token-Ring Network, a wiring concentrator that can connect up to eight lobes to a ring network.
multitasking. A mode of operation that provides for concurrent performance or interleaved execution of two or more tasks.
MVDM. A Virtual DOS Machine is a DOS session under OS/2 version 2.0, which simulates a complete 8088 system to the operating system. (Multiple Virtual DOS Machine)
Multiple Virtual DOS Machines. See also MVDM
N
NDIS. The Network Driver Interface Specification (NDIS) is a standard for OS/2 and DOS network platforms. This standard is developed by 3COM and Microsoft. NDIS provides access to network services at the Data Link Layer and is especially useful if more than one network protocol has to have access to the same network board.
NetBIOS. An application programming interface (API) between a local area network adapter and programs.
network. A configuration of data processing devices and software connected for information interchange.
Network manager. A program or a group of programs that is used to monitor, manage and diagnose the problems of a network.
network address. An address, consisting of subarea and element fields, that identifies a link, a link station, or a network addressable unit. Subarea nodes use network addresses; peripheral nodes use local
Glossary 127
addresses. The boundary function in the subarea node to which a peripheral node is attached, pairs local addresses with network addresses and vice versa.
network management. In the IBM Token-Ring Network, the conceptual control element of a data station that interfaces with all of the layers of that data station and is responsible for the resetting and setting of control parameters, obtaining reports of error conditions, and determining if the station should be connected to or disconnected from the medium.
NMS. See also NetWare Services for OS/2
NetWare Services for OS/2. NetWare Services for OS/2 is the IBM product, which is identical to NMS from Novell. NetWare Services for OS/2 is a network management tool to watch and administer the IPX network. Only IPX workstations can be administered by this utility.
node. An endpoint of a communications link or a junction common to two or more links in a network. Nodes can be processors, controllers, or workstations. See peripheral node.
node address. The address of a node in a network.
non-switched line. A connection between computers or devices using telephone switching equipment that does not have to be established by dialing. See leased line. Contrast with switched line.
o octet. A byte composed of eight binary elements.
001. The Open Data-Link Interface (001) is a standard for OS/2 and DOS network platforms. This standard is developed by Novell. 001 provides access to network services at the Data Link Layer and is especially useful if more than one network protocol has to have access to the same network board or one network protocol has to have access to more than one network board. screen used to display messages and status information.
p
pacing. In data communications, a technique by which receiving equipment controls the transmission of data by sending equipment to prevent overrun. See also flow control See receive pacing and send pacing.
packet. In data communication, a sequence of binary digits, including data and control signals, that is transmitted and switched as a composite whole.
128 OS/2 and Netware RIPL
R RAM. Random Access Memory. A computer's storage area into which data may be entered and retrieved in a consequential manner.
Random Access Memory. See RAM.
Remote bridge. A function that connects two LAN segments using a telecomminucations link between two Personal Systems.
remote initial program load (RIPL). The initial program load of a remote requester by a server on which the appropriate image is located.
remote IPL. See remote initial program load.
remote IPL server. A server that provides remote IPL (initial program load) support for one or more remote IPL requesters.
request header (RH). A three-byte header preceding a request unit (RU). See requestlresponse header. Contrast with response header.
request to send (RTS). This signal is raised by ACDI prior to establishing a connection, and it is lowered when the connection is brought down. This signal works in concert with data terminal ready (DTR) in that it is always raised after DTR and lowered before DTR.
requester. (1) In Server-Requester Programming Interface (SRPI), the application program that relays a request to host computer. Contrast with server. (2) A computer that accesses shared network resources made available by other computers running as servers on the network. See LAN Requester.
router. The hardware and software necessary to link to subnetworks of the same network together. More specifically, the hardware and software necessary to link two subnetwork at the Network Layer of the OSI Reference Model.
s SAA. See Systems Application Architecture.
SAP. See service access point.
server. (1) On a local area network (LAN), a data station that provides facilities to other data stations.
session. (1) A logical connection between two stations or network addressable units (NAUs) that allows them to communicate.
Synchronous Data Link Control (SOLC). A communications protocol for managing synchronous, code-transparent, serial-by-bit information transfer
over a link connection. Transmission exchanges can be duplex or half-duplex, over switched or non-switched links.
Systems Application Architecture (SAA). A set of software interfaces, conventions, and protocols that provide a framework for designing and developing applications across multiple computing environments.
Systems Network Architecture (SNA). The description of the logical structure, formats, protocols, and operational sequences for transmitting information units through and controlling the configuration and operation of networks.
T
token. (1) In a local area network (LAN), the symbol of authority passed among data stations to indicate the station temporarily in control of the transmission medium. It consists of a starting delimiter, a frame control field, and an ending delimiter. The frame control field contains a token indicator bit that
indicates to a receiving station that the token is ready to accept information. If the station has data to send along the network, it appends the data to the token. The token then becomes a frame.
Token.Ring Network. See IBM Token-Ring Network.
topology. The schematic arrangement of the links and nodes of a network.
u user 10. A unique name that identifies a user to the network.
w wide area network (WAN). A network that provides data communication capability in geographic areas larger than those serviced by local area networks.
Glossary 129

130 OS/2 and Netware RIPL

Index
A abbreviations 121 AB 10S.SYS 117 acronyms 121
B Bibliography xvii BIO files 117 BIOS 3 Boot ROM Initialization 7 Boot ROM Overview 3 Boot Sequences 47, 57 BOOTCONF.SYS 47,48, 57, 58, 59 BOOTCONF.SYS description 58 BOOTCONF.SYS File
D
BIND Override Parameters 59 Multiple Images per Address 58 Multiple Lines per Node Address 59 Wildcard Characters in BOOTCONF.sys 58
DLR RIPL 75 DOSGEN 63
Overview 63 Dual DOS Requester RI PL 75 Dual DOS RIPL Requester Environment 75
E External Router Server 49
G GETRPL program 17
file index table 21 glossary 123
IBM Boot ROM 3 IBM Operating System/2 126 IML files 42,44 Introduction IPL and RIPL overview 2
L Loading from a NetWare 2.2 Server 48 Loading from a NetWare External Router 48 LOGIN Subdirectory Contents 41
© Copyright IBM Corp. 1992
M Memory Considerations 57 Multiple Images 58 MVDM Support 95
N NET.CFG 55, 102 NetWare boot ROMs versus IBM boot ROMs 40 NetWare LITE 46 NetWare Lite Server 51 NetWare RIPL of DOS Images 63 NetWare RIPL of OS/2 V1.30.2 NetWare RIPL of OS/2 V2.0 Images 93
o OS/21.3 RIPL Images 79 OS/2 2.0 RI PL Images 93 Overview 2
p publications xvii
R Remote Program Load Overview RIPL from 3.11 Server
Binding RPL.nlm to the 802.2 Board 46 BOOTCONF.sys Extensions 47 Changing BOOTCONF.sys 48 NetWare 3.11 RPL-Server 45 RPL.nlm 45 RPL.nlm Parameters 46 Unique Boot Sequences 47
RIPL from a 3.11 Server 44 RIPL from a NetWare 2.2 Server or a NetWare
External Router 2.2 and External Router 49 Features of RPL. vp1 49 Installing RPL.vp1 49 RPCONFIG.COM 50
RIPL from a NetWare Lite Server Boot Sequences using RPL.com 57 BOOTCONF.sys Extensions 57 Changing BOOTCONF.sys 57 Creating and using NET.cfg 55 Features of RPL.com 53 On the NetWare Lite RPL-Server 53 RPL.com Command Line Parameters 53 The NetWare Lite RPL-Server 52
RIPL from OS/2 LAN Server V2.0 3COM Etherlink Adapter 14
131

RIPL from OS/2 LAN Server V2.0 (continued) 8514/A adapter 32 AT bus machine support 34 automatic NET SHARE by server 22 Boot Block Configuration file 23
sample 24 Busmaster Token-Ring Adapter 13 COMM and VCOMM 35 CONFIG.SYS 29 create a model workstation 20 defining RIPL workstations 18 directory structure for RIPL server 25 disk space required 35 file index table (FIT) 20
example of FIT file 22 file search order 22 introduction 21 subdirectory mapping 22 wildcard support 22
GETRPL program 17 Hardware Requirements 13 IBMLAN.INI 36
MAXTHREADS parameter 37 if the Server service does not start 17 installation 13 Installation of OS/2 2.0 Support 15 installation of OS/2 V1.3 support 14 making CONFIG.SYS read/write 30 mice 35 model workstations 20 multiple adapters 36 Remote boot service 17 Remote Program Load (RPL.MAP) file 23 RIPLINST program 15 RIPLINST stops copying 16 Software Requirements 13 STARTUP.CMD file 31 UNPACK program 15 VGA, XGA considerations 27 Western Digital Ethercard 14 XGA adapter 33
RIPL using NetWare from IBM BOOTCON F.SYS File 58 Contents of the LOGIN directory 41 kom a NetWare 2.2 Server 48 from a NetWare External Router 48 from a NetWare Lite Server 51 Using a NetWare Boot ROM 40 Using an IBM boot ROM 41
RIPLINST program 15 ROM Initialization 7 RPCONFIG.COM 50 RPL overview 1
RPL server 1 workstation 1
RPL.com 53, 57 RPL.nlm 45, 46
Loading RPL.nlm on the NetWare Lite RPL-Server 46
132 OS/2 and Netware RIPL
RPL.nlm Parameters 46 RPL.VAP 49 RPL.vp1 49
S Software Revision List 113
U UNPACK program 15

ITSC Technical Bulletin Evaluation GG24-3892-00
REDOOO
Fold and Tape
Fold and Tape
GG24-3892-00
Please do not staple
BUSINESS REPLY MAIL FIRST CLASS MAIL PERMIT NO. 40 ARMONK, NEW YORK
POSTAGE WILL BE PAID BY ADDRESSEE
IBM International Technical Support Center Department 948, Building 821 Internal Zip 2834 11400 BURNET ROAD AUSTIN TX USA 78758-3493
1111.11111.1'111.1.1.1111'1111 •• 11111.1111111 •• 11111
Please do not staple
--- ------ - ---- ---= .:::: :§':f§: ®
Fold and Tape
NO POSTAGE NECESSARY IF MAILED IN THE UNITED STATES
Fold and Tape

ITse Technical Bulletin Evaluation
Remote Initial Program Load for IBM OS/2 V1.3, V2.0, and NetWare
Publication No. GG24-3892-00
REDOOO
Your feedback is very important to us to maintain the quality of ITSO redbooks. Please fill out this questionnaire and return it via one of the following methods:
• Mail it to the address on the back (postage paid in U.S. only) • Give it to an IBM marketing representative for mailing • Fax it to: Your International Access Code + 1 914 432 8246
Please rate on a scale of 1 to 5 the subjects below. (1 = very good, 2 = good, 3 = average, 4 = poor, 5 = very poor)
Overall Satisfaction
Organization of the book Accuracy of the information Relevance of the information Completeness of the information Value of illustrations
Grammar/punctuation/spelling Ease of reading and understanding Ease of finding information Level of technical detail Print Quality
Please answer the following questions:
a) Are you an employee of IBM or its subsidiaries? Yes No --b) Are you working in the USA? Yes No --c) Was the bulletin published in time for your needs? Yes No --d) Did this bulletin meet your needs? Yes No --
If no, please explain:
What other Topics would you like to see in this Bulletin?
What other Technical Bulletins would you like to see published?
Comments/Suggestions: (THANK YOU FOR YOUR FEEDBACK!)
Name Address
Company or Organization
Phone No.

8
i ~ t.!l ~
Remote Initial Program Load for IHM OS/2 V 1.3, V2.0, and Netware
GG24-3892-00
•
PRINTEI> IN THE U.S.A.
co
111111118 11- ·
1111111
11:11:11 11111111