remote access instructions - snoqualmie valley school district
TRANSCRIPT

SNOQUALMIE VALLEY SCHOOL DISTRICT
REMOTE TERMINAL ACCESS

August 11, 2005 1
Remote Access to SVSD Server Remote Connection SVSD staff may now access the District server from home computers using a Remote Desktop Connection. This means that staff may access their individual usershares and the building usershares from remote locations via the Internet. Files saved to the hard drives of specific classroom/office computers will not be accessible using the Remote Desktop Connection. Only information saved to the usershares will be available. Users will sign on to the server using one of several options depending on the operating system employed. For those not using Windows XP, there are links listed below that must be downloaded for Remote Access. Mac client download link: http://www.microsoft.com/downloads/details.aspx?FamilyID=6573f9f1-8ae1-4da9-ab5c-f8457ecdaf2d&DisplayLang=en Windows client download link (for Windows 98/2000): http://www.microsoft.com/windowsxp/downloads/tools/rdclientdl.mspx Windows XP users can get to the Remote Desktop Client by Start -> Programs -> Accessories -> Communication -> Remote Desktop Connection as is shown in Figure 1 on the following page.

August 11, 2005 2
FIGURE 1

August 11, 2005 3
Logging in to the Server The server to which users will be connected is “tserver01.snoqualmie.k12.wa.us” and this must be typed in the Remote Desktop Connection access screen as shown below. Once a user has visited the site using his home computer, the server name will automatically appear in the sign-in area.
FIGURE 2

August 11, 2005 4
Signing In The users will sign in with the same user name that is used at the school. There are two possible versions of the sign-in screen that may appear. It is necessary to let the system know that your domain is Snoqualmie either by typing “snoqualmie\username” in the User name textbox or by typing the username in the top text box and choosing “SNOQUALMIE” in the ‘Log on to’ box. The two versions of the Log On screen appear on the following pages in figures 3 and 4.
FIGURE 3
FIGURE 4

August 11, 2005 5
Remote Desktop Once logged in, the user will have a Remote Desktop that is rather sparse in icons as shown below. (See Figure 5) Each user will determine which desktop shortcuts are most useful on his personal desktop.
FIGURE 5
Figure 5 does not show a bar that will appear at the top of the screen in a live session that indicates that the Remote Access is active. This is an important task bar because it will remind the user that the Remote Terminal is in use. It is particularly important that the user not click the X in order to leave the remote session because the session will remain open and running until the user signs in again (maybe much later). Instructions for Log Out are covered at the end of this document, but, briefly, the user logs out by clicking “Start” and then “Log Off username”. Please do not use the X in the bar that appears at the top of the screen as shown in this box.

August 11, 2005 6
Creating a Desktop Shortcut Directions and examples of how to add icons are provided in the following pages. If a user desires Outlook access through the Remote Desktop, Outlook must be configured with the steps shown in the following screen shots. First, in order to create a desktop shortcut to Outlook on the Remote Terminal, it is necessary to click “Start Programs Microsoft Office Microsoft Outlook 2003”. The desktop shortcut may be produced by right-clicking on Microsoft Outlook 2003 and choosing “Send to Desktop”. (See Figure 6)
FIGURE 6

August 11, 2005 7
Outlook Startup The first time that Outlook is accessed through the Remote Terminal, the program must be configured using Outlook 2003 Startup. The first screen (Figure 7) will begin the configuration. Click “Next”.
Figure 7

August 11, 2005 8
Outlook Startup (continued) The user will then be asked if Outlook is to be configured to be used with a Microsoft Exchange Server. Click “Yes” and then “Next” as is shown in Figure 8.
Figure 8

August 11, 2005 9
Outlook Startup (continued) In the next screen the user will be asked to choose the type of server for the e-mail account. Our server is a Microsoft Exchange Server so choose that one and “Next as is shown in Figure 9.
Figure 9

August 11, 2005 10
Outlook Startup (continued) The last step in the configuration is to identify the server and the username for the e-mail account. Type this information in the text boxes as shown using “imail01” as the server name and the user name as shown in Figure 10. Click “Next”.
Figure 10

August 11, 2005 11
Outlook Startup (continued) This last screen in the configuration process is confirmation that the operation was successful. (Figure 11) Click “Finish”. The configuration process is only required in the initial session of access. Later use of Outlook will function just as it does in the school.
Figure 11
Other Desktop Icons Desktop shortcuts for other applications such as Microsoft Word, Microsoft Excel, etc. may be added to the Remote Desktop in the same way that Outlook was added. Configuration for those applications is not necessary. Refer to Figure 6 for the process of adding application shortcuts to the Desktop.

August 11, 2005 12
Task Bar Icons on the Desktop must be double-clicked in order to open applications, but for those applications that are frequently used it is helpful to place a desktop shortcut on the Task Bar located at the bottom of the screen. This is easily done and may save time later. Icons on the Task Bar need only be clicked once to open an application. In order to change what appears on the Task Bar, it must be unlocked. Right click on the blank gray area to the right of the “Start” button and click the “Lock Task Bar” button if it has a check mark beside it. If no check mark appears, it is already unlocked. (See Figure 12.)
Figure 12
To place shortcuts on the Task Bar, right click on the desktop icon and drag the icon down to the Task Bar and release it. Once you have placed all shortcuts that you wish on the Task Bar, remember to “lock” it again by right clicking on the gray area and choosing “Lock the Taskbar”.
August 11, 2005 13
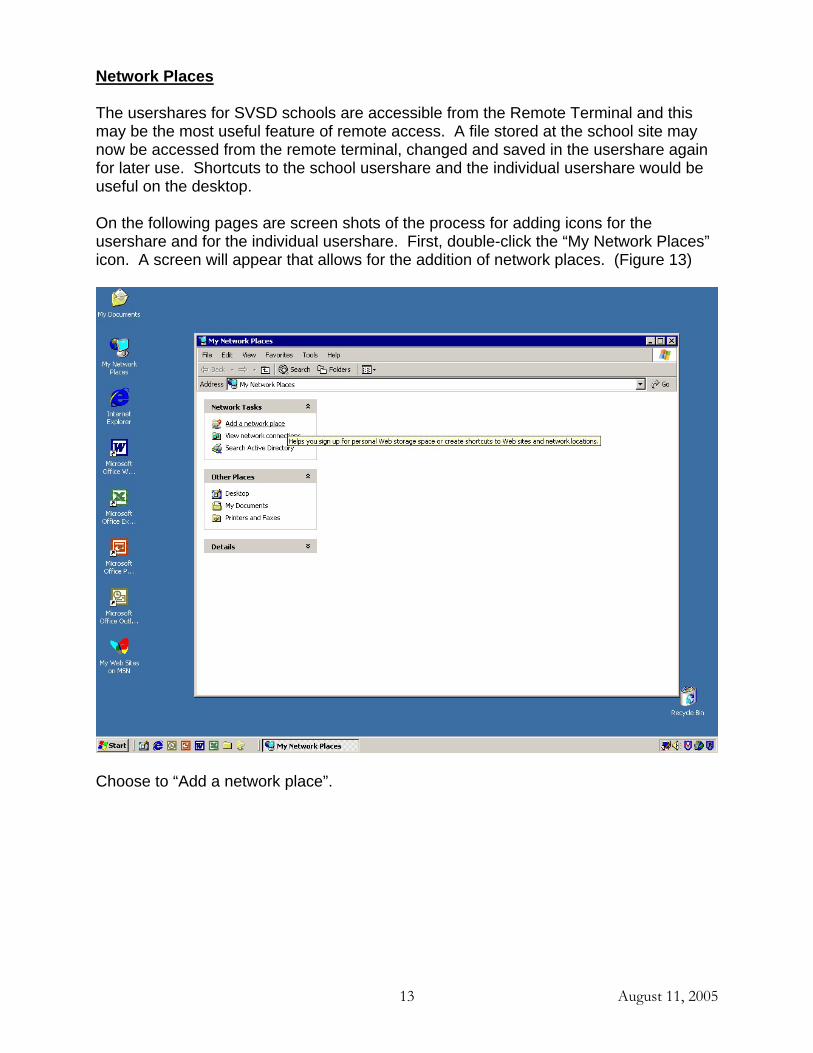
Network Places The usershares for SVSD schools are accessible from the Remote Terminal and this may be the most useful feature of remote access. A file stored at the school site may now be accessed from the remote terminal, changed and saved in the usershare again for later use. Shortcuts to the school usershare and the individual usershare would be useful on the desktop. On the following pages are screen shots of the process for adding icons for the usershare and for the individual usershare. First, double-click the “My Network Places” icon. A screen will appear that allows for the addition of network places. (Figure 13)
Choose to “Add a network place”.

August 11, 2005 14
Network Places (continued) In this next screen the user is asked to provide the address of the network place. Be sure to use the name of the proper school network. The example is for Mount Si High School. (Figure 14) The MSHS usershare address is \\mshsnt01\user_share.
Figure 14
Once this has been done, an icon will appear in the “My Network Places” screen. Individual usershares may also be added. See Figure 15 on the next page for that format.

August 11, 2005 15
Network Places (continued)
Figure 15
This screen shows the addition of an individual user’s access. The format is \\mshsnt01\\user_share\users\staff\username for an MSHS user. Be sure to use the appropriate school usershare.

August 11, 2005 16
Network Places (continued) In order to have a shortcut on the desktop, the user would “drag and drop” the usershare icon to the desktop as is shown in progress in Figure 16 or right click on the icon and “send to Desktop”.
Figure 16
Printing It is not possible to print to SVSD network printers from the Remote Terminal. If the user needs to print a document produced on the Remote Terminal, a local printer must be used. First, copy the entire document to the Clipboard, then minimize the “tserver” icon at the top of the screen. Open the appropriate application on the local computer and paste the information from the Clipboard. The document may now be printed on the local printer using the normal printing procedure from the application.

August 11, 2005 17
Desktop View On this page is a view of a desktop that has had several shortcuts added. (Figure 17) This configuration is similar to the one the user might have on the classroom computer directly connected to the SVSD network. Users who plan to use the Remote Access extensively will probably want to closely replicate access to applications frequently used.
Figure 17

August 11, 2005 18
Logging Off Be sure to log off of the remote access by using the “Start” button and choosing “Log off username” so that the session will be closed (Figure 18). Please do not use the X to exit the session.
Figure 18