register - tirekickerinspections.com · web viewwhen the report is not paid yet a “buy now”...
TRANSCRIPT

TIREKICKER INSPECTIONS
RegisterIn the top right menu of Tirekicker Inspections web site there is an option for Registration. In case the user has not registered yet using the phone app. (TKI).The registration can be as a single User or as a company.It has 3 steps for steps for single user and 4 steps for a company one.
Login & Forgot PasswordThis option allows the user to reset his own password. The new password will be emailed to them and it can be changed later on the user profile menu.

DashboardThe Dashboard provides access to all functionalies of the application.Admin Role – will see all functionalitiesUser Role – will see some of them

Company InfoIn this function company information can be updated. This Name and logo will be displayed on the reports. The address will be use to calculate the route on the report map, so is very important to enter a valid address and Postal Code.
Company UserDisplays current company users.
The search texbox allows you to filter by any of the showed columns. Also by clicking on the column itself the data can be sorted (alphabetical order, number or date) First click is sorting ascending then the second click sorts descending.
The “Add User” function will redirect the user to the “Add User” screen. The “Edit” function will allows to change any information for existing user.

1-Add User
Report TypesIt shows all report types this user/company has template of it. If the user diselect it will disable all templates for that specific report type that was diselected.

ReportsIt shows all reports created by all company users
Reports will be accessible for 48 hours, after that it need to be paid. If you try to open an unpaid report after the 48 hours period you will this page.

When the report is not paid yet a “Buy Now” button will be displayed instead of “Paid” word.
In order to pay for it just press that button. It will take you to PayPal web site where you log in with your PayPal account.

If you press “Cancel and return to Tirekicker Inspections Inc” it will return you to Tirekicker
When you finish the payment, PayPal will return you to Tirekicker and it will give you a receipt that can be printed

The reports can be Viewed, Edited, Export to PDF. Also the images from the report can be downloaded in a Zip file and document can be attached to the report in case needed.
1- View reportReport has all sections and fields that were assigned on the template. It also contains the Company logo, the revisions with Name and date when created. If paid can be printed and also download the images on it.

When multiple revisions, the first revision will appear in black, then red, blue, etc. One different color for each revision, so changes or additions made will appear in the color of the revision they were made. The same with pictures, damages added or changed.
In case the report template has damages on it. By clicking on the Damage part a pop up window will retrieve the damages and images if where added.

If Map present on the Template then it will contain the route from the Company to the place where the report was created.

It also can contain Canadian Black Book data
It also can contain Media Section
It also can contain Disclosure Section 2- Edit reportIt can be edited from Tirekicker Inspections or the TKI mobile App. When edited a new revision is created.

3- Export to PDF
4- Export images to a Zip file
5- Attach Documents to report
Up to 2 documents can be attached to report

After uploaded the documents will appear as attachments in the report
Report TemplatesTemplates can be created from scratch or copied from existing “Default Template”. The template allows to customize the report as it determine the sections and fields to show on the report. The search functionality allows you to filter templates or sort by any of the present columns.

1- Add Template (creates one from scratch) First, we choose a name for template Second, select report Type from drop down. The fields related to that type will be
populated Choose the fields you want in the report and determine if it is required or not Then choose Template pages for the report

Template PagesBy selecting Option page, it will display all report fieldsBy selecting Media Page, the report will have the page for entering vehicle pictures and videos
By selecting Condition Map, the report will have a page for storing vehicle damages, tires thread deep and paint
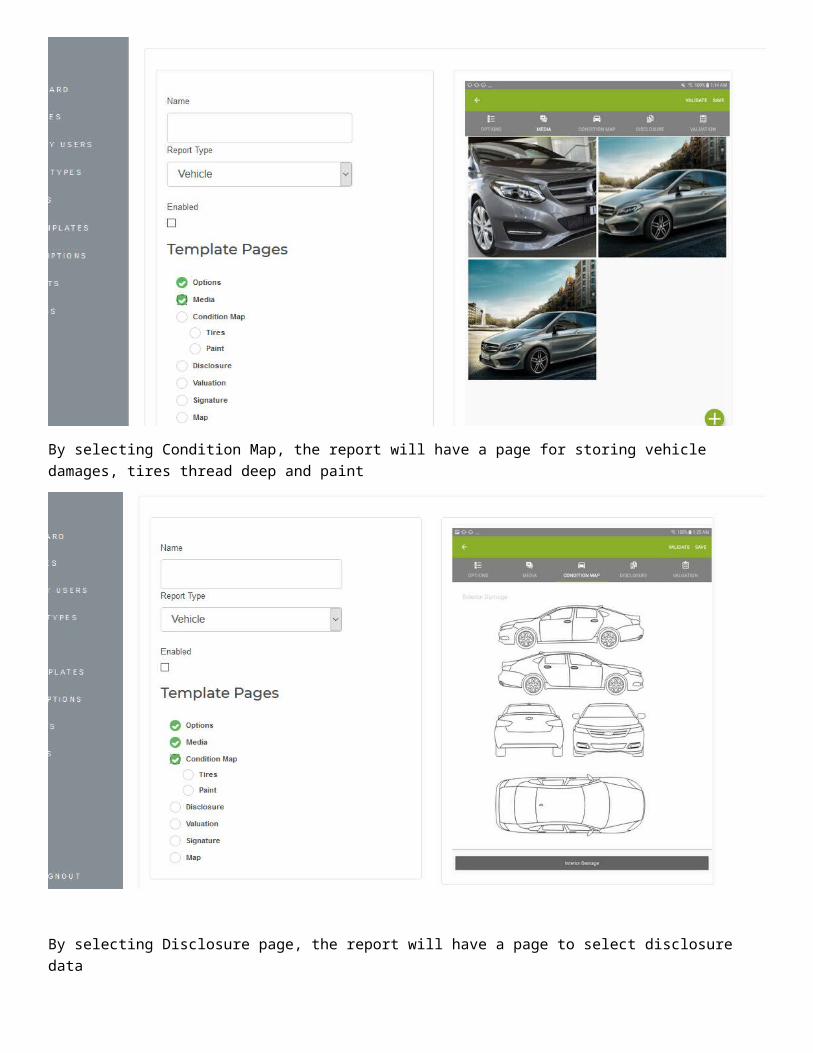
By selecting Disclosure page, the report will have a page to select disclosure data
By selecting Valuation page, the report will have Canadian Black Book values for the vehicle

By selecting Signature, the report will request the signature of the user creating a report
By selecting Map, the report will show the route between company coordinates and the report coordinates

2- Copy template from exiting default one. The default templates are ones created in TKI headquarter as a starting template for the user.
When click on “Copy from existing templates”, a pop up window appears.
Input the name of the new template and select from exiting default ones. It will create a new template that will contain the same configuration from the default one selected.Then this template can be edited and changed as desire.
3- Edit templates. This option will allow to change existing setting of a template but not the report type.

4- Assign Templates to users. Templates can be assigned to different company users that will execute different tasks.
On the top twill appear the name of the templateFrom the company users, select the ones that will be working with this template. Only those ones will be able to create a report from this template. For the rest of the users this template will be Not visible.

5- Select Email recipient users
In this option you will be able to choose company users that will receipt the report by email any time is created. Only reports with this template.

6- Delete templateA template can be deleted if there is no report done for this template.
Report SubscriptionIt will list all subscriptions for the company/individual users

1- Add Subscription
After clicking “Add Subscription” button a new page. A list of possible subscription types will appear.
By clicking “Accept Subscription Agreement” a list of possible subscription will show up. By clicking a link, a popup windows will appear.

By pressing “Subscribe” button it will redirect the user to PayPal web site to finish the transaction.
Report PaymentsIt will list all payments made by company/individual users. It could be a “Pay as you go” or Subscription

MessagesThis option allows TKI team send you messages regarding new functionality or new templates
By Clicking “View” button a popup window will show up
User MenuThe user menu contains 3 options

1- Edit profile - Allows to change his own information2- Change Password - It allows the user to change his own password3- Logout - Leave the application. End the session.
Another way to leave the application is by pressing the “Signout” button at the bottom left corner