referenceguide9.1 - adaptive computing
TRANSCRIPT

Moab ViewpointReference Guide 9.1.1
March 2017
© 2017 Adaptive Computing Enterprises, Inc. All rights reserved.
Distribution of this document for commercial purposes in either hard or soft copy form is strictly prohibited without priorwritten consent from Adaptive Computing Enterprises, Inc.
Adaptive Computing, Cluster Resources, Moab, Moab Workload Manager, Moab Viewpoint, Moab Cluster Manager, MoabCluster Suite, Moab Grid Scheduler, Moab Grid Suite, Moab Access Portal, and other Adaptive Computing products are eitherregistered trademarks or trademarks of Adaptive Computing Enterprises, Inc. The Adaptive Computing logo and the ClusterResources logo are trademarks of Adaptive Computing Enterprises, Inc. All other company and product names may betrademarks of their respective companies.
Adaptive Computing Enterprises, Inc.1712 S. East Bay Blvd., Suite 300Provo, UT 84606+1 (801) 717-3700www.adaptivecomputing.com
Scan to open online help
ii

iii
Welcome 1
Chapter 1 Viewpoint Configuration 3Configuration Page 4Basic Configuration Page 6File Manager Configuration Page 9About Roles 11
Role Management Page 11Roles Page 12Role Permissions 14Default Roles 19Creating Or Editing Roles 21Deleting Roles 22Resetting Default Roles 22Restoring Default Roles 23
About Principals 24Principal Management Page 25Principals Page 25Edit Users/Groups Pop-up 27Creating Or Editing Principals 30Deleting Principals 30
Remote Visualization Configuration Page 31Nitro Services Configuration Page 33Reporting Configuration Page 34Application Templates Configuration Page 35Licensed Features Page 37Additional Configuration 40
Securing The Connection Between Viewpoint AndMWS 40Configuring Viewpoint To Use SSL 41Authenticating Remote Visualization 43Viewing Elastic Computing Statistics 44
Chapter 2 Viewpoint Basics 51The Viewpoint Home Page 51Menu Bar 54Navigating Viewpoint 54Logging In/Signing Out 55Accessing Online Help 56
Chapter 3 Viewpoint Workload Overview 57Workload Page 57Job Details Page 60Job Details–Functional Areas 66Job Details–Additional Areas 73

Job Arrays 74Managing The Workload 77Creating A Job 77Creating Or Editing A Job Submission Script 79Viewing Job Details 86
Chapter 4 Application Templates 89Application Templates Page 89Create Application Template Page 93Edit Application Template Page 95Application Template Details 97Creating An Application Template 114Editing An Application Template 115Importing An Application Template 117Managing Application Template History 118Provided Application Templates 119
Free Form Application Template 120Docker Application Template 129Nitro Application Template 138Remote Viz Application Template 147
Application Template API 157Authenticate Against The Viewpoint Template API 158SupportedMethods 159Create Template 161Delete Template 189Delete Template History 189Get All Templates 190Get Single Template 206Modify Template 214Modify Template History 224
Chapter 5 Nodes 241Nodes Page 241Node Details Page 244Resource Job Timeline Page 247Threshold Settings 250
Chapter 6 File Manager 253File Manager Page 253Uploading Files 256Creating Folders 257Maintaining Files And Folders 257
iv
v
Chapter 7 Remote Visualization Sessions 261Sessions Page 261Creating A Session 264Connecting To A Session 265
Chapter 8 Reporting 267Reporting Roles 268Aggregated Views Page 268
Viewing An Aggregated View 272Viewing An Aggregated View Pipeline 275Creating An Aggregated View 278Importing An Aggregated View 280Editing An Aggregated View 281Designing An Aggregated View 282Provided Aggregated Views 297
Reports Page 299Viewing Reports 303Report Types 305Creating A Report 306Importing A Report 307Editing A Report 308Designing A Report 308Example Reports 318Exporting Reports 325Provided Reports 327
Dashboards Page 332Viewing A Dashboard 335Creating A Dashboard 336Importing A Dashboard 337Editing A Dashboard 338Designing A Dashboard 339Provided Dashboards 346

vi

1
Welcome
Welcome to the Moab Viewpoint Reference Guide for version 9.1.1.Viewpoint is a web application that, interacting with Moab Workload Manager,lets users manage jobs and resources without the complexities of maintainingMoab via the command line. Viewpoint uses a customizable portal that enablesusers to view and configure jobs and to compute node resources, principals,and roles. Viewpoint permissions allow system administrators to specify whichpages, tools, and settings certain users or groups are permitted to use,manage, and view.This guide is intended as a reference for system administrators and users. Thisguide is broken up into functional chapters to help you quickly navigate and useViewpoint.
This guide contains all functional chapters. The actual functions that areavailable to you will vary depending on the rights and privileges associatedwith your user profile.
In this guide:l Chapter 1 Viewpoint Configuration on page 3 – Provides the necessaryinformation for you to set up and configure your Viewpoint portal.
l Chapter 2 Viewpoint Basics on page 51 – Gives an overview of theViewpoint portal, including logging in/signing out and general navigationinformation.
l Chapter 3 Viewpoint Workload Overview on page 57 – Gives an overviewof the Workload page and provides information on viewing and managingworkloads.
l Chapter 4 Application Templates on page 89 – Gives an overview of theApplication Templates page and provides information on managing theapplication templates that are used to define job settings and optionsavailable to users when creating jobs.
l Chapter 5 Nodes on page 241 – Gives an overview of the Nodes page andprovides information on viewing and managing nodes for your workload.
l Chapter 6 File Manager on page 253 – Gives an overview of the FileManager page and provides information on using the RFS for filemanagement.
l Chapter 7 Remote Visualization Sessions on page 261 – Gives an overviewof the Sessions page and how you can view important aspects of your jobswhile also freeing up valuable resources that could be used for othertasks.
Welcome

l Chapter 8 Reporting on page 267 – Gives an overview of the Reportingpage and provides information on creating and generating workloadreports and dashboards.
Welcome
2

3
Chapter 1 Viewpoint Configuration
Configuring Viewpoint requires several setup and configuration proceduresbefore you can run Viewpoint:
Some Viewpoint functionality requires individual licenses. See Licensingfor more information.
1. Initial setup and configuration procedures crucial to the functionality ofViewpoint; performed when you first installed and configured Viewpoint.See Installing Moab Viewpoint in the Moab Installation and ConfigurationGuide.
2. Initial setup and configuration of RLM. Required if using RemoteVisualization and/or Nitro Web Services. See Installing RLM Server in theMoab Installation and Configuration Guide.
3. Initial setup and configuration of Remote Visualization (if part of yoursystem configuration). See Installing Remote Visualization in the MoabInstallation and Configuration Guide.
4. Initial setup and configuration of Nitro and Nitro Web Services (if part ofyour system configuration). See Nitro Integration in the Moab Installationand Configuration Guide.
Once the initial setup and and configuration steps have been completed,Viewpoint provides a Configuration page that lets you complete set up andconfiguration of your Viewpoint portal. See Configuration Page on page 4 formore information.In this chapter:
l Basic Configuration Page on page 6l File Manager Configuration Page on page 9l About Roles on page 11l About Principals on page 24l Reporting Configuration Page on page 34l Remote Visualization Configuration Page on page 31l Nitro Services Configuration Page on page 33l Application Templates Configuration Page on page 35l Licensed Features Page on page 37l Chapter 1 Viewpoint Configuration
Chapter 1 Viewpoint Configuration

Configuration Page
Only privileged users can see the Configuration page. In addition, theuser's credentials determine which configuration functions are available.
The Configuration page lets you perform administrative functions forViewpoint.This topic describes the Configuration page information after Viewpoint hasbeen installed or upgraded.To access this page, click Configuration in the menu bar. You can also click
next to where you sign out.
The Configuration page has these functional pages:l Basic Configuration – This is the default view when you access theConfiguration page.This page is primarily used only when installing or upgrading Viewpoint.See Installing Moab Viewpoint or Upgrading Moab Viewpoint (RPM) in theMoab Installation and Configuration Guide for more information.However, you can reset the default roles using this page. See ResettingDefault Roles on page 22 for more information.See Basic Configuration Page on page 6 for more information about thispage.
l File Manager Configuration – Available when you click File Managerfrom the left pane. This page lets you configure servers and pathsavailable in the File Manager. See File Manager Configuration Page onpage 9 for more information about this page.
l Roles – Available when you clickRoles from the left pane. This page letsyou manage roles and role permissions. See Role Management Page onpage 11 for more information about this page.
l Principals – Available when you click Principals from the left pane. Thispage lets you assign users, groups, or OUs to roles. See PrincipalManagement Page on page 25 for more information about this page.
l Remote Visualization Services – Available when your system includesRemote Visualization. ClickRemote Visualization Services from the leftpane to view this page.
Chapter 1 Viewpoint Configuration
4 Configuration Page

Configuration Page 5
This page is primarily used only when installing and configuring RemoteVisualization. See Installing Remote Visualization in the Moab Installationand Configuration Guide for more information.See Remote Visualization Configuration Page on page 31 for moreinformation about this page.
l Nitro Services – Available when your system includes Nitro WebServices. ClickNitro Services from the left pane to view this page.This page is primarily used only when installing and configuring Nitro WebServices. See Installing Nitro Web Services (manual install method) orInstalling Nitro Web Services (RPM install method) in the Moab Installationand Configuration Guide for more informationSee Nitro Services Configuration Page on page 33 for more informationabout this page.
l Reporting Configuration – Available when you clickReporting from theleft pane. This page lets you configure the reporting service. SeeReporting Configuration Page on page 34for more information.
l Application Templates – Available when you clickApplicationTemplates from the left pane. This page lets you import and exportapplication templates for creating jobs. See Application TemplatesConfiguration Page on page 35 for more information.
l Licensed Features – Available when you click Licensed Features fromthe left pane. This page lets you view the features available on your Moablicense. See Licensed Features Page on page 37 for more informationabout this page.
Related Topics
l Basic Configuration Page on page 6l File Manager Configuration Page on page 9l Role Management Page on page 11l Principal Management Page on page 25l Remote Visualization Configuration Page on page 31l Nitro Services Configuration Page on page 33l Reporting Configuration Page on page 34l Application Templates Configuration Page on page 35l Licensed Features Page on page 37l Chapter 1 Viewpoint Configuration on page 3
Chapter 1 Viewpoint Configuration

Basic Configuration PageThis topic provides an example of the Basic Configuration page and describesits layout and available information.
This page is primarily used only after Viewpoint is installed or upgraded.This page also lets you, at any time, reset the default roles.
To access this page click Configuration from the menu.In this topic:
l Page Example on page 6l Available Fields on page 7l Page Actions on page 8
Page ExampleThe following image is an example of the Basic Configuration page.
Chapter 1 Viewpoint Configuration
6 Basic Configuration Page

Basic Configuration Page 7
Available FieldsThe following table describes the fields on the Basic Configuration page.
Field Description
MWS Configuration
Server The URL for MWS on the Moab Server Host. For example: http://server:8080.
If your configuration uses a secure the connection between Viewpoint and MWS, the URLmust contain "https" and the secure port. See 1.1 Securing the Connection betweenViewpoint and MWS for more information.
Chapter 1 Viewpoint Configuration

Field Description
Username Name of the admin user (for example, "moab-admin"). This is the user who is given MWS accessand access to all Viewpoint pages as the default. However, this user is typically not a LDAP/PAMuser and does not have operating system permissions (like creating application templates). Thisuser can assign users to roles, including the HPCAdmin role (for LDAP/PAM users).This is the "auth.defaultUser.username"specified when MWS Server was installed. Thisinformation is stored in the /opt/mws/etc/mws-config.groovy file.
Password Password authentication for the admin user.This is the "auth.defaultUser.password" specified when MWS Server was installed. Thisinformation is stored in the /opt/mws/etc/mws-config.groovy file.
Path Path prefix of the Moab Web Services URL. This will almost always be "/mws/".
Client ID ID used to authorize Viewpoint as a client in MWS.This is the "OAuth clientId" specified when Viewpoint was installed. This information is stored inthe /opt/mws/etc/mws-config.groovy file.
Client Secret Permission (secret) used to authorize Viewpoint as client in MWS.This is the "OAuth clientSecret" specified when Viewpoint was installed. This information is storedin the /opt/mws/etc/mws-config.groovy file.
Reset Per-missions
Resets the default roles (HPCAdmin, HPCUser, NitroAdmin, NitroUser, RemoteVizAdmin, andRemoteVisUser) back to their default settings. See Resetting Default Roles on page 22 for moreinformation about this check box.
Misc Options
Node Namesto Ignore
Names of nodes for which you want to be ignored when submitting jobs. Separate names with acomma. For example, to prevent jobs from accessing the DEFAUT and GLOBAL nodes, type"DEFAULT,GLOBAL".
Use GoogleAnalytics tohelpimprovethis product
Indicates whether you want to track usage through Google Analytics.
Page ActionsThese buttons let you perform actions on this page:
l TEST - Confirms the settings are correct.l SAVE - Submits your settings.
Chapter 1 Viewpoint Configuration
8 Basic Configuration Page

File Manager Configuration Page 9
Related Topics
l Configuration Page on page 4l File Manager Configuration Page on page 9l Chapter 1 Viewpoint Configuration on page 3
File Manager Configuration PageTo access this page, click Configuration in the menu bar and then click FileManager in the left pane.This topic provides an example of the File Manager page and describes itslayout and available information.In this topic:
l Page Example on page 9l Available Fields on page 10l Page Actions on page 11
Page ExampleThe following image is an example of the File Manager Configuration page.
Chapter 1 Viewpoint Configuration
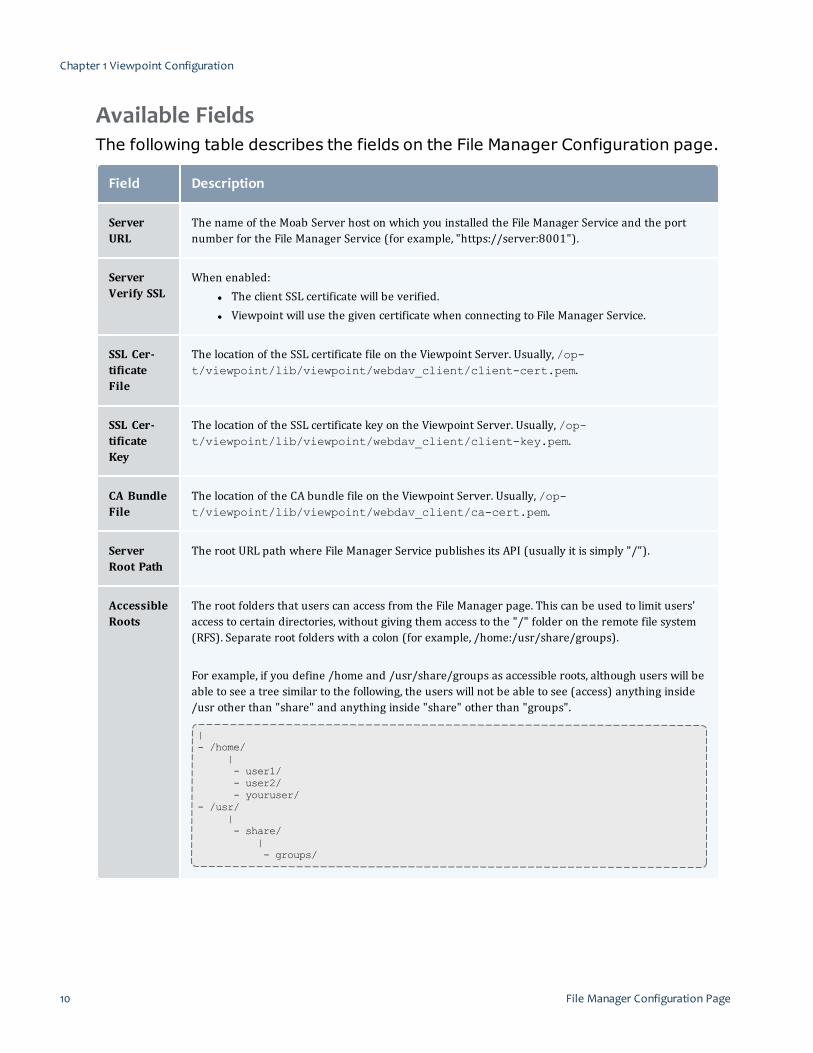
Available FieldsThe following table describes the fields on the File Manager Configuration page.
Field Description
ServerURL
The name of the Moab Server host on which you installed the File Manager Service and the portnumber for the File Manager Service (for example, "https://server:8001").
ServerVerify SSL
When enabled:l The client SSL certificate will be verified.l Viewpoint will use the given certificate when connecting to File Manager Service.
SSL Cer-tificateFile
The location of the SSL certificate file on the Viewpoint Server. Usually, /op-t/viewpoint/lib/viewpoint/webdav_client/client-cert.pem.
SSL Cer-tificateKey
The location of the SSL certificate key on the Viewpoint Server. Usually, /op-t/viewpoint/lib/viewpoint/webdav_client/client-key.pem.
CA BundleFile
The location of the CA bundle file on the Viewpoint Server. Usually, /op-t/viewpoint/lib/viewpoint/webdav_client/ca-cert.pem.
ServerRoot Path
The root URL path where File Manager Service publishes its API (usually it is simply "/").
AccessibleRoots
The root folders that users can access from the File Manager page. This can be used to limit users'access to certain directories, without giving them access to the "/" folder on the remote file system(RFS). Separate root folders with a colon (for example, /home:/usr/share/groups).
For example, if you define /home and /usr/share/groups as accessible roots, although users will beable to see a tree similar to the following, the users will not be able to see (access) anything inside/usr other than "share" and anything inside "share" other than "groups".
|- /home/
|- user1/- user2/- youruser/
- /usr/|- share/
|- groups/
Chapter 1 Viewpoint Configuration
10 File Manager Configuration Page

About Roles 11
Field Description
MaximumUploadSize(bytes)
Total amount of data that can be uploaded in a single file. A value of '-1' means unlimited.
Page ActionsThese buttons let you perform actions on this page:
l TEST - Confirms the settings are correct.l SAVE - Submits your settings.
Related Topics
l Chapter 6 File Manager on page 253l Chapter 1 Viewpoint Configuration on page 3
About RolesA role in Viewpoint is simply a collection of permissions. Once permissions areassigned, a role is assigned to users or user groups in a principal. This meansthat each user in the principal will be bound by the role permissions.This section describes the features and functions available to manage roles.In this section:
l Role Management Page on page 11l Roles Page on page 12l Role Permissions on page 14l Default Roles on page 19l Creating or Editing Roles on page 21l Deleting Roles on page 22
Role Management PageThe Role Management page displays the default and custom roles available foryour Viewpoint configuration. Using this page you can create, edit, and deleteroles. Click at any time to refresh the page display.
Chapter 1 Viewpoint Configuration

To access this page, click Configuration in the menu bar and then clickRolesfrom the left pane.The following image is an example of the Role Management page.
Related Topics
l About Roles on page 11l Creating or Editing Roles on page 21l Deleting Roles on page 22l Chapter 1 Viewpoint Configuration on page 3
Roles PageThe Roles page lets you manage the permissions for the specified role.To access this page, click Configuration in the menu bar, clickRoles in the leftpane, and then click either Create to add a new role or click the name of therole you want to edit.
The Roles page will display Create Role or Update Role depending onwhether you are creating or editing, respectively.
This topic provides an example of the Roles page and describes its layout andavailable information.In this topic:
Chapter 1 Viewpoint Configuration
12 About Roles
About Roles 13
l Page Example on page 13l Available Fields on page 13l Page Actions on page 14
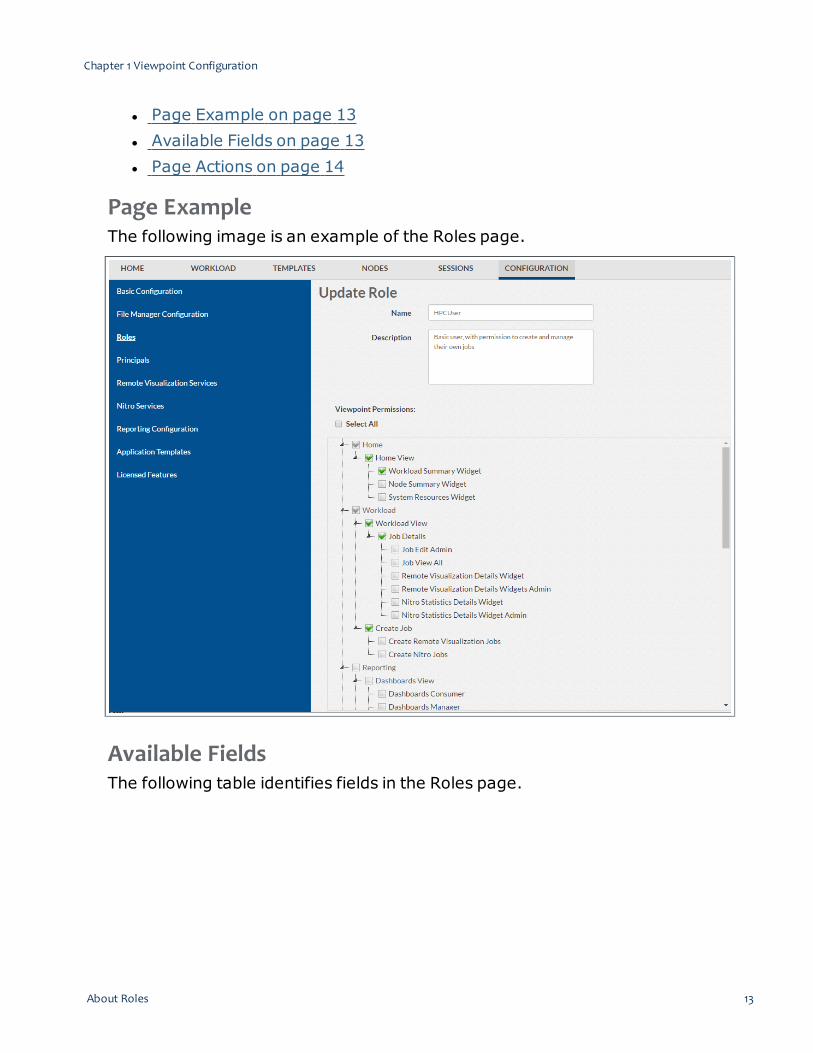
Page ExampleThe following image is an example of the Roles page.
Available FieldsThe following table identifies fields in the Roles page.
Chapter 1 Viewpoint Configuration

Field Description
Name Lets you specify the name of the role. The name you specify appears in the list of roles on the RoleManagement page and in the list of role options when you edit a principal. Role names are casesensitive and may include letters, numbers, dashes (-), periods (.), and underscores (_).
You cannot modify the role name after creating a role.
Description Lets you specify/modify the text description of the role. This description appears in the list ofroles on the Role Management page.
ViewpointPermissions
These fields let you specify the Viewpoint page permissions you want to set for the role. See RolePermissions for more information.
Page ActionsThese buttons let you perform actions on this page:
l CANCEL – Closes the page without saving any changes.l DONE – Saves the changes and closes the page.l APPLY – Saves the changes but does not close the page.l RESET – Displayed only when editing one of the default roles (HPCAdmin,HPCUser, NitroAdmin, NitroUser, RemoteVizAdmin, and RemoteVisUser).Resets the role back to the default settings and stays on the page. Thisdoes not remove principals from the role. The "Reset Permissions" checkbox on the Basic Configuration page will reset the role back to the defaultsettings and remove all principals assigned to the role. See ResettingDefault Roles on page 22 for more information.
Related Topics
l About Roles on page 11l Role Management Page on page 11l Role Permissions on page 14l Creating or Editing Roles on page 21l Chapter 1 Viewpoint Configuration on page 3
Role PermissionsViewpoint organizes roles based on Viewpoint pages, as grouped by the Menubar. For example, the Home View permission enables a user to access theViewpoint Home page. Other permissions enable the user to access various
Chapter 1 Viewpoint Configuration
14 About Roles
About Roles 15
widgets on the Home page. This topic describes the different permissions youcan manage for a role.In this topic:
l About Permissions on page 15l Viewpoint Permissions on page 15
About PermissionsViewpoint uses permissions to enable you to control user access. For example,you can grant a user the ability to see a feature, but not edit it. The Viewpointpermissions control access to the various pages and specific functions on thatpage.Some permissions are dependent on other permissions. For example, the JobEdit Admin permission enables you to manage jobs created by other users.When you grant this permission, Viewpoint also automatically grants the JobDetails permission, which enables you to view details for your own jobs, andthe Workload View permission, which enables you to access the Workloadpage.
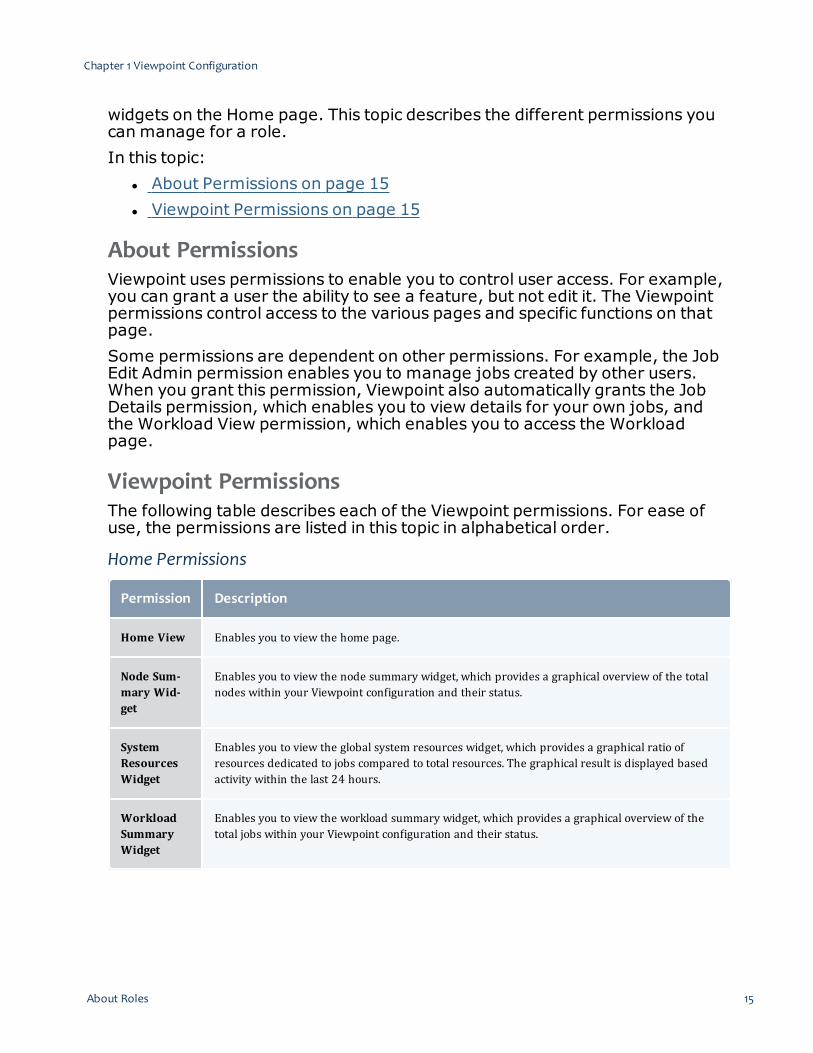
Viewpoint PermissionsThe following table describes each of the Viewpoint permissions. For ease ofuse, the permissions are listed in this topic in alphabetical order.
Home Permissions
Permission Description
Home View Enables you to view the home page.
Node Sum-mary Wid-get
Enables you to view the node summary widget, which provides a graphical overview of the totalnodes within your Viewpoint configuration and their status.
SystemResourcesWidget
Enables you to view the global system resources widget, which provides a graphical ratio ofresources dedicated to jobs compared to total resources. The graphical result is displayed basedactivity within the last 24 hours.
WorkloadSummaryWidget
Enables you to view the workload summary widget, which provides a graphical overview of thetotal jobs within your Viewpoint configuration and their status.
Chapter 1 Viewpoint Configuration
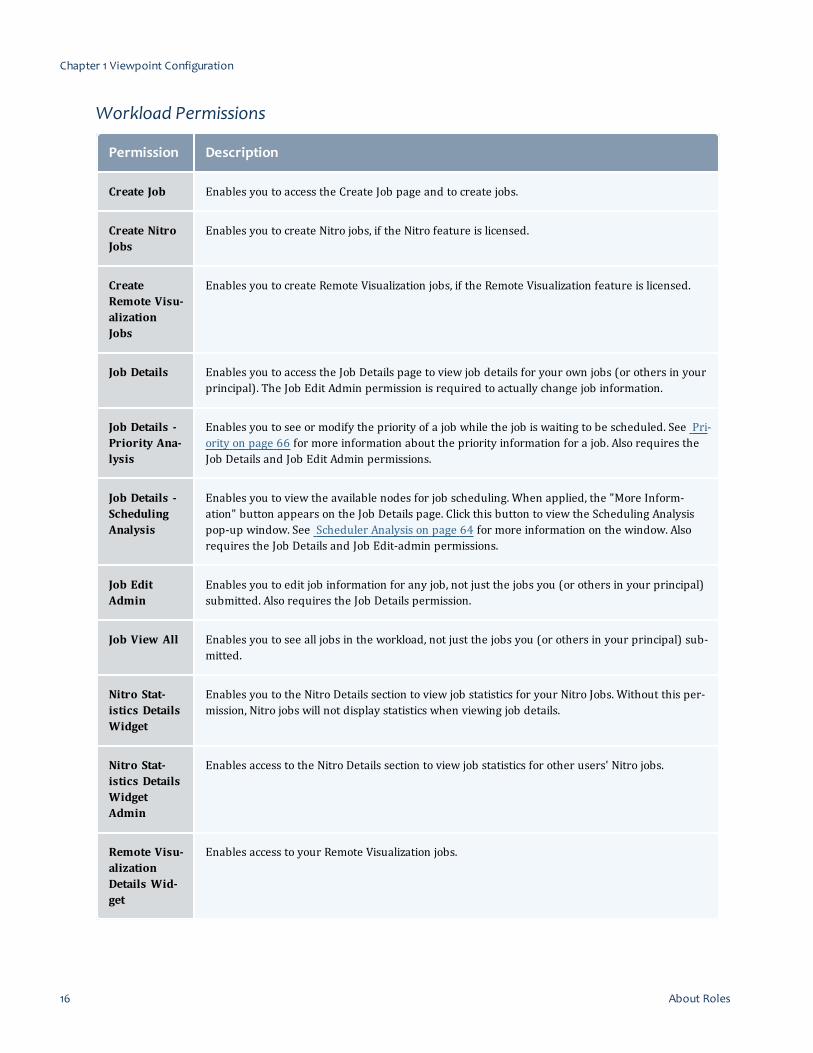
Workload Permissions
Permission Description
Create Job Enables you to access the Create Job page and to create jobs.
Create NitroJobs
Enables you to create Nitro jobs, if the Nitro feature is licensed.
CreateRemote Visu-alizationJobs
Enables you to create Remote Visualization jobs, if the Remote Visualization feature is licensed.
Job Details Enables you to access the Job Details page to view job details for your own jobs (or others in yourprincipal). The Job Edit Admin permission is required to actually change job information.
Job Details -Priority Ana-lysis
Enables you to see or modify the priority of a job while the job is waiting to be scheduled. See Pri-ority on page 66 for more information about the priority information for a job. Also requires theJob Details and Job Edit Admin permissions.
Job Details -SchedulingAnalysis
Enables you to view the available nodes for job scheduling. When applied, the "More Inform-ation" button appears on the Job Details page. Click this button to view the Scheduling Analysispop-up window. See Scheduler Analysis on page 64 for more information on the window. Alsorequires the Job Details and Job Edit-admin permissions.
Job EditAdmin
Enables you to edit job information for any job, not just the jobs you (or others in your principal)submitted. Also requires the Job Details permission.
Job View All Enables you to see all jobs in the workload, not just the jobs you (or others in your principal) sub-mitted.
Nitro Stat-istics DetailsWidget
Enables you to the Nitro Details section to view job statistics for your Nitro Jobs. Without this per-mission, Nitro jobs will not display statistics when viewing job details.
Nitro Stat-istics DetailsWidgetAdmin
Enables access to the Nitro Details section to view job statistics for other users' Nitro jobs.
Remote Visu-alizationDetails Wid-get
Enables access to your Remote Visualization jobs.
Chapter 1 Viewpoint Configuration
16 About Roles

About Roles 17
Permission Description
Remote Visu-alizationDetails Wid-gets Admin
Enables access to Remote Visualization jobs for all users.
WorkloadView
Enables you to view the Workload page. Admins will see all jobs; non-admins will only see theirjobs, or the jobs within their principal (user group).
Reporting Permissions
Permission Description
Aggregated Views View Enables you to view the Aggregated Views page.
Aggregated Views Admin Enables you to create aggregated views and administer other users' aggregatedviews.
Aggregated Views Con-sumer
Enables you to access the Aggregated Views page and view aggregated view data.
Aggregated Views Manager Enables you to create aggregated views and administer your own aggregatedviews.
Dashboards View Enables you to view the Dashboards page.
Dashboards Admin Enables you to create dashboards and administer other users' dashboards.
Dashboards Consumer Enables you to access the Dashboards page and run dashboards.
Dashboards Manager Enables you to create dashboards and administer your own dashboards.
Reports View Enables you to view the Reports page.
Reports Admin Enables you to create reports and administer other users' reports.
Reports Consumer Enables you to access the Reports page and run reports.
Reports Manager Enables you to create reports and administer your own reports.
Chapter 1 Viewpoint Configuration
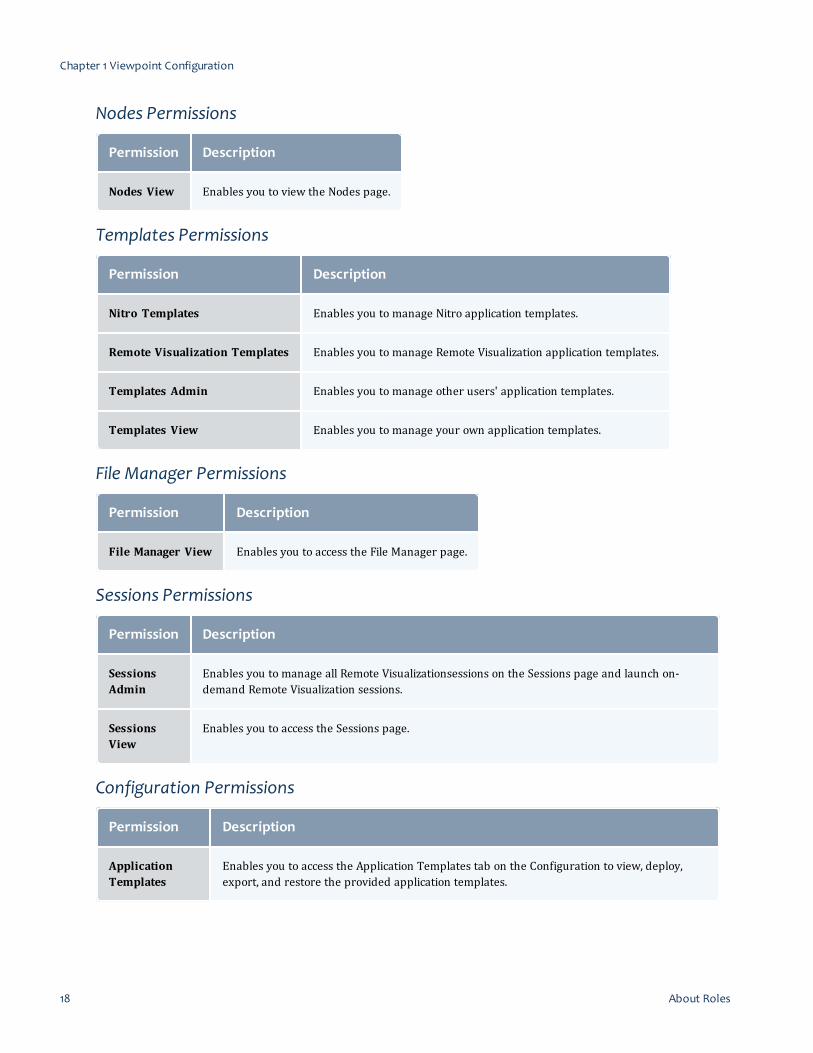
Nodes Permissions
Permission Description
Nodes View Enables you to view the Nodes page.
Templates Permissions
Permission Description
Nitro Templates Enables you to manage Nitro application templates.
Remote Visualization Templates Enables you to manage Remote Visualization application templates.
Templates Admin Enables you to manage other users' application templates.
Templates View Enables you to manage your own application templates.
File Manager Permissions
Permission Description
File Manager View Enables you to access the File Manager page.
Sessions Permissions
Permission Description
SessionsAdmin
Enables you to manage all Remote Visualizationsessions on the Sessions page and launch on-demand Remote Visualization sessions.
SessionsView
Enables you to access the Sessions page.
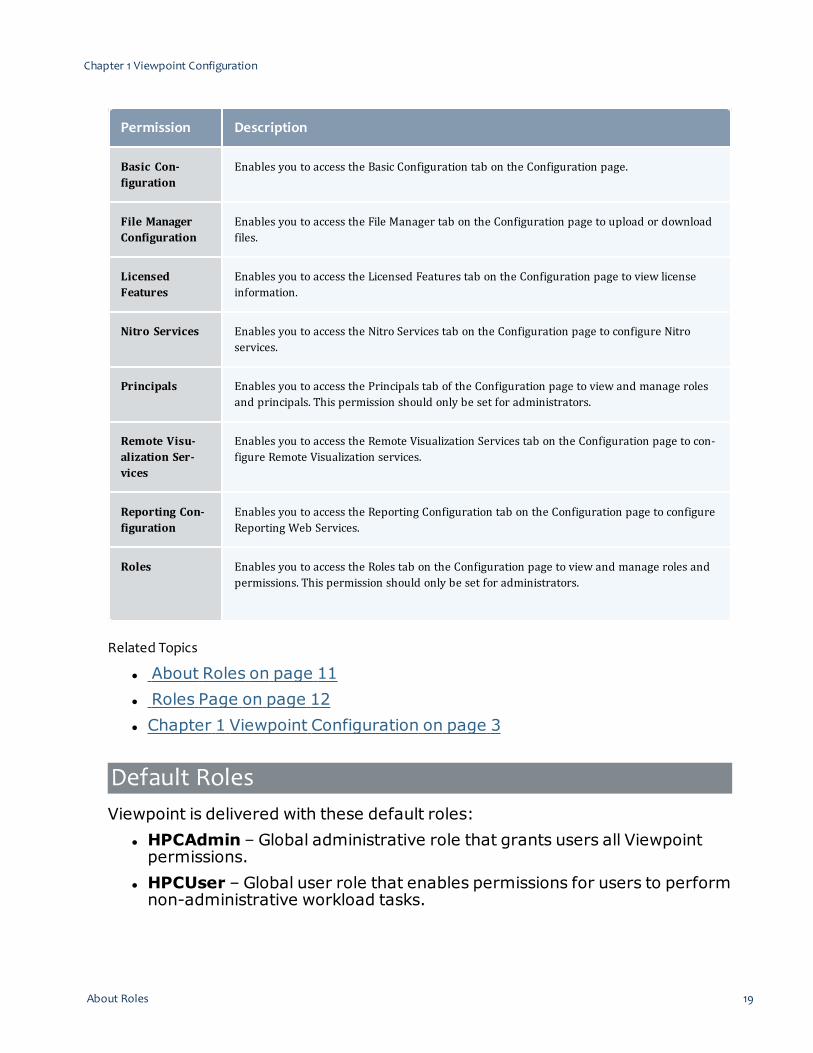
Configuration Permissions
Permission Description
ApplicationTemplates
Enables you to access the Application Templates tab on the Configuration to view, deploy,export, and restore the provided application templates.
Chapter 1 Viewpoint Configuration
18 About Roles
About Roles 19
Permission Description
Basic Con-figuration
Enables you to access the Basic Configuration tab on the Configuration page.
File ManagerConfiguration
Enables you to access the File Manager tab on the Configuration page to upload or downloadfiles.
LicensedFeatures
Enables you to access the Licensed Features tab on the Configuration page to view licenseinformation.
Nitro Services Enables you to access the Nitro Services tab on the Configuration page to configure Nitroservices.
Principals Enables you to access the Principals tab of the Configuration page to view and manage rolesand principals. This permission should only be set for administrators.
Remote Visu-alization Ser-vices
Enables you to access the Remote Visualization Services tab on the Configuration page to con-figure Remote Visualization services.
Reporting Con-figuration
Enables you to access the Reporting Configuration tab on the Configuration page to configureReporting Web Services.
Roles Enables you to access the Roles tab on the Configuration page to view and manage roles andpermissions. This permission should only be set for administrators.
Related Topics
l About Roles on page 11l Roles Page on page 12l Chapter 1 Viewpoint Configuration on page 3
Default RolesViewpoint is delivered with these default roles:
l HPCAdmin – Global administrative role that grants users all Viewpointpermissions.
l HPCUser – Global user role that enables permissions for users to performnon-administrative workload tasks.
Chapter 1 Viewpoint Configuration

l NitroAdmin – Administrative user role with permissions to create Nitroapplication templates and manage other users' Nitro jobs
l NitroUser – Basic user role with permission to create and manage theirown Nitro jobs.
l RemoteVizAdmin – Administrative user role with permissions to createremote visualization application templates and manage other users'Remote Visualization jobs
l RemoteVizUser – Basic user role with permissions to create and managetheir own Remote Visualization jobs.
If a Reporting license is installed, the following reporting roles are included inthe base roles.
l Reporting Admin – Administrative user role with permissions to createaggregated views, reports, and dashboards and manage aggregatedviews, reports, and dashboards created by other users.
l Reporting Manager – Basic user with permissions to create and managereports and dashboards.
l Reporting Consumer – Basic user, with permissions to use reports anddashboards.
Viewpoint lets you reset permissions for the default roles and restore thedefault roles if deleted. See Resetting Default Roles on page 22 andRestoring Default Roles on page 23, respectively.
Related Topics
l About Roles on page 11l Resetting Default Roles on page 22l Restoring Default Roles on page 23l Chapter 1 Viewpoint Configuration on page 3
Chapter 1 Viewpoint Configuration
20 About Roles

About Roles 21
Creating or Editing RolesUse the Role Management page to create new roles or edit existing roles andtheir permissions. The only user that is allowed to modify roles is the special'moab-admin' user set up in the MWS configuration file (/opt/mws/etc/mws-config.groovy). No other users are allowed to modify roles, including userswith administrative permissions.Do the following:1. If you have not already done so, access the Role Management page. (ClickConfiguration in the menu bar, then clickRoles in the left pane.)
2. Click Create to add a new role or click the name of the role you want to edit.The Roles page displays.
3. If you are creating a role, enter the name of the role and the roledescription.
4. If you are editing an existing role, change the role name and/or description,if desired.
5. Select and/or clear permissions for the role's purpose and use. See RolePermissions on page 14 for permission descriptions.
6. When finished, clickDONE to save your changes and close the page;otherwise, click CANCEL to discard the changes and close the page. ClickingAPPLY will save your changes, but does not close the page.
If you are editing a default role (HPCAdmin, HPCUser, NitroAdmin,NitroUser, RemoteVizAdmin, or RemoteVisUser), the Reset buttondisplays. Click this button to reset the role back to the default settings. Thiswill not close the page. In addition, this will not remove principals from therole. The "Reset Permissions" check box on the Basic Configuration pagewill reset the role back to the default settings and remove all principalsassigned to the role. See Resetting Default Roles on page 22 for moreinformation.
Related Topics
l About Roles on page 11l Roles Page on page 12l Role Permissions on page 14l Chapter 1 Viewpoint Configuration on page 3
Chapter 1 Viewpoint Configuration

Deleting RolesUse the Role Management page to delete existing roles.
You cannot delete roles if the roles have been selected in principals.
To delete roles, do the following:1. If you have not already done so, access the Role Management page. (ClickConfiguration in the menu bar, then clickRoles in the left pane.)
2. Hover the mouse over the name of the role you want to remove, click themenu icon that appears, and clickDelete.
3. When the window appears asking you to confirm the delete, clickOK todelete the role; otherwise, click Cancel.
If you removed a default role (HPCAdmin, HPCUser, NitroAdmin,NitroUser, RemoteVizAdmin, or RemoteVisUser), aRECREATE BASE ROLES button appears on this page. You can click thisbutton to restore the default role (with its default permissions); however,this action also affects the other default roles. This action resets thepermissions for all default roles (but not the assigned principals for theexisting roles).
Related Topics
l About Roles on page 11l Role Management Page on page 11l Chapter 1 Viewpoint Configuration on page 3
Resetting Default RolesViewpoint comes configured with several default roles (HPCAdmin, HPCUser,NitroAdmin, NitroUser, RemoteVizAdmin, and RemoteVisUser) and offers theability to reset these roles back to their original default settings at any time.You can choose whether to:
l reset the permissions and remove principals.l reset the permissions only.
This topic provides the information on the different options available to resetthe default roles.
Chapter 1 Viewpoint Configuration
22 About Roles

About Roles 23
Reset Permissions and Remove PrincipalsDo the following:1. If you have not already done so, log in to the Viewpoint portal. This can bethe moab-admin user or any user granted permission to reset roles from theRoles page.
2. Click Configuration in the menu bar. The Basic Configuration page displays.3. In the MWS Configuration area, click the Reset Permissions check box. Awarning appears informing you that this will reset the defaults.
4. Click Save. Once the permissions have finished resetting, you will be loggedout of the Viewpoint portal and will need to log in again.
5. Go to the Principals page and reassign the principals to the default roles, asneeded.
Reset Permissions OnlyDo the following:1. If you have not already done so, log in to the Viewpoint portal. This can bethe moab-admin user or any user granted permission to reset roles from theRoles page.
2. If you have not already done so, access the Role Management page. (ClickConfiguration in the menu bar, then clickRoles in the left pane.)
3. Click the name of the default role for which you want to reset permissions.The Roles page displays.
4. ClickRESET at the bottom of the page.5. When a message appears asking to your confirm the reset, clickOK;otherwise, click Cancel.
Related Topics
l About Roles on page 11l Default Roles on page 19l Restoring Default Roles on page 23l Chapter 1 Viewpoint Configuration on page 3
Restoring Default RolesIn addition to being able to reset the default permissions for the default roles(HPCAdmin, HPCUser, NitroAdmin, NitroUser, RemoteVizAdmin, and
Chapter 1 Viewpoint Configuration

RemoteVisUser), Viewpoint lets you restore the role if it was deleted. Restoringa default role, automatically restores it with the default permissions.Do the following:1. If you have not already done so, access the Role Management page. (ClickConfiguration in the menu bar, then clickRoles from the left pane.)
2. Click . (Button does not appear unless one of the
default roles has been deleted.)
Related Topics
l About Roles on page 11l Default Roles on page 19l Resetting Default Roles on page 22l Chapter 1 Viewpoint Configuration on page 3
About PrincipalsPrincipals is the term used to describe the assignment of users to roles. Users,groups, or OUs are assigned to one or more roles to create a principal.
LDAP or PAMmust be configured in MWS. See LDAP Configuration Using/opt/mws/etc/mws-config.groovy or PAM (Pluggable AuthenticationModule) Configuration Using /opt/mws/etc/mws-config.groovy in theMoab Web Services Reference Guide for details.
This section describes the features and functions available to manageprincipals.In this section:
l Principal Management Page on page 25l Principals Page on page 25l Edit Users/Groups Pop-up on page 27l Creating or Editing Principals on page 30l Deleting Principals on page 30
Chapter 1 Viewpoint Configuration
24 About Principals

About Principals 25
Principal Management PageThe Principal Management page displays the defined principals for yourViewpoint configuration. Using this page you can create, edit, and deleteprincipals.This page also provides access to the Principals page that lets you specify theusers, groups, or OUs and their applicable roles for a principal configuration.To access this page, click Configuration in the menu bar and then clickPrincipals in the left pane.The following image is an example of the Principal Management page.
Click at any time to refresh the page display.
Related Topics
l About Principals on page 24l Creating or Editing Principals on page 30l Deleting Principals on page 30l Chapter 1 Viewpoint Configuration on page 3
Principals PageThe Principals page lets you specify the users, groups, or organizational unitsand their applicable roles for a principal configuration.To access this page click Configuration in the menu bar, click Principals in theleft pane, and then click either Create to add a new principal or click next
to the principal you want to edit.
Chapter 1 Viewpoint Configuration
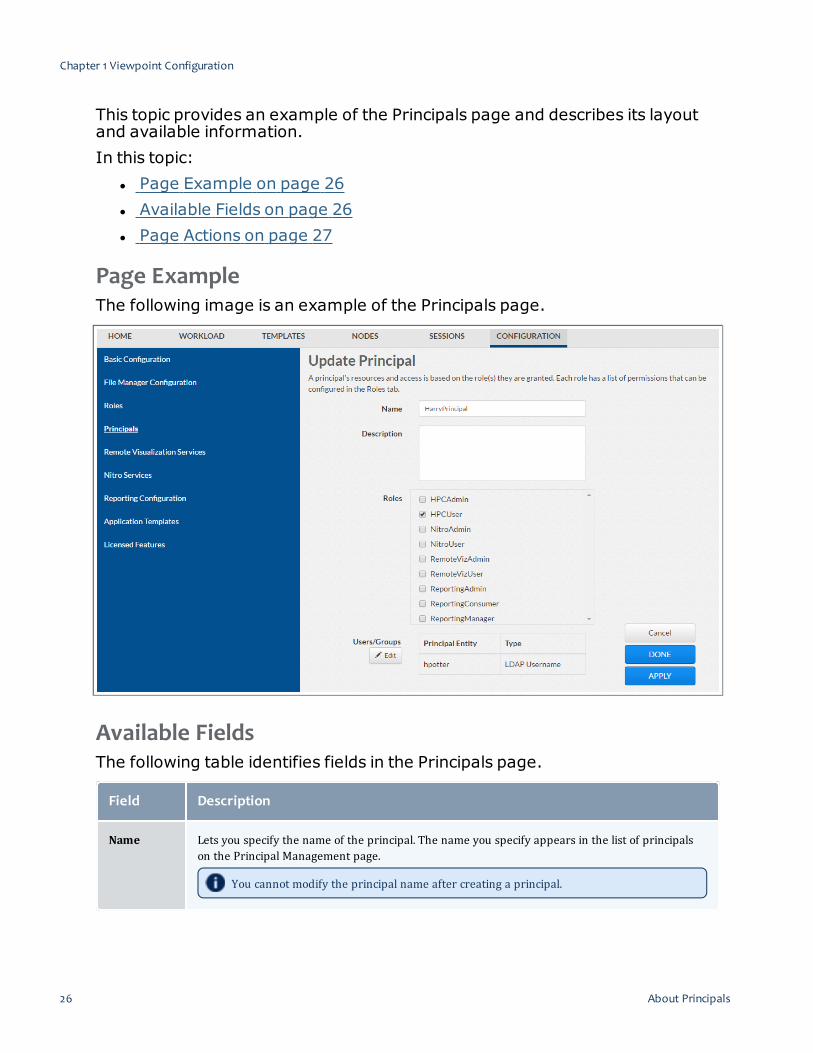
This topic provides an example of the Principals page and describes its layoutand available information.In this topic:
l Page Example on page 26l Available Fields on page 26l Page Actions on page 27
Page ExampleThe following image is an example of the Principals page.
Available FieldsThe following table identifies fields in the Principals page.
Field Description
Name Lets you specify the name of the principal. The name you specify appears in the list of principalson the Principal Management page.
You cannot modify the principal name after creating a principal.
Chapter 1 Viewpoint Configuration
26 About Principals

About Principals 27
Field Description
Description (Optional) Lets you specify a text description of the principal.
Roles Lets you select which roles are assigned to the principal.
Only roles defined for your Viewpoint configuration will appear in the selection list. SeeCreating or Editing Roles for details on creating roles.
PrincipalEntity
Lets you specify an LDAP or PAM entity with this principal.
If this principal entity is listed under an LDAP group or organizational unit, you mustprovide the entire distinguished name; PAM group names represent the UNIX group onthe underlying server.
Click to add or click to remove entities.
Type Specifies whether the principal entity is an LDAP user name, group, or organizational unit or aPAM user name or group.
Page ActionsThese buttons let you perform actions on this page:
l CANCEL – Closes the page without saving any changes.l DONE – Saves any changes and closes the page.l APPLY – Saves the changes but does not close the page.
Related Topics
l Creating or Editing Principals on page 30l Principal Management Page on page 25l About Principals on page 24l Chapter 1 Viewpoint Configuration on page 3
Edit Users/Groups Pop-upl Page Example on page 28l Editing Users/Groups on page 29l Page Actions on page 29
Chapter 1 Viewpoint Configuration

Page ExampleThe following image is an example of the Edit Users/Groups pop-up.
Chapter 1 Viewpoint Configuration
28 About Principals

About Principals 29
Editing Users/GroupsUse the Edit Users/Groups pop-up to add users or groups to principalassignments.Do the following:1. If you have not already done so, access the Edit Users/Groups pop-up. (ClickConfiguration in the menu bar, then click Principals in the left pane.)
2. Click CREATE to add a new principal or click the name of the principal youwant to edit.The Principals page displays. See Principals Page on page 25 for moreinformation.
3. Click Edit under Users/Groups to open the Edit Users/Groups pop-up.4. To add a new principal assignment, do the following:a. Click to add a new line.b. Enter the LDAP group, organizational unit, or user name associated withthis principal.
If the entity is an LDAP group or organizational unit, you mustprovide the entire distinguished name. If the entity is an LDAP user,you may provide just the user name.
c. Select the type that reflects the entity you just entered.
5. To delete a principal entity, click next to the entity you wish to remove.6. When finished, click SAVE to save the changes and close the page;otherwise, click CLOSE to discard the changes and close the page.
APPLY will save the changes, but does not close the page.
Page ActionsThese buttons let you perform actions on this page:
l CLOSE – Closes the page without saving any changes.l SAVE – Saves the changes and closes the page.
Related Topics
l Creating or Editing Principals on page 30l Principal Management Page on page 25l About Principals on page 24l Chapter 1 Viewpoint Configuration on page 3
Chapter 1 Viewpoint Configuration

Creating or Editing PrincipalsUse the Update Principal or Create Principal pages to create new principals oredit existing principals.Do the following:1. If you have not already done so, access the Update Principal or CreatePrincipal page. (Click Configuration in the menu bar, then click Principalsin the left pane.)
2. Click CREATE to add a new principal or click the name of the principal youwant to edit.The Principals page displays. See Principals Page on page 25 for moreinformation.
3. If you are creating a principal, enter the name of the principal.4. Add or modify the principal description if needed.5. Select and/or clear the roles assigned to this principal.6. Add or delete users or groups associated with the principal. See EditUsers/Groups Pop-up on page 27 for more information.
7. When finished, clickDONE to save the changes and close the page;otherwise, click CANCEL to discard the changes and close the page.
APPLY will save the changes, but does not close the page.
Related Topics
l About Principals on page 24l Principal Management Page on page 25l Principals Page on page 25l Edit Users/Groups Pop-up on page 27l Chapter 1 Viewpoint Configuration on page 3
Deleting PrincipalsUse the Principal Management page to delete existing principals.Do the following:1. If you have not already done so, access the Principal Management page.(Click Configuration in the menu bar, then click Principals in the leftpane.)
Chapter 1 Viewpoint Configuration
30 About Principals

Remote Visualization Configuration Page 31
2. Hover the mouse over the name of the principal you want to remove, clickthe menu icon that appears, and clickDelete
3. When the window appears asking you to confirm the delete, clickOK todelete the principal; otherwise, click Cancel.
Related Topics
l About Principals on page 24l Principal Management Page on page 25l Chapter 1 Viewpoint Configuration on page 3
Remote Visualization Configuration Page
Remote Visualization uses the FastX product.
This topic is provided for reference only as the actual RemoteVisualization configuration is set up when installing Remote Visualization.See Installing Remote Visualization in the Moab Installation andConfiguration Guide for detailed instructions.
Once you have configured Remote Visualization, the Sessions page is availableto maintain sessions used to display the job details in the Job Details page. SeeSessions Page on page 261 for more information.To access this page, click Configuration in the menu bar and then clickRemote Visualization Services in the left pane.This topic provides an example of the Remote Visualization page and describesits layout and available information.In this topic:
l Page Example on page 31l Available Fields on page 32l Page Actions on page 32
Page ExampleThe following image is an example of the Remote Visualization Configurationpage.
Chapter 1 Viewpoint Configuration

Available FieldsThe following table describes the fields on the Remote Visualization page.
Field Description
Gateway Server Hostname (or IP address) and port number for the FastX gateway server. For example,https://<server>:3443.
Trust Self Signed Indicates whether the Remote Visualization was set up using self-signed certificates.
Username User name to log into FastX.
AuthenticationMethod
Specifies whether a password or shared secret key is required to authenticate.l If using password-based, enter the FastX admin user's password in the Passwordfiled.
l If using key-based, click UPLOAD KEY and and navigate to the copy of the generated.ssh/id_rsa file.
Page ActionsThese buttons let you perform actions on this page:
l TEST - Tests the connection to the Remote Visualization (gateway)Server.
l SAVE - Saves the changes.
Related Topics
l 1.1 Authenticating Remote Visualizationl Sessions Page on page 261
Chapter 1 Viewpoint Configuration
32 Remote Visualization Configuration Page

Nitro Services Configuration Page 33
l Chapter 1 Viewpoint Configuration on page 3
Nitro Services Configuration Page
This topic is provided for reference only as the actual Nitro Servicesconfiguration is set up when installing Nitro Web Services. See InstallingNitro Web Services (manual install method) or Installing Nitro WebServices (RPM install method) in the Moab Installation and ConfigurationGuide for detailed instructions.
Once you have configured Nitro Services, you can view your Nitro jobinformation in the Job Details page. See Nitro Details on page 73 for moreinformation.To access this page, click Configuration in the menu bar and then clickNitroServices in the left pane.This topic provides an example of the Nitro Services page and describes itslayout and available information.In this topic:
l Page Example on page 33l Available Fields on page 34l Page Actions on page 34
Page ExampleThe following image is an example of the Nitro Services page.
Chapter 1 Viewpoint Configuration

Available FieldsThe following table identifies fields in the Nitro Services page.
Field Description
Nitro WS URL Hostname (or IP address) and port number for the host on which you installed Nitro WebServices. For example, https://<hostname>:9443
Username Name of the user. This typically nitro-readonly-user.
Password The user's password.
Trust Self Signed Indicates whether Nitro Web Services was set up using self-signed certificates.
Page ActionsThese buttons let you perform actions on this page:
l TEST - Tests the connection to Nitro Web Services.l SAVE - Saves the changes.
Related Topics
l Chapter 1 Viewpoint Configuration on page 3
Reporting Configuration PageReporting configuration involves establishing a connection with Reporting WebServices (RWS). Once you have configured Reporting, you can use Viewpoint'sreporting features to create and display reports, dashboards, and aggregatedviews. See for more information.To access this page, click Configuration in the menu bar and then clickReporting Configuration in the left pane.This topic provides an example of the Reporting Configuration page anddescribes its layout and available information.In this topic:
l Page Example on page 35l Available Fields on page 35l Page Actions on page 35
Chapter 1 Viewpoint Configuration
34 Reporting Configuration Page

Application Templates Configuration Page 35
Page ExampleThe following image is an example of the Reporting Configuration page.
Available FieldsThe following table describes the fields on the Reporting Configuration page.
Field Description
Reporting ServiceURL
Hostname (or IP address), port number, and path for the RWS service. For example,https://<server>:8080/rws.
Page ActionsThese buttons let you perform actions on this page:
l TEST - Tests the connection to the RWS service.l SAVE - Saves the changes.
Related Topics
l Chapter 1 Viewpoint Configuration on page 3l
Application Templates Configuration PageThe Application Templates Configuration page lets you deploy and exportapplication templates. Application templates are used to predefine the jobrequirements available to users when creating jobs.See Chapter 4 Application Templates on page 89for more information aboutapplication templates.To access this page, click Configuration on the menu bar and then clickApplication Templates in the left pane.
Chapter 1 Viewpoint Configuration
In this topic:l Page Example on page 36l Page Actions on page 36
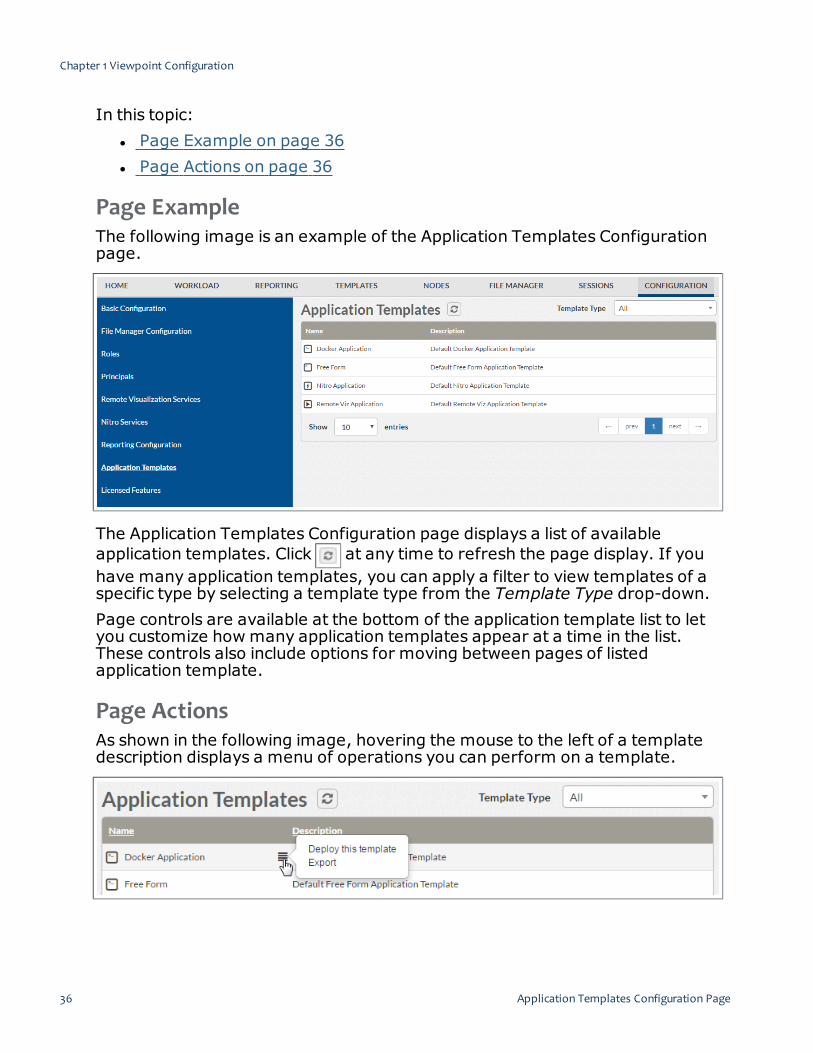
Page ExampleThe following image is an example of the Application Templates Configurationpage.
The Application Templates Configuration page displays a list of availableapplication templates. Click at any time to refresh the page display. If youhave many application templates, you can apply a filter to view templates of aspecific type by selecting a template type from the Template Type drop-down.Page controls are available at the bottom of the application template list to letyou customize howmany application templates appear at a time in the list.These controls also include options for moving between pages of listedapplication template.
Page ActionsAs shown in the following image, hovering the mouse to the left of a templatedescription displays a menu of operations you can perform on a template.
Chapter 1 Viewpoint Configuration
36 Application Templates Configuration Page

Licensed Features Page 37
Select Deploy to make a template available for editing and Export to create atemplate file that can be used to copy a template to another Viewpoint server.You can use Deploy to restore one of the provided templates that has beendeleted.
Related Topics
l Chapter 4 Application Templates on page 89l Chapter 1 Viewpoint Configuration on page 3
Licensed Features Page
Instructions on how to obtain and install the licenses are provided duringthe Viewpoint install or upgrade process. See Installing Moab Viewpointor Upgrading Moab Viewpoint (RPM) in the Moab Installation andConfiguration Guide for detailed instructions.
The Licensed Features page shows all of the licensed Viewpoint and Moabfeatures for your system configuration.To access this page, click Configuration in the menu bar and then clickLicensed Features in the left pane.The Licensed Features page has two tab options:
l Viewpoint License – This is the default view when you access theLicensed Features page. This tab displays a visual listing of the Viewpointlicense file. configuration information.
l Moab License – This tab displays a visual listing of the Moab license file.This license file is populated with a valid connection to MWS.
This topic provides an example of the Viewpoint License tab and theMoabLicense tab and describes the layout and available information in the tab.In this topic:
l Viewpoint License Tab on page 37l Moab License Tab on page 38
Viewpoint License TabThe following image is an example of the Viewpoint License tab.
Chapter 1 Viewpoint Configuration

This tab provides a visual representation of the licensed features for yourconfiguration. A green checkmark in a circle indicates that feature is licensed;whereas, a red x in a circle indicates a feature is not licensed.You can expand theMore Information section to view when the licensedfeatures will expire.You can also upload a new license by clicking Browse and locating the licensefile to be uploaded, then clicking Upload. However, this is typically done onlywhen you install or upgrade Viewpoint.
Moab License TabThe following image is an example of theMoab License tab.
Chapter 1 Viewpoint Configuration
38 Licensed Features Page

Licensed Features Page 39
This tab provides a visual representation of the licensed features for yourconfiguration. A green checkmark in a circle indicates that feature is licensed;whereas, a red x in a circle indicates a feature is not licensed.
You can click the graph icon next to the Elastic Computing license name
to open a graph of Elastic Computing statistics. See Viewing Elastic ComputingStatistics on page 44 for more information.You can expand theMore Information section to view any additionalinformation available about the licensed features.
Related Topics
l Configuration Page on page 4l Viewing Elastic Computing Statistics on page 44l Chapter 1 Viewpoint Configuration on page 3
Chapter 1 Viewpoint Configuration

Additional Configuration
Securing the Connection between Viewpoint and MWSAdaptive Computing strongly recommends using Viewpoint on a securechannel (SSL). See Configuring Viewpoint to Use SSL on page 41.Optionally, and depending on your system requirements, you can secure theconnection between Viewpoint and MWS.This topic explains how secure the connection between Viewpoint and MWS.
The steps in this topic must be performed before you set up the connectionto MWS.
Secure the Connection between Viewpoint and MWSDo the following:1. Configure the MWS Server for HTTPS. See Securing Client Connections toMWS in the Moab Web Services Reference Guide for more information.
2. Import the MWS Server Certificate.
If the MWS server is using a certificate signed by a certificate authority,skip this step.
Import the MWS server certificate by running the following command on theViewpoint server:
[root]# openssl s_client -showcerts -connect <hostname>:<secure_port> < /dev/null2> /dev/null |
sed -n -e '/-BEGIN CERTIFICATE-/,/-END CERTIFICATE-/p' \>> $(python -m requests.certs)
Where <hostname> is the MWS host name and <secure_port> is thesecured port number defined in the certificate.
3. Proceed with instructions to set up the connection to MWS (see BasicConfiguration Page on page 6), noting that:l you must use the full secure URL for MWS. For example:https://mws.example.com:8443
l the host name must match the Common Name (CN) of the MWS servercertificate.
Chapter 1 Viewpoint Configuration
40 Additional Configuration
Additional Configuration 41
l the Viewpoint server must be able to resolve the host name using/etc/hosts or DNS.
Related Topics
l Basic Configuration Page on page 6l Chapter 1 Viewpoint Configuration on page 3
Configuring Viewpoint to Use SSLAdaptive Computing strongly recommends using Viewpoint on a securechannel (SSL).This topic explains how to enable SSL for Viewpoint.
The steps in this topic must be performed before you set up the connectionto MWS.
Do the following in order:l Create a Self-Signed Certificatel Enable SSL for Viewpoint
Create a Self-Signed CertificateDo the following:1. Generate a private key.
[root]# openssl genrsa -out server.key 1024
This will create an unencrypted private key. It is recommended that thisprivate key has only root privileges.If you want to encrypt this private key (add a passphrase), do thefollowing:
[root]# openssl genrsa -des3 -out server.key 1024
2. Generate the certificate signing request from the private key (what is usedto create a self-signed certificate).
[root]# openssl req -new -key server.key -out server.csr
Chapter 1 Viewpoint Configuration
a. If you encrypted the private key, enter the passphrase when prompted.b. Enter the certificate metadata when prompted. For example:
...Country Name (2 letter code) [XX]:USState or Province Name (full name) []:UtahLocality Name (eg, city) [Default City]:ProvoOrganization Name (eg, company) [Default Company Ltd]:Adaptive ComputingEnterprises, Inc.Organizational Unit Name (eg, section) []:EngineeringCommon Name (eg, your name or your server's hostname)[]:test1.adaptivecomputing.com...
3. Generate the self-signed certificate from the CSR.
[root]# openssl x509 -req -in server.csr -signkey server.key -out server.crt
You should have both a private key (server.key) and a certificate (server.crt).
Enable SSL for ViewpointDo the following:1. Install the Apache SSL Module.
l Red Hat 6-based or Red Hat 7-based systems
[root]# yum install mod_ssl
2. Install the private key and certificate you generated earlier in this topic.
[root]# chmod 400 server.key server.crt[root]# chown root:root server.key server.crt[root]# cp -p server.key server.crt /etc/httpd
3. Edit /etc/httpd/conf.d/viewpoint.conf as follows:
Listen 443LoadModule ssl_module modules/mod_ssl.so
<VirtualHost *:443>
SSLEngine OnSSLCertificateKeyFile /etc/httpd/server.keySSLCertificateFile /etc/httpd/server.crt
---
</VirtualHost>
Viewpoint needs its own VirtualHost on its own port. Therefore, ifApache is serving pages or applications besides Viewpoint over SSL,choose a port for Viewpoint besides 443.
Chapter 1 Viewpoint Configuration
42 Additional Configuration

Additional Configuration 43
4. Start or restart Apache.l Red Hat 6-based systems
[root]# service httpd restart
l Red Hat 7-based systems
[root]# systemctl restart httpd.service
Related Topics
l Chapter 1 Viewpoint Configuration on page 3
Authenticating Remote VisualizationBeginning with the 9.0.2 release, Viewpoint supports two Remote Visualizationmethods: password-based and key-based.To set up the Remote Visualization authentication, do the following:1. Log into Viewpoint as the MWS administrative user.2. Access the Remote Visualization page. (Click Configuration in the menu barand then clickRemote Visualization Services in the left pane.)
3. Enter the hostname (or IP address) and port number for the FastX gatewayserver in the Gateway Server field. For example, https://<server>:3443.
4. If your Remote Visualization configuration was set up using self-signedcertificates, confirm the Trust Self Signed check box is selected.
5. Enter the FastX admin user you specified when you installed the RemoteVisualization Server in the Username field. For example, ace.
6. Do one of the following:l If your configuration will authenticate using the password-based method,do the following:a. Select Password Based Authentication from the Authentication Methodbox.
b. Enter the FastX admin user's password in the Password field.
The /etc/ssh/sshd_config file on each Session server mustbe configured to enable password authentication. See InstallRemote Visualization in the Moab HPC Suite Installation andConfiguration Guide for more information.
l If your configuration will authenticate using the password-based method,do the following:
Chapter 1 Viewpoint Configuration
a. Select Key Based Authentication from the Authentication Method box.b. ClickUPLOAD KEY and navigate to the copy of the generated
.ssh/id_rsa file.7. Click TEST to confirm your settings are correct.8. Click SAVE to submit your settings.
Related Topics
l Sessions Page on page 261l Remote Visualization Configuration Page on page 31l Chapter 1 Viewpoint Configuration on page 3
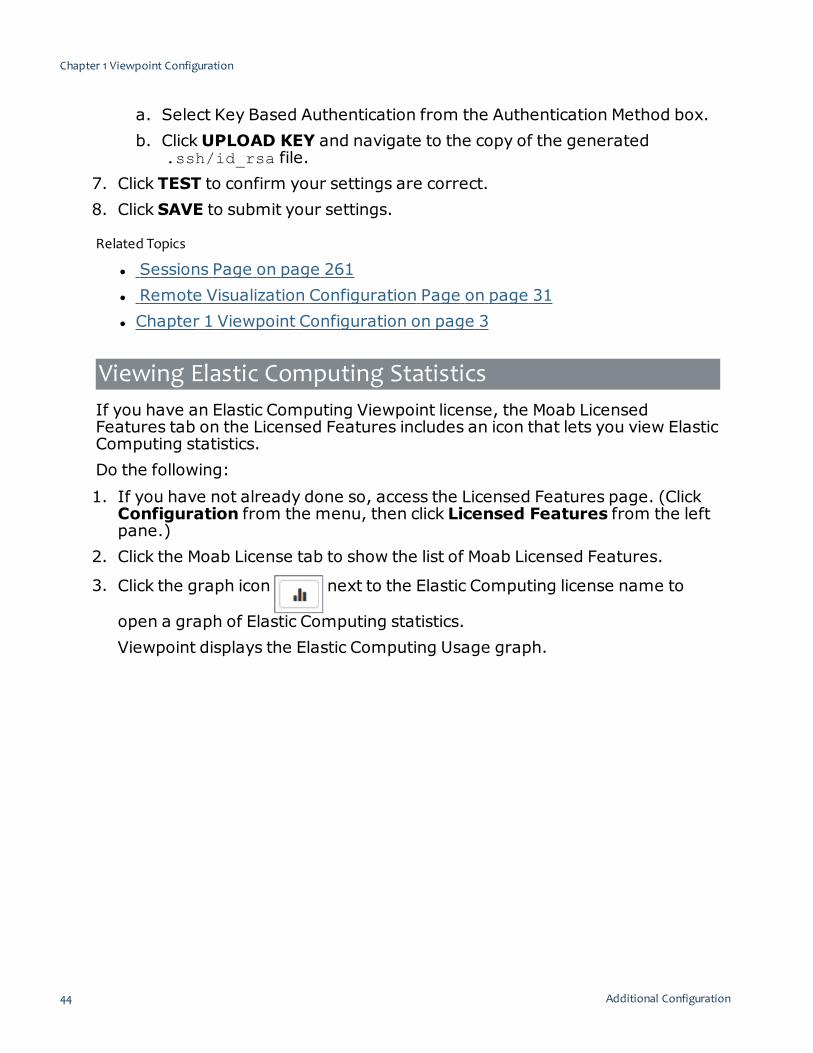
Viewing Elastic Computing StatisticsIf you have an Elastic Computing Viewpoint license, the Moab LicensedFeatures tab on the Licensed Features includes an icon that lets you view ElasticComputing statistics.Do the following:1. If you have not already done so, access the Licensed Features page. (ClickConfiguration from the menu, then click Licensed Features from the leftpane.)
2. Click the Moab License tab to show the list of Moab Licensed Features.
3. Click the graph icon next to the Elastic Computing license name to
open a graph of Elastic Computing statistics.Viewpoint displays the Elastic Computing Usage graph.
Chapter 1 Viewpoint Configuration
44 Additional Configuration

Additional Configuration 45
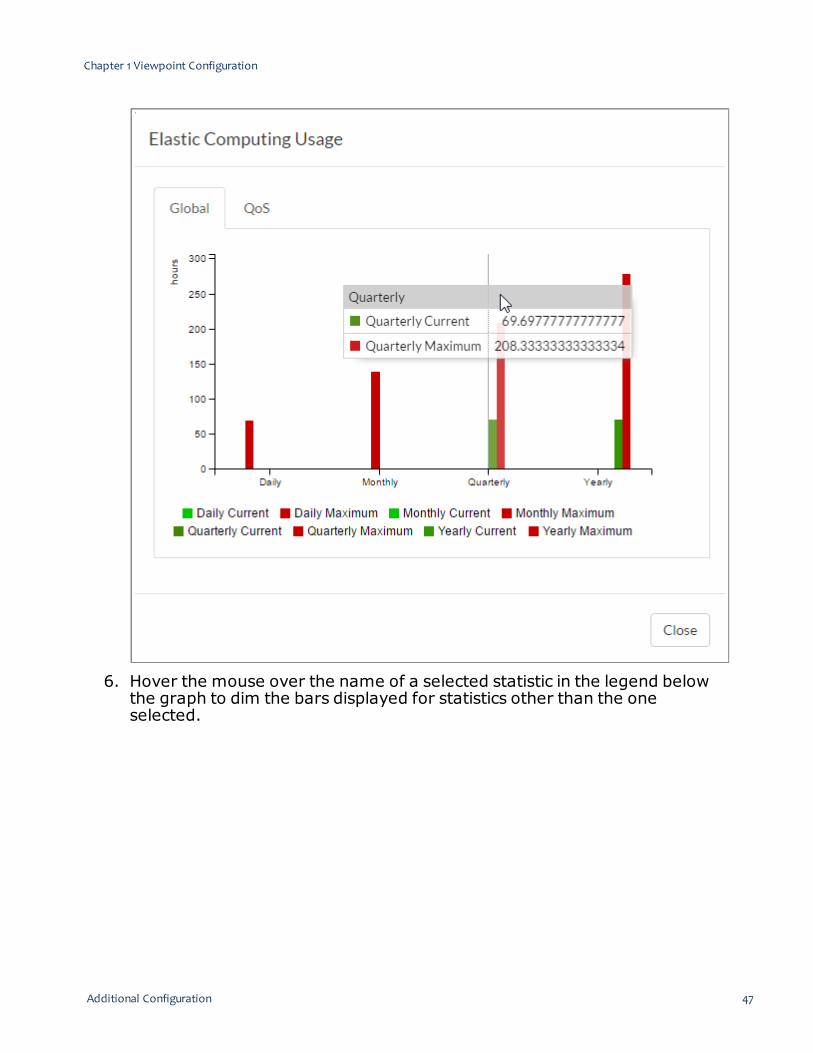
The Elastic Computing Usage graph displays current and maximum hours ofElastic Computing usage for the previous day, month, quarter, and year.You can click tabs at the top of the graph to switch between global ElasticComputing usage and usage by quality of service level (QoS).
4. Click the name of one of the statistics in the legend below the graph toremove the statistic from the graphical display.
Chapter 1 Viewpoint Configuration

Removing the tallest bar from the graph causes the vertical axis torecalibrate for the remaining bars. This feature can be used to moreprecisely compare the hourly values of the remaining bars.
5. Hover the mouse over one of the time period bars to display exact values forthe statistics displayed for the time period.
Chapter 1 Viewpoint Configuration
46 Additional Configuration
Additional Configuration 47
6. Hover the mouse over the name of a selected statistic in the legend belowthe graph to dim the bars displayed for statistics other than the oneselected.
Chapter 1 Viewpoint Configuration
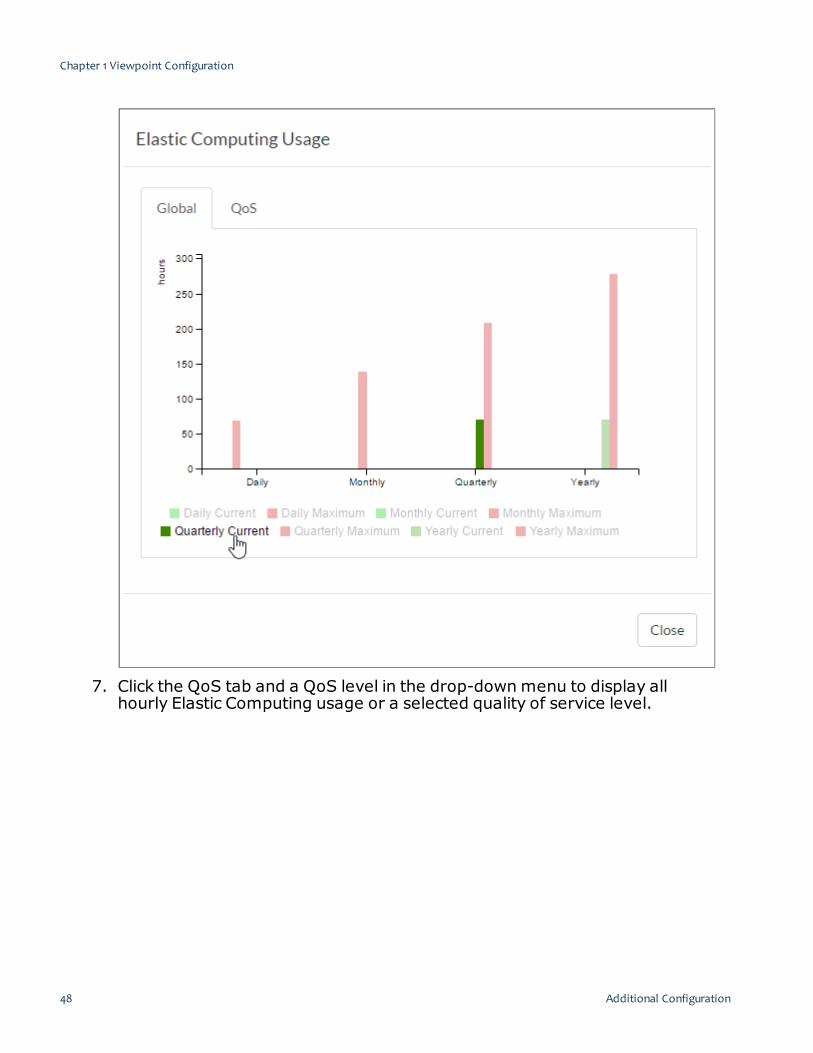
7. Click the QoS tab and a QoS level in the drop-downmenu to display allhourly Elastic Computing usage or a selected quality of service level.
Chapter 1 Viewpoint Configuration
48 Additional Configuration

Additional Configuration 49
See Quality of Service (QoS) Facilities in the Moab Administrator Guide formore information about Moab's Quality of Service facility.
Related Topics
l Chapter 1 Viewpoint Configuration on page 3
Chapter 1 Viewpoint Configuration

50 Additional Configuration

The Viewpoint Home Page 51
Chapter 2 Viewpoint Basics
This chapter provides a brief overview of Viewpoint, including the ViewpointHome page and general navigation.In this chapter:
l The Viewpoint Home Page on page 51l Menu Bar on page 54l Navigating Viewpoint on page 54l Logging In/Signing Out on page 55l Accessing Online Help on page 56
The Viewpoint Home PageThe Home page displays an overview of your system, including systemutilization, a workload summary, and resource allocation. Once the Viewpointportal has been configured, the Home page is the default view when logging in.You can also clickHome from the menu to view the Home page.This topic provides an example of the Home page and describes its layout andavailable information.In this topic:
l Page Example on page 51l Widgets on page 52
Page ExampleThe following image is an example of the Home page.
Chapter 2 Viewpoint Basics
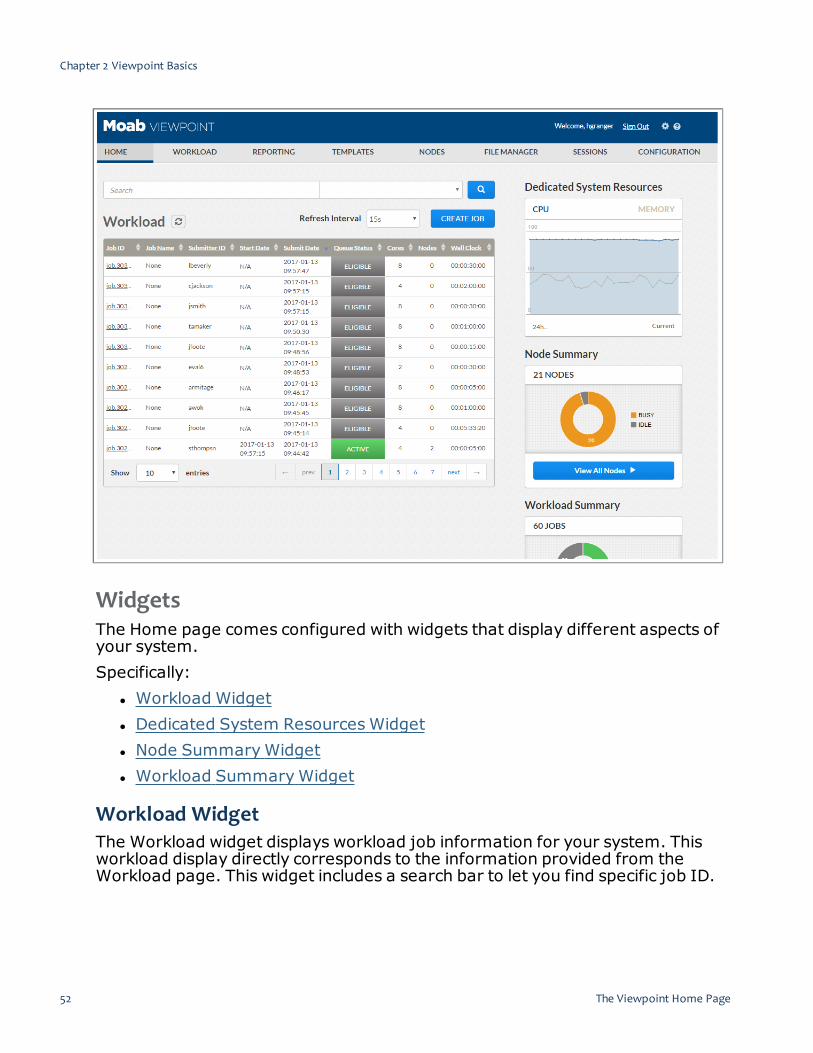
WidgetsThe Home page comes configured with widgets that display different aspects ofyour system.Specifically:
l Workload Widgetl Dedicated System Resources Widgetl Node SummaryWidgetl Workload SummaryWidget
Workload WidgetThe Workload widget displays workload job information for your system. Thisworkload display directly corresponds to the information provided from theWorkload page. This widget includes a search bar to let you find specific job ID.
Chapter 2 Viewpoint Basics
52 The Viewpoint Home Page

The Viewpoint Home Page 53
Using this widget lets you manage the workload and view the results in theWorkload Summary and Node Summary widgets without having to leave theHome page.
Dedicated System Resources WidgetThe Dedicated System Resources widget provides a graphical ratio ofresources dedicated to jobs compared to total resources. The graphical resultis displayed based activity within the last 24 hours.This widget uses these criteria:
l CPU – The percentage of processors dedicated to running jobs over thetotal processors in the cluster. For example if your cluster has 5,000processors and 4,500 of those processors are dedicated to jobs, your CPUutilization is 90%.
l Memory – The percentage of memory dedicated to running jobs over thetotal amount of memory in the cluster. For example, if your cluster has1,000 GB of memory and 850 GB of memory is dedicated to jobs, thenyour memory utilization is 85%.
You can hover the mouse over the graphical display to view additionalinformation.
The user must be assigned to a role with Systems Resources Widgetpermission selected to view information for this widget.
Node Summary WidgetThe Node Summary widget provides a graphical overview of the total nodeswithin your Viewpoint configuration and their status.Click on the status line to open the Nodes page to display only the nodes in thatstatus. Using the Home page example provided earlier, click anywhere on theorange line to view the 45 nodes that are busy.ClickView All Nodes to open the Nodes page in default view (without specifiedselection criteria).
The user must be assigned to a role with Node SummaryWidgetpermission selected to view information for this widget.
Workload Summary WidgetThe Workload Summary widget provides a graphical overview of the total jobswithin your Viewpoint configuration and their status.Click on the status line to open the Workload page to display only the jobs inthat status.ClickView All Workload to open the Workload page (without a status filter).
Chapter 2 Viewpoint Basics

The user must be assigned to a role with Workload SummaryWidgetpermission selected to view information for this widget.
Related Topics
l Chapter 2 Viewpoint Basics on page 51
Menu BarThe Menu bar appears just above the selected page and displays all of thepages available to the signed in user.Select a menu item to open directly to that page.
Related Topics
l The Viewpoint Home Page on page 51l 1.1 Workload Pagel Application Templates Page on page 89l Nodes Page on page 241l File Manager Page on page 253l Configuration Page on page 4l Chapter 2 Viewpoint Basics on page 51
Navigating ViewpointThe menu bar is fixed at the top of every page.
At any time you can select a menu item to open directly to that page. You canalso use the Homepage widgets to navigate to certain pages. See TheViewpoint Home Page for more information.
If the logged-in user does not have permissions to access a particularpage, the page link will not appear in the menu. If a user tries to access apage (by entering a URL) that he/she does not have permissions to see,Viewpoint disallows access.
Chapter 2 Viewpoint Basics
54 Menu Bar

Logging In/Signing Out 55
Related Topics
l Menu Bar on page 54l Chapter 2 Viewpoint Basics on page 51
Logging In/Signing OutYou must log in to Viewpoint from a web browser. For security purposes, it isimportant to log out (sign out) of Viewpoint after each use.This topic provides information on how to successfully log in to and sign out ofthe Viewpoint portal. This topic assumes that the system administrator, orother authorized user, has set up the Viewpoint portal with user roles andpermissions as described in Chapter 1 Viewpoint Configuration on page 3.
The Menu options available to a user will vary, depending on the user'scredentials.
Log In to ViewpointDo the following:1. In a web browser, navigate to the Viewpoint Login page (http://<viewpoint_host>:8081). Where <viewpoint_host> is the IP address or name of theViewpoint Host (actual machine on which Viewpoint was installed).
2. Enter your Username and Password into the respective fields.3. Click Login.You will be redirected to the Viewpoint homepage. See The Viewpoint HomePage on page 51.
Sign Out of ViewpointDo the following:1. Locate the Sign Out link in the top right corner of the page.
2. Click Sign Out.You will be redirected to the login page.
Chapter 2 Viewpoint Basics

Related Topics
l Menu Bar on page 54l Chapter 2 Viewpoint Basics on page 51
Accessing Online HelpYou can access the Viewpoint online help (documentation) directly from theViewpoint portal.
Click next to where you sign out to access the Viewpoint online help.
Documentation for the full Moab HPC Suite, including Viewpoint, is available atAdaptive Computing Documentation Index.
Related Topics
l Menu Bar on page 54l Chapter 2 Viewpoint Basics on page 51
Chapter 2 Viewpoint Basics
56 Accessing Online Help

Workload Page 57
Chapter 3 Viewpoint Workload Overview
The Viewpoint Workload page provides information relating to job metrics.Specifically the Workload page provides access to:
l A detailed list of the jobs in the workload. Using this page you can viewinformation about the job (for example, to see if the job is runningcorrectly), change a job's status, or create a new job (using an applicationtemplate).
l The Job Details page, which provides additional details about a job.In this chapter:
l Workload Page on page 57l Job Details Page on page 60l Job Details–Functional Areas on page 66l Job Details–Additional Areas on page 73l Job Arrays on page 74l Managing the Workload on page 77l Creating a Job on page 77l Creating or Editing a Job Submission Script on page 79l Viewing Job Details on page 86
Workload PageThe Workload page offers a place to determine the status of jobs in yourworkload. You can also change a job's status or create a new job (using anapplication template).To access this page, clickWORKLOAD from the menu.This topic provides an example of the Workload page and describes its layoutand available information.In this topic:
l Page Example on page 57l Selection Criteria Area on page 58l Workload View Details on page 59
Page ExampleThe following image is an example of the Workload page.
Chapter 3 Viewpoint Workload Overview

Selection Criteria AreaThe right side of this page provides selection criteria you can use to limit what isdisplayed in the workload view.You can choose to display:
l Specific jobs based on the job id or the user who submitted the job(submitter ID). Select the value from the Current Search drop-down, inthe Narrow Search box, enter the specific information, and then click .
l Jobs matching a specific status (state). Select the status from the SelectJob State drop-down and then click Filter.
l Only job arrays or only regular jobs. The job arrays option is onlyapplicable for arrays reported directly from Moab. Arrays reported usingTorque will only display as a single (combined) job. Select the job typefrom the Select Job Type drop-down and then click Filter.
l Jobs within a given start date range or within a wallclock range. SelectingStart Date or Wall Clock will provide additional fields to specify the range.Specify the desired range and then click Filter.
You can utilize multiple selection criteria options; however, only the jobsthat match all of the defined options will be shown in the workload view.
ClickReset at any time to remove all defined selection criteria options (restorethe page defaults).
Chapter 3 Viewpoint Workload Overview
58 Workload Page

Workload Page 59
Workload View DetailsThe following information explains the layout and additional informationavailable in the workload view.
l Display Refresh – You can refresh the information displayed in theworkload view (including specified search and filter criteria) to reflect thelatest information about the jobs. At the top of the workload view, click.
l Job Creation – The CREATE JOB button at the top of the workload viewlets you create a new job based on available application templates. SeeCreating a Job on page 77 for detailed instructions.
l Columns – The workload view displays the data in a column format.Column titles that are underlined indicate that you can sort (ascending ordescending) the column contents.The following table describes the different columns and their contents.You can hover the mouse over a column's contents to view additionalinformation.
ColumnHeading Description
Job ID Unique identifier given to a job by Moab (or the resource manager) . In this column you canalso:
o Use the icon to change the status of a non-completed job (as displayed in the
Job Status column). See Changing a Job's State.o Display additional information about a job. Click a job ID to open the Job Details page.
See Viewing Job Details on page 86.o See job array information. For a Moab job array, you will see the job array ID and
then you can expand it to see the jobs within the job array. See Job Arrays on page74. Job arrays sent through Torque will be treated as a single job.
Job Name Name of the job provided by the user; also called the friendly name.
SubmitterID
Name of the user that submitted the job.
Start Date Date and time when the job is scheduled to start or has started.
SubmitDate
Date and time that the job was submitted.
Chapter 3 Viewpoint Workload Overview

ColumnHeading Description
QueueStatus
Current state of the job (for example, ELIGIBLE, COMPLETE, ACTIVE, IDLE).
Cores Number of allocated cores.
Nodes Number of allocated nodes. A zero indicates the job has not yet run or executed.
Wall Clock Amount of time requested for the job. This represents the maximum amount of time the jobis expected to run and is specified when the job is submitted. It does not represent theamount of time for which the job actually ran (if the job is in COMPLETED status).Wall clock time uses the following format: Days:Hours:Minutes:Seconds. For example,01:02:03:04 means the owner of the job requested the job run for one day, two hours, threeminutes, and four seconds. Jobs that exceed their wall clock limits are subject to thecorrective action specified in the Moab WCVIOLATIONACTION parameter.
l Page Controls – Page controls are available at the bottom of theworkload view to let you customize howmany jobs appear per page. Thepage controls also include options for selecting which page to display.
Related Topics
l Creating a Job on page 77l 1.1 Changing a Job's Statel Viewing Job Details on page 86l Job Arrays on page 74l Job Details Page on page 60l Chapter 3 Viewpoint Workload Overview on page 57
Job Details PageThe Job Details page shows additional information about a job and lets youmake certain modifications to a given job. To access this page, from theWorkload view, click on the Job ID link for the job.This topic provides an example of the Job Details page and describes its overalllayout, with a detailed description of the job status information at the top of thepage.In this topic:
Chapter 3 Viewpoint Workload Overview
60 Job Details Page

Job Details Page 61
l Page Example on page 61l Page Actions and Navigation on page 62l Job Actions and Basic Information on page 63l Scheduler Analysis on page 64
See Job Details–Functional Areas and Job Details–Additional Areas forinformation about other areas of the Job Details page.
Page ExampleThe following image is an example of the Job Details page.
Chapter 3 Viewpoint Workload Overview

Page Actions and NavigationThese buttons let you perform actions on this page:
l Go Back – Returns to the Workload page; if you have authorization tomake changes, this will discard any unsaved changes.
l Done – Submits any job changes to Moab Workload Manager and returnsto the Workload page.
Chapter 3 Viewpoint Workload Overview
62 Job Details Page

Job Details Page 63
l Apply – Submits any job changes to Moab Workload Manager and stayson the Job Details page.
At the right of the page there are two floating buttons that can be pressed tonavigate to the top and the bottom of the page.
Click to navigate to the top of the page.
Click to navigate to the bottom of the page.
The information contained in, and the actions you can perform using, theJob Details page will vary based on the job's status, the user's rolepermissions and/or the fields available from the application template.
Job Actions and Basic InformationAt the top of the Job Details page you will find basic information and actionspertaining to the job.The following image is an example of the Job Actions and Basic Informationarea.
Job ActionsAt the upper right of the page, you may find several links and buttons toperform actions. You will only see links and buttons for actions that you areauthorized to perform. These are separate from the page-related actionsidentified later in this topic.
l The "Return to earlier search" link takes you to the Workload page withthe search and filter criteria you specified.
l The "Cancel" button appears for a running or idle job, and lets you cancelthe job.
l The "Hold" button appears for an active job, and lets you place the job inidle status.
l The "Release" button appears for a job for which a hold has been applied,and lets you release the hold on the job and allow it to continue running.
Chapter 3 Viewpoint Workload Overview

l The "More Information" button appears for blocked jobs and, based onthe user's permissions, lets you view the Schedule Analysis window. SeeScheduler Analysis on page 64.
Job Basic InformationAt the upper left and right of the page, you will find several fields displayingbasic information.
l Job Id – ID given to the job by Moab or the resource manager.l Submission Script – Name of the script used to generate the job. Forjobs sent directly from Moab or the resource manager, this will be "N/A".
l Reservation Name – Name of the reservation, if applicable, associatedwith the job.
l Template – Name of the application template used to create the jobinformation. For jobs sent directly from Moab or the resource manager,this will be "N/A".
Scheduler Analysis
The Scheduler Analysis requires the "Job Details - Scheduling Analysis"permission. See Role Permissions on page 14 for more information aboutthe available permissions you can set.
When Scheduler Analysis is enabled, the "More Information" button appearsunder the Status information when the job is blocked. Click this button to viewthe Schedule Analysis pop-up window.This window provides information useful in debugging why Moab is not runningthe job.The following image is an example of the Scheduler Analysis window.
Chapter 3 Viewpoint Workload Overview
64 Job Details Page

Job Details Page 65
Chapter 3 Viewpoint Workload Overview

Related Topics
l 1.1 Workload Pagel Viewing Job Details on page 86l Job Details–Functional Areas on page 66l Job Details–Additional Areas on page 73l Chapter 3 Viewpoint Workload Overview on page 57
Job Details–Functional AreasThe Job Details page shows additional information about a job and lets youmake certain modifications to a given job. To access this page, from theWorkload view, click on the Job ID link for the job.This topic describes functional areas, including field descriptions, available onthe Job Details page. To expand and display a functional area, click to theleft of the title of the desired area.
The information contained in, and the actions you can perform using, theJob Details page will vary based on the job's status, the user's rolepermissions and/or the fields available from the application template.
In this topic:l Priority on page 66l Job Messages on page 68l Credentials and CPU Statistics on page 68l Time Frame on page 69l Data Management and Other Information on page 70l Resource Requirement Summary on page 71l Requirement Details on page 72
Priority
The Priority area requires the "Job Details - Priority Analysis" permission.See Role Permissions on page 14 for more information about theavailable permissions you can set.
The Priority area lists the priority factors applied to the job for schedulingpurposes. Expand the area to view the prioritization factors.
Chapter 3 Viewpoint Workload Overview
66 Job Details–Functional Areas

Job Details–Functional Areas 67
Expand the Priority area to view the additional information. Click to refreshthe priority information.The following image is an example of the Priority area.
The Priority area is organized as follows:The top area shows the cumulative value for these prioritization areas:
l User Job Priority – User defined priority factors. See Job Priority Factorsin the Moab Workload Manager Reference Guide for more information onthe available factors.
This feature requires the User Priority field to be enabled in theapplication template and the Moab ENABLENEGJOBPRIORITY serverparameter must be set to "TRUE". See Advanced Settings on page106 for more information on the User Priority field.
l System Priority – Factors that are used to override Moab WorkloadManager's start priority to allow jobs to start sooner than they wouldordinarily. See mjobctl in the Moab Workload Manager Reference Guidefor more information on the available factors.
l Start Priority –Moab's defined start priority.l Job Start Count – Number of times Moab has requeued the job after ajob failure or preemption.
The second area provides details about how Moab calculated the start priority.The different start priority groups are listed and are also broken down into eachfactor within the group. The cumulative weight for the group and the how thatbreaks down into the different factors are provided.
Chapter 3 Viewpoint Workload Overview

Job MessagesThe Job Message area lists anymessages reported by Moab. These are thesame messages you can view in Moab using checkjob -v -v.
Expand the Job Messages area to view the reported messages, if any. Clickto refresh the job message information.The following image is an example of the Job Messages area.
Credentials and CPU StatisticsThe following image is an example of the Credentials and CPU Statistics areas.
Credentials AreaThe Credentials area displays information about the user whocreated/submitted the job.The following table describes the fields in the Credentials area.
Field Description
User The user that submitted a job.
Group Displays the group credential, which represents an aggregation of users. User-to-group mappings areoften specified by the operating system or resource manager and typically map to a user's UNIX groupID. However, user-to-group mappings may also be provided by a security and identity managementservice, or you can specify such directly within Moab.
Chapter 3 Viewpoint Workload Overview
68 Job Details–Functional Areas

Job Details–Functional Areas 69
Field Description
Account Displays the account credential. This credential is generally associated with a group of users along thelines of a particular project for accounting and billing purposes.
Class Displays the job class. The concept of the class credential is derived from the resource manager classor queue object. Classes differ from other credentials in that they more directly impact job attributes.In standard HPC usage, a user submits a job to a class and this class imposes a number of factors onthe job. The attributes of a class may be specified within the resource manager or directly withinMoab.
Qualityof Ser-vice
Quality of service status applied to the job (for example, low, medium, or high).
CPU Statistics AreaThe CPU Statics area contains a graph depicting the CPU statistics of the job.Click to open a pop-window to specify the range and refresh intervals forthe displayed statistics. You can also manually update the display.
Time FrameThe Time Frame area provides information on the job's start and completiontimes as well as duration information.The following image is an example of the Time Frame area.
The following table describes the fields in the Time Frame area.
Field Description
Start Time The date and time that the job started.
Duration The amount of time requested for the job in seconds. This represents the maximum amount oftime the job is expected to run and is specified when the job is submitted. This does not representthe amount of time the job actually ran if the job is completed.Jobs that exceed their wallclock limits are subject to the corrective action specified in the MoabWCVIOLATIONACTION parameter.
Chapter 3 Viewpoint Workload Overview

Field Description
CompletionTime
The date and time that the job completed; "None" if the job is running or idle.
Actual Dur-ation
The amount of time the job has been running (or ran if the job is completed).
Data Management and Other InformationThe following image is an example of the Data Management and OtherInformation areas.
Data Management AreaThe Data Management area displays the file paths defined for the job. Click
to open the File Manager page to change folder paths.
The following table describes the fields in the Data Management area.
Field Description
ExecutionPath
Directory path where the job was executed. This is typically the user's home directory.
Output Path Directory path where the standard output file is stored. This is typically the user's home dir-ectory.
Error Path Directory path where the error file is stored. This is typically the user's home directory.
Other Information AreaThe Other Information area displays additional Moab-related information job.The following table describes the fields in the Other Information area.
Chapter 3 Viewpoint Workload Overview
70 Job Details–Functional Areas

Job Details–Functional Areas 71
Field Description
Partition Access List List of available partitions on which the job can run.
Start Count Number of times Moab requeued the job after a job failure or preemption.
Resource Requirement SummaryThe Resource Requirement Summary area provides information on theresources requested/required for the job.The following image is an example of the Resource Requirement Summaryarea.
The following table describes the fields in the Resource Requirement Summaryarea.
Field Description
Total CoresRequested
Maximum dedicated processors allocated for the node.
Total MemoryRequested
Maximum memory made available for the job.
Total SwapRequested
Amount of swap memory made available for the job.
Total Disk Amount of disk space available for the job.
Features Maximum number of supported node features.
Chapter 3 Viewpoint Workload Overview

Field Description
Total NodesRequested
Number nodes requested at job submission.
Allocated NodeList
List of nodes allocated for the job. The job coordinator node is displayed with a dark blue back-ground. Job worker nodes are displayed on a light blue background.
Allocated NodeCount
Number of nodes actually allocated for the job.
Allocated Par-tition
Partition allocated for the job.
Operating Sys-tem
Operating system on which the node can run.
Architecture Node's processor architecture.
Total GenericResources
Number of generic resources available.
Requirement DetailsThe Requirement Details area provides task-specific details about the job.
If the job has more than one task definition, this area will list each taskseparately. In addition, if generic resources were defined, the genericresources field will contain a table listing the name of the resource and its usedcount.
Related Topics
l 1.1 Workload Pagel Viewing Job Details on page 86
Chapter 3 Viewpoint Workload Overview
72 Job Details–Functional Areas
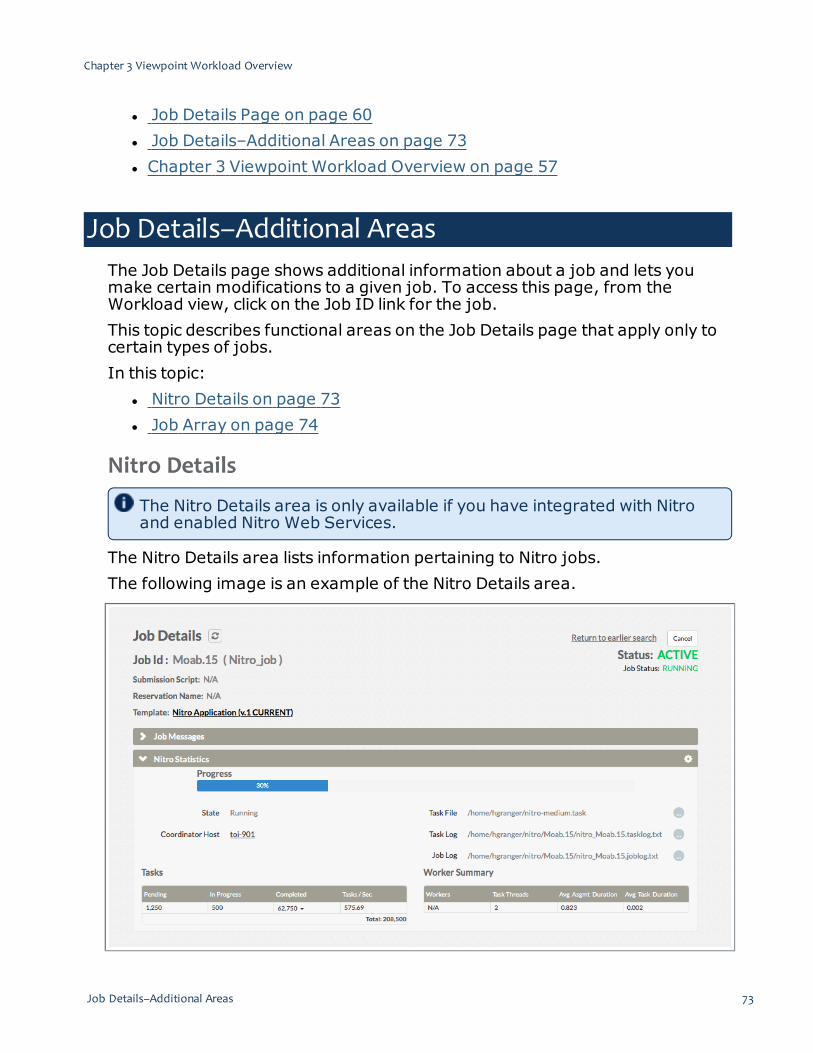
Job Details–Additional Areas 73
l Job Details Page on page 60l Job Details–Additional Areas on page 73l Chapter 3 Viewpoint Workload Overview on page 57
Job Details–Additional AreasThe Job Details page shows additional information about a job and lets youmake certain modifications to a given job. To access this page, from theWorkload view, click on the Job ID link for the job.This topic describes functional areas on the Job Details page that apply only tocertain types of jobs.In this topic:
l Nitro Details on page 73l Job Array on page 74
Nitro Details
The Nitro Details area is only available if you have integrated with Nitroand enabled Nitro Web Services.
The Nitro Details area lists information pertaining to Nitro jobs.The following image is an example of the Nitro Details area.
Chapter 3 Viewpoint Workload Overview
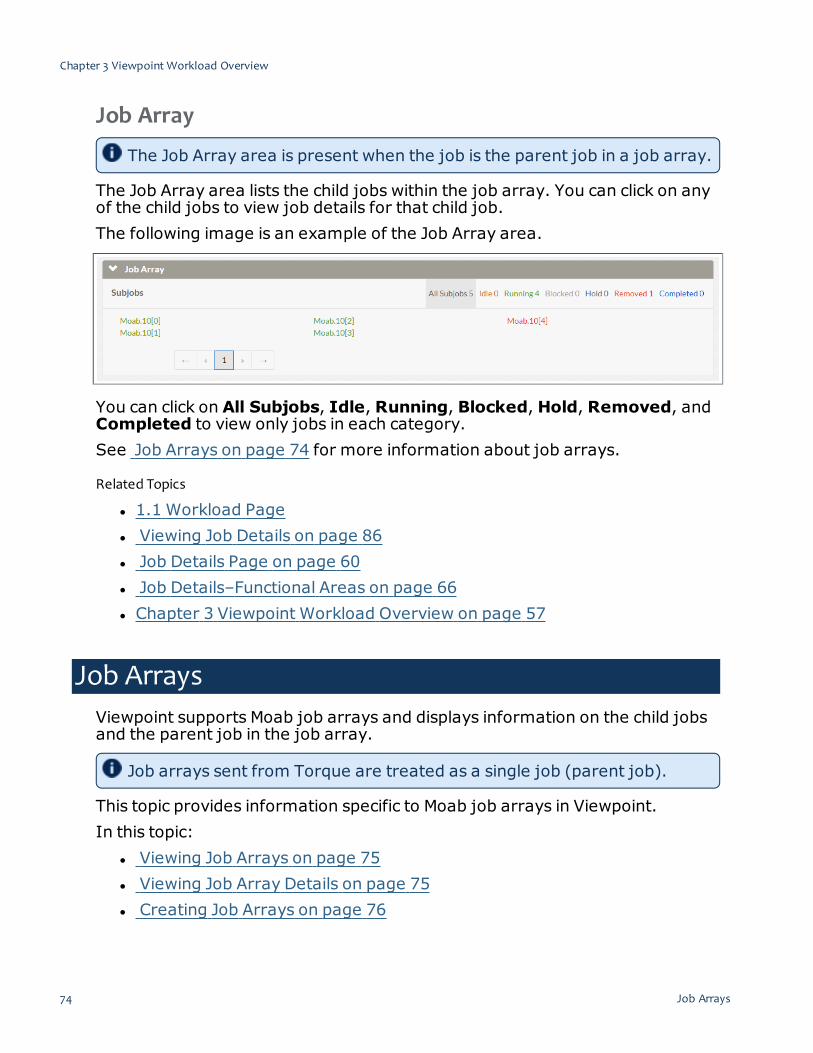
Job Array
The Job Array area is present when the job is the parent job in a job array.
The Job Array area lists the child jobs within the job array. You can click on anyof the child jobs to view job details for that child job.The following image is an example of the Job Array area.
You can click on All Subjobs, Idle, Running, Blocked, Hold, Removed, andCompleted to view only jobs in each category.See Job Arrays on page 74 for more information about job arrays.
Related Topics
l 1.1 Workload Pagel Viewing Job Details on page 86l Job Details Page on page 60l Job Details–Functional Areas on page 66l Chapter 3 Viewpoint Workload Overview on page 57
Job ArraysViewpoint supports Moab job arrays and displays information on the child jobsand the parent job in the job array.
Job arrays sent from Torque are treated as a single job (parent job).
This topic provides information specific to Moab job arrays in Viewpoint.In this topic:
l Viewing Job Arrays on page 75l Viewing Job Array Details on page 75l Creating Job Arrays on page 76
Chapter 3 Viewpoint Workload Overview
74 Job Arrays

Job Arrays 75
Viewing Job ArraysJob array information is viewable from the Workload page. However, with thejob array, instead of the Job ID, the job array ID is listed in the Job ID columnand the information in the rest of the columns is the parent job information.Expand the job ID to see a listing of the child jobs in the job array.The following image shows an example of the expanded job array.
Viewing Job Array DetailsJob detail information for a parent or child job in the job array is viewable usingthe Job Details page.
l For the parent job, select the job array ID in the Job ID column.l For a child job, select the link for the child job from the expanded jobarray.
Once you have selected the job, the Job Details page displays. This page issimilar to the Job Details page for non-job arrays, with these differences:
l Parent job:o The Job Array area is present. Expand this area to view the child jobsfor this job array.
Chapter 3 Viewpoint Workload Overview

o You can make changes to, hold, or cancel the parent job.
If you cancel a parent job, all child jobs will be canceled.However, if you hold the parent job, all the child jobs continueas normal.
l Child job:o The parent job ID is listed under the Job Id field. Click the parent jobID to return to the parent job.
o The Job Array area is not present, as this is a child job.o You can make changes to, hold, or cancel the child job.
Creating Job ArraysViewpoint also lets you create job arrays.
The user must have the Create Job permission applied. The user must alsohave access to an application template that has the "Job Arrays" labelenabled and visible and/or editable and which includes a script with the"Moab Array Env Variables". See Role Permissions on page 14 andApplication Template Details on page 97.
You use the Create Job page to also create a job array; however you mustchoose an application template that enables creation of a job array.When the Create Job page displays, you will see the job array-specificationfields in the Basic Job Settings area. For example:
The "From" number is the first number you want appended to the job forthe child job. The "To" number is the maximum number of child job. Forexample, if you specified the range as From 0 To 3. The job array will havefour child jobs: jobID[0], jobID[1], jobID[2], and jobID[3].
Related Topics
l 1.1 Workload Pagel Chapter 3 Viewpoint Workload Overview on page 57
Chapter 3 Viewpoint Workload Overview
76 Job Arrays

Managing the Workload 77
Managing theWorkloadViewpoint lets you manage the state of non-completed jobs directly from theWorkload view. For example, if a job is idle, you can place it on hold or cancel it.Do the following:1. If you have not already done so, display the Workload view. (ClickWORKLOAD in the menu bar; depending on your user credentials you mayalso access the Workload view from the Home page.)
2. In the workload view, hover your mouse over the Job ID for a non-completed job and click the icon.Depending on the current state of the job, the available options to changethe job state appear. For example, if the job state is IDLE, the Hold andCancel options are displayed.
3. Select the new state for the job.Once the state change as been passed to Moab, a message appearsindicating it has been changed and the new state appears in Queue Statuscolumn.
Related Topics
l Workload Page on page 57l Chapter 3 Viewpoint Workload Overview on page 57
Creating a JobViewpoint lets you create a job directly from the Workload page.
You must have been granted the "Create Job Page" Viewpoint permissionto create a job.
Do the following:1. If you have not already done so, access the Workload page. (ClickWORKLOAD in the menu bar.)
2. Click Create Job.The Select Application Template pop-up window appears, showing a list oftemplates you can use to create a job.
Chapter 3 Viewpoint Workload Overview

You can toggle between a grid view and list view by clicking and ,
respectively.3. If desired, filter the application template results. For example,
l Use the Type drop-down to limit by application template type.l Use the Filter drop-down to limit by its association to you:
o Shared With Me – Created by another but shared with you (based ontemplate permissions)
o Owned by Me – Created by youo All – All templates shared with you or created by you
You can use the Type and Filter drop-downs in combination to further limitapplication template results (for example, to search for HPC Applicationtemplates you created).
Alternatively, you can click to open a search box (replaces the filter box)that lets you enter the name of the application template you want to use.
Chapter 3 Viewpoint Workload Overview
78 Creating a Job

Creating or Editing a Job Submission Script 79
Again, you can use the Type drop-down to further limit the applicationtemplate results.
4. Click the application template you wish to use to create the job.The Create Job page appears with the fields from the selected applicationtemplate.
5. Enter the necessary information for the new job, such as the job name andsubmission script.At the right of the page there are two floating buttons that can be pressed tonavigate to the top and the bottom of the page.
Click to navigate to the top of the page.
Click to navigate to the bottom of the page.
6. Click Create to submit the information and create the job; otherwise, clickCancel to return to the Workload view.
Related Topics
l 1.1 Workload Pagel Chapter 3 Viewpoint Workload Overview on page 57
Creating or Editing a Job Submission ScriptYou may need to edit a job submission script when creating a job. If you havethe Templates Page Viewpoint permission, you can also create a default jobsubmission script associated with a job template. See Job Submission Script onpage 111 for more information.Do the following:1. If you have not already done so, click Customize Script on the Create Jobpage. The Script Builder appears.
Chapter 3 Viewpoint Workload Overview

2. Enter the script in the pane on the left side of the Script Builder. To assist youin building your script, there is a list of variables on the right side of the Scriptbuilder that you can drag and drop into your script. Hover the mouse overthe variable to view its description. When used in the script, the variablesshown in the right pane are highlighted and the number of times the variableis used in this script is displayed.
Chapter 3 Viewpoint Workload Overview
80 Creating or Editing a Job Submission Script

Creating or Editing a Job Submission Script 81
Another method for adding variables to a script is to type Ctrl+Space whenediting a script in the left pane. You can select the variables directly in this listinstead of having to drag them from the right pane.
Chapter 3 Viewpoint Workload Overview

In addition to Viewpoint input variables, the list may include Custom Inputs,which are defined in the Custom Settings section of the job template, andMoab environment variables. See Script Variables on page 82 for moreinformation about script variables.You can also import a script from a file by clicking Import and selecting thefile containing the script.
3. When you are done editing your script, clickDone Editing to save.If you want to export a script for use in other jobs or job templates, clickExport and enter a file name for the script file.
Script VariablesThe Script Builder provides a number of script variables that you can insert intoyour script. During script execution, Viewpoint replaces the variable with itscurrent value. General patterns Viewpoint follows when replacing variableswith current values is shown in the table below.
Text in ScriptEditor Current Value of Variable Text After
Replacement
%VAR% 1 1
text%VAR%text 1 text1text
Chapter 3 Viewpoint Workload Overview
82 Creating or Editing a Job Submission Script

Creating or Editing a Job Submission Script 83
Text in ScriptEditor Current Value of Variable Text After
Replacement
\%VAR% 1 \%VAR%
\\%VAR% 1 \1
%INVALID% (Undefined variable) %INVALID%
\%INVALID% (Undefined variable) %INVALID%
%VAR%VAR% 1 1VAR%
%VAR%%VAR% 1 11
%DURATION% 5 (Value set in one of the job template's widgets, such as the TimeManagement Duration widget)
5
%PATH% /home/hpotter (Value of a path variable) /home/hpotter
%DATE% 2017-03-15 11:00 UTC (Value of a date variable) 2017-03-15 11:00UTC
%BOOL% true (Value of a boolean variable) true
Script variables in the Script Builder are categorized as Viewpoint Inputs, MoabEnvironment Variables, and Custom Inputs. Viewpoint Inputs are variablesassociated with the job.
Variable Description
ACCOUNT Account associated with the job.
ARCHITECTURE Defines the system architecture required by the job. Example: x86_64.
DESTINATIONQUEUE The destination queue or class of the job.
DURATION The expected amount of time the job is expected to run.
ELIGIBLEDATE The time at which the job is eligible for execution.
Chapter 3 Viewpoint Workload Overview
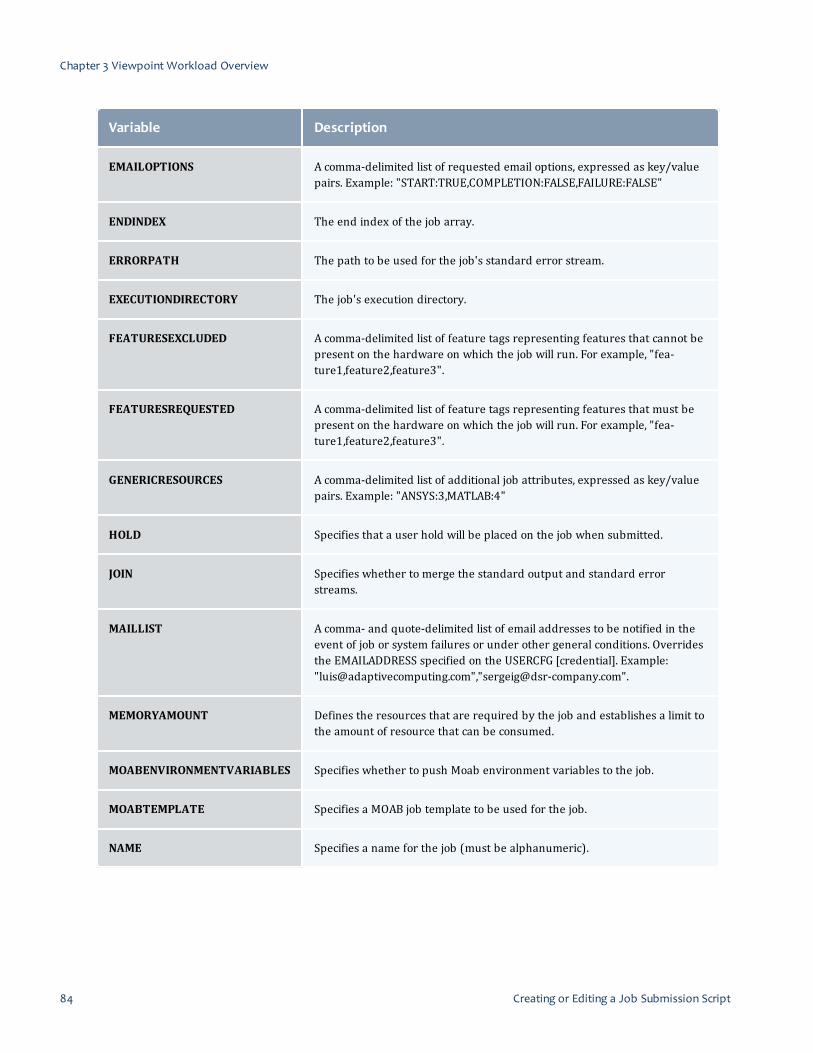
Variable Description
EMAILOPTIONS A comma-delimited list of requested email options, expressed as key/valuepairs. Example: "START:TRUE,COMPLETION:FALSE,FAILURE:FALSE"
ENDINDEX The end index of the job array.
ERRORPATH The path to be used for the job's standard error stream.
EXECUTIONDIRECTORY The job's execution directory.
FEATURESEXCLUDED A comma-delimited list of feature tags representing features that cannot bepresent on the hardware on which the job will run. For example, "fea-ture1,feature2,feature3".
FEATURESREQUESTED A comma-delimited list of feature tags representing features that must bepresent on the hardware on which the job will run. For example, "fea-ture1,feature2,feature3".
GENERICRESOURCES A comma-delimited list of additional job attributes, expressed as key/valuepairs. Example: "ANSYS:3,MATLAB:4"
HOLD Specifies that a user hold will be placed on the job when submitted.
JOIN Specifies whether to merge the standard output and standard errorstreams.
MAILLIST A comma- and quote-delimited list of email addresses to be notified in theevent of job or system failures or under other general conditions. Overridesthe EMAILADDRESS specified on the USERCFG [credential]. Example:"[email protected]","[email protected]".
MEMORYAMOUNT Defines the resources that are required by the job and establishes a limit tothe amount of resource that can be consumed.
MOABENVIRONMENTVARIABLES Specifies whether to push Moab environment variables to the job.
MOABTEMPLATE Specifies a MOAB job template to be used for the job.
NAME Specifies a name for the job (must be alphanumeric).
Chapter 3 Viewpoint Workload Overview
84 Creating or Editing a Job Submission Script

Creating or Editing a Job Submission Script 85
Variable Description
NODEACCESSPOLICY Specifies whether other tasks may execute on the job's compute node. See1.1 Node Access Policies for more more information.
NODEALLOCATIONPOLICY Specifies the criteria for determining whether a node is busy. See 1.1 NodeAvailability Policies for more information.
NODESREQUESTED Specifies the exact set, superset, or subset of nodes on which the job mustrun.
NODESREQUESTEDPOLICY Indicates an exact set, superset, or subset of nodes on which the job mustrun. Only relevant if NODESREQUESTED is provided.
NUMOFCORES If "Total Amount of Cores" is selected and total cores = 4, the value of thevariable is "4". If "Nodes with Core Count" is selected, total nodes =2, andcores per node = 4, the value of the variable is "2:4".
OPERATINGSYSTEM Specifies the job's required operating system.
OUTPUTPATH Specifies the path to be used for the job's standard output stream.
QOS Specifies the desired QoS for the job.
SHELL The shell to execute the job script. Example: /bin/bash.
STARTINDEX The start index of the job array.
USERPRIORITY Specifies the priority at which the job is to run.
Moab Environment Variables are variable whose values Viewpoint useswhen submitting a job to Moab.
Variable Description
MOAB_ACCOUNT Account name.
MOAB_BATCH Set if a batch job (non-interactive).
MOAB_CLASS Class name.
MOAB_DEPEND Job dependency string.
Chapter 3 Viewpoint Workload Overview

Variable Description
MOAB_GROUP Group name.
MOAB_JOBID Job ID.
MOAB_JOBNAME Job name.
MOAB_MACHINE Name of the machine (i.e. destination resource manager) on which the job is to run.
MOAB_NODECOUNT Number of nodes allocated to the job.
MOAB_NODELIST Comma-delimited list of nodes on which the job is to run.
MOAB_PARTITION Partition name in which the job is to run.
MOAB_PROCCOUNT Number of processors allocated to the job.
MOAB_QOS QoS name.
MOAB_SUBMITDIR Directory from which the job is submitted.
MOAB_TASKMAP Node list with tasks allocated to each node listed. <nodename>.<tasklist>
MOAB_USER User name.
Custom Inputs are variables defined in the Custom Settings section of a jobtemplate. If you are creating a job template, Custom Inputs are variables youhave defined. If you are creating a job, Custom Inputs are the variablesdefined by the designer of your selected job template. For example, the NitroApplication job template has a TASKFILE Custom Input variable that containsthe name of the task file associated with the job.
Related Topics
l Creating a Job on page 77l Application Template Details on page 97
Viewing Job DetailsViewpoint lets you view the job details for any job within your workload. Thisfunctionality uses both the Workload page and the Job Details page.
Chapter 3 Viewpoint Workload Overview
86 Viewing Job Details

Viewing Job Details 87
The detailed information available for a job will vary. See Job Details Pageon page 60 for more information.
View Job DetailsDo the following:1. If you have not already done so, access the Workload page. (ClickWorkload from the menu.)
2. Enter the search and/or filter criteria as needed to limit the jobs displayed.See 1.1.2 Search and/or Filter Areas for more information.
3. Click on the Job ID of the job for which you want to view details. The JobDetails page displays and shows information about that job. For the JobDetails page you can view and/or edit job information. See Job Details Pageon page 60 for more information.
Related Topics
l 1.1 Workload Pagel Job Details Page on page 60l Application Template Details on page 97
Chapter 3 Viewpoint Workload Overview

88 Viewing Job Details

Application Templates Page 89
Chapter 4 Application Templates
Application templates are used to predefine the job requirements available tousers when creating jobs. Specifically:
l The Application Templates page (default) lists the application templatesavailable to you when creating a job. Depending on how the applicationtemplate was setup, you can also make small changes to the applicationtemplate at job submission.
l If your credentials include the Templates Admin permission you can viewand edit every application template in your Viewpoint configuration. Youcan also create and import application templates using this page.
Viewpoint is delivered with several application templates that you cancustomize for your environment or to use as a guide for creating your ownapplication templates. See Provided Application Templates on page 119 formore information.
The admin user (for example, "moab-admin") can perform applicationtemplate functions programmatically in Viewpoint; instead of using theApplication Templates page in the portal. See Application Template APIon page 157.
In this chapter:l Application Templates Page on page 89l Create Application Template Page on page 93l Edit Application Template Page on page 95l Application Template Details on page 97l Creating an Application Template on page 114l Editing an Application Template on page 115l Importing an Application Template on page 117l Managing Application Template History on page 118l Provided Application Templates on page 119l Application Template API on page 157
Application Templates PageThe Application Templates page lets you manage application templates foryour Viewpoint configuration.To access this page, click TEMPLATES from the menu.
Chapter 4 Application Templates

This topic provides an example of the Application Templates page anddescribes its layout and available information.In this topic:
l Page Example on page 90l Page Details on page 90l Additional Functions on page 92
Page ExampleThe following image is an example of the Application Templates page.
Page DetailsThis section describes the functional areas of the Application Templates page.In this section:
l New Application Template Creation on page 90l Filters on page 91l Application Templates List on page 91
New Application Template CreationViewpoint lets you create a new application template or import an existingapplication template you can use when creating jobs. To enable thisfunctionality, two buttons are available towards the bottom of this page.
l CREATE APPLICATION TEMPLATE – Opens up a blank applicationtemplate. See Creating an Application Template on page 114.
Chapter 4 Application Templates
90 Application Templates Page

Application Templates Page 91
l IMPORT – Opens up a pop-window that lets you import an existingapplication template. See Importing an Application Template on page117.
FiltersFilters let you specify what is displayed in the list of application templates on themain pane.To use a filter, click the check box next to the filter to activate it, enter in theinformation, and then click Filter. You can clickReset at any time to restorethe page default view.The following table describes the different filters.
Filter Description
Name Name used to identify the application template.
Owner The owner of the application template.
Published Whether you want to display applications templates that are published or unpublished.
DateCreated
Date range during which the application template was created. When this filter is selected, addi-tional fields appear letting you specify the date range.
User Name of the user or users given permission to use this application template.
Group User group given permission to use this application template.
Account Account given permission to use this application template.
Application Templates ListThe main pane of the Application Templates page lists the applicationtemplates and their corresponding information in a column format.
Column titles that are underlined indicate that you can sort (ascending ordescending) the column contents.
Page controls are available at the bottom of the application templates list to letyou customize howmany application templates appear at a time in the list.These controls also include options for moving between pages of listedapplication templates.The following table describes the different columns and their contents.
Chapter 4 Application Templates

ColumnHeading Description
Name Name used to identify the application template. Click on the application template's name to openthe application template and view additional information about the application template.
Version The current version of the template.
Owner Name of the individual who created the application template.
Permissions User, Group, and Account permissions granted for this application template.
Published Indicates whether the application template is published.
Used Number of times the application template has been used (the number of jobs submitted usingthis application template).
Changed Date on which the application template was last changed.
Additional FunctionsThe Templates page also includes a pop-up menu with shortcuts to performadditional application template-related functions. To access the shortcuts,hover the mouse near the application template name to display , and thenclick this icon to display the pop-up menu.
Chapter 4 Application Templates
92 Application Templates Page
Create Application Template Page 93
From this pop-up menu, you can:l Create a job using the template (if you have the necessary permissions).l Open the Edit Application Template page to modify the applicationtemplate.
l Toggle this application template between published and unpublishedstatus.
l Export this application template.l Copy this application template.l Delete this application template.
If you delete one of the templates provided with Viewpoint, you canrestore the template on the Application Template Configuration page. SeeApplication Templates Configuration Page on page 35.
Related Topics
l Creating an Application Template on page 114l Importing an Application Template on page 117l Editing an Application Template on page 115l Managing Application Template History on page 118l Application Template Details on page 97l Chapter 4 Application Templates on page 89
Create Application Template PageThe Create Application Template Page lets you create application templatesthat users may use when creating jobs.To access this page, click TEMPLATE from the menu to access the ApplicationTemplates page, and then click CREATE APPLICATION TEMPLATE.This topic identifies how the Create Application Template page is organized andthe fields and functions available when creating an application template.
Page ExampleThe following image is an example of the Create Application Template page.
Chapter 4 Application Templates

The Create Application Template page is divided into several sections:l General Information – Contains the application template name, templatetype, and version description.
l Permissions – Defines who is allowed to use the application template.l Application Description – Contains a formatted text description of theapplication template that you can use to provide detailed instructions onhow to use the application template.
l Basic Settings – Contains basic fields for defining Moab-related settings forjobs created with the application template.
l Advanced Settings – Contains additional fields for defining Moab-relatedsettings for jobs created with the application template.
l Node Policies Settings – Contains fields for defining node policies for jobscreated with the application template.
l Custom Settings – Contains fields for defining custom parameters for jobscreated with the application template.
All sections except General Information and Permissions have editable namefields that make it possible for you to rename the section for the template youare creating. See Application Template Details on page 97 for detailedinformation about each of these sections.
Chapter 4 Application Templates
94 Create Application Template Page

Edit Application Template Page 95
Page Actions and NavigationThese buttons let you perform actions on this page:
l EXPORT TEMPLATE – Export the current template for use.l SAVE TEMPLATE – Save any changesmade to the current template.l SAVE AND CLOSE – Save any changesmade to the current template andreturn to the Template Page.
At the right of the page there are two floating buttons that can be pressed tonavigate to the top and the bottom of the page.
Click to navigate to the top of the page.
Click to navigate to the bottom of the page.
Related Topics
l Creating an Application Template on page 114l Application Template Details on page 97l Application Templates Page on page 89l Chapter 4 Application Templates on page 89
Edit Application Template PageThe Edit Application Template page lets you edit existing application templatesthat users can use when creating jobs.To access this page, click TEMPLATES in the menu bar to access theApplication Templates page, then click the name of an existing applicationtemplate from the list of application templates.This topic identifies how the Edit Application Template page is organized andthe fields and functions available when editing an application template.
Page ExampleThe following image is an example of the Edit Application Template page.
Chapter 4 Application Templates

The Edit Application Template page is divided into several sections:l General Information – Contains the application template name, templatetype, and version description.
l Permissions – Defines who is allowed to use the application template.l Application Description – Contains a formatted text description of theapplication template that you can use to provide detailed instructions onhow to use the application template.
l Basic Settings – Contains basic fields for defining Moab-related settings forjobs created with the application template.
l Advanced Settings – Contains additional fields for defining Moab-relatedsettings for jobs created with the application template.
l Node Policies Settings – Contains fields for defining node policies for jobscreated with the application template.
l Custom Settings – Contains fields for defining custom parameters for jobscreated with the application template.
All sections except General Information and Permissions have editable namefields that make it possible for you to rename the section for the template youare editing. See Application Template Details on page 97 for detailedinformation about each of these sections.
Chapter 4 Application Templates
96 Edit Application Template Page

Application Template Details 97
Page Actions and NavigationThese buttons let you perform actions on this page:
l EXPORT TEMPLATE – Export the current template for use.l SAVE TEMPLATE – Save any changesmade to the current template.l SAVE AND CLOSE – Save any changesmade to the current template andreturn to the Template Page.
At the right of the page there are two floating buttons that can be pressed tonavigate to the top and the bottom of the page.
Click to navigate to the top of the page.
Click to navigate to the bottom of the page.
Related Topics
l Editing an Application Template on page 115l Application Template Details on page 97l Application Templates Page on page 89l Chapter 4 Application Templates on page 89
Application Template DetailsThis topic identifies how the application template information is organized andthe fields and functions available when creating or editing an applicationtemplate.See Create Application Template Page on page 93 for more information aboutcreating application templates.See Edit Application Template Page on page 95 for more information aboutediting application templates.In this topic:
l Application Template Name on page 98 – Identifies the name for theapplication template.
l Application Template Type on page 98 - Identifies the type for theapplication template.
l Available Fields on page 98 – Provides information on the available fieldsand how the fields are organized.
Chapter 4 Application Templates
l Field Information and Actions on page 109 – Provides a generalexplanation of the field functions; including how to show or hide fields.
l Application Template Permissions on page 110 – Provides information onhow to restrict the users who have access to this application template.
l Published/Unpublished Application Template on page 111 – Providesinformation regarding the difference between published and unpublishedapplication templates.
l Job Submission Script on page 111 – Explains how to access and use theScript Builder window to manage the job submission script for theapplication template.
l Application Template History on page 113 - Identifies the version for theapplication template. Provides information on saving a template as a newview version, viewing a template's history, and reverting to previoustemplate versions.
Application Template NameThe name of the application template appears towards the top of this page.Using the example in this topic, the application template title is "UntitledApplication Template". The application template name is displayed in theapplication template list shown in the Application Templates page.To edit the template name, click on the name label and enter the desiredname.
Application Template TypeDirectly under the application template name, you can specify the applicationtemplate type. To choose, select one of the options from the drop-downmenu.The available application template types are:
l HPC Applicationl Job Arrayl Remote Visualizationl Nitro Application
When editing an existing application template, you can modify the applicationtemplate to create job arrays by changing the application template type to JobArray.
Available FieldsThe available fields used for creating/editing application templates are groupedinto five areas. Specifically:
Chapter 4 Application Templates
98 Application Template Details

Application Template Details 99
l Application Description on page 99l Basic Settings on page 99l Advanced Settings on page 106l Node Policy Settings on page 108l Custom Settings on page 108
Expand an area to view its fields. This section provides information on thesedifferent areas and their associated fields. See Field Information and Actionson page 109 for information on using the fields.
Application DescriptionThis area lets you provide a description for your application template. Use thisarea to tell users any necessary information to use or access this applicationtemplate. This field provides multiple options for styling and formatting, amongother ways to make your description more detailed.The following image shows the Application Description area.
Basic SettingsThis area, as well as the Advanced Settings area, contains Moab-specific inputfor the job. If the template will be used for creating job arrays, the BasicSettings area also specifies starting and ending job indexes.This area breaks the basic setting information into functional groups. Theinformation will also be grouped similarly on the Job Details page.The following images are examples of the functional groups.
l Basic Job – contains settings for basic information like the name assignedto jobs created with this template and the submission script used to
Chapter 4 Application Templates

submit jobs. See Job Submission Script on page 111 for more informationabout creating a job submission script.
If the Template Type for the application template is set to Job Array, theBasic Settings area also contains settings for job indexes.
Chapter 4 Application Templates
100 Application Template Details
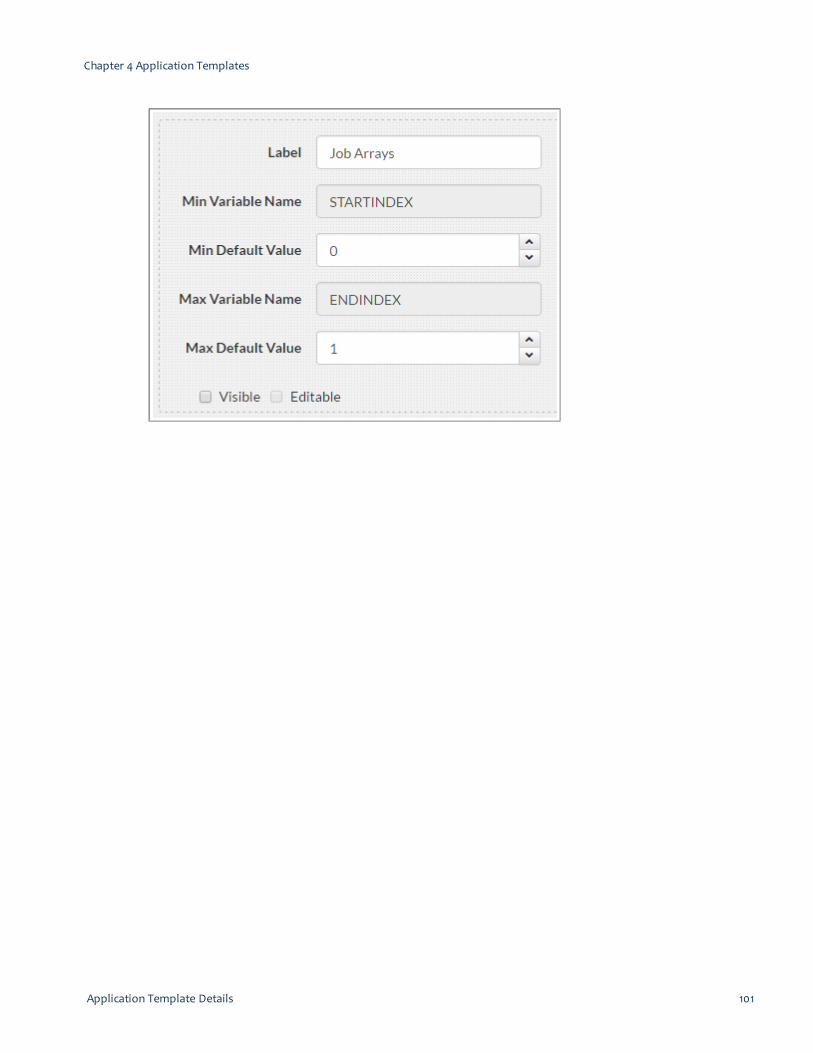
Application Template Details 101
Chapter 4 Application Templates

l Time Management – contains delay start and job duration settings.
l Credentials – settings for specifying job ownership, resource usage, policyenforcement, etc. See 1.1 Credential Overview for more information.
Chapter 4 Application Templates
102 Application Template Details

Application Template Details 103
l Resources – contains architecture, memory, and core settings.
Chapter 4 Application Templates

Use the up and down arrows to increment or decrement the resourcevalues. Click the settings icon to set minimum, maximum, and stepvalues to be used when incrementing and decrementing the resourcesetting.
Chapter 4 Application Templates
104 Application Template Details

Application Template Details 105
l Data Management – settings for job execution directory, output, anderror reporting. Check the Use execution path box to use the executionpath for the output path or error path.
Chapter 4 Application Templates

Advanced SettingsThis area contains advanced inputs that can be requested to Moab for the jobsuch as whether to include Moab environment variables at job submission time.You can also define job environment variables that can be used when creatingsubmission scripts.The following image is an example of the Advanced Settings area.
Chapter 4 Application Templates
106 Application Template Details

Application Template Details 107
Chapter 4 Application Templates

When enabled, the User Priority field requires the MoabENABLENEGJOBPRIORITY server parameter set to "TRUE". This Moabparameter should have been set when Viewpoint was installed. See MoabParameters in the Moab Workload Manager Reference Guide for moreinformation on this parameter.
Node Policy SettingsThis area contains policies that can be requested to Moab for the job such aswhether to include Moab environment variables at job submission time.The following image is an example of the Node Policies Settings area.
Custom SettingsThis area lets you add any custom settings to a template. You can add newcustom settings widgets by clicking Left, Fill, or Right to specify whether thewidget is to appear in the left column, right column, or fill both columns.
Chapter 4 Application Templates
108 Application Template Details

Application Template Details 109
When you add a custom setting, you can then specify the control that will bedisplayed to set the custom setting's value, a label to be displayed on thecontrol, a variable name, and default value for the variable. Depending on thetype of control you select, other settings may be required.
Field Information and ActionsThis section describes the different information and actions available for thefields in the Basic Settings, Advanced Settings, and Custom Settings areas ofthe application template.
l Label – User-friendly name shown for the field on the Create/Edit Jobpage. This is typically similar to the variable name.
l Variable Name – Actual name of the variable widget that will contain theuser’s input. For Basic and Advanced Settings areas, this is the Moabvariable for that field and cannot be changed. For the Custom Settingsarea, this variable can be any name that does not conflict with a Moabinput variable. See Job Submission Script on page 111 for a list of Moabvariable widgets.
l Default Value – Lets you specify a default value that will be used whencreating/editing a job. Depending on the type of variable for this field, thiscan be a selection list, a drop-down to select a date/time, or a space towrite in the value. If it is a date/time or write-in value, leave this empty ifyou do not want to assign a default value to the widget's variable and inputfields.
l Enabled, Visible, Editable check boxes – These three check boxescontrol if and how fields are used in the application template.
o Enabled –When checked, this field is activated; meaning that thisinformation is reported. At this time only two fields (Job Arrays andUser Priority) require activation. If Job Arrays is enabled, then onlyjob arrays can be created using this application template. If User
Chapter 4 Application Templates

Priority is enabled, users are able to make changes to the userpriority information for the job (this option requires additionalconfiguration, see Advanced Settings on page 106).
o Visible –When checked, this field will be displayed on theCreate/Edit Job page. This check box requires the Enabled check box,if present, to be checked.
o Editable –When checked, users can provide information for thisfield when creating/editing a job. This check box requires the Visiblecheck box to be checked.
Application Template PermissionsIn addition to being able to restrict which fields the user may see or edit, youcan also restrict who has access to the application template itself. This is doneusing the Permissions area at the top right of the page.The following image is an example of the Permissions area.
Using this area you can restrict access by:l Users. In the Users field, type the IDs of the users. Viewpoint will check ifthe users you added are valid; that is, has a valid operating systemaccount. If the user is valid, the user name turns green; otherwise it turnsred. Use "ALL" to remove restrictions.
l Group associations. In the Groups field, type the IDs of the groups.Viewpoint will check if the groups you added are valid; that is, has a validoperating system account. If the group is valid, the group ID turns green;otherwise it turns red. Use "ALL" to remove restrictions.
Chapter 4 Application Templates
110 Application Template Details

Application Template Details 111
l Account associations. In the Accounts field, select from the availableaccounts listed in the drop-down. Leave blank to remove restrictions.
Published/Unpublished Application TemplateViewpoint also lets you configure whether this application template is available(published) for use.
When an application template is marked "Unpublished" only the creator ofthe application template or template admins can view/edit the applicationtemplate; regardless of the Permissions settings. In addition, theapplication template does not appear in the application templates listwhen a user creates a job.
On the Create/Application Template page, under the "Permissions" area, selectthe appropriate radio button for the publish status.You can also change the publish status directly from the drop-downmenu in theApplication Templates page. See Additional Functions on page 92.
Job Submission ScriptViewpoint provides a Submission Script widget on the Application TemplateDetails page (in the Basic Job Settings area). This widget provides a ScriptBuilder window where you can create/edit, upload, or export the scriptinformation.
In order for users to submit jobs using the application template, theapplication template must have a defined job submission script. As withany field in the application template, you can choose whether to make thescript visible and editable by the user when creating a job.
Click Customize Script (located in the Default Value area in the SubmissionScript field) to access the Script Builder window.The following image is an example of the Script Builder window.
Chapter 4 Application Templates

Using this window you can:l Create/edit a script.1. Add/edit the lines for the script in the left pane.
o You can drag and drop the available variables from the right paneinto the left pane. Hover the mouse over the variable to view itsdescription. The right pane includes variables defined in theAdvanced Settings area. When used in the script, the variablesshown in the right pane are highlighted and the number of times thevariable is used in this script is displayed.
o From inside the left pane, click Ctrl+Space to access to a list ofvariables. You can select the variables directly in this list instead ofhaving to drag them from the right pane.
2. ClickDONE EDITING to save the script and close the window.l Import an existing script. You can import a script from your local computeror from your RFS.
l Export the script. Exporting a script lets you export a copy of your script toyour RFS. Then you can import the script for application templates to use.
See Creating or Editing a Job Submission Script on page 79 for moreinformation about creating and editing job submission scripts.
Chapter 4 Application Templates
112 Application Template Details

Application Template Details 113
Application Template HistoryViewpoint creates a new version of the application template every time you editan application template. The Template History Manager window displays ahistory of the versions and lets you manage the versions. Once an applicationtemplate has been edited and saved, the next time you go to edit the template,a History button is provided. Click this button to view the Template HistoryManager window.The following image is an example of the Template History Manager window.
The Template History Manager window displays a list of the different versionsfor the application template in a column format and provides operations formanaging the versions of an application template. The following tabledescribes the different columns and their contents.
Column titles that are underlined indicate that you can sort (ascending ordescending) the column contents.
Column Heading Description
Name Name used to identify the application template.
Version The version number for the version of the application template.
Changed By Name of the user who last edited the application template.
Description A description of the application template version.
Chapter 4 Application Templates
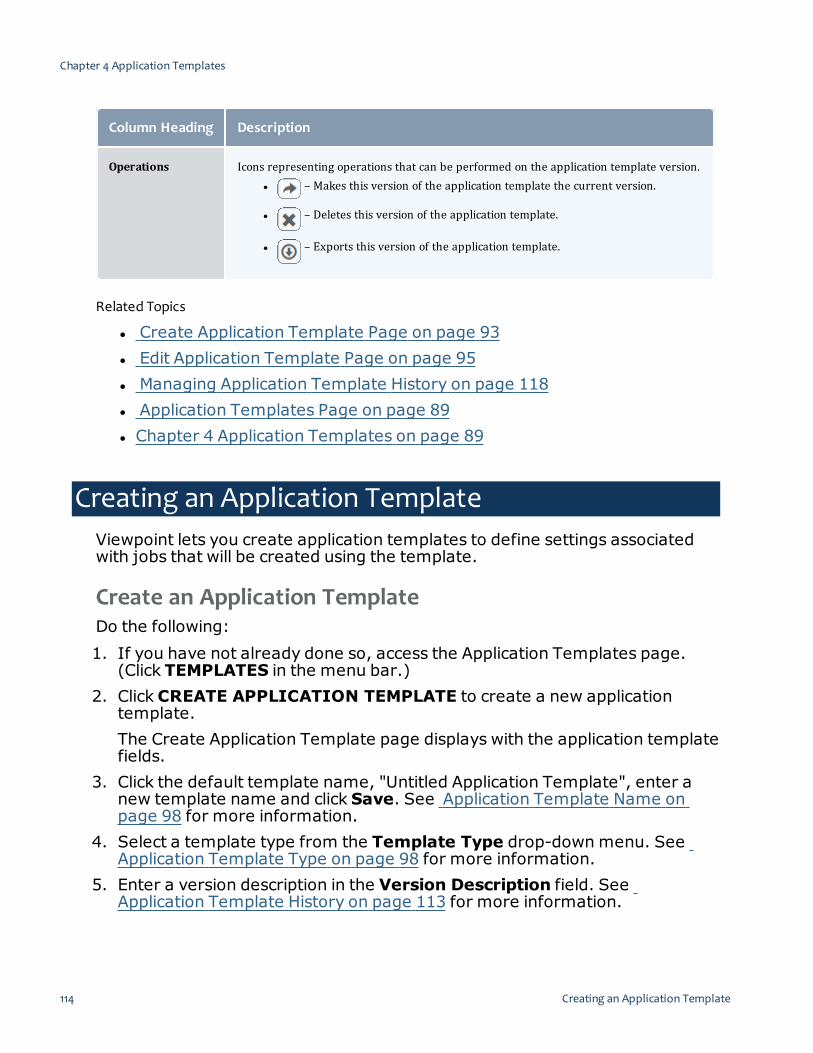
Column Heading Description
Operations Icons representing operations that can be performed on the application template version.l – Makes this version of the application template the current version.
l – Deletes this version of the application template.
l – Exports this version of the application template.
Related Topics
l Create Application Template Page on page 93l Edit Application Template Page on page 95l Managing Application Template History on page 118l Application Templates Page on page 89l Chapter 4 Application Templates on page 89
Creating an Application TemplateViewpoint lets you create application templates to define settings associatedwith jobs that will be created using the template.
Create an Application TemplateDo the following:1. If you have not already done so, access the Application Templates page.(Click TEMPLATES in the menu bar.)
2. Click CREATE APPLICATION TEMPLATE to create a new applicationtemplate.The Create Application Template page displays with the application templatefields.
3. Click the default template name, "Untitled Application Template", enter anew template name and click Save. See Application Template Name onpage 98 for more information.
4. Select a template type from the Template Type drop-downmenu. SeeApplication Template Type on page 98 for more information.
5. Enter a version description in the Version Description field. SeeApplication Template History on page 113 for more information.
Chapter 4 Application Templates
114 Creating an Application Template
Editing an Application Template 115
6. In the Permissions section, do one of the following:l If you want to let others to use the template, add the users, groups, oraccounts who can use the template and click the Published radio button.
l If you do not want others to use the template, click the Unpublishedradio button.
See Application Template Permissions on page 110 for more information.7. Enter a description of template in the Application Description section. SeeApplication Description on page 99 for more information.
8. Use the fields in the Basic Settings section to define the Moab-relatedsettings for jobs created with your application template. See Basic Settingson page 99 for more information.
9. Use the fields in the Advanced Settings section to define additional settingsfor jobs created with your application template. See Advanced Settings onpage 106 for more information.
10. Use the fields in the Node Policy Settings section to define node policysettings for jobs created with your application temperate. See Node PolicySettings on page 108 for more information.
11. Use the controls in the Custom Settings section to define custom parametersfor jobs created with your application template. See Custom Settings onpage 108 for more information.
12. Do one of the following:l Click SAVE TEMPLATE to save the application template and stay on thispage.
l Click SAVE AND CLOSE to save the application template and close thispage.
Related Topics
l Application Template Details on page 97l Create Application Template Page on page 93l Application Templates Page on page 89l Chapter 4 Application Templates on page 89
Editing an Application TemplateViewpoint lets you edit an existing application template to change settingsassociated with jobs that will be created using the template.
Chapter 4 Application Templates

Edit an Application TemplateDo the following:1. If you have not already done so, access the Application Templates page.(Click TEMPLATES in the menu bar.)
2. Do one of the following:l If you want to edit the current version of an application template, click onthe name of the application template you want to edit in the list of existingapplication templates to edit the application template.If you are not editing the latest version of the template, the EditApplication Template page displays a warning and gives you options torestore the version you are editing, edit the latest version, or return tothe version history.
l If you want to edit a previous version of an application template, use theTemplate History Manager. See Application Template History on page113 for more information.
The Edit Application Template page displays with the application templatefields.
3. Click the default template name, "Untitled Application Template", enter anew template name and click Save. See Application Template Name onpage 98 for more information.
4. Select a template type from the Template Type drop-downmenu. SeeApplication Template Type on page 98 for more information.
5. Enter a version description in the Version Description field. SeeApplication Template History on page 113 for more information.
6. In the Permissions section, do one of the following:l If you want to let others to use the template, add the users, groups, oraccounts who can use the template and click the Published radio button.
l If you do not want others to use the template, click the Unpublishedradio button.
See Application Template Permissions on page 110 for more information.7. Enter a description of template in the Application Description section. SeeApplication Description on page 99 for more information.
8. Use the fields in the Basic Settings section to define the Moab-relatedsettings for jobs created with your application template. See Basic Settingson page 99 for more information.
9. Use the fields in the Advanced Settings section to define additional settingsfor jobs created with your application template. See Advanced Settings onpage 106 for more information.
Chapter 4 Application Templates
116 Editing an Application Template
Importing an Application Template 117
10. Use the fields in the Node Policy Settings section to define node policysettings for jobs created with your application templage. See Node PolicySettings on page 108 for more information.
11. Use the controls in the Custom Settings section to define custom parametersfor jobs created with your application template. See Custom Settings onpage 108 for more information.
12. Do one of the following:l Click SAVE TEMPLATE to save the application template and stay on thispage.
l Click SAVE AND CLOSE to save the application template and close thispage.
Related Topics
l Application Template Details on page 97l Edit Application Template Page on page 95l Application Templates Page on page 89l Chapter 4 Application Templates on page 89
Importing an Application TemplateViewpoint lets you import an existing application template to use when creatingjobs. You can import a single application template or multiple applicationtemplates at the same time.Do the following:1. If you have not already done so, access the Application Templates page.(Click TEMPLATES in the menu bar.)
2. Click IMPORT.The Import Template pop-up window appears.
Chapter 4 Application Templates

3. ClickBROWSE and navigate to where the application template file is saved.You can select multiple application template files by pressing shift and thenclicking on each file.
4. Once you have chosen which files to include, clickOpen.5. When the application template appears in the Import Template window,click IMPORT. The application template appears in the application templatelist and can be edited as needed.
Related Topics
l Editing an Application Template on page 115l Application Templates Page on page 89l Chapter 4 Application Templates on page 89
Managing Application Template HistoryViewpoint creates a new version of an application template every time youopen and save an application template from the Edit Application Templatepage.
Manage the History for the Application TemplateDo the following:1. If you have not already done so, access the Application Templates page(click Template from the menu).
2. From the list of templates, select the application template for which youwould like to manage the application template version.The Edit Application page displays.
3. ClickHistory.
Chapter 4 Application Templates
118 Managing Application Template History

Provided Application Templates 119
The Template History Version page appears.4. In the row containing the version number you want to manage, do thefollowing, as needed:l Click the description of an application template version to change itsdescription.
l Click to make this version of the application template to be the currentversion.
l Click to delete this version of the application template.
l Click to export this version of the application template.
Related Topics
l Application Template History on page 113l Application Templates Page on page 89l Chapter 4 Application Templates on page 89
Provided Application TemplatesViewpoint comes configured with several application templates that you cancustomize for your environment. The available templates are:
l Free Form – Basic application template for creating jobs and job arrays.l Docker Application – Application template that can be used to create HPCjobs for a Docker container running an image of your choice.
l Nitro Application – Template for specifying setting and the task file tocreate Nitro jobs.
l Remote Viz Application – Template for creating remote visualization andworkload management sessions.
If you delete one of the provided templates, you can redeploy it from theApplication Templates Configuration page. See Application TemplatesConfiguration Page on page 35.In this section:
l Free Form Application Template on page 120l Docker Application Template on page 129l Nitro Application Template on page 138l Remote Viz Application Template on page 147
Chapter 4 Application Templates

l Application Templates Configuration Page on page 35l Chapter 4 Application Templates on page 89
Free Form Application TemplateThe Free Form Application Template is a basic application template for creatingHPC jobs and job arrays
Available FieldsThe available fields used for creating/editing the Free Form applicationtemplate are grouped into five areas. Specifically:
l Application Description on page 120l Basic Settings on page 121l Advanced Settings on page 126l Node Policy Settings on page 128l Custom Settings on page 128
Expand an area to view its fields. This section provides information on thesedifferent areas and their associated fields. See Field Information and Actionson page 109for information on using the fields.
Application DescriptionThis area lets you provide a description for your application template. Use thisarea to tell users any necessary information to use or access this template. Thisfield provides multiple options for styling and formatting, among other ways tomake your description more detailed.The following image shows the Application Description area.
Chapter 4 Application Templates
120 Provided Application Templates
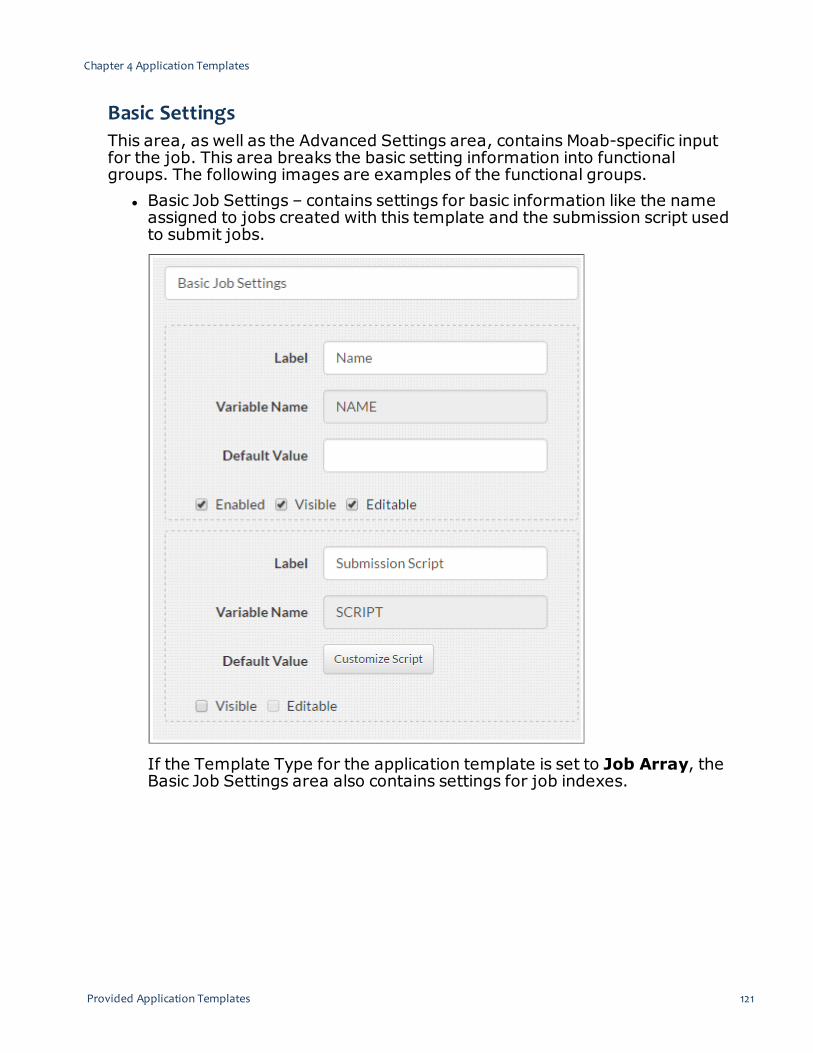
Provided Application Templates 121
Basic SettingsThis area, as well as the Advanced Settings area, contains Moab-specific inputfor the job. This area breaks the basic setting information into functionalgroups. The following images are examples of the functional groups.
l Basic Job Settings – contains settings for basic information like the nameassigned to jobs created with this template and the submission script usedto submit jobs.
If the Template Type for the application template is set to Job Array, theBasic Job Settings area also contains settings for job indexes.
Chapter 4 Application Templates
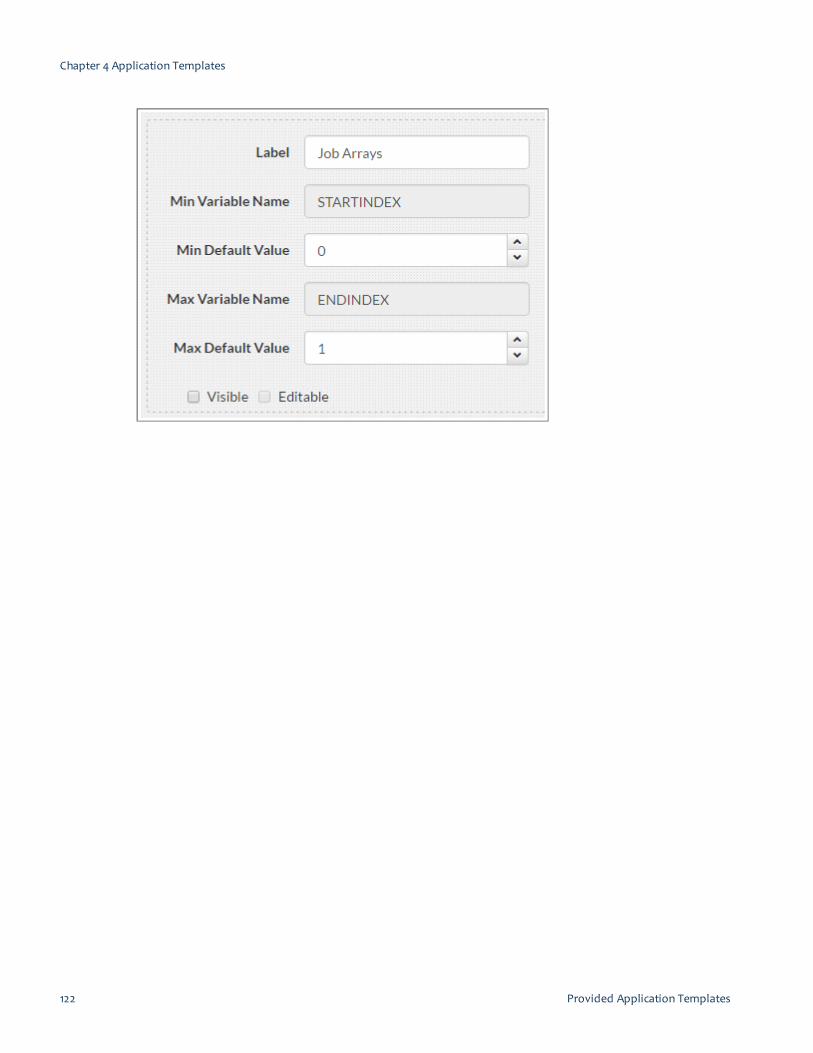
Chapter 4 Application Templates
122 Provided Application Templates

Provided Application Templates 123
l Time Management – contains delay start and job duration settings.
l Credentials – settings for specifying job ownership, resource usage, policyenforcement, etc. See 1.1 Credential Overview for more information.
Chapter 4 Application Templates

l Resources – contains architecture, memory, and core settings.
Chapter 4 Application Templates
124 Provided Application Templates
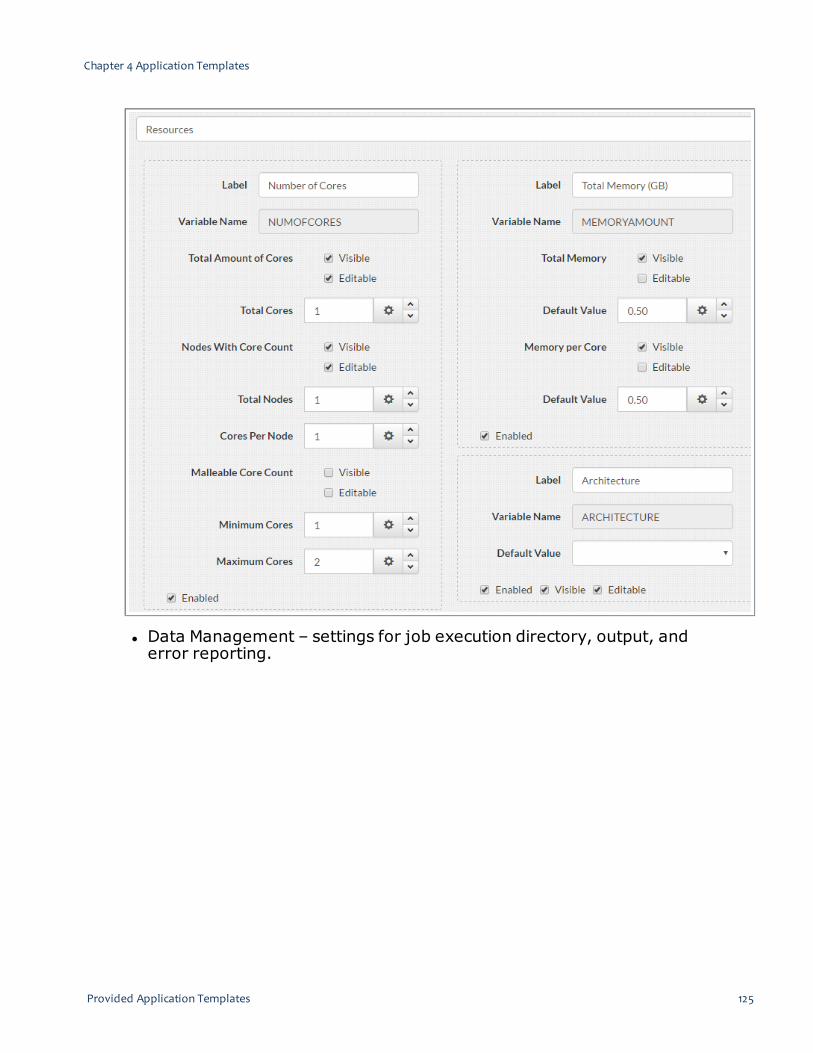
Provided Application Templates 125
l Data Management – settings for job execution directory, output, anderror reporting.
Chapter 4 Application Templates

Advanced SettingsThis area contains advanced inputs to Moab that can be requested for the job,such as whether to include Moab environment variables at job submission time.The following image is an example of the Advanced Settings area.
Chapter 4 Application Templates
126 Provided Application Templates
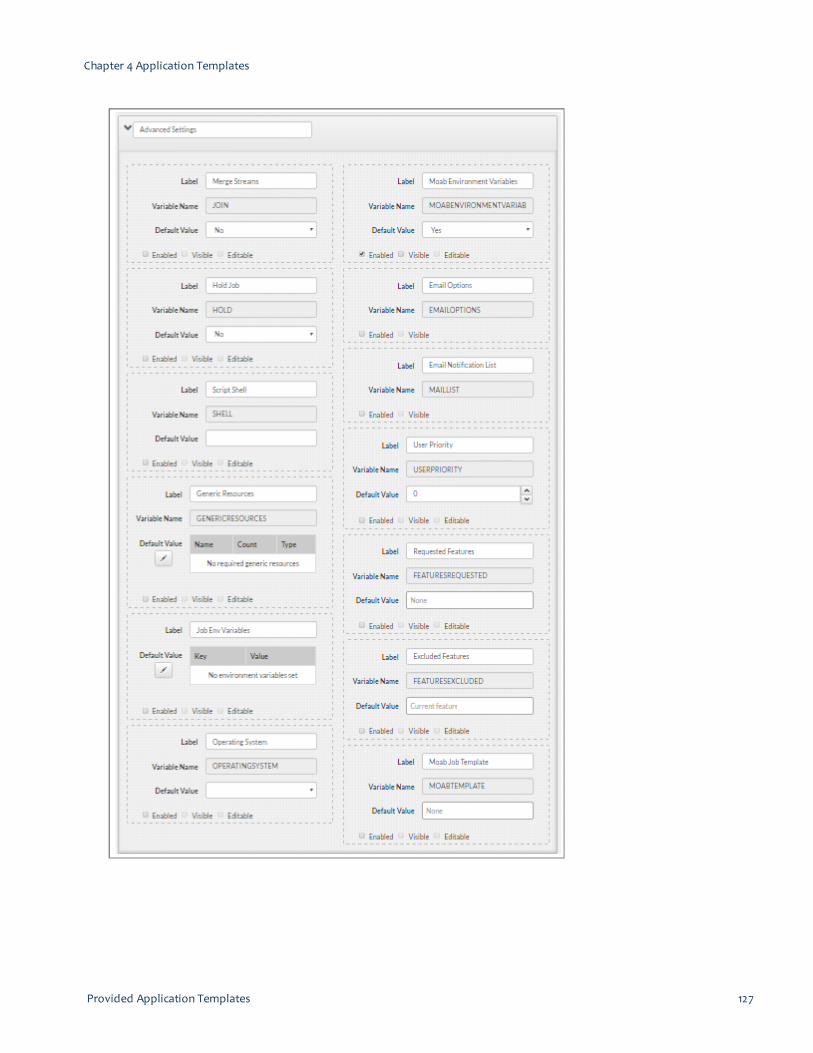
Provided Application Templates 127
Chapter 4 Application Templates

When enabled, the User Priority field requires the MoabENABLENEGJOBPRIORITY server parameter set to "TRUE". This Moabparameter should have been set when Viewpoint was installed. See MoabParameters in the Moab Workload Manager Reference Guide for moreinformation on this parameter.
Node Policy SettingsThis area specifies node request, access, and allocation policies for jobscreated with this template.The following image is an example of the Node Policies Settings area.
Custom SettingsThis area lets you add any custom settings to your template.
Chapter 4 Application Templates
128 Provided Application Templates

Provided Application Templates 129
Related Topics
l Editing an Application Template on page 115l Application Template Details on page 97l Provided Application Templates on page 119l Chapter 4 Application Templates on page 89
Docker Application TemplateThe Docker Application template can be used to create HPC jobs for a Dockercontainer running an operating system image that can be selected at jobsubmission time.
Available FieldsThe available fields used for creating/editing the Docker application templateare grouped into five areas. Specifically:
l Application Description on page 129l Basic Settings on page 130l Advanced Settings on page 135l Node Policy Settings on page 137l Image Selection on page 137
Expand an area to view its fields. This section provides information on thesedifferent areas and their associated fields. See Field Information and Actionson page 109 for information on using the fields.
Application DescriptionThis area lets you provide a description for your application template. Use thisarea to tell users any necessary information to use or access this template. Thisfield provides multiple options for styling and formatting, among other ways tomake your description more detailed.The following image shows the Application Description area.
Chapter 4 Application Templates

Basic SettingsThis area, as well as the Advanced Settings area, contains Moab-specific inputfor the job. This area breaks the basic setting information into functionalgroups. The following images are examples of the functional groups.
l Basic Job Settings– contains settings for basic information like the nameassigned to jobs created with this template and the submission script usedto submit jobs.
Chapter 4 Application Templates
130 Provided Application Templates

Provided Application Templates 131
If the Template Type for the application template is set to Job Array, theBasic Job Settings area also contains settings for job indexes.
Chapter 4 Application Templates

Chapter 4 Application Templates
132 Provided Application Templates

Provided Application Templates 133
l Time Management – contains delay start and job duration settings.
l Credentials – settings for specifying job ownership, resource usage, policyenforcement, etc. See 1.1 Credential Overview for more information.
Chapter 4 Application Templates

l Resources – contains architecture, memory, and core settings.
Chapter 4 Application Templates
134 Provided Application Templates

Provided Application Templates 135
l Data Management – settings for job execution directory, output, anderror reporting.
Advanced SettingsThis area contains advanced inputs to Moab that can be requested for the job,such as whether to include Moab environment variables at job submission time.The following image is an example of the Advanced Settings area.
Chapter 4 Application Templates

Chapter 4 Application Templates
136 Provided Application Templates

Provided Application Templates 137
When enabled, the User Priority field requires the MoabENABLENEGJOBPRIORITY server parameter set to "TRUE". This Moabparameter should have been set when Viewpoint was installed. See MoabParameters in the Moab Workload Manager Reference Guide for moreinformation on this parameter.
Node Policy SettingsThis area specifies node request, access, and allocation policies for jobscreated with this template.The following image is an example of the Node Policies Settings area.
Image SelectionThis area lets you specify operating system images in which to run Docker jobscreated with this template. You can also add any custom settings to thetemplate in this area.
Chapter 4 Application Templates

Related Topics
l Editing an Application Template on page 115l Application Template Details on page 97l Provided Application Templates on page 119l Chapter 4 Application Templates on page 89
Nitro Application TemplateThe Nitro Application Template lets you specifying settings and the task file forcreating Nitro jobs.
Available FieldsThe available fields used for creating/editing the Nitro application template aregrouped into five areas. Specifically:
l Application Description on page 139l Basic Settings on page 139l Advanced Settings on page 144
Chapter 4 Application Templates
138 Provided Application Templates

Provided Application Templates 139
l Node Policy Settings on page 146l Nitro Inputs on page 146
Expand an area to view its fields. This section provides information on thesedifferent areas and their associated fields. See Field Information and Actionson page 109 for information on using the fields.
Application DescriptionThis area lets you provide a description for your application template. Use thisarea to tell users any necessary information to use or access this template. Thisfield provides multiple options for styling and formatting, among other ways tomake your description more detailed.The following image shows the Application Description area.
Basic SettingsThis area, as well as the Advanced Settings area, contains Moab-specific inputfor the job. This area breaks the basic setting information into functionalgroups. The following images are examples of the functional groups.
l Basic Job – contains settings for basic information like the name assignedto jobs created with this template and the submission script used tosubmit jobs.
Chapter 4 Application Templates

If the Template Type for the application template is set to Job Array, theBasic Job Settings area also contains settings for job indexes.
Chapter 4 Application Templates
140 Provided Application Templates

Provided Application Templates 141
Chapter 4 Application Templates
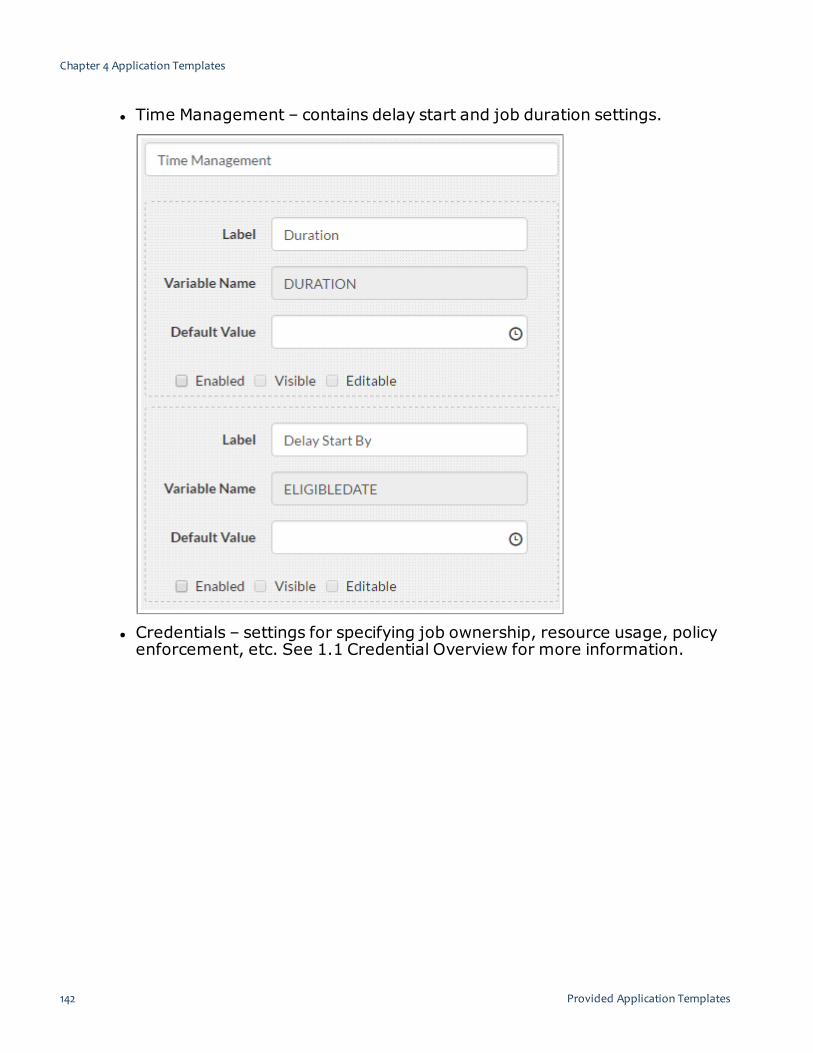
l Time Management – contains delay start and job duration settings.
l Credentials – settings for specifying job ownership, resource usage, policyenforcement, etc. See 1.1 Credential Overview for more information.
Chapter 4 Application Templates
142 Provided Application Templates
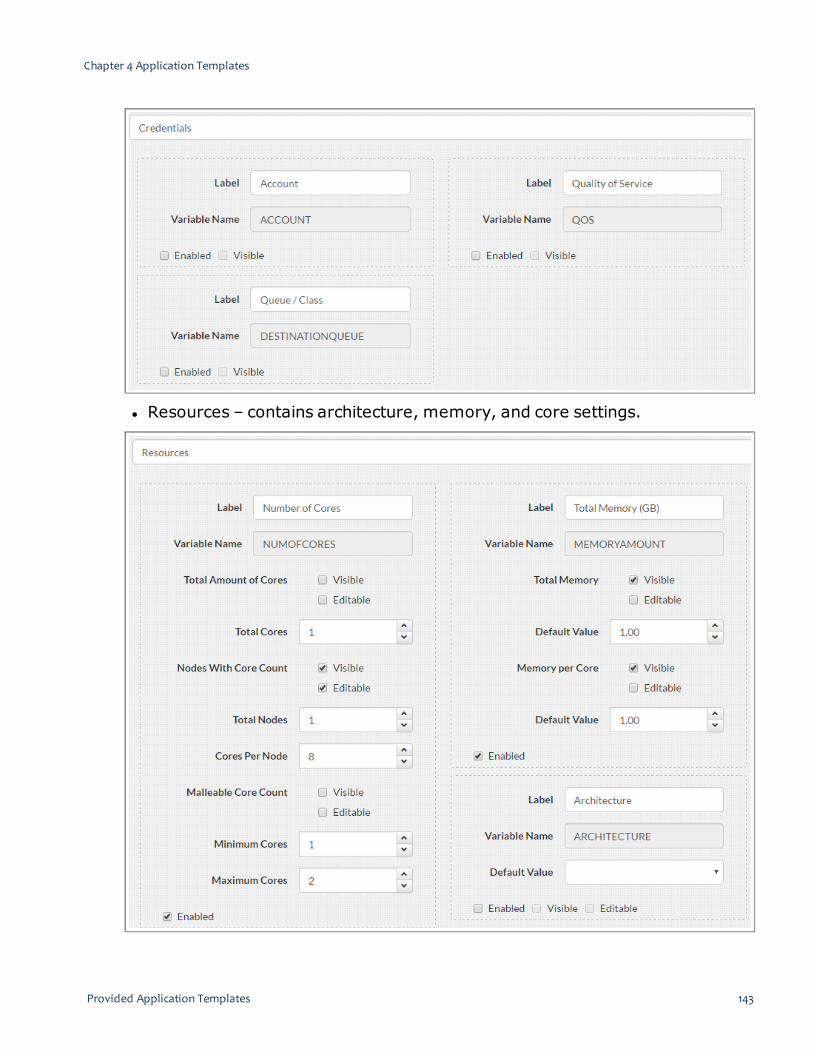
Provided Application Templates 143
l Resources – contains architecture, memory, and core settings.
Chapter 4 Application Templates

l Data Management – settings for job execution directory, output, anderror reporting.
Advanced SettingsThis area contains advanced inputs to Moab that can be requested for the job,such as whether to include Moab environment variables at job submission time.The following image is an example of the Advanced Settings area.
Chapter 4 Application Templates
144 Provided Application Templates

Provided Application Templates 145
Chapter 4 Application Templates

When enabled, the User Priority field requires the MoabENABLENEGJOBPRIORITY server parameter set to "TRUE". This Moabparameter should have been set when Viewpoint was installed. See MoabParameters in the Moab Workload Manager Reference Guide for moreinformation on this parameter.
Node Policy SettingsThis area specifies node request, access, and allocation policies for jobscreated with this template.The following image is an example of the Node Policies Settings area.
Nitro InputsThis area lets you specify the task file to be used when creating Nitro jobs. Youcan also add any custom settings to your template.
Chapter 4 Application Templates
146 Provided Application Templates

Provided Application Templates 147
Related Topics
l Editing an Application Template on page 115l Application Template Details on page 97l Provided Application Templates on page 119l Chapter 4 Application Templates on page 89
Remote Viz Application TemplateThe Remote Viz Application template lets you specify settings for remotevisualization and workload management sessions.
Available FieldsThe available fields used for creating/editing the Remote Viz applicationtemplate are grouped into five areas. Specifically:
l Application Description on page 148l Basic Settings on page 148l Advanced Settings on page 154l Node Policy Settings on page 156l User Inputs on page 156
Expand an area to view its fields. This section provides information on thesedifferent areas and their associated fields. See Field Information and Actionson page 109 for information on using the fields.
Chapter 4 Application Templates

Application DescriptionThis area lets you provide a description for your application template. Use thisarea to tell users any necessary information to use or access this template. Thisfield provides multiple options for styling and formatting, among other ways tomake your description more detailed.The following image shows the Application Description area.
Basic SettingsThis area, as well as the Advanced Settings area, contains Moab-specific inputfor the job. This area breaks the basic setting information into functionalgroups. The following images are examples of the functional groups.
l Basic Job Settings – contains settings for basic information like the nameassigned to jobs created with this template and the submission script usedto submit jobs.
Chapter 4 Application Templates
148 Provided Application Templates

Provided Application Templates 149
If the Template Type for the application template is set to Job Array, theBasic Job Settings area also contains settings for job indexes.
Chapter 4 Application Templates

Chapter 4 Application Templates
150 Provided Application Templates

Provided Application Templates 151
l Time Management – contains delay start and job duration settings.
l Credentials – settings for specifying job ownership, resource usage, policyenforcement, etc. See 1.1 Credential Overview for more information.
Chapter 4 Application Templates
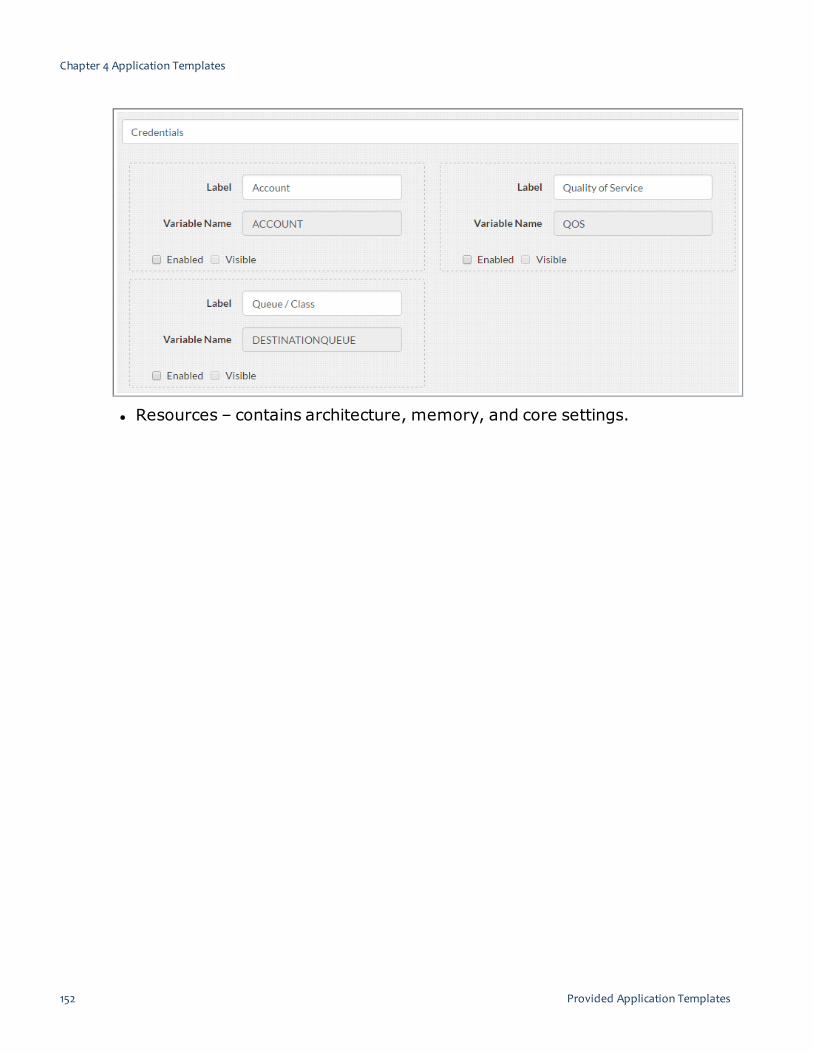
l Resources – contains architecture, memory, and core settings.
Chapter 4 Application Templates
152 Provided Application Templates

Provided Application Templates 153
l Data Management – settings for job execution directory, output, anderror reporting.
Chapter 4 Application Templates
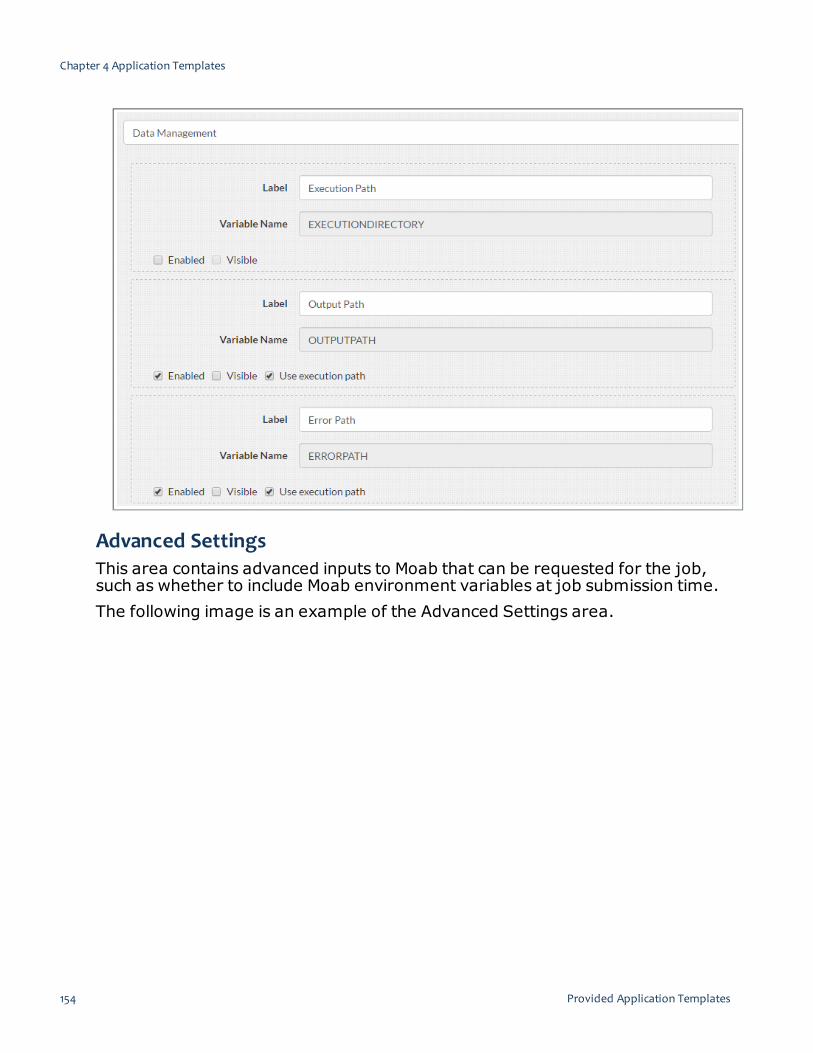
Advanced SettingsThis area contains advanced inputs to Moab that can be requested for the job,such as whether to include Moab environment variables at job submission time.The following image is an example of the Advanced Settings area.
Chapter 4 Application Templates
154 Provided Application Templates

Provided Application Templates 155
Chapter 4 Application Templates

When enabled, the User Priority field requires the MoabENABLENEGJOBPRIORITY server parameter set to "TRUE". This Moabparameter should have been set when Viewpoint was installed. See MoabParameters in the Moab Workload Manager Reference Guide for moreinformation on this parameter.
Node Policy SettingsThis area specifies node request, access, and allocation policies for jobscreated with this template.The following image is an example of the Node Policies Settings area.
User InputsThis area lets you specify graphical commands to run inside your remotevisualization session. You can also add any custom settings to the template inthis area.
Chapter 4 Application Templates
156 Provided Application Templates

Application Template API 157
Related Topics
l Editing an Application Template on page 115l Application Template Details on page 97l Provided Application Templates on page 119l Chapter 4 Application Templates on page 89
Application Template APIApplication Template API lets the admin user (for example, "moab-admin")perform application template functions programmatically in Viewpoint insteadof using the Application Templates page in the portal.This section provides information and example of the supported methods andhow to authenticate against the Viewpoint application template API.In this section:
Chapter 4 Application Templates

l Authenticate Against the Viewpoint Template API on page 158l Supported Methods on page 159l Create Template on page 161l Delete Template on page 189l Delete Template History on page 189l Get All Templates on page 190l Get Single Template on page 206l Modify Template on page 214l Modify Template History on page 224
Related Topics
l Chapter 4 Application Templates on page 89
Authenticate Against the Viewpoint Template APIThe Viewpoint Template API requires users to authenticate to it using cookies.This topic provides an example on how to authenticate using cURL to get a validcookie that can be used to validate your access.Do the following:
Chapter 4 Application Templates
158 Application Template API

Application Template API 159
1. Create the following script:
#!/bin/bash
REQUEST_METHOD=$1REQUEST_URL=$2
LOGIN_URL=http://localhost:8080/login/YOUR_USER='moab-admin'YOUR_PASS='changeme!'COOKIES=cookies.txtCURL_BIN="curl -s -c $COOKIES -b $COOKIES -e $LOGIN_URL"echo "Django Auth: get csrftoken ..."$CURL_BIN $LOGIN_URL > /dev/nullDJANGO_TOKEN="csrfmiddlewaretoken=$(grep cid $COOKIES | sed 's/^.*cid\s*//')"echo "DJANGO TOKEN is $DJANGO_TOKEN"echo "######################################################"echo "Performing login..."$CURL_BIN \
-d "$DJANGO_TOKEN&uName=$YOUR_USER&pwd=$YOUR_PASS" \ -X POST $LOGIN_URLecho "######################################################"echo "Request: $REQUEST_METHOD $REQUEST_URL"$CURL_BIN \
-d "$DJANGO_TOKEN&..." \ -X $REQUEST_METHOD \ -H "Accept:Application/json" \ $REQUEST_URL \ | python -m json.toolrm $COOKIES
2. Consume the API by running this script:
./iris-curl.sh GET "http://localhost:8080/api/templates/"
Related Topics
l Application Template API on page 157l Chapter 4 Application Templates on page 89
Supported MethodsThe table that follows shows the supported methods for the Viewpointapplication template API. Detailed information about each method is providedlater in this section.
Resource GET PUT POST DELETE PATCH
/api/templates/ Get AllTemplates
--- CreateTemplate
--- ---
Chapter 4 Application Templates

Resource GET PUT POST DELETE PATCH
/api/templates/<id>/ Get SingleTemplate
Modify Template
Beginningwith version9.0.1, thismethod createsa newapplicationtemplateversion everytime youmodify andsave changesto anapplicationtemplate. Thepreviousversion issaved in thetemplatehistory.
--- DeleteTemplate
Modify Tem-plate Attrib-ute"published"
/api/templates/<history_pk>/history/
Get Tem-plate His-tory
--- CreateTemplate(creates anew applic-ation tem-plate andassigns itas the cur-rent ver-sion)
--- ---
/api/templates/<history_pk>/history/<version>/
Get SingleTemplateHistory
Revert Template(creates a copy of theapplication templatefor the specified his-tory version andassigns it as the cur-rent version)
--- DeleteTemplateHistory
UpdateTemplateVersionDescription
Related Topics
l Application Template API on page 157l Authenticate Against the Viewpoint Template API on page 158
Chapter 4 Application Templates
160 Application Template API

Application Template API 161
l Create Template on page 161l Delete Template on page 189l Delete Template History on page 189l Get All Templates on page 190l Get Single Template on page 206l Modify Template on page 214l Modify Template History on page 224l Chapter 4 Application Templates on page 89
Create TemplateIn this topic:
l URL on page 161l Example on page 161
o Request Body on page 162o Response on page 176
URLPOST /api/templates/
ExamplePOST /api/templates/
Chapter 4 Application Templates

Request Body
Chapter 4 Application Templates
162 Application Template API

Application Template API 163
Request Body
{"name": "New Template","version_description": "","type": "regular","description": {"text": "","visible": false
},"published": true,"widgets": [{"default_value": "","label": "Name","variable_name": "NAME","visible": true,"editable": true,"properties": [{"name": "id","value": "name"
},{"name": "enable","value": "true"
}],"tooltip": "Allows you to specify a more friendly name (note: name must be
alphanumeric)"},{"default_value": 0,"label": "Duration","variable_name": "DURATION","visible": true,"editable": true,"properties": [{"name": "id","value": "duration"
},{"name": "enable","value": "true"
}],"tooltip": "The amount of time the job is expected to run for"
},{"default_value": "","label": "Job Arrays","variable_name": "arrays","visible": false,"editable": false,"properties": [{"name": "id","value": "arrays"
},{
Chapter 4 Application Templates

"name": "enable","value": "false"
},{"name": "start-value","value": "0"
},{"name": "end-value","value": "1"
},{"name": "start-variable","value": "STARTINDEX"
},{"name": "end-variable","value": "ENDINDEX"
}]
},{"default_value": 0,"label": "Delay Start By","variable_name": "ELIGIBLEDATE","visible": false,"editable": false,"properties": [{"name": "id","value": "eligibledate"
},{"name": "enable","value": "false"
}],"tooltip": "Declares the time after which the job is eligible for execution"
},{"default_value": "0","label": "User Priority","variable_name": "USERPRIORITY","visible": false,"editable": false,"properties": [{"name": "id","value": "priority"
},{"name": "enable","value": "false"
}],"tooltip": "Defines the priority of the job"
},{"default_value": "","label": "Submission Script",
Chapter 4 Application Templates
164 Application Template API

Application Template API 165
"variable_name": "SCRIPT","visible": true,"editable": true,"properties": [{"name": "id","value": "script"
}]
},{"default_value": "","label": "Account","variable_name": "ACCOUNT","visible": false,"editable": true,"properties": [{"name": "id","value": "account"
},{"name": "enable","value": "false"
}],"tooltip": "Defines the account associated with the job"
},{"default_value": "","label": "Queue / Class","variable_name": "DESTINATIONQUEUE","visible": false,"editable": true,"properties": [{"name": "id","value": "destinationQueue"
},{"name": "enable","value": "false"
}],"tooltip": "Defines the destination queue / class of the job"
},{"default_value": "","label": "Quality of Service","variable_name": "QOS","visible": false,"editable": true,"properties": [{"name": "id","value": "qos"
},{"name": "enable","value": "false"
Chapter 4 Application Templates

}],"tooltip": "Defines the desired QoS for the job"
},{"default_value": "","label": "Number of Cores","variable_name": "NUMOFCORES","visible": true,"editable": true,"properties": [{"name": "id","value": "cpupernode"
},{"name": "totalamount","value": true
},{"name": "nodeswithcount","value": true
},{"name": "malleablecorecount","value": true
},{"name": "totalamount_editable","value": true
},{"name": "nodeswithcount_editable","value": true
},{"name": "malleablecorecount_editable","value": true
},{"name": "totalamount_visible_default","value": true
},{"name": "nodeswithcount_visible_default","value": false
},{"name": "malleablecorecount_visible_default","value": false
},{"name": "totalcores_default","value": "1"
},{"name": "totalnodes_default","value": "1"
},{
Chapter 4 Application Templates
166 Application Template API

Application Template API 167
"name": "corespernode_default","value": "1"
},{"name": "minimumcores_default","value": "1"
},{"name": "maximumcores_default","value": "2"
},{"name": "enable","value": "true"
}],"tooltip": "Defines the resources that are required by the job and
establishes a limit to the amount of resource that can be consumed"},{"default_value": "","label": "Memory (GB)","variable_name": "MEMORYAMOUNT","visible": true,"editable": true,"properties": [{"name": "id","value": "memorypernode"
},{"name": "totalmemory","value": true
},{"name": "memorypercore","value": true
},{"name": "totalmemory_visible_default","value": false
},{"name": "memorypercore_visible_default","value": true
},{"name": "totalmemory_default","value": "0.50"
},{"name": "memorypercore_default","value": "0.50"
},{"name": "totalmemory_editable","value": true
},{"name": "memorypercore_editable",
Chapter 4 Application Templates

"value": true},{"name": "enable","value": "true"
}],"tooltip": "Defines the resources that are required by the job and
establishes a limit to the amount of resource that can be consumed"},{"default_value": "linux","label": "Architecture","variable_name": "ARCHITECTURE","visible": true,"editable": true,"properties": [{"name": "id","value": "architecture"
},{"name": "enable","value": "true"
}],"tooltip": "Defines the resources that are required by the job and
establishes a limit to the amount of resource that can be consumed"},{"default_value": "","label": "Execution Path","variable_name": "EXECUTIONDIRECTORY","visible": false,"editable": true,"properties": [{"name": "id","value": "exedir"
},{"name": "enable","value": "false"
}],"tooltip": "Your job’s execution directory"
},{"default_value": "","label": "Error Path","variable_name": "ERRORPATH","visible": false,"editable": true,"properties": [{"name": "id","value": "errorpath"
},{"name": "useExecutionPath",
Chapter 4 Application Templates
168 Application Template API

Application Template API 169
"value": false},{"name": "enable","value": "false"
}],"tooltip": "Defines the path to be used for the standard error stream of the
job"},{"default_value": "","label": "Output Path","variable_name": "OUTPUTPATH","visible": false,"editable": true,"properties": [{"name": "id","value": "outputpath"
},{"name": "useExecutionPath","value": false
},{"name": "enable","value": "false"
}],"tooltip": "Defines the path to be used for the standard output stream of the
job"},{"default_value": "false","label": "Merge Streams","variable_name": "JOIN","visible": false,"editable": false,"properties": [{"name": "id","value": "join"
},{"name": "enable","value": "false"
}],"tooltip": "Merge stderr and stdout streams?"
},{"default_value": "false","label": "Hold Job","variable_name": "HOLD","visible": false,"editable": false,"properties": [{"name": "id",
Chapter 4 Application Templates

"value": "hold"},{"name": "enable","value": "false"
}],"tooltip": "Specifies that a user hold be applied to the job at submission
time"},{"default_value": "","label": "Script Shell","variable_name": "SHELL","visible": false,"editable": false,"properties": [{"name": "id","value": "shell"
},{"name": "enable","value": "false"
}],"tooltip": "Declares the shell that interprets the job script, e.g.
/bin/bash"},{"default_value": "true","label": "Moab Environment Variables","variable_name": "MOABENVIRONMENTVARIABLES","visible": false,"editable": false,"properties": [{"name": "id","value": "moabenvironmentvariables"
},{"name": "enable","value": "true"
}],"tooltip": "Push Moab environment variables to job?"
},{"default_value": "","label": "Email Notification List","variable_name": "MAILLIST","visible": false,"editable": false,"properties": [{"name": "id","value": "maillist"
},{"name": "enable",
Chapter 4 Application Templates
170 Application Template API

Application Template API 171
"value": "false"}
],"tooltip": "Specifies the list of users to whom mail is sent by the execution
server. Overrides the EMAILADDRESS specified on the USERCFG [credential]"},{"default_value": "","label": "Email Options","variable_name": "EMAILOPTIONS","visible": false,"editable": false,"properties": [{"name": "id","value": "emailoptions"
},{"name": "enable","value": "false"
}],"tooltip": "A list of requested email options"
},{"default_value": "","label": "Generic Resources","variable_name": "GENERICRESOURCES","visible": false,"editable": false,"properties": [{"name": "id","value": "genericresources"
},{"name": "enable","value": "false"
}],"tooltip": "Allows for specification of additional job attributes"
},{"default_value": "","label": "Job Env Variables","variable_name": "Job Environment Variables","visible": false,"editable": false,"properties": [{"name": "id","value": "jobEnvVariables"
},{"name": "enable","value": "false"
}]
},{
Chapter 4 Application Templates

"default_value": "","label": "Moab Job Template","variable_name": "MOABTEMPLATE","visible": false,"editable": false,"properties": [{"name": "id","value": "moabtemplates"
},{"name": "enable","value": "false"
}],"tooltip": "Defines set of MOAB job templates"
},{"default_value": "SHARED","label": "Node Access Policy","variable_name": "NODEACCESSPOLICY","visible": false,"editable": false,"properties": [{"name": "id","value": "node-access-policy"
},{"name": "enable","value": "false"
}]
},{"default_value": "FIRSTAVAILABLE","label": "Node Allocation Policy","variable_name": "NODEALLOCATIONPOLICY","visible": false,"editable": false,"properties": [{"name": "id","value": "node-allocation-policy"
},{"name": "enable","value": "false"
}]
},{"default_value": "EXACTSET","label": "Node Requested Policy","variable_name": "NODESREQUESTEDPOLICY","visible": false,"editable": false,"properties": [{"name": "id",
Chapter 4 Application Templates
172 Application Template API

Application Template API 173
"value": "nodes-requested-policy"},{"name": "enable","value": "false"
}]
},{"default_value": "","label": "Operating System","variable_name": "OPERATINGSYSTEM","visible": false,"editable": false,"properties": [{"name": "id","value": "operatingSystem"
},{"name": "enable","value": "false"
}]
},{"default_value": "","label": "Requested Features","variable_name": "FEATURESREQUESTED","visible": false,"editable": false,"properties": [{"name": "id","value": "features-requested"
},{"name": "enable","value": "false"
}],"tooltip": "Contains a list of features that are required for the job to run"
},{"default_value": "","label": "Excluded Features","variable_name": "FEATURESEXCLUDED","visible": false,"editable": false,"properties": [{"name": "id","value": "features-excluded"
},{"name": "enable","value": "false"
}],"tooltip": "Contains a list of features that can not be present on hardware
Chapter 4 Application Templates
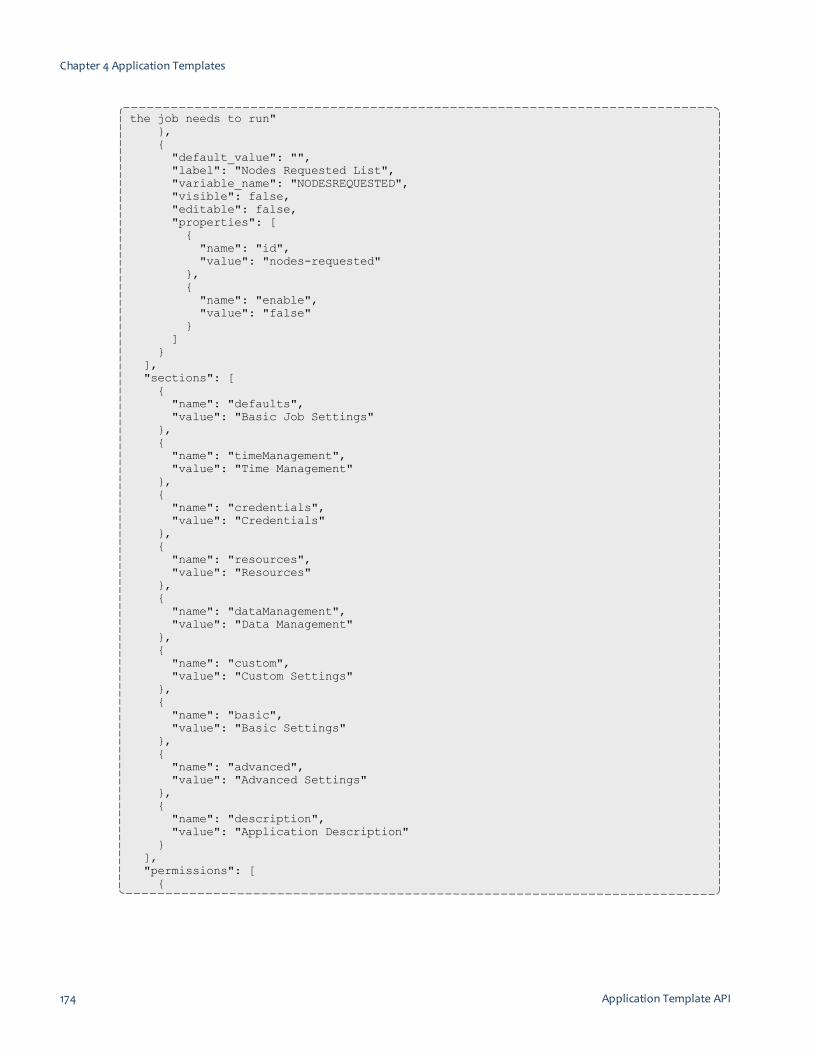
the job needs to run"},{"default_value": "","label": "Nodes Requested List","variable_name": "NODESREQUESTED","visible": false,"editable": false,"properties": [{"name": "id","value": "nodes-requested"
},{"name": "enable","value": "false"
}]
}],"sections": [{"name": "defaults","value": "Basic Job Settings"
},{"name": "timeManagement","value": "Time Management"
},{"name": "credentials","value": "Credentials"
},{"name": "resources","value": "Resources"
},{"name": "dataManagement","value": "Data Management"
},{"name": "custom","value": "Custom Settings"
},{"name": "basic","value": "Basic Settings"
},{"name": "advanced","value": "Advanced Settings"
},{"name": "description","value": "Application Description"
}],"permissions": [{
Chapter 4 Application Templates
174 Application Template API

Application Template API 175
"name": "ALL","type": "user"
},{"name": "ALL","type": "group"
},{"name": "ALL","type": "account"
}]
}
Chapter 4 Application Templates

Response
Chapter 4 Application Templates
176 Application Template API

Application Template API 177
Response
{"url": "http://10.2.184.87:8081/api/templates/7/","history_url": null,"changed_by": "moab-admin","current": true,"date": "2016-09-13T07:42:36.204904Z","id": 7,"name": "New Template","type": "regular","description": {"text": "","visible": false
},"owner": "moab-admin","permissions": [{"name": "ALL","type": "account"
},{"name": "ALL","type": "group"
},{"name": "ALL","type": "user"
}],"published": true,"sections": [{"name": "defaults","value": "Basic Job Settings"
},{"name": "timeManagement","value": "Time Management"
},{"name": "credentials","value": "Credentials"
},{"name": "resources","value": "Resources"
},{"name": "dataManagement","value": "Data Management"
},{"name": "custom","value": "Custom Settings"
},{"name": "basic","value": "Basic Settings"
},{
Chapter 4 Application Templates
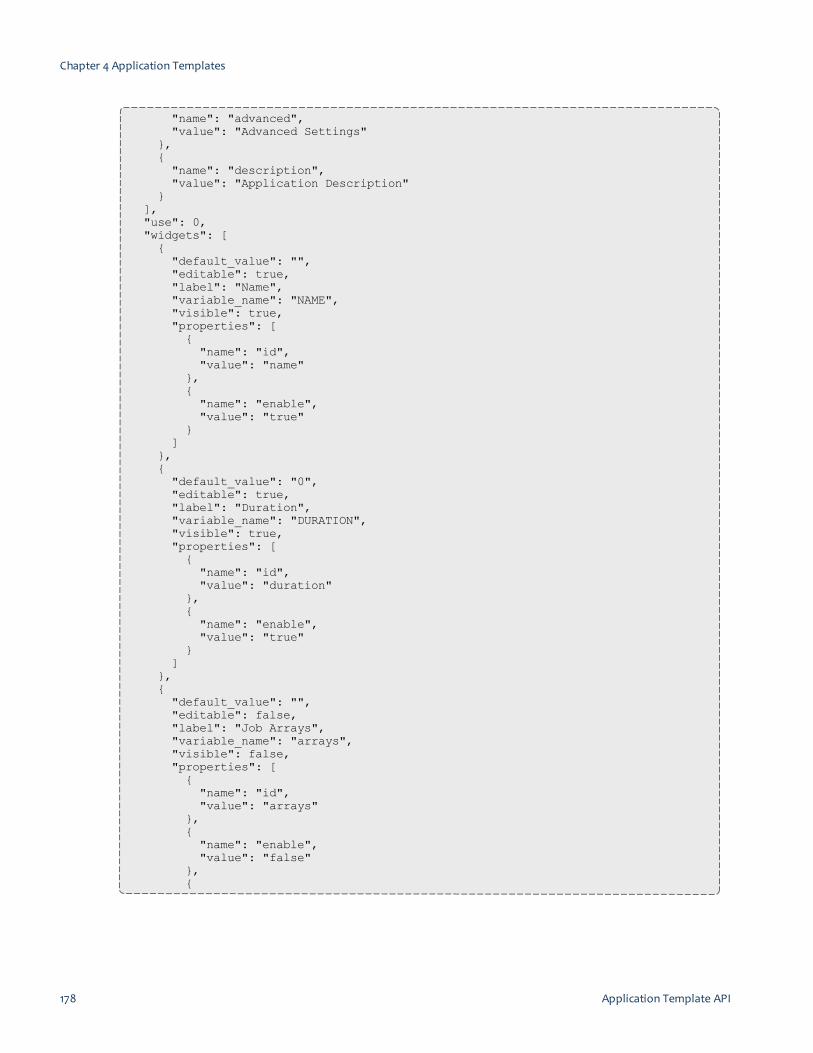
"name": "advanced","value": "Advanced Settings"
},{"name": "description","value": "Application Description"
}],"use": 0,"widgets": [{"default_value": "","editable": true,"label": "Name","variable_name": "NAME","visible": true,"properties": [{"name": "id","value": "name"
},{"name": "enable","value": "true"
}]
},{"default_value": "0","editable": true,"label": "Duration","variable_name": "DURATION","visible": true,"properties": [{"name": "id","value": "duration"
},{"name": "enable","value": "true"
}]
},{"default_value": "","editable": false,"label": "Job Arrays","variable_name": "arrays","visible": false,"properties": [{"name": "id","value": "arrays"
},{"name": "enable","value": "false"
},{
Chapter 4 Application Templates
178 Application Template API

Application Template API 179
"name": "start-value","value": "0"
},{"name": "end-value","value": "1"
},{"name": "start-variable","value": "STARTINDEX"
},{"name": "end-variable","value": "ENDINDEX"
}]
},{"default_value": "0","editable": false,"label": "Delay Start By","variable_name": "ELIGIBLEDATE","visible": false,"properties": [{"name": "id","value": "eligibledate"
},{"name": "enable","value": "false"
}]
},{"default_value": "0","editable": false,"label": "User Priority","variable_name": "USERPRIORITY","visible": false,"properties": [{"name": "id","value": "priority"
},{"name": "enable","value": "false"
}]
},{"default_value": "","editable": true,"label": "Submission Script","variable_name": "SCRIPT","visible": true,"properties": [{"name": "id",
Chapter 4 Application Templates

"value": "script"}
]},{"default_value": "","editable": true,"label": "Account","variable_name": "ACCOUNT","visible": false,"properties": [{"name": "id","value": "account"
},{"name": "enable","value": "false"
}]
},{"default_value": "","editable": true,"label": "Queue / Class","variable_name": "DESTINATIONQUEUE","visible": false,"properties": [{"name": "id","value": "destinationQueue"
},{"name": "enable","value": "false"
}]
},{"default_value": "","editable": true,"label": "Quality of Service","variable_name": "QOS","visible": false,"properties": [{"name": "id","value": "qos"
},{"name": "enable","value": "false"
}]
},{"default_value": "","editable": true,"label": "Number of Cores","variable_name": "NUMOFCORES",
Chapter 4 Application Templates
180 Application Template API

Application Template API 181
"visible": true,"properties": [{"name": "id","value": "cpupernode"
},{"name": "totalamount","value": "True"
},{"name": "nodeswithcount","value": "True"
},{"name": "malleablecorecount","value": "True"
},{"name": "totalamount_editable","value": "True"
},{"name": "nodeswithcount_editable","value": "True"
},{"name": "malleablecorecount_editable","value": "True"
},{"name": "totalamount_visible_default","value": "True"
},{"name": "nodeswithcount_visible_default","value": "False"
},{"name": "malleablecorecount_visible_default","value": "False"
},{"name": "totalcores_default","value": "1"
},{"name": "totalnodes_default","value": "1"
},{"name": "corespernode_default","value": "1"
},{"name": "minimumcores_default","value": "1"
},{"name": "maximumcores_default",
Chapter 4 Application Templates
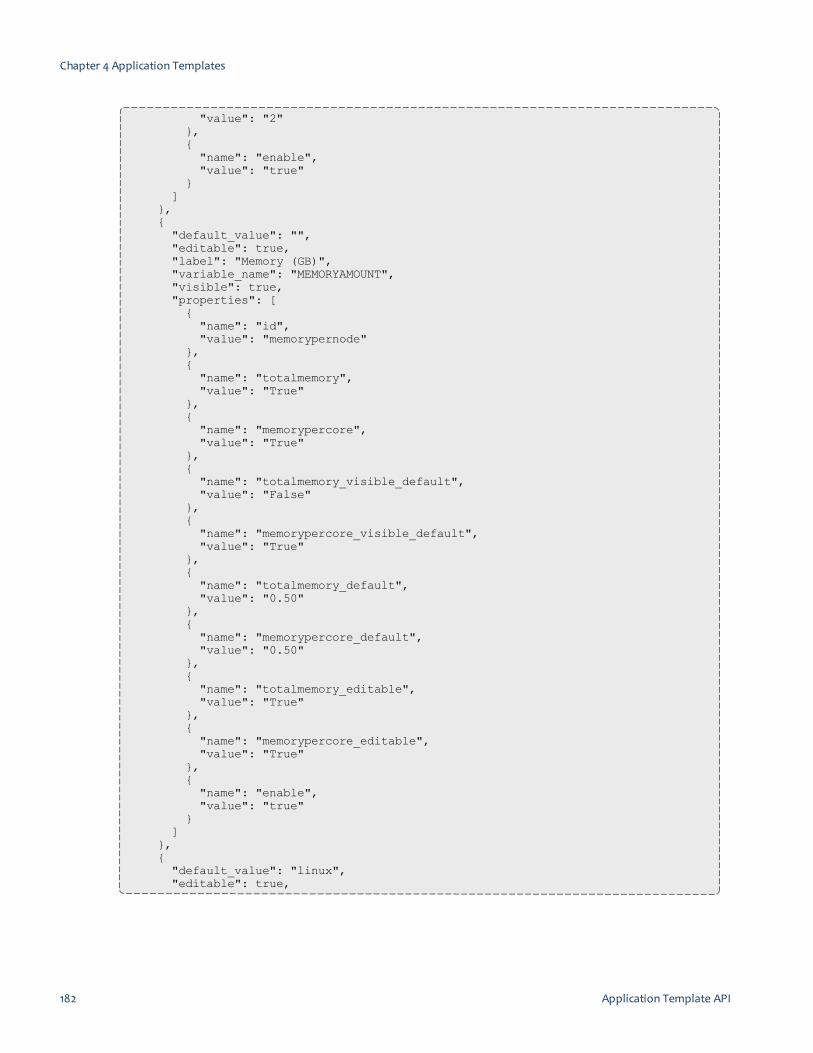
"value": "2"},{"name": "enable","value": "true"
}]
},{"default_value": "","editable": true,"label": "Memory (GB)","variable_name": "MEMORYAMOUNT","visible": true,"properties": [{"name": "id","value": "memorypernode"
},{"name": "totalmemory","value": "True"
},{"name": "memorypercore","value": "True"
},{"name": "totalmemory_visible_default","value": "False"
},{"name": "memorypercore_visible_default","value": "True"
},{"name": "totalmemory_default","value": "0.50"
},{"name": "memorypercore_default","value": "0.50"
},{"name": "totalmemory_editable","value": "True"
},{"name": "memorypercore_editable","value": "True"
},{"name": "enable","value": "true"
}]
},{"default_value": "linux","editable": true,
Chapter 4 Application Templates
182 Application Template API

Application Template API 183
"label": "Architecture","variable_name": "ARCHITECTURE","visible": true,"properties": [{"name": "id","value": "architecture"
},{"name": "enable","value": "true"
}]
},{"default_value": "","editable": true,"label": "Execution Path","variable_name": "EXECUTIONDIRECTORY","visible": false,"properties": [{"name": "id","value": "exedir"
},{"name": "enable","value": "false"
}]
},{"default_value": "","editable": true,"label": "Error Path","variable_name": "ERRORPATH","visible": false,"properties": [{"name": "id","value": "errorpath"
},{"name": "useExecutionPath","value": "False"
},{"name": "enable","value": "false"
}]
},{"default_value": "","editable": true,"label": "Output Path","variable_name": "OUTPUTPATH","visible": false,"properties": [{
Chapter 4 Application Templates

"name": "id","value": "outputpath"
},{"name": "useExecutionPath","value": "False"
},{"name": "enable","value": "false"
}]
},{"default_value": "false","editable": false,"label": "Merge Streams","variable_name": "JOIN","visible": false,"properties": [{"name": "id","value": "join"
},{"name": "enable","value": "false"
}]
},{"default_value": "false","editable": false,"label": "Hold Job","variable_name": "HOLD","visible": false,"properties": [{"name": "id","value": "hold"
},{"name": "enable","value": "false"
}]
},{"default_value": "","editable": false,"label": "Script Shell","variable_name": "SHELL","visible": false,"properties": [{"name": "id","value": "shell"
},{"name": "enable",
Chapter 4 Application Templates
184 Application Template API

Application Template API 185
"value": "false"}
]},{"default_value": "true","editable": false,"label": "Moab Environment Variables","variable_name": "MOABENVIRONMENTVARIABLES","visible": false,"properties": [{"name": "id","value": "moabenvironmentvariables"
},{"name": "enable","value": "true"
}]
},{"default_value": "","editable": false,"label": "Email Notification List","variable_name": "MAILLIST","visible": false,"properties": [{"name": "id","value": "maillist"
},{"name": "enable","value": "false"
}]
},{"default_value": "","editable": false,"label": "Email Options","variable_name": "EMAILOPTIONS","visible": false,"properties": [{"name": "id","value": "emailoptions"
},{"name": "enable","value": "false"
}]
},{"default_value": "","editable": false,"label": "Generic Resources","variable_name": "GENERICRESOURCES",
Chapter 4 Application Templates
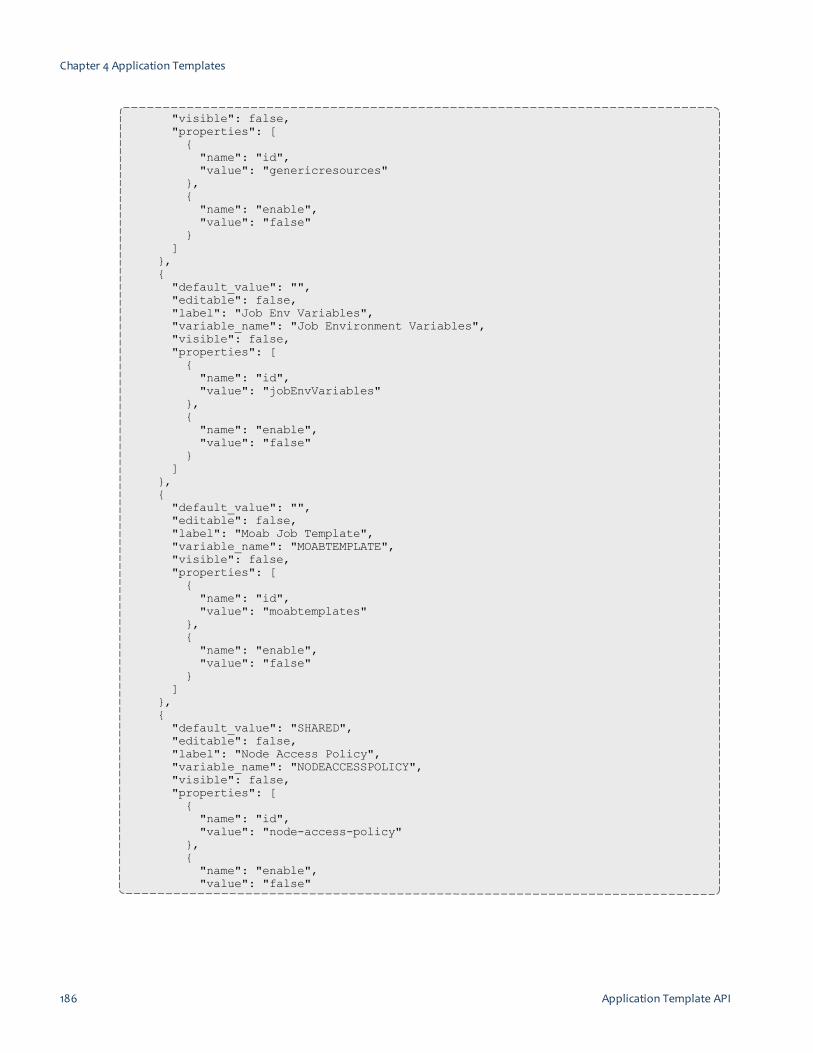
"visible": false,"properties": [{"name": "id","value": "genericresources"
},{"name": "enable","value": "false"
}]
},{"default_value": "","editable": false,"label": "Job Env Variables","variable_name": "Job Environment Variables","visible": false,"properties": [{"name": "id","value": "jobEnvVariables"
},{"name": "enable","value": "false"
}]
},{"default_value": "","editable": false,"label": "Moab Job Template","variable_name": "MOABTEMPLATE","visible": false,"properties": [{"name": "id","value": "moabtemplates"
},{"name": "enable","value": "false"
}]
},{"default_value": "SHARED","editable": false,"label": "Node Access Policy","variable_name": "NODEACCESSPOLICY","visible": false,"properties": [{"name": "id","value": "node-access-policy"
},{"name": "enable","value": "false"
Chapter 4 Application Templates
186 Application Template API
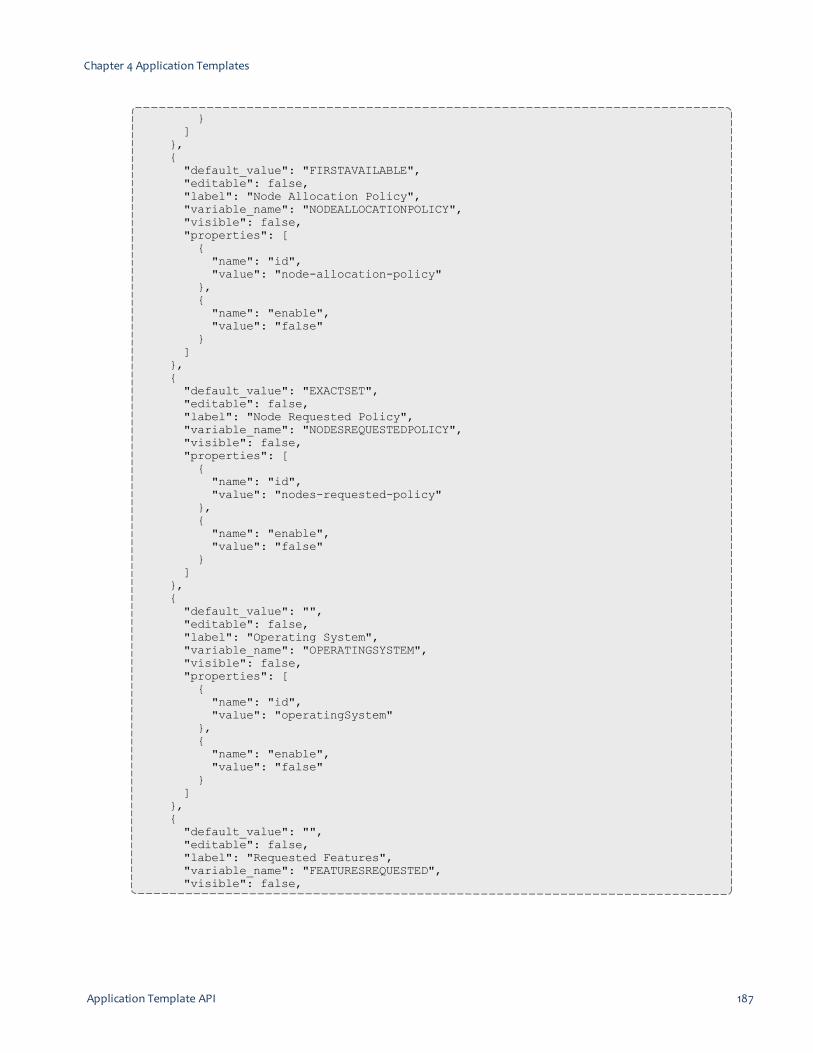
Application Template API 187
}]
},{"default_value": "FIRSTAVAILABLE","editable": false,"label": "Node Allocation Policy","variable_name": "NODEALLOCATIONPOLICY","visible": false,"properties": [{"name": "id","value": "node-allocation-policy"
},{"name": "enable","value": "false"
}]
},{"default_value": "EXACTSET","editable": false,"label": "Node Requested Policy","variable_name": "NODESREQUESTEDPOLICY","visible": false,"properties": [{"name": "id","value": "nodes-requested-policy"
},{"name": "enable","value": "false"
}]
},{"default_value": "","editable": false,"label": "Operating System","variable_name": "OPERATINGSYSTEM","visible": false,"properties": [{"name": "id","value": "operatingSystem"
},{"name": "enable","value": "false"
}]
},{"default_value": "","editable": false,"label": "Requested Features","variable_name": "FEATURESREQUESTED","visible": false,
Chapter 4 Application Templates

"properties": [{"name": "id","value": "features-requested"
},{"name": "enable","value": "false"
}]
},{"default_value": "","editable": false,"label": "Excluded Features","variable_name": "FEATURESEXCLUDED","visible": false,"properties": [{"name": "id","value": "features-excluded"
},{"name": "enable","value": "false"
}]
},{"default_value": "","editable": false,"label": "Nodes Requested List","variable_name": "NODESREQUESTED","visible": false,"properties": [{"name": "id","value": "nodes-requested"
},{"name": "enable","value": "false"
}]
}],"version_description": "","version": 1
}
Related Topics
l Application Template API on page 157l Supported Methods on page 159l Chapter 4 Application Templates on page 89
Chapter 4 Application Templates
188 Application Template API

Application Template API 189
Delete TemplateThis topic provides information on how to delete an application template;including all of its template history (api/templates/<id>). See Delete TemplateHistory on page 189 for information on how to delete the selected history for anapplication template (api/templates/<history_pk>/history/<version>).In this topic:
l URL on page 189l Parameters on page 189l Example on page 189
URLDELETE /api/templates/<id>/
Parameters
Parameter Required Type Description Example
id Yes Integer ID of the application template. 1
ExampleDELETE /api/templates/2/
Related Topics
l Application Template API on page 157l Supported Methods on page 159l Chapter 4 Application Templates on page 89
Delete Template HistoryThis topic provides information on how to delete the selected history for anapplication template (api/templates/<history_pk>/history/<version>). SeeDelete Template on page 189 for information on how to delete an applicationtemplate; including all of its template history (api/templates/<id>).In this topic:
l URL on page 190l Parameters on page 190
Chapter 4 Application Templates

l Example on page 190
URLDELETE /api/templates/<history_pk>/history/<version>/
Parameters
Parameter Required Type Description Example
history_pk Yes String History ID of the applicationtemplate
b00ce08c-01ed-4a9d-a916-f587b9f1af44
version Yes Integer Version of the application tem-plate
2
ExampleDELETE /api/templates/b00ce08c-01ed-4a9d-a916-f587b9f1af44/history/2/
Related Topics
l Application Template API on page 157l Supported Methods on page 159l Chapter 4 Application Templates on page 89
Get All TemplatesIn this topic:
l URL on page 190l Parameters on page 191
o Page Control on page 191o Filter on page 191
l Example on page 192o Response on page 193
URLGET /api/templates/
Chapter 4 Application Templates
190 Application Template API

Application Template API 191
Parameters
Page Control
Parameter Required Type Description Example
page_size No Integer Specifies count of application templates per page. page_size=3
page No Integer Specifies number of page. page=2
Filter
Parameter Required Type Description Example
name No String Specifies name of application tem-plate for filtering
name=Free Form
name__contains=foo
name__icontains=foo
name_startswith=foo
current No Boolean Specifies whether only the currentversion for the application templatesis included in the filtering
current=True
type No String Specify the application template typeto include in the filtering
type=array
owner No String Specifies the owner's name for fil-tering
owner=moab-foo
owner__contains=moab
owner__icontains=foo
owner__startswith=foo
owner_ne=foo
published No Boolean Specifies the published status of theapplication template for filtering
published=True
permissions__user__name__in
No List Specifies the list of users that theapplication template should contain
permissions__user__name__in=-=hpotter,hgranger
Chapter 4 Application Templates

Parameter Required Type Description Example
permissions__group__name__in
No List Specifies the list of groups that theapplication template should contain
permissions__group__name__in=-=hpotter,hgranger
permissions__account__name__in
No List Specifies the list of accounts that theapplication template should contain
permissions__account__name__in=DEFAULT,QA
date__gte No Date Specifies the date before which theapplication template was created
date__gte=2015-09-01
date__lte No Date Specifies the date after which theapplication template was created
date__lte=2015-09-16
ExampleGET /api/templates/?page_size=1&published=True
Chapter 4 Application Templates
192 Application Template API

Application Template API 193
Response
Chapter 4 Application Templates

Response
{"count": 1,"next": null,"previous": null,"results": [
{"url": "http://localhost:8080/api/templates/5/","history_url": "http://localhost:8080/api/templates/b00ce08c-01ed-4a9d-
a916-f587b9f1af44/history/","changed_by": "moab-admin","current": true,"date": "2016-09-08T12:14:19.647410Z","id": 5,"name": "Free Form","type": "regular","description": {
"text": "<h1><strong>Welcome to our Free Form</strong> ApplicationTemplate!</h1>\n\n<p>Fill in the inputs and press the "Create" button to submityour job!</p>\n\n<p>-- Enjoy!</p>",
"visible": true},"owner": "moab-admin","permissions": [
{"name": "ALL","type": "account"
},{
"name": "ALL","type": "group"
},{
"name": "ALL","type": "user"
}],"published": true,"sections": [
{"name": "description","value": "Application Description"
},{
"name": "advanced","value": "Advanced Settings"
},{
"name": "basic","value": "Basic Settings"
},{
"name": "custom","value": "Custom Settings"
},{
"name": "dataManagement","value": "Data Management"
},{
Chapter 4 Application Templates
194 Application Template API

Application Template API 195
"name": "resources","value": "Resources"
},{
"name": "credentials","value": "Credentials"
},{
"name": "timeManagement","value": "Time Management"
},{
"name": "defaults","value": "Basic Job Settings"
}],"use": 0,"widgets": [
{"default_value": "ggg","editable": true,"label": "Name","variable_name": "NAME","visible": true,"properties": [
{"name": "id","value": "name"
},{
"name": "enable","value": "true"
}]
},{
"default_value": "0","editable": true,"label": "Duration","variable_name": "DURATION","visible": true,"properties": [
{"name": "id","value": "duration"
},{
"name": "enable","value": "true"
}]
},{
"default_value": "","editable": false,"label": "Job Arrays","variable_name": "arrays","visible": false,"properties": [
{
Chapter 4 Application Templates

"name": "id","value": "arrays"
},{
"name": "enable","value": "false"
},{
"name": "start-value","value": "0"
},{
"name": "end-value","value": "1"
},{
"name": "start-variable","value": "STARTINDEX"
},{
"name": "end-variable","value": "ENDINDEX"
}]
},{
"default_value": "0","editable": true,"label": "Delay Start By","variable_name": "ELIGIBLEDATE","visible": true,"properties": [
{"name": "id","value": "eligibledate"
},{
"name": "enable","value": "true"
}]
},{
"default_value": "0","editable": false,"label": "User Priority","variable_name": "USERPRIORITY","visible": false,"properties": [
{"name": "id","value": "priority"
},{
"name": "enable","value": "true"
}]
},{
Chapter 4 Application Templates
196 Application Template API

Application Template API 197
"default_value": "","editable": true,"label": "Submission Script","variable_name": "SCRIPT","visible": true,"properties": [
{"name": "id","value": "script"
}]
},{
"default_value": "","editable": true,"label": "Account","variable_name": "ACCOUNT","visible": true,"properties": [
{"name": "id","value": "account"
},{
"name": "enable","value": "true"
}]
},{
"default_value": "","editable": true,"label": "Queue / Class","variable_name": "DESTINATIONQUEUE","visible": true,"properties": [
{"name": "id","value": "destinationQueue"
},{
"name": "enable","value": "true"
}]
},{
"default_value": "","editable": true,"label": "Quality of Service","variable_name": "QOS","visible": true,"properties": [
{"name": "id","value": "qos"
},{
"name": "enable","value": "true"
Chapter 4 Application Templates
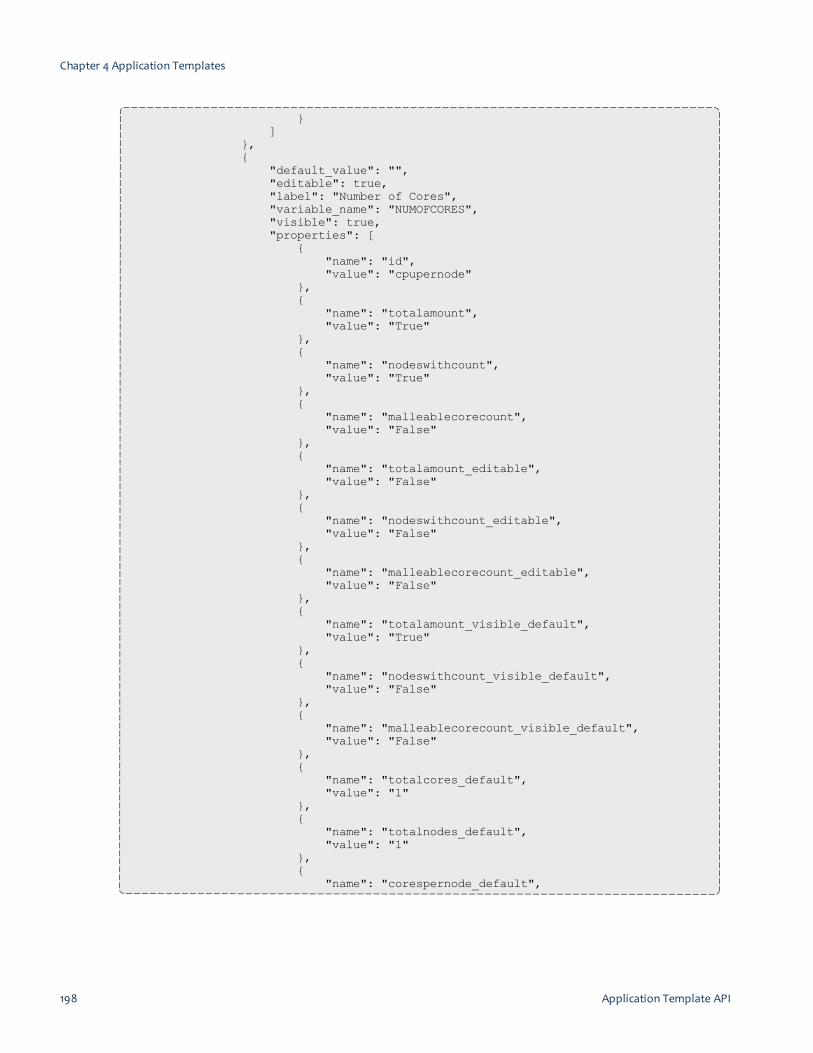
}]
},{
"default_value": "","editable": true,"label": "Number of Cores","variable_name": "NUMOFCORES","visible": true,"properties": [
{"name": "id","value": "cpupernode"
},{
"name": "totalamount","value": "True"
},{
"name": "nodeswithcount","value": "True"
},{
"name": "malleablecorecount","value": "False"
},{
"name": "totalamount_editable","value": "False"
},{
"name": "nodeswithcount_editable","value": "False"
},{
"name": "malleablecorecount_editable","value": "False"
},{
"name": "totalamount_visible_default","value": "True"
},{
"name": "nodeswithcount_visible_default","value": "False"
},{
"name": "malleablecorecount_visible_default","value": "False"
},{
"name": "totalcores_default","value": "1"
},{
"name": "totalnodes_default","value": "1"
},{
"name": "corespernode_default",
Chapter 4 Application Templates
198 Application Template API

Application Template API 199
"value": "1"},{
"name": "minimumcores_default","value": "1"
},{
"name": "maximumcores_default","value": "2"
},{
"name": "enable","value": "true"
}]
},{
"default_value": "","editable": true,"label": "Total Memory (GB)","variable_name": "MEMORYAMOUNT","visible": true,"properties": [
{"name": "id","value": "memorypernode"
},{
"name": "totalmemory","value": "True"
},{
"name": "memorypercore","value": "True"
},{
"name": "totalmemory_visible_default","value": "True"
},{
"name": "memorypercore_visible_default","value": "True"
},{
"name": "totalmemory_default","value": "0.5"
},{
"name": "memorypercore_default","value": "0.5"
},{
"name": "totalmemory_editable","value": "False"
},{
"name": "memorypercore_editable","value": "False"
},{
Chapter 4 Application Templates

"name": "enable","value": "true"
}]
},{
"default_value": "linux","editable": true,"label": "Architecture","variable_name": "ARCHITECTURE","visible": true,"properties": [
{"name": "id","value": "architecture"
},{
"name": "enable","value": "true"
}]
},{
"default_value": "","editable": true,"label": "Execution Path","variable_name": "EXECUTIONDIRECTORY","visible": true,"properties": [
{"name": "id","value": "exedir"
},{
"name": "enable","value": "true"
}]
},{
"default_value": "","editable": true,"label": "Error Path","variable_name": "ERRORPATH","visible": true,"properties": [
{"name": "id","value": "errorpath"
},{
"name": "useExecutionPath","value": "True"
},{
"name": "enable","value": "true"
}]
},
Chapter 4 Application Templates
200 Application Template API

Application Template API 201
{"default_value": "","editable": true,"label": "Output Path","variable_name": "OUTPUTPATH","visible": true,"properties": [
{"name": "id","value": "outputpath"
},{
"name": "useExecutionPath","value": "True"
},{
"name": "enable","value": "true"
}]
},{
"default_value": "false","editable": true,"label": "Merge Streams","variable_name": "JOIN","visible": true,"properties": [
{"name": "id","value": "join"
},{
"name": "enable","value": "true"
}]
},{
"default_value": "false","editable": true,"label": "Hold Job","variable_name": "HOLD","visible": true,"properties": [
{"name": "id","value": "hold"
},{
"name": "enable","value": "true"
}]
},{
"default_value": "","editable": true,"label": "Script Shell","variable_name": "SHELL",
Chapter 4 Application Templates
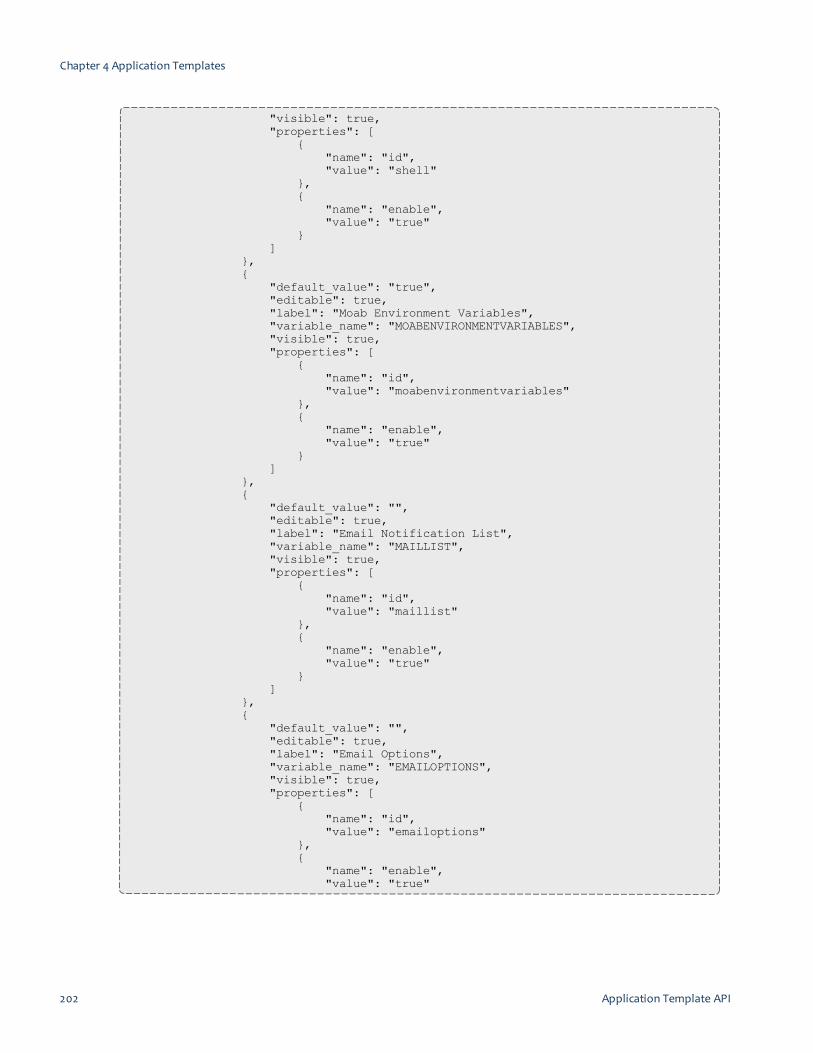
"visible": true,"properties": [
{"name": "id","value": "shell"
},{
"name": "enable","value": "true"
}]
},{
"default_value": "true","editable": true,"label": "Moab Environment Variables","variable_name": "MOABENVIRONMENTVARIABLES","visible": true,"properties": [
{"name": "id","value": "moabenvironmentvariables"
},{
"name": "enable","value": "true"
}]
},{
"default_value": "","editable": true,"label": "Email Notification List","variable_name": "MAILLIST","visible": true,"properties": [
{"name": "id","value": "maillist"
},{
"name": "enable","value": "true"
}]
},{
"default_value": "","editable": true,"label": "Email Options","variable_name": "EMAILOPTIONS","visible": true,"properties": [
{"name": "id","value": "emailoptions"
},{
"name": "enable","value": "true"
Chapter 4 Application Templates
202 Application Template API
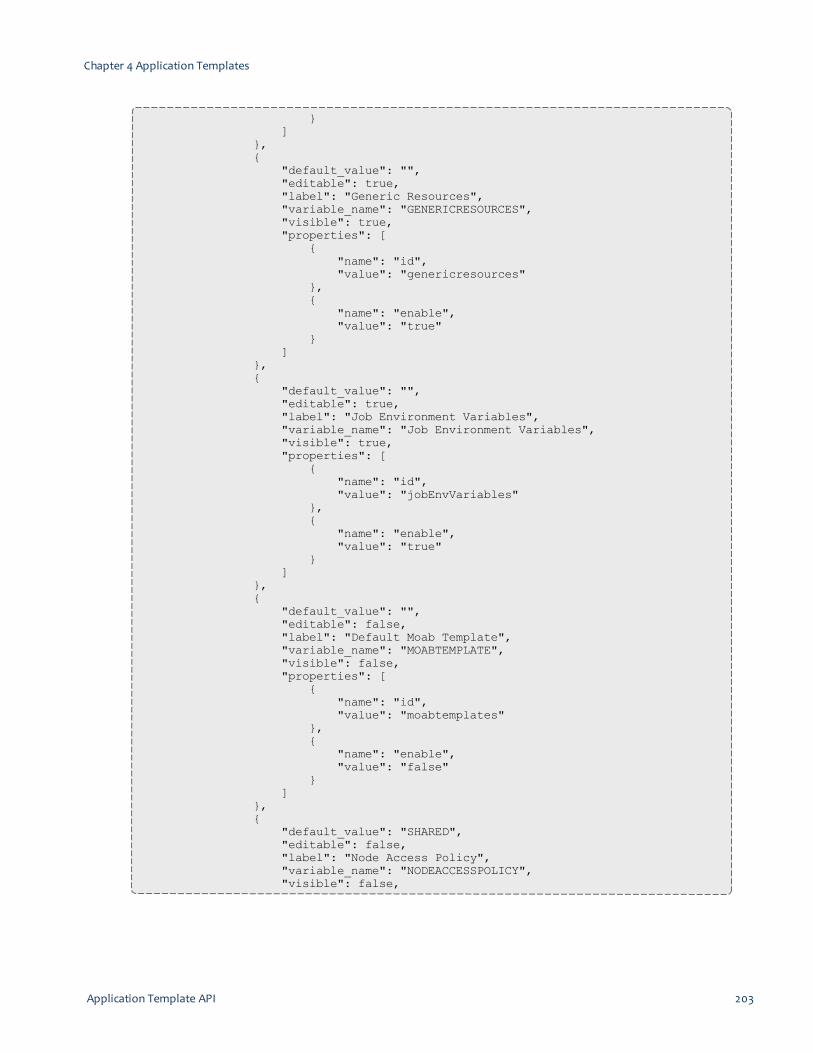
Application Template API 203
}]
},{
"default_value": "","editable": true,"label": "Generic Resources","variable_name": "GENERICRESOURCES","visible": true,"properties": [
{"name": "id","value": "genericresources"
},{
"name": "enable","value": "true"
}]
},{
"default_value": "","editable": true,"label": "Job Environment Variables","variable_name": "Job Environment Variables","visible": true,"properties": [
{"name": "id","value": "jobEnvVariables"
},{
"name": "enable","value": "true"
}]
},{
"default_value": "","editable": false,"label": "Default Moab Template","variable_name": "MOABTEMPLATE","visible": false,"properties": [
{"name": "id","value": "moabtemplates"
},{
"name": "enable","value": "false"
}]
},{
"default_value": "SHARED","editable": false,"label": "Node Access Policy","variable_name": "NODEACCESSPOLICY","visible": false,
Chapter 4 Application Templates

"properties": [{
"name": "id","value": "node-access-policy"
},{
"name": "enable","value": "false"
}]
},{
"default_value": "FIRSTAVAILABLE","editable": false,"label": "Node Allocation Policy","variable_name": "NODEALLOCATIONPOLICY","visible": false,"properties": [
{"name": "id","value": "node-allocation-policy"
},{
"name": "enable","value": "false"
}]
},{
"default_value": "EXACTSET","editable": false,"label": "Node Requested Policy","variable_name": "NODESREQUESTEDPOLICY","visible": false,"properties": [
{"name": "id","value": "nodes-requested-policy"
},{
"name": "enable","value": "false"
}]
},{
"default_value": "","editable": false,"label": "Operating System","variable_name": "OPERATINGSYSTEM","visible": false,"properties": [
{"name": "id","value": "operatingSystem"
},{
"name": "enable","value": "false"
}
Chapter 4 Application Templates
204 Application Template API

Application Template API 205
]},{
"default_value": "","editable": false,"label": "Requested Features","variable_name": "FEATURESREQUESTED","visible": false,"properties": [
{"name": "id","value": "features-requested"
},{
"name": "enable","value": "false"
}]
},{
"default_value": "","editable": false,"label": "Excluded Features","variable_name": "FEATURESEXCLUDED","visible": false,"properties": [
{"name": "id","value": "features-excluded"
},{
"name": "enable","value": "false"
}]
},{
"default_value": "","editable": false,"label": "Nodes Requested List","variable_name": "NODESREQUESTED","visible": false,"properties": [
{"name": "id","value": "nodes-requested"
},{
"name": "enable","value": "false"
}]
}],"version_description": "Default Free Form Application Template","version": 2
}]
}
Chapter 4 Application Templates

Related Topics
l Application Template API on page 157l Supported Methods on page 159l Chapter 4 Application Templates on page 89
Get Single TemplateIn this topic:
l URL on page 206l Parameters on page 206l Example on page 206
o Response on page 207
URLGET /api/templates/<id>/
Parameters
Parameter Required Type Description Example
id Yes Integer ID of the application template. 1
ExampleGET /api/templates/1/
Chapter 4 Application Templates
206 Application Template API

Application Template API 207
Response
Chapter 4 Application Templates

Response
{"url": "http://localhost:8080/api/templates/1/","assigned": "ALL","date": "2015-09-01","id": 1,"name": "Free Form","owner": "moab-admin","permissions": [
{"name": "ALL","type": "account"
},{
"name": "ALL","type": "group"
},{
"name": "ALL","type": "user"
}],"published": true,"sections": [
{"name": "defaults","value": "Basic Job Settings"
},{
"name": "timeManagement","value": "Time Management"
},{
"name": "credentials","value": "Credentials"
},{
"name": "resources","value": "Resources"
},{
"name": "dataManagement","value": "Data Management"
},{
"name": "custom","value": "Custom Settings"
}],"use": 3,"widgets": [
{"default_value": "","editable": true,"label": "Name","variable_name": "NAME","visible": true,"properties": [
{"name": "id","value": "name"
}]
},{
Chapter 4 Application Templates
208 Application Template API

Application Template API 209
"default_value": "","editable": true,"label": "Duration","variable_name": "DURATION","visible": true,"properties": [
{"name": "id","value": "duration"
}]
},{
"default_value": "","editable": false,"label": "Job Arrays","variable_name": "arrays","visible": false,"properties": [
{"name": "id","value": "arrays"
},{
"name": "enable","value": "false"
},{
"name": "start-value","value": "0"
},{
"name": "end-value","value": "1"
},{
"name": "start-variable","value": "STARTINDEX"
},{
"name": "end-variable","value": "ENDINDEX"
}]
},{
"default_value": "","editable": true,"label": "Delay Start By","variable_name": "ELIGIBLEDATE","visible": true,"properties": [
{"name": "id","value": "eligibledate"
}]
},{
"default_value": "0","editable": true,"label": "User Priority","variable_name": "PRIORITY","visible": true,"properties": [
Chapter 4 Application Templates

{"name": "id","value": "priority"
},{
"name": "enable","value": "true"
}]
},{
"default_value": "","editable": true,"label": "Submission Script","variable_name": "SCRIPT","visible": true,"properties": [
{"name": "id","value": "script"
}]
},{
"default_value": "","editable": true,"label": "Account","variable_name": "ACCOUNT","visible": true,"properties": [
{"name": "id","value": "account"
}]
},{
"default_value": "","editable": true,"label": "Queue / Class","variable_name": "DESTINATIONQUEUE","visible": true,"properties": [
{"name": "id","value": "destinationQueue"
}]
},{
"default_value": "","editable": true,"label": "Quality of Service","variable_name": "QOS","visible": true,"properties": [
{"name": "id","value": "qos"
}]
},{
"default_value": "","editable": true,
Chapter 4 Application Templates
210 Application Template API

Application Template API 211
"label": "Number of Cores","variable_name": "NUMOFCORES","visible": true,"properties": [
{"name": "id","value": "cpupernode"
}]
},{
"default_value": "0.5","editable": true,"label": "Total Memory (GB)","variable_name": "MEMORYPERNODE","visible": true,"properties": [
{"name": "id","value": "memorypernode"
}]
},{
"default_value": "","editable": true,"label": "Architecture","variable_name": "ARCHITECTURE","visible": true,"properties": [
{"name": "id","value": "architecture"
}]
},{
"default_value": "","editable": true,"label": "Execution Path","variable_name": "EXECUTIONDIRECTORY","visible": true,"properties": [
{"name": "id","value": "exedir"
}]
},{
"default_value": "","editable": true,"label": "Error Path","variable_name": "ERRORPATH","visible": true,"properties": [
{"name": "id","value": "errorpath"
}]
},{
"default_value": "","editable": true,
Chapter 4 Application Templates

"label": "Output Path","variable_name": "OUTPUTPATH","visible": true,"properties": [
{"name": "id","value": "outputpath"
}]
},{
"default_value": "false","editable": true,"label": "Merge Streams","variable_name": "JOIN","visible": true,"properties": [
{"name": "id","value": "join"
}]
},{
"default_value": "false","editable": true,"label": "Hold Job","variable_name": "HOLD","visible": true,"properties": [
{"name": "id","value": "hold"
}]
},{
"default_value": "","editable": true,"label": "Script Shell","variable_name": "SHELL","visible": true,"properties": [
{"name": "id","value": "shell"
}]
},{
"default_value": "true","editable": true,"label": "Moab Environment Variables","variable_name": "MOABENVIRONMENTVARIABLES","visible": true,"properties": [
{"name": "id","value": "moabenvironmentvariables"
}]
},{
"default_value": "","editable": true,
Chapter 4 Application Templates
212 Application Template API

Application Template API 213
"label": "Email Notification List","variable_name": "MAILLIST","visible": true,"properties": [
{"name": "id","value": "maillist"
}]
},{
"default_value": "","editable": true,"label": "Email Options","variable_name": "EMAILOPTIONS","visible": true,"properties": [
{"name": "id","value": "emailoptions"
}]
},{
"default_value": "","editable": true,"label": "Generic Resources","variable_name": "GENERICRESOURCES","visible": true,"properties": [
{"name": "id","value": "genericresources"
}]
},{
"default_value": "","editable": true,"label": "Feature Tags","variable_name": "FEATURETAGS","visible": true,"properties": [
{"name": "id","value": "featuretags"
}]
}]
}
Related Topics
l Application Template API on page 157l Supported Methods on page 159l Chapter 4 Application Templates on page 89
Chapter 4 Application Templates

Modify TemplateThis topic provides information on how to modify the application template itself(api/templates/<id>). See Modify Template History on page 224 forinformation on how to modify the application template's history/versioninformation (api/templates/<history_pk>/history/<version>).These are the different methods that you can use to modify an applicationtemplate:
l PUT – Creates a new application template version and enables you tomodify and save template attribute changes to that version. The previousversion is saved in the application template's history.
l PATCH – Lets you change whether the application template is published;all other template attributes, including the template version, remainunchanged.
In this topic:l PUT Method on page 214l PATCH Method on page 215
PUT MethodIn this section:
l URL on page 214l Parameters on page 214l Example on page 214
URLPUT /api/templates/<id>/
Parameters
Parameter Required Type Description Example
id Yes Integer ID of the application template 1
ExampleSee Create Template on page 161 for additional parameters you can modify.
Chapter 4 Application Templates
214 Application Template API

Application Template API 215
PATCH Method
You must the correct content type when using the PATCH API. If notspecified, the API will consider the type as 'text/html' which might causeside effects in the request processing code.
In this section:l URL on page 215l Parameters on page 215l JSON Structure on page 215l Example on page 215
o Request Body on page 216o Response on page 217
URLPATCH /api/templates/<id>/
Parameters
Parameter Required Type Description Example
id Yes Integer ID of the application template 1
JSON StructureThe following table identifies the template attributes that can be changed via aPATCH call.
Name Required Type Description
published No Boolean Application template's status: published or unpublished; if the applic-ation template is unpublished, then only owner can use it (not generallyvisible)
ExampleThis section provides an example of how to update application template 1 withthe published tag unset.
PATCH /api/templates/1/
Chapter 4 Application Templates

Request Body{"published": false
}
Chapter 4 Application Templates
216 Application Template API

Application Template API 217
Response
Chapter 4 Application Templates
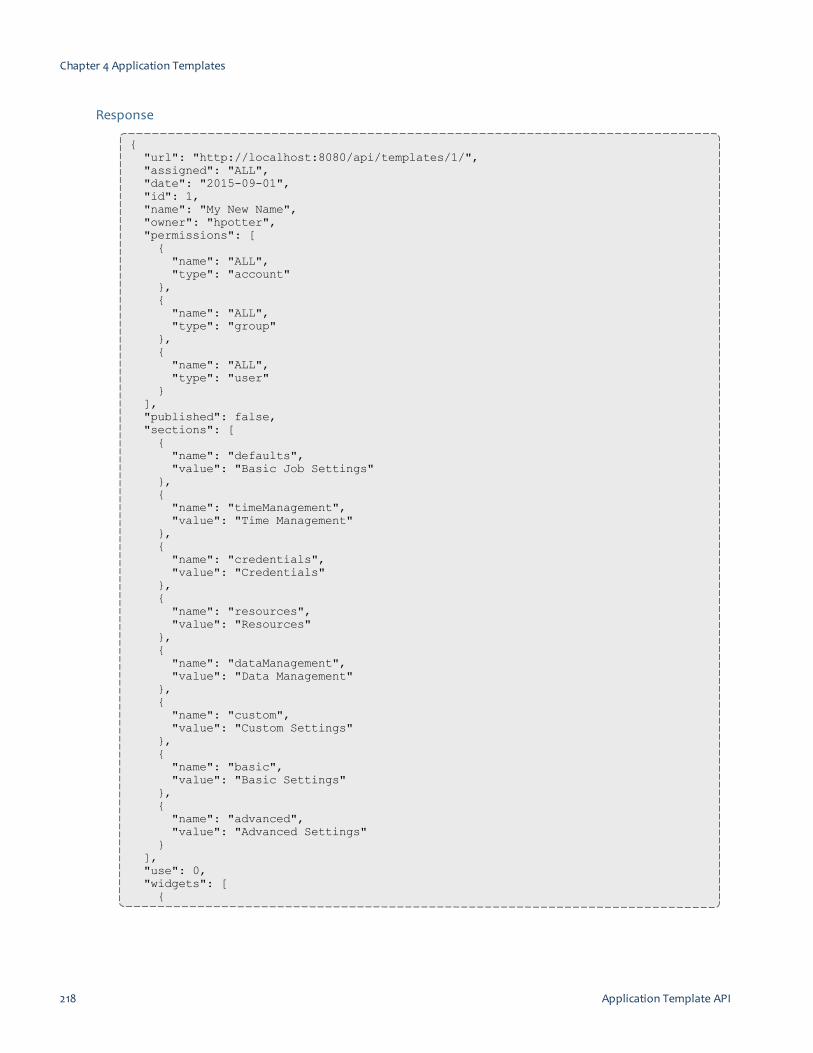
Response
{"url": "http://localhost:8080/api/templates/1/","assigned": "ALL","date": "2015-09-01","id": 1,"name": "My New Name","owner": "hpotter","permissions": [{"name": "ALL","type": "account"
},{"name": "ALL","type": "group"
},{"name": "ALL","type": "user"
}],"published": false,"sections": [{"name": "defaults","value": "Basic Job Settings"
},{"name": "timeManagement","value": "Time Management"
},{"name": "credentials","value": "Credentials"
},{"name": "resources","value": "Resources"
},{"name": "dataManagement","value": "Data Management"
},{"name": "custom","value": "Custom Settings"
},{"name": "basic","value": "Basic Settings"
},{"name": "advanced","value": "Advanced Settings"
}],"use": 0,"widgets": [{
Chapter 4 Application Templates
218 Application Template API

Application Template API 219
"default_value": "","editable": true,"label": "Name","variable_name": "NAME","visible": true,"properties": [{"name": "id","value": "name"
}]
},{"default_value": "0","editable": true,"label": "Duration","variable_name": "DURATION","visible": true,"properties": [{"name": "id","value": "duration"
}]
},{"default_value": "","editable": true,"label": "Job Arrays","variable_name": "arrays","visible": true,"properties": [{"name": "id","value": "arrays"
},{"name": "enable","value": "true"
},{"name": "start-value","value": "0"
},{"name": "end-value","value": "1"
},{"name": "start-variable","value": "STARTINDEX"
},{"name": "end-variable","value": "ENDINDEX"
}]
},{"default_value": "0",
Chapter 4 Application Templates

"editable": false,"label": "Delay Start By","variable_name": "ELIGIBLEDATE","visible": false,"properties": [{"name": "id","value": "eligibledate"
}]
},{"default_value": "0","editable": false,"label": "User Priority","variable_name": "USERPRIORITY","visible": false,"properties": [{"name": "id","value": "priority"
},{"name": "enable","value": "false"
}]
},{"default_value": "","editable": true,"label": "Submission Script","variable_name": "SCRIPT","visible": true,"properties": [{"name": "id","value": "script"
}]
},{"default_value": "","editable": true,"label": "Account","variable_name": "ACCOUNT","visible": false,"properties": [{"name": "id","value": "account"
}]
},{"default_value": "","editable": true,"label": "Queue / Class","variable_name": "DESTINATIONQUEUE","visible": false,
Chapter 4 Application Templates
220 Application Template API

Application Template API 221
"properties": [{"name": "id","value": "destinationQueue"
}]
},{"default_value": "","editable": true,"label": "Quality of Service","variable_name": "QOS","visible": false,"properties": [{"name": "id","value": "qos"
}]
},{"default_value": "","editable": true,"label": "Number of Cores","variable_name": "NUMOFCORES","visible": true,"properties": [{"name": "id","value": "cpupernode"
}]
},{"default_value": "0.5","editable": true,"label": "Total Memory (GB)","variable_name": "MEMORYPERNODE","visible": true,"properties": [{"name": "id","value": "memorypernode"
}]
},{"default_value": "","editable": true,"label": "Architecture","variable_name": "ARCHITECTURE","visible": true,"properties": [{"name": "id","value": "architecture"
}]
},{
Chapter 4 Application Templates

"default_value": "","editable": true,"label": "Execution Path","variable_name": "EXECUTIONDIRECTORY","visible": false,"properties": [{"name": "id","value": "exedir"
}]
},{"default_value": "","editable": true,"label": "Error Path","variable_name": "ERRORPATH","visible": false,"properties": [{"name": "id","value": "errorpath"
}]
},{"default_value": "","editable": true,"label": "Output Path","variable_name": "OUTPUTPATH","visible": false,"properties": [{"name": "id","value": "outputpath"
}]
},{"default_value": "false","editable": false,"label": "Merge Streams","variable_name": "JOIN","visible": false,"properties": [{"name": "id","value": "join"
}]
},{"default_value": "false","editable": false,"label": "Hold Job","variable_name": "HOLD","visible": false,"properties": [{"name": "id",
Chapter 4 Application Templates
222 Application Template API

Application Template API 223
"value": "hold"}
]},{"default_value": "","editable": false,"label": "Script Shell","variable_name": "SHELL","visible": false,"properties": [{"name": "id","value": "shell"
}]
},{"default_value": "true","editable": false,"label": "Moab Environment Variables","variable_name": "MOABENVIRONMENTVARIABLES","visible": false,"properties": [{"name": "id","value": "moabenvironmentvariables"
}]
},{"default_value": "","editable": false,"label": "Email Notification List","variable_name": "MAILLIST","visible": false,"properties": [{"name": "id","value": "maillist"
}]
},{"default_value": "","editable": false,"label": "Email Options","variable_name": "EMAILOPTIONS","visible": false,"properties": [{"name": "id","value": "emailoptions"
}]
},{"default_value": "","editable": false,"label": "Generic Resources",
Chapter 4 Application Templates

"variable_name": "GENERICRESOURCES","visible": false,"properties": [{"name": "id","value": "genericresources"
}]
},{"default_value": "","editable": false,"label": "Feature Tags","variable_name": "FEATURETAGS","visible": false,"properties": [{"name": "id","value": "featuretags"
}]
}]
}
Related Topics
l Application Template API on page 157l Supported Methods on page 159l Chapter 4 Application Templates on page 89
Modify Template HistoryThis topic provides information on how to modify the application template'shistory/version number (api/templates/<history_pk>/history/<version>). SeeModify Template on page 214 for information on how to modify the applicationtemplate itself (api/templates/<id>).The are two different methods that you can use to modify an applicationtemplate history/version number:
l PUT – Creates a copy of the selected application template history versionand applies it as the current version for the application template (revertsthe application template to a previous version's information).
l PATCH – Lets you modify the version description for the selectedapplication template history version, all other attributes, including thetemplate version, remain unchanged.
In this topic:l PUT Method on page 225l PATCH Method on page 239
Chapter 4 Application Templates
224 Application Template API

Application Template API 225
PUT MethodIn this section:
l URL on page 225l Parameters on page 225l Example on page 225
o Response on page 226
URLPUT /api/templates/<history_pk>/history/<version>/
Parameters
Parameter Required Type Description Example
history_pk Yes String History ID of the applicationtemplate
b00ce08c-01ed-4a9d-a916-f587b9f1af44
version Yes Integer Version of the application tem-plate
2
ExampleThis section provides an example of how to take an older application template'sversion and copy and save it as a new (current) version.
PUT /api/templates/b00ce08c-01ed-4a9d-a916-f587b9f1af44/history/1/
Chapter 4 Application Templates

Response
Chapter 4 Application Templates
226 Application Template API

Application Template API 227
Response
{ "url": "http://localhost:8080/api/templates/5/","history_url": "http://localhost:8080/api/templates/b00ce08c-01ed-4a9d-
a916-f587b9f1af44/history/","changed_by": "moab-admin","current": true,"date": "2016-09-08T12:14:19.647410Z","id": 5,"name": "Free Form v.2","type": "regular","description": {
"text": "<h1><strong>Welcometo our Free Form</strong> ApplicationTemplate!</h1>\n\n<p>Fill in the inputs and press the"Create" button to submit yourjob!</p>\n\n<p>-- Enjoy!</p>",
"visible": true},"owner": "moab-admin","permissions": [
{"name": "ALL","type": "account"
},{
"name": "ALL","type": "group"
},{
"name": "ALL","type": "user"
}],"published": true,"sections": [
{"name": "description","value": "Application Description"
},{
"name": "advanced","value": "Advanced Settings"
},{
"name": "basic","value": "Basic Settings"
},{
"name": "custom","value": "Custom Settings"
},{
"name": "dataManagement","value": "Data Management"
},{
"name": "resources","value": "Resources"
},{
Chapter 4 Application Templates

"name": "credentials","value": "Credentials"
},{
"name": "timeManagement","value": "Time Management"
},{
"name": "defaults","value": "Basic Job Settings"
}],"use": 0,"widgets": [
{"default_value": "ggg","editable": true,"label": "Name","variable_name": "NAME","visible": true,"properties": [
{"name": "id","value": "name"
},{
"name": "enable","value": "true"
}]
},{
"default_value": "0","editable": true,"label": "Duration","variable_name": "DURATION","visible": true,"properties": [
{"name": "id","value": "duration"
},{
"name": "enable","value": "true"
}]
},{
"default_value": "","editable": false,"label": "Job Arrays","variable_name": "arrays","visible": false,"properties": [
{"name": "id","value": "arrays"
},{
Chapter 4 Application Templates
228 Application Template API
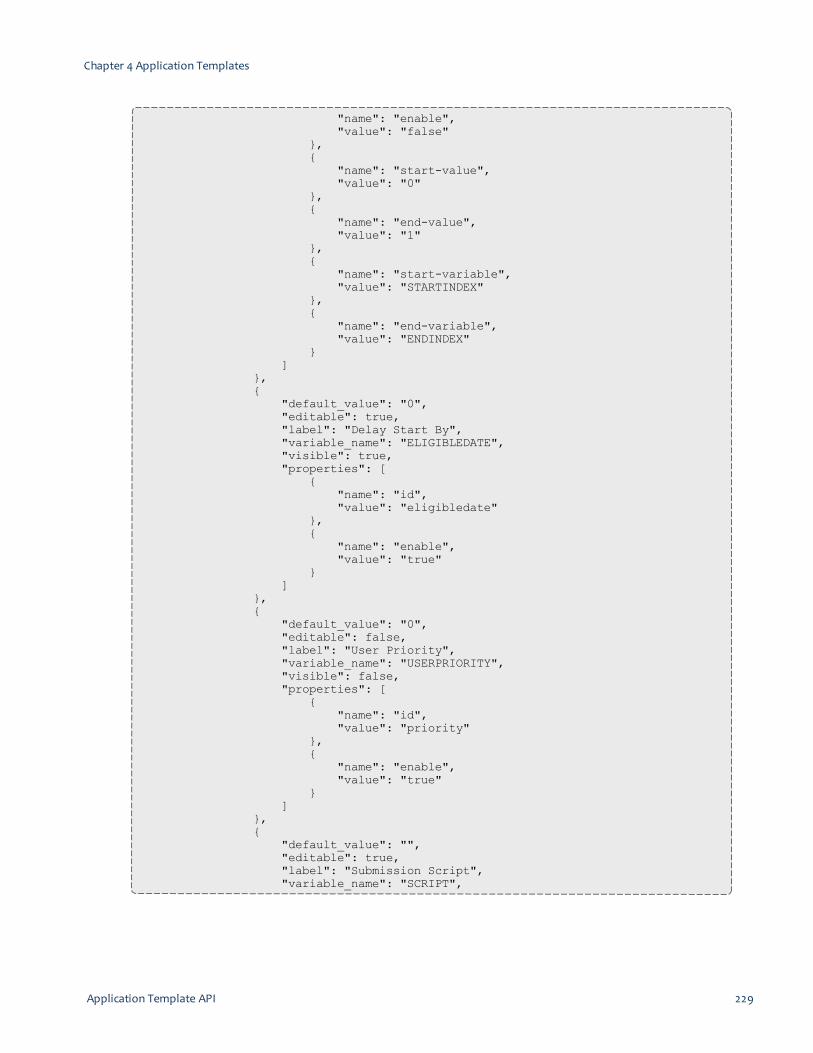
Application Template API 229
"name": "enable","value": "false"
},{
"name": "start-value","value": "0"
},{
"name": "end-value","value": "1"
},{
"name": "start-variable","value": "STARTINDEX"
},{
"name": "end-variable","value": "ENDINDEX"
}]
},{
"default_value": "0","editable": true,"label": "Delay Start By","variable_name": "ELIGIBLEDATE","visible": true,"properties": [
{"name": "id","value": "eligibledate"
},{
"name": "enable","value": "true"
}]
},{
"default_value": "0","editable": false,"label": "User Priority","variable_name": "USERPRIORITY","visible": false,"properties": [
{"name": "id","value": "priority"
},{
"name": "enable","value": "true"
}]
},{
"default_value": "","editable": true,"label": "Submission Script","variable_name": "SCRIPT",
Chapter 4 Application Templates

"visible": true,"properties": [
{"name": "id","value": "script"
}]
},{
"default_value": "","editable": true,"label": "Account","variable_name": "ACCOUNT","visible": true,"properties": [
{"name": "id","value": "account"
},{
"name": "enable","value": "true"
}]
},{
"default_value": "","editable": true,"label": "Queue / Class","variable_name": "DESTINATIONQUEUE","visible": true,"properties": [
{"name": "id","value": "destinationQueue"
},{
"name": "enable","value": "true"
}]
},{
"default_value": "","editable": true,"label": "Quality of Service","variable_name": "QOS","visible": true,"properties": [
{"name": "id","value": "qos"
},{
"name": "enable","value": "true"
}]
},{
Chapter 4 Application Templates
230 Application Template API
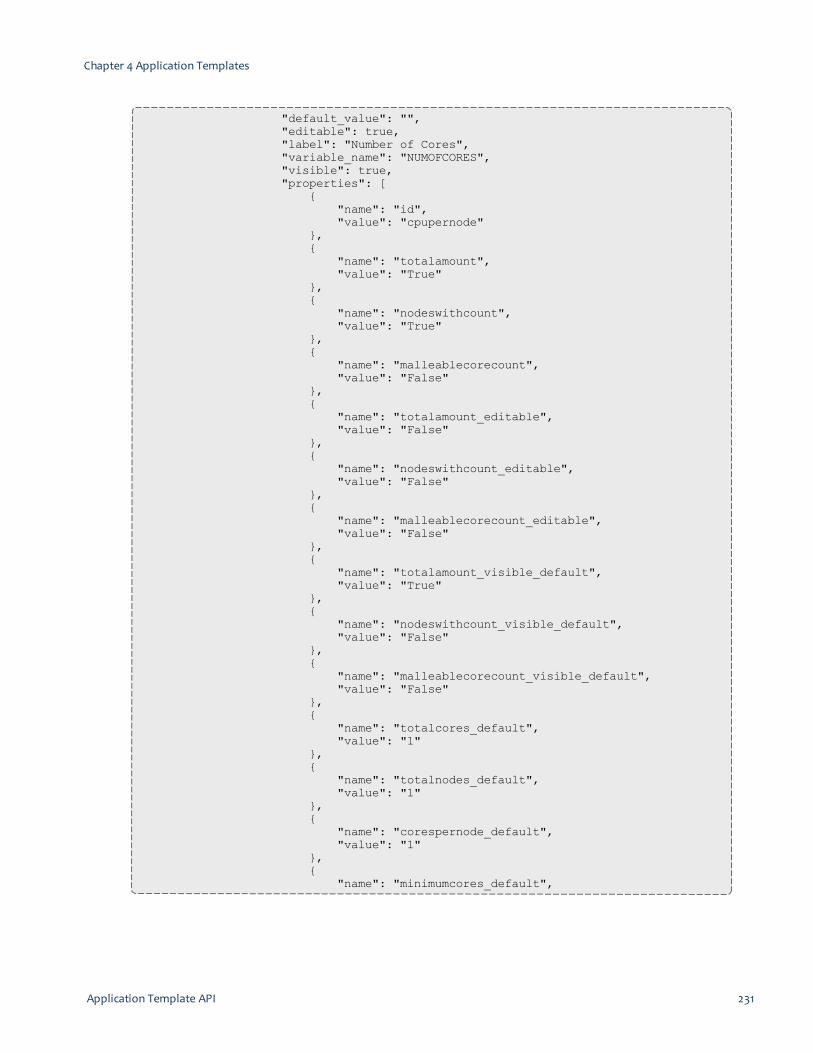
Application Template API 231
"default_value": "","editable": true,"label": "Number of Cores","variable_name": "NUMOFCORES","visible": true,"properties": [
{"name": "id","value": "cpupernode"
},{
"name": "totalamount","value": "True"
},{
"name": "nodeswithcount","value": "True"
},{
"name": "malleablecorecount","value": "False"
},{
"name": "totalamount_editable","value": "False"
},{
"name": "nodeswithcount_editable","value": "False"
},{
"name": "malleablecorecount_editable","value": "False"
},{
"name": "totalamount_visible_default","value": "True"
},{
"name": "nodeswithcount_visible_default","value": "False"
},{
"name": "malleablecorecount_visible_default","value": "False"
},{
"name": "totalcores_default","value": "1"
},{
"name": "totalnodes_default","value": "1"
},{
"name": "corespernode_default","value": "1"
},{
"name": "minimumcores_default",
Chapter 4 Application Templates

"value": "1"},{
"name": "maximumcores_default","value": "2"
},{
"name": "enable","value": "true"
}]
},{
"default_value": "","editable": true,"label": "Total Memory (GB)","variable_name": "MEMORYAMOUNT","visible": true,"properties": [
{"name": "id","value": "memorypernode"
},{
"name": "totalmemory","value": "True"
},{
"name": "memorypercore","value": "True"
},{
"name": "totalmemory_visible_default","value": "True"
},{
"name": "memorypercore_visible_default","value": "True"
},{
"name": "totalmemory_default","value": "0.5"
},{
"name": "memorypercore_default","value": "0.5"
},{
"name": "totalmemory_editable","value": "False"
},{
"name": "memorypercore_editable","value": "False"
},{
"name": "enable","value": "true"
}]
Chapter 4 Application Templates
232 Application Template API

Application Template API 233
},{
"default_value": "linux","editable": true,"label": "Architecture","variable_name": "ARCHITECTURE","visible": true,"properties": [
{"name": "id","value": "architecture"
},{
"name": "enable","value": "true"
}]
},{
"default_value": "","editable": true,"label": "Execution Path","variable_name": "EXECUTIONDIRECTORY","visible": true,"properties": [
{"name": "id","value": "exedir"
},{
"name": "enable","value": "true"
}]
},{
"default_value": "","editable": true,"label": "Error Path","variable_name": "ERRORPATH","visible": true,"properties": [
{"name": "id","value": "errorpath"
},{
"name": "useExecutionPath","value": "True"
},{
"name": "enable","value": "true"
}]
},{
"default_value": "","editable": true,"label": "Output Path",
Chapter 4 Application Templates

"variable_name": "OUTPUTPATH","visible": true,"properties": [
{"name": "id","value": "outputpath"
},{
"name": "useExecutionPath","value": "True"
},{
"name": "enable","value": "true"
}]
},{
"default_value": "false","editable": true,"label": "Merge Streams","variable_name": "JOIN","visible": true,"properties": [
{"name": "id","value": "join"
},{
"name": "enable","value": "true"
}]
},{
"default_value": "false","editable": true,"label": "Hold Job","variable_name": "HOLD","visible": true,"properties": [
{"name": "id","value": "hold"
},{
"name": "enable","value": "true"
}]
},{
"default_value": "","editable": true,"label": "Script Shell","variable_name": "SHELL","visible": true,"properties": [
{"name": "id",
Chapter 4 Application Templates
234 Application Template API

Application Template API 235
"value": "shell"},{
"name": "enable","value": "true"
}]
},{
"default_value": "true","editable": true,"label": "Moab Environment Variables","variable_name": "MOABENVIRONMENTVARIABLES","visible": true,"properties": [
{"name": "id","value": "moabenvironmentvariables"
},{
"name": "enable","value": "true"
}]
},{
"default_value": "","editable": true,"label": "Email Notification List","variable_name": "MAILLIST","visible": true,"properties": [
{"name": "id","value": "maillist"
},{
"name": "enable","value": "true"
}]
},{
"default_value": "","editable": true,"label": "Email Options","variable_name": "EMAILOPTIONS","visible": true,"properties": [
{"name": "id","value": "emailoptions"
},{
"name": "enable","value": "true"
}]
},{
Chapter 4 Application Templates

"default_value": "","editable": true,"label": "Generic Resources","variable_name": "GENERICRESOURCES","visible": true,"properties": [
{"name": "id","value": "genericresources"
},{
"name": "enable","value": "true"
}]
},{
"default_value": "","editable": true,"label": "Job Environment Variables","variable_name": "Job Environment Variables","visible": true,"properties": [
{"name": "id","value": "jobEnvVariables"
},{
"name": "enable","value": "true"
}]
},{
"default_value": "","editable": false,"label": "Default Moab Template","variable_name": "MOABTEMPLATE","visible": false,"properties": [
{"name": "id","value": "moabtemplates"
},{
"name": "enable","value": "false"
}]
},{
"default_value": "SHARED","editable": false,"label": "Node Access Policy","variable_name": "NODEACCESSPOLICY","visible": false,"properties": [
{"name": "id","value": "node-access-policy"
Chapter 4 Application Templates
236 Application Template API

Application Template API 237
},{
"name": "enable","value": "false"
}]
},{
"default_value": "FIRSTAVAILABLE","editable": false,"label": "Node Allocation Policy","variable_name": "NODEALLOCATIONPOLICY","visible": false,"properties": [
{"name": "id","value": "node-allocation-policy"
},{
"name": "enable","value": "false"
}]
},{
"default_value": "EXACTSET","editable": false,"label": "Node Requested Policy","variable_name": "NODESREQUESTEDPOLICY","visible": false,"properties": [
{"name": "id","value": "nodes-requested-policy"
},{
"name": "enable","value": "false"
}]
},{
"default_value": "","editable": false,"label": "Operating System","variable_name": "OPERATINGSYSTEM","visible": false,"properties": [
{"name": "id","value": "operatingSystem"
},{
"name": "enable","value": "false"
}]
},{
"default_value": "",
Chapter 4 Application Templates

"editable": false,"label": "Requested Features","variable_name": "FEATURESREQUESTED","visible": false,"properties": [
{"name": "id","value": "features-requested"
},{
"name": "enable","value": "false"
}]
},{
"default_value": "","editable": false,"label": "Excluded Features","variable_name": "FEATURESEXCLUDED","visible": false,"properties": [
{"name": "id","value": "features-excluded"
},{
"name": "enable","value": "false"
}]
},{
"default_value": "","editable": false,"label": "Nodes Requested List","variable_name": "NODESREQUESTED","visible": false,"properties": [
{"name": "id","value": "nodes-requested"
},{
"name": "enable","value": "false"
}]
}],"version_description": "Default Free Form Application Template","version": 2
}]
}
Chapter 4 Application Templates
238 Application Template API
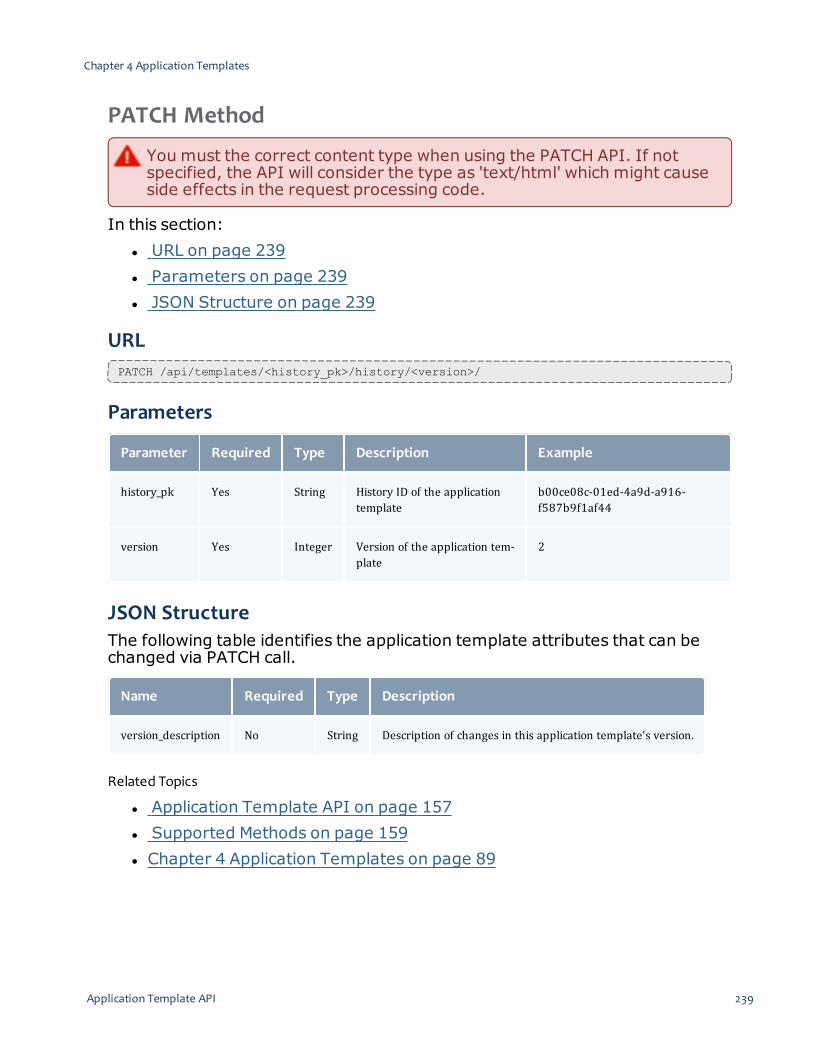
Application Template API 239
PATCH Method
You must the correct content type when using the PATCH API. If notspecified, the API will consider the type as 'text/html' which might causeside effects in the request processing code.
In this section:l URL on page 239l Parameters on page 239l JSON Structure on page 239
URLPATCH /api/templates/<history_pk>/history/<version>/
Parameters
Parameter Required Type Description Example
history_pk Yes String History ID of the applicationtemplate
b00ce08c-01ed-4a9d-a916-f587b9f1af44
version Yes Integer Version of the application tem-plate
2
JSON StructureThe following table identifies the application template attributes that can bechanged via PATCH call.
Name Required Type Description
version_description No String Description of changes in this application template's version.
Related Topics
l Application Template API on page 157l Supported Methods on page 159l Chapter 4 Application Templates on page 89
Chapter 4 Application Templates

240 Application Template API

Nodes Page 241
Chapter 5 Nodes
Viewpoint lets you view all of the nodes reported to Moab by your resourcemanager. Specifically:
l the Nodes page (default) offers a place to determine the status of yourcompute nodes, howmany jobs are running on each node, what featuresare on each node, and other information.
l the Node Details page provides additional details about a node.l the Resource Job Timeline page is a sub-page of the Nodes page thatdisplays information about the jobs and reservations that are running on aset of nodes.
In this chapter:l Nodes Page on page 241l Node Details Page on page 244l Resource Job Timeline Page on page 247l Threshold Settings on page 250
Nodes PageThe Nodes page offers a place to determine the status of your compute nodes,howmany jobs are running on each node, what features are on each node,and other information.To access this page, clickNodes in the menu bar.This topic provides an example of the Nodes page and describes its layout andavailable information.In this topic:
l Page Example on page 241l Selection Criteria Area on page 242l Nodelist View Details on page 243
Page ExampleThe following image is an example of the Nodes page.
Chapter 5 Nodes

Selection Criteria AreaThe right side of this page provides selection criteria you can use to limit what isdisplayed in the nodelist view.You can choose to display:
l Specific nodes or groups of nodes based on the Node ID, Class, or Featureinformation. Select the value from the Current Search drop-down, in theNarrow Search box, enter the specific information, and then click .
l Only nodes matching a specific status (state). Select the status from theSelect Status drop-down and then click Filter.
l Only nodes within a given processor, job, CPU utilization, and/or memoryutilization range. Select the minimum and maximum values and then clickFilter.
You can utilize multiple selection criteria options; however, only the nodesthat match all of the defined options will be shown in the nodelist view.
ClickReset at any time to remove all defined selection criteria options (restorethe page defaults).
Chapter 5 Nodes
242 Nodes Page

Nodes Page 243
Nodelist View DetailsThe following information explains the layout and additional informationavailable in the nodelist view.
l Display Refresh – You can refresh the information displayed in thenodelist view (including specified search and filter criteria) to reflect thelatest information about the nodes. At the top of the nodelist view, click.
l Refresh Interval – You can set a time interval for automatic refresh ofthe nodelist view. Select a time interval from the drop-down list or selectNONE to turn off automatic refresh.
l Resource Job Timeline – You can switch from viewing the nodelist to theResource Job Timeline by clicking at the top right corner of the
nodelist. (the icon is greyed out until it is selected). See Resource JobTimeline Page on page 247 for more information.
l Columns – The nodelist view displays the data in a column format.Column titles that are underlined indicate that you can sort (ascending ordescending) the column contents.
Column Heading Description
Node ID Unique identifier for the node. You can click a node ID in the column's contentsto view additional information about that node. See Node Details Page.
Status State of the node (for example, BUSY, IDLE, or DOWN).
CoresAvailable/Configured
Number of processors on this node displayed as available/configured; whereconfigured is the number of processors being reported by the resourcemanager.
Jobs Number of jobs running on this node.
UtilizationCPU/Memory
Percentage of this node's CPU utilization; based on the node's operating systemreported CPU load average/Percentage of this node's memory that is dedicatedto currently running jobs.
Time to Live Specifies the time that the node is supposed to be retired by Moab. Moab willnot schedule any jobs on a node after its time to live has passed.
Operational Task Indicates whether the node is provisioning or deprovisioning (or N/A for allother operations).
Chapter 5 Nodes
l Page Controls – Page controls are available at the bottom of thenodeslist view to let you customize howmany nodes appear per page. Thepage controls also include options for selecting which page to display.
Related Topics
l Node Details Page on page 244l Resource Job Timeline Page on page 247l Chapter 5 Nodes on page 241
Node Details PageThe Node Details page shows additional information about a selected node.To access this page, from the Nodes page, click on the Node ID link for thenode.
If you defined selection criteria on the Nodes page, when you are donewith the Nodes Details page, click the "Return to earlier search" link topreserve the criteria; otherwise, click Close to return to the default stateof the Nodes page.
This topic provides an example of the Nodes Details page and describes itslayout and available information.In this topic:
l Page Example on page 244l Page Details on page 245
Page ExampleThe following image is an example of the Node Details page.
Chapter 5 Nodes
244 Node Details Page

Node Details Page 245
Page DetailsThis section describes the different functional areas, including fielddescriptions, available on the Node Details page.In this section:
l Node Detailsl Resourcesl Featuresl Node Jobs
Chapter 5 Nodes

Node DetailsThe Node Details area displays specific information about the node. Thefollowing table describes the fields in the Node Details area.
Field Description
Name The ID of the node.
State The current state of the node or resource (such as BUSY, IDLE, DOWN).
Power The power state of the node.
Operating System The name of the operating system currently running on this node.
Resource Managers List of resource managers that report the node.
Jobs The number of jobs running on this node.
Reservations List of reservations that include this node.
ResourcesThe Resources area displays information about the node's available andallocated resources. The following table describes the fields in the Resourcesarea.
Field Description
Real Cores The number of processors on the node.
Available Cores The number of processors that are not dedicated to currently running jobs.
Real memory (GB) The amount of memory (in GB) on the node.
Available memory(GB)
The amount of memory (in GB) that is available on the node.
CPU utilization The current CPU utilization of the node; based on the node's operating system reportedcpu load average.
Generic Resource –Count
The generic resources required by the node or resource.
Chapter 5 Nodes
246 Node Details Page

Resource Job Timeline Page 247
FeaturesThe Features area lists the reported and the configurable features for thisnode.
l Reported features are the node features that were reported by theresource manager or configured in the Moab configuration file. Youcannot remove these features in the Features area.
l Configurable features are the node features that were added using theViewpoint portal (additional features available through MWS). You canadd/remove these features in the Features area.
Node JobsThe Node Jobs area lists the job information for this node. See 1.1 WorkloadPage for more information on the job fields.
Related Topics
l Nodes Page on page 241l Chapter 5 Nodes on page 241l Chapter 5 Nodes on page 241
Resource Job Timeline PageThe Resource Job Timeline page is a sub-page of the Nodes page that displaysinformation about the jobs and reservations that are running on a set of nodes.You can also utilize selection criteria to narrow the results shown graphically inthe timeline view.
To access this page, from the Nodes page, click (the icon is greyed out
until it is selected).
The Resource Job Timeline View, by default, is set is to show the last 24hours and the next 4 hours when you first visit the page. Depending onhowmany jobs run in your cluster per day, and howmany nodes you areviewing, that time windowmight contain too many objects for the browserto display. You can change the default setting. See Threshold Settings onpage 250more information.
This topic provides an example of the Resource Job Timeline page anddescribes its layout and available information.In this topic:
Chapter 5 Nodes
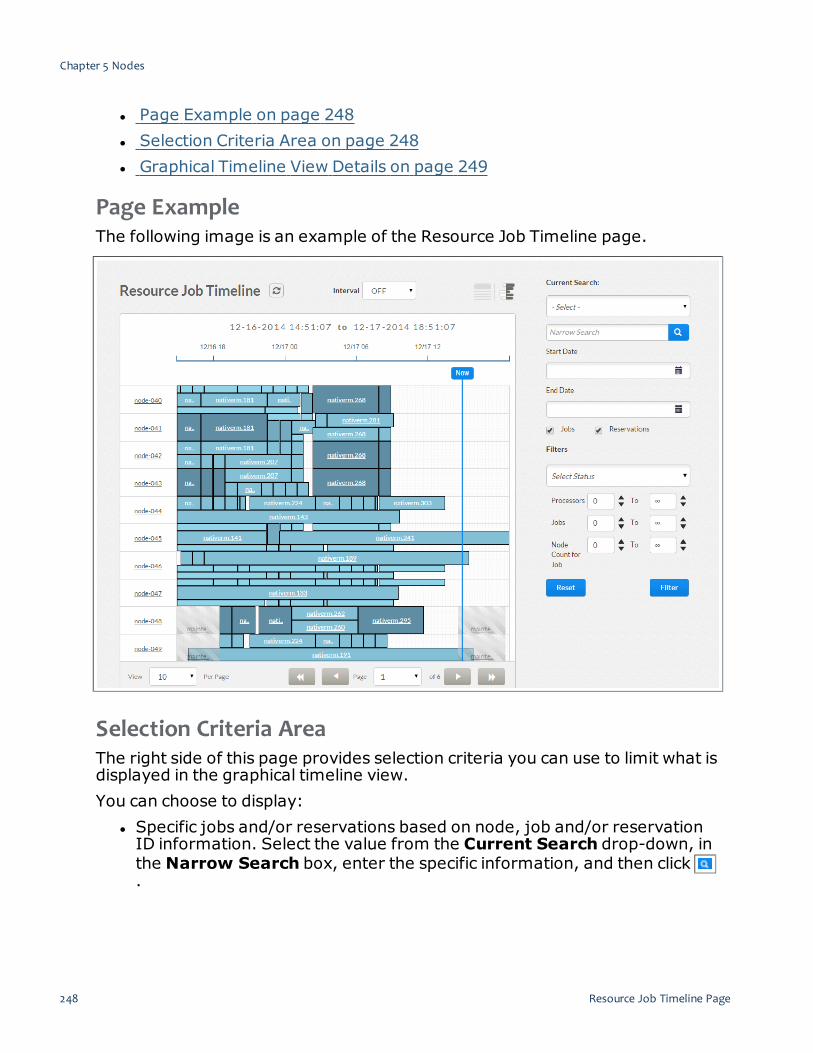
l Page Example on page 248l Selection Criteria Area on page 248l Graphical Timeline View Details on page 249
Page ExampleThe following image is an example of the Resource Job Timeline page.
Selection Criteria AreaThe right side of this page provides selection criteria you can use to limit what isdisplayed in the graphical timeline view.You can choose to display:
l Specific jobs and/or reservations based on node, job and/or reservationID information. Select the value from the Current Search drop-down, inthe Narrow Search box, enter the specific information, and then click.
Chapter 5 Nodes
248 Resource Job Timeline Page

Resource Job Timeline Page 249
l Jobs and/or reservations within a given start and end date range. In theStart Date and End Date fields, select the desired dates, and then clickFilter.
l Jobs, reservations, or both. Click the desired check boxes, and then clickFilter.
The Jobs check box is selected by default. If you chose to narrow thesearch by reservation ID, the Reservations check box isautomatically selected. When both the Reservations check box andthe Jobs check box are selected, and jobs and reservations co-existin the same time frame and on the same node, the Reservation blockoverlaps the Job block on the timeline.
l Only nodes matching a specific status (state). Select the status from theSelect Status drop-down and then click Filter.
l Only regular nodes or only elastic nodes (if an Elastic Computing license ispresent). Select the node type from the Select Type drop-down and thenclick Filter.
l Only nodes within a given processor and/or node count. Select theminimum and maximum values and then click Filter.
You can utilize multiple selection criteria options; however, only thenodes that match all of the defined options will be shown in thenodelist view.
ClickReset at any time to remove all defined selection criteria options (restorethe page defaults).
Graphical Timeline View DetailsThe following information explains the layout and additional informationavailable in the graphical timeline view.
l Refresh Interval – You can refresh the information displayed in thegraphical timeline view to reflect the latest information about the jobsrunning on the nodes. The refresh options are at the top of the graphicaltime view.
o The Refresh Interval field lets you select a time interval for whichthe graphical timeline view will automatically refresh.
o You can also click , at any time, to manually update the graphicaltimeline view.
l List of Nodes – The list of nodes (by node ID) is displayed on the verticalaxis on the left.
Chapter 5 Nodes

o Hover the mouse over the node ID to see the number of processorsconfigured on the node.
o Click on the node ID to view additional information about that node.See Node Details Page for more information.
l Time Span – The time span is displayed on the horizontal axis at the top.The vertical blue line with the "Now" label denotes the current time.
l Jobs – Jobs are visible on the timeline only if the Jobs check box isselected. A job that is running on a particular node is displayed against thenode on the timeline in the form of a blue block. The color shade of the jobblock indicates the number of processors used for the job. The darkershade indicates more processors and the lighter shade indicates fewerprocessors being used for the job (relative to your cluster's average jobsize). The vertical height of the block indicates the number of processorsthat the job is using on a particular node. For example, if a job is using 2out of 4 processors on a particular node, then the job will take up 50percent of the height of the Node ID row.
o Hover the mouse over the job block to display additional information(such as the job's start and stop time, the number of processors thatthe job is occupying on the node, and the wallclock limit time).
o Click on the job block to open the Job Details page to view additionalinformation about that job on that node. See Job Details Page formore information.
l Reservations – Reservations are visible on the timeline only if theReservations check box is selected. A reservation that is running on aparticular node is displayed against that node on the timeline in the formof a gray block. If a job and a reservation co-exist in the same time frameand for the same node, then the reservation block is displayed over thejob block.
l Page Controls – Page controls are available at the bottom of thegraphical timeline view to let you customize howmany nodes appear perpage.
Related Topics
l Node Details Page on page 244l Threshold Settings on page 250l Chapter 5 Nodes on page 241
Threshold SettingsThis topic contains instructions on how to configure Insight and Viewpointsettings to adjust the amount of data displayed by Viewpoint.
Chapter 5 Nodes
250 Threshold Settings

Threshold Settings 251
l The Resource Job Timeline View, by default, is set is to show the last 24hours and the next 4 hours when you first visit the page. Depending onhowmany jobs run in your cluster per day, and howmany nodes you areviewing, that time windowmight contain too many objects for the browserto display.
o You can change the default time window by editing PAST_HOURSand FUTURE_HOURS in /opt/viewpoint/etc/viewpoint.cfg.
o You can change the default limit on the number of objects to displayby editing RJTV_THRESHOLD in/opt/viewpoint/lib/viewpoint/config/config.json.
Related Topics
l Resource Job Timeline Page on page 247l Chapter 5 Nodes on page 241
Chapter 5 Nodes

252 Threshold Settings

File Manager Page 253
Chapter 6 File Manager
Viewpoint lets you connect to a remote file system (RFS) to upload anddownload files directly from the portal. For example, you can upload ordownload job submission scripts, access standard output or error files, andupload input files for your job. Specifically:
l the File Manager page (default) lists all of the folders and files that you canaccess. Using this page you can upload files, create folders, and performvarious file and folder maintenance options (such as download, compressor delete).
You can restrict system folder access using the Configuration page. Touse the File Manager page, users must have an operating system accounton the RFS and be assigned a role that has the "File Manager Page"Viewpoint Permission selected.
In this chapter:l File Manager Page on page 253l Uploading Files on page 256l Creating Folders on page 257l Maintaining Files and Folders on page 257
File Manager PageThe File Manager page lets users organize and manage files on the RFS. Forexample, you can upload a script or an application template, or you can savean output or error file.To access this page, click FILE MANAGER from the menu.This topic provides an example of the File Manager page and describes itslayout and available information.In this topic:
l Page Example on page 253l Page Details on page 254l Additional Functions on page 255
Page ExampleThe following image is an example of the File Manager page.
Chapter 6 File Manager

Page DetailsThis section describes the functional areas of the File Manager page.In this section:
l Directory Structure on page 254l View Settings on page 254l Folder/File Creation Buttons on page 255
Directory StructureAt the top of the File Manager page you will see the Home icon and thedirectory path box. Using the File Manager page example provided earlier, youwill see Remote File System/home/hgranger in the directory box.The File Manager page uses a left pane to list the folders available in theselected directory. The main pane lists the folders and any files in thatdirectory.If you select a folder in the left pane, the directory path changes and the leftand main panes display the applicable folders/files. Click the Home icon at anytime to go directly to your home directory.
View SettingsYou can change whether the main pane shows the directory contents in grid orlist view by clicking the appropriate icon at the top right of the page.
Chapter 6 File Manager
254 File Manager Page

File Manager Page 255
If you use the list view, the folders will have "/" at the end of their nameand the files will have information in the Size column.
The following is an example of the directory list view.
Controls are also provided to sort files by name, file type, date modified, orsize, change the sort order, and filter files by name.
Folder/File Creation ButtonsViewpoint lets you upload a file and/or create a new folder. To enable thisfunctionality, two buttons are available towards the top of this page.
l Upload – Opens up a pop-window that lets you upload an existing filefrom the RFS. See Uploading Files on page 256.
l New Folder – Opens up a pop-window that lets you specify the name ofthe new folder. See Creating Folders on page 257.
The new folder/file is saved in the active directory (shown in the directorybox).
Additional FunctionsThe File Manager page also includes a drop-down with shortcuts to performadditional folder-/file-related functions. See Maintaining Files and Folders onpage 257 for details.
Chapter 6 File Manager
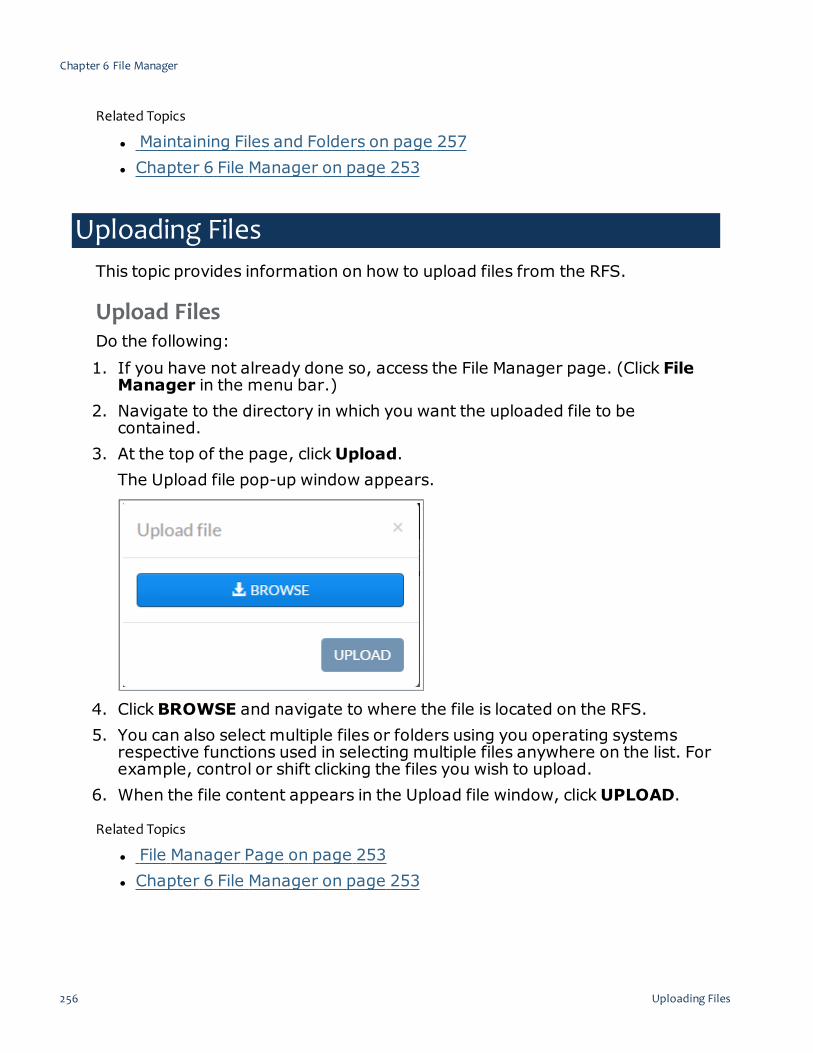
Related Topics
l Maintaining Files and Folders on page 257l Chapter 6 File Manager on page 253
Uploading FilesThis topic provides information on how to upload files from the RFS.
Upload FilesDo the following:1. If you have not already done so, access the File Manager page. (Click FileManager in the menu bar.)
2. Navigate to the directory in which you want the uploaded file to becontained.
3. At the top of the page, clickUpload.The Upload file pop-up window appears.
4. ClickBROWSE and navigate to where the file is located on the RFS.5. You can also select multiple files or folders using you operating systemsrespective functions used in selecting multiple files anywhere on the list. Forexample, control or shift clicking the files you wish to upload.
6. When the file content appears in the Upload file window, clickUPLOAD.
Related Topics
l File Manager Page on page 253l Chapter 6 File Manager on page 253
Chapter 6 File Manager
256 Uploading Files

Creating Folders 257
Creating FoldersThis topic provides information on how to add new folders.
You can only create new folders in the directories to which you have beengranted access.
Create FoldersDo the following:1. If you have not already done so, access the File Manager page. (Click FileManager in the menu bar.)
2. Navigate to the directory in which you want the new folder to be contained.3. ClickNew Folder.The Create new folder pop-window appears.
4. Enter the name for this folder and click CREATE; otherwise, click Close toexit this window without creating a folder.
Related Topics
l File Manager Page on page 253l Chapter 6 File Manager on page 253
Maintaining Files and FoldersThis topic provides information on the different tasks available for maintainingfiles and folders, including where to access the maintenance options.In this topic:
Chapter 6 File Manager

l Available Maintenance Options on page 258l Access Maintenance Options on page 258
Available Maintenance OptionsViewpoint provides these options for maintaining files and folders:
l Compress – Lets you create a copy of the file/folder in a compressed(zipped) format.
l Copy – Lets you save a copy of the file/folder in another location.l Delete – Removes the file/folder.l Download – Lets you download the file/folder.l Move – Lets you change the location of the folder/file (without creating acopy).
l Permissions – Lets you view the read/write/execute permissions forOwner/Group/Others. The owner of the folder/file can also change thepermissions.
l Rename – Lets you change the name of the folder/file.
Access Maintenance OptionsThe File Manager page provides two places where you can access folder/filemaintenance options.
l In the main pane. Hover the mouse over the folder/file to display . Clickthis icon to display a drop-down containing the available maintenancefunctions. For example:
Chapter 6 File Manager
258 Maintaining Files and Folders

Maintaining Files and Folders 259
You can also apply the same maintenance option to severalfiles/folders as the same time. Click Select All or Select All Files or usethe Shift or Ctrl key commands to select multiple files/folders andthen display the drop-down. The item you select from the drop-downis applied to all the selected folders/files.
l After you have selected an individual file (clicked the file name, not theicon for the drop-down on the main pane), the file information displays inthe main pane. A preview of the file displays and the differentmaintenance options are represented by icons. For example:
l You can also preview information about your file by clicking the icon.Clicking this icon will bring up a menu that lets you choose your previewmode as well as howmany lines you wish to view.
l Whenmoving or copying a file, File Manager displays a destination dialogthat lets you select a folder where you want the file to be moved or copied.The destination dialog includes controls to create a folder, filter files orfolders by name, to select the number of file and folder entries displayedin the list, and to sort the file/folder list in ascending or descending orderby name, file type, size, or last modified date.
Chapter 6 File Manager

You can also delete a file or folder by hovering the mouse over thefile/folder entry in the list and clicking the trashcan icon that appears nextto the file entry.
Related Topics
l File Manager Page on page 253l Chapter 6 File Manager on page 253
Chapter 6 File Manager
260 Maintaining Files and Folders

Sessions Page 261
Chapter 7 Remote Visualization Sessions
Viewpoint gives you a simple way to view important aspects of your jobs whilealso freeing up valuable resources that could be used for other tasks. Thischapter provides information on the following aspects of remote visualization:
l The Sessions page (default) lists all of the remote sessions that you canaccess. Using this page you can create a session and perform varioussession maintenance options.
If you are an HPCAdmin, you can also create sessions that do not go throughthe regular scheduling process and a session will be allocated just for you.Admins can also see other user's sessions.If you are a regular user, you will only be able to see your sessions and findjobs that represent each session.In this chapter:
l Sessions Page on page 261l Creating a Session on page 264l Connecting to a Session on page 265
Sessions Page
The Sessions page is only available when Remote Visualization is installedand configured. See Remote Visualization Configuration Page on page 31for more information.
The Sessions page offers a place to create and manage sessions, view runningsessions, running jobs, and other useful features.
l If you are a regular user, you will only be able to see your own sessionsand find jobs that represent your sessions.
l Users with the HPCAdmin role or Session Page-admin role permission cancreate sessions that bypass the regular scheduling process.
This topic provides an example of the Sessions page and describes its layoutand available information.In this topic:
l Page Example on page 262l Filter Search Area on page 262
Chapter 7 Remote Visualization Sessions

l Session List View Details on page 262l Additional Functions on page 263
Page ExampleThe following image is an example of the Sessions page.
Filter Search AreaThe right side of this page a filter search feature you can use to limit what isdisplayed in the session list view.You can choose to display:
l Specific sessions or groups of sessions based on the Session name,Job ID, or Submitter ID.
l Click Filter.ClickReset at any time to remove all defined selection criteria options (restorethe page defaults).
Session List View DetailsThe following information explains the layout and additional informationavailable in the session list view.
l Display Refresh – You can refresh the information displayed in thesession list view (including specified search and filter criteria) to reflect thelatest information about the nodes. At the top of the session list view, click.
l Columns – The session list view displays the data in a column format.Column titles that are underlined indicate that you can sort (ascending ordescending) the column contents.
Chapter 7 Remote Visualization Sessions
262 Sessions Page

Sessions Page 263
The following table describes the different columns and their contents.You can hover the mouse over a column's contents to view additionalinformation).
ColumnHeading Description
SessionName
Unique identifier for the session. You can click a Session Name in the column's contents toview additional information about that session.
Job ID Identifier of the job running on the session.
SubmitterID
Identifier of the user that submitted the session.
Started Time the session was initialized.
LastConnect
Time the session was last accessed.
LastDisconnect
Time the session was last disconnected from.
With the correct permissions, you can access the job details for asession if that session has a job associated with it by clicking the job idfor the session you are interested in viewing.
l Page Controls – Page controls are available at the bottom of the sessionlist view to let you customize howmany sessions appear per page. Thepage controls also include options for selecting which page to display.
Additional FunctionsThe Sessions page also includes a drop-down with shortcuts to performadditional session-related functions. To access the shortcuts, hover the mousenear the application template name to display , and then click this icon todisplay the drop-down.The following table lists the options you can use from the drop-down. From thisdrop-down, you can:
Chapter 7 Remote Visualization Sessions

SessionsPageOption
Description
Connect Connect to the chosen session.
Disconnect Disconnect from a session. This option is only available when you are connected to the session.This option disconnects all users that are connected to the session.
Terminate End the chosen session.
Related Topics
l Chapter 7 Remote Visualization Sessions on page 261
Creating a SessionViewpoint lets you create and edit sessions that users may access to viewinformation about your jobs.
Create or Terminate a SessionTo create or terminate a session, do the following:1. If you have not already done so, access the Sessions page. (ClickSESSIONS in the menu bar.)
2. Click CREATE SESSION to create a new session.The Create Sessions page displays with the command and screen resolutionfields.
3. Enter the graphical command you want to run inside your remotevisualization session. These include gnome-session, xterm, firefox, etc.
For a desktop like Gnome, the screen will auto-size to your browser. Forsingle applications requested without a desktop, like xterm or Firefox,there is limited resizing.
4. Click START SESSION to start the session and stay on this page.5. Click TERMINATE to terminate the chosen session.
Related Topics
l Sessions Page on page 261l Chapter 7 Remote Visualization Sessions on page 261
Chapter 7 Remote Visualization Sessions
264 Creating a Session

Connecting to a Session 265
Connecting to a SessionTo connect to a running session, do the following:1. If you have not already done so, access the Sessions page. (ClickSESSIONS in the menu bar.)
Remote Visualization sessions open in a separate browser window. Toaccess your sessions, you must enable pop-up windows. Firefox willshow you an icon next to the browser bar asking you if you trust thepage to launch a pop-up window. Click on this to allow access to yoursession.
2. Hover the mouse over the session you would like to connect to and clickCONNECT from the icon.
Related Topics
l Sessions Page on page 261l Chapter 7 Remote Visualization Sessions on page 261
Chapter 7 Remote Visualization Sessions

266 Connecting to a Session

267
Chapter 8 Reporting
Viewpoint lets you create aggregated data views that combine, organize, andsummarize data from multiple sources. You can then create reports thatsummarize and present data from the aggregated views, and then combinereports into dashboards that display data from a variety of sources in ways thatcommunicate job and workload data at a glance. Specifically:
l The Aggregated Views page lists available aggregated views thatsummarize and display data. You can extract and manipulate data fromvarious sources to create new aggregated views. See Aggregated ViewsPage on page 268 for more information.
l The Reports page lists the reports available to you for customizing andincluding in dashboards. You can also create new reports. See ReportsPage on page 299 for more information.
l The Dashboards page lists available dashboards for you to view or edit.You can also combine reports to create new dashboards. See DashboardsPage on page 332 for more information.
Viewpoint is delivered with sample aggregated views, reports, and dashboardsfor you to customize or use as guides when creating your own aggregatedviews, reports, and dashboards.In this chapter:
l Reporting Roles on page 268l Aggregated Views Page on page 268
o Viewing an Aggregated View on page 272o Viewing an Aggregated View Pipeline on page 275o Creating an Aggregated View on page 278o Importing an Aggregated View on page 280o Editing an Aggregated View on page 281o Designing an Aggregated View on page 282o Provided Aggregated Views on page 297
l Reports Page on page 299o Viewing Reports on page 303o Report Types on page 305o Creating a Report on page 306o Editing a Report on page 308o Designing a Report on page 308
Chapter 8 Reporting

o Exporting Reports on page 325o Provided Reports on page 327
l Dashboards Page on page 332o Viewing a Dashboard on page 335o Creating a Dashboard on page 336o Importing a Dashboard on page 337o Editing a Dashboard on page 338o Designing a Dashboard on page 339o Provided Dashboards on page 346
Reporting RolesViewpoint provides a set of Reporting user roles that may be assigned toprovide a user permissions to use, create, or manage aggregated views,reports, and dashboards. See Default Roles on page 19 for more informationabout Reporting roles.
Related Topics
l About Roles on page 11l Default Roles on page 19l Chapter 8 Reporting on page 267
Aggregated Views PageThe Aggregated Views page lets you manage, create, and view aggregateddata views that combine, summarize, and present data from multiple sources.To access this page, clickREPORTING in the menu bar, then click theAggregated Views tab.This topic provides an example of the Aggregated Views page and describes itslayout and available information.In this topic:
l Page Example on page 269l Page Details on page 269l Additional Functions on page 271
Chapter 8 Reporting
268 Reporting Roles

Aggregated Views Page 269
Page ExampleThe following image is an example of the Aggregated Views page.
Page DetailsThis section describes the functional areas of the Aggregated Views page.In this section:
l Aggregated View List on page 269l Filters on page 270l Creating and Importing Aggregated Views on page 270
Aggregated View ListThe main pane of the Aggregated Views page lists the aggregated views andtheir corresponding information in a column format.
Column titles that are underlined indicate that you can sort (ascending ordescending) the column contents.
Page controls are available at the bottom of the aggregated view list to let youcustomize howmany aggregated views appear at a time in the list. These
Chapter 8 Reporting

controls also include options for moving between pages of listed aggregatedviews.The following table describes the different columns and their contents.
ColumnHeading Description
Name Name used to identify the aggregated view. Click on the aggregated view's name to open the aggreg-ated view and view additional information about the aggregated view.
Descrption A description of the aggregated view.
CreateDate
Date the aggregated view was created.
Used Number of times the aggregated view has been used in a report.
Owner Name of the user who created the aggregated view.
FiltersFilters let you specify what is displayed in the list of aggregated views on themain pane.To use a filter, click the check box next to the filter to activate it, enter in theinformation, and then click Filter. You can clickReset at any time to restorethe page default view.The following table describes the different filters.
Filter Description
Name Name used to identify the aggregated view. Returns partial matches. For example, entering "utilization"in the Name filter will match all aggregated views with the word "utilization" in the name. Name filtersare not case sensitive.
DateCreated
Date range during which the aggregated view was created. When this filter is selected, additional fieldsappear letting you specify the date range.
Owner The owner of the aggregated view. An owner filter must match the full user name, and is case sensitive.
Creating and Importing Aggregated ViewsViewpoint lets you create a new aggregated view or import a saved aggregatedview. To enable this functionality, two buttons are available towards the bottom
Chapter 8 Reporting
270 Aggregated Views Page

Aggregated Views Page 271
of this page.l CREATE AGGREGATED VIEW – Opens up a blank aggregated view. SeeCreating an Aggregated View on page 278.
l IMPORT – Opens up a pop-window that lets you import a savedaggregated view. See Importing an Aggregated View on page 280.
Additional FunctionsThe Aggregated Views page also includes a pop-up menu with shortcuts toperform additional aggregated view-related functions. To access the shortcuts,hover the mouse near the aggregated view name to display , and then clickthis icon to display the pop-up menu.
From this pop-up menu, you can:l Open and view the aggregated view. See Viewing an Aggregated View onpage 272 for more information.
Chapter 8 Reporting

l Open and view the data pipeline that provides data for the aggregatedview. See Viewing an Aggregated View Pipeline on page 275 for moreinformation.
l Clone this aggregated view and open the Edit Aggregated View page toedit the clone of the aggregated view. See Editing an Aggregated View onpage 281 for more information.
l Delete this aggregated view.l Export this aggregated view. Clicking this menu item saves theaggregated view in a file that can be archived or imported into anotherViewpoint installation.
Related Topics
l Viewing an Aggregated View on page 272l Viewing an Aggregated View Pipeline on page 275l Creating an Aggregated View on page 278l Importing an Aggregated View on page 280l Editing an Aggregated View on page 281l Designing an Aggregated View on page 282l Provided Aggregated Views on page 297l Chapter 8 Reporting on page 267
Viewing an Aggregated ViewThis topic contains information on using the View Data page to view the data ofan aggregated view.To view the data of an aggregated view, do the following:1. If you have not already done so, access the Reporting page. (ClickREPORTING in the menu bar.)
2. If you are not on the Aggregated Views tab, click the Aggregated Viewstab.
3. Click on the name of an aggregated view in the list of aggregated views. Youcan also hover the mouse over the name of the aggregated view until the
pop-up menu appears and clickView Data.
Chapter 8 Reporting
272 Aggregated Views Page

Aggregated Views Page 273
The View Data page for the aggregated view displays.
Each of the areas of the View Data page are described below.
Aggregated View InformationThe View Data page displays the name of the aggregated view and informationabout the aggregated view above the data preview.
Chapter 8 Reporting

Field Description
Deployed Tells whether the aggregated view has been used in a report
Description Description of the aggregated view
Owner User name of the owner of the aggregated view
Created Date the aggregated view was created
The Statistics Data Processing graph displays statistics related to theaggregated view, if available.
Aggregated View PermissionsYou can restrict who is permitted to use the aggregated view when creatingreports. This is done using the Permissions area at the top right of the page.The following image is an example of the Permissions area.
Using this area you can restrict access by:l Users. In the Users field, type the IDs of the users. Viewpoint will check ifthe users you added are valid; that is, has a valid operating systemaccount. If the user is valid, the user name turns green; otherwise it turnsred. Use "ALL" to remove restrictions.
l Group associations. In the Groups field, type the IDs of the groups.Viewpoint will check if the groups you added are valid; that is, has a valid
Chapter 8 Reporting
274 Aggregated Views Page

Aggregated Views Page 275
operating system account. If the group is valid, the group ID turns green;otherwise it turns red. Use "ALL" to remove restrictions.
l Account associations. In the Accounts field, select from the availableaccounts listed in the drop-down. Leave blank to remove restrictions.
Data PreviewThe main pane of the View Data page displays a preview of the aggregateddata in a tabular format.
Column titles that are underlined indicate that you can sort (ascending ordescending) the column contents. If the data preview is wider than thespace available to display it, the data preview will include a scroll bar toscroll right and left to view the data.
There are two buttons at the bottom of the aggregated view data you can useto leave the View Data page.ClickVIEW THE PIPELINE to view the data pipeline that selects the data forthe aggregated view.ClickGO BACK to return to the Aggregated Views page.
Related Topics
l Viewing an Aggregated View on page 272l Viewing an Aggregated View Pipeline on page 275l Creating an Aggregated View on page 278l Importing an Aggregated View on page 280l Editing an Aggregated View on page 281l Designing an Aggregated View on page 282l Provided Aggregated Views on page 297l Chapter 8 Reporting on page 267
Viewing an Aggregated View PipelineThis topic contains information on using the View Pipeline page to view the datapipeline associated with an aggregated view.To view an aggregated view pipeline, do the following:1. If you have not already done so, access the Reporting page. (ClickREPORTING in the menu bar.)
Chapter 8 Reporting
2. If you are not on the Aggregated Views tab, click the Aggregated Viewstab.
3. Do one of the following:a. Click on the name of an aggregated view in the list of aggregated views.When Viewpoint displays the aggregated view, click the View thePipeline button.
b. Hover the mouse over the name of the aggregated view until the pop-up menu appears and clickView the Pipeline.The View Pipeline page for the aggregated view displays.
Chapter 8 Reporting
276 Aggregated Views Page

Aggregated Views Page 277
The View Pipeline page allows you to browse the nodes comprising theaggregated view in read-onlymode. Click on a node in the aggregated view toview the node's properties. Click the Inspect incoming JSON structure linkto view the JSON code on which the node operates. See Using the Pipeline
Chapter 8 Reporting

Designer on page 283 for more information about the function of the variousnode types in aggregated view pipelines.The View Pipeline page provides controls for some limited editing of theaggregated view pipeline. You can edit the description of the aggregated viewby clicking in the Description field. You can also modify the permissions for theaggregated view. See Aggregated View Permissions on page 282 for moreinformation about permissions.When you are finished viewing the aggregated view pipeline, clickGo Back toreturn to the Aggregated Views page.
Related Topics
l Viewing an Aggregated View Pipeline on page 275l Viewing an Aggregated View Pipeline on page 275l Creating an Aggregated View on page 278l Importing an Aggregated View on page 280l Editing an Aggregated View on page 281l Designing an Aggregated View on page 282l Provided Aggregated Views on page 297l Chapter 8 Reporting on page 267
Creating an Aggregated ViewViewpoint lets you create aggregated data views to view data extracted fromone or more data sources.To create an aggregated view, do the following:1. If you have not already done so, access the Reporting page. (ClickREPORTING in the menu bar.)
2. If you are not on the Aggregated Views tab, click the Aggregated Viewstab.
Chapter 8 Reporting
278 Aggregated Views Page
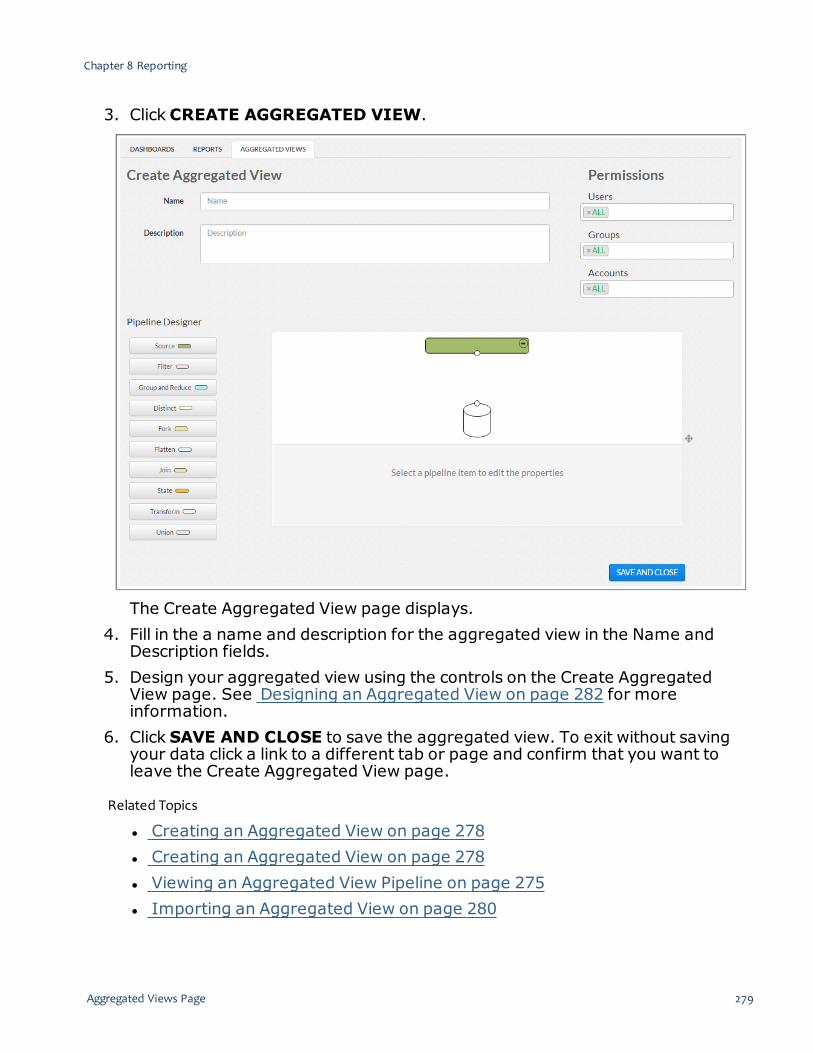
Aggregated Views Page 279
3. Click CREATE AGGREGATED VIEW.
The Create Aggregated View page displays.4. Fill in the a name and description for the aggregated view in the Name andDescription fields.
5. Design your aggregated view using the controls on the Create AggregatedView page. See Designing an Aggregated View on page 282 for moreinformation.
6. Click SAVE AND CLOSE to save the aggregated view. To exit without savingyour data click a link to a different tab or page and confirm that you want toleave the Create Aggregated View page.
Related Topics
l Creating an Aggregated View on page 278l Creating an Aggregated View on page 278l Viewing an Aggregated View Pipeline on page 275l Importing an Aggregated View on page 280
Chapter 8 Reporting

l Editing an Aggregated View on page 281l Designing an Aggregated View on page 282l Provided Aggregated Views on page 297l Chapter 8 Reporting on page 267
Importing an Aggregated ViewThis topic provides information and instructions on importing aggregatedviews.Viewpoint lets you import aggregated views that were previously saved. Youcan import a single or multiple aggregated views at the same time.Do the following:1. If you have not already done so, access the Reporting page. (ClickREPORTING in the menu bar.)
2. Click the Aggregated Views tab.3. Click IMPORT.The Import Aggregated View window appears.
4. ClickBROWSE and navigate to where the aggregated view file is saved. Youcan select multiple files by pressing Ctrl and then clicking on each file.
5. Once you have chosen which files to include, clickOpen.6. When the file appears in the Import window, click IMPORT. The importedaggregated view(s) appears in the list of available aggregated views and canbe edited as needed.
Related Topics
l Importing an Aggregated View on page 280l Importing an Aggregated View on page 280
Chapter 8 Reporting
280 Aggregated Views Page
Aggregated Views Page 281
l Viewing an Aggregated View Pipeline on page 275l Creating an Aggregated View on page 278l Editing an Aggregated View on page 281l Designing an Aggregated View on page 282l Provided Aggregated Views on page 297l Chapter 8 Reporting on page 267
Editing an Aggregated ViewAlthough you cannot edit an aggregated view, Viewpoint lets you edit a copy ofan existing aggregated view.To copy and edit an aggregated view, do the following:1. If you have not already done so, access the Reporting page. (ClickREPORTING in the menu bar.)
2. If you are not on the Aggregated Views tab, click the Aggregated Viewstab.
3. Hover the mouse next to the name of an aggregated view. When thepop-up menu appears, click Clone and Edit.
4. Design your aggregated view using the controls on the Create AggregatedView page. See Designing an Aggregated View on page 282 for moreinformation.
5. Click SAVE AND CLOSE to save the aggregated view. To exit without savingyour data, click a link to a different tab or page and confirm that you want toleave the Create Aggregated View page.
Related Topics
l Editing an Aggregated View on page 281l Editing an Aggregated View on page 281l Viewing an Aggregated View Pipeline on page 275l Creating an Aggregated View on page 278l Importing an Aggregated View on page 280l Designing an Aggregated View on page 282l Provided Aggregated Views on page 297l Chapter 8 Reporting on page 267
Chapter 8 Reporting

Designing an Aggregated ViewViewpoint enables you create new aggregated views and edit the providedaggregated views or aggregated views you have created. This topic identifieshow aggregated view components are organized and the resources availablewhen designing an aggregated view.See Creating an Aggregated View on page 278 for instructions on how tocreate an aggregated view.See Editing an Aggregated View on page 281 for instructions on how to edit anaggregated view.In this topic:
l Aggregated View Information on page 282l Aggregated View Permissions on page 282l Using the Pipeline Designer on page 283
Aggregated View InformationThere are two fields at the top of the Create and Edit Aggregated View pageswhere you can enter identifying information about the aggregated view youare designing:Name – The name of the aggregated view. This is a plain text field, which maycontain uppercase or lowercase letters, numbers, spaces, or specialcharacters.Description – A description of the aggregated view. May also be used toprovide instructions to report designers on how to use the aggregated view tocreate reports.
Aggregated View PermissionsYou can restrict who has access to your aggregated view. This is done using thePermissions area at the top right of the page.The following image is an example of the Permissions area.
Chapter 8 Reporting
282 Aggregated Views Page

Aggregated Views Page 283
Using this area you can restrict access by:l Users. In the Users field, type the IDs of the users. Viewpoint will check ifthe users you added are valid; that is, has a valid operating systemaccount. If the user is valid, the user name turns green; otherwise it turnsred. Use "ALL" to remove restrictions.
l Group associations. In the Groups field, type the IDs of the groups.Viewpoint will check if the groups you added are valid; that is, has a validoperating system account. If the group is valid, the group ID turns green;otherwise it turns red. Use "ALL" to remove restrictions.
l Account associations. In the Accounts field, select from the availableaccounts listed in the drop-down. Leave blank to remove restrictions.
Using the Pipeline DesignerWhen you create a new aggregated view, the Pipeline Designer for the viewappears as shown below:
Chapter 8 Reporting
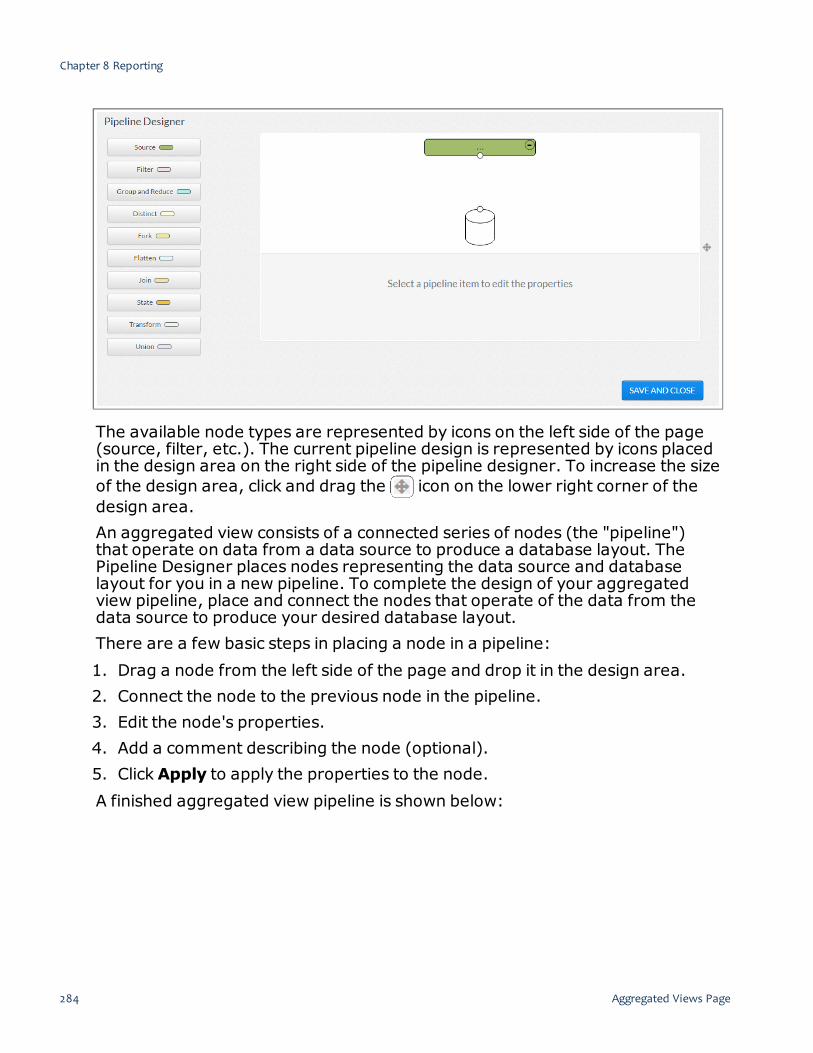
The available node types are represented by icons on the left side of the page(source, filter, etc.). The current pipeline design is represented by icons placedin the design area on the right side of the pipeline designer. To increase the sizeof the design area, click and drag the icon on the lower right corner of thedesign area.An aggregated view consists of a connected series of nodes (the "pipeline")that operate on data from a data source to produce a database layout. ThePipeline Designer places nodes representing the data source and databaselayout for you in a new pipeline. To complete the design of your aggregatedview pipeline, place and connect the nodes that operate of the data from thedata source to produce your desired database layout.There are a few basic steps in placing a node in a pipeline:1. Drag a node from the left side of the page and drop it in the design area.2. Connect the node to the previous node in the pipeline.3. Edit the node's properties.4. Add a comment describing the node (optional).5. ClickApply to apply the properties to the node.A finished aggregated view pipeline is shown below:
Chapter 8 Reporting
284 Aggregated Views Page

Aggregated Views Page 285
Pipeline DataData flowing through the aggregated view pipeline is represented usingJavaScript Object Notation (JSON). JSON is a standard format for datainterchange, designed to be easily readable.The data flowing through a pipeline consists of a stream of timestampedmessages:
{"msg": {
//message data},"ts": <timestamp of the message>
}
The structure and content of the data portion of each message depends onwhether the data source is a job, reservation, cluster sample, or job statejournal stream.You can view the structure of the data stream at any point in a pipeline designby clicking on a node, then clicking the Inpsect Incoming JSON structurelink below the design area. For example, in the pipeline design shown above, ifyou click the Filter node, then click Inspect Incoming JSON structure, youwill see the structure of the stream of job messages passed from the job datasource to the Filter node.
Chapter 8 Reporting

Pipeline NodesThe nodes in a pipeline operate on and transform the incoming data stream. Adescription of the operation of each node type is given in the table below.
Chapter 8 Reporting
286 Aggregated Views Page

Aggregated Views Page 287
NodeType Description Prop-
erty
Prop-erty Val-ues
Prop-ertyValueDescrip-tion
Source One of the registered sources of messagesSourceStream
job Job data
reser-vation
Resourcereser-vationrecords
cluster-Sample
Howclusterresourcesare alloc-ated
Chapter 8 Reporting

NodeType Description Prop-
erty
Prop-erty Val-ues
Prop-ertyValueDescrip-tion
FilterRemoves messages from the stream that do not meet spe-cified criteria
MatchType
Match All(And)
Data mustmeet allcriteria tocontinuethroughthepipeline
MatchAny (Or)
Data maymeet anycriterionto con-tinuethroughthepipeline
Field Messagefield
Oper-ator
Operatorused tocompareField toValue
Type Data typeof Value
Value Valuebeingcomparedto Field
Chapter 8 Reporting
288 Aggregated Views Page

Aggregated Views Page 289
NodeType Description Prop-
erty
Prop-erty Val-ues
Prop-ertyValueDescrip-tion
GroupandReduce
Accumulates the set of messages having the same key valueand then reduces the set to a single message by means ofan aggregate function. A Group and Reduce node is a singlemessage with the following output JSON:
{"msg": {
"key": <key by which grouping is performed>"value": <result of the aggregate function>
},"ts": <timestamp of the message>
}
Key toGroup-by
Key inmessagerecord togrouprecordsby
Aggreg-ation
Count,sum, min,max
Aggreg-ation func-tion(count ofrecords ingroup,sum ofselectedfield, fieldminimum,field max-imum
FieldType toAggreg-ate
Fieldvalue,Fieldvalue tointeger,fieldvalue todouble
Use fieldvalue orconvert tointeger ordouble
Field toAggreg-ate
Name ofmessagefield toaggregateusing theaggreg-ation func-tion
Chapter 8 Reporting
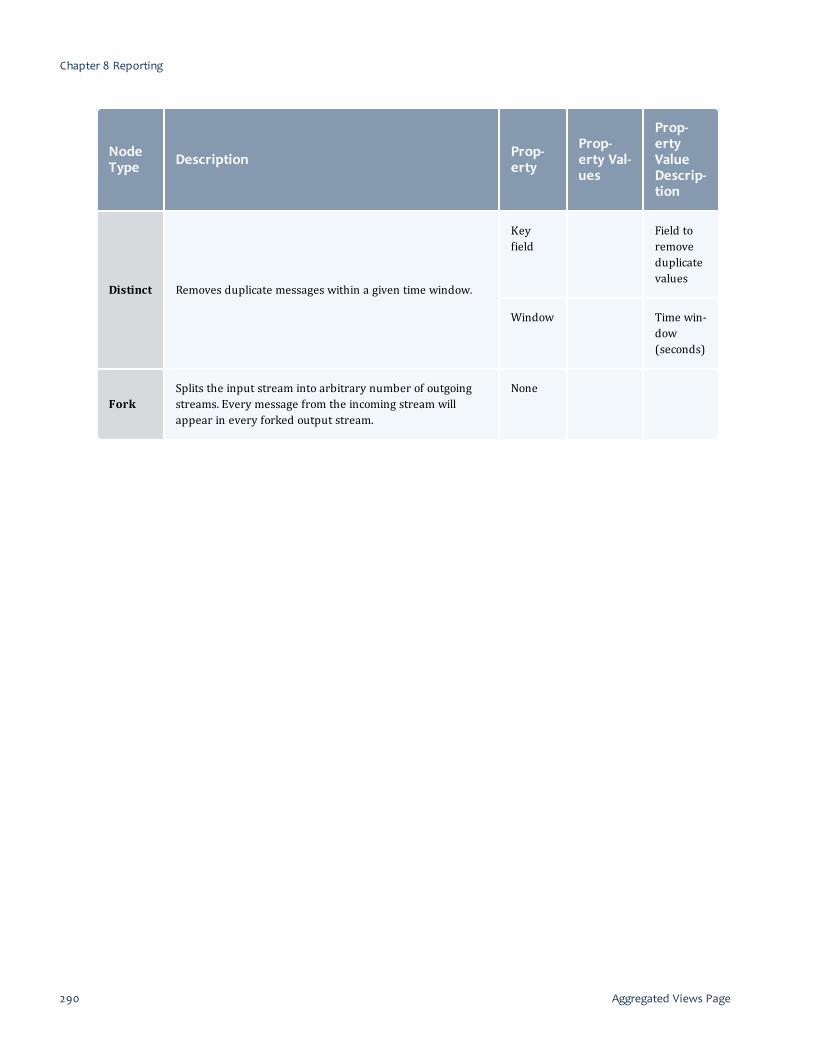
NodeType Description Prop-
erty
Prop-erty Val-ues
Prop-ertyValueDescrip-tion
Distinct Removes duplicate messages within a given time window.
Keyfield
Field toremoveduplicatevalues
Window Time win-dow(seconds)
ForkSplits the input stream into arbitrary number of outgoingstreams. Every message from the incoming stream willappear in every forked output stream.
None
Chapter 8 Reporting
290 Aggregated Views Page

Aggregated Views Page 291
NodeType Description Prop-
erty
Prop-erty Val-ues
Prop-ertyValueDescrip-tion
Flatten
Unwraps a collection within a single message into thestream of messages.
//JSON before flattening where key="msg.arr",type=integer, value=1{
"msg": {"arr": ["one", "two"]
},"ts": 123
}
//JSON after flattening{
"msg": {"key": "one","value": 1
},"ts": 123
},{
"msg": {"key": "two","value": 1
},"ts": 123
}
KeyField
An arrayor key-valueobject(map) tobeunwrapp-ed
ValueType
Boolean,double,integer,string,fieldvalue,fieldvalue tointeger,fieldvalue todouble
Data typeto be asso-ciatedwith eachextractedcollectionitem
Value Value tobe asso-ciatedwith theextractedcollectionitem
Chapter 8 Reporting

NodeType Description Prop-
erty
Prop-erty Val-ues
Prop-ertyValueDescrip-tion
Join
Takes two streams as the input, accumulates them in a timewindow, combines the messages from different streamstogether and sends the joined messages into the outputstream.
Window Time win-dow inwhich toaccu-mulatemessages(seconds)
JoinType
One toone
Takes thewholestructureof a mes-sage fromleftstream,adds anew field,places amatchingmessagesfrom therightstreamunderthat field.
Chapter 8 Reporting
292 Aggregated Views Page
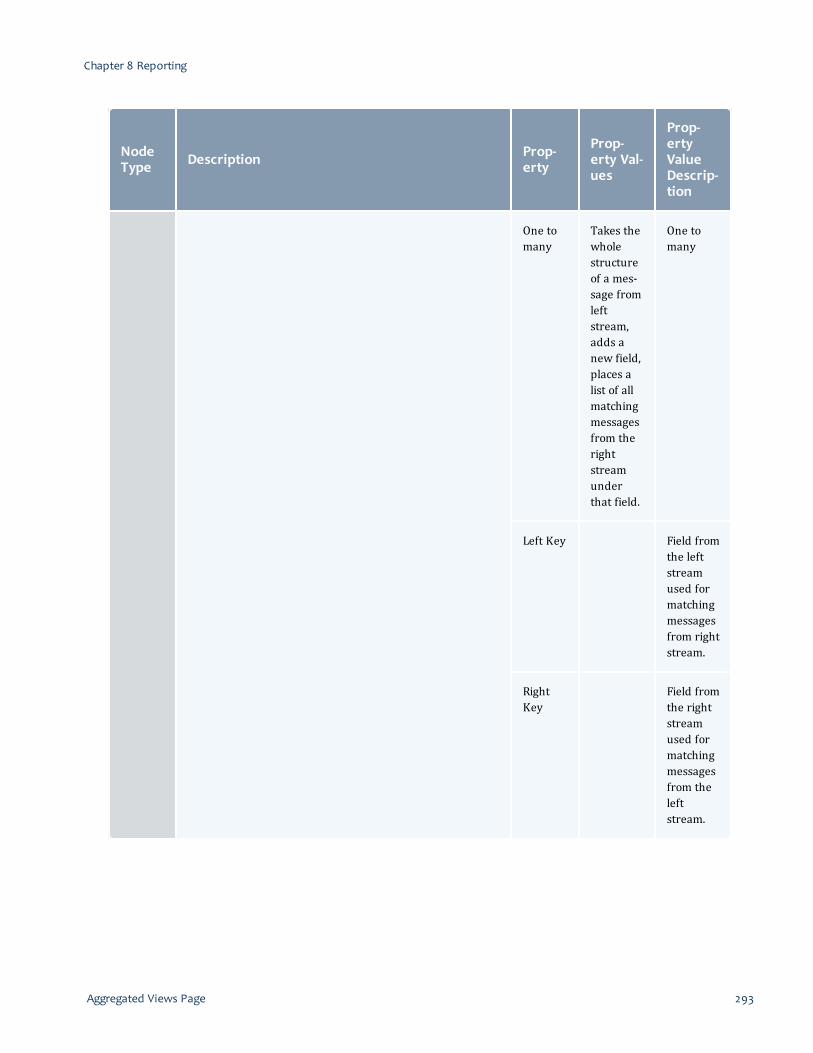
Aggregated Views Page 293
NodeType Description Prop-
erty
Prop-erty Val-ues
Prop-ertyValueDescrip-tion
One tomany
Takes thewholestructureof a mes-sage fromleftstream,adds anew field,places alist of allmatchingmessagesfrom therightstreamunderthat field.
One tomany
Left Key Field fromthe leftstreamused formatchingmessagesfrom rightstream.
RightKey
Field fromthe rightstreamused formatchingmessagesfrom theleftstream.
Chapter 8 Reporting

NodeType Description Prop-
erty
Prop-erty Val-ues
Prop-ertyValueDescrip-tion
StatePerform calculations based on indirect connections betweendifferent messages in the single stream.
KeyField
Field bywhich thestate iden-tifier canbe extrac-ted
Timeout Timeoutof thestate life-time(seconds).If no newmessagesappearthatrelate tothe givenkeybeforetimeout,the statefor thegiven keyisremovedauto-matically.
SourceField
TargetFieldName
Chapter 8 Reporting
294 Aggregated Views Page
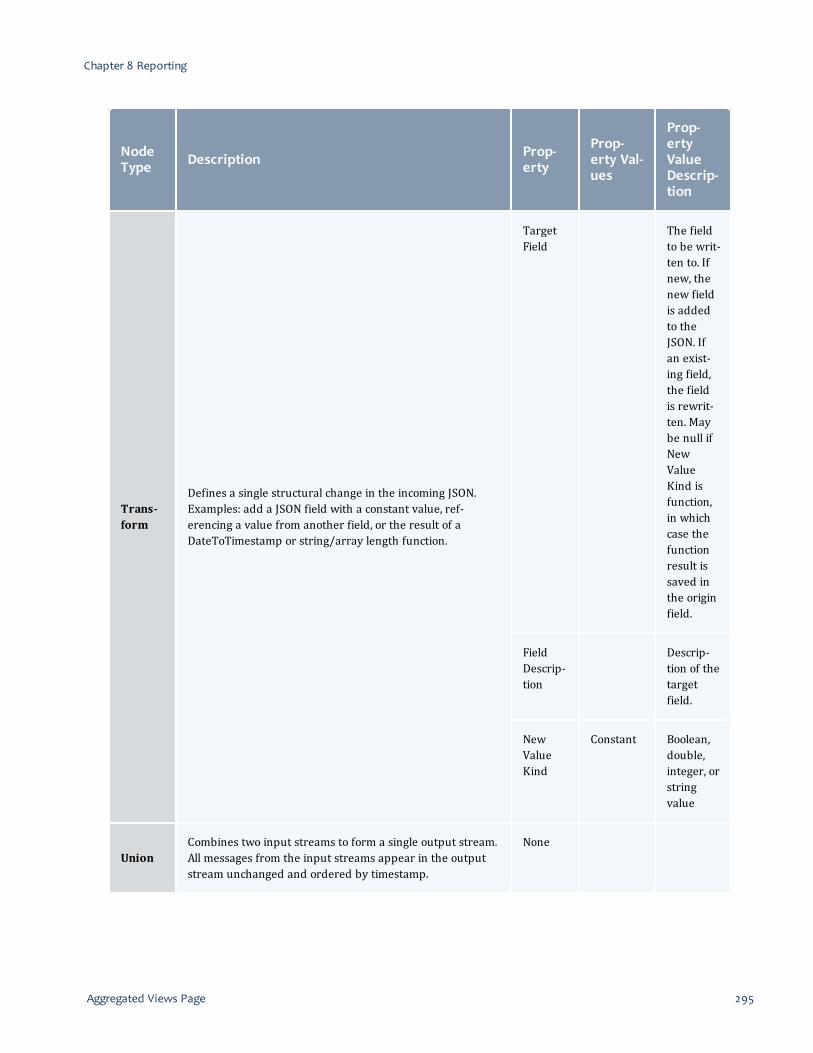
Aggregated Views Page 295
NodeType Description Prop-
erty
Prop-erty Val-ues
Prop-ertyValueDescrip-tion
Trans-form
Defines a single structural change in the incoming JSON.Examples: add a JSON field with a constant value, ref-erencing a value from another field, or the result of aDateToTimestamp or string/array length function.
TargetField
The fieldto be writ-ten to. Ifnew, thenew fieldis addedto theJSON. Ifan exist-ing field,the fieldis rewrit-ten. Maybe null ifNewValueKind isfunction,in whichcase thefunctionresult issaved inthe originfield.
FieldDescrip-tion
Descrip-tion of thetargetfield.
NewValueKind
Constant Boolean,double,integer, orstringvalue
UnionCombines two input streams to form a single output stream.All messages from the input streams appear in the outputstream unchanged and ordered by timestamp.
None
Chapter 8 Reporting

NodeType Description Prop-
erty
Prop-erty Val-ues
Prop-ertyValueDescrip-tion
DB Lay-out
Defines the layout of the destination data stream that willbe available to reports based on the aggregated view.
Per-sistenceGran-ularity
Minute,Hour, Day,Month,Year
Data gran-ularitiesto beincludedin the des-tinationdatastream.
ColumnMap
Mapsfields inthe incom-ing JSONstructuretocolumnsin the des-tinationdatastream.
Saving an Aggregated View DesignWhen you have finished designing your aggregated view, click SAVE ANDCLOSE to save the aggregated view and close the page or clickSAVE AND RUN to save and view the aggregated view.
Related Topics
l Designing an Aggregated View on page 282l Designing an Aggregated View on page 282l Viewing an Aggregated View Pipeline on page 275l Creating an Aggregated View on page 278l Importing an Aggregated View on page 280l Editing an Aggregated View on page 281l Provided Aggregated Views on page 297l Chapter 8 Reporting on page 267
Chapter 8 Reporting
296 Aggregated Views Page

Aggregated Views Page 297
Provided Aggregated ViewsViewpoint comes configured with several aggregated views that you can copy,customize for your environment, and use as the basis for reports you create.The provided aggregated views include:
Name Description
account_share_of_jobs The share of completed jobs associated with an account
class_completed_job_activity Conpleted jobs categorized by class (e.g., batch, interactive)
class_share_of_jobs The share of completed jobs associated with a class
dedication_and_utilization_by_most_act-ive_accounts
Processor time dedicated and utilized, by account
dedication_and_utilization_by_most_act-ive_classes
Processor time dedicated and utilized, by class
dedication_and_utilization_by_most_act-ive_groups
Processor time dedicated and utilized, by group
dedication_and_utilization_by_most_act-ive_qoses
Processor time dedicated and utilized, by QoS
dedication_and_utilization_by_most_act-ive_users
Processor time dedicated and utilized, by user
feature_completed_job_activity Completed jobs, categorized by required feature
generic_resource_completed_job_activ-ity
Completed jobs, categorized by generic resource
how_long_did_each_job_wait_to_start Wait time for each job
how_many_unique_users_ran_a_job Number of jobs submitted by each user
list_of_the_reservations_that_were_in_effect_during_some_time_period
Reservations in effect during a time period, with reservation properties
overall_availablility_and_utilization System processor time available and utilized
Chapter 8 Reporting

Name Description
partition_completed_job_activity Completed jobs categorized by partition
qos_completed_job_activity Completed jobs categorized by QoS
qos_share_of_jobs The share of completed jobs associated with a QoS
support_node_state_outage_report Node state (e.g., up, down, running, drained, idle) for a time period
wait_time_by_individual_account Wait time for each account's jobs
wait_time_by_individual_class Wait time for jobs in each job class
wait_time_by_individual_group Wait time for each group's jobs
wait_time_by_individual_qos Wait time for jobs in each QoS
wait_time_by_individual_user Wait time for each user's jobs
what_percentage_of_jobs_ran_on_dif-ferent_intervals
Percentage of jobs with wait time in each time interval (<1 min, 1-30min, 30-60 min, 1-12 hours, 12-24 hours, >24 hours)
who_are_the_most_active_users Job count by user
Related Topics
l Provided Aggregated Views on page 297l Provided Aggregated Views on page 297l Viewing an Aggregated View Pipeline on page 275l Creating an Aggregated View on page 278l Importing an Aggregated View on page 280l Editing an Aggregated View on page 281l Designing an Aggregated View on page 282l Chapter 8 Reporting on page 267
Chapter 8 Reporting
298 Aggregated Views Page
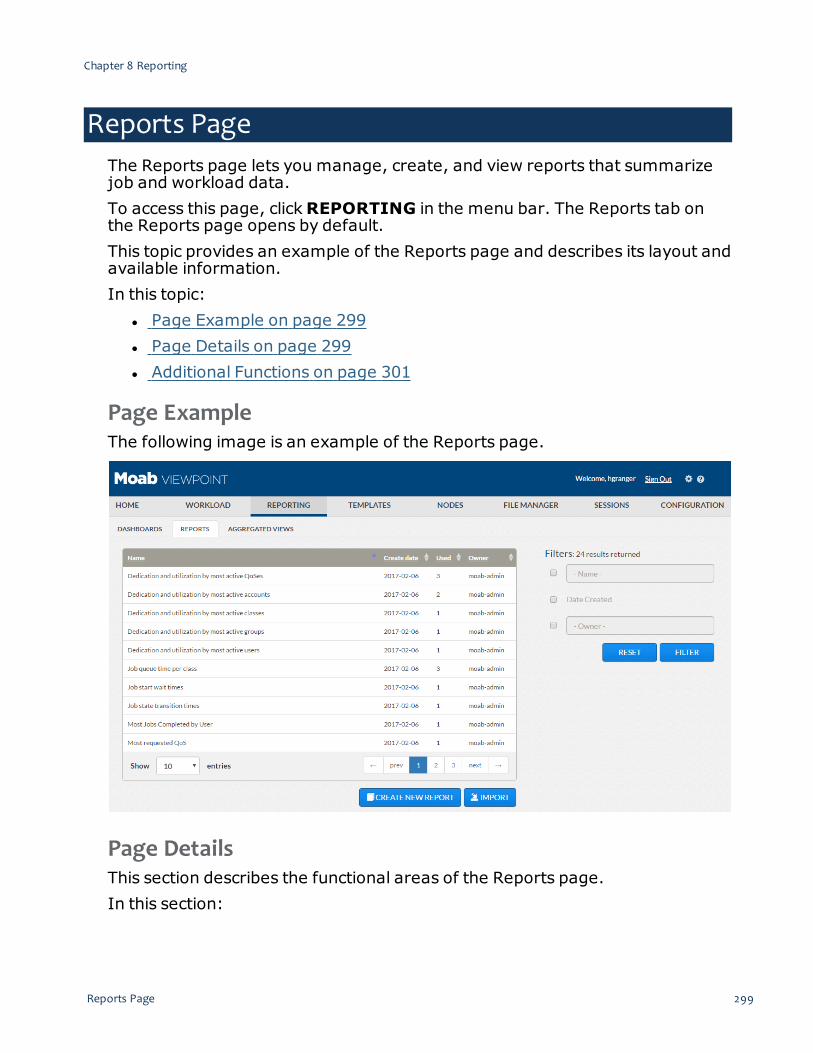
Reports Page 299
Reports PageThe Reports page lets you manage, create, and view reports that summarizejob and workload data.To access this page, clickREPORTING in the menu bar. The Reports tab onthe Reports page opens by default.This topic provides an example of the Reports page and describes its layout andavailable information.In this topic:
l Page Example on page 299l Page Details on page 299l Additional Functions on page 301
Page ExampleThe following image is an example of the Reports page.
Page DetailsThis section describes the functional areas of the Reports page.In this section:
Chapter 8 Reporting

l Report List on page 300l Filters on page 300l Creating a New Report on page 301
Report ListThe main pane of the Reports page lists the reports and their correspondinginformation in a column format. Several reports are provided with Viewpointfor you to customize or use as guides when creating your own reports. SeeProvided Reports on page 327 for more information.
Column titles that are underlined indicate that you can sort (ascending ordescending) the column contents. Hover the mouse over a column'scontents to view additional information.
Page controls are available at the bottom of the report list to let you customizehowmany reports appear at a time in the list. These controls also includeoptions for moving between pages of listed reports.The following table describes the different columns and their contents.
ColumnHeading Description
Name Name used to identify the report. You can hover the mouse over the report name to view a descrip-tion of the report. Click on the report's name to open the report and view additional informationabout the report.
CreateDate
Date the report was created.
Used Number of times the report has been used in a dashboard.
Owner Name of the user who created the report.
FiltersFilters let you specify what is displayed in the list of reports on the main pane.To use a filter, click the check box next to the filter to activate it, enter in theinformation, and then click Filter. You can clickReset at any time to restorethe page default view.The following table describes the different filters.
Chapter 8 Reporting
300 Reports Page

Reports Page 301
Filter Description
Name Name used to identify the report. Returns partial matches. For example, entering "utilization" in theName filter will match all reports with the word "utilization" in the name. Name filters are not case sens-itive.
DateCreated
Date range during which the report was created. When this filter is selected, additional fields appearletting you specify the date range.
Owner The owner of the report. An owner filter must match the full user name, and is case sensitive.
Creating a New ReportViewpoint lets you create a new report or import an existing report. To enablethis functionality, two buttons are available towards the bottom of this page.
l CREATE REPORT – Opens up a blank report. See Creating a Report onpage 306.
l IMPORT – Opens up a pop-window that lets you import an existingreport. See Importing a Report on page 307.
Additional FunctionsThe Reports page also includes a pop-up menu with shortcuts to performadditional report-related functions. To access the shortcuts, hover the mousenear the report name to display , and then click this icon to display the pop-up menu.
Chapter 8 Reporting

From this pop-up menu, you can:l Run the report and view the output. See Viewing Reports on page 303 formore information.
l Open the Edit Report page to modify this report. See Editing a Report onpage 308 for more information.
l Delete this report.l Export this report. Saves an image of a report in a PDF or PNG format filethat may be printed or incorporated into a document. See ExportingReports on page 325 for more information.
Related Topics
l Viewing Reports on page 303l Report Types on page 305l Reports Page on page 299l Importing a Report on page 307l Editing a Report on page 308l Designing a Report on page 308l Exporting Reports on page 325l Provided Reports on page 327l Chapter 8 Reporting on page 267
Chapter 8 Reporting
302 Reports Page
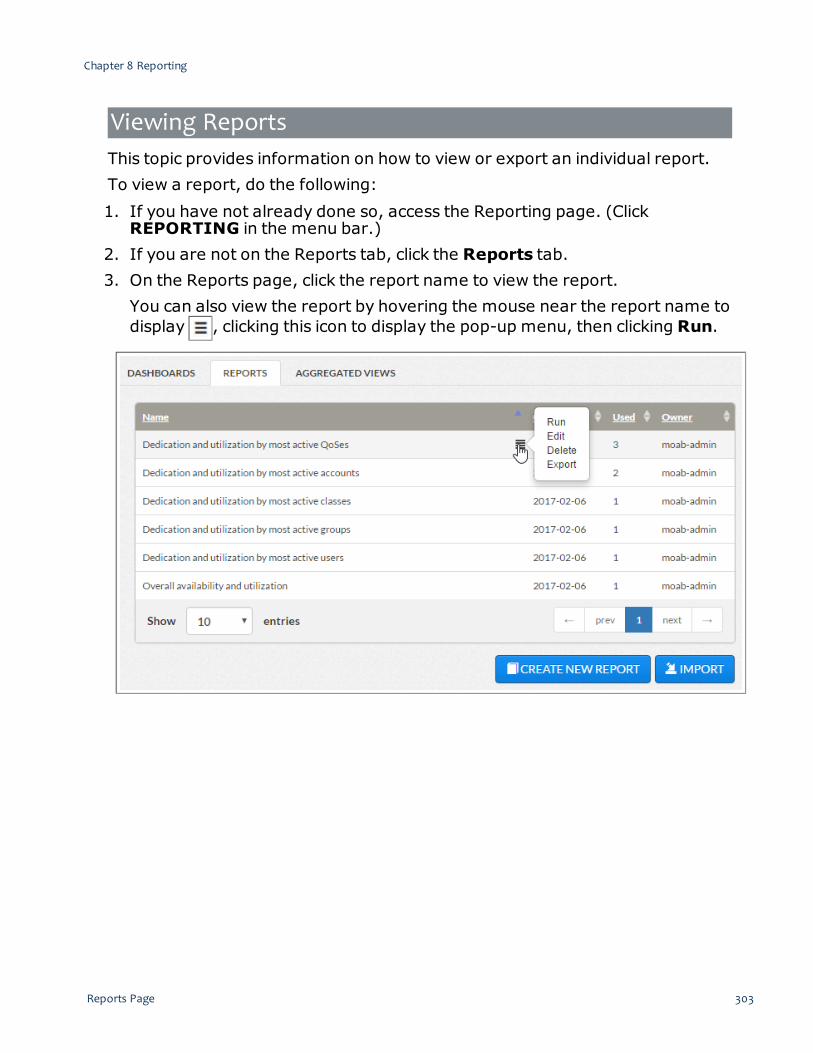
Reports Page 303
Viewing ReportsThis topic provides information on how to view or export an individual report.To view a report, do the following:1. If you have not already done so, access the Reporting page. (ClickREPORTING in the menu bar.)
2. If you are not on the Reports tab, click the Reports tab.3. On the Reports page, click the report name to view the report.You can also view the report by hovering the mouse near the report name todisplay , clicking this icon to display the pop-up menu, then clicking Run.
Chapter 8 Reporting

Viewpoint displays the selected report.
4. If desired, you can change report setting by clicking the icon next to thereport title.
Report settings vary according to the data type displayed in the report, andmay include:
Chapter 8 Reporting
304 Reports Page

Reports Page 305
l Auto Refresh – How frequently the report data is refreshed and thereport redisplayed. SelectOFF to turn off auto refresh.
l Granularity – Time interval for data to be summarized. For example, theUnique user job count report displays a line graph where each datapoint represents the number of unique users whose job was completedduring the time interval. Varying Granularity and Interval can facilitatedata analysis.
l Interval – Time interval to be presented in the report.l Limit – The maximum number of data values to be displayed.l Order Type – The order in which to display the data values (Most to Leastor Least to Most).
When you are done viewing the report, clickGO BACK to close the report andgo back to the Reports page.
Related Topics
l Viewing Reports on page 303l Report Types on page 305l Viewing Reports on page 303l Importing a Report on page 307l Editing a Report on page 308l Designing a Report on page 308l Exporting Reports on page 325l Provided Reports on page 327l Chapter 8 Reporting on page 267
Report TypesViewpoint comes configured with several reports that you can use or customizefor your environment. The available report types are:
l Bar report – Colored bars compare the magnitude of several values.l Line report – Lines track the magnitude of one or more values relative toanother value (usually time).
l Pie report – Sections of a circle represent proportions of each valuerelative to the total of all values.
l Table report – A table displaying the data provided by the aggregatedview associated with the table.
Chapter 8 Reporting

Examples of several of these report types are included with Viewpoint. SeeProvided Reports on page 327 for more information.
Related Topics
l Report Types on page 305l Report Types on page 305l Report Types on page 305l Importing a Report on page 307l Editing a Report on page 308l Designing a Report on page 308l Exporting Reports on page 325l Provided Reports on page 327l Chapter 8 Reporting on page 267
Creating a ReportViewpoint lets you create reports that summarize job or workload data.To create a report, do the following:1. If you have not already done so, access the Reporting page. (ClickREPORTING in the menu bar.)
2. If you are not on the Reports tab, click the Reports tab.3. Click CREATE NEW REPORT.The Create Report page displays.
4. Design your report, using the controls on the Create New Report page. SeeDesigning a Report on page 308 for more information.
5. Click SAVE REPORT to save the report and stay on this page or click SAVEAND CLOSE to save the report and close this page.
Related Topics
l Creating a Report on page 306l Viewing Reports on page 303l Report Types on page 305l Importing a Report on page 307l Editing a Report on page 308l Designing a Report on page 308
Chapter 8 Reporting
306 Reports Page

Reports Page 307
l Exporting Reports on page 325l Provided Reports on page 327l Chapter 8 Reporting on page 267
Importing a ReportThis topic provides information and instructions on importing reports.Viewpoint lets you import reports that were previously saved. You can import asingle or multiple reports at the same time.Do the following:1. If you have not already done so, access the Reporting page. (ClickREPORTING in the menu bar.)
2. Click the Reports tab.3. Click IMPORT.The Import Report window appears.
4. ClickBROWSE and navigate to where the report file is saved. You can selectmultiple files by pressing Ctrl and then clicking on each file.
5. Once you have chosen which files to include, clickOpen.6. When the file appears in the Import window, click IMPORT. The importedreport(s) will appear in the list of available reports and can be edited asneeded.
Related Topics
l Importing a Report on page 307l Viewing Reports on page 303l Report Types on page 305l Importing a Report on page 307
Chapter 8 Reporting

l Editing a Report on page 308l Designing a Report on page 308l Exporting Reports on page 325l Provided Reports on page 327l Chapter 8 Reporting on page 267
Editing a ReportViewpoint lets you edit the provided reports or reports you have created.To edit a report, do the following:1. If you have not already done so, access the Reporting page. (ClickREPORTING in the menu bar.)
2. If you are not on the Reports tab, click the Reports tab.
3. Hover the mouse next to the name of a report. When the pop-up menuappears, click Edit.
4. Edit your report design, using the controls on the Edit Report page. SeeDesigning a Report on page 308 for more information.
5. Click SAVE AND CLOSE to save the report and close the page.
Related Topics
l Editing a Report on page 308l Viewing Reports on page 303l Report Types on page 305l Editing a Report on page 308l Importing a Report on page 307l Designing a Report on page 308l Exporting Reports on page 325l Provided Reports on page 327l Chapter 8 Reporting on page 267
Designing a ReportViewpoint enables you create new reports and edit the provided reports orreports you have created. This topic identifies how report components areorganized and the resources available when designing a report.
Chapter 8 Reporting
308 Reports Page

Reports Page 309
See Creating a Report on page 306 for instructions on how to create a report.See Editing a Report on page 308 for instructions on how to edit a report.In this topic:
l Report Information on page 309l Report Permissions on page 309l Using the Report Designer on page 310
Report InformationThere are two fields at the top of the Create and Edit Report pages where youcan enter identifying information about the report you are designing:Name – The name of the report. This is a plain text field, which may containuppercase or lowercase letters, numbers, spaces, or special characters.Description – A description of the report. This is a formatted field that maycontain formatted text, numbered or bulleted lists, links, tables, pictures, etc.
Report PermissionsYou can restrict who has access to your report. This is done using thePermissions area at the top right of the page.The following image is an example of the Permissions area.
Using this area you can restrict access by:
Chapter 8 Reporting

l Users. In the Users field, type the IDs of the users. Viewpoint will check ifthe users you added are valid; that is, has a valid operating systemaccount. If the user is valid, the user name turns green; otherwise it turnsred. Use "ALL" to remove restrictions.
l Group associations. In the Groups field, type the IDs of the groups.Viewpoint will check if the groups you added are valid; that is, has a validoperating system account. If the group is valid, the group ID turns green;otherwise it turns red. Use "ALL" to remove restrictions.
l Account associations. In the Accounts field, select from the availableaccounts listed in the drop-down. Leave blank to remove restrictions.
Using the Report DesignerIn addition to the report information and permissions described above, areport design consists of three parts:1. An output query that specifies fields in an aggregated view on which thereport will be based
2. Report settings3. A report layoutTo construct the output query, the Report Designer operates in two modes,Basic and Advanced. In Basic mode, you select an aggregated view and specifythe data to be included in the report based on the data provided by the selectedaggregated view. In Advanced mode, you construct the output query textually.You can toggle between Basic and Advance modes by clicking the OutputQuery button, labeled Switch to Basic or Switch to Advanced.Example reports have been provided to illustrate how to create reports in bothBasic and Advanced mode. See for more information.
Basic Report DesignIn Basic mode, the output query design portion of the Report Designer appearsas shown below:
To begin constructing an output query, click on the name of an aggregatedview in the Aggregated View Explorer drop-downmenu.
Chapter 8 Reporting
310 Reports Page

Reports Page 311
You can view the structure of the selected aggregated view by clicking theVIEW STRUCTURE button. In the example shown above, the user_completed_job_count aggregated view has the structure shown below:
The aggregated view includes user names with a count of completed jobs(jobCount). In the example shown below, the user and jobCount fields fromthe aggregated view are identified as the source columns and the result columnnames for the report are User and Jobs, respectively.
Chapter 8 Reporting

In this example, no Filter Criteria ("where" clause) or Limit is specified.The results are ordered by user name. Filter Criteria could, for example, limitthe resulting data set to jobCounts greater than 10. Limit could be used to limitthe data to the top 10 jobCount values.
Advanced Report DesignIn Advanced mode, you construct the output query textually. You can view thestructure of an aggregated view by clicking the name of the aggregated viewfrom theAggregated View Explorer drop-downmenu, then clicking theVIEW STRUCTURE button. When referencing an aggregated view in theoutput query, type the name of the aggregated view; the Aggregated ViewExplorer does not enter the name for you.An example of an output query created in Advanced mode is shown below:
To assist you in constructing the output query, the Advanced mode outputquery designer provides the predefined variables defined in the table below.
Chapter 8 Reporting
312 Reports Page

Reports Page 313
VariableName
DataType Description
$current_user
String The username of the person who runs the report. Can be used to apply per-user per-missions for the output dataset.
$current_user_groups
String Comma-separated list of the groups the report runner belongs to.
$current_user_accounts
String Comma-separated list of the accounts the report runner belongs to.
$start_date LongInteger
Time stamp of the beginning of the time interval to show in the report.
$end_date LongInteger
Time stamp of the end of the time interval to show in the report.
$granularity String One of the following values: "MINUTE", "HOUR", "DAY", "MONTH", "YEAR"
$limit Integer How many top rows of the result set should be given to the report. Should be usedinside LIMIT clause.
$order_by String Defines the sort order of the query result set, typically by specifying a column in theselect list. Should be used inside ORDER BY clause.
$order_type String Specifies that the results should be returned in ascending or descending order.Should be used inside ORDER BY clause.
You must convert data to the appropriate data types when used in expressionsor for display. For example, the expression TO_CHAR(TO_TIMESTAMP(t.data.ts / 1000) ,'YYYY-MM-dd HH:mm z') as 'Timestamp' dividesthe t.data.ts timestamp value (an integer) by 1000, converts the value to atimestamp, then converts the timestamp to a string formatted according to the'YYYY-MM-dd HH:mm z' format string for display in the report.The basic data type conversion functions are shown in the table below.
Function Description Example
CAST (<expres-sion> AS <datatype>)
Convert a value from one type to another CAST(b.'Timestamp' AS BIGINT)
Chapter 8 Reporting

Function Description Example
TO_CHAR(expression,'format')
expression is a INTEGER, FLOAT, DOUBLE,DATE, TIME, or TIMESTAMP expression.'format' is a format specifier enclosed in singlequotation marks that sets a pattern for the outputformatting.
TO_CHAR(t.data.`value` /t.data.`count`, '#.##')
TO_DATE(expression [,'format'])
expression is a character string enclosed insingle quotation marks.'format' is a format specifier enclosed in singlequotation marks that sets a pattern for the outputformatting.
TO_DATE('2016-07-20', 'yyyy-MM-dd')
TO_NUMBER('string','format')
'string' is a character string enclosed in singlequotation marks.'format' is one or more Java DecimalFormatclass specifiers enclosed in single quotation marksthat set a pattern for the output formatting.
TO_NUMBER(t.data.-configuredProcessors, '#')
TO_TIMESTAMP(expression [,'format'])
expression is a character string enclosed insingle quotation marks.'format' is an optional format specifier enclosedin single quotation marks that sets a pattern forthe output formatting.
TO_TIMESTAMP(t.data.ts /1000)
See Data Type Conversion for more information about type conversionfunctions and the associated format specifiers.In addition to data conversion functions, many SQL functions are available foruse in output queries. See Drill SQL Reference for more information.
Configuring Report Default SettingsYou can set default values for several variables that determine how your reportis initially displayed. The user can modify the values of these variables tochange the data displayed in the report. For example, the Interval variabledetermines the period of time for which data is selected for display in thereport. You may set the default value to Day to display data from the previousday. The user may change the Interval setting to Week to view data from theprevious week.
Chapter 8 Reporting
314 Reports Page

Reports Page 315
Variable Description PossibleValues
Interval Time period of data included in the report. 5 minutes
30minutesHourDayWeekMonthQuarterYearCustomrange
Granularity Period of time for which data is aggregated. For example, a report may show thenumber of jobs submitted in each hour over a period of a month. In this case, theinterval is a month; the granularity is an hour.
MinuteHourDayMonthYear
Order Type Sort order of data values. Least toMostMost toLeast
Limit Number of data values included in the report. 5102050100500
Report LayoutsYou can choose between a table layout or chart layout for your report using theLayout buttons at the bottom of the Report Designer .
If you select Table Output, there are no additional layout settings for yourreport; Viewpoint formats the table for you. If you select Chart Output, theReport Designer displays a drop-downmenu where you select your desiredchart type. The Report Designer displays additional controls for you to enter
Chapter 8 Reporting

additional layout settings, based on the selected chart type. Additional reportlayout settings for each of the chart types are shown in the table below.
Layout Set-ting
Usedin Description
Title PieChartLineChartBarChart
Title displayed at the top of the chart
Label Field PieChartLineChartBarChart
Result column containing labels for data points.
Value Field PieChartLineChartBarChart
Result column containing data to be used as data points in the chart (for example,points on a line chart or the height of bars in a bar chart).
Value Legend PieChartLineChartBarChart
Label for data values (typically units, such as jobs, hours, processors). Displayed on y-axis in line and bar charts; with data values in pie charts.
Show Per-cent/ShowValue
PieChart
Check boxes indicating whether to display data as raw values or percents.
Show EmptyData as Zero
LineChart
Check box indicating whether to display empty data values as zero.
X-Value Field LineChartBarChart
Result column containing labels for data values to be plotted.
Chapter 8 Reporting
316 Reports Page

Reports Page 317
Layout Set-ting
Usedin Description
X-ValueLegend
LineChartBarChart
Label describing x-value labels. Displayed on x-axis.
X-Value Rota-tion
LineChartBarChart
Angle to rotate x-axis labels. 0-90 degrees.
A sample chart with the various components labeled is shown below.
Generating a Report PreviewIf you are designing a chart report, a View Data button appears that willgenerate a table with a preview of data on which the chart will be based.Whether you are designing a table report or chart report, clicking theGenerate Preview button will generate a preview of the table or chart. Tominimize the time required to generate the preview, it is based on the first 10data records. The final report may appear different from the preview.
Saving a Report DesignWhen you have finished designing your report, click SAVE AND CLOSE to savethe report and close the page or click SAVE AND RUN to save and view the
Chapter 8 Reporting

report.
Related Topics
l Designing a Report on page 308l Viewing Reports on page 303l Report Types on page 305l Designing a Report on page 308l Importing a Report on page 307l Editing a Report on page 308l Exporting Reports on page 325l Provided Reports on page 327l Chapter 8 Reporting on page 267
Example ReportsVersions of two reports created in both Basic and Advanced mode have beenprovided as examples. This topic describes the example reports to assist you indesigning your own reports using the Report Designer in both Basic andAdvanced modes.See Designing a Report on page 308 for instructions on how to use the ReportDesigner.In this topic:
l Node Access PolicyWasted Processors Report on page 318l Node State/Outage Report on page 322
Node Access Policy Wasted Processors ReportThe Node Access PolicyWasted Processors report is a table report that showsthe number of idle processors on partially dedicated nodes that cannot bededicated to or utilized by any job because of a node access policy ofSINGLEJOB or SINGLETASK.
Chapter 8 Reporting
318 Reports Page

Reports Page 319
Basic ModeThe Basic mode version of the Node Access PolicyWasted Processors report isbased on the overall_availability_and_utilization aggregated view,which provides a data view based on the clusterSample stream with theschema shown below.
Chapter 8 Reporting
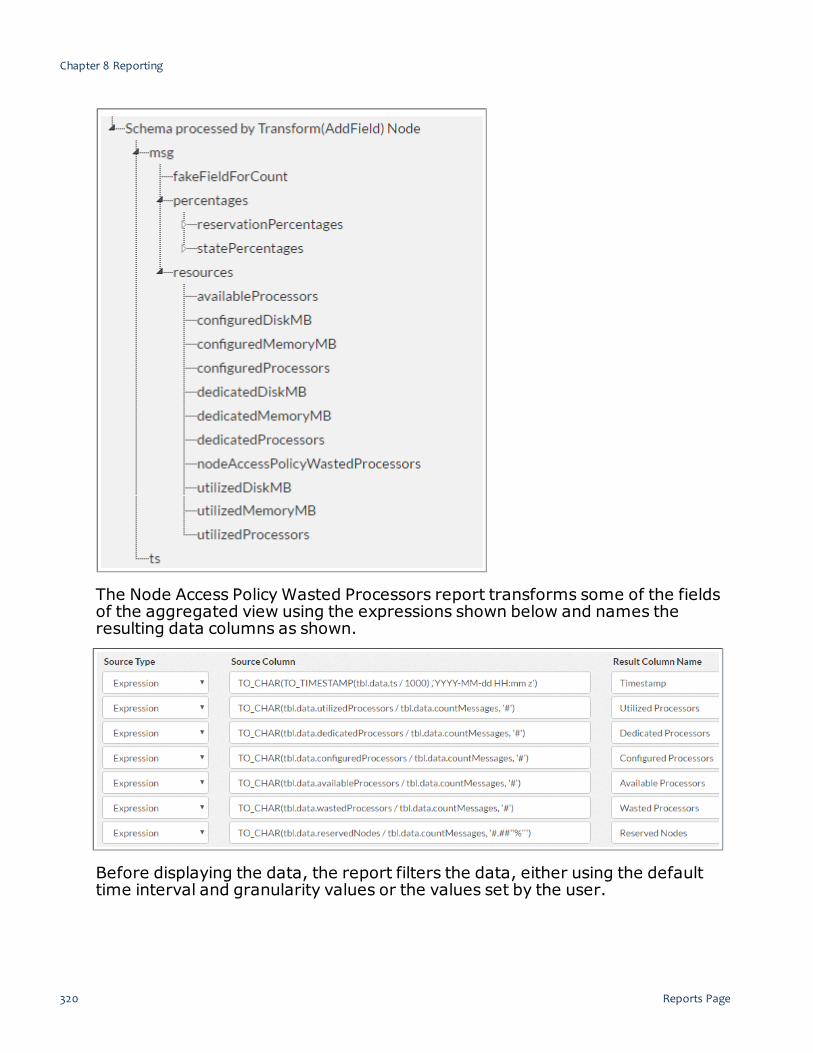
The Node Access PolicyWasted Processors report transforms some of the fieldsof the aggregated view using the expressions shown below and names theresulting data columns as shown.
Before displaying the data, the report filters the data, either using the defaulttime interval and granularity values or the values set by the user.
Chapter 8 Reporting
320 Reports Page

Reports Page 321
Advanced ModeThe Advanced mode version of the Node Access PolicyWasted Processorsreport creates the same table shown above for the Basic mode report.The Advanced mode version queries the overall_availability_and_utilizationaggregated view in the Mongo database using the SQL query shown below.Comparing the SQL query below to the expressions in the Basic mode versionof the report above shows how the Basic mode of the Report Designer helpsyou construct a query without having to write SQL code.
SELECT TO_CHAR(TO_TIMESTAMP(t.data.ts / 1000) ,'YYYY-MM-dd HH:mm z') as 'Timestamp',TO_CHAR(t.data.utilizedProcessors / t.data.countMessages, '#') as 'Utilized
Processors',TO_CHAR(t.data.dedicatedProcessors / t.data.countMessages, '#') as 'Dedicated
Processors',TO_CHAR(t.data.configuredProcessors / t.data.countMessages, '#') as 'Configured
Processors',TO_CHAR(t.data.availableProcessors / t.data.countMessages, '#') as 'Available
Processors',TO_CHAR(t.data.wastedProcessors / t.data.countMessages, '#') as 'Wasted Processors',TO_CHAR(t.data.reservedNodes / t.data.countMessages, '#.##''%''') as 'Reserved
Nodes'FROM mongo.reporting.overall_availablility_and_utilization tWHERE t.data.ts >= $start_dateAND t.data.ts <= $end_dateAND t.keys.granularity = '$granularity'
The report defines the default Interval, Granularity, Sort By, and Limitvalues of the report parameters as shown below.
Chapter 8 Reporting

Node State/Outage ReportThe Node State/Outage Report is a line graph report that shows what percentof nodes were in each of the various states (busy, down, idle, reservedNodes,running, etc.) over a time interval.
Basic ModeThe Node State/Outage report is based on the suppport_node_state_outage_report aggregated view, which creates a data view based on theclusterSample stream with the schema shown below.
The Node State/Outage report transforms some of the fields of the aggregatedview using the expressions shown below and names the resulting data columnsas shown.
Chapter 8 Reporting
322 Reports Page

Reports Page 323
Before displaying the data, the report filters the data, either using the defaulttime interval and granularity values or the values set by the user.
The fields shown below format the report for display.
Advanced ModeThe Advanced mode version of the Node State/Outage report creates thesame graph shown above for the Basic report.The Advanced mode version queries the support_node_state_outage_reportaggregated view in the Mongo database using the SQL query shown below.
Chapter 8 Reporting

Comparing the SQL query below to the expressions in the Basic mode versionof the report above shows how the Basic mode of the Report Designer helpsyou construct a query without having to write SQL code.
SELECT t.data.state AS 'State',TO_CHAR(t.data.'value' / t.data.'count', '#.##') AS 'Value',CAST(t.data.ts AS BIGINT) AS 'Timestamp'
FROM mongo.reporting.support_node_state_outage_report tWHERE t.keys.ts >= $start_dateAND t.keys.ts <= $end_dateAND t.keys.granularity = '$granularity'AND t.'data'.'value' <> 0
ORDER BY t.keys.ts ASC
The report defines the default Interval, Granularity, Sort By, and Limitvalues of the report parameters as shown below.
The report uses the same format as the Basic mode report.
Related Topics
l Reports Page on page 299l Viewing Reports on page 303l Creating a Report on page 306l Editing a Report on page 308l Designing a Report on page 308l Provided Reports on page 327l Chapter 8 Reporting on page 267
Chapter 8 Reporting
324 Reports Page

Reports Page 325
Exporting ReportsThis topic provides information on how to export an image of an individualreport as a PDF or PNG file.To export a report, do the following:1. If you have not already done so, access the Reporting page. (ClickREPORTING in the menu bar.)
2. If you are not on the Reports tab, click the Reports tab.
3. On the Reports page, hover the mouse near the report name to display ,and then click this icon to display the pop-up menu.
Chapter 8 Reporting

4. ClickRun to view the selected report.
5. Click the Export button and select whether you want to export the report asa PDF or PNG image file.
The image file is downloaded to the download directory configured for yourbrowser. The file name is the name of the report.
Related Topics
l Exporting Reports on page 325l Viewing Reports on page 303l Report Types on page 305l Exporting Reports on page 325l Importing a Report on page 307l Editing a Report on page 308
Chapter 8 Reporting
326 Reports Page

Reports Page 327
l Designing a Report on page 308l Provided Reports on page 327l Chapter 8 Reporting on page 267
Provided ReportsViewpoint comes configured with several reports that you can copy, customizefor your environment, and include in dashboards you design. The providedreports include examples of several of the available report types. See ReportTypes on page 305 for more information. The available reports are:
ReportName Report Description
Repo-rtType
Default Values
AutoRefres-h
Gran-ularity
Inter-val
Lim-it
Ord-erType
Accountjob count
The number of completedjobs per account.
PieChart
OFF Minute Pre-viousDay
10 LeasttoMost
Averagequeuetime perQoS
The average number ofhours each QoS's jobswaited in the queuebefore starting.
BarChart
OFF Hour Pre-viousDay
10 MosttoLeast
Averagequeuetime peraccount
The average number ofhours each account's jobswaited in the queuebefore starting
BarChart
OFF Hour Pre-viousDay
10 MosttoLeast
Averagequeuetime perclass
The average number ofhours each class's jobswaited in the queuebefore starting.
BarChart
OFF Hour Pre-viousDay
10 MosttoLeast
Averagequeuetime pergroup
The average number ofhours each group's jobswaited in the queuebefore starting.
BarChart
OFF Hour Pre-viousDay
10 MosttoLeast
Chapter 8 Reporting

ReportName Report Description
Repo-rtType
Default Values
AutoRefres-h
Gran-ularity
Inter-val
Lim-it
Ord-erType
Averagequeuetime peruser
The average number ofhours each user's jobswaited in the queuebefore starting.
BarChart
OFF Hour Pre-viousDay
10 MosttoLeast
Class com-pleted jobactivity
Each data point shows thenumber of jobs associatedwith a class that com-pleted during the timerange covered by thatdata point.
LineChart
OFF Hour Pre-viousDay
10 MosttoLeast
Class jobcount
The number of completedjobs per class.
PieChart
OFF Minute Pre-viousDay
10 LeasttoMost
Dedicationand util-ization perQoSes
Average number of pro-cessor hours dedicatedand utilized for each QoS'sjobs.
BarChart
OFF Hour Pre-viousDay
10 MosttoLeast
Dedicationand util-ization peraccounts
Average number of pro-cessor hours dedicatedand utilized for eachaccount's jobs.
BarChart
OFF Hour Pre-viousDay
10 MosttoLeast
Dedicationand util-ization perclasses
Average number of pro-cessor hours dedicatedand utilized for eachclass's jobs.
BarChart
OFF Hour Pre-viousDay
10 MosttoLeast
Dedicationand util-ization pergroups
Average number of pro-cessor hours dedicatedand utilized for eachgroup's jobs.
BarChart
OFF Hour Pre-viousDay
10 MosttoLeast
Chapter 8 Reporting
328 Reports Page

Reports Page 329
ReportName Report Description
Repo-rtType
Default Values
AutoRefres-h
Gran-ularity
Inter-val
Lim-it
Ord-erType
Dedicationand util-ization perusers
Average number of pro-cessor hours dedicatedand utilized for eachuser's jobs.
BarChart
OFF Hour Pre-viousDay
10 MosttoLeast
Featurecompletedjob activity
Each data point shows thenumber of jobs that com-pleted during the timerange covered by thatdata point that required aspecific feature.
LineChart
OFF Hour Pre-viousDay
10 MosttoLeast
Genericresourcecompletedjob activity
Each data point shows thenumber of dedicated gen-eric resources during thetime range.
LineChart
OFF Hour Pre-viousDay
10 MosttoLeast
Job queuetime perclass
What percentage of thejobs associated with aclass/queue had a queuetime within a specifiedinterval.
BarChart
OFF Hour Pre-viousDay
Most JobsCompletedby User
Shows the most activeusers based on the num-ber of jobs from each userthat completed over thereporting period.
BarChart
OFF Hour Pre-viousDay
10 MosttoLeast
NodeAccessPolicy Was-ted Pro-cessors
The number of idle pro-cessors on partially ded-icated nodes that cannotbe dedicated to or utilizedby any job because of anode access policy ofSINGLEJOB orSINGLETASK. (Createdusing the advanced reportbuilder.)
Table OFF Minute Pre-viousDay
Chapter 8 Reporting

ReportName Report Description
Repo-rtType
Default Values
AutoRefres-h
Gran-ularity
Inter-val
Lim-it
Ord-erType
NodeAccessPolicy Was-ted Pro-cessors(BasicMode)
The number of idle pro-cessors on partially ded-icated nodes that cannotbe dedicated to or utilizedby any job because of anode access policy ofSINGLEJOB orSINGLETASK. (Createdusing the basic reportbuilder.)
Table OFF Minute Pre-viousDay
Nodestate/outa-ge
The percentage of nodeswere run-ning/idle/reserved overthe reporting period.(Created using theadvanced report builder.)
LineChart
OFF Hour Pre-viousDay
Nodestate/outa-ge (BasicMode)
The percentage of nodeswere run-ning/idle/reserved overthe reporting period.(Created using the basicreport builder.)
LineChart
OFF Hour Pre-viousDay
Partitioncompletedjob activity
Each data point shows thenumber of jobs that com-pleted during a time win-dow that required aspecific partition.
LineChart
OFF Hour Pre-viousDay
10 MosttoLeast
QoS com-pleted jobactivity
Each data point shows thenumber of jobs associatedwith a QoS that completedduring the time rangecovered by that datapoint.
LineChart
OFF Hour Pre-viousDay
10 MosttoLeast
Chapter 8 Reporting
330 Reports Page

Reports Page 331
ReportName Report Description
Repo-rtType
Default Values
AutoRefres-h
Gran-ularity
Inter-val
Lim-it
Ord-erType
QoS jobcount
The number of completedjobs per QoS.
PieChart
OFF Minute Pre-viousDay
10 LeasttoMost
Queuetime perjob
The number of hours eachjob waited in the queuebefore starting.
BarChart
OFF Pre-viousDay
10 MosttoLeast
Reser-vations bytime
List of the reservationsthat were in effect duringsome time period.
Table OFF Pre-viousDay
SystemCPU andmemory
The percentage of CPUand memory dedicationand utilization over thereporting interval.
LineChart
OFF Hour Pre-viousDay
SystemCPU avail-ability andutilization
The number of CPUs util-ized/ded-icated/configured overthe reporting interval.
LineChart
OFF Hour Pre-viousDay
Uniqueuser jobcount
Each data point showshow many unique usershad a job complete sincethe last data point.
LineChart
OFF Minute Pre-viousDay
Related Topics
l Provided Reports on page 327l Viewing Reports on page 303l Report Types on page 305l Provided Reports on page 327l Importing a Report on page 307l Editing a Report on page 308l Designing a Report on page 308
Chapter 8 Reporting

l Exporting Reports on page 325l Chapter 8 Reporting on page 267
Dashboards PageThe Dashboards page lets you manage, create, and view dashboards thatcombine reports that summarize job and workload data.To access this page, clickReporting in the menu bar, then click theDashboards tab.This topic provides an example of the Dashboards page and describes its layoutand available information.In this topic:
l Page Example on page 332l Page Details on page 332l Additional Functions on page 334
Page ExampleThe following image is an example of the Dashboards page.
Page DetailsThis section describes the functional areas of the Dashboards page.In this section:
l Dashboard List on page 333l Filters on page 333l Creating a New Dashboard on page 334
Chapter 8 Reporting
332 Dashboards Page

Dashboards Page 333
Dashboard ListThe main pane of the Dashboards page lists the dashboards and theircorresponding information in a column format.
Column titles that are underlined indicate that you can sort (ascending ordescending) the column contents.
Page controls are available at the bottom of the dashboard list to let youcustomize howmany dashboards appear at a time in the list. These controlsalso include options for moving between pages of listed dashboards.The following table describes the different columns and their contents.
ColumnHeading Description
Name Name used to identify the dashboard. Click on the dashboard's name to open the dashboard andview additional information about the dashboard.
Description A description of the dashboard.
Create Date Date the dashboard was created.
Owner Name of the user who created the dashboard.
FiltersFilters let you specify what is displayed in the list of dashboards on the mainpane.To use a filter, click the check box next to the filter to activate it, enter in theinformation, and then click Filter. You can clickReset at any time to restorethe page default view.The following table describes the different filters.
Filter Description
Name Enter a string to search by the name used to identify the dashboard. Displays all dashboards with thestring in the dashboard name.
DateCreated
Date range during which the dashboard was created. When this filter is selected, additional fieldsappear letting you specify the date range.
Owner The owner of the dashboard.
Chapter 8 Reporting
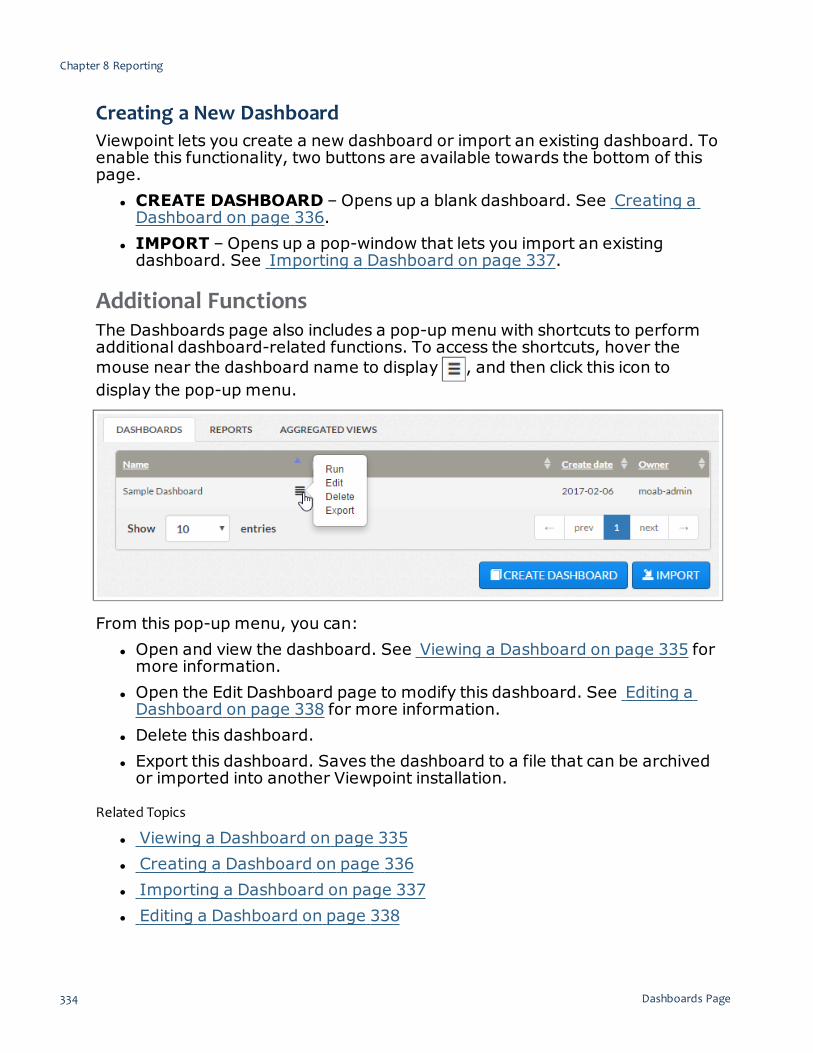
Creating a New DashboardViewpoint lets you create a new dashboard or import an existing dashboard. Toenable this functionality, two buttons are available towards the bottom of thispage.
l CREATE DASHBOARD – Opens up a blank dashboard. See Creating aDashboard on page 336.
l IMPORT – Opens up a pop-window that lets you import an existingdashboard. See Importing a Dashboard on page 337.
Additional FunctionsThe Dashboards page also includes a pop-up menu with shortcuts to performadditional dashboard-related functions. To access the shortcuts, hover themouse near the dashboard name to display , and then click this icon todisplay the pop-up menu.
From this pop-up menu, you can:l Open and view the dashboard. See Viewing a Dashboard on page 335 formore information.
l Open the Edit Dashboard page to modify this dashboard. See Editing aDashboard on page 338 for more information.
l Delete this dashboard.l Export this dashboard. Saves the dashboard to a file that can be archivedor imported into another Viewpoint installation.
Related Topics
l Viewing a Dashboard on page 335l Creating a Dashboard on page 336l Importing a Dashboard on page 337l Editing a Dashboard on page 338
Chapter 8 Reporting
334 Dashboards Page
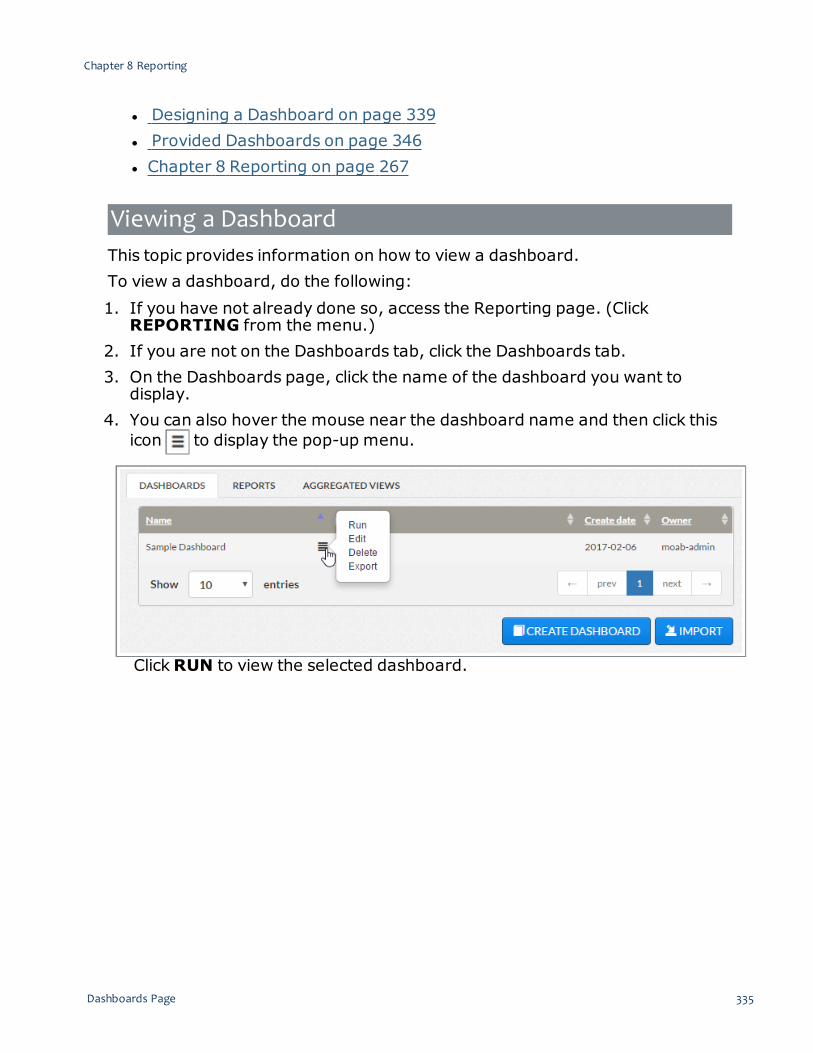
Dashboards Page 335
l Designing a Dashboard on page 339l Provided Dashboards on page 346l Chapter 8 Reporting on page 267
Viewing a DashboardThis topic provides information on how to view a dashboard.To view a dashboard, do the following:1. If you have not already done so, access the Reporting page. (ClickREPORTING from the menu.)
2. If you are not on the Dashboards tab, click the Dashboards tab.3. On the Dashboards page, click the name of the dashboard you want todisplay.
4. You can also hover the mouse near the dashboard name and then click thisicon to display the pop-up menu.
ClickRUN to view the selected dashboard.
Chapter 8 Reporting

Related Topics
l Viewing a Dashboard on page 335l Creating a Dashboard on page 336l Importing a Dashboard on page 337l Editing a Dashboard on page 338l Designing a Dashboard on page 339l Provided Dashboards on page 346l Chapter 8 Reporting on page 267
Creating a DashboardViewpoint lets you create new dashboards that users may use to viewmultiplereports.To create a dashboard, do the following:1. If you have not already done so, access the Reporting page. (ClickREPORTING in the menu bar.)
2. ClickDASHBOARDS to access the Dashboards page.
Chapter 8 Reporting
336 Dashboards Page

Dashboards Page 337
3. Click CREATE DASHBOARD to create a new dashboard.The Create Dashboard page displays.
4. Fill in the necessary information or make the necessary changes. SeeDesigning a Dashboard on page 339 for more information.
5. Click SAVE AND CLOSE to save the dashboard and close the page or clickSAVE AND RUN to save and view the dashboard.
Related Topics
l Creating a Dashboard on page 336l Viewing a Dashboard on page 335l Importing a Dashboard on page 337l Editing a Dashboard on page 338l Designing a Dashboard on page 339l Provided Dashboards on page 346l Chapter 8 Reporting on page 267
Importing a DashboardThis topic provides information and instructions on importing dashboards.Viewpoint lets you import dashboards that have previously been exported. Youcan import a single dashboard or multiple dashboards at the same time.Do the following:1. If you have not already done so, access the Reporting page. (ClickReporting in the menu bar.)
2. Click the Dashboards tab.3. Click IMPORT.The Import Dashboard window appears.
Chapter 8 Reporting

4. ClickBROWSE and navigate to where the dashboard, file is saved. You canselect multiple files by pressing Ctrl and then clicking on each file.
5. Once you have chosen which files to include, clickOpen.6. When the file appears in the Import window, click IMPORT. The dashboardappears in the list of dashboards and can be edited as needed.
Related Topics
l Importing a Dashboard on page 337l Viewing a Dashboard on page 335l Creating a Dashboard on page 336l Editing a Dashboard on page 338l Designing a Dashboard on page 339l Provided Dashboards on page 346l Chapter 8 Reporting on page 267
Editing a DashboardViewpoint lets you edit the provided dashboards or dashboards you havecreated.To edit a dashboard, do the following:1. If you have not already done so, access the Reporting page. (ClickREPORTING from the menu.)
2. If you are not on the Dashboards tab, click the Dashboards tab.
3. Hover the mouse next to the name of a dashboard. Click the pop-upmenu when it appears, then click Edit.
Chapter 8 Reporting
338 Dashboards Page

Dashboards Page 339
4. Fill in the necessary information or make the necessary changes. SeeDesigning a Dashboard on page 339 for more information.
5. Click SAVE AND CLOSE to save the dashboard and close the page or clickSAVE AND RUN to save and view the dashboard.
Related Topics
l Editing a Dashboard on page 338l Viewing a Dashboard on page 335l Creating a Dashboard on page 336l Importing a Dashboard on page 337l Designing a Dashboard on page 339l Provided Dashboards on page 346l Chapter 8 Reporting on page 267
Designing a DashboardViewpoint enables you create new dashboards and edit the provideddashboards or dashboards you have created. This topic identifies howdashboard components are organized and the resources available whendesigning a dashboard.See Creating a Dashboard on page 336 to create a dashboard.See Editing a Dashboard on page 338 to open an existing dashboard forediting.In this topic:
l Dashboard Information on page 339l Dashboard Permissions on page 340l Using the Dashboard Designer on page 340
Dashboard InformationAt the top of the Create or Edit Dashboard pages, there are Name andDescription fields for the dashboard you are designing. The dashboard nameand description are displayed in the dashboard list shown in the Dashboardspage.Click in the Name and Description fields to enter a name and description forthe dashboard you are designing.
Chapter 8 Reporting

Dashboard PermissionsYou can restrict who has access to your dashboard. This is done using thePermissions area at the top right of the page.The following image is an example of the Permissions area.
Using this area you can restrict access by:l Users. In the Users field, type the IDs of the users. Viewpoint will check ifthe users you added are valid; that is, has a valid operating systemaccount. If the user is valid, the user name turns green; otherwise it turnsred. Use "ALL" to remove restrictions.
l Group associations. In the Groups field, type the IDs of the groups.Viewpoint will check if the groups you added are valid; that is, has a validoperating system account. If the group is valid, the group ID turns green;otherwise it turns red. Use "ALL" to remove restrictions.
l Account associations. In the Accounts field, select from the availableaccounts listed in the drop-down. Leave blank to remove restrictions.
Using the Dashboard DesignerThe main part of the Create or Edit Dashboard pages is the DashboardDesigner, which you use to add and configure the reports to be displayed onyour dashboard. The Dashboard Designer for a newly created dashboard isshown below.
Chapter 8 Reporting
340 Dashboards Page

Dashboards Page 341
Adding a Report to a DashboardA dashboard can have up to three report lanes where reports can be displayed.Do the following to add a report to a report lane:1. Click the Add Report button at the bottom of the report lane where youwould like the report to be displayed.The Dashboard Designer displays a drop-down list of available reports.
Chapter 8 Reporting

2. Click the name of the report you would like to display in the report lane
3. Click the check icon next to the name of the selected report.
Viewpoint adds a report summary to the report lane in which you clicked theAdd Report button.
Chapter 8 Reporting
342 Dashboards Page

Dashboards Page 343
4. You can change the position of the report on the dashboard by dragging anddropping the report summary to a different position in the report lane or to adifferent report lane. You can remove the report from the dashboard byclicking the in the upper right corner of the report summary.
Viewing a Report DescriptionYou can view a description of a report by clicking the icon in the lower rightcorner of the report summary. The report description is added to the report bythe report designer and may include instructions for how to use the report.
Configuring Report SettingsIf desired, you can set default report settings by clicking the icon in thelower right corner of the report summary.
Chapter 8 Reporting

Report settings vary according to the data type displayed in the report, andmay include:
l Auto Refresh – How frequently the report data is refreshed and thereport redisplayed. SelectOFF to turn off auto refresh.
l Granularity – Time interval for data to be summarized. For example, theUnique user job count report displays a line graph where each datapoint represents the number of unique users whose job was completedduring the time interval. Varying Granularity and Interval can facilitatedata analysis.
l Interval – Time interval to be presented in the report.l Limit – The maximum number of data values to be displayed.l Order Type – The order in which to display the data values (Most to Leastor Least to Most).
Modifying the Dashboard DisplayAt the top of the Dashboard Designer, there is a checkbox labeled ExpandReport Lanes. When the checkbox is checked, Viewpoint expands the width ofa dashboard's report lanes to fill the Viewpoint page (when the dasbhoard isdesigned to have reports in just one or two report lanes; the checkbox has noeffect when the dashboard has reports in three report lanes).A dashboard with reports in two report lanes and the Expand Report Lanescheckbox unchecked is shown below.
Chapter 8 Reporting
344 Dashboards Page

Dashboards Page 345
And this is how the same dashboard appears when the Expand Report Lanescheckbox has been checked.
Chapter 8 Reporting

Saving a Dashboard DesignWhen you have finished designing your dashboard, click SAVE AND CLOSE tosave the dashboard and close the page or click SAVE AND RUN to save andview the dashboard.
Related Topics
l Designing a Dashboard on page 339l Viewing a Dashboard on page 335l Creating a Dashboard on page 336l Importing a Dashboard on page 337l Editing a Dashboard on page 338l Provided Dashboards on page 346l Chapter 8 Reporting on page 267
Provided DashboardsViewpoint comes configured with a dashboard that you can copy or customizefor your environment. The provided dashboard is:
Chapter 8 Reporting
346 Dashboards Page

Dashboards Page 347
l Sample dashboard – A simple dashboard that displays a set of reports in atwo-column format.
The following image shows the Sample dashboard.
Related Topics
l Provided Dashboards on page 346l Viewing a Dashboard on page 335l Creating a Dashboard on page 336l Importing a Dashboard on page 337l Editing a Dashboard on page 338l Designing a Dashboard on page 339l Chapter 8 Reporting on page 267
Chapter 8 Reporting

348 Dashboards Page