reference guide (command) -...
TRANSCRIPT

J2X1-7607-08ENZ0(00)April 2017
Windows/Linux
FUJITSU SoftwareServerView Resource Orchestrator Virtual Edition V3.3.0
Reference Guide (Command)

Preface
Purpose of This Document
This manual explains the commands available in FUJITSU Software ServerView Resource Orchestrator Virtual Edition (hereinafterResource Orchestrator).
Intended Readers
This manual is written for people who will install and administer systems using Resource Orchestrator.It is strongly recommended that you read the "Design Guide VE" before using this manual.When setting up systems, it is assumed that readers have the basic knowledge required to configure the servers, storage, and networkdevices to be installed.
Structure of This Document
This manual is composed as follows:
Part 1 Command Reference
Explains each type of command.
Chapter 1 Overview
Provides an overview of the commands provided in Resource Orchestrator.
Chapter 2 Login
Explains the command used to log in to Resource Orchestrator.
Chapter 3 Resource Operations
Explains the commands used to manage resources in Resource Orchestrator.
Chapter 4 Image Operations
Explains the command used to perform image operations in Resource Orchestrator.
Chapter 5 Control and Environment Setup
Explains the commands used to control Resource Orchestrator managers and agents, and to configure environment settings.
Chapter 6 Backup and Restoration Operations for Configuration Definition Information
Explains the commands used to perform backup and restoration in Resource Orchestrator.
Chapter 7 Maintenance Commands
Explains the maintenance commands available in Resource Orchestrator.
Part 2 File Reference
Explains the input files for each type of command.
Chapter 8 XML Files
Explains XML files.
Appendix A GUI/CLI
Explains the GUI/CLI.
Web Site URLs
URLs provided as reference sources within the main text are correct as of April 2017.
- i -

Document Conventions
The notation in this manual conforms to the following conventions.
- When there is different information for the different versions of Resource Orchestrator, it is indicated as follows:
[All Editions] Sections relevant for all editions
[Cloud Edition] Sections related to Cloud Edition
[Virtual Edition] Sections related to Virtual Edition
- When using Resource Orchestrator and the functions necessary differ due to the necessary basic software (OS), it is indicated asfollows:
[Windows Manager] Sections related to Windows manager
[Linux Manager] Sections related to Linux manager
[Windows] Sections related to Windows
[Linux] Sections related to Linux
[Red Hat Enterprise Linux] Sections related to Red Hat Enterprise Linux
[Solaris] Sections related to Solaris
[VMware] Sections related to VMware
[Horizon View] Sections related to VMware Horizon View
[Hyper-V] Sections related to Hyper-V
[Xen] Sections related to RHEL5-Xen
[KVM] Sections related to RHEL-KVM
[Solaris Zones] Sections related to Solaris Zones (Solaris 10) and Solaris Zones (Solaris 11)
[Solaris Zones (Solaris 10)] Sections related to Solaris Zones with Solaris 10 VM hosts
[Solaris Zones (Solaris 11)] Sections related to Solaris Zones with Solaris 11 VM hosts
[OVM for x86]Sections related to Oracle VM Server for x86 2.2 and Oracle VM Server forx86 3.x
[OVM for x86 2.2] Sections related to Oracle VM Server for x86 2.2
[OVM for x86 3.x]Sections related to Oracle VM Server for x86 3.2 and Oracle VM Server forx86 3.3
[OVM for SPARC] Sections related to Oracle VM Server for SPARC
[Citrix Xen] Sections related to Citrix XenServer
[Physical Servers] Sections related to physical servers
- Unless specified otherwise, the blade servers mentioned in this manual refer to PRIMERGY BX servers.
- Oracle Solaris may also be indicated as Solaris, Solaris Operating System, or Solaris OS.
- Oracle Solaris Zones may also be indicated as Solaris Containers or Solaris Container.
- Oracle VM Server for x86 may also be indicated as Oracle VM.
- In Resource Orchestrator, the following servers are referred to as SPARC Enterprise.
- SPARC Enterprise M3000/M4000/M5000/M8000/M9000
- SPARC Enterprise T5120/T5140/T5220/T5240/T5440
- In Resource Orchestrator, the following servers are referred to as SPARC M12.
- SPARC M12-2/M12-2S
- ii -

- In Resource Orchestrator, the following servers are referred to as SPARC M10.
- SPARC M10-1/M10-4/M10-4S
- Fujitsu SPARC M12 is the product name used for SPARC M12 when they are sold outside Japan.
- Fujitsu M10 is the product name used for SPARC M10 when they are sold outside Japan.
- In this manual, Fujitsu SPARC M12 is referred to as SPARC M12.
- In this manual, Fujitsu M10 is referred to as SPARC M10.
- In this manual, Fujitsu SPARC M12 and Fujitsu M10 are collectively referred to as SPARC M10/M12.
- In Resource Orchestrator, the following software is referred to as GLS.
- PRIMECLUSTER GLS 4.4 or earlier
- In Resource Orchestrator, the following software is referred to as GDS.
- PRIMECLUSTER GDS 4.4 or earlier
- References and character strings or values requiring emphasis are indicated using double quotes ( " ).
- GUI items are shown enclosed by brackets ([ ]).
- The order of selecting menus is indicated using [ ]-[ ].
- Text to be entered by the user is indicated using bold text.
- Variables are indicated using italic text and underscores.
- The ellipses ("...") in menu names, indicating settings and operation window startup, are not shown.
- The ">" used in Windows is included in usage examples. When using Linux, read ">" as meaning "#".
- When using Resource Orchestrator on Windows 8 and Windows Server 2012, please note the following.When OS operations are explained in this manual, the examples assume OSs up to Windows 7 and Windows Server 2008. When usingResource Orchestrator on Windows 8 or Windows Server 2012, take explanations regarding the [Start] menu as indicating the [Apps]screen.The [Apps] screen can be displayed by right-clicking on the [Start] screen and then right-clicking [All apps].
- When using Resource Orchestrator on Windows 8.1 and Windows Server 2012 R2, please note the following.When OS operations are explained in this manual, the examples assume OSs up to Windows 7 and Windows Server 2008. When usingResource Orchestrator on Windows 8.1 or Windows Server 2012 R2, take explanations regarding the [Start] menu as indicating the[Apps] screen.The [Apps] screen can be displayed by swiping the [Start] screen from bottom to top, or clicking the downward facing arrow on thelower-left of the [Start] screen.
Menus in the ROR console
Operations on the ROR console can be performed using either the menu bar or pop-up menus.
By convention, procedures described in this manual only refer to pop-up menus.
Regarding Installation Folder Paths
The installation folder path may be given as C:\Fujitsu\ROR in this manual.
Replace it as shown below.
[Virtual Edition]
- When using Windows 64-bit (x64)
C:\Program Files (x86)\Resource Orchestrator
- iii -

- When using Windows 32-bit (x86)
C:\Program Files\Resource Orchestrator
[Cloud Edition]
C:\Program Files (x86)\Resource Orchestrator
Command Examples
The paths used in command examples may be abbreviated. When using commands, execute them using the paths in the "Name" columnin the "Reference Guide (Command) VE" and the "Reference Guide (Command/XML) CE".
Abbreviations
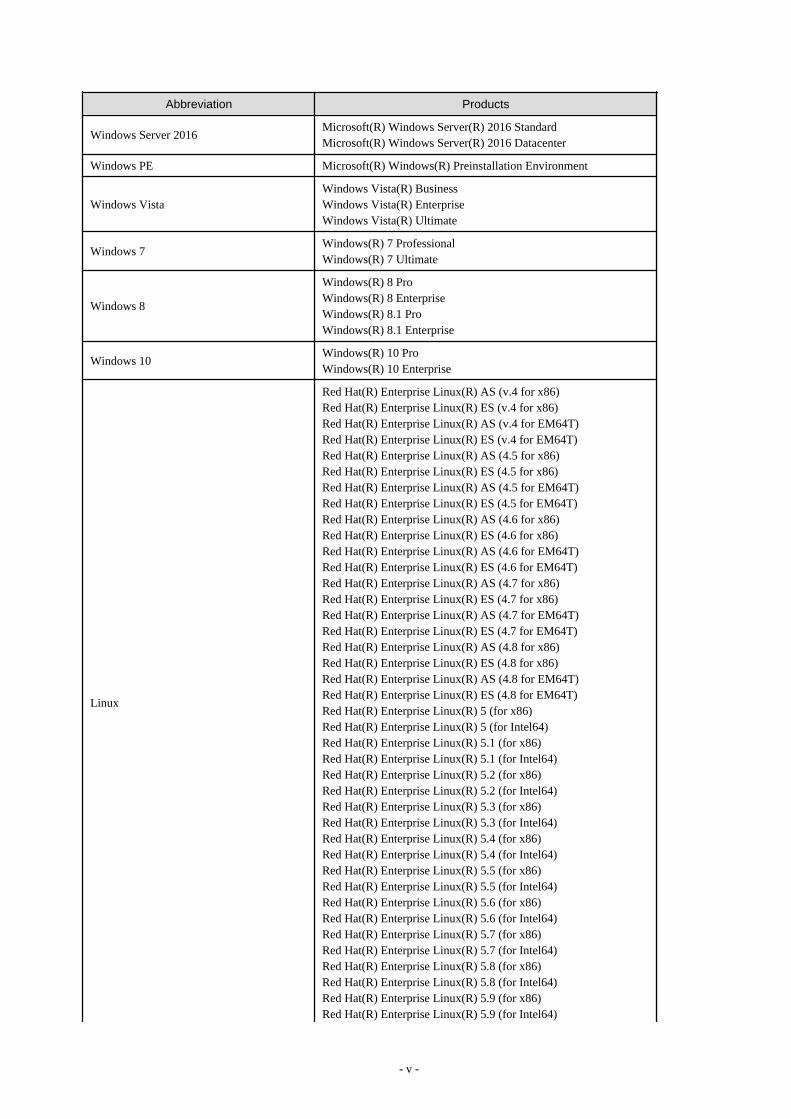
The following abbreviations are used in this manual:
Abbreviation Products
Windows
Microsoft(R) Windows Server(R) 2008 StandardMicrosoft(R) Windows Server(R) 2008 EnterpriseMicrosoft(R) Windows Server(R) 2008 R2 StandardMicrosoft(R) Windows Server(R) 2008 R2 EnterpriseMicrosoft(R) Windows Server(R) 2008 R2 DatacenterMicrosoft(R) Windows Server(R) 2012 StandardMicrosoft(R) Windows Server(R) 2012 DatacenterMicrosoft(R) Windows Server(R) 2012 R2 EssentialsMicrosoft(R) Windows Server(R) 2012 R2 StandardMicrosoft(R) Windows Server(R) 2012 R2 DatacenterMicrosoft(R) Windows Server(R) 2016 StandardMicrosoft(R) Windows Server(R) 2016 DatacenterWindows Vista(R) BusinessWindows Vista(R) EnterpriseWindows Vista(R) UltimateWindows(R) 7 ProfessionalWindows(R) 7 UltimateWindows(R) 8 ProWindows(R) 8 EnterpriseWindows(R) 8.1 ProWindows(R) 8.1 EnterpriseWindows(R) 10 ProWindows(R) 10 Enterprise
Windows Server 2008
Microsoft(R) Windows Server(R) 2008 StandardMicrosoft(R) Windows Server(R) 2008 EnterpriseMicrosoft(R) Windows Server(R) 2008 R2 StandardMicrosoft(R) Windows Server(R) 2008 R2 EnterpriseMicrosoft(R) Windows Server(R) 2008 R2 Datacenter
Windows 2008 x86 EditionMicrosoft(R) Windows Server(R) 2008 Standard (x86)Microsoft(R) Windows Server(R) 2008 Enterprise (x86)
Windows 2008 x64 EditionMicrosoft(R) Windows Server(R) 2008 Standard (x64)Microsoft(R) Windows Server(R) 2008 Enterprise (x64)
Windows Server 2012
Microsoft(R) Windows Server(R) 2012 StandardMicrosoft(R) Windows Server(R) 2012 DatacenterMicrosoft(R) Windows Server(R) 2012 R2 EssentialsMicrosoft(R) Windows Server(R) 2012 R2 StandardMicrosoft(R) Windows Server(R) 2012 R2 Datacenter
- iv -
Abbreviation Products
Windows Server 2016Microsoft(R) Windows Server(R) 2016 StandardMicrosoft(R) Windows Server(R) 2016 Datacenter
Windows PE Microsoft(R) Windows(R) Preinstallation Environment
Windows VistaWindows Vista(R) BusinessWindows Vista(R) EnterpriseWindows Vista(R) Ultimate
Windows 7Windows(R) 7 ProfessionalWindows(R) 7 Ultimate
Windows 8
Windows(R) 8 ProWindows(R) 8 EnterpriseWindows(R) 8.1 ProWindows(R) 8.1 Enterprise
Windows 10Windows(R) 10 ProWindows(R) 10 Enterprise
Linux
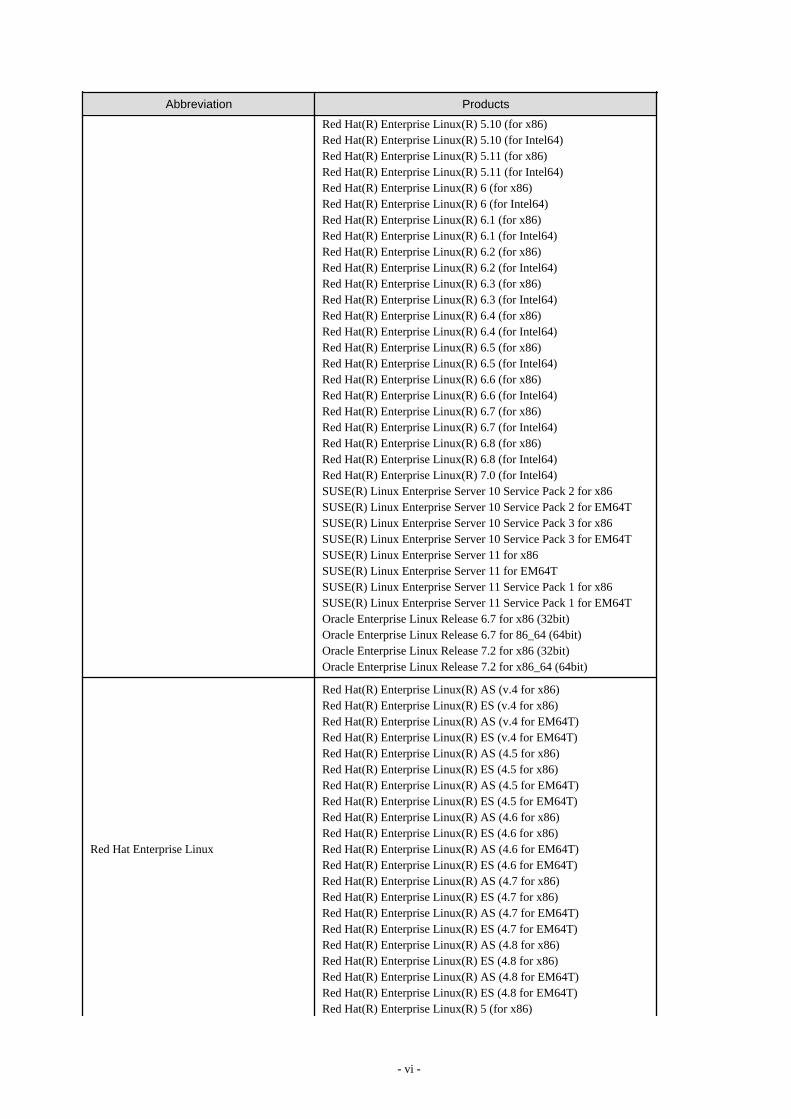
Red Hat(R) Enterprise Linux(R) AS (v.4 for x86)Red Hat(R) Enterprise Linux(R) ES (v.4 for x86)Red Hat(R) Enterprise Linux(R) AS (v.4 for EM64T)Red Hat(R) Enterprise Linux(R) ES (v.4 for EM64T)Red Hat(R) Enterprise Linux(R) AS (4.5 for x86)Red Hat(R) Enterprise Linux(R) ES (4.5 for x86)Red Hat(R) Enterprise Linux(R) AS (4.5 for EM64T)Red Hat(R) Enterprise Linux(R) ES (4.5 for EM64T)Red Hat(R) Enterprise Linux(R) AS (4.6 for x86)Red Hat(R) Enterprise Linux(R) ES (4.6 for x86)Red Hat(R) Enterprise Linux(R) AS (4.6 for EM64T)Red Hat(R) Enterprise Linux(R) ES (4.6 for EM64T)Red Hat(R) Enterprise Linux(R) AS (4.7 for x86)Red Hat(R) Enterprise Linux(R) ES (4.7 for x86)Red Hat(R) Enterprise Linux(R) AS (4.7 for EM64T)Red Hat(R) Enterprise Linux(R) ES (4.7 for EM64T)Red Hat(R) Enterprise Linux(R) AS (4.8 for x86)Red Hat(R) Enterprise Linux(R) ES (4.8 for x86)Red Hat(R) Enterprise Linux(R) AS (4.8 for EM64T)Red Hat(R) Enterprise Linux(R) ES (4.8 for EM64T)Red Hat(R) Enterprise Linux(R) 5 (for x86)Red Hat(R) Enterprise Linux(R) 5 (for Intel64)Red Hat(R) Enterprise Linux(R) 5.1 (for x86)Red Hat(R) Enterprise Linux(R) 5.1 (for Intel64)Red Hat(R) Enterprise Linux(R) 5.2 (for x86)Red Hat(R) Enterprise Linux(R) 5.2 (for Intel64)Red Hat(R) Enterprise Linux(R) 5.3 (for x86)Red Hat(R) Enterprise Linux(R) 5.3 (for Intel64)Red Hat(R) Enterprise Linux(R) 5.4 (for x86)Red Hat(R) Enterprise Linux(R) 5.4 (for Intel64)Red Hat(R) Enterprise Linux(R) 5.5 (for x86)Red Hat(R) Enterprise Linux(R) 5.5 (for Intel64)Red Hat(R) Enterprise Linux(R) 5.6 (for x86)Red Hat(R) Enterprise Linux(R) 5.6 (for Intel64)Red Hat(R) Enterprise Linux(R) 5.7 (for x86)Red Hat(R) Enterprise Linux(R) 5.7 (for Intel64)Red Hat(R) Enterprise Linux(R) 5.8 (for x86)Red Hat(R) Enterprise Linux(R) 5.8 (for Intel64)Red Hat(R) Enterprise Linux(R) 5.9 (for x86)Red Hat(R) Enterprise Linux(R) 5.9 (for Intel64)
- v -
Abbreviation Products
Red Hat(R) Enterprise Linux(R) 5.10 (for x86)Red Hat(R) Enterprise Linux(R) 5.10 (for Intel64)Red Hat(R) Enterprise Linux(R) 5.11 (for x86)Red Hat(R) Enterprise Linux(R) 5.11 (for Intel64)Red Hat(R) Enterprise Linux(R) 6 (for x86)Red Hat(R) Enterprise Linux(R) 6 (for Intel64)Red Hat(R) Enterprise Linux(R) 6.1 (for x86)Red Hat(R) Enterprise Linux(R) 6.1 (for Intel64)Red Hat(R) Enterprise Linux(R) 6.2 (for x86)Red Hat(R) Enterprise Linux(R) 6.2 (for Intel64)Red Hat(R) Enterprise Linux(R) 6.3 (for x86)Red Hat(R) Enterprise Linux(R) 6.3 (for Intel64)Red Hat(R) Enterprise Linux(R) 6.4 (for x86)Red Hat(R) Enterprise Linux(R) 6.4 (for Intel64)Red Hat(R) Enterprise Linux(R) 6.5 (for x86)Red Hat(R) Enterprise Linux(R) 6.5 (for Intel64)Red Hat(R) Enterprise Linux(R) 6.6 (for x86)Red Hat(R) Enterprise Linux(R) 6.6 (for Intel64)Red Hat(R) Enterprise Linux(R) 6.7 (for x86)Red Hat(R) Enterprise Linux(R) 6.7 (for Intel64)Red Hat(R) Enterprise Linux(R) 6.8 (for x86)Red Hat(R) Enterprise Linux(R) 6.8 (for Intel64)Red Hat(R) Enterprise Linux(R) 7.0 (for Intel64)SUSE(R) Linux Enterprise Server 10 Service Pack 2 for x86SUSE(R) Linux Enterprise Server 10 Service Pack 2 for EM64TSUSE(R) Linux Enterprise Server 10 Service Pack 3 for x86SUSE(R) Linux Enterprise Server 10 Service Pack 3 for EM64TSUSE(R) Linux Enterprise Server 11 for x86SUSE(R) Linux Enterprise Server 11 for EM64TSUSE(R) Linux Enterprise Server 11 Service Pack 1 for x86SUSE(R) Linux Enterprise Server 11 Service Pack 1 for EM64TOracle Enterprise Linux Release 6.7 for x86 (32bit)Oracle Enterprise Linux Release 6.7 for 86_64 (64bit)Oracle Enterprise Linux Release 7.2 for x86 (32bit)Oracle Enterprise Linux Release 7.2 for x86_64 (64bit)
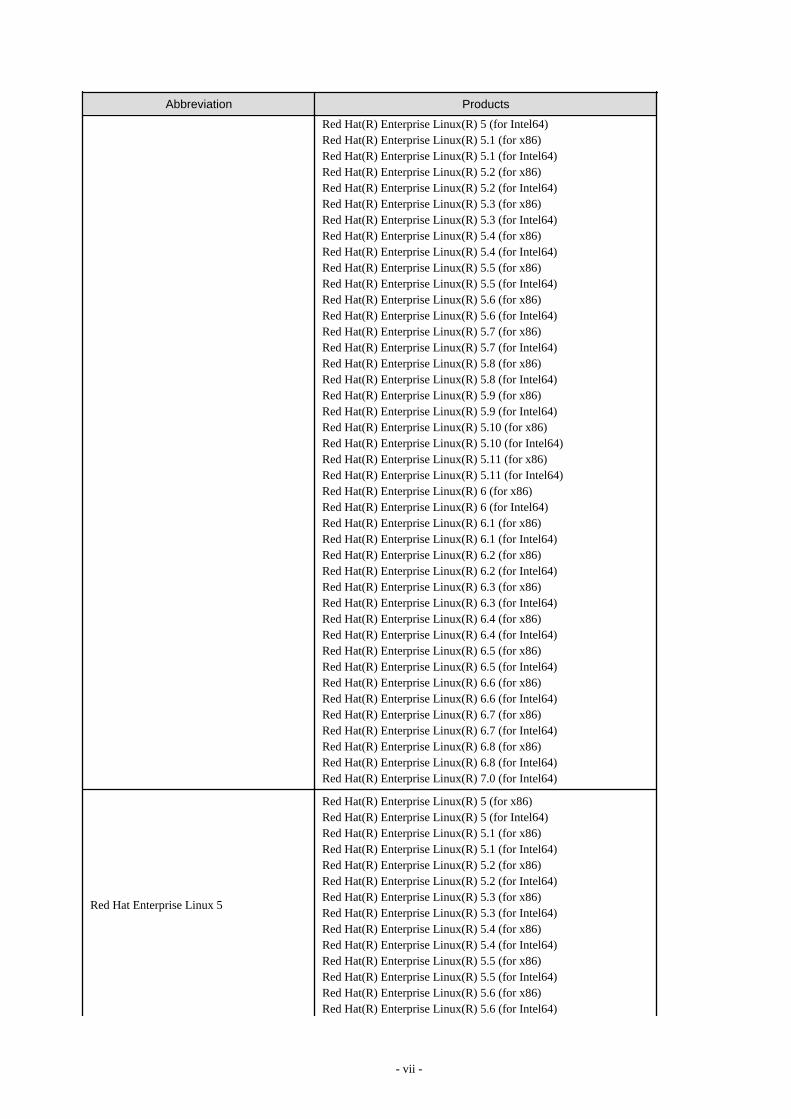
Red Hat Enterprise Linux
Red Hat(R) Enterprise Linux(R) AS (v.4 for x86)Red Hat(R) Enterprise Linux(R) ES (v.4 for x86)Red Hat(R) Enterprise Linux(R) AS (v.4 for EM64T)Red Hat(R) Enterprise Linux(R) ES (v.4 for EM64T)Red Hat(R) Enterprise Linux(R) AS (4.5 for x86)Red Hat(R) Enterprise Linux(R) ES (4.5 for x86)Red Hat(R) Enterprise Linux(R) AS (4.5 for EM64T)Red Hat(R) Enterprise Linux(R) ES (4.5 for EM64T)Red Hat(R) Enterprise Linux(R) AS (4.6 for x86)Red Hat(R) Enterprise Linux(R) ES (4.6 for x86)Red Hat(R) Enterprise Linux(R) AS (4.6 for EM64T)Red Hat(R) Enterprise Linux(R) ES (4.6 for EM64T)Red Hat(R) Enterprise Linux(R) AS (4.7 for x86)Red Hat(R) Enterprise Linux(R) ES (4.7 for x86)Red Hat(R) Enterprise Linux(R) AS (4.7 for EM64T)Red Hat(R) Enterprise Linux(R) ES (4.7 for EM64T)Red Hat(R) Enterprise Linux(R) AS (4.8 for x86)Red Hat(R) Enterprise Linux(R) ES (4.8 for x86)Red Hat(R) Enterprise Linux(R) AS (4.8 for EM64T)Red Hat(R) Enterprise Linux(R) ES (4.8 for EM64T)Red Hat(R) Enterprise Linux(R) 5 (for x86)
- vi -
Abbreviation Products
Red Hat(R) Enterprise Linux(R) 5 (for Intel64)Red Hat(R) Enterprise Linux(R) 5.1 (for x86)Red Hat(R) Enterprise Linux(R) 5.1 (for Intel64)Red Hat(R) Enterprise Linux(R) 5.2 (for x86)Red Hat(R) Enterprise Linux(R) 5.2 (for Intel64)Red Hat(R) Enterprise Linux(R) 5.3 (for x86)Red Hat(R) Enterprise Linux(R) 5.3 (for Intel64)Red Hat(R) Enterprise Linux(R) 5.4 (for x86)Red Hat(R) Enterprise Linux(R) 5.4 (for Intel64)Red Hat(R) Enterprise Linux(R) 5.5 (for x86)Red Hat(R) Enterprise Linux(R) 5.5 (for Intel64)Red Hat(R) Enterprise Linux(R) 5.6 (for x86)Red Hat(R) Enterprise Linux(R) 5.6 (for Intel64)Red Hat(R) Enterprise Linux(R) 5.7 (for x86)Red Hat(R) Enterprise Linux(R) 5.7 (for Intel64)Red Hat(R) Enterprise Linux(R) 5.8 (for x86)Red Hat(R) Enterprise Linux(R) 5.8 (for Intel64)Red Hat(R) Enterprise Linux(R) 5.9 (for x86)Red Hat(R) Enterprise Linux(R) 5.9 (for Intel64)Red Hat(R) Enterprise Linux(R) 5.10 (for x86)Red Hat(R) Enterprise Linux(R) 5.10 (for Intel64)Red Hat(R) Enterprise Linux(R) 5.11 (for x86)Red Hat(R) Enterprise Linux(R) 5.11 (for Intel64)Red Hat(R) Enterprise Linux(R) 6 (for x86)Red Hat(R) Enterprise Linux(R) 6 (for Intel64)Red Hat(R) Enterprise Linux(R) 6.1 (for x86)Red Hat(R) Enterprise Linux(R) 6.1 (for Intel64)Red Hat(R) Enterprise Linux(R) 6.2 (for x86)Red Hat(R) Enterprise Linux(R) 6.2 (for Intel64)Red Hat(R) Enterprise Linux(R) 6.3 (for x86)Red Hat(R) Enterprise Linux(R) 6.3 (for Intel64)Red Hat(R) Enterprise Linux(R) 6.4 (for x86)Red Hat(R) Enterprise Linux(R) 6.4 (for Intel64)Red Hat(R) Enterprise Linux(R) 6.5 (for x86)Red Hat(R) Enterprise Linux(R) 6.5 (for Intel64)Red Hat(R) Enterprise Linux(R) 6.6 (for x86)Red Hat(R) Enterprise Linux(R) 6.6 (for Intel64)Red Hat(R) Enterprise Linux(R) 6.7 (for x86)Red Hat(R) Enterprise Linux(R) 6.7 (for Intel64)Red Hat(R) Enterprise Linux(R) 6.8 (for x86)Red Hat(R) Enterprise Linux(R) 6.8 (for Intel64)Red Hat(R) Enterprise Linux(R) 7.0 (for Intel64)
Red Hat Enterprise Linux 5
Red Hat(R) Enterprise Linux(R) 5 (for x86)Red Hat(R) Enterprise Linux(R) 5 (for Intel64)Red Hat(R) Enterprise Linux(R) 5.1 (for x86)Red Hat(R) Enterprise Linux(R) 5.1 (for Intel64)Red Hat(R) Enterprise Linux(R) 5.2 (for x86)Red Hat(R) Enterprise Linux(R) 5.2 (for Intel64)Red Hat(R) Enterprise Linux(R) 5.3 (for x86)Red Hat(R) Enterprise Linux(R) 5.3 (for Intel64)Red Hat(R) Enterprise Linux(R) 5.4 (for x86)Red Hat(R) Enterprise Linux(R) 5.4 (for Intel64)Red Hat(R) Enterprise Linux(R) 5.5 (for x86)Red Hat(R) Enterprise Linux(R) 5.5 (for Intel64)Red Hat(R) Enterprise Linux(R) 5.6 (for x86)Red Hat(R) Enterprise Linux(R) 5.6 (for Intel64)
- vii -
Abbreviation Products
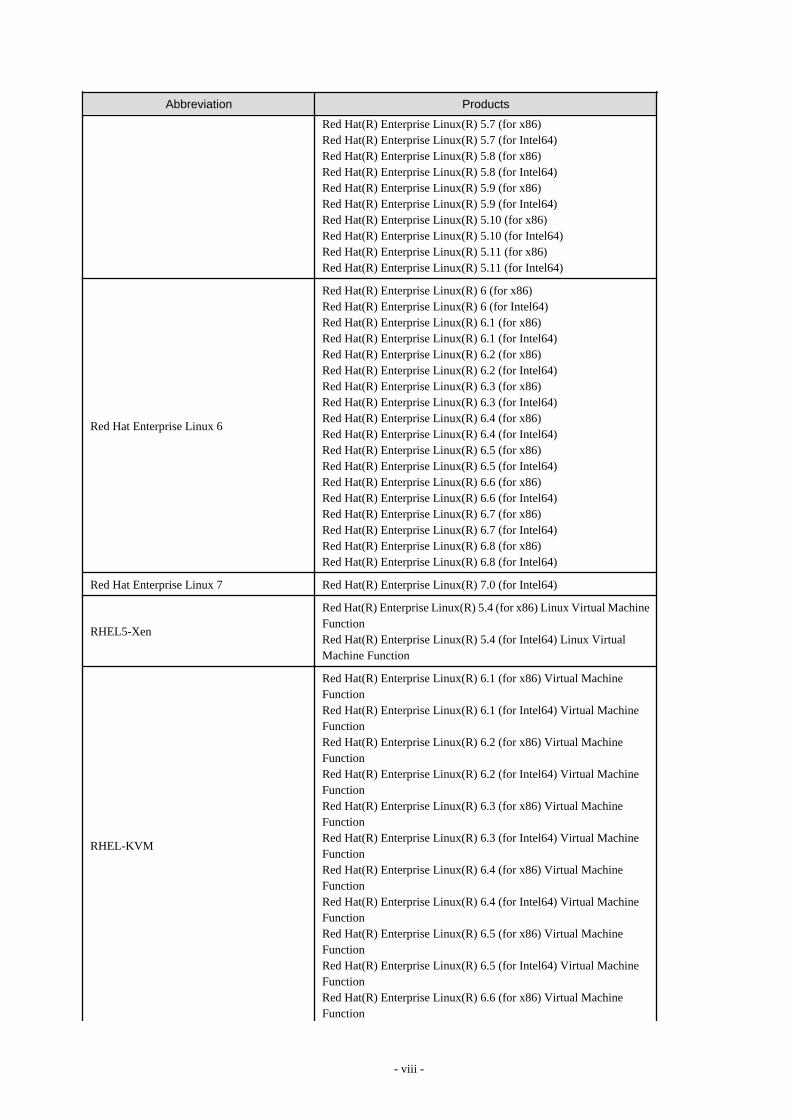
Red Hat(R) Enterprise Linux(R) 5.7 (for x86)Red Hat(R) Enterprise Linux(R) 5.7 (for Intel64)Red Hat(R) Enterprise Linux(R) 5.8 (for x86)Red Hat(R) Enterprise Linux(R) 5.8 (for Intel64)Red Hat(R) Enterprise Linux(R) 5.9 (for x86)Red Hat(R) Enterprise Linux(R) 5.9 (for Intel64)Red Hat(R) Enterprise Linux(R) 5.10 (for x86)Red Hat(R) Enterprise Linux(R) 5.10 (for Intel64)Red Hat(R) Enterprise Linux(R) 5.11 (for x86)Red Hat(R) Enterprise Linux(R) 5.11 (for Intel64)
Red Hat Enterprise Linux 6
Red Hat(R) Enterprise Linux(R) 6 (for x86)Red Hat(R) Enterprise Linux(R) 6 (for Intel64)Red Hat(R) Enterprise Linux(R) 6.1 (for x86)Red Hat(R) Enterprise Linux(R) 6.1 (for Intel64)Red Hat(R) Enterprise Linux(R) 6.2 (for x86)Red Hat(R) Enterprise Linux(R) 6.2 (for Intel64)Red Hat(R) Enterprise Linux(R) 6.3 (for x86)Red Hat(R) Enterprise Linux(R) 6.3 (for Intel64)Red Hat(R) Enterprise Linux(R) 6.4 (for x86)Red Hat(R) Enterprise Linux(R) 6.4 (for Intel64)Red Hat(R) Enterprise Linux(R) 6.5 (for x86)Red Hat(R) Enterprise Linux(R) 6.5 (for Intel64)Red Hat(R) Enterprise Linux(R) 6.6 (for x86)Red Hat(R) Enterprise Linux(R) 6.6 (for Intel64)Red Hat(R) Enterprise Linux(R) 6.7 (for x86)Red Hat(R) Enterprise Linux(R) 6.7 (for Intel64)Red Hat(R) Enterprise Linux(R) 6.8 (for x86)Red Hat(R) Enterprise Linux(R) 6.8 (for Intel64)
Red Hat Enterprise Linux 7 Red Hat(R) Enterprise Linux(R) 7.0 (for Intel64)
RHEL5-Xen
Red Hat(R) Enterprise Linux(R) 5.4 (for x86) Linux Virtual MachineFunctionRed Hat(R) Enterprise Linux(R) 5.4 (for Intel64) Linux VirtualMachine Function
RHEL-KVM
Red Hat(R) Enterprise Linux(R) 6.1 (for x86) Virtual MachineFunctionRed Hat(R) Enterprise Linux(R) 6.1 (for Intel64) Virtual MachineFunctionRed Hat(R) Enterprise Linux(R) 6.2 (for x86) Virtual MachineFunctionRed Hat(R) Enterprise Linux(R) 6.2 (for Intel64) Virtual MachineFunctionRed Hat(R) Enterprise Linux(R) 6.3 (for x86) Virtual MachineFunctionRed Hat(R) Enterprise Linux(R) 6.3 (for Intel64) Virtual MachineFunctionRed Hat(R) Enterprise Linux(R) 6.4 (for x86) Virtual MachineFunctionRed Hat(R) Enterprise Linux(R) 6.4 (for Intel64) Virtual MachineFunctionRed Hat(R) Enterprise Linux(R) 6.5 (for x86) Virtual MachineFunctionRed Hat(R) Enterprise Linux(R) 6.5 (for Intel64) Virtual MachineFunctionRed Hat(R) Enterprise Linux(R) 6.6 (for x86) Virtual MachineFunction
- viii -
Abbreviation Products
Red Hat(R) Enterprise Linux(R) 6.6 (for Intel64) Virtual MachineFunctionRed Hat(R) Enterprise Linux(R) 6.7 (for x86) Virtual MachineFunctionRed Hat(R) Enterprise Linux(R) 6.7 (for Intel64) Virtual MachineFunctionRed Hat(R) Enterprise Linux(R) 6.8 (for x86) Virtual MachineFunctionRed Hat(R) Enterprise Linux(R) 6.8 (for Intel64) Virtual MachineFunction
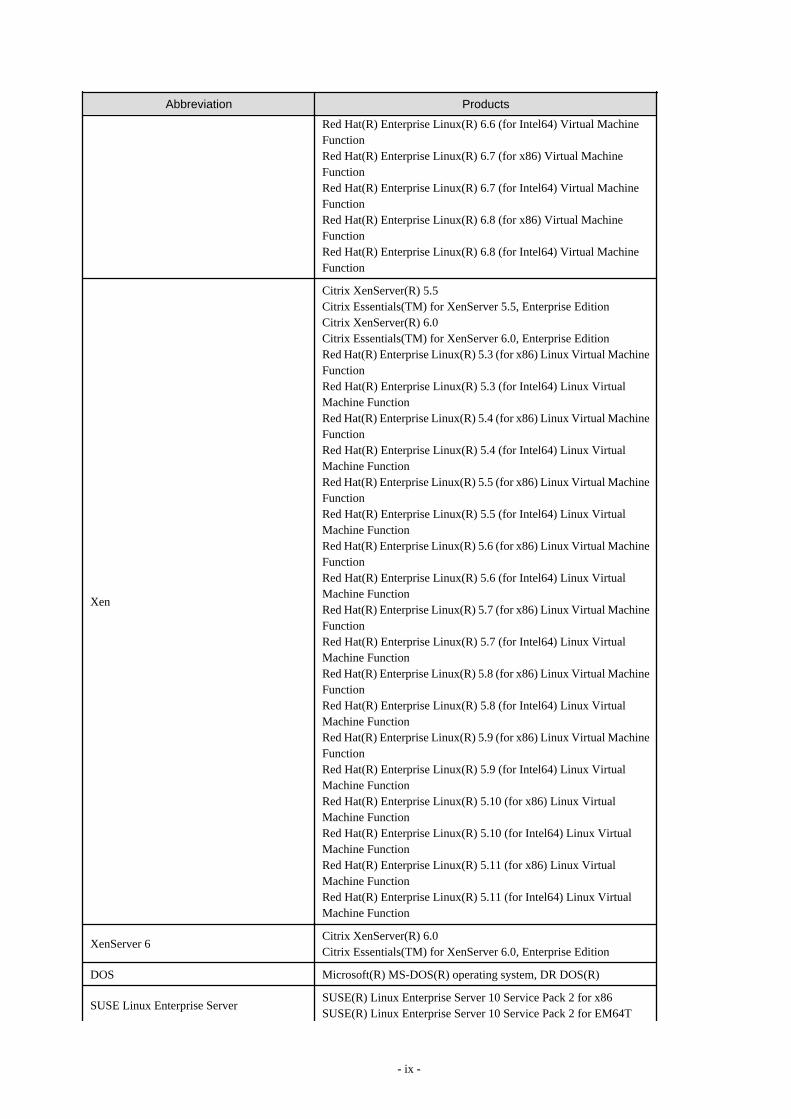
Xen
Citrix XenServer(R) 5.5Citrix Essentials(TM) for XenServer 5.5, Enterprise EditionCitrix XenServer(R) 6.0Citrix Essentials(TM) for XenServer 6.0, Enterprise EditionRed Hat(R) Enterprise Linux(R) 5.3 (for x86) Linux Virtual MachineFunctionRed Hat(R) Enterprise Linux(R) 5.3 (for Intel64) Linux VirtualMachine FunctionRed Hat(R) Enterprise Linux(R) 5.4 (for x86) Linux Virtual MachineFunctionRed Hat(R) Enterprise Linux(R) 5.4 (for Intel64) Linux VirtualMachine FunctionRed Hat(R) Enterprise Linux(R) 5.5 (for x86) Linux Virtual MachineFunctionRed Hat(R) Enterprise Linux(R) 5.5 (for Intel64) Linux VirtualMachine FunctionRed Hat(R) Enterprise Linux(R) 5.6 (for x86) Linux Virtual MachineFunctionRed Hat(R) Enterprise Linux(R) 5.6 (for Intel64) Linux VirtualMachine FunctionRed Hat(R) Enterprise Linux(R) 5.7 (for x86) Linux Virtual MachineFunctionRed Hat(R) Enterprise Linux(R) 5.7 (for Intel64) Linux VirtualMachine FunctionRed Hat(R) Enterprise Linux(R) 5.8 (for x86) Linux Virtual MachineFunctionRed Hat(R) Enterprise Linux(R) 5.8 (for Intel64) Linux VirtualMachine FunctionRed Hat(R) Enterprise Linux(R) 5.9 (for x86) Linux Virtual MachineFunctionRed Hat(R) Enterprise Linux(R) 5.9 (for Intel64) Linux VirtualMachine FunctionRed Hat(R) Enterprise Linux(R) 5.10 (for x86) Linux VirtualMachine FunctionRed Hat(R) Enterprise Linux(R) 5.10 (for Intel64) Linux VirtualMachine FunctionRed Hat(R) Enterprise Linux(R) 5.11 (for x86) Linux VirtualMachine FunctionRed Hat(R) Enterprise Linux(R) 5.11 (for Intel64) Linux VirtualMachine Function
XenServer 6Citrix XenServer(R) 6.0Citrix Essentials(TM) for XenServer 6.0, Enterprise Edition
DOS Microsoft(R) MS-DOS(R) operating system, DR DOS(R)
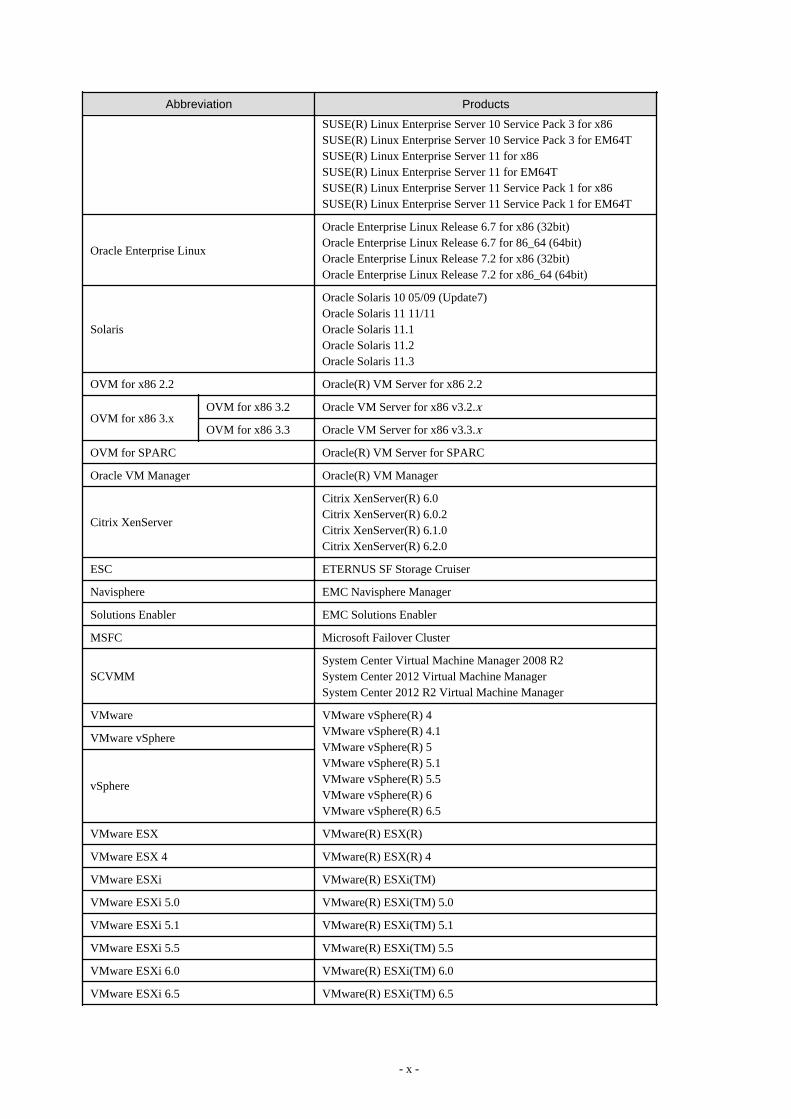
SUSE Linux Enterprise ServerSUSE(R) Linux Enterprise Server 10 Service Pack 2 for x86SUSE(R) Linux Enterprise Server 10 Service Pack 2 for EM64T
- ix -
Abbreviation Products
SUSE(R) Linux Enterprise Server 10 Service Pack 3 for x86SUSE(R) Linux Enterprise Server 10 Service Pack 3 for EM64TSUSE(R) Linux Enterprise Server 11 for x86SUSE(R) Linux Enterprise Server 11 for EM64TSUSE(R) Linux Enterprise Server 11 Service Pack 1 for x86SUSE(R) Linux Enterprise Server 11 Service Pack 1 for EM64T
Oracle Enterprise Linux
Oracle Enterprise Linux Release 6.7 for x86 (32bit)Oracle Enterprise Linux Release 6.7 for 86_64 (64bit)Oracle Enterprise Linux Release 7.2 for x86 (32bit)Oracle Enterprise Linux Release 7.2 for x86_64 (64bit)
Solaris
Oracle Solaris 10 05/09 (Update7)Oracle Solaris 11 11/11Oracle Solaris 11.1Oracle Solaris 11.2Oracle Solaris 11.3
OVM for x86 2.2 Oracle(R) VM Server for x86 2.2
OVM for x86 3.xOVM for x86 3.2 Oracle VM Server for x86 v3.2.x
OVM for x86 3.3 Oracle VM Server for x86 v3.3.x
OVM for SPARC Oracle(R) VM Server for SPARC
Oracle VM Manager Oracle(R) VM Manager
Citrix XenServer
Citrix XenServer(R) 6.0Citrix XenServer(R) 6.0.2Citrix XenServer(R) 6.1.0Citrix XenServer(R) 6.2.0
ESC ETERNUS SF Storage Cruiser
Navisphere EMC Navisphere Manager
Solutions Enabler EMC Solutions Enabler
MSFC Microsoft Failover Cluster
SCVMMSystem Center Virtual Machine Manager 2008 R2System Center 2012 Virtual Machine ManagerSystem Center 2012 R2 Virtual Machine Manager
VMware VMware vSphere(R) 4VMware vSphere(R) 4.1VMware vSphere(R) 5VMware vSphere(R) 5.1VMware vSphere(R) 5.5VMware vSphere(R) 6VMware vSphere(R) 6.5
VMware vSphere
vSphere
VMware ESX VMware(R) ESX(R)
VMware ESX 4 VMware(R) ESX(R) 4
VMware ESXi VMware(R) ESXi(TM)
VMware ESXi 5.0 VMware(R) ESXi(TM) 5.0
VMware ESXi 5.1 VMware(R) ESXi(TM) 5.1
VMware ESXi 5.5 VMware(R) ESXi(TM) 5.5
VMware ESXi 6.0 VMware(R) ESXi(TM) 6.0
VMware ESXi 6.5 VMware(R) ESXi(TM) 6.5
- x -
Abbreviation Products
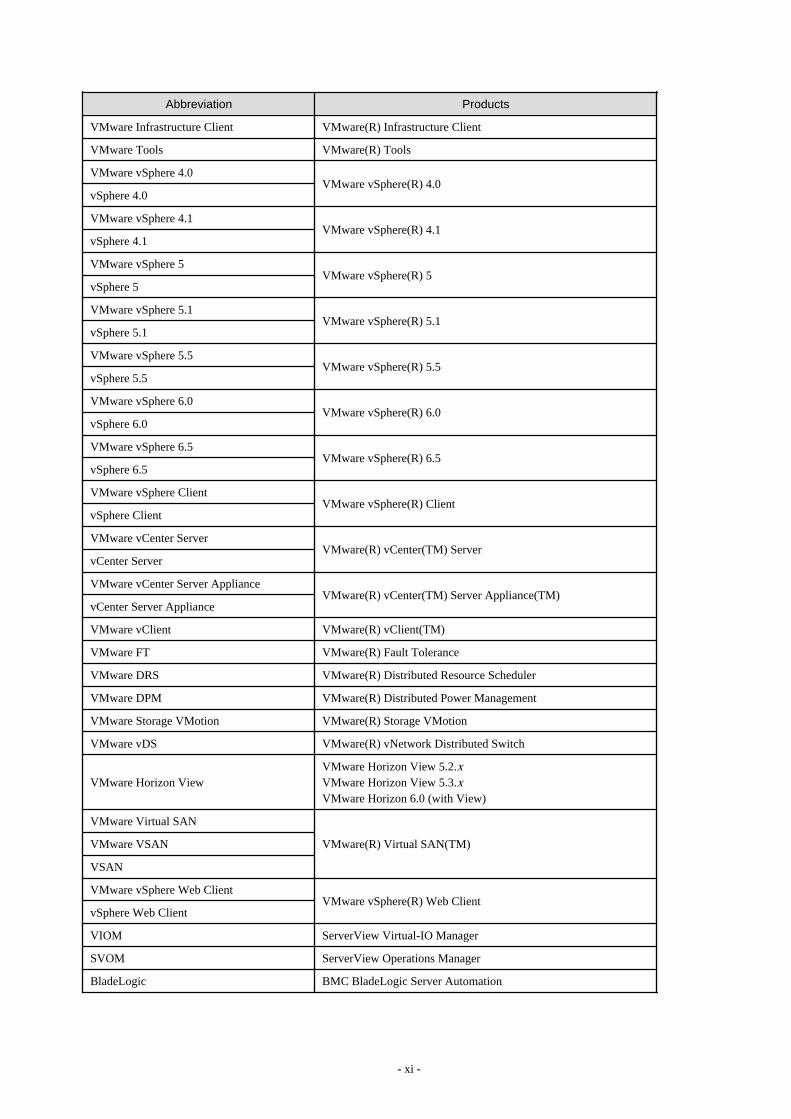
VMware Infrastructure Client VMware(R) Infrastructure Client
VMware Tools VMware(R) Tools
VMware vSphere 4.0VMware vSphere(R) 4.0
vSphere 4.0
VMware vSphere 4.1VMware vSphere(R) 4.1
vSphere 4.1
VMware vSphere 5VMware vSphere(R) 5
vSphere 5
VMware vSphere 5.1VMware vSphere(R) 5.1
vSphere 5.1
VMware vSphere 5.5VMware vSphere(R) 5.5
vSphere 5.5
VMware vSphere 6.0VMware vSphere(R) 6.0
vSphere 6.0
VMware vSphere 6.5VMware vSphere(R) 6.5
vSphere 6.5
VMware vSphere ClientVMware vSphere(R) Client
vSphere Client
VMware vCenter ServerVMware(R) vCenter(TM) Server
vCenter Server
VMware vCenter Server ApplianceVMware(R) vCenter(TM) Server Appliance(TM)
vCenter Server Appliance
VMware vClient VMware(R) vClient(TM)
VMware FT VMware(R) Fault Tolerance
VMware DRS VMware(R) Distributed Resource Scheduler
VMware DPM VMware(R) Distributed Power Management
VMware Storage VMotion VMware(R) Storage VMotion
VMware vDS VMware(R) vNetwork Distributed Switch
VMware Horizon ViewVMware Horizon View 5.2.xVMware Horizon View 5.3.xVMware Horizon 6.0 (with View)
VMware Virtual SAN
VMware(R) Virtual SAN(TM)VMware VSAN
VSAN
VMware vSphere Web ClientVMware vSphere(R) Web Client
vSphere Web Client
VIOM ServerView Virtual-IO Manager
SVOM ServerView Operations Manager
BladeLogic BMC BladeLogic Server Automation
- xi -

Abbreviation Products
ExcelMicrosoft(R) Office Excel(R) 2007Microsoft(R) Office Excel(R) 2010Microsoft(R) Office Excel(R) 2013
Excel 2007 Microsoft(R) Office Excel(R) 2007
Excel 2010 Microsoft(R) Office Excel(R) 2010
Excel 2013 Microsoft(R) Office Excel(R) 2013
Internet ExplorerWindows(R) Internet Explorer(R) 9Windows(R) Internet Explorer(R) 10Internet Explorer(R) 11
Firefox Firefox(R)
ServerView AgentServerView SNMP Agents for MS Windows (32bit-64bit)ServerView Agents LinuxServerView Agents VMware for VMware ESX Server
RCVE ServerView Resource Coordinator VE
ROR FUJITSU Software ServerView Resource Orchestrator
ROR VEFUJITSU Software ServerView Resource Orchestrator VirtualEdition
ROR CE FUJITSU Software ServerView Resource Orchestrator Cloud Edition
Resource CoordinatorSystemwalker Resource CoordinatorSystemwalker Resource Coordinator Virtual server Edition
Resource Coordinator VEServerView Resource Coordinator VESystemwalker Resource Coordinator Virtual server Edition
Resource Orchestrator FUJITSU Software ServerView Resource Orchestrator
SVFAB ServerView Fabric Manager
OfficeScan Trend Micro OfficeScan
Export Administration Regulation Declaration
Exportation/release of this document may require necessary procedures in accordance with the regulations of your resident countryand/or US export control laws.
Trademark Information
- BMC, BMC Software, and the BMC Software logo are the exclusive properties of BMC Software, Inc., are registered with the U.S.Patent and Trademark Office, and may be registered or pending registration in other countries.
- Citrix(R), Citrix XenServer(R), Citrix Essentials(TM), and Citrix StorageLink(TM) are trademarks of Citrix Systems, Inc. and/or oneof its subsidiaries, and may be registered in the United States Patent and Trademark Office and in other countries.
- Dell is a registered trademark of Dell Computer Corp.
- HP is a registered trademark of Hewlett-Packard Company.
- IBM is a registered trademark or trademark of International Business Machines Corporation in the U.S.
- Linux is a trademark or registered trademark of Linus Torvalds in the United States and other countries.
- Microsoft, Windows, MS-DOS, Windows Server, Windows Vista, Excel, Active Directory, and Internet Explorer are either registeredtrademarks or trademarks of Microsoft Corporation in the United States and other countries.
- Firefox is a trademark or registered trademark of the Mozilla Foundation in the United States and other countries.
- xii -

- Oracle and Java are registered trademarks of Oracle and/or its affiliates in the United States and other countries.
- Oracle is a registered trademark of Oracle Corporation and/or its affiliates.
- Red Hat, RPM and all Red Hat-based trademarks and logos are trademarks or registered trademarks of Red Hat, Inc. in the UnitedStates and other countries.
- Spectrum is a trademark or registered trademark of Computer Associates International, Inc. and/or its subsidiaries.
- SUSE is a registered trademark of SUSE LINUX AG, a Novell business.
- TREND MICRO and OfficeScan are registered trademarks of Trend Micro, Inc.
- VMware, the VMware "boxes" logo and design, Virtual SMP, and VMotion are registered trademarks or trademarks of VMware, Inc.in the United States and/or other jurisdictions.
- ServerView and Systemwalker are registered trademarks of FUJITSU LIMITED.
- All other brand and product names are trademarks or registered trademarks of their respective owners.
Notices
- The contents of this manual shall not be reproduced without express written permission from FUJITSU LIMITED.
- The contents of this manual are subject to change without notice.
Revision History
Month/Year Issued, Edition Manual Code
November 2011, First Edition J2X1-7607-01ENZ0(00)
December 2011, Edition 1.1 J2X1-7607-01ENZ0(01)
January 2012, Edition 1.2 J2X1-7607-01ENZ0(02)
February 2012, Edition 1.3 J2X1-7607-01ENZ0(03)
March 2012, Edition 1.4 J2X1-7607-01ENZ0(04)
April 2012, Edition 1.5 J2X1-7607-01ENZ0(05)
July 2012, Second Edition J2X1-7607-02ENZ0(00)
October 2012, Third Edition J2X1-7607-03ENZ0(00)
December 2012, Fourth Edition J2X1-7607-04ENZ0(00)
January 2013, Fifth Edition J2X1-7607-05ENZ0(00)
January 2013, Edition 5.1 J2X1-7607-05ENZ0(01)
January 2013, Edition 5.2 J2X1-7607-05ENZ0(02)
June 2013, Edition 5.3 J2X1-7607-05ENZ0(03)
August 2013, Edition 5.4 J2X1-7607-05ENZ0(04)
December 2013, Sixth Edition J2X1-7607-06ENZ0(00)
February 2014, Edition 6.1 J2X1-7607-06ENZ0(01)
April 2014, Edition 6.2 J2X1-7607-06ENZ0(02)
June 2014, Edition 6.3 J2X1-7607-06ENZ0(03)
April 2015, Seventh Edition J2X1-7607-07ENZ0(00)
July 2015, Edition 7.1 J2X1-7607-07ENZ0(01)
September 2015, Edition 7.2 J2X1-7607-07ENZ0(02)
- xiii -

Month/Year Issued, Edition Manual Code
December 2015, Edition 7.3 J2X1-7607-07ENZ0(03)
January 2016, Edition 7.4 J2X1-7607-07ENZ0(04)
June 2016, Edition 7.5 J2X1-7607-07ENZ0(05)
September 2016, Edition 7.6 J2X1-7607-07ENZ0(06)
December 2016, Edition 7.7 J2X1-7607-07ENZ0(07)
February 2017, Edition 7.8 J2X1-7607-07ENZ0(08)
April 2017, Eighth Edition J2X1-7607-08ENZ0(00)
Copyright
Copyright 2010-2017 FUJITSU LIMITED
- xiv -

ContentsPart 1 Command Reference.....................................................................................................................................................1
Chapter 1 Overview..................................................................................................................................................................2
Chapter 2 Login........................................................................................................................................................................52.1 rcxlogin................................................................................................................................................................................................ 5
Chapter 3 Resource Operations...............................................................................................................................................83.1 rcxadm chassis..................................................................................................................................................................................... 83.2 rcxadm netconfig................................................................................................................................................................................. 93.3 rcxadm netdevice............................................................................................................................................................................... 113.4 rcxadm server.....................................................................................................................................................................................24
Chapter 4 Image Operations.................................................................................................................................................. 374.1 rcxadm image.....................................................................................................................................................................................37
Chapter 5 Control and Environment Setup.............................................................................................................................445.1 deployment_service_uninstall........................................................................................................................................................... 445.2 rcxadm agtctl......................................................................................................................................................................................455.3 rcxadm authctl....................................................................................................................................................................................475.4 rcxadm certctl.................................................................................................................................................................................... 515.5 rcxadm dbctl...................................................................................................................................................................................... 535.6 rcxadm deployctl................................................................................................................................................................................545.7 rcxadm eventctl..................................................................................................................................................................................555.8 rcxadm imagemgr.............................................................................................................................................................................. 575.9 rcxadm lanctl......................................................................................................................................................................................595.10 rcxadm license................................................................................................................................................................................. 615.11 rcxadm mgrctl.................................................................................................................................................................................. 625.12 rcxadm servermgr............................................................................................................................................................................ 665.13 rcxadm storagemgr.......................................................................................................................................................................... 685.14 macbindconfig................................................................................................................................................................................. 70
Chapter 6 Backup and Restoration Operations for Configuration Definition Information....................................................... 726.1 rcxbackup...........................................................................................................................................................................................726.2 rcxkeydefbackup................................................................................................................................................................................746.3 rcxkeydefrestore.................................................................................................................................................................................776.4 rcxrestore........................................................................................................................................................................................... 786.5 scwbackup..........................................................................................................................................................................................806.6 scwrestore.......................................................................................................................................................................................... 83
Chapter 7 Maintenance Commands.......................................................................................................................................867.1 inst_collectinfo (Collection of Investigation Data during Installation)............................................................................................. 86
Part 2 File Reference..............................................................................................................................................................88
Chapter 8 XML Files...............................................................................................................................................................898.1 Network Configuration Information..................................................................................................................................................89
8.1.1 Creation.......................................................................................................................................................................................898.1.2 Modification..............................................................................................................................................................................117
8.2 Network Device Model Definition.................................................................................................................................................. 119
Appendix A GUI/CLI............................................................................................................................................................. 123
Index.....................................................................................................................................................................................124
- xv -
Part 1 Command Reference
Chapter 1 Overview..........................................................................................................................................2
Chapter 2 Login................................................................................................................................................5
Chapter 3 Resource Operations.......................................................................................................................8
Chapter 4 Image Operations.......................................................................................................................... 37
Chapter 5 Control and Environment Setup.....................................................................................................44
Chapter 6 Backup and Restoration Operations for Configuration Definition Information............................... 72
Chapter 7 Maintenance Commands...............................................................................................................86
- 1 -
Chapter 1 OverviewThis chapter provides an overview of the commands available in Resource Orchestrator.
Five types of commands are available: the login command, the resource operation commands, the image operation command, the controland environment setup commands, and the maintenance commands.
- Login Command
rcxlogin
- Resource Operation Commands
rcxadm chassisrcxadm netconfigrcxadm netdevicercxadm server (rcxserver) (*)
- Image Operation Command
rcxadm image (rcximage) (*)
- Control and Environment Setup Commands
deployment_service_uninstallrcxadm agtctlrcxadm authctlrcxadm certctlrcxadm dbctlrcxadm deployctlrcxadm eventctlrcxadm imagemgrrcxadm lanctlrcxadm licensercxadm mgrctlrcxadm servermgrrcxadm storagemgrmacbindconfig
- Backup and restore the configuration definition information of Resource Orchestrator Commands
rcxbackuprcxkeydefbackuprcxkeydefrestorercxrestorescwbackupscwrestore
- Maintenance Commands
inst_collectinfo
* Note: rcxserver and rcximage are abbreviated forms of the rcxadm server and rcxadm image commands. They both produce exactly thesame results as their counterparts.
User accounts with administrative privileges within the operating system have access to all commands.When using Windows, the OS administrator is an Administrator account. The rcxadm command can only be used from an Administratoraccount.For user accounts that do not have administrative privileges within the operating system, it is necessary to first log into ResourceOrchestrator as a privileged user with the login command. This will grant access to the resource operation, control and environment setup(only rcxadm mgrctl snap -all), and image operation command.For details on privileged users, refer to "Chapter 5 Managing User Accounts" in the "User's Guide VE".
The table below lists the permissions required to execute each command depending on the server on which they are executed.
- 2 -
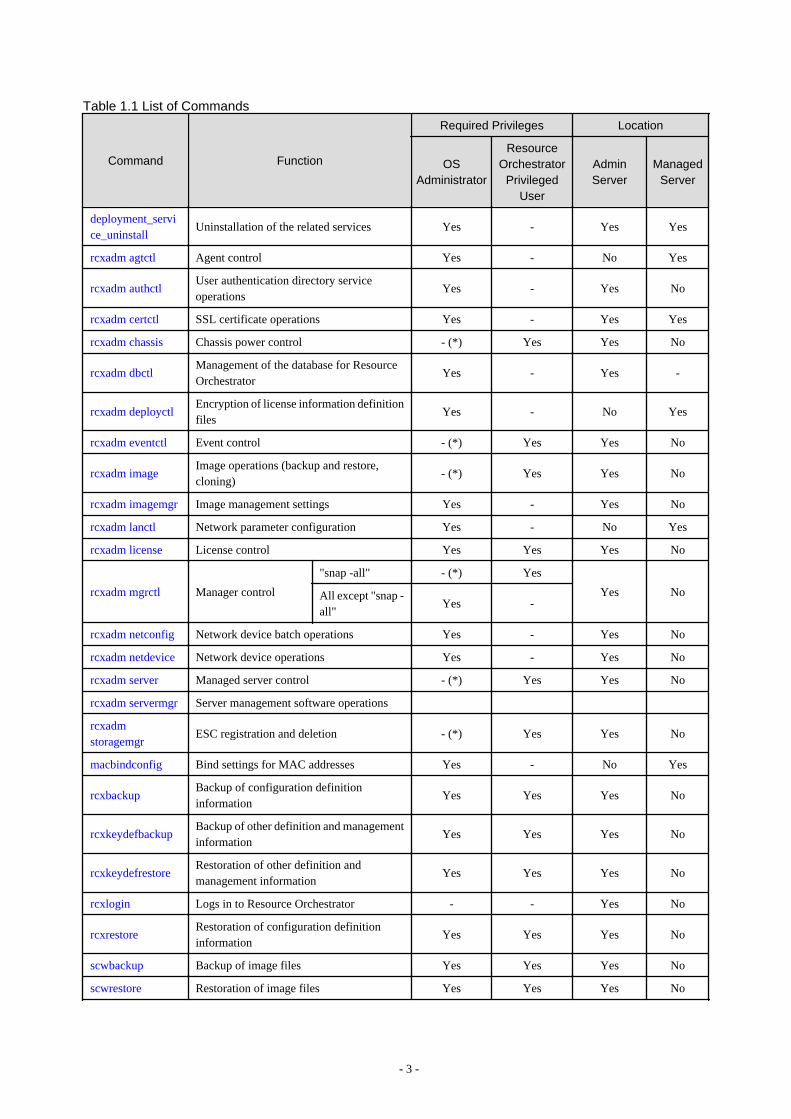
Table 1.1 List of Commands
Command Function
Required Privileges Location
OSAdministrator
ResourceOrchestrator
PrivilegedUser
AdminServer
ManagedServer
deployment_service_uninstall
Uninstallation of the related services Yes - Yes Yes
rcxadm agtctl Agent control Yes - No Yes
rcxadm authctlUser authentication directory serviceoperations
Yes - Yes No
rcxadm certctl SSL certificate operations Yes - Yes Yes
rcxadm chassis Chassis power control - (*) Yes Yes No
rcxadm dbctlManagement of the database for ResourceOrchestrator
Yes - Yes -
rcxadm deployctlEncryption of license information definitionfiles
Yes - No Yes
rcxadm eventctl Event control - (*) Yes Yes No
rcxadm imageImage operations (backup and restore,cloning)
- (*) Yes Yes No
rcxadm imagemgr Image management settings Yes - Yes No
rcxadm lanctl Network parameter configuration Yes - No Yes
rcxadm license License control Yes Yes Yes No
rcxadm mgrctl Manager control
"snap -all" - (*) Yes
Yes NoAll except "snap -all"
Yes -
rcxadm netconfig Network device batch operations Yes - Yes No
rcxadm netdevice Network device operations Yes - Yes No
rcxadm server Managed server control - (*) Yes Yes No
rcxadm servermgr Server management software operations
rcxadmstoragemgr
ESC registration and deletion - (*) Yes Yes No
macbindconfig Bind settings for MAC addresses Yes - No Yes
rcxbackupBackup of configuration definitioninformation
Yes Yes Yes No
rcxkeydefbackupBackup of other definition and managementinformation
Yes Yes Yes No
rcxkeydefrestoreRestoration of other definition andmanagement information
Yes Yes Yes No
rcxlogin Logs in to Resource Orchestrator - - Yes No
rcxrestoreRestoration of configuration definitioninformation
Yes Yes Yes No
scwbackup Backup of image files Yes Yes Yes No
scwrestore Restoration of image files Yes Yes Yes No
- 3 -

Command Function
Required Privileges Location
OSAdministrator
ResourceOrchestrator
PrivilegedUser
AdminServer
ManagedServer
inst_collectinfoCollecting investigation data duringinstallation
Yes - Yes No
Yes: Can be usedNo: Cannot be used-: Not required* Note: This command can also be executed by a user with administrative privileges within the operating system. However, if the sameuser executes this command after logging into Resource Orchestrator, the operating system privileges will be replaced by ResourceOrchestrator privileges. To use this command when logged into Resource Orchestrator, administrative privileges for Resource Orchestratorare required.
Information
- Executing privileged commands within a script requires the user to be logged in with administrative privileges within the operatingsystem. Otherwise, the rcxlogin -save command should first be run to grant access to privileged commands from scripts.Refer to "2.1 rcxlogin" for details.
- If, in Windows Server 2008 or later, a user account with administrative privileges that does not have the user ID "Administrator" startsup a command prompt from the menu, commands executed in that prompt cannot be executed with administrative privileges.Right-click the command prompt in the menu, select [Run as administrator] from the displayed menu to start up the command prompt,and run the required command from there.
Point
Commands available on the admin server are all located under the following folder.
[Windows Manager]
- Installation_folder\SVROR\Manager\bin
In Systemwalker Resource Coordinator VE V13.2 and VE V13.3, when using commands under the following folder within the createdbatch file, they must be changed to the specified folders, because the folder configuration for Resource Orchestrator is different.
- Installation_folder\Site Manager\opt\FJSVrcxmr\bin
[Linux Manager]
- /opt/FJSVrcvmr/bin
- 4 -

Chapter 2 LoginThis chapter explains the command used to log in to Resource Orchestrator.
2.1 rcxlogin
Name
[Windows Manager]Installation_folder\SVROR\Manager\bin\rcxlogin - Logs in to Resource Orchestrator
[Linux Manager]/opt/FJSVrcvmr/bin/rcxlogin - Logs in to Resource Orchestrator
Format
rcxlogin [-save] user_name
Description
rcxlogin is the command used to authenticate users in Resource Orchestrator.
If you are using commands for which administrative privileges are required, first use this command to log in as a user with administrativeprivileges.If a user already has administrative privileges within the operating system, it is not necessary for that user to execute this command inorder to use Resource Orchestrator commands.
user_name
Specify a user ID that has been registered in Resource Orchestrator. You will then be asked to enter the password of the specified user.If the correct password is entered, a new command prompt will be displayed showing that the authentication succeeded.If an invalid password or user ID is entered, an error message is displayed.
To log off, execute the exit command. To log in as a different user without logging off, re-execute the rcxlogin command.
Option
-save (optional)
Saves the entered password. This password is remembered only for the user account (within the operating system) used to execute thiscommand. Once a password has been saved for a given user account, this command can then be executed from the same accountwithout being asked for a password again.Saving the password also allows scripts to use commands for which administrative privileges are required.Refer to "Automation Using Scripts" in the "Examples" section for details.
Note
- Saving the password makes it possible to log in to Resource Orchestrator just by logging in to the operating system user accountfor which the password was saved. When using this function, ensure that strict control is exercised over this user account on theadmin server.
- In a clustered manager configuration, use the following procedure to save the password on both the primary and secondary clusternodes.
[Windows Manager]
- 5 -

1. Start the cluster service on the primary node.
In the Failover Cluster Management tree, right-click [RC-manager] under [Services and Applications], and select [Bringthis service or application online] from the popup menu.Confirm that all resources are turned online.
2. Run the rcxlogin -save user_name command on the primary node.
3. Move the manager "service or application" to the secondary node.
Confirm that all resources are turned online on the secondary node.
4. Run the rcxlogin -save user_name command on the secondary node.
5. Move the manager "service or application" back to the primary node.
Confirm that all resources are turned online on the primary node.
[Linux Manager]
1. Start the cluster service on the primary node.
Use the cluster system's operation management view (Cluster Admin) and start the cluster service of the manager.
Confirm that all resources are turned online.
2. Run the rcxlogin -save user_name command on the primary node.
3. Use the cluster system's operation management view (Cluster Admin) and switch to the secondary node.
Confirm that all resources are turned online on the secondary node.
4. Run the rcxlogin -save user_name command on the secondary node.
5. Use the cluster system's operation management view (Cluster Admin) and switch to the primary node.
Confirm that all resources are turned online on the primary node.
For a user account with OS administrative privileges, Resource Orchestrator commands can be executed freely without needingto save a password first.
Requirements
Permissions
Not required.
Location
Admin server
Examples
- Logging in Using Password Authentication
>rcxlogin userA <RETURN>Password: password <RETURN>
- Automation Using Scripts
To use commands requiring administrative privileges from within a script, thus allowing automated calls from external products, theuser account's password must be registered in advance using the rcxlogin -save command.
Within the script, the RCX_USER environment variable must be defined and set to the user ID of the account for which the passwordwas saved.
Once this variable is properly set, Resource Orchestrator commands can be executed using the previously saved password.
- 6 -
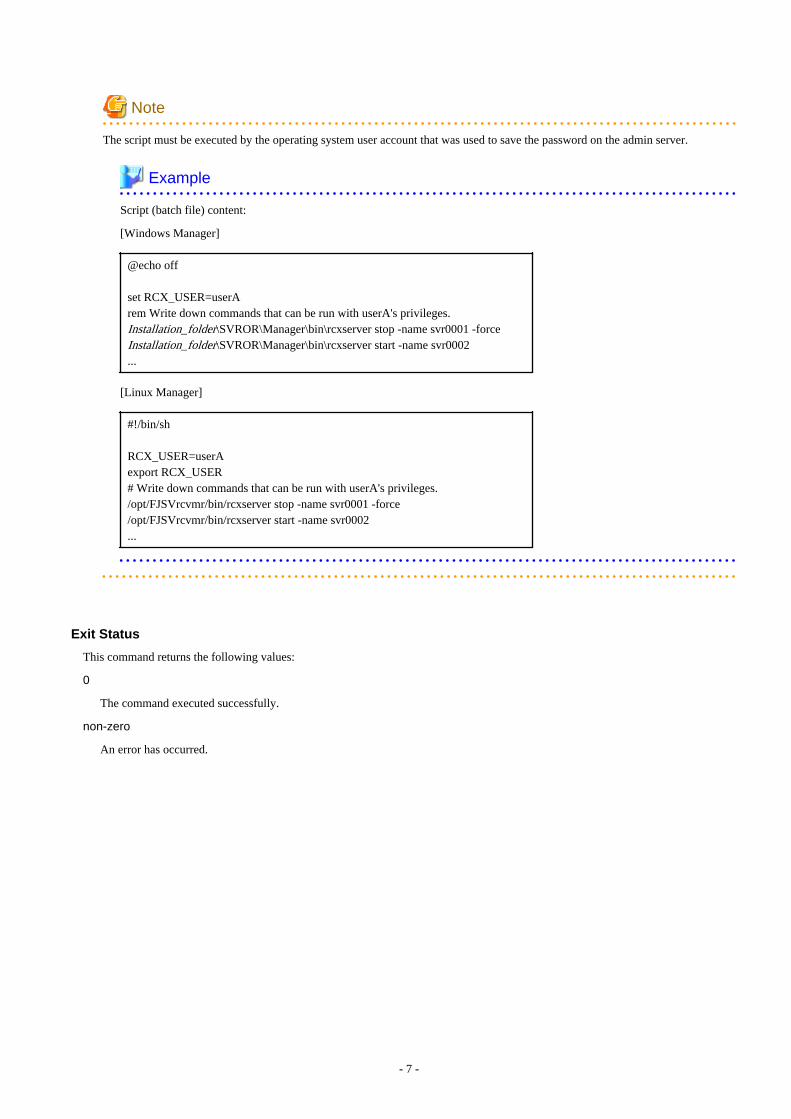
Note
The script must be executed by the operating system user account that was used to save the password on the admin server.
Example
Script (batch file) content:
[Windows Manager]
@echo off
set RCX_USER=userArem Write down commands that can be run with userA's privileges.Installation_folder\SVROR\Manager\bin\rcxserver stop -name svr0001 -forceInstallation_folder\SVROR\Manager\bin\rcxserver start -name svr0002...
[Linux Manager]
#!/bin/sh
RCX_USER=userAexport RCX_USER# Write down commands that can be run with userA's privileges./opt/FJSVrcvmr/bin/rcxserver stop -name svr0001 -force/opt/FJSVrcvmr/bin/rcxserver start -name svr0002...
Exit Status
This command returns the following values:
0
The command executed successfully.
non-zero
An error has occurred.
- 7 -

Chapter 3 Resource OperationsThis chapter explains the commands used to manage resources in Resource Orchestrator.
3.1 rcxadm chassis
Name
[Windows Manager]Installation_folder\SVROR\Manager\bin\rcxadm chassis - Chassis power control
[Linux Manager]/opt/FJSVrcvmr/bin/rcxadm chassis - Chassis power control
Format
rcxadm chassis start -name resource [-nowait]
rcxadm chassis stop -name resource [-nowait] [-force]
Description
rcxadm chassis is the command used to power on or power off a blade chassis.
This function can only be used with chassis for PRIMERGY BX servers.
Subcommands
start
Powers on the target chassis.
stop
Powers off the target chassis.
Options
-name resource
Specify the name of the target chassis in resource.
-nowait (optional)
Use this option to return directly to the command prompt without waiting for the command to complete its execution.
Specify the following options when using the stop subcommand:
-force (optional)
Use this option to forcibly stop a chassis.
Requirements
Permissions
One of the following permissions is required:
- OS Administrator
- Resource Orchestrator Privileged User
- 8 -

Location
Admin server
Exit Status
This command returns the following values:
0
The command executed successfully.
non-zero
An error has occurred.
Note
- When powering off a chassis, all management blades contained in the target chassis will be gracefully shut down. This function requiresServerView Agents to be installed on all server blades in the chassis.
- After starting a chassis, it may take some time until it is possible to power on server blades. When powering on server blades afterstarting a chassis, wait several minutes before doing so.
- Server blade BIOS settings can be configured to automatically start up when powering on the chassis. Refer to the server blade manualfor details about such settings.
3.2 rcxadm netconfig
Name
[Windows Manager]Installation_folder\SVROR\Manager\bin\rcxadm netconfig - network device batch operations
[Linux Manager]/opt/FJSVrcvmr/bin/rcxadm netconfig - network device batch operations
Format
rcxadm netconfig export -file file.xml
rcxadm netconfig import -file file.xml [-dryrun|-nowait]
Description
rcxadm netconfig is the command used to manage network devices in one operation.
Subcommands
export
Exports the network configuration information of all network devices registered in XML format.
import
Imports all network configuration information defined in the XML file.For network device resources, they are created or modified according to the registration mode under the Netdevices element (the Modeelement) defined in the network configuration information.
- 9 -
For link information, they are created or modified according to the registration mode under the Links element (the Mode element)defined in the network configuration information.
Information
- If importing is performed for network devices (with the status (unregistered)) detected by LAN switch searching, the import processis terminated and registration fails.
For registration of network devices with the status unregistered, after deleting those network devices, either import the networkconfiguration information file again or create new network devices.For creation and deletion of network devices, use the rcxadm netdevice command.For details on the rcxadm netdevice command, refer to "3.3 rcxadm netdevice".
- For a network device with the status "registered", when importing the XML definitions specifying "add" for the registration mode(the Mode element under the Netdevices element), the target network device is not modified. The importing process will becontinued for other network devices defined in the XML definitions.When performing import operations by specifying the XML definitions to use "modify" for the registration mode (the Modeelement under the Netdevices element), update operations are performed for the network devices registered using the same IPaddress as the admin IP address (Netdevice ip).
- For already registered link information, when importing the XML definitions specifying "add" for the registration mode (the Modeelement under the Links element), already registered link information is not modified. The importing process will be continuedfor other link information defined in the XML definitions. To determine whether the link information has been registered, checkthe combination of "Admin IP Address of Device (Device ip)" and "Connection Port (Port)".When importing the information specifying the XML definition using "modify" for the registration mode (the Mode element underthe Links element), delete all registered link information, and then register the link information specified in the XML definitions.
Options
-dryrun|-nowait
-dryrun
Use this option to verify the XML file format that defines the network configuration information, without registering resources.
-nowait
Use this option to return the command without waiting for completion of the operation for the network configuration informationspecified in the subcommands.
-file file.xml
- For the Import Subcommand
In file.xml, specify the XML file that defines all network resources for creation.
- For the Export Subcommand
In file.xml, specify the destination file name for the XML file to be exported.
For details on the XML file definition, refer to "8.1.1 Creation".
Information
If an existing XML file name is specified for the -file option of the export subcommand, message number 65927 will be output andthe export operation will fail.
- 10 -
Note
This command can only be executed when expanding the scope of network device support. For the procedure for expanding the scope ofnetwork device support, refer to "7.5.1 Enabling the Network Device Management Function" in the "User's Guide VE".
3.3 rcxadm netdevice
Name
[Windows Manager]Installation_folder\SVROR\Manager\bin\rcxadm netdevice - network device operations
[Linux Manager]/opt/FJSVrcvmr/bin/rcxadm netdevice - network device operations
Format
rcxadm netdevice create -file file.xml [-nowait]
rcxadm netdevice delete -name name [-nowait]
rcxadm netdevice list
rcxadm netdevice modify -name name -file file.xml [-nowait]
rcxadm netdevice set -name name -attr mode={active [-with_va]|maintenance} [-nowait]
rcxadm netdevice show -name name
rcxadm netdevice refresh -name name [-recreate] [-nowait]
Description
rcxadm netdevice is the command used to operate network devices.
Subcommands
create
Creates a network device.
Information
- If two or more pieces of network device information are defined in the network configuration information definition file, theresource creation process is terminated and device registration fails.When registering two or more network devices for resources in one operation, use the rcxadm netconfig command.
delete
Deletes a network device.
list
Displays a list of network devices.
The following detailed information is displayed:
Table 3.1 Network Device Information
Item Name Description
NAME Network device name
IPADDRESS Admin IP address for the network device
- 11 -
Item Name Description
NETDEVICE_TYPES
Network device type
When there is more than one, they are displayed separated bycommas.
For virtual appliances, the type is displayed with "(virtual)" added.
STATUS
Network device operation status
One of the following is displayed:
- For normal status
"normal" is displayed.
- For error status
"error" is displayed.
- For warning status
"Warning" is displayed.
- For unknown status
"unknown" is displayed.
MAINTENANCE
Maintenance mode setting status for the network device
One of the following is displayed:
- When maintenance mode is set
"ON" is displayed.
- When maintenance mode is not set
"OFF" is displayed.
modify
Modifies a network device.
set
Perform switchover of the maintenance mode of the network device.
show
Displays the detailed information for a network device.
The following information is displayed:
Table 3.2 Detailed Information for Network Devices
Item Name Description
Name Network device name
SystemName System name
IPAddress Admin IP address
ProductName Device name (product name)
ModelName Model name
VendorName Vendor name
Firmware Firmware version
Location The location of the device is displayed.
StatusNetwork device operation status
One of the following is displayed:
- 12 -

Item Name Description
- For normal status
"normal" is displayed.
- For error status
"error" is displayed.
- For warning status
"Warning" is displayed.
- For unknown status
"unknown" is displayed.
StatusCause
If the operational status of the network device is one other than"normal"
One of the following is displayed:
- When there is no response for ping
"Ping unreachable" is displayed.
- When there is no response for SNMP
"SNMP unreachable" is displayed.
- When there is no response for NETCONF
"NETCONF unreachable" is displayed.
- When automatic configuration failed
"auto configuration failed" is displayed.
- When an error is detected in a switch in the domain of theEthernet Fabric
"Domain status error" is displayed.
If the operational status is normal, "-" is displayed.
NetdeviceTypes
Network device type
When there is more than one, they are displayed separated bycommas.When the type is omitted, only the item name is displayed and thetype is not displayed.
FabricType
Fabric type
One of the following is displayed:
- When using Converged Fabric
"C-Fabric" is displayed.
- When using VCS
"VCS" is displayed.
This is displayed only when the type of network device is "Fabric".
Maintenance
Maintenance mode setting status for the network device
One of the following is displayed:
- When maintenance mode is set
"ON" is displayed.
- When maintenance mode is not set
- 13 -
Item Name Description
"OFF" is displayed.
FabricId
Fabric ID
This is only displayed when the network device type is "Fabric" andthe fabric type is "C-Fabric".
VCSId
VCS ID
This is only displayed when the network device type is "Fabric" andthe fabric type is "VCS".
ManagementHost
Management Host
The IP address and resource name of the management host (thephysical server on which the IPCOM VX or NS Appliance operates)are displayed.
They are only displayed for virtual appliances.
Redundancy Group ID
Redundancy[GroupDevice]
Group device name
When there is more than one, they are displayed separated bycommas.
Port[num]
Port name
In num, the index number of a port element is displayed. The numberis an integer starting from "0".
Port[num][Link]
Port link status
One of the following is displayed:
- For link-up status
"up" is displayed.
- For link-down status
"down" is displayed.
- For unknown status
"unknown" is displayed.
In num, the index number of a port element is displayed. The numberis an integer starting from "0".
Port[num][PhysicalState]
Port communication status
This is displayed in the format of line speed/communication mode.The unit of line speed is in Mbps.For the communication mode, one of the following is displayed:
- For full duplex line
"F" is displayed.
- For half duplex lines
"H" is displayed.
- For unknown status
A hyphen ("-") is displayed.
In num, the index number of a port element is displayed. The numberis an integer starting from "0".
Port[num][Type] Port type
- 14 -
Item Name Description
When the fabric type is "C-Fabric", one of the following is displayed:
- For the port connected to a server
"EP" is displayed.
- For the port connected to another network device
"CIR" is displayed.
When the fabric type is "VCS", one of the following is displayed:
- For the port connected to something other than VCS
"Edge" is displayed.
- For the port connecting VDXs in a VCS
"ISL" is displayed.
In num, the index number of a port element is displayed. The numberis an integer starting from "0".
This is displayed only when the type of network device is "Fabric".
Port[num][DistributionMode]
Packet distribution mode
One of the following is displayed:
- When performing distribution of S-TAG(TPID=88a8)
"VLAN(S-TAG)" is displayed.
- When performing distribution of MAC addresses
"MAC" is displayed.
- When performing distribution of C-TAG(TPID=8100)
"VLAN(C-TAG)" is displayed.
- When not performing distribution
"no-distribution" is displayed.
- When performing distribution of VLANs other than S-TAG(TPID=88a8) and C-TAG(TPID=8100)
"VLAN(other)" is displayed.
In num, the index number of a port element is displayed. The numberis an integer starting from "0".
This is only displayed for IPCOM VA.
Port[num][Stag]
S-TAG ID
The ID of the S-TAG used for IPCOM VA port distribution isdisplayed.
In num, the index number of a port element is displayed. The numberis an integer starting from "0".
It is only displayed when the packet distribution mode for IPCOMVA is "VLAN(S-TAG)".
Port[num][Ctag]
C-TAG ID
The ID of the C-TAG used for the IPCOM VA port distribution isdisplayed.
In num, the index number of a port element is displayed. The numberis an integer starting from "0".
- 15 -

Item Name Description
It is only displayed when the packet distribution mode for IPCOMVA is "VLAN(C-TAG)".
Port[num][OtherVlan]
VLAN IDs other than S-TAG and C-TAG
VLAN IDs other than the S-TAG and C-TAG used for IPCOM VAport distribution are displayed.
In num, the index number of a port element is displayed. The numberis an integer starting from "0".
It is only displayed when the packet distribution mode for IPCOMVA is "VLAN(other)".
Vlan[num]
VLAN ID
In num, the index number of a VLAN element is displayed. Thenumber is an integer starting from "0".
Vlan[num][UntaggedPort]
Name of the port belonging to an Untagged port of VLAN ID
In num, the index number of a VLAN element is displayed. Thenumber is an integer starting from "0".When there is more than one, they are displayed separated bycommas.Some VLANs which have been configured with an AMPP functionfor VCS fabrics may not be displayed.
Vlan[num][TaggedPort]
Name of the port belonging to a Tagged port of VLAN ID
In num, the index number of a VLAN element is displayed. Thenumber is an integer starting from "0".When there is more than one, they are displayed separated bycommas.
Link[num][NeighborResourceName]
Name of the resource linked to the port number [num]
In num, the index number of a port element is displayed. The numberis an integer starting from "0".
Link[num][NeighborPort]
Name of the port of the resource linked to the port number [num]
In num, the index number of a port element is displayed. The numberis an integer starting from "0".
Link[num][NeighborNicIndex]
Name of the port of the resource linked to the port number [num]
When the connection destination is a rack mount server and the portfor display (NicIndex) is specified, the name of the port of theresource linked to the port number [num] is output.
In num, the index number of a port element is displayed. The numberis an integer starting from "0".
LoginInfo[num][User]
User name of the account
In num, the index number of an account element is displayed. Thenumber is an integer starting from "0".
LoginInfo[num][IPAddress]
Destination IP address of the account
In num, the index number of an account element is displayed. Thenumber is an integer starting from "0".
LoginInfo[num][Port]
Destination port number of the account
In num, the index number of an account element is displayed. Thenumber is an integer starting from "0".
- 16 -

Item Name Description
LoginInfo[num][Protocol]
Protocol name used by the account
In num, the index number of an account element is displayed. Thenumber is an integer starting from "0".
LoginInfo[num][Authority]
Account privileges
One of the following is displayed:
- For administrator authority
"administrator" is displayed.
- For user authority
"user" is displayed.
In num, the index number of an account element is displayed. Thenumber is an integer starting from "0".
LoginInfo[num][AuthType]
Management method of account authentication information
One of the following is displayed:
- When the information is managed within a network device
"local password" is displayed.
- When the information is managed within an external server
"external server" is displayed.
In num, the index number of an account element is displayed. Thenumber is an integer starting from "0".
LoginInfo[num][LoginCheck]
Check results of account availability
One of the following is displayed:
- When the account can be used
"Successful" is displayed.
- When the account cannot be used
"Failed" is displayed.
- When the account has not been checked
"Unchecked" is displayed.
In num, the index number of an account element is displayed. Thenumber is an integer starting from "0".
SnmpCommunityName SNMP community name
FaultMonitoringMethod
Method of fault monitoring
One of the following is displayed:
- When alive monitoring is performed using ping
"ping" is displayed.
- When the status is monitored using SNMP
"SNMP" is displayed.
- When the status is monitored using NETCONF
"NETCONF" is displayed.
When there are multiple monitoring methods employed, they aredisplayed separated by commas.
- 17 -
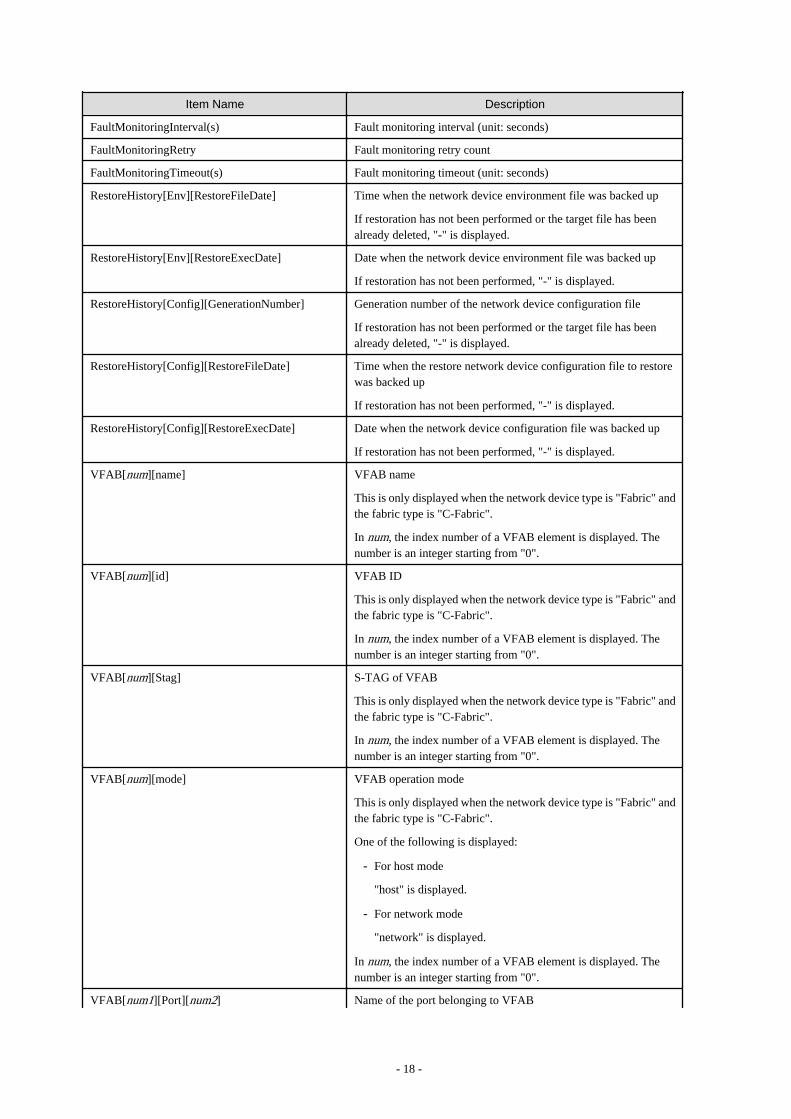
Item Name Description
FaultMonitoringInterval(s) Fault monitoring interval (unit: seconds)
FaultMonitoringRetry Fault monitoring retry count
FaultMonitoringTimeout(s) Fault monitoring timeout (unit: seconds)
RestoreHistory[Env][RestoreFileDate] Time when the network device environment file was backed up
If restoration has not been performed or the target file has beenalready deleted, "-" is displayed.
RestoreHistory[Env][RestoreExecDate] Date when the network device environment file was backed up
If restoration has not been performed, "-" is displayed.
RestoreHistory[Config][GenerationNumber] Generation number of the network device configuration file
If restoration has not been performed or the target file has beenalready deleted, "-" is displayed.
RestoreHistory[Config][RestoreFileDate] Time when the restore network device configuration file to restorewas backed up
If restoration has not been performed, "-" is displayed.
RestoreHistory[Config][RestoreExecDate] Date when the network device configuration file was backed up
If restoration has not been performed, "-" is displayed.
VFAB[num][name] VFAB name
This is only displayed when the network device type is "Fabric" andthe fabric type is "C-Fabric".
In num, the index number of a VFAB element is displayed. Thenumber is an integer starting from "0".
VFAB[num][id] VFAB ID
This is only displayed when the network device type is "Fabric" andthe fabric type is "C-Fabric".
In num, the index number of a VFAB element is displayed. Thenumber is an integer starting from "0".
VFAB[num][Stag] S-TAG of VFAB
This is only displayed when the network device type is "Fabric" andthe fabric type is "C-Fabric".
In num, the index number of a VFAB element is displayed. Thenumber is an integer starting from "0".
VFAB[num][mode] VFAB operation mode
This is only displayed when the network device type is "Fabric" andthe fabric type is "C-Fabric".
One of the following is displayed:
- For host mode
"host" is displayed.
- For network mode
"network" is displayed.
In num, the index number of a VFAB element is displayed. Thenumber is an integer starting from "0".
VFAB[num1][Port][num2] Name of the port belonging to VFAB
- 18 -
Item Name Description
This is only displayed when the network device type is "Fabric" andthe fabric type is "C-Fabric".
In num1, the index number of a VFAB element is displayed. Thenumber is an integer starting from "0".
In num2, the index number of a port element is displayed. Thenumber is an integer starting from "0".
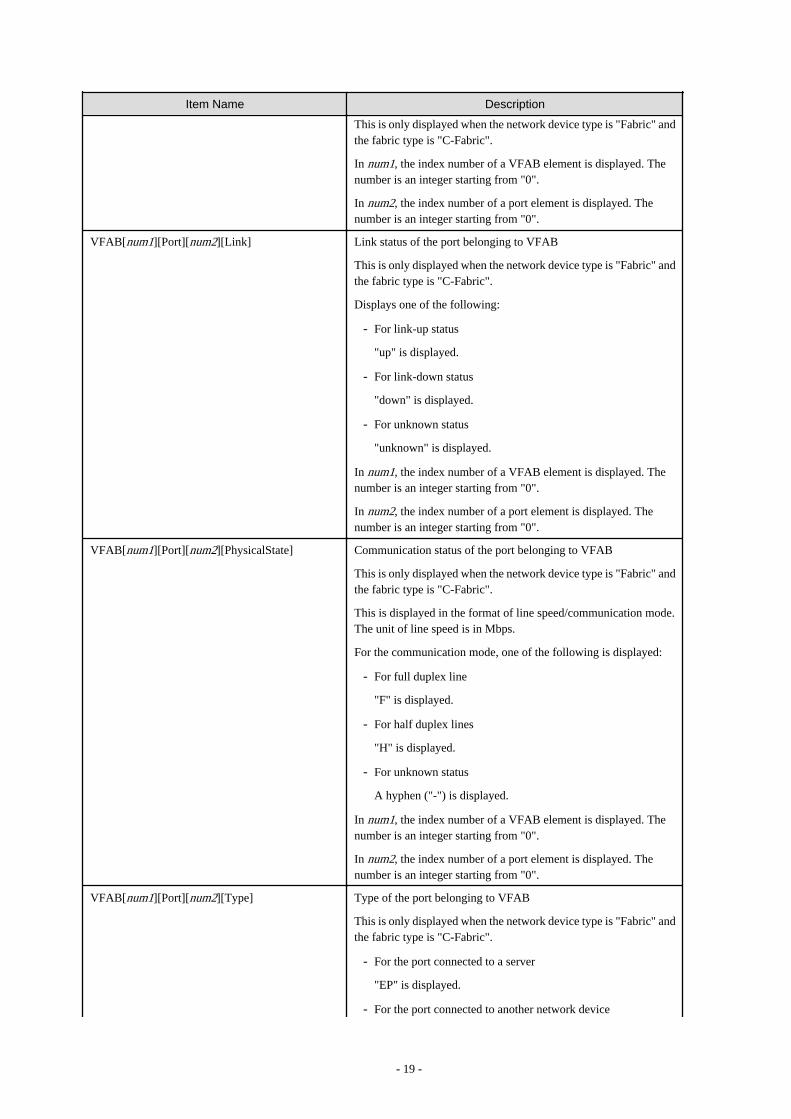
VFAB[num1][Port][num2][Link] Link status of the port belonging to VFAB
This is only displayed when the network device type is "Fabric" andthe fabric type is "C-Fabric".
Displays one of the following:
- For link-up status
"up" is displayed.
- For link-down status
"down" is displayed.
- For unknown status
"unknown" is displayed.
In num1, the index number of a VFAB element is displayed. Thenumber is an integer starting from "0".
In num2, the index number of a port element is displayed. Thenumber is an integer starting from "0".
VFAB[num1][Port][num2][PhysicalState] Communication status of the port belonging to VFAB
This is only displayed when the network device type is "Fabric" andthe fabric type is "C-Fabric".
This is displayed in the format of line speed/communication mode.The unit of line speed is in Mbps.
For the communication mode, one of the following is displayed:
- For full duplex line
"F" is displayed.
- For half duplex lines
"H" is displayed.
- For unknown status
A hyphen ("-") is displayed.
In num1, the index number of a VFAB element is displayed. Thenumber is an integer starting from "0".
In num2, the index number of a port element is displayed. Thenumber is an integer starting from "0".
VFAB[num1][Port][num2][Type] Type of the port belonging to VFAB
This is only displayed when the network device type is "Fabric" andthe fabric type is "C-Fabric".
- For the port connected to a server
"EP" is displayed.
- For the port connected to another network device
- 19 -

Item Name Description
"CIR" is displayed.
- For the port sending and receiving using the IEEEdot1ad frame
"CIR(dot1ad)" or "EP(dot1ad)" is displayed.
In num1, the index number of a VFAB element is displayed. Thenumber is an integer starting from "0".
In num2, the index number of a port element is displayed. Thenumber is an integer starting from "0".
VFAB[num1][Vlan][num2] VLAN(C-TAG) ID in VFAB
This is only displayed when the network device type is "Fabric" andthe fabric type is "C-Fabric".
In num1, the index number of a VFAB element is displayed. Thenumber is an integer starting from "0".
In num2, the index number of a VFAB element in VFAB isdisplayed. The number is an integer starting from "0".
VFAB[num1][Vlan][num2][UntaggedPort] Name of the port belonging to an Untagged port of a VLAN ID inVFAB
This is only displayed when the network device type is "Fabric" andthe fabric type is "C-Fabric".
In num1, the index number of a VFAB element is displayed. Thenumber is an integer starting from "0".
In num2, the index number of a VFAB element in VFAB isdisplayed. The number is an integer starting from "0".
When there are multiple index numbers, they are displayed separatedby commas.
VFAB[num1][Vlan][num2][TaggedPort] Name of the port belonging to a Tagged port of a VLAN ID in VFAB
This is only displayed when the network device type is "Fabric" andthe fabric type is "C-Fabric".
In num1, the index number of a VFAB element is displayed. Thenumber is an integer starting from "0".
In num2, the index number of a VFAB element in VFAB isdisplayed. The number is an integer starting from "0".
When there are multiple index numbers, they are displayed separatedby commas.
refresh
Updates the configuration information of the network device.
Options
-attr {mode={active [-with_va]|maintenance}
For a network device, switch the maintenance mode settings.
-attr mode=active
Checks the status of the device. If the device is in the normal state, this option will change the operational status to "normal" andrelease maintenance mode.If an error is detected during the status check of the device, failure to release maintenance mode is notified as the command execution
- 20 -

result. In this case, it is necessary to take corrective action according to the message that is output, and perform release ofmaintenance mode again.
-with_va
Specify this to release the virtual appliances on the management host (IPCOM VX) when releasing the management host frommaintenance mode.
-attr mode=maintenance
Places into maintenance mode.
-file file.xml
In file.xml, specify the XML file that defines the network resource for creation.For details on the XML file definition, refer to "8.1.1 Creation".
-name name
In name, specify the name of a network device.If an unregistered network device name is specified for name, an error will occur.
-nowait
Use this option to return directly to the command prompt without waiting for the operation of the network device specified in thesubcommand to complete its execution.
-recreate
Update the port information and link information of the network device specified in name.
- When it is necessary to update the port information specifying this option
- When the number of ports of network devices is increased or decreased
- When fabric IDs, domain IDs, switch IDs, or port types for Ethernet Fabric (Converged Fabric) are modified
- When VCS IDs or RBridge IDs for Ethernet Fabric (VCS) are modified
- When it is necessary to update the link information specifying this option
- When logical linkage between IPCOM VX and IPCOM VA is modified
If communication with the network device of the operation target is not possible, an error will occur.
Examples
- To display a list of network device information:
>rcxadm netdevice list <RETURN>
NAME IPADDRESS NETDEVICE_TYPES STATUS MAINTENANCE
---- --------- -------- ------ -----------
cat4503.network.com 192.168.5.17 L2-Switch normal OFF
Firewall1 192.168.5.1 Firewall normal OFF
Firewall2 192.168.5.2 Firewall(virtual) normal OFF
NSappliance1 192.168.5.3 Firewall(virtual) normal OFF
SLB1 192.168.5.4 SLB normal OFF
SLB2 192.168.5.5 SLB normal OFF
ipcomex1 192.168.5.10 Firewall,SLB normal OFF
ipcomex2 192.168.5.11 Firewall,SLB normal OFF
fabric1 192.168.5.100 Fabric normal OFF
- To display the detailed information for a network device (server load balancer):
>rcxadm netdevice show -name SLB1 <RETURN>
Name: SLB1
SystemName: SLB1
- 21 -

IPAddress: 192.168.5.4
ProductName: IPCOMEXIN
ModelName: IPCOM EX2000 IN
VendorName: Fujitsu
Firmware: E20L10
Location: NUMAZU_B1
Status: normal
StatusCause: -
NetdeviceTypes: SLB
Maintenance: OFF
Redundancy: 2
Redundancy[GroupDevice]: SLB1,SLB2
Port[0]: LAN0.0
Port[0][Link]: up
Port[0][PhysicalState]: 1000M / F
Vlan[0]: 1
Vlan[0][UntaggedPort]: LAN0.1,LAN0.2
Vlan[0][TaggedPort]: LAN0.3
Link[0][NeighborResourceName]: SLB2
Link[0][NeighborPort]: LAN0.0
LoginInfo[0][User]: admin
LoginInfo[0][IPAddress]: 192.168.5.4
LoginInfo[0][Port]: 8080
LoginInfo[0][Protocol]: remote_login
LoginInfo[0][Authority]: administrator
LoginInfo[0][AuthType]: local password
LoginInfo[0][LoginCheck]: Successful
SnmpCommunityName: public
FaultMonitoringMethod: SNMP
FaultMonitoringInterval(s): 300
FaultMonitoringRetry: 3
FaultMonitoringTimeout(s): 10
- To display the detailed information for a network device (Ethernet Fabric switch (Converged Fabric)):
>rcxadm netdevice show -name fabric1 <RETURN>
Name: fabric1
SystemName: fabric_1
IPAddress: 192.168.5.100
ProductName: Converged Fabric
ModelName: Converged Fabric
VendorName: Fujitsu
Firmware:V01.00
Location: NUMAZU_B1
Status: normal
StatusCause: -
NetdeviceTypes: Fabric
FabricType: C-Fabric
Maintenance: OFF
FabricId: 1
Redundancy:
Redundancy[GroupDevice]:
Port[0]: 3/1/0/2
Port[0][Link]: up
Port[0][PhysicalState]: 10G / F
Port[0][Type]: CIR
Port[1]: 3/1/0/4
Port[1][Link]: up
Port[1][PhysicalState]: 10G / F
Port[1][Type]: CIR
Link[0][NeighborResourceName]: ipcomex2500in-1
Link[0][NeighborPort]: LAN0.1
LoginInfo[0][User]: user1
- 22 -
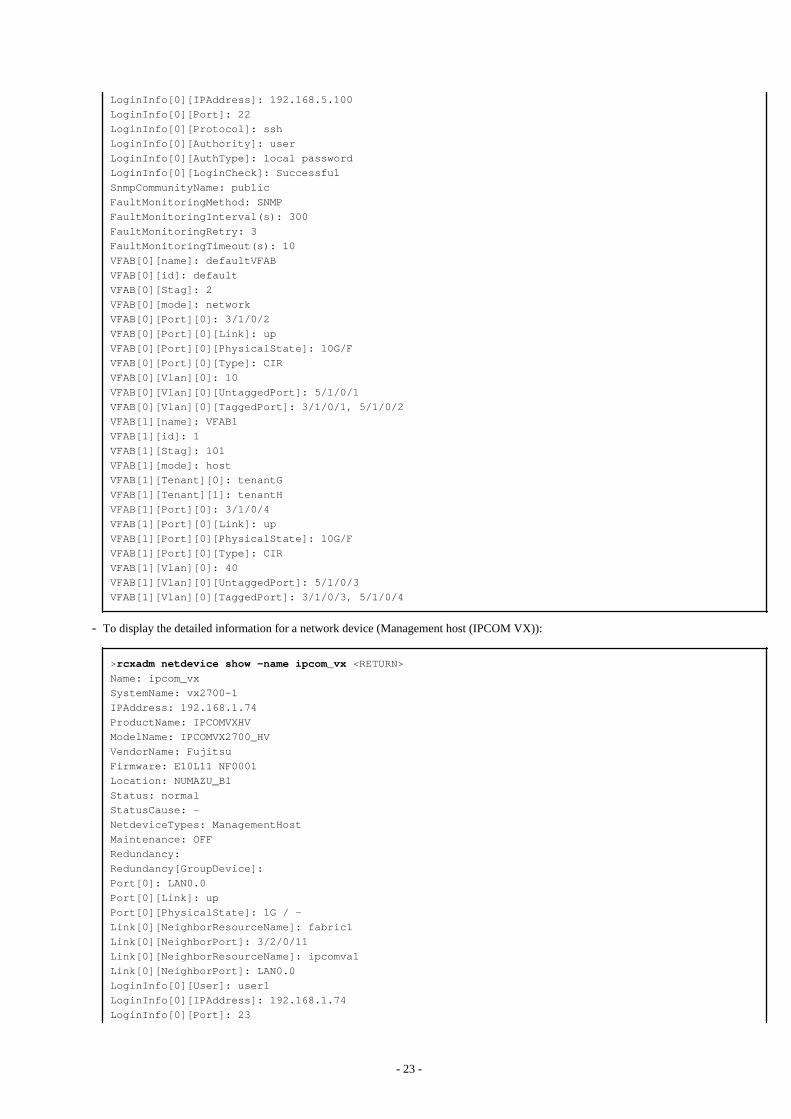
LoginInfo[0][IPAddress]: 192.168.5.100
LoginInfo[0][Port]: 22
LoginInfo[0][Protocol]: ssh
LoginInfo[0][Authority]: user
LoginInfo[0][AuthType]: local password
LoginInfo[0][LoginCheck]: Successful
SnmpCommunityName: public
FaultMonitoringMethod: SNMP
FaultMonitoringInterval(s): 300
FaultMonitoringRetry: 3
FaultMonitoringTimeout(s): 10
VFAB[0][name]: defaultVFAB
VFAB[0][id]: default
VFAB[0][Stag]: 2
VFAB[0][mode]: network
VFAB[0][Port][0]: 3/1/0/2
VFAB[0][Port][0][Link]: up
VFAB[0][Port][0][PhysicalState]: 10G/F
VFAB[0][Port][0][Type]: CIR
VFAB[0][Vlan][0]: 10
VFAB[0][Vlan][0][UntaggedPort]: 5/1/0/1
VFAB[0][Vlan][0][TaggedPort]: 3/1/0/1, 5/1/0/2
VFAB[1][name]: VFAB1
VFAB[1][id]: 1
VFAB[1][Stag]: 101
VFAB[1][mode]: host
VFAB[1][Tenant][0]: tenantG
VFAB[1][Tenant][1]: tenantH
VFAB[1][Port][0]: 3/1/0/4
VFAB[1][Port][0][Link]: up
VFAB[1][Port][0][PhysicalState]: 10G/F
VFAB[1][Port][0][Type]: CIR
VFAB[1][Vlan][0]: 40
VFAB[1][Vlan][0][UntaggedPort]: 5/1/0/3
VFAB[1][Vlan][0][TaggedPort]: 3/1/0/3, 5/1/0/4
- To display the detailed information for a network device (Management host (IPCOM VX)):
>rcxadm netdevice show -name ipcom_vx <RETURN>
Name: ipcom_vx
SystemName: vx2700-1
IPAddress: 192.168.1.74
ProductName: IPCOMVXHV
ModelName: IPCOMVX2700_HV
VendorName: Fujitsu
Firmware: E10L11 NF0001
Location: NUMAZU_B1
Status: normal
StatusCause: -
NetdeviceTypes: ManagementHost
Maintenance: OFF
Redundancy:
Redundancy[GroupDevice]:
Port[0]: LAN0.0
Port[0][Link]: up
Port[0][PhysicalState]: 1G / -
Link[0][NeighborResourceName]: fabric1
Link[0][NeighborPort]: 3/2/0/11
Link[0][NeighborResourceName]: ipcomva1
Link[0][NeighborPort]: LAN0.0
LoginInfo[0][User]: user1
LoginInfo[0][IPAddress]: 192.168.1.74
LoginInfo[0][Port]: 23
- 23 -

LoginInfo[0][Protocol]: telnet
LoginInfo[0][Authority]: user
LoginInfo[0][AuthType]: local password
LoginInfo[0][LoginCheck]: Successful
SnmpCommunityName: public
FaultMonitoringMethod: SNMP
FaultMonitoringInterval(s): 300
FaultMonitoringRetry: 3
FaultMonitoringTimeout(s): 30
Note
This command can only be executed when expanding the scope of network device support. For the procedure for expanding the scope ofnetwork device support, refer to "7.5.1 Enabling the Network Device Management Function" in the "User's Guide VE".
3.4 rcxadm server
Name
[Windows Manager]Installation_folder\SVROR\Manager\bin\rcxadm server - Managed server operations
[Linux Manager]/opt/FJSVrcvmr/bin/rcxadm server - Managed server operations
Format
rcxadm server start -name resource [-nowait]
rcxadm server stop -name resource [-force] [-nowait]
rcxadm server restart -name resource [-force] [-nowait]
rcxadm server switchover -name resource [-spare spare_server] [-nowait]
rcxadm server failback -name resource [-nowait]
rcxadm server takeover -name resource [-nowait]rcxadm server list [{[-type {physical|vmguest [-server_role]|all [-server_role]}] | [-spare] | [-
bootagt] | [-target_disk]} ]
rcxadm server migrate -name guest_name -to vmhost [-mode {live|cold}] [-nowait]
rcxadm server migrate -home [-name vmhost] [-nowait]
rcxadm server set -name resource -attr vmm_mode={maintenance|active}
rcxadm server set -name resource -attr {vmm_mode={maintenance|active}|
vmware.maintenance={maintenance|active}} [VMware]
rcxadm server set -name resource -attr vmm_mode={maintenance|active|maintenance_with_move}[Hyper-V] [Citrix Xen]
rcxadm server set -name resource -attr bootagt={dos|winpe}
rcxadm server set -name resource -attr server_role={none|manager}
rcxadm server set -name resource -attr target_disk=disk_number
rcxadm server unset -name resource -target_disk
rcxadm server show -name resource -disk
rcxadm server collect -name resource -disk [-nowait]
rcxadm server backup -name resource -attr os=solaris (when using SPARC M10/M12)
Information
rcxserver is an abbreviated form of the rcxadm server command. Both forms provide the same subcommands and options, and producethe same results.
- 24 -

Point
[VMware]There are following two formats of the command options for setting and releasing the VM maintenance mode of VM hosts:
a. rcxadm server set -name resource -attr vmm_mode=maintenance|active
b. rcxadm server set -name resource -attr vmware.maintenance=maintenance|active
Format b is only provided to support ServerView Resource Coordinator VE V2.1.0.
As this format may not be provided in future versions, it is recommended to use method a. if you are starting to use Resource Orchestrator.
Description
rcxadm server is the command used to control server resources. This function provides the following functionality:
- Display of server statuses (physical OS, VM host, or VM guest)
- Startup, shutdown, or restart of a designated server (physical server, physical OS, VM host, or VM guest)
- Switchover, failback, or takeover of a designated server (physical OS or VM host)
- VM guest migration
- VM maintenance mode settings for VM hosts
- Migration to VM Home Position
- Change the boot agent of the specified server (physical server)
- Collection and display of the disk information of the specified server (physical server)
- Configure and display of the image operation of the target disk of the specified server (physical server)
- Saving of OVM for SPARC configuration information as XML files
- Setting of the server role for VM guests
When stopping or restarting a VM host, any VM guests that are running will also be stopped.Verify that stopping the affected VM guests will not cause any problems before stopping or restarting a VM host.
For details on the switchover, failback and takeover operations, refer to "Chapter 18 Settings for Server Switchover" in the "User's GuideVE".For details on VM guest migrations, refer to "15.1 Migration of VM Guests between Servers" in the "User's Guide VE".For details on VM maintenance mode settings, refer to "15.2 VM Maintenance Mode of VM Hosts" in the "User's Guide VE".For details on server role settings of VM guests, refer to "9.10 Changing Server Roles" in the "User's Guide VE".
Subcommands
start
Starts the target server (physical server, physical OS, VM host, or VM guest).
stop
Stops the target server (physical server, physical OS, VM host, or VM guest).
restart
Restarts the target server (physical server, physical OS, VM host, or VM guest).
switchover
Switches over the target server (physical OS or VM host) with one of its spare servers.
- 25 -

failback
Switches back a server in switchover state (physical OS or VM host). The spare server that was switched over with is stopped, and theoperating system will be restarted on the primary server.
takeover
Sets a post-switchover configuration as final, and allows the spare server to take over the role of the original primary server (physicalOS or VM host). After takeover, both servers exchange their roles: the original spare server becomes the new primary server, whilethe original primary server becomes the new spare server.
list
Displays all registered servers (physical OS's, VM hosts, and VM guests).
The following properties are displayed for each server (when no options are specified).
Item Name Description
PHYSICAL_SERVER Physical server name
SERVER Server name (physical OS or VM host)
ADMIN_IP Admin LAN IP address
STATUS
Server status
Displays one of the following:
- normal
- warning
- unknown
- stop
- error
- fatal
For an explanation of possible server statuses, refer to "11.2 Resource Status" in the"Operation Guide VE".
MAINTENANCE
Current maintenance mode
- If maintenance mode is set
"ON" is displayed.
- If maintenance mode is not set
"OFF" is displayed.
For details on the maintenance mode, refer to "Appendix C Maintenance Mode" inthe "User's Guide VE".
migrate
Migrates a VM guest to a VM host on a different physical server.
set
Sets or releases VM maintenance mode for a given VM host.Change the boot agent used when manipulating images.Sets the server role of a VM guest.Configures the image operation target disk.
unset
Releases the configuration of the image operation target disk.
- 26 -

show
Displays the information of a disk on which image operations can be performed.
collect
Collects the information of a disk on which image operations can be performed.Restarts the target server (physical server, physical OS, VM host, or VM guest) to acquire the disk information.
backup
Saves configuration information of OVM for SPARC as XML files. When a server is powered on and its status is normal, itsconfiguration information can be saved as an XML file.XML files of OVM configuration information are saved in the following location on the control domain.
Storage Location of Saved Files
[Control Domain]/etc/opt/FJSVrcvat/config
Definition File Name
ovm_config.xml
Options
The following option can be specified for subcommands other than the list subcommand:
-name resource
Specify the name of the target server in resource.
The following option can be specified when using subcommands other than the list, set, unset, or, show subcommand:
-nowait (optional)
Use this option to return directly to the command prompt without waiting for the command to complete its execution.
The following option can be specified for the stop and restart subcommands:
-force (optional)
Use this option to forcibly stop or restart a server without shutting down its operating system.
The following option can be specified for the switchover subcommand:
-spare spare_server (optional)
This defines the spare server (physical server) to be switched over with. If omitted, an appropriate server will be automatically selectedfrom the list of spare servers already assigned to the target server.
The following options can be specified for the list subcommand:
-type {physical|vmguest [-server_role]|all [-server_role]}(optional)
This defines the type of server (physical servers, VM guests, all servers) to be listed up.The following properties are displayed for each server. The option column shows the relationship between displayed properties andthe option given in -type ("always" in the table below designates properties that are always displayed, independently from the optiongiven in -type).
Item Name Description Options
PHYSICAL_SERVER Physical server name always
SERVER Server name (for a Physical OS, VM host, or VM guest) always
- 27 -

Item Name Description Options
TYPE
Server type
Displays one of the following:
- native
Physical OS
- vm_host
VM host
- vm_guest
VM guest
physical
all
VM_HOST
VM host name
For a VM guest, this shows the name of the VM host on which thisVM guest operates.
vmguest
all
ADMIN_IP Admin LAN IP address always
STATUS
Server status
Displays one of the following:
- normal
- warning
- unknown
- stop
- error
- fatal
For an explanation of possible server statuses, refer to "11.2Resource Status" in the "Operation Guide VE".
always
MAINTENANCE
Current maintenance mode
- If maintenance mode is set
"ON" is displayed.
- If maintenance mode is not set
"OFF" is displayed.
For details on the maintenance mode, refer to "Appendix CMaintenance Mode" in the "User's Guide VE".
physical
all
SERVER_ROLE
Server role of the VM guest.
One of the following is displayed:
- none
No server role is set.
- manager
"Manager" is set for the server role.
- -
For items other than VM guests, "-" is displayed.
vmguest -server_role
all -server_role
- 28 -
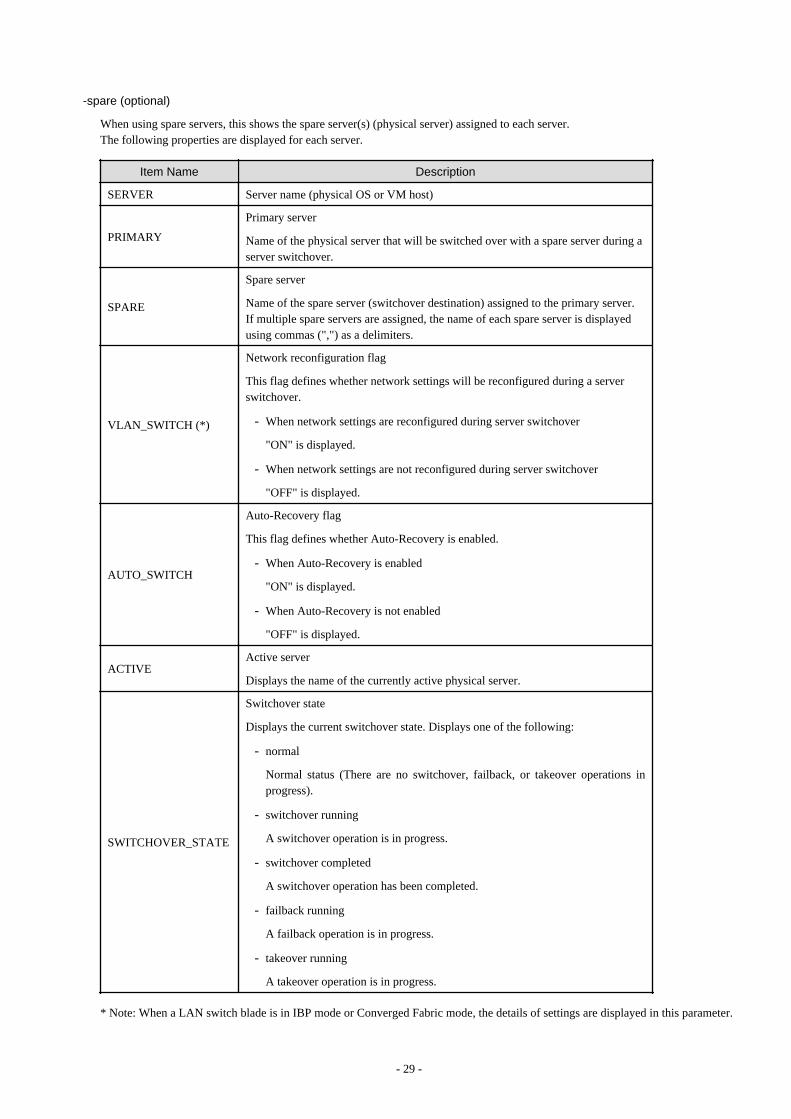
-spare (optional)
When using spare servers, this shows the spare server(s) (physical server) assigned to each server.The following properties are displayed for each server.
Item Name Description
SERVER Server name (physical OS or VM host)
PRIMARY
Primary server
Name of the physical server that will be switched over with a spare server during aserver switchover.
SPARE
Spare server
Name of the spare server (switchover destination) assigned to the primary server.If multiple spare servers are assigned, the name of each spare server is displayedusing commas (",") as a delimiters.
VLAN_SWITCH (*)
Network reconfiguration flag
This flag defines whether network settings will be reconfigured during a serverswitchover.
- When network settings are reconfigured during server switchover
"ON" is displayed.
- When network settings are not reconfigured during server switchover
"OFF" is displayed.
AUTO_SWITCH
Auto-Recovery flag
This flag defines whether Auto-Recovery is enabled.
- When Auto-Recovery is enabled
"ON" is displayed.
- When Auto-Recovery is not enabled
"OFF" is displayed.
ACTIVEActive server
Displays the name of the currently active physical server.
SWITCHOVER_STATE
Switchover state
Displays the current switchover state. Displays one of the following:
- normal
Normal status (There are no switchover, failback, or takeover operations inprogress).
- switchover running
A switchover operation is in progress.
- switchover completed
A switchover operation has been completed.
- failback running
A failback operation is in progress.
- takeover running
A takeover operation is in progress.
* Note: When a LAN switch blade is in IBP mode or Converged Fabric mode, the details of settings are displayed in this parameter.
- 29 -
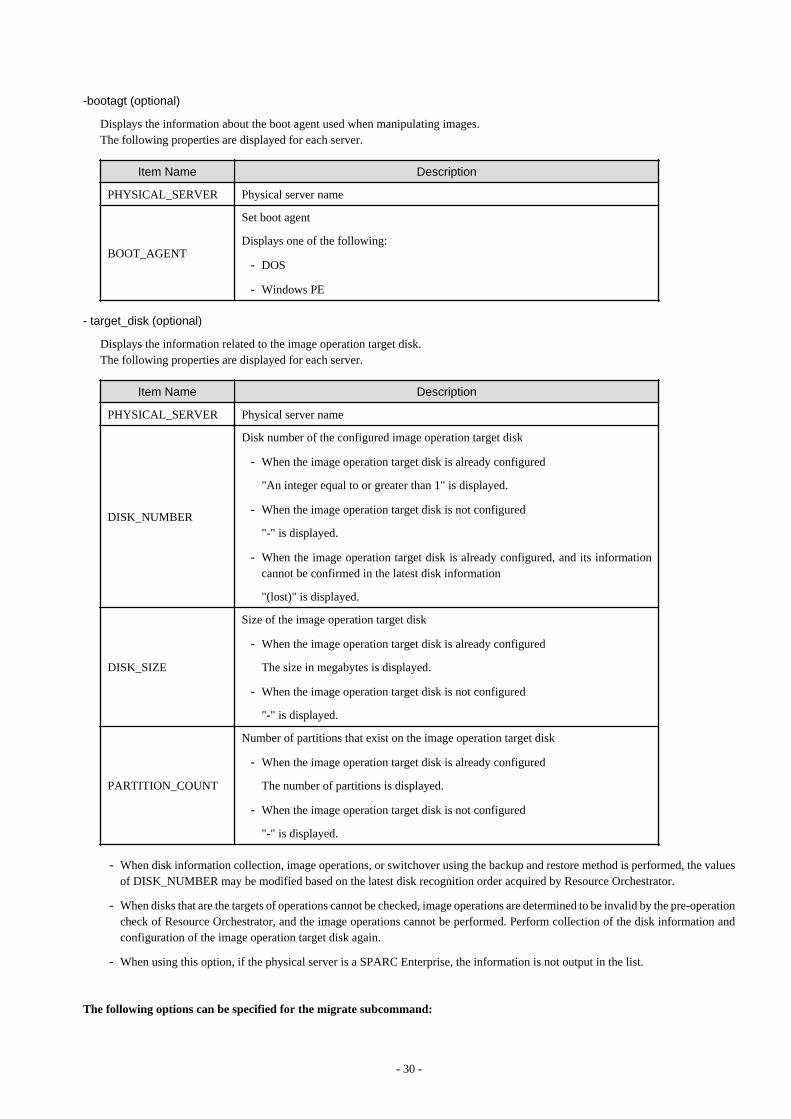
-bootagt (optional)
Displays the information about the boot agent used when manipulating images.The following properties are displayed for each server.
Item Name Description
PHYSICAL_SERVER Physical server name
BOOT_AGENT
Set boot agent
Displays one of the following:
- DOS
- Windows PE
- target_disk (optional)
Displays the information related to the image operation target disk.The following properties are displayed for each server.
Item Name Description
PHYSICAL_SERVER Physical server name
DISK_NUMBER
Disk number of the configured image operation target disk
- When the image operation target disk is already configured
"An integer equal to or greater than 1" is displayed.
- When the image operation target disk is not configured
"-" is displayed.
- When the image operation target disk is already configured, and its informationcannot be confirmed in the latest disk information
"(lost)" is displayed.
DISK_SIZE
Size of the image operation target disk
- When the image operation target disk is already configured
The size in megabytes is displayed.
- When the image operation target disk is not configured
"-" is displayed.
PARTITION_COUNT
Number of partitions that exist on the image operation target disk
- When the image operation target disk is already configured
The number of partitions is displayed.
- When the image operation target disk is not configured
"-" is displayed.
- When disk information collection, image operations, or switchover using the backup and restore method is performed, the valuesof DISK_NUMBER may be modified based on the latest disk recognition order acquired by Resource Orchestrator.
- When disks that are the targets of operations cannot be checked, image operations are determined to be invalid by the pre-operationcheck of Resource Orchestrator, and the image operations cannot be performed. Perform collection of the disk information andconfiguration of the image operation target disk again.
- When using this option, if the physical server is a SPARC Enterprise, the information is not output in the list.
The following options can be specified for the migrate subcommand:
- 30 -
-name guest_name
Specify the name of the destination target VM guest in guest_name.
-to vmhost
Specify the name of the destination VM host in vmhost.
-mode {live|cold} (optional)
The type of migration method to perform is given for mode.Depending on the power state of the VM guest to migrate, only one of those types may be available. When omitted, the appropriatetype will be chosen depending on the state of the VM guest.The following values can be specified.
live
Performs a live migration: migration of an active (powered-on) VM guest.
cold
Performs a cold migration: migration of an inactive (powered-off) VM guest.The power status of the VM guest after migration will be the same as it was before migration.
[KVM]When -mode cold is specified for migration of a powered-on VM guest, migration may fail.In that case, power off the VM guest and perform migration, then wait for a while before powering it back on.
-home
Specify when performing migration to the VM Home Position.
-name vmhost (optional)
Specify the name of the operation target VM host in vmhost.
The following options can be specified for the set subcommand:
-attr vmm_mode=maintenance
-attr {vmm_mode={maintenance|active}|vmware.maintenance=maintenance [VMware]
Sets VM maintenance mode for the VM host.
-attr vmm_mode=active
-attr vmware.maintenance=active [VMware]
Releases VM maintenance mode for the VM host.
-attr vmm_mode=maintenance_with_move [Hyper-V] [Citrix Xen]
Sets VM maintenance mode for the target VM host and migrates the VM guest when set.
-attr bootagt={dos|winpe}
Changes the boot agent used when manipulating images to DOS or Windows PE.
When the managed server has the following configuration, this option must be specified before manipulating images to change theboot agent settings.
- When using Red Hat Enterprise Linux 6 or the Red Hat Enterprise Linux 7 ext4 file system and one of the following conditionsapplies, it needs to be changed to Windows PE.
- SAN boot environment using HBA address rename
- Rack mount or tower servers have been registered with "Disabled" selected for "Association with server management software(ServerView)"
- In a SAN boot environment using HBA address rename and where the following model or OS is used, it needs to be changed toWindows PE.
- PRIMERGY BX960 S1
- 31 -
- XenServer6 or later
This option cannot be specified for the following models:
- SPARC M10/M12 or SPARC Enterprise
- PRIMEQUEST
When configuring DOS as the boot agent, it is necessary to configure the Microsoft LAN Manager Module. Contact Fujitsu technicalstaff before manipulating images using DOS.
-attr server_role={none|manager}
Sets the server role of a VM guest.When Resource Orchestrator is operating on a VM guest, setting "manager" limits the operations that stop the manager of ResourceOrchestrator.This prevents the Resource Orchestrator manager from being stopped unintentionally due to incorrect operations.
-attr target_disk=disk_number
In disk_number, specify the number of the disk configured as the image operation target disk.An integer larger than 1 can be specified for the disk number.Check which disk numbers can be specified using the rcxadm server show -name resource -disk command.When using this option, it is only possible to specify the disk number of a physical server for which the disk information has beenacquired in advance by execution of the rcxadm server collect -name resource -disk command.When a backup of an admin server is restored, the actual disk configuration and the disk information may not match. Perform collectionof the disk information and configuration of the image operation target disk again.
The following options can be specified for the unset subcommand:
-target_disk
Deletes the configuration of the image operation target disk for the specified server.
The following options can be specified for the show subcommand:
-disk
When the server is a physical server for which the disk information has already been acquired, the following information is displayed.
- Number of disks (Number of Disk: 0 or larger)
- Disk number (Equal to the number of disks, 1 or larger)
- Disk name (Hardware display name)
- Disk size unit: MByte
- Number of partitions
- Partition number (Equal to the number of partitions, 1 or larger)
- Partition type
(One of PRIMARY, EXTENDED, LOGICAL, ESP, MSR, DATA, LINUXSWAP, WINRE, or UNKNOWN)
- File systems of partitions
(One of FAT12, FAT16, NTFS, FAT32, LINUXSWAP, EXT2, EXT3, EXT4, DISKDUMP, REISERFS, VMFS, EXTENDED,or UNKNOWN)
- Partition size
- Usage area of partitions
When the disk information has not been acquired, no value is displayed.
The following options can be specified for the collect subcommand:
- 32 -

-disk
When a physical server is in the following configuration, it is necessary to acquire and configure the information of disks for whichimage operations are possible before starting image operations.
- When using a SAN data disk environment with a built-in disk boot
This option can only be executed while the physical server is in maintenance mode, and stopped. Start the physical server to acquirethe disk information from, and stop it after acquiring the disk information.
When performing update of a physical server for which the disk information has already been acquired, save the disk informationacquired during the latest update.
This option cannot be specified for the following models:
- SPARC Enterprise
The following option can be specified for the backup subcommand:
-name resource
Specify the name of the VM host (control domain).
-attr os=solaris
Sets Solaris for the target OS.
Requirements
Permissions
One of the following permissions is required:
- OS Administrator
- Resource Orchestrator Privileged User
Location
Admin server
Example
- To display a list of registered servers and their properties
>rcxadm server list <RETURN>
PHYSICAL_SERVER SERVER ADMIN_IP STATUS MAINTENANCE
--------------- ------ -------- ------ -----------
blade01 WebServer01 192.168.1.4 normal ON
rackserver01 AppServer01 192.168.1.2 normal OFF
rackserver02 DBServer01 192.168.1.6 stop OFF
rackserver03 DBServer02 192.168.1.7 normal ON
- To display spare server settings
>rcxadm server list -spare <RETURN>
SERVER PRIMARY SPARE VLAN_SWITCH AUTO_SWITCH ACTIVE
SWITCHOVER_STATE
------ ------- ----- ----------- ----------- ------
----------------
Server1 blade1-1 blade1-9 ON ON blade1-9
failback running
Server2 blade1-2 blade1-9,blade1-10 OFF ON blade1-2
normal
- 33 -
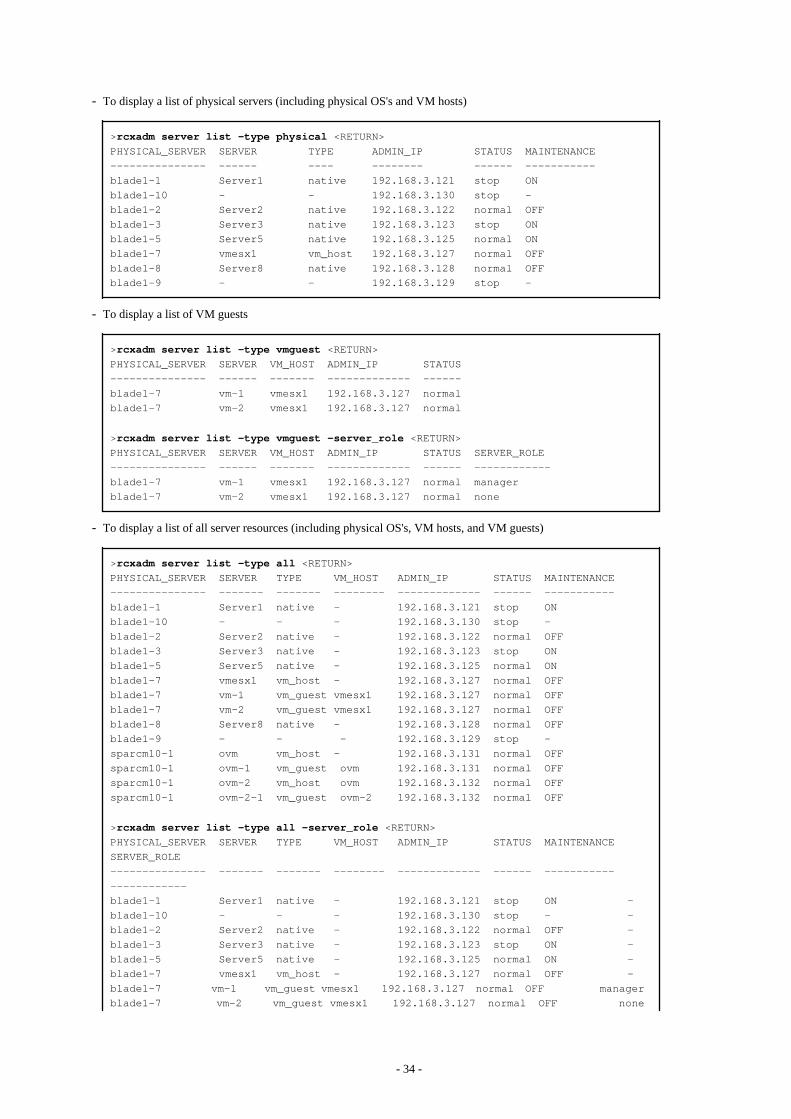
- To display a list of physical servers (including physical OS's and VM hosts)
>rcxadm server list -type physical <RETURN>
PHYSICAL_SERVER SERVER TYPE ADMIN_IP STATUS MAINTENANCE
--------------- ------ ---- -------- ------ -----------
blade1-1 Server1 native 192.168.3.121 stop ON
blade1-10 - - 192.168.3.130 stop -
blade1-2 Server2 native 192.168.3.122 normal OFF
blade1-3 Server3 native 192.168.3.123 stop ON
blade1-5 Server5 native 192.168.3.125 normal ON
blade1-7 vmesx1 vm_host 192.168.3.127 normal OFF
blade1-8 Server8 native 192.168.3.128 normal OFF
blade1-9 - - 192.168.3.129 stop -
- To display a list of VM guests
>rcxadm server list -type vmguest <RETURN>
PHYSICAL_SERVER SERVER VM_HOST ADMIN_IP STATUS
--------------- ------ ------- ------------- ------
blade1-7 vm-1 vmesx1 192.168.3.127 normal
blade1-7 vm-2 vmesx1 192.168.3.127 normal
>rcxadm server list -type vmguest -server_role <RETURN>
PHYSICAL_SERVER SERVER VM_HOST ADMIN_IP STATUS SERVER_ROLE
--------------- ------ ------- ------------- ------ ------------
blade1-7 vm-1 vmesx1 192.168.3.127 normal manager
blade1-7 vm-2 vmesx1 192.168.3.127 normal none
- To display a list of all server resources (including physical OS's, VM hosts, and VM guests)
>rcxadm server list -type all <RETURN>
PHYSICAL_SERVER SERVER TYPE VM_HOST ADMIN_IP STATUS MAINTENANCE
--------------- ------- ------- -------- ------------- ------ -----------
blade1-1 Server1 native - 192.168.3.121 stop ON
blade1-10 - - - 192.168.3.130 stop -
blade1-2 Server2 native - 192.168.3.122 normal OFF
blade1-3 Server3 native - 192.168.3.123 stop ON
blade1-5 Server5 native - 192.168.3.125 normal ON
blade1-7 vmesx1 vm_host - 192.168.3.127 normal OFF
blade1-7 vm-1 vm_guest vmesx1 192.168.3.127 normal OFF
blade1-7 vm-2 vm_guest vmesx1 192.168.3.127 normal OFF
blade1-8 Server8 native - 192.168.3.128 normal OFF
blade1-9 - - - 192.168.3.129 stop -
sparcm10-1 ovm vm_host - 192.168.3.131 normal OFF
sparcm10-1 ovm-1 vm_guest ovm 192.168.3.131 normal OFF
sparcm10-1 ovm-2 vm_host ovm 192.168.3.132 normal OFF
sparcm10-1 ovm-2-1 vm_guest ovm-2 192.168.3.132 normal OFF
>rcxadm server list -type all -server_role <RETURN>
PHYSICAL_SERVER SERVER TYPE VM_HOST ADMIN_IP STATUS MAINTENANCE
SERVER_ROLE
--------------- ------- ------- -------- ------------- ------ -----------
------------
blade1-1 Server1 native - 192.168.3.121 stop ON -
blade1-10 - - - 192.168.3.130 stop - -
blade1-2 Server2 native - 192.168.3.122 normal OFF -
blade1-3 Server3 native - 192.168.3.123 stop ON -
blade1-5 Server5 native - 192.168.3.125 normal ON -
blade1-7 vmesx1 vm_host - 192.168.3.127 normal OFF -
blade1-7 vm-1 vm_guest vmesx1 192.168.3.127 normal OFF manager
blade1-7 vm-2 vm_guest vmesx1 192.168.3.127 normal OFF none
- 34 -
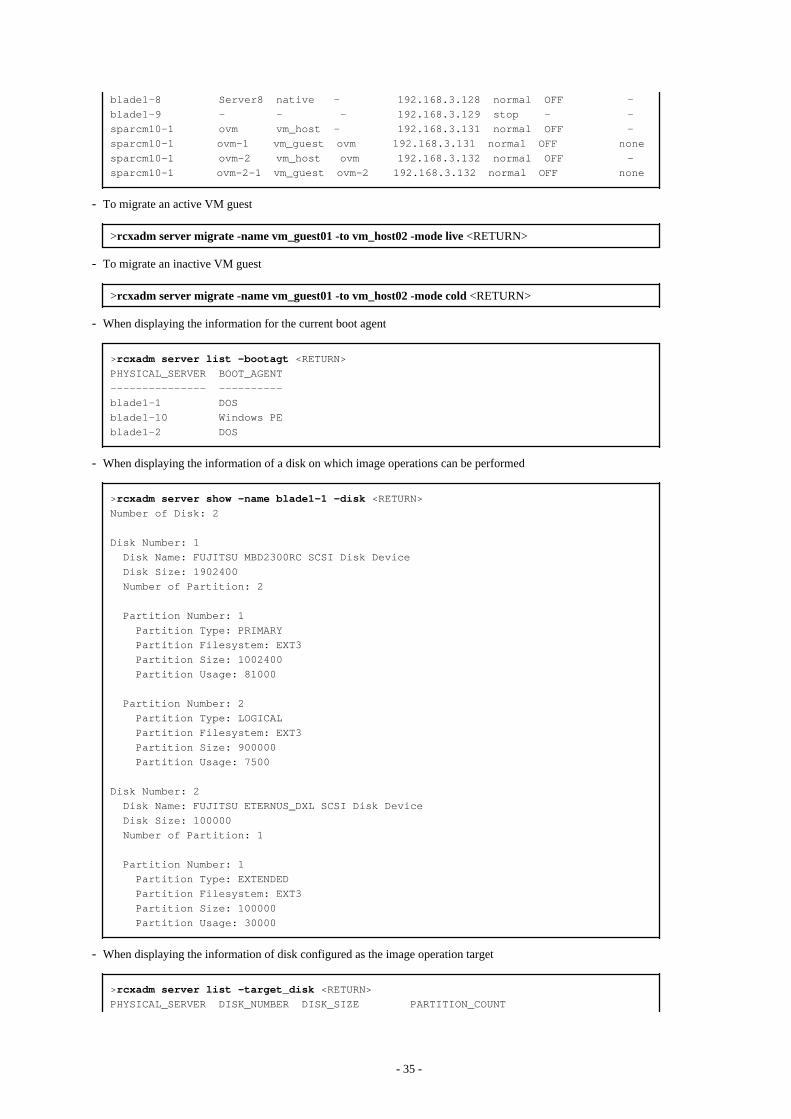
blade1-8 Server8 native - 192.168.3.128 normal OFF -
blade1-9 - - - 192.168.3.129 stop - -
sparcm10-1 ovm vm_host - 192.168.3.131 normal OFF -
sparcm10-1 ovm-1 vm_guest ovm 192.168.3.131 normal OFF none
sparcm10-1 ovm-2 vm_host ovm 192.168.3.132 normal OFF -
sparcm10-1 ovm-2-1 vm_guest ovm-2 192.168.3.132 normal OFF none
- To migrate an active VM guest
>rcxadm server migrate -name vm_guest01 -to vm_host02 -mode live <RETURN>
- To migrate an inactive VM guest
>rcxadm server migrate -name vm_guest01 -to vm_host02 -mode cold <RETURN>
- When displaying the information for the current boot agent
>rcxadm server list -bootagt <RETURN>
PHYSICAL_SERVER BOOT_AGENT
--------------- ----------
blade1-1 DOS
blade1-10 Windows PE
blade1-2 DOS
- When displaying the information of a disk on which image operations can be performed
>rcxadm server show -name blade1-1 -disk <RETURN>
Number of Disk: 2
Disk Number: 1
Disk Name: FUJITSU MBD2300RC SCSI Disk Device
Disk Size: 1902400
Number of Partition: 2
Partition Number: 1
Partition Type: PRIMARY
Partition Filesystem: EXT3
Partition Size: 1002400
Partition Usage: 81000
Partition Number: 2
Partition Type: LOGICAL
Partition Filesystem: EXT3
Partition Size: 900000
Partition Usage: 7500
Disk Number: 2
Disk Name: FUJITSU ETERNUS_DXL SCSI Disk Device
Disk Size: 100000
Number of Partition: 1
Partition Number: 1
Partition Type: EXTENDED
Partition Filesystem: EXT3
Partition Size: 100000
Partition Usage: 30000
- When displaying the information of disk configured as the image operation target
>rcxadm server list -target_disk <RETURN>
PHYSICAL_SERVER DISK_NUMBER DISK_SIZE PARTITION_COUNT
- 35 -
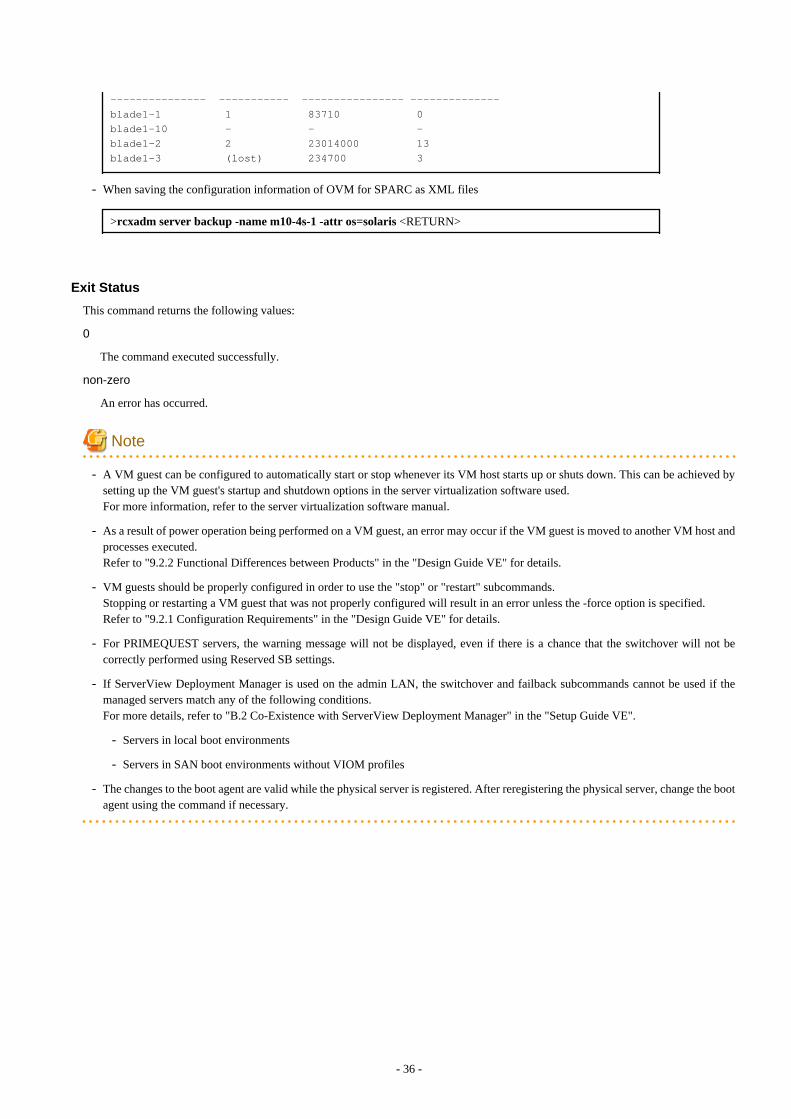
--------------- ----------- ---------------- --------------
blade1-1 1 83710 0
blade1-10 - - -
blade1-2 2 23014000 13
blade1-3 (lost) 234700 3
- When saving the configuration information of OVM for SPARC as XML files
>rcxadm server backup -name m10-4s-1 -attr os=solaris <RETURN>
Exit Status
This command returns the following values:
0
The command executed successfully.
non-zero
An error has occurred.
Note
- A VM guest can be configured to automatically start or stop whenever its VM host starts up or shuts down. This can be achieved bysetting up the VM guest's startup and shutdown options in the server virtualization software used.For more information, refer to the server virtualization software manual.
- As a result of power operation being performed on a VM guest, an error may occur if the VM guest is moved to another VM host andprocesses executed.Refer to "9.2.2 Functional Differences between Products" in the "Design Guide VE" for details.
- VM guests should be properly configured in order to use the "stop" or "restart" subcommands.Stopping or restarting a VM guest that was not properly configured will result in an error unless the -force option is specified.Refer to "9.2.1 Configuration Requirements" in the "Design Guide VE" for details.
- For PRIMEQUEST servers, the warning message will not be displayed, even if there is a chance that the switchover will not becorrectly performed using Reserved SB settings.
- If ServerView Deployment Manager is used on the admin LAN, the switchover and failback subcommands cannot be used if themanaged servers match any of the following conditions.For more details, refer to "B.2 Co-Existence with ServerView Deployment Manager" in the "Setup Guide VE".
- Servers in local boot environments
- Servers in SAN boot environments without VIOM profiles
- The changes to the boot agent are valid while the physical server is registered. After reregistering the physical server, change the bootagent using the command if necessary.
- 36 -
Chapter 4 Image OperationsThis chapter explains the commands used to operate images managed in Resource Orchestrator.
4.1 rcxadm image
Name
[Windows Manager]Installation_folder\SVROR\Manager\bin\rcxadm image - system or cloning image operations of servers
[Linux Manager]/opt/FJSVrcvmr/bin/rcxadm image - system or cloning image operations of servers
Format
rcxadm image backup -server resource [-comment comment] [-nowait] [-force]
rcxadm image restore -server resource [-version version] [-nowait]
rcxadm image create -server resource -name image [-comment comment] [-nowait]
rcxadm image deploy -server resource [:hostname][,resource[:hostname]]... -name image [-version
version] [-nowait]
rcxadm image delete -server resource -version version
rcxadm image delete -name image -version version
rcxadm image list -type {backup|cloning} {[-server resource]|[-name image]}
rcxadm image list -server [resource]
Information
rcximage is an abbreviated form of the rcxadm image command. Both forms provide the same subcommands and options, and producethe same results.
Point
A list of system images can be obtained using one of the following two methods.
a. rcxadm image list -type backup [-server resource]
b. rcxadm image list -server [resource]
Method b. is only supported only for compatibility purposes with Systemwalker Resource Coordinator Virtual Server Edition V13.2.0and V13.3.0. As future versions may not support this method, it is recommended to use method a. instead.
Description
rcxadm image is the command used to perform operations involving system images and cloning images.
Backup and restore operations are done by collecting a system image from a managed server (physical OS or VM host) and storing it onthe admin server disk. This system image can later be restored to the same managed server.
Cloning is done by collecting a cloning image from a reference server, and storing it on the admin server disk. Cloning images can laterbe distributed to other servers (either individually or simultaneously to multiple servers). All image operations (backup, restore, andcloning) are performed remotely over the network.Before using this command, refer to the overview and sections about each operation mentioned in the following manuals.
- "Chapter 16 Backup and Restore" in the "User's Guide VE"
- "Chapter 17 Cloning [Physical Servers]" in the "User's Guide VE"
- 37 -
If any one of the "backup", "restore", "create", or "deploy" subcommands is executed, the target server is automatically placed intomaintenance mode until processing completes. Once complete, the server is set back to its original mode.
Note
- The number of cloning image versions that can be kept for a given cloning image (identified by its name attribute) is limited.Using the create subcommand to collect a new cloning image when the limit has already been reached will fail and display an error.In such a case, use the delete subcommand to delete one of the existing versions before collecting a new version of the cloning image.Existing versions can be checked using the list subcommand.By default, this limit is set to 3 versions per cloning image.For details on changing the maximum number of cloning image versions, refer to "8.4 Changing the Maximum Number of CloningImage Versions" in the "User's Guide VE".
- This command is not available if ServerView Deployment Manager is used on the admin LAN. For more details, refer to "B.2 Co-Existence with ServerView Deployment Manager" in the "Setup Guide VE".
Subcommand
backup
Backs up a system image from the specified server (physical OS or VM host) to the admin server.
restore
Restores a system image to the specified server (physical OS or VM host).
create
Collects a cloning image from the specified server (physical OS).
deploy
Deploys a cloning image to one or multiple servers (physical OS).
delete
- System image deletion
Deletes a system image belonging to the specified server (physical OS or VM host).
- Cloning image deletion
Deletes the specified cloning image.
list
System Image List
Displays a list of system images for the specified server.The following properties are displayed for each server.
Item Name Description
SERVERNAMEName of the server (physical OS or VM host) from which the system image wasbacked up
VERSION Version number of the system image
BACKUPDATE Backup date and time of the system image
COMMENT Comment describing the system image
Cloning Image Display
Displays a list of cloning images for the specified server.The following properties are displayed for each server.
- 38 -

Item Name Description
NAME Name of the cloning image
VERSION Version of cloning images
CREATIONDATE Creation date and time of the cloning image
COMMENT Comment describing the cloning image
Option
The following option can be specified for the backup, restore, create, or deploy subcommands:
-nowait (optional)
Use this option to return directly to the command prompt without waiting for the command to complete its execution.
The following option can be specified for the backup, restore or delete subcommand:
-server resource
Specify the name of the target server (physical OS or VM host) in resource.
The following options can be specified for the deploy or delete subcommand:
-name image
Specify the name of the target cloning image in image.
-version version (optional)
Specify the version of the target cloning image to distribute in version.This option can be omitted when deploying the latest cloning image version.
The following option can be specified for the backup subcommand:
-comment comment (optional)
Specify a comment to help identify the system image.Enter a string no longer than 128 alphanumeric characters (either single or double-byte characters).Note that percent signs ("%"), backslashes ("\") and double quotes ( " ) cannot be used for comment.
Note
When using blank spaces in comment, enclose the whole character string, comment, in double quotes ( " ).
-force (optional)
Forces execution of a server backup when the target server's status is one of the following:
- normal
- warning
- unknown
- error
- fatal
The following option can be specified for the restore subcommand:
- 39 -
-version version (optional)
Specify the version number of the system image to restore in version.If omitted, the latest version of the system image will be restored.
The following options can be specified for the create subcommand:
-server resource
Specify the name of the target server (physical OS) in resource.
-name image
Specify a name to assign to the collected cloning image in image.Enter a string that is no more than 32 characters long, where the first character is a letter and the remaining characters are alphanumericcharacters or underscores ("_").
-comment comment (optional)
Specify a comment to help identify the cloning image.Enter a string no longer than 128 alphanumeric characters (either single or double-byte characters).Note that percent signs ("%"), backslashes ("\") and double quotes ( " ) cannot be used for comment.
Note
When using blank spaces in comment, enclose the whole character string, comment, in double quotes ( " ).
The following option can be specified for the deploy subcommand:
-server resource[[:hostname],...]
Specify the name of the server(s) (physical server) to deploy a cloning image to in resource.Multiple server names can be specified using commas (",").The name attributed to a server after deployment can be specified in hostname. This is done by adding a colon (":") and the hostnamestring behind each physical server's resource identifier string. If the hostname string is omitted, the post-deployment server name isset to the following.
- When a physical OS has not been registered
Physical server (resource) name
- When a physical OS has been registered
Physical OS name
Use the following syntax for the hostname.
[Windows]A string of up to 63 characters, including alphanumeric characters, underscores ("_"), and hyphens ("-").Hostnames made of only numbers are not allowed.
[Linux]A string of up to 64 characters, including alphanumeric characters, hyphens ("-"), periods ("."), and underscores ("_").
Note
When using SUSE Linux Enterprise Server, server names including periods (".") cannot be configured for post-deployment servernames of cloning images.
Information
As the physical OS name of a managed server refers to that server's hostname, it is recommended to use only characters specified inthe RFC (Request For Comments) 952. Those characters are listed below.
- 40 -
- Alphanumeric Characters
- Hyphens ("-")
- Periods (".") [Linux]
The following options can be specified for the delete subcommand:
-version version
Specify the version number of the system image or cloning image to delete in version.
The following options can be specified for the list subcommand:
-type {backup|cloning}
Specify the type of image to list up.
- If "backup" is specified
A list of system images is displayed.
- If "cloning" is specified
A list of cloning images is displayed.
-server resource
Specify the name of the server (physical OS or VM host) for which to display system images in resource. This option should not bespecified if the "-type" option has been set to "cloning".
- If the "-type" option is set
Omitting this option will output a list of system images for all managed servers.
- If the "-type" option is not set
The same list of system images (for all servers) can be output by specifying only the -server option without specifying a resource(this command usage differs from that of Systemwalker Resource Coordinator Virtual Server Edition V13.2.0 and V13.3.0. Referto "Point" at the top of this section for details).
-name image
Specify the name of the cloning image to display in image.If omitted, a list of all cloning images will be displayed.
Requirements
Permissions
One of the following permissions is required:
- OS Administrator
- Resource Orchestrator Privileged User
Location
Admin server
Usage example
- To create a system image backup
>rcxadm image backup -server blade07 -comment "Database Server-2" <RETURN>
- 41 -
- To restore a system image to a managed server
>rcxadm image restore -server blade07 -version 2 <RETURN>
- To delete a system image
>rcxadm image delete -server blade07 -version 2 <RETURN>
- To display a list of all system images
>rcxadm image list -type backup -server blade07 <RETURN>
SERVERNAME VERSION BACKUPDATE COMMENT
---------- ------- ---------- -------
blade07 2 2007/11/01-10:06:35 Database Server-1
blade07 3 2007/11/12-15:16:55 Database Server-2
- To display a list of all system images
>rcxadm image list -type backup <RETURN>
SERVERNAME VERSION BACKUPDATE COMMENT
---------- ------- ---------- -------
blade01 2 2007/11/01-10:06:35 Application Server-1
blade01 3 2007/11/12-15:16:55 Application Server-2
blade05 2 2007/12/01-10:06:35 File Server-1
blade05 3 2007/12/12-15:16:55 File Server-2
blade07 2 2007/01/31-20:46:25 Database Server-1
- To collect a cloning image
>rcxadm image create -server blade01 -name AppImage -comment "Windows" <RETURN>
- To deploy a cloning image
>rcxadm image deploy -server blade08:db02,blade09 -name AppImage -version 2 <RETURN>
- To delete a cloning image
>rcxadm image delete -name AppImage -version 2 <RETURN>
- To display a list of image versions for a given cloning image
>rcxadm image list -type cloning -name AppImage <RETURN>
NAME VERSION CREATIONDATE COMMENT
---- ------- ------------ -------
AppImage 1 2008/11/12-16:54:05 Windows
AppImage 2 2008/11/13-10:16:53 Windows+patch
- To display a list of all cloning images
>rcxadm image list -type cloning <RETURN>
NAME VERSION CREATIONDATE COMMENT
---- ------- ------------ -------
AppImage 1 2008/11/12-16:54:05 Windows
AppImage 2 2008/11/13-10:16:53 Windows+patch
DBImage 1 2008/11/13-13:21:38 Redhat
DBImage 2 2008/11/14-04:39:27 -
Exit Status
This command returns the following values:
- 42 -

0
The command executed successfully.
non-zero
An error has occurred.
- 43 -
Chapter 5 Control and Environment SetupThis chapter explains the commands used for control and environment setup of the manager and agents that comprise ResourceOrchestrator.
5.1 deployment_service_uninstall
Name
- Manager
[Windows Manager]Installation_folder\SVROR\Manager\bin\deployment_service_uninstall.bat - Uninstallation of the related services
[Linux Manager]/opt/FJSVrcvmr/bin/deployment_service_uninstall.sh - Uninstallation of the related services
- Agent
[Windows]Installation_folder\Agent\bin\deployment_service_uninstall.bat - Uninstallation of the related services
[Linux]/opt/FJSVrcxat/bin/deployment_service_uninstall.sh - Uninstallation of the related services
Format
deployment_service_uninstall.bat
deployment_service_uninstall.sh
Description
deployment_service_uninstall is the command used to uninstall the related services from Resource Orchestrator.Please stop managers and agents before using this command.After using this command, please start managers and agents.
For information on starting and stopping managers, refer to "2.1 Starting and Stopping Managers" in the "Operation Guide VE".For information on starting and stopping agents, refer to "2.2 Starting and Stopping Agents" in the "Operation Guide VE".
Requirements
Permissions
OS Administrator
Location
Admin server, managed server
Example
- To uninstall the related services from manager
>deployment_service_uninstall.bat <RETURN>
- 44 -
Exit Status
This command returns the following values:
0
The command executed successfully.
non-zero
An error has occurred.
5.2 rcxadm agtctl
Name
[Windows] [Hyper-V]Installation_folder\Agent\bin\rcxadm agtctl - Agent control
[Linux] [VMware] [Xen] [KVM]/opt/FJSVrcxat/bin/rcxadm agtctl - Agent control
[Solaris]/opt/FJSVrcvat/bin/rcxadm agtctl - Agent control
Format
rcxadm agtctl start
rcxadm agtctl stop
rcxadm agtctl modify -manager ip
rcxadm agtctl snap [-dir directory] [-full]
Description
rcxadm agtctl is the command used to start and stop agents, collect troubleshooting data and modify the admin LAN IP address of themanager that is registered in the agent.
For information on starting and stopping agents, refer to "2.2 Starting and Stopping Agents" in the "Operation Guide VE".For information on collecting troubleshooting data, refer to "1.2.1 Collecting Initial Troubleshooting Data" and "1.2.2 CollectingExhaustive Troubleshooting Data" in the "Troubleshooting".For information on changing the manager's admin LAN IP address, refer to "8.1 Changing Admin IP Addresses" in the "User's GuideVE".
Subcommands
start
Starts the Agent.
stop
Stops the Agent.
modify [Physical server] [Hyper-V]
Modifies the admin LAN IP address of the manager that is registered in the agent.
snap
Collects troubleshooting data from the managed server.
The collected data is stored in the following compressed files:
[Windows] [Hyper-V]rcxtssnap_server_name.jar
- 45 -
[Linux] [Solaris] [VMware] [Xen] [KVM]When collecting troubleshooting data, data is compressed on managed servers using the bzip2, the gzip, or the compress command.Depending on the command used, the name assigned to troubleshooting data will be one of the following.Resource Orchestrator uses the command with the best compression ratio (bzip2 -> gzip -> compress) available on the managed server.
- When Compressing with bzip2
rcxtssnap_server_name.tar.bz2
- When Compressing with gzip
rcxtssnap_server_name.tar.gz
- When Compressing with compress
rcxtssnap_server_name.tar.Z
Options
Specify the following options when using the modify subcommand:
-manager ip
Specify the new manager IP address.
The following options can be specified for the snap subcommand:
-dir directory(Optional)
Specify the folder used to store the collected data in directory.If this option is omitted, the data will be stored in the following folder:
[Windows] [Hyper-V]The folder defined by the TEMP environment variable
[Linux] [Solaris] [VMware]/tmp
Note
- When using full paths in the dir and the TEMP environment variable
The length of the full path string must not exceed 100 characters. If more than 100 characters are used the troubleshooting datacannot be collected, and message number 67131 or message number 67265 will be displayed.
- When using relative paths in the dir and the TEMP environment variable
When specifying a relative folder path, its equivalent full path must not exceed 100 characters (calculated using the Windows 8.3format (*)). If the converted full path string exceeds 100 characters, the troubleshooting data will not be collected, and the "Messagenumber 67131" will be displayed.
* Note: This rule specifies that the file name can be a maximum of 8 characters, with a file extension of up to 3 characters
- The following symbols cannot be specified in the name of the folder in which the collected data is stored:
""", "|", "*", "?", "/", "<", ">", ",", "%", "&", "^", "=", "!", ";"
[Windows] [Hyper-V]
- When specifying a folder using a relative path, specify the folder adding ".\" as the first characters.
-dir .\folder_name
- 46 -
-full (Optional)
Collects exhaustive managed server troubleshooting data. This data is required to isolate the cause of a problem which could not beidentified from initial troubleshooting data alone.This requires significantly more disk space for the generated data files. This option can be omitted when collecting troubleshootingdata for an initial investigation (first diagnostic).
Requirements
Permissions
OS Administrator
Location
Managed server
Exit Status
This command returns the following values:
0
The command executed successfully.
non-zero
An error has occurred.
5.3 rcxadm authctl
Name
[Windows Manager]Installation_folder\SVROR\Manager\bin\rcxadm authctl - user authentication directory service connection settings
[Linux Manager]/opt/FJSVrcvmr/bin/rcxadm authctl - user authentication directory service connection settings
Format
rcxadm authctl register {-host hostname|-ip ip_address} [-port port] -base base_dn -bind bind_dn [-
method {SSL|PLAIN}] {-passwd password|-passwd_file password_file}
rcxadm authctl unregister
rcxadm authctl show
rcxadm authctl modify {[{-host hostname|-ip ip_address}] [-port port] [-base base_dn] [-bind bind_dn
{-passwd password|-passwd_file password_file}] [-method {SSL|PLAIN}]}
rcxadm authctl diffcert
rcxadm authctl refreshcert -alias aliasrcxadm authctl sync
Description
rcxadm authctl is the command to operate the connection information of the directory server that retains user authentication information.
Only OS administrators can execute this command.
When using the following subcommands, stop the manager prior to command execution:
- register
- unregister
- 47 -
- modify
- refreshcert
Subcommands
register
Registers directory server connection information. When executing this command, the directory server is not connected.This command cannot be used when multiple sets of directory server connection information are registered.
unregister
Deletes the connection information of registered directory servers.This command cannot be used when multiple sets of directory server connection information are registered.
show
The registered directory server connection information is displayed in the following format.
host1: Host name or IP addresshost2: Host name or IP addressport: Port_numberbase: Base DNbind: Administrative_user_DNmethod: Encryption_communication_method
When directory server connection information for only one server is registered, only one host name (or IP address) is displayed.
modify
Modifies the connection information of registered directory servers.This command cannot be used when multiple sets of directory server connection information are registered.
diffcert
Compares the certificates registered with ServerView Operations Manager and the Resource Orchestrator manager, and when thefollowing difference exists, that certificate is displayed using a different name.
- Certificates that exist in the ServerView Operations Manager keystore, but not in the Resource Orchestrator manager's keystore
- Certificates that exist in the ServerView Operations Manager keystore and the Resource Orchestrator manager's keystore, but haveconflicting fingerprints
This command cannot be used for the following configurations:
- ServerView Operations Manager has not been installed.
- Internal authentication is used as the authentication method
Difference of the CA certificate (keystore) is displayed using alias in the following format:
svs_cmsldaphost.fujitsu.com
refreshcert
Imports the certificate of ServerView Operations Manager corresponding to the specified alias into Resource Orchestrator.
Specify the alias displayed by the diffcert command.
This command cannot be used for the following configurations:
- ServerView Operations Manager has not been installed.
- Internal authentication is used as the authentication method
If a root CA certificate has been registered with ServerView Operations Manager, specify that root CA certificate.
- 48 -

To import the server certificate, specify the alias for the following certificate:
- Server certificate of ServerView Operations Manager
- Server certificate of the directory server to be used
This is unnecessary when using the directory service provided with ServerView Operations Manager.
Note
The certificate is imported using the specified alias. The existing certificate is deleted in the following cases:
- There is a certificate which has the same alias
- There is a certificate which has the same content as the certificate to be imported
Point
When executing the command, create a copy of the keystore (truststore-cacerts) file for Resource Orchestrator in the following format.When a file with the same name already exists, it will be overwritten.
[Windows Manager]
- Source File
Installation_folder\SVROR\Manager\runtime\jre6\lib\security\cacerts
- Destination File
Installation_folder\SVROR\Manager\runtime\jre6\lib\security\cacerts.org
[Linux Manager]
- Source File
/opt/FJSVrcvmr/runtime/jre6/lib/security/cacerts
- Destination File
/opt/FJSVrcvmr/runtime/jre6/lib/security/cacerts.org
sync
Synchronizes the directory server connection settings of Resource Orchestrator with those of ServerView Operations Manager. Whendirectory server configuration information is not already registered, it will be registered with Resource Orchestrator using the settingsof ServerView Operations Manager.
This command cannot be used for the following configurations:
- ServerView Operations Manager has not been installed.
Options
The following options can be specified when using the register and modify subcommands:
-port port (optional)
Specify the port number of the directory server. When omitted, the following port number is regarded as having been specified usingthe -method value.
- SSL
636
- PLAIN
389
- 49 -

-method {SSL|PLAIN} (optional)
Specify the communication encryption method for the directory server. Specify either one of the following:
- When encrypted communication is enabled
SSL
- When encrypted communication is not enabled
PLAIN
When this option is omitted, the -method SSL is regarded as being specified.
The following options can be specified when using the register subcommand:
-host hostname
Specify the host name for the directory server using an FQDN or an IP address.
-ip ip_address
Specify the IP address of the directory server. This option is for compatibility. Use the -host option.
-base base_dn
Specify the search base of the directory server in DN format.
-bind bind_dn
Specify administrative user name of the directory server in the DN format.
-passwd password
Specify the password for the administrative user name of the directory server.
-passwd_file password_file
Specify the password file for the administrative user name of the directory server. Enter the password file using the following format(remove the quotation marks).
"userdn,password"
Specify the following options when using the modify subcommand:
-host hostname
Specify the host name for the directory server using an FQDN or an IP address.
-ip ip_address (optional)
Specify the IP address of the directory server. This option is for compatibility. Use the -host option.
-base base_dn (optional)
Specify the search base of the directory server in DN format.
-bind bind_dn (optional)
Specify administrative user name of the directory server in the DN format.
-passwd password (optional)
Specify the password for the administrative user name of the directory server.
-passwd_file password_file (optional)
Specify the password file for the administrative user name of the directory server. Enter the password file using the following format(remove the quotation marks).
"userdn,password"
Specify the following options when using the refreshcert subcommand:
-alias alias
Specify the alias of the certificate to import into the CA certificate of Resource Orchestrator.
When using blank spaces or symbols in the specified string, enclose the whole string in double quotes ( " ).
- 50 -

An alias which contains double quotes ( " ) as character elements cannot be specified for this command. Remove any double quotes(") included in the alias before executing this command.
Note
- Enter a string of 1 or more characters for the administrative user name.
- Enter a string no longer than 128 characters for the password.
- When changing the configuration of the administrative user name and password, specify both files.
- When using blank spaces in the specified string, enclose the whole specified string in double quotes ( " ). Note that it is not necessaryto use double quotations (") when specifying the character string in the password file.
Requirements
Permissions
OS Administrator
Location
Admin server
Exit Status
This command returns the following values:
0
The command executed successfully.
non-zero
An error has occurred.
5.4 rcxadm certctl
Name
- Manager
[Windows Manager]Installation_folder\SVROR\Manager\bin\rcxadm certctl - SSL certificate operations
[Linux Manager]/opt/FJSVrcvmr/bin/rcxadm certctl - SSL certificate operations
- Agent
[Windows] [Hyper-V]Installation_folder\Agent\bin\rcxadm certctl - SSL certificate operations
[Linux] [VMware] [Xen] [KVM]/opt/FJSVrcxat/bin/rcxadm certctl - SSL certificate operations
[Solaris]/opt/FJSVrcvat/bin/rcxadm certctl - SSL certificate operations
- 51 -
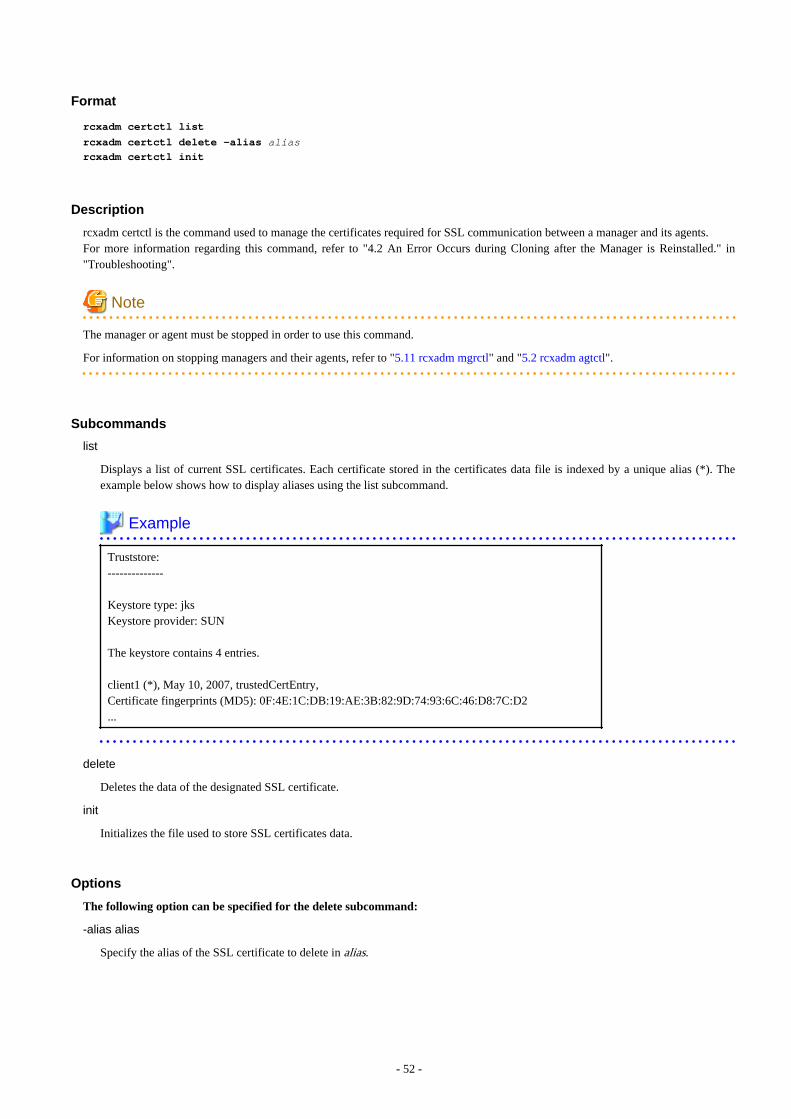
Format
rcxadm certctl list
rcxadm certctl delete -alias aliasrcxadm certctl init
Description
rcxadm certctl is the command used to manage the certificates required for SSL communication between a manager and its agents.For more information regarding this command, refer to "4.2 An Error Occurs during Cloning after the Manager is Reinstalled." in"Troubleshooting".
Note
The manager or agent must be stopped in order to use this command.
For information on stopping managers and their agents, refer to "5.11 rcxadm mgrctl" and "5.2 rcxadm agtctl".
Subcommands
list
Displays a list of current SSL certificates. Each certificate stored in the certificates data file is indexed by a unique alias (*). Theexample below shows how to display aliases using the list subcommand.
Example
Truststore:--------------
Keystore type: jksKeystore provider: SUN
The keystore contains 4 entries.
client1 (*), May 10, 2007, trustedCertEntry,Certificate fingerprints (MD5): 0F:4E:1C:DB:19:AE:3B:82:9D:74:93:6C:46:D8:7C:D2...
delete
Deletes the data of the designated SSL certificate.
init
Initializes the file used to store SSL certificates data.
Options
The following option can be specified for the delete subcommand:
-alias alias
Specify the alias of the SSL certificate to delete in alias.
- 52 -

Requirements
Permissions
OS Administrator
Location
Admin server, managed server
Examples
- To display a list of SSL certificates currently used by the manager
>rcxadm certctl list <RETURN>
- To delete an SSL certificate used by the manager
>rcxadm certctl delete -alias alias <RETURN>
- To initialize the file used by the manager to store SSL certificates data
>rcxadm certctl init <RETURN>
Exit Status
This command returns the following values:
0
The command executed successfully.
non-zero
An error has occurred.
5.5 rcxadm dbctl
Name
[Windows Manager]Installation_folder\SVROR\Manager\bin\rcxadm dbctl - Management of the database for Resource Orchestrator
[Linux Manager]/opt/FJSVrcvmr/bin/rcxadm dbctl - Management of the database for Resource Orchestrator
Format
rcxadm dbctl modify -passwd
Description
rcxadm dbctl is the command used for management of the database for Resource Orchestrator.
Note
The manager must be stopped in order to use this command.
For information on stopping managers, refer to "5.11 rcxadm mgrctl".
- 53 -

Subcommands
modify
Changes the database configuration for Resource Orchestrator.
Options
-password
Changes the database password for Resource Orchestrator.When the password of the OS user account (rcxdb) for use in connection with Resource Orchestrator has been changed, this commandmust be executed.It is also possible to change the password for the OS user account (rcxdb) directly using this command.When changing the password, enter the following interactively.
1. New Password
2. New Password for Confirmation
Note
For the password, enter a string including upper case alphabetic characters, lower case alphabetic characters, and numerals. The lengthof the string must be the length allowed by the OS of the admin server.
Requirements
Permissions
OS Administrator
Location
Admin server
Exit Status
This command returns the following values:
0
The command executed successfully.
non-zero
An error has occurred.
5.6 rcxadm deployctl
Name
[Windows]Installation_folder\Agent\bin\rcxadm deployctl - Encryption of license information definition files
Format
rcxadm deployctl passwd -encrypt
- 54 -

Description
rcxadm deployctl is the command used to encrypt the administrator password on managed servers running on Windows Server 2008 orlater, after editing the license information definition file.The license information definition file is created by installing the Resource Orchestrator Agent. With the cloning function, use this file toperform Windows license authorization.For details on how to use this command, refer to "17.2 Collecting" in the "User's Guide VE".
Subcommands
passwd
Encrypts the administrator password that is included in the license information definition file.
Options
-encrypt
Always specify this option when encrypting the password.
Requirements
Permissions
OS Administrator
Location
Managed server
Exit Status
This command returns the following values:
0
The command executed successfully.
non-zero
An error has occurred.
5.7 rcxadm eventctl
Name
[Windows Manager]Installation_folder\SVROR\Manager\bin\rcxadm eventctl - Event control
[Linux Manager]/opt/FJSVrcvmr/bin/rcxadm eventctl - Event control
Format
rcxadm eventctl add -destination host -community snmp_community
rcxadm eventctl delete -destination host -community snmp_communityrcxadm eventctl list
- 55 -

Description
rcxadm eventctl is the command used to send Resource Orchestrator events as SNMP traps.For details on how to use this command, refer to "Appendix G Sending SNMP Traps" in the "Setup Guide VE".
Subcommands
add
Registers the SNMP trap transmission destination. A maximum of five destinations can be registered.
delete
Deletes a registered SNMP trap transmission destination.
list
Displays a list of registered SNMP trap transmission destinations.The following properties are displayed for each server.
Item Name Description
DESTINATION Host name or IP address
COMMUNITY SNMP community name
Options
The following options can be specified for the set subcommand, when specifying add or delete:
-destination host
Specify the IP address or server name of the server that is the SNMP trap transmission destination for host.For the server name, enter a string of up to 64 alphanumeric characters and numerals.
"%", "+", ",", "-", ".", "/", ":", "=", "@", "_", "~"
-community snmp_community
Specify SNMP community name or server name of the server that is the SNMP trap transmission destination for snmp_community.For the SNMP community name, enter a string of up to 32 alphanumeric characters, hyphens ("-"), and underscores ("_").
Requirements
Permissions
One of the following permissions is required:
- OS Administrator
- Resource Orchestrator Privileged User
Location
Admin server
Exit Status
This command returns the following values:
0
The command executed successfully.
non-zero
An error has occurred.
- 56 -
5.8 rcxadm imagemgr
Name
[Windows Manager]Installation_folder\SVROR\Manager\bin\rcxadm imagemgr - Image management settings
[Linux Manager]/opt/FJSVrcvmr/bin/rcxadm imagemgr - Image management settings
Format
rcxadm imagemgr info
rcxadm imagemgr set -attr imagedir=dir
rcxadm imagemgr set -attr {backup|clone}.maxversion=value
Description
rcxadm imagemgr is the command used to change the image files folder location, or the maximum number of image versions that can bekept in Resource Orchestrator.
Operations for system images and cloning images of servers
For details on changing the maximum number of system image versions, refer to "8.3 Changing the Maximum Number of SystemImage Versions" in the "User's Guide VE".
For details on changing the maximum number of cloning image versions, refer to "8.4 Changing the Maximum Number of CloningImage Versions" in the "User's Guide VE".
A new folder should be created when changing the location of the image file storage folder.
For details on changing the path for the image file storage folder, refer to "8.5 Changing the Image Folder Location" in the "User'sGuide VE".
Subcommand
info
Displays current image settings (the maximum number of image versions and the location of the image files folder).The following properties are displayed for each server.
Table 5.1 info Subcommand Display Parameters
Item Name Description
backup.maxversionMaximum number of system imageversions
clone.maxversionMaximum number of cloning imageversions
imagedir Location of the image files folder
set
Sets a new location for the image files folder, or sets a new limit for the number of image versions.
Option
The following options can be specified for the set subcommand:
- 57 -

-attr imagedir=dir
Specify a new location (path) for the image files folder in dir.The specified folder path must match all of the following requirements.
- The specified path should be no more than 100 characters long
- The specified path should include none of the following characters
""", "|", "*", "?", "/", "<", ">", ",", "%", "&", "^", "=", "!", ";"
[Windows Manager]"/"
[Linux Manager]"\"
- Only local folder paths are allowed (UNC paths are not permitted)
- Folders must be created beforehand
- When using blank spaces in the specified path, enclose the whole specified path in double quotes ( " )
- Do not add "\" to the end of the specified path
- The specified path should not point to any of the following folders
[Windows Manager]Installation_folder\SVROR\Manager
[Linux Manager]/opt/FJSVrcvmr
/etc/opt/FJSVrcvmr
/var/opt/FJSVrcvmr
- The specified folder is empty
[Linux]If a partition (file-system) was specially created to store image files, this partition will include a "lost+found" folder, and thereforecannot be considered as empty.
In that case, be sure to create and use a dedicated directory to store image files within that partition.
- The specified path should have proper security settings
[Linux]For safer administration, it is recommended to use either the following permissions settings for each ancestor directory of theimage files directory.
- Give write permissions only to system administrators
- Use the sticky bit to prevent other users from renaming or deleting image files
If permissions are not set as above, this command may fail to change the image files folder location.
When changing the image files folder location, image files are copied to the new location, which may take some time to complete.
-attr {backup|clone}.maxversion=value
Changes the maximum number of image file versions.
- To change the maximum number of system image versions
Specify backup.
- To change the maximum number of cloning image versions
Specify clone.Specify a new maximum number of image file versions in value.Enter a numerical value between 1 and 10 in value.
- 58 -
Requirements
Permissions
OS Administrator
Location
Admin server
The manager should be stopped when changing the image files folder location. For information on stopping managers, refer to "2.1Starting and Stopping Managers" in the "Operation Guide VE".
If the ROR console was opened, the Web browser should be refreshed after changing the maximum number of image file versions.
Usage example
- When specifying a path for the image files folder that includes no blank spaces
[Windows Manager]When changing to C:\temp
>rcxadm imagemgr set -attr imagedir=C:\temp <RETURN>
[Linux Manager]When changing to /home/tmp
# rcxadm imagemgr set -attr imagedir=/home/tmp <RETURN>
- When specifying a path for the image files folder that includes blank spaces
[Windows Manager]When changing to C:\temp\Resource Orchestrator VE
>rcxadm imagemgr set -attr imagedir=C:\temp Resource Orchestrator VE" <RETURN>
[Linux Manager]When changing to /home/tmp/Resource Orchestrator VE
# rcxadm imagemgr set -attr imagedir="/home/tmp/Resource Orchestrator VE" <RETURN>
Exit Status
This command returns the following values:
0
The command executed successfully.
non-zero
An error has occurred.
5.9 rcxadm lanctl
Name
[Windows]Installation_folder\Agent\bin\rcxadm lanctl - Network parameters configuration
[Linux]/opt/FJSVrcxat/bin/rcxadm lanctl - Network parameters configuration
- 59 -

Format
rcxadm lanctl set
rcxadm lanctl unset
rcxadm lanctl enable
rcxadm lanctl disable
Description
rcxadm lanctl is the command used to configure network parameters for network interfaces on managed servers.
This command cannot be used on managed servers running SUSE Linux Enterprise Server as their operating system.
Subcommands
set
Applies the settings previously defined in the network configuration file to the managed server's network interfaces.For more information regarding the network configuration file, refer to "17.6 Network Parameter Auto-Configuration for CloningImages" in the "User's Guide VE".
unset
Clears the network parameters previously applied to the managed server's network interfaces via the set subcommand.
enable
Enables the network parameter auto-configuration function for cloning image deployment.
disable
Disables the network parameter auto-configuration function for cloning image deployment.
Requirements
Permissions
OS Administrator
Location
Managed server
Examples
- To apply the network parameters configuration
>rcxadm lanctl set <RETURN>
- To undo the network parameters configuration
>rcxadm lanctl unset <RETURN>
- To enable the network parameter auto-configuration function
>rcxadm lanctl enable <RETURN>
- To disable the network parameter auto-configuration function
>rcxadm lanctl disable <RETURN>
- 60 -

Exit Status
This command returns the following values:
0
The command executed successfully.
non-zero
An error has occurred.
5.10 rcxadm license
Name
[Windows Manager]Installation_folder\SVROR\Manager\bin\rcxadm license - license control
[Linux Manager]/opt/FJSVrcvmr/bin/rcxadm license - license control
Format
rcxadm license add -lkey license_keyrcxadm license list
Description
rcxadm license is the command used to register licenses or to check the licenses already registered.
Subcommands
add
Registers a license.
list
To display a list of registered licenses.
Options
-lkey license_key
Specify a license key to be registered in license_key.
Requirements
Permissions
One of the following permissions is required:
- OS Administrator
- Resource Orchestrator Privileged User
Location
Admin server
- 61 -
Example
- To display a list of registered licenses.
>rcxadm license list <RETURN>
LICENSE_ NAME NUMBER_OF_LICENSES STATUS
--------------- ------------------ --------
Cloud Edition 10 Inactive
Virtual Edition 5 Active
DR option 0 -
NS option 0 -
Exit Status
This command returns the following values:
0
The command executed successfully.
non-zero
An error has occurred.
5.11 rcxadm mgrctl
Name
[Windows Manager]Installation_folder\SVROR\Manager\bin\rcxadm mgrctl - Manager control
[Linux Manager]/opt/FJSVrcvmr/bin/rcxadm mgrctl - Manager control
Format
rcxadm mgrctl start
rcxadm mgrctl stop
rcxadm mgrctl modify {-ip ip |-port name=number}
rcxadm mgrctl snap [-dir directory] [-full|-all]
Description
rcxadm mgrctl is the command used to start and stop managers, collect troubleshooting data, and change admin LAN IP addresses andport numbers.For information on starting and stopping managers, refer to "2.1 Starting and Stopping Managers" in the "Operation Guide VE".For information on collecting troubleshooting data, refer to "1.2.1 Collecting Initial Troubleshooting Data" and "1.2.2 CollectingExhaustive Troubleshooting Data" in "Troubleshooting".For information on methods for changing IP addresses and port numbers, refer to "8.1 Changing Admin IP Addresses" and "8.2 ChangingPort Numbers" in the "User's Guide VE".
[Windows Manager]If port numbers are changed, the following lines in the Windows_system_folder\system32\drivers\etc\services file are automaticallyupdated.
[Linux Manager]If the port number has been changed, the following lines in the \etc\services file will be changed automatically.
- 62 -
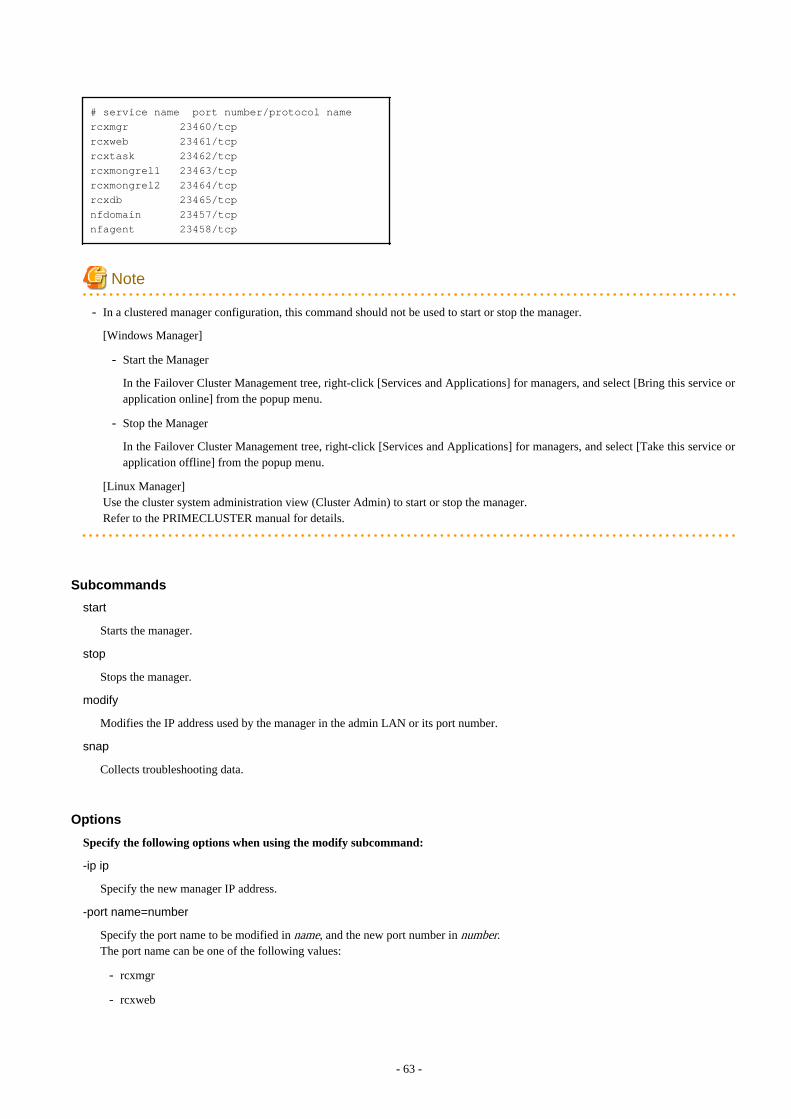
# service name port number/protocol name
rcxmgr 23460/tcp
rcxweb 23461/tcp
rcxtask 23462/tcp
rcxmongrel1 23463/tcp
rcxmongrel2 23464/tcp
rcxdb 23465/tcp
nfdomain 23457/tcp
nfagent 23458/tcp
Note
- In a clustered manager configuration, this command should not be used to start or stop the manager.
[Windows Manager]
- Start the Manager
In the Failover Cluster Management tree, right-click [Services and Applications] for managers, and select [Bring this service orapplication online] from the popup menu.
- Stop the Manager
In the Failover Cluster Management tree, right-click [Services and Applications] for managers, and select [Take this service orapplication offline] from the popup menu.
[Linux Manager]Use the cluster system administration view (Cluster Admin) to start or stop the manager.Refer to the PRIMECLUSTER manual for details.
Subcommands
start
Starts the manager.
stop
Stops the manager.
modify
Modifies the IP address used by the manager in the admin LAN or its port number.
snap
Collects troubleshooting data.
Options
Specify the following options when using the modify subcommand:
-ip ip
Specify the new manager IP address.
-port name=number
Specify the port name to be modified in name, and the new port number in number.The port name can be one of the following values:
- rcxmgr
- rcxweb
- 63 -
- rcxtask
- rcxmongrel1
- rcxmongrel2
- rcxdb
- nfdomain
- nfagent
The following options can be specified for the snap subcommand:
-dir directory(Optional)
Specify the folder used to store the collected data in directory.When omitted, the data will be stored in the folder specified by the TEMP environment variable:
Note
- When using full paths in the dir and the TEMP environment variable
The length of the full path string must not exceed 100 characters. If more than 100 characters are used the troubleshooting datacannot be collected, and message number 67131 or message number 67265 will be displayed.
- When using relative paths in the dir and the TEMP environment variable
When specifying a relative folder path, its equivalent full path must not exceed 100 characters (calculated using the Windows 8.3format (*)). If the converted full path string exceeds 100 characters, the troubleshooting data will not be collected, and the "Messagenumber 67131" will be displayed.
* Note: This rule specifies that the file name can be a maximum of 8 characters, with a file extension of up to 3 characters
- The following symbols cannot be specified in the name of the folder in which the collected data is stored:
""", "|", "*", "?", "<", ">", ",", "%", "&", "^", "=", "!", ";"
[Windows Manager]"/"
[Linux Manager]"\"
-full (Optional)
Collects exhaustive troubleshooting data from the admin server. This data is required to isolate the cause of a problem which couldnot be identified from initial troubleshooting data alone.This requires significantly more disk space for the generated data files. This option can be omitted when collecting troubleshootingdata for an initial investigation (first diagnostic).
-all (Optional)
This option collects troubleshooting data not only from the admin server, but from all the managed servers as well. This option cannotbe used together with the -full option.Since only data required for initial troubleshooting is collected, it does not require much disk space. The data can also be collectedquickly and sent easily via email.Data collected from both the admin server and managed servers is stored in the directory specified by dir on the admin server fromwhich the command was executed.If the user account does not have administrative authority within the operating system, it is necessary to log in as a Resource Orchestratorprivileged user (using the rcxlogin command) to use this option.For information on the rcxlogin command, refer to "2.1 rcxlogin".
- Collected Files
The collected data is stored in the following compressed files:
- 64 -
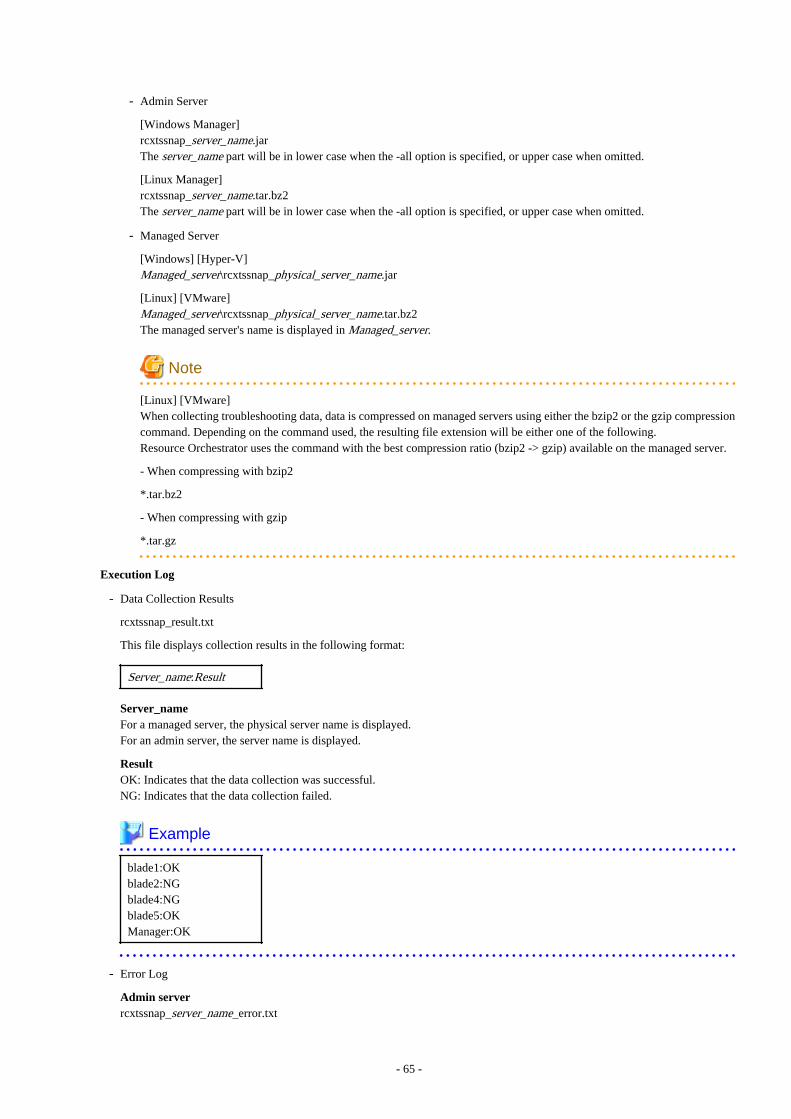
- Admin Server
[Windows Manager]rcxtssnap_server_name.jarThe server_name part will be in lower case when the -all option is specified, or upper case when omitted.
[Linux Manager]rcxtssnap_server_name.tar.bz2The server_name part will be in lower case when the -all option is specified, or upper case when omitted.
- Managed Server
[Windows] [Hyper-V]Managed_server\rcxtssnap_physical_server_name.jar
[Linux] [VMware]Managed_server\rcxtssnap_physical_server_name.tar.bz2The managed server's name is displayed in Managed_server.
Note
[Linux] [VMware]When collecting troubleshooting data, data is compressed on managed servers using either the bzip2 or the gzip compressioncommand. Depending on the command used, the resulting file extension will be either one of the following.Resource Orchestrator uses the command with the best compression ratio (bzip2 -> gzip) available on the managed server.
- When compressing with bzip2
*.tar.bz2
- When compressing with gzip
*.tar.gz
Execution Log
- Data Collection Results
rcxtssnap_result.txt
This file displays collection results in the following format:
Server_name:Result
Server_nameFor a managed server, the physical server name is displayed.For an admin server, the server name is displayed.
ResultOK: Indicates that the data collection was successful.NG: Indicates that the data collection failed.
Example
blade1:OKblade2:NGblade4:NGblade5:OKManager:OK
- Error Log
Admin serverrcxtssnap_server_name_error.txt
- 65 -

Managed server
[Windows]Managed_Server\rcxtssnap_physical_server_name_error.txt
[Linux]Managed_Server\rcxtssnap_physical_server_name_error.txt
Requirements
Permissions
OS AdministratorNote that when logged in as a Resource Orchestrator privileged user (using the rcxlogin command), only the -all option of thetroubleshooting data collection subcommand (snap) can be used.
Location
Admin server
Exit Status
This command returns the following values:
0
The command executed successfully.
non-zero
An error has occurred.
5.12 rcxadm servermgr
Name
[Windows Manager]Installation_folder\SVROR\Manager\bin\rcxadm servermgr - Server management software operations
[Linux Manager]/opt/FJSVrcvmr/bin/rcxadm servermgr - Server management software operations
Format
rcxadm servermgr register -name name [-label label] [-comment comment] -soft_name soft_name
rcxadm servermgr list [-verbose]
rcxadm servermgr show -name name
rcxadm servermgr unregister -name name
rcxadm servermgr modify -name name [-label label] [-comment comment]
rcxadm servermgr refresh -name name
Description
rcxadm servermgr is the command used to perform operations of server management software.
- 66 -

Subcommands
register
Registers server management software.
list
Displays a list of server management software information.
The following detailed information is displayed:
Table 5.2 Server Management Software Information
Item Name Description
NAME Server management software name
LABEL Label of the server management software
COMMENT (*)Comment for the server managementsoftware
SOFT NAME Name of the server management software
STATUS Status of the server management software
* Note: When specifying -verbose for the option, it is displayed.
show
Displays the detailed information of the server management software.
The following detailed information is displayed:
Table 5.3 Detailed Information of Server Management Software
Item Name Description
Name Server management software name
Label Label of the server management software
CommentComment for the server managementsoftware
Soft name Name of the server management software
VersionVersion of the server managementsoftware
Status Status of the server management software
unregister
Unregisters the server management software.
modify
Modifies the following items of server management software:
- Label
- Comment
refresh
Updates server management software information.
Options
-name name
In name, specify the resource name of the target server management software.
- 67 -

-soft_name soft_name
In soft_name, specify the server management software. The specifiable names are shown below.
- When using BMC BladeLogic Server Automation
Specify "blade_logic".
-verbose
Specify when displaying detailed information.
-label label
In label, specify the label of the target server management software.
-comment comment
In comment, specify the comment for the target server management software.
Examples
- To display the list of server management software information:
>rcxadm servermgr list <RETURN>
NAME LABEL SOFT NAME STATUS
---- ----- --------- ------
BladeLogic - BMC BladeLogic Server Automation normal
- To display the detailed list of server management software information:
>rcxadm servermgr list -verbose <RETURN>
NAME LABEL COMMENT SOFT NAME STATUS
---- ----- ------- --------- ------
BladeLogic - - BMC BladeLogic Server Automation normal
- To display the detailed information for server management software:
>rcxadm servermgr show -name BladeLogic <RETURN>
Name: BladeLogic
Label:
Comment:
Soft name: BMC BladeLogic Server Automation
Version: 8.2.01.273
Status: normal
5.13 rcxadm storagemgr
Name
[Windows Manager]Installation_folder\SVROR\Manager\bin\rcxadm storagemgr - Storage management software operations
[Linux Manager]/opt/FJSVrcvmr/bin/rcxadm storagemgr - Storage management software operations
Format
rcxadm storagemgr register -name name -soft_name soft_name
rcxadm storagemgr list
rcxadm storagemgr unregister -name name
- 68 -
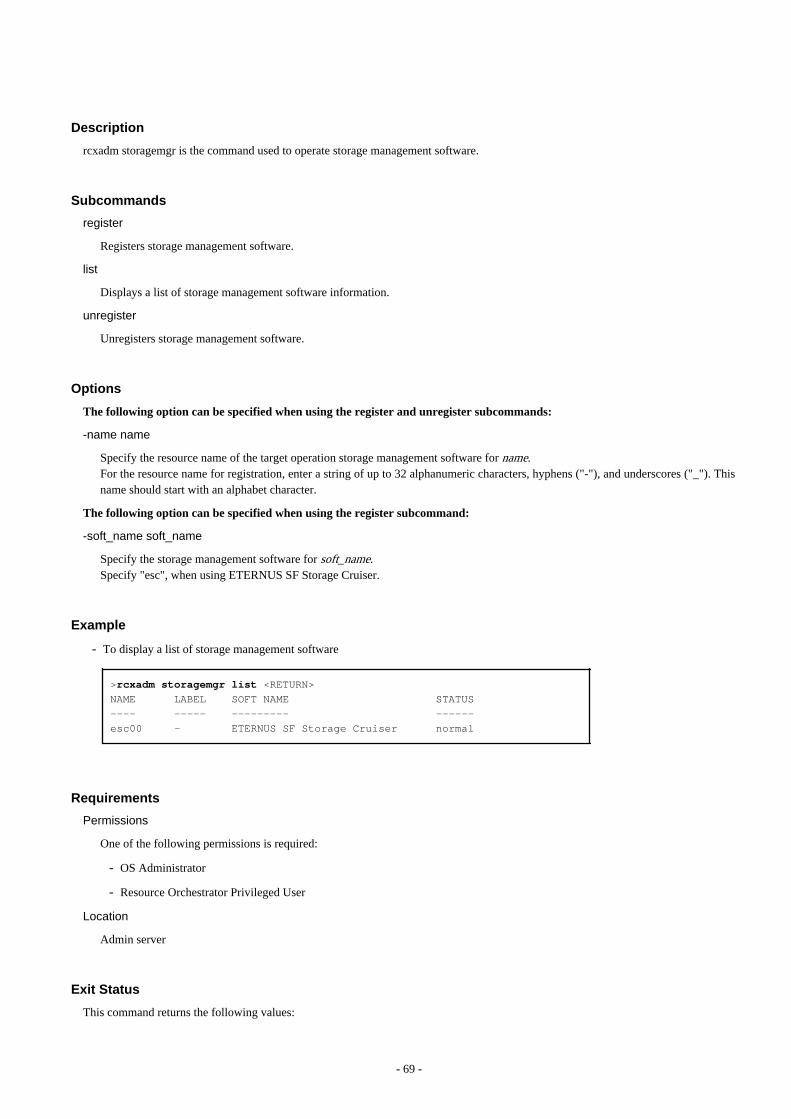
Description
rcxadm storagemgr is the command used to operate storage management software.
Subcommands
register
Registers storage management software.
list
Displays a list of storage management software information.
unregister
Unregisters storage management software.
Options
The following option can be specified when using the register and unregister subcommands:
-name name
Specify the resource name of the target operation storage management software for name.For the resource name for registration, enter a string of up to 32 alphanumeric characters, hyphens ("-"), and underscores ("_"). Thisname should start with an alphabet character.
The following option can be specified when using the register subcommand:
-soft_name soft_name
Specify the storage management software for soft_name.Specify "esc", when using ETERNUS SF Storage Cruiser.
Example
- To display a list of storage management software
>rcxadm storagemgr list <RETURN>
NAME LABEL SOFT NAME STATUS
---- ----- --------- ------
esc00 - ETERNUS SF Storage Cruiser normal
Requirements
Permissions
One of the following permissions is required:
- OS Administrator
- Resource Orchestrator Privileged User
Location
Admin server
Exit Status
This command returns the following values:
- 69 -

0
The command executed successfully.
non-zero
An error has occurred.
5.14 macbindconfig
Name
- Agent
[Linux]/usr/local/sbin/macbindconfig - Bind settings for MAC addresses (Red Hat Enterprise Linux 5, Red Hat Enterprise Linux 6, or RedHat Enterprise Linux 7)
Format
macbindconfig create
Description
macbindconfig is the function that configures MAC addresses of Network Interface Cards (NICs) in interface configuration filescorresponding to Ethernet interface names (eth0, eno1, enp5s0f0, etc.) and allocates the correct NIC to each interface, regardless of theNIC load order, in the environment where multiple NICs are used.
This command is automatically executed when installing an ROR agent.
After an ROR agent has been installed, execute this command when adding or removing network interfaces.
Subcommands
create
Retains the relation information on the PCI bus number that corresponds to the Ethernet interface name (eth0, eno1, enp5s0f0, etc.) ina file (/etc/macbind-tool/pci-eth_table) as configuration information.
Requirements
Permissions
OS Administrator
Location
Managed server
Examples
- When creating a configuration information file with the PCI bus number that corresponds to the Ethernet interface name
> /usr/local/sbin/macbindconfig create <RETURN>
Exit Status
This command returns the following values:
- 70 -

0
The command executed successfully.
non-zero
An error has occurred.
- 71 -

Chapter 6 Backup and Restoration Operations forConfiguration Definition Information
This chapter explains how to use the commands to backup and restore the configuration definition information of Resource Orchestrator.
6.1 rcxbackup
Name
[Windows Manager]Installation_folder\SVROR\Manager\bin\rcxbackup - Backup of configuration definition information
[Linux Manager]/opt/FJSVrcvmr/bin/rcxbackup - Backup of configuration definition information
Format
rcxbackup [-dir directory] [[-immediate]|[-timeout value]]
Description
rcxbackup is the command used for backup of the configuration definition information of Resource Orchestrator.
Back up configuration definition information of Resource Orchestrator using this command for restoration in case the configurationdefinition information is damaged.
Configuration definition information cannot be backed up while resource operations are being performed.Backup of configuration definition information can only be performed when no operation is being executed for the resources.
When executing the command while the manager is running, backup will be performed after the operations are completed.
When this command is executed while the manager is being stopped, this command will be returned without waiting for the completionof operations being executed, regardless of the presence or absence of the specified options.
Options
-dir directory
In directory, specify a directory to use for backup of the configuration definition information of Resource Orchestrator. However, foronline backups, the name of a directory on a network drive cannot be specified.
When omitting the directory specification, or the destination is defined in the following definition file, the backup is saved in thespecified directory.
Storage Location of Definition Files
[Windows Manager]Installation_folder\SVROR\Manager\etc\customize_data\Manager_backup.rcxprop
[Linux Manager]/etc/opt/FJSVrcvmr/customize_data/manager_backup.rcxprop
If the directory specification is omitted in the definition file, the backup is saved in the following directory:
Storage Location of Backup Files
[Windows Manager]Installation_folder\SVROR\Manager\var\backup
[Linux Manager]/var/opt/FJSVrcvmr/backup
- 72 -
-immediate
Use this option to return directly to the command prompt without waiting for the operation being executed on the admin server tocomplete its execution.
Backup of configuration definition information can only be performed when no operation is being executed for the resources. If anoperation is being executed, this command will return an error.
-timeout value
Use this option to wait the number of seconds specified in value for completion of the operation being performed on the admin server.If the operation is not completed within the specified time, this command will return an error.
If this option is omitted, the default value (3600 seconds) is set.
Use this option to return an error when the operation being executed on the admin server does not complete its execution after theexpiration of the number of seconds specified in value.
Periodical backup may not be able to start its process while the manager is performing operations using the configuration definitioninformation. Specify this option to cancel the backup after the specified number of seconds has elapsed.
If this command is executed when the manager has been stopped, the specification of this option will be ignored.
Requirements
Permissions
- OS Administrator
- Resource Orchestrator Privileged User
Location
Admin server
Example
>rcxbackup -dir /dir0 -immediate <RETURN>
Exit Status
This command returns the following values:
0
The command executed successfully.
non-zero
An error has occurred.
Note
- Specify the command using an absolute path.
- When specifying folders or directories, take note of the following points.
- Do not specify the system installation folder or the installation directory for the -dir option.
- Do not use double-byte characters or the following symbols to specify folders or directories for the -dir option.
""", "|", "*", "?", "<", ">", ",", "%", "&", "^", "=", "!", ";"
[Windows Manager]"/"
- 73 -

[Linux Manager]"\"
- The folder path or directory path can be specified using up to 100 characters.
- For the -timeout option, 172,800 or less seconds can be specified.
- Do not stop or start the manager during execution of this command.
- If this command fails, a folder or a directory that has a name starting with tmp will be created in the folder or directory specified forthe -dir option. If the problem is still not resolved after performing the actions based on the output error message, collect the folderor the directory as troubleshooting data, and contact Fujitsu technical staff. Delete these folders or directories when they are no longernecessary.
- Do not execute this command while resource operations are being performed.
- If the configuration definition information is being updated when the periodical backup operation starts, the backup operation will bepostponed until the update is complete.
- When an operation is being executed on the admin server, "INFO: Manager operation is still running." is displayed periodically.
6.2 rcxkeydefbackup
Name
[Windows Manager]Installation_folder\SVROR\Manager\bin\rcxkeydefbackup - Backup of other definition and management information
[Linux Manager]/opt/FJSVrcvmr/bin/rcxkeydefbackup - Backup of other definition and management information
Format
rcxkeydefbackup [-dir directory] [[-immediate]|[-timeout value]]
Description
rcxkeydefbackup is the command used for backup of the other definition and management information of Resource Orchestrator.
Back up the following other definition and management information of Resource Orchestrator using this command for restoration in casethe information is damaged.
Table 6.1 List of Items for Backup/Restore [Windows Manager]
No Overview Item
1 Certificates
Installation_folder\SVROR\Manager\etc\opt\FJSVssmgr\current\certificate (*1)
Installation_folder\SVROR\Manager\etc\opt\FJSVrcxdm\certificate (*1)
Installation_folder\SVROR\Manager\sys\apache\conf\ssl.crt
Installation_folder\SVROR\Manager\sys\apache\conf\ssl.key
2Session encryptionkeys
Installation_folder\SVROR\Manager\rails\config\rcx_secret.key
3 Definition files
Installation_folder\SVROR\Manager\etc\customize_data (*1)
Installation_folder\SVROR\Manager\etc\vm (*1)
Installation folder\SVROR\Manager\etc\l_server (*1)
installation folder\SVROR\Manager\etc\trapop.bat
Installation folder\SVROR\Manager\sys\usm\etc\symmetrix.conf
- 74 -
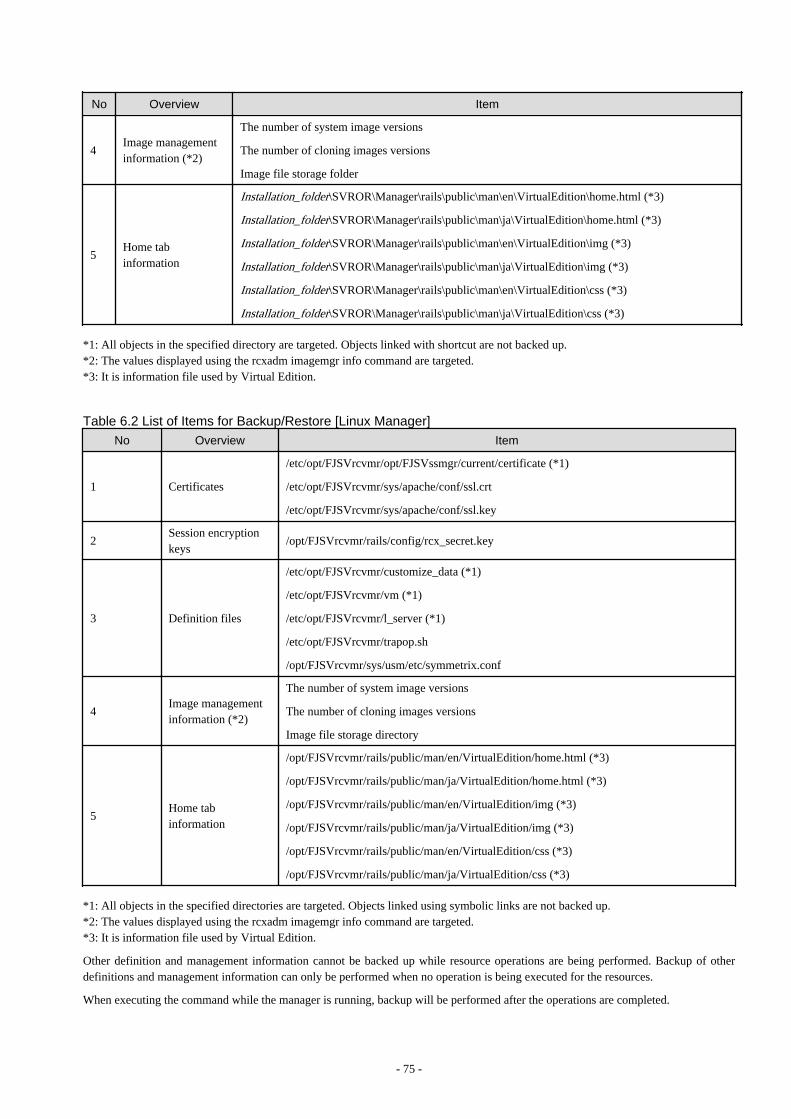
No Overview Item
4Image managementinformation (*2)
The number of system image versions
The number of cloning images versions
Image file storage folder
5Home tabinformation
Installation_folder\SVROR\Manager\rails\public\man\en\VirtualEdition\home.html (*3)
Installation_folder\SVROR\Manager\rails\public\man\ja\VirtualEdition\home.html (*3)
Installation_folder\SVROR\Manager\rails\public\man\en\VirtualEdition\img (*3)
Installation_folder\SVROR\Manager\rails\public\man\ja\VirtualEdition\img (*3)
Installation_folder\SVROR\Manager\rails\public\man\en\VirtualEdition\css (*3)
Installation_folder\SVROR\Manager\rails\public\man\ja\VirtualEdition\css (*3)
*1: All objects in the specified directory are targeted. Objects linked with shortcut are not backed up.*2: The values displayed using the rcxadm imagemgr info command are targeted.*3: It is information file used by Virtual Edition.
Table 6.2 List of Items for Backup/Restore [Linux Manager]
No Overview Item
1 Certificates
/etc/opt/FJSVrcvmr/opt/FJSVssmgr/current/certificate (*1)
/etc/opt/FJSVrcvmr/sys/apache/conf/ssl.crt
/etc/opt/FJSVrcvmr/sys/apache/conf/ssl.key
2Session encryptionkeys
/opt/FJSVrcvmr/rails/config/rcx_secret.key
3 Definition files
/etc/opt/FJSVrcvmr/customize_data (*1)
/etc/opt/FJSVrcvmr/vm (*1)
/etc/opt/FJSVrcvmr/l_server (*1)
/etc/opt/FJSVrcvmr/trapop.sh
/opt/FJSVrcvmr/sys/usm/etc/symmetrix.conf
4Image managementinformation (*2)
The number of system image versions
The number of cloning images versions
Image file storage directory
5Home tabinformation
/opt/FJSVrcvmr/rails/public/man/en/VirtualEdition/home.html (*3)
/opt/FJSVrcvmr/rails/public/man/ja/VirtualEdition/home.html (*3)
/opt/FJSVrcvmr/rails/public/man/en/VirtualEdition/img (*3)
/opt/FJSVrcvmr/rails/public/man/ja/VirtualEdition/img (*3)
/opt/FJSVrcvmr/rails/public/man/en/VirtualEdition/css (*3)
/opt/FJSVrcvmr/rails/public/man/ja/VirtualEdition/css (*3)
*1: All objects in the specified directories are targeted. Objects linked using symbolic links are not backed up.*2: The values displayed using the rcxadm imagemgr info command are targeted.*3: It is information file used by Virtual Edition.
Other definition and management information cannot be backed up while resource operations are being performed. Backup of otherdefinitions and management information can only be performed when no operation is being executed for the resources.
When executing the command while the manager is running, backup will be performed after the operations are completed.
- 75 -
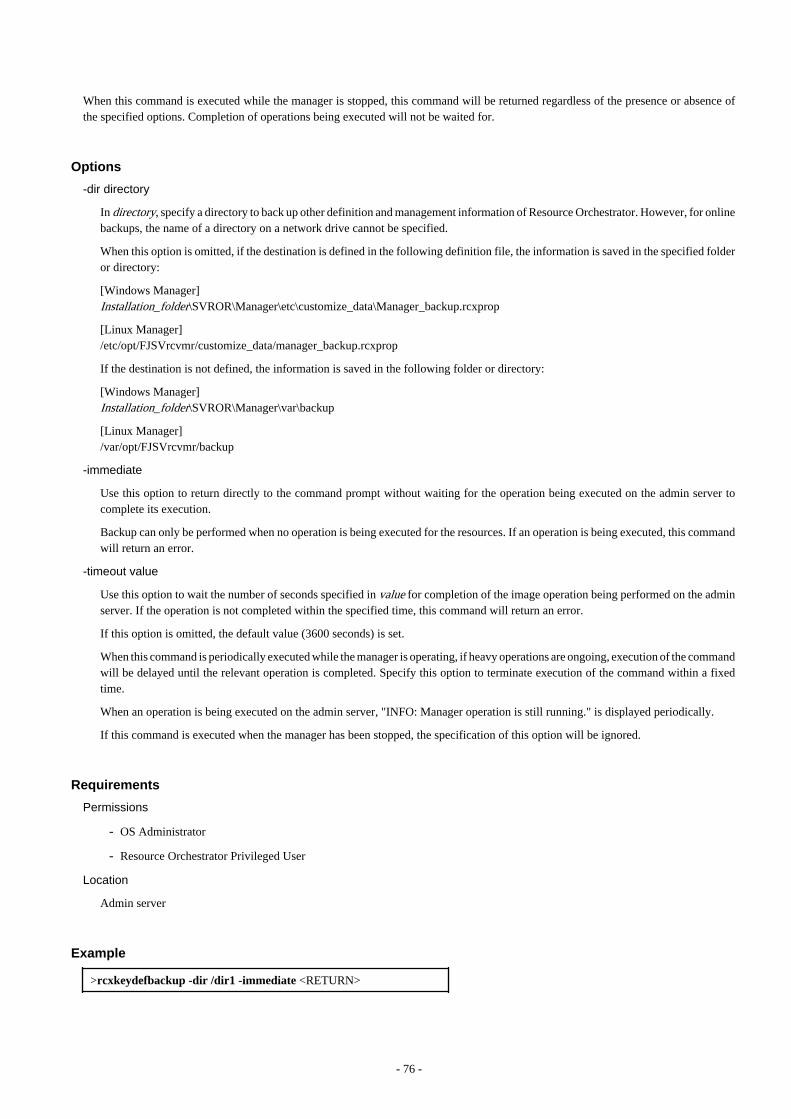
When this command is executed while the manager is stopped, this command will be returned regardless of the presence or absence ofthe specified options. Completion of operations being executed will not be waited for.
Options
-dir directory
In directory, specify a directory to back up other definition and management information of Resource Orchestrator. However, for onlinebackups, the name of a directory on a network drive cannot be specified.
When this option is omitted, if the destination is defined in the following definition file, the information is saved in the specified folderor directory:
[Windows Manager]Installation_folder\SVROR\Manager\etc\customize_data\Manager_backup.rcxprop
[Linux Manager]/etc/opt/FJSVrcvmr/customize_data/manager_backup.rcxprop
If the destination is not defined, the information is saved in the following folder or directory:
[Windows Manager]Installation_folder\SVROR\Manager\var\backup
[Linux Manager]/var/opt/FJSVrcvmr/backup
-immediate
Use this option to return directly to the command prompt without waiting for the operation being executed on the admin server tocomplete its execution.
Backup can only be performed when no operation is being executed for the resources. If an operation is being executed, this commandwill return an error.
-timeout value
Use this option to wait the number of seconds specified in value for completion of the image operation being performed on the adminserver. If the operation is not completed within the specified time, this command will return an error.
If this option is omitted, the default value (3600 seconds) is set.
When this command is periodically executed while the manager is operating, if heavy operations are ongoing, execution of the commandwill be delayed until the relevant operation is completed. Specify this option to terminate execution of the command within a fixedtime.
When an operation is being executed on the admin server, "INFO: Manager operation is still running." is displayed periodically.
If this command is executed when the manager has been stopped, the specification of this option will be ignored.
Requirements
Permissions
- OS Administrator
- Resource Orchestrator Privileged User
Location
Admin server
Example
>rcxkeydefbackup -dir /dir1 -immediate <RETURN>
- 76 -
Exit Status
This command returns the following values:
0
The command executed successfully.
non-zero
An error has occurred.
Note
- When specifying folders or directories, take note of the following points:
- Do not specify the system installation folder or the installation directory for the -dir option.
- Do not use double-byte characters or the following symbols to specify folders or directories for the -dir option.
""", "|", "*", "?", "<", ">", ",", "%", "&", "^", "=", "!", ";"
[Windows Manager]"/"
[Linux Manager]"\"
- The folder or directory path can be specified using up to 100 characters.
- For restoration, the certificates, configuration definition information, OS property definition files, system images, and cloningimages must have been backed up at the same point in time. It is recommended to store the backed up information in folders withnames including the date and time of backup.
- For the -timeout option, "172800" or less seconds can be specified.
- Do not stop or start the manager during execution of this command.
- If this command fails, a folder or a directory that has a name starting with tmp will be created in the folder or directory specified forthe -dir option.If the problem is still not resolved after performing the actions based on the output error message, collect the folder or the directoryas troubleshooting data, and contact Fujitsu technical staff. Delete these folders or directories after collecting the troubleshooting data.
6.3 rcxkeydefrestore
Name
[Windows Manager]Installation_folder\SVROR\Manager\bin\rcxkeydefrestore - Restoration of other definition and management information
[Linux Manager]/opt/FJSVrcvmr/bin/rcxkeydefrestore - Restoration of other definition and management information
Format
rcxkeydefrestore -file filename
Description
rcxkeydefrestore is the command used for the restoration of other definition and management information of Resource Orchestrator.
- 77 -

Options
-file filename
In filename, specify the compressed format file name of the backup collected using the rcxbackup command.
Requirements
Permissions
- OS Administrator
- Resource Orchestrator Privileged User
Location
Admin server
Example
>rcxkeydefrestore -file mgr_20110123_1159.bz2 <RETURN>
Exit Status
This command returns the following values:
0
The command executed successfully.
non-zero
An error has occurred.
Note
- This command deletes everything in the folder or directory that is the target of Backup/Restore when it is executed, and then restoresthe backup specified with the -file option.
- When specifying files, take note of the following points:
- Do not use double-byte characters or the following symbols to specify files for the -file option.
""", "|", "*", "?", "<", ">", ",", "%", "&", "^", "=", "!", ";"
[Windows Manager]"/"
[Linux Manager]"\"
- The file path can be specified using up to 100 characters.
- Do not stop or start the manager during execution of this command.
- If this command fails, a folder or a directory that has a name starting with tmp will be created in the folder or directory specified forthe -file option.If the problem is still not resolved after performing the actions based on the output error message, collect the folder or the directoryas troubleshooting data, and contact Fujitsu technical staff.Delete these folders or directories after collecting the troubleshooting data.
6.4 rcxrestore
- 78 -

Name
[Windows Manager]Installation_folder\SVROR\Manager\bin\rcxrestore - Restoration of configuration definition information
[Linux Manager]/opt/FJSVrcvmr/bin/rcxrestore - Restoration of configuration definition information
Format
rcxrestore -file filename
Description
rcxrestore is the command used for restoration of the configuration definition information of Resource Orchestrator.
Options
-file filename
In filename, specify the compressed format file name of the backup collected using the rcxbackup command.
Requirements
Permissions
- OS Administrator
- Resource Orchestrator Privileged User
Location
Admin server
Example
>rcxrestore -file mgr_20110123_1159.bz2 <RETURN>
Exit Status
This command returns the following values:
0
The command executed successfully.
non-zero
An error has occurred.
Note
- Specify the command using an absolute path.
- When specifying files, take note of the following points.
- Do not use double-byte characters or the following symbols to specify files for the -file option.
""", "|", "*", "?", "<", ">", ",", "%", "&", "^", "=", "!", ";"
- 79 -
[Windows Manager]"/"
[Linux Manager]"\"
- The file path can be specified using up to 100 characters.
- For restoration, the certificates, configuration definition information, OS property definition files, system images, and cloningimages must have been backed up at the same point in time. It is recommended to store the backed up information in folders withnames including the date and time of backup.
- Do not stop or start the manager during execution of this command. If this command fails, a folder or a directory that has a namestarting with tmp will be created in the folder or directory specified for the -file option. If the problem is still not resolved afterperforming the actions based on the output error message, collect the folder or the directory as troubleshooting data, and contact Fujitsutechnical staff. Delete these folders or directories when they are no longer necessary.
6.5 scwbackup
Name
[Windows Manager]Installation_folder\SVROR\Manager\bin\scwbackup - Backup of image file information
[Linux Manager]/opt/FJSVrcvmr/bin/scwbackup - Backup of image file information
Format
scwbackup [-dir directory] [[-immediate]|[-timeout value]]
Description
scwbackup is the command used for backing up the image file information of Resource Orchestrator.
This command backs up the following image file information of Resource Orchestrator using this command for restoration in caseServerView Deployment Manager information is damaged:
- System Images and Cloning Images
All objects in the specified folder or directory are targeted. Objects linked with shortcuts or symbolic links are not backed up.
Table 6.3 List of Items for Backup/Restore [Windows Manager]
No Overview Item
1 System imagesImage file storage folder\Managed server name@0@0@Managementinformation@Management information@Version
2 Cloning images Image file storage folder\Cloning image name@Version
Image_file_storage_folder is The_value_of_imagedir_displayed_by_executing_the_rcxadm imagemgr_info_command\Cloneimg.
Table 6.4 List of Items for Backup/Restore [Linux Manager]
No Overview Item
1 System imagesImage_file_storage_directory/Managed server name@0@0@Managementinformation@Management information@Version
2 Cloning images Image_file_storage_directory/Cloning image name@Version
- 80 -

Image_file_storage_directory is The_value_of_imagedir_displayed_by_executing_the_rcxadm imagemgr_info_command/CLONEIMG.
- Image file related information
Table 6.5 List of Items for Backup/Restore [Windows Manager]
No Overview Item
1 Registry
- For 32-bit operating systems
HKEY_LOCAL_MACHINE\SOFTWARE\Fujitsu\SystemcastWizard
- For 64-bit operating systems (*1)
HKEY_LOCAL_MACHINE\SOFTWARE\Wow6432Node\Fujitsu\SystemcastWizard
2 DatabaseInstallation_folder\ScwPro\scwdb\scwdb1.mdb
Installation_folder\ScwPro\scwdb\scwdb1.mdw
3DHCP configurationinformation file
Installation_folder\ScwPro\bin\ipTable.dat
4IP addressconfiguration file
Installation_folder\ScwPro\bin\localipaddress.txt
5AWWN definitionfile (*2)
Installation_folder\ScwPro\tftp\rcbootimg\awwn_IP_address.cfg
Installation_folder\ScwPro\tftp\rcbootimg\_awwn_IP_address.cfg
6
BROADCASTconfiguration file forclient connectionrequests
Installation_folder\ScwPro\bin\bcastaddress.txt
*1: For 64-bit operating systems, it is redirected to Wow6432Node.*2: In VIOM environments, this file does not exist.
Table 6.6 List of Items for Backup/Restore [Linux Manager]
No Overview Item
1 Configuration file /etc/opt/FJSVscw-common/scwconf.reg
2 Database/var/opt/FJSVscw-deploysv/scwdb/scwdb1.db
/var/opt/FJSVscw-deploysv/scwdb/scwdb2.db
3DHCP configurationinformation file
/var/opt/FJSVscw-pxesv/ipTable.dat
4bootcfg configurationfile (*1)
/etc/opt/FJSVscw-pxesv/ClientBoot/*
5AWWN definitionfile (*2)
/var/opt/FJSVscw-tftpsv/tftproot/rcbootimg/awwn_IP_address.cfg
/var/opt/FJSVscw-tftpsv/tftproot/rcbootimg/_awwn_IP_address.cfg
6
BROADCASTconfiguration file forclient connectionrequests
/opt/FJSVscw-deploysv/sys/bcastaddress.txt
*1: All objects in the specified directories are targeted. Objects linked using symbolic links are not backed up.*2: In VIOM environments, this file does not exist.
Image file information cannot be backed up while an image operation is being performed for a VM host.
Backup of image file information is only performed when no operation is being executed.
- 81 -
When executing the command while the manager is running, backup will be performed after the operations are completed.
When this command is executed while the manager is stopped, this command will be returned regardless of the presence or absence ofthe specified options. Completion of operations being executed will not be waited for.
Options
-dir directory
In directory, specify a folder or a directory to back up the image file information of Resource Orchestrator. However, for online backups,the name of a directory on a network drive cannot be specified.
If previous backup information remains in the specified folder or directory, the previous backup information will be reused in thebackup operation for system images and cloning images.
When this option is omitted, if the destination is defined in the following definition file, the information is saved in the specified folderor directory:
[Windows Manager]Installation_folder\SVROR\Manager\etc\customize_data\Manager_backup.rcxprop
[Linux Manager]/etc/opt/FJSVrcvmr/customize_data/manager_backup.rcxprop
If the destination is not defined, the information is saved in the following folder or directory:
[Windows Manager]Installation_folder\SVROR\Manager\var\backup
[Linux Manager]/var/opt/FJSVrcvmr/backup
-immediate
Use this option to return directly to the command prompt without waiting for the operation being executed on the admin server tocomplete its execution.
Backup can only be performed when no operation is being executed for the resources. If an operation is being executed, this commandwill return an error.
-timeout value
Use this option to wait the number of seconds specified in value for completion of the image operation being performed on the adminserver. If the operation is not completed within the specified time, this command will return an error.
If this option is omitted, the default value (3600 seconds) is set.
When this command is periodically executed while the manager is operating, if heavy operations such as cloning image collection areongoing, execution of the command will be delayed until the relevant operation is completed. Specify this option to terminate executionof the command within a fixed time.
When an operation is being executed on the admin server, "INFO: Manager operation is still running." is displayed periodically.
If this command is executed when the manager has been stopped, the specification of this option will be ignored.
Requirements
Permissions
- OS Administrator
- Resource Orchestrator Privileged User
Location
Admin server
- 82 -

Example
>scwbackup -dir /scwdir0 -immediate <RETURN>
Exit Status
This command returns the following values:
0
The command executed successfully.
non-zero
An error has occurred.
Note
- When specifying folders or directories, take note of the following points:
- Do not specify the system installation folder or the installation directory for the -dir option.
- Do not use double-byte characters or the following symbols to specify folders or directories for the -dir option.
""", "|", "*", "?", "<", ">", ",", "%", "&", "^", "=", "!", ";"
[Windows Manager]"/"
[Linux Manager]"\"
- The folder path or directory path can be specified using up to 100 characters.
- For restoration, the certificates, configuration definition information, OS property definition files, system images, and cloningimages must have been backed up at the same point in time. It is recommended to store the backed up information in folders withnames including the date and time of backup.
- For the -timeout option, "172800" or less seconds can be specified.
- Do not stop or start the manager during execution of this command.
- If this command fails, a folder or a directory that has a name starting with tmp will be created in the folder or directory specified forthe -dir option.If the problem is still not resolved after performing the actions based on the output error message, collect the folder or the directoryas troubleshooting data, and contact Fujitsu technical staff.Delete these folders or directories after collecting the troubleshooting data.
6.6 scwrestore
Name
[Windows Manager]Installation_folder\SVROR\Manager\bin\scwrestore - Restoration of image file information
[Linux Manager]/opt/FJSVrcvmr/bin/scwrestore - Restoration of image file information
Format
scwrestore -dir directory
- 83 -

Description
scwrestore is the command used for restoration of image file information of Resource Orchestrator.
Options
-dir directory
In directory, specify a directory name created as a result of collection using the backup command.
Requirements
Permissions
- OS Administrator
- Resource Orchestrator Privileged User
Location
Admin server
Example
>scwrestore -dir /scwdir0/mgr_20110123_1159 <RETURN>
Exit Status
This command returns the following values:
0
The command executed successfully.
non-zero
An error has occurred.
Note
- This command deletes everything in the folder or directory that is the target of Backup/Restore when it is executed, and then restoresthe backup specified with the -dir option.
- When specifying files, take note of the following points:
- Do not use double-byte characters or the following symbols to specify folders or directories for the -dir option.
""", "|", "*", "?", "<", ">", ",", "%", "&", "^", "=", "!", ";"
[Windows Manager]"/"
[Linux Manager]"\"
- The folder path or directory path can be specified using up to 100 characters.
- Do not stop or start the manager during execution of this command.
- If this command fails, a folder or a directory that has a name starting with tmp will be created in the folder or directory specified forthe -dir option.If the problem is still not resolved after performing the actions based on the output error message, collect the folder or the directory
- 84 -

as troubleshooting data, and contact Fujitsu technical staff.Delete these folders or directories after collecting the troubleshooting data.
- 85 -

Chapter 7 Maintenance CommandsThis chapter describes the commands for maintenance.
7.1 inst_collectinfo (Collection of Investigation Data duringInstallation)
Name
[Windows Manager]Installation_medium\DISK1\Common\install_tool\inst_collectinfo - Collection of Investigation Data during Installation
[Linux Manager]DVD-ROM_mount_point/DISK1/Common/install_tool/inst_collectinfo.sh - Collection of Investigation Data during Installation
Format
[Windows Manager]
inst_collectinfo folder
[Linux Manager]
inst_collectinfo.sh folder
Description
inst_collectinfo collects investigation data when an error occurs while installing Resource Orchestrator.
Before requesting a problem investigation, collect investigation data with this command.
Point
- About 450 MB of disk size is required to collect the data. Because changes in system configuration and settings may require moredisk space, prepare enough space on the disk to store the data.
- When you specify a folder or a directory, keep the following point in mind.
- Specify the name of the folder to store data in not more than 46 bytes. If a name more than 46 bytes was specified, some informationcould be inaccurate.
Options
folder
Specify the name of the folder for storing investigation data of Resource Orchestrator.A folder path that includes spaces cannot be specified.If the specified folder does not exist, it will be created automatically.If the specified folder contains a file or a subfolder that has the same name as one of the investigation data files, it will be overwritten.
Requirements
Permissions
OS Administrator
Location
Admin server
- 86 -
Example
[Windows Manager]
> inst_collectinfo folder1
[Linux Manager]
# inst_collectinfo.sh folder1
Exit Status
This command returns the following values:
0
The command executed successfully.
non-zero
An error has occurred.
- 87 -

Part 2 File Reference
Chapter 8 XML Files.......................................................................................................................................89
- 88 -
Chapter 8 XML FilesThis chapter explains resource configuration information and user definition information (XML files).
8.1 Network Configuration InformationThis section explains the creation and modification of network configuration information.
The commands for network device operations are shown below.
Operation Command
CreationIndividual creation rcxadm netdevice create
Batch creation rcxadm netconfig import
ModificationIndividual modification rcxadm netdevice modify
Batch modification rcxadm netconfig import
8.1.1 CreationThe XML definition for network configuration information is shown below.
- XML definitions for creation of individual network devices
<?xml version="1.0" encoding="utf-8"?>
<Netdevice ip="Admin IP Address" subnetmask="Admin LAN Subnet Mask> <Location>Location</Location> <Types>
<Type>Type</Type> </Types>
<FabricType>Fabric type</FabricType> <ApplianceType>Appliance Type</ApplianceType> <Maintenance>Maintenance Mode</Maintenance> <ManagementHost>Management host IP address</ManagementHost> <Vfabs>
<Vfab vfabid="VFAB ID" name="VFAB Name" mode="Operation Mode"> <Dot1adPorts>
<Dot1adPort name="Sending and Receiving Port of the IEEE802.1ad Frame"></Dot1adPort> </Dot1adPorts>
<CirPorts>
<CirPort name="CIR port name or CIR Link Aggregation Port Identifier Information"></CirPort>
</CirPorts>
<EpPorts>
<EpPort name="EP port name or EP Link Aggregation Port Identifier Information"></EpPort>
</EpPorts>
</Vfab>
</Vfabs>
<DeviceInfo>
<SysObjectId>sysObjectID</SysObjectId> <Vendor>Vendor Name</Vendor> <ProductName>Device Name</ProductName> <ModelName>Model Name</ModelName> <Firmware>Firmware</Firmware> </DeviceInfo>
<Redundancy group_id="Group ID"></Redundancy> <MgmtInfos>
<Snmps>
<ReadCommunity>Community Name</ReadCommunity> </Snmps>
- 89 -
<LoginInfos>
<LoginInfo="Protocol" auth_type="Management Method for Authentication Information" authority="Administrator Authority" check="Account Confirmation"> <IpAddress>Destination IP Address</IpAddress> <Port>Destination Port Number</Port> <User>Account</User> <Password>Password</Password> <PrivilegedPassword>Administrator Password</PrivilegedPassword> <PasswordEncryption>Password Encryption</PasswordEncryption> </LoginInfo>
</LoginInfos>
<Monitoring>
<Methods>
<Method>Monitoring method</Method> </Methods>
<Interval>Monitoring Interval</Interval> <RetryCount>Retry Count</RetryCount> <Timeout>Timeout</Timeout> </Monitoring>
<MgmtURL>Web Management Window URL</MgmtURL> </MgmtInfos>
<Ports>
<Port name="Port Name"> <Description>Port Overview</Description> <PhysicalState>Communication Status</PhysicalState> <Link ip="Management IP address for Link Destination Device" port="Port Name of Link Destination" kind="Type of Link Destination Device" /> <Link ip="Management IP address for Link Destination Device" nic_index="Port Name of Link Destination (for display)" kind="server" /> <StagId>S-TAG ID</StagId> </Port>
</Ports>
</Netdevice>
- XML definitions for batch creation of multiple network devices
<?xml version="1.0" encoding="utf-8"?>
<NetConfig>
<Netdevices>
<Mode>Registration Mode</Mode> <Netdevice ip="Admin IP Address" subnetmask="Admin LAN Subnet Mask> <Location>Location</Location> <Types>
<Type>Type</Type> </Types>
<FabricType>Fabric type</FabricType> <ApplianceType>Appliance Type</ApplianceType> <Maintenance>Maintenance Mode</Maintenance> <ManagementHost>Management host IP address</ManagementHost> <Vfabs>
<Vfab vfabid="VFAB ID" name="VFAB Name" mode="Operation Mode"> <Dot1adPorts>
<Dot1adPort name="Sending and Receiving Port of the IEEE802.1ad Frame"></Dot1adPort> </Dot1adPorts>
<CirPorts>
<CirPort name="CIR port name or CIR Link Aggregation Port Identifier Information"></CirPort>
</CirPorts>
<EpPorts>
<EpPort name="EP port name or EP Link Aggregation Port Identifier Information"></EpPort>
</EpPorts>
</Vfab>
- 90 -
</Vfabs>
<DeviceInfo>
<SysObjectId>sysObjectID</SysObjectId> <Vendor>Vendor Name</Vendor> <ProductName>Device Name</ProductName> <ModelName>Model Name</ModelName> <Firmware>Firmware</Firmware> </DeviceInfo>
<Redundancy group_id="Group ID"></Redundancy> <MgmtInfos>
<Snmps>
<ReadCommunity>Community Name</ReadCommunity> </Snmps>
<LoginInfos>
<LoginInfo="Protocol" auth_type="Management Method for Authentication Information" authority="Administrator Authority" check="Account Confirmation"> <IpAddress>Destination IP Address</IpAddress> <Port>Destination Port Number</Port> <User>Account</User> <Password>Password</Password> <PrivilegedPassword>Administrator Password</PrivilegedPassword> <PasswordEncryption>Password Encryption</PasswordEncryption> </LoginInfo>
</LoginInfos>
<Monitoring>
<Methods>
<Method>Monitoring method</Method> </Methods>
<Interval>Monitoring Interval</Interval> <RetryCount>Retry Count</RetryCount> <Timeout>Timeout</Timeout> </Monitoring>
<MgmtURL>Web Management Window URL</MgmtURL> </MgmtInfos>
<Ports>
<Port name="Port Name"> <Description>Port Overview</Description> <PhysicalState>Communication Status</PhysicalState> <Link ip="Management IP address for Link Destination Device" port="Port Name of Link Destination" kind="Type of Link Destination Device" /> <Link ip="Management IP address for Link Destination Device" nic_index="Port Name of Link Destination (for display)" kind="server" /> <StagId>S-TAG ID</StagId> </Port>
</Ports>
</Netdevice>
</Netdevices>
<Links>
<Mode>Link Information Registration Mode</Mode> <Link>
<Devices>
<Device ip="Admin IP Address of Device 1" name="Resource Name of Device 1" kind="Type of Device 1"> <Port>Connection Port Name of Device 1</Port> <NicIndex>Connection Port Name of Device 1</NicIndex> </Device>
<Device ip="Admin IP Address of Device 2" name="Resource Name of Device 2" kind="Type of Device 2"> <Port>Connection Port Name of Device 2</Port> <NicIndex>Connection Port Name of Device 2</NicIndex> </Device>
</Devices>
</Link>
- 91 -

</Links>
</NetConfig>
Table 8.1 List of Items Specified in XML Definitions for Network Configuration Information
Element Name DescriptionRemarks (Possible Values,
Examples)
Specification
OutputUsingExport
Individual
Registration
Individual
Modification
BatchRegistration
BatchModification
Networkconfigurationinformation(NetConfig)
A collection ofnetworkconfigurationinformation
-Not
possible
Notpossib
le
Required
Required
Yes
Network deviceinformation
(Netdevices)
A collection ofnetwork deviceinformation
Specify one or more Netdeviceelements.
When registering two or morenetwork devices for resourcessimultaneously, this element cannotbe omitted.
Notpossib
le
Notpossib
le
Optional
Optional
Yes (*1)
Registration mode
(Mode)Registration mode
Specify the registration mode of thenetwork device.
Specify one of following items.
- add
New registrationNetwork device information isnot overwritten when thespecified management IP addresshas already been used to registeranother resource.
- modify
ModificationNetwork device information isoverwritten when the specifiedmanagement IP address hasalready been used to registeranother resource.
If left blank, "add" is specified.
Notpossib
le
Notpossib
le
Optional
Required
No
Admin IP address
(Netdevice ip)
Admin IP address forthe network device
Specify an IPv4 address.Requir
edOption
alRequir
edRequir
edYes
Device name
(Netdevice name)
Name of the networkdevice
Specify a character string containingup to 32 alphanumeric characters,underscores ("_"), hyphens ("-"), andperiods (".").
If left blank, the host name or IPaddress obtained from the networkdevice is specified.
For Ethernet Fabric, if left blank, thedestination host name of the
Optional
Optional
Optional
Optional
Yes
- 92 -
Element Name DescriptionRemarks (Possible Values,
Examples)
Specification
OutputUsingExport
Individual
Registration
Individual
Modification
BatchRegistration
BatchModification
representative virtual IP address ofthe fabric is specified.
If characters other than alphanumericcharacters, underscores ("_"),hyphens ("-"), and periods (".") areused in the host name obtained fromthe network device, they will bereplaced with underscores ("_").However, when the obtained value is33 characters or longer, only the first32 characters will be specified.
Location
(Location)Location
Specify a character string containingup to 32 alphanumeric characters,underscores ("_"), and hyphens ("-").
If left blank, the location obtainedfrom the network device is specified.
For Ethernet Fabric, if left blank, thedestination location of therepresentative virtual IP address ofthe fabric is specified.
If characters other than alphanumericcharacters, underscores ("_"),hyphens ("-"), and periods (".") areused in the location obtained from thenetwork device, they will be replacedwith underscores ("_"). However,when the obtained value is 33characters or longer, only the first 32characters will be specified.
Optional
Optional
Optional
Optional
Yes (*2)
Type information
(Types)
A collection of typeinformation
Specify one or more Type elements.Option
alOption
alOption
alOption
alYes (*1)
Type
(Type)Network device type
Specify the type of the networkdevice.
Specify one of following items.
- L2-Switch
- Firewall
- SLB
- Fabric
- ManagementHost
Network devices with "Firewall" or"SLB" specified are set as theregistration targets for network pools.When omitted, the type obtained fromthe Network Device ModelDefinitions is specified.
Optional
Optional
Optional
Optional
Yes (*2)
- 93 -

Element Name DescriptionRemarks (Possible Values,
Examples)
Specification
OutputUsingExport
Individual
Registration
Individual
Modification
BatchRegistration
BatchModification
When registering network deviceswith multiple types, specify multipleentries of this element.
However, when "Fabric" or"ManagementHost" is specified,multiple entries of this elementcannot be specified.
Fabric type
(FabricType)Fabric type
Specify the fabric type.
Specify one of the following options:
- C-Fabric
- VCS
Specify when "Fabric" is specified forthe Type (type).
When omitted, "C-Fabric" isspecified.
Optional
-Option
al- Yes
Appliance type
(ApplianceType)Appliance type
Specify the type of the appliance.
Specify one of following items.
- physical
Physical appliance
- virtual
Virtual appliance
If left blank, "physical" is specified.
Specify "virtual", when registeringIPCOM VA.
Optional
Notpossib
le
Optional
Notpossib
leYes (*2)
Maintenance mode
(Maintenance)
Maintenance modesettings
Specify the status of maintenancemode.
Specify one of following items.
- true
Maintenance mode
- false
Normal
If left blank, "false" is specified.
Optional
-Option
al- Yes
Management host IPaddress
(ManagementHost)
Management host IPaddress
When registering virtual appliances,specify an IPv4 address of themanagement host (IPCOM VX).
Specify the value only whenregistering a virtual appliance.
Optional
-Option
al- Yes
VFAB information
(Vfabs)
A collection ofVFAB information
One or more Vfab elements arespecified.
- - - -Yes
(*15)
- 94 -
Element Name DescriptionRemarks (Possible Values,
Examples)
Specification
OutputUsingExport
Individual
Registration
Individual
Modification
BatchRegistration
BatchModification
VFAB
(Vfab)
A single piece ofVFAB information
None - - - - Yes
VFAB ID attributes
(vfabid)VFAB ID
The VFAB ID configured for theEthernet Fabric (Converged Fabric)is specified.
An integer between 1 - 3000, or"default" is specified.
- - - - Yes
name attributes
(name)VFAB name The VFAB name is specified. - - - - Yes
mode attribute
(mode)
VFAB operationmode
A VFAB operation mode is specified.
One of the following is specified:
- host
Host mode
- network
Network mode
For details on operation of eachmode, refer to the manuals of theEthernet Fabric switch device(Converged Fabric).
- - - - Yes
Ports for sending andreceiving of theIEEE802.1ad frame
(Dot1adPorts)
Collection of portsfor sending andreceiving of theIEEE802.1ad frameused in VFABs
One or more Dot1adPort elements arespecified.
- - - - Yes
Information of portsfor sending andreceiving of theIEEE802.1ad frame
(Dot1adPort)
Information of portsfor sending andreceiving of theIEEE802.1ad frameused by a singleVFAB
There is no information to specify. - - - - Yes
name attributes
(name)
The names of portsfor sending andreceiving of theIEEE802.1ad frameused by VFABs
The port name (ifName) configuredin the Converged Fabric is specified.
- - - - Yes
CIR ports
(CirPorts)
Collection of CIRports used for VFABs
One or more CirPort elements arespecified.
This item is specified when the modeattribute under the Vfab element is"host".
- - - - Yes
CIR port information
(CirPort)
Information of CIRports used for a singleVFAB
There is no information to specify. - - - - Yes
- 95 -
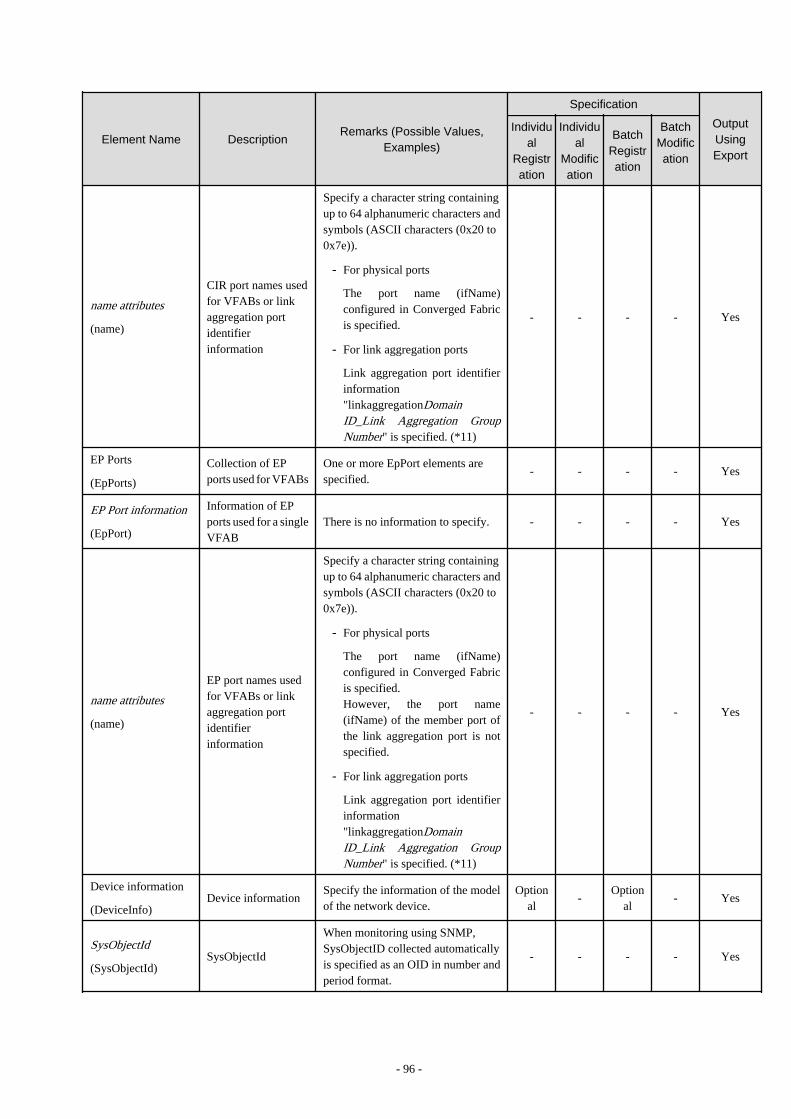
Element Name DescriptionRemarks (Possible Values,
Examples)
Specification
OutputUsingExport
Individual
Registration
Individual
Modification
BatchRegistration
BatchModification
name attributes
(name)
CIR port names usedfor VFABs or linkaggregation portidentifierinformation
Specify a character string containingup to 64 alphanumeric characters andsymbols (ASCII characters (0x20 to0x7e)).
- For physical ports
The port name (ifName)configured in Converged Fabricis specified.
- For link aggregation ports
Link aggregation port identifierinformation"linkaggregationDomainID_Link Aggregation GroupNumber" is specified. (*11)
- - - - Yes
EP Ports
(EpPorts)
Collection of EPports used for VFABs
One or more EpPort elements arespecified.
- - - - Yes
EP Port information
(EpPort)
Information of EPports used for a singleVFAB
There is no information to specify. - - - - Yes
name attributes
(name)
EP port names usedfor VFABs or linkaggregation portidentifierinformation
Specify a character string containingup to 64 alphanumeric characters andsymbols (ASCII characters (0x20 to0x7e)).
- For physical ports
The port name (ifName)configured in Converged Fabricis specified.However, the port name(ifName) of the member port ofthe link aggregation port is notspecified.
- For link aggregation ports
Link aggregation port identifierinformation"linkaggregationDomainID_Link Aggregation GroupNumber" is specified. (*11)
- - - - Yes
Device information
(DeviceInfo)Device information
Specify the information of the modelof the network device.
Optional
-Option
al- Yes
SysObjectId
(SysObjectId)SysObjectId
When monitoring using SNMP,SysObjectID collected automaticallyis specified as an OID in number andperiod format.
- - - - Yes
- 96 -
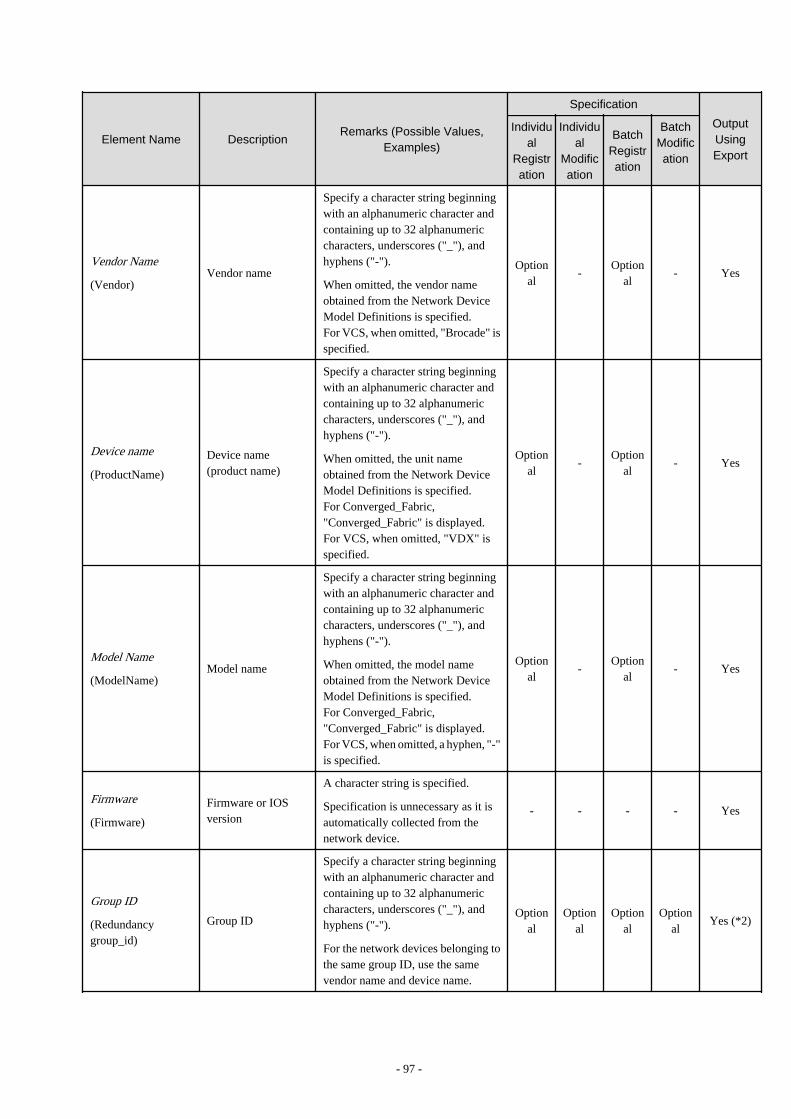
Element Name DescriptionRemarks (Possible Values,
Examples)
Specification
OutputUsingExport
Individual
Registration
Individual
Modification
BatchRegistration
BatchModification
Vendor Name
(Vendor)Vendor name
Specify a character string beginningwith an alphanumeric character andcontaining up to 32 alphanumericcharacters, underscores ("_"), andhyphens ("-").
When omitted, the vendor nameobtained from the Network DeviceModel Definitions is specified.For VCS, when omitted, "Brocade" isspecified.
Optional
-Option
al- Yes
Device name
(ProductName)
Device name(product name)
Specify a character string beginningwith an alphanumeric character andcontaining up to 32 alphanumericcharacters, underscores ("_"), andhyphens ("-").
When omitted, the unit nameobtained from the Network DeviceModel Definitions is specified.For Converged_Fabric,"Converged_Fabric" is displayed.For VCS, when omitted, "VDX" isspecified.
Optional
-Option
al- Yes
Model Name
(ModelName)Model name
Specify a character string beginningwith an alphanumeric character andcontaining up to 32 alphanumericcharacters, underscores ("_"), andhyphens ("-").
When omitted, the model nameobtained from the Network DeviceModel Definitions is specified.For Converged_Fabric,"Converged_Fabric" is displayed.For VCS, when omitted, a hyphen, "-"is specified.
Optional
-Option
al- Yes
Firmware
(Firmware)
Firmware or IOSversion
A character string is specified.
Specification is unnecessary as it isautomatically collected from thenetwork device.
- - - - Yes
Group ID
(Redundancygroup_id)
Group ID
Specify a character string beginningwith an alphanumeric character andcontaining up to 32 alphanumericcharacters, underscores ("_"), andhyphens ("-").
For the network devices belonging tothe same group ID, use the samevendor name and device name.
Optional
Optional
Optional
Optional
Yes (*2)
- 97 -

Element Name DescriptionRemarks (Possible Values,
Examples)
Specification
OutputUsingExport
Individual
Registration
Individual
Modification
BatchRegistration
BatchModification
Managementinformation
(MgmtInfos)
A collection ofmanagementinformation
Specify one or more Snmps elements,LoginInfo elements, or other similarelements.
Required
Optional
Required
Optional
Yes
SNMP information
(Snmps)
A collection ofSNMP information
Specify the ReadCommunity elementonce.
Optional
Optional
Optional
Optional
Yes
Community name
(ReadCommunity)
Community name
(This cannot beomitted whenspecifying SNMPinformation)
Specify a character string containingup to 32 alphanumeric characters,underscores ("_"), and hyphens ("-").
Optional (*8)
Optional
Optional (*8)
Optional
Yes
Login information
(LoginInfos)
A collection of logininformation
Specify one or more LoginInfoelements.
Optional
(*7)
Optional
Optional
Optional
Yes (*1)
Protocol
(LoginInfo protocol)Protocol
Specify the protocol used whenlogging in using login information.
Specify one of following items.
- remote_login
Specify when using Telnet orSSH login information.If login via Telnet is possible, useTelnet. If login via Telnet is notpossible, use SSH.
- ftp
Specify when using FTP logininformation.
- telnet
Specify when using Telnet logininformation.
- ssh
Specify when using SSH logininformation.
- netconf
Specify when "NETCONF" hasbeen specified for the Monitoringmethod (Method).
When omitted, "remote_login" isspecified.
Specify "ssh", when Type (Type) is"Fabric" and the Fabric type is "C-Fabric".
Optional
(*7)
Optional
Optional
Optional
Yes
- 98 -
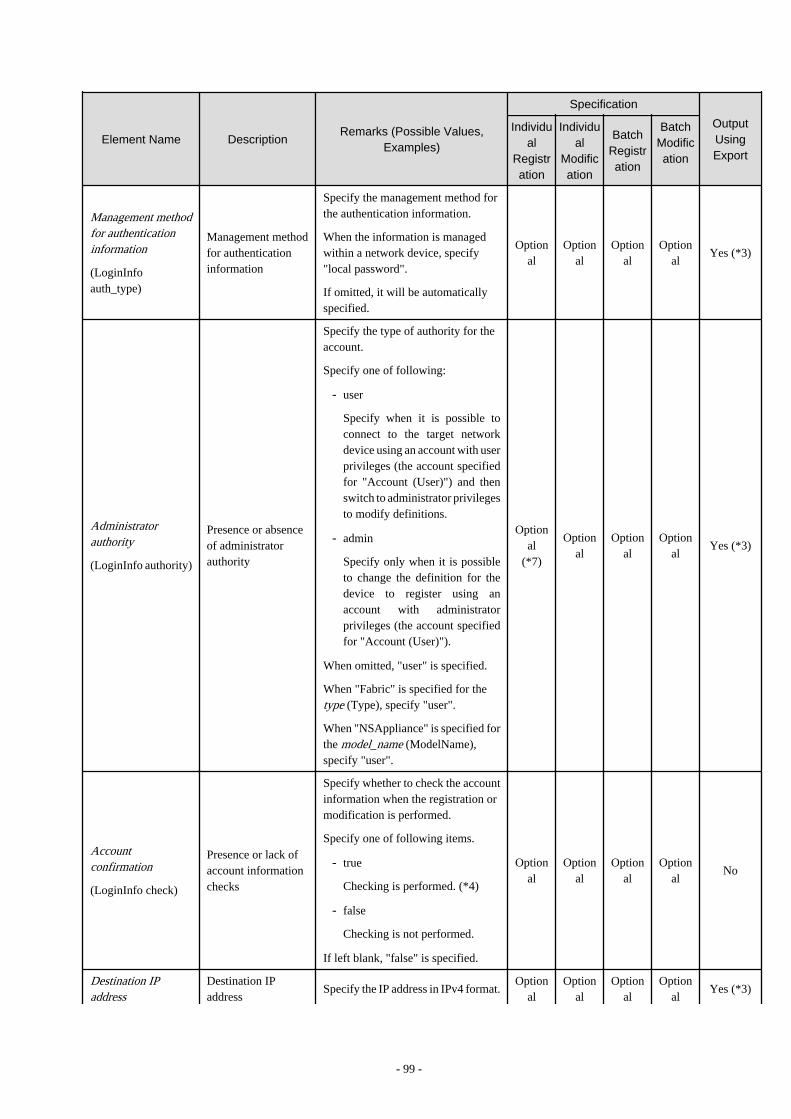
Element Name DescriptionRemarks (Possible Values,
Examples)
Specification
OutputUsingExport
Individual
Registration
Individual
Modification
BatchRegistration
BatchModification
Management methodfor authenticationinformation
(LoginInfoauth_type)
Management methodfor authenticationinformation
Specify the management method forthe authentication information.
When the information is managedwithin a network device, specify"local password".
If omitted, it will be automaticallyspecified.
Optional
Optional
Optional
Optional
Yes (*3)
Administratorauthority
(LoginInfo authority)
Presence or absenceof administratorauthority
Specify the type of authority for theaccount.
Specify one of following:
- user
Specify when it is possible toconnect to the target networkdevice using an account with userprivileges (the account specifiedfor "Account (User)") and thenswitch to administrator privilegesto modify definitions.
- admin
Specify only when it is possibleto change the definition for thedevice to register using anaccount with administratorprivileges (the account specifiedfor "Account (User)").
When omitted, "user" is specified.
When "Fabric" is specified for thetype (Type), specify "user".
When "NSAppliance" is specified forthe model_name (ModelName),specify "user".
Optional
(*7)
Optional
Optional
Optional
Yes (*3)
Accountconfirmation
(LoginInfo check)
Presence or lack ofaccount informationchecks
Specify whether to check the accountinformation when the registration ormodification is performed.
Specify one of following items.
- true
Checking is performed. (*4)
- false
Checking is not performed.
If left blank, "false" is specified.
Optional
Optional
Optional
Optional
No
Destination IPaddress
Destination IPaddress
Specify the IP address in IPv4 format.Option
alOption
alOption
alOption
alYes (*3)
- 99 -

Element Name DescriptionRemarks (Possible Values,
Examples)
Specification
OutputUsingExport
Individual
Registration
Individual
Modification
BatchRegistration
BatchModification
(IpAddress)
Specify when performing checks ofthe auto-configuration settings for thenetwork device and accountinformation (when "true" is specifiedfor the account check (LoginInfocheck)) from an IP address other thanthe admin IP address (Netdevice ip).
Specify the same IP address whenthere are multiple specifications ofthe same login information for thetenant name (Tenant).
When a different IP address isspecified, or partially omitted, theauto-configuration settings for thenetwork device and the accountinformation of the connection IPaddress (IpAddress) in the logininformation with "user" specified inthe administrator privileges(LoginInfo authority) are checked.
If left blank, the admin IP address(Netdevice ip) is specified.
Destination portnumber
(Port)
Port number of theprotocol to connectthe destination
Specify an integer between 1 and65535.
Specify the port number of thenetwork device to perform checkingof auto-configuration settings andaccount information (when "true" isspecified for the account check(Login Info check)).
Specify the same port number whenthere are multiple specifications ofthe same login information for thetenant name (Tenant).
When a different port number isspecified, or partially omitted, theauto-configuration settings for thenetwork device and the accountinformation of the port number in thelogin information with "user"specified in the administratorprivileges (LoginInfo authority) arechecked.
If left blank, one of the following isspecified based on the value specifiedfor the protocol (LoginInfo protocol).
- 23 or 22
Optional
Optional
Optional
Optional
Yes (*3)
- 100 -
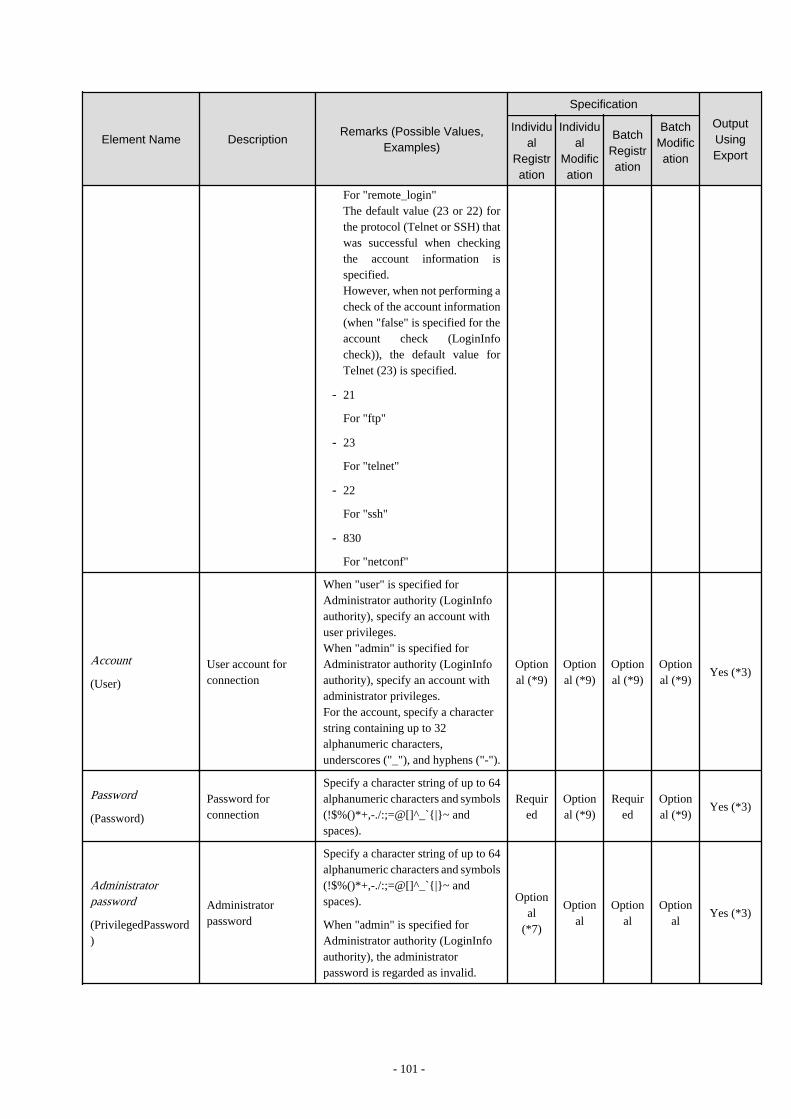
Element Name DescriptionRemarks (Possible Values,
Examples)
Specification
OutputUsingExport
Individual
Registration
Individual
Modification
BatchRegistration
BatchModification
For "remote_login"The default value (23 or 22) forthe protocol (Telnet or SSH) thatwas successful when checkingthe account information isspecified.However, when not performing acheck of the account information(when "false" is specified for theaccount check (LoginInfocheck)), the default value forTelnet (23) is specified.
- 21
For "ftp"
- 23
For "telnet"
- 22
For "ssh"
- 830
For "netconf"
Account
(User)
User account forconnection
When "user" is specified forAdministrator authority (LoginInfoauthority), specify an account withuser privileges.When "admin" is specified forAdministrator authority (LoginInfoauthority), specify an account withadministrator privileges.For the account, specify a characterstring containing up to 32alphanumeric characters,underscores ("_"), and hyphens ("-").
Optional (*9)
Optional (*9)
Optional (*9)
Optional (*9)
Yes (*3)
Password
(Password)
Password forconnection
Specify a character string of up to 64alphanumeric characters and symbols(!$%()*+,-./:;=@[]^_`{|}~ andspaces).
Required
Optional (*9)
Required
Optional (*9)
Yes (*3)
Administratorpassword
(PrivilegedPassword)
Administratorpassword
Specify a character string of up to 64alphanumeric characters and symbols(!$%()*+,-./:;=@[]^_`{|}~ andspaces).
When "admin" is specified forAdministrator authority (LoginInfoauthority), the administratorpassword is regarded as invalid.
Optional
(*7)
Optional
Optional
Optional
Yes (*3)
- 101 -

Element Name DescriptionRemarks (Possible Values,
Examples)
Specification
OutputUsingExport
Individual
Registration
Individual
Modification
BatchRegistration
BatchModification
Password encryption
(PasswordEncryption)
Presence or absenceof passwordencryption
Specify whether the password of thenetwork device is encrypted.
Specify either one of the following:
- true
Encrypted
- false
Not encrypted
If left blank, "false" is specified.
Specify "false" for initial registrationas the password is entered in plain textat that time.When exporting the information, thepassword will be encrypted and "true"is set for this element to ensuresecurity.Specify "true" only when registeringan external server using an encryptedpassword.
Optional
Optional
Optional
Optional
Yes (*3)
Monitoringinformation
(Monitoring)
Monitoringinformation
Specify the element of monitoringinformation.
Optional
Optional
Optional
Optional
Yes
Monitoring methodinformation
(Methods)
Collection ofmonitoring methodinformation
Specify the monitoring method byspecifying one or more Methodelements.
When this element is omitted, one ofthe following will be specified.
- NETCONF
When using VCS
- SNMP
For something other than VCS
Optional
Optional
Optional
Optional
Yes
Monitoring method
(Method)Monitoring method
Specify the monitoring method forthe network device.
Specify one of following items.
- ping
When using ping monitoring
- SNMP
When using SNMP monitoringHowever, specification is notpossible when Fabric type is"VCS".
- NETCONF
Optional
Optional
Optional
Optional
Yes
- 102 -

Element Name DescriptionRemarks (Possible Values,
Examples)
Specification
OutputUsingExport
Individual
Registration
Individual
Modification
BatchRegistration
BatchModification
This can only be specified whenFabric type is "VCS".Furthermore, it is necessary tospecify "netconf" for Protocol(LoginInfo protocol).
When omitted, "no monitoring" isspecified for monitoring of thenetwork device.
When specifying multiple monitoringmethods, specify multiple entries ofthis element.
Monitoring interval
(Interval) (*5)
Monitoring interval(seconds)
(This cannot beomitted whenmodifying themonitoring method)
Specify an integer between 1 and86400.
If left blank, "300" is set.
Specify "60" when "Simple" isspecified for Pre-configurationdetails (PresettingInfo) and"Firewall" and "SLB" are specifiedfor Type (Type).
Optional
Optional
Optional
Optional
Yes
Retry count
(RetryCount) (*5)
Retry count
(This cannot beomitted whenmodifying themonitoring method)
Specify an integer between 1 and 10.
If left blank, "3" is set.
Optional
Optional
Optional
Optional
Yes
Timeout
(Timeout) (*5)
Timeout (seconds)
(This cannot beomitted whenmodifying themonitoring method)
Specify an integer between 1 and 300.
If left blank, "30" is set.
Optional
Optional
Optional
Optional
Yes
Web ManagementWindow URL
(MgmtURL)
Web managementwindow URL
Specify the URL for the Webmanagement window.
This can be specified when the Webmanagement functions of thecorresponding network devices areprovided.
If left blank, "http://Admin IPaddress/" is specified.
When "Fabric" is specified for thetype (Type), the default value is notspecified.
Optional
Optional
Optional
Optional
Yes
Port information
(Ports)
A collection of portinformation
One or more Port elements arespecified.
Optional
Optional
Optional
Optional
Yes (*1)
Port name
(Port name) (*12)Port name
Specify the port name configured inthe network device using a string ofup to 64 characters.
Optional
(*13)
Optional
(*13)
Optional
(*13)
Optional
(*13)Yes
- 103 -
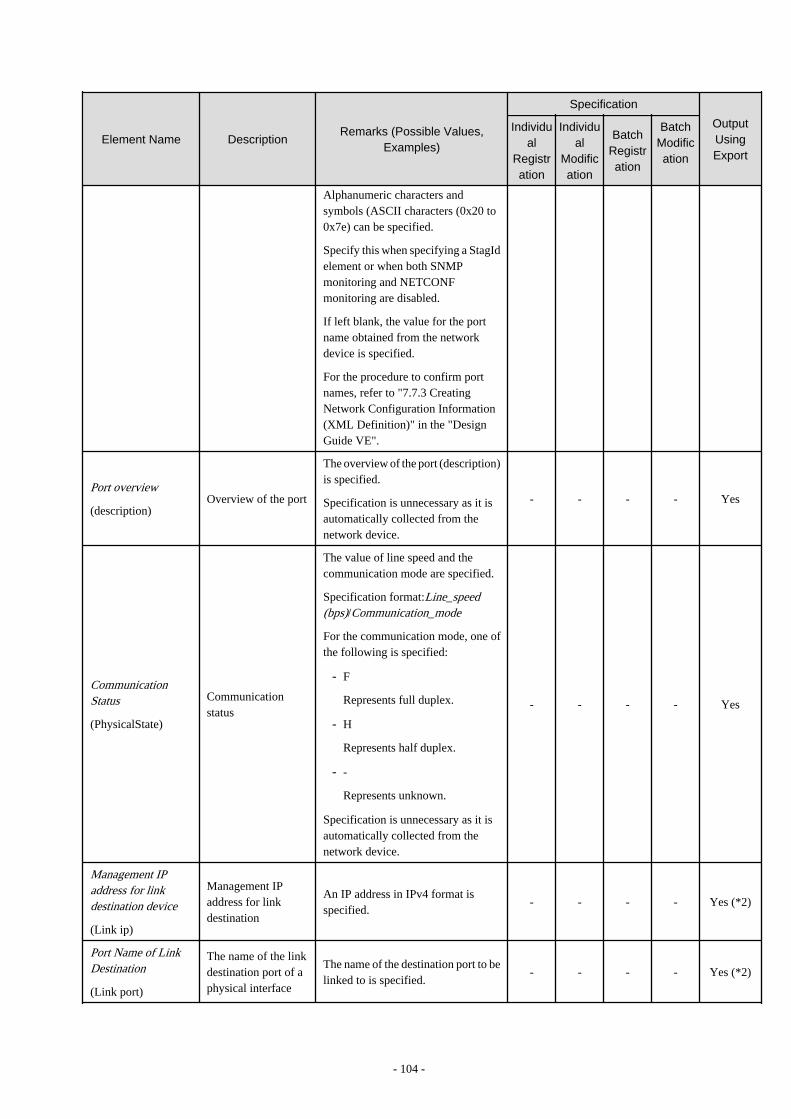
Element Name DescriptionRemarks (Possible Values,
Examples)
Specification
OutputUsingExport
Individual
Registration
Individual
Modification
BatchRegistration
BatchModification
Alphanumeric characters andsymbols (ASCII characters (0x20 to0x7e) can be specified.
Specify this when specifying a StagIdelement or when both SNMPmonitoring and NETCONFmonitoring are disabled.
If left blank, the value for the portname obtained from the networkdevice is specified.
For the procedure to confirm portnames, refer to "7.7.3 CreatingNetwork Configuration Information(XML Definition)" in the "DesignGuide VE".
Port overview
(description)Overview of the port
The overview of the port (description)is specified.
Specification is unnecessary as it isautomatically collected from thenetwork device.
- - - - Yes
CommunicationStatus
(PhysicalState)
Communicationstatus
The value of line speed and thecommunication mode are specified.
Specification format:Line_speed(bps)/Communication_mode
For the communication mode, one ofthe following is specified:
- F
Represents full duplex.
- H
Represents half duplex.
- -
Represents unknown.
Specification is unnecessary as it isautomatically collected from thenetwork device.
- - - - Yes
Management IPaddress for linkdestination device
(Link ip)
Management IPaddress for linkdestination
An IP address in IPv4 format isspecified.
- - - - Yes (*2)
Port Name of LinkDestination
(Link port)
The name of the linkdestination port of aphysical interface
The name of the destination port to belinked to is specified.
- - - - Yes (*2)
- 104 -
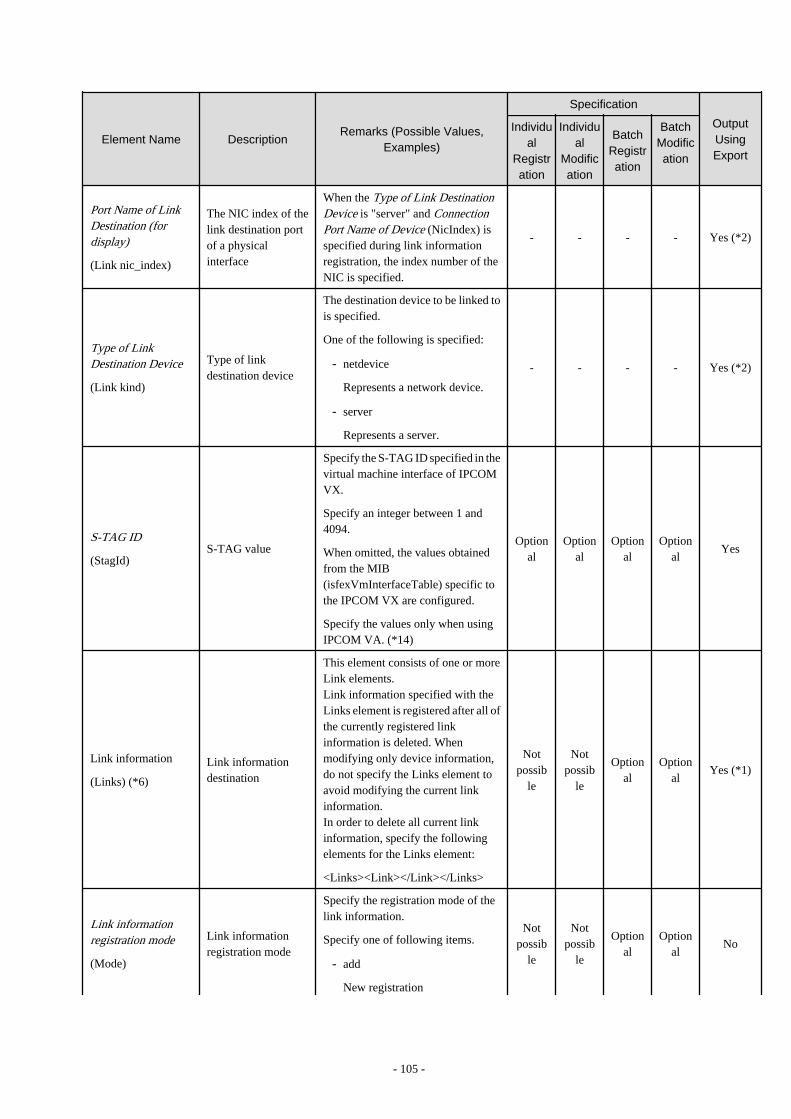
Element Name DescriptionRemarks (Possible Values,
Examples)
Specification
OutputUsingExport
Individual
Registration
Individual
Modification
BatchRegistration
BatchModification
Port Name of LinkDestination (fordisplay)
(Link nic_index)
The NIC index of thelink destination portof a physicalinterface
When the Type of Link DestinationDevice is "server" and ConnectionPort Name of Device (NicIndex) isspecified during link informationregistration, the index number of theNIC is specified.
- - - - Yes (*2)
Type of LinkDestination Device
(Link kind)
Type of linkdestination device
The destination device to be linked tois specified.
One of the following is specified:
- netdevice
Represents a network device.
- server
Represents a server.
- - - - Yes (*2)
S-TAG ID
(StagId)S-TAG value
Specify the S-TAG ID specified in thevirtual machine interface of IPCOMVX.
Specify an integer between 1 and4094.
When omitted, the values obtainedfrom the MIB(isfexVmInterfaceTable) specific tothe IPCOM VX are configured.
Specify the values only when usingIPCOM VA. (*14)
Optional
Optional
Optional
Optional
Yes
Link information
(Links) (*6)
Link informationdestination
This element consists of one or moreLink elements.Link information specified with theLinks element is registered after all ofthe currently registered linkinformation is deleted. Whenmodifying only device information,do not specify the Links element toavoid modifying the current linkinformation.In order to delete all current linkinformation, specify the followingelements for the Links element:
<Links><Link></Link></Links>
Notpossib
le
Notpossib
le
Optional
Optional
Yes (*1)
Link informationregistration mode
(Mode)
Link informationregistration mode
Specify the registration mode of thelink information.
Specify one of following items.
- add
New registration
Notpossib
le
Notpossib
le
Optional
Optional
No
- 105 -
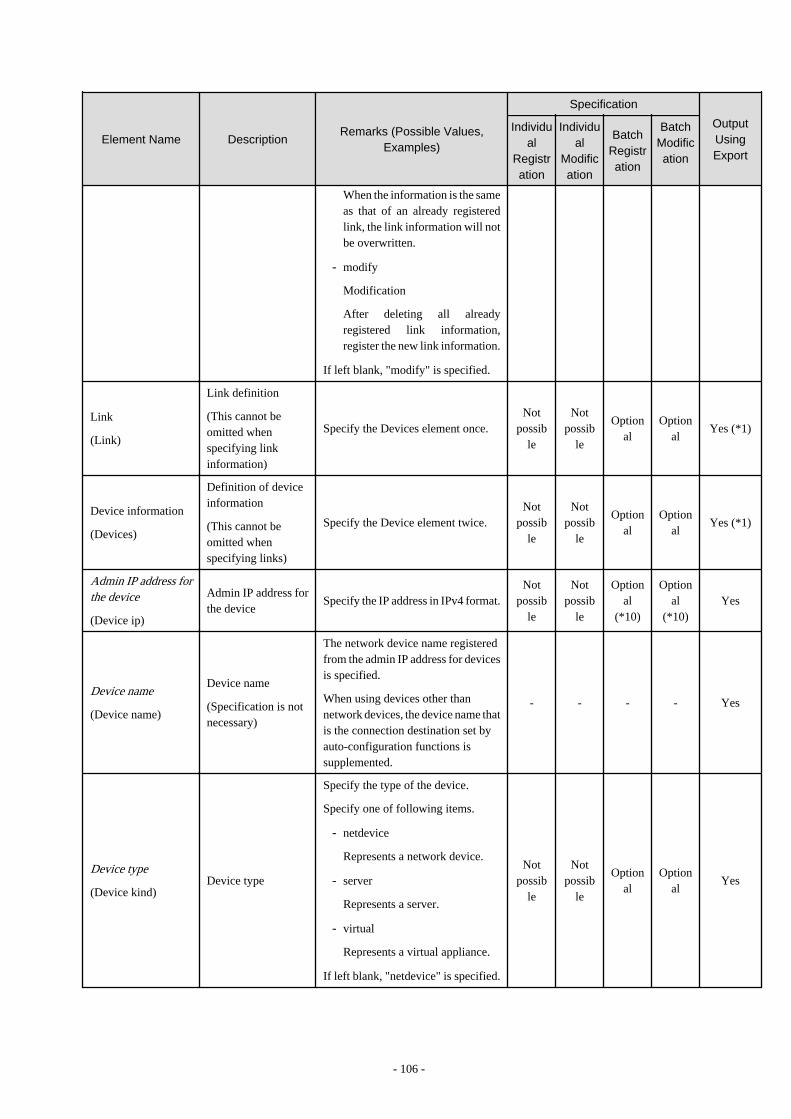
Element Name DescriptionRemarks (Possible Values,
Examples)
Specification
OutputUsingExport
Individual
Registration
Individual
Modification
BatchRegistration
BatchModification
When the information is the sameas that of an already registeredlink, the link information will notbe overwritten.
- modify
Modification
After deleting all alreadyregistered link information,register the new link information.
If left blank, "modify" is specified.
Link
(Link)
Link definition
(This cannot beomitted whenspecifying linkinformation)
Specify the Devices element once.Not
possible
Notpossib
le
Optional
Optional
Yes (*1)
Device information
(Devices)
Definition of deviceinformation
(This cannot beomitted whenspecifying links)
Specify the Device element twice.Not
possible
Notpossib
le
Optional
Optional
Yes (*1)
Admin IP address forthe device
(Device ip)
Admin IP address forthe device
Specify the IP address in IPv4 format.Not
possible
Notpossib
le
Optional
(*10)
Optional
(*10)Yes
Device name
(Device name)
Device name
(Specification is notnecessary)
The network device name registeredfrom the admin IP address for devicesis specified.
When using devices other thannetwork devices, the device name thatis the connection destination set byauto-configuration functions issupplemented.
- - - - Yes
Device type
(Device kind)Device type
Specify the type of the device.
Specify one of following items.
- netdevice
Represents a network device.
- server
Represents a server.
- virtual
Represents a virtual appliance.
If left blank, "netdevice" is specified.
Notpossib
le
Notpossib
le
Optional
Optional
Yes
- 106 -

Element Name DescriptionRemarks (Possible Values,
Examples)
Specification
OutputUsingExport
Individual
Registration
Individual
Modification
BatchRegistration
BatchModification
Connection portname of device
(Port)
Connection portname of device
Specify a character string.
- When device type is "netdevice"
Specify the port name of thenetwork device.
For the procedure to confirm portnames, refer to "7.7.3 CreatingNetwork ConfigurationInformation (XML Definition)"in the "Design Guide VE".
- When device type is "server"
Specify the server NIC number.
Specify the NIC number of a rackmount server or a tower server.The NIC number is defined in thepreparations explained in "9.3.5Pre-configuring ManagedServers" in the "Design GuideCE".
Example
If "1" is defined for the NICnumber placed on the upper leftof the back face of a rack mountserver, specify "1".
Notpossib
le
Notpossib
le
Optional
(*10)
Optional
(*10)Yes
Connection portname of device (fordisplay
(NicIndex)
Connection portname of device (fordisplay
Specify an integer.
When the device type is "server" andyou want to display the linkinformation on the [Resource Details]tab of the ROR console andNetworkViewer, specify the index ofthe physical NIC displayed in theresource details of the correspondingphysical server. If an index that is notregistered is specified, an error willoccur.
Notpossib
le
Notpossib
le
Optional
(*10)
Optional
(*10)Yes
-: Specification is unnecessary when registering or modifying. The information for the element is supplied by automatic configuration.The information is notified when the network configuration information is exported.Yes: The element is output when exporting the network configuration information.No: The element is not output when exporting the network configuration information.*1: The element is output only when the elements are defined under that element.*2: The element is output only when values are specified for that element.*3: The element is output only when login information is set. When login information is not set, the default value (the value used whenomitted) for that element is output if available.*4: Account information for network device models satisfying all of the following conditions can be confirmed.
- 107 -

Vendor Name Model Name Prompt Type Prompt Character
Fujitsu
SR-XEthernetFabric (*)
Login prompt Login:
Password prompt Password:
Command promptArbitrary_character_string#
Arbitrary_character_string>
IPCOM EXIPCOM VXIPCOM VA
Login prompt login:
Password prompt Password:
Command promptArbitrary_character_string#
Arbitrary_character_string>
Cisco
CatalystASA
Login prompt Username:
Password prompt Password:
Command promptArbitrary_character_string#
Arbitrary_character_string>
Nexus
Login prompt login:
Password prompt Password:
Command promptArbitrary_character_string#
Arbitrary_character_string>
Brocade VDX
Login prompt Login:
Password prompt Password:
Command promptArbitrary_character_string#
Arbitrary_character_string>
F5 Networks BIG-IPLogin promptPassword promptCommand prompt
There are no particularrestrictions.
The command prompt treats the arbitrary character string and the "#" or ">" that follows it as a prompt character string.The model name of the BIG-IP LTM series is treated as being "BIG-IP".*: Fujitsu PRIMERGY Converged Fabric Switch Blade (10Gbps 18/8+2) or Fujitsu Converged Fabric Switch.
*5: Only specify the values when there are special requirements.*6: It is not necessary to register network link information between Cisco ASA and adjacent network devices.*7: Required when Type (Type) is "Fabric" and Fabric type is "C-Fabric".*8: Required when specifying "SNMP" for the monitoring method (Method).*9: Required when specifying the login information (LoginInfos).*10: Required when specifying the device information (Devices). However, when the device type is "server", either one or both of theConnection Port Name of Device (Port) and the Connection Port Name of Device (for display) (NicIndex) must be specified.*11: Indicates linkaggregationDomain ID to which the Link Aggregation Port Belongs_Link Aggregation Group Number (Last Numberof ifDescr).*12: When specifying "Fabric" for type (Type) and "C-Fabric" for Fabric type, port information cannot be registered using this definition.*13: Required when specifying port information (Ports).*14: For the settings specific to the IPCOM VA series, refer to "7.7.3 Creating Network Configuration Information (XML Definition)"in the "Design Guide VE".*15: Output when Type (Type) is "Fabric" and Fabric type is "C-Fabric".
Example
- When creating one network device:
- 108 -
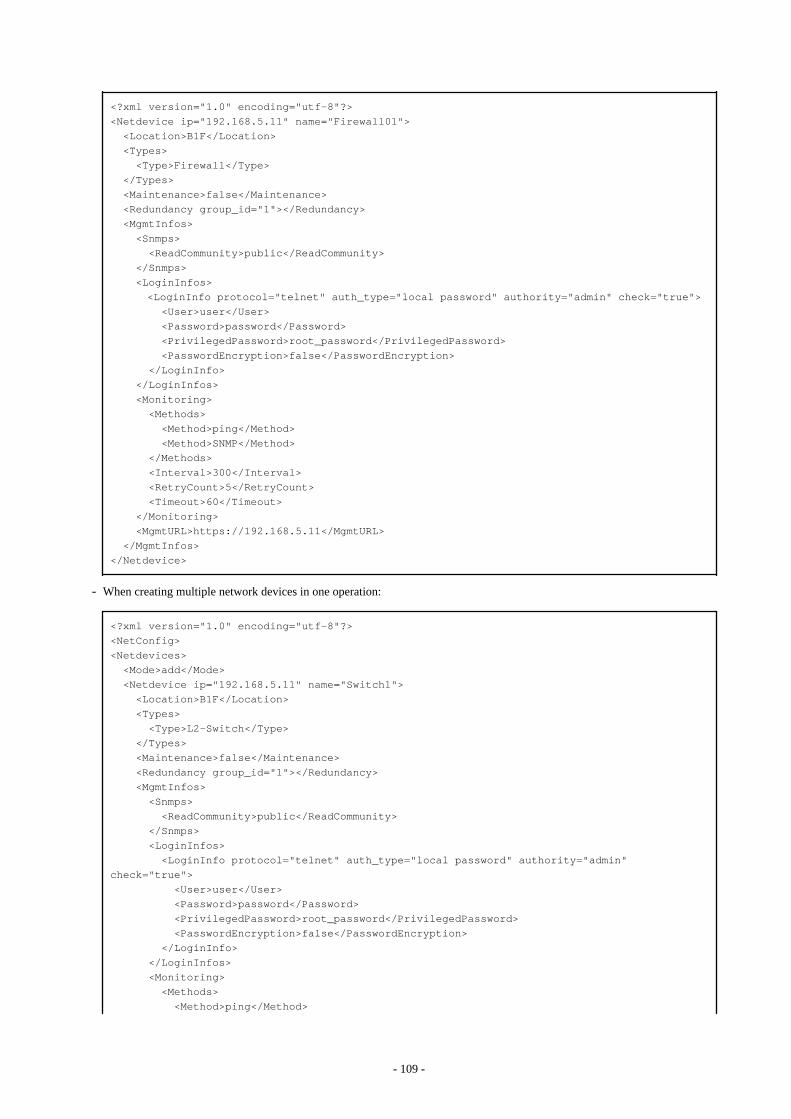
<?xml version="1.0" encoding="utf-8"?>
<Netdevice ip="192.168.5.11" name="Firewall01">
<Location>B1F</Location>
<Types>
<Type>Firewall</Type>
</Types>
<Maintenance>false</Maintenance>
<Redundancy group_id="1"></Redundancy>
<MgmtInfos>
<Snmps>
<ReadCommunity>public</ReadCommunity>
</Snmps>
<LoginInfos>
<LoginInfo protocol="telnet" auth_type="local password" authority="admin" check="true">
<User>user</User>
<Password>password</Password>
<PrivilegedPassword>root_password</PrivilegedPassword>
<PasswordEncryption>false</PasswordEncryption>
</LoginInfo>
</LoginInfos>
<Monitoring>
<Methods>
<Method>ping</Method>
<Method>SNMP</Method>
</Methods>
<Interval>300</Interval>
<RetryCount>5</RetryCount>
<Timeout>60</Timeout>
</Monitoring>
<MgmtURL>https://192.168.5.11</MgmtURL>
</MgmtInfos>
</Netdevice>
- When creating multiple network devices in one operation:
<?xml version="1.0" encoding="utf-8"?>
<NetConfig>
<Netdevices>
<Mode>add</Mode>
<Netdevice ip="192.168.5.11" name="Switch1">
<Location>B1F</Location>
<Types>
<Type>L2-Switch</Type>
</Types>
<Maintenance>false</Maintenance>
<Redundancy group_id="1"></Redundancy>
<MgmtInfos>
<Snmps>
<ReadCommunity>public</ReadCommunity>
</Snmps>
<LoginInfos>
<LoginInfo protocol="telnet" auth_type="local password" authority="admin"
check="true">
<User>user</User>
<Password>password</Password>
<PrivilegedPassword>root_password</PrivilegedPassword>
<PasswordEncryption>false</PasswordEncryption>
</LoginInfo>
</LoginInfos>
<Monitoring>
<Methods>
<Method>ping</Method>
- 109 -

<Method>SNMP</Method>
</Methods>
<Interval>300</Interval>
<RetryCount>5</RetryCount>
<Timeout>60</Timeout>
</Monitoring>
<MgmtURL>https://192.168.5.11</MgmtURL>
</MgmtInfos>
</Netdevice>
<Netdevice ip="192.168.5.10" name="Firewall1">
<Location>B1F</Location>
<Types>
<Type>Firewall</Type>
</Types>
<Maintenance>false</Maintenance>
<Redundancy group_id="2"></Redundancy>
<MgmtInfos>
<Snmps>
<ReadCommunity>public</ReadCommunity>
</Snmps>
<LoginInfos>
<LoginInfo protocol="telnet" auth_type="local password" authority="admin"
check="true">
<User>user</User>
<Password>password</Password>
<PrivilegedPassword>root_password</PrivilegedPassword>
<PasswordEncryption>false</PasswordEncryption>
</LoginInfo>
</LoginInfos>
<Monitoring>
<Methods>
<Method>ping</Method>
<Method>SNMP</Method>
</Methods>
<Interval>300</Interval>
<RetryCount>5</RetryCount>
<Timeout>60</Timeout>
</Monitoring>
<MgmtURL>https://192.168.5.10:82</MgmtURL>
</MgmtInfos>
</Netdevice>
<Netdevice ip="192.168.5.20" name="SLB1">
<Location>B1F</Location>
<Types>
<Type>SLB</Type>
</Types>
<Maintenance>false</Maintenance>
<Redundancy group_id="3"></Redundancy>
<MgmtInfos>
<Snmps>
<ReadCommunity>public</ReadCommunity>
</Snmps>
<LoginInfos>
<LoginInfo protocol="telnet" auth_type="local password" authority="admin"
check="true">
<User>user</User>
<Password>password</Password>
<PrivilegedPassword>root_password</PrivilegedPassword>
<PasswordEncryption>false</PasswordEncryption>
</LoginInfo>
</LoginInfos>
<Monitoring>
<Methods>
- 110 -

<Method>ping</Method>
<Method>SNMP</Method>
</Methods>
<Interval>300</Interval>
<RetryCount>5</RetryCount>
<Timeout>60</Timeout>
</Monitoring>
<MgmtURL>https://192.168.5.20:82</MgmtURL>
</MgmtInfos>
</Netdevice>
<Netdevice ip="192.168.5.30" name="IPCOMEXIN1">
<Location>B1F</Location>
<Types>
<Type>Firewall</Type>
<Type>SLB</Type>
</Types>
<Maintenance>false</Maintenance>
<Redundancy group_id="4"></Redundancy>
<MgmtInfos>
<Snmps>
<ReadCommunity>public</ReadCommunity>
</Snmps>
<LoginInfos>
<LoginInfo protocol="telnet" auth_type="local password" authority="admin"
check="true">
<User>user</User>
<Password>password</Password>
<PrivilegedPassword>root_password</PrivilegedPassword>
<PasswordEncryption>false</PasswordEncryption>
</LoginInfo>
</LoginInfos>
<Monitoring>
<Methods>
<Method>ping</Method>
<Method>SNMP</Method>
</Methods>
<Interval>300</Interval>
<RetryCount>5</RetryCount>
<Timeout>60</Timeout>
</Monitoring>
<MgmtURL>https://192.168.5.30:82</MgmtURL>
</MgmtInfos>
</Netdevice>
</Netdevices>
<Links>
<Link>
<Devices>
<Device ip="192.168.1.1" kind="netdevice">
<Port>lan0.1</Port>
</Device>
<Device ip="192.168.1.2" kind="netdevice">
<Port>Fa2/1</Port>
</Device>
</Devices>
</Link>
<Link>
<Devices>
<Device ip="192.168.1.3" kind="netdevice">
<Port>Fa2/2</Port>
</Device>
<Device ip="192.168.1.4" kind="server">
<Port>1</Port>
</Device>
- 111 -
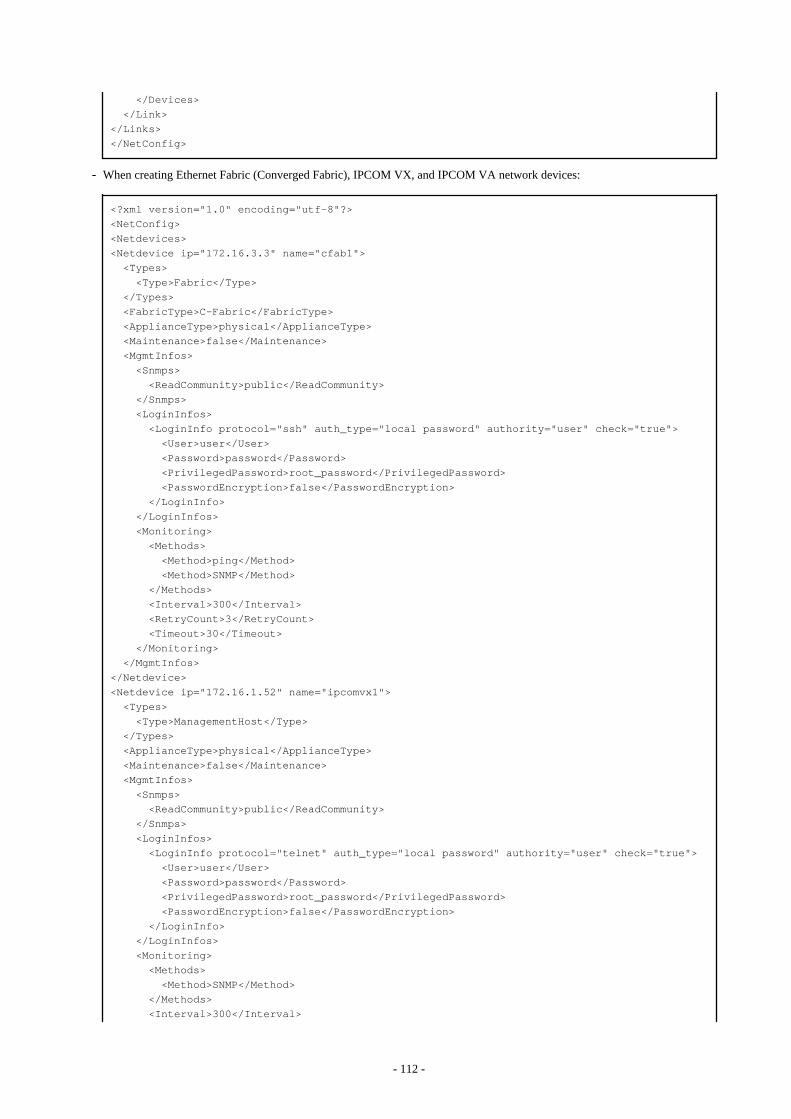
</Devices>
</Link>
</Links>
</NetConfig>
- When creating Ethernet Fabric (Converged Fabric), IPCOM VX, and IPCOM VA network devices:
<?xml version="1.0" encoding="utf-8"?>
<NetConfig>
<Netdevices>
<Netdevice ip="172.16.3.3" name="cfab1">
<Types>
<Type>Fabric</Type>
</Types>
<FabricType>C-Fabric</FabricType>
<ApplianceType>physical</ApplianceType>
<Maintenance>false</Maintenance>
<MgmtInfos>
<Snmps>
<ReadCommunity>public</ReadCommunity>
</Snmps>
<LoginInfos>
<LoginInfo protocol="ssh" auth_type="local password" authority="user" check="true">
<User>user</User>
<Password>password</Password>
<PrivilegedPassword>root_password</PrivilegedPassword>
<PasswordEncryption>false</PasswordEncryption>
</LoginInfo>
</LoginInfos>
<Monitoring>
<Methods>
<Method>ping</Method>
<Method>SNMP</Method>
</Methods>
<Interval>300</Interval>
<RetryCount>3</RetryCount>
<Timeout>30</Timeout>
</Monitoring>
</MgmtInfos>
</Netdevice>
<Netdevice ip="172.16.1.52" name="ipcomvx1">
<Types>
<Type>ManagementHost</Type>
</Types>
<ApplianceType>physical</ApplianceType>
<Maintenance>false</Maintenance>
<MgmtInfos>
<Snmps>
<ReadCommunity>public</ReadCommunity>
</Snmps>
<LoginInfos>
<LoginInfo protocol="telnet" auth_type="local password" authority="user" check="true">
<User>user</User>
<Password>password</Password>
<PrivilegedPassword>root_password</PrivilegedPassword>
<PasswordEncryption>false</PasswordEncryption>
</LoginInfo>
</LoginInfos>
<Monitoring>
<Methods>
<Method>SNMP</Method>
</Methods>
<Interval>300</Interval>
- 112 -
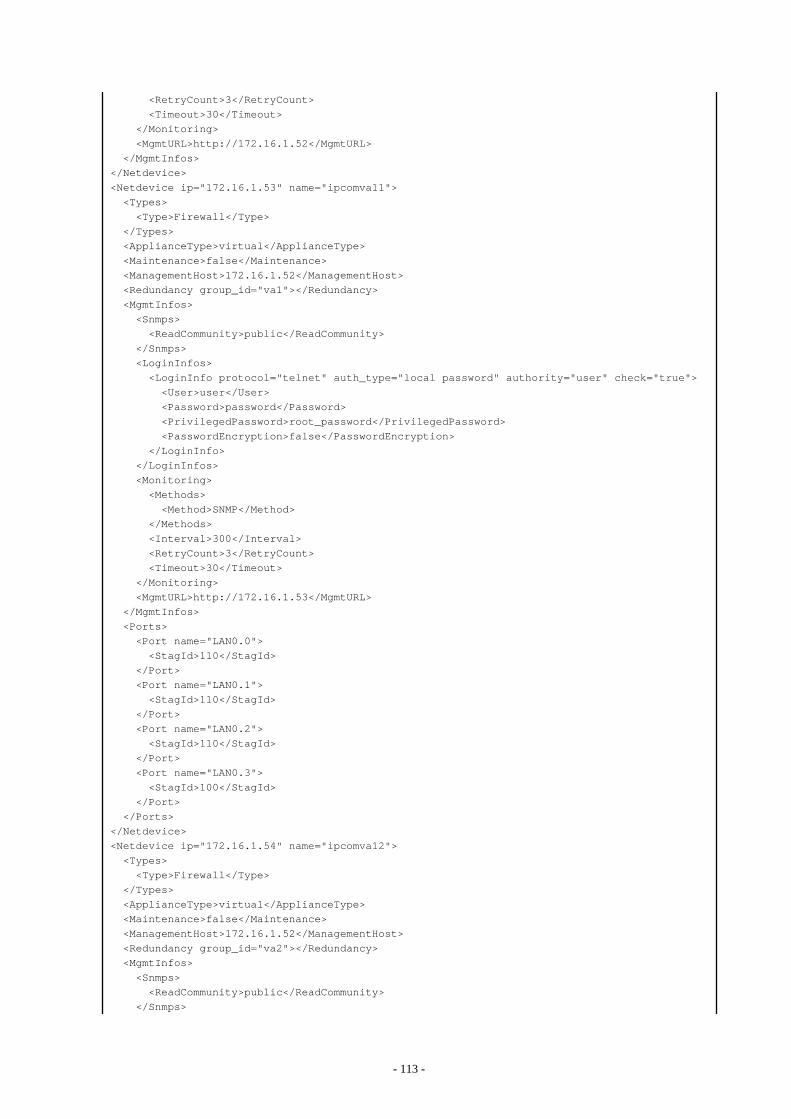
<RetryCount>3</RetryCount>
<Timeout>30</Timeout>
</Monitoring>
<MgmtURL>http://172.16.1.52</MgmtURL>
</MgmtInfos>
</Netdevice>
<Netdevice ip="172.16.1.53" name="ipcomva11">
<Types>
<Type>Firewall</Type>
</Types>
<ApplianceType>virtual</ApplianceType>
<Maintenance>false</Maintenance>
<ManagementHost>172.16.1.52</ManagementHost>
<Redundancy group_id="va1"></Redundancy>
<MgmtInfos>
<Snmps>
<ReadCommunity>public</ReadCommunity>
</Snmps>
<LoginInfos>
<LoginInfo protocol="telnet" auth_type="local password" authority="user" check="true">
<User>user</User>
<Password>password</Password>
<PrivilegedPassword>root_password</PrivilegedPassword>
<PasswordEncryption>false</PasswordEncryption>
</LoginInfo>
</LoginInfos>
<Monitoring>
<Methods>
<Method>SNMP</Method>
</Methods>
<Interval>300</Interval>
<RetryCount>3</RetryCount>
<Timeout>30</Timeout>
</Monitoring>
<MgmtURL>http://172.16.1.53</MgmtURL>
</MgmtInfos>
<Ports>
<Port name="LAN0.0">
<StagId>110</StagId>
</Port>
<Port name="LAN0.1">
<StagId>110</StagId>
</Port>
<Port name="LAN0.2">
<StagId>110</StagId>
</Port>
<Port name="LAN0.3">
<StagId>100</StagId>
</Port>
</Ports>
</Netdevice>
<Netdevice ip="172.16.1.54" name="ipcomva12">
<Types>
<Type>Firewall</Type>
</Types>
<ApplianceType>virtual</ApplianceType>
<Maintenance>false</Maintenance>
<ManagementHost>172.16.1.52</ManagementHost>
<Redundancy group_id="va2"></Redundancy>
<MgmtInfos>
<Snmps>
<ReadCommunity>public</ReadCommunity>
</Snmps>
- 113 -

<LoginInfos>
<LoginInfo protocol="telnet" auth_type="local password" authority="user" check="true">
<User>user</User>
<Password>password</Password>
<PrivilegedPassword>root_password</PrivilegedPassword>
<PasswordEncryption>false</PasswordEncryption>
</LoginInfo>
</LoginInfos>
<Monitoring>
<Methods>
<Method>SNMP</Method>
</Methods>
<Interval>300</Interval>
<RetryCount>3</RetryCount>
<Timeout>30</Timeout>
</Monitoring>
<MgmtURL>http://172.16.1.54</MgmtURL>
</MgmtInfos>
<Ports>
<Port name="LAN0.0">
<StagId>120</StagId>
</Port>
<Port name="LAN0.1">
<StagId>120</StagId>
</Port>
<Port name="LAN0.2">
<StagId>120</StagId>
</Port>
<Port name="LAN0.3">
<StagId>100</StagId>
</Port>
</Ports>
</Netdevice>
</Netdevices>
<Links>
<Link>
<Devices>
<Device ip="172.16.1.52" kind="netdevice" name="ipcomvx1">
<Port>LAN0.0</Port>
</Device>
<Device ip="172.16.3.3" kind="netdevice" name="cfab1">
<Port>3/1/0/11</Port>
</Device>
</Devices>
</Link>
<Link>
<Devices>
<Device ip="172.16.1.52" kind="netdevice" name="ipcomvx1">
<Port>lan0.1</Port>
</Device>
<Device ip="172.16.3.3" kind="netdevice" name="cfab1">
<Port>3/1/0/12</Port>
</Device>
</Devices>
</Link>
<Link>
<Devices>
<Device ip="172.16.1.52" kind="netdevice" name="ipcomvx1">
<Port>LAN0.2</Port>
</Device>
<Device ip="172.16.3.3" kind="netdevice" name="cfab1">
<Port>3/1/0/13</Port>
</Device>
- 114 -

</Devices>
</Link>
<Link>
<Devices>
<Device ip="172.16.1.52" kind="netdevice" name="ipcomvx1">
<Port>LAN0.3</Port>
</Device>
<Device ip="172.16.3.3" kind="netdevice" name="cfab1">
<Port>3/1/0/14</Port>
</Device>
</Devices>
</Link>
<Link>
<Devices>
<Device ip="172.16.1.52" kind="netdevice" name="ipcomvx1">
<Port>LAN1.0</Port>
</Device>
<Device ip="172.16.3.3" kind="netdevice" name="cfab1">
<Port>3/1/0/15</Port>
</Device>
</Devices>
</Link>
<Link>
<Devices>
<Device ip="172.16.1.53" kind="virtual" name="ipcomva11">
<Port>LAN0.0</Port>
</Device>
<Device ip="172.16.1.52" kind="netdevice" name="ipcomvx1">
<Port>LAN0.0</Port>
</Device>
</Devices>
</Link>
<Link>
<Devices>
<Device ip="172.16.1.53" kind="virtual" name="ipcomva11">
<Port>lan0.1</Port>
</Device>
<Device ip="172.16.1.52" kind="netdevice" name="ipcomvx1">
<Port>lan0.1</Port>
</Device>
</Devices>
</Link>
<Link>
<Devices>
<Device ip="172.16.1.53" kind="virtual" name="ipcomva11">
<Port>LAN0.2</Port>
</Device>
<Device ip="172.16.1.52" kind="netdevice" name="ipcomvx1">
<Port>LAN0.2</Port>
</Device>
</Devices>
</Link>
<Link>
<Devices>
<Device ip="172.16.1.53" kind="virtual" name="ipcomva11">
<Port>LAN0.3</Port>
</Device>
<Device ip="172.16.1.52" kind="netdevice" name="ipcomvx1">
<Port>LAN0.3</Port>
</Device>
</Devices>
</Link>
<Link>
- 115 -
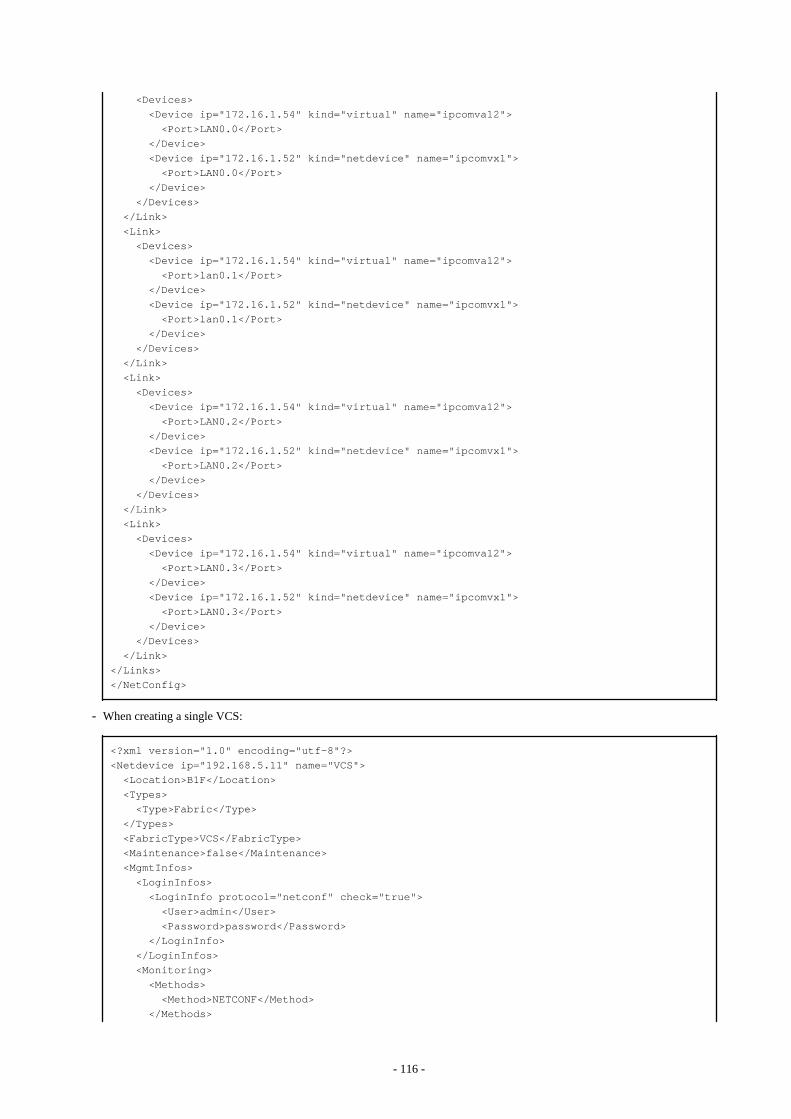
<Devices>
<Device ip="172.16.1.54" kind="virtual" name="ipcomva12">
<Port>LAN0.0</Port>
</Device>
<Device ip="172.16.1.52" kind="netdevice" name="ipcomvx1">
<Port>LAN0.0</Port>
</Device>
</Devices>
</Link>
<Link>
<Devices>
<Device ip="172.16.1.54" kind="virtual" name="ipcomva12">
<Port>lan0.1</Port>
</Device>
<Device ip="172.16.1.52" kind="netdevice" name="ipcomvx1">
<Port>lan0.1</Port>
</Device>
</Devices>
</Link>
<Link>
<Devices>
<Device ip="172.16.1.54" kind="virtual" name="ipcomva12">
<Port>LAN0.2</Port>
</Device>
<Device ip="172.16.1.52" kind="netdevice" name="ipcomvx1">
<Port>LAN0.2</Port>
</Device>
</Devices>
</Link>
<Link>
<Devices>
<Device ip="172.16.1.54" kind="virtual" name="ipcomva12">
<Port>LAN0.3</Port>
</Device>
<Device ip="172.16.1.52" kind="netdevice" name="ipcomvx1">
<Port>LAN0.3</Port>
</Device>
</Devices>
</Link>
</Links>
</NetConfig>
- When creating a single VCS:
<?xml version="1.0" encoding="utf-8"?>
<Netdevice ip="192.168.5.11" name="VCS">
<Location>B1F</Location>
<Types>
<Type>Fabric</Type>
</Types>
<FabricType>VCS</FabricType>
<Maintenance>false</Maintenance>
<MgmtInfos>
<LoginInfos>
<LoginInfo protocol="netconf" check="true">
<User>admin</User>
<Password>password</Password>
</LoginInfo>
</LoginInfos>
<Monitoring>
<Methods>
<Method>NETCONF</Method>
</Methods>
- 116 -
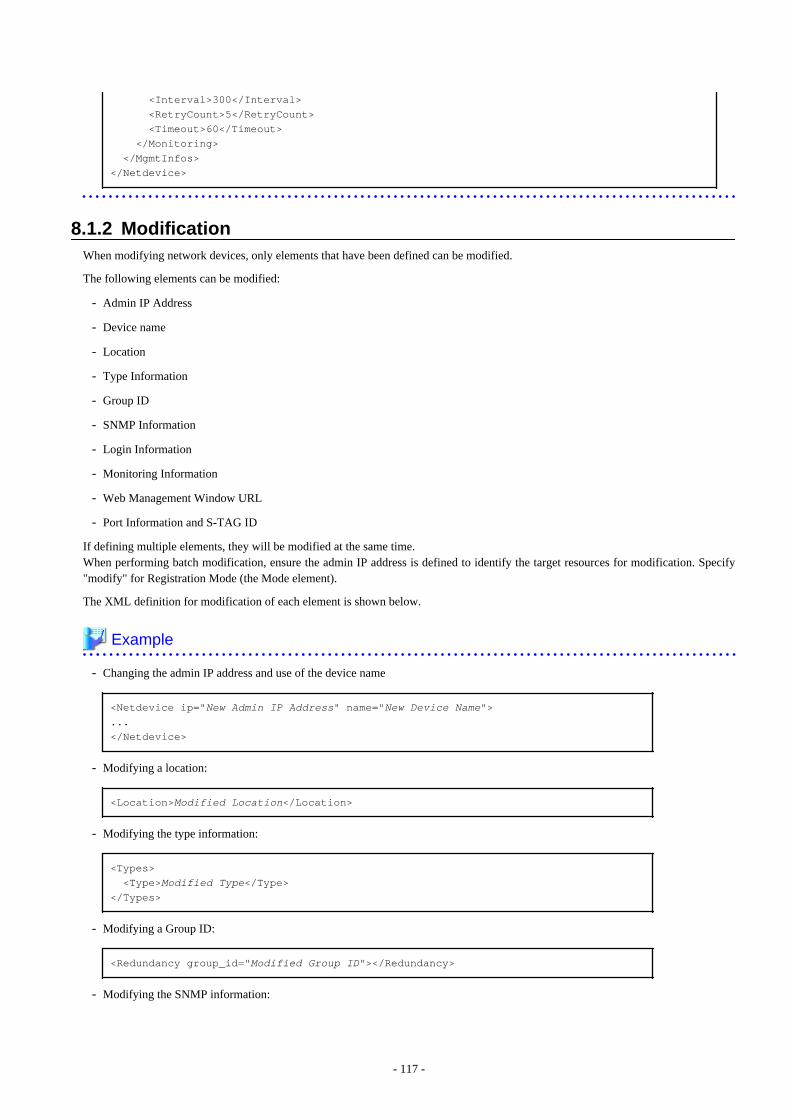
<Interval>300</Interval>
<RetryCount>5</RetryCount>
<Timeout>60</Timeout>
</Monitoring>
</MgmtInfos>
</Netdevice>
8.1.2 ModificationWhen modifying network devices, only elements that have been defined can be modified.
The following elements can be modified:
- Admin IP Address
- Device name
- Location
- Type Information
- Group ID
- SNMP Information
- Login Information
- Monitoring Information
- Web Management Window URL
- Port Information and S-TAG ID
If defining multiple elements, they will be modified at the same time.When performing batch modification, ensure the admin IP address is defined to identify the target resources for modification. Specify"modify" for Registration Mode (the Mode element).
The XML definition for modification of each element is shown below.
Example
- Changing the admin IP address and use of the device name
<Netdevice ip="New Admin IP Address" name="New Device Name">...
</Netdevice>
- Modifying a location:
<Location>Modified Location</Location>
- Modifying the type information:
<Types>
<Type>Modified Type</Type></Types>
- Modifying a Group ID:
<Redundancy group_id="Modified Group ID"></Redundancy>
- Modifying the SNMP information:
- 117 -

<Snmps>
<ReadCommunity>Modified Community Name</ReadCommunity></Snmps>
- Modifying the login information:
<LoginInfo="Modified protocol" auth_type="Modified Management Method of Authentication Information" authority="Modified Administrator Authority" check="Modified Account Confirmation"> <IpAddress>Modified Destination IP Address</IpAddress> <Port>Modified Destination Port Number</Port> <User>Modified User Account for Connection</User> <Password>Modified Password for Connection</Password> <PrivilegedPassword>Modified Administrator Password</PrivilegedPassword> <PasswordEncryption>Presence or absence of password encryption after modification</PasswordEncryption></LoginInfo>
- Modifying the monitoring information:
<Monitoring>
<Methods>
<Method>Monitoring Method After Modification</Method> </Methods>
<Interval>Modified Monitoring Interval</Interval> <RetryCount>Modified Retry Count</RetryCount> <Timeout>Modified Timeout</Timeout></Monitoring>
- Modifying the Web management window URL:
<MgmtURL>Modified Web Management Window URL</MgmtURL>
- Modifying the port information and S-TAG ID
<Ports>
<Port name="Port Name"> <StagId>New S-TAG ID</StagId> </Port>
</Ports>
Information
- Type information cannot be modified when the target network device for modification has been registered as "Fabric" or"ManagementHost".In order to change the type information of the target network device from "Fabric" or "ManagementHost" to something else, unregisterthe network device and then re-register it.
- Type information of network devices which are already registered cannot be changed to "Fabric" or "ManagementHost".In order to change the type information of the target network device to "Fabric" or "ManagementHost", unregister the network devicefirst and then re-register it.
- Redundancy configuration information cannot be modified when there is a firewall or server load balancer deployed for the networkdevice to be modified.
- When modifying login information, all existing login information is replaced.All registered login information is deleted.
- 118 -
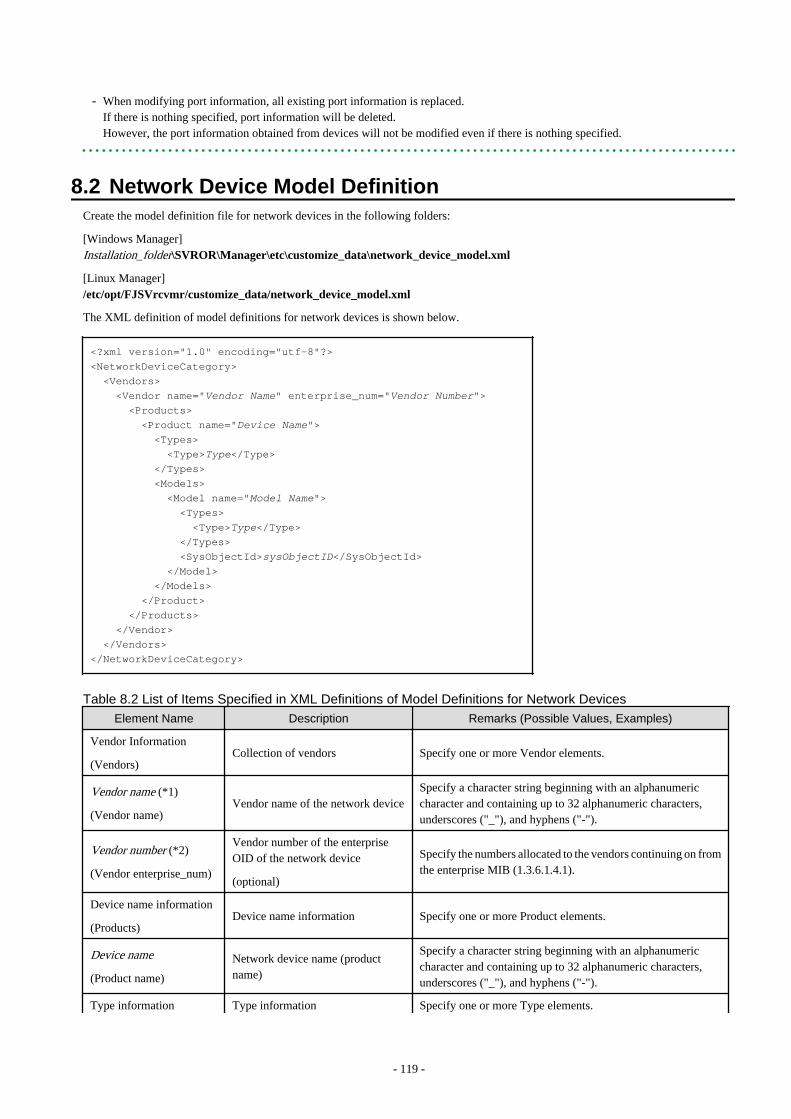
- When modifying port information, all existing port information is replaced.If there is nothing specified, port information will be deleted.However, the port information obtained from devices will not be modified even if there is nothing specified.
8.2 Network Device Model DefinitionCreate the model definition file for network devices in the following folders:
[Windows Manager]Installation_folder\SVROR\Manager\etc\customize_data\network_device_model.xml
[Linux Manager]/etc/opt/FJSVrcvmr/customize_data/network_device_model.xml
The XML definition of model definitions for network devices is shown below.
<?xml version="1.0" encoding="utf-8"?>
<NetworkDeviceCategory>
<Vendors>
<Vendor name="Vendor Name" enterprise_num="Vendor Number"> <Products>
<Product name="Device Name"> <Types>
<Type>Type</Type> </Types>
<Models>
<Model name="Model Name"> <Types>
<Type>Type</Type> </Types>
<SysObjectId>sysObjectID</SysObjectId> </Model>
</Models>
</Product>
</Products>
</Vendor>
</Vendors>
</NetworkDeviceCategory>
Table 8.2 List of Items Specified in XML Definitions of Model Definitions for Network Devices
Element Name Description Remarks (Possible Values, Examples)
Vendor Information
(Vendors)Collection of vendors Specify one or more Vendor elements.
Vendor name (*1)
(Vendor name)Vendor name of the network device
Specify a character string beginning with an alphanumericcharacter and containing up to 32 alphanumeric characters,underscores ("_"), and hyphens ("-").
Vendor number (*2)
(Vendor enterprise_num)
Vendor number of the enterpriseOID of the network device
(optional)
Specify the numbers allocated to the vendors continuing on fromthe enterprise MIB (1.3.6.1.4.1).
Device name information
(Products)Device name information Specify one or more Product elements.
Device name
(Product name)
Network device name (productname)
Specify a character string beginning with an alphanumericcharacter and containing up to 32 alphanumeric characters,underscores ("_"), and hyphens ("-").
Type information Type information Specify one or more Type elements.
- 119 -

Element Name Description Remarks (Possible Values, Examples)
(Types) (optional)
Type (*3)
(Type)
Type
(This cannot be omitted whenspecifying type information)
Specify the type of the network device.
- L2-Switch
- Firewall
- SLB
Model name information
(Models)Model name information Specify one or more Model elements.
Model Name
(Model name)Model name of network device
Specify a character string beginning with an alphanumericcharacter and containing up to 32 alphanumeric characters,underscores ("_"), and hyphens ("-").
Type information
(Types)
Type information
(optional)Specify one or more Type elements.
Type (*3)
(Type)
Type
(This cannot be omitted whenspecifying type information)
Specify the type of the network device.
- L2-Switch
- Firewall
- SLB
sysObjectID
(SysObjectId)sysObjectID of network device
Specify the OID character string including numbers and periods(".").When the standard MIB sysObjectID for a network device isunknown, it can be confirmed using the snmpwalk command.
Example
This example shows checking using the snmpwalk command.
>snmpwalk -v 1 -c [SNMP community name] -On [IP address] sysObjectID
sysObjectID is displayed in the following format:
.1.3.6.1.2.1.1.2.0 = OID: .[sysObjectID]
When specifying the sysObjectID displayed in the commandabove, exclude the period (".") which is the first character of thecommand.
*1: If two or more Vendor information (Vendor) that have the same Vendor Number are defined, the earliest one will take effect.If only the vendor name is to be defined, specify the Vendor name and Vendor enterprise_num, and do not specify the apparatus name(Products) or model name (Models).
*2: The vendor numbers for major vendors are shown for reference.
Vendor Name Organization name registered in IANA Vendor Number
Fujitsu Fujitsu Limited 211
Brocade
Brocade Communications Systems, Inc.(previous was 'McData Corporation')
289
Brocade Communications Systems, Inc. 1588
Brocade Communications Systems, Inc.(previous was 'Foundry Networks, Inc.')
1991
- 120 -

Vendor Name Organization name registered in IANA Vendor Number
Brocade Communications Systems, Inc.(previous was 'NuView Inc.')
2427
Brocade Communications Systems, Inc.(previous was 'McDATA,Inc')
4369
Brocade Communications Systems, Inc.(previous was 'Rhapsody Networks Inc.')
6905
Brocade Communications Systems, Inc.(previous was 'McDATA Corp.')
8244
Cisco
ciscoSystems 9
Cisco Systems, Inc. 5771
Cisco Systems 5842
Alaxala_Networks ALAXALA Networks Corporation 21839
Alcatel-Lucent
Alcatel-Lucent (previously was 'AlcatelData Network')
637
Alcatel-Lucent (previously was TropicNetworks)
7483
Alcatel-Lucent, 4ESS 35710
Allied_Telesis Allied Telesis, Inc. 207
Blue_Coat Blue Coat Systems 14501
Extreme_Networks Extreme Networks 1916
Fortinet Fortinet, Inc. 12356
F5_NetworksF5 Labs, Inc. 3375
F5 Networks Inc 12276
Hitachi_Cable Hitachi Cable, Ltd. 278
HP Hewlett-Packard 11
H3C H3C 25506
Juniper_Networks
Juniper Networks, Inc. 2636
Juniper Networks/Unisphere 4874
Juniper Networks/Funk Software 1411
NEC NEC Corporation 119
Panasonic_Electric_Works Panasonic Electric Works Co., Ltd. 396
Radware RND 89
3Com 3Com 43
IANA: Internet Assigned Number Authority
*3: If a type (Type) has been specified under both Product name and Models, the type under Models is given priority.No network device type is specified if neither is specified.
Example <?xml version="1.0" encoding="UTF-8"?>
<NetworkDeviceCategory>
<Vendors>
<Vendor name="Fujitsu" enterprise_num="211">
- 121 -

<Products>
<Product name="SR-X300">
<Types>
<Type>L2-Switch</Type>
</Types>
<Models>
<Model name="SR-X316T1">
<SysObjectId>1.3.6.1.4.1.211.1.127.65.53</SysObjectId>
</Model>
<Model name="SR-X324T1">
<SysObjectId>1.3.6.1.4.1.211.1.127.65.54</SysObjectId>
</Model>
<Model name="SR-X340TR1">
<SysObjectId>1.3.6.1.4.1.211.1.127.65.55</SysObjectId>
</Model>
</Models>
</Product>
<Product name="SR-X500">
<Types>
<Type>L2-Switch</Type>
</Types>
<Models>
<Model name="SR-X526R1">
<SysObjectId>1.3.6.1.4.1.211.1.127.65.52</SysObjectId>
</Model>
</Models>
</Product>
</Products>
</Vendor>
</Vendors>
</NetworkDeviceCategory>
Information
It is not necessary to specify supported device models in network device model definitions because model information is obtainedautomatically.
The values of Vendor elements, ProductName elements, ModelName elements, and Type elements of the network configurationinformation are used for the vendor name, device name, model name, and type of the network device preferentially.
If the Vendor elements, ProductName elements, ModelName elements, or Type elements are not specified in the XML definition of thenetwork configuration information, identify the vendor name, device name, model name, or type from the model definition file.
In the model definition file, the vendor name, device name, model name, and type of a network device are identified using the OID characterstring specified in the SysObjectId element in the Model element.
- The model definition file of the network device is searched from the top.The value of the name attribute of the Model element is the device name, the value of the Product element is the unit name, the valueof the Vendor element is the vendor name, and the value of the Type element is the type of sysObjectID which has been matched first.
- If no matching 0ID character string is found in the model definition file of the network device, it is taken as meaning the networkdevice has no vendor name, device name, model name, or type.
- 122 -
Appendix A GUI/CLIThis appendix provides references for operation using the GUI/CLI based on functions.
Table A.1 Network Devices
FunctionOperations
GUI CLI
Creating network devices No "3.3 rcxadm netdevice" create
Viewing listsOperate using the [Resource List] tab explained in "A.5 [Resource List] Tab" in the "User's Guide VE".
"3.3 rcxadm netdevice" list
Viewing detailed informationOperate using the [Resource Details] tab explained in"A.6 [Resource Details] Tab" in the "User's GuideVE".
"3.3 rcxadm netdevice" show
Modifying basic information No "3.3 rcxadm netdevice" modify
Deleting network devices"11.4.2 Deleting Network Devices" in the "User'sGuide VE"
"3.3 rcxadm netdevice" delete
Maintenance mode settings"20.1 Switchover of Maintenance Mode" in the "User'sGuide VE"
"3.3 rcxadm netdevice" set
Import No "3.2 rcxadm netconfig" import
Export No "3.2 rcxadm netconfig" export
- 123 -

Index[D]
deployment_service_uninstall.................................................. 44
[M]macbindconfig.......................................................................... 70
[R]rcxadm agtctl............................................................................ 45rcxadm authctl.......................................................................... 47rcxadm certctl........................................................................... 51rcxadm chassis............................................................................8rcxadm dbctl............................................................................. 53rcxadm deployctl...................................................................... 54rcxadm eventctl.........................................................................55rcxadm image........................................................................... 37rcxadm imagemgr..................................................................... 57rcxadm lanctl............................................................................ 59rcxadm license.......................................................................... 61rcxadm mgrctl...........................................................................62rcxadm netconfig........................................................................ 9rcxadm netdevice......................................................................11rcxadm server........................................................................... 24rcxadm servermgr..................................................................... 66rcxadm storagemgr................................................................... 68rcxbackup..................................................................................72rcxkeydefbackup.......................................................................74rcxkeydefrestore....................................................................... 77rcxlogin.......................................................................................5rcxrestore.................................................................................. 78
[S]scwbackup................................................................................ 80scwrestore................................................................................. 83
- 124 -