red hat jboss developer studio 10.1 getting started with
TRANSCRIPT
Misha Husnain Ali Supriya BharadwajRed Hat Developer Group DocumentationTeam
Red Hat JBoss Developer Studio10.1Getting Started with Container andCloud-based Development
Starting Development of Container and Cloud-based Applications UsingRed Hat JBoss Developer Studio


Red Hat JBoss Developer Studio 10.1 Getting Started with Container andCloud-based Development
Starting Development of Container and Cloud-based Applications UsingRed Hat JBoss Developer Studio
Misha Husnain [email protected]
Supriya [email protected]
Legal Notice
Copyright © 2017 Red Hat, Inc.
The text of and illustrations in this document are licensed by Red Hat under a Creative CommonsAttribution–Share Alike 3.0 Unported license ("CC-BY-SA"). An explanation of CC-BY-SA isavailable athttp://creativecommons.org/licenses/by-sa/3.0/. In accordance with CC-BY-SA, if you distribute this document or an adaptation of it, you mustprovide the URL for the original version.
Red Hat, as the licensor of this document, waives the right to enforce, and agrees not to assert,Section 4d of CC-BY-SA to the fullest extent permitted by applicable law.
Red Hat, Red Hat Enterprise Linux, the Shadowman logo, JBoss, OpenShift, Fedora, the Infinitylogo, and RHCE are trademarks of Red Hat, Inc., registered in the United States and othercountries.
Linux ® is the registered trademark of Linus Torvalds in the United States and other countries.
Java ® is a registered trademark of Oracle and/or its affiliates.
XFS ® is a trademark of Silicon Graphics International Corp. or its subsidiaries in the United Statesand/or other countries.
MySQL ® is a registered trademark of MySQL AB in the United States, the European Union andother countries.
Node.js ® is an official trademark of Joyent. Red Hat Software Collections is not formally related toor endorsed by the official Joyent Node.js open source or commercial project.
The OpenStack ® Word Mark and OpenStack logo are either registered trademarks/service marksor trademarks/service marks of the OpenStack Foundation, in the United States and other countriesand are used with the OpenStack Foundation's permission. We are not affiliated with, endorsed orsponsored by the OpenStack Foundation, or the OpenStack community.
All other trademarks are the property of their respective owners.
AbstractThis compilation of topics contains information on how to start developing containerized applicationsand applications for cloud deployment.
. . . . . . . . . . . . . . . . . . . . . . . . . . . . . . . . . . . . . . . . . . . . . . . . . . . . . . . . . . . . . . . . . . . . . . . . . . . . . . . . . . . . . . . . . . . . . . . . . . . . . . . . . . . . . . . . . . . . . . . . . . . . . . . . . . . . . . . . . . . . . . . . . . . . . . . . . . . . . . . . . . . . . . . . . . . . . . . . . . . . . . . . . . . . . . . . . . . . . . . . . . . . . . . . . . . . . . . . . . . . . . . . . . . . . . . . . . . . . . . . . . . . . . . . . . . . . . . . . . . . . . . . . . . . . . . . . . . . . . . .
. . . . . . . . . . . . . . . . . . . . . . . . . . . . . . . . . . . . . . . . . . . . . . . . . . . . . . . . . . . . . . . . . . . . . . . . . . . . . . . . . . . . . . . . . . . . . . . . . . . . . . . . . . . . . . . . . . . . . . . . . . . . . . . . . . . . . . . . . . . . . . . . . . . . . . . . . . . . . . . . . . . . . . . . . . . . . . . . . . . . . . . . . . . . . . . . . . . . . . . . . . . . . . . . . . . . . . . . . . . . . . . . . . . . . . . . . . . . . . . . . . . . . . . . . . . . . . . . . . . . . . . . . . . . . . . . . . . . . . . .
. . . . . . . . . . . . . . . . . . . . . . . . . . . . . . . . . . . . . . . . . . . . . . . . . . . . . . . . . . . . . . . . . . . . . . . . . . . . . . . . . . . . . . . . . . . . . . . . . . . . . . . . . . . . . . . . . . . . . . . . . . . . . . . . . . . . . . . . . . . . . . . . . . . . . . . . . . . . . . . . . . . . . . . . . . . . . . . . . . . . . . . . . . . . . . . . . . . . . . . . . . . . . . . . . . . . . . . . . . . . . . . . . . . . . . . . . . . . . . . . . . . . . . . . . . . . . . . . . . . . . . . . . . . . . . . . . . . . . . . .
. . . . . . . . . . . . . . . . . . . . . . . . . . . . . . . . . . . . . . . . . . . . . . . . . . . . . . . . . . . . . . . . . . . . . . . . . . . . . . . . . . . . . . . . . . . . . . . . . . . . . . . . . . . . . . . . . . . . . . . . . . . . . . . . . . . . . . . . . . . . . . . . . . . . . . . . . . . . . . . . . . . . . . . . . . . . . . . . . . . . . . . . . . . . . . . . . . . . . . . . . . . . . . . . . . . . . . . . . . . . . . . . . . . . . . . . . . . . . . . . . . . . . . . . . . . . . . . . . . . . . . . . . . . . . . . . . . . . . . . .
Table of Contents
CHAPTER 1. DEVELOPING USING CONTAINERS AND THE CLOUD1.1. USING CONTAINER DEVELOPMENT KIT TOOLING IN JBOSS DEVELOPER STUDIO 10.X
CHAPTER 2. DEVELOPING FOR THE CLOUD WITH OPENSHIFT 32.1. CREATING AN OPENSHIFT 3 APPLICATION IN RED HAT JBOSS DEVELOPER STUDIO2.2. SETTING UP AND REMOTELY MONITORING AN OPENSHIFT APPLICATION2.3. BUILDING AND DEPLOYING DOCKER-FORMATTED CONTAINER IMAGE TO CONTAINERDEVELOPMENT KIT OPENSHIFT REGISTRY
CHAPTER 3. DEVELOPING FOR THE CLOUD WITH OPENSHIFT 23.1. CREATING YOUR FIRST OPENSHIFT ONLINE APPLICATION3.2. DEVELOPING AN EXISTING OPENSHIFT APPLICATION3.3. CUSTOM PUBLISHING YOUR OPENSHIFT APPLICATION3.4. DEBUGGING AN OPENSHIFT JAVA APPLICATION3.5. DEPLOYING A WORKSPACE PROJECT TO OPENSHIFT ONLINE3.6. CONFIGURING SSH KEYS FOR OPENSHIFT
CHAPTER 4. DEVELOPING WITH DOCKER4.1. CONFIGURING DOCKER TOOLING BASICS
33
111118
21
27273337424548
5555
Table of Contents
1

Red Hat JBoss Developer Studio 10.1 Getting Started with Container and Cloud-based Development
2
CHAPTER 1. DEVELOPING USING CONTAINERS AND THECLOUD
1.1. USING CONTAINER DEVELOPMENT KIT TOOLING IN JBOSSDEVELOPER STUDIO 10.X
1.1.1. About Using Red Hat Container Development Kit with the IDE
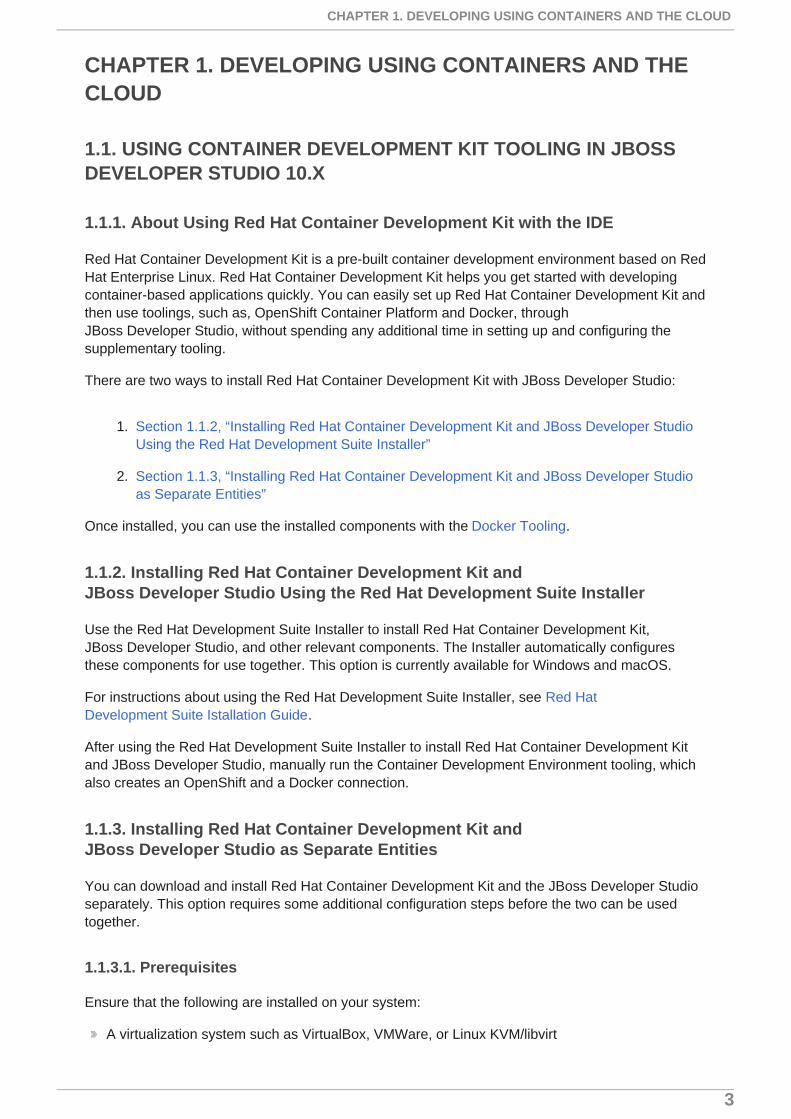
Red Hat Container Development Kit is a pre-built container development environment based on RedHat Enterprise Linux. Red Hat Container Development Kit helps you get started with developingcontainer-based applications quickly. You can easily set up Red Hat Container Development Kit andthen use toolings, such as, OpenShift Container Platform and Docker, throughJBoss Developer Studio, without spending any additional time in setting up and configuring thesupplementary tooling.
There are two ways to install Red Hat Container Development Kit with JBoss Developer Studio:
1. Section 1.1.2, “Installing Red Hat Container Development Kit and JBoss Developer StudioUsing the Red Hat Development Suite Installer”
2. Section 1.1.3, “Installing Red Hat Container Development Kit and JBoss Developer Studioas Separate Entities”
Once installed, you can use the installed components with the Docker Tooling.
1.1.2. Installing Red Hat Container Development Kit andJBoss Developer Studio Using the Red Hat Development Suite Installer
Use the Red Hat Development Suite Installer to install Red Hat Container Development Kit,JBoss Developer Studio, and other relevant components. The Installer automatically configuresthese components for use together. This option is currently available for Windows and macOS.
For instructions about using the Red Hat Development Suite Installer, see Red HatDevelopment Suite Istallation Guide.
After using the Red Hat Development Suite Installer to install Red Hat Container Development Kitand JBoss Developer Studio, manually run the Container Development Environment tooling, whichalso creates an OpenShift and a Docker connection.
1.1.3. Installing Red Hat Container Development Kit andJBoss Developer Studio as Separate Entities
You can download and install Red Hat Container Development Kit and the JBoss Developer Studioseparately. This option requires some additional configuration steps before the two can be usedtogether.
1.1.3.1. Prerequisites
Ensure that the following are installed on your system:
A virtualization system such as VirtualBox, VMWare, or Linux KVM/libvirt
CHAPTER 1. DEVELOPING USING CONTAINERS AND THE CLOUD
3
Vagrant, which is an open source tool to create and distribute portable developmentenvironments
Red Hat Container Development Kit 2.3
JBoss Developer Studio 10.x
For details about installing these prerequisites, see the Red Hat Container Development KitInstallation Guide.
1.1.3.2. Set Up Red Hat Container Development Kit in the IDE
To set up Red Hat Container Development Kit in the IDE:
1. Start the IDE.
2. Press Ctrl+3 and in the Quick Access bar, type CDK.
3. From the results, click Launch Container Development Environment using Red HatCDK.
4. If asked, enter your user credentials.
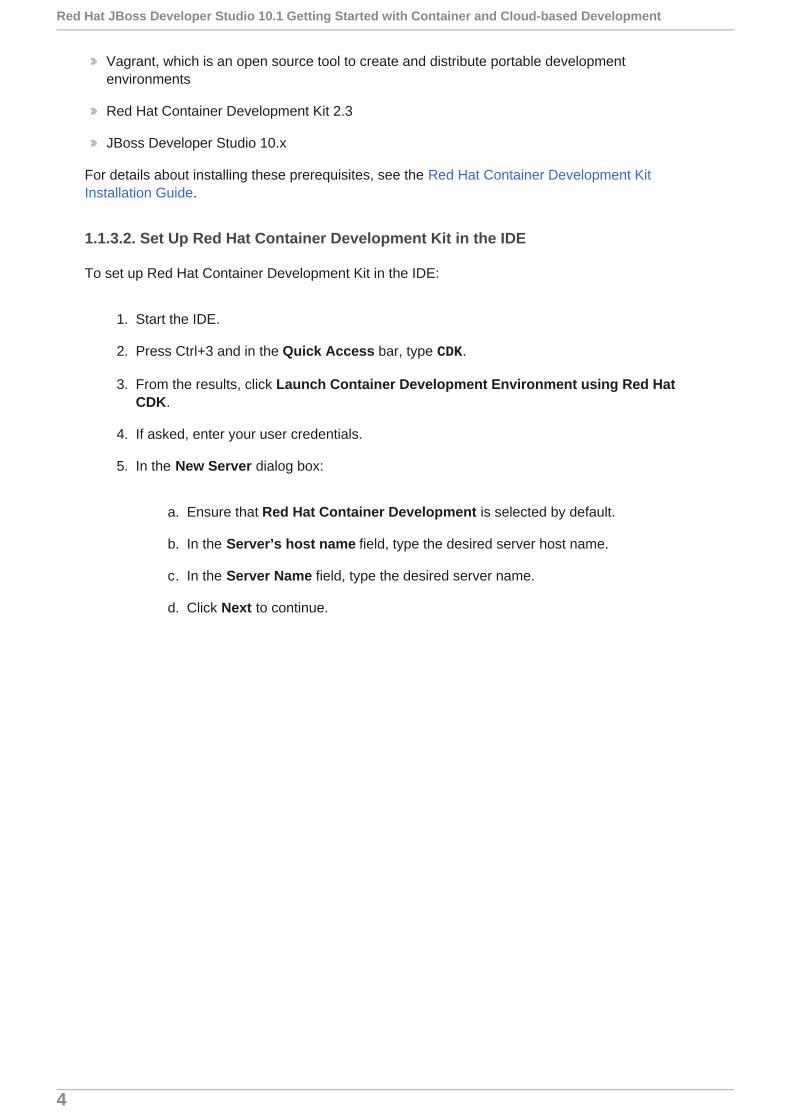
5. In the New Server dialog box:
a. Ensure that Red Hat Container Development is selected by default.
b. In the Server’s host name field, type the desired server host name.
c. In the Server Name field, type the desired server name.
d. Click Next to continue.
Red Hat JBoss Developer Studio 10.1 Getting Started with Container and Cloud-based Development
4
6. In the New Server Red Hat Container Development Environment window, add thesecurity information and your access.redhat.com credentials:
a. In the Username field, click Add to add a new username for the Red Hat CustomerPortal or select an existing user from the drop-down menu.
b. In the Folder field, navigate to the directory that contains your local Vagrantfile.You can also use the Vagrantfile supplied in the cdk.zip file to initialize theRed Hat Container Development Kit box.
7. Click Finish to conclude setting up the Red Hat Container Development Kit server adapter.
CHAPTER 1. DEVELOPING USING CONTAINERS AND THE CLOUD
5

8. Open the Servers view, right-click Container Development Environment and click Start.
9. If asked, enter the password.
10. In the Untrusted SSL Certificate dialog box, click Yes.
11. The Servers view shows the server adapter started. To monitor the status of the serveradapter, read the log in the built-in terminal.
Red Hat JBoss Developer Studio 10.1 Getting Started with Container and Cloud-based Development
6
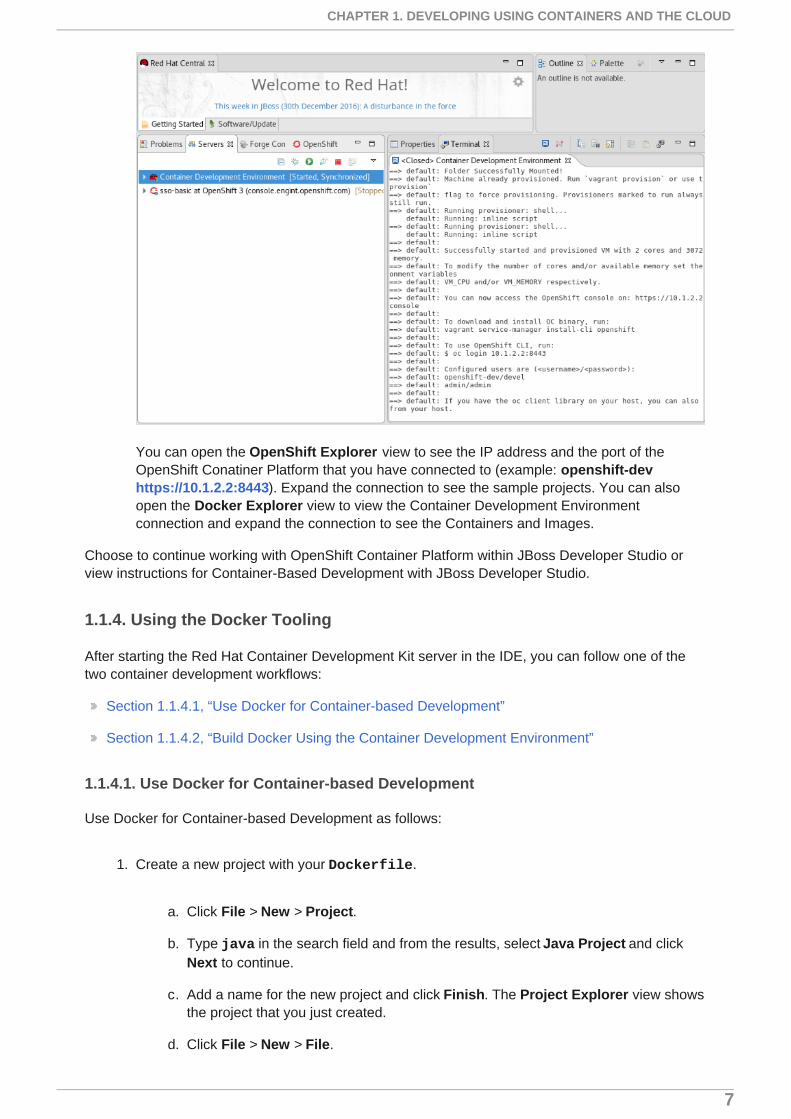
You can open the OpenShift Explorer view to see the IP address and the port of theOpenShift Conatiner Platform that you have connected to (example: openshift-devhttps://10.1.2.2:8443). Expand the connection to see the sample projects. You can alsoopen the Docker Explorer view to view the Container Development Environmentconnection and expand the connection to see the Containers and Images.
Choose to continue working with OpenShift Container Platform within JBoss Developer Studio orview instructions for Container-Based Development with JBoss Developer Studio.
1.1.4. Using the Docker Tooling
After starting the Red Hat Container Development Kit server in the IDE, you can follow one of thetwo container development workflows:
Section 1.1.4.1, “Use Docker for Container-based Development”
Section 1.1.4.2, “Build Docker Using the Container Development Environment”
1.1.4.1. Use Docker for Container-based Development
Use Docker for Container-based Development as follows:
1. Create a new project with your Dockerfile.
a. Click File > New > Project.
b. Type java in the search field and from the results, select Java Project and clickNext to continue.
c. Add a name for the new project and click Finish. The Project Explorer view showsthe project that you just created.
d. Click File > New > File.
CHAPTER 1. DEVELOPING USING CONTAINERS AND THE CLOUD
7
e. In the New File window:
i. In the Enter or select the parent folder field, click the project name thatyou created.
ii. In the File name field, type Dockerfile and click Finish.
iii. Edit the Dockerfile as desired and then save (for example, by creating anew Docker image to customize a given version of JBoss/WildFly by addinga datasource definition and its associated driver). The Dockerfile mayalso package your application as a war file via a Maven command, andcopy it into the container in the WildFly deployments directory. Seehttps://docs.docker.com/engine/reference/builder for more informationabout the Dockerfile instructions.
1.1.4.2. Build Docker Using the Container Development Environment
Do a Docker build using the Container Development Environment as follows:
1. In the Project Explorer view, right-click the Dockerfile and select Run As > DockerImage Build.
2. In the dialog box:
a. In the Connection field, select your Container Development Environment serveradapter.
b. In the Repository Name field, enter the desired name for the docker image andclick OK. After the build is done, a new image with the given name will be listed inthe Docker Explorer view and in the Docker Images view.
3. Do a Docker run using the Container Development Environment:
a. Open the Docker Explorer view by typing Ctrl+3 in the quick access menu.
b. Navigate to the Images node under the Docker connection.
c. Right-click your image and click Run.
d. Fill in the necessary details and click Finish to run your image. It is optional to givethe container a name, but it is recommended to name it. This name helps locate thespecific container in a list of containers in the future.
4. In the Docker Explorer view, select the container and expand its node and select the 8080port and click Show In > Web Browser to access the application deployed in the Dockercontainer.
1.1.4.2.1. Next Steps for the Docker Tooling
For further information about the basics of Docker Tooling, see Configure Docker Tooling (Basic).
1.1.5. Using OpenShift Container Platform Tooling
Use OpenShift for Container-based Development as follows:
Red Hat JBoss Developer Studio 10.1 Getting Started with Container and Cloud-based Development
8
1. Create a new OpenShift Container Platform project. These projects are like namespaces forOpenShift applications. They are different from how Eclipse projects relate to Eclipseapplications. Additionally, Eclipse projects can be mapped to OpenShift applications.
a. In the OpenShift Explorer view, right-click the name of the connection and selectNew > Project to create a new OpenShift Container Platform project.
Note
The CDK server adapter creates the OpenShift Container Platformconnection when you start the CDK server adapter in the precedingsections.
b. Add the name and any other relevant details for the new project and click Finish.
2. Create an application in your OpenShift Container Platform project using the templates:
a. Right-click your new project name and click New > Application.
b. In the Select Template dialog box, search box, type the application type required.For example, for a node.js application, type nodejs and from the displayed list,select the relevant nodejs template and click Finish.
c. Click OK to accept the results of the application creation process.
d. When prompted, enter a new git location or click Finish in the dialog box to use thelisted default git location for your application.
3. Create a new OpenShift Container Platform server adapter for your project and application:
a. In the OpenShift Explorer view, expand the connection and then the project.
b. Right-click the service and click Server Adapter.
c. In the OpenShift Adapter Settings window:
i. Ensure that the Eclipse Project field, shows the relevant project or clickBrowse to locate the project.
ii. In the Services field, select the relevant service.
iii. Click Finish.
4. Debug the application, if required.
a. In the Servers view, right-click the server adapter and click Restart in Debug.
1.1.5.1. Next Steps for the OpenShift Tooling
See the Developing for the Cloud with OpenShift 3 section in the index for additional tasks using theOpenShift Container Platform tooling.
1.1.6. Known Issues
CHAPTER 1. DEVELOPING USING CONTAINERS AND THE CLOUD
9
When the Docker Explorer is first started, attempting to extend the Containers or Imagescauses the explorer to fail and throw an exception. To work around this issue, restartEclipse/JBoss Developer Studio. Details are in JBIDE-21983.
Red Hat JBoss Developer Studio 10.1 Getting Started with Container and Cloud-based Development
10
CHAPTER 2. DEVELOPING FOR THE CLOUD WITHOPENSHIFT 3
2.1. CREATING AN OPENSHIFT 3 APPLICATION IN RED HAT JBOSSDEVELOPER STUDIO
The OpenShift 3 Tooling allows users to create, import, and modify OpenShift 3 applications asfollows:
1. Create a New OpenShift 3 Connection
2. Create a New OpenShift 3 Project
3. Create a New OpenShift 3 Application
4. Import an Existing OpenShift 3 Application into the IDE
5. Deploy an Application Using the Server Adapter
6. View an Existing Application in a Web Browser
7. Delete an OpenShift Project
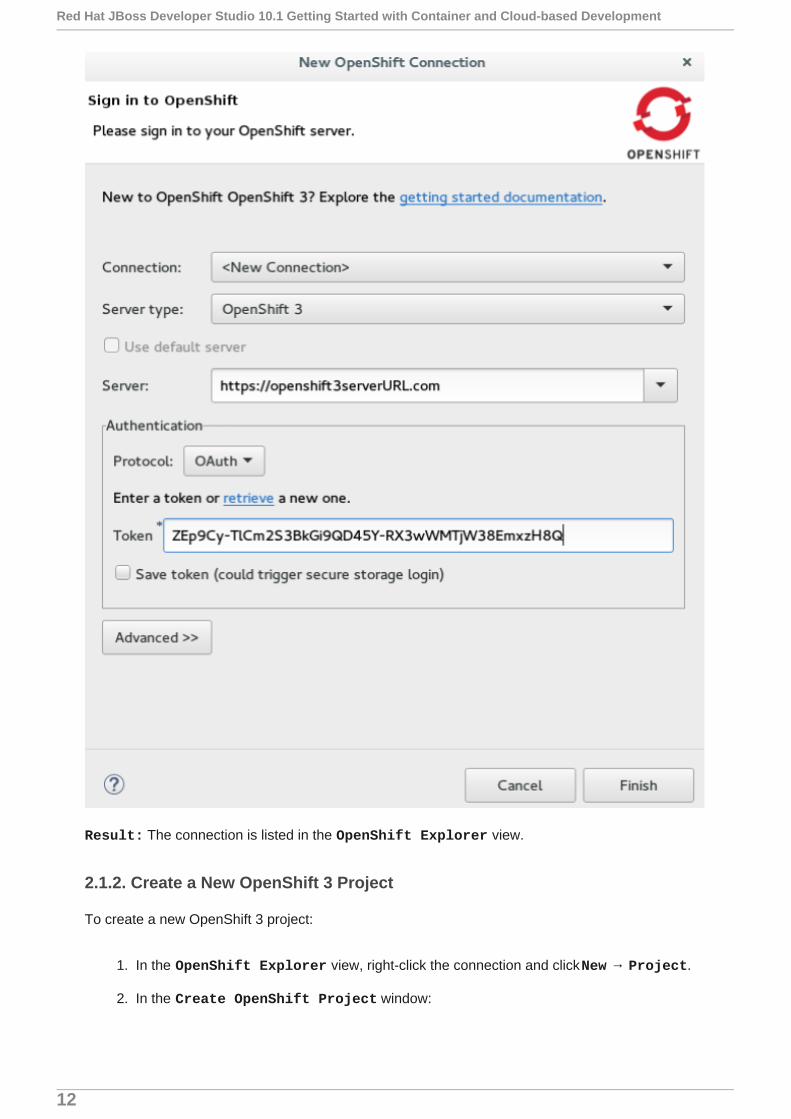
2.1.1. Create a New OpenShift 3 Connection
To be able to use the OpenShift 3 tooling in the IDE, you must first create an OpenShift 3connection. To create a new OpenShift 3 connection:
1. In the OpenShift Explorer view, click New Connection Wizard. In case the OpenShift Explorer view is not available, click Window → Show View → Other andthen in the Show View window search for OpenShift Explorer and click OK after youfind it.
2. In the New OpenShift Connection wizard:
a. In the Connection list, click <New Connection>.
b. In the Server type list, click OpenShift 3.
c. In the Server field, type the URL for an OpenShift 3 server.
d. In the Authentication section, in the Protocol list, click OAuth to authenticateusing the token or click Basic to authenticate using login credentials.
3. Click Finish.
Figure 2.1. Set up a New OpenShift3 Connection
CHAPTER 2. DEVELOPING FOR THE CLOUD WITH OPENSHIFT 3
11
Result: The connection is listed in the OpenShift Explorer view.
2.1.2. Create a New OpenShift 3 Project
To create a new OpenShift 3 project:
1. In the OpenShift Explorer view, right-click the connection and click New → Project.
2. In the Create OpenShift Project window:
Red Hat JBoss Developer Studio 10.1 Getting Started with Container and Cloud-based Development
12
a. In the Project Name field, type a name for the project. Project names must bealphanumeric and can contain the character “-” but must not begin or end with thischaracter.
b. In the Display Name field, type a display name for the project. This name is usedas the display name for your project in the OpenShift Explorer view and on theOpenShift web console after the project is created.
c. In the Description field, type a description of the project.
3. Click Finish.
Result: The project is listed in the OpenShift Explorer view, under the relevant connection.
2.1.3. Create a New OpenShift 3 Application
Use the New OpenShift Application wizard to create OpenShift applications from default orcustom templates. Using a template to create an application is useful because the same templatecan be used to create multiple similar applications with different or identical configurations for eachof them.
Note
To learn more about using and creating templates with OpenShift 3, see Using Templateswith OpenShift 3.
1. In the OpenShift Explorer view, right-click the connection and click New → Application.
2. If required, in the New OpenShift Application wizard, sign into your OpenShift serverusing the Basic protocol (username and password) or the OAuth protocol (token) and click Next.
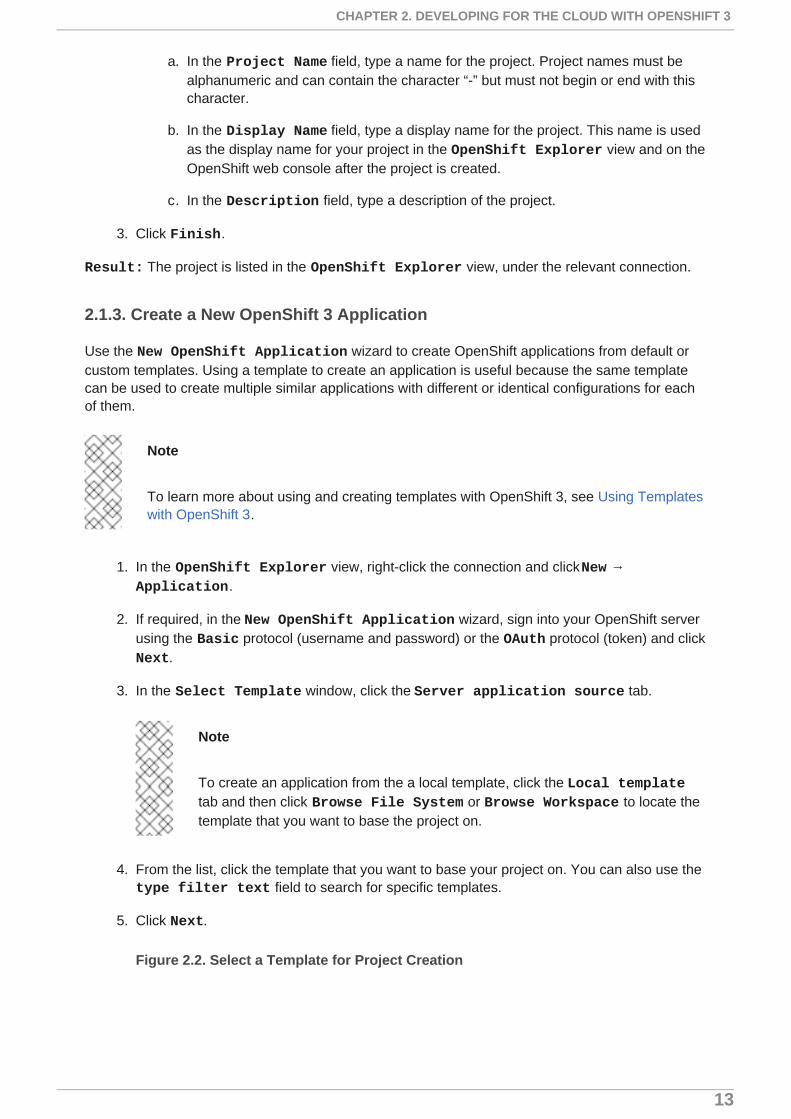
3. In the Select Template window, click the Server application source tab.
Note
To create an application from the a local template, click the Local templatetab and then click Browse File System or Browse Workspace to locate thetemplate that you want to base the project on.
4. From the list, click the template that you want to base your project on. You can also use the type filter text field to search for specific templates.
5. Click Next.
Figure 2.2. Select a Template for Project Creation
CHAPTER 2. DEVELOPING FOR THE CLOUD WITH OPENSHIFT 3
13
6. In the Template Parameters window, confirm the parameter values and click Next.
7. In the Resource Labels window, confirm the labels that you want to add to eachresource. You can also click Add or Edit to add labels or edit the existing ones.
8. Click Finish.
9. In the Results of creating the resources from the [template_name]window, review the details and click OK.
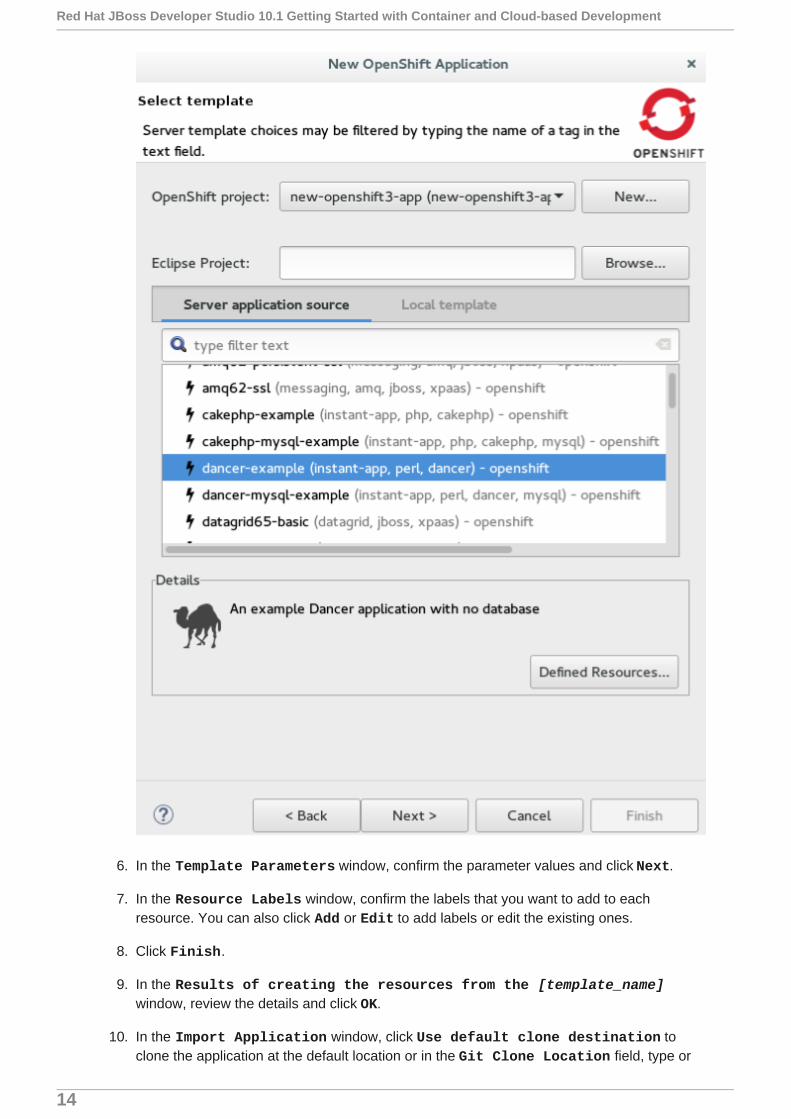
10. In the Import Application window, click Use default clone destination toclone the application at the default location or in the Git Clone Location field, type or
Red Hat JBoss Developer Studio 10.1 Getting Started with Container and Cloud-based Development
14
browse for the location where you want to clone the application and click Finish.
Figure 2.3. Select a Git Clone Location
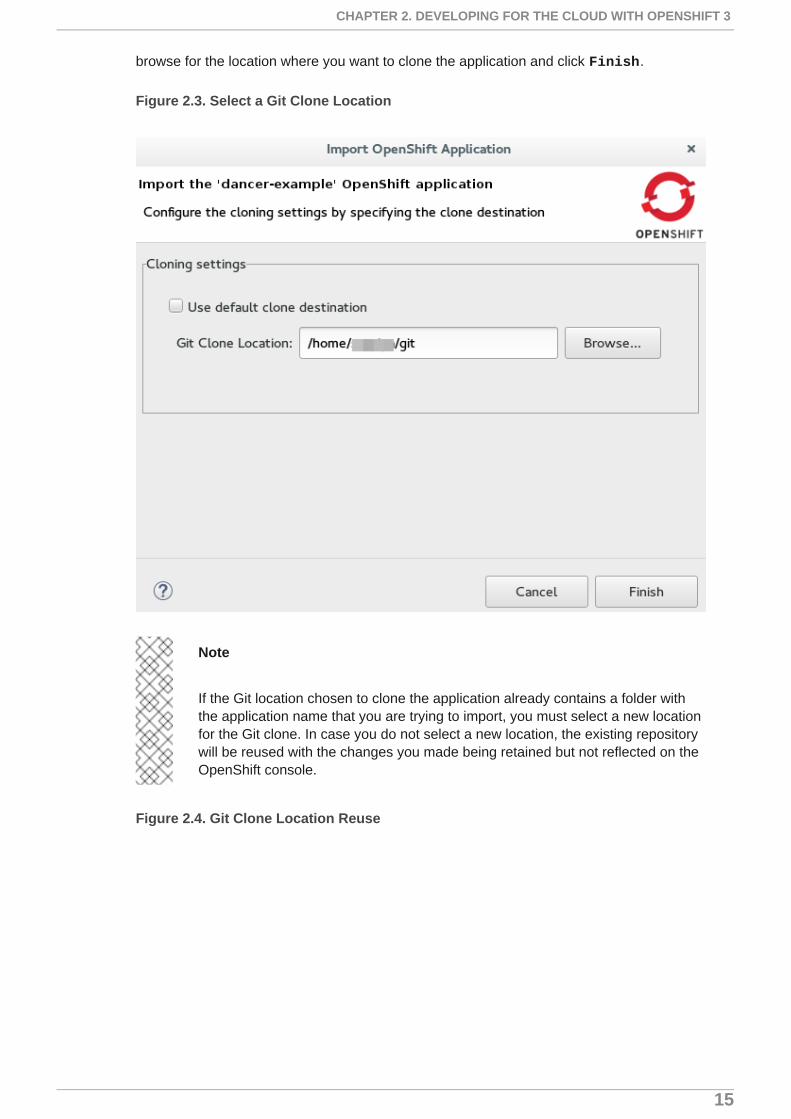
Note
If the Git location chosen to clone the application already contains a folder withthe application name that you are trying to import, you must select a new locationfor the Git clone. In case you do not select a new location, the existing repositorywill be reused with the changes you made being retained but not reflected on theOpenShift console.
Figure 2.4. Git Clone Location Reuse
CHAPTER 2. DEVELOPING FOR THE CLOUD WITH OPENSHIFT 3
15

Result: The application appears in the Project Explorer view.
2.1.4. Import an Existing OpenShift 3 Application into the IDE
Note
Only an application that has its source specified in the build config file can beimported in the workspace.
Applications associated with your OpenShift account(s) are listed in the OpenShift Explorerview. The source code for these applications can be individually imported into the IDE using theOpenShift tools Import OpenShift Application wizard. Once imported, the user can easilymodify the application source code, as required, build the application and view it in a web browser.
To import an existing OpenShift 3 application as a new project in the existing IDE workspace:
1. If required, sign into your OpenShift server using the Basic protocol or the OAuth protocol.
2. In the OpenShift Explorer view, expand the connection to locate the application toimport.
3. Right-click {project name} and click Import Application.
Red Hat JBoss Developer Studio 10.1 Getting Started with Container and Cloud-based Development
16
Note
To import a particular application from a service, right-click the service and thenclick Import Application. If you right-click a project and click Import Application, and if there are more than one build configs with source codeunder a project, you will be prompted to select the desired application for importbecause of existence of several applications under one project.
4. In the Import OpenShift Application wizard, Existing Build Configs list, clickthe application that you want to import and click Next.
5. Ensure the location in the Git Clone Destination field corresponds to where you wantto make a local copy of the OpenShift application Git repository and click Finish.
Result: The application is listed in the Project Explorer view.
2.1.5. Deploy an Application Using the Server Adapte
The server adapter allows incremental deployment of applications directly into the deployed pods onOpenShift.
To deploy an application:
1. In the OpenShift Explorer view, expand the connection, the project, and then theapplication.
2. Right-click the and click Server Adapter. In the Server Settings window, Servicessection, select the service.
Note
A workspace project will be selected automatically, if the OpenShift service has aBuild Config with a git URL matching the git remote URL of one of the workspaceprojects.
3. Click Finish.
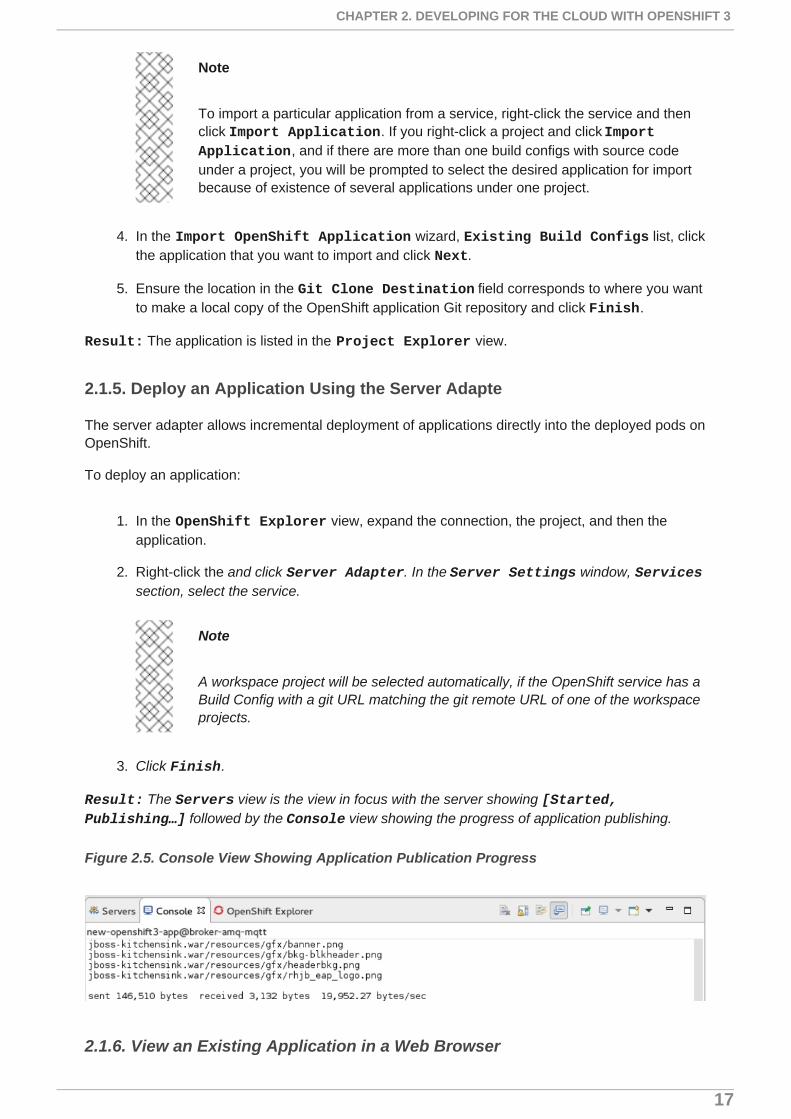
Result: The Servers view is the view in focus with the server showing [Started, Publishing…] followed by the Console view showing the progress of application publishing.
Figure 2.5. Console View Showing Application Publication Progress
2.1.6. View an Existing Application in a Web Browser
CHAPTER 2. DEVELOPING FOR THE CLOUD WITH OPENSHIFT 3
17
To view an application in the internal web browser, after it has been successfully deployed, in the OpenShift Explorer view, right-click the application, and click Show In → Web browser.
Result: The application displays in the built-in web browser.
2.1.7. Delete an OpenShift Project
You may choose to delete a project from the workspace to make a fresh start in project developmentor after you have concluded development in a project. All resources associated with a project getdeleted when the project is deleted.
To delete an OpenShift 3 project:
1. In the OpenShift Explorer view, expand the connection and then the project to locatethe application you want to delete.
2. Right-click {project name} and click Delete Project.
3. In the OpenShift resource deletion window, click OK.
Note
To delete more than one project (and the containing applications), in the OpenShift Explorer view, click the project to select it and while holding the Control key selectanother project that you want to delete and then press Delete.
2.1.8. Did You Know
Scale the project deployment, using the context menu for the service (the first node below theproject). You can also scale the deployment from the Properties tab of a deployment(replication controller) and deploymentconfig.
View the rsync output in the Console view. You can also see the progress of the file transferafter you publish local changes to OpenShift.
2.2. SETTING UP AND REMOTELY MONITORING AN OPENSHIFTAPPLICATION
In some scenarios, the user may already have a remote instance of OpenShift 3 running withvarious applications on it and wants to monitor it. The IDE allows users to set up a connection to aremote instance of OpenShift 3 and then use logs (such as the application and build logs) totroubleshoot and monitor running applications. Use the following tasks to connect to and work with aremote OpenShift instance:
1. Set up OpenShift Client Binaries
2. Set up Port Forwarding
3. Stream Pod Logs
4. Stream Build Logs
Red Hat JBoss Developer Studio 10.1 Getting Started with Container and Cloud-based Development
18
2.2.1. Set up OpenShift Client Binaries
Before setting up port forwarding or streaming application and build logs, it is mandatory to set upOpenShift Client Binaries as follows:
1. In the IDE, click Windows → Preferences → JBoss Tools → OpenShift v3.
2. Click the here link.
3. In the Download from GitHub section, click the Release page link.
4. Scroll to the Downloads section and click the appropriate link to begin the client toolsdownload for the binary for your operating system.
5. After the download is complete, extract the contents of the file.
6. Click Windows → Preferences → JBoss Tools → OpenShift v3.
7. Click Browse and select the location of the OpenShift Client executable file.
8. Click Apply and then click OK.
Result: OpenShift Client Binaries are now set up for your IDE.
2.2.2. Set up Port Forwarding
Using the Application Port Forwarding window, you can connect the local ports to theirremote counterparts to access data or debug the application. Port forwarding automatically stopswhen the OpenShift connection terminates, or when the IDE is shut down or when the workspace ischanged. Port forwarding must be enabled each time to connect to OpenShift from the IDE.
Prerequisite: Ensure that the OpenShift Client Binaries are set up (see Set up OpenShift ClientBinaries for instructions).
Set up port forwarding as follows:
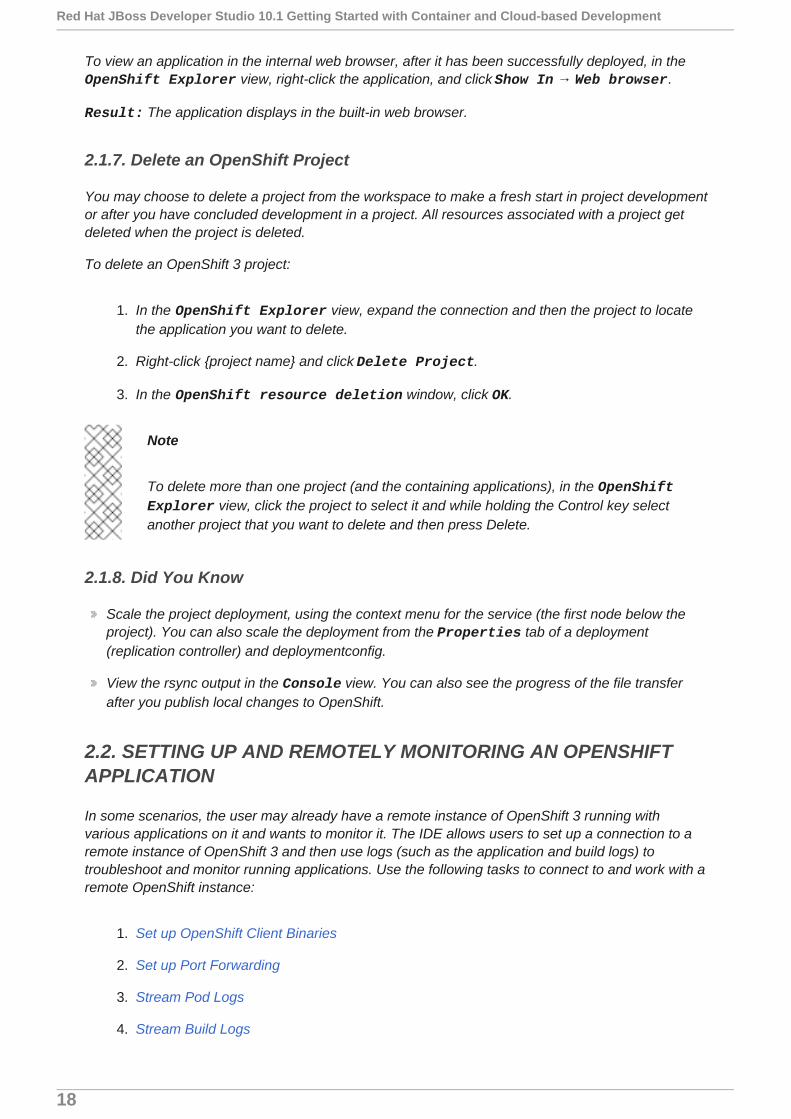
1. In the OpenShift Explorer view, expand the connection and then expand the project,the services, and then the Pods.
2. Right-click the relevant pod and then click Port Forwarding.
Figure 2.6. Set up Port Forwarding
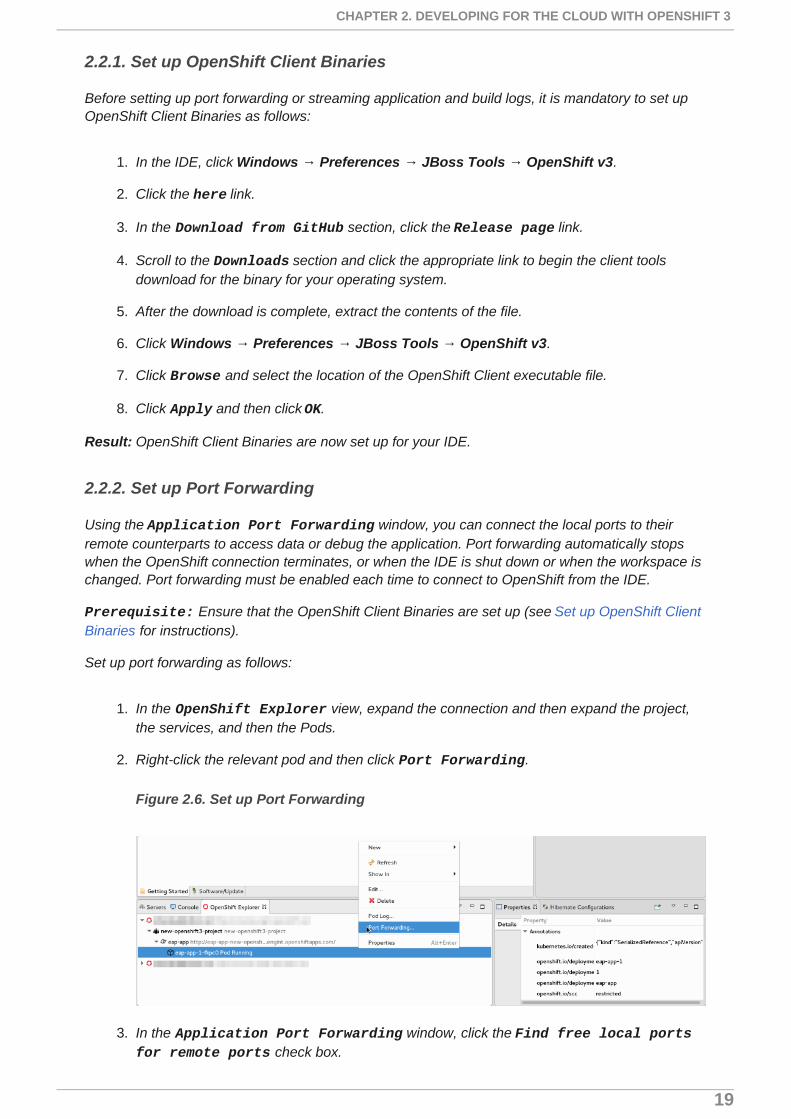
3. In the Application Port Forwarding window, click the Find free local ports for remote ports check box.
CHAPTER 2. DEVELOPING FOR THE CLOUD WITH OPENSHIFT 3
19
4. Click Start All.
Result: The Status column now shows Started, indicating that port forwarding is now active.Additionally, the Console view shows the status of port forwarding for the particular service.
Figure 2.7. Start Port Forwarding
2.2.3. Stream Pod Logs
Pod logs are general logs for an application running on a remote OpenShift 3 instance. Thestreaming application logs feature in the IDE is used to monitor applications and use the previouspod log to troubleshoot if the application fails or returns errors.
Prerequisite: Ensure that the OpenShift Client Binaries are set up (see Set up OpenShift ClientBinaries for instructions).
To stream the application logs:
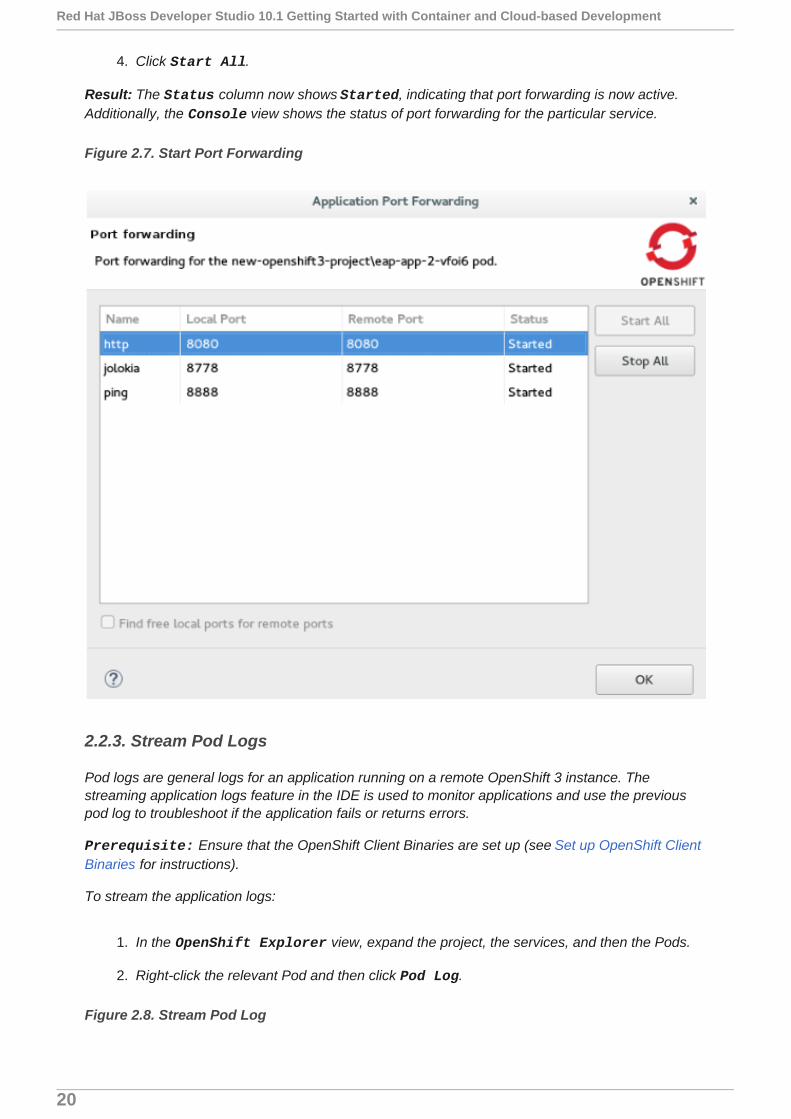
1. In the OpenShift Explorer view, expand the project, the services, and then the Pods.
2. Right-click the relevant Pod and then click Pod Log.
Figure 2.8. Stream Pod Log
Red Hat JBoss Developer Studio 10.1 Getting Started with Container and Cloud-based Development
20
Result: The Console view displays the Pod log.
2.2.4. Stream Build Logs
Build logs are logs documenting changes to applications running on a remote OpenShift 3 instance.The streaming build logs feature in the IDE is used to view the progress of the application buildprocess and to debug the application.
Prerequisite: Ensure that the OpenShift Client Binaries are set up (see Set up OpenShift ClientBinaries for instructions).
To stream build logs:
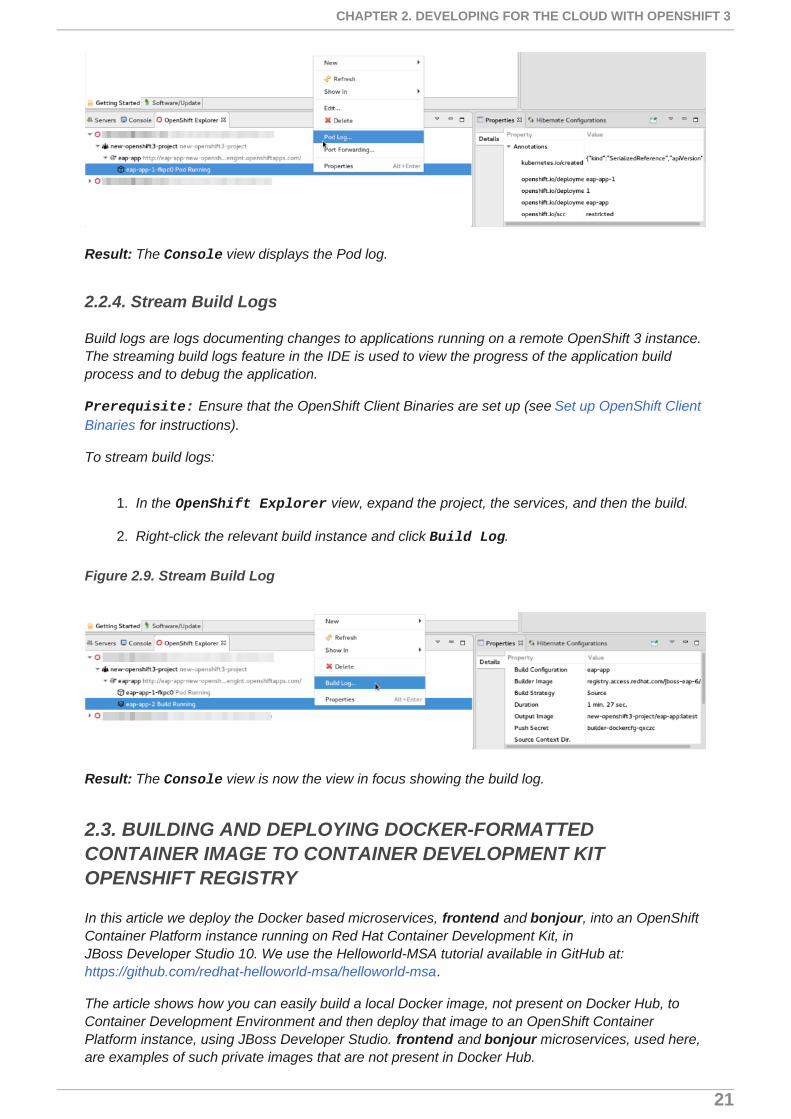
1. In the OpenShift Explorer view, expand the project, the services, and then the build.
2. Right-click the relevant build instance and click Build Log.
Figure 2.9. Stream Build Log
Result: The Console view is now the view in focus showing the build log.
2.3. BUILDING AND DEPLOYING DOCKER-FORMATTEDCONTAINER IMAGE TO CONTAINER DEVELOPMENT KITOPENSHIFT REGISTRY
In this article we deploy the Docker based microservices, frontend and bonjour, into an OpenShiftContainer Platform instance running on Red Hat Container Development Kit, inJBoss Developer Studio 10. We use the Helloworld-MSA tutorial available in GitHub at:https://github.com/redhat-helloworld-msa/helloworld-msa.
The article shows how you can easily build a local Docker image, not present on Docker Hub, toContainer Development Environment and then deploy that image to an OpenShift ContainerPlatform instance, using JBoss Developer Studio. frontend and bonjour microservices, used here,are examples of such private images that are not present in Docker Hub.
CHAPTER 2. DEVELOPING FOR THE CLOUD WITH OPENSHIFT 3
21

To build and deploy a Docker-formatted Container Image to Container Development Kit OpenShiftRegistry:
1. Section 2.3.2, “Install the javascript Modules”
2. Section 2.3.3, “Build the frontend Microservice”
a. Section 2.3.3.1, “Deploy the frontend Microservice”
3. Section 2.3.4, “Connect the frontend and bonjour Microservices”
a. Section 2.3.4.1, “Deploy the bonjour Microservice”
b. Section 2.3.4.2, “Scale the Pod”
4. Section 2.3.5, “Edit the bonjour Microservice”
a. Section 2.3.5.1, “View the Edited bonjour Microservice on the frontendMicroservice”
2.3.1. Prerequisites
1. Install nmp: Before running JBoss Developer Studio, install npm on your system. See thenpm documentation for instructions for various platforms: https://docs.npmjs.com/getting-started/what-is-npm.
2. Download and install JDK 8.
3. Install JBoss Developer Studio and Red Hat Container Development Kit.
a. On a Windows system: Install Red Hat Development Suite to automatically installboth: JBoss Developer Studio and Red Hat Container Development Kit (forinstallation instructions, see https://access.redhat.com/documentation/en/red-hat-development-suite/1.1/paged/installation-guide/).
b. On other operating systems: Install JBoss Developer Studio (for installationinstructions, see: https://access.redhat.com/documentation/en/red-hat-jboss-developer-studio/10.1/paged/installation-guide/) and install Red HatContainer Development Kit (for installation instructions, seehttps://access.redhat.com/documentation/en/red-hat-container-development-kit/2.2/paged/installation-guide/).
4. Clone the following projects and then import them into JBoss Developer Studio using theImport wizard (from File > Open Projects from File System).
a. bonjour project from: https://github.com/redhat-helloworld-msa/bonjour
b. frontend project from: https://github.com/redhat-helloworld-msa/frontend
5. Set up the oc client binaries in the IDE from Window > Preferences, expand JBoss Tools,and then click OpenShift 3.
2.3.2. Install the javascript Modules
Red Hat JBoss Developer Studio 10.1 Getting Started with Container and Cloud-based Development
22
To download and install all the required javascript modules:
1. In the Project Explorer view, expand frontend and right-click package.json.
2. Click Run As > npm Install to download and install the required javascript modules in theproject.
Result: After the build is complete, a new node_modules folder is listed under the project in theProject Explorer view.
2.3.3. Build the frontend Microservice
In this section we build the frontend microservice which is the landing page for the application beingbuilt. The frontend microservice calls other microservices (bonjour, in this case) and displays theresults from these calls.
To build the Docker-formatted Container image:
1. In the Project Explorer view, expand frontend and right-click Dockerfile and then clickRun As > Docker Image Build.
2. In the Docker Image Build Configuration window:
a. In the Connection list, select Container Development Environment.
b. In the Repository Name field, type demo/frontend.
3. Click OK.
Result: The Docker-formatted Container image starts building against the Docker Daemon runningin the Container Development Environment.
2.3.3.1. Deploy the frontend Microservice
After the build is complete, the Docker-formatted Container image demo/frontend is available in theDocker Explorer under Container Development Environment.
To deploy the frontend microservice:
1. In the Docker Explorer view, Container Development Environment > Images, right-clickdemo/frontend and click Deploy to OpenShift.
2. In the Deploy an Image window, click New.
3. In the Create OpenShift Project window:
a. In the Project Name field, type the name of the new project, demo.
b. Optionally, in the Display Name and Description fields, enter the required details.
c. Click OK.
4. In the Deploy an Image window, click the Push Image to Registry check box and clickNext.
CHAPTER 2. DEVELOPING FOR THE CLOUD WITH OPENSHIFT 3
23
5. In the Deployment Configuration & Scalability window, change the following environmentvariables:
a. Click OS_PROJECT to open the Environment Variable window and in the Valuefield, type demo (from step 5) and click OK.
6. In the Deployment Configuration & Scalability window, click Next and then click Finish.After the Docker-formatted Container image is pushed to the Docker Registry on OpenShiftContainer Platform, the Eclipse plugin generates all the required OpenShift ContainerPlatform resources for the application to run.
7. In the Deploy Image to OpenShift window, review the details of deploying the image andclick OK.
8. In the OpenShift Explorer view, expand the connection > > Service > Pod to see the Podrunning. Right-click the Pod and click Pod Log. The Console view shows thefrontend service running. In the OpenShift Explorer view, expand the application andright-click the service and click Show In > Web Browser.
Result: The frontend microservice, in the Bonjour Service shows: Error getting value fromservice <microservice> meaning the bonjour microservice must be connected.
2.3.4. Connect the frontend and bonjour Microservices
In this section we build the bonjour microservice and then view it on the frontendmicroservice. The bonjour microservice is a simple node.js application that returns thestring bonjour-de-<pod_ID>.
To connect the Microservices:
1. In the Project Explorer view, expand bonjour and right-click package.json.
2. Click Run As > npm Install.
3. In the Project Explorer view, expand bonjour and right-click Dockerfile.
4. Click Run As > Docker Image Build.
5. In the Docker Image Build Configuration window:
a. In the Connectio*n list, select *Container Development Environment.
b. In the Repository Name field, type demo/bonjour.
6. Click OK.
2.3.4.1. Deploy the bonjour Microservice
You can either deploy the Docker-formatted Container image from the Docker Explorer (asdone in step 3 of the Building a Docker-formatted Container Image section above), or in thefollowing way from the OpenShift Explorer view:
1. In the OpenShift Explorer view, right-click the project (demo), and click DeployDocker Image.
Red Hat JBoss Developer Studio 10.1 Getting Started with Container and Cloud-based Development
24
2. In the Deploy an Image window:
a. In the Docker Connection list, click the Docker connection.
b. In the Image Name field, type demo/bonjour.
c. Click the Push Image to Registry check box.
3. Click Next.
4. In the Deployment Configuration & Scalability window, click Next.
5. In the Services and Routing Settings window, click Finish.
6. In the Deploy Image to OpenShift window, click OK.
2.3.4.2. Scale the Pod
To see the bonjour service with the Pod running:
1. In the OpenShift Explorer view, expand the application name (demo).
2. Right-click the pod and click Pod Log to check if the pod is running.
3. Navigate to the browser where you have the application running and click RefreshResults. You will see a greeting from the bonjour service with a hostname thatmatches the Pod name in the OpenShift Explorer view.
4. In the OpenShift Explorer view, right-click the service and click Scale > Up. You nowhave two Pods running on OpenShift Container Platform.
Result: Navigate to the browser and click Refresh Results to see the service balancingbetween the two Pods.
2.3.5. Edit the bonjour Microservice
In this section we edit the bonjour microservice and then view the results on the frontendmicroservice.
To edit the bonjour microservice:
1. In the Project Explorer view, expand bonjour, and double-click bonjour.js to open itin the default editor.
2. Find
function say_bonjour(){ Return “Bonjour de “ + os.hostname();
3. Change it to:
function say_bonjour(){ Return “Salut de “ + os.hostname();
4. Save the file.
CHAPTER 2. DEVELOPING FOR THE CLOUD WITH OPENSHIFT 3
25
2.3.5.1. View the Edited bonjour Microservice on the frontend Microservice
After you have edited the bonjour microservice:
1. In the Project Explorer view, expand bonjour, and right-click Dockerfile.
2. Click Run As > Docker Image Build.
Note
Here, the Docker run configuration, the connection, and the repositoryname used earlier are being reused. To edit the configuration, open the RunConfiguration window.
After the Console view shows that the Docker-formatted Container image has beensuccessfully pushed to the Docker Daemon:
3. In the Docker Explorer view, expand Container Development Environment > Images.
4. Right-click the image and click Deploy to OpenShift.
5. In the Deploy an Image window, click Push Image to Registry and then click Next.
6. In the Deployment Configuration & Scalability window, click Finish. The OpenShiftExplorer view, under bonjour shows the Pods being added and then running.Navigate to the browser and click Refresh Results.
Result: The new greeting appears.
2.3.6. Troubleshooting
2.3.6.1. No Docker Connection Available
Error message: No Docker Connection available to build the image.
Issue: You have installed JBoss Developer Studio through Red Hat Development Suite andyou must start Red Hat Container Development Kit for it to be available. Resolution:
1. In the Servers view, right-click Container Development Environment and click Start.
2. Enter your credentials in the box provided.
If, after doing this the Container Development Environment does not start and you get thefollowing error: Error message: Server Container Development Environment failed to start.
On the command prompt, cd to cdk/components/rhel/rhel-ose and run the vagrantdestroy command. After it is destroyed, run the vagrant up command. In the IDE, in theServers view, right-click Container Development Environment and click Start once again.
Red Hat JBoss Developer Studio 10.1 Getting Started with Container and Cloud-based Development
26
CHAPTER 3. DEVELOPING FOR THE CLOUD WITHOPENSHIFT 2
3.1. CREATING YOUR FIRST OPENSHIFT ONLINE APPLICATION
OpenShift Tools provides an all-in-one New OpenShift Application wizard for creatingnew OpenShift applications from templates and existing projects. This wizard is the startingpoint for creating all new OpenShift Online applications from the IDE and also for importingOpenShift Online applications to your workspace.
The New OpenShift Application wizard is an ideal starting point for new users toOpenShift and OpenShift Tools as it guides you through all the steps necessary to set up theIDE to use your OpenShift Online account and configure your account ready for applications.
The instructions here demonstrate how to use this wizard and a default OpenShiftapplication template to create a basic OpenShift Online application. This includes one-timesteps, such as signing up for an OpenShift Online account, creating an OpenShift Onlinedomain and uploading SSH keys. If you have previously used OpenShift Online or OpenShiftTools, you can omit unnecessary one-time steps as appropriate.
3.1.1. Start the New OpenShift Application Wizard
1. In JBoss Central, under Start from scratch, click OpenShift Application.
3.1.2. Sign up for an OpenShift Online Account
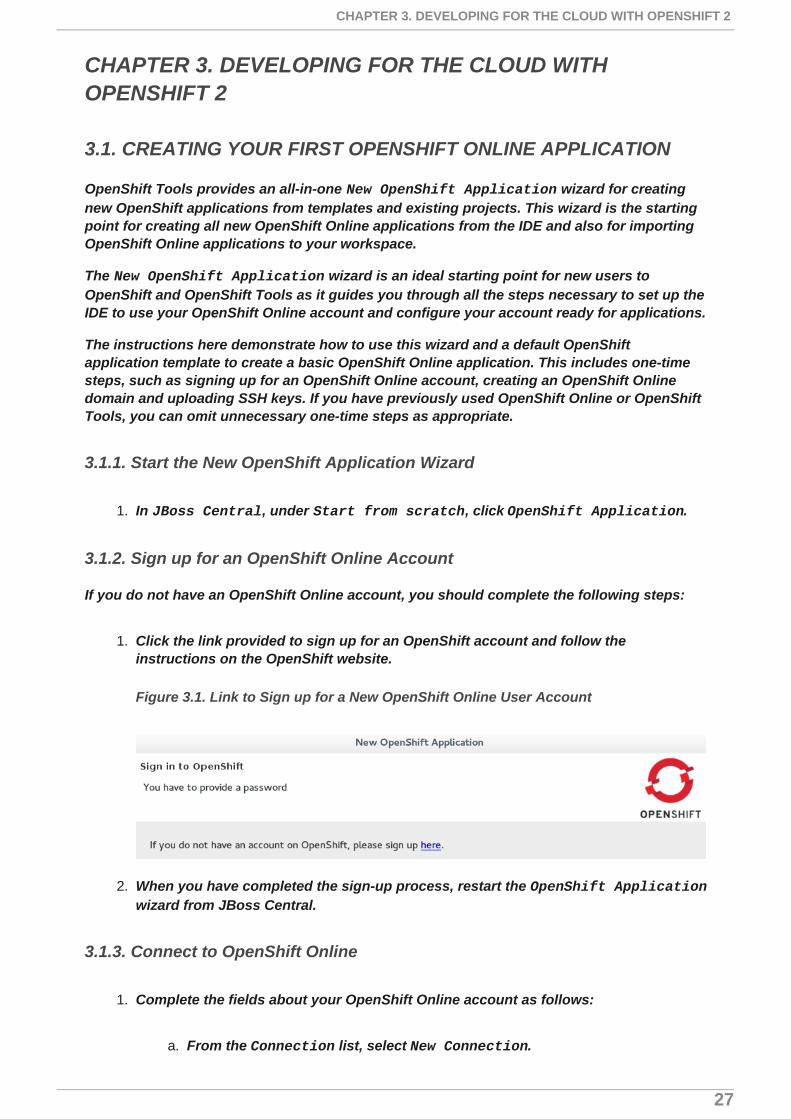
If you do not have an OpenShift Online account, you should complete the following steps:
1. Click the link provided to sign up for an OpenShift account and follow theinstructions on the OpenShift website.
Figure 3.1. Link to Sign up for a New OpenShift Online User Account
2. When you have completed the sign-up process, restart the OpenShift Applicationwizard from JBoss Central.
3.1.3. Connect to OpenShift Online
1. Complete the fields about your OpenShift Online account as follows:
a. From the Connection list, select New Connection.
CHAPTER 3. DEVELOPING FOR THE CLOUD WITH OPENSHIFT 2
27
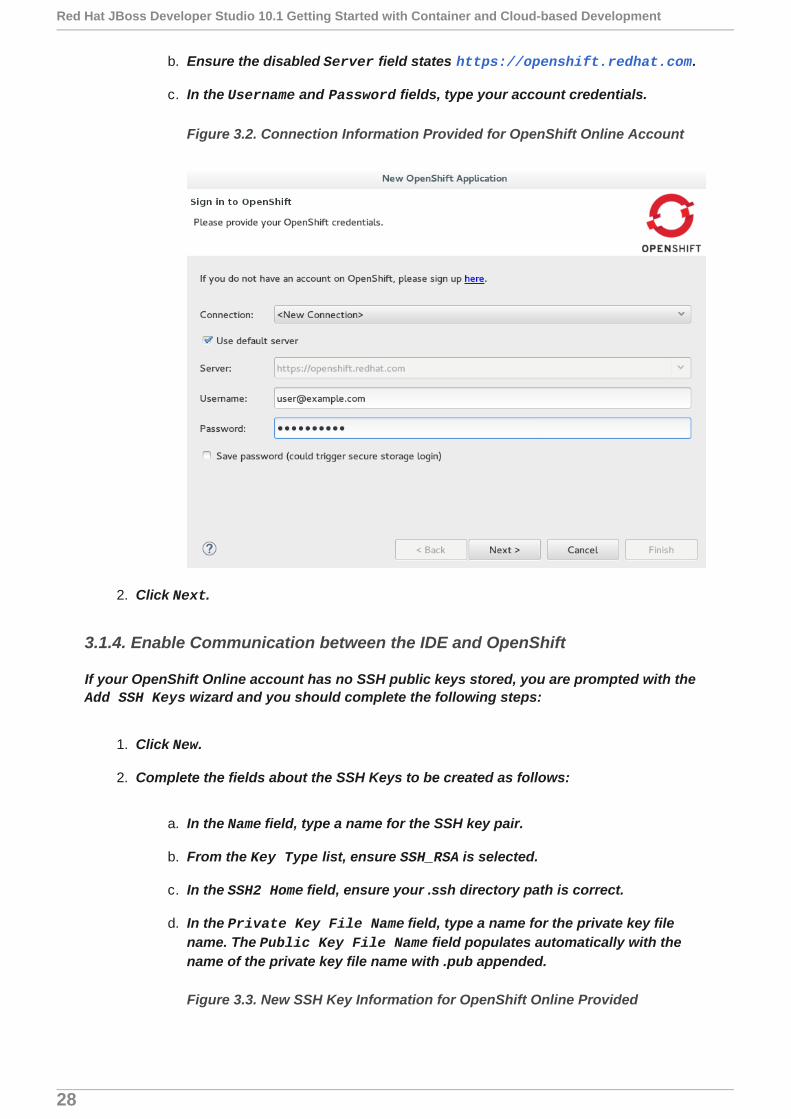
b. Ensure the disabled Server field states https://openshift.redhat.com.
c. In the Username and Password fields, type your account credentials.
Figure 3.2. Connection Information Provided for OpenShift Online Account
2. Click Next.
3.1.4. Enable Communication between the IDE and OpenShift
If your OpenShift Online account has no SSH public keys stored, you are prompted with the Add SSH Keys wizard and you should complete the following steps:
1. Click New.
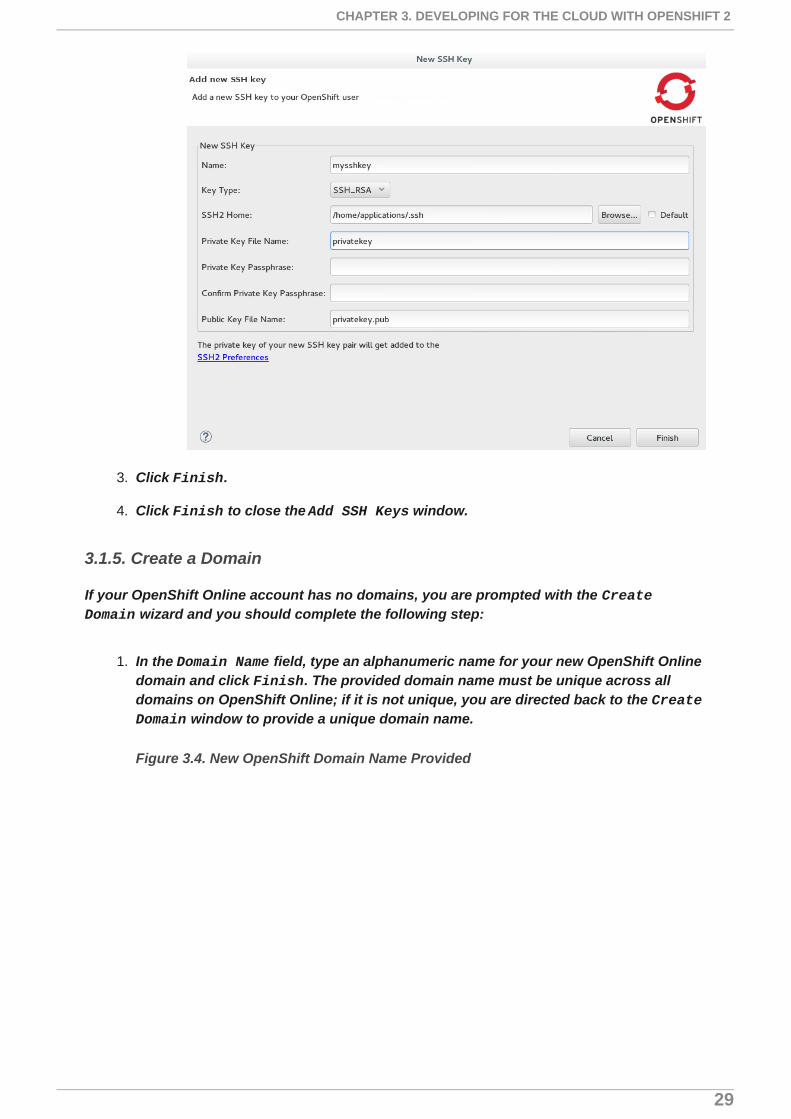
2. Complete the fields about the SSH Keys to be created as follows:
a. In the Name field, type a name for the SSH key pair.
b. From the Key Type list, ensure SSH_RSA is selected.
c. In the SSH2 Home field, ensure your .ssh directory path is correct.
d. In the Private Key File Name field, type a name for the private key filename. The Public Key File Name field populates automatically with thename of the private key file name with .pub appended.
Figure 3.3. New SSH Key Information for OpenShift Online Provided
Red Hat JBoss Developer Studio 10.1 Getting Started with Container and Cloud-based Development
28
3. Click Finish.
4. Click Finish to close the Add SSH Keys window.
3.1.5. Create a Domain
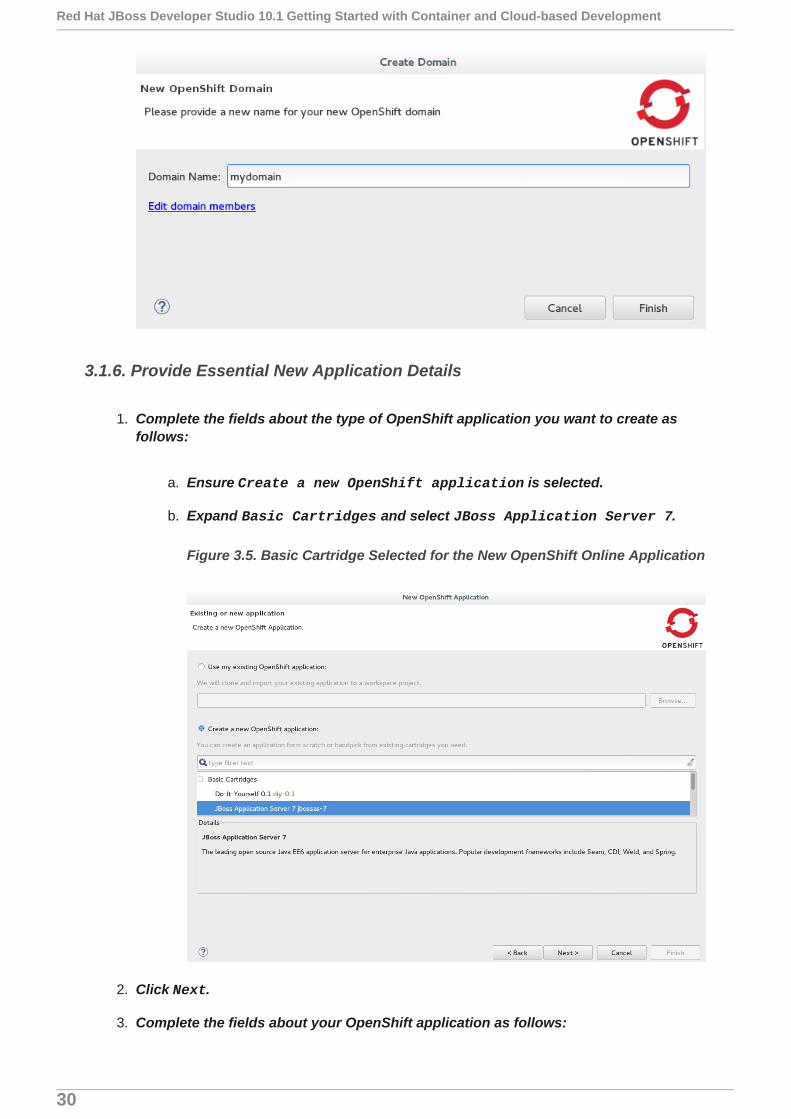
If your OpenShift Online account has no domains, you are prompted with the Create Domain wizard and you should complete the following step:
1. In the Domain Name field, type an alphanumeric name for your new OpenShift Onlinedomain and click Finish. The provided domain name must be unique across alldomains on OpenShift Online; if it is not unique, you are directed back to the Create Domain window to provide a unique domain name.
Figure 3.4. New OpenShift Domain Name Provided
CHAPTER 3. DEVELOPING FOR THE CLOUD WITH OPENSHIFT 2
29
3.1.6. Provide Essential New Application Details
1. Complete the fields about the type of OpenShift application you want to create asfollows:
a. Ensure Create a new OpenShift application is selected.
b. Expand Basic Cartridges and select JBoss Application Server 7.
Figure 3.5. Basic Cartridge Selected for the New OpenShift Online Application
2. Click Next.
3. Complete the fields about your OpenShift application as follows:
Red Hat JBoss Developer Studio 10.1 Getting Started with Container and Cloud-based Development
30
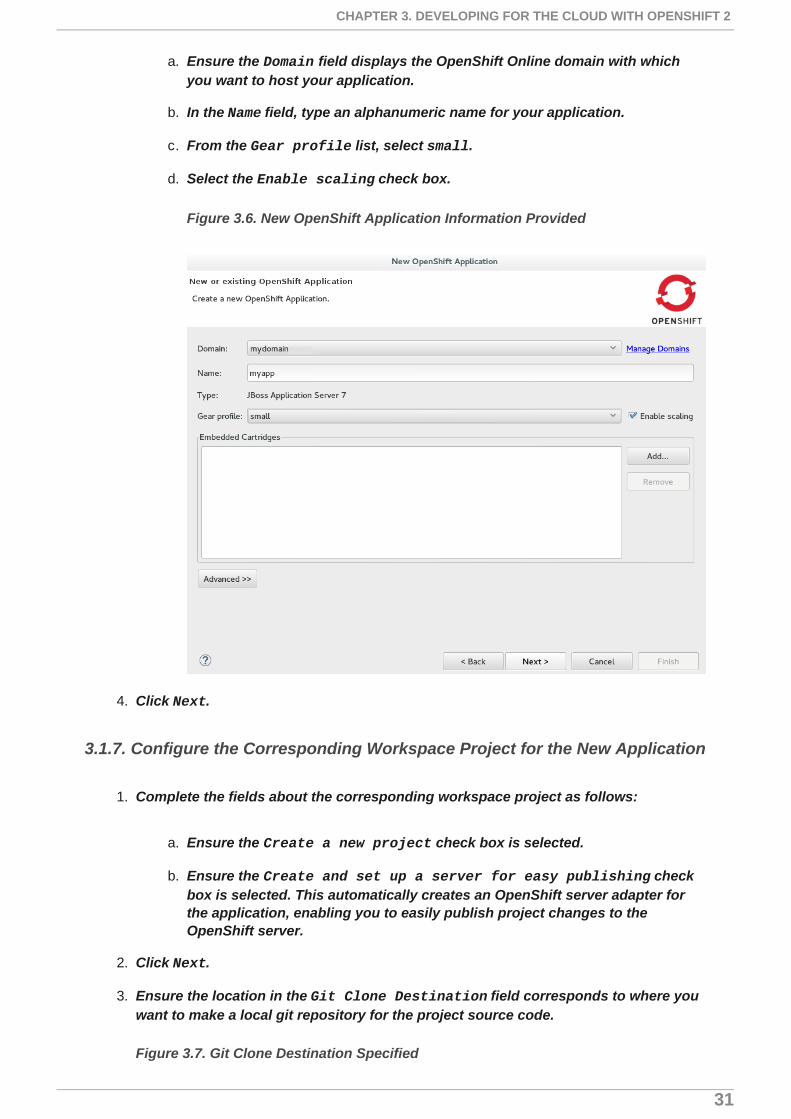
a. Ensure the Domain field displays the OpenShift Online domain with whichyou want to host your application.
b. In the Name field, type an alphanumeric name for your application.
c. From the Gear profile list, select small.
d. Select the Enable scaling check box.
Figure 3.6. New OpenShift Application Information Provided
4. Click Next.
3.1.7. Configure the Corresponding Workspace Project for the New Application
1. Complete the fields about the corresponding workspace project as follows:
a. Ensure the Create a new project check box is selected.
b. Ensure the Create and set up a server for easy publishing checkbox is selected. This automatically creates an OpenShift server adapter forthe application, enabling you to easily publish project changes to theOpenShift server.
2. Click Next.
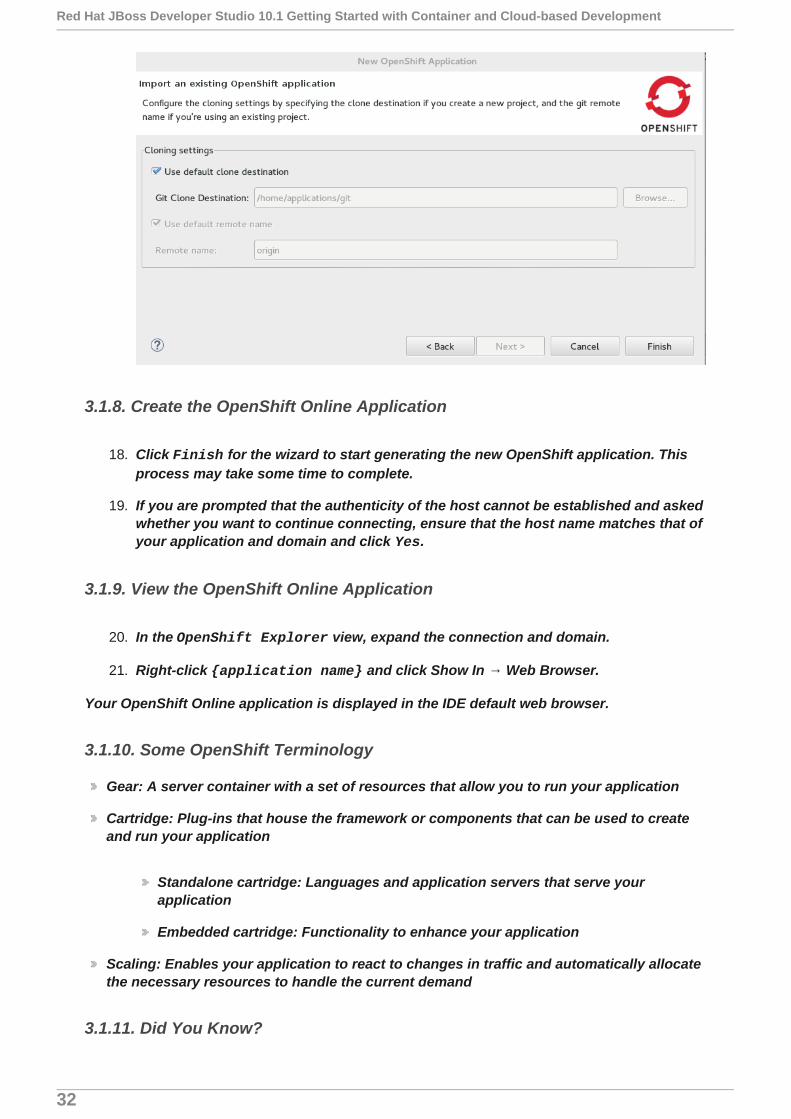
3. Ensure the location in the Git Clone Destination field corresponds to where youwant to make a local git repository for the project source code.
Figure 3.7. Git Clone Destination Specified
CHAPTER 3. DEVELOPING FOR THE CLOUD WITH OPENSHIFT 2
31
3.1.8. Create the OpenShift Online Application
18. Click Finish for the wizard to start generating the new OpenShift application. Thisprocess may take some time to complete.
19. If you are prompted that the authenticity of the host cannot be established and askedwhether you want to continue connecting, ensure that the host name matches that ofyour application and domain and click Yes.
3.1.9. View the OpenShift Online Application
20. In the OpenShift Explorer view, expand the connection and domain.
21. Right-click {application name} and click Show In → Web Browser.
Your OpenShift Online application is displayed in the IDE default web browser.
3.1.10. Some OpenShift Terminology
Gear: A server container with a set of resources that allow you to run your application
Cartridge: Plug-ins that house the framework or components that can be used to createand run your application
Standalone cartridge: Languages and application servers that serve yourapplication
Embedded cartridge: Functionality to enhance your application
Scaling: Enables your application to react to changes in traffic and automatically allocatethe necessary resources to handle the current demand
3.1.11. Did You Know?
Red Hat JBoss Developer Studio 10.1 Getting Started with Container and Cloud-based Development
32
You can also start the New OpenShift Application wizard from the OpenShift Explorer view by right-clicking a connection, domain or existing application andclicking New → Application or from the IDE main menus by clicking File → New →OpenShift Application.
To save time when logging in to OpenShift Online in future, you can click the Save Password check box in the Sign in to OpenShift window. The password is retainedin secure storage provided by the IDE and automatically populates the Password field forthe associated connection.
Using the New OpenShift Application wizard, you can also create a new OpenShiftapplication from an existing workspace project or a Git source.
Each time you start the IDE or switch workspaces the IDE is initially disconnected fromOpenShift. When you attempt to complete an action that requires an active OpenShiftconnection, you are automatically prompted to reconnect.
3.2. DEVELOPING AN EXISTING OPENSHIFT APPLICATION
OpenShift Tools enables you to import existing OpenShift Online applications into the IDE sothat you can take advantage of the IDE features in further developing your applications. Asillustrated in this article, during the import process you can configure the IDE for easyrepublishing to OpenShift Online.
The instructions here demonstrate how to complete the following tasks:
1. Import an Existing OpenShift Online Application
2. Modify the Application Source Code
3. Republish the Modified Application
4. View the Modified Application
3.2.1. Import an Existing OpenShift Online Application
Applications associated with your OpenShift Online account(s) are listed in the OpenShift Explorer view. The source code for these applications can be individually imported into theIDE using the OpenShift Tools Import OpenShift Application wizard.
To import an existing OpenShift Online application as a new project in the existing IDEworkspace, complete the following steps:
1. In the OpenShift Explorer view, ensure your OpenShift Online connection is listed
or click the Connection icon and complete your OpenShift Online accountdetails to create a new connection.
2. In the OpenShift Explorer view, expand the connection and domain to locate theapplication you want to import.
3. Right-click {application name} and click Import Application.
4. Complete the fields about the application to be imported as follows:
CHAPTER 3. DEVELOPING FOR THE CLOUD WITH OPENSHIFT 2
33

a. Ensure that Use my existing OpenShift application is selected.
b. Ensure that the name of the application you want to import is listed. If this isnot the case, type the name of the application or click Browse to select theapplication.
Figure 3.8. Existing OpenShift Online Application Information Provided
5. Click Next.
6. Complete the fields about the corresponding new workspace project as follows:
a. Ensure the Create a new project check box is selected.
b. Ensure the Create and set up a server adapter for easy publishing check box is selected.
7. Click Next.
8. Ensure the location in the Git Clone Destination field corresponds to where youwant to make a local copy of the OpenShift Online application Git repository.
9. Ensure a public SSH key is uploaded to OpenShift Online and private key location isspecified in the IDE preferences by clicking SSH Keys Wizard and reviewing theinformation.
10. Click Finish.
Red Hat JBoss Developer Studio 10.1 Getting Started with Container and Cloud-based Development
34
If you are prompted that the authenticity of the host cannot be established and askedwhether you want to continue connecting, ensure that the host name matches that of yourapplication and domain and click Yes.
When the import process is complete, the project is listed in the Project Explorer viewand a server adapter is listed for the application in the Servers view.
OpenShift Tools makes a number of small changes to the application source code on import.It adds several IDE-specific files to the project and modifies the .gitignore file so that youare not prompted about these files each time you commit project changes to the Gitrepository.
3.2.2. Modify the Application Source Code
The files contained in your project depend on the type of project that you have imported.Here a common OpenShift application file, index.html, is changed as an example ofmodifying the project source code. You can opt to change this file or another file of yourproject.
To modify the index.html file, complete the following steps:
1. In the Project Explorer view, expand {project name} → src → main → webapp.
2. Double-click index.html to open it in the JBoss Tools HTML Editor.
3. After the opening <body> tag add the following line:
4. Save the index.html file by pressing Ctrl+S (or Cmd+S).
Note that in the Project Explorer view, index.html has > prepended to show that thesource code has changed since the last Git commit.
3.2.3. Republish the Modified Application
You must commit and push any changes you have made to the project source code and thenrepublish the application before you can see changes reflected in the OpenShift Onlineapplication. As an example of committing and pushing source code changes to theOpenShift Online application repository and republishing the application, here the index.html file changed earlier is used. You can opt to use the project file that you changedearlier.
To commit and push the index.html changes and republish the application to OpenShiftOnline, complete the following steps:
1. In the Servers view, right-click {application name} at OpenShift and click Publish. Or you can drag the from the Project Explorer view and drop it on theserver adapter in the Servers view.
2. Complete the fields about the project changes to commit and push to the OpenShiftOnline application Git repository as follows:
<h1>This is a change made to my OpenShift Online app from the IDE.</h1>
CHAPTER 3. DEVELOPING FOR THE CLOUD WITH OPENSHIFT 2
35

a. In the Commit message field, type the following message
Added new heading in body of index.html
b. In the table of files, ensure the index.html file is selected.
Figure 3.9. Commit Message Provided and Changed Project File Selected
3. Click Commit and Publish.
The republishing process can take some time. When the Console view shows Deployment completed with status: success, the republishing process is complete.
3.2.4. View the Modified Application
After the modified application is republished, you can view the live updated version at theOpenShift Online application URL.
To view the modified OpenShift Online application in the IDE default web browser, completethe following steps:
1. In the OpenShift Explorer view, expand the connection and the domain.
Red Hat JBoss Developer Studio 10.1 Getting Started with Container and Cloud-based Development
36
2. Right-click {application name} and click Show In → Web Browser.
Your modified and republished OpenShift Online application is displayed in the IDE defaultweb browser.
3.2.5. Did You Know?
On the first occasion that you republish your application to OpenShift Online, you may beprompted to provide a username and email address for use by Git. The IDE looks for adefault Git configuration file on your system from which to obtain this information and ifthe IDE cannot find the file it prompts you to provide the values. You can specify thelocation of your system Git configuration file in the IDE Preferences, under Team → Git →Configuration.
You can review the progress of republishing applications to OpenShift Online in the Console view.
You can also open the OpenShift application in a web browser from the Servers view byright-clicking {application name} at OpenShift and clicking Show In → WebBrowser.
You can change the IDE default web browser to be either the IDE internal web browser,BrowserSim (when installed) or an external web browser. Click Window → Web Browserand select from the available web browser options or click Window → Preferences →General → Web Browser to extend the list of available external web browsers.
3.3. CUSTOM PUBLISHING YOUR OPENSHIFT APPLICATION
Through the IDE you can manage your OpenShift Online application beyond simply itssource code. OpenShift Online allows customization of the build and deployment processwith markers and action hooks, each of which can be added to the application configurationfiles using OpenShift Tools and existing IDE functionality. Further, the Git commit and pushprocesses for your changed application source code and configuration files can becustomized through the IDE preferences to meet your needs.
The instructions here demonstrate how to complete the following tasks:
1. Add a Marker to the Application
2. Add an Action Hook to the Application
3. Extend the Git Remote Connection Timeout
4. Republish the Application
3.3.1. Add a Marker to the Application
OpenShift Tools provides the Configure Markers wizard for adding markers to andremoving them from your OpenShift application. The wizard lists markers that are alreadyapplied to your application and those that are available to add given the cartridgeconfiguration of your application. The wizard manages the adding and removing of markersfrom your application, creating or deleting marker files and adding or removing them fromthe Git index respectively.
CHAPTER 3. DEVELOPING FOR THE CLOUD WITH OPENSHIFT 2
37
As an example, here the hot deploy marker is added to the application, which triggersOpenShift to publish application changes without first restarting the application cartridgesand hence making the republishing faster.
To add the hot deploy marker to the application, complete the following steps:
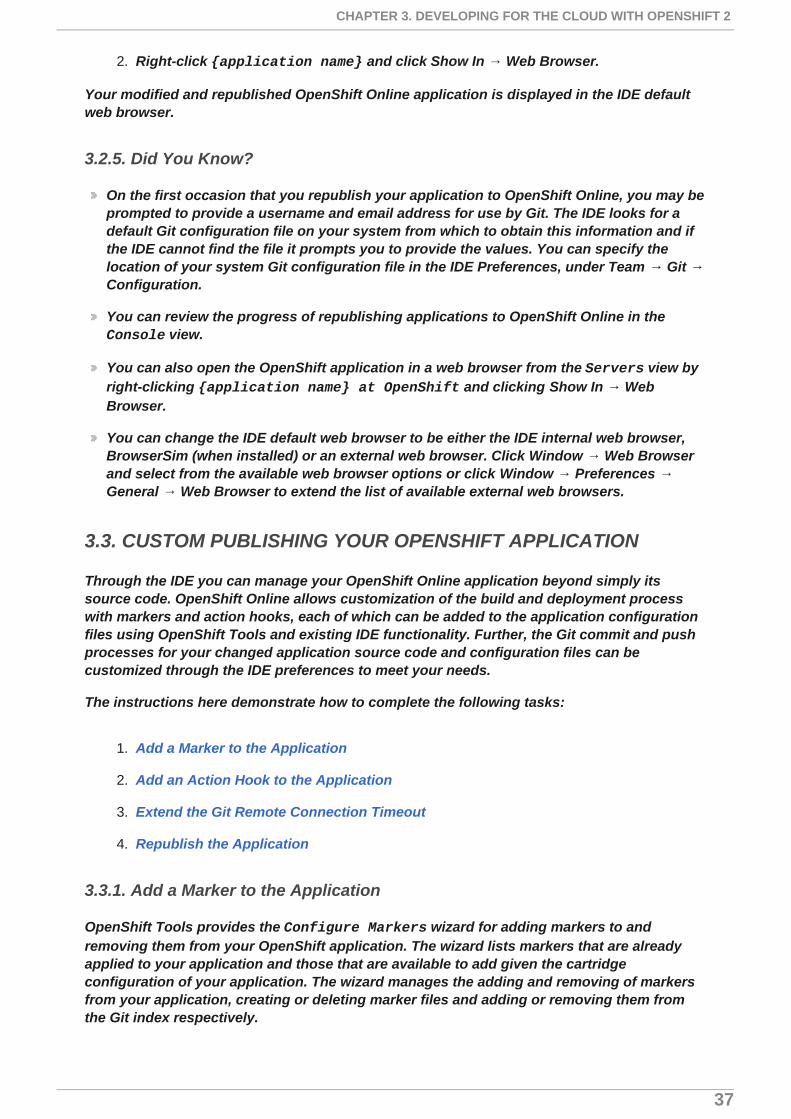
1. In the Project Explorer view, right-click {project name} and click OpenShift →Configure Markers.
2. From the Marker table, select Hot Deploy and click OK.
Figure 3.10. Hot Deploy Marker Selected
An empty .openshift/markers/hot_deploy file is added to the application.OpenShift Tools automatically completes the git add action so that this new file isadded to the Git index and can be committed and pushed to the OpenShiftapplication repository when ready.
3.3.2. Add an Action Hook to the Application
Using IDE features, you can quickly add action hooks to your OpenShift application. Addingan action hook requires creating a script file named according to the phase in which it is torun, locating it in the application .openshift/action_hooks directory, adding the file tothe Git index and ensuring the file is executable by all.
As an example, here a post deploy action hook is added to the application, which triggers asimple bash script to execute on the application main gear after the application is deployed.
To add a post deploy action hook to the application, complete the following steps:
Red Hat JBoss Developer Studio 10.1 Getting Started with Container and Cloud-based Development
38
Create the post deploy action hook
1. In the Navigator view, expand {project name} → .openshift.
2. Right-click action_hooks and click New → File.
3. In the File name field, type post_deploy and click Finish.
4. In the file editor, add the following lines to the post_deploy file:
5. Save the file by pressing Ctrl+S (or Cmd+S).
Make the post deploy action hook executable
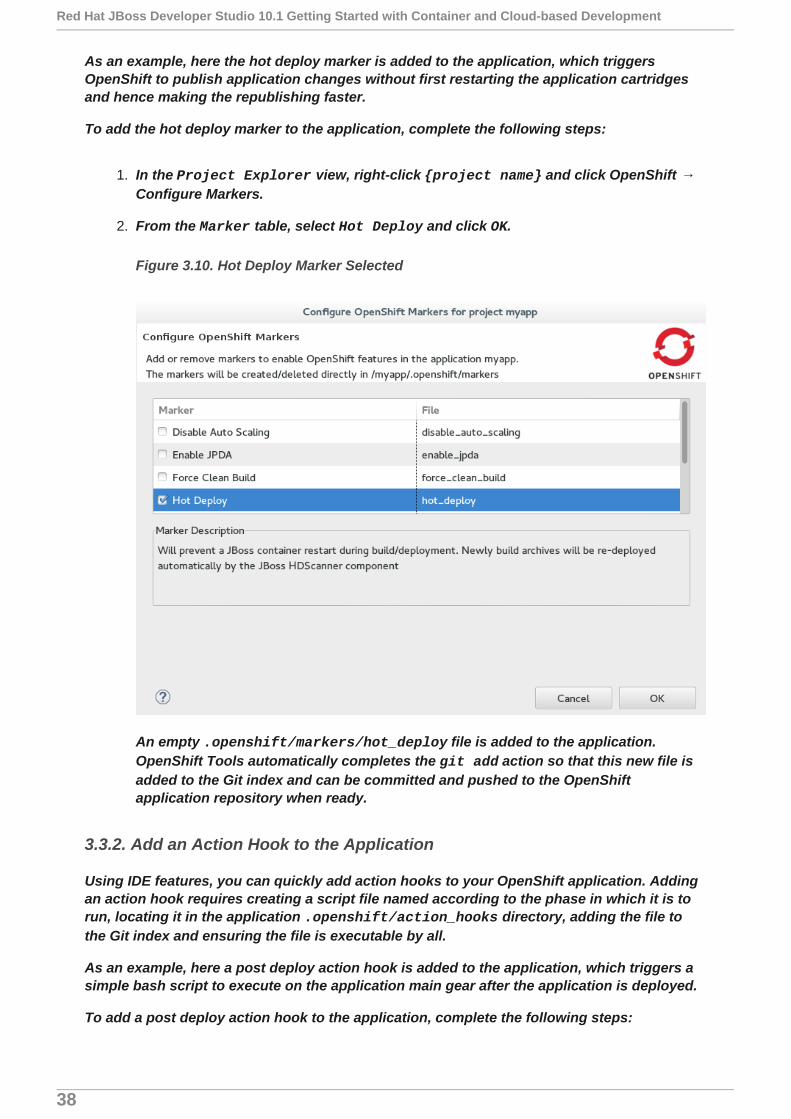
6. In the Navigator view, right-click the post_deploy file and click Properties.
7. In the Permissions table, select the Execute check boxes for all user types.
Figure 3.11. Execute Permissions Check Boxes Selected for All Users
8. Click Apply and click OK.
3.3.3. Extend the Git Remote Connection Timeout
As your application source code grows in size, the remote connection from the IDE to theOpenShift Online application Git repository may not remain open long enough for the pushprocess to complete. The default Git remote connection timeout is set to 30 seconds afterwhich the connection is closed. But you can extend the Git timeout through the IDEpreferences to ensure that the push process is provided with sufficient time to complete.
#!/bin/bashecho "This is my post-deploy bash script”
CHAPTER 3. DEVELOPING FOR THE CLOUD WITH OPENSHIFT 2
39
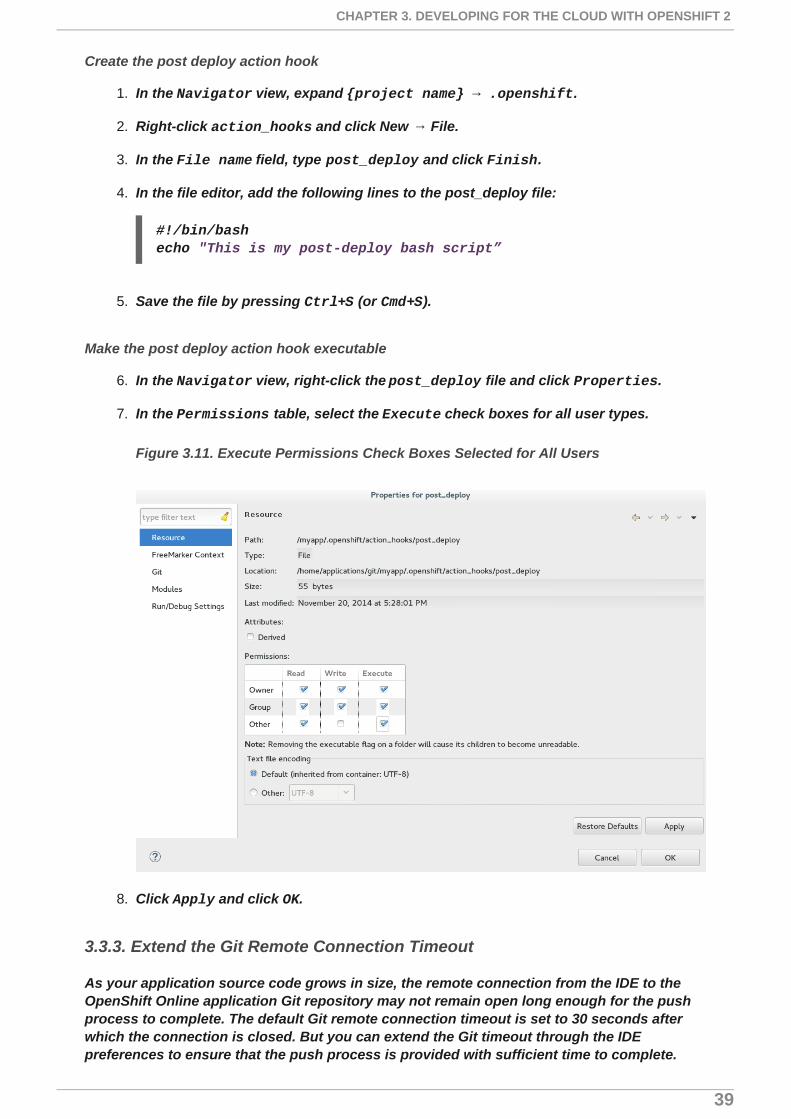
To extend the Git remote connection timeout, complete the following steps:
1. Click Window → Preferences → Team → Git.
2. In the Remote connection timeout (seconds) field, type a value in seconds.
Figure 3.12. Git Remote Connection Timeout Set
3. Click Apply and click OK to close the Preferences window.
3.3.4. Republish the Application
Before markers and action hooks take effect on your application building and deploymentprocess you must commit the files and push changes to the OpenShift applicationrepository. OpenShift Tools assists you to perform these Git actions as part of therepublishing process.
To republish the application, complete the following steps:
1. In the Servers view, right-click {application name} at OpenShift and click Publish.
2. Complete the fields about the application changes to commit and push to theOpenShift Online application repository as follows:
a. In the Commit message field, type the following message:
Added hot_deploy marker and post_deploy bash script
Red Hat JBoss Developer Studio 10.1 Getting Started with Container and Cloud-based Development
40
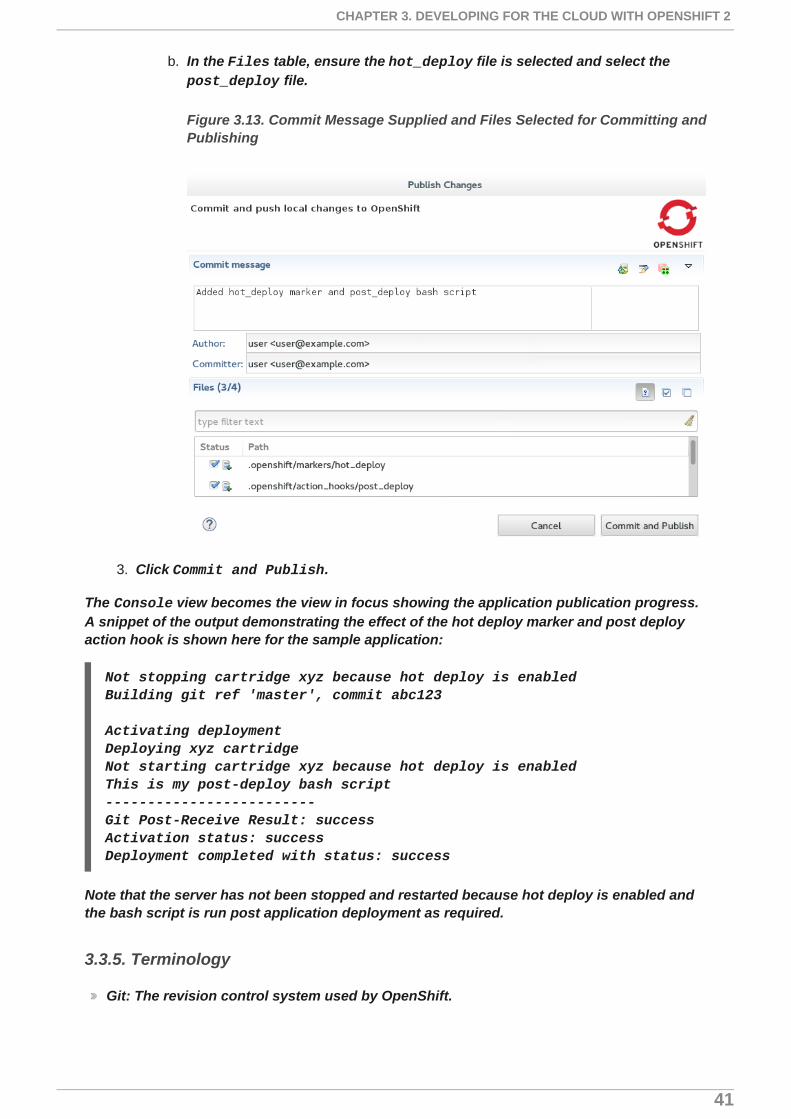
b. In the Files table, ensure the hot_deploy file is selected and select the post_deploy file.
Figure 3.13. Commit Message Supplied and Files Selected for Committing andPublishing
3. Click Commit and Publish.
The Console view becomes the view in focus showing the application publication progress.A snippet of the output demonstrating the effect of the hot deploy marker and post deployaction hook is shown here for the sample application:
Not stopping cartridge xyz because hot deploy is enabledBuilding git ref 'master', commit abc123
Activating deploymentDeploying xyz cartridgeNot starting cartridge xyz because hot deploy is enabledThis is my post-deploy bash script-------------------------Git Post-Receive Result: successActivation status: successDeployment completed with status: success
Note that the server has not been stopped and restarted because hot deploy is enabled andthe bash script is run post application deployment as required.
3.3.5. Terminology
Git: The revision control system used by OpenShift.
CHAPTER 3. DEVELOPING FOR THE CLOUD WITH OPENSHIFT 2
41
Marker: A set-named empty file added in the OpenShift application in the .openshift/markers directory; markers are used to specify configuration to theOpenShift server.
Action hook: A user-specified script that is added to the OpenShift application, in the .openshift/action_hooks directory; scripts are run by OpenShift at specified stagesof the application build and deploy process as denoted by the file name.
3.3.6. Did You Know?
You can also access the Configure Markers wizard from the Server view by right-clicking {application name} at OpenShift and clicking OpenShift → ConfigureMarkers.
You can add files to the Git index at any time by right-clicking the file in, for example, the Navigator view and clicking Team → Add to Index.
You can see more information relating to the application Git repository by opening the Git perspective or individual Git views. All of these can be assessed from the Windowmenu.
3.4. DEBUGGING AN OPENSHIFT JAVA APPLICATION
OpenShift Tools enables you to debug your deployed OpenShift applications within the IDE,enabling you to take advantage of the IDE debugging tools. This article specifically detailsthe steps needed to set up an OpenShift Online Java application for debugging. A number ofconfiguration tasks are required both locally and remotely to enable the IDE debugger toconnect to the OpenShift server and OpenShift Tools for achieving this. Some tasks onlyneed to be completed once for each OpenShift Online application but others must becompleted every time you reconnect to OpenShift Online from the IDE.
Instructions are provided for the following tasks:
1. Configure the OpenShift Application for Debugging
2. Enable Port Forwarding for the Local and Remote Debug Ports
3. Configure and Connect the IDE Debugger
This article guides you through each of these configuration requirements and must becompleted in the given order.
Note
Your application must be deployed on OpenShift before attempting to configure theOpenShift application for debugging and enabling port forwarding.
3.4.1. Configure the OpenShift Application for Debugging
You must first configure your OpenShift application for debugging, which requires settingthe Enable JPDA (Java Platform Debugger Architecture) marker in your application sourcecode and republishing the application. Marker information is retained with the application soyou only need to complete this task once for each OpenShift Online application:
Red Hat JBoss Developer Studio 10.1 Getting Started with Container and Cloud-based Development
42
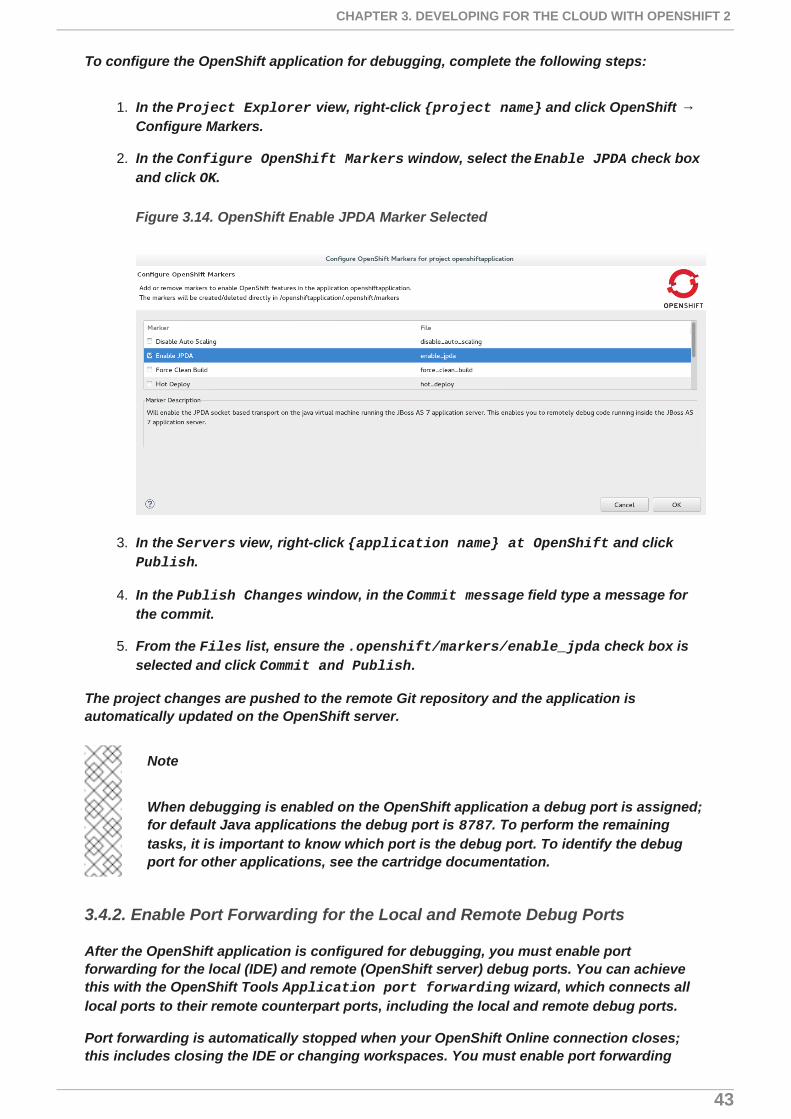
To configure the OpenShift application for debugging, complete the following steps:
1. In the Project Explorer view, right-click {project name} and click OpenShift →Configure Markers.
2. In the Configure OpenShift Markers window, select the Enable JPDA check boxand click OK.
Figure 3.14. OpenShift Enable JPDA Marker Selected
3. In the Servers view, right-click {application name} at OpenShift and click Publish.
4. In the Publish Changes window, in the Commit message field type a message forthe commit.
5. From the Files list, ensure the .openshift/markers/enable_jpda check box isselected and click Commit and Publish.
The project changes are pushed to the remote Git repository and the application isautomatically updated on the OpenShift server.
Note
When debugging is enabled on the OpenShift application a debug port is assigned;for default Java applications the debug port is 8787. To perform the remainingtasks, it is important to know which port is the debug port. To identify the debugport for other applications, see the cartridge documentation.
3.4.2. Enable Port Forwarding for the Local and Remote Debug Ports
After the OpenShift application is configured for debugging, you must enable portforwarding for the local (IDE) and remote (OpenShift server) debug ports. You can achievethis with the OpenShift Tools Application port forwarding wizard, which connects alllocal ports to their remote counterpart ports, including the local and remote debug ports.
Port forwarding is automatically stopped when your OpenShift Online connection closes;this includes closing the IDE or changing workspaces. You must enable port forwarding
CHAPTER 3. DEVELOPING FOR THE CLOUD WITH OPENSHIFT 2
43
every time you reconnect to OpenShift Online from the IDE.
To enable port forwarding, complete the following steps:
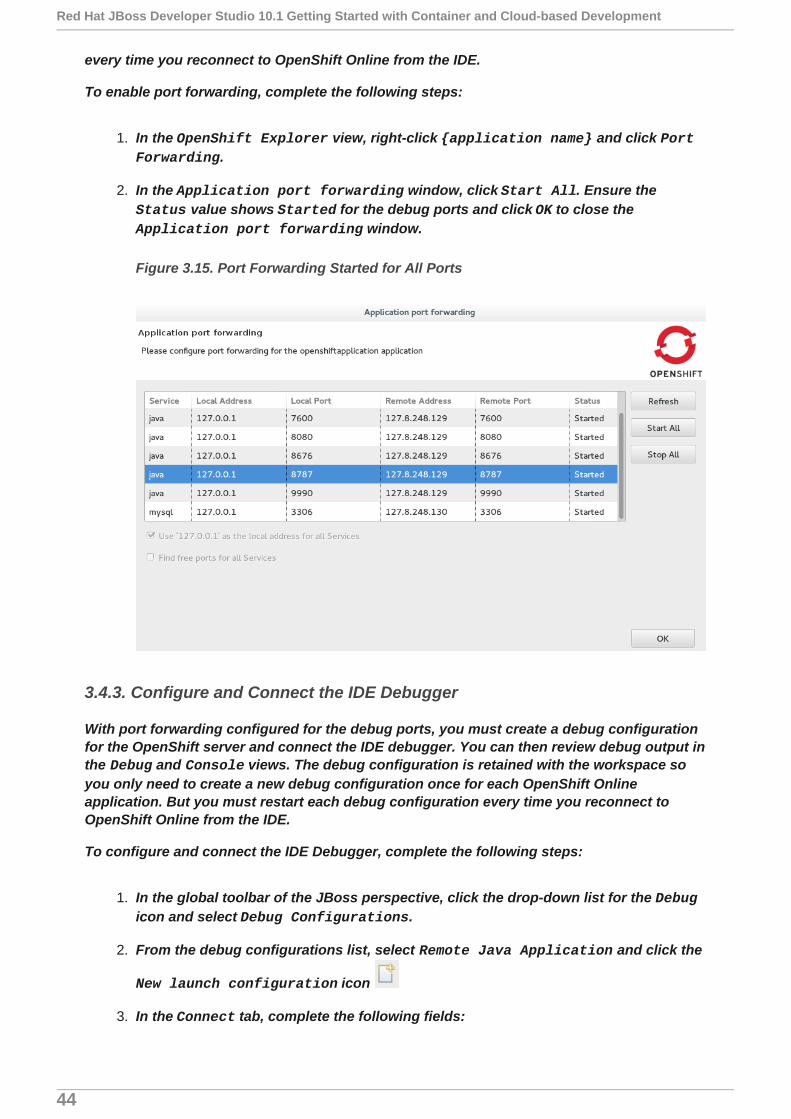
1. In the OpenShift Explorer view, right-click {application name} and click Port Forwarding.
2. In the Application port forwarding window, click Start All. Ensure the Status value shows Started for the debug ports and click OK to close the Application port forwarding window.
Figure 3.15. Port Forwarding Started for All Ports
3.4.3. Configure and Connect the IDE Debugger
With port forwarding configured for the debug ports, you must create a debug configurationfor the OpenShift server and connect the IDE debugger. You can then review debug output inthe Debug and Console views. The debug configuration is retained with the workspace soyou only need to create a new debug configuration once for each OpenShift Onlineapplication. But you must restart each debug configuration every time you reconnect toOpenShift Online from the IDE.
To configure and connect the IDE Debugger, complete the following steps:
1. In the global toolbar of the JBoss perspective, click the drop-down list for the Debugicon and select Debug Configurations.
2. From the debug configurations list, select Remote Java Application and click the
New launch configuration icon
3. In the Connect tab, complete the following fields:
Red Hat JBoss Developer Studio 10.1 Getting Started with Container and Cloud-based Development
44
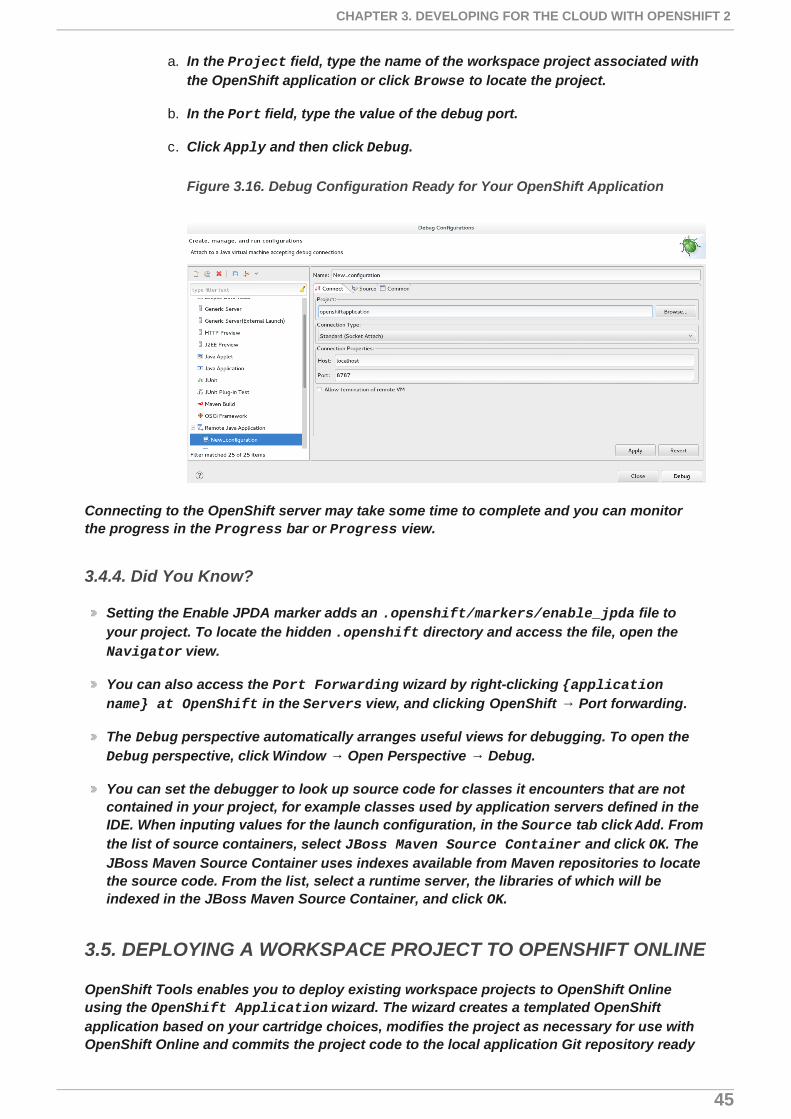
a. In the Project field, type the name of the workspace project associated withthe OpenShift application or click Browse to locate the project.
b. In the Port field, type the value of the debug port.
c. Click Apply and then click Debug.
Figure 3.16. Debug Configuration Ready for Your OpenShift Application
Connecting to the OpenShift server may take some time to complete and you can monitorthe progress in the Progress bar or Progress view.
3.4.4. Did You Know?
Setting the Enable JPDA marker adds an .openshift/markers/enable_jpda file toyour project. To locate the hidden .openshift directory and access the file, open the Navigator view.
You can also access the Port Forwarding wizard by right-clicking {application name} at OpenShift in the Servers view, and clicking OpenShift → Port forwarding.
The Debug perspective automatically arranges useful views for debugging. To open the Debug perspective, click Window → Open Perspective → Debug.
You can set the debugger to look up source code for classes it encounters that are notcontained in your project, for example classes used by application servers defined in theIDE. When inputing values for the launch configuration, in the Source tab click Add. Fromthe list of source containers, select JBoss Maven Source Container and click OK. TheJBoss Maven Source Container uses indexes available from Maven repositories to locatethe source code. From the list, select a runtime server, the libraries of which will beindexed in the JBoss Maven Source Container, and click OK.
3.5. DEPLOYING A WORKSPACE PROJECT TO OPENSHIFT ONLINE
OpenShift Tools enables you to deploy existing workspace projects to OpenShift Onlineusing the OpenShift Application wizard. The wizard creates a templated OpenShiftapplication based on your cartridge choices, modifies the project as necessary for use withOpenShift Online and commits the project code to the local application Git repository ready
CHAPTER 3. DEVELOPING FOR THE CLOUD WITH OPENSHIFT 2
45
for publishing. The wizard can also generate a server adapter for easy publishing of theapplication both for first deployment and for future changes.
The instructions here demonstrate how to complete the following tasks:
1. Prepare a Workspace Project for OpenShift Online Deployment
2. Deploy the OpenShift Online Application
3. View the Deployed OpenShift Online Application
3.5.1. Prepare a Workspace Project for OpenShift Online Deployment
In preparing workspace projects for OpenShift Online, the OpenShift Application wizardmerges the existing project content with the key metadata files from a new OpenShiftapplication and connects the project to the OpenShift application Git repository.
To prepare an existing workspace project for OpenShift Online, complete the followingsteps:
1. In the Project Explorer, right-click {project name} and click Configure →New/Import OpenShift Application.
2. Complete the fields about your OpenShift Online account as follows:
a. In the Connection list, select the connection.
b. In the Password field, type your OpenShift Online account password.
3. Click Next.
4. Complete the fields about the type of OpenShift application you want to create asfollows:
a. Ensure Create a new OpenShift application is selected.
b. Expand Basic Cartridges and select the core cartridge to match theapplication type; for example, for applications with Java-based server-sidefunctionality select jbossas-7, jboss-wildfly-8, or jbosseap-6.
5. Click Next.
6. Complete the fields about your OpenShift application as follows:
a. Ensure that the 'Domain' list displays the domain in which you want to hostyour application.
b. Ensure the Name field contains a valid alphanumeric name for yourapplication.
c. In the Gear profile field, select the gear size that you want for yourapplication or leave blank to use the default gear profile.
d. Select the Enable Scaling check box to make your application scalable.
Red Hat JBoss Developer Studio 10.1 Getting Started with Container and Cloud-based Development
46
7. Click Next.
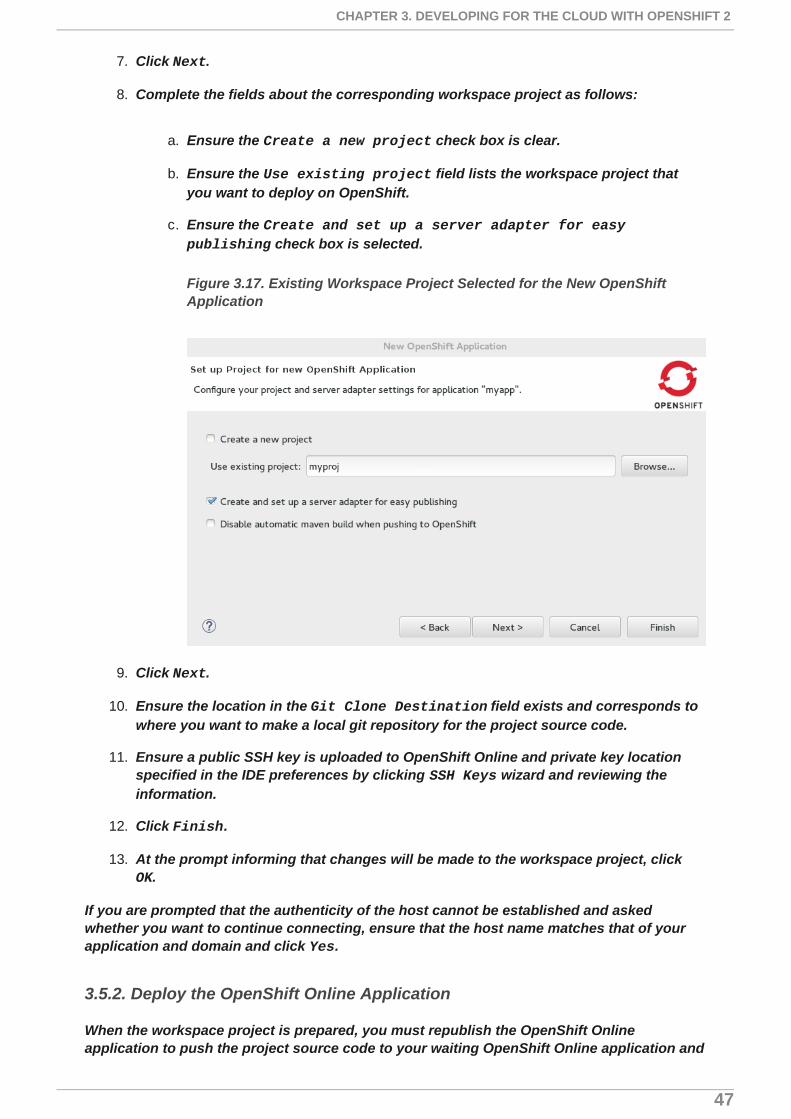
8. Complete the fields about the corresponding workspace project as follows:
a. Ensure the Create a new project check box is clear.
b. Ensure the Use existing project field lists the workspace project thatyou want to deploy on OpenShift.
c. Ensure the Create and set up a server adapter for easy publishing check box is selected.
Figure 3.17. Existing Workspace Project Selected for the New OpenShiftApplication
9. Click Next.
10. Ensure the location in the Git Clone Destination field exists and corresponds towhere you want to make a local git repository for the project source code.
11. Ensure a public SSH key is uploaded to OpenShift Online and private key locationspecified in the IDE preferences by clicking SSH Keys wizard and reviewing theinformation.
12. Click Finish.
13. At the prompt informing that changes will be made to the workspace project, click OK.
If you are prompted that the authenticity of the host cannot be established and askedwhether you want to continue connecting, ensure that the host name matches that of yourapplication and domain and click Yes.
3.5.2. Deploy the OpenShift Online Application
When the workspace project is prepared, you must republish the OpenShift Onlineapplication to push the project source code to your waiting OpenShift Online application and
CHAPTER 3. DEVELOPING FOR THE CLOUD WITH OPENSHIFT 2
47
trigger a build and redeployment of the application. Republishing can be achieved using theserver adapter created by the OpenShift Application wizard and completes thedeployment of the workspace project to OpenShift Online.
To deploy the OpenShift Online application, complete the following steps:
1. In the Servers view, right-click {application name} at OpenShift and click Full Publish.
2. When prompted if you want to publish the committed project changes to OpenShift,click Yes.
The Console view becomes the view in focus showing the application publication progress.After the workspace project is published at OpenShift Online, the following messagedisplays in the Console view:
3.5.3. View the Deployed OpenShift Online Application
After the application is published, you can view the live version at the OpenShift Onlineapplication URL.
To view the OpenShift Online application in a web browser, complete the following steps:
1. In the OpenShift Explorer view, expand the connection and the domain.
2. Right-click {application name} and click Show In → Web Browser.
Your deployed OpenShift Online application is displayed in the IDE default web browser.
3.5.4. Did You Know?
You can find the URL of your OpenShift Online application from the OpenShift Explorer view by right-clicking {application name} and clicking Details or from the Servers view by right-clicking {application name} on OpenShift and clickingOpenShift → Details.
You can set the preference for which type of web browser the IDE opens by default. ClickWindow → Web Browser and click the type of web browser.
If your project is large, it may require more time than the default set by the IDE to pushchanges to the application OpenShift Online Git repository. You can increase the Gittimeout by clicking Windows → Preferences → JBoss Tools → OpenShift and changingthe OpenShift request timeout (in seconds) value.
You can also access the same wizard for deploying an existing workspace project toOpenShift Online from JBoss Central by click OpenShift Application under Start from scratch.
3.6. CONFIGURING SSH KEYS FOR OPENSHIFT
Deployment completed with status: success
Red Hat JBoss Developer Studio 10.1 Getting Started with Container and Cloud-based Development
48
OpenShift Online uses SSH authentication for development tasks that interact directly withgears such as pushing code changes to application OpenShift Online Git repositories,reading application log files, listing and setting environment variables, and port forwarding.
You must have an SSH key pair configured for your OpenShift Online account before usingOpenShift Tools features to create, edit and manage OpenShift Online applications. Thisrequires a private-public key pair, with the private key stored on your local system and itslocation specified in the IDE and the associated public key stored on the OpenShift Onlineserver and associated with your account.
OpenShift Tools enables you to quickly complete these requirements with the assistance ofa multipurpose SSH wizard. If you are new to OpenShift Online, the wizards can help youconfigure a new or existing SSH key pair. If you are already using OpenShift Online throughthe web interface or RHC client tools, you only need to specify the private key location in theIDE preferences to complete the SSH key configuration.
The instructions here demonstrate how to complete the following tasks:
A. Create and Use a New SSH Key Pair
B. Use an Existing SSH Key Pair
C. Specify an Existing Private Key File
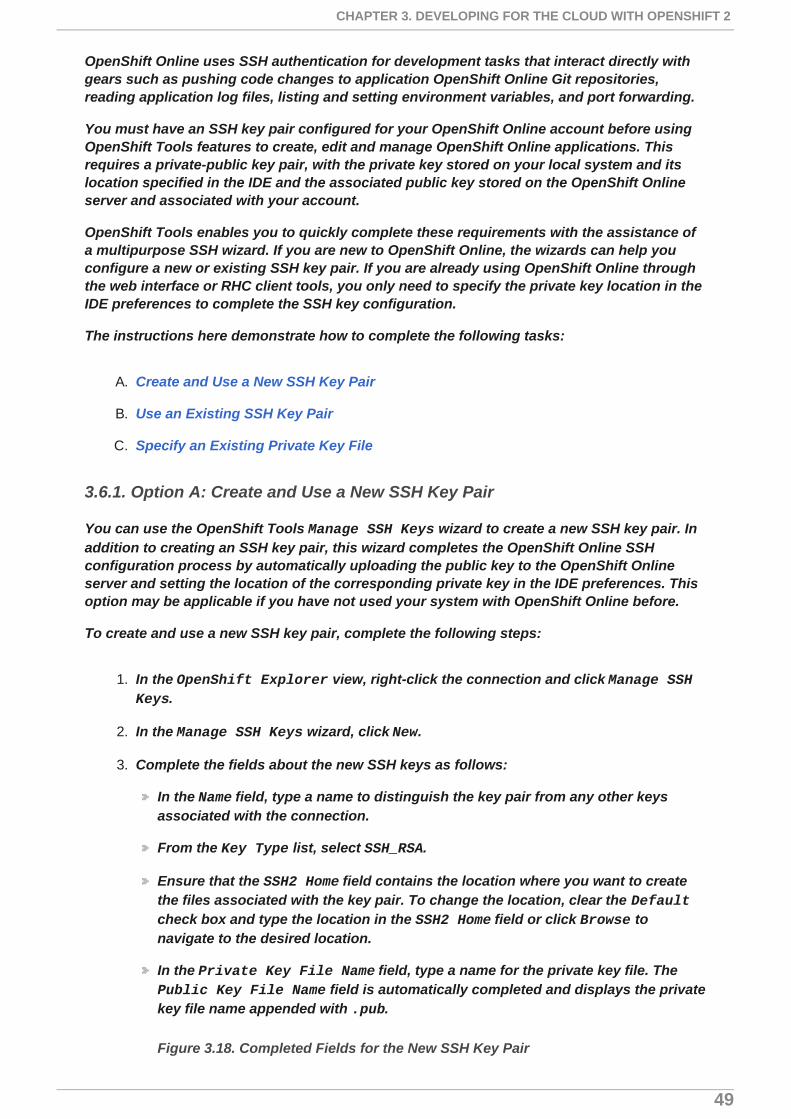
3.6.1. Option A: Create and Use a New SSH Key Pair
You can use the OpenShift Tools Manage SSH Keys wizard to create a new SSH key pair. Inaddition to creating an SSH key pair, this wizard completes the OpenShift Online SSHconfiguration process by automatically uploading the public key to the OpenShift Onlineserver and setting the location of the corresponding private key in the IDE preferences. Thisoption may be applicable if you have not used your system with OpenShift Online before.
To create and use a new SSH key pair, complete the following steps:
1. In the OpenShift Explorer view, right-click the connection and click Manage SSH Keys.
2. In the Manage SSH Keys wizard, click New.
3. Complete the fields about the new SSH keys as follows:
In the Name field, type a name to distinguish the key pair from any other keysassociated with the connection.
From the Key Type list, select SSH_RSA.
Ensure that the SSH2 Home field contains the location where you want to createthe files associated with the key pair. To change the location, clear the Defaultcheck box and type the location in the SSH2 Home field or click Browse tonavigate to the desired location.
In the Private Key File Name field, type a name for the private key file. The Public Key File Name field is automatically completed and displays the privatekey file name appended with .pub.
Figure 3.18. Completed Fields for the New SSH Key Pair
CHAPTER 3. DEVELOPING FOR THE CLOUD WITH OPENSHIFT 2
49
4. Click Finish and click OK to close the Manage SSH Keys wizard.
3.6.2. Option B: Use an Existing SSH Key Pair
You can use the OpenShift Tools Manage SSH Keys wizard to use an already generated SSHkey pair with OpenShift Online. This wizard uploads the public key to the OpenShift Onlineserver and sets the location of the corresponding private key in the IDE preferences. Thisoption may be applicable if you have removed a SSH key pair from your OpenShift account,still have the generated key files available on your system and want to reassociate them withyour OpenShift account.
To use an existing SSH key pair, complete the following steps:
1. In the OpenShift Explorer view, right-click the connection and click Manage SSH Keys.
2. Click Add Existing.
3. Complete the fields about the existing public SSH key as follows:
In the Name field, type a name for the SSH key.
Red Hat JBoss Developer Studio 10.1 Getting Started with Container and Cloud-based Development
50

In the Public Key field, type the path of the public key file or click Browse tolocate the public key file.
Figure 3.19. Completed Fields for Adding an Existing SSH Public Key
4. Click the SSH2 Preferences link.
5. In the Private keys field, click Add Private Key and locate the private key file.
6. Click Apply and click OK to close the Preferences window.
7. Click Finish and click OK.
3.6.3. Option C: Specify an Existing Private Key File
When using a public key that is already uploaded to OpenShift Online, you must ensure thelocation of the corresponding private key is set in the IDE preferences. This option may beapplicable if you are an existing OpenShift Online user and you have not yet accessedOpenShift Online from your IDE workspace or you are using multiple IDE workspaces.
To specify an existing private key file, complete the following steps:
1. Click Window → Preferences → General → Network Connections → SSH2.
2. In the General tab, click Add Private Key and locate the private key file.
3. Click Apply and click OK to close the Preferences window.
3.6.4. Did You Know?
CHAPTER 3. DEVELOPING FOR THE CLOUD WITH OPENSHIFT 2
51
To quickly open the OpenShift Explorer view, in the IDE Quick Access field type OpenShift Explorer and choose OpenShift Explorer view from the list of items.
For added security, you can add a passphrase to the private SSH keys associated withyour OpenShift account when you create them. You must enter the passphrase for thespecific key for each OpenShift Tools action that uses the SSH key for authentication withOpenShift Online.
IDE preferences are workspace specific and therefore you must specify private keylocation under Preferences for each workspace.
You can remove an existing public SSH key from your OpenShift Online account with the Manage SSH Keys wizard. Note that this only disassociates keys with your OpenShiftaccount. The files associated with a removed SSH key pair still exist in the local locationwhere they were generated and the private key is still set in the IDE preferences.
If you are using the OpenShift Online web interface or RHC client tools to manage SSHkeys simultaneously with OpenShift Tools, the information specified by OpenShift Toolsabout keys may be out of sync. You can resync the information in the Manage SSH Keyswizard with the Refresh button.
You can change the default location used by the IDE to store newly created SSH keys.Click Window → Preferences → General → Network Connections → SSH2. In the Generaltab, in the SSH2 home field type the new location.
3.6.5. Troubleshoot SSH Key Issues
3.6.5.1. “You have no SSH public keys in your OpenShift account”
Error Message
You have no SSH public keys in your OpenShift account [email protected] yet, please add your key(s) or create new one(s).
Figure 3.20. No SSH Keys Window Displaying the Error Message
Red Hat JBoss Developer Studio 10.1 Getting Started with Container and Cloud-based Development
52
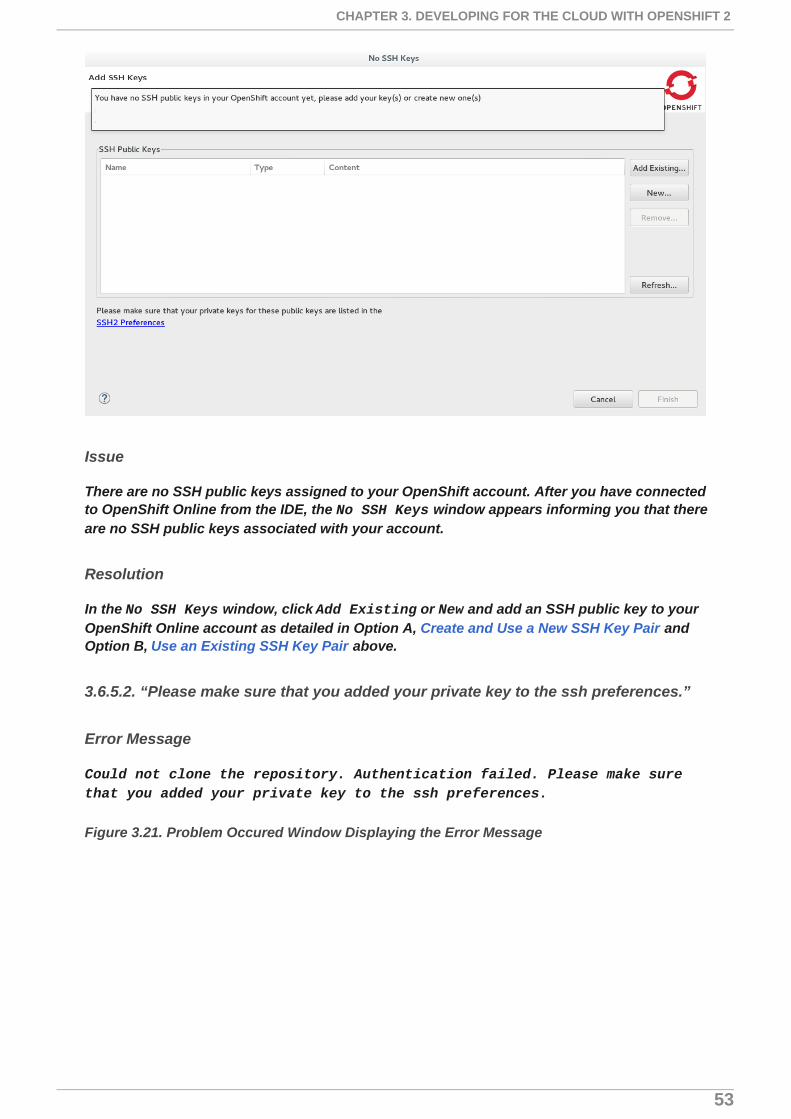
Issue
There are no SSH public keys assigned to your OpenShift account. After you have connectedto OpenShift Online from the IDE, the No SSH Keys window appears informing you that thereare no SSH public keys associated with your account.
Resolution
In the No SSH Keys window, click Add Existing or New and add an SSH public key to yourOpenShift Online account as detailed in Option A, Create and Use a New SSH Key Pair andOption B, Use an Existing SSH Key Pair above.
3.6.5.2. “Please make sure that you added your private key to the ssh preferences.”
Error Message
Could not clone the repository. Authentication failed. Please make sure that you added your private key to the ssh preferences.
Figure 3.21. Problem Occured Window Displaying the Error Message
CHAPTER 3. DEVELOPING FOR THE CLOUD WITH OPENSHIFT 2
53
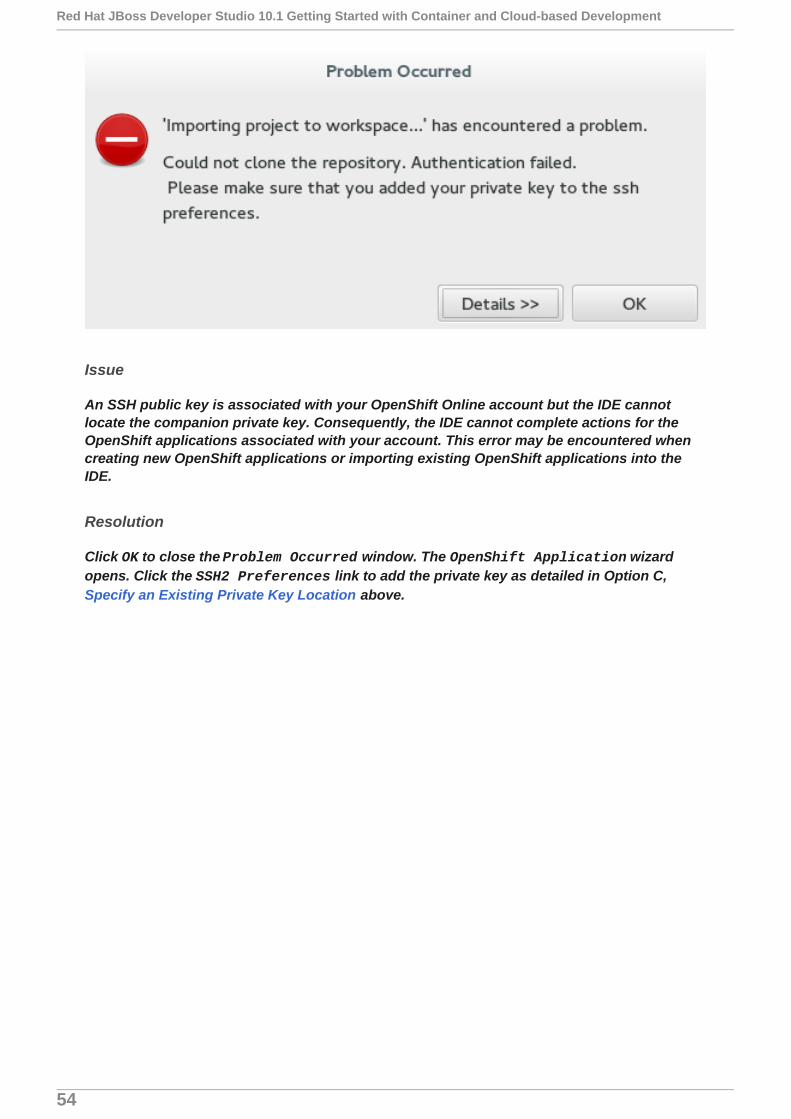
Issue
An SSH public key is associated with your OpenShift Online account but the IDE cannotlocate the companion private key. Consequently, the IDE cannot complete actions for theOpenShift applications associated with your account. This error may be encountered whencreating new OpenShift applications or importing existing OpenShift applications into theIDE.
Resolution
Click OK to close the Problem Occurred window. The OpenShift Application wizardopens. Click the SSH2 Preferences link to add the private key as detailed in Option C,Specify an Existing Private Key Location above.
Red Hat JBoss Developer Studio 10.1 Getting Started with Container and Cloud-based Development
54
CHAPTER 4. DEVELOPING WITH DOCKER
4.1. CONFIGURING DOCKER TOOLING BASICS
Docker offers images that can be managed in one of two ways: build/create your own imageusing a script file, or pull down an existing image file from public or private registries online.This procedure contains instructions for pulling down an image from the JBoss registry.Such registries are useful to share images between developers or between environments toensure a standardized software stack for development or testing requirements. Once theDocker Container is created and running, users can manage the container.
JBoss Tools 4.3.0 Beta1 includes the Docker tooling out of the box. This article introducesthe basic usage for the Docker tooling, such as:
1. Prerequisites for Docker Tooling
2. Pulling Docker Images from a Docker Registry
3. Managing Docker Containers
4.1.1. Prerequisites for Docker Tooling
Ensure that the following prerequisites are met when using the Docker tooling with the IDE:
1. Install and set up JBoss Tools 4.3.0 Beta1 or higher.
2. Install and set up Docker.
3. Establish a connection to a Docker daemon within JBoss Tools as follows:
a. Click Window → Show View → Other… .
b. In the View window, type docker in the filter text box to view Docker-relatedoptions in the list.
c. Expand the Docker item in the results and select Docker Explorer.
d. In the Docker Explorer view, if no connection is configured, a messageappears stating that "No connection to a Docker daemon is available. Clickthis link to create a new connection…”. Click the link to start configuring anew Docker daemon connection.
Figure 4.1. No Connection to a Docker Daemon is Available
e. In the Connect to a Docker daemon wizard:
i. Use the default value or set a desired connection name in the Connection Name field.
CHAPTER 4. DEVELOPING WITH DOCKER
55
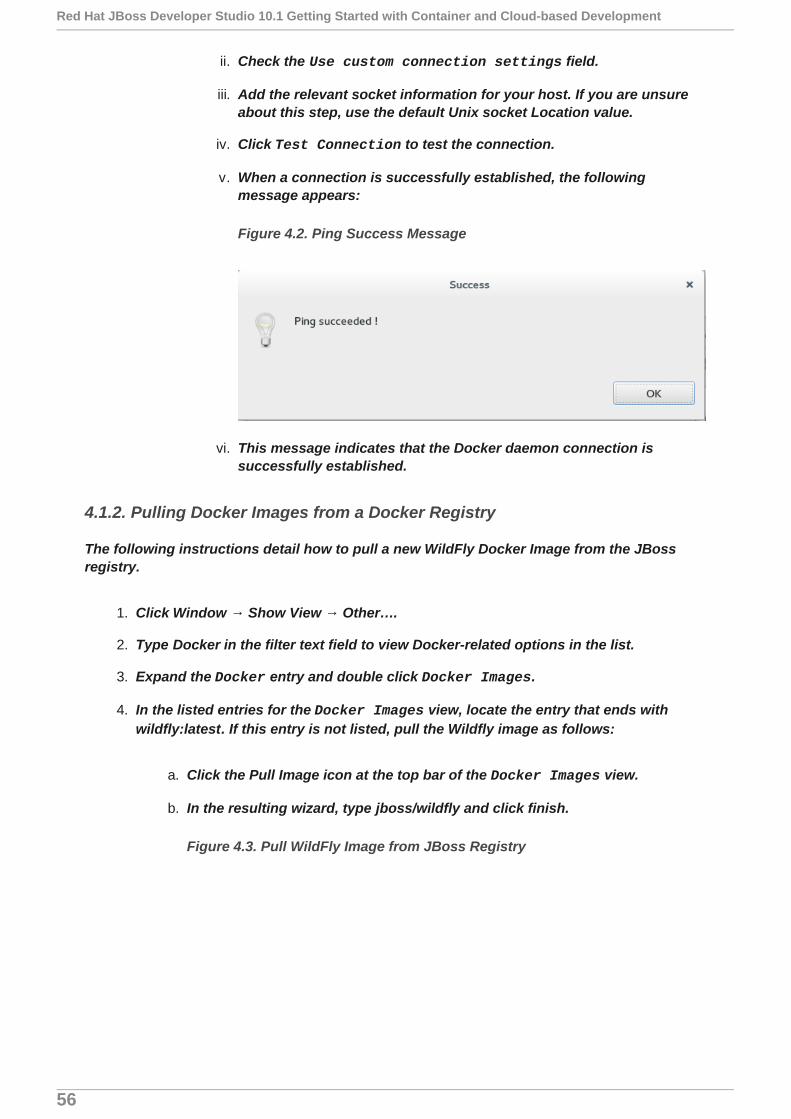
ii. Check the Use custom connection settings field.
iii. Add the relevant socket information for your host. If you are unsureabout this step, use the default Unix socket Location value.
iv. Click Test Connection to test the connection.
v. When a connection is successfully established, the followingmessage appears:
Figure 4.2. Ping Success Message
vi. This message indicates that the Docker daemon connection issuccessfully established.
4.1.2. Pulling Docker Images from a Docker Registry
The following instructions detail how to pull a new WildFly Docker Image from the JBossregistry.
1. Click Window → Show View → Other… .
2. Type Docker in the filter text field to view Docker-related options in the list.
3. Expand the Docker entry and double click Docker Images.
4. In the listed entries for the Docker Images view, locate the entry that ends withwildfly:latest. If this entry is not listed, pull the Wildfly image as follows:
a. Click the Pull Image icon at the top bar of the Docker Images view.
b. In the resulting wizard, type jboss/wildfly and click finish.
Figure 4.3. Pull WildFly Image from JBoss Registry
Red Hat JBoss Developer Studio 10.1 Getting Started with Container and Cloud-based Development
56
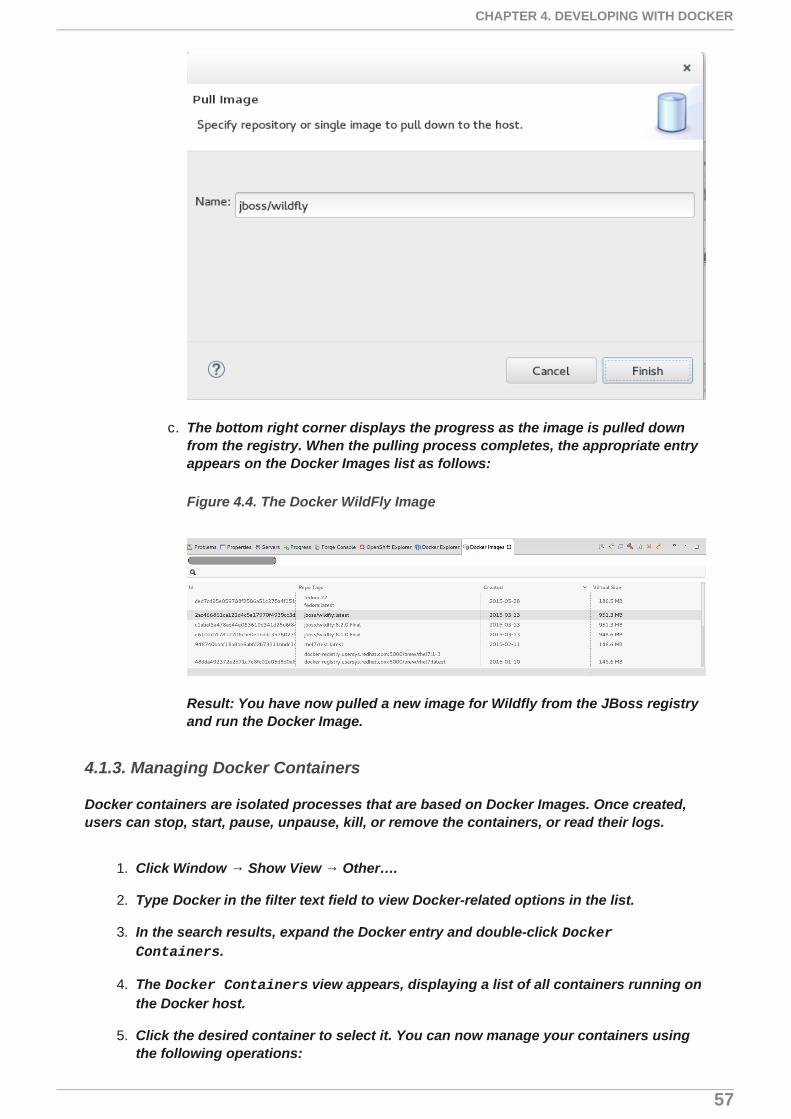
c. The bottom right corner displays the progress as the image is pulled downfrom the registry. When the pulling process completes, the appropriate entryappears on the Docker Images list as follows:
Figure 4.4. The Docker WildFly Image
Result: You have now pulled a new image for Wildfly from the JBoss registryand run the Docker Image.
4.1.3. Managing Docker Containers
Docker containers are isolated processes that are based on Docker Images. Once created,users can stop, start, pause, unpause, kill, or remove the containers, or read their logs.
1. Click Window → Show View → Other… .
2. Type Docker in the filter text field to view Docker-related options in the list.
3. In the search results, expand the Docker entry and double-click Docker Containers.
4. The Docker Containers view appears, displaying a list of all containers running onthe Docker host.
5. Click the desired container to select it. You can now manage your containers usingthe following operations:
CHAPTER 4. DEVELOPING WITH DOCKER
57
a. Click the pause button from the icons on the top right corner of the view topause the container.
b. Click the green triangle icon in the row to unpause the container.
c. To view the container logs, right click the container name and click Display Log.
d. To view a list of all containers, click on the right-most icon in the list of iconsin the view, which displays a drop-down option to view all containers. Clickthis option to view all available containers.
Result: You have performed various management operations on your Docker container.
4.1.4. Troubleshooting
Attempting to connect to a running local Docker instance as a non-root user results in errorsbeing logged, but not displayed in the User Interface, which results in the error being non-obvious. The following workarounds are available for this problem:
Connect to the Docker instance manually. Define a custom configuration file and specifythe TCP URL displayed by the systemctl status docker service. As an example, you canuse a TCP URL such as tcp://0.0.0.0:2375 to connect to the running Docker instanceinstead of the default unix:///var/run/docker.sock configuration file.
Figure 4.5. Connect to a Docker Daemon
Red Hat JBoss Developer Studio 10.1 Getting Started with Container and Cloud-based Development
58
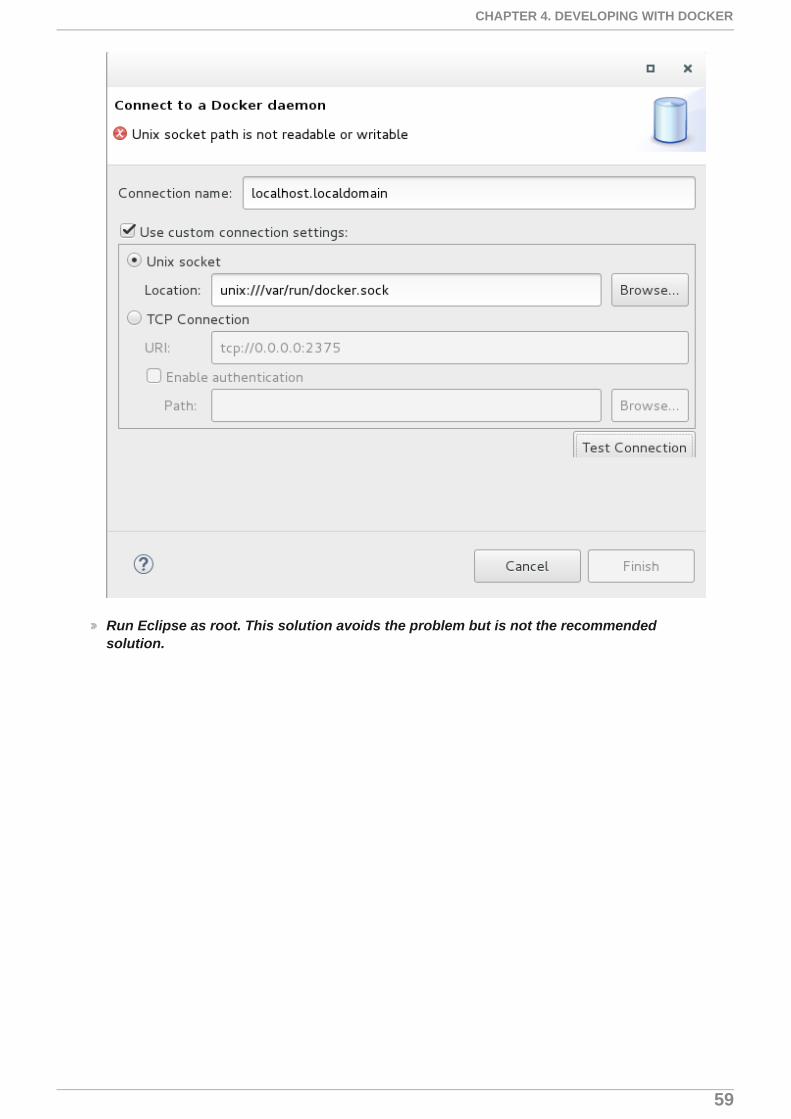
Run Eclipse as root. This solution avoids the problem but is not the recommendedsolution.
CHAPTER 4. DEVELOPING WITH DOCKER
59