red hat enterprise linux 7 · red hat enterprise linux 7 global file system 2 red hat global file...
TRANSCRIPT

Red Hat Enterprise Linux 7
Global File System 2
Red Hat Global File System 2
Last Updated: 2018-08-24


Red Hat Enterprise Linux 7 Global File System 2
Red Hat Global File System 2
Steven LevineRed Hat Customer Content [email protected]

Legal Notice
Copyright © 2018 Red Hat, Inc.
This document is licensed by Red Hat under the Creative Commons Attribution-ShareAlike 3.0Unported License. If you distribute this document, or a modified version of it, you must provideattribution to Red Hat, Inc. and provide a link to the original. If the document is modified, all RedHat trademarks must be removed.
Red Hat, as the licensor of this document, waives the right to enforce, and agrees not to assert,Section 4d of CC-BY-SA to the fullest extent permitted by applicable law.
Red Hat, Red Hat Enterprise Linux, the Shadowman logo, JBoss, OpenShift, Fedora, the Infinitylogo, and RHCE are trademarks of Red Hat, Inc., registered in the United States and othercountries.
Linux ® is the registered trademark of Linus Torvalds in the United States and other countries.
Java ® is a registered trademark of Oracle and/or its affiliates.
XFS ® is a trademark of Silicon Graphics International Corp. or its subsidiaries in the UnitedStates and/or other countries.
MySQL ® is a registered trademark of MySQL AB in the United States, the European Union andother countries.
Node.js ® is an official trademark of Joyent. Red Hat Software Collections is not formally relatedto or endorsed by the official Joyent Node.js open source or commercial project.
The OpenStack ® Word Mark and OpenStack logo are either registered trademarks/service marksor trademarks/service marks of the OpenStack Foundation, in the United States and othercountries and are used with the OpenStack Foundation's permission. We are not affiliated with,endorsed or sponsored by the OpenStack Foundation, or the OpenStack community.
All other trademarks are the property of their respective owners.
Abstract
This book provides information about configuring and maintaining Red Hat GFS2 (Red Hat GlobalFile System 2) for Red Hat Enterprise Linux 7.

. . . . . . . . . . . . . . . . . . . . . . . . . . . . . . . . . . . . . . . . . . . . . . . . . . . . . . . . . . . . . . . . . . . . . . . . . . . . . . . . . . . . . . . . . . . . . . . . . . . . . . . . . . . . . . . . . . . . . . . . . . . . . . . . . . . . . . . . . . . . . . . . . . . . . . . . . . . . . . . . . . . . . . . . . . . . . . . . . . . . . . . . . . . . . . . . . . . . . . . . . . . . . . . . . . . . . . . . . . . . . . . . . . . . . . . . . . . . . . . . . . . . . . . . . . . . . . . . . . . . . . . . . . . . . . . . . . . . . . . .
. . . . . . . . . . . . . . . . . . . . . . . . . . . . . . . . . . . . . . . . . . . . . . . . . . . . . . . . . . . . . . . . . . . . . . . . . . . . . . . . . . . . . . . . . . . . . . . . . . . . . . . . . . . . . . . . . . . . . . . . . . . . . . . . . . . . . . . . . . . . . . . . . . . . . . . . . . . . . . . . . . . . . . . . . . . . . . . . . . . . . . . . . . . . . . . . . . . . . . . . . . . . . . . . . . . . . . . . . . . . . . . . . . . . . . . . . . . . . . . . . . . . . . . . . . . . . . . . . . . . . . . . . . . . . . . . . . . . . . . .
. . . . . . . . . . . . . . . . . . . . . . . . . . . . . . . . . . . . . . . . . . . . . . . . . . . . . . . . . . . . . . . . . . . . . . . . . . . . . . . . . . . . . . . . . . . . . . . . . . . . . . . . . . . . . . . . . . . . . . . . . . . . . . . . . . . . . . . . . . . . . . . . . . . . . . . . . . . . . . . . . . . . . . . . . . . . . . . . . . . . . . . . . . . . . . . . . . . . . . . . . . . . . . . . . . . . . . . . . . . . . . . . . . . . . . . . . . . . . . . . . . . . . . . . . . . . . . . . . . . . . . . . . . . . . . . . . . . . . . . .
. . . . . . . . . . . . . . . . . . . . . . . . . . . . . . . . . . . . . . . . . . . . . . . . . . . . . . . . . . . . . . . . . . . . . . . . . . . . . . . . . . . . . . . . . . . . . . . . . . . . . . . . . . . . . . . . . . . . . . . . . . . . . . . . . . . . . . . . . . . . . . . . . . . . . . . . . . . . . . . . . . . . . . . . . . . . . . . . . . . . . . . . . . . . . . . . . . . . . . . . . . . . . . . . . . . . . . . . . . . . . . . . . . . . . . . . . . . . . . . . . . . . . . . . . . . . . . . . . . . . . . . . . . . . . . . . . . . . . . . .
. . . . . . . . . . . . . . . . . . . . . . . . . . . . . . . . . . . . . . . . . . . . . . . . . . . . . . . . . . . . . . . . . . . . . . . . . . . . . . . . . . . . . . . . . . . . . . . . . . . . . . . . . . . . . . . . . . . . . . . . . . . . . . . . . . . . . . . . . . . . . . . . . . . . . . . . . . . . . . . . . . . . . . . . . . . . . . . . . . . . . . . . . . . . . . . . . . . . . . . . . . . . . . . . . . . . . . . . . . . . . . . . . . . . . . . . . . . . . . . . . . . . . . . . . . . . . . . . . . . . . . . . . . . . . . . . . . . . . . . .
. . . . . . . . . . . . . . . . . . . . . . . . . . . . . . . . . . . . . . . . . . . . . . . . . . . . . . . . . . . . . . . . . . . . . . . . . . . . . . . . . . . . . . . . . . . . . . . . . . . . . . . . . . . . . . . . . . . . . . . . . . . . . . . . . . . . . . . . . . . . . . . . . . . . . . . . . . . . . . . . . . . . . . . . . . . . . . . . . . . . . . . . . . . . . . . . . . . . . . . . . . . . . . . . . . . . . . . . . . . . . . . . . . . . . . . . . . . . . . . . . . . . . . . . . . . . . . . . . . . . . . . . . . . . . . . . . . . . . . . .
. . . . . . . . . . . . . . . . . . . . . . . . . . . . . . . . . . . . . . . . . . . . . . . . . . . . . . . . . . . . . . . . . . . . . . . . . . . . . . . . . . . . . . . . . . . . . . . . . . . . . . . . . . . . . . . . . . . . . . . . . . . . . . . . . . . . . . . . . . . . . . . . . . . . . . . . . . . . . . . . . . . . . . . . . . . . . . . . . . . . . . . . . . . . . . . . . . . . . . . . . . . . . . . . . . . . . . . . . . . . . . . . . . . . . . . . . . . . . . . . . . . . . . . . . . . . . . . . . . . . . . . . . . . . . . . . . . . . . . . .
Table of Contents
CHAPTER 1. GFS2 OVERVIEW1.1. NEW AND CHANGED FEATURES1.2. BEFORE SETTING UP GFS21.3. INSTALLING GFS21.4. REPLACEMENT FUNCTIONS FOR GFS2_TOOL IN RED HAT ENTERPRISE LINUX 7
CHAPTER 2. GFS2 CONFIGURATION AND OPERATIONAL CONSIDERATIONS2.1. FORMATTING CONSIDERATIONS2.2. FILE SYSTEM FRAGMENTATION2.3. BLOCK ALLOCATION ISSUES2.4. CLUSTER CONSIDERATIONS2.5. USAGE CONSIDERATIONS2.6. FILE SYSTEM BACKUPS2.7. HARDWARE CONSIDERATIONS2.8. PERFORMANCE ISSUES: CHECK THE RED HAT CUSTOMER PORTAL2.9. GFS2 NODE LOCKING
CHAPTER 3. MANAGING GFS23.1. MAKING A FILE SYSTEM3.2. MOUNTING A FILE SYSTEM3.3. UNMOUNTING A FILE SYSTEM3.4. SPECIAL CONSIDERATIONS WHEN MOUNTING GFS2 FILE SYSTEMS3.5. GFS2 QUOTA MANAGEMENT3.6. GROWING A FILE SYSTEM3.7. ADDING JOURNALS TO A FILE SYSTEM3.8. DATA JOURNALING3.9. CONFIGURING ATIME UPDATES3.10. SUSPENDING ACTIVITY ON A FILE SYSTEM3.11. REPAIRING A FILE SYSTEM3.12. THE GFS2 WITHDRAW FUNCTION
CHAPTER 4. DIAGNOSING AND CORRECTING PROBLEMS WITH GFS2 FILE SYSTEMS4.1. GFS2 FILE SYSTEM SHOWS SLOW PERFORMANCE4.2. GFS2 FILE SYSTEM HANGS AND REQUIRES REBOOT OF ONE NODE4.3. GFS2 FILE SYSTEM HANGS AND REQUIRES REBOOT OF ALL NODES4.4. GFS2 FILE SYSTEM DOES NOT MOUNT ON NEWLY ADDED CLUSTER NODE4.5. SPACE INDICATED AS USED IN EMPTY FILE SYSTEM
CHAPTER 5. CONFIGURING A GFS2 FILE SYSTEM IN A CLUSTER
APPENDIX A. GFS2 PERFORMANCE ANALYSIS WITH PERFORMANCE CO-PILOTA.1. OVERVIEW OF PERFORMANCE CO-PILOTA.2. PCP DEPLOYMENTA.3. PCP INSTALLATIONA.4. TRACING GFS2 PERFORMANCE DATAA.5. METRIC CONFIGURATION (USING PMSTORE)A.6. LOGGING PERFORMANCE DATA (USING PMLOGGER)A.7. VISUAL TRACING (USING PCP-GUI AND PMCHART)
APPENDIX B. GFS2 TRACEPOINTS AND THE DEBUGFS GLOCKS FILEB.1. GFS2 TRACEPOINT TYPESB.2. TRACEPOINTSB.3. GLOCKS
45567
10101212131315161616
22222529292934363839404143
464646464748
49
5252535354565758
60606061
Table of Contents
1

. . . . . . . . . . . . . . . . . . . . . . . . . . . . . . . . . . . . . . . . . . . . . . . . . . . . . . . . . . . . . . . . . . . . . . . . . . . . . . . . . . . . . . . . . . . . . . . . . . . . . . . . . . . . . . . . . . . . . . . . . . . . . . . . . . . . . . . . . . . . . . . . . . . . . . . . . . . . . . . . . . . . . . . . . . . . . . . . . . . . . . . . . . . . . . . . . . . . . . . . . . . . . . . . . . . . . . . . . . . . . . . . . . . . . . . . . . . . . . . . . . . . . . . . . . . . . . . . . . . . . . . . . . . . . . . . . . . . . . . .
. . . . . . . . . . . . . . . . . . . . . . . . . . . . . . . . . . . . . . . . . . . . . . . . . . . . . . . . . . . . . . . . . . . . . . . . . . . . . . . . . . . . . . . . . . . . . . . . . . . . . . . . . . . . . . . . . . . . . . . . . . . . . . . . . . . . . . . . . . . . . . . . . . . . . . . . . . . . . . . . . . . . . . . . . . . . . . . . . . . . . . . . . . . . . . . . . . . . . . . . . . . . . . . . . . . . . . . . . . . . . . . . . . . . . . . . . . . . . . . . . . . . . . . . . . . . . . . . . . . . . . . . . . . . . . . . . . . . . . . .
B.4. THE GLOCK DEBUGFS INTERFACEB.5. GLOCK HOLDERSB.6. GLOCK TRACEPOINTSB.7. BMAP TRACEPOINTSB.8. LOG TRACEPOINTSB.9. GLOCK STATISTICSB.10. REFERENCES
APPENDIX C. REVISION HISTORY
INDEX
62656667676768
69
70
Global File System 2
2

Table of Contents
3

CHAPTER 1. GFS2 OVERVIEWThe Red Hat GFS2 file system is included in the Resilient Storage Add-On. It is a native file system thatinterfaces directly with the Linux kernel file system interface (VFS layer). When implemented as acluster file system, GFS2 employs distributed metadata and multiple journals. Red Hat supports theuse of GFS2 file systems only as implemented in the High Availability Add-On.
NOTE
Although a GFS2 file system can be implemented in a standalone system or as part of acluster configuration, for the Red Hat Enterprise Linux 7 release Red Hat does notsupport the use of GFS2 as a single-node file system. Red Hat does support a number ofhigh-performance single node file systems which are optimized for single node and thushave generally lower overhead than a cluster file system. Red Hat recommends usingthese file systems in preference to GFS2 in cases where only a single node needs tomount the file system.
Red Hat will continue to support single-node GFS2 file systems for mounting snapshotsof cluster file systems (for example, for backup purposes).
NOTE
Red Hat does not support using GFS2 for cluster file system deployments greater than16 nodes.
GFS2 is based on a 64-bit architecture, which can theoretically accommodate an 8 EB file system.However, the current supported maximum size of a GFS2 file system for 64-bit hardware is 100TB. Thecurrent supported maximum size of a GFS2 file system for 32-bit hardware is 16TB. If your systemrequires larger GFS2 file systems, contact your Red Hat service representative.
When determining the size of your file system, you should consider your recovery needs. Running the fsck.gfs2 command on a very large file system can take a long time and consume a large amount ofmemory. Additionally, in the event of a disk or disk subsystem failure, recovery time is limited by thespeed of your backup media. For information on the amount of memory the fsck.gfs2 commandrequires, see Section 3.11, “Repairing a File System” .
When configured in a cluster, Red Hat GFS2 nodes can be configured and managed with HighAvailability Add-On configuration and management tools. Red Hat GFS2 then provides data sharingamong GFS2 nodes in a cluster, with a single, consistent view of the file system name space across theGFS2 nodes. This allows processes on different nodes to share GFS2 files in the same way thatprocesses on the same node can share files on a local file system, with no discernible difference. Forinformation about the High Availability Add-On see Configuring and Managing a Red Hat Cluster.
While a GFS2 file system may be used outside of LVM, Red Hat supports only GFS2 file systems thatare created on a CLVM logical volume. CLVM is included in the Resilient Storage Add-On. It is a cluster-wide implementation of LVM, enabled by the CLVM daemon clvmd, which manages LVM logicalvolumes in a cluster. The daemon makes it possible to use LVM2 to manage logical volumes across acluster, allowing all nodes in the cluster to share the logical volumes. For information on the LVMvolume manager, see Logical Volume Manager Administration.
The gfs2.ko kernel module implements the GFS2 file system and is loaded on GFS2 cluster nodes.
Global File System 2
4

NOTE
When you configure a GFS2 file system as a cluster file system, you must ensure that allnodes in the cluster have access to the shared storage. Asymmetric clusterconfigurations in which some nodes have access to the shared storage and others do notare not supported. This does not require that all nodes actually mount the GFS2 filesystem itself.
This chapter provides some basic, abbreviated information as background to help you understandGFS2. It contains the following sections:
Section 1.1, “New and Changed Features”
Section 1.2, “Before Setting Up GFS2”
Section 1.3, “Installing GFS2”
Section 2.9, “GFS2 Node Locking”
1.1. NEW AND CHANGED FEATURES
This section lists new and changed features of the GFS2 file system and the GFS2 documentation thatare included with the initial and subsequent releases of Red Hat Enterprise Linux 7.
1.1.1. New and Changed Features for Red Hat Enterprise Linux 7.0
Red Hat Enterprise Linux 7.0 includes the following documentation and feature updates and changes.
For Red Hat Enterprise Linux 7, a cluster that includes a GFS2 file system requires that youconfigure your cluster with Pacemaker according to the procedure described in Chapter 5,Configuring a GFS2 File System in a Cluster.
The gfs2_tool command is not supported in Red Hat Enterprise Linux 7. Replacementfunctions for the gfs2_tool are summarized in Section 1.4, “Replacement Functions forgfs2_tool in Red Hat Enterprise Linux 7”.
1.1.2. New and Changed Features for Red Hat Enterprise Linux 7.1
For Red Hat Enterprise Linux 7.1, Appendix A, GFS2 Performance Analysis with Performance Co-Pilot hasbeen updated.
In addition, small technical corrections and clarifications have been made throughout the document.
1.1.3. New and Changed Features for Red Hat Enterprise Linux 7.2
Small technical corrections and clarifications have been made throughout the document.
1.1.4. New and Changed Features for Red Hat Enterprise Linux 7.4
As of Red Hat Enterprise Linux 7.4, Security Enhanced Linux (SELinux) is supported for use with GFS2file systems. For information on SELinux and GFS2, see Section 2.5.3, “SELinux on GFS2” .
1.2. BEFORE SETTING UP GFS2
CHAPTER 1. GFS2 OVERVIEW
5

Before you install and set up GFS2, note the following key characteristics of your GFS2 file systems:
GFS2 nodes
Determine which nodes in the cluster will mount the GFS2 file systems.
Number of file systems
Determine how many GFS2 file systems to create initially. (More file systems can be added later.)
File system name
Determine a unique name for each file system. The name must be unique for all lock_dlm filesystems over the cluster. Each file system name is required in the form of a parameter variable. Forexample, this book uses file system names mydata1 and mydata2 in some example procedures.
Journals
Determine the number of journals for your GFS2 file systems. One journal is required for each nodethat mounts a GFS2 file system. GFS2 allows you to add journals dynamically at a later point asadditional servers mount a file system. For information on adding journals to a GFS2 file system, seeSection 3.7, “Adding Journals to a File System” .
Storage devices and partitions
Determine the storage devices and partitions to be used for creating logical volumes (using CLVM)in the file systems.
Time protocol
Make sure that the clocks on the GFS2 nodes are synchronized. It is recommended that you use thePrecision Time Protocol (PTP) or, if necessary for your configuration, the Network Time Protocol(NTP) software provided with your Red Hat Enterprise Linux distribution.
NOTE
The system clocks in GFS2 nodes must be within a few minutes of each other toprevent unnecessary inode time stamp updating. Unnecessary inode time stampupdating severely impacts cluster performance.
NOTE
You may see performance problems with GFS2 when many create and deleteoperations are issued from more than one node in the same directory at the same time.If this causes performance problems in your system, you should localize file creationand deletions by a node to directories specific to that node as much as possible.
For further recommendations on creating, using, and maintaining a GFS2 file system. see Chapter 2,GFS2 Configuration and Operational Considerations.
1.3. INSTALLING GFS2
In addition to the packages required for the Red Hat High Availability Add-On, you must install the gfs2-utils package for GFS2 and the lvm2-cluster package for the Clustered Logical VolumeManager (CLVM). The lvm2-cluster and gfs2-utils packages are part of ResilientStorage
Global File System 2
6

channel, which must be enabled before installing the packages.
You can use the following yum install command to install the Red Hat High Availability Add-Onsoftware packages:
# yum install lvm2-cluster gfs2-utils
For general information on the Red Hat High Availability Add-On and cluster administration, see theCluster Administration manual.
1.4. REPLACEMENT FUNCTIONS FOR GFS2_TOOL IN RED HATENTERPRISE LINUX 7
The gfs2_tool command is not supported in Red Hat Enterprise Linux 7. Table 1.1, “gfs2_toolEquivalent Functions in Red Hat Enterprise Linux 7” summarizes the equivalent functionality for the gfs2_tool command options in Red Hat Enterprise Linux 7.
Table 1.1. gfs2_tool Equivalent Functions in Red Hat Enterprise Linux 7
gfs2_tool option Replacement Functionality
clearflag Flag File1 File2 ...
Clear an attribute flag on a file
Linux standard chattr command
freeze mountpoint
Freeze (quiesce) a GFS2 file system
Linux standard fsfreeze -f mountpointcommand
gettune mountpoint
Print out current values of tuning parameters
For many cases, has been replaced by mount (get mount options). Other tuning parameters maybe fetched from the respective sysfs files: /sys/fs/gfs2/dm-3/tune/*.
journals mountpoint
Print out information on the journals in a GFS2 filesystem
Information about journals can be fetched with gfs2_edit -p journals device. You canrun this command when the file system is mounted.
# gfs2_edit -p journals /dev/clus_vg/lv1 Block #Journal Status: of 2620416 (0x27fc00) -------------------- Journal List --------------------journal0: 0x14 128MB clean.journal1: 0x805b 128MB clean.------------------------------------------------------
CHAPTER 1. GFS2 OVERVIEW
7
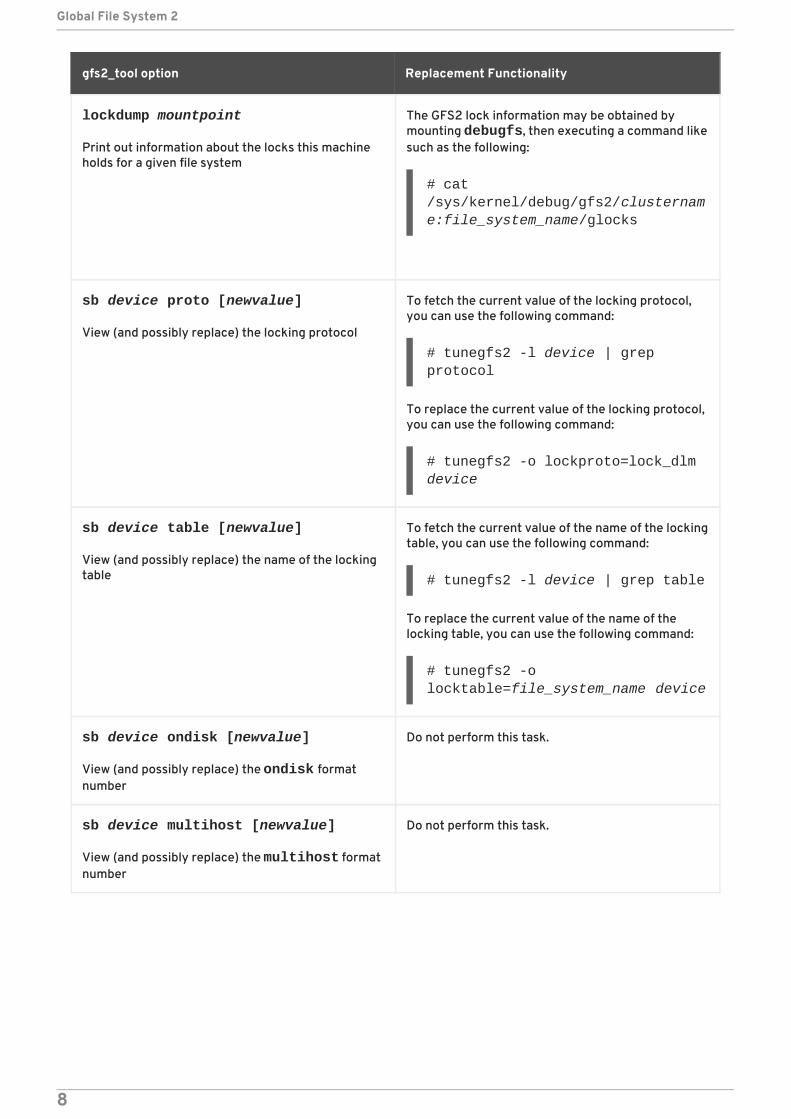
lockdump mountpoint
Print out information about the locks this machineholds for a given file system
The GFS2 lock information may be obtained bymounting debugfs, then executing a command likesuch as the following:
# cat /sys/kernel/debug/gfs2/clustername:file_system_name/glocks
sb device proto [newvalue]
View (and possibly replace) the locking protocol
To fetch the current value of the locking protocol,you can use the following command:
# tunegfs2 -l device | grep protocol
To replace the current value of the locking protocol,you can use the following command:
# tunegfs2 -o lockproto=lock_dlm device
sb device table [newvalue]
View (and possibly replace) the name of the lockingtable
To fetch the current value of the name of the lockingtable, you can use the following command:
# tunegfs2 -l device | grep table
To replace the current value of the name of thelocking table, you can use the following command:
# tunegfs2 -o locktable=file_system_name device
sb device ondisk [newvalue]
View (and possibly replace) the ondisk formatnumber
Do not perform this task.
sb device multihost [newvalue]
View (and possibly replace) the multihost formatnumber
Do not perform this task.
gfs2_tool option Replacement Functionality
Global File System 2
8

sb device uuid [newvalue]
View (and possibly replace) the uuid value
To fetch the current value of the uuid , you can usethe following command:
# tunegfs2 -l device | grep UUID
To replace the current value of the uuid, you canuse the following command:
# tunegfs2 -U uuid device
sb device all
Print out the GFS2 superblock# tunegfs2 -l device
setflag Flag File1 File2 ...
Sets an attribute flag on a file
Linux standard chattr command
settune mountpoint parameter newvalue
Set the value of a tuning parameter
For many cases, has been replaced by mount (-o remount with options). Other tuning parametersmay be set by the respective sysfs files: /sys/fs/gfs2/cluster_name:file_system_name/tune/*
unfreeze mountpoint
Unfreeze a GFS2 file system
Linux standard fsfreeze -unfreeze mountpoint command
version
Displays version of the gfs2_tool command
N/A
withdraw mountpoint
Cause GFS2 to abnormally shutdown a given filesystem
# echo 1 > /sys/fs/gfs2/cluster_name:file_system_name/tune/withdraw
gfs2_tool option Replacement Functionality
CHAPTER 1. GFS2 OVERVIEW
9

CHAPTER 2. GFS2 CONFIGURATION AND OPERATIONALCONSIDERATIONSThe Global File System 2 (GFS2) file system allows several computers (“nodes”) in a cluster tocooperatively share the same storage. To achieve this cooperation and maintain data consistencyamong the nodes, the nodes employ a cluster-wide locking scheme for file system resources. Thislocking scheme uses communication protocols such as TCP/IP to exchange locking information.
You can improve performance by following the recommendations described in this chapter, includingrecommendations for creating, using, and maintaining a GFS2 file system.
IMPORTANT
Make sure that your deployment of the Red Hat High Availability Add-On meets yourneeds and can be supported. Consult with an authorized Red Hat representative toverify your configuration prior to deployment.
2.1. FORMATTING CONSIDERATIONS
This section provides recommendations for how to format your GFS2 file system to optimizeperformance.
2.1.1. File System Size: Smaller Is Better
GFS2 is based on a 64-bit architecture, which can theoretically accommodate an 8 EB file system.However, the current supported maximum size of a GFS2 file system for 64-bit hardware is 100TB andthe current supported maximum size of a GFS2 file system for 32-bit hardware is 16TB.
Note that even though GFS2 large file systems are possible, that does not mean they arerecommended. The rule of thumb with GFS2 is that smaller is better: it is better to have 10 1TB filesystems than one 10TB file system.
There are several reasons why you should keep your GFS2 file systems small:
Less time is required to back up each file system.
Less time is required if you need to check the file system with the fsck.gfs2 command.
Less memory is required if you need to check the file system with the fsck.gfs2 command.
In addition, fewer resource groups to maintain mean better performance.
Of course, if you make your GFS2 file system too small, you might run out of space, and that has itsown consequences. You should consider your own use cases before deciding on a size.
2.1.2. Block Size: Default (4K) Blocks Are Preferred
The mkfs.gfs2 command attempts to estimate an optimal block size based on device topology. Ingeneral, 4K blocks are the preferred block size because 4K is the default page size (memory) for Linux.Unlike some other file systems, GFS2 does most of its operations using 4K kernel buffers. If your blocksize is 4K, the kernel has to do less work to manipulate the buffers.
It is recommended that you use the default block size, which should yield the highest performance. Youmay need to use a different block size only if you require efficient storage of many very small files.
Global File System 2
10

2.1.3. Number of Journals: One For Each Node That Mounts
GFS2 requires one journal for each node in the cluster that needs to mount the file system. Forexample, if you have a 16-node cluster but need to mount only the file system from two nodes, youneed only two journals. If you need to mount from a third node, you can always add a journal with the gfs2_jadd command. With GFS2, you can add journals on the fly.
2.1.4. Journal Size: Default (128MB) Is Usually Optimal
When you run the mkfs.gfs2 command to create a GFS2 file system, you may specify the size of thejournals. If you do not specify a size, it will default to 128MB, which should be optimal for mostapplications.
Some system administrators might think that 128MB is excessive and be tempted to reduce the size ofthe journal to the minimum of 8MB or a more conservative 32MB. While that might work, it canseverely impact performance. Like many journaling file systems, every time GFS2 writes metadata, themetadata is committed to the journal before it is put into place. This ensures that if the system crashesor loses power, you will recover all of the metadata when the journal is automatically replayed atmount time. However, it does not take much file system activity to fill an 8MB journal, and when thejournal is full, performance slows because GFS2 has to wait for writes to the storage.
It is generally recommended to use the default journal size of 128MB. If your file system is very small(for example, 5GB), having a 128MB journal might be impractical. If you have a larger file system andcan afford the space, using 256MB journals might improve performance.
2.1.5. Size and Number of Resource Groups
When a GFS2 file system is created with the mkfs.gfs2 command, it divides the storage into uniformslices known as resource groups. It attempts to estimate an optimal resource group size (ranging from32MB to 2GB). You can override the default with the -r option of the mkfs.gfs2 command.
Your optimal resource group size depends on how you will use the file system. Consider how full it willbe and whether or not it will be severely fragmented.
You should experiment with different resource group sizes to see which results in optimalperformance. It is a best practice to experiment with a test cluster before deploying GFS2 into fullproduction.
If your file system has too many resource groups (each of which is too small), block allocations canwaste too much time searching tens of thousands (or hundreds of thousands) of resource groups for afree block. The more full your file system, the more resource groups that will be searched, and everyone of them requires a cluster-wide lock. This leads to slow performance.
If, however, your file system has too few resource groups (each of which is too big), block allocationsmight contend more often for the same resource group lock, which also impacts performance. Forexample, if you have a 10GB file system that is carved up into five resource groups of 2GB, the nodes inyour cluster will fight over those five resource groups more often than if the same file system werecarved into 320 resource groups of 32MB. The problem is exacerbated if your file system is nearly fullbecause every block allocation might have to look through several resource groups before it finds onewith a free block. GFS2 tries to mitigate this problem in two ways:
First, when a resource group is completely full, it remembers that and tries to avoid checking itfor future allocations (until a block is freed from it). If you never delete files, contention will beless severe. However, if your application is constantly deleting blocks and allocating newblocks on a file system that is mostly full, contention will be very high and this will severelyimpact performance.
CHAPTER 2. GFS2 CONFIGURATION AND OPERATIONAL CONSIDERATIONS
11

Second, when new blocks are added to an existing file (for example, appending) GFS2 willattempt to group the new blocks together in the same resource group as the file. This is doneto increase performance: on a spinning disk, seeks take less time when they are physicallyclose together.
The worst case scenario is when there is a central directory in which all the nodes create files becauseall of the nodes will constantly fight to lock the same resource group.
2.2. FILE SYSTEM FRAGMENTATION
While there is no defragmentation tool for GFS2 on Red Hat Enterprise Linux, you can defragmentindividual files by identifying them with the filefrag tool, copying them to temporary files, andrenaming the temporary files to replace the originals.
2.3. BLOCK ALLOCATION ISSUES
This section provides a summary of issues related to block allocation in GFS2 file systems. Eventhough applications that only write data typically do not care how or where a block is allocated, a littleknowledge about how block allocation works can help you optimize performance.
2.3.1. Leave Free Space in the File System
When a GFS2 file system is nearly full, the block allocator starts to have a difficult time finding spacefor new blocks to be allocated. As a result, blocks given out by the allocator tend to be squeezed intothe end of a resource group or in tiny slices where file fragmentation is much more likely. This filefragmentation can cause performance problems. In addition, when a GFS2 file system is nearly full, theGFS2 block allocator spends more time searching through multiple resource groups, and that addslock contention that would not necessarily be there on a file system that has ample free space. Thisalso can cause performance problems.
For these reasons, it is recommended that you not run a file system that is more than 85 percent full,although this figure may vary depending on workload.
2.3.2. Have Each Node Allocate Its Own Files, If Possible
Due to the way the distributed lock manager (DLM) works, there will be more lock contention if all filesare allocated by one node and other nodes need to add blocks to those files.
In GFS (version 1), all locks were managed by a central lock manager whose job was to control lockingthroughout the cluster. This grand unified lock manager (GULM) was problematic because it was asingle point of failure. GFS2’s replacement locking scheme, DLM, spreads the locks throughout thecluster. If any node in the cluster goes down, its locks are recovered by the other nodes.
With DLM, the first node to lock a resource (like a file) becomes the “lock master” for that lock. Othernodes may lock that resource, but they have to ask permission from the lock master first. Each nodeknows which locks for which it is the lock master, and each node knows which node it has lent a lock to.Locking a lock on the master node is much faster than locking one on another node that has to stopand ask permission from the lock’s master.
As in many file systems, the GFS2 allocator tries to keep blocks in the same file close to one anotherto reduce the movement of disk heads and boost performance. A node that allocates blocks to a filewill likely need to use and lock the same resource groups for the new blocks (unless all the blocks inthat resource group are in use). The file system will run faster if the lock master for the resource groupcontaining the file allocates its data blocks (it is faster to have the node that first opened the file do allthe writing of new blocks).
Global File System 2
12

2.3.3. Preallocate, If Possible
If files are preallocated, block allocations can be avoided altogether and the file system can run moreefficiently. Newer versions of GFS2 include the fallocate(1) system call, which you can use topreallocate blocks of data.
2.4. CLUSTER CONSIDERATIONS
When determining the number of nodes that your system will contain, note that there is a trade-offbetween high availability and performance. With a larger number of nodes, it becomes increasinglydifficult to make workloads scale. For that reason, Red Hat does not support using GFS2 for cluster filesystem deployments greater than 16 nodes.
Deploying a cluster file system is not a "drop in" replacement for a single node deployment. Red Hatrecommends that you allow a period of around 8-12 weeks of testing on new installations in order totest the system and ensure that it is working at the required performance level. During this period anyperformance or functional issues can be worked out and any queries should be directed to the Red Hatsupport team.
Red Hat recommends that customers considering deploying clusters have their configurationsreviewed by Red Hat support before deployment to avoid any possible support issues later on.
2.5. USAGE CONSIDERATIONS
This section provides general recommendations about GFS2 usage.
2.5.1. Mount Options: noatime and nodiratime
It is generally recommended to mount GFS2 file systems with the noatime and nodiratimearguments. This allows GFS2 to spend less time updating disk inodes for every access.
2.5.2. VFS Tuning Options: Research and Experiment
Like all Linux file systems, GFS2 sits on top of a layer called the virtual file system (VFS). You can tunethe VFS layer to improve underlying GFS2 performance by using the sysctl(8) command. Forexample, the values for dirty_background_ratio and vfs_cache_pressure may be adjusteddepending on your situation. To fetch the current values, use the following commands:
# sysctl -n vm.dirty_background_ratio# sysctl -n vm.vfs_cache_pressure
The following commands adjust the values:
# sysctl -w vm.dirty_background_ratio=20# sysctl -w vm.vfs_cache_pressure=500
You can permanently change the values of these parameters by editing the /etc/sysctl.conf file.
To find the optimal values for your use cases, research the various VFS options and experiment on atest cluster before deploying into full production.
2.5.3. SELinux on GFS2
CHAPTER 2. GFS2 CONFIGURATION AND OPERATIONAL CONSIDERATIONS
13

As of Red Hat Enterprise Linux 7.4 and later, Security Enhanced Linux (SELinux) is supported for usewith GFS2 file systems.
Use of SELinux with GFS2 incurs a small performance penalty. To avoid this overhead, you may choosenot to use SELinux with GFS2 even on a system with SELinux in enforcing mode. When mounting aGFS2 file system, you can ensure that SELinux will not attempt to read the seclabel element on eachfile system object by using one of the context options as described on the mount(8) man page;SELinux will assume that all content in the file system is labeled with the seclabel element providedin the context mount options. This will also speed up processing as it avoids another disk read of theextended attribute block that could contain seclabel elements.
For example, on a system with SELinux in enforcing mode, you can use the following mount commandto mount the GFS2 file system if the file system is going to contain Apache content. This label willapply to the entire file system; it remains in memory and is not written to disk.
# mount -t gfs2 -o context=system_u:object_r:httpd_sys_content_t:s0 /dev/mapper/xyz/mnt/gfs2
If you are not sure whether the file system will contain Apache content, you can use the labels public_content_rw_t or public_content_t, or you could define a new label altogether anddefine a policy around it.
Note that in a Pacemaker cluster you should always use Pacemaker to manage a GFS2 file system. Youcan specify the mount options when you create a GFS2 file system resource, as described inChapter 5, Configuring a GFS2 File System in a Cluster.
2.5.4. Setting Up NFS Over GFS2
Due to the added complexity of the GFS2 locking subsystem and its clustered nature, setting up NFSover GFS2 requires taking many precautions and careful configuration. This section describes thecaveats you should take into account when configuring an NFS service over a GFS2 file system.
WARNING
If the GFS2 file system is NFS exported, and NFS client applications use POSIXlocks, then you must mount the file system with the localflocks option. Theintended effect of this is to force POSIX locks from each server to be local: non-clustered, independent of each other. (A number of problems exist if GFS2attempts to implement POSIX locks from NFS across the nodes of a cluster.) Forapplications running on NFS clients, localized POSIX locks means that two clientscan hold the same lock concurrently if the two clients are mounting from differentservers. If all clients mount NFS from one server, then the problem of separateservers granting the same locks independently goes away. If you are not surewhether to mount your file system with the localflocks option, you should notuse the option; it is always safer to have the locks working on a clustered basis.
In addition to the locking considerations, you should take the following into account when configuringan NFS service over a GFS2 file system.
Global File System 2
14

Red Hat supports only Red Hat High Availability Add-On configurations using NFSv3 withlocking in an active/passive configuration with the following characteristics:
The back-end file system is a GFS2 file system running on a 2 to 16 node cluster.
An NFSv3 server is defined as a service exporting the entire GFS2 file system from a singlecluster node at a time.
The NFS server can fail over from one cluster node to another (active/passiveconfiguration).
No access to the GFS2 file system is allowed except through the NFS server. This includesboth local GFS2 file system access as well as access through Samba or Clustered Samba.
There is no NFS quota support on the system.
This configuration provides High Availability (HA) for the file system and reduces systemdowntime since a failed node does not result in the requirement to execute the fsck commandwhen failing the NFS server from one node to another.
The fsid= NFS option is mandatory for NFS exports of GFS2.
If problems arise with your cluster (for example, the cluster becomes inquorate and fencing isnot successful), the clustered logical volumes and the GFS2 file system will be frozen and noaccess is possible until the cluster is quorate. You should consider this possibility whendetermining whether a simple failover solution such as the one defined in this procedure is themost appropriate for your system.
2.5.5. Samba (SMB or Windows) File Serving Over GFS2
You can use Samba (SMB or Windows) file serving from a GFS2 file system with CTDB, which allowsactive/active configurations.
Simultaneous access to the data in the Samba share from outside of Samba is not supported. There iscurrently no support for GFS2 cluster leases, which slows Samba file serving.
2.5.6. Configuring Virtual Machines for GFS2
When using a GFS2 file system with a virtual machine, it is important that your VM storage settings oneach node be configured properly in order to force the cache off. For example, including these settingsfor cache and io in the libvirt domain should allow GFS2 to behave as expected.
<driver name='qemu' type='raw' cache='none' io='native'/>
Alternately, you can configure the shareable attribute within the device element. This indicates thatthe device is expected to be shared between domains (as long as hypervisor and OS support this). If shareable is used, cache='no' should be used for that device.
2.6. FILE SYSTEM BACKUPS
It is important to make regular backups of your GFS2 file system in case of emergency, regardless ofthe size of your file system. Many system administrators feel safe because they are protected by RAID,multipath, mirroring, snapshots, and other forms of redundancy, but there is no such thing as safeenough.
CHAPTER 2. GFS2 CONFIGURATION AND OPERATIONAL CONSIDERATIONS
15

It can be a problem to create a backup since the process of backing up a node or set of nodes usuallyinvolves reading the entire file system in sequence. If this is done from a single node, that node willretain all the information in cache until other nodes in the cluster start requesting locks. Running thistype of backup program while the cluster is in operation will negatively impact performance.
Dropping the caches once the backup is complete reduces the time required by other nodes to regainownership of their cluster locks/caches. This is still not ideal, however, because the other nodes willhave stopped caching the data that they were caching before the backup process began. You can dropcaches using the following command after the backup is complete:
echo -n 3 > /proc/sys/vm/drop_caches
It is faster if each node in the cluster backs up its own files so that the task is split between the nodes.You might be able to accomplish this with a script that uses the rsync command on node-specificdirectories.
Red Hat recommends making a GFS2 backup by creating a hardware snapshot on the SAN, presentingthe snapshot to another system, and backing it up there. The backup system should mount thesnapshot with -o lockproto=lock_nolock since it will not be in a cluster.
2.7. HARDWARE CONSIDERATIONS
You should take the following hardware considerations into account when deploying a GFS2 filesystem.
Use Higher Quality Storage Options
GFS2 can operate on cheaper shared storage options, such as iSCSI or Fibre Channel overEthernet (FCoE), but you will get better performance if you buy higher quality storage withlarger caching capacity. Red Hat performs most quality, sanity, and performance tests on SANstorage with Fibre Channel interconnect. As a general rule, it is always better to deploysomething that has been tested first.
Test Network Equipment Before Deploying
Higher quality, faster network equipment makes cluster communications and GFS2 run fasterwith better reliability. However, you do not have to purchase the most expensive hardware.Some of the most expensive network switches have problems passing multicast packets, whichare used for passing fcntl locks (flocks), whereas cheaper commodity network switches aresometimes faster and more reliable. Red Hat recommends trying equipment before deployingit into full production.
2.8. PERFORMANCE ISSUES: CHECK THE RED HAT CUSTOMERPORTAL
For information on recommendations for deploying and upgrading Red Hat Enterprise Linux clustersusing the High Availability Add-On and Red Hat Global File System 2 (GFS2) see the article "Red HatEnterprise Linux Cluster, High Availability, and GFS Deployment Best Practices" on the Red HatCustomer Portal at https://access.redhat.com/kb/docs/DOC-40821.
2.9. GFS2 NODE LOCKING
In order to get the best performance from a GFS2 file system, it is very important to understand someof the basic theory of its operation. A single node file system is implemented alongside a cache, the
Global File System 2
16

purpose of which is to eliminate latency of disk accesses when using frequently requested data. InLinux the page cache (and historically the buffer cache) provide this caching function.
With GFS2, each node has its own page cache which may contain some portion of the on-disk data.GFS2 uses a locking mechanism called glocks (pronounced gee-locks) to maintain the integrity of thecache between nodes. The glock subsystem provides a cache management function which isimplemented using the distributed lock manager (DLM) as the underlying communication layer.
The glocks provide protection for the cache on a per-inode basis, so there is one lock per inode which isused for controlling the caching layer. If that glock is granted in shared mode (DLM lock mode: PR)then the data under that glock may be cached upon one or more nodes at the same time, so that all thenodes may have local access to the data.
If the glock is granted in exclusive mode (DLM lock mode: EX) then only a single node may cache thedata under that glock. This mode is used by all operations which modify the data (such as the writesystem call).
If another node requests a glock which cannot be granted immediately, then the DLM sends a messageto the node or nodes which currently hold the glocks blocking the new request to ask them to droptheir locks. Dropping glocks can be (by the standards of most file system operations) a long process.Dropping a shared glock requires only that the cache be invalidated, which is relatively quick andproportional to the amount of cached data.
Dropping an exclusive glock requires a log flush, and writing back any changed data to disk, followedby the invalidation as per the shared glock.
The difference between a single node file system and GFS2, then, is that a single node file system has asingle cache and GFS2 has a separate cache on each node. In both cases, latency to access cacheddata is of a similar order of magnitude, but the latency to access uncached data is much greater inGFS2 if another node has previously cached that same data.
NOTE
Due to the way in which GFS2's caching is implemented the best performance isobtained when either of the following takes place:
An inode is used in a read only fashion across all nodes.
An inode is written or modified from a single node only.
Note that inserting and removing entries from a directory during file creation anddeletion counts as writing to the directory inode.
It is possible to break this rule provided that it is broken relatively infrequently. Ignoringthis rule too often will result in a severe performance penalty.
If you mmap() a file on GFS2 with a read/write mapping, but only read from it, this onlycounts as a read. On GFS though, it counts as a write, so GFS2 is much more scalablewith mmap() I/O.
If you do not set the noatime mount parameter, then reads will also result in writes toupdate the file timestamps. We recommend that all GFS2 users should mount with noatime unless they have a specific requirement for atime.
2.9.1. Issues with Posix Locking
CHAPTER 2. GFS2 CONFIGURATION AND OPERATIONAL CONSIDERATIONS
17

When using Posix locking, you should take the following into account:
Use of Flocks will yield faster processing than use of Posix locks.
Programs using Posix locks in GFS2 should avoid using the GETLK function since, in aclustered environment, the process ID may be for a different node in the cluster.
2.9.2. Performance Tuning with GFS2
It is usually possible to alter the way in which a troublesome application stores its data in order to gaina considerable performance advantage.
A typical example of a troublesome application is an email server. These are often laid out with a spooldirectory containing files for each user (mbox), or with a directory for each user containing a file foreach message (maildir). When requests arrive over IMAP, the ideal arrangement is to give each useran affinity to a particular node. That way their requests to view and delete email messages will tend tobe served from the cache on that one node. Obviously if that node fails, then the session can berestarted on a different node.
When mail arrives by means of SMTP, then again the individual nodes can be set up so as to pass acertain user's mail to a particular node by default. If the default node is not up, then the message can besaved directly into the user's mail spool by the receiving node. Again this design is intended to keepparticular sets of files cached on just one node in the normal case, but to allow direct access in the caseof node failure.
This setup allows the best use of GFS2's page cache and also makes failures transparent to theapplication, whether imap or smtp.
Backup is often another tricky area. Again, if it is possible it is greatly preferable to back up theworking set of each node directly from the node which is caching that particular set of inodes. If youhave a backup script which runs at a regular point in time, and that seems to coincide with a spike inthe response time of an application running on GFS2, then there is a good chance that the cluster maynot be making the most efficient use of the page cache.
Obviously, if you are in the (enviable) position of being able to stop the application in order to performa backup, then this will not be a problem. On the other hand, if a backup is run from just one node, thenafter it has completed a large portion of the file system will be cached on that node, with a performancepenalty for subsequent accesses from other nodes. This can be mitigated to a certain extent bydropping the VFS page cache on the backup node after the backup has completed with followingcommand:
echo -n 3 >/proc/sys/vm/drop_caches
However this is not as good a solution as taking care to ensure the working set on each node is eithershared, mostly read only across the cluster, or accessed largely from a single node.
2.9.3. Troubleshooting GFS2 Performance with the GFS2 Lock Dump
If your cluster performance is suffering because of inefficient use of GFS2 caching, you may see largeand increasing I/O wait times. You can make use of GFS2's lock dump information to determine thecause of the problem.
This section provides an overview of the GFS2 lock dump. For a more complete description of the GFS2lock dump, see Appendix B, GFS2 Tracepoints and the debugfs glocks File.
Global File System 2
18

The GFS2 lock dump information can be gathered from the debugfs file which can be found at thefollowing path name, assuming that debugfs is mounted on /sys/kernel/debug/:
/sys/kernel/debug/gfs2/fsname/glocks
The content of the file is a series of lines. Each line starting with G: represents one glock, and thefollowing lines, indented by a single space, represent an item of information relating to the glockimmediately before them in the file.
The best way to use the debugfs file is to use the cat command to take a copy of the completecontent of the file (it might take a long time if you have a large amount of RAM and a lot of cachedinodes) while the application is experiencing problems, and then looking through the resulting data at alater date.
NOTE
It can be useful to make two copies of the debugfs file, one a few seconds or even aminute or two after the other. By comparing the holder information in the two tracesrelating to the same glock number, you can tell whether the workload is makingprogress (it is just slow) or whether it has become stuck (which is always a bug andshould be reported to Red Hat support immediately).
Lines in the debugfs file starting with H: (holders) represent lock requests either granted or waitingto be granted. The flags field on the holders line f: shows which: The 'W' flag refers to a waiting request,the 'H' flag refers to a granted request. The glocks which have large numbers of waiting requests arelikely to be those which are experiencing particular contention.
Table 2.1, “Glock flags” shows the meanings of the different glock flags and Table 2.2, “Glock holderflags” shows the meanings of the different glock holder flags.
Table 2.1. Glock flags
Flag Name Meaning
b Blocking Valid when the locked flag is set, and indicates that theoperation that has been requested from the DLM may block.This flag is cleared for demotion operations and for "try" locks.The purpose of this flag is to allow gathering of stats of the DLMresponse time independent from the time taken by other nodesto demote locks.
d Pending demote A deferred (remote) demote request
D Demote A demote request (local or remote)
f Log flush The log needs to be committed before releasing this glock
F Frozen Replies from remote nodes ignored - recovery is in progress.This flag is not related to file system freeze, which uses adifferent mechanism, but is used only in recovery.
i Invalidate in progress In the process of invalidating pages under this glock
CHAPTER 2. GFS2 CONFIGURATION AND OPERATIONAL CONSIDERATIONS
19

I Initial Set when DLM lock is associated with this glock
l Locked The glock is in the process of changing state
L LRU Set when the glock is on the LRU list
o Object Set when the glock is associated with an object (that is, aninode for type 2 glocks, and a resource group for type 3 glocks)
p Demote in progress The glock is in the process of responding to a demote request
q Queued Set when a holder is queued to a glock, and cleared when theglock is held, but there are no remaining holders. Used as partof the algorithm the calculates the minimum hold time for aglock.
r Reply pending Reply received from remote node is awaiting processing
y Dirty Data needs flushing to disk before releasing this glock
Flag Name Meaning
Table 2.2. Glock holder flags
Flag Name Meaning
a Async Do not wait for glock result (will poll for result later)
A Any Any compatible lock mode is acceptable
c No cache When unlocked, demote DLM lock immediately
e No expire Ignore subsequent lock cancel requests
E exact Must have exact lock mode
F First Set when holder is the first to be granted for this lock
H Holder Indicates that requested lock is granted
p Priority Enqueue holder at the head of the queue
t Try A "try" lock
T Try 1CB A "try" lock that sends a callback
W Wait Set while waiting for request to complete
Global File System 2
20

Having identified a glock which is causing a problem, the next step is to find out which inode it relatesto. The glock number (n: on the G: line) indicates this. It is of the form type/number and if type is 2, thenthe glock is an inode glock and the number is an inode number. To track down the inode, you can thenrun find -inum number where number is the inode number converted from the hex format in theglocks file into decimal.
WARNING
If you run the find command on a file system when it is experiencing lockcontention, you are likely to make the problem worse. It is a good idea to stop theapplication before running the find command when you are looking for contendedinodes.
Table 2.3, “Glock types” shows the meanings of the different glock types.
Table 2.3. Glock types
Typenumber
Lock type Use
1 Trans Transaction lock
2 Inode Inode metadata and data
3 Rgrp Resource group metadata
4 Meta The superblock
5 Iopen Inode last closer detection
6 Flock flock(2) syscall
8 Quota Quota operations
9 Journal Journal mutex
If the glock that was identified was of a different type, then it is most likely to be of type 3: (resourcegroup). If you see significant numbers of processes waiting for other types of glock under normal loads,report this to Red Hat support.
If you do see a number of waiting requests queued on a resource group lock there may be a number ofreasons for this. One is that there are a large number of nodes compared to the number of resourcegroups in the file system. Another is that the file system may be very nearly full (requiring, on average,longer searches for free blocks). The situation in both cases can be improved by adding more storageand using the gfs2_grow command to expand the file system.
CHAPTER 2. GFS2 CONFIGURATION AND OPERATIONAL CONSIDERATIONS
21

CHAPTER 3. MANAGING GFS2This chapter describes the tasks and commands for managing GFS2 and consists of the followingsections:
Section 3.1, “Making a File System”
Section 3.2, “Mounting a File System”
Section 3.3, “Unmounting a File System”
Section 3.5, “GFS2 Quota Management”
Section 3.6, “Growing a File System”
Section 3.7, “Adding Journals to a File System”
Section 3.8, “Data Journaling”
Section 3.9, “Configuring atime Updates”
Section 3.10, “Suspending Activity on a File System”
Section 3.11, “Repairing a File System”
Section 3.12, “The GFS2 Withdraw Function”
3.1. MAKING A FILE SYSTEM
You create a GFS2 file system with the mkfs.gfs2 command. You can also use the mkfs commandwith the -t gfs2 option specified. A file system is created on an activated LVM volume. The followinginformation is required to run the mkfs.gfs2 command:
Lock protocol/module name (the lock protocol for a cluster is lock_dlm)
Cluster name (needed when specifying the LockTableName parameter)
Number of journals (one journal required for each node that may be mounting the file system)
When creating a GFS2 file system, you can use the mkfs.gfs2 command directly, or you can use the mkfs command with the -t parameter specifying a file system of type gfs2, followed by the GFS2 filesystem options.
NOTE
Once you have created a GFS2 file system with the mkfs.gfs2 command, you cannotdecrease the size of the file system. You can, however, increase the size of an existingfile system with the gfs2_grow command, as described in Section 3.6, “Growing a FileSystem”.
Usage
When creating a clustered GFS2 file system, you can use either of the following formats:
mkfs.gfs2 -p LockProtoName -t LockTableName -j NumberJournals BlockDevice
Global File System 2
22

mkfs -t gfs2 -p LockProtoName -t LockTableName -j NumberJournals BlockDevice
When creating a local GFS2 file system, you can use either of the following formats:
NOTE
As of the Red Hat Enterprise Linux 6 release, Red Hat does not support the use of GFS2as a single-node file system.
mkfs.gfs2 -p LockProtoName -j NumberJournals BlockDevice
mkfs -t gfs2 -p LockProtoName -j NumberJournals BlockDevice
WARNING
Make sure that you are very familiar with using the LockProtoName and LockTableName parameters. Improper use of the LockProtoName and LockTableName parameters may cause file system or lock space corruption.
LockProtoName
Specifies the name of the locking protocol to use. The lock protocol for a cluster is lock_dlm.
LockTableName
This parameter is specified for a GFS2 file system in a cluster configuration. It has two partsseparated by a colon (no spaces) as follows: ClusterName:FSName
ClusterName, the name of the cluster for which the GFS2 file system is being created.
FSName, the file system name, can be 1 to 16 characters long. The name must be unique forall lock_dlm file systems over the cluster, and for all file systems ( lock_dlm and lock_nolock) on each local node.
Number
Specifies the number of journals to be created by the mkfs.gfs2 command. One journal isrequired for each node that mounts the file system. For GFS2 file systems, more journals can beadded later without growing the file system, as described in Section 3.7, “Adding Journals to a FileSystem”.
BlockDevice
Specifies a logical or physical volume.
CHAPTER 3. MANAGING GFS2
23

Examples
In these examples, lock_dlm is the locking protocol that the file system uses, since this is a clusteredfile system. The cluster name is alpha, and the file system name is mydata1. The file system containseight journals and is created on /dev/vg01/lvol0.
# mkfs.gfs2 -p lock_dlm -t alpha:mydata1 -j 8 /dev/vg01/lvol0
# mkfs -t gfs2 -p lock_dlm -t alpha:mydata1 -j 8 /dev/vg01/lvol0
In these examples, a second lock_dlm file system is made, which can be used in cluster alpha. Thefile system name is mydata2. The file system contains eight journals and is created on /dev/vg01/lvol1.
mkfs.gfs2 -p lock_dlm -t alpha:mydata2 -j 8 /dev/vg01/lvol1
mkfs -t gfs2 -p lock_dlm -t alpha:mydata2 -j 8 /dev/vg01/lvol1
Complete Options
Table 3.1, “Command Options: mkfs.gfs2” describes the mkfs.gfs2 command options (flags andparameters).
Table 3.1. Command Options: mkfs.gfs2
Flag Parameter Description
-c Megabytes Sets the initial size of each journal's quota change file to Megabytes.
-D Enables debugging output.
-h Help. Displays available options.
-J Megabytes Specifies the size of the journal in megabytes. Defaultjournal size is 128 megabytes. The minimum size is 8megabytes. Larger journals improve performance,although they use more memory than smaller journals.
-j Number Specifies the number of journals to be created by the mkfs.gfs2 command. One journal is required for eachnode that mounts the file system. If this option is notspecified, one journal will be created. For GFS2 filesystems, you can add additional journals at a later timewithout growing the file system.
-O Prevents the mkfs.gfs2 command from asking forconfirmation before writing the file system.
Global File System 2
24

-p LockProtoNameSpecifies the name of the locking protocol to use. Recognizedlocking protocols include:
lock_dlm — The standard locking module, required for aclustered file system.
lock_nolock — Used when GFS2 is acting as a local filesystem (one node only).
-q Quiet. Do not display anything.
-r Megabytes Specifies the size of the resource groups in megabytes. Theminimum resource group size is 32 megabytes. Themaximum resource group size is 2048 megabytes. A largeresource group size may increase performance on verylarge file systems. If this is not specified, mkfs.gfs2chooses the resource group size based on the size of thefile system: average size file systems will have 256megabyte resource groups, and bigger file systems willhave bigger RGs for better performance.
-t LockTableNameA unique identifier that specifies the lock table field whenyou use the lock_dlm protocol; the lock_nolockprotocol does not use this parameter.
This parameter has two parts separated by a colon (nospaces) as follows: ClusterName:FSName.
ClusterName is the name of the cluster for which theGFS2 file system is being created; only members of thiscluster are permitted to use this file system. The cluster nameis set in the /etc/cluster/cluster.conf file bymeans of the Cluster Configuration Tool and displayed at theCluster Status Tool in the Red Hat Cluster Suite clustermanagement GUI.
FSName, the file system name, can be 1 to 16 characters inlength, and the name must be unique among all file systemsin the cluster.
-u Megabytes Specifies the initial size of each journal's unlinked tag file.
-V Displays command version information.
Flag Parameter Description
3.2. MOUNTING A FILE SYSTEM
CHAPTER 3. MANAGING GFS2
25

Before you can mount a GFS2 file system, the file system must exist (see Section 3.1, “Making a FileSystem”), the volume where the file system exists must be activated, and the supporting clustering andlocking systems must be started (see Configuring and Managing a Red Hat Cluster). After thoserequirements have been met, you can mount the GFS2 file system as you would any Linux file system.
To manipulate file ACLs, you must mount the file system with the -o acl mount option. If a file systemis mounted without the -o acl mount option, users are allowed to view ACLs (with getfacl), but arenot allowed to set them (with setfacl).
Usage
Mounting Without ACL Manipulation
mount BlockDevice MountPoint
Mounting With ACL Manipulation
mount -o acl BlockDevice MountPoint
-o acl
GFS2-specific option to allow manipulating file ACLs.
BlockDevice
Specifies the block device where the GFS2 file system resides.
MountPoint
Specifies the directory where the GFS2 file system should be mounted.
Example
In this example, the GFS2 file system on /dev/vg01/lvol0 is mounted on the /mygfs2 directory.
# mount /dev/vg01/lvol0 /mygfs2
Complete Usage
mount BlockDevice MountPoint -o option
The -o option argument consists of GFS2-specific options (see Table 3.2, “GFS2-Specific MountOptions”) or acceptable standard Linux mount -o options, or a combination of both. Multiple optionparameters are separated by a comma and no spaces.
NOTE
The mount command is a Linux system command. In addition to using GFS2-specificoptions described in this section, you can use other, standard, mount command options(for example, -r). For information about other Linux mount command options, see theLinux mount man page.
Global File System 2
26

Table 3.2, “GFS2-Specific Mount Options” describes the available GFS2-specific -o option valuesthat can be passed to GFS2 at mount time.
NOTE
This table includes descriptions of options that are used with local file systems only.Note, however, that as of the Red Hat Enterprise Linux 6 release, Red Hat does notsupport the use of GFS2 as a single-node file system. Red Hat will continue to supportsingle-node GFS2 file systems for mounting snapshots of cluster file systems (forexample, for backup purposes).
Table 3.2. GFS2-Specific Mount Options
Option Description
acl Allows manipulating file ACLs. If a file system is mountedwithout the acl mount option, users are allowed to viewACLs (with getfacl), but are not allowed to set them(with setfacl).
data=[ordered|writeback] When data=ordered is set, the user data modified by atransaction is flushed to the disk before the transaction iscommitted to disk. This should prevent the user fromseeing uninitialized blocks in a file after a crash. When data=writeback mode is set, the user data is written tothe disk at any time after it is dirtied; this does not providethe same consistency guarantee as ordered mode, but itshould be slightly faster for some workloads. The defaultvalue is ordered mode.
ignore_local_fs
Caution: This option should not be usedwhen GFS2 file systems are shared.
Forces GFS2 to treat the file system as a multi-host filesystem. By default, using lock_nolock automaticallyturns on the localflocks flag.
localflocks
Caution: This option should not be usedwhen GFS2 file systems are shared.
Tells GFS2 to let the VFS (virtual file system) layer do allflock and fcntl. The localflocks flag is automaticallyturned on by lock_nolock.
lockproto=LockModuleName Allows the user to specify which locking protocol to usewith the file system. If LockModuleName is not specified,the locking protocol name is read from the file systemsuperblock.
locktable=LockTableName Allows the user to specify which locking table to use withthe file system.
CHAPTER 3. MANAGING GFS2
27

quota=[off/account/on] Turns quotas on or off for a file system. Setting the quotasto be in the account state causes the per UID/GID usagestatistics to be correctly maintained by the file system;limit and warn values are ignored. The default value is off.
errors=panic|withdraw When errors=panic is specified, file system errors willcause a kernel panic. When errors=withdraw isspecified, which is the default behavior, file system errorswill cause the system to withdraw from the file system andmake it inaccessible until the next reboot; in some casesthe system may remain running.
discard/nodiscard Causes GFS2 to generate "discard" I/O requests for blocksthat have been freed. These can be used by suitablehardware to implement thin provisioning and similarschemes.
barrier/nobarrier Causes GFS2 to send I/O barriers when flushing thejournal. The default value is on. This option is automaticallyturned off if the underlying device does not support I/Obarriers. Use of I/O barriers with GFS2 is highlyrecommended at all times unless the block device isdesigned so that it cannot lose its write cache content (forexample, if it is on a UPS or it does not have a write cache).
quota_quantum=secs Sets the number of seconds for which a change in the quotainformation may sit on one node before being written tothe quota file. This is the preferred way to set thisparameter. The value is an integer number of secondsgreater than zero. The default is 60 seconds. Shortersettings result in faster updates of the lazy quotainformation and less likelihood of someone exceeding theirquota. Longer settings make file system operationsinvolving quotas faster and more efficient.
statfs_quantum=secs Setting statfs_quantum to 0 is the preferred way toset the slow version of statfs. The default value is 30secs which sets the maximum time period before statfschanges will be synced to the master statfs file. This canbe adjusted to allow for faster, less accurate statfsvalues or slower more accurate values. When this option isset to 0, statfs will always report the true values.
statfs_percent=value Provides a bound on the maximum percentage change inthe statfs information on a local basis before it issynced back to the master statfs file, even if the timeperiod has not expired. If the setting of statfs_quantum is 0, then this setting is ignored.
Option Description
Global File System 2
28

3.3. UNMOUNTING A FILE SYSTEM
The GFS2 file system can be unmounted the same way as any Linux file system — by using the umountcommand.
NOTE
The umount command is a Linux system command. Information about this commandcan be found in the Linux umount command man pages.
Usage
umount MountPoint
MountPoint
Specifies the directory where the GFS2 file system is currently mounted.
3.4. SPECIAL CONSIDERATIONS WHEN MOUNTING GFS2 FILESYSTEMS
GFS2 file systems that have been mounted manually rather than automatically through Pacemaker willnot be known to the system when file systems are unmounted at system shutdown. As a result, theGFS2 script will not unmount the GFS2 file system. After the GFS2 shutdown script is run, the standardshutdown process kills off all remaining user processes, including the cluster infrastructure, and triesto unmount the file system. This unmount will fail without the cluster infrastructure and the system willhang.
To prevent the system from hanging when the GFS2 file systems are unmounted, you should do one ofthe following:
Always use Pacemaker to manage the GFS2 file system. For information on configuring a GFS2file system in a Pacemaker cluster, see Chapter 5, Configuring a GFS2 File System in a Cluster.
If a GFS2 file system has been mounted manually with the mount command, be sure tounmount the file system manually with the umount command before rebooting or shuttingdown the system.
If your file system hangs while it is being unmounted during system shutdown under thesecircumstances, perform a hardware reboot. It is unlikely that any data will be lost since the file systemis synced earlier in the shutdown process.
3.5. GFS2 QUOTA MANAGEMENT
File system quotas are used to limit the amount of file system space a user or group can use. A user orgroup does not have a quota limit until one is set. When a GFS2 file system is mounted with the quota=on or quota=account option, GFS2 keeps track of the space used by each user and groupeven when there are no limits in place. GFS2 updates quota information in a transactional way sosystem crashes do not require quota usages to be reconstructed.
To prevent a performance slowdown, a GFS2 node synchronizes updates to the quota file onlyperiodically. The fuzzy quota accounting can allow users or groups to slightly exceed the set limit. Tominimize this, GFS2 dynamically reduces the synchronization period as a hard quota limit is
CHAPTER 3. MANAGING GFS2
29

approached.
NOTE
GFS2 supports the standard Linux quota facilities. In order to use this you will need toinstall the quota RPM. This is the preferred way to administer quotas on GFS2 andshould be used for all new deployments of GFS2 using quotas. This section documentsGFS2 quota management using these facilities.
3.5.1. Configuring Disk Quotas
To implement disk quotas, use the following steps:
1. Set up quotas in enforcement or accounting mode.
2. Initialize the quota database file with current block usage information.
3. Assign quota policies. (In accounting mode, these policies are not enforced.)
Each of these steps is discussed in detail in the following sections.
3.5.1.1. Setting Up Quotas in Enforcement or Accounting Mode
In GFS2 file systems, quotas are disabled by default. To enable quotas for a file system, mount the filesystem with the quota=on option specified.
It is possible to keep track of disk usage and maintain quota accounting for every user and groupwithout enforcing the limit and warn values. To do this, mount the file system with the quota=account option specified.
To mount a file system with quotas enabled, specify quota=on for the options argument whencreating the GFS2 file system resource in a cluster. For example, the following command specifies thatthe GFS2 Filesystem resource being created will be mounted with quotas enabled.
# pcs resource create gfs2mount Filesystem options="quota=on" device=BLOCKDEVICE directory=MOUNTPOINT fstype=gfs2 clone
For information on configuring a GFS2 file system in a Pacemaker cluster, see Chapter 5, Configuring aGFS2 File System in a Cluster.
To mount a file system with quota accounting maintained, even though the quota limits are notenforced, specify quota=account for the options argument when creating the GFS2 file systemresource in a cluster.
To mount a file system with quotas disabled, specify quota=off for the options argument whencreating the GFS2 file system resource in a cluster.
3.5.1.2. Creating the Quota Database Files
After each quota-enabled file system is mounted, the system is capable of working with disk quotas.However, the file system itself is not yet ready to support quotas. The next step is to run the quotacheck command.
Global File System 2
30

The quotacheck command examines quota-enabled file systems and builds a table of the current diskusage per file system. The table is then used to update the operating system's copy of disk usage. Inaddition, the file system's disk quota files are updated.
To create the quota files on the file system, use the -u and the -g options of the quotacheckcommand; both of these options must be specified for user and group quotas to be initialized. Forexample, if quotas are enabled for the /home file system, create the files in the /home directory:
quotacheck -ug /home
3.5.1.3. Assigning Quotas Per User
The last step is assigning the disk quotas with the edquota command. Note that if you have mountedyour file system in accounting mode (with the quota=account option specified), the quotas are notenforced.
To configure the quota for a user, as root in a shell prompt, execute the command:
# edquota username
Perform this step for each user who needs a quota. For example, if a quota is enabled for the /homepartition (/dev/VolGroup00/LogVol02 in the example below) and the command edquota testuser is executed, the following is shown in the editor configured as the default for the system:
Disk quotas for user testuser (uid 501): Filesystem blocks soft hard inodes soft hard/dev/VolGroup00/LogVol02 440436 0 0
NOTE
The text editor defined by the EDITOR environment variable is used by edquota. Tochange the editor, set the EDITOR environment variable in your ~/.bash_profile fileto the full path of the editor of your choice.
The first column is the name of the file system that has a quota enabled for it. The second columnshows how many blocks the user is currently using. The next two columns are used to set soft and hardblock limits for the user on the file system.
The soft block limit defines the maximum amount of disk space that can be used.
The hard block limit is the absolute maximum amount of disk space that a user or group can use. Oncethis limit is reached, no further disk space can be used.
The GFS2 file system does not maintain quotas for inodes, so these columns do not apply to GFS2 filesystems and will be blank.
If any of the values are set to 0, that limit is not set. In the text editor, change the limits. For example:
Disk quotas for user testuser (uid 501): Filesystem blocks soft hard inodes soft hard/dev/VolGroup00/LogVol02 440436 500000 550000
CHAPTER 3. MANAGING GFS2
31

To verify that the quota for the user has been set, use the command:
quota testuser
3.5.1.4. Assigning Quotas Per Group
Quotas can also be assigned on a per-group basis. Note that if you have mounted your file system inaccounting mode (with the account=on option specified), the quotas are not enforced.
To set a group quota for the devel group (the group must exist prior to setting the group quota), usethe following command:
edquota -g devel
This command displays the existing quota for the group in the text editor:
Disk quotas for group devel (gid 505): Filesystem blocks soft hard inodes soft hard/dev/VolGroup00/LogVol02 440400 0 0
The GFS2 file system does not maintain quotas for inodes, so these columns do not apply to GFS2 filesystems and will be blank. Modify the limits, then save the file.
To verify that the group quota has been set, use the following command:
$ quota -g devel
3.5.2. Managing Disk Quotas
If quotas are implemented, they need some maintenance — mostly in the form of watching to see if thequotas are exceeded and making sure the quotas are accurate.
Of course, if users repeatedly exceed their quotas or consistently reach their soft limits, a systemadministrator has a few choices to make depending on what type of users they are and how much diskspace impacts their work. The administrator can either help the user determine how to use less diskspace or increase the user's disk quota.
You can create a disk usage report by running the repquota utility. For example, the command repquota /home produces this output:
*** Report for user quotas on device /dev/mapper/VolGroup00-LogVol02 Block grace time: 7days; Inode grace time: 7days Block limits File limits User used soft hard grace used soft hard grace ---------------------------------------------------------------------- root -- 36 0 0 4 0 0 kristin -- 540 0 0 125 0 0 testuser -- 440400 500000 550000 37418 0 0
To view the disk usage report for all (option -a) quota-enabled file systems, use the command:
# repquota -a
Global File System 2
32

While the report is easy to read, a few points should be explained. The -- displayed after each user is aquick way to determine whether the block limits have been exceeded. If the block soft limit isexceeded, a + appears in place of the first - in the output. The second - indicates the inode limit, butGFS2 file systems do not support inode limits so that character will remain as -. GFS2 file systems donot support a grace period, so the grace column will remain blank.
Note that the repquota command is not supported over NFS, irrespective of the underlying filesystem.
3.5.3. Keeping Quotas Accurate
If you enable quotas on your file system after a period of time when you have been running with quotasdisabled, you should run the quotacheck command to create, check, and repair quota files.Additionally, you may want to run the quotacheck command if you think your quota files may not beaccurate, as may occur when a file system is not unmounted cleanly after a system crash.
For more information about the quotacheck command, see the quotacheck man page.
NOTE
Run quotacheck when the file system is relatively idle on all nodes because diskactivity may affect the computed quota values.
3.5.4. Synchronizing Quotas with the quotasync Command
GFS2 stores all quota information in its own internal file on disk. A GFS2 node does not update thisquota file for every file system write; rather, by default it updates the quota file once every 60 seconds.This is necessary to avoid contention among nodes writing to the quota file, which would cause aslowdown in performance.
As a user or group approaches their quota limit, GFS2 dynamically reduces the time between its quota-file updates to prevent the limit from being exceeded. The normal time period between quotasynchronizations is a tunable parameter, quota_quantum. You can change this from its default valueof 60 seconds using the quota_quantum= mount option, as described in Table 3.2, “GFS2-SpecificMount Options”. The quota_quantum parameter must be set on each node and each time the filesystem is mounted. Changes to the quota_quantum parameter are not persistent across unmounts.You can update the quota_quantum value with the mount -o remount.
You can use the quotasync command to synchronize the quota information from a node to the on-disk quota file between the automatic updates performed by GFS2.
Usage
Synchronizing Quota Information
quotasync [-ug] -a|mntpnt...
u
Sync the user quota files.
g
Sync the group quota files
CHAPTER 3. MANAGING GFS2
33

a
Sync all file systems that are currently quota-enabled and support sync. When -a is absent, a filesystem mountpoint should be specified.
mntpnt
Specifies the GFS2 file system to which the actions apply.
Tuning the Time Between Synchronizations
mount -o quota_quantum=secs,remount BlockDevice MountPoint
MountPoint
Specifies the GFS2 file system to which the actions apply.
secs
Specifies the new time period between regular quota-file synchronizations by GFS2. Smaller valuesmay increase contention and slow down performance.
Examples
This example synchronizes all the cached dirty quotas from the node it is run on to the on-disk quotafile for the file system /mnt/mygfs2.
# quotasync -ug /mnt/mygfs2
This example changes the default time period between regular quota-file updates to one hour (3600seconds) for file system /mnt/mygfs2 when remounting that file system on logical volume /dev/volgroup/logical_volume.
# mount -o quota_quantum=3600,remount /dev/volgroup/logical_volume /mnt/mygfs2
3.5.5. References
For more information on disk quotas, see the man pages of the following commands:
quotacheck
edquota
repquota
quota
3.6. GROWING A FILE SYSTEM
The gfs2_grow command is used to expand a GFS2 file system after the device where the file systemresides has been expanded. Running the gfs2_grow command on an existing GFS2 file system fills allspare space between the current end of the file system and the end of the device with a newly
Global File System 2
34

initialized GFS2 file system extension. When the fill operation is completed, the resource index for thefile system is updated. All nodes in the cluster can then use the extra storage space that has beenadded.
The gfs2_grow command must be run on a mounted file system, but only needs to be run on one nodein a cluster. All the other nodes sense that the expansion has occurred and automatically start usingthe new space.
NOTE
Once you have created a GFS2 file system with the mkfs.gfs2 command, you cannotdecrease the size of the file system.
Usage
gfs2_grow MountPoint
MountPoint
Specifies the GFS2 file system to which the actions apply.
Comments
Before running the gfs2_grow command:
Back up important data on the file system.
Determine the volume that is used by the file system to be expanded by running the df MountPoint command.
Expand the underlying cluster volume with LVM. For information on administering LVMvolumes, see Logical Volume Manager Administration.
After running the gfs2_grow command, run the df command to check that the new space is nowavailable in the file system.
Examples
In this example, the file system on the /mygfs2fs directory is expanded.
# gfs2_grow /mygfs2fsFS: Mount Point: /mygfs2fsFS: Device: /dev/mapper/gfs2testvg-gfs2testlvFS: Size: 524288 (0x80000)FS: RG size: 65533 (0xfffd)DEV: Size: 655360 (0xa0000)The file system grew by 512MB.gfs2_grow complete.
Complete Usage
CHAPTER 3. MANAGING GFS2
35

gfs2_grow [Options] {MountPoint | Device} [MountPoint | Device]
MountPoint
Specifies the directory where the GFS2 file system is mounted.
Device
Specifies the device node of the file system.
Table 3.3, “GFS2-specific Options Available While Expanding A File System” describes the GFS2-specific options that can be used while expanding a GFS2 file system.
Table 3.3. GFS2-specific Options Available While Expanding A File System
Option Description
-h Help. Displays a short usage message.
-q Quiet. Turns down the verbosity level.
-r Megabytes Specifies the size of the new resource group. The default size is 256megabytes.
-T Test. Do all calculations, but do not write any data to the disk and do notexpand the file system.
-V Displays command version information.
3.7. ADDING JOURNALS TO A FILE SYSTEM
The gfs2_jadd command is used to add journals to a GFS2 file system. You can add journals to aGFS2 file system dynamically at any point without expanding the underlying logical volume. The gfs2_jadd command must be run on a mounted file system, but it needs to be run on only one node inthe cluster. All the other nodes sense that the expansion has occurred.
NOTE
If a GFS2 file system is full, the gfs2_jadd command will fail, even if the logical volumecontaining the file system has been extended and is larger than the file system. This isbecause in a GFS2 file system, journals are plain files rather than embedded metadata,so simply extending the underlying logical volume will not provide space for the journals.
Before adding journals to a GFS2 file system, you can find out how many journals the GFS2 file systemcurrently contains with the gfs2_edit -p jindex command, as in the following example:
# gfs2_edit -p jindex /dev/sasdrives/scratch|grep journal 3/3 [fc7745eb] 4/25 (0x4/0x19): File journal0 4/4 [8b70757d] 5/32859 (0x5/0x805b): File journal1 5/5 [127924c7] 6/65701 (0x6/0x100a5): File journal2
Global File System 2
36

Usage
gfs2_jadd -j Number MountPoint
Number
Specifies the number of new journals to be added.
MountPoint
Specifies the directory where the GFS2 file system is mounted.
Examples
In this example, one journal is added to the file system on the /mygfs2 directory.
gfs2_jadd -j 1 /mygfs2
In this example, two journals are added to the file system on the /mygfs2 directory.
gfs2_jadd -j 2 /mygfs2
Complete Usage
gfs2_jadd [Options] {MountPoint | Device} [MountPoint | Device]
MountPoint
Specifies the directory where the GFS2 file system is mounted.
Device
Specifies the device node of the file system.
Table 3.4, “GFS2-specific Options Available When Adding Journals” describes the GFS2-specificoptions that can be used when adding journals to a GFS2 file system.
Table 3.4. GFS2-specific Options Available When Adding Journals
Flag Parameter Description
-h Help. Displays short usage message.
-J Megabytes Specifies the size of the new journals in megabytes. Defaultjournal size is 128 megabytes. The minimum size is 32megabytes. To add journals of different sizes to the filesystem, the gfs2_jadd command must be run for eachsize journal. The size specified is rounded down so that it isa multiple of the journal-segment size that was specifiedwhen the file system was created.
CHAPTER 3. MANAGING GFS2
37

-j Number Specifies the number of new journals to be added by the gfs2_jadd command. The default value is 1.
-q Quiet. Turns down the verbosity level.
-V Displays command version information.
Flag Parameter Description
3.8. DATA JOURNALING
Ordinarily, GFS2 writes only metadata to its journal. File contents are subsequently written to disk bythe kernel's periodic sync that flushes file system buffers. An fsync() call on a file causes the file'sdata to be written to disk immediately. The call returns when the disk reports that all data is safelywritten.
Data journaling can result in a reduced fsync() time for very small files because the file data iswritten to the journal in addition to the metadata. This advantage rapidly reduces as the file sizeincreases. Writing to medium and larger files will be much slower with data journaling turned on.
Applications that rely on fsync() to sync file data may see improved performance by using datajournaling. Data journaling can be enabled automatically for any GFS2 files created in a flaggeddirectory (and all its subdirectories). Existing files with zero length can also have data journalingturned on or off.
Enabling data journaling on a directory sets the directory to "inherit jdata", which indicates that all filesand directories subsequently created in that directory are journaled. You can enable and disable datajournaling on a file with the chattr command.
The following commands enable data journaling on the /mnt/gfs2/gfs2_dir/newfile file and thencheck whether the flag has been set properly.
# chattr +j /mnt/gfs2/gfs2_dir/newfile# lsattr /mnt/gfs2/gfs2_dir---------j--- /mnt/gfs2/gfs2_dir/newfile
The following commands disable data journaling on the /mnt/gfs2/gfs2_dir/newfile file andthen check whether the flag has been set properly.
# chattr -j /mnt/gfs2/gfs2_dir/newfile# lsattr /mnt/gfs2/gfs2_dir------------- /mnt/gfs2/gfs2_dir/newfile
You can also use the chattr command to set the j flag on a directory. When you set this flag for adirectory, all files and directories subsequently created in that directory are journaled. The followingset of commands sets the j flag on the gfs2_dir directory, then checks whether the flag has been setproperly. After this, the commands create a new file called newfile in the /mnt/gfs2/gfs2_dirdirectory and then check whether the j flag has been set for the file. Since the j flag is set for thedirectory, then newfile should also have journaling enabled.
# chattr -j /mnt/gfs2/gfs2_dir# lsattr /mnt/gfs2
Global File System 2
38

---------j--- /mnt/gfs2/gfs2_dir# touch /mnt/gfs2/gfs2_dir/newfile# lsattr /mnt/gfs2/gfs2_dir---------j--- /mnt/gfs2/gfs2_dir/newfile
3.9. CONFIGURING ATIME UPDATES
Each file inode and directory inode has three time stamps associated with it:
ctime — The last time the inode status was changed
mtime — The last time the file (or directory) data was modified
atime — The last time the file (or directory) data was accessed
If atime updates are enabled as they are by default on GFS2 and other Linux file systems then everytime a file is read, its inode needs to be updated.
Because few applications use the information provided by atime, those updates can require asignificant amount of unnecessary write traffic and file locking traffic. That traffic can degradeperformance; therefore, it may be preferable to turn off or reduce the frequency of atime updates.
Two methods of reducing the effects of atime updating are available:
Mount with relatime (relative atime), which updates the atime if the previous atime updateis older than the mtime or ctime update.
Mount with noatime, which disables atime updates on that file system.
3.9.1. Mount with relatime
The relatime (relative atime) Linux mount option can be specified when the file system is mounted.This specifies that the atime is updated if the previous atime update is older than the mtime or ctime update.
Usage
mount BlockDevice MountPoint -o relatime
BlockDevice
Specifies the block device where the GFS2 file system resides.
MountPoint
Specifies the directory where the GFS2 file system should be mounted.
Example
In this example, the GFS2 file system resides on /dev/vg01/lvol0 and is mounted on directory /mygfs2. The atime updates take place only if the previous atime update is older than the mtime or ctime update.
CHAPTER 3. MANAGING GFS2
39

# mount /dev/vg01/lvol0 /mygfs2 -o relatime
3.9.2. Mount with noatime
The noatime Linux mount option can be specified when the file system is mounted, which disables atime updates on that file system.
Usage
mount BlockDevice MountPoint -o noatime
BlockDevice
Specifies the block device where the GFS2 file system resides.
MountPoint
Specifies the directory where the GFS2 file system should be mounted.
Example
In this example, the GFS2 file system resides on /dev/vg01/lvol0 and is mounted on directory /mygfs2 with atime updates turned off.
# mount /dev/vg01/lvol0 /mygfs2 -o noatime
3.10. SUSPENDING ACTIVITY ON A FILE SYSTEM
You can suspend write activity to a file system by using the dmsetup suspend command. Suspendingwrite activity allows hardware-based device snapshots to be used to capture the file system in aconsistent state. The dmsetup resume command ends the suspension.
Usage
Start Suspension
dmsetup suspend MountPoint
End Suspension
dmsetup resume MountPoint
MountPoint
Specifies the file system.
Examples
This example suspends writes to file system /mygfs2.
Global File System 2
40

# dmsetup suspend /mygfs2
This example ends suspension of writes to file system /mygfs2.
# dmsetup resume /mygfs2
3.11. REPAIRING A FILE SYSTEM
When nodes fail with the file system mounted, file system journaling allows fast recovery. However, if astorage device loses power or is physically disconnected, file system corruption may occur.(Journaling cannot be used to recover from storage subsystem failures.) When that type of corruptionoccurs, you can recover the GFS2 file system by using the fsck.gfs2 command.
IMPORTANT
The fsck.gfs2 command must be run only on a file system that is unmounted from allnodes. When the file system is being managed as a Pacemaker cluster resource, you candisable the file system resource, which unmounts the file system. After running the fsck.gfs2 command, you enable the file system resource again. The timeout valuespecified with the --wait option of the pcs resource disable indicates a value inseconds.
# pcs resource disable --wait=timeoutvalue resource_id[fsck.gfs2]# pcs resource enable resource_id
To ensure that fsck.gfs2 command does not run on a GFS2 file system at boot time,you can set the run_fsck parameter of the options argument when creating theGFS2 file system resource in a cluster. Specifying "run_fsck=no" will indicate thatyou should not run the fsck command.
CHAPTER 3. MANAGING GFS2
41

NOTE
If you have previous experience using the gfs_fsck command on GFS file systems,note that the fsck.gfs2 command differs from some earlier releases of gfs_fsck inthe following ways:
Pressing Ctrl+C while running the fsck.gfs2 command interrupts processingand displays a prompt asking whether you would like to abort the command,skip the rest of the current pass, or continue processing.
You can increase the level of verbosity by using the -v flag. Adding a second -vflag increases the level again.
You can decrease the level of verbosity by using the -q flag. Adding a second -q flag decreases the level again.
The -n option opens a file system as read only and answers no to any queriesautomatically. The option provides a way of trying the command to reveal errorswithout actually allowing the fsck.gfs2 command to take effect.
Refer to the fsck.gfs2 man page for additional information about other commandoptions.
Running the fsck.gfs2 command requires system memory above and beyond the memory used forthe operating system and kernel. Each block of memory in the GFS2 file system itself requiresapproximately five bits of additional memory, or 5/8 of a byte. So to estimate how many bytes ofmemory you will need to run the fsck.gfs2 command on your file system, determine how manyblocks the file system contains and multiply that number by 5/8.
For example, to determine approximately how much memory is required to run the fsck.gfs2command on a GFS2 file system that is 16TB with a block size of 4K, first determine how many blocksof memory the file system contains by dividing 16TB by 4K:
17592186044416 / 4096 = 4294967296
Since this file system contains 4294967296 blocks, multiply that number by 5/8 to determine howmany bytes of memory are required:
4294967296 * 5/8 = 2684354560
This file system requires approximately 2.6GB of free memory to run the fsck.gfs2 command. Notethat if the block size was 1K, running the fsck.gfs2 command would require four times the memory,or approximately 11GB.
Usage
fsck.gfs2 -y BlockDevice
-y
The -y flag causes all questions to be answered with yes. With the -y flag specified, the fsck.gfs2 command does not prompt you for an answer before making changes.
BlockDevice
Global File System 2
42

Specifies the block device where the GFS2 file system resides.
Example
In this example, the GFS2 file system residing on block device /dev/testvg/testlv is repaired. Allqueries to repair are automatically answered with yes.
# fsck.gfs2 -y /dev/testvg/testlvInitializing fsckValidating Resource Group index.Level 1 RG check.(level 1 passed)Clearing journals (this may take a while)...Journals cleared.Starting pass1Pass1 completeStarting pass1bPass1b completeStarting pass1cPass1c completeStarting pass2Pass2 completeStarting pass3Pass3 completeStarting pass4Pass4 completeStarting pass5Pass5 completeWriting changes to diskfsck.gfs2 complete
3.12. THE GFS2 WITHDRAW FUNCTION
The GFS2 withdraw function is a data integrity feature of the GFS2 file system that prevents potentialfile system damage due to faulty hardware or kernel software. If the GFS2 kernel module detects aninconsistency while using a GFS2 file system on any given cluster node, it withdraws from the filesystem, leaving it unavailable to that node until it is unmounted and remounted (or the machinedetecting the problem is rebooted). All other mounted GFS2 file systems remain fully functional onthat node. (The GFS2 withdraw function is less severe than a kernel panic, which causes the node to befenced.)
The main categories of inconsistency that can cause a GFS2 withdraw are as follows:
Inode consistency error
Resource group consistency error
Journal consistency error
Magic number metadata consistency error
Metadata type consistency error
An example of an inconsistency that would cause a GFS2 withdraw is an incorrect block count for a
CHAPTER 3. MANAGING GFS2
43

file’s inode. When GFS2 deletes a file, it systematically removes all the data and metadata blocksreferenced by that file. When done, it checks the inode’s block count. If the block count is not 1(meaning all that is left is the disk inode itself), that indicates a file system inconsistency, since theinode’s block count did not match the actual blocks used for the file.
In many cases, the problem may have been caused by faulty hardware (faulty memory, motherboard,HBA, disk drives, cables, and so forth). It may also have been caused by a kernel bug (another kernelmodule accidentally overwriting GFS2’s memory), or actual file system damage (caused by a GFS2bug).
In most cases, the GFS2 inconsistency is fixed by rebooting the cluster node. Before rebooting thecluster node, disable the GFS2 file system “clone” service from Pacemaker, which unmounts the filesystem on that node only.
# pcs resource disable --wait=100 mydata_fs_clone# /sbin/reboot
WARNING
Do not try to unmount and remount the file system manually with the umount and mount commands. You must use the pcs command, otherwise Pacemaker willdetect the file system service has disappeared and fence the node.
The consistency problem that caused the withdraw may make stopping the file system serviceimpossible as it may cause the system to hang.
If the problem persists after a remount, you should stop the file system service to unmount the filesystem from all nodes in the cluster, then perform a file system check with the fsck.gfs2 commandbefore restarting the service with the following procedure.
1. Reboot the affected node.
2. Disable the non-clone file system service in Pacemaker to unmount the file system from everynode in the cluster.
# pcs resource disable --wait=100 mydata_fs
3. From one node of the cluster, run the fsck.gfs2 command on the file system device to checkfor and repair any file system damage.
# fsck.gfs2 -y /dev/vg_mydata/mydata > /tmp/fsck.out
4. Remount the GFS2 file system from all nodes by re-enabling the file system service:
# pcs resource enable --wait=100 mydata_fs
You can override the GFS2 withdraw function by mounting the file system with the -o errors=panic option specified in the file system service.
Global File System 2
44

# pcs resource update mydata_fs “options=noatime,errors=panic”
When this option is specified, any errors that would normally cause the system to withdraw force akernel panic instead. This stops the node's communications, which causes the node to be fenced. Thisis especially useful for clusters that are left unattended for long periods of time without monitoring orintervention.
Internally, the GFS2 withdraw function works by disconnecting the locking protocol to ensure that allfurther file system operations result in I/O errors. As a result, when the withdraw occurs, it is normal tosee a number of I/O errors from the device mapper device reported in the system logs.
CHAPTER 3. MANAGING GFS2
45

CHAPTER 4. DIAGNOSING AND CORRECTING PROBLEMSWITH GFS2 FILE SYSTEMSThis chapter provides information about some common GFS2 issues and how to address them.
4.1. GFS2 FILE SYSTEM SHOWS SLOW PERFORMANCE
You may find that your GFS2 file system shows slower performance than an ext3 file system. GFS2performance may be affected by a number of influences and in certain use cases. Information thataddresses GFS2 performance issues is found throughout this document.
4.2. GFS2 FILE SYSTEM HANGS AND REQUIRES REBOOT OF ONENODE
If your GFS2 file system hangs and does not return commands run against it, but rebooting one specificnode returns the system to normal, this may be indicative of a locking problem or bug. Should thisoccur, gather the following data:
The GFS2 lock dump for the file system on each node:
cat /sys/kernel/debug/gfs2/fsname/glocks >glocks.fsname.nodename
The DLM lock dump for the file system on each node: You can get this information with the dlm_tool:
dlm_tool lockdebug -sv lsname.
In this command, lsname is the lockspace name used by DLM for the file system in question.You can find this value in the output from the group_tool command.
The output from the sysrq -t command.
The contents of the /var/log/messages file.
Once you have gathered that data, you can open a ticket with Red Hat Support and provide the datayou have collected.
4.3. GFS2 FILE SYSTEM HANGS AND REQUIRES REBOOT OF ALLNODES
If your GFS2 file system hangs and does not return commands run against it, requiring that you rebootall nodes in the cluster before using it, check for the following issues.
You may have had a failed fence. GFS2 file systems will freeze to ensure data integrity in theevent of a failed fence. Check the messages logs to see if there are any failed fences at thetime of the hang. Ensure that fencing is configured correctly.
The GFS2 file system may have withdrawn. Check through the messages logs for the word withdraw and check for any messages and call traces from GFS2 indicating that the filesystem has been withdrawn. A withdraw is indicative of file system corruption, a storagefailure, or a bug. At the earliest time when it is convenient to unmount the file system, youshould perform the following procedure:
Global File System 2
46
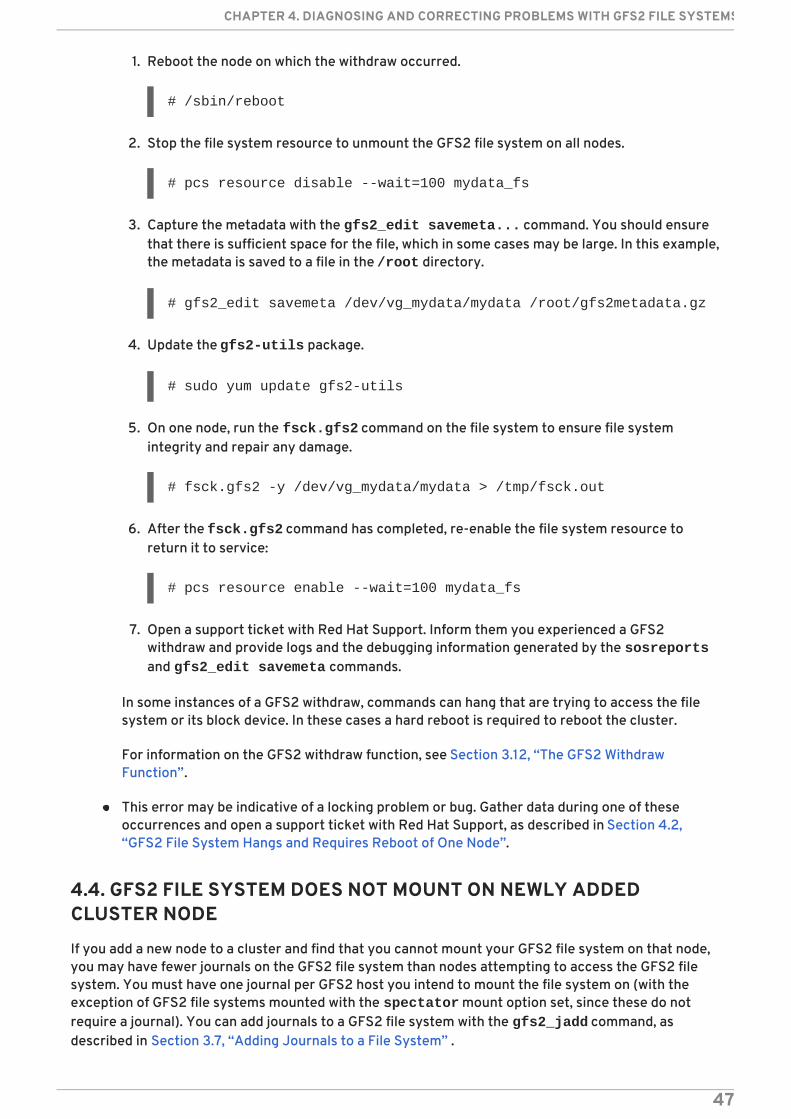
1. Reboot the node on which the withdraw occurred.
# /sbin/reboot
2. Stop the file system resource to unmount the GFS2 file system on all nodes.
# pcs resource disable --wait=100 mydata_fs
3. Capture the metadata with the gfs2_edit savemeta... command. You should ensurethat there is sufficient space for the file, which in some cases may be large. In this example,the metadata is saved to a file in the /root directory.
# gfs2_edit savemeta /dev/vg_mydata/mydata /root/gfs2metadata.gz
4. Update the gfs2-utils package.
# sudo yum update gfs2-utils
5. On one node, run the fsck.gfs2 command on the file system to ensure file systemintegrity and repair any damage.
# fsck.gfs2 -y /dev/vg_mydata/mydata > /tmp/fsck.out
6. After the fsck.gfs2 command has completed, re-enable the file system resource toreturn it to service:
# pcs resource enable --wait=100 mydata_fs
7. Open a support ticket with Red Hat Support. Inform them you experienced a GFS2withdraw and provide logs and the debugging information generated by the sosreportsand gfs2_edit savemeta commands.
In some instances of a GFS2 withdraw, commands can hang that are trying to access the filesystem or its block device. In these cases a hard reboot is required to reboot the cluster.
For information on the GFS2 withdraw function, see Section 3.12, “The GFS2 WithdrawFunction”.
This error may be indicative of a locking problem or bug. Gather data during one of theseoccurrences and open a support ticket with Red Hat Support, as described in Section 4.2,“GFS2 File System Hangs and Requires Reboot of One Node”.
4.4. GFS2 FILE SYSTEM DOES NOT MOUNT ON NEWLY ADDEDCLUSTER NODE
If you add a new node to a cluster and find that you cannot mount your GFS2 file system on that node,you may have fewer journals on the GFS2 file system than nodes attempting to access the GFS2 filesystem. You must have one journal per GFS2 host you intend to mount the file system on (with theexception of GFS2 file systems mounted with the spectator mount option set, since these do notrequire a journal). You can add journals to a GFS2 file system with the gfs2_jadd command, asdescribed in Section 3.7, “Adding Journals to a File System” .
CHAPTER 4. DIAGNOSING AND CORRECTING PROBLEMS WITH GFS2 FILE SYSTEMS
47

4.5. SPACE INDICATED AS USED IN EMPTY FILE SYSTEM
If you have an empty GFS2 file system, the df command will show that there is space being taken up.This is because GFS2 file system journals consume space (number of journals * journal size) on disk. Ifyou created a GFS2 file system with a large number of journals or specified a large journal size then youwill be see (number of journals * journal size) as already in use when you execute the df command.Even if you did not specify a large number of journals or large journals, small GFS2 file systems (in the1GB or less range) will show a large amount of space as being in use with the default GFS2 journal size.
Global File System 2
48
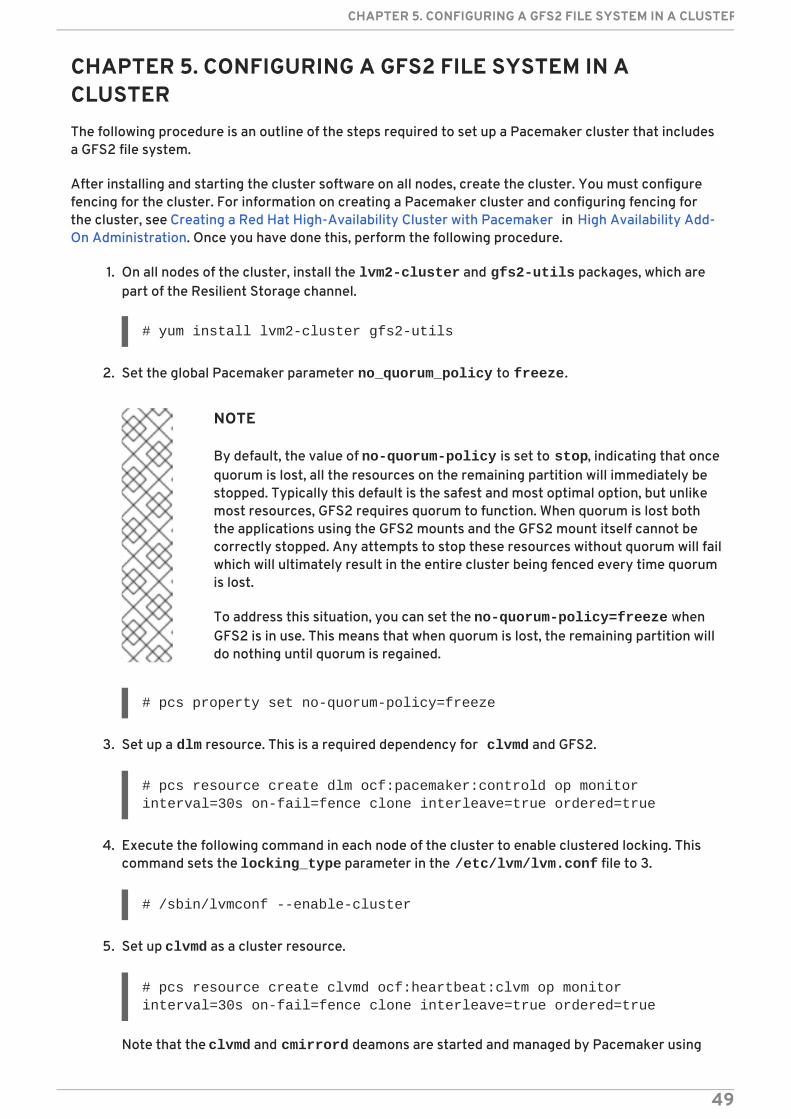
CHAPTER 5. CONFIGURING A GFS2 FILE SYSTEM IN ACLUSTERThe following procedure is an outline of the steps required to set up a Pacemaker cluster that includesa GFS2 file system.
After installing and starting the cluster software on all nodes, create the cluster. You must configurefencing for the cluster. For information on creating a Pacemaker cluster and configuring fencing forthe cluster, see Creating a Red Hat High-Availability Cluster with Pacemaker in High Availability Add-On Administration. Once you have done this, perform the following procedure.
1. On all nodes of the cluster, install the lvm2-cluster and gfs2-utils packages, which arepart of the Resilient Storage channel.
# yum install lvm2-cluster gfs2-utils
2. Set the global Pacemaker parameter no_quorum_policy to freeze.
NOTE
By default, the value of no-quorum-policy is set to stop, indicating that oncequorum is lost, all the resources on the remaining partition will immediately bestopped. Typically this default is the safest and most optimal option, but unlikemost resources, GFS2 requires quorum to function. When quorum is lost boththe applications using the GFS2 mounts and the GFS2 mount itself cannot becorrectly stopped. Any attempts to stop these resources without quorum will failwhich will ultimately result in the entire cluster being fenced every time quorumis lost.
To address this situation, you can set the no-quorum-policy=freeze whenGFS2 is in use. This means that when quorum is lost, the remaining partition willdo nothing until quorum is regained.
# pcs property set no-quorum-policy=freeze
3. Set up a dlm resource. This is a required dependency for clvmd and GFS2.
# pcs resource create dlm ocf:pacemaker:controld op monitor interval=30s on-fail=fence clone interleave=true ordered=true
4. Execute the following command in each node of the cluster to enable clustered locking. Thiscommand sets the locking_type parameter in the /etc/lvm/lvm.conf file to 3.
# /sbin/lvmconf --enable-cluster
5. Set up clvmd as a cluster resource.
# pcs resource create clvmd ocf:heartbeat:clvm op monitor interval=30s on-fail=fence clone interleave=true ordered=true
Note that the clvmd and cmirrord deamons are started and managed by Pacemaker using
CHAPTER 5. CONFIGURING A GFS2 FILE SYSTEM IN A CLUSTER
49

the ocf:heartbeat:clvm resource agent and do not need to be started during boot with systemd. Additionally, the ocf:heartbeat:clvm resource agent, as part of the startprocedure, sets the locking_type parameter in the /etc/lvm/lvm.conf file to 3 anddisables the lvmetad daemon.
6. Set up clvmd and dlm dependency and start up order. clvmd must start after dlm and mustrun on the same node as dlm.
# pcs constraint order start dlm-clone then clvmd-clone# pcs constraint colocation add clvmd-clone with dlm-clone
7. Create the clustered logical volume.
# pvcreate /dev/vdb# vgcreate -Ay -cy cluster_vg /dev/vdb# lvcreate -L5G -n cluster_lv cluster_vg
WARNING
When you create volume groups with CLVM on shared storage, you mustensure that all nodes in the cluster have access to the physical volumesthat constitute the volume group. Asymmetric cluster configurations inwhich some nodes have access to the storage and others do not are notsupported.
When managing volume groups using CLVMD to allow for concurrentactivation of volumes across multiple nodes, the volume groups must havethe clustered flag enabled. This flag allows CLVMD to identify the volumesit must manage, which is what enables CLVMD to maintain LVM metadatacontinuity. Failure to adhere to this configuration renders theconfiguration unsupported by Red Hat and may result in storagecorruption and loss of data.
8. Format the logical volume with a GFS2 file system. Ensure that you create enough journals foreach of the nodes in your cluster.
# mkfs.gfs2 -j2 -p lock_dlm -t rhel7-demo:gfs2-demo /dev/cluster_vg/cluster_lv
Global File System 2
50

WARNING
When you create the GFS2 filesystem, it is important to specify a correctvalue for the -t LockTableName option. The correct format isClusterName:FSName. Failure to specify a correct value will prevent thefilesystem from mounting and may cause corruption. For more informationon the options for the mkfs.gfs2 command, see Section 3.1, “Making aFile System”.
9. Configure a clusterfs resource.
You should not add the file system to the /etc/fstab file because it will be managed as aPacemaker cluster resource. Mount options can be specified as part of the resourceconfiguration with options=options. Run the pcs resource describe Filesystemcommand for full configuration options.
This cluster resource creation command specifies the noatime mount option.
# pcs resource create clusterfs Filesystem device="/dev/cluster_vg/cluster_lv" directory="/var/mountpoint" fstype="gfs2" "options=noatime" op monitor interval=10s on-fail=fence clone interleave=true
10. Set up GFS2 and clvmd dependency and startup order. GFS2 must start after clvmd and mustrun on the same node as clvmd.
# pcs constraint order start clvmd-clone then clusterfs-clone# pcs constraint colocation add clusterfs-clone with clvmd-clone
11. Verify that GFS2 is mounted as expected.
# mount |grep /mnt/gfs2-demo/dev/mapper/cluster_vg-cluster_lv on /mnt/gfs2-demo type gfs2 (rw,noatime,seclabel)
CHAPTER 5. CONFIGURING A GFS2 FILE SYSTEM IN A CLUSTER
51

APPENDIX A. GFS2 PERFORMANCE ANALYSIS WITHPERFORMANCE CO-PILOTRed Hat Enterprise Linux 7 supports Performance Co-Pilot (PCP) with GFS2 performance metrics. Thisallows you to monitor the performance of a GFS2 file system. This appendix describes the GFS2performance metrics and how to use them.
A.1. OVERVIEW OF PERFORMANCE CO-PILOT
Performance Co-Pilot (PCP) is a open source toolkit for monitoring, visualizing, recording, andcontrolling the status, activities and performance of computers, applications and servers. PCP allowsthe monitoring and management of both real-time data and the logging and retrieval of historical data.Historical data can be used to analyze any patterns with issues by comparing live results over thearchived data.
PCP is designed with a client-server architecture. The PCP collector service is the Performance MetricCollector Daemon (PMCD), which can be installed and run on a server. Once it is started, PCMD beginscollecting performance data from the installed Performance Metric Domain Agents (PMDAs). PMDAscan be individually loaded or unloaded on the system and are controlled by the PMCD on the samehost. The GFS2 PMDA, which is part of the default PCP installation, is used. to gather performancemetric data of GFS2 file systems in PCP.
Table A.1, “PCP Tools” provides a brief list of some PCP tools in the PCP Toolkit that this chapterdescribes. For information about additional PCP tools, see the PCPIntro(1) man page and theadditional PCP man pages.
Table A.1. PCP Tools
Tool Use
pmcd Performance Metric Collector Service: collects the metric data from thePMDA and makes the metric data available for the other components inPCP
pmlogger Allows the creation of archive logs of performance metric values whichmay be played back by other PCP tools
pmproxy A protocol proxy for pmcd which allows PCP monitoring clients toconnect to one or more instances of pmcd by means of pmproxy
pminfo Displays information about performance metrics on the command line
pmstore Allows the modification of performance metric values (re-initializecounters or assign new values)
pmdumptext Exports performance metric data either live or from performancearchives to an ASCII table
pmchart Graphical utility that plots performance metric values into charts(pcp-gui package)
Global File System 2
52

A.2. PCP DEPLOYMENT
To monitor an entire cluster, the recommended approach is to install and configure PCP so that theGFS2 PMDA is enabled and loaded on each node of the cluster along with any other PCP services. Youwill then be able to monitor nodes either locally or remotely on a machine that has PCP installed withthe corresponding PMDAs loaded in monitor mode. You may also install the optional pcp-guipackage to allow graphical representation of trace data through the pmchart tool
For additional information, see the pcp-doc package, which is installed to /usr/share/doc/pcp-doc by default. PCP also provides a man page for every tool.
A.3. PCP INSTALLATION
The most recent tested version of PCP should be available to download from the Red Hat EnterpriseLinux 7 repositories.
The debugfs file system must be mounted in order for the GFS2 PMDA to operate correctly. If the debugfs file system is not mounted, run the following commands commands before installing theGFS2 PMDA.
# mkdir /sys/kernel/debug# mount -t debugfs none /sys/kernel/debug
The GFS2 PMDA is not enabled by default upon installation. In order use GFS2 metric monitoringthrough PCP, you must enable the GFS2 domain agent. Use the following commands to install PCP andthe GFS2 PMDA module and to enable GFS2 PMDA. Note that the PMDA install script must be run asroot.
# yum install pcp pcp-gui pcp-pmda-gfs2# cd /var/lib/pcp/pmdas/gfs2# ./Install
When running the PMDA installation script, you will be prompted for which role you would like thePMDA to take:
collector allows the collection of performance metrics on the current system
monitor only allows the system to monitor local system or remote systems or both local andremote system
both enables both the collector and monitor configurations
In most cases the default choice (both collector and monitor) is sufficient to allow the PMDA to operatecorrectly.
# ./Install You will need to choose an appropriate configuration for installation of the "gfs2" Performance Metrics Domain Agent (PMDA).
collector collect performance statistics on this system monitor allow this system to monitor local and/or remote systems both collector and monitor configuration for this system
Please enter c(ollector) or m(onitor) or b(oth) [b]
APPENDIX A. GFS2 PERFORMANCE ANALYSIS WITH PERFORMANCE CO-PILOT
53

Updating the Performance Metrics Name Space (PMNS) ... Terminate PMDA if already installed ... Updating the PMCD control file, and notifying PMCD ... Waiting for pmcd to terminate ... Starting pmcd ... Starting pmlogger ... Check gfs2 metrics have appeared ... 316 metrics and 205 values
If there are any errors or warning with the installation of the GFS2 PMDA, make sure that PMCD isstarted and running and that debugfs is mounted (there may be warnings in the event that there isnot at least one GFS2 file system loaded on the system).
NOTE
When installing the GFS2 PMDA on cluster nodes the default choice for PMDAconfiguration (both) will be sufficient to allow the PMDA to run correctly. Onworkstation machines where you intend just to monitor the data from remote PCPinstallations, it is recommended you you install the PMDA as a monitor.
A.4. TRACING GFS2 PERFORMANCE DATA
With PCP installed and the GFS2 PMDA enabled, the easiest way to start looking at the performancemetrics available for PCP and GFS2 is to make use of the pminfo tool. The pminfo command line tooldisplays information about available performance metrics. Normally pminfo operates using the localmetric namespace but you can change this to view the metrics on a remote host by using the -h flag,For further information on the pminfo tool, see the pminfo(1) man page.
The following command displays a list of all available GFS2 metrics provided by the GFS2 PMDA.
# pminfo gfs2
You can specify the -T flag order to obtain help information and descriptions for each metric alongwith the -f flag to obtain a current reading of the performance value that corresponds to each metric.You can do this for a group of metrics or an individual metric. Most metric data is provided for eachmounted GFS2 file system on the system at time of probing.
# pminfo -t gfs2.glocksgfs2.glocks.total [Count of total observed incore GFS2 global locks] gfs2.glocks.shared [GFS2 global locks in shared state] gfs2.glocks.unlocked [GFS2 global locks in unlocked state] gfs2.glocks.deferred [GFS2 global locks in deferred state] gfs2.glocks.exclusive [GFS2 global locks in exclusive state]
# pminfo -T gfs2.glocks.total
gfs2.glocks.total Help: Count of total incore GFS2 glock data structures based on parsing the contents of the /sys/kernel/debug/gfs2/bdev/glocks files.
# pminfo -f gfs2.glocks.total
Global File System 2
54
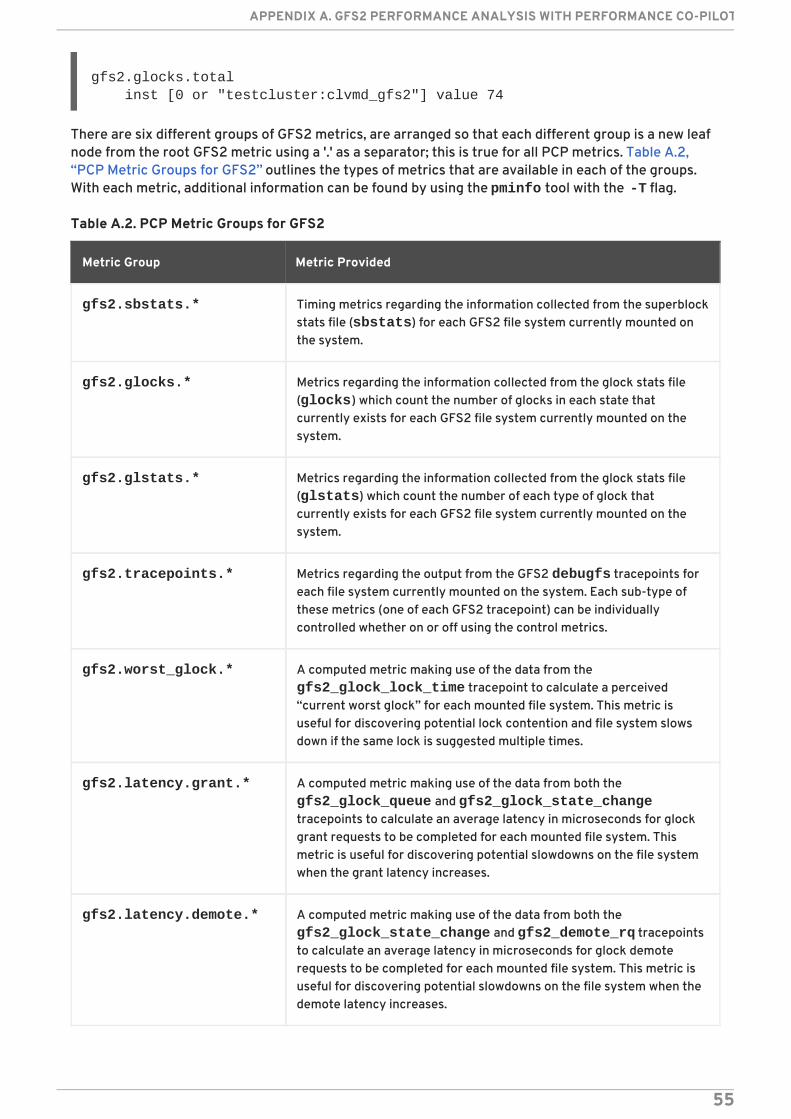
gfs2.glocks.total inst [0 or "testcluster:clvmd_gfs2"] value 74
There are six different groups of GFS2 metrics, are arranged so that each different group is a new leafnode from the root GFS2 metric using a '.' as a separator; this is true for all PCP metrics. Table A.2,“PCP Metric Groups for GFS2” outlines the types of metrics that are available in each of the groups.With each metric, additional information can be found by using the pminfo tool with the -T flag.
Table A.2. PCP Metric Groups for GFS2
Metric Group Metric Provided
gfs2.sbstats.* Timing metrics regarding the information collected from the superblockstats file (sbstats) for each GFS2 file system currently mounted onthe system.
gfs2.glocks.* Metrics regarding the information collected from the glock stats file(glocks) which count the number of glocks in each state thatcurrently exists for each GFS2 file system currently mounted on thesystem.
gfs2.glstats.* Metrics regarding the information collected from the glock stats file(glstats) which count the number of each type of glock thatcurrently exists for each GFS2 file system currently mounted on thesystem.
gfs2.tracepoints.* Metrics regarding the output from the GFS2 debugfs tracepoints foreach file system currently mounted on the system. Each sub-type ofthese metrics (one of each GFS2 tracepoint) can be individuallycontrolled whether on or off using the control metrics.
gfs2.worst_glock.* A computed metric making use of the data from the gfs2_glock_lock_time tracepoint to calculate a perceived“current worst glock” for each mounted file system. This metric isuseful for discovering potential lock contention and file system slowsdown if the same lock is suggested multiple times.
gfs2.latency.grant.* A computed metric making use of the data from both the gfs2_glock_queue and gfs2_glock_state_changetracepoints to calculate an average latency in microseconds for glockgrant requests to be completed for each mounted file system. Thismetric is useful for discovering potential slowdowns on the file systemwhen the grant latency increases.
gfs2.latency.demote.* A computed metric making use of the data from both the gfs2_glock_state_change and gfs2_demote_rq tracepointsto calculate an average latency in microseconds for glock demoterequests to be completed for each mounted file system. This metric isuseful for discovering potential slowdowns on the file system when thedemote latency increases.
APPENDIX A. GFS2 PERFORMANCE ANALYSIS WITH PERFORMANCE CO-PILOT
55

gfs2.latency.queue.* A computed metric making use of the data from the gfs2_glock_queue tracepoint to calculate an average latency inmicroseconds for glock queue requests to be completed for eachmounted file system.
gfs2.control.* Configuration metrics which are used to control what tracepointmetrics are currently enabled or disabled and are toggled by means ofthe pmstore tool. These configuration metrics are described inSection A.5, “Metric Configuration (using pmstore)”.
Metric Group Metric Provided
A.5. METRIC CONFIGURATION (USING PMSTORE)
Some metrics in PCP allow the modification of their values, especially in the case where the metric actsas a control variable. This is the case with the gsf2.control.* metrics with the GFS2 PMDA. This isachieved through the use of the pmstore command line tool. As with most of the other PCP tools, the pmstore tool normally changes the current value for the specified metric on the local system, but youcan use the -h switch to allow the change of metric values on specified remote systems. For furtherinformation, see the pmstore(3) man page.
As an example, the following command enables all of the GSF2 tracepoints on the local machine on asystem with the GFS2 PMDA installed and loaded. When this command is run, the PMDA will switch onall of the GFS2 tracepoints in the debugfs file system.
# pmstore gfs2.control.tracepoints.all 1gfs2.control.tracepoints.all old value=0 new value=1
Table A.3, “Control Tracepoints” describes each of the control tracepoints and its usage. Anexplanation on the effect of each control tracepoint and its available options is available through thehelp switch in the pminfo tool.
Table A.3. Control Tracepoints
Control Metric Use and Available Options
gfs2.contol.tracepoints.all
The GFS2 tracepoint statistics can be manually controlled using 0 [off]or 1 [on]. Setting the value of the metric controls the behavior of thePMDA to whether it tries to collect from tracepoint metrics or not.
gfs2.control.tracepoints.*
The GFS2 tracepoint statistics can be manually controlled using 0 [off]or 1 [on]. Setting the value of the metric controls the behavior of thePMDA to whether it tries to collect from each specified tracepointmetric or not.
gfs2.control.global_tracing
The global tracing can be controlled using 0 [off] or 1 [on]. This isrequired to be on for most of the GFS2 metrics to function.
Global File System 2
56

gfs2.control.worst_glock
Can be individually controlled whether on or off using the controlmetrics.0 [off] or 1 [on]. Setting the value of the metric controls thebehavior of the PMDA to whether it tries to collect the lock_timemetrics or not. The machine must have the GFS2 tracepoints availablefor the glock_lock_time based metrics to function.
gfs2.control.latency The gfs2.latency statistics can be manually controlled using pmstore gfs2.control.latency 0 [off] or 1 [on]. Setting thevalue of the metric controls the behavior of the PMDA to whether ittries to collect the latency metrics or not. The machine must havethe gfs2 tracepoints available for the latency metrics to function.
gfs2.control.glock_threshold
The number of glocks that will be processed and accepted over all ftrace statistics. This number can be manually altered using the pmstore tool in order to tailor the number of glocks processed. Thisvalue must be positive.
Control Metric Use and Available Options
A.6. LOGGING PERFORMANCE DATA (USING PMLOGGER)
PCP allows you to log performance metric values which can replayed at a later date by creatingarchived logs of selected metrics on the system through the pmlogger tool. These metric archivesmay be played back at a later date to give retrospective performance analysis.
The pmlogger tool provides flexibility and control over the logged metrics by allowing you to specifywhich metrics are recorded on the system and at what frequency. By default, the configuration file for pmlogger is stored at /var/lib/pcp/config/pmlogger/config.default; the configuration fileoutlines which metrics are logged by the primary logging instance.
In order for pmlogger to log metric values on the local machine, a primary logging instance must bestarted. You can use systemctl to ensure that pmlogger is started as a service when the machinestarts.
The following example shows an extract of a pmlogger configuration file which enables the recordingof GFS2 performance metrics. This extract shows that pmlogger will log the performance metricvalues for the PCP GFS2 latency metrics every 10 seconds, the top 10 worst glock metric every 30seconds, the tracepoint data every minute, and it will log the data from the glock, glstats and sbstats metrics every 10 minutes.
# It is safe to make additions from here on ...#
log mandatory on every 5 seconds { gfs2.latency.grant gfs2.latency.queue gfs2.latency.demote gfs2.glocks}
log mandatory on every 10 seconds { gfs2.worst_glock
APPENDIX A. GFS2 PERFORMANCE ANALYSIS WITH PERFORMANCE CO-PILOT
57

}
log mandatory on every 30 seconds { gfs2.tracepoints}
log mandatory on every 5 minutes { gfs2.glstats gfs2.sbstats}
[access]disallow * : all;allow localhost : enquire;
NOTE
PCP comes with a default set of metrics which it will log on the host when pmlogger isenabled. However, no logging of GFS2 metrics occur with this default configuration.
After recording metric data, you have multiple options when it comes to the replaying of PCP logarchives on the system. You can export the logs to text files and import them into spreadsheets, or youcan replay them in the PCP-GUI application using graphs to visualize the retrospective data alongsidelive data of the system.
One of the tools available in PCP for viewing the log files is pmdumptext. This tool allows the user toparse the selected PCP log archive and export the values into an ASCII table. pmdumptext can be usedto dump the entire archive log or only select metric values from the log by specifying individual metricsthrough the command line. For more information on using pmdumptext, see the pmdumptext(1) manpage.
A.7. VISUAL TRACING (USING PCP-GUI AND PMCHART)
Through the use of of the PCP-GUI package, you can use the pmchart graphical utility to plotperformance metric values into graphs. The pmchart utility allows multiple charts to be displayedsimultaneously, with metrics being sourced from one or more live hosts with alternative options to usemetric data from PCP log archives as a source of historical data.
When you open pmchart, the PCP charts GUI displays. On the bottom of the display is the pmtimeVCR-like controls. The start/pause button allows you to control the interval in which the metric data ispolled and in the event that you are using historical data, the date and time for the metrics.
From the File -> New Chart option in the toolbar, you can select a metric from both the localmachine and remote machines by specifying their host name or address and then selectingperformance metrics from the remote hosts. Advanced configuration options include the ability tomanually set the axis values for the chart and to manually choose the color of the plots.
There are multiple options to take images or record the views created in pmchart. You can save animage of the current view through the File -> Export option in the toolbar. Recording is madeavailable by the Record -> Start option in the toolbar and these recordings can be stopped at alater time using Record -> Stop. After the recording has been terminated, the recorded metrics arearchived to be viewed at a later date.
You can customize the pmchart interface to display the data from performance metrics in multiple
Global File System 2
58

ways, including line plot, bar graphs and utilization graphs. In pmchart, the main configuration fileknown as the “view” allows the metadata associated with one or more charts to be saved. Thismetadata describes all of the chart's aspects including the metrics used and the chart columns. Youcan create a custom “view” configuration which can be saved using File -> Save View and thenloaded again at a later time. For more information about view configuration files and their syntax, seethe pmchart(1) man page.
The following example pmchart view configuration describes a stacking chart graph showing the totalnumber of glocks for the mounted GFS2 file system loop1 using the gfs2.glocks metric. We alsohave a plot graph underneath which plots the average latency for the glock grant, demote and queuerequests for the same file system instance “loop1”.
#kmchartversion 1
chart title "Total number of Glocks /loop1" style stacking antialiasing off plot legend "Shared" metric gfs2.glocks.shared instance "loop1" plot legend "Unlocked" metric gfs2.glocks.unlocked instance "loop1" plot legend "Deferred" metric gfs2.glocks.deferred instance "loop1" plot legend "Exclusive"metric gfs2.glocks.exclusive instance "loop1"
chart title "Average Glock Latency (usecs) /loop1" style plot antialiasing off plot legend "Demote" metric gfs2.latency.demote.all instance "loop1" plot legend "Grant" metric gfs2.latency.grant.all instance "loop1" plot legend "Queue" metric gfs2.latency.queue.all instance "loop1"
APPENDIX A. GFS2 PERFORMANCE ANALYSIS WITH PERFORMANCE CO-PILOT
59

APPENDIX B. GFS2 TRACEPOINTS AND THE DEBUGFSGLOCKS FILEThis appendix describes both the glock debugfs interface and the GFS2 tracepoints. It is intended foradvanced users who are familiar with file system internals who would like to learn more about thedesign of GFS2 and how to debug GFS2-specific issues.
B.1. GFS2 TRACEPOINT TYPES
There are currently three types of GFS2 tracepoints: glock (pronounced "gee-lock") tracepoints, bmaptracepoints and log tracepoints. These can be used to monitor a running GFS2 file system and giveadditional information to that which can be obtained with the debugging options supported in previousreleases of Red Hat Enterprise Linux. Tracepoints are particularly useful when a problem, such as ahang or performance issue, is reproducible and thus the tracepoint output can be obtained during theproblematic operation. In GFS2, glocks are the primary cache control mechanism and they are the keyto understanding the performance of the core of GFS2. The bmap (block map) tracepoints can be usedto monitor block allocations and block mapping (lookup of already allocated blocks in the on-diskmetadata tree) as they happen and check for any issues relating to locality of access. The logtracepoints keep track of the data being written to and released from the journal and can provideuseful information on that part of GFS2.
The tracepoints are designed to be as generic as possible. This should mean that it will not benecessary to change the API during the course of Red Hat Enterprise Linux 7. On the other hand, usersof this interface should be aware that this is a debugging interface and not part of the normal Red HatEnterprise Linux 7 API set, and as such Red Hat makes no guarantees that changes in the GFS2tracepoints interface will not occur.
Tracepoints are a generic feature of Red Hat Enterprise Linux 7 and their scope goes well beyondGFS2. In particular they are used to implement the blktrace infrastructure and the blktracetracepoints can be used in combination with those of GFS2 to gain a fuller picture of the systemperformance. Due to the level at which the tracepoints operate, they can produce large volumes ofdata in a very short period of time. They are designed to put a minimum load on the system when theyare enabled, but it is inevitable that they will have some effect. Filtering events by a variety of meanscan help reduce the volume of data and help focus on obtaining just the information which is useful forunderstanding any particular situation.
B.2. TRACEPOINTS
The tracepoints can be found under the /sys/kernel/debug/tracing/ directory assuming that debugfs is mounted in the standard place at the /sys/kernel/debug directory. The eventssubdirectory contains all the tracing events that may be specified and, provided the gfs2 module isloaded, there will be a gfs2 subdirectory containing further subdirectories, one for each GFS2 event.The contents of the /sys/kernel/debug/tracing/events/gfs2 directory should look roughlylike the following:
[root@chywoon gfs2]# lsenable gfs2_bmap gfs2_glock_queue gfs2_log_flushfilter gfs2_demote_rq gfs2_glock_state_change gfs2_pingfs2_block_alloc gfs2_glock_put gfs2_log_blocks gfs2_promote
To enable all the GFS2 tracepoints, enter the following command:
Global File System 2
60

[root@chywoon gfs2]# echo -n 1 >/sys/kernel/debug/tracing/events/gfs2/enable
To enable a specific tracepoint, there is an enable file in each of the individual event subdirectories.The same is true of the filter file which can be used to set an event filter for each event or set ofevents. The meaning of the individual events is explained in more detail below.
The output from the tracepoints is available in ASCII or binary format. This appendix does not currentlycover the binary interface. The ASCII interface is available in two ways. To list the current content ofthe ring buffer, you can enter the following command:
[root@chywoon gfs2]# cat /sys/kernel/debug/tracing/trace
This interface is useful in cases where you are using a long-running process for a certain period of timeand, after some event, want to look back at the latest captured information in the buffer. An alternativeinterface, /sys/kernel/debug/tracing/trace_pipe, can be used when all the output is required.Events are read from this file as they occur; there is no historical information available through thisinterface. The format of the output is the same from both interfaces and is described for each of theGFS2 events in the later sections of this appendix.
A utility called trace-cmd is available for reading tracepoint data. For more information on this utility,see the link in Section B.10, “References”. The trace-cmd utility can be used in a similar way to the strace utility, for example to run a command while gathering trace data from various sources.
B.3. GLOCKS
To understand GFS2, the most important concept to understand, and the one which sets it aside fromother file systems, is the concept of glocks. In terms of the source code, a glock is a data structure thatbrings together the DLM and caching into a single state machine. Each glock has a 1:1 relationship witha single DLM lock, and provides caching for that lock state so that repetitive operations carried outfrom a single node of the file system do not have to repeatedly call the DLM, and thus they help avoidunnecessary network traffic. There are two broad categories of glocks, those which cache metadataand those which do not. The inode glocks and the resource group glocks both cache metadata, othertypes of glocks do not cache metadata. The inode glock is also involved in the caching of data inaddition to metadata and has the most complex logic of all glocks.
Table B.1. Glock Modes and DLM Lock Modes
Glock mode DLM lock mode Notes
UN IV/NL Unlocked (no DLM lock associated withglock or NL lock depending on I flag)
SH PR Shared (protected read) lock
EX EX Exclusive lock
DF CW Deferred (concurrent write) used for DirectI/O and file system freeze
Glocks remain in memory until either they are unlocked (at the request of another node or at therequest of the VM) and there are no local users. At that point they are removed from the glock hash
APPENDIX B. GFS2 TRACEPOINTS AND THE DEBUGFS GLOCKS FILE
61

table and freed. When a glock is created, the DLM lock is not associated with the glock immediately.The DLM lock becomes associated with the glock upon the first request to the DLM, and if this requestis successful then the 'I' (initial) flag will be set on the glock. Table B.4, “Glock flags” shows themeanings of the different glock flags. Once the DLM has been associated with the glock, the DLM lockwill always remain at least at NL (Null) lock mode until the glock is to be freed. A demotion of the DLMlock from NL to unlocked is always the last operation in the life of a glock.
Each glock can have a number of "holders" associated with it, each of which represents one lockrequest from the higher layers. System calls relating to GFS2 queue and dequeue holders from theglock to protect the critical section of code.
The glock state machine is based on a work queue. For performance reasons, tasklets would bepreferable; however, in the current implementation we need to submit I/O from that context whichprohibits their use.
NOTE
Workqueues have their own tracepoints which can be used in combination with the GFS2tracepoints.
Table B.2, “Glock Modes and Data Types” shows what state may be cached under each of the glockmodes and whether that cached state may be dirty. This applies to both inode and resource grouplocks, although there is no data component for the resource group locks, only metadata.
Table B.2. Glock Modes and Data Types
Glock mode Cache Data Cache Metadata Dirty Data Dirty Metadata
UN No No No No
SH Yes Yes No No
DF No Yes No No
EX Yes Yes Yes Yes
B.4. THE GLOCK DEBUGFS INTERFACE
The glock debugfs interface allows the visualization of the internal state of the glocks and the holdersand it also includes some summary details of the objects being locked in some cases. Each line of thefile either begins G: with no indentation (which refers to the glock itself) or it begins with a differentletter, indented with a single space, and refers to the structures associated with the glock immediatelyabove it in the file (H: is a holder, I: an inode, and R: a resource group) . Here is an example of what thecontent of this file might look like:
G: s:SH n:5/75320 f:I t:SH d:EX/0 a:0 r:3 H: s:SH f:EH e:0 p:4466 [postmark] gfs2_inode_lookup+0x14e/0x260 [gfs2]G: s:EX n:3/258028 f:yI t:EX d:EX/0 a:3 r:4 H: s:EX f:tH e:0 p:4466 [postmark] gfs2_inplace_reserve_i+0x177/0x780 [gfs2] R: n:258028 f:05 b:22256/22256 i:16800G: s:EX n:2/219916 f:yfI t:EX d:EX/0 a:0 r:3
Global File System 2
62

I: n:75661/219916 t:8 f:0x10 d:0x00000000 s:7522/7522G: s:SH n:5/127205 f:I t:SH d:EX/0 a:0 r:3 H: s:SH f:EH e:0 p:4466 [postmark] gfs2_inode_lookup+0x14e/0x260 [gfs2]G: s:EX n:2/50382 f:yfI t:EX d:EX/0 a:0 r:2G: s:SH n:5/302519 f:I t:SH d:EX/0 a:0 r:3 H: s:SH f:EH e:0 p:4466 [postmark] gfs2_inode_lookup+0x14e/0x260 [gfs2]G: s:SH n:5/313874 f:I t:SH d:EX/0 a:0 r:3 H: s:SH f:EH e:0 p:4466 [postmark] gfs2_inode_lookup+0x14e/0x260 [gfs2]G: s:SH n:5/271916 f:I t:SH d:EX/0 a:0 r:3 H: s:SH f:EH e:0 p:4466 [postmark] gfs2_inode_lookup+0x14e/0x260 [gfs2]G: s:SH n:5/312732 f:I t:SH d:EX/0 a:0 r:3 H: s:SH f:EH e:0 p:4466 [postmark] gfs2_inode_lookup+0x14e/0x260 [gfs2]
The above example is a series of excerpts (from an approximately 18MB file) generated by thecommand cat /sys/kernel/debug/gfs2/unity:myfs/glocks >my.lock during a run of thepostmark benchmark on a single node GFS2 file system. The glocks in the figure have been selected inorder to show some of the more interesting features of the glock dumps.
The glock states are either EX (exclusive), DF (deferred), SH (shared) or UN (unlocked). These statescorrespond directly with DLM lock modes except for UN which may represent either the DLM null lockstate, or that GFS2 does not hold a DLM lock (depending on the I flag as explained above). The s: field ofthe glock indicates the current state of the lock and the same field in the holder indicates therequested mode. If the lock is granted, the holder will have the H bit set in its flags (f: field). Otherwise,it will have the W wait bit set.
The n: field (number) indicates the number associated with each item. For glocks, that is the typenumber followed by the glock number so that in the above example, the first glock is n:5/75320; whichindicates an iopen glock which relates to inode 75320. In the case of inode and iopen glocks, theglock number is always identical to the inode's disk block number.
NOTE
The glock numbers (n: field) in the debugfs glocks file are in hexadecimal, whereas thetracepoints output lists them in decimal. This is for historical reasons; glock numberswere always written in hex, but decimal was chosen for the tracepoints so that thenumbers could easily be compared with the other tracepoint output (from blktracefor example) and with output from stat(1).
The full listing of all the flags for both the holder and the glock are set out in Table B.4, “Glock flags”and Table B.5, “Glock holder flags” . The content of lock value blocks is not currently available throughthe glock debugfs interface.
Table B.3, “Glock Types” shows the meanings of the different glock types.
Table B.3. Glock Types
Typenumber
Lock type Use
1 trans Transaction lock
2 inode Inode metadata and data
APPENDIX B. GFS2 TRACEPOINTS AND THE DEBUGFS GLOCKS FILE
63

3 rgrp Resource group metadata
4 meta The superblock
5 iopen Inode last closer detection
6 flock flock(2) syscall
8 quota Quota operations
9 journal Journal mutex
Typenumber
Lock type Use
One of the more important glock flags is the l (locked) flag. This is the bit lock that is used to arbitrateaccess to the glock state when a state change is to be performed. It is set when the state machine isabout to send a remote lock request through the DLM, and only cleared when the complete operationhas been performed. Sometimes this can mean that more than one lock request will have been sent,with various invalidations occurring between times.
Table B.4, “Glock flags” shows the meanings of the different glock flags.
Table B.4. Glock flags
Flag Name Meaning
d Pending demote A deferred (remote) demote request
D Demote A demote request (local or remote)
f Log flush The log needs to be committed before releasing this glock
F Frozen Replies from remote nodes ignored - recovery is in progress.
i Invalidate in progress In the process of invalidating pages under this glock
I Initial Set when DLM lock is associated with this glock
l Locked The glock is in the process of changing state
L LRU Set when the glock is on the LRU list`
o Object Set when the glock is associated with an object (that is, aninode for type 2 glocks, and a resource group for type 3 glocks)
p Demote in progress The glock is in the process of responding to a demote request
Global File System 2
64

q Queued Set when a holder is queued to a glock, and cleared when theglock is held, but there are no remaining holders. Used as partof the algorithm the calculates the minimum hold time for aglock.
r Reply pending Reply received from remote node is awaiting processing
y Dirty Data needs flushing to disk before releasing this glock
Flag Name Meaning
When a remote callback is received from a node that wants to get a lock in a mode that conflicts withthat being held on the local node, then one or other of the two flags D (demote) or d (demote pending)is set. In order to prevent starvation conditions when there is contention on a particular lock, each lockis assigned a minimum hold time. A node which has not yet had the lock for the minimum hold time isallowed to retain that lock until the time interval has expired.
If the time interval has expired, then the D (demote) flag will be set and the state required will berecorded. In that case the next time there are no granted locks on the holders queue, the lock will bedemoted. If the time interval has not expired, then the d (demote pending) flag is set instead. This alsoschedules the state machine to clear d (demote pending) and set D (demote) when the minimum holdtime has expired.
The I (initial) flag is set when the glock has been assigned a DLM lock. This happens when the glock isfirst used and the I flag will then remain set until the glock is finally freed (which the DLM lock isunlocked).
B.5. GLOCK HOLDERS
Table B.5, “Glock holder flags” shows the meanings of the different glock holder flags.
Table B.5. Glock holder flags
Flag Name Meaning
a Async Do not wait for glock result (will poll for result later)
A Any Any compatible lock mode is acceptable
c No cache When unlocked, demote DLM lock immediately
e No expire Ignore subsequent lock cancel requests
E Exact Must have exact lock mode
F First Set when holder is the first to be granted for this lock
H Holder Indicates that requested lock is granted
APPENDIX B. GFS2 TRACEPOINTS AND THE DEBUGFS GLOCKS FILE
65

p Priority Enqueue holder at the head of the queue
t Try A "try" lock
T Try 1CB A "try" lock that sends a callback
W Wait Set while waiting for request to complete
Flag Name Meaning
The most important holder flags are H (holder) and W (wait) as mentioned earlier, since they are set ongranted lock requests and queued lock requests respectively. The ordering of the holders in the list isimportant. If there are any granted holders, they will always be at the head of the queue, followed byany queued holders.
If there are no granted holders, then the first holder in the list will be the one that triggers the nextstate change. Since demote requests are always considered higher priority than requests from the filesystem, that might not always directly result in a change to the state requested.
The glock subsystem supports two kinds of "try" lock. These are useful both because they allow thetaking of locks out of the normal order (with suitable back-off and retry) and because they can be usedto help avoid resources in use by other nodes. The normal t (try) lock is just what its name indicates; itis a "try" lock that does not do anything special. The T (try 1CB) lock, on the other hand, is identical tothe t lock except that the DLM will send a single callback to current incompatible lock holders. One useof the T (try 1CB) lock is with the iopen locks, which are used to arbitrate among the nodes when aninode's i_nlink count is zero, and determine which of the nodes will be responsible for deallocatingthe inode. The iopen glock is normally held in the shared state, but when the i_nlink count becomeszero and ->evict_inode() is called, it will request an exclusive lock with T ( try 1CB) set. It willcontinue to deallocate the inode if the lock is granted. If the lock is not granted it will result in thenode(s) which were preventing the grant of the lock marking their glock(s) with the D (demote) flag,which is checked at ->drop_inode() time in order to ensure that the deallocation is not forgotten.
This means that inodes that have zero link count but are still open will be deallocated by the node onwhich the final close() occurs. Also, at the same time as the inode's link count is decremented to zerothe inode is marked as being in the special state of having zero link count but still in use in the resourcegroup bitmap. This functions like the ext3 file system3's orphan list in that it allows any subsequentreader of the bitmap to know that there is potentially space that might be reclaimed, and to attempt toreclaim it.
B.6. GLOCK TRACEPOINTS
The tracepoints are also designed to be able to confirm the correctness of the cache control bycombining them with the blktrace output and with knowledge of the on-disk layout. It is thenpossible to check that any given I/O has been issued and completed under the correct lock, and that noraces are present.
The gfs2_glock_state_change tracepoint is the most important one to understand. It tracks everystate change of the glock from initial creation right through to the final demotion which ends with gfs2_glock_put and the final NL to unlocked transition. The l (locked) glock flag is always set beforea state change occurs and will not be cleared until after it has finished. There are never any granted
Global File System 2
66

holders (the H glock holder flag) during a state change. If there are any queued holders, they will alwaysbe in the W (waiting) state. When the state change is complete then the holders may be granted whichis the final operation before the l glock flag is cleared.
The gfs2_demote_rq tracepoint keeps track of demote requests, both local and remote. Assumingthat there is enough memory on the node, the local demote requests will rarely be seen, and mostoften they will be created by umount or by occasional memory reclaim. The number of remote demoterequests is a measure of the contention between nodes for a particular inode or resource group.
The gfs2_glock_lock_time tracepoint provides information on the time taken by requests to theDLM. The blocking (b) flag was introduced into the glock specifically to be used in combination withthis tracepoint.
When a holder is granted a lock, gfs2_promote is called, this occurs as the final stages of a statechange or when a lock is requested which can be granted immediately due to the glock state alreadycaching a lock of a suitable mode. If the holder is the first one to be granted for this glock, then the f(first) flag is set on that holder. This is currently used only by resource groups.
B.7. BMAP TRACEPOINTS
Block mapping is a task central to any file system. GFS2 uses a traditional bitmap-based system withtwo bits per block. The main purpose of the tracepoints in this subsystem is to allow monitoring of thetime taken to allocate and map blocks.
The gfs2_bmap tracepoint is called twice for each bmap operation: once at the start to display thebmap request, and once at the end to display the result. This makes it easy to match the requests andresults together and measure the time taken to map blocks in different parts of the file system,different file offsets, or even of different files. It is also possible to see what the average extent sizesbeing returned are in comparison to those being requested.
The gfs2_rs tracepoint traces block reservations as they are created, used, and destroyed in theblock allocator.
To keep track of allocated blocks, gfs2_block_alloc is called not only on allocations, but also onfreeing of blocks. Since the allocations are all referenced according to the inode for which the block isintended, this can be used to track which physical blocks belong to which files in a live file system. Thisis particularly useful when combined with blktrace, which will show problematic I/O patterns thatmay then be referred back to the relevant inodes using the mapping gained by means this tracepoint.
B.8. LOG TRACEPOINTS
The tracepoints in this subsystem track blocks being added to and removed from the journal(gfs2_pin), as well as the time taken to commit the transactions to the log ( gfs2_log_flush). Thiscan be very useful when trying to debug journaling performance issues.
The gfs2_log_blocks tracepoint keeps track of the reserved blocks in the log, which can help showif the log is too small for the workload, for example.
The gfs2_ail_flush tracepoint is similar to the gfs2_log_flush tracepoint in that it keeps trackof the start and end of flushes of the AIL list. The AIL list contains buffers which have been through thelog, but have not yet been written back in place and this is periodically flushed in order to release morelog space for use by the file system, or when a process requests a sync or fsync.
B.9. GLOCK STATISTICS
APPENDIX B. GFS2 TRACEPOINTS AND THE DEBUGFS GLOCKS FILE
67

GFS2 maintains statistics that can help track what is going on within the file system. This allows you tospot performance issues.
GFS2 maintains two counters:
dcount, which counts the number of DLM operations requested. This shows how much datahas gone into the mean/variance calculations.
qcount, which counts the number of syscall level operations requested. Generally qcountwill be equal to or greater than dcount.
In addition, GFS2 maintains three mean/variance pairs. The mean/variance pairs are smoothedexponential estimates and the algorithm used is the one used to calculate round trip times in networkcode. The mean and variance pairs maintained in GFS2 are not scaled, but are in units of integernanoseconds.
srtt/srttvar: Smoothed round trip time for non-blocking operations
srttb/srttvarb: Smoothed round trip time for blocking operations
irtt/irttvar: Inter-request time (for example, time between DLM requests)
A non-blocking request is one which will complete right away, whatever the state of the DLM lock inquestion. That currently means any requests when (a) the current state of the lock is exclusive (b) therequested state is either null or unlocked or (c) the "try lock" flag is set. A blocking request covers allthe other lock requests.
Larger times are better for IRTTs, whereas smaller times are better for the RTTs.
Statistics are kept in two sysfs files:
The glstats file. This file is similar to the glocks file, except that it contains statistics, withone glock per line. The data is initialized from "per cpu" data for that glock type for which theglock is created (aside from counters, which are zeroed). This file may be very large.
The lkstats file. This contains "per cpu" stats for each glock type. It contains one statisticper line, in which each column is a cpu core. There are eight lines per glock type, with typesfollowing on from each other.
B.10. REFERENCES
For more information about tracepoints and the GFS2 glocks file, see the following resources:
For information on glock internal locking rules, see http://git.kernel.org/?p=linux/kernel/git/torvalds/linux-2.6.git;a=blob;f=Documentation/filesystems/gfs2-glocks.txt;h=0494f78d87e40c225eb1dc1a1489acd891210761;hb=HEAD.
For information on event tracing, seehttps://git.kernel.org/pub/scm/linux/kernel/git/torvalds/linux.git/tree/Documentation/trace/events.rst
For information on the trace-cmd utility, see http://lwn.net/Articles/341902/.
Global File System 2
68

APPENDIX C. REVISION HISTORY
Revision 3.1-0 Tue Aug 9 2018 Steven LevinePreparing document for 7.6 Beta publication.
Revision 2.1-1 Thu Mar 15 2018 Steven LevinePreparing document for 7.5 GA publication.
Revision 2.1-0 Thu Dec 14 2017 Steven LevinePreparing document for 7.5 Beta publication.
Revision 1.3-6 Wed Nov 8 2017 Steven LevineUpdated version for 7.4.
Revision 1.3-3 Thu Jul 27 2017 Steven LevineDocument version for 7.4 GA publication.
Revision 1.3-1 Wed May 10 2017 Steven LevinePreparing document for 7.4 Beta publication.
Revision 1.2-5 Thu Mar 23 2017 Steven LevineUpdate to 7.3 GA publication.
Revision 1.2-4 Mon Oct 17 2016 Steven LevineVersion for 7.3 GA publication.
Revision 1.2-3 Wed Aug 17 2016 Steven LevinePreparing document for 7.3 Beta publication.
Revision 0.3-5 Mon Nov 9 2015 steven levinePreparing document for 7.2 GA publication
Revision 0.3-2 Wed Aug 19 2015 Steven LevinePreparing document for 7.2 Beta publication.
Revision 0.2-13 Wed Feb 18 2015 Steven LevineVersion for 7.1 GA release
Revision 0.2-8 Thu Dec 11 2014 Steven LevineVersion for 7.0 Beta release
Revision 0.1-29 Wed Jun 11 2014 Steven LevineVersion for 7.0 GA release
Revision 0.1-11 Mon Dec 9 2013 Steven Levine7.0 Beta release
Revision 0.1-1 Wed Jan 16 2013 Steven LevineBranched from the Red Hat Enterprise Linux 6 version of the document
APPENDIX C. REVISION HISTORY
69

INDEX
A
acl mount option, Mounting a File System
adding journals to a file system, Adding Journals to a File System
atime, configuring updates, Configuring atime Updates
mounting with noatime , Mount with noatime
mounting with relatime , Mount with relatime
C
Configuration considerations, GFS2 Configuration and Operational Considerations
configuration, before, Before Setting Up GFS2
D
data journaling, Data Journaling
debugfs, GFS2 Tracepoints and the debugfs glocks File
debugfs file, Troubleshooting GFS2 Performance with the GFS2 Lock Dump
disk quotas
additional resources, References
assigning per group, Assigning Quotas Per Group
assigning per user, Assigning Quotas Per User
enabling, Configuring Disk Quotas
creating quota files, Creating the Quota Database Files
quotacheck, running, Creating the Quota Database Files
hard limit, Assigning Quotas Per User
management of, Managing Disk Quotas
quotacheck command, using to check, Keeping Quotas Accurate
reporting, Managing Disk Quotas
soft limit, Assigning Quotas Per User
F
features, new and changed, New and Changed Features
file system
adding journals, Adding Journals to a File System
atime, configuring updates, Configuring atime Updates
mounting with noatime , Mount with noatime
mounting with relatime , Mount with relatime
data journaling, Data Journaling
growing, Growing a File System
Global File System 2
70

making, Making a File System
mounting, Mounting a File System , Special Considerations when Mounting GFS2 File Systems
quota management, GFS2 Quota Management, Setting Up Quotas in Enforcement orAccounting Mode
synchronizing quotas, Synchronizing Quotas with the quotasync Command
repairing, Repairing a File System
suspending activity, Suspending Activity on a File System
unmounting, Unmounting a File System , Special Considerations when Mounting GFS2 FileSystems
fsck.gfs2 command, Repairing a File System
G
GFS2
atime, configuring updates, Configuring atime Updates
mounting with noatime , Mount with noatime
mounting with relatime , Mount with relatime
Configuration considerations, GFS2 Configuration and Operational Considerations
managing, Managing GFS2
Operation, GFS2 Configuration and Operational Considerations
quota management, GFS2 Quota Management, Setting Up Quotas in Enforcement orAccounting Mode
synchronizing quotas, Synchronizing Quotas with the quotasync Command
withdraw function, The GFS2 Withdraw Function
GFS2 file system maximum size, GFS2 Overview
GFS2-specific options for adding journals table, Complete Usage
GFS2-specific options for expanding file systems table, Complete Usage
gfs2_grow command, Growing a File System
gfs2_jadd command, Adding Journals to a File System
glock, GFS2 Tracepoints and the debugfs glocks File
glock flags, Troubleshooting GFS2 Performance with the GFS2 Lock Dump , The glock debugfsInterface
glock holder flags, Troubleshooting GFS2 Performance with the GFS2 Lock Dump , Glock Holders
glock types, Troubleshooting GFS2 Performance with the GFS2 Lock Dump , The glock debugfsInterface
growing a file system, Growing a File System
M
making a file system, Making a File System
managing GFS2, Managing GFS2
maximum size, GFS2 file system, GFS2 Overview
INDEX
71

mkfs command, Making a File System
mkfs.gfs2 command options table, Complete Options
mount command, Mounting a File System
mount table, Complete Usage
mounting a file system, Mounting a File System , Special Considerations when Mounting GFS2 FileSystems
N
node locking, GFS2 Node Locking
O
overview, GFS2 Overview
configuration, before, Before Setting Up GFS2
features, new and changed, New and Changed Features
P
performance tuning, Performance Tuning with GFS2
Posix locking, Issues with Posix Locking
Q
quota management, GFS2 Quota Management, Setting Up Quotas in Enforcement or AccountingMode
synchronizing quotas, Synchronizing Quotas with the quotasync Command
quotacheck , Creating the Quota Database Files
quotacheck command
checking quota accuracy with, Keeping Quotas Accurate
quota_quantum tunable parameter, Synchronizing Quotas with the quotasync Command
R
repairing a file system, Repairing a File System
S
suspending activity on a file system, Suspending Activity on a File System
system hang at unmount, Special Considerations when Mounting GFS2 File Systems
T
tables
GFS2-specific options for adding journals, Complete Usage
GFS2-specific options for expanding file systems, Complete Usage
mkfs.gfs2 command options, Complete Options
mount options, Complete Usage
Global File System 2
72

tracepoints, GFS2 Tracepoints and the debugfs glocks File
tuning, performance, Performance Tuning with GFS2
U
umount command, Unmounting a File System
unmount, system hang, Special Considerations when Mounting GFS2 File Systems
unmounting a file system, Unmounting a File System , Special Considerations when Mounting GFS2File Systems
W
withdraw function, GFS2, The GFS2 Withdraw Function
INDEX
73