rear carrier - motoringfile
TRANSCRIPT

Original MINI ZubehörMontageinformation
Alu-HeckträgerAluminium rear-mounted carrier Porte-vélos arrière en aluAluminium achterdragerBakre lasthållare av aluminium Portapacchi in alluminio soporte posterior de aluminioSuporte traseiro de alumínio
Aluminium rear-mounted carrierInstallation information
DE
ENFR
NL
SVIT
ESPT
© 2006 BMW AG, Munich/Germany
Contents
General information 28Notes 28
Safety information 28Care instructions 30
Parts kit for aluminium rear-mounted carrier 31Parts kit for ski/snowboard carrier 32
Unfolding aluminium rear-mounted carrier 33Mounting number plate 33
Mounting aluminium rear-mounted carrier 34Removing aluminium rear-mounted carrier 37
Opening and closing luggage compartment tailgate 39Loading aluminium rear-mounted carrier with cycle 40
Unloading aluminium rear-mounted carrier 43Mounting ski/snowboard carrier 43
Loading ski/snowboard carrier 45Removing ski/snowboard carrier 47
Mounting cycle rack 47
27
Reprint, also by way of extract, only with written permission of BMW AG, Munich.Printed in Germany on environmentally-friendly paper(chlorine-free bleached, recyclable).Printing errors, mistakes excepted and subject to changes.

MINI recommends using only parts and accessory products that it has checked for safety, function and suitability and approved on this basis.
Symbols used
Denotes instructions or warning information that you must heed.
Denotes instructions that draw your attention to special features.
Denotes a movement that must be performed in the direction indicated by
the arrow.
Denotes the end of the instruction.
Notes
• The installation or fitting of the lighting kit must be carried out in accordance with specific national guidelines.
• The installation of the aluminium rear-mounted carrier for MINI is illustrated for one side of the car only in some places. Proceed in the same way for the opposite side.
• Stow the second key safely and note the key number. This avoids having to replace the lock if the main key is lost.
• The installation information shows the alu-minium rear-mounted carrier with lighting kit for European countries. For North America and other countries, it may not be necessary to connect the lighting kit.
• Remove the aluminium rear-mounted carrier from the car when it is not being used in order to save fuel and for the safety of other drivers.
• Only open the luggage compartment tailgate when the platform is tilted backwards.
• The platform can be tilted to the rear when it is loaded or unloaded. Make sure there is ample space behind your car when doing this.
• Never put a cover or similar over the load while driving.
• Note the car height with loaded aluminium rear-mounted carrier.
• Remove the aluminium rear-mounted carrier before using a car wash/drive-through car wash.
• Adhere exactly to each individual operation of the installation information. If the alu-minium rear-mounted carrier is not mounted correctly, it and the load can become loose from the car and endanger other drivers.
• Remember you need more space behind the car when the aluminium rear-mounted carrier is fitted.
• As the driver or owner of the car, you bear sole responsibility for the condition and secure attachment of the aluminium rear-mounted carrier.
• After the initial fitting, after driving a distance of max. 15 km check that all retaining ele-ments of the aluminium rear-mounted carrier are firmly attached.
• The loaded aluminium rear-mounted carrier can alter the driving characteristics of the car, especially with a side wind or when braking in bends.
General information Safety information
28

DE
ENFR
NL
SVIT
ESPT
• Check that the aluminium rear-mounted carrier is securely attached before every journey. Repeat the check at regular intervals during longer journeys or poor road conditions.
• Match the speed of the loaded car to the driving conditions (road conditions, road surface, side wind conditions, etc.) and the general traffic conditions. We recommend a maximum road speed of 130 km/h.
• If you sense that the load has shifted, stop immediately and again ensure that the alu-minium rear-mounted carrier is securely attached.
• When the aluminium rear-mounted carrier with lighting unit is fitted, the PDC (Park Distance Control) system switches off as long as the rear-mounted carrier is fitted to the car. After removing the rear-mounted carrier, the PDC is again ready for use. Ensure there is adequate space when reversing.
• Remove all loose parts (air pump, drink bottles, child seats, etc.) from the mounted cycles before setting off.
• Only use the rear-mounted carrier for trans-porting cycles, skis and snowboards. Do not transport or attach any other objects.
• The load may only protrude laterally a maxi-mum of 40 cm beyond the rear lights.
• Heed the country-specific loading guidelines.
• If any play is detected after fitting the alu rear-mounted carrier, have the rear-mounted carrier lock adjusted in the workshop as described in the installation manual.
• The total weight of the carrier system is made up of the following weights plus the maximum load:
- weight of the rear-mounted carrier: 12.0 kg
- weight of the ski/snowboard holder: 3 kg
- max. load: per cycle rail: 15 kgski/snowboard carrier: 7.5 kg
• Please heed the permitted total weight and the axle loads of the car
29
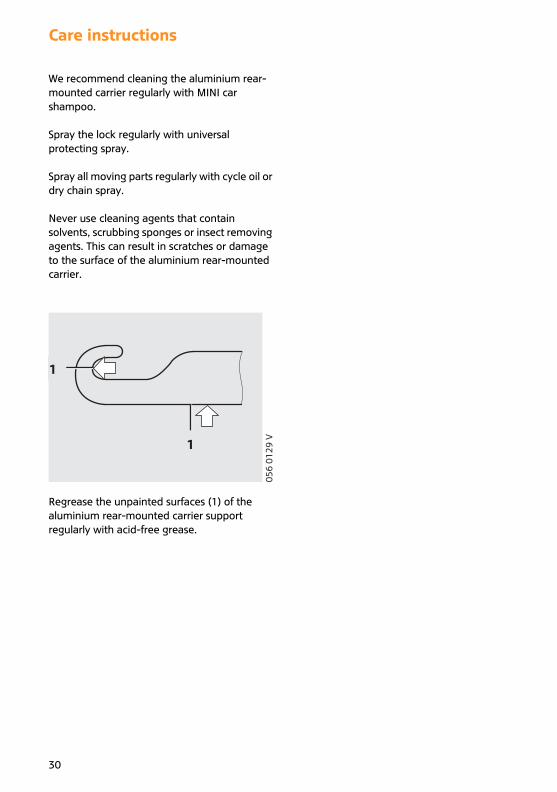
We recommend cleaning the aluminium rear-mounted carrier regularly with MINI car shampoo.
Spray the lock regularly with universal protecting spray.
Spray all moving parts regularly with cycle oil or dry chain spray.
Never use cleaning agents that contain solvents, scrubbing sponges or insect removing agents. This can result in scratches or damage to the surface of the aluminium rear-mounted carrier.
Regrease the unpainted surfaces (1) of the aluminium rear-mounted carrier support regularly with acid-free grease.
1
1
056
0129
V
Care instructions
30
DE
ENFR
NL
SVIT
ESPT
056
0051
V
Bescheinigung3. Kennzeichen
A
CB D
F GG IGE JGH
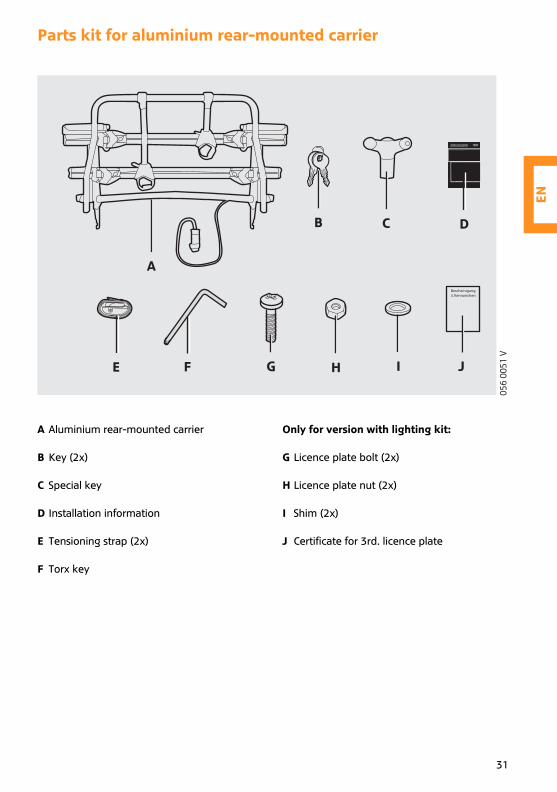
A Aluminium rear-mounted carrier
B Key (2x)
C Special key
D Installation information
E Tensioning strap (2x)
F Torx key
Only for version with lighting kit:
G Licence plate bolt (2x)
H Licence plate nut (2x)
I Shim (2x)
J Certificate for 3rd. licence plate
Parts kit for aluminium rear-mounted carrier
31

056
0088
V
K
L M
K Ski/Snowboard carrier
L Key (2x)
M Long tensioning strap (4x)
Parts kit for ski/snowboard carrier
32

DE
ENFR
NL
SVIT
ESPT
Open the catch (1) on both sides of aluminium rear-mounted carrier A.Then tilt the retaining bar (2) upwards.
To lock the retaining bar in place, close the catch (1) again on both sides.
Check the retaining bar. It must not move on the aluminium rear-mounted
carrier.
Open the catch (1) if necessary, turn the bolt (2) to the right with Torx key F and close the catch (1) again.
Repeat the process if necessary.
Place aluminium rear-mounted carrier A on a flat surface in order to fit the license plate.
The licence plate is attached to the brackets (1) with supplied bolts G, shims I and nuts H.
If necessary, a license plate holder can also be placed under the licence plate.
Attach the licence plate (1) so that it lies flush with the top edge of the aluminium rail (2).
1
A
2
056
0086
V
1
A
2
056
0087
V
A
1
056
0085
V
12
056
0052
V
Unfolding aluminium rear-mounted carrier
Mounting number plate
33

Screw on the licence plate (1) with nuts H and shims I on aluminium rear-mounted carrier A.
There is a recess at the bottom right of the cover cap (1).
Remove the cover caps (1) on both sides of the frame (2) using a coin in the recess if necessary.
Stow the cover caps (1) in a suitable place in the car.
Only for aluminium rear-mounted carrier with light
Swivel the power socket (1) downwards.
1
HI
056
0053
V
056
0054
V1
1
2
056
0055
V
1
Mounting aluminium rear-mounted carrier
34
DE
ENFR
NL
SVIT
ESPT
For all cars
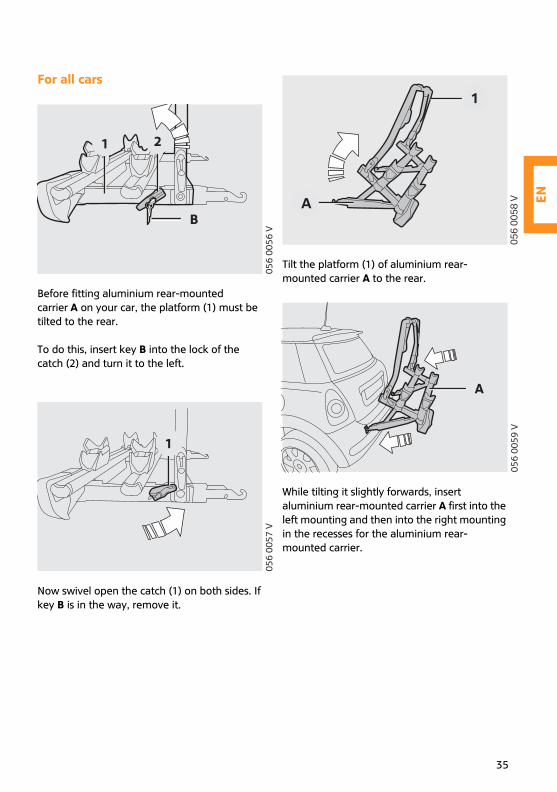
Before fitting aluminium rear-mounted carrier A on your car, the platform (1) must be tilted to the rear.
To do this, insert key B into the lock of the catch (2) and turn it to the left.
Now swivel open the catch (1) on both sides. If key B is in the way, remove it.
Tilt the platform (1) of aluminium rear-mounted carrier A to the rear.
While tilting it slightly forwards, insert aluminium rear-mounted carrier A first into the left mounting and then into the right mounting in the recesses for the aluminium rear-mounted carrier.
B
21
056
0056
V
1
056
0057
V
A
1
056
0058
V
A
056
0059
V
35
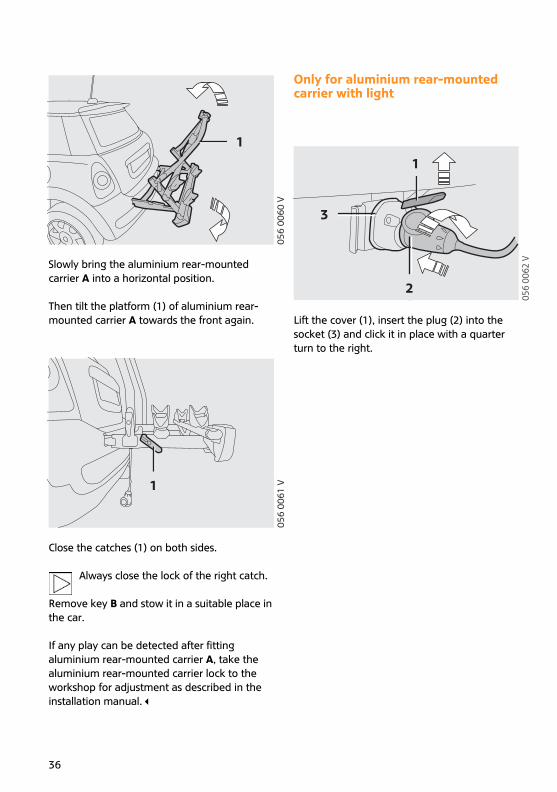
Slowly bring the aluminium rear-mounted carrier A into a horizontal position.
Then tilt the platform (1) of aluminium rear-mounted carrier A towards the front again.
Close the catches (1) on both sides.
Always close the lock of the right catch.
Remove key B and stow it in a suitable place in the car.
If any play can be detected after fitting aluminium rear-mounted carrier A, take the aluminium rear-mounted carrier lock to the workshop for adjustment as described in the installation manual.
Only for aluminium rear-mounted carrier with light
Lift the cover (1), insert the plug (2) into the socket (3) and click it in place with a quarter turn to the right.
1
056
0060
V
1
056
0061
V
056
0062
V
2
1
3
36

DE
ENFR
NL
SVIT
ESPT
You must unload aluminium rear-mounted carrier A before removal.
Only for aluminium rear-mounted carrier with light
Lift the cover (1), release the plug (2) with a quarter turn to the left and pull it out of the socket (3).
For all cars
Insert key B into the lock (1) of the catch (2) and turn it to the left. Swivel open the catch (2) on both sides. If key B is in the way, remove it.
Tilt the platform (1) of aluminium rear-mounted carrier A to the rear.
First push aluminium rear-mounted carrier A forwards slightly in the direction of the car and tilt it forwards towards the luggage compartment tailgate. In this position, carefully remove alu rear-mounted carrier A from the rear-mounted carrier recesses (1) and store.
056
0063
V
2
1
3
1
2
056
0064
V
1
A
056
0065
V
1
A1
056
0066
V
Removing aluminium rear-mounted carrier
37
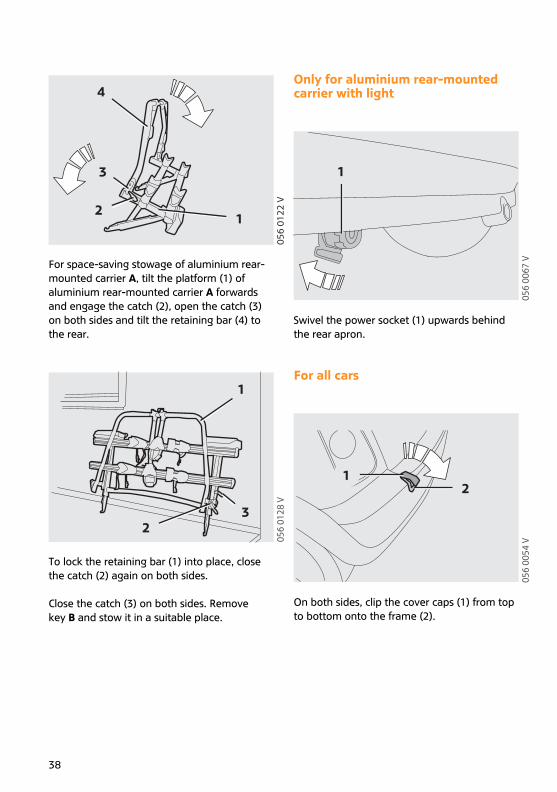
For space-saving stowage of aluminium rear-mounted carrier A, tilt the platform (1) of aluminium rear-mounted carrier A forwards and engage the catch (2), open the catch (3) on both sides and tilt the retaining bar (4) to the rear.
To lock the retaining bar (1) into place, close the catch (2) again on both sides.
Close the catch (3) on both sides. Remove key B and stow it in a suitable place.
Only for aluminium rear-mounted carrier with light
Swivel the power socket (1) upwards behind the rear apron.
For all cars
On both sides, clip the cover caps (1) from top to bottom onto the frame (2).
3
1
4
2
056
0122
V05
6 01
28 V
3
1
205
6 00
67 V
1
056
0054
V
12
38

DE
ENFR
NL
SVIT
ESPT
The luggage compartment tailgate can be opened with loaded and with
unloaded aluminium rear-mounted carrier A.
Insert key B into the lock (1) of the catch (2) and turn it to the left. Swivel the catch (2) upwards. If key B is in the way, remove it.
Swivel the catch (1) upwards.
Tilt the loaded or unloaded platform (1) of aluminium rear-mounted carrier A slowly backwards to the end stop.
Make sure there is ample space behind your car when doing this.
Unlock and open the luggage compartment tailgate (2).
Each time the luggage compartment tailgate (2) is opened or closed, make
sure that aluminium rear-mounted carrier A is completely tilted to the rear.
1
2
056
0064
V
1
056
0121
V
2
1
056
0069
V
Opening and closing luggage compartment tailgate
39

Close the luggage compartment tailgate and lock the platform accordingly in
reverse order.
Close the locks (1) on both sides.
Before starting to drive, ensure that the platform of aluminium rear-mounted
carrier A is properly locked by pulling on the tubular guide.
To conclude, insert key B into the lock (1) of the catch (2) and turn it to the right.
Remove key B and stow it in a suitable place in the car.
Always load the cycle rail close to the car first. Use the short retainer arm for
attaching the cycle in this case.
Use the long retainer arm for attaching the cycle to the second cycle rail.
When transporting two cycles, make sure that the heavier cycle is always mounted on the cycle rail nearest the car.
Open the cover of the bolt (1), undo the bolt (1) with special key C and rotate the short retainer arm (2) until it is horizontal. If necessary, push the short retainer arm (2) along the tubular guide (3) in the longitudinal direction.
1
2
056
0064
V
056
0070
V
3
1
C
2
Loading aluminium rear-mounted carrier with cycle
40

DE
ENFR
NL
SVIT
ESPT
Insert key B into the lock (1).
Turn key B to the left to unlock the gripping belt (2).
When the lock (1) is open, you cannot remove key B of aluminium rear-
mounted carrier A.
Press the pushbutton (1) and pull out the gripping belt (2) at the same time.
Before mounting, it may be necessary to turn the cycle handlebars by a quarter
turn to the left as shown in the picture. Rotate the pedal closest to the car to the top.
Place the cycle (1) on the cycle rail (2) and align it centrally.
Ensure that no parts jut out from the load. Otherwise this can lead to collisions
when opening and closing the luggage compartment tailgate.
Position the short retainer arm (1) at a suitable location on the cycle frame (2).
Attach the retainer arm (1) to the highest possible location on the cycle frame or
saddle post. If necessary, push the retainer arm (1) along the tubular guide to the left or right.
056
0071
V
12
B
056
0072
V
2
1
056
0073
V
1
2
056
0074
V
3
2
1
4
41

The padding (3) can be removed for very thick frames.
Wrap the gripping belt (4) around the cycle frame and push the end in again. Pull the gripping belt (4) tight.
The gripping belt is locked by inserting key B in the lock and turning it to the
right.
The locks on the spacers must always be locked. Stow key B in a suitable place.
Tighten the bolt of the short retainer arm (1) with special key C.
Close the bolt cover.
Stow special key C in a suitable place.
Undo the wing bolts (1) of the wheel shoes (2).
Push the wheel shoes (2) onto the cycle wheels.
Tighten the wing bolts (1) on the wheel shells (2) by hand.
Secure the cycle wheels with the tensioning straps (1).
Stretch tensioning strap E around the rim of the front wheel and the outer end of the rail of alu rear-mounted carrier A.
Place the fasteners of the clamping belts on the sides of the cycle wheels, not on
the rim. Load the aluminium rear-mounted carrier with a second cycle. The fitting corresponds to that of the first cycle.
056
0075
V
C
1
056
0081
V
1
2
056
0082
V
1
E
42

DE
ENFR
NL
SVIT
ESPT
Unload aluminium rear-mounted carrier A in reverse order.
Push both the short retainer arm (1) and, if necessary, the long retainer arm (2) to one side to ensure the best possible rear view.
To mount ski/snowboard carrier K, remove the wheel shells and retainer
arms beforehand.
Pull the cover caps (1) out of the wheel shells (2). Then undo the bolts (3) and pull the wheel shells (4) out of the wheel rails (2).
Undo the bolts (1) with special key C. Then tilt up the retainer arms (2) and remove them.
Stow the retainer arms (2) so they cannot be lost.
056
0079
V
21
12
3
4
056
0083
V05
6 01
24 V
C
1
2
Unloading aluminium rear-mounted carrier
Mounting ski/snowboard carrier
43

Push ski/snowboard carrier K with the slot nuts (1) into the wheel rails (2).
Then put the cover caps (3) back on again.
Unscrew both retainer arms (1) with special key C. Tilt up the retainer arms (1).
Close the retainer arm brackets (1) around the tubular guide (2) of aluminium rear-mounted carrier A. Lightly screw on the retainer arms (1) with special key C.
Align ski/snowboard holder K centrally on aluminium rear-mounted carrier A.
Tighten the bolt connections on the wheel rail (1) and the retainer arms (2).
32 2
1
K
056
0091
V05
6 00
93 V
1
C
056
0094
V
1
C
2
056
0089
V
K
1
2
44

DE
ENFR
NL
SVIT
ESPT
Use the short tensioning straps (1) (pre-installed when shipped) for transporting skis. Open the lock cover caps and swivel them to the side. Open the lock (2) of ski/snowboard carrier K with key L. Press the button (3) in the direction of the arrow and pull out the tensioning strap (1).
When the lock (2) is open, you cannot remove key L of ski/snowboard
carrier K.
Place the skis (1) and poles (2) into the holder. The ski tips point upwards. Push long tensioning strap (3) through the opening above the button (4) until the pulling lash can be grabbed.Pull tensioning strap (3) taut. Use additional pressure on the clamping piece (5) to help pull it taut.
The firm seating of tensioning straps must be checked at regular intervals and
the tensioning strap re-tensioned if necessary. Always keep the lock closed.
To transport snowboards, you must replace the short tensioning straps (1) (pre-installed when delivered) with long tensioning straps M. Push the short tensioning strap (1) into the opening (2) until the end of the tensioning strap (3) can be grabbed. Pull the short tensioning strap (1) completely out by the end of the tensioning strap (3).
To reinstall, push the tensioning strap (1) with the toothing to the inside through
the opening (4) and pull it until the end of the clamping belt (3) clicks snugly into place in the opening.
056
0095
V
13
2
056
0096
V
1
4
2
53
056
0097
V
3
1
24
Loading ski/snowboard carrier
45
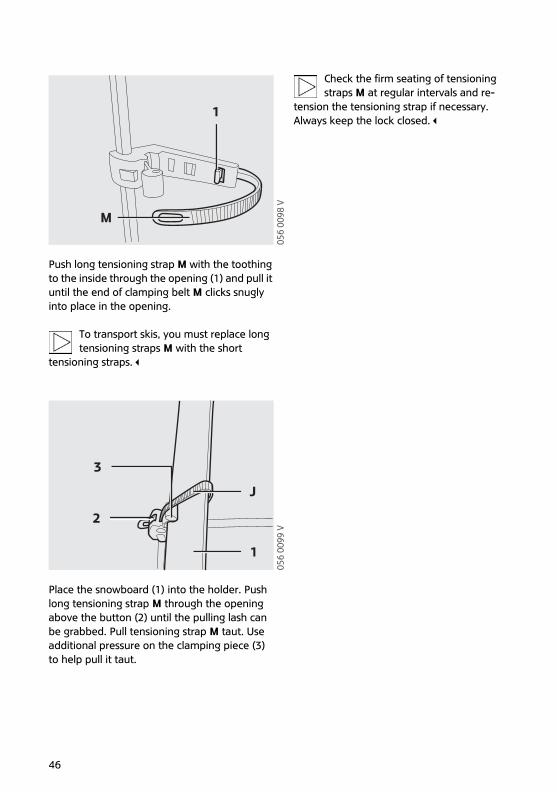
Push long tensioning strap M with the toothing to the inside through the opening (1) and pull it until the end of clamping belt M clicks snugly into place in the opening.
To transport skis, you must replace long tensioning straps M with the short
tensioning straps.
Place the snowboard (1) into the holder. Push long tensioning strap M through the opening above the button (2) until the pulling lash can be grabbed. Pull tensioning strap M taut. Use additional pressure on the clamping piece (3) to help pull it taut.
Check the firm seating of tensioning straps M at regular intervals and re-
tension the tensioning strap if necessary. Always keep the lock closed.
056
0098
V
M
1
056
0099
V
2
J
1
3
46
DE
ENFR
NL
SVIT
ESPT
You must unload ski/snowboard carrier K before removal.
Pull the cover cap (1) out of the wheel rail (2).
Undo the bolt connections (3) on the wheel rail and the bolt connections of both holders (4) with special key C.
Pull ski/snowboard carrier K out of the wheel rail (1).
Then put the cover caps (2) back on again.
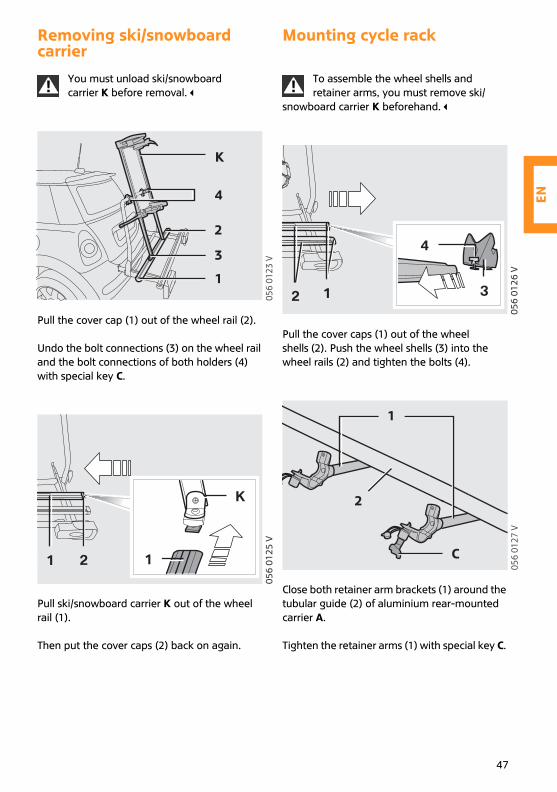
To assemble the wheel shells and retainer arms, you must remove ski/
snowboard carrier K beforehand.
Pull the cover caps (1) out of the wheel shells (2). Push the wheel shells (3) into the wheel rails (2) and tighten the bolts (4).
Close both retainer arm brackets (1) around the tubular guide (2) of aluminium rear-mounted carrier A.
Tighten the retainer arms (1) with special key C.
056
0123
V
K
1
4
3
2
21 1
K
056
0125
V
12
4
3
056
0126
V05
6 01
27 V
C
2
1
Removing ski/snowboard carrier
Mounting cycle rack
47

Take me.01 29 0 418 182 / / Downloaded from MotoringFile.com