real-time hair rendering - markus rappmarkusrapp.de/wordpress/wp...realtimehairrendering.pdf ·...
TRANSCRIPT

Real-Time Hair Rendering
Master Thesis
Computer Science and Media M.Sc.
Stuttgart Media University
Markus Rapp
Matrikel-Nr.: 25823
Erstprüfer: Stefan Radicke
Zweitprüfer: Simon Spielmann
Stuttgart, 7. November 2014
Real-Time Hair Rendering Abstract
i
A b s t r a c t
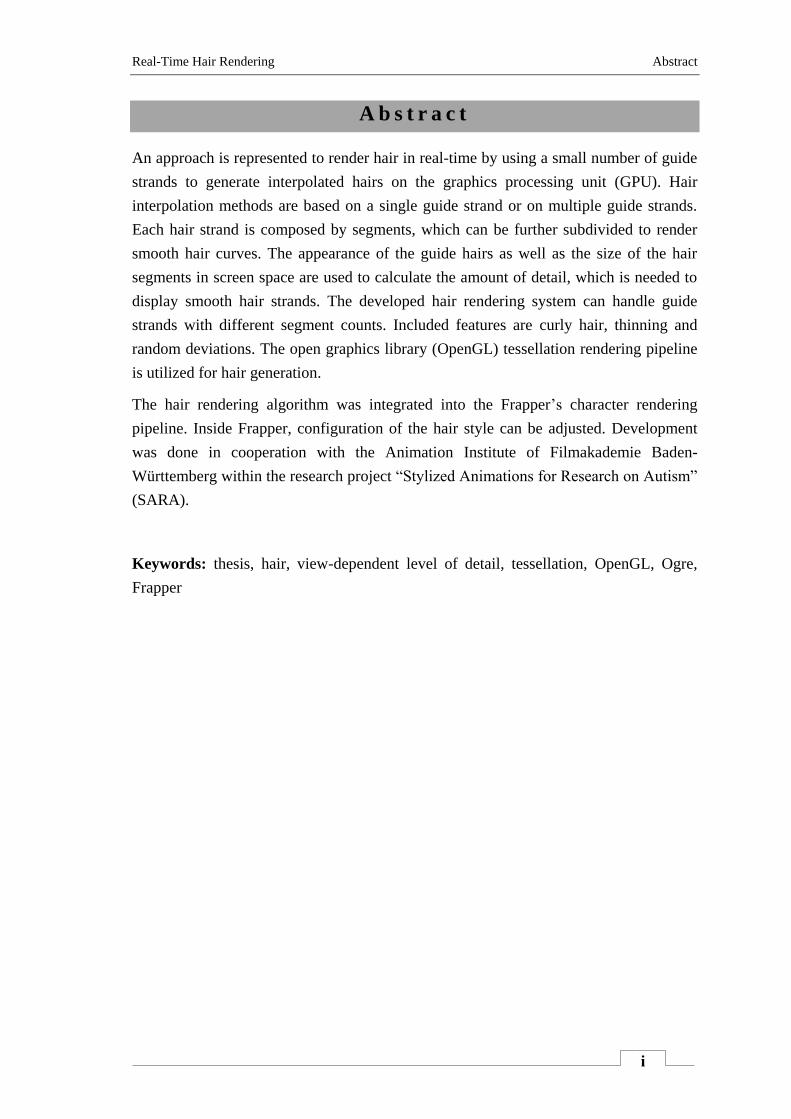
An approach is represented to render hair in real-time by using a small number of guide
strands to generate interpolated hairs on the graphics processing unit (GPU). Hair
interpolation methods are based on a single guide strand or on multiple guide strands.
Each hair strand is composed by segments, which can be further subdivided to render
smooth hair curves. The appearance of the guide hairs as well as the size of the hair
segments in screen space are used to calculate the amount of detail, which is needed to
display smooth hair strands. The developed hair rendering system can handle guide
strands with different segment counts. Included features are curly hair, thinning and
random deviations. The open graphics library (OpenGL) tessellation rendering pipeline
is utilized for hair generation.
The hair rendering algorithm was integrated into the Frapper’s character rendering
pipeline. Inside Frapper, configuration of the hair style can be adjusted. Development
was done in cooperation with the Animation Institute of Filmakademie Baden-
Württemberg within the research project “Stylized Animations for Research on Autism”
(SARA).
Keywords: thesis, hair, view-dependent level of detail, tessellation, OpenGL, Ogre,
Frapper

Real-Time Hair Rendering Declaration of Originality
ii
D e c l a r a t i o n o f O r i g i n a l i t y
I hereby certify that I am the sole author of this thesis and that no part of this thesis has
been published or submitted for publication.
I certify that, to the best of my knowledge, my thesis does not infringe upon anyone’s
Copyright nor violate any proprietary rights and that any ideas, techniques, quotations,
or any other material from the work of other people included in my thesis, published or
otherwise, are fully acknowledged in accordance with the standard referencing
practices.
I confirm that I understand the meaning of the affidavit and the legal consequences for
examination (§ 19 Abs. 2 Master-SPO of Stuttgart Media University) as well as
criminal law (§ 156 StGB) for a wrong or incomplete affidavit.
Markus Rapp, 7. November 2014

Real-Time Hair Rendering Acknowledgements
iii
A c k n o w l e d g e m e n t s
This work has been carried out in the German Research Foundation (DFG) funded
project SARA (AR 892/1-1).
I want to say thank you to the Animation Institute of Filmakademie Baden-
Württemberg, who gave me the chance to implement a tessellation based, real-time hair
rendering system for their research project SARA. Thank you for the support of the
R&D department including Volker Helzle, Diana Arellano, Simon Spielmann and Kai
Götz.
I also want to say thank you to my family, who supported me financially over my whole
study time.
Finally, I want to say thank you to all professors and employees of Stuttgart Media
University and University of Abertay Dundee, who taught me a lot at my studies.
Without the skills I got from the lectures and coursework, making this thesis would not
have been possible.

Real-Time Hair Rendering Contents
iv
C o n t e n t s
Abstract .............................................................................................................................. i
Declaration of Originality ................................................................................................ ii
Acknowledgements .......................................................................................................... iii
Contents ........................................................................................................................... iv
1. Introduction .................................................................................................................. 1
2. Related Work ................................................................................................................ 3
2.1. NVIDIA Fermi Hair Demo 2008 ..................................................................................... 5
2.2. NVIDIA HairWorks....................................................................................................... 10
2.3. AMD TressFX ................................................................................................................ 11
3. Requirements .............................................................................................................. 17
4. OpenGL Tessellation Rendering Pipeline ................................................................. 19
4.1. Vertex Shader ................................................................................................................. 20
4.2. Tessellation Control Shader .......................................................................................... 21
4.3. Tessellator ....................................................................................................................... 22
4.4. Tessellation Evaluation Shader ..................................................................................... 23
4.5. Geometry Shader ........................................................................................................... 24
4.6. Fragment Shader ............................................................................................................ 26
4.7. Tessellation Primitive Isolines ....................................................................................... 27
5. Implementation .......................................................................................................... 31
5.1. Input Data ........................................................................................................................ 32
5.2. Single Strand Interpolation ........................................................................................... 33
5.3. Multi Strand Interpolation ............................................................................................ 36
5.4. Combination of Single Strand and Multi Strand Interpolation................................. 38
5.5. Handling Different Hair Guide Sizes ........................................................................... 39
5.6. Expand Lines into Camera Facing Quads ................................................................... 41
5.7. Hair Form ....................................................................................................................... 42
5.8. Hair Strand Tessellation ................................................................................................ 43
5.8.1. Hermite Curve Interpolation ................................................................................................... 43
5.8.2. Uniform Cubic B-Splines ........................................................................................................ 45
5.9. Curly Hair ....................................................................................................................... 47
5.10. Thinning ........................................................................................................................ 48
5.11. Random Deviations ...................................................................................................... 51

Real-Time Hair Rendering Contents
v
5.12. Level of Detail ............................................................................................................... 53
5.12.1. Screen Space Adaptive Level of Detail ................................................................................. 54
5.12.2. Hair Culling ........................................................................................................................... 55
5.13. Hair Shading ................................................................................................................. 56
6. Character Rendering System Integration ................................................................. 59
6.1. Hair Geometry ................................................................................................................ 59
6.2. Hair LOD ........................................................................................................................ 61
6.3. Hair Lighting .................................................................................................................. 62
6.4. Light Definition .............................................................................................................. 62
7. Hair Rendering Performance Analysis ..................................................................... 63
8. Conclusion .................................................................................................................. 70
8.1. Future Work ................................................................................................................... 71
9. References .................................................................................................................. 73
10. List of Figures .......................................................................................................... 78
11. List of Tables ............................................................................................................ 81
12. List of Abbreviations ................................................................................................ 82

Real-Time Hair Rendering 1. Introduction
1
1 . I n t r o d u c t i o n
Real-time hair rendering has been a huge challenge in the games industry and for
simulation applications. On a human head are up to 150000 hairs. Main challenge is to
be able to render this huge amount of hair strands in real-time. With modern graphics
processors it becomes possible to render thousands of hair strands on the GPU. How can
modern graphics cards be utilized for hair rendering? Is it possible today to render
realistic hair in real-time?
These questions were answered within the research project SARA for Institute of
Animation of Filmakademie Baden-Württemberg. The official name of the project is
“Impact of non-photorealistic rendering for the understanding of emotional facial
expressions by children and adolescents with high-functioning Autism Spectrum
Disorders”. The project deals with the creation and animation of computer-generated
facial expressions in different levels of abstraction for the purpose of investigating how
these different facial expressions are perceived by subjects with Attention-
Deficit/Hyperactivity Disorder (ADHD) and Autism Spectrum Disorders (ASD).
Filmakademie Baden-Württemberg cooperates for this research project with University
of Konstanz and University Hospital Freiburg. The project is funded by DFG.
One area of the project is the rendering of realistic hair in real-time. For hair rendering
there is already an implementation. The implementation uses predefined geometry. For
every single hair strand vertices, normals, tangents and texture coordinates are stored in
a mesh file. This leads to a huge amount of data, which needs to be loaded, transferred
to GPU memory and rendered.
Target of this thesis is to research different techniques to reduce the amount of data that
needs to be stored and to increase the frame rate for rendering the virtual character. It is
investigated how hair geometry can be directly generated on the GPU. The idea is to use
a small number of guide strands and generate new hair strands out of these guides.
Techniques are compared, which use a single guide strand as well as multiple guide
strands as input. Different distribution patterns and randomization techniques for the
position of hair and shape of hair are tried out. It is investigated how level of detail
(LOD) techniques can be utilized to be able to render smooth hair strands and at the
same time save processing resources for an increased frame rate. Additionally, hair
shading techniques are evaluated for rendering of realistic hair.
Related work, which already has been done in real-time hair rendering is analysed in
section 2. Afterwards, requirements for the development of the hair rendering system
are described. In section 4 the features and functionality OpenGL tessellation rendering
pipeline are shown. Section 5 focuses on the implementation of the hair rendering
system. Topic in section 6 is the integration of the developed hair rendering system into

Real-Time Hair Rendering 1. Introduction
2
the character rendering system of the Frapper framework. In the following section the
performance of the developed hair rendering system is tested and compared against
related work. The final section concludes this thesis and points out possible areas of
future research.

Real-Time Hair Rendering 2. Related Work
3
2 . R e l a t e d W o r k
In the past, real-time hair rendering could only be done with a mesh representation of
the hair on which a material was applied.
Figure 1: Hair rendering of Ruby by [Scheuermann 2004]
One attempt to put hair on a human mesh was done by [Scheuermann 2004] of ATI
Research and presented at Siggraph 2004. Scheuermann’s approach is based on the hair
shading model of [Kajiya and Kay 1989] and specular highlights model of [Marschner
et al. 2003]. The hair model consisted of two-dimensional (2D) layered polygon patches
with a main texture for the structure and an opacity map for the diversity of the hair. 2D
layered polygon patches were used instead of lines because they have a low geometric
complexity, which reduced load for the vertex shader. Shading was done with a diffuse
lighting term, two specular highlights and ambient occlusion. The first specular
highlight is the direct reflection of the light. The second specular highlight is
transmitted into the hair in direction of the root and internally reflected back to the
viewer. As a result, the colour of the second specular highlight is modulated by the hair
colour and the shape of the highlight is depolarized. Additional calculations need to be
executed for depth sorting, which is done entirely on the GPU. Four render passes are
needed for this operation. This hair technique was used by ATI for their Ruby demo
“The Assassin”.
In 2004 [Nguyen and Donnelly 2004] developed the Nalu Demo for the NVIDIA
Geforce 6800 launch. Their target was to render realistic hair in real-time. The hair of
Nalu was long, blond and needed to flow underwater. 4095 individual hairs were
represented as line primitives. These lines had a total of 123000 vertices. However, this

Real-Time Hair Rendering 2. Related Work
4
number of hairs was too huge for dynamics and collision detection calculations. The
solution was to use hundreds of control hairs instead. Segments of the control hair did
not have a uniform length. Segments near to the hair root were short and further away
from the root were longer. This allowed to render long hairs with a smaller vertex count.
A scalp mesh defined the roots of the control hairs.
Figure 2: Screenshot of NVIDIA Nalu demo [NVIDIA 2004]
For every render pass tangents of the control hairs were calculated. The lines were
converted into Bézier curves and tessellated to get smooth lines. These smoothed lines
were interpolated to increase the hair density. For interpolation three control hairs were
selected according to their position in the scalp mesh. Barycentric interpolation was
used to calculate a new vertex position out of three vertex positions of the guide hairs.
The barycentric coefficients were random generated, which gave a random distribution
of hair strands within the scalp mesh triangle. The result hair had the same number of
vertices as the guide hairs. A dynamic vertex buffer was used to hold the vertex data.
Dynamics and collision computations were based on a particle system, where every
control hair vertex represented one particle. Distance constraints between particles were
used to control the hair length. Hair segment repelled when they were too close to each
other and contracted if they were too far apart. Collision was done only with spheres.
Spheres represented the head and upper body of Nalu as well as every vertex of the
guide strands.
For the local reflectance model of the hair, the lighting model of [Marschner et al. 2003]
was used, which describes how hair fibres scatter and reflect light. The hair fibre is
described as a translucent cylinder. Three possible paths that light may take through the

Real-Time Hair Rendering 2. Related Work
5
hair are considered. The first is a direct reflection of the light, which bounces of the
surface. In the second path light is refracted into the hair and refracted out again. In the
third case light refracts into the hair, is reflected inside the surface of the hair and
refracted out of the hair. [Nguyen and Donnelly 2004] also considered self-shadowing
of the hair. For this purpose they used opacity shadow maps, which were developed by
[Kim and Neumann 2001].
2.1. NVIDIA Fermi Hair Demo 2008
Sarah Tariq implemented an impressive real-time hair simulation and rendering demo
based on the work of the NVIDIA Nalu Demo. The demo with source code was
published at [NVIDIA 2010b]. Papers and presentations about Sarah Tariq’s work are
available at [Tariq and Bavoil 2008b; Tariq 2010c; Yuksel and Tariq 2010; Tariq and
Bavoil 2008a; Tariq 2010d, 2010b, 2010a, 2008].
Figure 3: NVIDIA Fermi Hair Demo screenshot [NVIDIA 2010b]
The hair demo uses 166 simulated hair strands. The rest of the hairs are generated and
interpolated on the GPU with two different interpolation patterns called single strand
and multi strand interpolation.
Single strand interpolation uses one guide hair. The interpolated hair has the same shape
as the guide hair and is placed with a random offset in two directions in a plane that is
perpendicular to the guide strand. A predefined maximum radius is set to control the

Real-Time Hair Rendering 2. Related Work
6
maximum distance of the interpolated strand to the guide strand. Single strand
interpolated hair results into a clumpy hair style. For the given 166 guide strands up to
10624 strands can be generated on the GPU.
Multi strand interpolation works the same way as in [Nguyen and Donnelly 2004]. The
interpolated strand is created by linearly interpolating the attribute of three guide
strands, which are selected according to the triangle vertices of a scalp mesh.
Coefficients values for barycentric interpolation are generated randomly. Result of this
interpolation scheme is a uniform look. The number of strands that can be generated is
dependent on the face number of the scalp mesh. The demo scalp mesh consists of 294
faces, which allow up to 18816 hair strands generated on the GPU with a single draw
call.
Hair geometry is rendered as camera facing quads. The problem with rendering lines is
that the width of lines can only be changed per draw call. Width of hair segments need
to be different to be able to render hair strands with varying width towards the hair tip.
Varying width would only be possible for lines with multiple draw calls. A draw call is
an expensive operation and the number of draw calls should be minimized. Therefore
rendering lines with multiple draw calls is bad for performance. Additionally, a flexible
hair segment width is needed for level of detail operations. Furthermore, it is not
possible to apply textures to lines. Camera facing quads can be textured and have a real
world width. It is also possible to taper hair towards its end with camera facing quads.
However, rendering quads is more expensive than rendering lines. All calculation prior
to rendering like simulation, tessellation and interpolation, are done with lines. In the
geometry shader those calculated lines are expanded to camera facing quads.
The hair demo utilizes the tessellation rendering engine of modern GPUs, which is
perfect for the creation of large amounts of data on the GPU. The main bottleneck is the
bandwidth between central processing unit (CPU) and GPU. It is faster creating data on
the GPU than uploading data from the CPU to the GPU. It is also possible to have a fine
grained and continuous level of detail with the tessellation engine.
The demo also works with DirectX 10 capable graphic cards. The geometry shader is
not used for the generation of hair because it would be extremely inefficient. The
geometry shader is optimized for relatively small amounts of data expansion. A good
use case for the geometry shader is to expand lines to camera facing quads. This raises
the question how it is possible to generate geometry without the tessellation engine and
the geometry shader? The idea is to render dummy hair strands with empty vertex and
index buffer. A line strip render call with a vertex count of m*n needs to be executed,
where m stands for the maximum number of vertices per strand and n is the number of
interpolated strands to render. Rendering for this operation is reasonably fast because
there are no real attributes used. The evaluation of vertex attributes can be done in the

Real-Time Hair Rendering 2. Related Work
7
vertex shader. Guide strand attributes are stored into textures or buffers. Stored data are
length, width and vertex positions of the guide strands. The GPU uses a different vertex
index (ID) for each call of the vertex shader, which allows to select the right vertex
attributes of the strand segment that needs to be rendered.
The implementation with the tessellation engine compared to the DirectX 10
implementation is faster, easy and intuitive, more programmable, supports continuous
level of detail, and the tessellation engine saves memory and bandwidth. The DirectX
11 tessellation engine introduces three new shader stages, the hull shader, the tessellator
and the domain shader, which are placed between the vertex shader and the geometry
shader in the DirectX 11 shader pipeline. For the tessellation engine the isoline domain
was used. The hardware tessellator creates for each patch a number of isolines with
multiple line segments per line. A patch with a single control point was used as
primitive topology. In the hull shader is calculated how many lines are generated and
how many segments per line are tessellated. There is a hardware limitation for how
many lines and line segments can be generated with the tessellation engine. Per patch a
maximum of 64 isolines with 64 segments can be created. The hull shader allows to
calculate the level of detail per line segment.
In the Fermi Hair Demo the level of detail is dependent on the distance of the camera to
the head. With a higher distance less hair strands with a thicker width are generated.
This is done to achieve no visible reduction in density of hair and at the same time save
computing resources for rendering. A density map and thickness map were used for a
more precise level of detail. Artists can define in the density map, which areas of the
scalp should have a high density of generated hairs. This allows to use the limited
computing resources at places of the scalp, where it is most important to show hairs. In
the thickness map it can also be defined how thick the hair should be. The final
positions of the line segments vertices are calculated in the domain shader.
Following steps are performed for hair rendering. First, the guide hairs are imported.
Every frame, guide hairs are simulated, tessellated, interpolated and rendered. Shading
operation and shadow calculations are executed for the final rendering of the hair. These
multiple operations have to be divided in multiple render stages. At the end of each
stage, data is streamed out to the next stage to minimize re-computation. In the first
stage, simulated guide strands are tessellated and streamed out. These tessellated strands
are interpolated in the next stage. Afterwards, the final hair is rendered for shading into
shadow maps. The last stage is to render the final hair to the screen.
The guide hairs are smoothly tessellated with uniform cubic b-splines, which
automatically handle continuity. To tessellate hair strands with uniform cubic b-splines
four vertices of the strand are needed per patch. The end points of the guide hair need to
be repeated because uniform cubic b-splines do not interpolate the endpoints.

Real-Time Hair Rendering 2. Related Work
8
It is also possible to render curly hair in the demo. Therefore, additional curl offsets are
pre-computed and encoded. The result is stored in a buffer or a texture. Curl offsets can
be created procedurally as in the demo. It is also possible that artists create these curl
offsets manually.
Another important feature of the NVIDIA hair demo is random variations between hair
strands. Without this feature hair looks smooth and synthetic. Randomness is applied
when hair is interpolated. Two types of deviations are defined. The first type is small
deviations near the tips, which is applied to 30% of the hair strands. The second type is
applied to 10% of the hair strands and produces deviations along the whole strand.
Hair simulation is another important part of hair rendering. All simulations are done on
a small number of guide strands. Tariq used a particle constraint system. All guide
strand hair vertices are simulated as particles. Three constraints are applied for
simulation: distance, collision and angular forces constraint. With the distance
constraint length of hair is maintained, which prevents hair from stretching and
compressing. The angular forces constraint maintains the shape of the hair. The
collision constraint keeps hair outside of collision obstacles and handles collision
between guide hair strands.
Those constraints are applied in parallel. Two constraints can be updated in parallel
only if they are independent of each other. In case of hair segments this means that they
share no vertex. The solution to be able to calculate constraints in parallel is to
subdivide independent constraints into two groups. Calculate the second group after the
calculations of the first group are finished.
Hair simulation is calculated entirely on the GPU. In Direct3D 11 the compute shader is
used for hair simulation. With the compute shader, code is easier to write and can be
faster. All constraints can be satisfied in a single function call using shared memory and
all vertices of a single strand are in the same thread group. For the Direct3D 10
implementation GPGPU1 pingponging technique is used. Constraints are calculated in
the geometry shader. The results are written to stream out and can be used at the next
rendering pass. Tariq also used a level of detail system for the simulation of the hair.
For high level of detail, simulation is done every frame and for low level of detail,
simulation is done once every n frames, where n is the number of frames without
simulation calculations.
One issue for simulation is that multi strand hair interpolation leads to hair penetration
into collision objects. For the solution of this problem it was important that no
simulations should be done on the interpolated hair strands. The solution for that
problem was to switch to single strand interpolation when it is detected that multi strand
1 general purpose computing on graphics processing units (GPGPU)

Real-Time Hair Rendering 2. Related Work
9
interpolation leads to penetration of collision obstacles. Therefore, all hair strand
vertices, which penetrate collision obstacles and all vertices beneath penetration need to
change the interpolation mode. First, a pre-pass is executed, where all the interpolated
hairs are rendered to a texture. All vertices of an interpolated hair strand are rendered to
the same pixel. It is checked for each hair vertex if it collides with a collision obstacle.
If a collision occurs, the ID of the hair vertex is saved to the pixel. The ID is the number
of vertices that separate the current vertex from the hair root. If no collision happens,
output value is a large constant number. Result is a texture that encodes for each
interpolated guide strand weather any of its vertices intersect a collision object and at
which position of the guide strand the collided vertex is located. For the hair
interpolation this texture is used to decide if the interpolation mode has to be switched.
For a smoother transition a blending zone is used above the first intersection to blend
from multi strand to single strand interpolation.
A problem related with the hair strands is their thinness. This leads to unpleasant
aliasing effects when projected onto a screen because they are often much thinner than a
pixel. Solution for this problem is antialiasing or render thicker lines with transparency.
Light coloured hair is semi-transparent. Handling transparency would also mean an
improvement in visual quality. Antialiasing techniques, which can be used are super
sampled anti-aliasing (SSAA) or multi sampled anti-aliasing (MSAA). For SSAA the
scene is rendered in a higher resolution and down sampled. MSAA is implemented in
hardware and therefore very fast. MSAA performs on the pixel shader a depth/stencil
test independent of each other. For 4xMSAA the vertex shader is executed once and the
depth/stencil test is executed four times. In the demo a combination of 8xMSAA and
2xSSAA was used.
According to Tariq transparency can be done with alpha blending. It hides aliasing. The
problem is that the geometry has to be sorted from back to front. This means that every
line segment needs to be sorted. If sorting is executed, it should be done on the GPU.
Quick sort can be calculated on the GPU. Therefore line segments need to be partitioned
and sorted according to their distance to the camera. The geometry shader can be used
for this operation. A faster but more complicated algorithm is radix sort. Radix sort can
be computed on the GPU using CUDA. Depth sorting can be avoided with fake
transparency by dividing the hair into three subgroups and blending the result together.
Tariq recommended two approaches. For a performance oriented approach multi-layer
fake transparency and MSAA should be used. If quality is the main target alpha
blending with GPU sorted line fragments with MSAA is the better solution.
For hair shading it has also an effect that hair strands are very thin. Because of that
tangents are used instead of normals. Tangents have to represent the direction of a hair
strand segment and have to be smooth. Additionally, jitter and noise is used for tangents

Real-Time Hair Rendering 2. Related Work
10
to break strong highlights. The used lighting model was [Kajiya and Kay 1989]. It is not
completely physical based. The diffuse term integrates lambertian surface along a thin
cylinder. The specular term is based on phong using thin cylinders. A physical based
alternative would be [Marschner et al. 2003].
Shadows were handled with deep opacity maps of [Yuksel and Keyser 2008b, 2008a].
These volumetric shadow maps are suitable for rendering semi-transparent hair. Deep
opacity maps is a real-time, artefact free algorithm, which uses a depth map and one
opacity map per layer. The algorithm needs three passes. The first pass is for the
creation of the depth map, which is rendered from the position of the light source. The
second pass is for the calculation of the opacity map layers. Three layers give a
sufficient result. Layer distances can be constant, powers of 2, Fibonacci or linear. The
third pass is to render the final image to screen. As an analysis of the source code of
[NVIDIA 2010b] has shown, deep opacity maps were not enabled for this demo. Only a
simple shadow map is generated, which handles shadowing of the hair for one light
source. However, there is source code of the implementation of deep opacity maps
available in [NVIDIA 2010b].
The demo reaches 15 frames per second (FPS) with an NVIDIA GeForce 8800 GTX, a
resolution of 1280x1024, 8xMSAA, 166 simulated strands, 10220 rendered strands and
1.6 million triangles.
2.2. NVIDIA HairWorks
Figure 4: Screenshot of NVIDIA HairWorks Viewer [NVIDIA 2014b]
At 26th June 2014 NVIDIA announced the release of their HairWorks tool chain for
real-time hair and fur rendering [NVIDIA 2014c]. This technology was previously

Real-Time Hair Rendering 2. Related Work
11
presented by [Kim 2014] at GTC 2014. NVIDIAs HairWorks is an enhancement of the
NVIDIA Fermi Hair demo and was made ready for production. This technology was
used for the game Call of Duty Ghosts. Here the fur of the wolves and the dog Riley
was rendered and simulated with NVIDIA HairWorks. In The Witcher 3: Wild Hunt the
technology of NVIDIA HairWorks was used for the hair of the main character Geralt
and for other characters. Furthermore, the fur technology was applied to wolves and
monsters of this game [Burnes 2014]. HairWorks supports a Maya and 3ds Max model
pipeline. Additionally, NVIDIA has implemented the NVIDIA HairWorks Viewer tool
for iterating and fine tuning. The technology is still based on the tessellation engine and
includes view-space culling, back face culling, continuous distance LOD and
continuous detail LOD. Continuous distance LOD adjusts based on the distance of the
camera, hair density and thickness. Continuous detail LOD handles hair density and
thickness during close up moments. The simulation was also improved to be more
efficient. NVIDIA used therefore [Müller et al. 2012], which is based on [Kim et al.
2012]. For fur rendering they were able to render 500000 hairs out of 10000 guide hairs.
Main bottleneck here was the rendering engine. Tessellation stages hull shader and
domain shader had the highest execution time. Simulation took up only 10% to 20% of
the overall time. Shader performance had to be lowered for flexibility. This adds the
ability to pass additional attributes for more control over the hair style. The SDK is still
in closed beta and requires licencing to get access to the source code. NVIDIA is
working on the improvement of their technology and tools. They plan to enhance long
hair dynamics, body collision and hair interaction. They also need to adapt to engine
requirements like deferred shading support, motion blur, depth of field, ambient
occlusion and shader caches.
2.3. AMD TressFX
Advanced Micro Devices (AMD) TressFX is a high-quality real-time hair rendering and
physics system, which was first used for the game Tomb Raider in 2013. It was the first
hair strand based hair rendering system used inside a video game. At FMX 2013 [Engel
and Hodes 2013] presented about their integration of this technology inside the Tomb
Raider and how they applied hair rendering and simulation to Lara Crofts hair. TressFX
is based on [Yu et al. 2012]. Enhancements and improvements of this technology were
later done by [Bilodeau and Han 2013] and released as TressFX11 v2.0 [AMD 2013].
In 2014 an article about hair rendering [Martin et al. 2014] and an article about hair
simulation [Han 2014] were published in [Engel 2014].

Real-Time Hair Rendering 2. Related Work
12
Figure 5: AMD TressFX11 v2.0 screenshot [AMD 2013]
With TressFX thousands of hair strands are simulated and rendered on the GPU. For
physics simulation on the GPU Direct Compute is used. The capabilities of shader
model 5.0 vertex shader is utilized for rendering. Lara Crofts hair had a spline count of
about 21042 hair strands with 16 vertices per strand. These source hair strands were
duplicated with an offset to achieve increased hair coverage. Flexibility is another key
feature of TressFX, which allows different hair styles and different conditions for the
hair. Hair strands are organized into primitive groups to support different configurations
and therefore different simulation behaviour of hair parts. The hair strand vertex count
has to be the same for all hair strands within a primitive group. Lara Crofts hair was
separated into bangs, cap, fringe and ponytail. For each hair strand position, tangent,
local/global quaternions, resting length and thickness were saved. The TressFX test
model is organized into four primitive groups, which are called hair free, hair front long,
hair pulled and hair tail. Hair tail has a vertex count of 14 vertices per hair strand and
the other primitive groups have a vertex count of 11 vertices per hair strand. The strand
count all together is 21809 hair strands.

Real-Time Hair Rendering 2. Related Work
13
Figure 6: Rendering pipeline in Tomb Raider [Engel and Hodes 2013]
Figure 6 shows the render pipeline, which was used in Tomb Raider. The tessellation
engine and the geometry shader was not utilized. Geometry expansion was done in the
vertex shader. Here each hair segment is expanded into two triangles with a world-space
direction vector, which is perpendicular to the hair. This direction vector is calculated
with the cross product of tangent and view vector. A camera facing quad has at least a
width of one pixel in screen space. Similar to 2.1 an empty vertex buffer and index
buffer are used for the draw call to render the hair. The vertex ID is used to look up the
right vertex data, which is saved in a buffer or a texture. The vertex count of the draw
call is calculated dependent on the number of segments, which need to be rendered.
This number is multiplied with 6 because each segment will be expanded to two
triangles, which have a vertex count of 6. Output of the vertex shader is the position of
the vertex, a tangent, the left hair edge and right hair edge in screen space, and texture
coordinates. The left hair edge and right hair edge is needed for antialiasing calculations
inside the pixel shader.
Lighting was done according to [Kajiya and Kay 1989] and [Marschner et al. 2003].
TressFX uses an approximation of [Marschner et al. 2003] when rendering two specular
highlights. Additionally, a diffuse texture is used to support variation in hair colour.
Crystal Dynamics had two rendering profiles for wet and dry hair in Tomb Raider.
Antialiasing was not done with SSAA or MSAA. An image based solution was used
similar to geometric post-process anti-aliasing (GPAA) [Persson 2011]. Every hair
strand is anti-aliased manually. The location of the hair fibre edges are used to evaluate
each hair fragments distance with respect to these edges. The farther the pixel is inside
the hair fibre, the more the coverage value is increased. Is the pixel more than 0.5 pixels

Real-Time Hair Rendering 2. Related Work
14
inside the hair fibre, the coverage value is set to 1.0. Is the pixel on the hair fibre edge,
coverage is 0.5. Coverage has the value of 0 when the pixel is more than half a pixel
outside of the hair fibre.
For self-shadowing a simplified version of deep shadow maps [Lokovic and Veach
2000] was used. First, hair splines are rendered as lines to a shadow map. Afterwards
depth in the shadow map is compared with the depth of the hair strand that is currently
drawn. The distance between the hair strand that is currently drawn and the hair strand
that is closest to the light determines how dark the shadow value of the current hair
strand is. The bottom hair receives darker shadow values and top hair receives brighter
shadow values. Each shadow value is stored in a per-pixel linked list (PPLL).
A PPLL was used for order independent transparency (OIT). The usage of a PPLL is
based on [McKee 2011]. Transparency helps to simulate the presence of thin individual
hair strands. For every pixel on the screen, which has one or more layers of hair, a
linked list is generated containing each overlapping hair fragment. Two passes are
executed. In the first pass, an A-buffer is filled with an unsorted linked list for each
pixel on screen that contains hair fragments. Therefore, all strands are rendered and
shaded in the pixel shader. In the second pass, the a-buffer of the previous path is
traversed and the data is sorted in a k-buffer for the topmost hair pixels. 8 layers are
sufficient enough for rendering. The influence of the 8th layer is barely over 1%. Sorting
is performed using the depth stored in the linked list node. At the end the nearest k
fragments are rendered in right order back to front. The remaining layer are just blended
in out of order. This technique for transparency only works if hair does not take up the
whole screen. Otherwise, it causes artefacts and the hair is not rendered correctly on
screen.
First requirement for the simulation of TressFX was performance. More than 20000 hair
strands needed to be simulated and the simulation should be possible within a game,
where available resources for hair simulation are limited. This is the main reason
because performance is more important than correct hair simulation. Other requirements
were more artist based. The simulation should maintain a predefined hair style.
Additionally, different conditions like wet and dry should be supported by the
simulation. Hair should also be stable, respond to wind, gravity and external forces, and
should allow collision handling with head and body. The simulation is based on [Han
and Harada 2012].
Three constraints were used to achieve these requirements: global shape constraint
(GSC), local shape constraint (LSC) and edge length constraint (ELC). GSC helps to
preserve the initial hair shape. Initial positions of each hair strand vertex is saved and
serves as the goal position of each particle. It is an easy and cheap solution and helps to
maintain the hair style. As a result, detail of the hair simulation is lost. LSC is to

Real-Time Hair Rendering 2. Related Work
15
simulate bending and twist effects. The last constraint is ELC. This is a hard constraint
to simulate inextensible hair. ELC can be applied in parallel and does not converge for
fast movement. For the case of fast movement, the constraint is switched to adhoc
constraint, which updates only one vertex position at a time, starting from the root of the
hair strand. The problem with the adhoc constraint is that it can add extra energy to the
system. The adhoc constraint is only used when absolutely necessary.
Most of the simulation calculation is done on the GPU. The CPU is only needed at start
up to load hair data and compute state values, which also can be precomputed. On the
GPU the simulation loop is executed. First, gravity is applied and Verlet integration is
executed. Afterwards, GSC, LSC, wind and ELC are applied. Collision is handled at the
end of the loop. Shader code is separated into 5 shaders. The first shader is for gravity,
integration and GSC. In the second shader LSC is applied. Wind application and length
constraint is executed in the next shader. The fourth shader is responsible for extra
length constraint for erratic movement to handle fast movement of the hair. The final
shader does collision handling.
For simulation in Tomb Raider special cases needed to be handled. The simulation does
not work when hair is placed upside down like in the sac swing part of Tomb Raider. At
the first level Lara Croft is hanged on the ceiling upside down and needs to swing like a
sack to release herself from the chains. An additional hair geometry had to be designed
for this scene to give a realistic look. Other special cases were wet hair, weapon aiming
and cinematics. Different hair settings were used for these situations. Blending between
different hair settings was also possible. Settings were made for dry, mid wet, wet,
weapon aiming, upside down, upside down sac swing and special cinematic clamp
down.
The first version of TressFX only supported forward rendering. As a result, all hair
fragments were shaded before they were sorted. Many hair segments were shaded that
were not visible. At GDC 2014 [Thibieroz and Hillesland 2014] presented
improvements, which were implemented into TressFX. One improvement was to use
offline created vertex and index buffers to draw the hair indexed. Distance-based level
of detail (LOD) was also an improvement. The input line segments have a random
order. It is possible to render fewer lines with thicker fragments for lower level of detail.
Another improvement to save performance was the use of deferred shading. With
deferred shading hair fragments are shaded after the sort operation. This allows to use a
level of detail for shading. Only the top most hair fragments have a huge influence on
the final image quality. Tail fragments can be shaded with a simpler and faster shading
operation. There is a very little quality difference compared to full shading, but shader
LOD gives a much better performance. It was also presented why the tessellation engine
was not used in their implementation. Thibieroz and Hillesland claimed that isoline

Real-Time Hair Rendering 2. Related Work
16
tessellation is not cost effective because lines have to be expanded in the geometry
shader, which is a major impact on performance. They also think that pure vertex shader
solution is faster and curvature is barely a problem. However, they did not back up their
claims with test results, which compares a tessellation based version with their version.
In conclusion, TressFX is fast enough to be used on next generation consoles like the
PlayStation 4 and Xbox One. The deferred shading implementation gives a significant
performance boost. There is still ongoing research to improve and expand the use of this
technology for fur, grass and hair rendering. Especially, the quality of the simulation
can be improved and combined in less shader stages.

Real-Time Hair Rendering 3. Requirements
17
3 . R e q u i r e m e n t s
Since the hair rendering for this thesis is developed at the Research and Development
department of the Institute of Animation at Filmakademie Baden-Württemberg there are
multiple requirements and dependencies, which influence the implementation and the
technology, which was used.
First, the hair has to be rendered in real-time. The target is to be able to render the
virtual character with a frame rate of 60 FPS. The animation of the character needs to be
calculated and additional to the hair, face geometry, eyes, eyelashes, eyebrows, the
upper body and clothes needed to be rendered. All these assets share a frame time of
about 16.6 milli seconds. Therefore, it is crucial to use as less time as possible for the
rendering of the hair and at the same time keep or improve the visual quality.
High quality hair rendering consists of the generation of the hair, lighting, shadowing,
handling of transparency and antialiasing. All these factors needed to be evaluated
against the rendering times.
Level of detail was another important requirement. A target of the research project
SARA is to find out if children and teenager with ASD or ADHD read the emotional
states of the virtual character easier from a realistic character or an abstract character.
Different level of detail settings allow to render fewer hair strands with a thicker width.
Additionally, level of detail calculations should be evaluated for performance
optimization and improvement of the visual quality of the rendered hair.
It is not only important to be able to render multiple strands of hair on the GPU.
Another important requirement for this project was to be able to create multiple hair
styles and to optimize the work flow for the creation of the hair rendering engine. The
creation of the hair should be artist friendly. Generation of guide hairs should be
possible with Maya, 3D Studio Max and Cinema 4D.
Another dependency of this project is that the virtual characters need to be implemented
in the application framework Frapper [Helzle et al. 2014]. Shaders and the animation
system were implemented into Frapper using mainly Cg shader. Frapper is based on the
rendering engine Ogre3D [OGRE 2014], which supports in there released versions Cg,
OpenGL2, DirectX 9 and DirectX 11. Ogre3D has also an OpenGL 3+ renderer. This
renderer supports OpenGL shader above OpenGL 3, which also includes OpenGL 4
features. The problem of this renderer is that it was not officially released from the Ogre
developers.
For the hair generation on the GPU, DirectX 11 or OpenGL 4 needed to be used in
order to be able to utilize the tessellation functionality of modern graphics cards. Cg
supports DirectX 11, which would have been the best solution given that it permits to

Real-Time Hair Rendering 3. Requirements
18
reuse the old Cg and at the same time uses the features of the tessellation pipeline. On
the other hand, Cg only supports OpenGL 4 for NVIDIA graphics hardware [NVIDIA
2014d]. Additionally, the OpenGL 3+ renderer of Ogre does not support Cg. Using
OpenGL 4 with Cg in Ogre was therefore no option. Another argument against Cg is
that NVIDIA stopped the support of Cg after the release of the Cg 3.1 Toolkit [NVIDIA
2014e]. For this reason, Cg is not a shader language to utilize future improvements of
graphics cards.
The decision to use OpenGL 4 was also influenced by the need to implement other parts
of the project including the non-photorealistic rendering algorithms in OpenGL.
After evaluation of the Ogre OpenGL 3+ renderer, which has proven to be a stable
version, it was decided to implement the hair rendering algorithms in OpenGL 4. This
meant that all previous written Cg shader for face, eye and cloth rendering had to be
translated into OpenGL shading language (glsl).

Real-Time Hair Rendering 4. OpenGL Tessellation Rendering Pipeline
19
4 . O p e n G L T e s s e l l a t i o n R e n d e r i n g P i p e l i n e
Since the hair rendering is implemented in OpenGL 4 using its tessellation rendering
stages, a brief overview of the OpenGL 4 tessellation pipeline is provided together with
a more in-depth look at the tessellation stages. Khronos released the specification of
OpenGL 4.5 at 11th August 2014. The core profile [Khronos Group 2014a] and quick-
reference card [Khronos Group 2014b] gives in depth information about OpenGL 4.5.
Another great overview of the OpenGL render pipeline gives [Khronos Group 2014c].
Input Assembler
Vertex Shader
Fragment Shader
Tessellation ControlShader
Rasterizer
Framebuffer
Tessellator
Tessellation EvaluationShader
Geometry Shader
Memory Resources (Buffer, Texture, Constant Buffer)
Stream Output
Vertex Buffer
V0 V1 V2 V3
Index Buffer
I0 I1 I2 I3 I4 I5
Render Target/Final Output
Figure 7: OpenGL tessellation pipeline overview

Real-Time Hair Rendering 4. OpenGL Tessellation Rendering Pipeline
20
Figure 7 shows a simplified overview of the OpenGL 4 rendering pipeline. Data can be
streamed in a vertex buffer and index buffer. The vertex buffer stores all specific vertex
data, which includes the position of the vertex. Optional attributes can be added to the
vertex buffer. Often normals, tangents, texture coordinates or blend weights are used as
input. It is up to the programmer to decide, which input values need to be used. The
index buffer helps to reduce the size of the vertex buffer because no duplicates have to
be saved in the vertex buffer. Its use is optional as objects can be drawn with and
without index buffer.
The programmable shader stages are vertex shader, tessellation control shader (TCS),
tessellation evaluation shader (TES), geometry shader and fragment shader. TCS, TES
and geometry shader are optional. TCS, tessellator and TES form the tessellation shader
stage. All shader stages have access to memory resources, which consist of textures,
buffers and constant buffers.
4.1. Vertex Shader
The vertex shader is the first
programmable shader stage of the
OpenGL tessellation pipeline. As input the
vertex shader gets a vertex stream. The
vertex shader is executed once per input
vertex of the vertex stream. Calculations
and transformation can be performed per
vertex. Additional data can be passed
through to the next programmable shader
stage. If tessellation is enabled, data will
be passed through to the TCS. Otherwise, data will be passed through to the pixel
shader. In the vertex shader geometric transformation has to be performed if the
tessellation stage is disabled. The resultant vertices of the input shader are assembled
afterwards into primitives. Additional fixed
inputs that can be accessed from the vertex
shader are gl_VertexID and
gl_InstanceID. gl_VertexID is the index
of the current vertex and gl_InstanceID is
the index of the current instance. OpenGL also
has predefined outputs for the vertex shader,
which is defined in an interface block without an
instance name. The most important one is gl_Position, which is the output vertex
data. This variable has to be used for the output data. gl_PointSize is only used for
Figure 8: Vertex shader
out gl_PerVertex { vec4 gl_Position; float gl_PointSize; float gl_ClipDistance[]; }
Figure 9: Vertex shader predefined output
Input Assembler
Vertex Shader
vertex data

Real-Time Hair Rendering 4. OpenGL Tessellation Rendering Pipeline
21
point primitives. It describes pixel width and height of the point. The last predefined
output is the array gl_ClipDistance. Here the distance of the vertex to each clip
plane can be defined.
4.2. Tessellation Control Shader
Figure 10: Tessellation control shader
First, it needs to be defined how many control points will be used per primitive. The
maximum number of output control points is hardware dependent, but never smaller
than 32. Figure 11 shows the definition
inside the TCS, where patch_size is
the number of defined control points.
The TCS is executed once per tessellation primitive. Three different primitive types can
be handled by the tessellation engine: quads, triangles and isolines. Dependent on the
primitive type tessellation factors need to be
calculated. These are set in
gl_TessLevelOuter[4] and
gl_TessLevelInner[2]. For quads all
tessellation levels are used. Triangles only need
the first three outer tessellation levels and the
first inner tessellation level. For isolines only
the first two outer tessellation levels need to be set. Tessellation values are between 0.0
and 64.0. If all tessellation values are set to 0.0, the primitive is not rendered and all
shader stages after the TCS are not called for the current primitive.
Fixed input for TCS is gl_PatchVerticesIn, gl_PrimitiveID and
gl_InvocationID. gl_PatchVerticesIn gives the number of vertices in the
input patch. gl_PrimitiveID is the index of the current patch and
TCS output per control point:[1.. GL_MAX_PATCH_VERTICES] control pointsTCS output per patch:patch constant datatessellation factors
TCS output:tessellation factors
TCS input:[1..GL_MAX_PATCH_VERTICES] control points
Tessellation Control Shader
Tessellator
Tessellation EvalutionShader
layout(vertices = patch_size) out;
Figure 11: Output patch size definition
out gl_PerVertex { vec4 gl_Position; float gl_PointSize; float gl_ClipDistance[]; } gl_out[];
Figure 12: TES predefined output

Real-Time Hair Rendering 4. OpenGL Tessellation Rendering Pipeline
22
gl_InvocationID is the index of TCS invocations. The tessellation stage is also
used to calculate per patch and per vertex attributes, which are passed through to the
TES. Per vertex attributes have to be outputted in an array, which has the same size as
the predefined number of output control points. Predefined output is the same as in the
vertex shader. It is defined as an array for every control point. It is not necessary to set
any of the predefined output data.
4.3. Tessellator
Figure 13: Tessellator
The tessellator, which is also called tessellation primitive generator, is a fixed-function
stage. Dependent on the tessellation primitive, spacing, primitive order and the defined
tessellation factors, the tessellator generates UVW coordinates values per tessellated
vertex and passes these values to the TES. Barycentric coordinates are calculated for
triangles. For quads and isolines UV coordinates will be generated by the tessellator.
Spacing can be defined as equal_spacing, fractional_even_spacing and
fractional_odd_spacing. Tessellation levels are defined in float values.
equal_spacing rounds up each float value to the nearest higher integer. Each edge
is divided into n segments of the same size. Range is from one to the maximum
tessellation value. fractional_even_spacing has range from two to maximum
tessellation value. The tessellation value is rounded up to the nearest even integer.
Segment sizes vary in this spacing scheme. It starts at level two with one subdivision.
This subdivision is represented with the original vertices of an edge and one new
generated vertex. With a tessellation value between 2.0 and 3.0, two new generated
points move from the first tessellated vertex to one of the original vertices. This scheme
is used to support a smooth transition between tessellation levels. It can be used for
distance dependent and view-space dependent tessellation.
TS input:tessellation factors
TS output:U V {W} coordinates
TS output:topology list(to primitive assembly to prepare for rasterization)
Note: Tessellator does not see control points
Tessellation ControlShader
Tessellator
Tessellation Evaluation Shader

Real-Time Hair Rendering 4. OpenGL Tessellation Rendering Pipeline
23
fractional_odd_spacing also generates non-uniform segment sizes. Its range is
from one to maximum tessellation level minus one and rounds up the tessellation value
to the nearest odd integer values. Only one segment is drawn when the tessellation
factor is between 0.0 and 1.0. Between tessellation value 1.0 and 3.0, two new vertices
are generated at the position of the original vertices, which move into the middle of the
line. fractional_even_spacing and fractional_odd_spacing is not
drawn when the tessellation factor is smaller than 0.0. The primitive order can be
changed between clockwise and counter clockwise.
4.4. Tessellation Evaluation Shader
Figure 14: Tessellation evaluation shader
The TES is used to calculate the final vertex position of the generated vertex. The TES
gets as input UV{W} coordinates from the tessellator. Additionally, tessellation factors,
per patch input data and per control point data are provided from the TCS for the TES.
In the TES tessellation options for the
tessellater can be defined. Figure 15 shows
the line of code, which has to be inserted
before the main function of the TES shader.
Parameters can be patch type (isolines, triangles, quads), spacing
(equal_spacing, fractional_even_spacing,
fractional_odd_spacing) or primitive ordering (cw, ccw).
Built-in inputs are gl_TessCoord, gl_PatchVerticesIn and
gl_PrimitiveID. UV{W} can be accessed with gl_TessCoord.
gl_PatchVerticesIn is the vertex count of the patch and gl_PrimitiveID is
TES input:U V {W} coordinates
TES input:[1..GL_MAX_PATCH_VERTICES] control points
tessellation factors
TES output:one vertex
Tessellation Control Shader
Tessellator
Tessellation Evaluation Shader
layout(param1, param2, ...) in;
Figure 15: Tessellation options definition

Real-Time Hair Rendering 4. OpenGL Tessellation Rendering Pipeline
24
the index of the current patch. Tessellation factors can be accessed with
gl_TessLevelOuter and gl_TessLevelInner. The built-in per vertex input
from the TCS can be accessed with gl_in. The struct is except of gl_in the same as
in Figure 12. The built in per vertex output is the same as for the vertex shader.
4.5. Geometry Shader
Figure 16: Geometry shader
The geometry shader is executed either after the vertex shader or after the TES if
tessellation is activated. It uses a single primitive as input and outputs zero or more
primitives. Input and output primitives can be of different types. The geometry shader is
optimized for small geometry expansions. Theoretically, the geometry shader can be
used for tessellation, but this would not be very efficient. The main areas the geometry
shader is useful are layered rendering, transform feedback and transformation of
primitive types. With layered rendering it is possible to render one primitive to multiple
images or render targets. In transform feedback the captured primitive from the vertex
processing step can be saved to buffer. Vertex processing steps can include vertex
shader and the tessellation stage. Transformation of primitives is a general use case for
the geometry shader. One example for that is the expansion of lines to quads.
Rasterizer
Tessellation Evaluation Shader
Geometry Shader
Stream Output
GS input:vertices
GS output:multiple vertices

Real-Time Hair Rendering 4. OpenGL Tessellation Rendering Pipeline
25
Figure 17 shows how the input and output of the geometry shader is defined. For the
input of the geometry shader only the input primitive type has to be defined at
input_primitive. The available primitive types are points, lines and
triangles. For the geometry output output_primitive and vert_count
need to be set. Output primitives can be points, line_strip or
triangle_strip. Additionally, the maximum number of vertices, which can be
generated by the vertex shader, needs to be defined. This number of vertices is a
hardware limited factor defined by MAX_GEOMETRY_OUTPUT_VERTICES, which
has a minimum value of 256.
OpenGL 4 has a new instancing
feature available. The geometry
shader can be executed multiple times
per input primitive. Figure 18 shows
the declaration of geometry instancing. With num_instances it needs to be defined
how many times an input primitive will be executed. The maximum number is defined
with MAX_GEOMETRY_SHADER_INVOCATIONS and is at least 32.
Another feature of the geometry shader is layered rendering. Specific primitives can be
send to different layers of a layered frame buffer. This functionality can be used for the
creation of shadow maps.
Built-in input is gl_PrimitiveIDIn and gl_InvocationID.
gl_PrimitiveIDIn is the ID of the input primitive while gl_InvocationID is
the current instance ID. gl_InvocationID can be different to
gl_PrimitiveIDIn when instancing is activated. The built-in output is the same
interface as for the vertex shader and TES. Another built-in output is
gl_PrimitiveID. This output will be passed to the fragment shader and can be
freely defined. For layered rendering two additional built-in output values can be set.
gl_Layer defines the output layer and gl_ViewportIndex sets the output view
port.
// geometry shader input layout(input_primitive) in; // geometry shader output layout(output_primitive, max_vertices = vert_count) out;
layout(invocations = num_instances) in;
Figure 18: Geometry shader instancing
Figure 17: Geometry shader input and output declaration

Real-Time Hair Rendering 4. OpenGL Tessellation Rendering Pipeline
26
4.6. Fragment Shader
Fragment Shader
Rasterizer
Framebuffer
Render Target/Final Output
FS input:texture coordinates, normals, …
FS output:pixel colour
Figure 19: Fragment shader
The fragment shader gets as input fragments, which are the result values of the
rasterizer. The fragment size is related to a pixel area. Multiple fragments are possible
per pixel. The fragment shader is executed once per fragment. Main purpose of the
fragment shader are lighting calculations, texturing and screen space calculations. The
fragment shader calculates the pixel colour values of the rendered image, which are in
the end saved to the frame buffer.
Built-in inputs are the 4D vector gl_FragCoord, the boolean value
gl_FrontFacing and 2D vector gl_PointCoord. The location of a fragment in
screen space is described with gl_FragCoord. The x value is the x position on the
screen, the y value is the y position, the z value is the depth and the w value is
1/W_clip, where W_clip is the interpolated w component of the clip-space vertex.
If the primitive is from a front face or from a back face is located in
gl_FrontFacing. gl_PointCoord describes the 2D location within in a point

Real-Time Hair Rendering 4. OpenGL Tessellation Rendering Pipeline
27
primitive. The only point primitive in OpenGL is GL_POINTS. Points have square or
circle form. The coordinates are in a range from 0 to 1, where (0, 0) is the upper right
corner.
OpenGL 4.0 specific inputs are sample attributes, the array gl_ClipDistance, and
gl_PrimitiveID. When sample attributes are used the shader is forced to evaluate
per-sample. The use of samples should be avoided and only used when absolutely
needed. Sample attributes are gl_SampleID, gl_SamplePosition and
gl_SampleMaskIn. gl_SampleID is the ID of the current sample. The 2D vector
gl_SamplePosition supplies location of the current sample within a pixel area.
The array gl_SampleMaskIn defines the sample mask for multi-sampled rendering
and the array is as long as the supported sample count of OpenGL.
gl_ClipDistance provides the interpolated clipping space values. The ID of the
current primitive is stored in gl_PrimitiveID. If the geometry shader is enabled,
gl_PrimitiveID is the value the geometry shader provided.
OpenGL 4.3 expands the fragment shader built-in input with the layer number
gl_Layer and the viewport number gl_ViewportIndex.
Built-in outputs gl_FragDepth,
gl_SampleMask and fragment
colours. The fragment depth is
stored in gl_FragDepth. If
fragment depth is not set, the z value of gl_FragCoord is saved instead. The integer
array gl_SampleMask defines sample masks for the fragment shader when
performing multisampled rendering. Output buffers are the most important output of the
fragment shader. The output is a series of colours, which are called fragment colours
and stored as a framebuffer. A framebuffer is a collection of buffers and can be used for
rendering. There are three ways to assign fragment buffers. The first possibility to
declare a buffer as an in-shader specification with the layout modifier shown in Figure
20. An alternative is a pre-link specification. The OpenGL function
glBindFragDataLocation needs to be called with the arguments name of the
program, the colour number to assign and the fragment shader name. The last possibility
is to use auto assignment. However, auto assignment is not recommended because the
assignment is arbitrary.
4.7. Tessellation Primitive Isolines
Isolines are the tessellation primitive, which can be used best for hair rendering.
Because of this reason, this section describes how isolines are used within the
layout(location = 3) out vec4 diffuseColor;
Figure 20: In-shader specification

Real-Time Hair Rendering 4. OpenGL Tessellation Rendering Pipeline
28
tessellation stage. Isolines have two parameters. The tessellation factor defines how
many copies of the line are generated and the detail factor defines in how many parts a
single line segment is separated. The tessellation factor is set in
gl_TessLevelOuter[0] and the detail factor is set in
gl_TessLevelOuter[1]. The maximum number of generated lines and line
subdivision is 64. Different spacing values have no influence on the tessellation factor.
The detail factor is influenced by spacing settings.
The first example in Figure 21 shows isolines generation with equal_spacing
setting. Detail tessellation factor 1.0 and detail factor 1.0 display the original input line
segment without any subdivisions. Is the detail factor set to 2.0, two line segments are
generated out of the input line segment. The tessellation factor defines how many copies
of the line are rendered. In this example three line copies were generated.
Isoline with tessellation factor 1.0 and detail factor 1.0
Isoline with tessellation factor 1.0 and detail factor 2.0
Isoline with tessellation factor 3.0 and detail factor 2.0
Figure 21: Isoline example equal_spacing
Figure 22 demonstrates how different detail factor settings influence the position of the
generated vertices inside the line segment with the spacing setting
fractional_even_spacing. Note that the generated line has at least one
subdivision. With fractional_even_spacing it is not possible to render the
original line without subdivision. In this example, it is shown how the new generated
vertices move from the middle to their final position with a detail factor between 2.0
and 4.0. Is the detail tessellation level greater than 4.0, four new vertices are generated
at the position of the two previous generated vertices. Two of these new generated
vertices move left to their initial position and the other two move right to their previous

Real-Time Hair Rendering 4. OpenGL Tessellation Rendering Pipeline
29
position. At a detail factor 6.0 the vertices are arrived at their final position. Here all line
segments have the same size.
Isoline with tessellation factor 1.0 and detail factor 2.0
Isoline with tessellation factor 1.0 and detail factor 3.0
Isoline with tessellation factor 1.0 and detail factor 4.0
Isoline with tessellation factor 1.0 and detail factor 5.0
Isoline with tessellation factor 1.0 and detail factor 6.0
Figure 22: Isoline example fractional_even_spacing
The last spacing technique is fractional_odd_spacing. Here the input line can
be displayed without subdivision. It is shown how two new vertices are generated and
change their position between the detail factor 1.0 and 3.0. Is the detail factor greater
than 3.0, two new vertices are generated at the position of the last two generated
vertices. The new generated vertices as well as the previous two generated vertices
move in opposite direction until detail factor 5.0 is reached, where all generated sub
segments of the line have the same size.

Real-Time Hair Rendering 4. OpenGL Tessellation Rendering Pipeline
30
Isoline with tessellation factor 1.0 and detail factor 1.0
Isoline with tessellation factor 1.0 and detail factor 2.0
Isoline with tessellation factor 1.0 and detail factor 3.0
Isoline with tessellation factor 1.0 and detail factor 4.0
Isoline with tessellation factor 1.0 and detail factor 5.0
Figure 23: Isoline example fractional_odd_spacing

Real-Time Hair Rendering 5. Implementation
31
5 . I m p l e m e n t a t i o n
In this section all implemented features for the hair rendering system are described.
Main focus for this work was to implement a realistic looking hair rendering system
with a huge number of hairs and at the same time provide a level of detail system to
control the geometric detail as well as the needed processing power of the graphics card.
Hair simulation is not a focus of this work and has therefore not been implemented. But
the possibility for future implementation should still be provided.
The implementation of the hair rendering system is mainly based on Tariq’s work
described in section 2.1. Tariq’s implementation was chosen as a basis over AMD
TressFX, which was described in section 2.3, because Tariq’s work showed the better
results for hair rendering, uses a more realistic hair simulation, has a smaller amount of
guide hairs and utilizes the tessellation pipeline. Especially, the tessellation pipeline
allows more flexibility and control over the tessellated hairs for level of detail purposes.
The number of generated hairs, the subdivision of each hair segment as well as the
width of the hair can be manipulated per TCS call, which is called once per hair
segment of the guide hair. Tariq also implemented two different hair interpolation
techniques, which allow to show different hair styles. Additionally, there is support of
curly hair, random deviations and thinning. Overall, Tariq’s implementation allows
more flexibility over the final hair style with less guide hairs, which allows lower
memory consumption and less data has to be transferred from the CPU to the GPU.
AMD TressFX on the other side is more performance optimized, which would free up
calculation power for other algorithms of our character pipeline. However, the main
problem with AMD TressFX is that artefacts appear when the hair style takes up more
than the whole screen. Because our characters are rendered at a close up view, this is a
visual bug, which is unthinkable for our implementation. Therefore the only way to use
AMD TressFX is without the linked list ordering for hair geometry, which is the cause
of the visual artefacts.
Another reason to use an implementation that utilizes the tessellation pipeline is because
it also can be used to render face and cloth geometry more efficiently and with less
memory consumption. It is possible to implement a view-dependent level of detail,
which could be useful for the future of our character rendering pipeline. The tessellation
pipeline would also allow to decide how much geometry detail is generated per frame.
Therefore a version of our characters with less geometric detail would be possible. We
would also have the possibility to have a continuous transition between low poly
geometry and high detail geometry.
In the following subsections it is described how input data for hair rendering is
represented and used within Frapper. Afterwards, the implementation of hair strand

Real-Time Hair Rendering 5. Implementation
32
interpolations techniques single strand, multi strand and the combination of both are
explained. In the next subsection it is evaluated how different hair guide sizes can be
used with single strand and multi strand interpolation, where multi strand interpolation
proves to be more challenging to get right. In the following subsections random
deviations, curly hair and thinning are explained. At the end of the implementation
paragraph, level of detail techniques as well as the used hair shading are shown.
5.1. Input Data
As input data of the hair guide hairs and a scalp mesh is needed. Guide hairs are a small
number of hairs, which define the form and density of the hair style. These guide hairs
can also be used for hair simulation. Each guide hair is saved as a separate submesh
within the Ogre mesh file. A guide hair is a line_strip, which includes vertex
buffer of all guide hair vertices. These vertices define the form of the hair. First vertex
is the root vertex and the last vertex of the line_strip is the tip vertex of the hair.
Two neighbouring vertices build a hair segment.
The scalp mesh is very important for multi strand interpolation to be able to pick the
neighbouring guide hairs. The scalp mesh is a mesh, which describes the scalp of the
character. Each vertex of the scalp mesh represents a root vertex of a hair guide. Best
practice is to place the root vertex of a guide hair at the same position as a vertex of the
scalp mesh. If that is not the case a distance variable was added to the system, which
allows a small distance between root vertex of the hair and scalp mesh vertex. With that
it is possible to use input data even when scalp mesh vertices and root vertices of guide
hairs are not exactly the same, which can simplify the work of the hair artist.
Figure 24: Guide hairs and scalp mesh (left), guide hairs and scalp mesh with rendered hair (right)
These guide hairs and the scalp mesh can be created with Maxon Cinema 4D, Autodesk
Maya or Autodesk 3DS Max and exported with the Ogre mesh exporter. For our
character Sara the hair style was created by Kai Götz within Cinema4D. First, a scalp
mesh needs to be modelled. Afterwards, all faces of the scalp mesh need to be selected

Real-Time Hair Rendering 5. Implementation
33
to generate hair splines at the position of the scalp mesh vertices. Thereafter, the form of
the splines can be modified. For the export all guide hairs need to be saved in a separate
mesh and the amount of guide hair segments per guide hair need to be defined. The
lower the number of hair guide segments, the faster will be the rendering of the guide
hairs. However, the geometry detail and control over the final form of the hair will be
less. The data has to be exported first in Cinema 4D as an FBX file. This file needs to be
loaded into Autodesk Maya, where hair and scalp mesh can be exported with the Maya
Ogre exporter. Description about how to design and export hair styles have been
supported by Kai Götz [Götz 2014b, 2014a].
This generated guide hair is read in at start up. For every vertex of the scalp mesh a
corresponding guide hair is searched. When the guide hair is found, all vertices of the
guide hair are saved within a guide hair position texture, which can be accessed at
run-time by the TCS. Additional information that need to be saved to the guide hair
vertices are the size of the guide hair as well as the distance to the tip of the current hair
guide vertex. This additional data has to be saved to be able to support different hair
sizes. In the end, the index buffer of the scalp mesh can be used to select the right guide
hairs for multi strand interpolation.
5.2. Single Strand Interpolation
The idea of single strand interpolation is to use a single hair guide as input for the
interpolation of generated hair strands. Two different techniques were tried out for
single strand interpolation.
The first implementation is based on the Archimedean spiral algorithm [Rutter 2000].
For the implementation the parametric equation was used, where:
𝑥 = 𝑎 𝜑 cos(𝜑), 𝑦 = 𝑎 𝜑 sin(𝜑) (𝜑 ≥ 0)
For the implementation the glsl code in Figure 25 was used inside the TES for the
position calculation of the generated hair strand vertices.
// Parameters for the wisp shape float r1 = g_rootRadius + g_tipRadius * gl_TessCoord.x; float f1 = gl_TessCoord.y * 20 + 1; // Order generated hair strands as Archimedean spiral vec4 finalPosition = vec4( position.x + f1 * cos(f1) * r1,
position.y, position.z + f1 * sin(f1) * r1, 1.0);
Figure 25: Archimedean spiral implementation glsl
With g_rootRadius and g_tipRadius can be controlled how hair strands are
tapered in direction of the hair tip. gl_TessCoord.x gives the position within the
hair segment while gl_TessCoord.y defines, which generated hair strand is called

Real-Time Hair Rendering 5. Implementation
34
for the current invocation of the TES. The calculated values are used to offset the
previous position of the hair in x and z direction. Results are shown in Figure 26. For
the debug view on the left this implementation gives nice results. However with shading
the pattern of the spiral is visible. Additionally, offset in x and z direction is not the
perfect solution especially for hair strands at the side of the head.
Figure 26: Results Archimedean spiral
Figure 27: Rendering of coordinate frames for Fermi Hair Demo [NVIDIA 2010b]
Another approach that was tried out are random circular coordinates. Idea is to offset
the generated hair with random values along their coordinate frames. One coordinate
frame are three vectors, which define the plane the hair is offset at each vertex of the
guide strand. Figure 27 illustrates how this three vectors, which are perpendicular to
each other, look like for every vertex of the guide hair strand. One vector is calculated
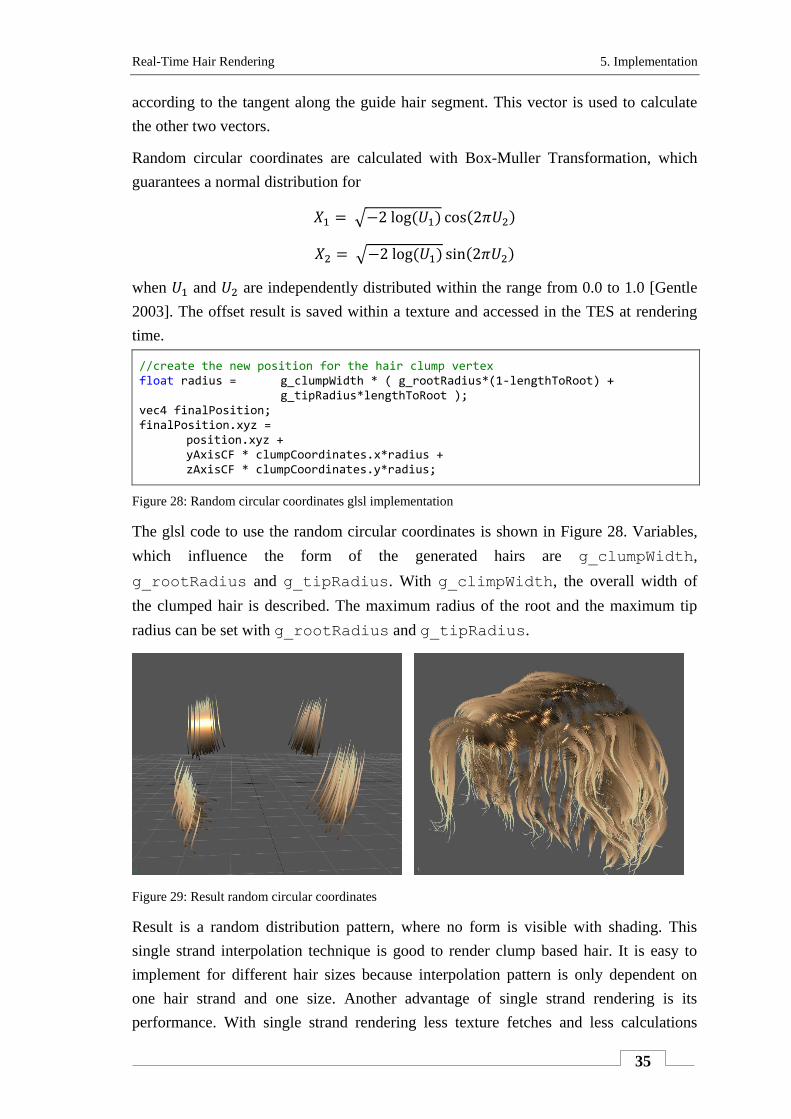
Real-Time Hair Rendering 5. Implementation
35
according to the tangent along the guide hair segment. This vector is used to calculate
the other two vectors.
Random circular coordinates are calculated with Box-Muller Transformation, which
guarantees a normal distribution for
𝑋1 = √−2 log (𝑈1) cos(2𝜋𝑈2)
𝑋2 = √−2 log (𝑈1) sin(2𝜋𝑈2)
when 𝑈1 and 𝑈2 are independently distributed within the range from 0.0 to 1.0 [Gentle
2003]. The offset result is saved within a texture and accessed in the TES at rendering
time.
//create the new position for the hair clump vertex float radius = g_clumpWidth * ( g_rootRadius*(1-lengthToRoot) +
g_tipRadius*lengthToRoot ); vec4 finalPosition; finalPosition.xyz = position.xyz + yAxisCF * clumpCoordinates.x*radius + zAxisCF * clumpCoordinates.y*radius;
Figure 28: Random circular coordinates glsl implementation
The glsl code to use the random circular coordinates is shown in Figure 28. Variables,
which influence the form of the generated hairs are g_clumpWidth,
g_rootRadius and g_tipRadius. With g_climpWidth, the overall width of
the clumped hair is described. The maximum radius of the root and the maximum tip
radius can be set with g_rootRadius and g_tipRadius.
Figure 29: Result random circular coordinates
Result is a random distribution pattern, where no form is visible with shading. This
single strand interpolation technique is good to render clump based hair. It is easy to
implement for different hair sizes because interpolation pattern is only dependent on
one hair strand and one size. Another advantage of single strand rendering is its
performance. With single strand rendering less texture fetches and less calculations

Real-Time Hair Rendering 5. Implementation
36
need to be performed compared to multi strand rendering. However, single strand
rendering alone does not give good enough visual results to render a hair style. It needs
to be combined with another hair interpolation technique for better results.
5.3. Multi Strand Interpolation
Multi strand interpolation uses three guide hairs for interpolation. Each TCS invocation
uses three vertices for input. These can be the three root vertices of the guide hairs or
three other vertices with the same distance to the root. These three vertices build
together a triangle on which a new generated vertex is placed dependent on random
generated barycentric coordinates.
To make this operation clearer a simple example is used with three hair guides, which
all have a vertex count of three and therefore two segments. For these three guide hairs
the TCS is called three times to read in the right vertex data on which barycentric
interpolation is performed. One call is for the root vertices, one call for the vertices in
the middle and another call for the tip vertices. After the vertices are read in the TCS,
the hair segment is tessellated dependent on tessellation and detail factor. In the TES the
calculation of the final vertex position for multi strand rendering takes place. For the
simplest case with tessellation factor one and detail tessellation factor one the TES is
called once for the root vertices, once for the middle vertices and once for the tip
vertices to calculate the final vertex position. Result is one generated hair, which form is
defined by the three input guide hairs. If the tessellation factor is increased more hairs
will be generated, which means more invocations for the TES. Different barycentric
coordinate values need to be used for each invocation of the TES with the same input
vertices. Figure 30 shows the result of the simple example.
Figure 30: Multi strand interpolation simple example

Real-Time Hair Rendering 5. Implementation
37
The barycentric coordinates are calculated once at start up. Two random values between
0.0 and 1.0 are stored into a variable for the first two barycentric coordinates. If the sum
of these values is greater than 1.0, the new first barycentric value is the subtraction of
the old first barycentric value from 1.0 and the new second barycentric value is the
subtraction of the old second barycentric value from 1.0. In the end the first two
barycentric values are subtracted from 1.0 to calculate the third barycentric coordinate
value.
coord1 = Ogre::Math::RangeRandom(0.0, 1.0); coord2 = Ogre::Math::RangeRandom(0.0, 1.0); // sum has to be smaller than one to be useful for barycentric coordinates if(coord1 + coord2 > 1) { coord1 = 1.0 - coord1; coord2 = 1.0 - coord2; } pStrandCoordinatesFloat[writePosition++] = coord1; pStrandCoordinatesFloat[writePosition++] = coord2; pStrandCoordinatesFloat[writePosition++] = 1.0f - coord1 - coord2;
Figure 31: Calculation of a random barycentric value
One advantage of multi strand interpolation is that the generated hair covers the whole
scalp of the character. The left picture of Figure 32 shows how new generated guide
hairs are placed on top of the scalp mesh (blue quad). Additionally, the form of the
generated hairs is a mix out of the form of the three guide hairs, which lets every
generated hair look slightly different. The nearer a hair is to a guide hair, the more it
will look like this hair. Hairs, which are placed in the middle of the triangle are a
mixture of all three guide hairs.
Figure 32: Results multi strand interpolation
There are still two problems with multi strand interpolation. It is not possible to render
separated wisps and parting in the hair. First try to solve this problem, was not to render
hair segments if the distance between guide hair vertices or the angle between guide
hairs was too big. Unfortunately, this experiment did not give the wanted results. Figure

Real-Time Hair Rendering 5. Implementation
38
33 shows the results of this attempt. There is a big bold area, were the parting should be
and the hair at the position of the separated wisp is just cut off.
Figure 33: Attempt to fix separate wisp and parting problem
5.4. Combination of Single Strand and Multi Strand Interpolation
The second attempt to fix the separate wisp and parting problem was based on how
Tariq implemented collision handling for multi strand interpolation. Her target was not
to have to do collision calculation for the generated hairs. But the multi strand
tessellation hair always goes through a collision object when this object is between the
used guide hairs. The idea of Tariq was to switch to single strand rendering when a
collision of the guide hairs with a collision obstacle occurred. Switching between guide
strands is also implemented for this solution. Instead of checking for collisions it is
checked how far are the guide strand separated from each other and how big the angle
between their tangents for their current hair segment are. The maximum distance and
the maximum angle are parameters, which can be changed to be able to get the wanted
result for the hair style. Figure 34 shows the result from two different perspectives. The
separate wisp problem is solved. For the parting of the hair it shows a better result than
the previous implementation. However, perfect parting cannot be achieved with this
approach. A solution would be to separate the scalp mesh into two parts, with additional
guide hairs for the parting area. This would allow to render a parting, with a defined
distance, dependent on the distance of the two scalp meshes.

Real-Time Hair Rendering 5. Implementation
39
Figure 34: Result of single strand and multi strand interpolation combined
5.5. Handling Different Hair Guide Sizes
Target was to be able to have the possibility of different number of hair segments per
hair guide instead of having the same number of hair segments for every hair guide.
Since the number of hair segments is directly connected with the performance of hair
rendering and also the memory, which needs to be used to save the input data, reducing
the number of hair segments for short hair guides and at the same time provide enough
hair segments for long hair is reasonable.
As mentioned in section 5.2 different hair guide sizes can easily be handled with single
strand interpolation. Only the hair strand size as well as the current position of the hair
strand vertex relative to the hair tip needs to be saved. Unfortunately, for multi strand
rendering handling different hair strand sizes is not that trivial because three hair guides
are used as input. When those three hair guides do not have the same segment number
and therefore not the same vertex number, it needs to be handled, which vertices of the
hair guides are used for interpolation.
It was tried to handle this problem with three different approaches. The first idea was to
use the vertex number of the longest guide strand for the number of invocations for the
TCS. It should be interpolated the same way as with uniform guide hair sizes, until the
tip vertex of the shortest guide strand. This would mean that all operation stay the same
until the tip of the shortest guide strand is reached. For the following interpolations the
tip vertex of the shortest guide hair is used. When tip of the next guide hair is reached,
the tip vertex of this guide hair is used for the following interpolations until the tip of
the last guide hair is reached. This iteration did not work well because hair segments are
drawn into each other when the tip of one or two guide hairs is used for multiple multi
strand interpolations.

Real-Time Hair Rendering 5. Implementation
40
Figure 35: Different hair sizes first iteration
In the second iteration the shortest guide strand vertex count was used for the number of
invocations of the TCS. Vertices were used in the same way until the tip of the shortest
guide strand was reached. This means that only the same number of vertices of the
longer guide strands is used for interpolation as the number of vertices of the shortest
guide strand. The rest of the vertices are ignored. The result hairs are drawn correctly.
However, this approach also causes a choppy transition from long to short guide
strands. It would be better if the transition between different sizes is smooth. Another
problem with this approach is that geometric detail of longer guide strands is lost.
Figure 36: Different hair sizes second iteration
One problem is that the number of vertices that are used for multi strand interpolation
has to be the same for every guide strand. With the first iteration it was tried to use all
available vertices. The second iteration on the other hand ignored vertices. The third
iteration is a middle ground between the first and second iteration. The same amount of
vertices will be ignored in iteration three as in iteration two. However, the selected
vertices, which are used for interpolation are different. It will always be used the root
and the tip vertex. Which vertices are selected in-between is dependent on the vertex
buffer size of the smallest guide hair. A delta step value is calculated to retrieve the next
used vertex.

Real-Time Hair Rendering 5. Implementation
41
Figure 37: Different hair sizes third iteration
With the third iteration the length of the guide hairs is better represented and it allows a
smoother transition from short to long hairs. However, there is still some geometry
information lost. This is especially visible if the vertex count difference of the guide
hairs is big. If the vertex number of the guide hairs only differs in a small number, the
missing of geometry detail is only barely visible.
5.6. Expand Lines into Camera Facing Quads
After the generation of hair within the tessellation stage, the geometry shader is used to
expand the isolines into camera facing quads.
The geometry shader is designed for small geometry expansion and therefore efficient
for this operation. The reason to expand isolines into camera facing quads is to be able
to show hair, which changes is width when it gets nearer to the tip of the hair. This
functionality would not be possible with isolines because the width of isolines can only
be changed per draw call. Another reason is to be able to change the width of hair
dependent on the number of hairs that are generated. If less hairs are generated the
width of hair needs to be thicker. With this functionality level of detail for hair can be
implemented, which shows less hairs with a thicker width.
The geometry shader gets as input the two vertices of a line segment. First, the eye
vector and the tangent of the line segment is calculated. The normalized cross-product
of eye vector and tangent results into the offset vector, which is used to calculate the
four new vertices of the camera facing quad.

Real-Time Hair Rendering 5. Implementation
42
vec3 tangent = pos2.xyz - pos1.xyz; tangent = normalize(tangent); vec3 eyeVec = (g_mInverseWorldMatrix * g_CameraPosition).xyz - pos1.xyz; vec3 sideVec = normalize(cross(eyeVec, tangent)); vec3 width1 = sideVec * strandWidth[0]; vec3 width2 = sideVec * strandWidth[1]; // Offset positions to for drawing triangles in world space vec4 pos11 = vec4( pos1.xyz + width1, 1 ); vec4 pos12 = vec4( pos1.xyz - width1, 1 ); vec4 pos21 = vec4( pos2.xyz + width2, 1 ); vec4 pos22 = vec4( pos2.xyz - width2, 1 );
Figure 38: Expansion of isolines into camera facing quads
5.7. Hair Form
With camera facing quads the form of the hair can be adjusted with two width values
per segment. These two width values have to be calculated inside the TES per hair
vertex and will be send to the geometry shader for the geometric expansion. For the
tapering of the hair a simple solution was used, which gives a good result for thin hair
and provides the option to define, where tapering of the hair begins.
Figure 39: Hair strand tapering (1, 2, 3 and 6 segments)
Result of this implementation is a hair form, which has the same width from root
position to the position, where tapering is defined to begin. From there a linear
interpolation is used, which reduces the width until it has reached the tip of the hair. At
the tip of the hair the width of the hair is 0. Figure 39 shows different hair tapering
settings for a hair strand that has the same base width.

Real-Time Hair Rendering 5. Implementation
43
5.8. Hair Strand Tessellation
Hair strand tessellation is about how a single hair strand can be tessellated to get a
smooth curve at the end. The detail tessellation factor of the OpenGL tessellation stage
is needed for this operation. Tariq had a different approach for her hair strand
tessellation. She made it in a pre-calculation step within the geometry shader and wrote
the result to a buffer, which was used in the following render passes to render the
tessellated hair on the screen.
Our implementation of the hair rendering is done in a single draw call, which has the
advantage that for every single hair segment of the guide hair a different detail
tessellation factor can be applied. This is a crucial functionality to support dynamic
view dependent level of detail, which also is dependent on the shape of the hair strand.
Important for the used algorithm was that it works with a small amount of input vertices
on a per segment basis. Best solution for hair strand tessellation would be an algorithm
that just needs the two vertices of a hair segment. Two different techniques for hair
strand tessellation were implemented and evaluated.
5.8.1. Hermite Curve Interpolation
The first implementation was hermite curve interpolation [Pipenbrinck 2013]. For the
calculation of the result position the starting point 𝑃0, the tangent 𝑇0 at the starting
point, the end point 𝑃1 and the tangent 𝑇1 at the end point are needed. For hermite
curves the tangents define the smoothness or tightness of the curve. The variable 𝑡 is
defined between 0 and 1. It gives information about the current position in the line
segment. If 𝑡 is 0 it is the start position. If 𝑡 is 1 it is the end position. Each result
position can be calculated with the following equation:
𝐻(𝑡) = (2𝑡3 − 3𝑡2 + 1)𝑃0 + (𝑡3 − 2𝑡2 + 𝑡)𝑇0 + (−2𝑡3 + 3𝑡2)𝑃1 + (𝑡3 − 𝑡2)𝑇1
The hermite curve equation is executed in the TES. The input variable
gl_TessCoord.x exactly provides the information needed for the variable 𝑡. The
vertices for the start point and the end point are given. However, the tangents need to be
calculated at start up out of the hair guide vertices. For the calculation of the tangents
the formula for Cardinal splines can be used.
𝑇𝑖 = 𝑎 ∗ (𝑃𝑖+1 − 𝑃𝑖−1)
Result is the tangent 𝑇𝑖 at the vertex 𝑃𝑖, where 𝑃𝑖+1 is the next vertex and 𝑃𝑖−1 is the
previous vertex. In this formula, 𝑎 defines the tightness of the resulting curve. For the
special case, which is called Catmull-Rom spline, 𝑎 is set to 0.5. This results into
following equation.
𝑇𝑖 = 0.5 ∗ (𝑃𝑖+1 − 𝑃𝑖−1)

Real-Time Hair Rendering 5. Implementation
44
Catmull-Rom splines were used for the implementation. For the calculation of the
tangents of the hair guides vertices, two special cases needed to be handled for the root
vertex and the tip vertex. The root vertex has no previous vertex. Instead the root vertex
is used for the previous vertex. For the tip tangent calculation the tip vertex is used
instead of the next vertex. The calculated tangents are stored in an additional texture and
read in the same way as the positions in the TCS.
Figure 40: Hermite curve interpolation with detail tessellation factor 1, 2, 16 and 64
Result is a smooth curve, which goes directly through all control points of the hair
guide. The problem with the calculation of hermite curves is that there is no
documented way how interpolated tangents can be calculated, which are mandatory for
the right hair shading calculation in the fragment shader. It is also not possible to
calculate the right tangents within the geometry shader because there is only access to
the vertices of the current generated line segment. An alternative approach needed to be
used, which also allows to calculate interpolated tangents for tessellated hair strands.

Real-Time Hair Rendering 5. Implementation
45
5.8.2. Uniform Cubic B-Splines
Tariq used in her implementation uniform cubic b-splines, where she also interpolated
the tangents. Uniform cubic b-splines use four vertices as input. The following equation
shows how uniform cubic b-splines are calculated [Hamilton 2014].
𝑃(𝑢) =1
6[𝑢3 𝑢2 𝑢 1] [
−1 3 −3 13 −6 3 0
−3 0 3 01 4 1 0
] [
𝑃𝑖
𝑃𝑖+1
𝑃𝑖+2
𝑃𝑖+3
]
The variable 𝑢 is again the gl_TessCoord.x, which is defined between 0 and 1. The
main difference is that as input four vertices are needed. These vertices are the control
points of the generated curve. 𝑃𝑖 is the previous vertex, 𝑃𝑖+1 is the start vertex, 𝑃𝑖+2 is
the end vertex and 𝑃𝑖+3 is the next vertex. The root segment of the guide hair as well as
the last segment of the guide hair needs to be handled in a different way. For the root
segment, the previous vertex 𝑃𝑖 is the same as the start vertex 𝑃𝑖+1. For the tip segment
the next vertex 𝑃𝑖+3 is the same as the end vertex 𝑃𝑖+2. For tangent calculation the
following equation is used.
𝑇(𝑢) = [𝑢2 𝑢 1] [0.5 −1.0 0.5
−1.0 1.0 0.00.5 0.5 0.0
] [
𝑇𝑖
𝑇𝑖+1
𝑇𝑖+2
]
The three tangents 𝑇𝑖, 𝑇𝑖+1, and 𝑇𝑖+2 can be calculated with:
𝑇𝑖 = 𝑃𝑖+1 − 𝑃𝑖
𝑇𝑖+1 = 𝑃𝑖+2 − 𝑃𝑖+1
𝑇𝑖+2 = 𝑃𝑖+3 − 𝑃𝑖+2
The matrix calculation form is efficient to calculate on the GPU. No pre-calculation of
tangents is needed. Tangents can be calculated inside the TES, which is especially
important for multi strand interpolation because the hair segment is an interpolation of
three hair segments and the tangent will be different dependent on the used barycentric
coordinates. The results are smooth curves and smooth tessellated tangents.

Real-Time Hair Rendering 5. Implementation
46
Figure 41: Uniform cubic b-spline interpolation with tessellation factor 1, 2, 16 and 32
One problem is that uniform cubic b-splines cut off a small part of the start and the end
of the hair strand. The end parts do not really matter and the root part is so small that it
can barely be recognised when rendering hair with thousands of strands for a hair style.
Figure 42: Uniform cubic b-splines start and end segment

Real-Time Hair Rendering 5. Implementation
47
5.9. Curly Hair
Realistic curly hair is hard to render. Guide hairs with a huge number of vertices are
needed to be able to render curly hair. In real-time there are limited resources and
number of guide hair vertices should be as small as possible. However, there is one way
to fake curly hair. The idea is to offset the calculated hair vertex in x and z direction
dependent on a generated curl deviations texture.
int numCVs = 13; float sd = 1.5f; int numSegments = numCVs - 3; int numVerticesPerSegment = ceil( ((m_NumberMaxOfHairSegments+1)*64) / float(numSegments) ); float uStep = 1.0/numVerticesPerSegment; Ogre::Vector2* CVs = new Ogre::Vector2[numCVs]; CVs[0] = Ogre::Vector2(0,0); CVs[1] = Ogre::Vector2(0,0); CVs[2] = Ogre::Vector2(0,0); CVs[3] = Ogre::Vector2(0,0); float x,y; int index = 0; int lastIndex = 0; Ogre::Matrix4 basisMatrix = Ogre::Matrix4 ( -1/6.0f, 3/6.0f, -3/6.0f, 1/6.0f, 3/6.0f, -6/6.0f, 0, 4/6.0f, -3/6.0f, 3/6.0f, 3/6.0f, 1/6.0f, 1/6.0f, 0, 0, 0 ); for (int i = 0; i < numberOfGuideHairs; i++) { //create the random CVs for(int j=4;j<numCVs;j++) { BoxMullerTransform(x,y); x *= sd; y *= sd; CVs[j] = Ogre::Vector2(x,y); } //create the points for(int s=0;s<numSegments;s++) { for(float u=0;u<1.0;u+=uStep) { Ogre::Vector4 basis; basis = basisMatrix * Ogre::Vector4(u*u*u, u*u, u, 1); Ogre::Vector2 position = Ogre::Vector2(0,0); for (int c = 0; c < 4; ++c) position += basis[c] * CVs[s+c]; // save position to texture/buffer } } lastIndex = index; }
Figure 43: Creation of curl deviations for curly hair
The texture is generated at start up on the CPU. Adjustable input variables are the
number for control vertices numCVs and the deviation scale sd. The higher the number

Real-Time Hair Rendering 5. Implementation
48
of hair segments per guide strand, the higher should be the number of control vertices
and the deviation scale. Dependent on numCVs random control vertices are generated
using Box-Muller Transformation. Notice that the first four control vertices are always
set to 0. This has the reason that vertices near the root of the hair are not influenced to
make sure that the hair still has the original position near the scalp. The number of
generated curl deviations per segment is dependent on the maximum tessellation factor
and the highest number of guide hair segments. For curl deviation, calculation per sub
segment a basis matrix is calculated and multiplied with four different control vertices.
These calculations are executed for each hair guide positions to ensure different curl
deviations per hair strand. For multi strand interpolation the index count of the scalp
mesh divided by three is used, instead of the hair guide count.
Figure 44: Curly hair results with no curl offset, low curl offset, increased curl offset and increased curl
offset with hair strand tessellation
The result is more curvy hair, which is slightly offset in x and z direction. A low curl
offset is doable with small amount of subdivisions. The higher the curly hair offset, the
more subdivisions of a hair segment is needed to still provide a smooth curve.
Therefore, good quality curly hair is still processing intensive to render on the GPU.
5.10. Thinning
Especially with single strand interpolation all hairs have the same overall length as the
corresponding guide hair. In multi strand interpolation the length of the hair is
dependent on the three input guide hairs. For some hair styles, hairs with the same
length can be the wished result. However, there are also hair styles, where hairs are
thinned. The result are hairs, which have a slightly different size. Hair dresser often use
this to make thick hair look thinner. Thinning is the functionality to support this feature

Real-Time Hair Rendering 5. Implementation
49
for a hair style. The variable g_thinning, which is defined between 0.0 and 1.0 is
used to control the amount of thinning for the hair.
// calculate data and write to texture and array m_strandLength = new float[m_numStrandVariables]; float minLength = 0.2f; for (int i = 0; i < m_numStrandVariables; ++i) { m_strandLength[i] = Ogre::Math::RangeRandom(0.0, 1.0) * (1-minLength) + minLength; pFloat[writePos++] = m_strandLength[i]; }
Figure 45: Random strand length generation
At start up a random generated texture is created with a predefined number of variables.
1024 random values have proven to be enough for this implementation. First the
minimum length is defined. Afterwards the random generated length values are saved
into a texture.
//thinning the hair lengths float strandLengthPosition = float(iMasterStrand & (g_numStrandVariables-1)) / g_numStrandVariables; float inLengthFrac = texture( TexStrandLength , strandLengthPosition ).r; // percentage of max length float maxLength = 1.0-g_thinning + g_thinning*inLengthFrac; float cutOfLength = hs_currentNumOfGuideHairSegments – (maxLength * hs_currentNumOfGuideHairSegments); // add LOD to strand width float tmpStrandWidth = g_strandWidth * g_strandWidthLOD; // Make hair strand thinner from defined position to top if( lengthToRoot > (maxLength * hs_currentNumOfGuideHairSegments) ) { strandWidth = 0.0; } else if( (hs_strandPosition - gl_TessCoord.x) <= (g_strandTaperingStart+cutOfLength) ) { float ignoredPositions = hs_currentNumOfGuideHairSegments – (g_strandTaperingStart+cutOfLength); strandWidth = tmpStrandWidth * (maxLength - ( ( hs_currentNumOfGuideHairSegments – ignoredPositions - hs_strandPosition + gl_TessCoord.x ) / (hs_currentNumOfGuideHairSegments - ignoredPositions) ) ); } else { strandWidth = tmpStrandWidth; }
Figure 46: Thinning in TES and adjustment of hair tapering
In the TES the calculated, predefined strand length is read in and applied dependent on
g_thinning. The maximum length of the current hair strand is calculated. Dependent

Real-Time Hair Rendering 5. Implementation
50
on the maximum length the tapering of the hair is adjusted. If the current length to the
root vertex is greater than the maximum length, the width of the hair strand is set to 0.
Figure 47: Thinning with value 0.0, 0.5 and 1.0 (top to bottom)

Real-Time Hair Rendering 5. Implementation
51
5.11. Random Deviations
The look of the hair styles, the current hair rendering system generates, is too uniform
and too predictable. All hairs strands are perfectly aligned either clamp based with
single strand interpolation or evenly distributed with multi strand interpolation. All the
hairs strands look like as they were perfectly styled. Real human hair behaves
differently. It can often be observed that some hair strands are separated from the other
hairs strands. Especially at the edges of the hair style, single hair strands are visible,
which have a different form than the neighbouring hair strands. It almost never happens
that every hair follows the same form. There are very often a small amount of hairs that
have another form. Random deviations is an attempt to bring randomness into a hair
style to get a more realistic result, which can be better compared with a real-world hair
styles.
The implementation of random deviations is similar to the creation of curly hairs.
Adjustable input variables are the number for control vertices numCVs, the global
deviation scale sdScale and a deviation scale sd, which is set dependent on the
wished deviation of a hair strand. The main difference for random deviations compared
to curly hair is the added randomness. The deviation scale sd chances dependent on a
random value. With a probability of 60%, hairs are not modified at all. Only 5% of the
hair have high sd value, which leads to stray hair. 15% of hair are lesser stray hair. For
the remaining 20% small random deviations are only applied near the tips. For the offset
of the tips the thinning scale m_thinning is used. The different sd values are applied
for the control vertices creation. The offset position calculations in x and z direction are
calculated the same way as for curly hair and saved into a texture. For the hair strands
that were not modified, a zero vector is saved to the texture.

Real-Time Hair Rendering 5. Implementation
52
float sdScale = 1.0f; for (int i = 0; i < m_numStrandVariables; i++) { float randomChoice = Ogre::Math::RangeRandom(0.0, 1.0); if(randomChoice>0.6) { float maxLength = (1.0-m_thinning) +
m_thinning*m_strandLength[i%m_numStrandVariables]; int maxCV = floor(maxLength*numSegments)+ 2; //create the random CVs for(int j=2;j<numCVs;j++) { float sd; if(randomChoice > 0.95)//make some very stray hair sd = 1.2f; else if(randomChoice > 0.8) sd = 0.8f; else // some lesser stray hair (more deviant near tip) { if(maxLength>((numCVs-1)/numCVs) && j==numCVs-1) sd = 100.0f; else if(j>=maxCV) sd = 4.0f; else sd = 0.12f; } BoxMullerTransform(x,y); x *= sd * sdScale; y *= sd * sdScale; CVs[j] = Ogre::Vector2(x,y); } //create the points for(int s=0;s<numSegments;s++) { for(float u=0;u<1.0;u+=uStep) { Ogre::Vector4 basis; basis = basisMatrix * Ogre::Vector4(u * u * u, u * u, u, 1); Ogre::Vector2 position = Ogre::Vector2(0,0); for (int c = 0; c < 4; ++c) position += basis[c] * CVs[s+c]; // save position to texture/buffer } } } else // no deviations, save 0 position to texture }
Figure 48: Creation of random deviations
Result is added randomness to the hair, which makes the overall hair style more realistic
and believable. Figure 49 shows three different deviations settings of one hair style to
demonstrate the difference between hair without deviations and hair with deviations
enabled.

Real-Time Hair Rendering 5. Implementation
53
Figure 49: Hair style (full hair and zoomed) with random deviation scale 0, 0.025 and 0.05 left to right
5.12. Level of Detail
LOD for the hair rendering system is an important part to adjust the amount of
generated hair and smoothness of the hair dependent on the available computing
resources of the GPU. LOD is often done distance dependent. For the research project it
made no sense to implement a distance dependent LOD because the camera distance
never changes. Instead a LOD slider was implemented, which has a value between 0.0
and 2.0. The interval from 0.0 to 1.0 adjusts the number of generated guide strands and
at the same time decreases the width of single guide strand with increased value. Is the
value between 1.0 and 2.0, the detail tessellation factor is increased, which improves the
smoothness of the hair. This LOD slider is also useful for the research project to be able
to render less detailed hair with a thicker width and therefore get a more abstract
representation of the hair style.

Real-Time Hair Rendering 5. Implementation
54
Figure 50: Hair with LOD slider set to 0.1, 0.5 and 1.0
Result is a simple modification of the tessellation factors dependent on a slider value.
This works perfectly fine for the amount of generated hair. However, the amount of
needed processing power increases dramatically with increased detail tessellation factor.
The problem here is that all hair segments are subdivided in the same way even if the
hair is straight, where subdivision of hair does not give additional geometric detail.
There is a potential to save computing resources, without the loss of geometric detail.
5.12.1. Screen Space Adaptive Level of Detail
The idea of screen space adaptive level of detail (SSALOD) is to have a dynamic detail
tessellation factor for each hair strand segment, which is dependent on the shape of the
hair and the size of a hair segment in screen space. The calculation of the detail factor in
the TCS is done once per hair segment. The two vertices of the hair segment are
transformed into screen-space to get the size of the hair segment. According to this size
the detail tessellation factor is calculated. Additionally, the form of the hair strand is
taken into account for the calculation of the detail factor. As pre-calculation step, the
angle between the previous segment and the current segment, as well as the angle
between current segment and the next segment is calculated. The larger angle is then
used in the shader to influence the final detail factor.
Configuration options for SSALOD are the screen segment size of a hair strand
segment, the meaningful bend angle and the maximum bend angle. The meaningful
bend angle describes the angle above which detail tessellation should be applied. Is the
angle between hair segments smaller than the meaningful bend angle no subdivision
should be performed. The maximum bend angle defines the angle between hair
segments, where maximum subdivisions of hair segments should be performed. All
three options can be modified dependent on the available processing power and the
anticipated smoothness of the hair.
Result of this technique are hair strands with different tessellated hair segments. Screen
space size setting 15 gives a smooth result for the example hair strands with only a
small number of subdivisions per hair strand.

Real-Time Hair Rendering 5. Implementation
55
Figure 51: Example of SSALOD with bend angle minimum 5, bend angle max 45 and hair segment
screen space size of 40, 15 and 4 from top to bottom.
5.12.2. Hair Culling
Another way to save computing resources is not to generate and tessellate hair strands,
which are not visible. These calculations can also be done in the TCS. The implemented
solution for this character rendering system uses the normals of the scalp mesh to decide
if hairs should be generated or not. A slider was added, which controls the amount of
culled hairs. If hairs are culled, which are visible to the viewer, is dependent on the
created guide hairs and it cannot be guaranteed that visible hairs are not culled.
Therefore, this slider needs to be adjusted carefully. For short hair it is less likely that
hairs are culled, which are visible. In this case the culling value can be set higher.

Real-Time Hair Rendering 5. Implementation
56
Figure 52: Hair culling with culling scale 0.0, 0.2, 0.4, 0.6, 0.8 and 1.0
5.13. Hair Shading
Previous sections were concerned with the geometric generation of hair. Another
important part of high quality hair is the shading of the hair. For hair shading
Filmakademie Baden-Württemberg has already implemented a hair shading algorithm
based on [Sadeghi et al. 2010; Zinke and Weber 2007]. In this section this implemented
shading algorithm is explained. This algorithm has been ported to glsl and is used for
the generated hair.
[Sadeghi et al. 2010] added to physically based
shading model artistic friendly controls. Their
implementation is based on [Marschner et al.
2003]. The hair is represented as a translucent
cylinder with tilted cuticles. These cuticles have
the effect that the single scattering of the hair has
three subcomponents. These subcomponents are
the primary highlight (R), the secondary
highlight (TRT) and rim light (TT). Figure 53
shows the different paths light can take through a
hair fibre. The primary highlight is from light
that is directly reflected. Therefore, the colour of the primary highlight is the same
colour as the light. The secondary highlight comes from light that was absorbed by the
hair fibre, reflected internally and appears next to the primary highlight. The secondary
highlight is nearer to the tip than the primary highlight. The colour of the hair influences
Figure 53: Hair model [Sadeghi et al. 2010]

Real-Time Hair Rendering 5. Implementation
57
the colour of the secondary highlight. The rim light happens when light is transmitted
through the hair fibre. In a backlighting situation a bright halo is shown around the hair.
This effect is described with TT. Preferably, artists want to be able to modify the
primary highlight, the secondary highlight and the rim light.
vec3 lightDir = normalize(light_positions[i] – gs_worldPos).xyz; float lightVec = dot(lightDir, gs_tangent); float viewDepSpec = dot(gs_viewDir, gs_tangent); float theta_h = asin(lightVec) + asin(viewDepSpec); float cosPhi_i = dot(normalize(lightDir – lightVec*gs_tangent), normalize(gs_viewDir – viewDepSpec*gs_tangent)); // R (reflection) component vec3 reflectionColor = clamp( _AM_c_R * pow( abs(cos(theta_h - _AM_s_R)) ,reflectWidth ) , 0.0, 1.0); // TRT component vec3 transRefTransColor = clamp( _AM_c_TRT * pow( abs(cos(theta_h - _AM_s_TRT)),scatterWidth ), 0.0, 1.0); // TT component vec3 transTransColor = clamp(_AM_c_TT * max(0.0, cosPhi_i) * pow( cos(theta_h - _AM_s_TT) , transmitWidth ), 0.0, 1.0); // diffuse component vec3 diffColor = clamp(_AM_d * sqrt(min(1.0, lightVec*lightVec)) + (gs_strandPosition * tipColor + gs_strandPosition * rootColor), 0.0, 1.0); fragColor.xyz += (diffColor + reflectionColor + transTransColor + transRefTransColor) * light_colors[i].xyz * lightPower;
Figure 54: Hair shading glsl code
Our implementation allows artist to change colour, strength, width and shift of the R,
TT and TRT component. Additionally, it is possible to change the diffuse, root and tip
colour of the hair. For every light in the scene the code of Figure 54 is executed.
Calculation is done based on the tangents of the hair. First, the light direction is
calculated with the position of the light and the position of the hair. Afterwards the
angles θ and φ are calculated. With these angles and the artist controlled input variables
the R, TT, TRT and diffuse colour are calculated. In the end all components are added
together for the final colour.

Real-Time Hair Rendering 5. Implementation
58
Figure 55: Sara hair style with hair shading

Real-Time Hair Rendering 6. Character Rendering System Integration
59
6 . C h a r a c t e r R e n d e r i n g S y s t e m I n t e g r a t i o n
The character rendering system is implemented in the open source framework of
Filmakademie Baden-Württemberg called Frapper. It uses Qt for the graphical user
interface and Ogre3D for graphics rendering including animations. Frapper is node
based. Different nodes inside Frapper provide different functionalities. Two tasks were
required to put the developed hair rendering system and the previous work that has been
done for character rendering together. The first task was to create a node, which
provides the functionality for the hair rendering system. This node is described in the
next subsections. The second task was to translate the Cg shader for character rendering
into glsl.
Character rendering has previously been done with a different node called
AnimatableMeshNode. This node inherits from GeometryAnimationNode,
which provides functionality to produce 3D geometry and play animations.
For the hair rendering system a custom node was created, which provides all adjustable
inputs and functionality. This node is called AnimatalbeMeshHairNode. It is used
to load the character geometry including the hair geometry. For each character there is
one mesh file created, which includes all geometric information for face, eyes, teeth,
clothes, eye brows, eyelashes, scalp mesh and guide hairs. Additionally, the node is
used inside Frapper to modify input parameter of the different geometries. For
AnimatalbeMeshHairNode input configurations were added to be able to modify
the hair style. This section gives an overview about all input variables and their effect
for hair rendering. The AnimatalbeMeshHairNode is subdivided in four tabs
called Hair Geometry, Hair LOD, Hair Lighting and Light Definition.
6.1. Hair Geometry
The first tab Hair Geometry is concerned with all input values, which directly
influence the form of the hair geometry. First input value is the Geometry File. Here
the character mesh with all the geometry data needs to be selected. Light Description
File is for a txt file, which includes the data of all light sources. With this file different
lighting settings can be loaded in the scene in a fast way without having to add and
place each individual light. Light description files have usually 8 to 16 lights included.
The next two string based input parameters are Scalp Mesh Name and Hair Guides
Name. These two inputs are important for the right selection of the scalp mesh and the
guide vertices. All geometry in the mesh file is stored as submeshes. When the mesh file
is selected and the mesh is loaded, these submeshes are searched for the scalp mesh and
all the hair guides. Submesh names must contain these strings, which were set as input

Real-Time Hair Rendering 6. Character Rendering System Integration
60
of Scalp Mesh Name or Hair Guides Name, that the
AnimatalbeMeshHairNode is able to select the right
submeshes when the mesh is loaded. If the scalp mesh or
guide hairs are not found in the load mesh method, an error
will be logged and the mesh will not be rendered. It is also
important to keep in mind that the number of indices of the
scalp mesh have to be the same as the number of guide
hairs. Only then hair can be loaded and multi strand
interpolation is rendered correctly.
The following input value Distance Root Vertex to Scalp
Vertex is a slider to configure the distance the root vertex
of a hair guide can have to a scalp vertex and still be recognised as the corresponding
hair guide. This functionality was added for the case when the root vertices of the hair
guides are not exactly placed on the vertices of the scalp mesh.
Assigned Bone Name is the name of the bone the hair style is assigned to. This
assignment is done to support hair style movement relative to a bone when animation is
applied to it. Hair Style Initial Position defines the initial position of the hair style
relative to the bone position.
Single Strand is a check box to enable single strand
rendering. If this input parameter is not selected, the hair
will be rendered with multi strand interpolation. The
mesh needs to be reloaded before the different hair
interpolation method is applied. The slider
g_rootRadius, g_tipRadius and g_clumpWidth are
single strand interpolation specific parameters.
g_rootRadius defines the maximum radius around the
guide hair in which single strand interpolated hairs can
be generated. g_tipRadius has the same functionality
only for the tip of the hair. With modifying
g_rootRadius and g_tipRadius, it can be defined how
the distance of interpolated hair strands changes from
the root to the tip of the hair. It can often be observed
that hair moves together at the tip of the hair to build
combined, clump based hair strands. g_clumpWidth
scales the radius of g_rootRadius and g_tipRadius.
The following five parameter are used for single and
multi strand interpolation. The input parameter to
change the width of the hair is g_strandWidth. It defines the minimum width of the
Figure 56: Hair geometry part1
Figure 57: Hair geometry part 2

Real-Time Hair Rendering 6. Character Rendering System Integration
61
hair. Tapering of the hair can be modified with g_strandTaperingStart. This slider
defines at which distance relative to the tip of the hair strand tapering starts. This
distance is counted in vertices. Next the input parameter g_curlyHairScale,
g_deviationHairScale and g_thinning are provided. These are the scale parameters for
curly hair, hair deviations and thinning.
The last three sliders are the input values to configure the combination of multi strand
and single strand interpolation. g_clumpTransitionLength defines how long the
transition phase between single and multi strand interpolation is. The distance of two
hair guides when single strand interpolation should be performed is configured with
g_maxDistance. If the distance between two hair guides is under this value, multi
strand interpolation will be used. g_maxAngle handles the maximum angle between
guide hairs. At the end there are two check boxes Render Guide Strands and Render
Scalp Mesh to enable and disable rendering of guide hairs and scalp mesh.
6.2. Hair LOD
The second tab Hair LOD provides all level of detail
settings, which can be applied to the hair rendering. First
is the Hair LOD Factor, which changes the level of
detail of the hair. Between 0.0 and 1.0 the hair number
and width is modified. Between 1.0 and 2.0 the detail
tessellation factor is increased. g_tessellationFactor is
the slider to control the number of generated hairs per
TCS invocation. g_detailFactor is the input value for
the number of subdivisions per guide hair segment. Hair
culling can be configured with the input value
g_backFaceCullingScale. The value 1.0 is here
maximum culling.
SSALOD can be enabled and disabled with Screen
Space Adaptive LOD. Is SSALOD enabled changes to the detail tessellation factor will
have no effect. SSALOD can be configured with Segment Screen Size, Bend Angle
Meaningful and Bend Angle Max Tessellation. Segment Screen Size defines the size
a hair segment should have in screen space. Dependent on this value the detail
tessellation factor is calculated. Bend Angle Meaningful and Bend Angle Max
Tessellation are configurations for form dependent tessellation. They define the angle
between hair segments, which is meaningful enough to start hair segment subdivision
and the angle were the maximum amount of subdivisions should be applied.
Figure 58: Hair LOD

Real-Time Hair Rendering 6. Character Rendering System Integration
62
6.3. Hair Lighting
Hair Lighting is concerned with all the hair shading
input values. Basic colours of the hair, which can be
defined are rootColor, tipColor and diffuseColor.
These colour values set the hair colour of the hair roots,
the hair colour of the hair tip and the overall diffuse
colour of the hair. The next input parameters are
subdivided into parameters to change the R, the TRT
and the TT component of the hair. For each of these
components the colour, strength, width and shift can be
modified. The input values for R start with reflect, the
input values for TRT start with scatter and the input
values for TT start with transmit.
6.4. Light Definition
The last tab is Light Definition, which consists of all
lighting specific values. The position of the lights can be
modified with Light Scale Pos. This value scales the
position of the created point lights. The intensity of the
light can be set with lightPower and the number of used
lights for the geometry is set with Number of Lights.
The rendering performance of the hair is directly
dependent on the number of lights that are set in the scene. The more lights are used the
higher is the fragment shader load for hair rendering.
Figure 59: Hair Lighting
Figure 60: Light Definition

Real-Time Hair Rendering 7. Hair Rendering Performance Analysis
63
7 . H a i r R e n d e r i n g P e r f o r m a n c e A n a l y s i s
In this section the developed hair rendering system is evaluated for performance and
compared against the NVIDIA Fermi Hair Demo [NVIDIA 2010b] and AMD
TressFX11 v2.0 [AMD 2013]. Graphics card, which was used for this test is a NVIDIA
Geforce GTX 580 [NVIDIA 2010a]. The CPU of the test hardware was a 6 core Intel
Xeon X5660 with a core speed of 2.80 GHz [Intel 2010]. NVIDIA Nsight 4.1 [NVIDIA
2014a] and Fraps 3.5.99 [Beepa 2013] functioned as profiling tools. NVIDIA Nsight
allows to profile frames and to analyse single draw calls. With this tool 5 frames were
captured per test application and the average result is taken for comparison. Fraps can
record the frame rate of the application over a predefined time and gives as result the
lowest, highest and average frame rate. The frame rate of all three applications were
recorded for 60 seconds.
Application Frapper Hair NVIDIA Fermi Hair AMD TressFX11 v2.0
Guide hairs 335 166 21809
Rendered hairs 37632 <29440 65427
Hair segment
count 30 between 6 and 40 13 or 10
Hair segment
subdivision 2 2 not supported
Lighting 1 point light 1 directional light 1 point light
Shadows not supported disabled disabled
Simulation not supported disabled disabled
Resolution 1284x1058 1024x768 1024x768
Table 1: Test application setup
The setup of the three applications is shown in Table 1. Frapper Hair is our
implemented hair rendering system. Sara’s hair style was used for this test. Hair culling
was set to 0.3. Her hair style is the most similar hair style to the ones of the NVIDIA
Fermi Hair and the AMD TressFX11 v2.0 demo. It was tried to make the conditions as
near as possible. The NVIDIA Fermi Hair demo and AMD TressFX11 v2.0 were not
modified in code. For NVIDIA Fermi Hair demo scene rendering, simulation and
shadows were disabled. The hair render count for the NVIDIA demo cannot precisely
be counted. Reason for this is that Tariq implemented in her demo a scalp texture,
which influences the maximum amount of rendered hair dependent on the position of
the generated hairs to save resources. The generated hairs are less than 29440 hairs,
which is the maximum amount of generated hairs for the provided hair style input data.
In the AMD TressFX demo it was possible to disable the HUD, simulation and self-
shadowing. The 21809 hair strand input data is copied twice to triple the amount of
rendered hair per frame.

Real-Time Hair Rendering 7. Hair Rendering Performance Analysis
64
Figure 61: Test application setup NVIDIA Nsight
The test application setup for test with NVIDIA Nsight is shown in Figure 61. The hair
styles in all demos were positioned once and 5 different frames were captured, which
were analysed in NVIDIA Nsight. Only draw calls for hair rendering were recorded and
had an impact on the results. Node that for our implementation the hair shading is not
rendered correctly. This result of the hair shading only happens in the NVIDIA Nsight
graphics debugger. If Frapper hair rendering is started in a standalone application the
hair shading is correct.
Application Frapper Hair NVIDIA Fermi Hair AMD TressFX11 v2.0
GPU time
avg/min/max [μs] 17989/17977/17993 4676/4556/4695 9992/9990/9993
CPU time
avg/min/max [μs] 128/107/615 <1/<1/<1 <1/<1/<1
Number draw calls 1 6 1
Primitives 17640 1252 1201764
Shaded pixel count
avg/min/max
4739814/4699632/
4758640
2896233/2877888/
2908336
3819635/3786960/
3844624
Shaded pixel coverage
avg/min/max 347% / 344% / 349% 365% / 362% / 367 % 485% / 481% / 488%
Bottleneck top three
average %
36.46% Rasterizer
32.11% L2-Cache
10.47% Blending and
Z-Buffer
33.49% Rasterizer
31.22% L2-Cache
8.20% Blending and
Z-Buffer
60.20% Rasterizer
24.04% Shading
18.78% L2-Cache
Utilization top three
average %
31.42% Shader
25.84% Frame Buffer
16.33% Rasterizer
26.92% Shader
22.09% Frame Buffer
13.62% Rasterizer
41.13 % Shader
19.37% Frame Buffer
12.04% Z-Culling
Shader Type 0% Vertex
4.27% TCS
34.08% TES
13.06% Geometry
48.55% Fragment
0.01% Vertex
0.32% Hull
19.00% Domain
22.64% Geometry
57.87% Pixel
12.90% Vertex
0.0% Hull
0.0% Domain
0.0% Geometry
87.42% Pixel
Table 2: Results NVIDIA Nsight profiler
The Frapper hair implementation is less performance optimized than the other two test
applications. Interesting is the spend CPU time. Only the measurements of the CPU
time suffered from huge differences in the results. Therefore the slowest and fastest
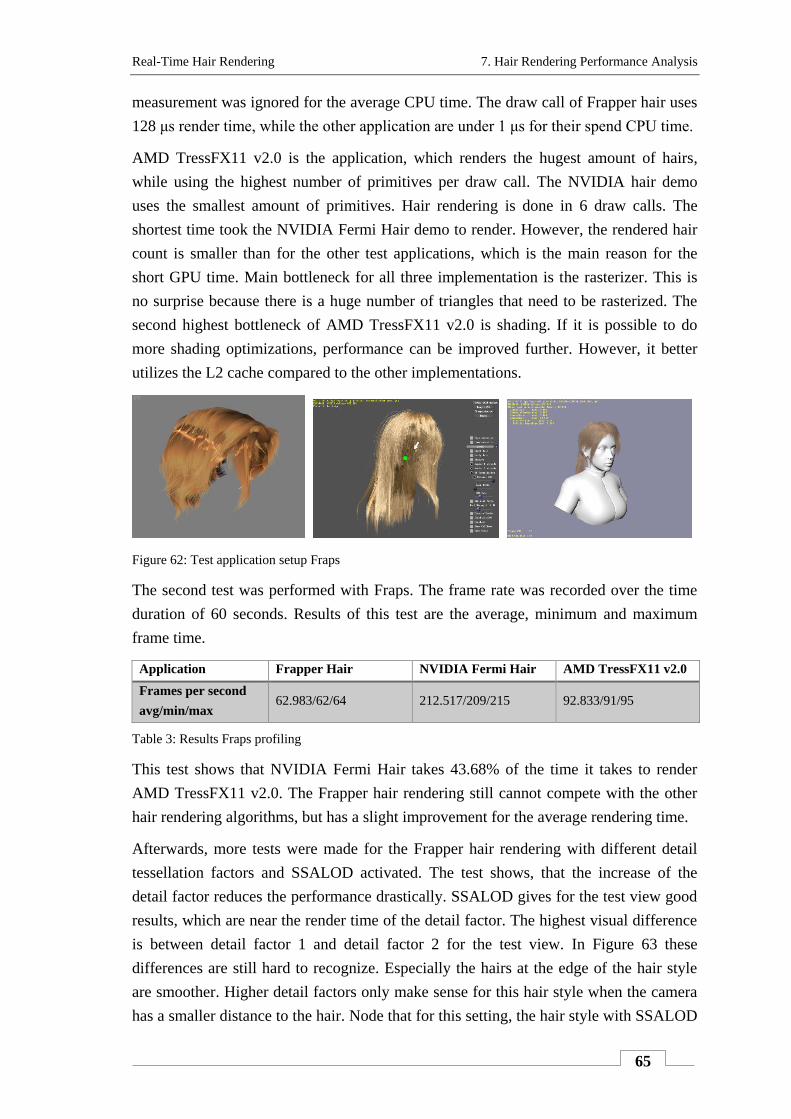
Real-Time Hair Rendering 7. Hair Rendering Performance Analysis
65
measurement was ignored for the average CPU time. The draw call of Frapper hair uses
128 μs render time, while the other application are under 1 μs for their spend CPU time.
AMD TressFX11 v2.0 is the application, which renders the hugest amount of hairs,
while using the highest number of primitives per draw call. The NVIDIA hair demo
uses the smallest amount of primitives. Hair rendering is done in 6 draw calls. The
shortest time took the NVIDIA Fermi Hair demo to render. However, the rendered hair
count is smaller than for the other test applications, which is the main reason for the
short GPU time. Main bottleneck for all three implementation is the rasterizer. This is
no surprise because there is a huge number of triangles that need to be rasterized. The
second highest bottleneck of AMD TressFX11 v2.0 is shading. If it is possible to do
more shading optimizations, performance can be improved further. However, it better
utilizes the L2 cache compared to the other implementations.
Figure 62: Test application setup Fraps
The second test was performed with Fraps. The frame rate was recorded over the time
duration of 60 seconds. Results of this test are the average, minimum and maximum
frame time.
Application Frapper Hair NVIDIA Fermi Hair AMD TressFX11 v2.0
Frames per second
avg/min/max 62.983/62/64 212.517/209/215 92.833/91/95
Table 3: Results Fraps profiling
This test shows that NVIDIA Fermi Hair takes 43.68% of the time it takes to render
AMD TressFX11 v2.0. The Frapper hair rendering still cannot compete with the other
hair rendering algorithms, but has a slight improvement for the average rendering time.
Afterwards, more tests were made for the Frapper hair rendering with different detail
tessellation factors and SSALOD activated. The test shows, that the increase of the
detail factor reduces the performance drastically. SSALOD gives for the test view good
results, which are near the render time of the detail factor. The highest visual difference
is between detail factor 1 and detail factor 2 for the test view. In Figure 63 these
differences are still hard to recognize. Especially the hairs at the edge of the hair style
are smoother. Higher detail factors only make sense for this hair style when the camera
has a smaller distance to the hair. Node that for this setting, the hair style with SSALOD

Real-Time Hair Rendering 7. Hair Rendering Performance Analysis
66
enabled and a screen segment size of 15 is near the performance of the test with detail
factor 1.
Figure 63: Comparison Sara hair style detail factor 1 (top left), detail factor 2 (top right), detail factor 64
(down left) and SSALOD with segment screen size 15 (down right)
Figure 64: NVIDIA Fermi hair demo setup Fraps detail factor 1 (left) and detail factor 64 (right)

Real-Time Hair Rendering 7. Hair Rendering Performance Analysis
67
Settings Frames per second avg/min/max
Sara Gunnar NVIDIA Fermi
Detail factor 1 125.450/125/126 173.200/172/174 377.567/374/381
Detail factor 2 62.983/62/64 78.717/78/79 233.483/230/234
Detail factor 16 11.467/11/12 13.800/13/14 32.717/32/34
Detail factor 32 6.283/6/7 7.667/7/8 16.483/17/16
Detail factor 64 3.300/3/4 4.033/4/5 8.250/8/9
SSALOD, segment screen size 40 109.617/109/110 172.417/172/173 not supported
SSALOD, segment screen size 15 109.050/108/110 172.467/172/174 not supported
SSALOD, segment screen size 4 93.633/93/94 165.367/165/167 not supported
Table 4: Sara/Gunnar/NVIDIA Fermi hair style results Fraps profiling with different tessellation settings
For comparison with a short hair style, another test was done in Fraps with the Gunnar
hair style. The Gunnar scalp mesh has a face count of 782, which results into a
maximum of 50048 generated hairs. The settings of the hair are the same as for Sara’s
hair style. Only the maximum distance and the maximum angle for transition into single
strand interpolation had to be adjusted for better visual results. The hair segment count
is 24. Especially, for short hair the number of used segments could be reduced to
optimize performance further.
Figure 65: Comparison Gunnar hair style detail factor 1 (top left), detail factor 2 (top right), detail factor
64 (down left) and SSALOD with segment screen size 15 (down right)

Real-Time Hair Rendering 7. Hair Rendering Performance Analysis
68
The result of Gunnar hair style test is an increased performance compared to Sara’s hair
style. This is an interesting result because for Gunnar 18768 hair segments and for Sara
only 10050 hair segments need to be processed. The reason for this increased
performance is the visual size of the hair. Sara’s hair style covers more screen space
than Gunnar’s hair style. This leads to more pixels that need to be shaded.
To support the previous claim another test was done with NVIDIA Nsight using this
time the Gunnar hair style. The results are shown and compared to the result of the Sara
hair style test in Table 5. First, less pixels are generated on screen. The Gunnar hair
style has only 51.80% of the shaded pixel count of the Sara hair style. This leads to a
smaller shaded pixel coverage, which reduces load on the rasterizer. Shader type
distribution also changes slightly. There is less work to do for the TCS, TES and
fragment shader. The geometry shader load increases 2.71%.
Application Frapper Hair Sara Frapper Hair Gunnar
GPU time avg/min/max [μs] 17989/17977/17993 12629/12621/12634
CPU time avg/min/max [μs] 128/107/615 121/104/122
Number draw calls 1 1
Primitives 17640 18768
Shaded pixel count
avg/min/max 4739814/4699632/4758640 2455338/2442640/2470128
Shaded pixel coverage
avg/min/max 347% / 344% / 349% 180% / 179% / 181%
Bottleneck top three average % 36.46% Rasterizer
32.11% L2-Cache
10.47% Blending and Z-Buffer
33,67% L2-Cache
14,95% Rasterizer
9,09% Z-Culling
Utilization top three average % 31.42% Shader
25.84% Frame Buffer
16.33% Rasterizer
28.77 Shader
18,71% Frame Buffer
10,44% Z-Culling
Shader Type 0% Vertex
4.27% TCS
34.08% TES
13.06% Geometry
48.55% Fragment
0% Vertex
4.21% TCS
31.98% TES
15.77% Geometry
48.0% Fragment
Table 5: Sara/Gunnar results NVIDIA Nsight profiler

Real-Time Hair Rendering 7. Hair Rendering Performance Analysis
69
Figure 66: Test application setup NVIDIA Nsight Sara and Gunnar hair style
Both hair styles of Sara and Gunnar were compared with the NVIDIA Fermi hair
implementation in respect to performance for hair segment subdivision. NVIDIA Fermi
hair demo gives the better results for uniform subdivision of the hair segments. Frapper
hair rendering can keep up with the NVIDIA demo when SSALOD is enabled. For a
small amount of subdivisions the NVIDIA Fermi hair demo is the better solution, but
for higher detail SSALOD gives the better performance.
Overall, the ability to modify detail tessellation per fragment comes with a cost, which
can be compensated with SSALOD. The Frapper hair rendering has still possible areas
of improvements. First, the amount of hair segments can be reduced to increase
performance. Nevertheless, this comes with reduced detail of the hair. Shader code can
still be optimized to make better use of the L1 cache and therefore reduce the L2 cache
bottleneck. On the plus side the Frapper hair rendering system allows smooth high
quality hair at close up view of the hair. SSALOD can also increase the frame rate with
reduced hair segments. AMD TressFX11 v2.0 is the fastest implementation. It has the
cost of larger hair guide counts, less controllability about the level of detail and does not
allow the subdivision of hair segments. The NVIDIA Fermi hair demo allows to save
performance with the limitation of hair strand generation in predefined areas. For small
hair segment subdivision it gives the better performance. But it is not possible to change
the subdivision for every hair segment independently. This functionality allows the
Frapper hair rendering and is therefore the better solution for rendering smooth hairs at
close distances.

Real-Time Hair Rendering 8. Conclusion
70
8 . C o n c l u s i o n
Result of thesis is an implementation of a hair rendering system using the OpenGL 4
tessellation pipeline. The hair rendering system was integrated into the framework
Frapper and utilizes the Ogre OpenGL 3+ renderer. Single strand and multi strand
interpolation was combined in one draw call to generate a more realistic hair look with
additional artistic control. The developed algorithm can handle hair guides with
different hair segment count. The tapering of the hair is adjustable. Additional features
are curly hair, random deviations and thinning. Furthermore, a level of detail system has
been implemented to cull hair, which is not seen and to adjust hair segment subdivision
dependent on the form of the hair and size of a hair segment projected into screen space.
This level of detail system is called SSALOD. The rendered hair uses an artist friendly
hair shading algorithm, which allows artist to modify the appearance of primary
highlight, the secondary highlight and rim light.
Figure 67: Character Sara with new hair rendering system
The developed hair rendering system was integrated into the Frapper character
rendering pipeline converting the existing Cg shader into glsl shader. As test character
served the Sara character. In the future the Animation Institute of Filmakademie BW

Real-Time Hair Rendering 8. Conclusion
71
plans to include this hair rendering system for their other characters Gunnar, Nikita and
Hank.
Performance of this algorithm was compared against [AMD 2013] and [NVIDIA
2010b]. The results are that the AMD’s and NVIDIA’s algorithm have the better
performance for hair styles with hair segments, which are either not subdivided or only
subdivided in a small number. The developed SSALOD algorithm has its strength at
close up views to render smooth hair, where a higher subdivision of hair segments is
necessary.
8.1. Future Work
There are many areas were the hair rendering algorithm could still be improved. One
part that was not implemented is shadowing of the hair. Here deep opacity maps could
be implemented [Yuksel and Keyser 2008a]. From every light source first a depth map
is rendered. Out of this depth map, opacity layers are generated. The depth map and the
opacity layers are used for the final rendering of the hair. Deep opacity maps have the
problem of two additional render passes per light source. This can lead to a performance
problem when multiple lights are used.
Another feature, which has not been implemented was hair simulation. If hair
simulation is integrated the SSALOD algorithm will need to be adapted for hair form
dependent LOD calculations. The angle between hair segments is calculated once for
the static hair guides. These angle calculations would need to be updated before every
rendered frame. Making these calculations on the GPU should be reasonably fast.
Further performance optimizations could be done for the hair rendering algorithm. First,
it needs to be evaluated if and how the L1 cache can be better utilized to increase
performance. It could be evaluated if the use of OpenGL or Ogre has to do with the
performance loss. For the future it could also be tested if future graphic APIs like AMD
Mantle [AMD 2014] or DirectX 12 [McMullen 2014] have a positive effect on the
performance of the developed hair rendering system.
The rendered hair count was 37632. For a more realistic hair style more hairs would
need to be rendered. Up to 150000 rendered hair is the target. With improved graphic
cards and further performance optimizations this targeted hair count should be possible.
Another area of improvement is artistic control of the hair. Especially, when the greater
part of the hairs are generated, control for the hair style is limited. For our hair
rendering system artists can control the basic shape of the hair style with guide hairs. In
Frapper it is possible to modify the width of the hair, curly hair scale, random deviation
scale and thinning scale to adjust the appearance of the hair. Translation form multi
strand interpolation to single strand interpolation can also be influenced by the artist.

Real-Time Hair Rendering 8. Conclusion
72
One problem that has not been solved is how to make partings. Separate hair parts
would be the solution without changing the developed algorithm and also would the
best solution for performance. Further research on how to give artist more
controllability about the generated hair style is an important area for real-time hair
rendering.
For hair shading only single hair scattering was implemented. For improved visual
quality in hair rendering multiple scattering of the hair has to be taken into account.
There has already been done research about multiple hair scattering in real-time by
[Zinke et al. 2008]. Their GPU implementation is based on deep opacity maps and uses
also a depth map for shaping the depth layers. The used data per layer is increased. For
4 layers 8 textures are needed to store the data. They achieved with their real-time dual
scattering algorithm 14 frames per second. Not yet ready for real-time applications, but
a step in the right direction.
In conclusion, it is possible today to render realistic hair on modern graphic cards and
on current generation consoles like the Xbox One and PS4. The realism of real-time hair
rendering can still be improved further for rendered hair count and visual quality.

Real-Time Hair Rendering 9. References
73
9 . R e f e r e n c e s
AMD. 2013. TressFX11 v2.0 (Nov. 2013). Retrieved July 24, 2014 from
http://developer.amd.com/tools-and-sdks/graphics-development/amd-radeon-sdk/
AMD. 2014. Mantle White Paper (Mar. 2014). Retrieved September 24, 2014 from
http://www.amd.com/Documents/Mantle_White_Paper.pdf
Beepa. 2013. FRAPS game capture video recorder fps viewer (2013). Retrieved
September 22, 2014 from http://www.fraps.com/
Bilodeau, Bill and Han, Dongsoo. 2013. TressFX 2.0 and Beyond (2013). Retrieved
July 24, 2014 from http://www.slideshare.net/DevCentralAMD/gs4147-billbilodeau#
Burnes, Andrew. 2014. The Witcher 3: Wild Hunt Highlights NVIDIA HairWorks In
New 37 Minute Video | GeForce. Retrieved September 14, 2014 from
http://www.geforce.com/whats-new/articles/gamescom-2014-witcher-3-gameworks
Engel, Wolfgang. 2014. GPU Pro 5. Advanced rendering techniques. CRC Press, Boca
Raton, FL. ISBN-13: 978-1482208634.
Engel, Wolfgang and Hodes, Stephan. 2013. Hair Rendering in Tomb Raider (2013).
Retrieved July 23, 2014 from http://www.slideshare.net/WolfgangEngel/hair-
intombraider-final#
Gentle, James E. 2003. Random Number Generation and Monte Carlo Methods.
Statistics and computing (2nd. ed.). Springer, New York. ISBN-13: 978-0387001784.
Götz, Kai. 2014a. Appealing haircuts in Cinema 4D.
Götz, Kai. 2014b. Export Cinema 4D Hair to Frapper.
Hamilton, Howard J. 2014. Uniform Cubic B-Spline Curves. Retrieved September 12,
2014 from
http://www2.cs.uregina.ca/~anima/408/Notes/Interpolation/UniformBSpline.htm
Han, Dongsoo. 2014. Hair Simulation in TressFX. GPU Pro 5 (2014).
Han, Dongsoo and Harada, Takahiro. 2012. Real-time Hair Simulation with Efficient
Hair Style Preservation (2012). Retrieved July 24, 2014 from
http://www.potentialmotion.com/home/hairsimulation
Helzle, Volker, Spielmann, Simon, and Arellano, Diana. 2014. Frapper. Retrieved
October 9, 2014 from https://sourceforge.net/projects/frapper/

Real-Time Hair Rendering 9. References
74
Intel. 2010. ARK | Intel® Xeon® Processor X5660 (12M Cache, 2.80 GHz, 6.40 GT/s
Intel® QPI) (2010). Retrieved October 22, 2014 from
http://ark.intel.com/products/47921/Intel-Xeon-Processor-X5660-(12M-Cache-2_80-
GHz-6_40-GTs-Intel-QPI)
Kajiya, James T. and Kay, Timothy L. 1989. Rendering fur with three dimensional
textures. SIGGRAPH Comput. Graph. 23, 3 (1989), 271–280.
DOI:10.1145/74334.74361
Khronos Group. 2014a. OpenGL 4.5 (Core Profile) - August 8, 2014 (Aug. 2014).
Retrieved September 2, 2014 from
http://www.opengl.org/registry/doc/glspec45.core.pdf
Khronos Group. 2014b. OpenGL 4.5 (Quick-Reference-Card) (Aug. 2014). Retrieved
September 2, 2014 from http://www.khronos.org/files/opengl45-quick-reference-
card.pdf
Khronos Group. 2014c. Rendering Pipeline Overview - OpenGL.org. Retrieved
September 2, 2014 from http://www.opengl.org/wiki/Rendering_Pipeline_Overview
Kim, Tae-Yong. 2014. Bringing Digital Fur to Computer Games (Mar. 2014).
Retrieved July 25, 2014 from http://on-
demand.gputechconf.com/gtc/2014/video/S4179-digital-fur-computer-games.mp4
Kim, Tae-Yong, Chentanez, Nuttapong, and Müller, Matthias. 2012. Long Range
Attachments - A Method to Simulate Inextensible Clothing in Computer Games
(2012). Retrieved July 25, 2014 from http://matthias-mueller-
fischer.ch/publications/sca2012cloth.pdf
Kim, Tae-Yong and Neumann, Ulrich. 2001. Opacity Shadow Maps (2001). Retrieved
July 17, 2014 from http://game-tech.com/Reading/EGRW_KIM2001H.pdf
Lokovic, Tom and Veach, Eric. 2000. Deep Shadow Maps (2000). Retrieved July 24,
2014 from http://dl.acm.org/citation.cfm?id=344958
Marschner, Stephen R., Jensen, Henrik Wann, Cammarano, Mike, Worley, Steve, and
Hanrahan, Pat. 2003. Light Scattering from Human Hair Fibers. ACM Trans. Graph.
22, 3 (2003), 780. DOI:10.1145/882262.882345
Martin, Timothy, Engel, Wolfgang, Thibieroz, Nicolas, Yang, Jason, and Lacroix,
Jason. 2014. TressFX: Advanced Real-Time Hair Rendering. GPU Pro 5 (2014).
McKee, Jay. 2011. Real-Time Concurrent Linked List Construction on the GPU (2011).
Retrieved July 24, 2014 from
http://developer.amd.com/wordpress/media/2013/06/2041_final.pdf

Real-Time Hair Rendering 9. References
75
McMullen, Max. 2014. Direct3D 12 API Preview. Retrieved September 24, 2014 from
https://channel9.msdn.com/Events/Build/2014/3-564
Müller, Matthias, Kim, Tae-Yong, and Chentanez, N. 2012. Fast Simulation of
Inextensible Hair and Fur (2012). Retrieved July 25, 2014 from http://matthias-
mueller-fischer.ch/publications/FTLHairFur.pdf
Nguyen, Hubert and Donnelly, William. 2004. Hair Animation and Rendering in the
Nalu Demo. Retrieved July 17, 2014 from
http://http.developer.nvidia.com/GPUGems2/gpugems2_chapter23.html
NVIDIA. 2004. Nalu Demo | GeForce 6800 (Jul. 2004). Retrieved October 7, 2014
from http://www.nvidia.de/coolstuff/demos#!/nalu
NVIDIA. 2010a. NVIDIA GeForce GTX 580 | NVIDIA UK (2010). Retrieved
September 22, 2014 from http://www.nvidia.co.uk/object/product-geforce-gtx-580-
in.html
NVIDIA. 2010b. Fermi Hair Demo | GeForce GTX 400 series (Apr. 2010). Retrieved
July 18, 2014 from http://www.geforce.com/games-applications/pc-
applications/fermi-hair-demo
NVIDIA. 2014a. NVIDIA Nsight (2014). Retrieved September 22, 2014 from
http://www.nvidia.com/object/nsight.html
NVIDIA. 2014b. NVIDIA HairWorks (Jun. 2014). Retrieved October 21, 2014 from
https://developer.nvidia.com/hairworks
NVIDIA. 2014c. NVIDIA HairWorks tools released (Jun. 2014). Retrieved July 25,
2014 from https://developer.nvidia.com/content/nvidia-hairworks-tools-released
NVIDIA. 2014d. Cg Profiles. Retrieved September 1, 2014 from
https://developer.nvidia.com/cg-profiles
NVIDIA. 2014e. Cg Toolkit. Retrieved September 1, 2014 from
https://developer.nvidia.com/cg-toolkit
OGRE. 2014. OGRE – Open Source 3D Graphics Engine. Retrieved September 1, 2014
from http://www.ogre3d.org/
Persson, Emil. 2011. Geometric Post-process Anti-Aliasing (Mar. 2011). Retrieved July
24, 2014 from http://www.humus.name/index.php?page=3D&ID=86
Pipenbrinck, Nils. 2013. Hermite Curve Interpolation. Retrieved September 12, 2014
from http://cubic.org/docs/hermite.htm
Rutter, John W. 2000. Geometry of Curves. Chapman & Hall/CRC mathematics.
Chapman & Hall/CRC, Boca Raton, Fla. ISBN-13: 978-1584881667.

Real-Time Hair Rendering 9. References
76
Sadeghi, Iman, Pritchet, Heather, Jensen, Henrik W., and Tamstorf, Rasmus. 2010. An
Artist Friendly Hair Shading System (2010). Retrieved September 15, 2014 from
http://graphics.ucsd.edu/~iman/an_artist_friendly_hair_shading_system.php
Scheuermann, Thorsten. 2004. Practical Real-Time Hair Rendering and Shading
(2004). Retrieved July 16, 2014 from http://amd-dev.wpengine.netdna-
cdn.com/wordpress/media/2012/10/Scheuermann_HairSketch.pdf
Tariq, Sarah. 2008. Real-Time Hair Rendering on GPU - SIGGRAPH 2008 (2008).
Retrieved July 18, 2014 from
http://developer.download.nvidia.com/presentations/2008/SIGGRAPH/RealTimeHair
Rendering_SponsoredSession2.pdf
Tariq, Sarah. 2010a. Data Management and Rendering Pipeline - SIGGRAPH 2010
Course Notes (2010). Retrieved July 18, 2014 from
http://www.sarahtariq.com/Chapter2a-
HairCourseNotes_DataManagementandRenderingPipeline.pdf
Tariq, Sarah. 2010b. Hair Dynamics for Real-time Applications - SIGGRAPH 2010
Course Notes (2010). Retrieved July 18, 2014 from
http://www.sarahtariq.com/Chapter7-
HairCourseNotes_HairDynamicsforRealTimeApplications.pdf
Tariq, Sarah. 2010c. Transparency and Antialiasing - SIGGRAPH 2010 Course Notes
(2010). Retrieved July 18, 2014 from http://www.sarahtariq.com/Chapter3-
HairCourseNotes_AntialiasingAndTransparency.pdf
Tariq, Sarah. 2010d. Hair SDK White Paper (Mar. 2010). Retrieved July 17, 2014 from
https://developer.nvidia.com/sites/default/files/akamai/gamedev/files/sdk/11/HairSD
KWhitePaper.pdf
Tariq, Sarah and Bavoil, Louis. 2008a. Real Time Hair Simulation and Rendering on
the GPU (Aug. 2008). Retrieved July 18, 2014 from
http://dl.acm.org/citation.cfm?id=1401032.1401080&coll=DL&dl=GUIDE
Tariq, Sarah and Bavoil, Louis. 2008b. Real-Time Hair Simulation and Rendering on
the GPU - SIGGRAPH 2008 Presentation (Aug. 2008). Retrieved July 18, 2014 from
http://developer.download.nvidia.com/presentations/2008/SIGGRAPH/RealTimeHair
SimulationAndRenderingOnGPU.pdf
Thibieroz, Nicolas and Hillesland, Karl. 2014. Grass, Fur and all Things Hairy - AMD
at GDC14. Retrieved July 24, 2014 from
http://www.slideshare.net/DevCentralAMD/grass-fur-and-all-things-hairy-amd-at-
gdc14

Real-Time Hair Rendering 9. References
77
Yu, Xuan, Yang, Jason C., Hensley, Justin, Harada, Takahiro, and Yu, Jingyi. 2012. A
Framework for Rendering Complex Scattering Effects on Hair (2012). Retrieved July
24, 2014 from http://dl.acm.org/citation.cfm?id=2159635
Yuksel, Cem and Keyser, John. 2008a. Deep Opacity Maps (Feb. 2008). Retrieved July
22, 2014 from
http://www.cemyuksel.com/research/deepopacity/deepopacitymaps.pdf
Yuksel, Cem and Keyser, John. 2008b. Deep Opacity Maps - EUROGRAPHICS 2008
Presentation (Feb. 2008). Retrieved July 22, 2014 from
http://www.cemyuksel.com/research/deepopacity/deepopacitymaps_slides.pdf
Yuksel, Cem and Tariq, Sarah. 2010. Advanced Techniques in Real-time Hair
Rendering and Simulation - SIGGRAPH 2010 Course Notes (2010). Retrieved July
18, 2014 from http://dl.acm.org/citation.cfm?id=1837101.1837102
Zinke, Arno and Weber, Andreas. 2007. Light scattering from filaments. IEEE Trans
Vis Comput Graph 13, 2 (2007), 342–356. DOI:10.1109/TVCG.2007.43
Zinke, Arno, Yuksel, Cem, Weber, Andreas, and Keyser, John. 2008. Dual Scattering
Approximation for Fast Multiple Scattering in Hair (Aug. 2008). Retrieved
September 24, 2014 from
http://www.cemyuksel.com/research/dualscattering/dualscattering.pdf

Real-Time Hair Rendering 10. List of Figures
78
1 0 . L i s t o f F i g u r e s
Figure 1: Hair rendering of Ruby by [Scheuermann 2004] .............................................. 3
Figure 2: Screenshot of NVIDIA Nalu demo [NVIDIA 2004] ........................................ 4
Figure 3: NVIDIA Fermi Hair Demo screenshot [NVIDIA 2010b] ................................ 5
Figure 4: Screenshot of NVIDIA HairWorks Viewer [NVIDIA 2014b] ....................... 10
Figure 5: AMD TressFX11 v2.0 screenshot [AMD 2013] ............................................. 12
Figure 6: Rendering pipeline in Tomb Raider [Engel and Hodes 2013] ........................ 13
Figure 7: OpenGL tessellation pipeline overview .......................................................... 19
Figure 8: Vertex shader ................................................................................................... 20
Figure 9: Vertex shader predefined output ..................................................................... 20
Figure 10: Tessellation control shader ............................................................................ 21
Figure 11: Output patch size definition .......................................................................... 21
Figure 12: TES predefined output .................................................................................. 21
Figure 13: Tessellator ..................................................................................................... 22
Figure 14: Tessellation evaluation shader ...................................................................... 23
Figure 15: Tessellation options definition ...................................................................... 23
Figure 16: Geometry shader ........................................................................................... 24
Figure 17: Geometry shader input and output declaration ............................................. 25
Figure 18: Geometry shader instancing .......................................................................... 25
Figure 19: Fragment shader ............................................................................................ 26
Figure 20: In-shader specification .................................................................................. 27
Figure 21: Isoline example equal_spacing ............................................................. 28
Figure 22: Isoline example fractional_even_spacing ..................................... 29
Figure 23: Isoline example fractional_odd_spacing ........................................ 30
Figure 24: Guide hairs and scalp mesh (left), guide hairs and scalp mesh with rendered
hair (right) ....................................................................................................................... 32
Figure 25: Archimedean spiral implementation glsl ....................................................... 33
Figure 26: Results Archimedean spiral ........................................................................... 34
Figure 27: Rendering of coordinate frames for Fermi Hair Demo [NVIDIA 2010b] .... 34

Real-Time Hair Rendering 10. List of Figures
79
Figure 28: Random circular coordinates glsl implementation ........................................ 35
Figure 29: Result random circular coordinates ............................................................... 35
Figure 30: Multi strand interpolation simple example .................................................... 36
Figure 31: Calculation of a random barycentric value ................................................... 37
Figure 32: Results multi strand interpolation ................................................................. 37
Figure 33: Attempt to fix separate wisp and parting problem ........................................ 38
Figure 34: Result of single strand and multi strand interpolation combined .................. 39
Figure 35: Different hair sizes first iteration .................................................................. 40
Figure 36: Different hair sizes second iteration .............................................................. 40
Figure 37: Different hair sizes third iteration ................................................................. 41
Figure 38: Expansion of isolines into camera facing quads ........................................... 42
Figure 39: Hair strand tapering (1, 2, 3 and 6 segments) ................................................ 42
Figure 40: Hermite curve interpolation with detail tessellation factor 1, 2, 16 and 64 .. 44
Figure 41: Uniform cubic b-spline interpolation with tessellation factor 1, 2, 16 and 32
........................................................................................................................................ 46
Figure 42: Uniform cubic b-splines start and end segment ............................................ 46
Figure 43: Creation of curl deviations for curly hair ...................................................... 47
Figure 44: Curly hair results with no curl offset, low curl offset, increased curl offset
and increased curl offset with hair strand tessellation .................................................... 48
Figure 45: Random strand length generation .................................................................. 49
Figure 46: Thinning in TES and adjustment of hair tapering ......................................... 49
Figure 47: Thinning with value 0.0, 0.5 and 1.0 (top to bottom) ................................... 50
Figure 48: Creation of random deviations ...................................................................... 52
Figure 49: Hair style (full hair and zoomed) with random deviation scale 0, 0.025 and
0.05 left to right .............................................................................................................. 53
Figure 50: Hair with LOD slider set to 0.1, 0.5 and 1.0 ................................................. 54
Figure 51: Example of SSALOD with bend angle minimum 5, bend angle max 45 and
hair segment screen space size of 40, 15 and 4 from top to bottom. .............................. 55
Figure 52: Hair culling with culling scale 0.0, 0.2, 0.4, 0.6, 0.8 and 1.0 ........................ 56
Figure 53: Hair model [Sadeghi et al. 2010] .................................................................. 56
Figure 54: Hair shading glsl code ................................................................................... 57
Real-Time Hair Rendering 10. List of Figures
80
Figure 55: Sara hair style with hair shading ................................................................... 58
Figure 56: Hair geometry part1 ...................................................................................... 60
Figure 57: Hair geometry part 2 ..................................................................................... 60
Figure 58: Hair LOD ....................................................................................................... 61
Figure 59: Hair Lighting ................................................................................................. 62
Figure 60: Light Definition ............................................................................................. 62
Figure 61: Test application setup NVIDIA Nsight ......................................................... 64
Figure 62: Test application setup Fraps .......................................................................... 65
Figure 63: Comparison Sara hair style detail factor 1 (top left), detail factor 2 (top
right), detail factor 64 (down left) and SSALOD with segment screen size 15 (down
right) ................................................................................................................................ 66
Figure 64: NVIDIA Fermi hair demo setup Fraps detail factor 1 (left) and detail factor
64 (right) ......................................................................................................................... 66
Figure 65: Comparison Gunnar hair style detail factor 1 (top left), detail factor 2 (top
right), detail factor 64 (down left) and SSALOD with segment screen size 15 (down
right) ................................................................................................................................ 67
Figure 66: Test application setup NVIDIA Nsight Sara and Gunnar hair style ............. 69
Figure 67: Character Sara with new hair rendering system ............................................ 70

Real-Time Hair Rendering 11. List of Tables
81
1 1 . L i s t o f T a b l e s
Table 1: Test application setup ....................................................................................... 63
Table 2: Results NVIDIA Nsight profiler ....................................................................... 64
Table 3: Results Fraps profiling ...................................................................................... 65
Table 4: Sara/Gunnar/NVIDIA Fermi hair style results Fraps profiling with different
tessellation settings ......................................................................................................... 67
Table 5: Sara/Gunnar results NVIDIA Nsight profiler ................................................... 68

Real-Time Hair Rendering 12. List of Abbreviations
82
1 2 . L i s t o f A b b r e v i a t i o n s
2D two-dimensional
ADHD attention-deficit/hyperactivity disorder
AMD Advanced Micro Devices
ASD autism spectrum disorder
CPU central processing unit
DFG German research foundation
ELC edge length constraint
FPS frames per second
glsl OpenGL shading language
GPAA geometric post-process anti-aliasing
GPGPU general purpose computing on graphics processing units
GPU graphics processing unit
GSC global shape constraint
ID index
LOD level of detail
LSC local shape constraint
MSAA multi sampled anti-aliasing
OIT order independent transparency
OpenGL open graphics library
PPLL per-pixel linked list
R primary highlight
SARA stylized animations for research on autism
SSAA super sampled anti-aliasing
SSALOD screen space adaptive level of detail
TCS tessellation control shader
TES tessellation evaluation shader
TRT secondary highlight
TT rim light