ready to go - copian | cdÉacf · the ready to go training materials were designed for use in ......
TRANSCRIPT

Ready to Go Training Materials for School Bus Drivers
By Calgary Immigrant Women’s Association
Essential Skills Curriculum Project
Essential Skills Curriculum Project Team Fiona Hayes and Tuvshin Uuld, Project Coordinators Fiona Hayes, Mary Jane Turcato and Tamara Jorgic, Curriculum Developer/Instructors The Essential Skills Curriculum Project team would like to thank: Project Partners: Southland Transportation Limited Pacific Western Transportation Limited Best Western Port O’Call Hotel, Calgary Sheraton Cavalier Calgary Hotel Calgary Marriott Hotel Contributors: Sherlock Publishing Limited DavidsonNews.net Calgary Board of Education Project Funders: Human Resources and Skills Development Canada,
CIWA has made every effort to obtain copyright permission for material we have used in this publication. Please bring any omissions to our attention. This resource is made available for non-profit, educational use. If you wish to use or adapt any of this material for this purpose, please attribute it to CIWA. For commercial purposes, please seek permission. Copyright © 2010, Calgary Immigrant Women’s Association Calgary Immigrant Women’s Association 200, 138-4th Avenue SE Calgary, AB T2G 4Z6 www.ciwa-online.com
Topics and Essential Skills Calgary Immigrant Women’s Association
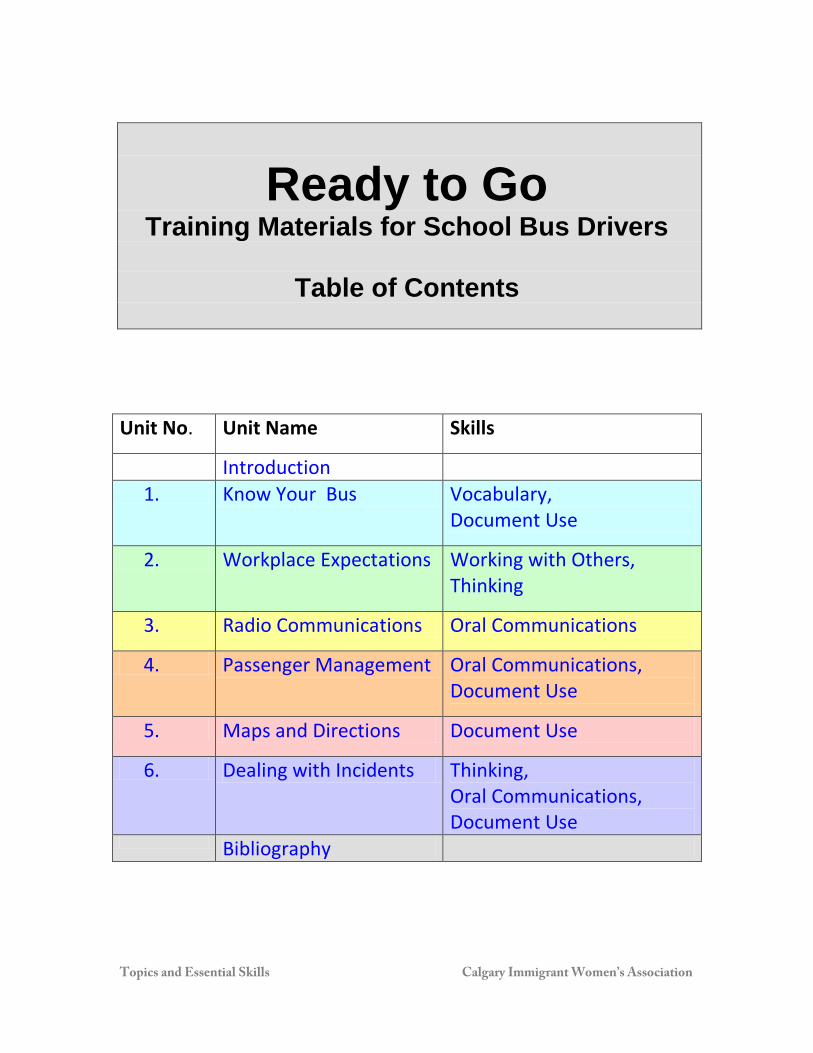
Ready to Go Training Materials for School Bus Drivers
Table of Contents
Unit No. Unit Name Skills
Introduction 1. Know Your Bus Vocabulary,
Document Use
2. Workplace Expectations Working with Others, Thinking
3. Radio Communications Oral Communications
4. Passenger Management Oral Communications, Document Use
5. Maps and Directions Document Use
6. Dealing with Incidents Thinking, Oral Communications, Document Use
Bibliography

Ready to Go: Training Materials for School Bus Drivers
Introduction
1
Calgary Immigrant Women’s Association Calgary Immigrant Women’s Association (CIWA) is a non-profit, charitable organization established in 1982 to address the barriers, needs and concerns of immigrant and refugee women, youth and families. It is our vision that women from diverse backgrounds be empowered to reach their goals and dreams as equal and contributing members of Canadian society. Essential Skills Curriculum Project This resource is the product of a one year project funded by the Government of Canada’s Human Resources and Social Development Department to enhance the skills of immigrants and others in entry level positions in the service industry. It was developed to respond to Essential Skills training needs identified by project staff and partner employers in the Transportation industry, through interviews with management and staff, observation of training of new drivers, observation of drivers and dispatch staff at work, interviews, focus groups with immigrant and non-immigrant staff and review of written materials used in the workplace. A number of transportation companies have reported that there are many immigrants interested in becoming drivers (in Calgary and elsewhere). Candidates are identified who seem to have most of the necessary skills, and start training, but too many are not completing training, or completing it, then leaving within a few months. In some cases, this may be because of a mismatch in workplace expectations. Our focus groups with school bus drivers suggested a few other factors in the traditional driver training approach may contribute to this. English as a Second Language speakers: • had to cope with too much new vocabulary at once, • were shy to ask questions, • found the written material they were asked to read too difficult, and • needed time to practice the listening, speaking and reporting tasks which were
expected of them as school bus drivers. Interestingly, a number of native English speaking drivers complained of similar difficulties. Our training needs analysis indicated that current training would be enhanced if training started with a review of driver duties, relating them to the training offered, also if drivers started with a strong foundation of bus-related vocabulary. Drivers need more training on radio communications, passenger management, map reading and dealing with and reporting incidents. These duties require Essential Skills such as Oral Communications, Working with Others, Document Use and Thinking Skills. The usual format for new driver training consisted of a brief group session on the first day, then a series of mornings of driving practice in a school bus, with a school bus driving instructor. Each afternoon there was a short (60-90 minute) group session, led
Ready to Go: Training Materials for School Bus Drivers
Introduction
2
by a bus driving instructor. There were also 2-3 hour training workshops for staff on policy and safety issues. This curriculum does not cover how to operate a school bus, apart from a short session in Unit 1 on Safe Turns. Our assumption here is that, for students with a good foundation of bus-related vocabulary, good training on operating the bus is already widely offered by certified school bus driving instructors. New school bus drivers have the challenge of multi-tasking while driving, using a variety of new skills: • listening and speaking on the radio • passenger management • finding their way on a new route. This curriculum aims to take training on the non-driving skills out of the bus, into the office or classroom, so students can build their skills in a more comfortable, less stressful environment. Structure of the lesson plans These training materials consist of a series of short practical group lessons, based on situations encountered by school bus drivers, each lesson building on and reviewing content from the previous lessons in the unit. They are designed following a participative/communicative model of learning. Lessons start with a short activity, sometimes marked as an Engage activity, designed to introduce the topic and allow the instructor to assess what students already know. Many sessions expect students to watch or listen to a brief demonstration, then participate in discussions, role plays and activities to demonstrate their skills. Students are expected to learn from the materials, their trainer and from each other. Lessons are designed for use with groups of new trainees or more experienced staff and can be combined to fit the time and training format. Many can be adapted for use with individual trainees.
CLB level of the material The Canadian Language Benchmarks (CLB’s) were developed by Citizenship and Immigration Canada to provide a yardstick that can be used to describe an individual’s ability to communicate in English as a Second Language. They describe a set of communication tasks the individual is able to perform, including a global performance profile, performance conditions, outcomes and standards, all expressed in a common language used by English as a Second Language educators across Canada. The Canadian Language Benchmarks 2000 address four language skills: speaking, listening, reading and writing. Each skill is organized into three stages--basic (CLB 1-4), intermediate (5-8) and advanced (9-12)--for a total of 12 benchmarks in each skill.*
Ready to Go: Training Materials for School Bus Drivers
Introduction
3
The Ready to Go training materials were designed for use in training native English and English as a Second Language (ESL) speakers, with sensitivity to the needs of second language learners. Lessons assume ESL students have Speaking and Listening ability at CLB 6 and above; Reading at CLB 5 and above; and Writing at CLB 4 and above. *For further information, see Canadian Language Benchmarks 2000 by Grazyna Pawlikowska-Smith, Centre for Canadian Language Benchmarks, published by Public Works and Government Services Canada, 2005, or the Centre for Canadian Language Benchmarks website: www.language.ca.
Ready to Go: Training Materials for School Bus Drivers
Summary : Unit 1 Calgary Immigrant Women’s Association
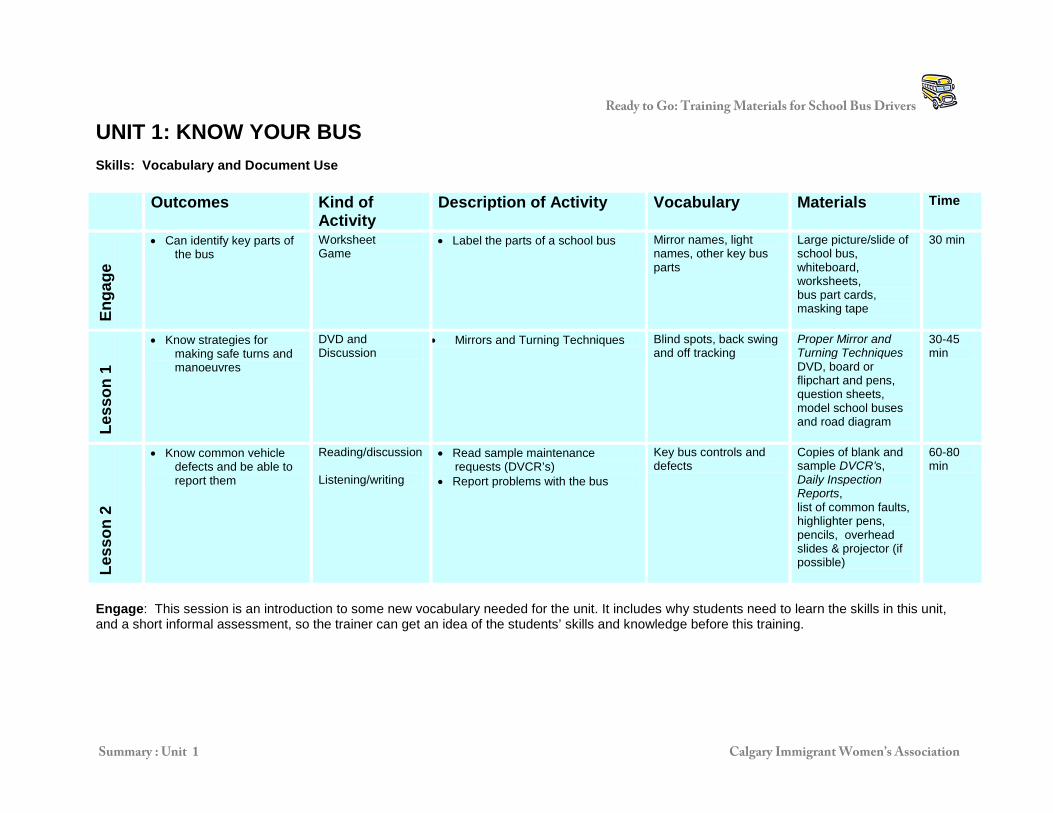
UNIT 1: KNOW YOUR BUS Skills: Vocabulary and Document Use
Engage: This session is an introduction to some new vocabulary needed for the unit. It includes why students need to learn the skills in this unit, and a short informal assessment, so the trainer can get an idea of the students’ skills and knowledge before this training.
Outcomes Kind of Activity
Description of Activity Vocabulary Materials Time
Enga
ge
• Can identify key parts of the bus
Worksheet Game
• Label the parts of a school bus
Mirror names, light names, other key bus parts
Large picture/slide of school bus, whiteboard, worksheets, bus part cards, masking tape
30 min
Less
on 1
• Know strategies for making safe turns and manoeuvres
DVD and Discussion
• Mirrors and Turning Techniques Blind spots, back swing and off tracking
Proper Mirror and Turning Techniques DVD, board or flipchart and pens, question sheets, model school buses and road diagram
30-45 min
Less
on 2
• Know common vehicle defects and be able to report them
Reading/discussion Listening/writing
• Read sample maintenance requests (DVCR’s)
• Report problems with the bus
Key bus controls and defects
Copies of blank and sample DVCR’s, Daily Inspection Reports, list of common faults, highlighter pens, pencils, overhead slides & projector (if possible)
60-80 min

Ready to Go: Training Materials for School Bus Drivers
Unit 1: Engage 1
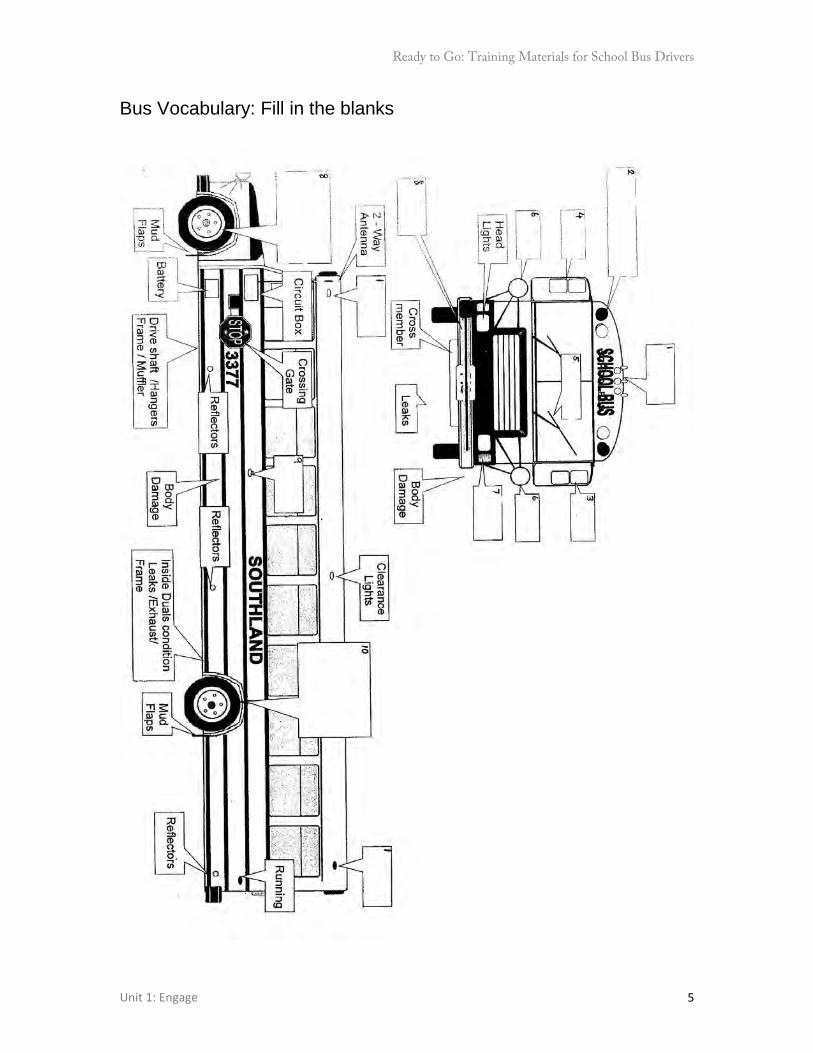
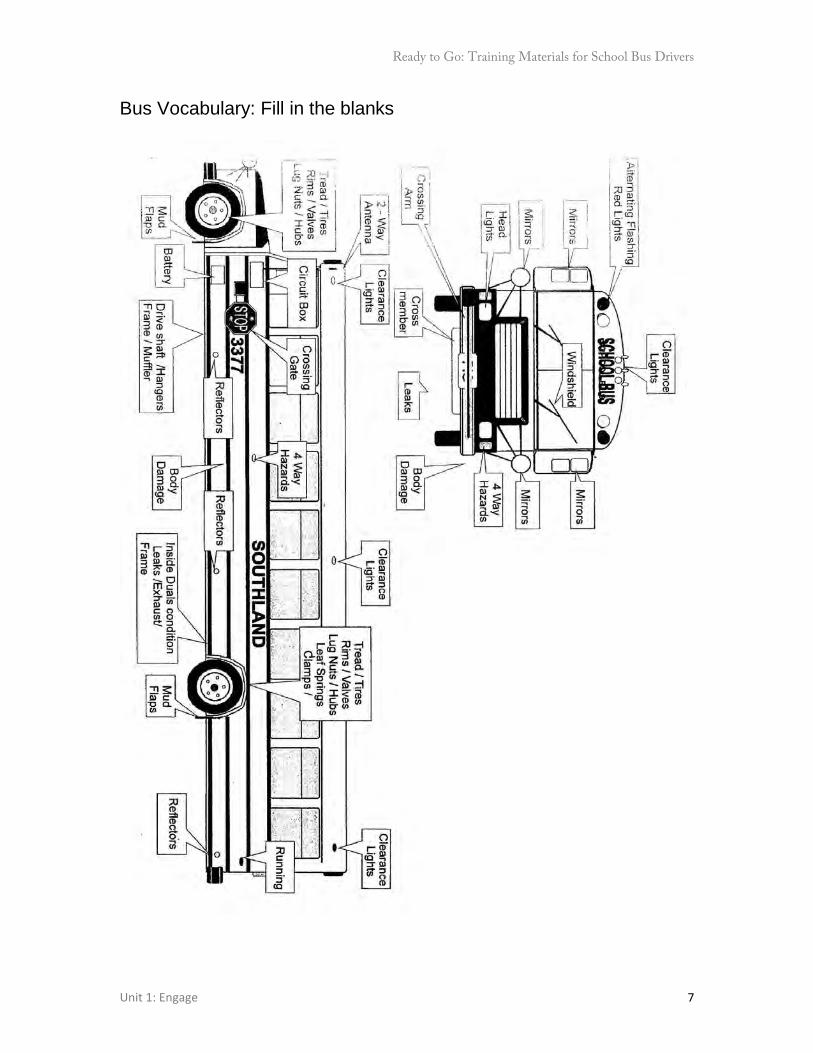
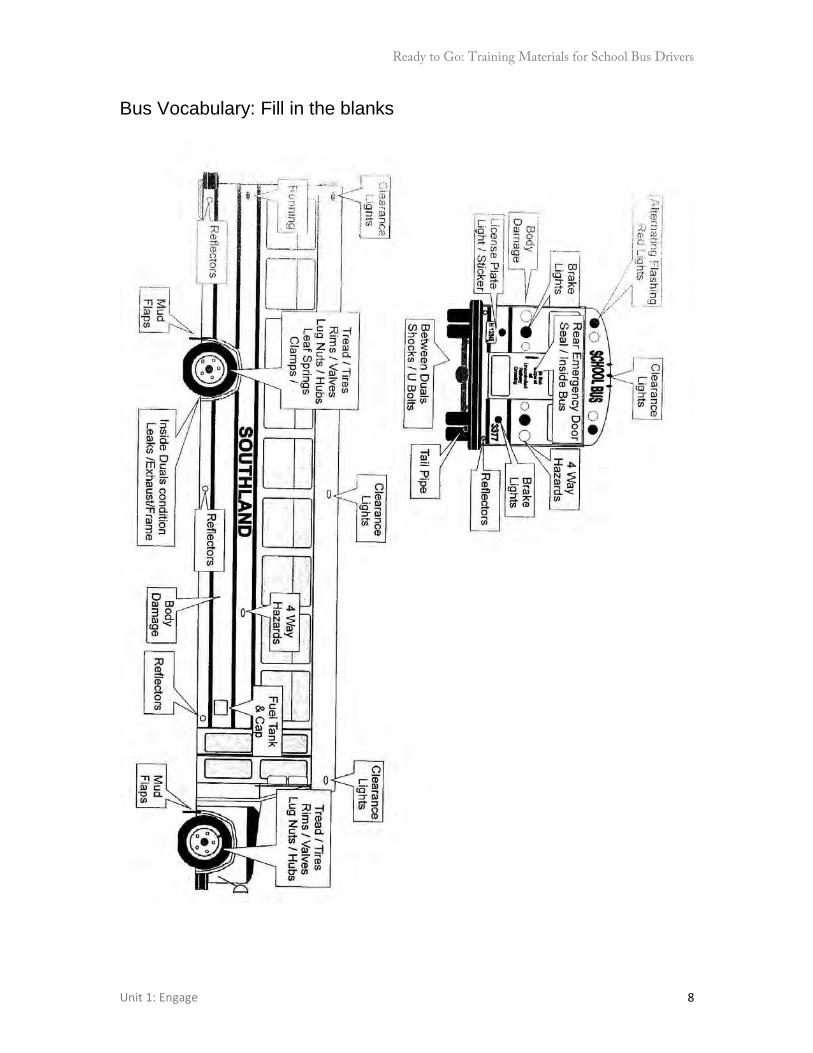
KNOW YOUR BUS ENGAGE
Outcome: Can identify the key parts of a school bus Overall Time: 30 minutes KEY PARTS OF THE BUS Type of Activity Worksheet, Game Time 30 minutes Objective To evaluate students’ prior knowledge about school buses and
ensure they know key vocabulary before observing their first pre-trip inspection
Materials Large picture of school bus (or could be Power Point slide
projected on the board), worksheets, pencils, board, cards, masking tape
Preparation Copy worksheets, copy the card page and cut out cards Instructions:
1. Ask: How many people have driven or done maintenance on a bus before? Get a show of hands. Ask: How many people have seen a bus diagram with names of key parts?
2. Hold up/show a large picture of a school bus and, as you point to them, ask students to shout out the name of a few of the key parts of the bus.
3. Explain that this session will help you find out what they already know, and let them learn the names of parts they do not know. Give out worksheets, and explain these are parts of the bus which are checked in a pre-trip inspection. Some parts are already labeled, others are blank. Ask students to fill in the blanks. When finished, they can see which of the labeled parts they know, and guess what they need to be inspected for.
4. Quickly go through answers and ask for a show of hands: how many got more than 5 correct, more than 6 right etc.
5. Divide the class into teams, and explain that each student will receive one or two cards, and the trainer will call out a part name. If the student has this card, they need to raise their hand, to bring the card and stick it on the part of the bus on the large picture using masking tape. If need be, team members can help. Demonstrate, using one of the cards.
6. Give out cards. Run the game. 7. Keep score and announce a winning team.

Ready to Go: Training Materials for School Bus Drivers
Unit 1: Engage 2
Key bus parts cards
Clearance Lights Alternating Red Lights West coast/Flat mirror Convex mirror Crossover mirror Hazard Lights

Ready to Go: Training Materials for School Bus Drivers
Unit 1: Engage 3
Crossing Arm Tires/Treads Rim Fuel Tank Hood Hub/Lug Nuts Mud Flaps

Ready to Go: Training Materials for School Bus Drivers
Unit 1: Engage 4
Rear Emergency Door
Ready to Go: Training Materials for School Bus Drivers
Unit 1: Engage 5
Bus Vocabulary: Fill in the blanks

Ready to Go: Training Materials for School Bus Drivers
Unit 1: Engage 6
Bus Vocabulary: Fill in the blanks
Ready to Go: Training Materials for School Bus Drivers
Unit 1: Engage 7
Bus Vocabulary: Fill in the blanks
Ready to Go: Training Materials for School Bus Drivers
Unit 1: Engage 8
Bus Vocabulary: Fill in the blanks

Ready to Go: Training Materials for School Bus Drivers
Unit 1: Lesson 1 1
KNOW YOUR BUS LESSON 1
Outcome: Know strategies for making safe turns and maneuvers. Overall Time: 30-45 minutes MIRRORS AND TURNING TECHNIQUES Type of Activity DVD and group discussion Time 30-45 minutes Objective To introduce the use of bus mirrors and safe turning techniques
before students start driving a bus. Materials Proper Mirror and Turning Techniques DVD*, flipchart, pens, toy
school buses, question sheets Preparation Write the questions in bold in 3 below on the flipchart (suggest
the questions for each part on a separate page), draw a diagram of a road and intersection on the flipchart (an aerial view, to use with a model bus to demonstrate off-tracking and backswing)
Instructions:
1. Ask: How many mirrors do you use when you are driving a car? How many do you think you use when driving a bus? Why?
2. Explain the session objective. Tell students you will show a DVD in 3 different parts and will be giving them questions to keep in mind when watching the video for each part.
3. Before starting the video, ask the students to keep in mind the question: When you are driving, what do you need to watch for outside the bus? How can you make sure you see them? Stop the video after the discussion on blind spots. Ask students: What is a blind spot? Then, collect answers to the questions above.
4. Copy the questions below onto the flipchart. Next, divide the class into groups of 2 to 4. Assign one of the following questions (A or B) to each group, for the next section of the video. • What are the procedures for a safe left turn? • What are the procedures for a safe right turn?
Stop the video after safe procedures for left and right turns. Hand out question sheets and pencils for students to write notes, if they wish. Ask students to discuss their ideas with their group. Give
Ready to Go: Training Materials for School Bus Drivers
Unit 1: Lesson 1 2
them a toy school bus and a road/intersection diagram which they can use to demonstrate. While they are doing this, tape a road diagram on the wall or board. Ask them to choose a spokesperson to tell the class their answer to the question. Ask one group to present for each question and demonstrate the left or right turn procedures using the model bus and road drawn on the paper to the class. Encourage other groups to add their ideas.
5. Copy the next questions onto the flipchart. Assign the last two questions, one to each half of the class and continue the video.
• What is back swing? How can you watch for it and prevent problems with it?
• What is off tracking? How can you watch for it and prevent problems with it?
Ask students to discuss their ideas together in their groups and choose a spokesperson to tell the class their answer to their question. One group should present for each question and someone from the group demonstrate back swing/off tracking by using the model bus and road drawn on the paper to the class. Encourage other groups to add their ideas.
6. Ask for a show of hands of how many students have driven a long vehicle before. Which of these issues is the most challenging?
_____________________________________________ * Proper Mirror and Turning Techniques DVD, Calgary Board of Education Media Services, 2008.
Ready to Go: Training Materials for School Bus Drivers
Unit 1: Lesson 1 3
Proper Mirrors and Turning Techniques
1. What are the procedures for a safe left turn?
____________________________________________________________
____________________________________________________________
2. What are the procedures for a safe right turn?
___________________________________________________________
___________________________________________________________
4. What is back swing?
___________________________________________________________
How can you watch for back swing and prevent problems with it?
__________________________________________________________
__________________________________________________________
5. What is off tracking?
__________________________________________________________
How can you watch for off tracking and prevent problems with it?
__________________________________________________________
__________________________________________________________
Ready to Go: Training Materials for School Bus Drivers
Unit 1: Lesson 2 1
KNOW YOUR BUS LESSON 2
Outcome: Know common vehicle defects and be able to report them. Overall Time: 60-80 minutes
READ SAMPLE MAINTENANCE REQUESTS Type of Activity Reading, Discussion Time 20 minutes Objective To read sample Driver Vehicle Control Reports (DVCR’s),
understand Maintenance Department requirements and introduce bus faults vocabulary
Instructions:
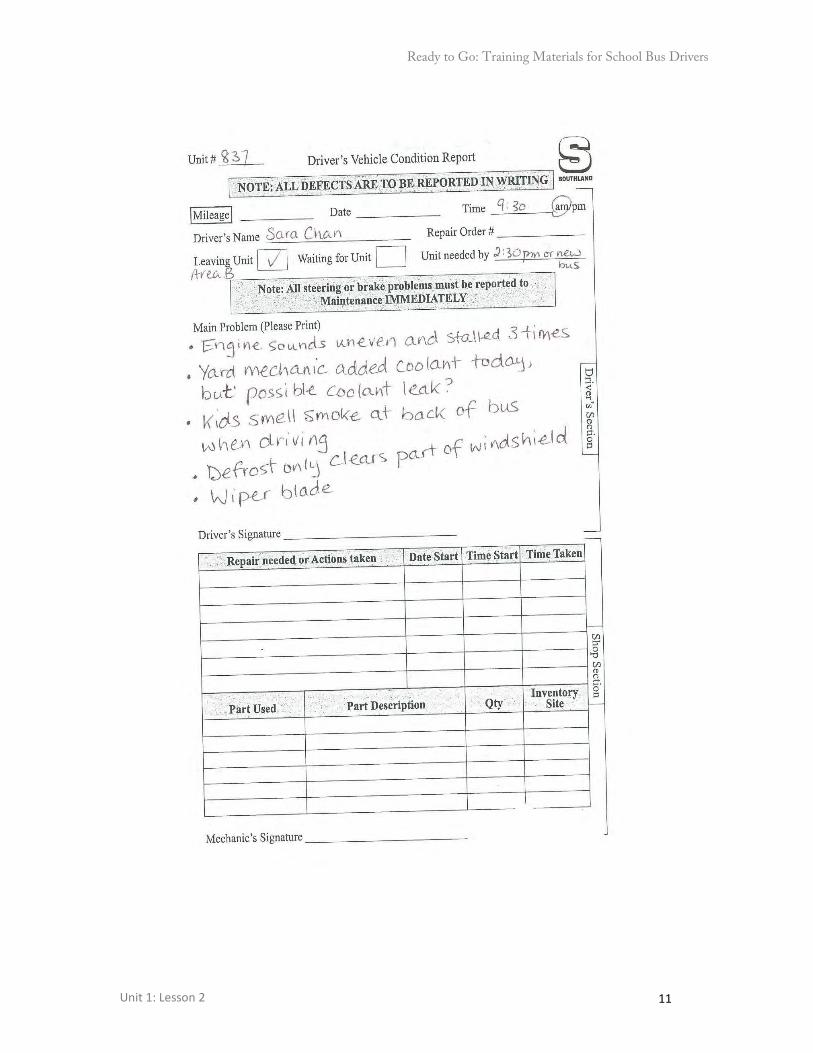
1. Tell students the session objective. Ask: What are common problems with buses? What do you do if you find these problems when you do a pre-trip check? (report it) How? (note it on a pre-trip inspection sheet, then write a report and give it to the yard mechanic or the maintenance department). Show a copy of the inspection sheet and a Driver Vehicle Control Report (DVCR) on the overhead.
2. Pair up your students and give each pair a sample DVCR form to read and highlighter pens. Give them 3 minutes to read the report and decide what the problem is with the bus and if they think the form has been filled in well. Students need to highlight things which are missing or hard to understand.
3. When they are finished, ask a pair to report on each DVCR. Ask others for their comments, and ask them to evaluate: Was this a good example form? Is any information missing? Is it clear what the mechanic needs to look at? Use an overhead projector and transparency, if possible and highlight problem areas, using a transparency highlighter.
4. Hand out Reporting Problems with School Buses page. Ask partners to look at the list of common problems. Describe the first problem (tire low) and ask: Is it safe for me to drive the bus with this fault for one trip or do I need to get this fixed right away, before driving? Give each pair a few faults to discuss for a few
Materials Copies of sample Driver Vehicle Control Reports (DVCR) forms, copies of Reporting Problems with School Buses page, overhead (transparency) slides of blank and sample DVCR’s, overhead projector, blank paper, pencils, highlighter pens (for students and for transparency)

Ready to Go: Training Materials for School Bus Drivers
Unit 1: Lesson 2 2
minutes. Review the items which need immediate attention and have to be fixed before you drive the bus.
5. Ask students: What could happen if you left some of these faults for longer than one trip?
Ready to Go: Training Materials for School Bus Drivers
Unit 1: Lesson 2 3
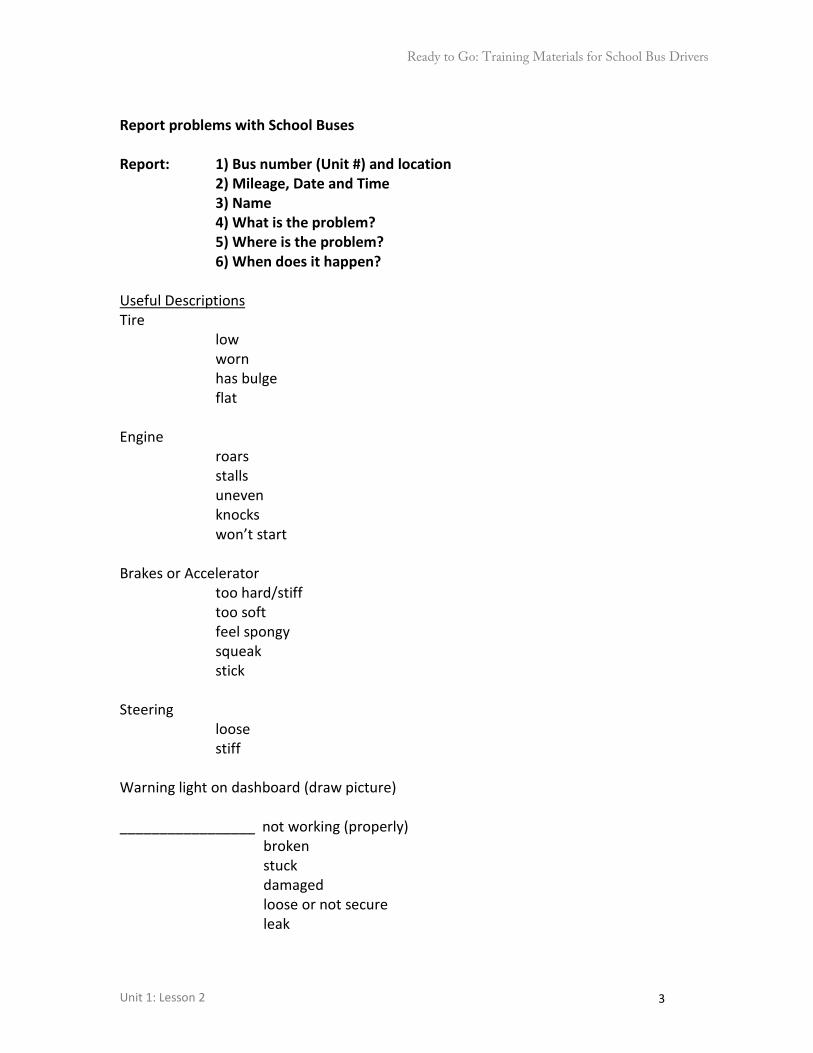
Report problems with School Buses Report: 1) Bus number (Unit #) and location 2) Mileage, Date and Time 3) Name 4) What is the problem? 5) Where is the problem? 6) When does it happen? Useful Descriptions Tire low worn has bulge flat Engine roars stalls uneven knocks won’t start Brakes or Accelerator too hard/stiff too soft feel spongy squeak stick Steering
loose stiff
Warning light on dashboard (draw picture) _________________ not working (properly) broken stuck damaged loose or not secure leak
Ready to Go: Training Materials for School Bus Drivers
Unit 1: Lesson 2 4
REPORT PROBLEMS WITH THE BUS Type of Activity Listening and Writing Time 40-60 minutes Objective To practice writing sample Driver Vehicle Control Reports (DVCR’s)
and encourage drivers to get faults fixed promptly
Instructions:
1. Give each student blank paper and pencil. The blank paper is to let students take notes while you read the story below: Problems, Problems. Later they will be completing the reports. Read the story below, emphasizing the highlighted text. Ask students if they want you to repeat it. Students should then compare notes with their partner on key information and the problems with this bus. Take this up with the class and write key words on the board. Check: Did everyone agree on the faults?
2. Ask: Did Sara follow correct procedures before starting her route? (Did thorough pre-trip inspection, asked mechanic to OK bus, should have reported problems to dispatcher at check-in)
3. Hand out copies of the Daily Inspection Sheet which Sara completed, blank DVCR’s and copies of Reporting Problems with School Buses page (if they do not have it from the previous exercise). Review the instructions at the top of the Reporting Problems page. Ask students to write out the DVCR’s. Walk around the class and help students.
4. When they are finished, display a blank DVCR on overhead or using power point, asking students what to put in each section. Hand out copies of the sample answer.
5. Go through the procedures for taking the bus in to be fixed and getting a spare bus, if necessary.
6. Ask students: Did it seem strange that there were so many problems with this bus? Does this make you wonder about the driver who used this bus last time? There are a lot of faults to investigate and fix and the bus might not be ready even for the next day. Talk about the importance of getting things like defrost and windshield wipers fixed.
Materials Blank Driver Vehicle Control Report (DVCR) forms, Daily Inspection Sheets, copies of Reporting Problems with School Buses page (used in previous exercise), overhead slides of blank DVCR, overhead projector, blank paper, pencils, highlighter pens (for students and for transparency), copies of sample answer.

Ready to Go: Training Materials for School Bus Drivers
Unit 1: Lesson 2 5
Story: Problems, Problems (key information is highlighted) My name is Sara Chan. I usually love being a bus driver, but this was a bad morning. I made it to the yard by 6:30. It was really cold and dark outside, as usual, but at least I had my big coat, mitts, hat and a big cup of coffee with me. Today I had to drive bus number 837. I started my pre-trip and everything seemed OK until I tried to start the engine. It would not start. After a few more tries it started, but the engine sounded a bit uneven, instead of the usual steady sound. Dispatch called and I checked in. Just my luck! The defrost is not working properly, so only part of the windshield is clear. And one of the wipers isn’t very good—it keeps making lines across the windshield. Look the coolant light is on! I wrote it up on my pre trip sheet—look at the mileage on this old bus: 350,000! I went to find the yard mechanic to see if he could get me going. I scraped the bad bit of the windshield, then the mechanic came and looked at the coolant. He said it was OK to drive but to bring it back right after my run so he can check it out some more and change the wiper blade. Time to head off to my first stop. All went well on the route until the third stop. While I was waiting for the last little kid, the engine stopped. I started it again, and got almost to the traffic lights and the engine stalled. What a pain! I put on my hazards and tried to start the engine again. It started but the engine didn’t sound good. I drove to my last stop and radioed dispatch, who told me to keep going but to stay in the right lane wherever possible. As I drove on, the kids started to complain of a funny smell on the bus. I was close to the school so I waited until we got there to investigate. The kids at the back said it smelled like smoke when we were driving. I thanked the kids for reporting it, and let them off the bus. I radioed dispatch again and they told me to drive straight to Quick Fix Maintenance. I got to Blackfoot Trail, then the engine stalled again. Again I put on my hazard lights and, thanks goodness, it started. I made my way slowly back to Quick Fix and parked next to the fence across from QuickFix . I wrote up my Vehicle Condition Report also known as DVCR. They were really busy at QuickFix, so I handed in my form to Jessica and she gave me a spare bus request. I went into the office to see what bus I would be driving for the afternoon.
Ready to Go: Training Materials for School Bus Drivers
Unit 1: Lesson 2 6

Ready to Go: Training Materials for School Bus Drivers
Unit 1: Lesson 2 7
Ready to Go: Training Materials for School Bus Drivers
Unit 1: Lesson 2 8

Ready to Go: Training Materials for School Bus Drivers
Unit 1: Lesson 2 9
Ready to Go: Training Materials for School Bus Drivers
Unit 1: Lesson 2 10
Ready to Go: Training Materials for School Bus Drivers
Unit 1: Lesson 2 11
Ready to Go: Training Materials for School Bus Drivers
Summary : Unit 2 Calgary Immigrant Women’s Association
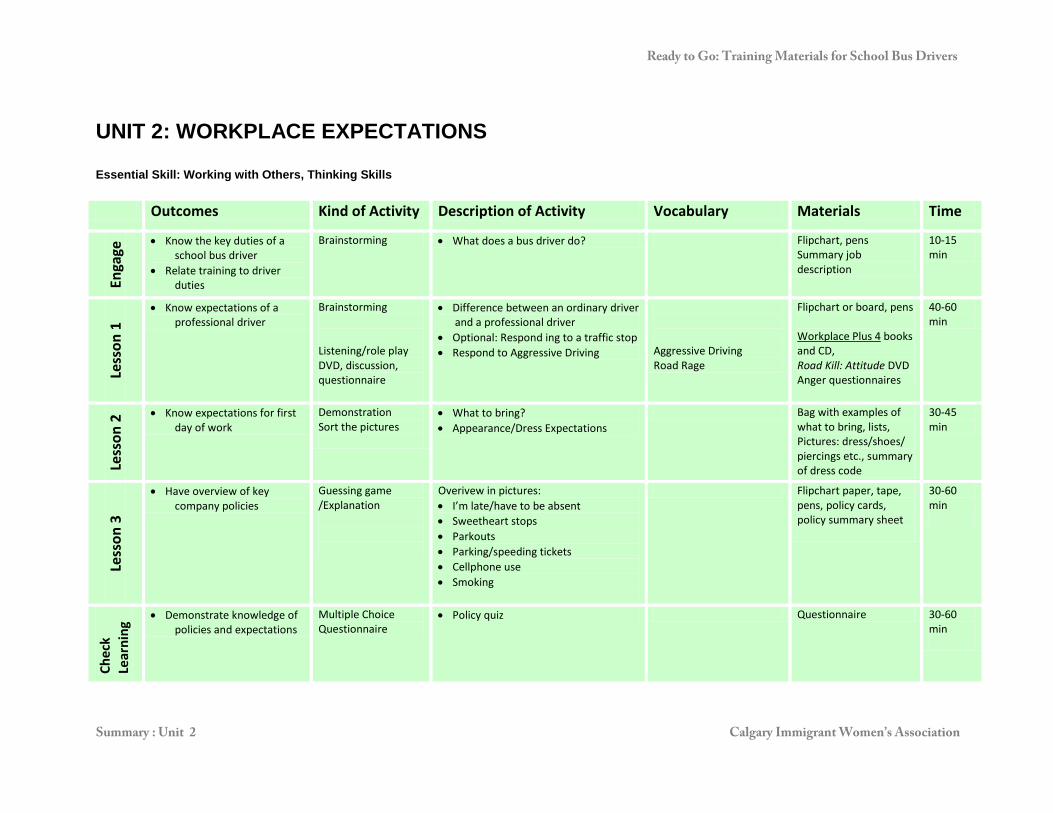
UNIT 2: WORKPLACE EXPECTATIONS Essential Skill: Working with Others, Thinking Skills
Outcomes Kind of Activity Description of Activity Vocabulary Materials Time
Enga
ge • Know the key duties of a
school bus driver • Relate training to driver
duties
Brainstorming • What does a bus driver do? Flipchart, pens Summary job description
10-15 min
Less
on 1
• Know expectations of a professional driver
Brainstorming Listening/role play DVD, discussion, questionnaire
• Difference between an ordinary driver and a professional driver
• Optional: Respond ing to a traffic stop • Respond to Aggressive Driving
Aggressive Driving Road Rage
Flipchart or board, pens Workplace Plus 4 books and CD, Road Kill: Attitude DVD Anger questionnaires
40-60 min
Less
on 2
• Know expectations for first day of work
Demonstration Sort the pictures
• What to bring? • Appearance/Dress Expectations
Bag with examples of what to bring, lists, Pictures: dress/shoes/ piercings etc., summary of dress code
30-45 min
Less
on 3
• Have overview of key company policies
Guessing game /Explanation
Overivew in pictures: • I’m late/have to be absent • Sweetheart stops • Parkouts • Parking/speeding tickets • Cellphone use • Smoking
Flipchart paper, tape, pens, policy cards, policy summary sheet
30-60 min
Chec
k Le
arni
ng • Demonstrate knowledge of
policies and expectations Multiple Choice Questionnaire
• Policy quiz Questionnaire 30-60 min
Ready to Go: Training Materials for School Bus Drivers
Summary : Unit 2 Calgary Immigrant Women’s Association
Engage: This session is an introduction to some new vocabulary needed for the unit. It includes why students need to learn the skills in this unit, and a short informal assessment, so the trainer can get an idea of the students’ skills and knowledge before training. Check Learning: Short activities which ask students to demonstrate what they have learned. They can be used for informal assessment of student learning at the end of the unit.

Ready to Go: Training Materials for School Bus Drivers
Unit 2: Engage 1
WORKPLACE EXPECTATIONS ENGAGE
Outcome: Know the key duties of a school bus driver. Relate training to driver duties
Overall Time: 10-15 minutes WHAT DOES A BUS DRIVER DO? Type of Activity Brainstorm Time 7-10 minutes Objective To ensure students have a realistic idea of what the bus driver
does Materials Flipchart, pens, copies of summary job description (and slide and
projector, if using) Instructions:
1. Ask: How many people have driven a bus before? Get a show of hands. Reassure those who have no previous experience that you are going to teach them what they need to know.
2. Have each student find a partner. Ask each pair to discuss: What does a bus driver do? Copy your question on the flipchart and give them 3 minutes to come up with a list.
3. After 3-5 minutes, ask each group to tell you one thing a bus driver does, and write it on the flip chart. Continue around the group until they have no more ideas. Give them hints on other duties, if necessary.
4. Flag items which are not so much driver duties, as driver attitudes.
5. Hand out copies of summary key driver duties or show it using a power point or overhead slide, and ask students: Were any of these items missed on the flipchart?
6. Ask: Do you still want to become a school bus driver? 7. Relate the different parts of the job to the training students will
receive.

Ready to Go: Training Materials for School Bus Drivers
Unit 2: Engage 2
Key Driver Duties
• Check and fuel the bus, report problems, and make sure the bus is safe to drive
• Drive safely • Communicate on radio • Manage passengers • Read and follow route maps and
directions • Communicate with parents and school • Take action in an emergency or
mechanical breakdown • Complete reports as required

Ready to Go: Training Materials for School Bus Drivers
Unit 2: Lesson 1 1
WORKPLACE EXPECTATIONS LESSON 1
Outcome: Know expectations of a professional driver Overall Time: 40-60 minutes
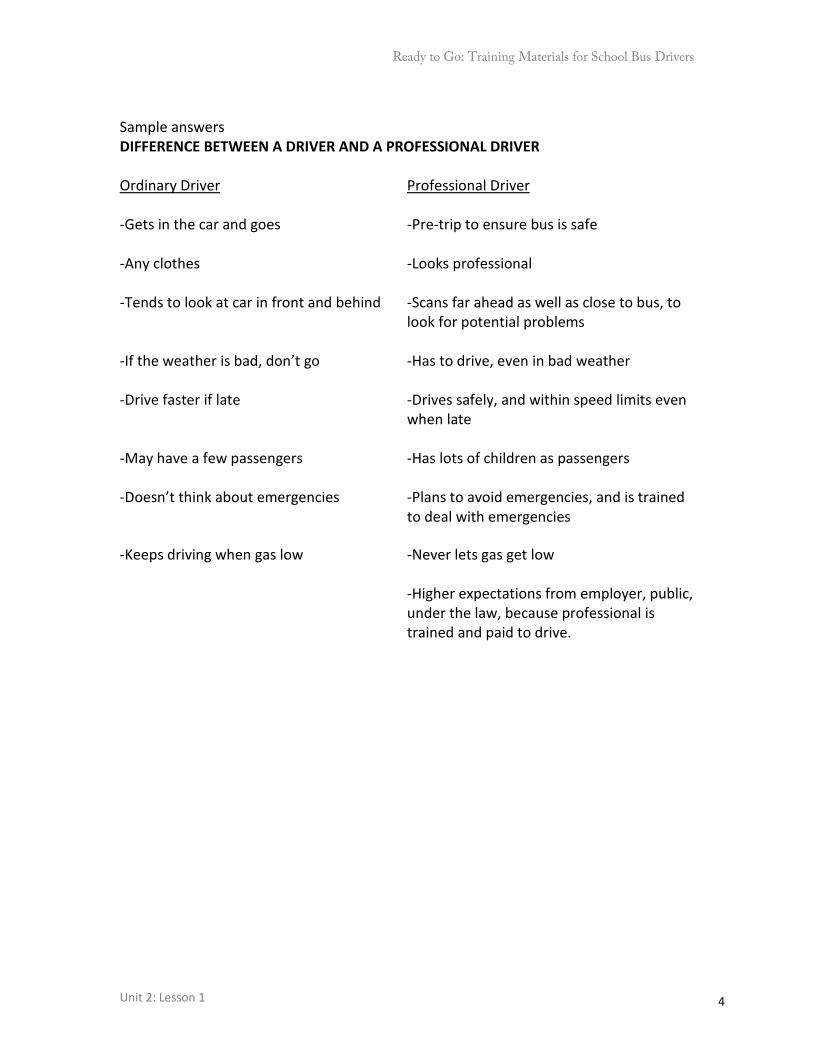
DIFFERENCE BETWEEN A DRIVER AND A PROFESSIONAL DRIVER Type of Activity Brainstorming Time 10-15 minutes Objective To highlight the attitudes expected of a professional driver Materials Flipchart or Board, pens Instructions:
1. Ask students: Are professional drivers different than people who just drive their own car?
2. Divide the class into groups of 4 or 5 and ask them to discuss the differences. Write 2 columns on the flipchart: Ordinary driver, Professional driver
3. Ask each group in turn to give one idea. Summarize their answers on the flipchart. Add other ideas which they have missed (see sample answers at the end of lesson).
OPTIONAL LISTENING ACTIVITY: RESPONDING TO A TRAFFIC STOP Type of Activity Listening and Group activity Time 15 minutes Objective To introduce driving vocabulary, and ensure English as a Second
Language speakers speak appropriately to police Materials Set of Workplace Plus 4 books*, CD, handout of Workplace Plus 4
page 34 with driver’s responses removed, pencils Instructions
1. Give out books and have students open them to p. 30 (Respond appropriately in a traffic stop). Ask students: What is happening in the picture at the top? Has anyone ever been stopped by the police?
Ready to Go: Training Materials for School Bus Drivers
Unit 2: Lesson 1 2
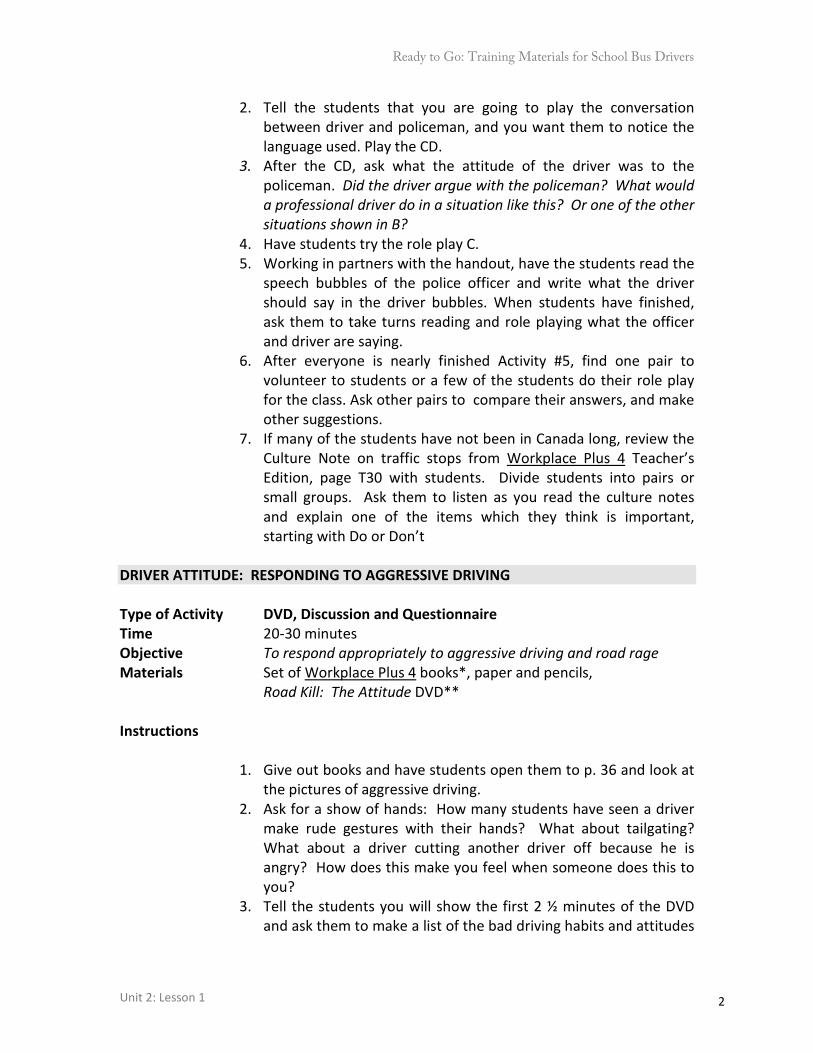
2. Tell the students that you are going to play the conversation between driver and policeman, and you want them to notice the language used. Play the CD.
3. After the CD, ask what the attitude of the driver was to the policeman. Did the driver argue with the policeman? What would a professional driver do in a situation like this? Or one of the other situations shown in B?
4. Have students try the role play C. 5. Working in partners with the handout, have the students read the
speech bubbles of the police officer and write what the driver should say in the driver bubbles. When students have finished, ask them to take turns reading and role playing what the officer and driver are saying.
6. After everyone is nearly finished Activity #5, find one pair to volunteer to students or a few of the students do their role play for the class. Ask other pairs to compare their answers, and make other suggestions.
7. If many of the students have not been in Canada long, review the Culture Note on traffic stops from Workplace Plus 4 Teacher’s Edition, page T30 with students. Divide students into pairs or small groups. Ask them to listen as you read the culture notes and explain one of the items which they think is important, starting with Do or Don’t
DRIVER ATTITUDE: RESPONDING TO AGGRESSIVE DRIVING Type of Activity DVD, Discussion and Questionnaire Time 20-30 minutes Objective To respond appropriately to aggressive driving and road rage Materials Set of Workplace Plus 4 books*, paper and pencils,
Road Kill: The Attitude DVD** Instructions
1. Give out books and have students open them to p. 36 and look at the pictures of aggressive driving.
2. Ask for a show of hands: How many students have seen a driver make rude gestures with their hands? What about tailgating? What about a driver cutting another driver off because he is angry? How does this make you feel when someone does this to you?
3. Tell the students you will show the first 2 ½ minutes of the DVD and ask them to make a list of the bad driving habits and attitudes

Ready to Go: Training Materials for School Bus Drivers
Unit 2: Lesson 1 3
they see on it. Show the DVD and stop just after the first driver describes his attitudes. Ask for a few examples.
4. Divide the class into groups of 3 or 4 to discuss what they saw and what their reaction would be to drivers like this on the road (E in the workbook).
5. Briefly have groups mention a few types of bad/aggressive driving they saw and how they would feel.
6. Read the introduction to the survey on p.37 and ask drivers to work together to rate themselves. What is most likely to make them angry? How to deal with this? Take up some answers.
7. Ask students to add up their score and look at the ratings at the bottom of the page. What does it mean “as cool as a cucumber”? Explain that a professional driver acts “as cool as a cucumber”, even when others drive badly. Collect ideas from the class (and your own experience) on how to keep your cool.
________________________ *Workplace Plus 4, by Joan Saslow. Longman, 2005. **Road Kill: The Attitude DVD, co-produced by Shaw Cable and Dale Harney Productions, Alberta Safety Council.
Ready to Go: Training Materials for School Bus Drivers
Unit 2: Lesson 1 4
Sample answers DIFFERENCE BETWEEN A DRIVER AND A PROFESSIONAL DRIVER Ordinary Driver Professional Driver -Gets in the car and goes -Pre-trip to ensure bus is safe -Any clothes -Looks professional -Tends to look at car in front and behind -Scans far ahead as well as close to bus, to
look for potential problems -If the weather is bad, don’t go -Has to drive, even in bad weather -Drive faster if late -Drives safely, and within speed limits even
when late -May have a few passengers -Has lots of children as passengers -Doesn’t think about emergencies -Plans to avoid emergencies, and is trained
to deal with emergencies -Keeps driving when gas low -Never lets gas get low
-Higher expectations from employer, public, under the law, because professional is trained and paid to drive.
Ready to Go: Training Materials for School Bus Drivers
Unit 2: Lesson 2 1
WORKPLACE EXPECTATIONS LESSON 2
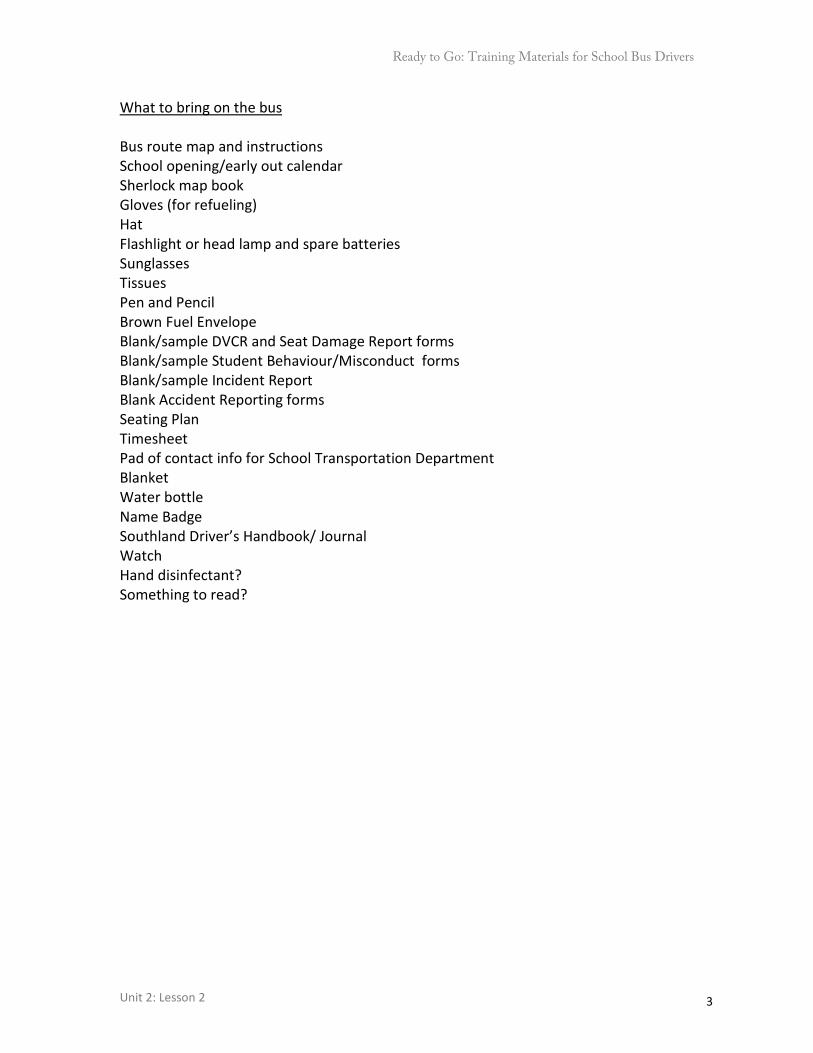
Outcome: Know expectations for first day at work Overall Time: 30-45 minutes WHAT SHOULD I TAKE WITH ME ON THE BUS? Type of Activity Demonstration/game Time 15-25 minutes Objective Students bring the right things with them on their first day of work Materials Driver’s bag with examples of what to bring, a flipchart, pens, a
piece of flipchart paper or tablecloth, paper, pencils, lists of things to bring
Instructions:
1. Ask students: What does a school bus driver need to bring with him/her each day on the bus?
2. Listen to a few answers, then ask for a volunteer to write items on the flipchart while you show them the contents of the driver bag.
3. Take items out of the bag one at a time and place them on the desk or table in front of you for all to see. Ask students what they are and have your volunteer list them on the flipchart chart. Hand around any items that you think students may want to look at more closely.
4. After all the items are on the table, thank your volunteer and have him/her sit down. Cover the flipchart list and cover the items with the paper or table cloth.
5. Hand out paper and pencils. Give them 3 minutes to write or draw all the items they can remember.
6. Ask them to tick off all the items they got right, as you go through them again. How many people got more than 7? Who got the most correct?
7. Give students time to copy any items which they missed (or hand out a copy of the recommended list).

Ready to Go: Training Materials for School Bus Drivers
Unit 2: Lesson 2 2
APPEARANCE/DRESS EXPECTATIONS Type of Activity Group activity Time 15-20 minutes Objective Students know appearance and dress expectations for school bus
drivers Materials Pictures of people dressed/groomed suitably and unsuitably for
work as a bus driver (including piercings, tattoos, unkempt hair, etc.), masking tape, summary of dress code (if available)
Instructions:
1. Ask students: What do bus drivers need to think about when getting dressed for work? (Outside temperature, forecast, may get dirty, good footwear for driving, want to look like professional driver)
2. Split the class into groups. Give each group a pile of pictures and ask them to divide their pictures into two categories: people who look like professional drivers, people who don’t.
3. Once they have agreed, they need to hang the pictures of professional drivers on one wall, others on the opposite wall.
4. Once finished, review the results with the class, highlighting the key elements of bus company dress code.
5. Hand out a dress code summary, if available.
Ready to Go: Training Materials for School Bus Drivers
Unit 2: Lesson 2 3
What to bring on the bus Bus route map and instructions School opening/early out calendar Sherlock map book Gloves (for refueling) Hat Flashlight or head lamp and spare batteries Sunglasses Tissues Pen and Pencil Brown Fuel Envelope Blank/sample DVCR and Seat Damage Report forms Blank/sample Student Behaviour/Misconduct forms Blank/sample Incident Report Blank Accident Reporting forms Seating Plan Timesheet Pad of contact info for School Transportation Department Blanket Water bottle Name Badge Southland Driver’s Handbook/ Journal Watch Hand disinfectant? Something to read?
Ready to Go: Training Materials for School Bus Drivers
Unit 2: Lesson 3 1
WORKPLACE EXPECTATIONS LESSON 3
Outcome: Have an overview of key company policies Overall Time: 30-60 minutes Overview of Company Policies in Pictures Type of Activity Guessing game Time 30-60 minutes Objective Students have a mental image to help them remember some key
company policies Materials Paper, pencils, flipchart paper, markers, masking tape, policy
cards, copies of policy card page Preparation: Draw on the flipchart a “No Left Turn” sign (with the no left turn symbol only—it should look hand drawn like the example at
the end of the lesson). Copy and cut out policy cards. Instructions:
1. Explain the purpose of this lesson. Ask students: What does this symbol on the flipchart mean? Do you like signs like this, with pictures or do you prefer signs with words?
2. Tell the students that they are going to work in pairs to design a sign with a picture to show a company policy.
3. Demonstrate this by explaining the company policy that drivers need to get permission before they can park their bus anywhere outside of a bus yard or the school. Then draw a picture or symbols that demonstrate the company policy about park outs on the flipchart (example at the end of the lesson). Ask students to confirm what policy this represents.
4. Ensure all students have a partner or group of three, and give each group a few pieces of paper, flipchart paper, pens, and a policy card. Tell them they have 5 minutes to draw a picture that everyone can see from their seats, to show the policy on their policy card.
5. Help any groups who need more explanation of the company policy statement.
6. As groups finish their pictures, number the pictures and use masking tape to stick them around the classroom.
7. After you have a few up, tell students: When you are finished, get up and look at the signs and see if you can guess what policy each sign represents.
Ready to Go: Training Materials for School Bus Drivers
Unit 2: Lesson 3 2
8. Once all the signs are up and all have had a few minutes to look at the signs, the instructor should go around the room, sign by sign and ask for guesses and confirm with the designers the policy it represents. Have the designers stick their policy card on their sign. As you take up each answer, explain the policy which is illustrated, and let students ask questions.
NEED TO INSERT EXAMPLE OF HAND DRAWN NOT LEFT TURN SIGN AND SIGN TO REPRESENT PARKOUT POLICY
Ready to Go: Training Materials for School Bus Drivers
Unit 2: Lesson 3 3
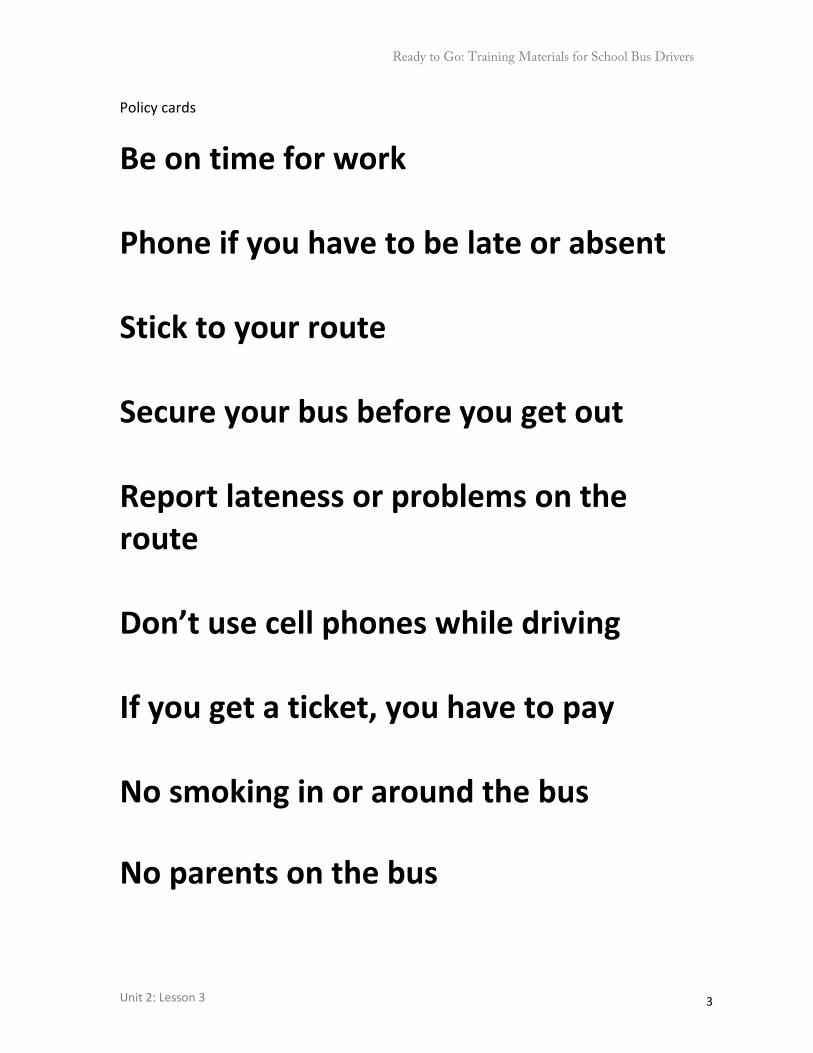
Policy cards
Be on time for work Phone if you have to be late or absent Stick to your route Secure your bus before you get out Report lateness or problems on the route Don’t use cell phones while driving If you get a ticket, you have to pay No smoking in or around the bus No parents on the bus

Ready to Go: Training Materials for School Bus Drivers
Unit 2: Check Learning 1
WORKPLACE EXPECTATIONS CHECK LEARNING
Outcome: Demonstrate knowledge of policies and expectations Overall Time: 30-60 minutes Policy Quiz Type of Activity Multiple Choice Questionnaire Time 30-60 minutes Objective Show they can apply knowledge of policies and expectations Materials Questionnaires Instructions
1) Tell the students: Now you need to try to use company policies to decide what to do in some situations on the bus.
2) Hand out questionnaires and pencils. 3) Read out the first situation and ask which of the responses would
fit with company policies. Confirm the right answers (c and d) and ask students to try continuing with the rest.
4) With a larger group, or if there are students who find reading challenging, allow them to try this in pairs, ensuring there is a good reader in each pair.
5) Walk around and help students read any terms they have trouble with.
6) Take up the answers and explain the policies, encouraging students to ask questions to clarify policy.

Ready to Go: Training Materials for School Bus Drivers
Unit 2: Check Learning 2
Workplace Expectations Policy Quiz Tick the best driver response or responses for each of the following: 1. There is only one child at the last stop on the route every day. Her
parent asks you to drop her off 2 blocks away, as it is across from
her house and a safer place to cross the road.
___ a) “Yes, I will do that starting tomorrow.”
___ b) “I will check this with dispatch and get back to you
tomorrow.”
___ c) “No, sorry, I can’t change the stops because they
are set by the school board.”
___ d) “Here is the name and phone number of
Transportation Services, if you want to ask for a
change of stop.”
2. You are running 15 minutes late on your route, but notice a green
light ahead on a busy intersection.
___ a) Call dispatch and report that you are 15 minutes
late.
___ b) Keep driving and check your time at the next stop,
in case you have made up time since the last stop.
___ c) Call in when safe to do so.
___ d) Drive faster to get to the next stop on time.
___ e) Tell the children they will miss their first class.
Ready to Go: Training Materials for School Bus Drivers
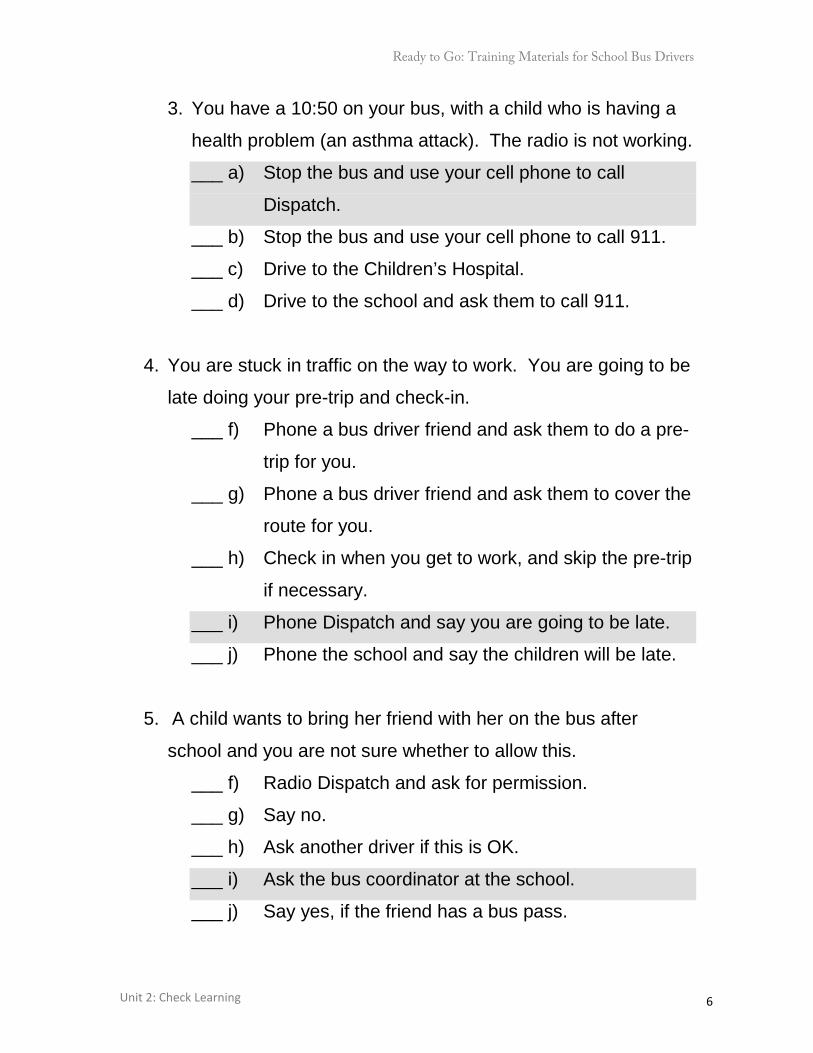
Unit 2: Check Learning 3
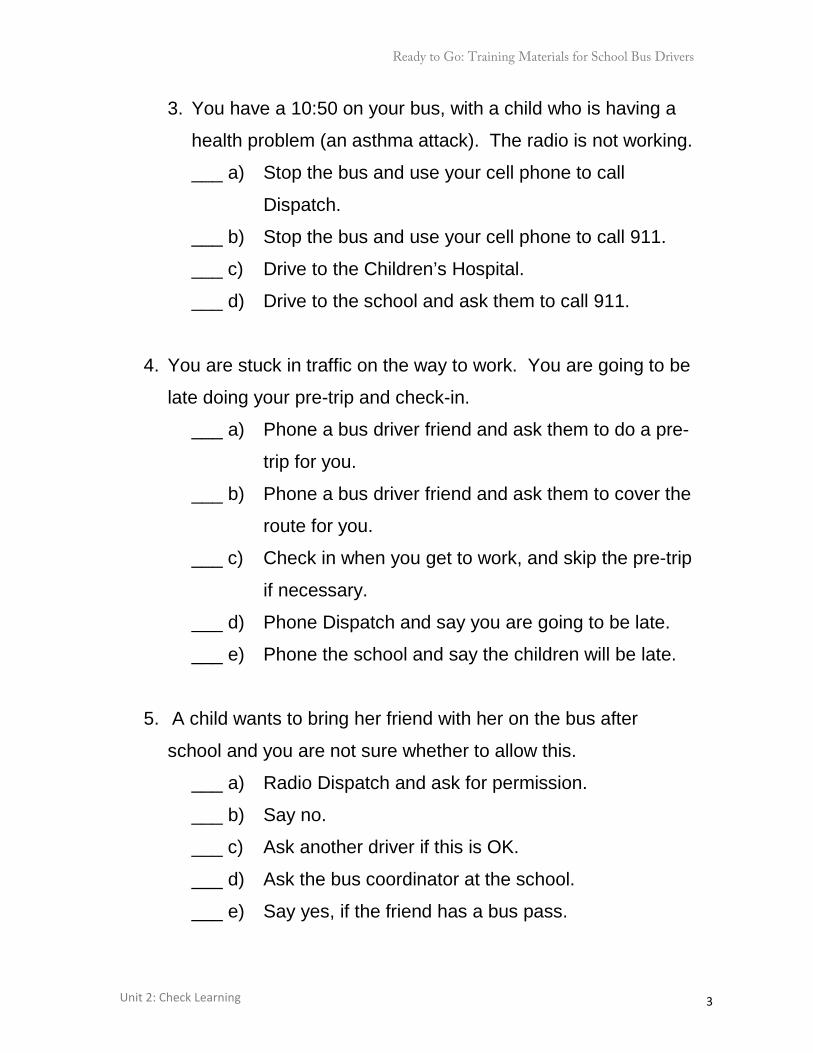
3. You have a 10:50 on your bus, with a child who is having a
health problem (an asthma attack). The radio is not working.
___ a) Stop the bus and use your cell phone to call
Dispatch.
___ b) Stop the bus and use your cell phone to call 911.
___ c) Drive to the Children’s Hospital.
___ d) Drive to the school and ask them to call 911.
4. You are stuck in traffic on the way to work. You are going to be
late doing your pre-trip and check-in.
___ a) Phone a bus driver friend and ask them to do a pre-
trip for you.
___ b) Phone a bus driver friend and ask them to cover the
route for you.
___ c) Check in when you get to work, and skip the pre-trip
if necessary.
___ d) Phone Dispatch and say you are going to be late.
___ e) Phone the school and say the children will be late.
5. A child wants to bring her friend with her on the bus after
school and you are not sure whether to allow this.
___ a) Radio Dispatch and ask for permission.
___ b) Say no.
___ c) Ask another driver if this is OK.
___ d) Ask the bus coordinator at the school.
___ e) Say yes, if the friend has a bus pass.
Ready to Go: Training Materials for School Bus Drivers
Unit 2: Check Learning 4
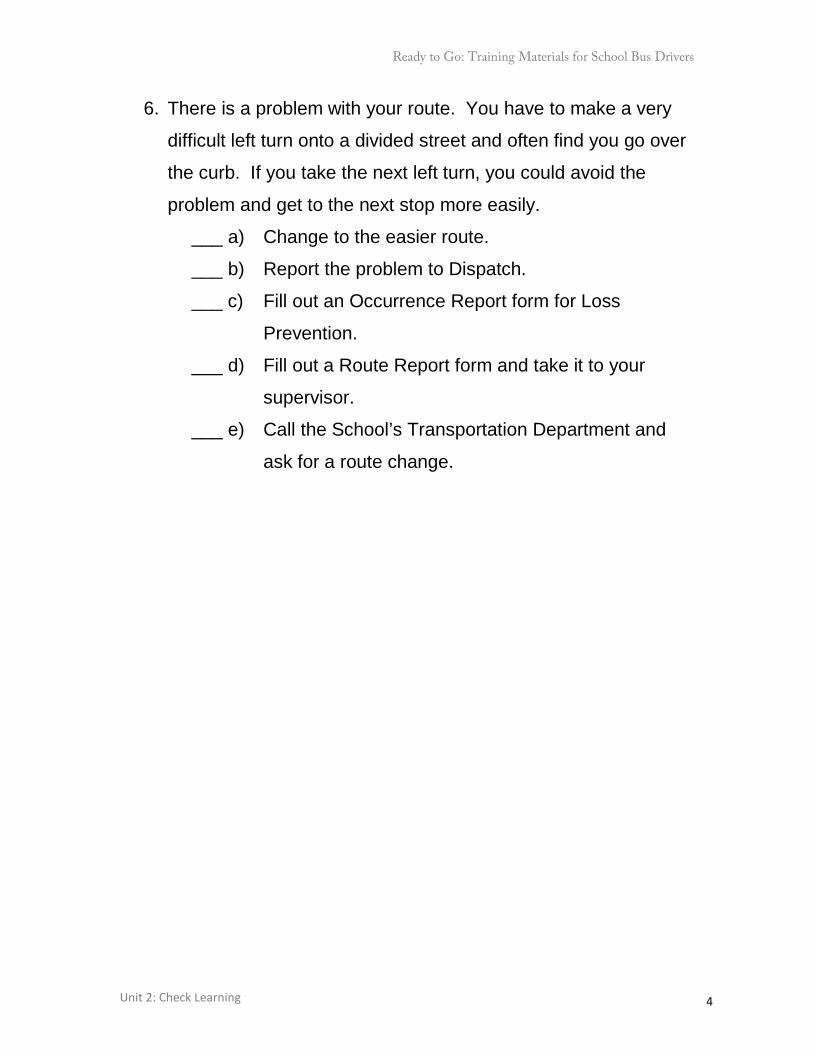
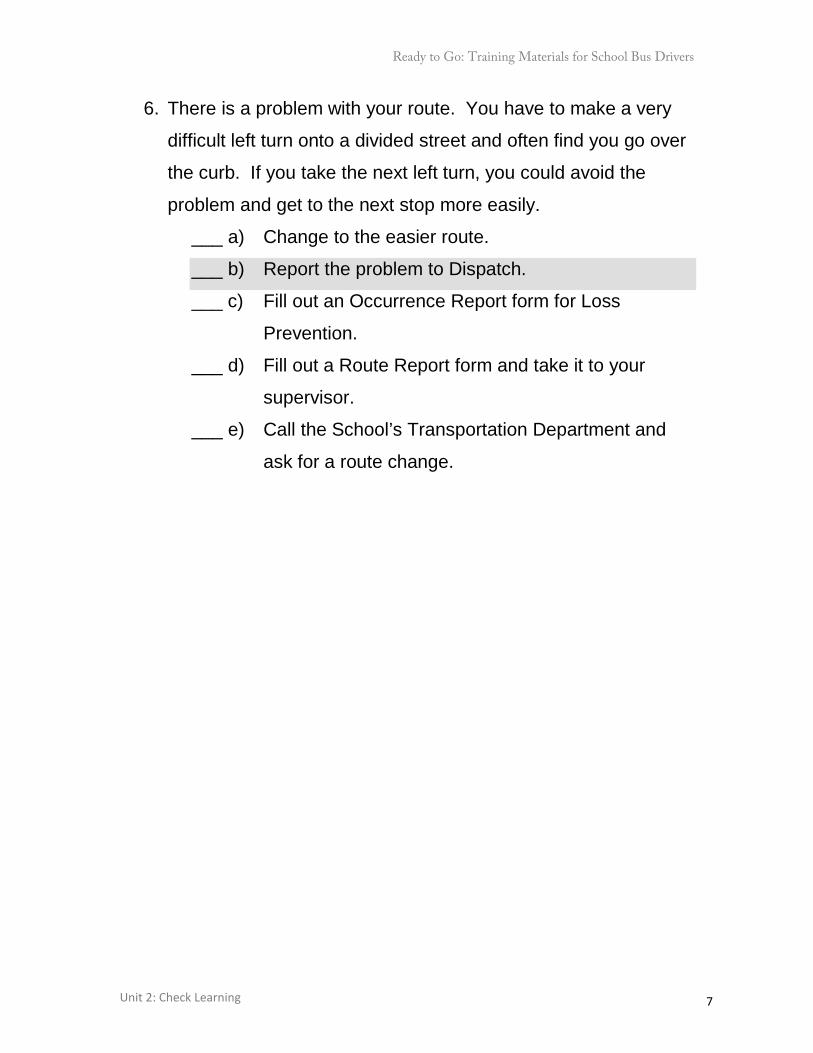
6. There is a problem with your route. You have to make a very
difficult left turn onto a divided street and often find you go over
the curb. If you take the next left turn, you could avoid the
problem and get to the next stop more easily.
___ a) Change to the easier route.
___ b) Report the problem to Dispatch.
___ c) Fill out an Occurrence Report form for Loss
Prevention.
___ d) Fill out a Route Report form and take it to your
supervisor.
___ e) Call the School’s Transportation Department and
ask for a route change.

Ready to Go: Training Materials for School Bus Drivers
Unit 2: Check Learning 5
Workplace Expectations Policy Quiz Answers (correct answers shaded) Tick the best driver response or responses for each of the following: 1. There is only one child at the last stop on the route every day. Her
parent asks you to drop her off 2 blocks away, as it is across from
her house and a safer place to cross the road.
___ a) “Yes, I will do that starting tomorrow.”
___ b) “I will check this with dispatch and get back to you
tomorrow.”
___ c) “No, sorry, I can’t change the stops because they
are set by the school board.”
___ d) “Here is the name and phone number of
Transportation Services, if you want to ask for a
change of stop.”
2. You are running 15 minutes late on your route, but notice a green
light ahead on a busy intersection.
___ b) Call dispatch and report that you are 15 minutes
late.
___ b) Keep driving and check your time at the next stop,
in case you have made up time since the last stop.
___ f) Call in when safe to do so.
___ g) Drive faster to get to the next stop on time.
___ h) Tell the children they will miss their first class.
Ready to Go: Training Materials for School Bus Drivers
Unit 2: Check Learning 6
3. You have a 10:50 on your bus, with a child who is having a
health problem (an asthma attack). The radio is not working.
___ a) Stop the bus and use your cell phone to call
Dispatch.
___ b) Stop the bus and use your cell phone to call 911.
___ c) Drive to the Children’s Hospital.
___ d) Drive to the school and ask them to call 911.
4. You are stuck in traffic on the way to work. You are going to be
late doing your pre-trip and check-in.
___ f) Phone a bus driver friend and ask them to do a pre-
trip for you.
___ g) Phone a bus driver friend and ask them to cover the
route for you.
___ h) Check in when you get to work, and skip the pre-trip
if necessary.
___ i) Phone Dispatch and say you are going to be late.
___ j) Phone the school and say the children will be late.
5. A child wants to bring her friend with her on the bus after
school and you are not sure whether to allow this.
___ f) Radio Dispatch and ask for permission.
___ g) Say no.
___ h) Ask another driver if this is OK.
___ i) Ask the bus coordinator at the school.
___ j) Say yes, if the friend has a bus pass.
Ready to Go: Training Materials for School Bus Drivers
Unit 2: Check Learning 7
6. There is a problem with your route. You have to make a very
difficult left turn onto a divided street and often find you go over
the curb. If you take the next left turn, you could avoid the
problem and get to the next stop more easily.
___ a) Change to the easier route.
___ b) Report the problem to Dispatch.
___ c) Fill out an Occurrence Report form for Loss
Prevention.
___ d) Fill out a Route Report form and take it to your
supervisor.
___ e) Call the School’s Transportation Department and
ask for a route change.
Ready to Go: Training Materials for School Bus Drivers
Summary : Unit 3 Calgary Immigrant Women’s Association
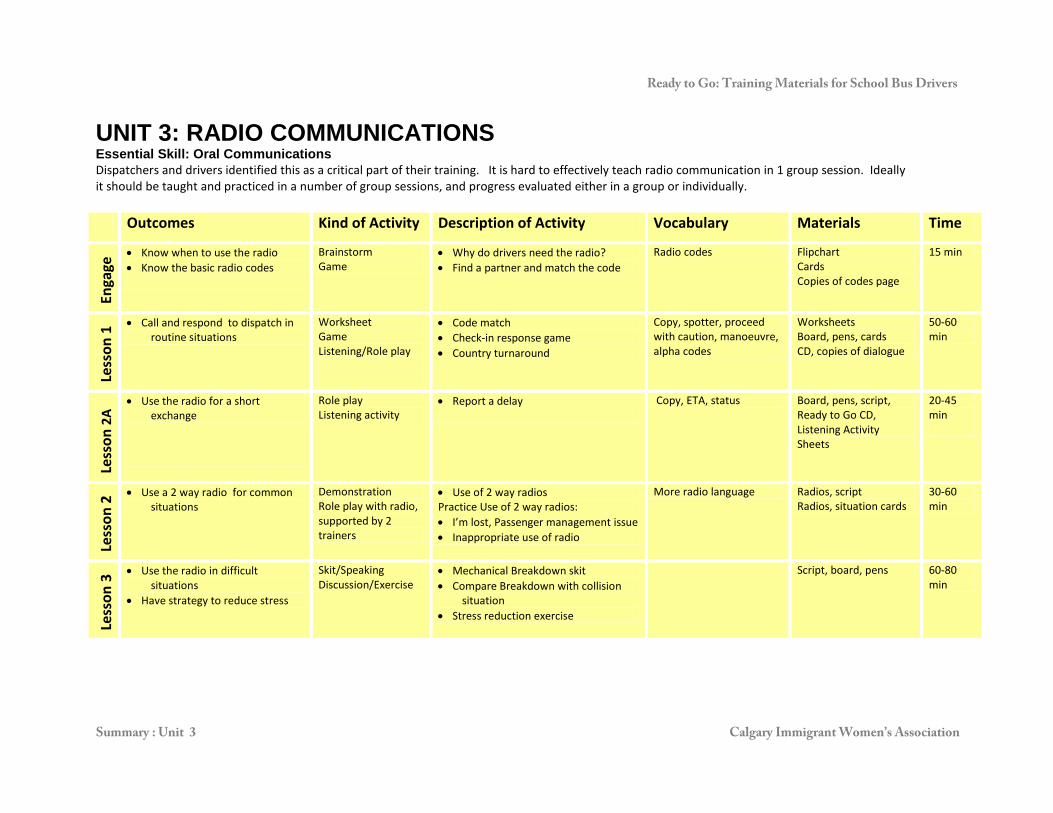
UNIT 3: RADIO COMMUNICATIONS Essential Skill: Oral Communications Dispatchers and drivers identified this as a critical part of their training. It is hard to effectively teach radio communication in 1 group session. Ideally it should be taught and practiced in a number of group sessions, and progress evaluated either in a group or individually.
Outcomes Kind of Activity Description of Activity Vocabulary Materials Time
Enga
ge • Know when to use the radio
• Know the basic radio codes
Brainstorm Game
• Why do drivers need the radio? • Find a partner and match the code
Radio codes Flipchart Cards Copies of codes page
15 min
Less
on 1
• Call and respond to dispatch in routine situations
Worksheet Game Listening/Role play
• Code match • Check-in response game • Country turnaround
Copy, spotter, proceed with caution, manoeuvre, alpha codes
Worksheets Board, pens, cards CD, copies of dialogue
50-60 min
Less
on 2
A • Use the radio for a short
exchange
Role play Listening activity
• Report a delay
Copy, ETA, status Board, pens, script, Ready to Go CD, Listening Activity Sheets
20-45 min
Less
on 2
• Use a 2 way radio for common situations
Demonstration Role play with radio, supported by 2 trainers
• Use of 2 way radios Practice Use of 2 way radios: • I’m lost, Passenger management issue • Inappropriate use of radio
More radio language Radios, script Radios, situation cards
30-60 min
Less
on 3
• Use the radio in difficult situations
• Have strategy to reduce stress
Skit/Speaking Discussion/Exercise
• Mechanical Breakdown skit • Compare Breakdown with collision
situation • Stress reduction exercise
Script, board, pens 60-80 min
Ready to Go: Training Materials for School Bus Drivers
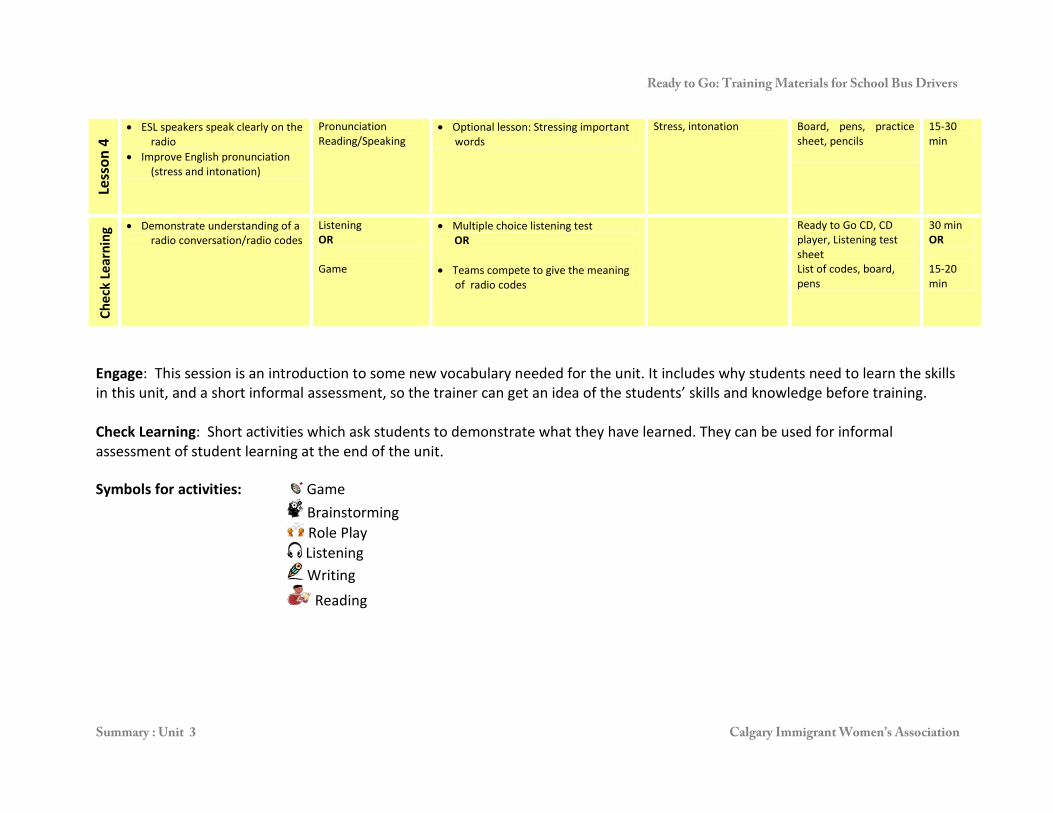
Summary : Unit 3 Calgary Immigrant Women’s Association
Engage: This session is an introduction to some new vocabulary needed for the unit. It includes why students need to learn the skills in this unit, and a short informal assessment, so the trainer can get an idea of the students’ skills and knowledge before training. Check Learning: Short activities which ask students to demonstrate what they have learned. They can be used for informal assessment of student learning at the end of the unit. Symbols for activities: Game
Brainstorming Role Play Listening Writing
Reading
Less
on 4
• ESL speakers speak clearly on the radio
• Improve English pronunciation (stress and intonation)
Pronunciation Reading/Speaking
• Optional lesson: Stressing important words
Stress, intonation Board, pens, practice sheet, pencils
15-30 min
Chec
k Le
arni
ng • Demonstrate understanding of a
radio conversation/radio codes Listening OR Game
• Multiple choice listening test OR • Teams compete to give the meaning
of radio codes
Ready to Go CD, CD player, Listening test sheet List of codes, board, pens
30 min OR 15-20 min

Ready to Go: Training Materials for School Bus Drivers
Unit 3: Lesson 1 1
RADIO COMMUNICATIONS ENGAGE
Outcome: Know when to use the radio and know the basic radio codes Overall Time: 15 minutes
WHY DO DRIVERS NEED THE RADIO? Type of Activity Brainstorm Time 10 minutes Objective Students learn why the radio is important to bus drivers and learn
the most common radio codes Materials Flipchart or board, pens Instructions:
1. Ask students: Who listens to the radio? Ask for a show of hands of all who do. Why do they listen?
2. Ask: Why do bus drivers need a radio? In what situations would it be important? Encourage students to give as many ideas as they can, as fast as possible. Write their answers on the flipchart or board, leaving space next to each one.
3. Go back through their answers and summarize. Add other ideas which they have missed (see code meaning cards at the end of lesson).
4. Give an example of something which is important and is not short to say on the radio like “I have an emergency on my bus” or “There’s been an accident between one of our buses and a car”. Ask students: How do drivers say this quickly? (By using a radio code)
5. Ask if anyone knows the appropriate code. Write it in. Ask for the codes for other situations on your list.

Ready to Go: Training Materials for School Bus Drivers
Unit 3: Lesson 1 2
WHO HAS MY CODE? Type of Activity Whole Class Game Time 5-10 minutes Objective Demonstrate knowledge of radio codes Materials Set of code cards, photocopies of radio code card page Instructions
1. Before the class, copy the following cards template sheet, and cut out the appropriate number of cards, or prepare your own.
2. Explain that all cards contain either a radio code or the meaning of a radio card. Students will need to read their card, and to look for a partner, who has the card which goes with it. Demonstrate this by reading out a meaning card. What would be the matching radio code, you would be listening for? Once they find their partner with the matching card, they need to sit down next to each other.
3. Distribute cards to students and have them read them. Anyone with trouble reading their card should raise their hand, so you can help. Students get out of their seats and can look for their partner, then sit together when they find them.
4. Once all cards are matched, ask the pair to say out loud the code and its meaning.
5. Give students a photocopy of the complete radio code sheet to study, for homework, or before moving on to Lesson 1.

Ready to Go: Training Materials for School Bus Drivers
Unit 3: Lesson 1 3
RADIO COMMUNICATIONS: CODE CARDS CODES MEANINGS
10:4
Message received
10:7
Check in for work
10:9
Say that again, please
10:20
What is your location?
10:50
Emergency
10:51
Southland Bus Collision
10:53
Passenger problem
10:54
Brakes/steering problem
Go ahead
Dispatch is waiting for your
message

Ready to Go: Training Materials for School Bus Drivers
Unit 3: Lesson 1
1
RADIO COMMUNICATIONS LESSON 1: CALL AND RESPOND TO A DISPATCHER
Outcome: Call and respond promptly to a dispatcher in routine situations Overall Time: 50-60 minutes
MATCH THE CODES Type of Activity Worksheet Time 10 minutes Objective To see what radio codes students remember after Engage session Materials Worksheet for each student, pencils Instructions:
1. Ask students why they need to know radio codes. 2. Hand out worksheets and pencils. 3. Read out the first three meanings on the sheet. Ask students
which one of these is the meaning of 10:9. Ask them to draw a line, matching the code and meaning. Explain that the words “Please repeat” are not used in radio communications when you do not understand, so knowing this code is really important. Ask students to try continuing with the rest.
4. Walk around and help students read any terms they have trouble with.
5. Have students compare worksheets with their neighbour, when they are finished.
6. Take up the answers. Take a show of hands: How many people got 6 or more right?
CHECK IN RESPONSE
Type of Activity Whole Class Game Time 15 minutes Objective Fast response to check-in call from a dispatcher Materials White board or flipchart, markers, list of bus numbers, number
cards, Ready to Go CD (optional) Preparation
1. Prepare a list of bus numbers/routes (representative of the call numbers/names in your organization), one for each student in the class and copy one on each card.
2. Copy Check-In Dialogue 1 (from the box below) on the board or flipchart.

Ready to Go: Training Materials for School Bus Drivers
Unit 3: Lesson 1
2
Instructions
1. Explain that in many companies, dispatchers call drivers at the beginning of their shift asking them to check in. Drivers need to respond quickly. This game will allow students to practice this.
2. Ask for a student volunteer. Choose a student who was confident with the codes in the opening activity above (see lesson Match the Codes), introduce them as a driver and yourself as the dispatcher. Let the driver choose a bus number/name card, which you show to the class. Demonstrate the dialogue on the board with this volunteer as the Driver and you as the Dispatcher.
3. Hand out all the bus number cards and ask students to listen for their number and respond “10:7” to dispatch quickly.
4. Now start the game. Using your list, call a bus number and see how fast students can respond. If there is no response, look for the student who has the card with the number you called.
5. If there is time, ask students what they would do if they were not sitting in their driver’s seat at the time the dispatcher called, but thought they might have heard a check in call for them. Change the dialogue on the board to Check-In Dialogue 2 below, or something similar, as appropriate in your organization. Play Driver calls to check in on the CD, if you have time. Repeat it and ask: What does the dispatcher mean by “Copy”? Who is “Elbow Park Charley”?
6. Go through the alpha codes commonly used over the radio (A=Alpha, B= Bravo, C=Charley, D=Delta etc.)
Check-In Dialogue 2 (Driver calls to check in)
Driver: (route name e.g. Elbow Park C), to base Dispatcher: Go ahead (Elbow Park Charley), Driver Did you call me? If you did, I’m 10:7 Dispatcher: Copy Elbow Park Charley. Have a good day, John. Driver: 10:4
Check-In Dialogue 1 (Dispatcher calls) Dispatcher: (route name e.g. Meadow Park A) Driver 10:7 Dispatcher: Good morning
Ready to Go: Training Materials for School Bus Drivers
Unit 3: Lesson 1
3
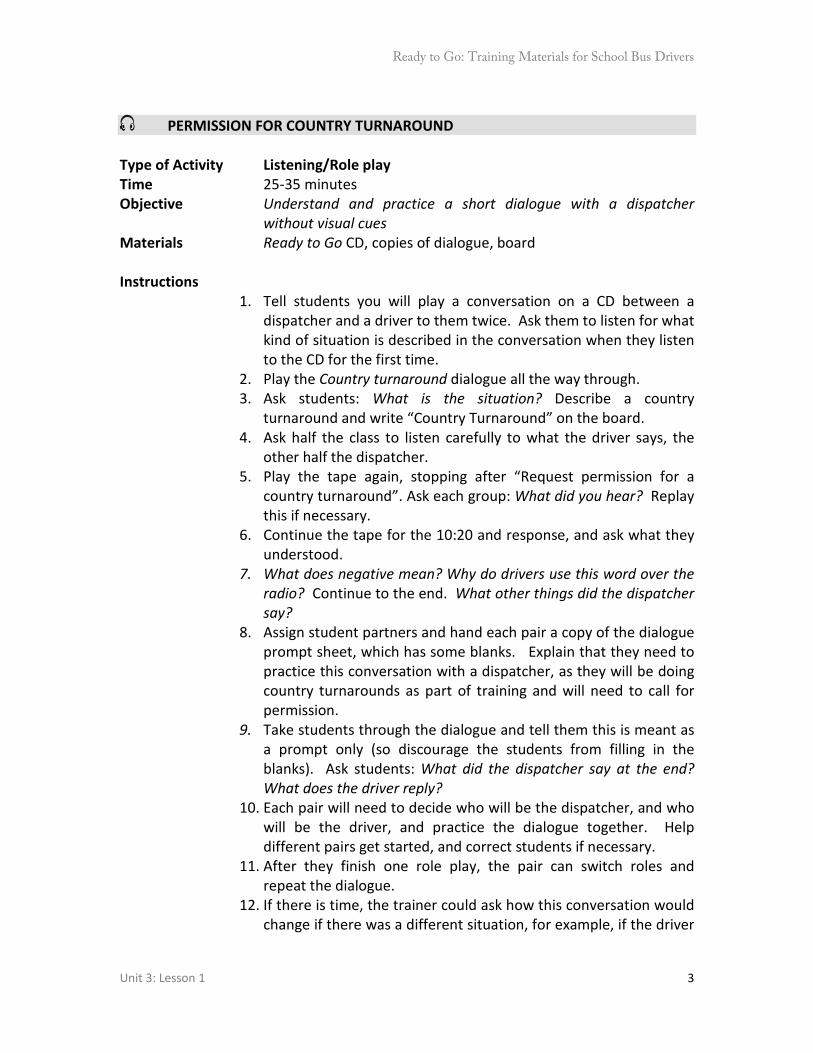
PERMISSION FOR COUNTRY TURNAROUND
Type of Activity Listening/Role play Time 25-35 minutes Objective Understand and practice a short dialogue with a dispatcher
without visual cues Materials Ready to Go CD, copies of dialogue, board Instructions
1. Tell students you will play a conversation on a CD between a dispatcher and a driver to them twice. Ask them to listen for what kind of situation is described in the conversation when they listen to the CD for the first time.
2. Play the Country turnaround dialogue all the way through. 3. Ask students: What is the situation? Describe a country
turnaround and write “Country Turnaround” on the board. 4. Ask half the class to listen carefully to what the driver says, the
other half the dispatcher. 5. Play the tape again, stopping after “Request permission for a
country turnaround”. Ask each group: What did you hear? Replay this if necessary.
6. Continue the tape for the 10:20 and response, and ask what they understood.
7. What does negative mean? Why do drivers use this word over the radio? Continue to the end. What other things did the dispatcher say?
8. Assign student partners and hand each pair a copy of the dialogue prompt sheet, which has some blanks. Explain that they need to practice this conversation with a dispatcher, as they will be doing country turnarounds as part of training and will need to call for permission.
9. Take students through the dialogue and tell them this is meant as a prompt only (so discourage the students from filling in the blanks). Ask students: What did the dispatcher say at the end? What does the driver reply?
10. Each pair will need to decide who will be the dispatcher, and who will be the driver, and practice the dialogue together. Help different pairs get started, and correct students if necessary.
11. After they finish one role play, the pair can switch roles and repeat the dialogue.
12. If there is time, the trainer could ask how this conversation would change if there was a different situation, for example, if the driver

Ready to Go: Training Materials for School Bus Drivers
Unit 3: Lesson 1
4
was running late. Students could improvise this situation if there is time.
13. Remind students that the best way to learn radio skills is to listen to the 2 way radio when driving.
Ready to Go: Training Materials for School Bus Drivers
Unit 3: Lesson 1
5
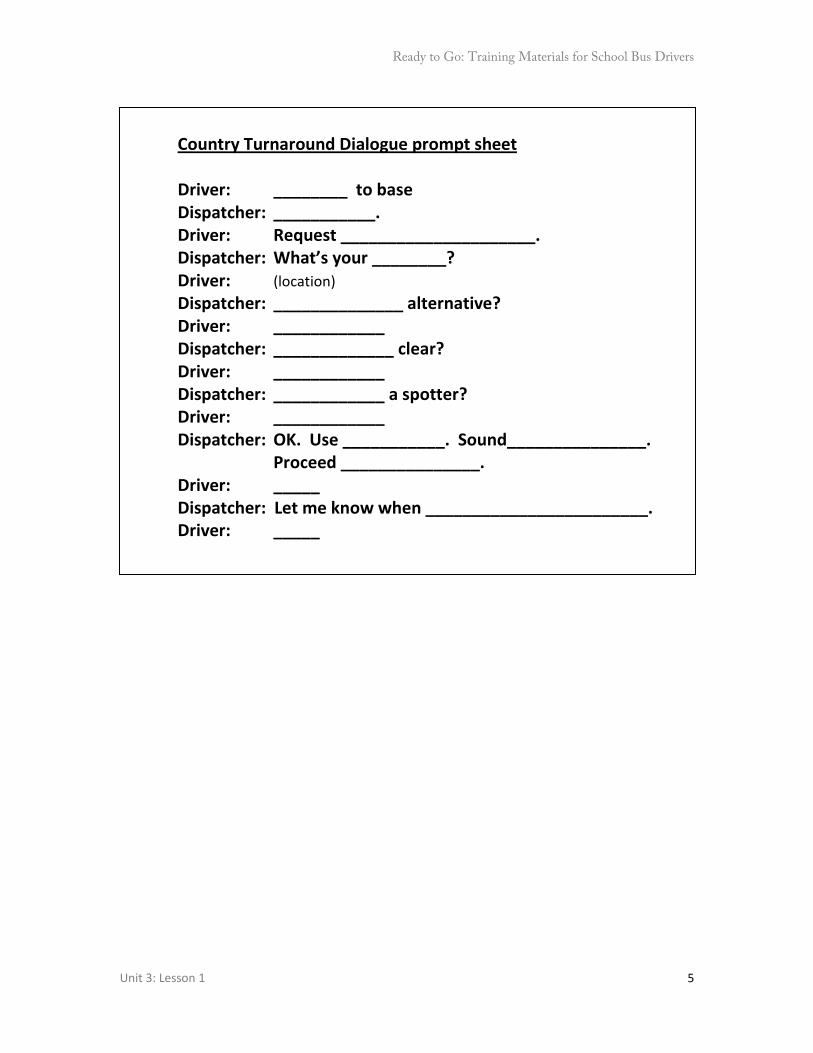
Country Turnaround Dialogue prompt sheet Driver: ________ to base Dispatcher: ___________. Driver: Request _____________________. Dispatcher: What’s your ________? Driver: (location) Dispatcher: ______________ alternative? Driver: ____________ Dispatcher: _____________ clear? Driver: ____________ Dispatcher: ____________ a spotter? Driver: ____________ Dispatcher: OK. Use ___________. Sound_______________.
Proceed _______________. Driver: _____ Dispatcher: Let me know when ________________________. Driver: _____

Ready to Go: Training Materials for School Bus Drivers
Unit 3: Lesson 1
6
Country Turnaround Dialogue (Listening Activity 2) Driver: Westmount G to base Dispatcher: Go ahead Westmount Golf. Driver: Request permission for a country turnaround. Dispatcher: What’s your 10:20? Driver: Township Road 270 and Range Road 292 Dispatcher: Do you have any alternative? Driver: Negative. Dispatcher: Is the way behind you clear? Driver: 10:4. Dispatcher: Do you have a spotter? Driver: Negative. Dispatcher: OK. Please use your hazard lights, sound your horn
and proceed with the utmost of caution. Driver: 10:4 Dispatcher: Westmount Golf, let me know when your manoeuver is
complete. Driver: 10:4
Underlining shows vocabulary which trainers should check students understand.
Ready to Go: Training Materials for School Bus Drivers
Unit 3: Lesson 1
7
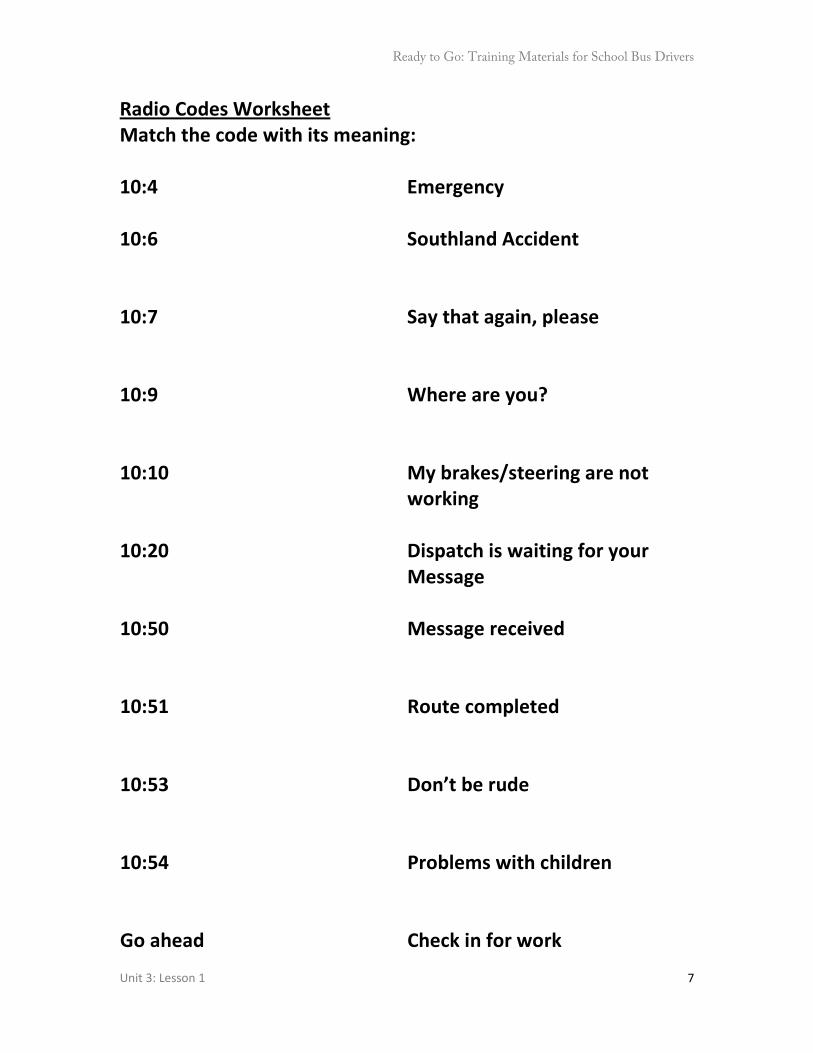
Radio Codes Worksheet Match the code with its meaning: 10:4 Emergency 10:6 Southland Accident 10:7 Say that again, please 10:9 Where are you? 10:10 My brakes/steering are not
working 10:20 Dispatch is waiting for your Message 10:50 Message received 10:51 Route completed 10:53 Don’t be rude 10:54 Problems with children Go ahead Check in for work
Ready to Go: Training Materials for School Bus Drivers
Unit 3: Lesson 2 1
RADIO COMMUNICATIONS LESSON 2: OPERATE A TWO-WAY RADIO
Outcome: Use a 2 way radio to communicate in common situations Overall Time: 30-60 minutes DEMONSTRATE USE OF TWO WAY RADIO Type of Activity Demonstration Objective Students see how to use different radios and listen to a model
conversation Materials Radios (and pictures), board and pens Instructions
1. Before class, identify someone (either a student or some other volunteer) who would be willing to demonstrate a two way radio conversation. A sample script is below, for use in step 3.
2. In class, hold up a radio (or a picture, if not available). Ask students to identify the key controls (on/off switch, power light, band selector, what to press when speaking etc.). Explain how to change channels.
3. Demonstrate a test. Demonstrate common problems with the radio (e.g. speaking too close to the mike, shouting)
4. Ask students to listen to a demonstration, and see if they can understand what is happening.
5. Demonstrate a conversation with the dispatcher when the driver is lost. A sample script is below.
6. Ask students what the conversation was about. Split the class in two. Tell them you will repeat the conversation, while one half listens for what the driver is saying, the other is listening to what the dispatcher is asking. Students can take notes if they like.
7. Repeat the conversation. 8. Ask students to report what the driver did (Driver: Called dispatch
and reported situation). Write this prompt on the board. Was the driver going to or from the school?
9. What did the dispatcher need to know? (Dispatch: Need to know route, stop, 10:20, direction, landmarks to give the driver directions)
10. What words did they use for direction? ( heading or going North, South, first/second left, East, eastbound)
11. If continuing on to next exercise, leave these prompts on the board.
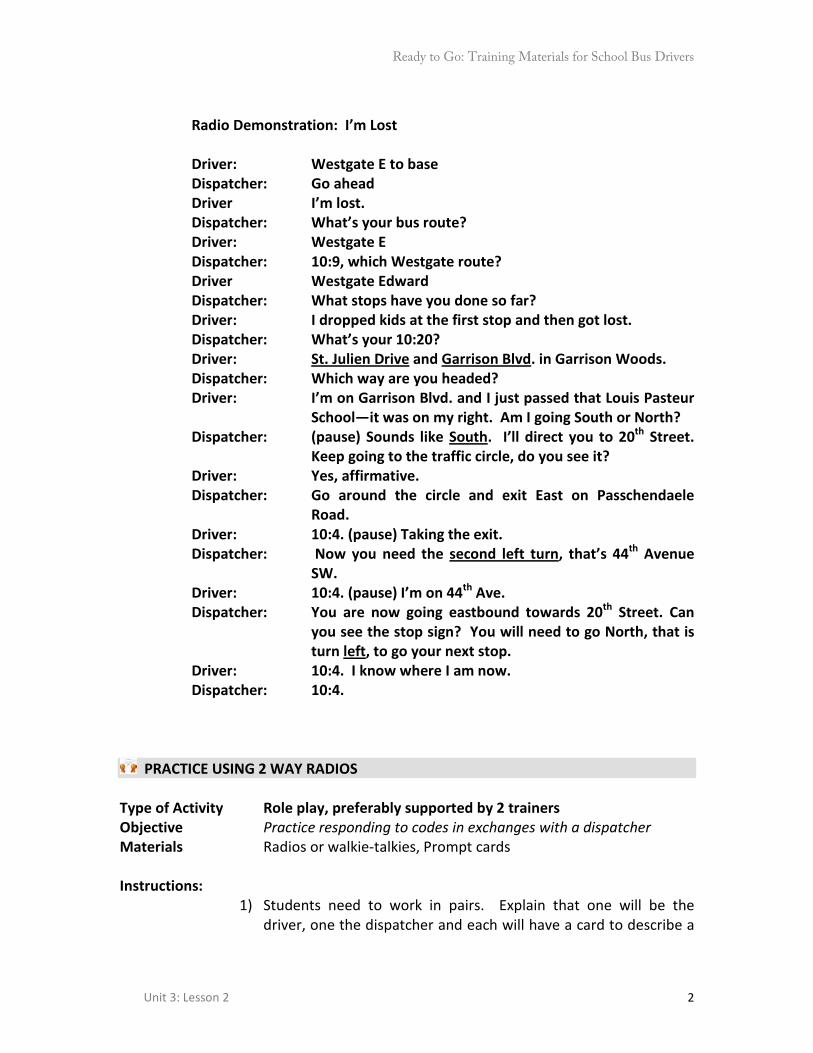
Ready to Go: Training Materials for School Bus Drivers
Unit 3: Lesson 2 2
Radio Demonstration: I’m Lost
Driver: Westgate E to base Dispatcher: Go ahead Driver I’m lost. Dispatcher: What’s your bus route? Driver: Westgate E Dispatcher: 10:9, which Westgate route? Driver Westgate Edward Dispatcher: What stops have you done so far? Driver: I dropped kids at the first stop and then got lost. Dispatcher: What’s your 10:20? Driver: St. Julien Drive and Garrison Blvd. in Garrison Woods. Dispatcher: Which way are you headed? Driver: I’m on Garrison Blvd. and I just passed that Louis Pasteur
School—it was on my right. Am I going South or North? Dispatcher: (pause) Sounds like South. I’ll direct you to 20th Street.
Keep going to the traffic circle, do you see it? Driver: Yes, affirmative. Dispatcher: Go around the circle and exit East on Passchendaele
Road. Driver: 10:4. (pause) Taking the exit. Dispatcher: Now you need the second left turn, that’s 44th Avenue
SW. Driver: 10:4. (pause) I’m on 44th Ave. Dispatcher: You are now going eastbound towards 20th Street. Can
you see the stop sign? You will need to go North, that is turn left, to go your next stop.
Driver: 10:4. I know where I am now. Dispatcher: 10:4.
PRACTICE USING 2 WAY RADIOS
Type of Activity Role play, preferably supported by 2 trainers Objective Practice responding to codes in exchanges with a dispatcher Materials Radios or walkie-talkies, Prompt cards Instructions:
1) Students need to work in pairs. Explain that one will be the driver, one the dispatcher and each will have a card to describe a

Ready to Go: Training Materials for School Bus Drivers
Unit 3: Lesson 2 3
situation, which they will need to explain over the radio, a bit like the prompts you wrote on the board in the demonstration above.
2) Ensure one student in each pair has a driver situation card 1 and their partner has the corresponding dispatcher card.
3) Read the cards with the class. Ask students to think about the situation and what they need to say. Students need to try a radio conversation (without showing their card to their partner), making up details if they need to. You can go around the room and help students to get started.
4) Each pair could have a turn to practice a role play using the two-way radio, with one student out of the room. A trainer may need to help them.
5) Once a group has finished a dialogue, they can change roles, or get new cards from the trainer, so they can role play a different situation .
6) After everyone has had a turn with the radio(s), ask students how they found this activity.
7) Review misuse of the radio (Situation 5, repeatedly calling dispatch, lengthy traffic reports). Also: What to do if the radio stops working?
SITUATION CARDS –Radio Communications, Lesson 2 Driver 1: Bus: 229 Route: Arbour Lake C It is your first day on this route. You can’t find Tuscany Valley Way to drop your last 2 children off at the last stop. You are on Tuscany Boulevard, heading down to Stoney Trail. You just passed Tuscany Way. Dispatcher 1: • Find out school route name, and stop number. • What’s the driver’s location? • The drive should pull over and stand by. You’ll try to give them directions. • Has the driver passed Tuscany Way yet? • Tell the driver: Turn left on Tuscany Valley View, then turn left again on Tuscany
Drive, then look out for Tuscany Valley Way on the left.
Ready to Go: Training Materials for School Bus Drivers
Unit 3: Lesson 2 4
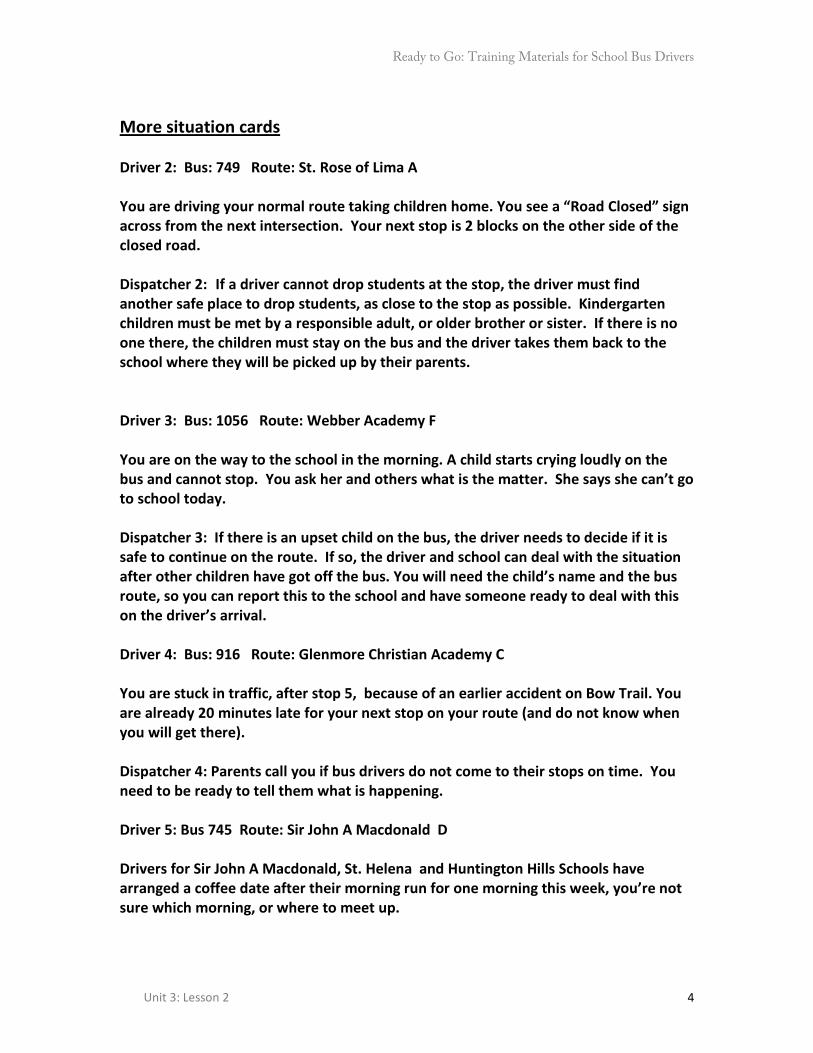
More situation cards Driver 2: Bus: 749 Route: St. Rose of Lima A You are driving your normal route taking children home. You see a “Road Closed” sign across from the next intersection. Your next stop is 2 blocks on the other side of the closed road. Dispatcher 2: If a driver cannot drop students at the stop, the driver must find another safe place to drop students, as close to the stop as possible. Kindergarten children must be met by a responsible adult, or older brother or sister. If there is no one there, the children must stay on the bus and the driver takes them back to the school where they will be picked up by their parents. Driver 3: Bus: 1056 Route: Webber Academy F You are on the way to the school in the morning. A child starts crying loudly on the bus and cannot stop. You ask her and others what is the matter. She says she can’t go to school today. Dispatcher 3: If there is an upset child on the bus, the driver needs to decide if it is safe to continue on the route. If so, the driver and school can deal with the situation after other children have got off the bus. You will need the child’s name and the bus route, so you can report this to the school and have someone ready to deal with this on the driver’s arrival. Driver 4: Bus: 916 Route: Glenmore Christian Academy C You are stuck in traffic, after stop 5, because of an earlier accident on Bow Trail. You are already 20 minutes late for your next stop on your route (and do not know when you will get there). Dispatcher 4: Parents call you if bus drivers do not come to their stops on time. You need to be ready to tell them what is happening. Driver 5: Bus 745 Route: Sir John A Macdonald D Drivers for Sir John A Macdonald, St. Helena and Huntington Hills Schools have arranged a coffee date after their morning run for one morning this week, you’re not sure which morning, or where to meet up.

Ready to Go: Training Materials for School Bus Drivers
Unit 3: Lesson 2 5
Dispatcher 5: The radio is not used for social purposes: it is needed for emergencies and for the coordination of over 100 buses. Dispatchers may give a short warning on the radio and ask drivers to come in for a warning if they misuse the radio. Driver 6: Bus 88 Route: Foundations for the Future G You are driving a new route and running 15 minutes behind, in very cold and icy road conditions. You just realized that you skipped stop 3 by mistake, and you are now picking up children at stop 7. Dispatcher 6: Some stops have no children waiting at them, especially in very cold conditions, when the bus is late. The children on the bus should be dropped at school rather than the driver doing a difficult route to go back and pick up the children at one stop. Tell the driver to go on to the school and report back to you. If necessary, the driver can then go back and pick up any children at the stop.
Ready to Go: Training Materials for School Bus Drivers
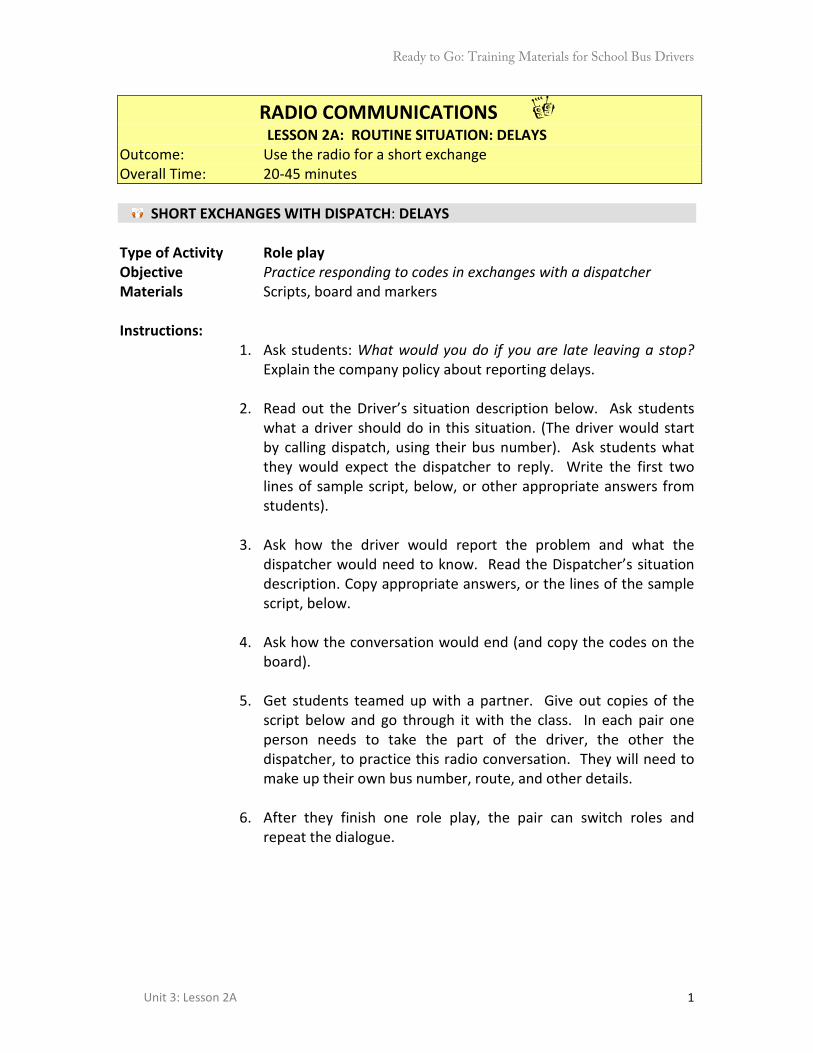
Unit 3: Lesson 2A 1
RADIO COMMUNICATIONS LESSON 2A: ROUTINE SITUATION: DELAYS
Outcome: Use the radio for a short exchange Overall Time: 20-45 minutes
SHORT EXCHANGES WITH DISPATCH: DELAYS Type of Activity Role play Objective Practice responding to codes in exchanges with a dispatcher Materials Scripts, board and markers Instructions:
1. Ask students: What would you do if you are late leaving a stop? Explain the company policy about reporting delays.
2. Read out the Driver’s situation description below. Ask students what a driver should do in this situation. (The driver would start by calling dispatch, using their bus number). Ask students what they would expect the dispatcher to reply. Write the first two lines of sample script, below, or other appropriate answers from students).
3. Ask how the driver would report the problem and what the dispatcher would need to know. Read the Dispatcher’s situation description. Copy appropriate answers, or the lines of the sample script, below.
4. Ask how the conversation would end (and copy the codes on the board).
5. Get students teamed up with a partner. Give out copies of the script below and go through it with the class. In each pair one person needs to take the part of the driver, the other the dispatcher, to practice this radio conversation. They will need to make up their own bus number, route, and other details.
6. After they finish one role play, the pair can switch roles and repeat the dialogue.

Ready to Go: Training Materials for School Bus Drivers
Unit 3: Lesson 2A 2
Driver’s Situation Driver 1: You are stuck in traffic because of an earlier accident. You are already 15 minutes late for your next stop on your route, stop 6 and do not know when you will get there. Dispatcher 1: Parents call you if bus drivers do not come to their stops on time. You need to be ready to tell them what is happening.

Ready to Go: Training Materials for School Bus Drivers
Unit 3: Lesson 2A 3
Sample Script: Delayed in traffic
Driver: ____ to base Dispatcher: Go ahead. Driver: I’m stuck on _______ and I’m going to be
late. Dispatcher: What’s your bus route? Driver: ____________________ Dispatcher: What’s your next stop number? Driver: _______ Dispatcher: What’s your ETA at that stop? Driver: I’m already ___________ minutes late, and
traffic is moving very slowly. Dispatcher: 10:4, keep me posted. Driver: 10:4

Ready to Go: Training Materials for School Bus Drivers
Unit 3: Lesson 2A 4
OPTIONAL LISTENING ACTIVITY: DELAYS Type of Activity Listening Objective To help learners understand a real radio dialogue Materials Ready to Go CD (Delayed in traffic), CD player, board and markers,
Listening Activity sheets Instructions:
7. Explain to students that they will now hear a real driver and dispatcher talking over the radio. You will play the recording more than once: the first time so they can get a general idea of what is happening. The next time for details.
8. Play the Delayed in traffic recording once. Ask students: What was happening? Who called first over the radio? Why would you guess that he called?
9. Give out copies of the Listening Activity sheet below and pencils. Ask students to listen as you play the recording again and see if they can hear the missing information.
10. Take up the answers, checking that they understand vocabulary like approaching, ETA, Copy and “Base will post you at 20 minutes”.
Ready to Go: Training Materials for School Bus Drivers
Unit 3: Lesson 2A 5
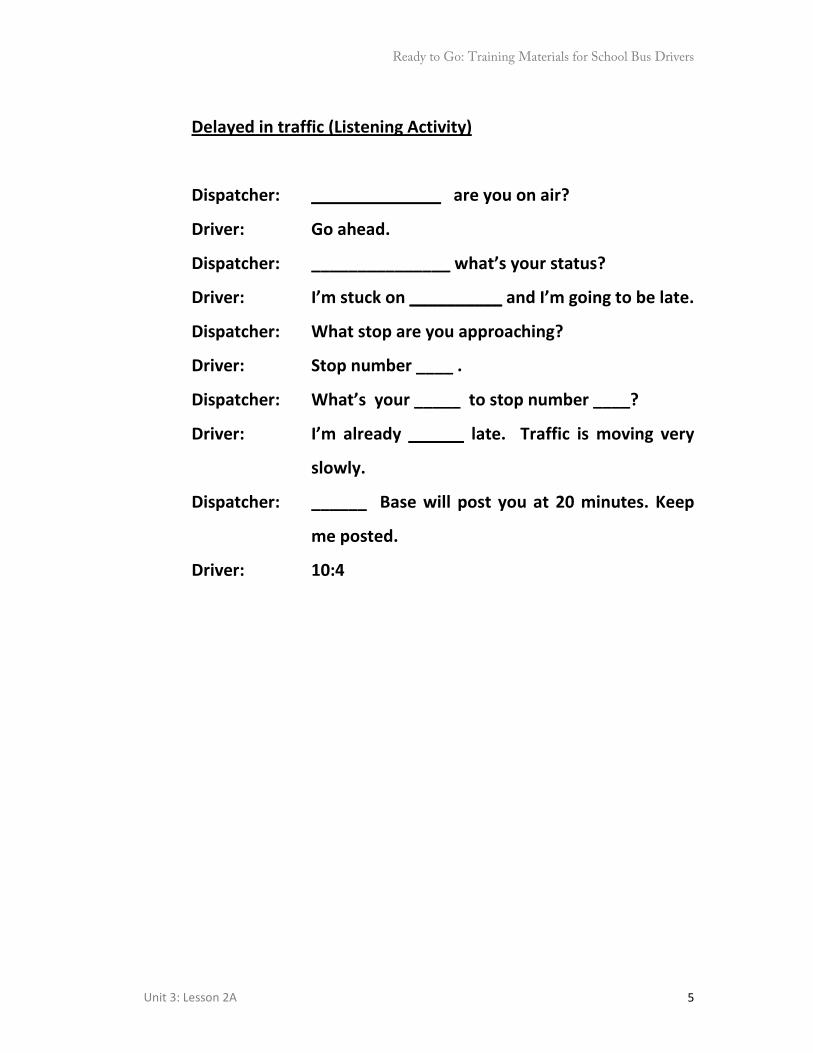
Delayed in traffic (Listening Activity)
Dispatcher: ______________ are you on air?
Driver: Go ahead.
Dispatcher: _______________ what’s your status?
Driver: I’m stuck on __________ and I’m going to be late.
Dispatcher: What stop are you approaching?
Driver: Stop number ____ .
Dispatcher: What’s your _____ to stop number ____?
Driver: I’m already ______ late. Traffic is moving very
slowly.
Dispatcher: ______ Base will post you at 20 minutes. Keep
me posted.
Driver: 10:4
Ready to Go: Training Materials for School Bus Drivers
Unit 3: Lesson 2A 6
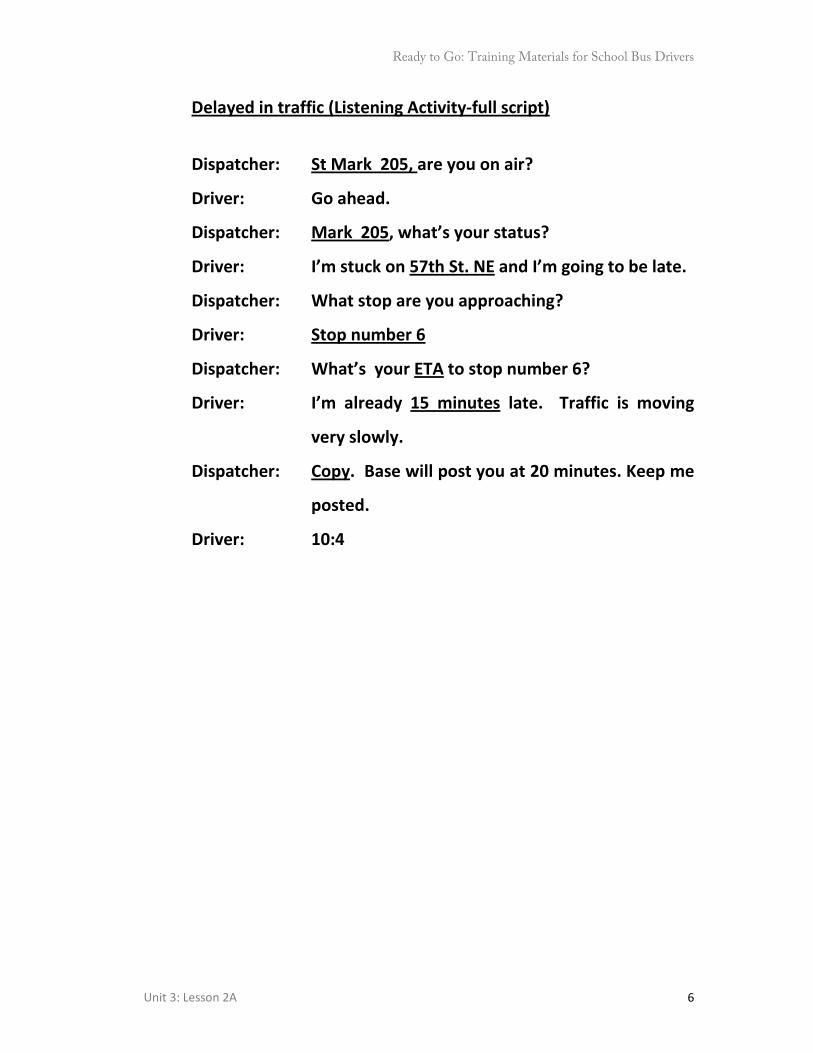
Delayed in traffic (Listening Activity-full script)
Dispatcher: St Mark 205, are you on air?
Driver: Go ahead.
Dispatcher: Mark 205, what’s your status?
Driver: I’m stuck on 57th St. NE and I’m going to be late.
Dispatcher: What stop are you approaching?
Driver: Stop number 6
Dispatcher: What’s your ETA to stop number 6?
Driver: I’m already 15 minutes late. Traffic is moving
very slowly.
Dispatcher: Copy. Base will post you at 20 minutes. Keep me
posted.
Driver: 10:4
Ready to Go: Training Materials for School Bus Drivers
Unit 3: Lesson 3
1
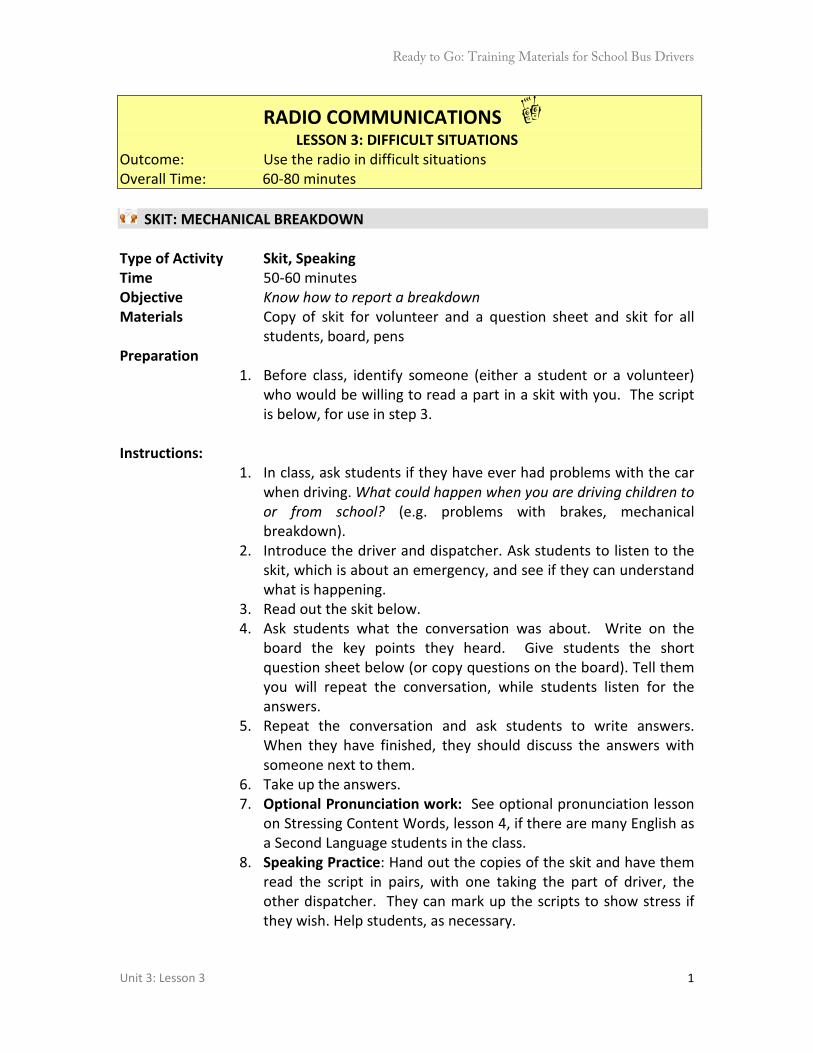
RADIO COMMUNICATIONS LESSON 3: DIFFICULT SITUATIONS
Outcome: Use the radio in difficult situations Overall Time: 60-80 minutes
SKIT: MECHANICAL BREAKDOWN Type of Activity Skit, Speaking Time 50-60 minutes Objective Know how to report a breakdown Materials Copy of skit for volunteer and a question sheet and skit for all
students, board, pens Preparation
1. Before class, identify someone (either a student or a volunteer) who would be willing to read a part in a skit with you. The script is below, for use in step 3.
Instructions:
1. In class, ask students if they have ever had problems with the car when driving. What could happen when you are driving children to or from school? (e.g. problems with brakes, mechanical breakdown).
2. Introduce the driver and dispatcher. Ask students to listen to the skit, which is about an emergency, and see if they can understand what is happening.
3. Read out the skit below. 4. Ask students what the conversation was about. Write on the
board the key points they heard. Give students the short question sheet below (or copy questions on the board). Tell them you will repeat the conversation, while students listen for the answers.
5. Repeat the conversation and ask students to write answers. When they have finished, they should discuss the answers with someone next to them.
6. Take up the answers. 7. Optional Pronunciation work: See optional pronunciation lesson
on Stressing Content Words, lesson 4, if there are many English as a Second Language students in the class.
8. Speaking Practice: Hand out the copies of the skit and have them read the script in pairs, with one taking the part of driver, the other dispatcher. They can mark up the scripts to show stress if they wish. Help students, as necessary.

Ready to Go: Training Materials for School Bus Drivers
Unit 3: Lesson 3
2
9. Ask them what steps the driver needs to follow after the breakdown and write them on the board (put on hazards, move to a safe location, check children, report the problem).
Ready to Go: Training Materials for School Bus Drivers
Unit 3: Lesson 3
3
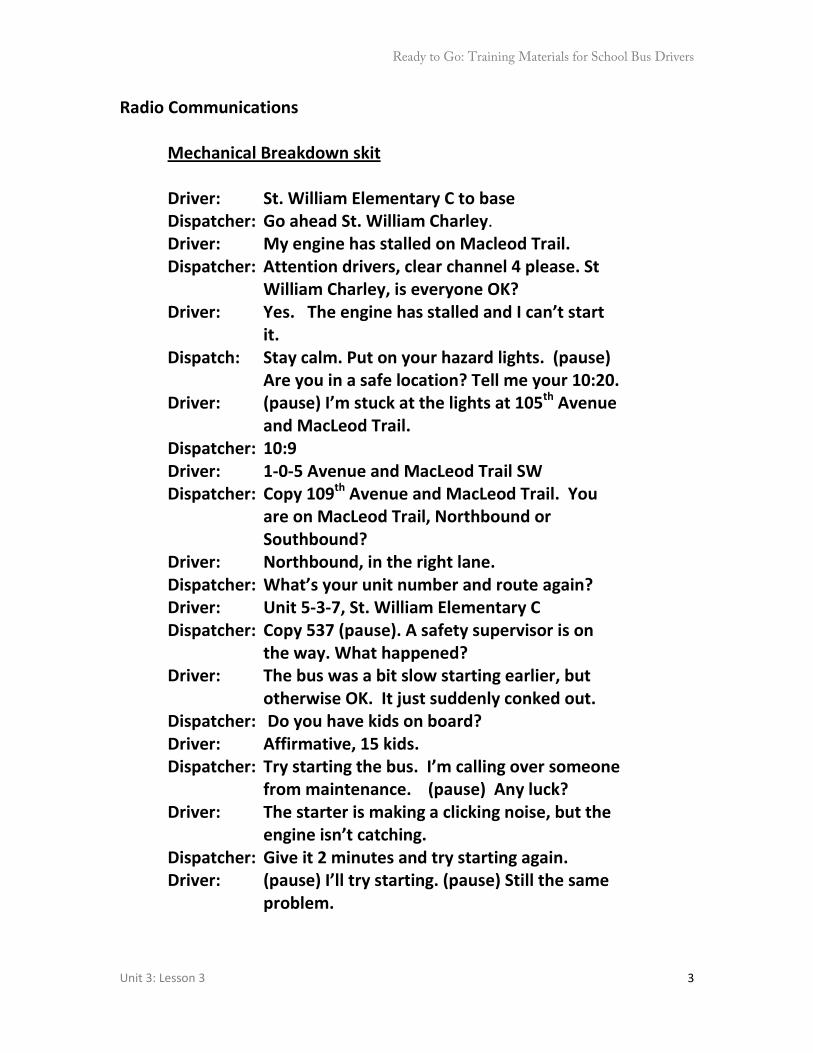
Radio Communications
Mechanical Breakdown skit Driver: St. William Elementary C to base Dispatcher: Go ahead St. William Charley. Driver: My engine has stalled on Macleod Trail. Dispatcher: Attention drivers, clear channel 4 please. St
William Charley, is everyone OK? Driver: Yes. The engine has stalled and I can’t start
it. Dispatch: Stay calm. Put on your hazard lights. (pause)
Are you in a safe location? Tell me your 10:20. Driver: (pause) I’m stuck at the lights at 105th Avenue
and MacLeod Trail. Dispatcher: 10:9 Driver: 1-0-5 Avenue and MacLeod Trail SW Dispatcher: Copy 109th Avenue and MacLeod Trail. You
are on MacLeod Trail, Northbound or Southbound?
Driver: Northbound, in the right lane. Dispatcher: What’s your unit number and route again? Driver: Unit 5-3-7, St. William Elementary C Dispatcher: Copy 537 (pause). A safety supervisor is on
the way. What happened? Driver: The bus was a bit slow starting earlier, but
otherwise OK. It just suddenly conked out. Dispatcher: Do you have kids on board? Driver: Affirmative, 15 kids. Dispatcher: Try starting the bus. I’m calling over someone
from maintenance. (pause) Any luck? Driver: The starter is making a clicking noise, but the
engine isn’t catching. Dispatcher: Give it 2 minutes and try starting again. Driver: (pause) I’ll try starting. (pause) Still the same
problem.
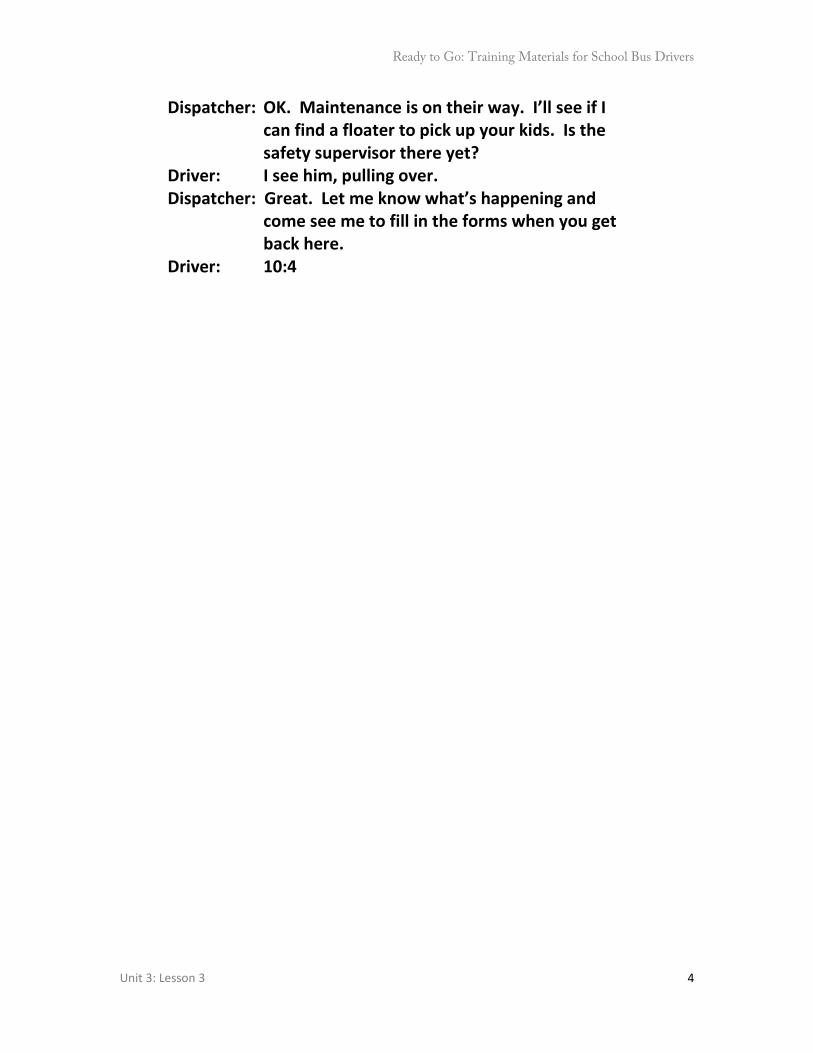
Ready to Go: Training Materials for School Bus Drivers
Unit 3: Lesson 3
4
Dispatcher: OK. Maintenance is on their way. I’ll see if I can find a floater to pick up your kids. Is the safety supervisor there yet?
Driver: I see him, pulling over. Dispatcher: Great. Let me know what’s happening and
come see me to fill in the forms when you get back here.
Driver: 10:4
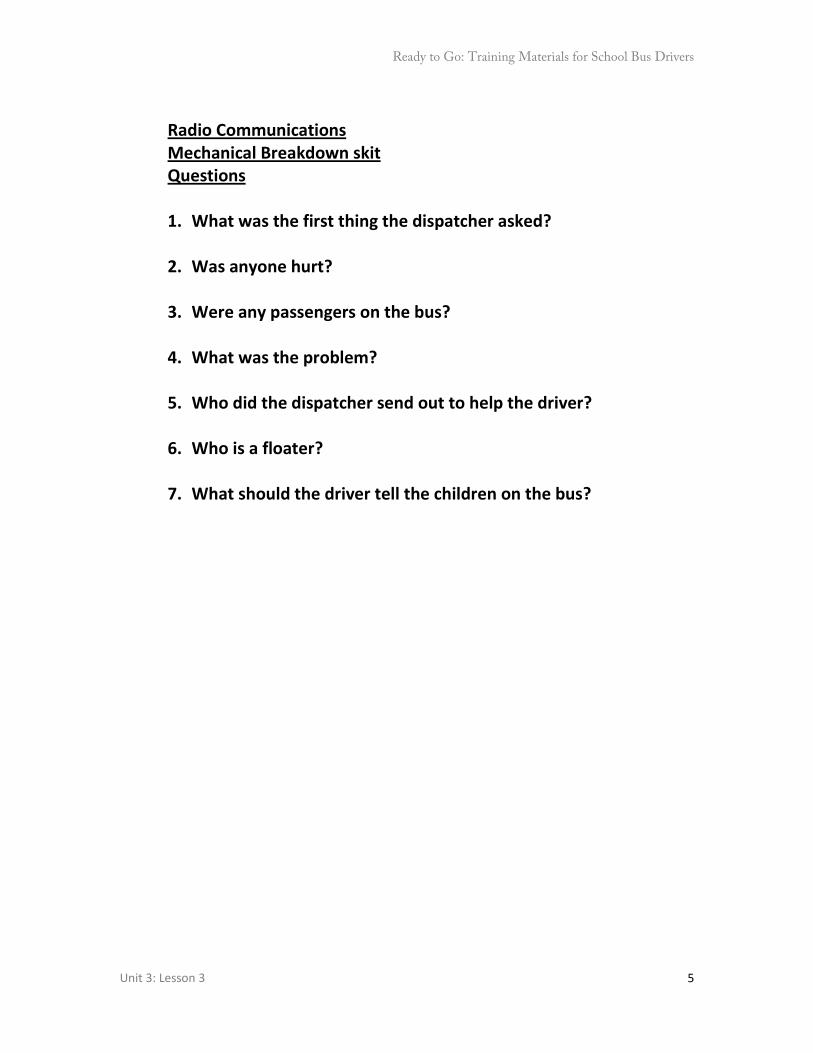
Ready to Go: Training Materials for School Bus Drivers
Unit 3: Lesson 3
5
Radio Communications Mechanical Breakdown skit Questions 1. What was the first thing the dispatcher asked?
2. Was anyone hurt?
3. Were any passengers on the bus?
4. What was the problem?
5. Who did the dispatcher send out to help the driver?
6. Who is a floater?
7. What should the driver tell the children on the bus?
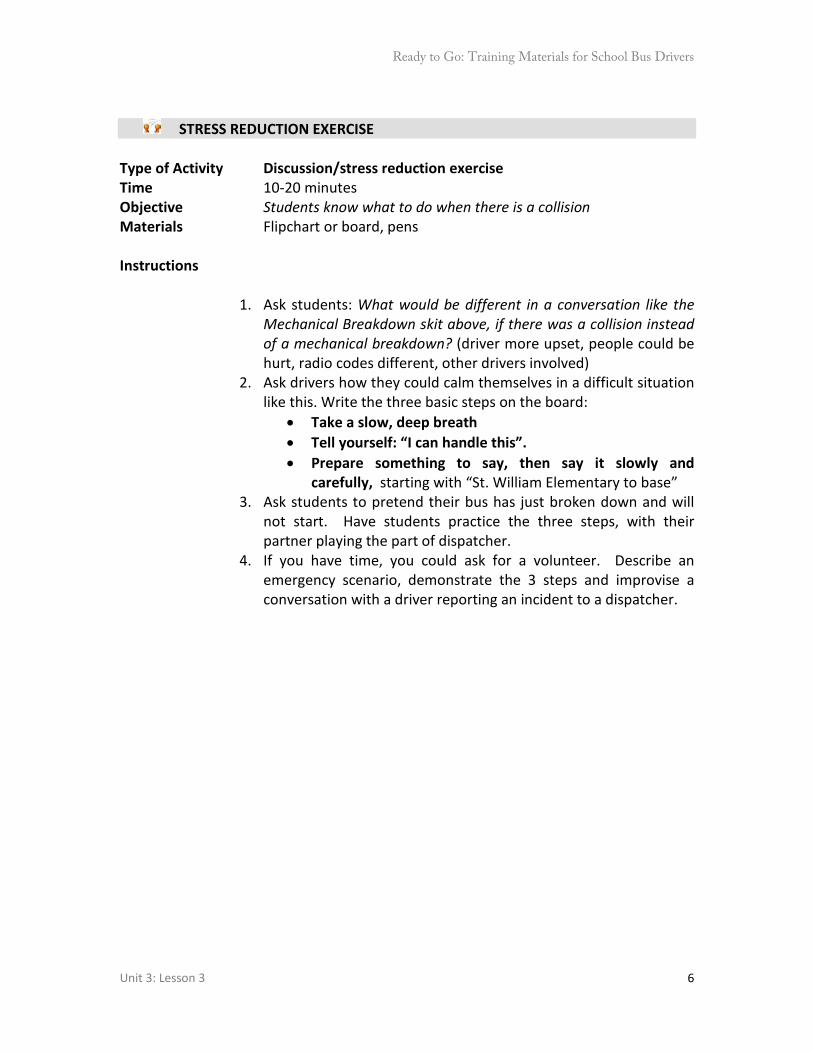
Ready to Go: Training Materials for School Bus Drivers
Unit 3: Lesson 3
6
STRESS REDUCTION EXERCISE
Type of Activity Discussion/stress reduction exercise Time 10-20 minutes Objective Students know what to do when there is a collision Materials Flipchart or board, pens Instructions
1. Ask students: What would be different in a conversation like the Mechanical Breakdown skit above, if there was a collision instead of a mechanical breakdown? (driver more upset, people could be hurt, radio codes different, other drivers involved)
2. Ask drivers how they could calm themselves in a difficult situation like this. Write the three basic steps on the board:
• Take a slow, deep breath • Tell yourself: “I can handle this”. • Prepare something to say, then say it slowly and
carefully, starting with “St. William Elementary to base” 3. Ask students to pretend their bus has just broken down and will
not start. Have students practice the three steps, with their partner playing the part of dispatcher.
4. If you have time, you could ask for a volunteer. Describe an emergency scenario, demonstrate the 3 steps and improvise a conversation with a driver reporting an incident to a dispatcher.

Ready to Go: Training Materials for School Bus Drivers
Unit 3: Check Learning
1
RADIO COMMUNICATIONS CHECK LEARNING
Outcome: Students demonstrate what they have learned in this unit Overall Time: 15-30 minutes Choose one of the two following activities:
LISTENING TEST Type of Activity Listening Test, with multiple choice answer sheet Time 30 minutes Objective To demonstrate that students can listen and understand a routine
radio exchange between a dispatcher and driver. Materials Ready to Go CD (Child asleep on the bus), CD player, Listening
Test sheet for each student, pencils Dialogue script is available at the end of this activity. Instructions:
1. Give each student an answer sheet, face down. 2. Tell students you will play a conversation between a dispatcher and a
driver. They should listen once, without looking at the paper. They then will have a chance to read the paper, then listen again.
3. Play the Child asleep on the bus dialogue all the way through. 4. Ask students to turn over their paper, write their names at the top
and read it through. Answer any questions which do not give away test answers.
5. Play the dialogue again. 6. Collect completed papers.
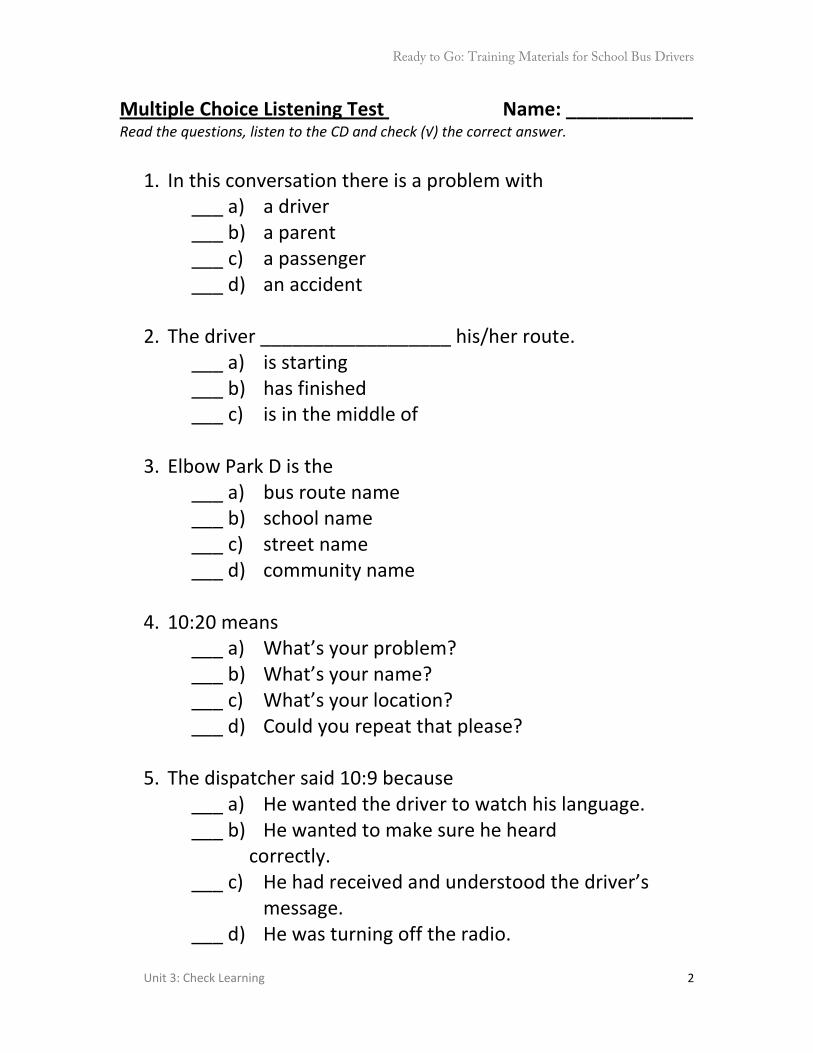
Ready to Go: Training Materials for School Bus Drivers
Unit 3: Check Learning
2
Multiple Choice Listening Test Name: ____________ Read the questions, listen to the CD and check (√) the correct answer.
1. In this conversation there is a problem with
___ a) a driver ___ b) a parent ___ c) a passenger ___ d) an accident
2. The driver __________________ his/her route. ___ a) is starting ___ b) has finished ___ c) is in the middle of
3. Elbow Park D is the
___ a) bus route name ___ b) school name ___ c) street name ___ d) community name
4. 10:20 means ___ a) What’s your problem? ___ b) What’s your name? ___ c) What’s your location? ___ d) Could you repeat that please?
5. The dispatcher said 10:9 because
___ a) He wanted the driver to watch his language. ___ b) He wanted to make sure he heard correctly. ___ c) He had received and understood the driver’s
message. ___ d) He was turning off the radio.
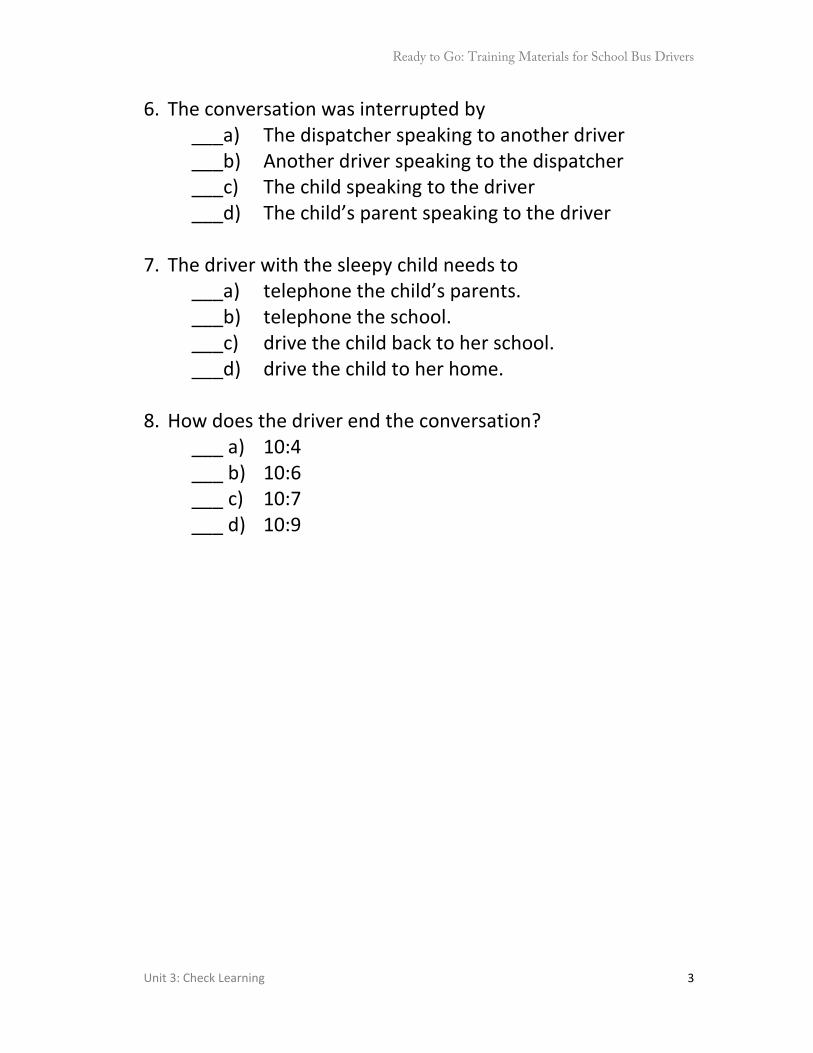
Ready to Go: Training Materials for School Bus Drivers
Unit 3: Check Learning
3
6. The conversation was interrupted by ___a) The dispatcher speaking to another driver ___b) Another driver speaking to the dispatcher ___c) The child speaking to the driver ___d) The child’s parent speaking to the driver
7. The driver with the sleepy child needs to ___a) telephone the child’s parents. ___b) telephone the school. ___c) drive the child back to her school. ___d) drive the child to her home.
8. How does the driver end the conversation? ___ a) 10:4 ___ b) 10:6 ___ c) 10:7 ___ d) 10:9

Ready to Go: Training Materials for School Bus Drivers
Unit 3: Check Learning
4
Listening Test Dialogue: Child Asleep on the Bus
Driver 1: Elbow Park D to base Dispatcher: Go ahead, Elbow Park Delta Driver 1: I’ve finished my route and have a sleepy
child who forgot to get off. Dispatcher: What’s the child’s name, John? Driver 1: Susan Chang, last name Chang, Charly Hotel
Alpha November Golf Dispatcher: Copy. What is the route again? Driver 1: Elbow Park Delta Dispatcher: Copy, Delta. I’ll give the school a call and
see if there’s anyone in the office. What’s your 10:20?
Driver 1: 104th Avenue and 37th Street SW Dispatcher: 10:9, please. Driver 1: 104th Avenue and 37th Street SW Driver 2: 1052 to base. Dispatcher: Please stand by, 1052 (pause)… Elbow Park Delta Driver 1: Go ahead. Dispatcher: John, take Susan back to the school, the
secretary is calling her parents. Driver 1: Copy that, 10:4
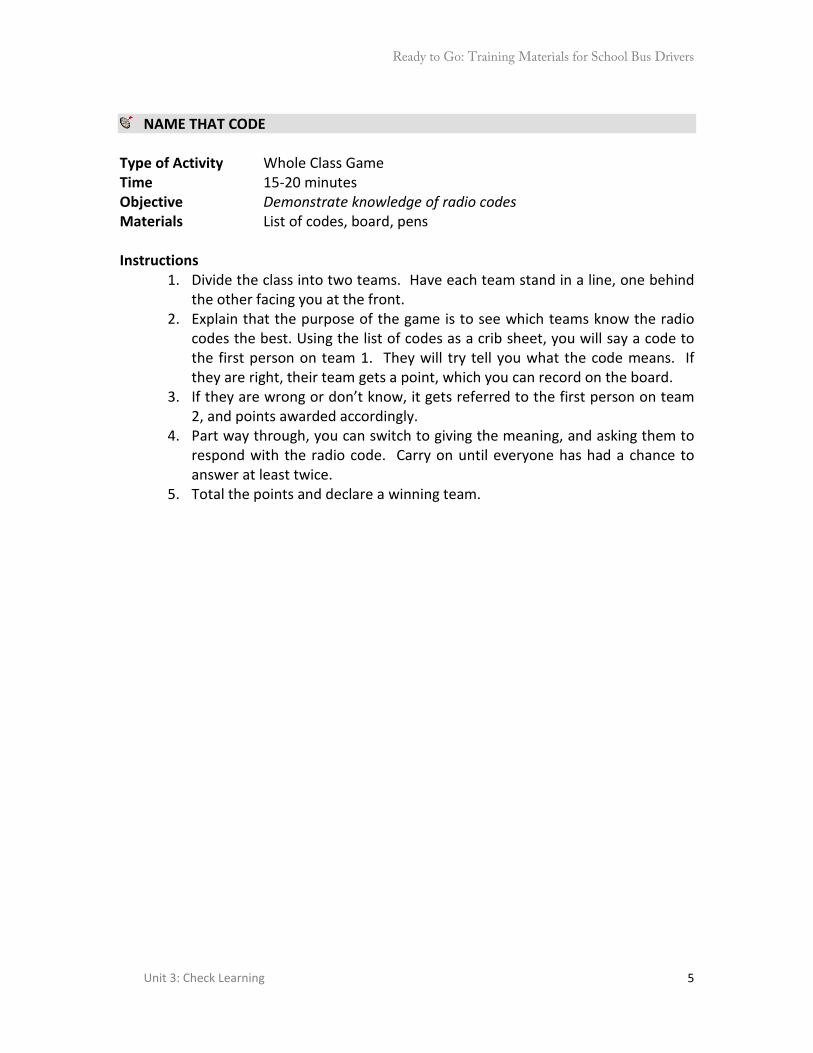
Ready to Go: Training Materials for School Bus Drivers
Unit 3: Check Learning
5
NAME THAT CODE
Type of Activity Whole Class Game Time 15-20 minutes Objective Demonstrate knowledge of radio codes Materials List of codes, board, pens Instructions
1. Divide the class into two teams. Have each team stand in a line, one behind the other facing you at the front.
2. Explain that the purpose of the game is to see which teams know the radio codes the best. Using the list of codes as a crib sheet, you will say a code to the first person on team 1. They will try tell you what the code means. If they are right, their team gets a point, which you can record on the board.
3. If they are wrong or don’t know, it gets referred to the first person on team 2, and points awarded accordingly.
4. Part way through, you can switch to giving the meaning, and asking them to respond with the radio code. Carry on until everyone has had a chance to answer at least twice.
5. Total the points and declare a winning team.
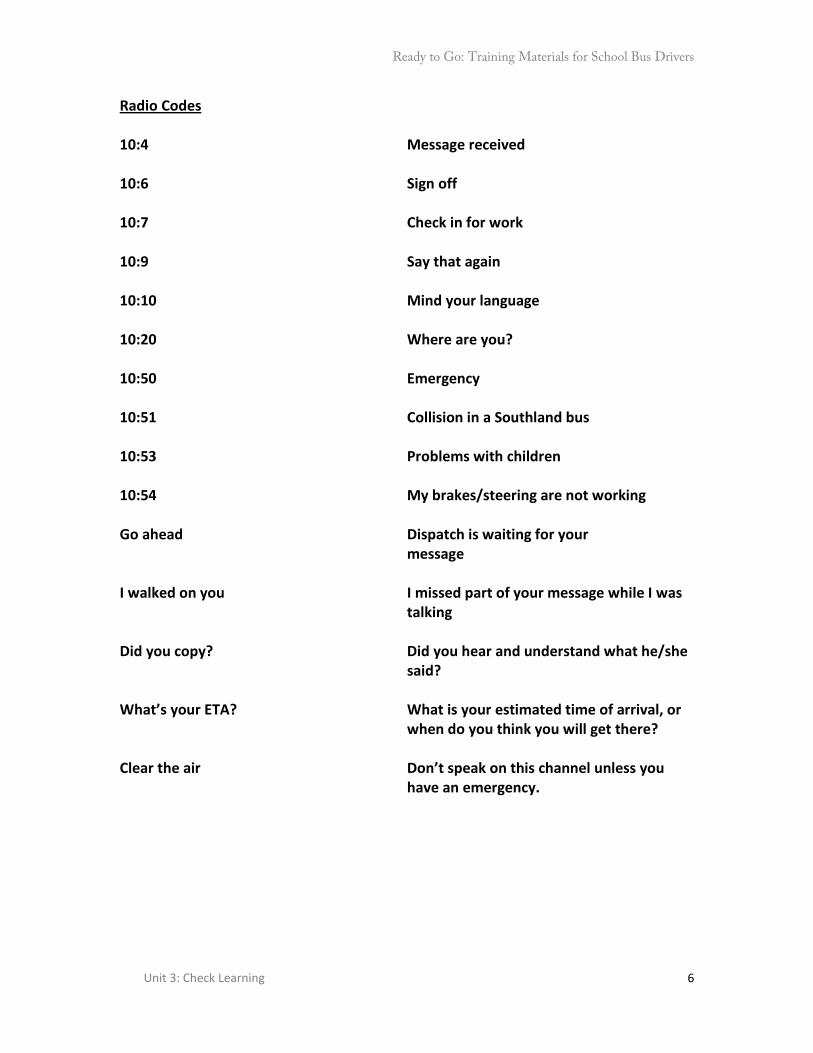
Ready to Go: Training Materials for School Bus Drivers
Unit 3: Check Learning
6
Radio Codes 10:4 Message received 10:6 Sign off 10:7 Check in for work 10:9 Say that again 10:10 Mind your language 10:20 Where are you? 10:50 Emergency 10:51 Collision in a Southland bus 10:53 Problems with children 10:54 My brakes/steering are not working Go ahead Dispatch is waiting for your message I walked on you I missed part of your message while I was
talking Did you copy? Did you hear and understand what he/she
said? What’s your ETA? What is your estimated time of arrival, or
when do you think you will get there? Clear the air Don’t speak on this channel unless you
have an emergency.
Ready to Go: Training Materials for School Bus
Unit 3: Lesson 3 1
RADIO COMMUNICATIONS LESSON 4: OPTIONAL PRONUNCIATION LESSON
Outcome: ESL speakers speak clearly on the radio. Improve English pronunciation. Overall Time: 30-60 minutes
STRESSING CONTENT WORDS Type of Activity Pronunciation practice Time 30-60 minutes Objective English as a Second Language speakers learn to stress and slow
down content words to make themselves more easily understood Materials Flipchart or board, pens, Radio Communication Pronunciation
practice sheets, Listening Activity worksheets, pencils Instructions:
1. Tell students: I am going to read two phrases and I would like you to tell me which is easier to understand. Read the following, with stress and slower speech (bold and underlined) and word grouping as shown: a) Tell the [kids what’s] happening and ask [them to] be quiet so
you can listen. b) [Tell the] kids what’s happening [and ask them to be] quiet
[so you can] listen.
2. Ask: Which was easier to understand? (b) Why? (The important words were louder and slower, i.e. content words had stress, and long words had stress in the right place.) Write the phrase on the board or flipchart.
3. Ask students: What is a content word? (A word with important information in the phrase) What is stress? (When the word or part of word is louder, slower and more clearly pronounced than the rest of the phrase).
4. Have students identify the content words in the sentence and underline them on the board. (Should be as in b above).
5. Ask students to listen again as you read the sentence, for the words which are short and grouped together. As students identify them, group them in brackets[] as shown. Ask the students: If you have to divide this long sentence into 3, where would you do it? Mark the breaks with a “/”. Ask students to practice this phrase with you, stopping in appropriate places. Then have a few students to read the sentence on the board to the class emphasizing the content words.

Ready to Go: Training Materials for School Bus
Unit 3: Lesson 3 2
6. Give out the Radio Communication Pronunciation practice sheet to students and ask them to underline the content words, the stressed parts of long words and to group together de-stressed words.
7. Go around and help them. 8. Take up answers and ask the students to practice reading the
handout to their partners emphasizing the content words. 9. Highlight nos. 3, 12 and 14. Explain to the students the
importance of clear speech in giving addresses. Calgary addresses have a lot of numbers, which can be repeated digit by digit (e.g. 1-0-9 Avenue). Calgary has many road names which are almost the same (30th Ave, 13th Ave; Bridlecreek Park SW vs. Bridlecrest Lake SW)
10. If there is time, have students try listening to each other reading out addresses using the Listening Activity worksheet below. They need to see if they can identify the correct addresses.
Ready to Go: Training Materials for School Bus
Unit 3: Lesson 3 3
Radio Communications: Pronunciation • Underline the content words
• Underline the part of word (syllable) in any long words to stress
• Group short de-stressed words together
• Practice saying these sentences
1. Turn right at the lights.
2. Make a left turn at the park.
3. I am going northbound on 43rd Street SW.
4. Tell them to wait for a different bus.
5. A safety supervisor is on the way.
6. The school is on the west side of Signal Hill Court.
7. Do you have any kids on the bus?
8. There are fifteen children on board.
9. Is everyone OK?
10. Nobody is hurt.
11. What’s your 10:20?
12. I am at 109th Avenue and MacLeod Trail, going northbound.
13. What’s your 10:20?
14. My location is Templevale Gate NE near Temple Drive.

Ready to Go: Training Materials for School Bus
Unit 3: Lesson 3 4
Listening Activity: Which did you hear?
1.
___ a) Ramsey Gardens
___ b) Ramsey Gate
___ c) Ramsey Court
___ d) Ranchview Crescent
2.
___ a) Forest Hill Drive
___ b) Forest Heights Road
___ c) Forest Hill Place
___ d) Forest Grove Place
3.
___ a) Edgebank Lane
___ b) Edgebrook Link
___ c) Edgeview Bank
___ d) Edgemont Brook
4.
___ a) West Hillhurst
___ b) East Hillhurst
___ c) Westhills
___ d) Whitehill Place
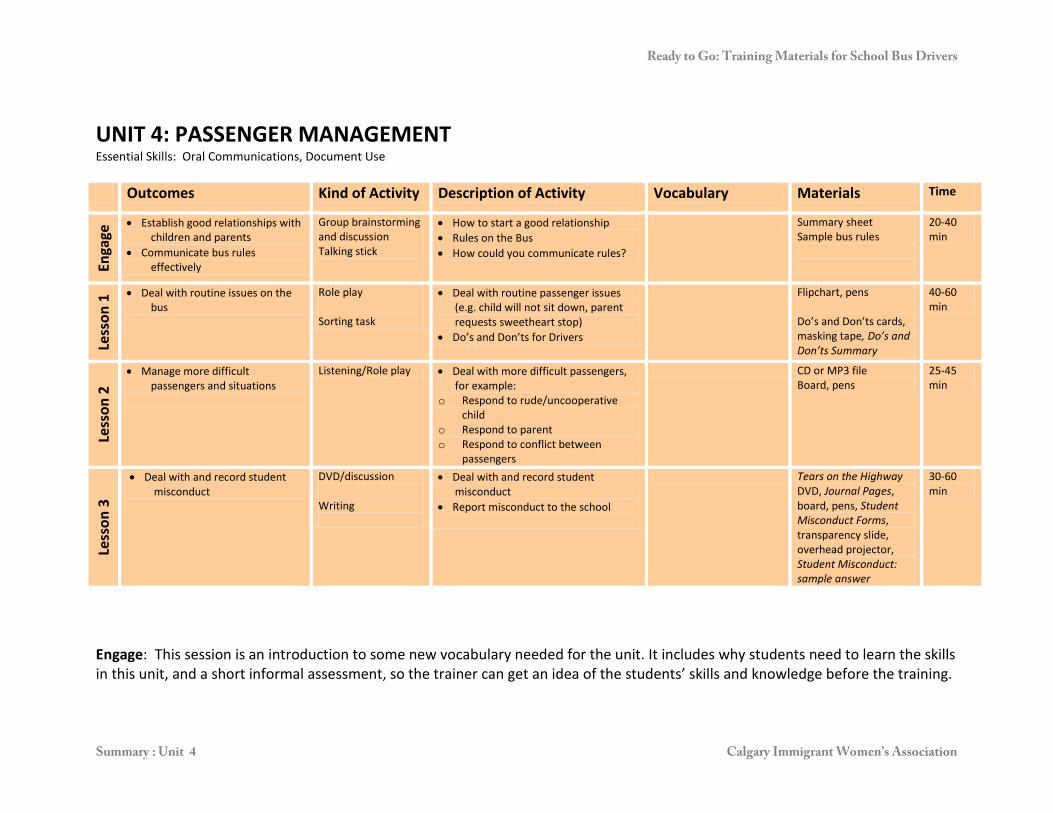
Ready to Go: Training Materials for School Bus Drivers
Summary : Unit 4 Calgary Immigrant Women’s Association
UNIT 4: PASSENGER MANAGEMENT
Essential Skills: Oral Communications, Document Use
Engage: This session is an introduction to some new vocabulary needed for the unit. It includes why students need to learn the skills in this unit, and a short informal assessment, so the trainer can get an idea of the students’ skills and knowledge before the training.
Outcomes Kind of Activity Description of Activity Vocabulary Materials Time
Enga
ge • Establish good relationships with
children and parents • Communicate bus rules
effectively
Group brainstorming and discussion Talking stick
• How to start a good relationship • Rules on the Bus • How could you communicate rules?
Summary sheet Sample bus rules
20-40 min
Less
on 1
• Deal with routine issues on the bus
Role play Sorting task
• Deal with routine passenger issues (e.g. child will not sit down, parent requests sweetheart stop)
• Do’s and Don’ts for Drivers
Flipchart, pens Do’s and Don’ts cards, masking tape, Do’s and Don’ts Summary
40-60 min
Less
on 2
• Manage more difficult passengers and situations
Listening/Role play • Deal with more difficult passengers, for example:
o Respond to rude/uncooperative child
o Respond to parent o Respond to conflict between
passengers
CD or MP3 file Board, pens
25-45 min
Less
on 3
• Deal with and record student misconduct
DVD/discussion Writing
• Deal with and record student misconduct
• Report misconduct to the school
Tears on the Highway DVD, Journal Pages, board, pens, Student Misconduct Forms, transparency slide, overhead projector, Student Misconduct: sample answer
30-60 min
Ready to Go: Training Materials for School Bus Drivers
Summary : Unit 4 Calgary Immigrant Women’s Association
Symbols for activities: Game
Brainstorming Role Play Listening Writing
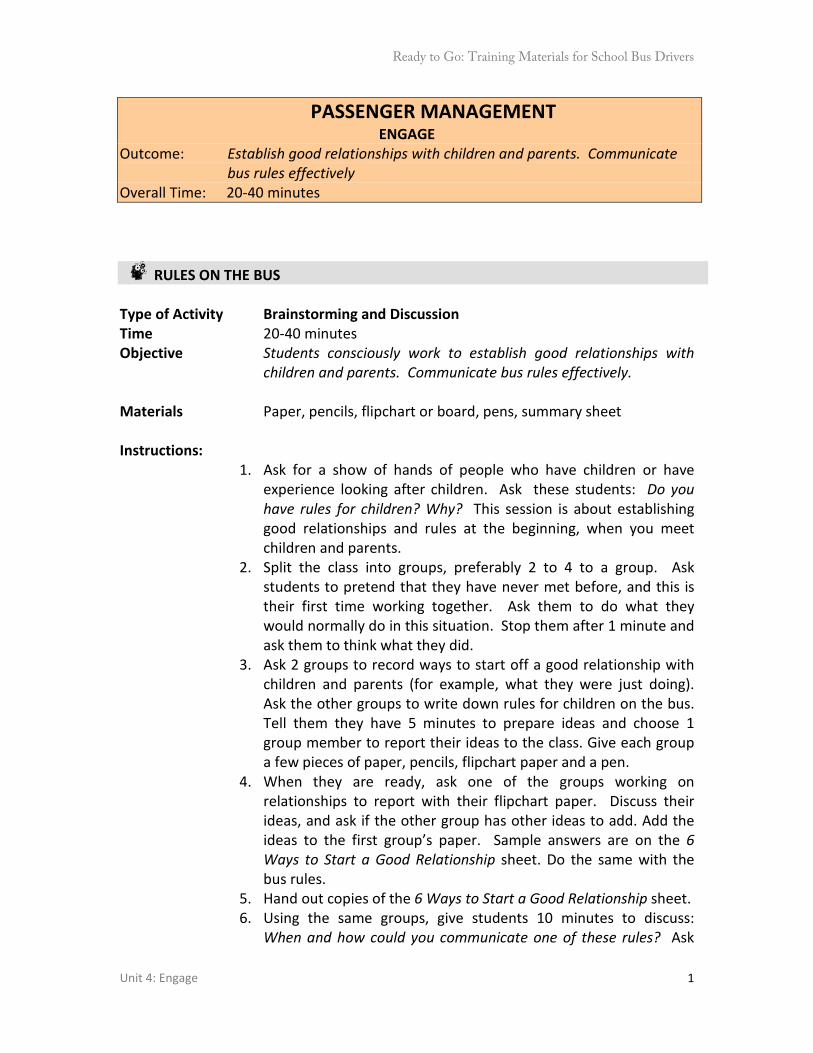
Ready to Go: Training Materials for School Bus Drivers
Unit 4: Engage
1
PASSENGER MANAGEMENT ENGAGE
Outcome: Establish good relationships with children and parents. Communicate bus rules effectively
Overall Time: 20-40 minutes
RULES ON THE BUS Type of Activity Brainstorming and Discussion Time 20-40 minutes Objective Students consciously work to establish good relationships with
children and parents. Communicate bus rules effectively. Materials Paper, pencils, flipchart or board, pens, summary sheet Instructions:
1. Ask for a show of hands of people who have children or have experience looking after children. Ask these students: Do you have rules for children? Why? This session is about establishing good relationships and rules at the beginning, when you meet children and parents.
2. Split the class into groups, preferably 2 to 4 to a group. Ask students to pretend that they have never met before, and this is their first time working together. Ask them to do what they would normally do in this situation. Stop them after 1 minute and ask them to think what they did.
3. Ask 2 groups to record ways to start off a good relationship with children and parents (for example, what they were just doing). Ask the other groups to write down rules for children on the bus. Tell them they have 5 minutes to prepare ideas and choose 1 group member to report their ideas to the class. Give each group a few pieces of paper, pencils, flipchart paper and a pen.
4. When they are ready, ask one of the groups working on relationships to report with their flipchart paper. Discuss their ideas, and ask if the other group has other ideas to add. Add the ideas to the first group’s paper. Sample answers are on the 6 Ways to Start a Good Relationship sheet. Do the same with the bus rules.
5. Hand out copies of the 6 Ways to Start a Good Relationship sheet. 6. Using the same groups, give students 10 minutes to discuss:
When and how could you communicate one of these rules? Ask
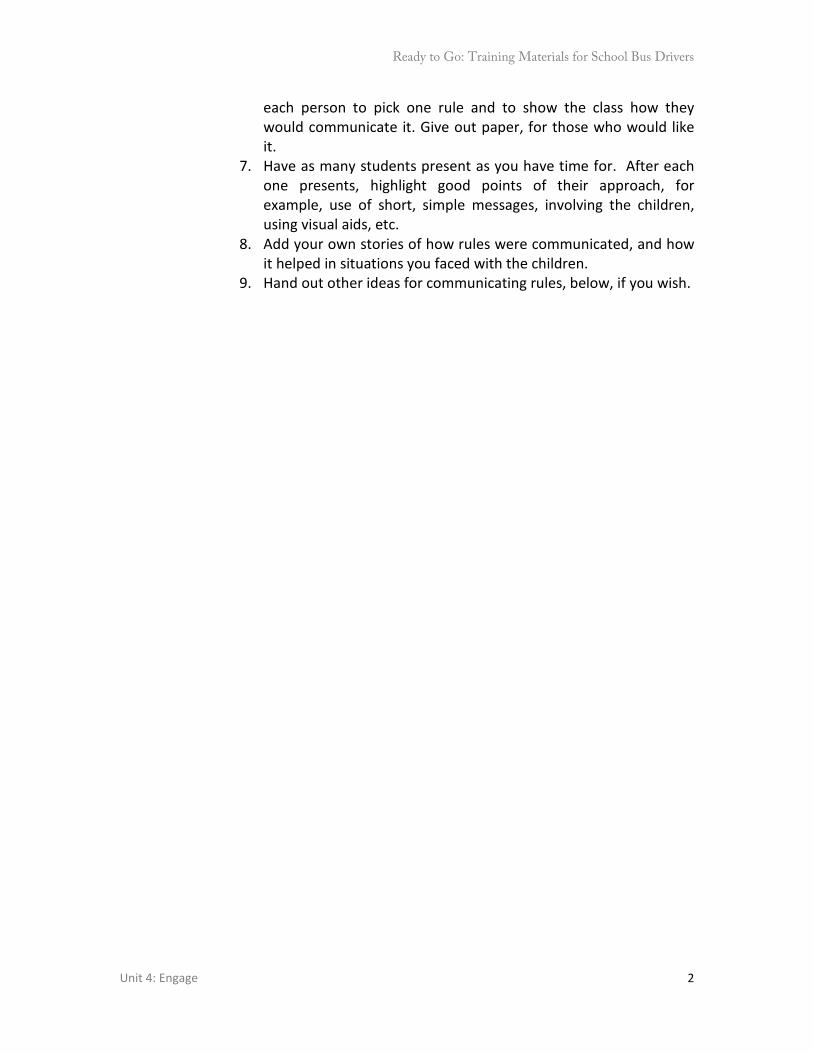
Ready to Go: Training Materials for School Bus Drivers
Unit 4: Engage
2
each person to pick one rule and to show the class how they would communicate it. Give out paper, for those who would like it.
7. Have as many students present as you have time for. After each one presents, highlight good points of their approach, for example, use of short, simple messages, involving the children, using visual aids, etc.
8. Add your own stories of how rules were communicated, and how it helped in situations you faced with the children.
9. Hand out other ideas for communicating rules, below, if you wish.
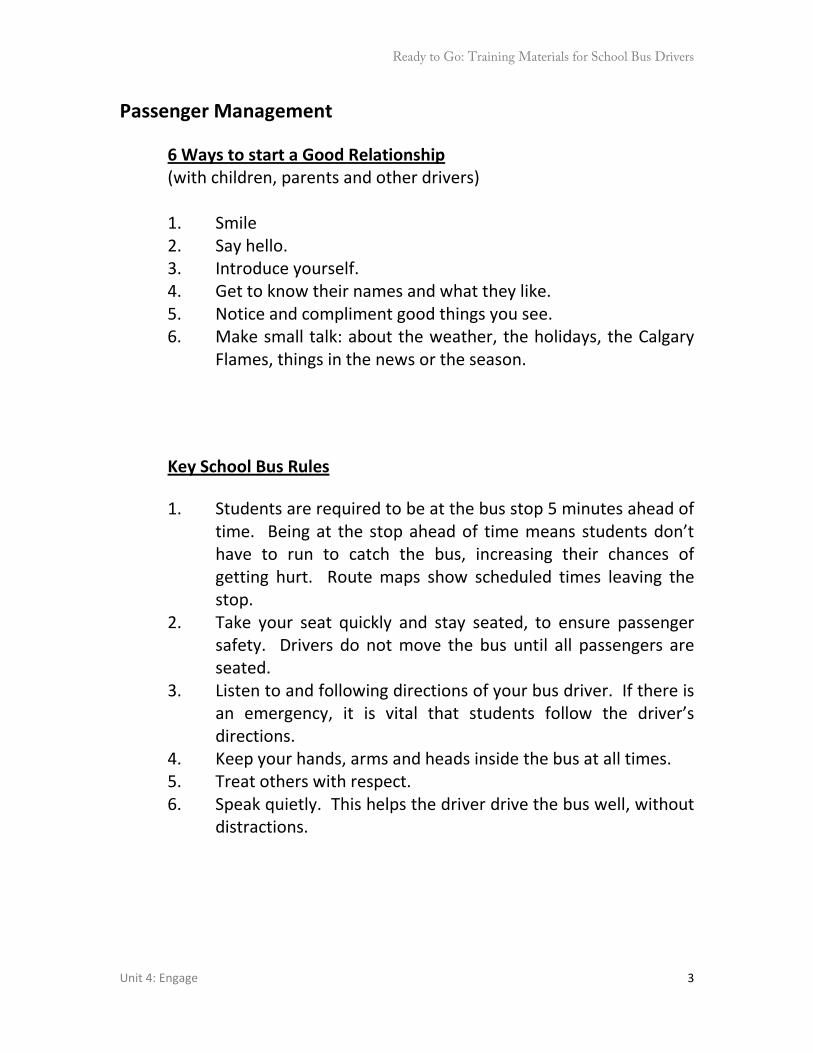
Ready to Go: Training Materials for School Bus Drivers
Unit 4: Engage
3
Passenger Management
6 Ways to start a Good Relationship (with children, parents and other drivers)
1. Smile 2. Say hello. 3. Introduce yourself. 4. Get to know their names and what they like. 5. Notice and compliment good things you see. 6. Make small talk: about the weather, the holidays, the Calgary
Flames, things in the news or the season.
Key School Bus Rules
1. Students are required to be at the bus stop 5 minutes ahead of time. Being at the stop ahead of time means students don’t have to run to catch the bus, increasing their chances of getting hurt. Route maps show scheduled times leaving the stop.
2. Take your seat quickly and stay seated, to ensure passenger safety. Drivers do not move the bus until all passengers are seated.
3. Listen to and following directions of your bus driver. If there is an emergency, it is vital that students follow the driver’s directions.
4. Keep your hands, arms and heads inside the bus at all times. 5. Treat others with respect. 6. Speak quietly. This helps the driver drive the bus well, without
distractions.
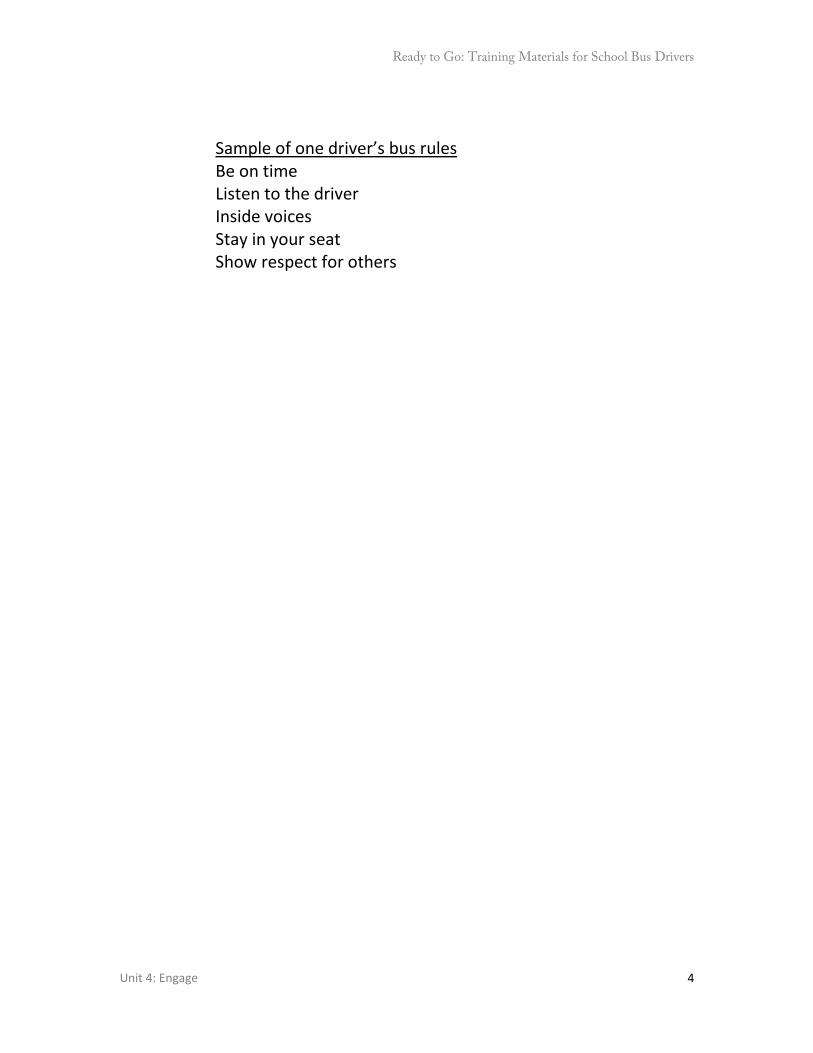
Ready to Go: Training Materials for School Bus Drivers
Unit 4: Engage
4
Sample of one driver’s bus rules Be on time Listen to the driver Inside voices Stay in your seat Show respect for others
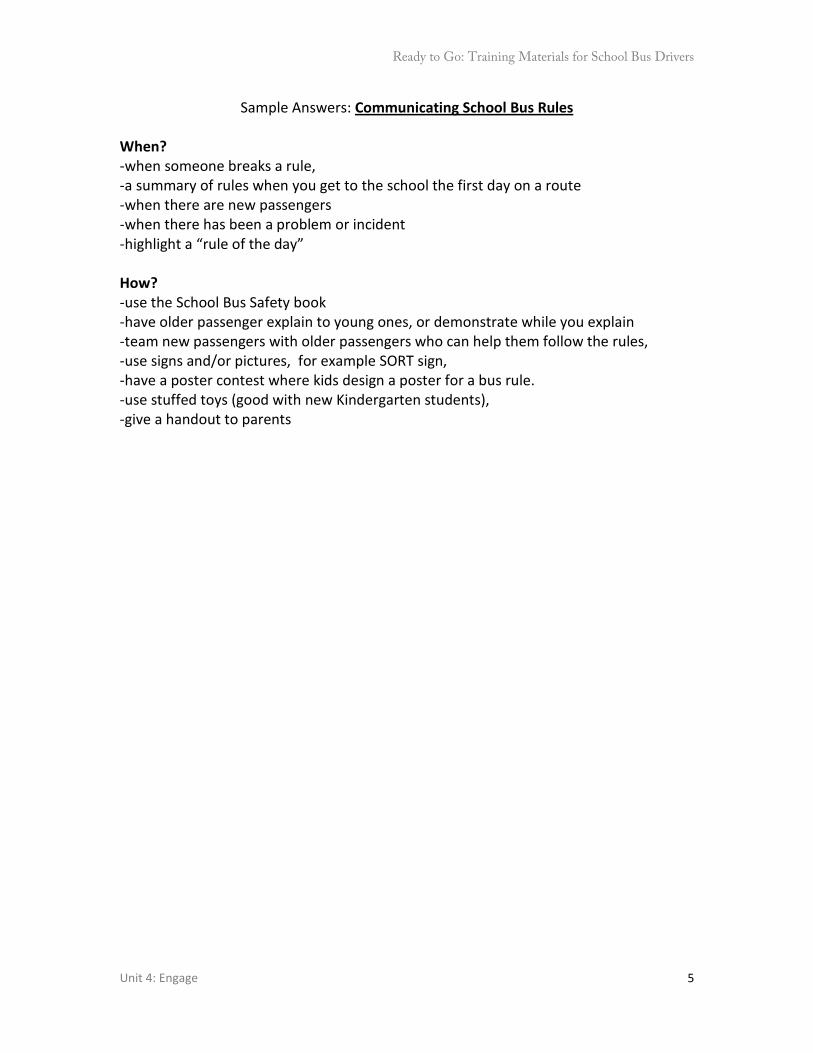
Ready to Go: Training Materials for School Bus Drivers
Unit 4: Engage
5
Sample Answers: Communicating School Bus Rules When? -when someone breaks a rule, -a summary of rules when you get to the school the first day on a route -when there are new passengers -when there has been a problem or incident -highlight a “rule of the day” How? -use the School Bus Safety book -have older passenger explain to young ones, or demonstrate while you explain -team new passengers with older passengers who can help them follow the rules, -use signs and/or pictures, for example SORT sign, -have a poster contest where kids design a poster for a bus rule. -use stuffed toys (good with new Kindergarten students), -give a handout to parents
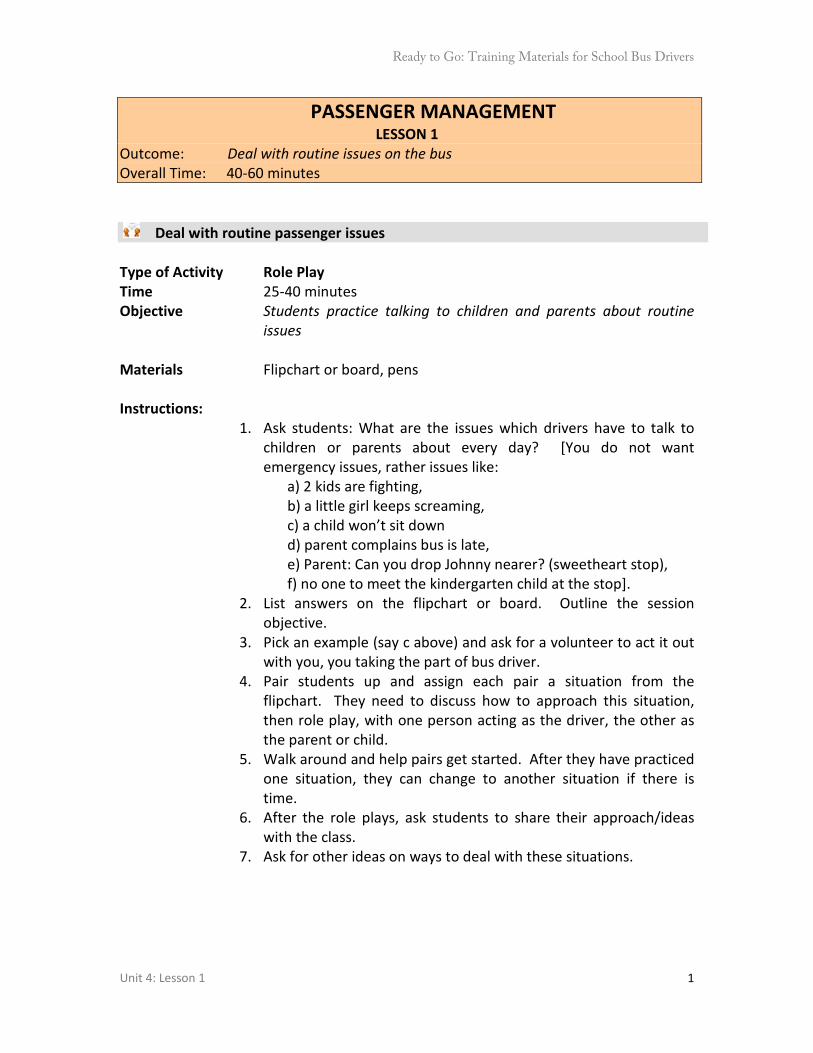
Ready to Go: Training Materials for School Bus Drivers
Unit 4: Lesson 1
1
PASSENGER MANAGEMENT LESSON 1
Outcome: Deal with routine issues on the bus Overall Time: 40-60 minutes
Deal with routine passenger issues Type of Activity Role Play Time 25-40 minutes Objective Students practice talking to children and parents about routine
issues Materials Flipchart or board, pens Instructions:
1. Ask students: What are the issues which drivers have to talk to children or parents about every day? [You do not want emergency issues, rather issues like:
a) 2 kids are fighting, b) a little girl keeps screaming, c) a child won’t sit down d) parent complains bus is late, e) Parent: Can you drop Johnny nearer? (sweetheart stop), f) no one to meet the kindergarten child at the stop].
2. List answers on the flipchart or board. Outline the session objective.
3. Pick an example (say c above) and ask for a volunteer to act it out with you, you taking the part of bus driver.
4. Pair students up and assign each pair a situation from the flipchart. They need to discuss how to approach this situation, then role play, with one person acting as the driver, the other as the parent or child.
5. Walk around and help pairs get started. After they have practiced one situation, they can change to another situation if there is time.
6. After the role plays, ask students to share their approach/ideas with the class.
7. Ask for other ideas on ways to deal with these situations.
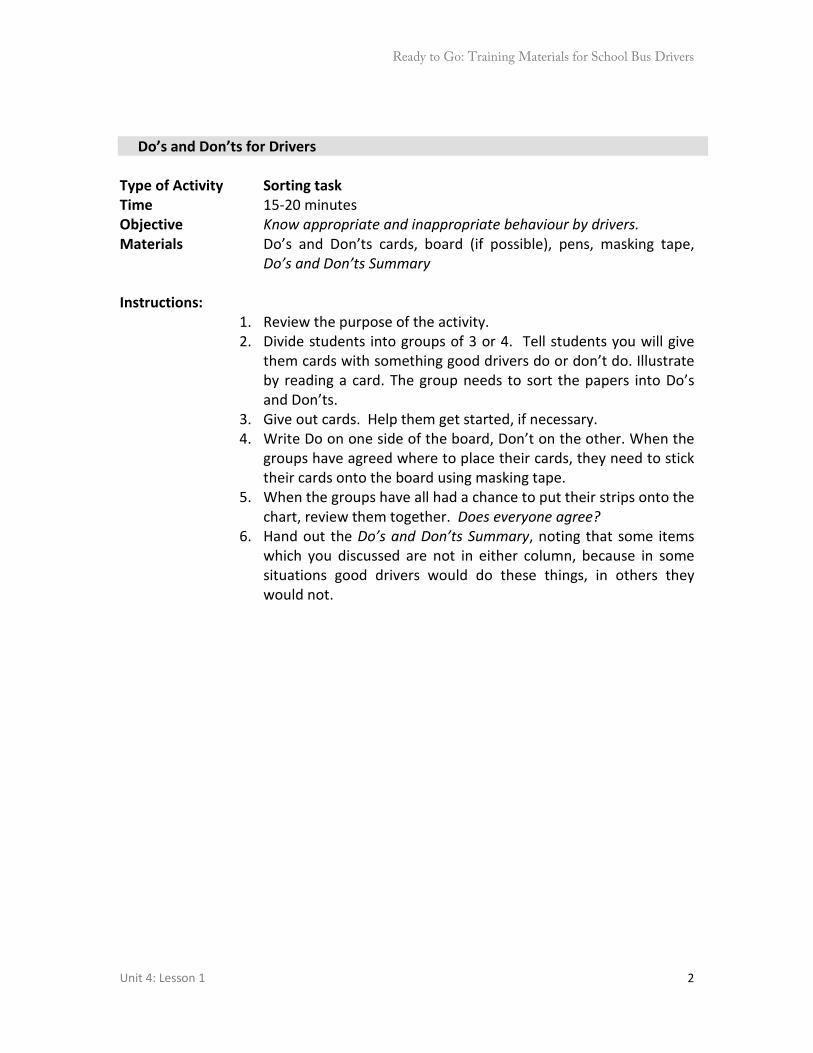
Ready to Go: Training Materials for School Bus Drivers
Unit 4: Lesson 1
2
Do’s and Don’ts for Drivers Type of Activity Sorting task Time 15-20 minutes Objective Know appropriate and inappropriate behaviour by drivers. Materials Do’s and Don’ts cards, board (if possible), pens, masking tape,
Do’s and Don’ts Summary Instructions:
1. Review the purpose of the activity. 2. Divide students into groups of 3 or 4. Tell students you will give
them cards with something good drivers do or don’t do. Illustrate by reading a card. The group needs to sort the papers into Do’s and Don’ts.
3. Give out cards. Help them get started, if necessary. 4. Write Do on one side of the board, Don’t on the other. When the
groups have agreed where to place their cards, they need to stick their cards onto the board using masking tape.
5. When the groups have all had a chance to put their strips onto the chart, review them together. Does everyone agree?
6. Hand out the Do’s and Don’ts Summary, noting that some items which you discussed are not in either column, because in some situations good drivers would do these things, in others they would not.
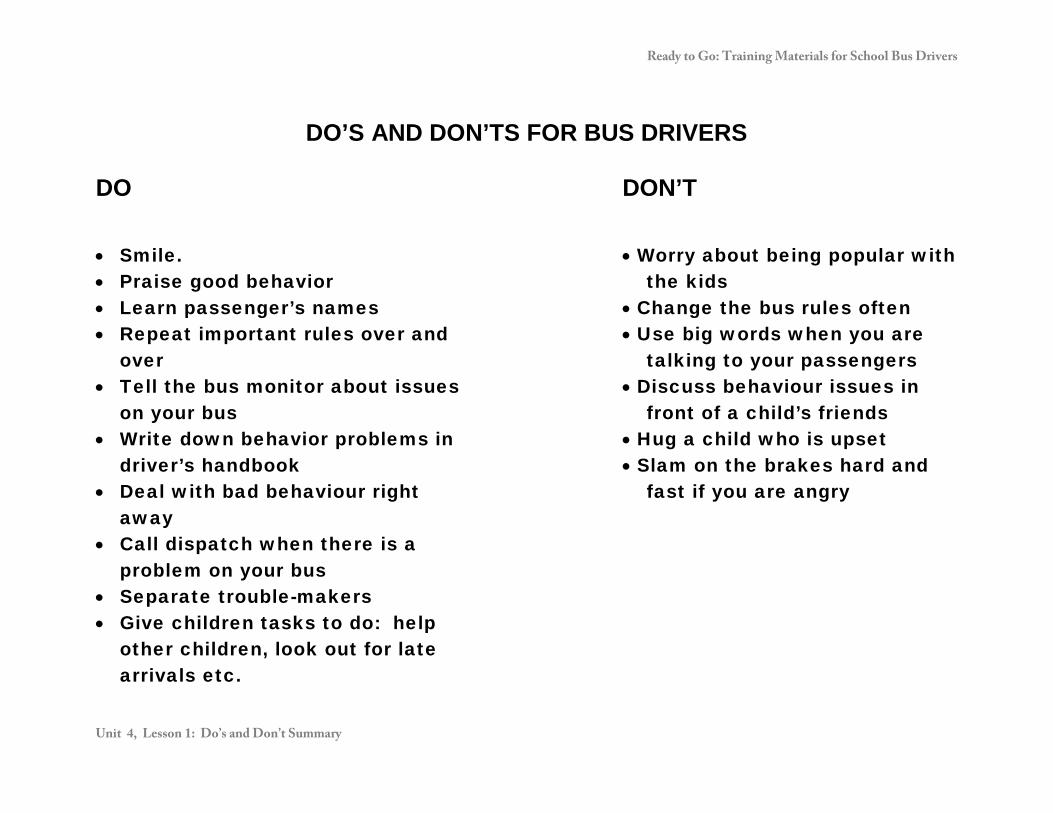
Ready to Go: Training Materials for School Bus Drivers
Unit 4, Lesson 1: Do’s and Don’t Summary
DO’S AND DON’TS FOR BUS DRIVERS
DO DON’T
• Smile. • Praise good behavior • Learn passenger’s names • Repeat important rules over and
over • Tell the bus monitor about issues
on your bus • Write down behavior problems in
driver’s handbook • Deal with bad behaviour right
away • Call dispatch when there is a
problem on your bus • Separate trouble-makers • Give children tasks to do: help
other children, look out for late arrivals etc.
• Worry about being popular with
the kids • Change the bus rules often • Use big words when you are
talking to your passengers • Discuss behaviour issues in
front of a child’s friends • Hug a child who is upset • Slam on the brakes hard and
fast if you are angry
Ready to Go: Training Materials for School Bus Drivers
Unit 4, Lesson 1: Do’s and Don’t Summary
DO’S AND DON’TS CARDS
1. Praise good behavior.
2. Change the bus rules often.
Ready to Go: Training Materials for School Bus Drivers
Unit 4, Lesson 1: Do’s and Don’t Summary
3. Discuss behaviour issues in
front of a child’s friends.
4. Repeat important rules over and
over.
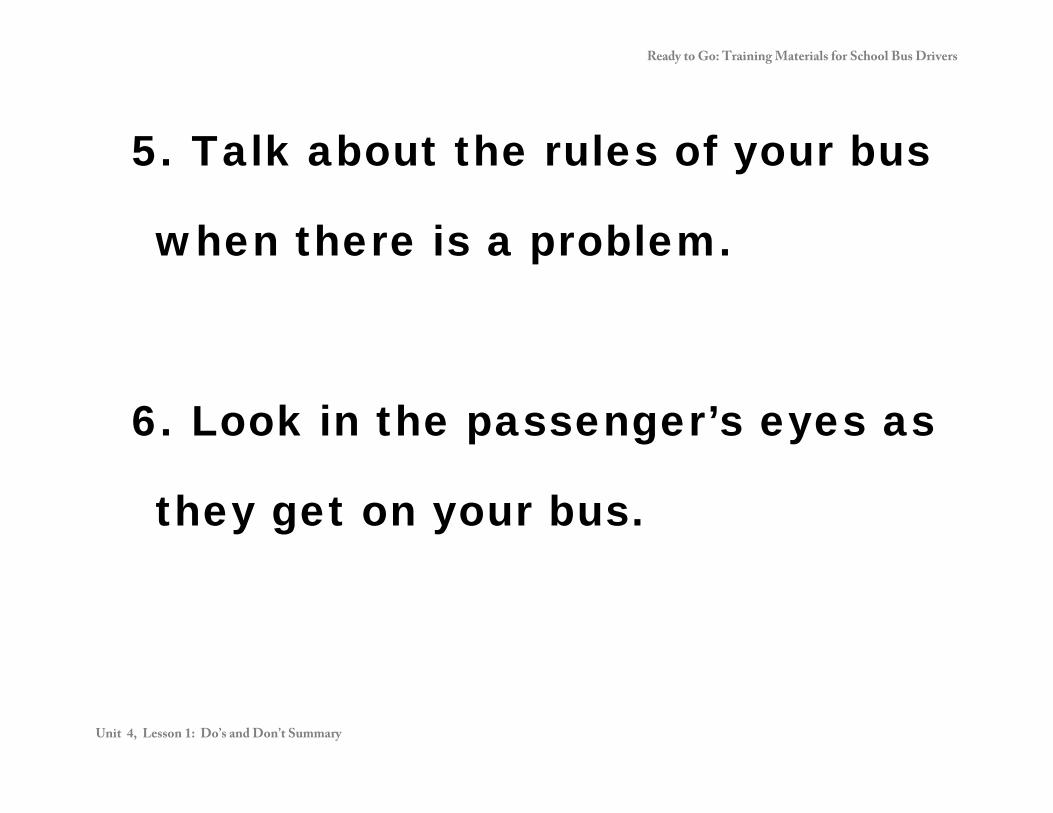
Ready to Go: Training Materials for School Bus Drivers
Unit 4, Lesson 1: Do’s and Don’t Summary
5. Talk about the rules of your bus
when there is a problem.
6. Look in the passenger’s eyes as
they get on your bus.

Ready to Go: Training Materials for School Bus Drivers
Unit 4, Lesson 1: Do’s and Don’t Summary
7. Hug a child who is upset.
8. Use big words when you are
talking to your passengers.
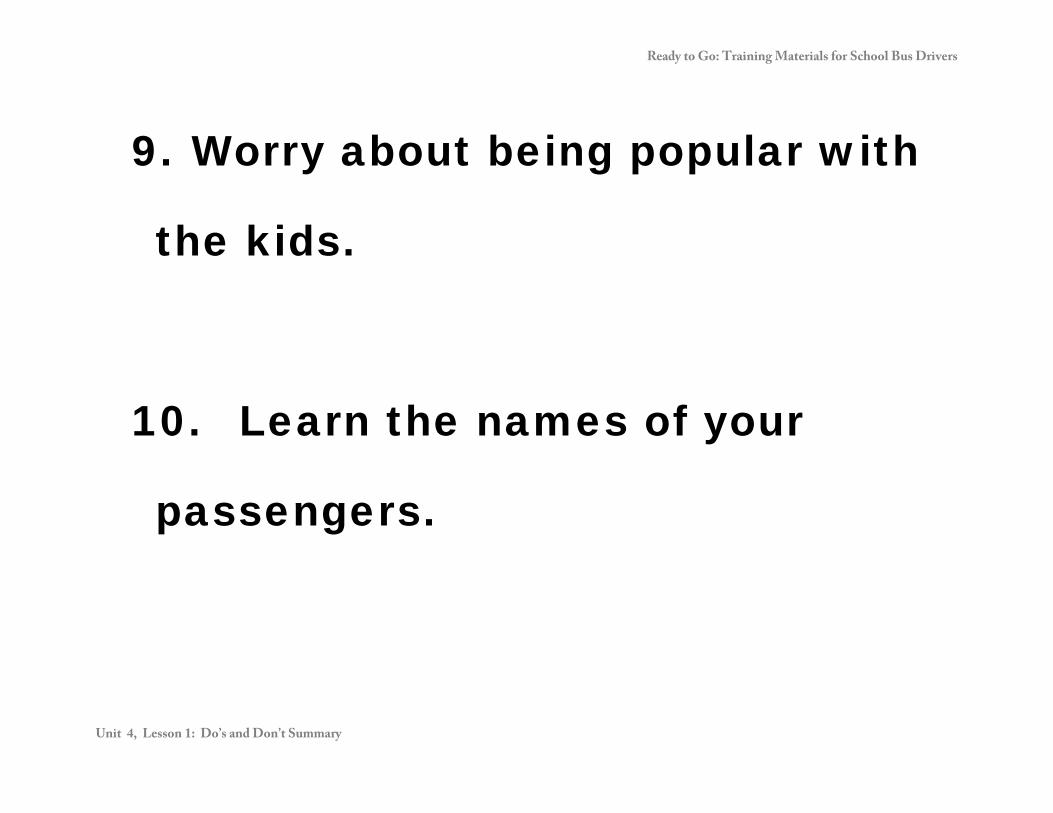
Ready to Go: Training Materials for School Bus Drivers
Unit 4, Lesson 1: Do’s and Don’t Summary
9. Worry about being popular with
the kids.
10. Learn the names of your
passengers.
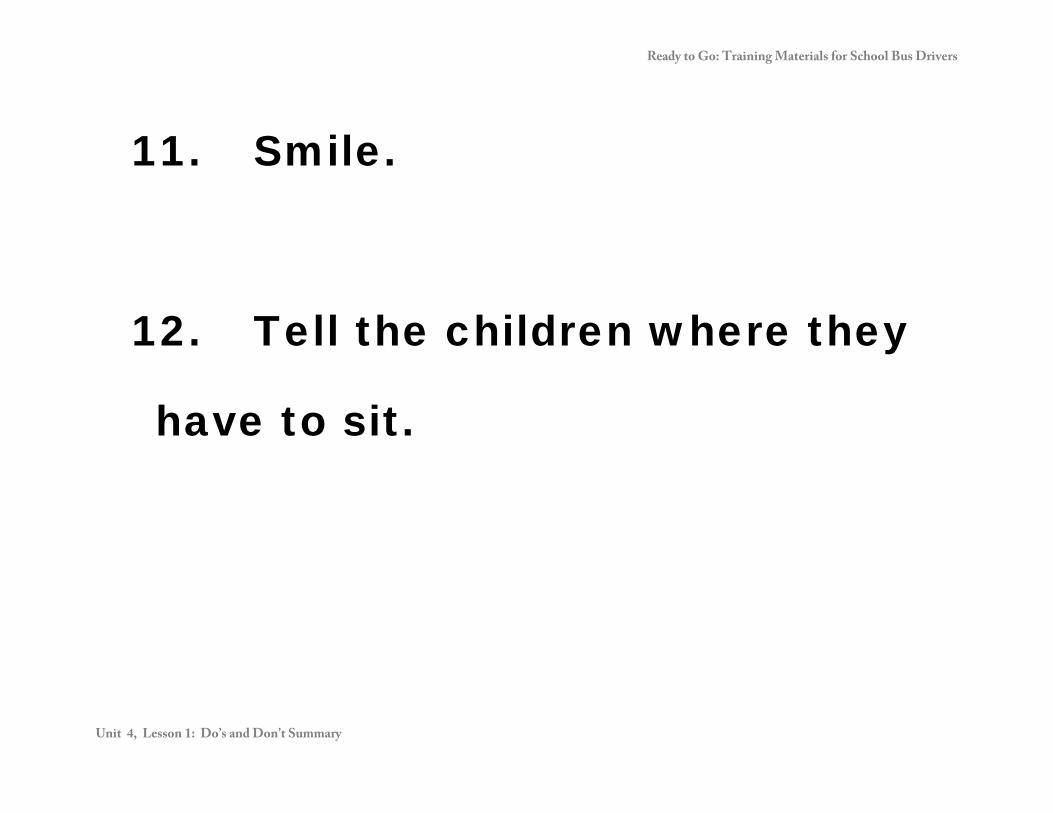
Ready to Go: Training Materials for School Bus Drivers
Unit 4, Lesson 1: Do’s and Don’t Summary
11. Smile.
12. Tell the children where they
have to sit.
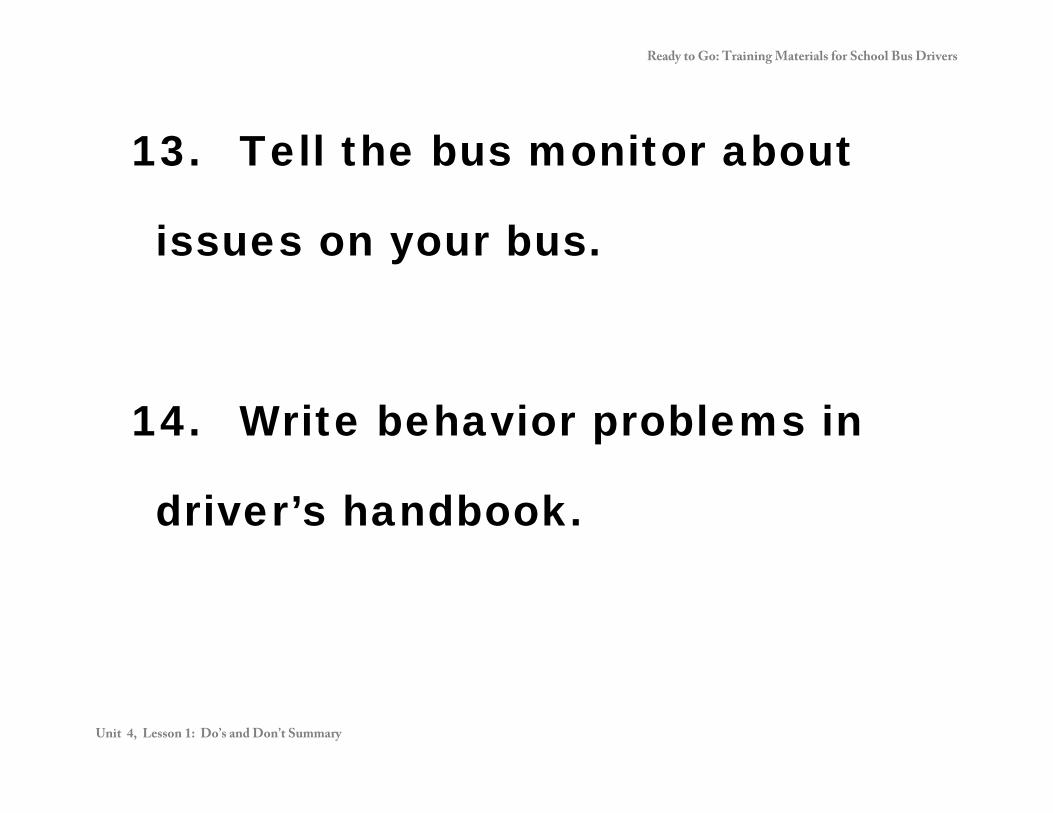
Ready to Go: Training Materials for School Bus Drivers
Unit 4, Lesson 1: Do’s and Don’t Summary
13. Tell the bus monitor about
issues on your bus.
14. Write behavior problems in
driver’s handbook.
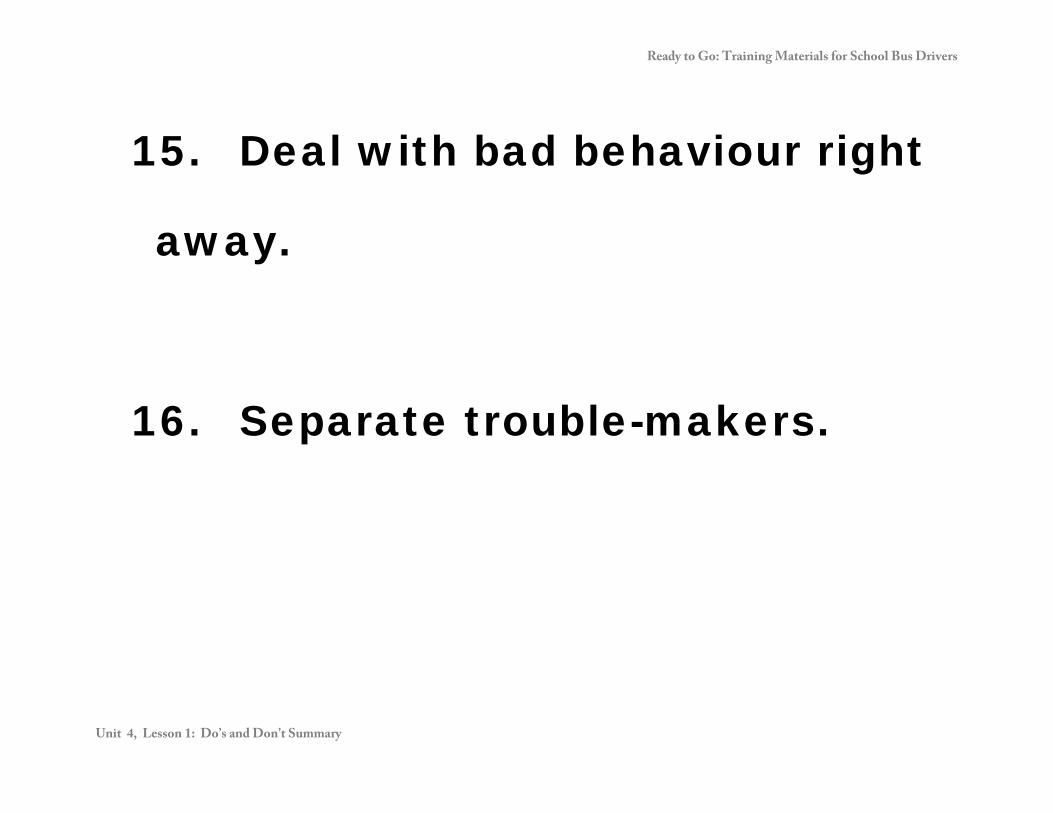
Ready to Go: Training Materials for School Bus Drivers
Unit 4, Lesson 1: Do’s and Don’t Summary
15. Deal with bad behaviour right
away.
16. Separate trouble-makers.

Ready to Go: Training Materials for School Bus Drivers
Unit 4, Lesson 1: Do’s and Don’t Summary
17. Call Dispatch when there is a
problem on your bus.
18. Slam on the brakes hard and
fast if you are angry.

Ready to Go: Training Materials for School Bus Drivers
Unit 4, Lesson 1: Do’s and Don’t Summary
19. Give children tasks to do:
help other children, look out for
late arrivals etc.
20. Talk to parents about issues
with their child on the bus.
Ready to Go: Training Materials for School Bus Drivers
Unit 4: Lesson 2
1
PASSENGER MANAGEMENT LESSON 2
Outcome: Manage more difficult passengers and situations Overall Time: 25-45 minutes
Deal with more difficult passenger issues
Type of Activity Listening, Role play Time 25-45 minutes Objective Students practice responding to difficult passengers and parent
requests Materials Ready to Go CD Instructions:
1. Explain to the students: In a minute, you will listen to a child or parent talking while on the bus. Listen to see if you can understand the situation.
2. Pick a useful dialogue from the CD (transcripts are below). Tell students who is speaking. Play only until the passengers or parent stops speaking. Stop the CD before the driver responds. Ask students: What is happening here?
3. Replay this section of the CD if necessary, asking for more details of what was said.
4. Divide the class up into partners. Ask partners to discuss what the driver should do in this situation for a few minutes, and what the driver should say.
5. Ask for one or two volunteers willing to respond to the person on the CD. Replay the CD and have the class listen to the volunteer’s response. Can the class suggest other ideas?
6. Listen to the bus driver’s response on the CD. Is this a good or bad response?
7. Continue, choosing other examples from the CD with parents and with conflicts on the bus. For situations where drivers could take a variety of approaches, you could ask all students to think of their one, best idea for dealing with the problem. Then ask students one by one to “be the driver” and respond in one sentence, without discussion until everyone has spoken. Transcripts of the CD are below.
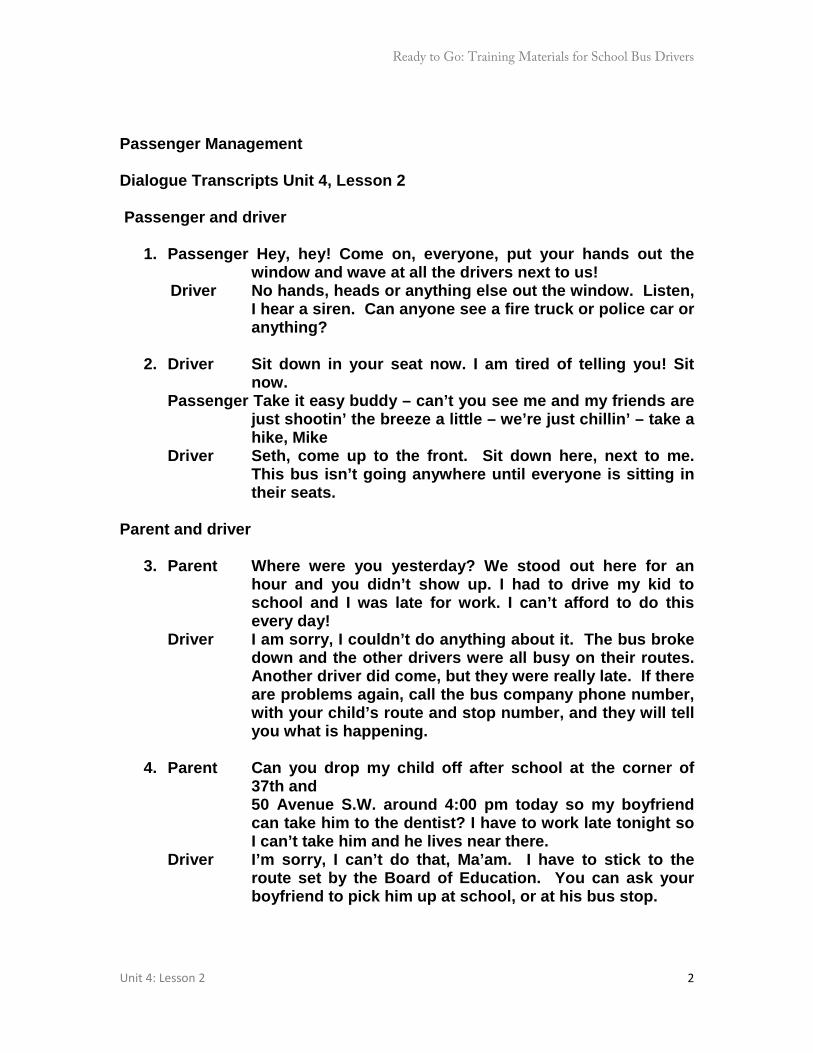
Ready to Go: Training Materials for School Bus Drivers
Unit 4: Lesson 2
2
Passenger Management Dialogue Transcripts Unit 4, Lesson 2 Passenger and driver
1. Passenger Hey, hey! Come on, everyone, put your hands out the window and wave at all the drivers next to us!
Driver No hands, heads or anything else out the window. Listen, I hear a siren. Can anyone see a fire truck or police car or anything?
2. Driver Sit down in your seat now. I am tired of telling you! Sit
now. Passenger Take it easy buddy – can’t you see me and my friends are
just shootin’ the breeze a little – we’re just chillin’ – take a hike, Mike
Driver Seth, come up to the front. Sit down here, next to me. This bus isn’t going anywhere until everyone is sitting in their seats.
Parent and driver
3. Parent Where were you yesterday? We stood out here for an hour and you didn’t show up. I had to drive my kid to school and I was late for work. I can’t afford to do this every day!
Driver I am sorry, I couldn’t do anything about it. The bus broke down and the other drivers were all busy on their routes. Another driver did come, but they were really late. If there are problems again, call the bus company phone number, with your child’s route and stop number, and they will tell you what is happening.
4. Parent Can you drop my child off after school at the corner of
37th and 50 Avenue S.W. around 4:00 pm today so my boyfriend can take him to the dentist? I have to work late tonight so I can’t take him and he lives near there.
Driver I’m sorry, I can’t do that, Ma’am. I have to stick to the route set by the Board of Education. You can ask your boyfriend to pick him up at school, or at his bus stop.

Ready to Go: Training Materials for School Bus Drivers
Unit 4: Lesson 2
3
Conflicts between passengers on the bus
5. Passenger 1 Oh, sorry buddy – I didn’t mean to trip you – guess I just have big feet or something
Passenger 2 Having problems walking? ha ha ha Driver Freeze! Everyone freeze. John, help him up. Mary, help
to pick up his things. This isn’t good behavior. Somebody could have been really hurt. I will report this to the school and your parents.
6. Passenger Hey, give that back – That is mine – MINE – I am telling
on you if you do not give it back. I want it right now !!!!!!
Driver Stop that. What are you doing? – you kids are such brats – here, give that to me – I said give that to me – I’m going to phone your mother about this tonight – stop it.

Ready to Go: Training Materials for School Bus Drivers
Unit 4: Lesson 3 1
PASSENGER MANAGEMENT LESSON 3
Outcome: Deal with and record student misconduct Overall Time: 30-60 minutes
Deal with and record student misconduct Type of Activity DVD, Discussion Time 20-30 minutes Objective Students discuss how to respond to children behaving badly on the
bus Materials Tears on the Highway DVD*, journal pages, pencils, flipchart or
board and pens Instructions:
1. Ask: Who has to driven a car with children behaving badly in the back seat? How bad would it be for the bus driver with 30 children behaving badly? What are examples of bad behaviour? Introduce the purpose of the session.
2. Introduce characters on the DVD (and write names on the board): Ryan Marbeck-a dark-haired boy, wearing a dark shirt Jack-a boy with very short hair and a blue shirt who plays his Gameboy on the bus Fred- a boy wearing a red striped shirt Joey-a boy with black afro hair and a gray shirt Ask students to watch the DVD and think what they would do if they were the bus driver. Start the DVD at chapter 2 and stop after about 1 minute, when the children are very noisy and are not sitting down. Ask what was happening.
3. Show the clip again. Ask students what they would do, if they were drivers with children acting like this (Warn students, stop the bus, write down what happened) .
4. Hand out copies of journal pages. Explain that this is a copy of a page from the handbook all drivers are given, so they can record the days they work, what happened that day etc. Tell them to assume that the day the children were acting up was Wednesday, October 14th. Ask students to write 1 or 2 lines about what they saw in the journal under Wednesday, October 14th. Ask a student who finishes early to copy what they wrote on the board or flipchart. Discuss with students.
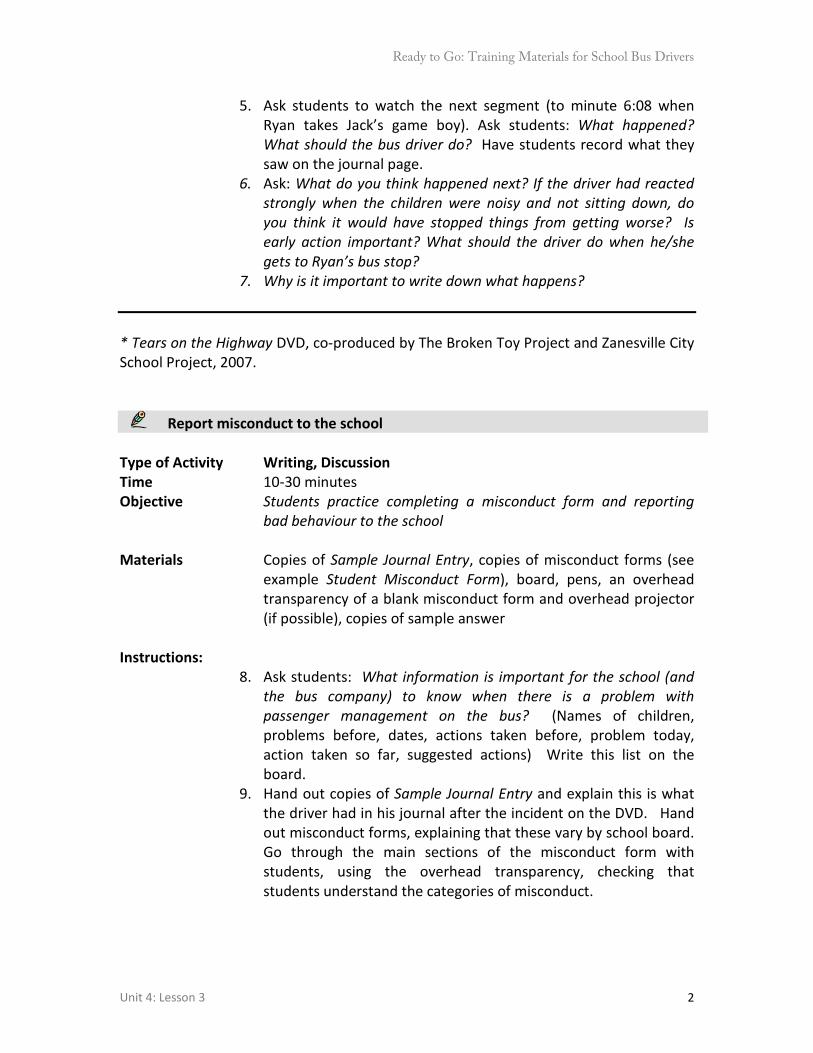
Ready to Go: Training Materials for School Bus Drivers
Unit 4: Lesson 3 2
5. Ask students to watch the next segment (to minute 6:08 when Ryan takes Jack’s game boy). Ask students: What happened? What should the bus driver do? Have students record what they saw on the journal page.
6. Ask: What do you think happened next? If the driver had reacted strongly when the children were noisy and not sitting down, do you think it would have stopped things from getting worse? Is early action important? What should the driver do when he/she gets to Ryan’s bus stop?
7. Why is it important to write down what happens? * Tears on the Highway DVD, co-produced by The Broken Toy Project and Zanesville City School Project, 2007.
Report misconduct to the school Type of Activity Writing, Discussion Time 10-30 minutes Objective Students practice completing a misconduct form and reporting
bad behaviour to the school Materials Copies of Sample Journal Entry, copies of misconduct forms (see
example Student Misconduct Form), board, pens, an overhead transparency of a blank misconduct form and overhead projector (if possible), copies of sample answer
Instructions:
8. Ask students: What information is important for the school (and the bus company) to know when there is a problem with passenger management on the bus? (Names of children, problems before, dates, actions taken before, problem today, action taken so far, suggested actions) Write this list on the board.
9. Hand out copies of Sample Journal Entry and explain this is what the driver had in his journal after the incident on the DVD. Hand out misconduct forms, explaining that these vary by school board. Go through the main sections of the misconduct form with students, using the overhead transparency, checking that students understand the categories of misconduct.
Ready to Go: Training Materials for School Bus Drivers
Unit 4: Lesson 3 3
10. Ask students to complete the form, using the journal pages, and the notes they wrote during the DVD to help them. Walk around and help students get started.
11. After they have had a chance to try completing the form, take up their answers using the overhead transparency. Hand out copies of the sample answer, if you wish, noting the point form, and that normally the form has four copies.
12. Ask students: What do you do with this form, the next morning? (Mention the problem to the bus monitor, Take the form to the office and ask if the principal or vice principal wish to discuss the bad behaviour before you go).
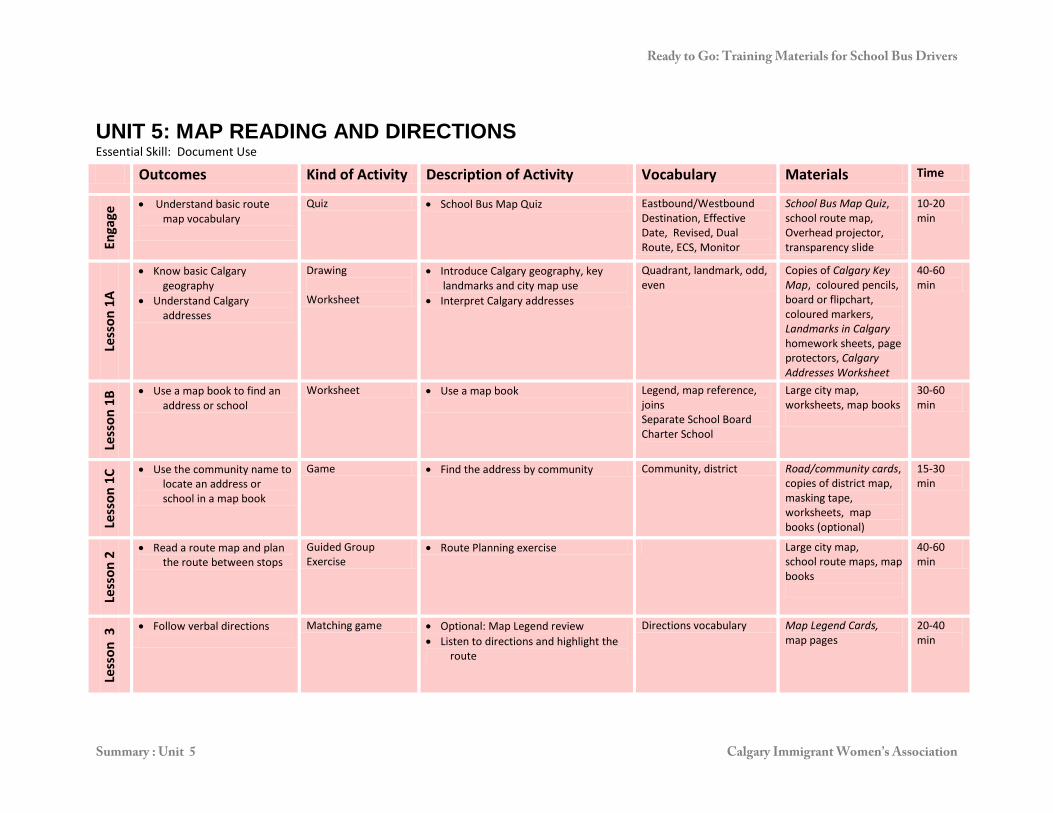
Ready to Go: Training Materials for School Bus Drivers
Summary : Unit 5 Calgary Immigrant Women’s Association
UNIT 5: MAP READING AND DIRECTIONS Essential Skill: Document Use
Outcomes Kind of Activity Description of Activity Vocabulary Materials Time
Enga
ge • Understand basic route
map vocabulary
Quiz • School Bus Map Quiz Eastbound/Westbound Destination, Effective Date, Revised, Dual Route, ECS, Monitor
School Bus Map Quiz, school route map, Overhead projector, transparency slide
10-20 min
Less
on 1
A
• Know basic Calgary geography
• Understand Calgary addresses
Drawing Worksheet
• Introduce Calgary geography, key landmarks and city map use
• Interpret Calgary addresses
Quadrant, landmark, odd, even
Copies of Calgary Key Map, coloured pencils, board or flipchart, coloured markers, Landmarks in Calgary homework sheets, page protectors, Calgary Addresses Worksheet
40-60 min
Less
on 1
B • Use a map book to find an address or school
Worksheet • Use a map book
Legend, map reference, joins Separate School Board Charter School
Large city map, worksheets, map books
30-60 min
Less
on 1
C • Use the community name to locate an address or school in a map book
Game • Find the address by community Community, district Road/community cards, copies of district map, masking tape, worksheets, map books (optional)
15-30 min
Less
on 2
• Read a route map and plan the route between stops
Guided Group Exercise
• Route Planning exercise Large city map, school route maps, map books
40-60 min
Less
on 3
• Follow verbal directions
Matching game • Optional: Map Legend review • Listen to directions and highlight the
route
Directions vocabulary Map Legend Cards, map pages
20-40 min
Ready to Go: Training Materials for School Bus Drivers
Summary : Unit 5 Calgary Immigrant Women’s Association
Engage: This session is an introduction to some new vocabulary needed for the unit. It includes why students need to learn the skills in this unit, and a short informal assessment, so the trainer can get an idea of the students’ skills and knowledge before this training. The Map Reading activities above were planned using Sherlock’s Map of Calgary, 9th edition, Sherlock’s Map Publishing, 2007.
Ready to Go: Training Materials for School Bus Drivers
Unit 5: Engage
1
MAP READING AND DIRECTIONS ENGAGE
Outcome: Understand basic bus map vocabulary Overall Time: 10-20 minutes
School Bus Map Quiz Type of Activity Quiz Time 10-20 minutes Objective To evaluate students’ prior knowledge of school bus maps and
ensure they know some key vocabulary before doing route planning
Materials School Bus Maps (use local maps or Westgate School Bus Map at the end of the lesson), School Map Quiz sheets, overhead transparency (or power point slide) of map, overhead projector (or computer with projector)
Instructions:
1. Ask for a show of hands: How many people have seen a school bus route map before?
2. Explain that this session will help you to find out what they already know, and let them learn route map words they do not know.
3. Hand out the school bus map and explain this is an example of a local school board map. Also hand out quiz sheets and ask them to work with their neighbour to complete the quiz over the next 5 minutes.
4. Take up the answers, highlighting the information on the school route map, using the transparency and transparency highlighter pens. Ask students to define: effective date, arrival, departure, alphabetic order, pm drop information, reverse order, dual route or other difficult vocabulary on the map.
5. Ask: How many pairs got 6 answers right? How many got 8 or more?
6. Have students turn to the map side of the page. Ask: Can you find stop 3 on the map? What is the name of the road it is on? (66th Ave SW) What is the name of the other street at this corner? (30th Street) If this is difficult, repeat with other stops. Next, ask: If it is not clear from the map, where can you look? (The description on the other side of the page).
7. If you have time, ask: Which is the most important information on the map for parents? (Route name, their child’s stop number, their

Ready to Go: Training Materials for School Bus Drivers
Unit 5: Engage
2
child’s stop leaving time, how to find out about delays, who to call about stop changes)
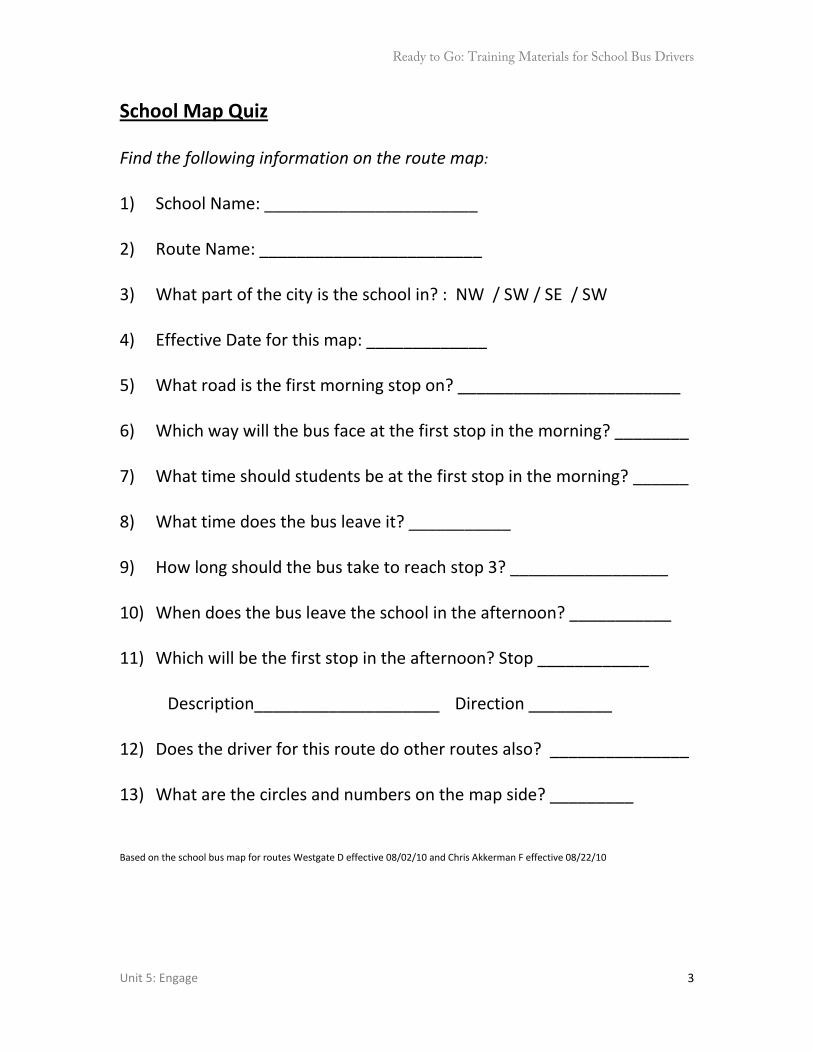
Ready to Go: Training Materials for School Bus Drivers
Unit 5: Engage
3
School Map Quiz Find the following information on the route map: 1) School Name: _______________________ 2) Route Name: ________________________ 3) What part of the city is the school in? : NW / SW / SE / SW 4) Effective Date for this map: _____________ 5) What road is the first morning stop on? ________________________ 6) Which way will the bus face at the first stop in the morning? ________ 7) What time should students be at the first stop in the morning? ______ 8) What time does the bus leave it? ___________ 9) How long should the bus take to reach stop 3? _________________ 10) When does the bus leave the school in the afternoon? ___________ 11) Which will be the first stop in the afternoon? Stop ____________
Description____________________ Direction _________ 12) Does the driver for this route do other routes also? _______________ 13) What are the circles and numbers on the map side? _________ Based on the school bus map for routes Westgate D effective 08/02/10 and Chris Akkerman F effective 08/22/10
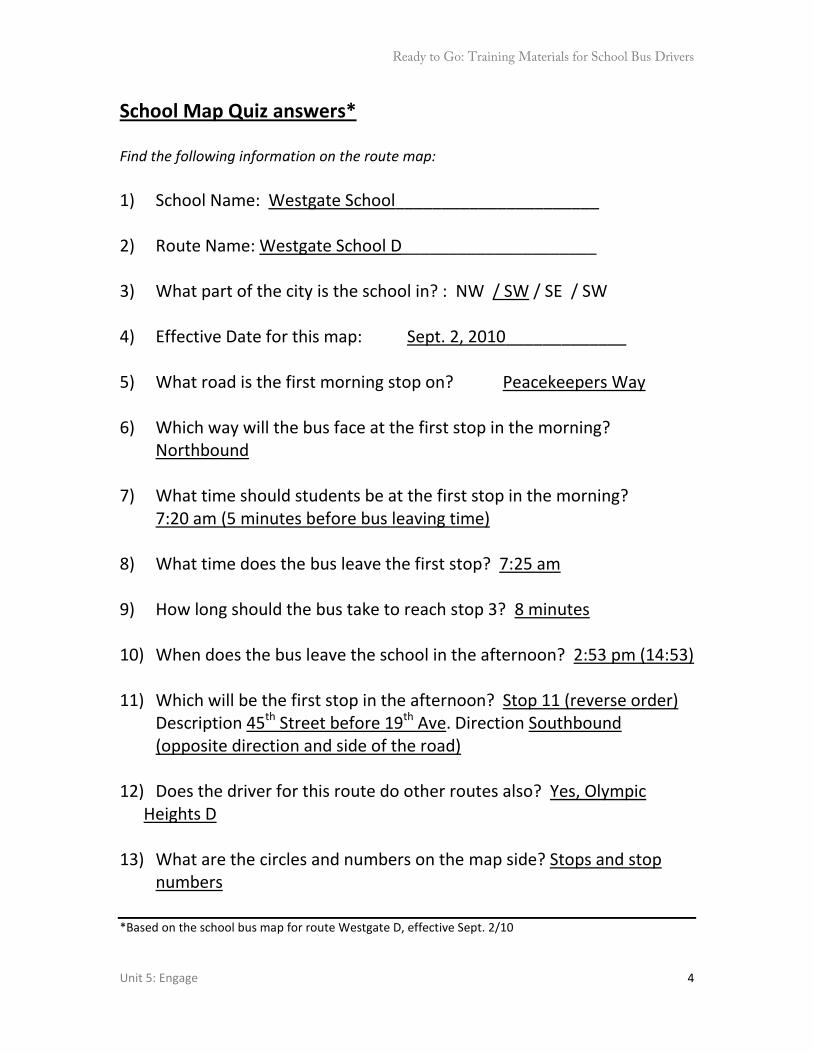
Ready to Go: Training Materials for School Bus Drivers
Unit 5: Engage
4
School Map Quiz answers* Find the following information on the route map: 1) School Name: Westgate School______________________ 2) Route Name: Westgate School D_____________________ 3) What part of the city is the school in? : NW / SW / SE / SW 4) Effective Date for this map: Sept. 2, 2010_____________ 5) What road is the first morning stop on? Peacekeepers Way 6) Which way will the bus face at the first stop in the morning?
Northbound 7) What time should students be at the first stop in the morning?
7:20 am (5 minutes before bus leaving time) 8) What time does the bus leave the first stop? 7:25 am 9) How long should the bus take to reach stop 3? 8 minutes 10) When does the bus leave the school in the afternoon? 2:53 pm (14:53) 11) Which will be the first stop in the afternoon? Stop 11 (reverse order)
Description 45th Street before 19th Ave. Direction Southbound (opposite direction and side of the road)
12) Does the driver for this route do other routes also? Yes, Olympic
Heights D 13) What are the circles and numbers on the map side? Stops and stop
numbers *Based on the school bus map for route Westgate D, effective Sept. 2/10

Ready to Go: Training Materials for School Bus Drivers
Unit 5: Lesson 1A
1
MAP READING AND DIRECTIONS LESSON 1A
Outcome: Know basic Calgary geography. Understand Calgary addresses. Overall Time: 40-60 minutes
INTRO TO CALGARY GEOGRAPHY Type of Activity Guided Group Exercise Time 25-30 minutes Objective Introduce Calgary geography and landmarks Materials Calgary Key Maps, large Calgary city map (optional), coloured
pencils, board or flipchart and markers, Landmarks in Calgary homework sheet, page protectors
Preparation Write the following list on the flipchart or on the right side of the board:
Quadrant Landmark Instructions:
1. Draw a compass on the top left of the board showing N, NE, E, SE, S, SW, W and NW. Ask students: What do these letters stand for? Ask for a show of hands: How many people live in South West? How many live in North West? South West is a quadrant of Calgary. Underline the word quadrants on the board or flipchart. Ask some students what quadrant they live in.
2. Explain: This session is about Calgary and the landmarks here (the big things everyone can see, underline the word landmark on the flipchart or board). What could be a landmark here?
3. Explain that you will do a short presentation about Calgary, then you will be asking students to find all these features on the map. Draw the 4 quadrants of Calgary on the board and label them (see Calgary Geography Diagram below). Ask students:
• What is the line between NW and NE? Between SW and SE? (Centre Street: draw in red on the flipchart or left side of board).
• What is the line between NW and SW? (in central Calgary: Bow River: draw in blue, Trans Canada to the West: draw in black)
• Between NE and SW? (Bow River until it turns South and then Memorial Drive: draw the road in black).

Ready to Go: Training Materials for School Bus Drivers
Unit 5: Lesson 1A
2
4. Ask: • Which side of Calgary are the mountains? (West, add to diagram) • Where is the airport? (in the NE, add to diagram) • Where is Fish Creek and Fish Creek Park? (in the SW and SE, but
there is more of Calgary further South, add to diagram).
5. Hand out copies of a Calgary key map (eg copies of the front page in a map book of Calgary or the diagram below) and coloured pencils in the colours shown. Ask students to look for the quadrants and landmarks on the flipchart or board, and colour them as shown. Ask them to start by colouring the name and the outline of the quadrants in yellow. Write: quadrants yellow on the board. Then ask them to colour some Calgary landmarks (Bow River, Fish Creek in blue, Memorial Drive in black etc.) Write the landmarks and colours on the board.
6. Go around, helping students to get started. Encourage those who know Calgary to help those who are new to Calgary.
7. After most students have finished the landmarks, ask students: What quadrant is 14th Street in? (Trick question: you do not know, because you do not know the quadrant.) Explain: All roads in Calgary need to have their quadrant at the end (eg 14th Street SW) or you are not sure where it is. Which ways do the streets run in Calgary? (from North to South). Draw 14th NW to SW on the board. An address on this street north of the river is on 14th Street NW. An address on the same street south of the river is on 14th Street SW.
8. Ask: • If you drive from Centre Street N going East, what is the next
street you come to? (1st St. NE, draw on diagram) • And the next one? (2nd St. NE). • And what about if you drive from Centre Street N in the other
direction? (1st St. NW, draw on diagram) • And the next one? (2nd St. NW)
9. Where is downtown Calgary? (north from 17th Ave , draw in red,
and South of the Bow River and from 14th Street SW to MacLeod Trail SE, draw in red). Add this to your list of landmarks. Ask students to shade this area on their map in red (write on board).

Ready to Go: Training Materials for School Bus Drivers
Unit 5: Lesson 1A
3
10. Ask students to look at MacLeod Trail. Which way does it go:
North/South or East/West? (North/South). 11. Hand out the homework sheet and a plastic sheet protector for
the map to each student. Quickly go through the questions on the homework sheet, so students can ask you to explain any they do not understand. Ask students to do the worksheet overnight and hand in the completed worksheet and map in the morning, so it can be checked.
12. If any students have trouble doing this at home, they can get help, as long as the students find the places on the Calgary map themselves and they write and do the colouring themselves. Students need to be able to do this themselves if they are going to drive school buses in Calgary.
*The key map in Sherlock’s Map of Calgary map book, 9th edition, Sherlock Publishing Ltd., 2007 was used in the design of this lesson.
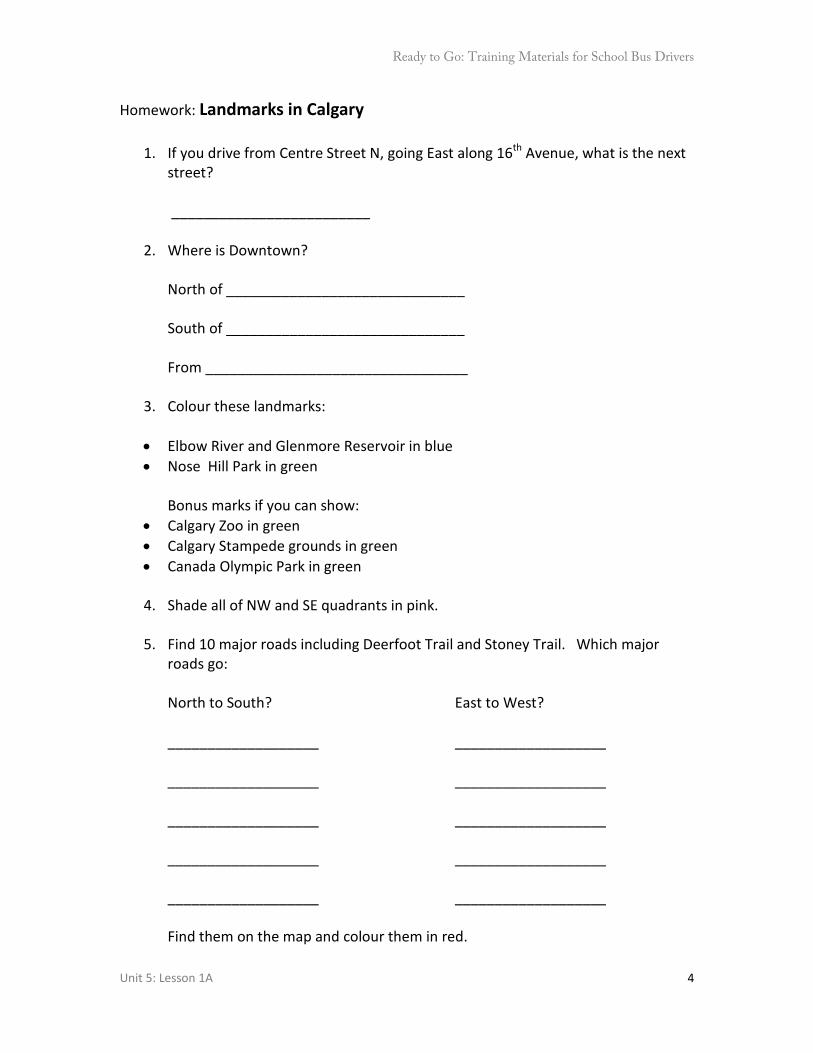
Ready to Go: Training Materials for School Bus Drivers
Unit 5: Lesson 1A
4
Homework: Landmarks in Calgary
1. If you drive from Centre Street N, going East along 16th Avenue, what is the next street?
_________________________
2. Where is Downtown? North of ______________________________ South of ______________________________ From _________________________________
3. Colour these landmarks:
• Elbow River and Glenmore Reservoir in blue • Nose Hill Park in green
Bonus marks if you can show:
• Calgary Zoo in green • Calgary Stampede grounds in green • Canada Olympic Park in green
4. Shade all of NW and SE quadrants in pink.
5. Find 10 major roads including Deerfoot Trail and Stoney Trail. Which major
roads go: North to South? East to West? ___________________ ___________________ ___________________ ___________________ ___________________ ___________________ ___________________ ___________________ ___________________ ___________________ Find them on the map and colour them in red.
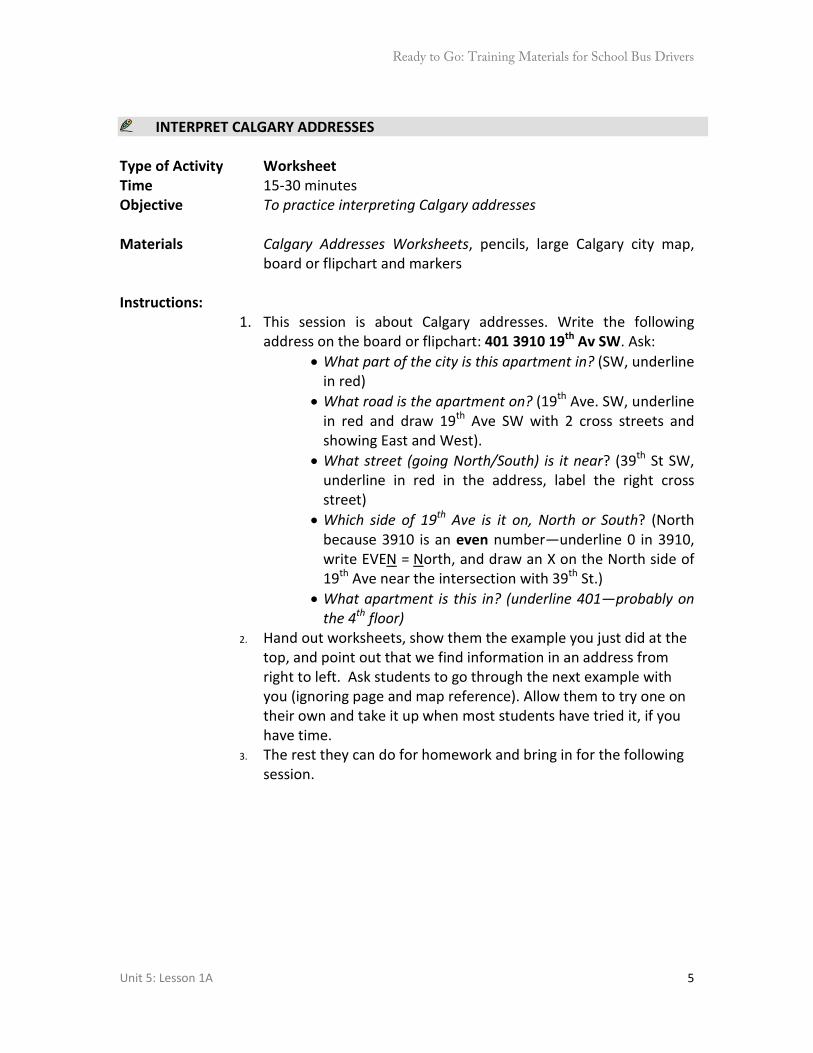
Ready to Go: Training Materials for School Bus Drivers
Unit 5: Lesson 1A
5
INTERPRET CALGARY ADDRESSES
Type of Activity Worksheet Time 15-30 minutes Objective To practice interpreting Calgary addresses Materials Calgary Addresses Worksheets, pencils, large Calgary city map,
board or flipchart and markers Instructions:
1. This session is about Calgary addresses. Write the following address on the board or flipchart: 401 3910 19th Av SW. Ask:
• What part of the city is this apartment in? (SW, underline in red)
• What road is the apartment on? (19th Ave. SW, underline in red and draw 19th Ave SW with 2 cross streets and showing East and West).
• What street (going North/South) is it near? (39th St SW, underline in red in the address, label the right cross street)
• Which side of 19th Ave is it on, North or South? (North because 3910 is an even number—underline 0 in 3910, write EVEN = North, and draw an X on the North side of 19th Ave near the intersection with 39th St.)
• What apartment is this in? (underline 401—probably on the 4th floor)
2. Hand out worksheets, show them the example you just did at the top, and point out that we find information in an address from right to left. Ask students to go through the next example with you (ignoring page and map reference). Allow them to try one on their own and take it up when most students have tried it, if you have time.
3. The rest they can do for homework and bring in for the following session.

Ready to Go: Training Materials for School Bus Drivers
Unit 5: Lesson 1A
6
Calgary Addresses Side of the Road rule: Use house or building number For Streets, EVEN numbers (ending in 2, 4, 6, 8 or 0) are on the EAST side,
ODD numbers (ending in 1, 3, 5, 7 or 9) on the West. For Avenues, EVEN numbers (ending in 2, 4, 6, 8 or 0) are on the NORTH side,
ODD numbers (ending in 1, 3, 5, 7 or 9) on the South.
Address Quad. NW/NE/SW/SE
Road Near St./Ave
Side of Road N/S/E/W
Apt./ Office
Page Map Ref
Example: 401 3910 19th Av SW
SW
19th Av SW
39 St
(0 is EVEN) North
401
1795A 14th St NW
200, 139-4th Av SE
823 Highfield Av SE
6120-1A St SW
6329 Falconridge Blvd NE, Apt 1309
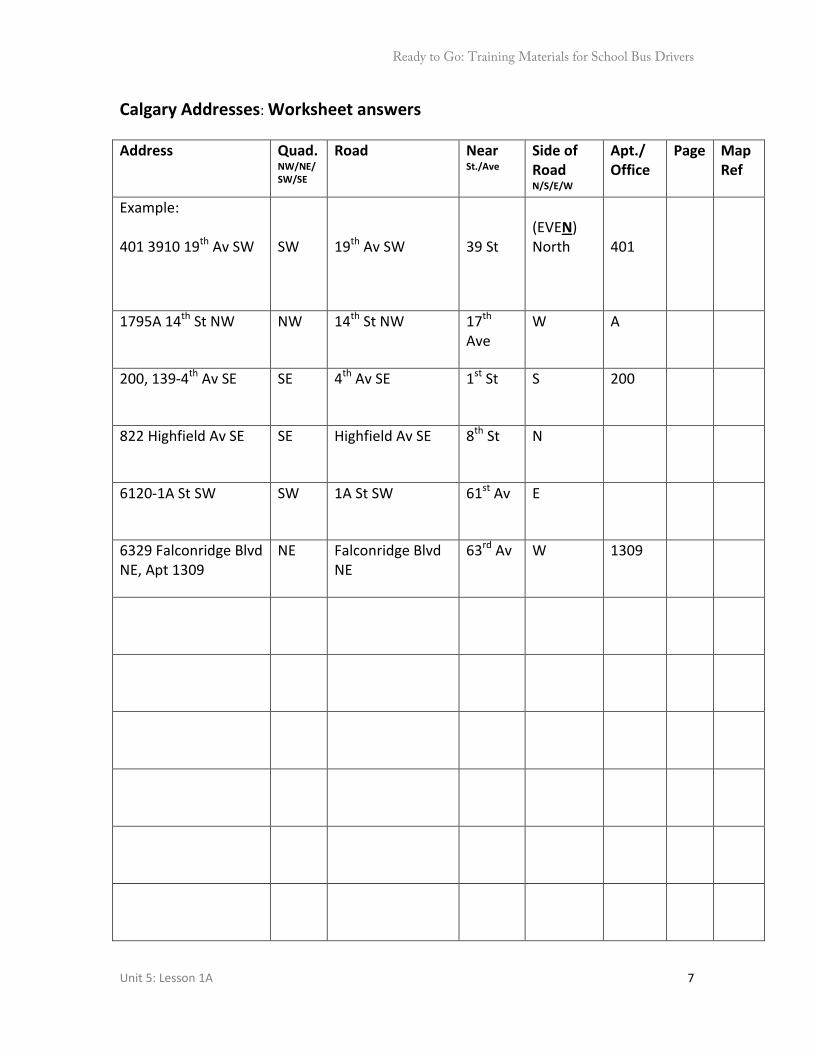
Ready to Go: Training Materials for School Bus Drivers
Unit 5: Lesson 1A
7
Calgary Addresses: Worksheet answers Address Quad.
NW/NE/SW/SE
Road Near St./Ave
Side of Road N/S/E/W
Apt./ Office
Page Map Ref
Example: 401 3910 19th Av SW
SW
19th Av SW
39 St
(EVEN) North
401
1795A 14th St NW NW 14th St NW 17th Ave
W A
200, 139-4th Av SE SE 4th Av SE 1st St S 200
822 Highfield Av SE SE Highfield Av SE 8th St N
6120-1A St SW SW 1A St SW 61st Av E
6329 Falconridge Blvd NE, Apt 1309
NE Falconridge Blvd NE
63rd Av W 1309

Ready to Go: Training Materials for School Bus Drivers
Unit: 5 Lesson 1B
1
MAP READING AND DIRECTIONS LESSON 1B
Outcome: Use a map book to find an address or school Overall Time: 30-60 minutes
USE A MAP BOOK
Type of Activity Worksheet Time 30-60 minutes Objective To practice using a map book to find schools and other addresses Materials Pictures of landmarks (see below), paper, pencils, worksheets
showing a list of addresses (for Calgary you could use the worksheet from the previous lesson), large city map, map books*, highlighter pens in different colours, Post-it notes (or similar), board or flipchart and markers
Instructions: 1. Post pictures of a few key landmarks in your area (for example,
for Calgary: the mountains, Calgary airport, Fish Creek Park, Calgary Stampede Ground, Downtown, also possibly the Bow River or Glenmore Reservoir). Ask students: Get up and take a look at each picture and decide what this is and which part of the city this is in: North, South, SouthEast, NorthWest etc. Show them the large city map. Ask:
• Which of these landmarks is up here? (Point to top of North East corner)
• Which is down here? (point to far South). • What is here, just south of the river? (point to a picture, if they
need a hint) 2. Ask for a show of hands: Who thinks finding places in the map
book is easy? 3. Explain: We are going to take up an address worksheet and start
using a map book. This is easier if at least one student in each group has done this before.
4. Give each group a map book. Show the class the big city map. Explain: The map book is a big map cut into pieces so it can fit in a small book. Have students turn to the key map page and mark it with a yellow tag. This is the small map of the city (as used in the previous session). It has numbers to show which page in the map book shows all the streets in this part of the city. Practice a few lookups (e.g. one near a key landmark used in 1 above).
5. Look briefly at the Legend page and quiz them on the colour of: railways, rivers, parks, schools, traffic signals. Draw a few symbols
Ready to Go: Training Materials for School Bus Drivers
Unit: 5 Lesson 1B
2
on the board (e.g. traffic light, pedestrian crossing, railway crossing, playground): What do these mean?
6. Have students turn to a page in the map book. Name a major road and ask students to find it. Ask:
• How many traffic lights are on this road on the page? • How many pedestrian crossings? • Can you find the railway and a railway crossing? • Can you see a playground? • Why is it useful to find these things on a map?
7. Have students look at the letters on the top and the numbers
(grid references) on the side of the map. Have students practice using grid references on that map ( eg What do you see at A6?) Ask students to look for important roads on the page. Ask students to use grid references to help others find these roads. Do they run North to South or East to West?
8. Also, ask: What does the arrow mean at the top: Joins ____ or at the side Joins ____? Pick a major road which goes off the map to the west or east and ask them to find it using grid reference. Have students turn over to the next page to look at it and back again to see how the road continues and the two areas are next to each other.
9. Have students turn to the important parts of the book: Downtown maps, detailed city maps, maps of the local region, Indexes. Ask them to put a yellow tag on the most important sections (for example: downtown and schools index page, if applicable).
10. Explain: Now you are going to find places in the map book. Give out worksheets (or if students have the worksheets used in lesson 1A, they can use them). Ask:
• Which of these addresses is downtown? • How could I find the right page for this address (use Index or Key
Map) • Can you find it in the Index under the first letter of the road? • What page would this address be on in the map book? • What is the grid reference on that page?
Have students continue and find the page and references (the last 2 columns) for some of the addresses. Walk around and observe group progress. Ask students who have done this before to help the others in their group to look up a map reference. Take up the answers.
11. Identify School Board. Write the names of schools of some schools from your area (from different school boards) on the left side of the flipchart. Ask students: What are the different school
Ready to Go: Training Materials for School Bus Drivers
Unit: 5 Lesson 1B
3
boards and types of schools in the city? Write them on the right side.
12. Ask students to turn to the Schools index (if included in your map book). Name one specific separate school. Which school board is it under? (Catholic/Separate). What is the same in many Separate School names? (St., Father, Holy)
13. Ask students to copy the separate school and its address onto their worksheet and fill in the blanks, including page and map reference. Then ask groups to see who can be first to find it on the map.
14. Students need to choose more school names to copy onto their worksheets, then fill in the blanks and find them on the map.
15. Have one or two groups report back the school board, address and other information, depending on time. If there is time, ask them what major road(s) are near these schools.
16. Encourage those who find the map book difficult to copy down the names of the other schools and practice finding them by themselves later.
*Sherlock’s Map of Calgary map book, 9th edition, Sherlock Publishing Ltd., 2007 was used in the design of this lesson.
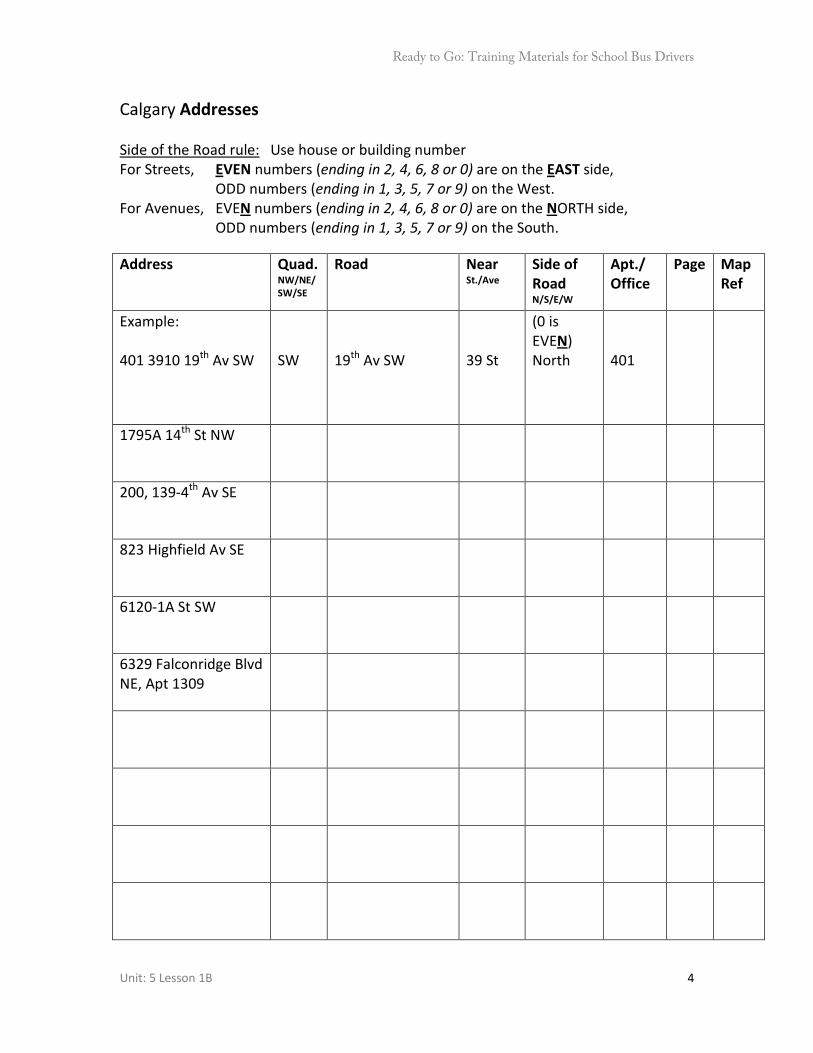
Ready to Go: Training Materials for School Bus Drivers
Unit: 5 Lesson 1B
4
Calgary Addresses Side of the Road rule: Use house or building number For Streets, EVEN numbers (ending in 2, 4, 6, 8 or 0) are on the EAST side,
ODD numbers (ending in 1, 3, 5, 7 or 9) on the West. For Avenues, EVEN numbers (ending in 2, 4, 6, 8 or 0) are on the NORTH side,
ODD numbers (ending in 1, 3, 5, 7 or 9) on the South.
Address Quad. NW/NE/SW/SE
Road Near St./Ave
Side of Road N/S/E/W
Apt./ Office
Page Map Ref
Example: 401 3910 19th Av SW
SW
19th Av SW
39 St
(0 is EVEN) North
401
1795A 14th St NW
200, 139-4th Av SE
823 Highfield Av SE
6120-1A St SW
6329 Falconridge Blvd NE, Apt 1309

Ready to Go: Training Materials for School Bus Drivers
Unit: 5 Lesson 1B
5
Calgary Addresses: Worksheet answers Address Quad.
NW/NE/SW/SE
Road Near St./Ave
Side of Road N/S/E/W
Apt./ Office
Page Map Ref
Example: 401 3910 19th Av SW
SW
19th Av SW
39 St
(EVEN) North
401
25
F9
1795A 14th St NW NW 14th St NW 17th Av W A 26 G6
200, 139-4th Av SE SE 4th Av SE 1st St S 200 C E4
822 Highfield Av SE SE Highfield Av SE 8th St N 36 A6
6120-1A St SW SW 1A St SW 61st Av E 41 D1
6329 Falconridge Blvd NE, Apt 1309
NE Falconridge Blvd NE
63rd Av W 1309 21 G3
St. Benedict Elementary 10340 19th St SW
SW 19th St SW 103rd Av E 40 E9
Alex Munro School, 427-78th Av NE
NE 78th Av NE 4th St S 11 E7
Rundle College, 7375-17th Avenue SW
SW 17th Avenue SW 73rd St S 24 F9
Mother Theresa School, 121 Midlake Blvd SE
SE Midlake Blvd SE 1st St S 53 F3
Thomas B. Riley School, 3915-69th St NW
NW 69th St NW 39th Av W 16 F6
Westmount Charter School 2519 Richmond Rd SW
SW Richmond Road SW 25th St S 34 C2
Ready to Go: Training Materials for School Bus Drivers
Unit 5: Lesson 1C
1
MAP READING AND DIRECTIONS LESSON 1C
Outcome: Use community name to locate an address or school in a map book Overall Time: 15-30 minutes
FIND THE ADDRESS BY COMMUNITY
Type of Activity Game Time 15-30 minutes Objective To practice finding addresses and nearby major roads, using
community names Materials Road/community cards (make your own, or use the Calgary cards
at the end of the lesson), 2 copies of the district map and district index from your map book*, masking tape, map books* (optional), worksheets
Instructions:
1. Explain the purpose of this lesson. 2. Match road to community name. Explain to students they will
receive a card with the name of a road. Some of the roads on the cards are in the same community, the same part of the city and you know that by looking at their names. Give out the cards and ask students to find the others who have roads in the same community and sit together. While they are doing this, write community names on the board (For Calgary communities, you could include: Beddington, University, Garrison Woods, Strathcona, Scarboro, Bridlewood, Riverbend). Stick 2 copies of the community map on the wall.
3. Check students have found a group. Review the cards with the class, (including any you did not use to sort people into groups). Which of the communities on the board do they belong to? Stick the names next to the community they belong to. What did the road names have in common?
4. Tell students: In each group, one person will be the reader/writer and the others are the “runners” who need to be good at reading names. Ask each group to pick a reader/writer.
5. Use a District Map and Index. Show students the community maps and explain that they show where a community is on the map, but also it has an index, which has community names in alphabetic order and gives a page and map reference for each community. The job of the reader/writer is to look at the worksheet and give one of the runners a road name from it. The runner’s job is to run to the community map and find which
Ready to Go: Training Materials for School Bus Drivers
Unit 5: Lesson 1C
2
community it is in, the map page and the map reference. They need to report this back to the reader/writer. If any of the other runners already know the name of the community and quadrant, they can help the runner by telling them, but the runner will still need to check the page and map reference. The runner reports back to the team’s reader/writer.
6. Demonstrate this with one of the cards from 1 above. 7. Have teams try the game, stopping when the first team finds the
information on 3 roads and 2 schools. Take up answers. Let groups carry on with other addresses.
8. If there is time, have groups find the addresses in the map book and the nearby major roads. If they cannot find the road using the community map and index, students can use the general road index at the back.
9. Ask students: Is this an easy way to find addresses? Could there be any problems with this approach?
*We used Sherlock’s Map of Calgary mapbook, 9th edition, Sherlock Publishing Ltd., 2007 when designing and presenting this lesson.

Ready to Go: Training Materials for School Bus Drivers
Unit 5: Lesson 1C
3
Road/community cards for Calgary
Road Community
Rivercrest Wy Riverbend River Rock Court Riverview Cl Beacham Way Beddington Bedford Green Bermuda Drive Underhill Dr University Utah Pl
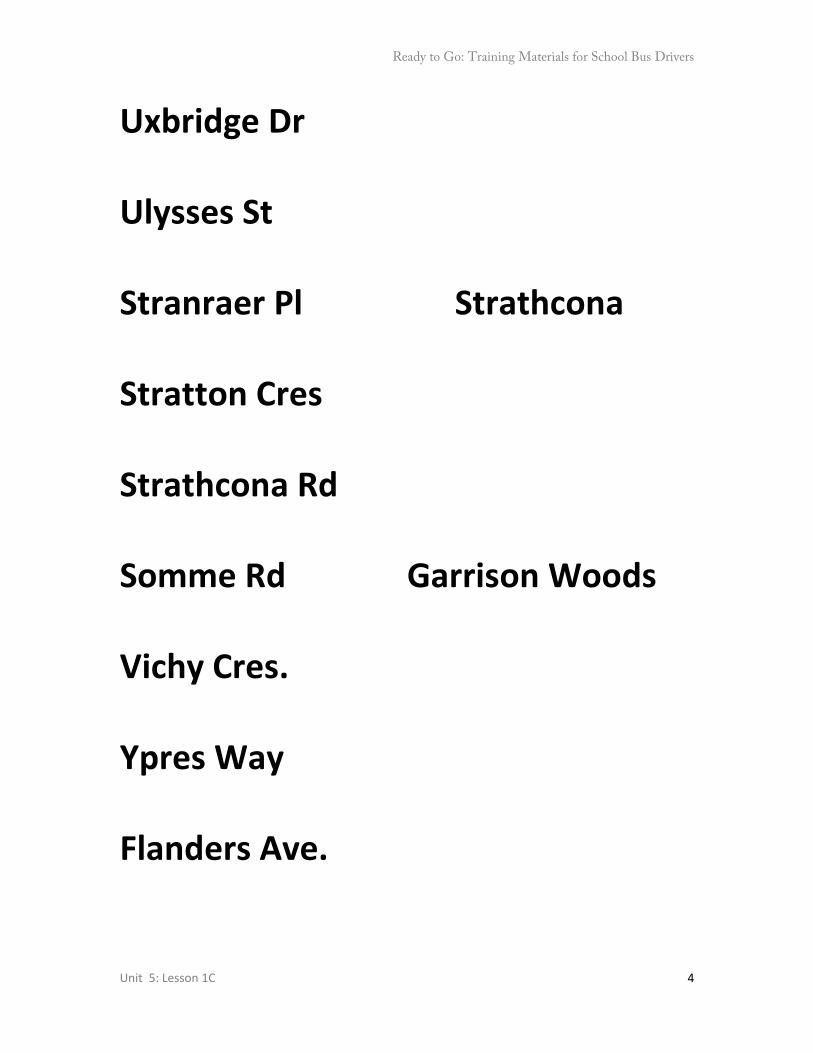
Ready to Go: Training Materials for School Bus Drivers
Unit 5: Lesson 1C
4
Uxbridge Dr Ulysses St Stranraer Pl Strathcona Stratton Cres Strathcona Rd Somme Rd Garrison Woods Vichy Cres. Ypres Way Flanders Ave.
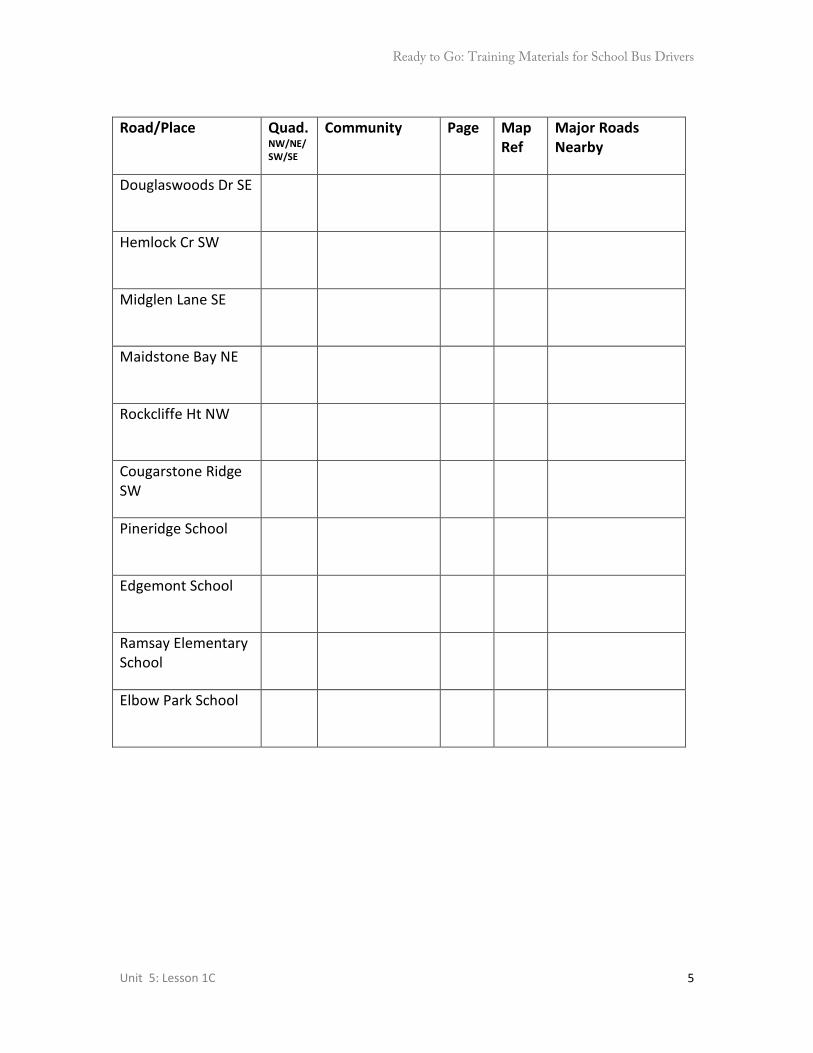
Ready to Go: Training Materials for School Bus Drivers
Unit 5: Lesson 1C
5
Road/Place Quad.
NW/NE/SW/SE
Community Page Map Ref
Major Roads Nearby
Douglaswoods Dr SE
Hemlock Cr SW
Midglen Lane SE
Maidstone Bay NE
Rockcliffe Ht NW
Cougarstone Ridge SW
Pineridge School
Edgemont School
Ramsay Elementary School
Elbow Park School
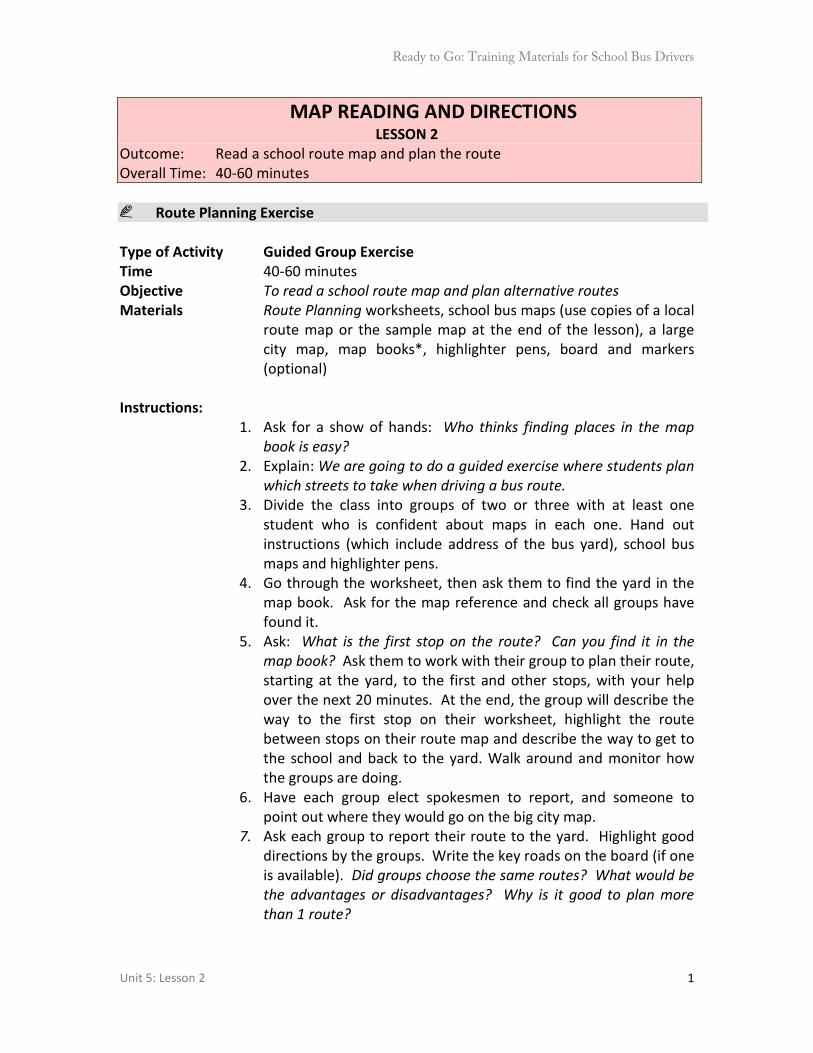
Ready to Go: Training Materials for School Bus Drivers
Unit 5: Lesson 2
1
MAP READING AND DIRECTIONS LESSON 2
Outcome: Read a school route map and plan the route Overall Time: 40-60 minutes
Route Planning Exercise Type of Activity Guided Group Exercise Time 40-60 minutes Objective To read a school route map and plan alternative routes Materials Route Planning worksheets, school bus maps (use copies of a local
route map or the sample map at the end of the lesson), a large city map, map books*, highlighter pens, board and markers (optional)
Instructions:
1. Ask for a show of hands: Who thinks finding places in the map book is easy?
2. Explain: We are going to do a guided exercise where students plan which streets to take when driving a bus route.
3. Divide the class into groups of two or three with at least one student who is confident about maps in each one. Hand out instructions (which include address of the bus yard), school bus maps and highlighter pens.
4. Go through the worksheet, then ask them to find the yard in the map book. Ask for the map reference and check all groups have found it.
5. Ask: What is the first stop on the route? Can you find it in the map book? Ask them to work with their group to plan their route, starting at the yard, to the first and other stops, with your help over the next 20 minutes. At the end, the group will describe the way to the first stop on their worksheet, highlight the route between stops on their route map and describe the way to get to the school and back to the yard. Walk around and monitor how the groups are doing.
6. Have each group elect spokesmen to report, and someone to point out where they would go on the big city map.
7. Ask each group to report their route to the yard. Highlight good directions by the groups. Write the key roads on the board (if one is available). Did groups choose the same routes? What would be the advantages or disadvantages? Why is it good to plan more than 1 route?
Ready to Go: Training Materials for School Bus Drivers
Unit 5: Lesson 2
2
8. Then ask groups to report how they would go from stop to stop, picking up children. Did all the groups go the same way? Would the groups do the same route backwards in the afternoon?
9. What route did the group choose to go back to the yard? Write the key roads on the board (if one is available). Did groups choose the same routes? What would be the advantages or disadvantages?
*We used Sherlock’s Map of Calgary map book, 9th edition, Sherlock Publishing Ltd., 2007 was used in the design of this lesson.
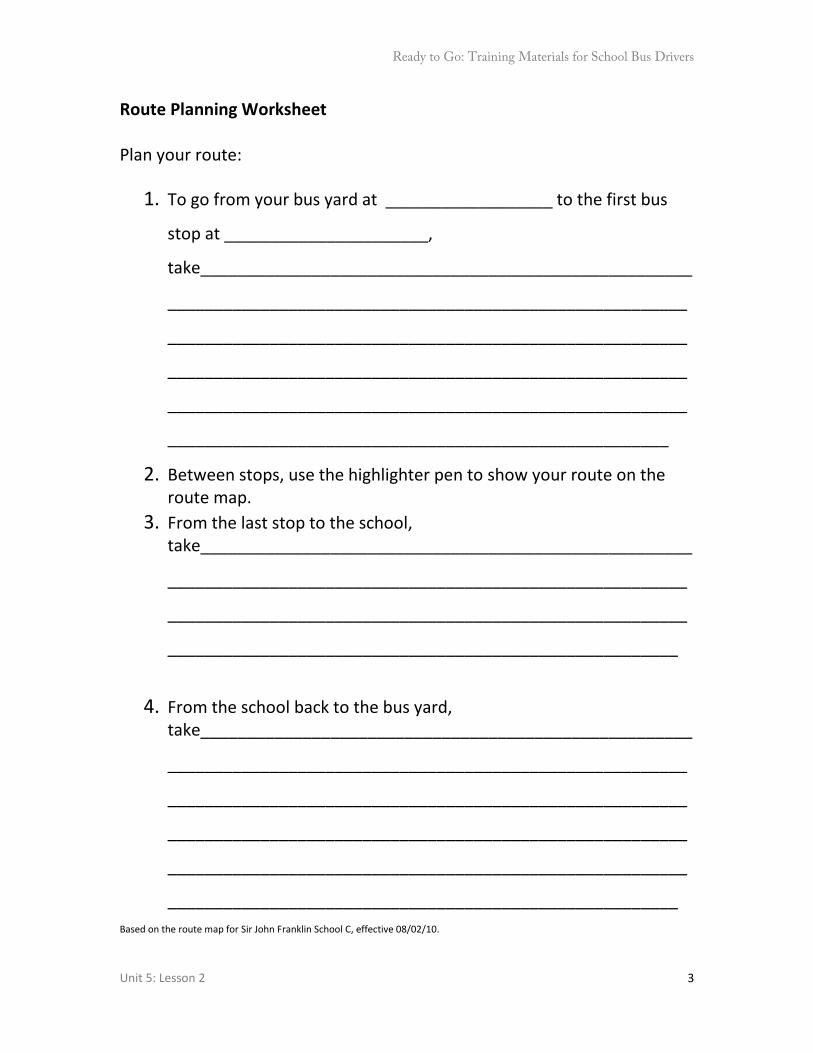
Ready to Go: Training Materials for School Bus Drivers
Unit 5: Lesson 2
3
Route Planning Worksheet Plan your route:
1. To go from your bus yard at __________________ to the first bus
stop at ______________________,
take_____________________________________________________
________________________________________________________
________________________________________________________
________________________________________________________
________________________________________________________
______________________________________________________
2. Between stops, use the highlighter pen to show your route on the route map.
3. From the last stop to the school, take_____________________________________________________
________________________________________________________
________________________________________________________
_______________________________________________________
4. From the school back to the bus yard,
take_____________________________________________________
________________________________________________________
________________________________________________________
________________________________________________________
________________________________________________________
_______________________________________________________ Based on the route map for Sir John Franklin School C, effective 08/02/10.

Ready to Go: Training Materials for School Bus Drivers
Unit 5: Lesson 3
1
MAP READING AND DIRECTIONS LESSON 3
Outcome: Follow verbal directions Overall Time: 20-40 minutes
Optional: Map Legend Review Type of Activity Matching game Time 5-10 minutes Objective To review the legend used on the maps for the next exercise Preparation Prepare pairs of cards: the symbols from your map, and
definitions (see examples of useful symbols to know on the Map Legend Review page at the end of the lesson).
Materials A set of cards (cut and shuffled) for each pair in the class Instructions:
1. Explain the objective and that you will do this through a game. Show one of the picture cards and ask what this means on a map. Show its partner card with the definition. Tell students: Each of you will get a card and then need to find a partner with a matching card.
2. Once students have found their partners, they need to sit together and you can collect their cards. You then give each pair a complete set of cards, shuffled. They need to match the symbols to their definitions.
Ready to Go: Training Materials for School Bus Drivers
Unit 5: Lesson 3
2
Map legend review cards
River Major Road (divided, with central median) Traffic Lights Railway School or University Playground Park One Way Street
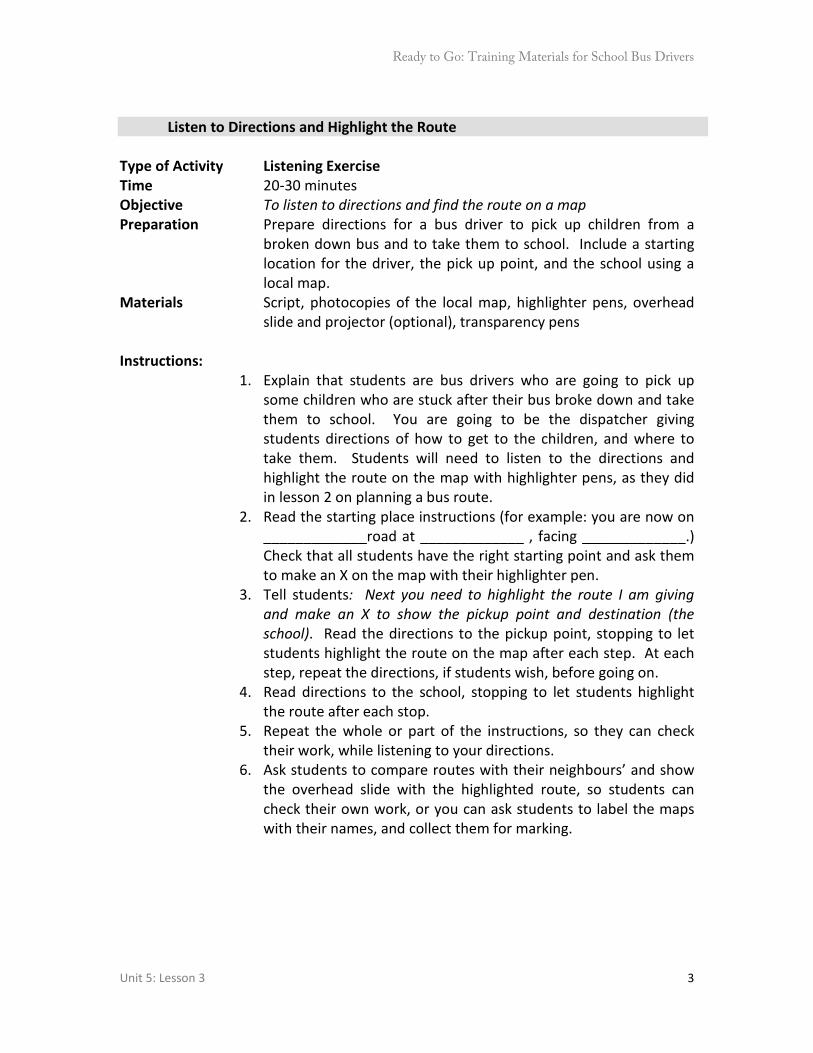
Ready to Go: Training Materials for School Bus Drivers
Unit 5: Lesson 3
3
Listen to Directions and Highlight the Route
Type of Activity Listening Exercise Time 20-30 minutes Objective To listen to directions and find the route on a map Preparation Prepare directions for a bus driver to pick up children from a
broken down bus and to take them to school. Include a starting location for the driver, the pick up point, and the school using a local map.
Materials Script, photocopies of the local map, highlighter pens, overhead slide and projector (optional), transparency pens
Instructions:
1. Explain that students are bus drivers who are going to pick up some children who are stuck after their bus broke down and take them to school. You are going to be the dispatcher giving students directions of how to get to the children, and where to take them. Students will need to listen to the directions and highlight the route on the map with highlighter pens, as they did in lesson 2 on planning a bus route.
2. Read the starting place instructions (for example: you are now on _____________road at _____________ , facing _____________.) Check that all students have the right starting point and ask them to make an X on the map with their highlighter pen.
3. Tell students: Next you need to highlight the route I am giving and make an X to show the pickup point and destination (the school). Read the directions to the pickup point, stopping to let students highlight the route on the map after each step. At each step, repeat the directions, if students wish, before going on.
4. Read directions to the school, stopping to let students highlight the route after each stop.
5. Repeat the whole or part of the instructions, so they can check their work, while listening to your directions.
6. Ask students to compare routes with their neighbours’ and show the overhead slide with the highlighted route, so students can check their own work, or you can ask students to label the maps with their names, and collect them for marking.
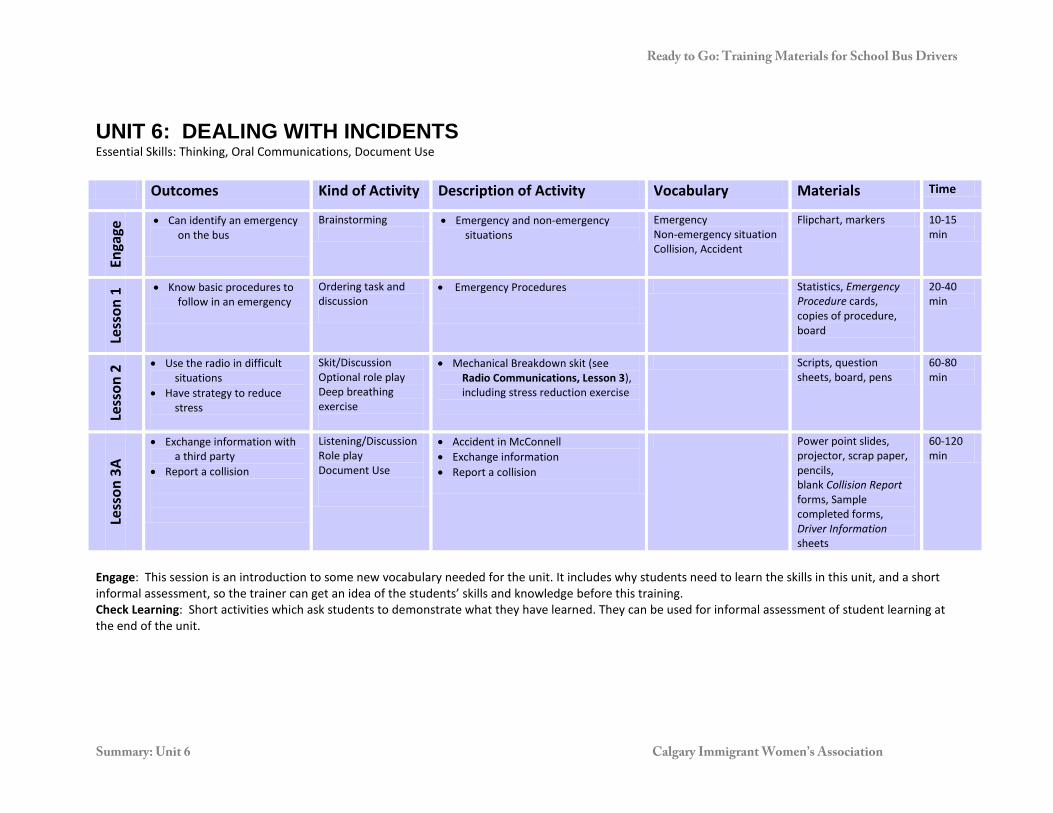
Ready to Go: Training Materials for School Bus Drivers
Summary: Unit 6 Calgary Immigrant Women’s Association
UNIT 6: DEALING WITH INCIDENTS Essential Skills: Thinking, Oral Communications, Document Use
Engage: This session is an introduction to some new vocabulary needed for the unit. It includes why students need to learn the skills in this unit, and a short informal assessment, so the trainer can get an idea of the students’ skills and knowledge before this training. Check Learning: Short activities which ask students to demonstrate what they have learned. They can be used for informal assessment of student learning at the end of the unit.
Outcomes Kind of Activity Description of Activity Vocabulary Materials Time
Enga
ge • Can identify an emergency
on the bus
Brainstorming
• Emergency and non-emergency situations
Emergency Non-emergency situation Collision, Accident
Flipchart, markers 10-15 min
Less
on 1
• Know basic procedures to follow in an emergency
Ordering task and discussion
• Emergency Procedures
Statistics, Emergency Procedure cards, copies of procedure, board
20-40 min
Less
on 2
• Use the radio in difficult situations
• Have strategy to reduce stress
Skit/Discussion Optional role play Deep breathing exercise
• Mechanical Breakdown skit (see Radio Communications, Lesson 3), including stress reduction exercise
Scripts, question sheets, board, pens
60-80 min
Less
on 3
A
• Exchange information with a third party
• Report a collision
Listening/Discussion Role play Document Use
• Accident in McConnell • Exchange information • Report a collision
Power point slides, projector, scrap paper, pencils, blank Collision Report forms, Sample completed forms, Driver Information sheets
60-120 min

Ready to Go: Training Materials for School Bus Drivers
Unit 6: Engage 1
Dealing with Incidents ENGAGE
Outcome: Can identify an emergency situation on the bus Overall Time: 10-15 minutes
Emergency and Non-Emergency Situations Type of Activity Group brainstorming and discussion Time 10-15 minutes Objective Identify emergency and non-emergency situations bus drivers may
face on a school bus Materials Flipchart or board, pens Instructions:
1. Brainstorm as a large group what kinds of problem situations you might have on a school bus – write a three word summary of each of these ideas down on the flip chart. Continue until you have a broad range of situations.
2. In pairs, have students discuss which of these are emergency situations and why.
3. Ask each pair to identify one emergency situation. Mark it with an E, and ask them to explain why it is an emergency.
4. Have the class come up with a definition of emergency, and write it on the board. For example: An emergency
• needs immediate attention • could be life threatening or lead to a serious injury • requires outside help (e.g. 911 services, relief bus,
maintenance etc.)
A non-emergency situation is something that the driver could deal with themselves with the use of a First Aid kit and/or problem solving skills.
Ready to Go: Training Materials for School Bus
Unit 6: Lesson 1 1
Dealing with Incidents LESSON 1 Outcome: Know the basic procedures to follow in an emergency situation Overall Time: 20-40 minutes
Emergency Procedures Type of Activity Discussion and Ordering Task Time 20-40 minutes Objective Students discuss priorities when dealing with different
emergencies on the bus Materials Incident statistics, Emergency Procedure cards (following, enlarge
as necessary), masking tape, Emergency Procedures checklist, board, markers
Preparation Write the following list on the board: • Collisions • Health Emergencies • Breakdowns
Instructions: 1. As a warm up, ask students to guess how many collisions a bus
company might have to face in a month. Remind students of the number of buses in the fleet and that many collisions are not the bus driver’s fault. Provide statistics, if available.
2. Ask students to discuss with their neighbour: If any of these things happened when you are driving a school bus, what is the first thing they should do? (pull over, stop, put on hazard lights)
3. Take up answers. 4. Write numbers 1 to 12 on the board. Mix up and give out the
Emergency Procedure cards and masking tape to students and explain that each card is one step out of a driver’s Emergency Procedure checklist. As a class, their task is to put the steps in order, by each student taping their paper up on the board in the right order. In a larger class, you could split up the class into groups, each with their own set of cards to put in order.
5. When all have had a chance to put their strips onto the chart, review them together. Does this order seem sensible? Test out the procedure, using an example situation from each of the three categories on the flipchart.
6. Emphasize the importance of contacting Dispatch who will guide drivers through emergency procedures.
7. A quick memory game to check learning: Ask half of the class to turn around or hide their eyes. Have students from the other half
Ready to Go: Training Materials for School Bus
Unit 6: Lesson 1 2
come and remove a few steps from the chart. Next, the students who turned around now turn back and identify the missing steps.
8. Hand out a copy of your emergency procedures, or the sample procedures attached, if available.
Ready to Go: Training Materials for School Bus
Unit 6: Lesson 1 3
Emergency Procedure Cards
• Remain calm and stay in control
• Pull over and stop in a safe place
• Put on hazard lights • Secure the bus • Do you need to
evacuate? • Tell the children
what is happening/ what to do
Ready to Go: Training Materials for School Bus
Unit 6: Lesson 1 4
• Call Dispatch: give location and type of emergency
• In a health emergency, ask to switch to cell
• Assess situation • Ask for help (911,
relief bus, maintenance)
• Have monitor count passengers and start passenger list
Ready to Go: Training Materials for School Bus
Unit 6: Lesson 1 5
• Talk to police, safety supervisor, other drivers
• Write reports • Everyone staying
safe and calm is the most important!
Ready to Go: Training Materials for School Bus
Unit 6: Lesson 1 6
Emergency Procedures
“10:50 Emergency” will clear the air if heard by Dispatch.
1. Remain calm and stay in control
2. Pull over to a safe place, park and secure the bus. 3. Put on hazard lights
4. Assess situation
5. Call Dispatch: give location and type of emergency. In a health
emergency, ask to switch to cell phone.
6. Ask for help (911, relief bus, maintenance)
7. Do you need to evacuate?
8. Tell the children what is happening/what to do
9. Count passengers and start passenger list
10. Talk to safety supervisors, police, other drivers
11. Write reports
12. Everyone staying safe and calm is the most
important!

Ready to Go: Training Materials for School Bus Drivers
Unit 6: Lesson 3 1
DEALING WITH INCIDENTS LESSON 3
Outcome: Deal with and report on a collision Overall Time: 60-120 minutes
Accident in McConnell
Type of Activity Listening, Discussion Time 20-30 minutes Objective Students listen to the description of a collision and discuss how to
respond to it Materials Accident in McConnell power point slide, projector, scrap paper,
pencils, flipchart or board and pens Instructions:
1. Ask: Has anyone ever seen a car accident in real life or on TV? What happened? What did the driver do after the accident? (Called police, drivers exchanged information etc.) Introduce the purpose of the session. What might be different when there is a collision involving a school bus?
2. Tell students you will read a TV news item about an accident and show pictures on the screen. Give out scrap paper and pencils. Ask students to listen carefully as you read it twice and take notes so they can answer questions afterwards.
3. Display the power point slide. Read out the Accident in McConnell news item clearly and slowly. After the first reading, ask about the basic details: Who was involved in this collision? Were there any children on the bus? Was anyone hurt?
4. Before reading it again, ask them to listen for more details, for example: location of the accident, bus number, name of the van’s company. Read it, then ask for these details and write them on the board or flipchart, as they are given.
5. Ask: What do you think the driver did after this collision? (Secured the bus, checked if anyone was hurt and called dispatch who called 911 and got the police and a safety supervisor to come.)
6. Ask: What do you think he did next?
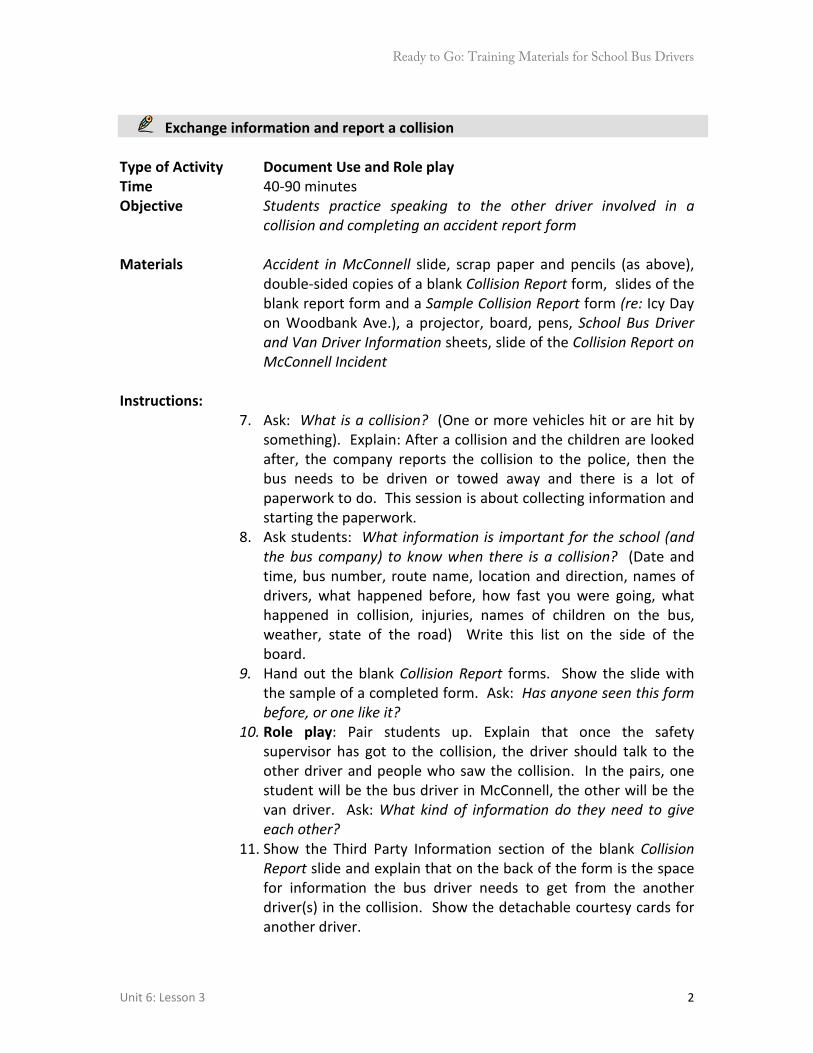
Ready to Go: Training Materials for School Bus Drivers
Unit 6: Lesson 3 2
Exchange information and report a collision Type of Activity Document Use and Role play Time 40-90 minutes Objective Students practice speaking to the other driver involved in a
collision and completing an accident report form Materials Accident in McConnell slide, scrap paper and pencils (as above),
double-sided copies of a blank Collision Report form, slides of the blank report form and a Sample Collision Report form (re: Icy Day on Woodbank Ave.), a projector, board, pens, School Bus Driver and Van Driver Information sheets, slide of the Collision Report on McConnell Incident
Instructions:
7. Ask: What is a collision? (One or more vehicles hit or are hit by something). Explain: After a collision and the children are looked after, the company reports the collision to the police, then the bus needs to be driven or towed away and there is a lot of paperwork to do. This session is about collecting information and starting the paperwork.
8. Ask students: What information is important for the school (and the bus company) to know when there is a collision? (Date and time, bus number, route name, location and direction, names of drivers, what happened before, how fast you were going, what happened in collision, injuries, names of children on the bus, weather, state of the road) Write this list on the side of the board.
9. Hand out the blank Collision Report forms. Show the slide with the sample of a completed form. Ask: Has anyone seen this form before, or one like it?
10. Role play: Pair students up. Explain that once the safety supervisor has got to the collision, the driver should talk to the other driver and people who saw the collision. In the pairs, one student will be the bus driver in McConnell, the other will be the van driver. Ask: What kind of information do they need to give each other?
11. Show the Third Party Information section of the blank Collision Report slide and explain that on the back of the form is the space for information the bus driver needs to get from the another driver(s) in the collision. Show the detachable courtesy cards for another driver.
Ready to Go: Training Materials for School Bus Drivers
Unit 6: Lesson 3 3
12. Ask: What should the driver say to the other driver? Write a few
suitable phrases on the board, such as: Hi. Are you OK? I guess we need to exchange information. Do you have your insurance and driver’s license? I have a card you can write on, for my information, if you
wish. 13. Write the date of the collision on the board (August 26th, 2009).
Give the School Bus Driver’s Information page to the students who are bus drivers and ask them to use this information, and their own name and driver’s license when talking to the van driver. Give out the Van Driver Information page to the students who are van drivers, but ask them to use their own name and driver’s license. Give students a few minutes to read the information and ask questions.
14. Ask students to do the role play, with bus drivers collecting information to write on the form. Van drivers can record information on scrap paper or on the courtesy card. Encourage them to practice the phrases on the board and look at their partner’s driver’s license and insurance document. Go around the room and help the pairs, as necessary.
15. Take up answers, using the power point slide projected on a white board, if possible.
16. Ask: What should you do if the other driver will not give you information and tries to leave? (Record as much information as you can: License Plate, Colour, Model/Make of Vehicle, Description of Driver, Company Name etc., Report this to dispatch)
17. Document Use: Statement and Diagram. Show the slide with the sample of a completed form. Review the information needed on the Statement and Diagram part of the form and where to find the information.
18. Display Accident in McConnell slide. 19. Ask students to complete the Statement and Diagram sections of
their form, using the slide and notes they wrote during the news report to help them. Walk around and help students get started.
20. After they have had a chance to try completing the form so far, either take up their answers using the power point slide of a blank form or ask them to produce a good copy of the report for homework to hand in.
21. Hand out copies of the Icy Day Collision sample.

Ready to Go: Training Materials for School Bus Drivers
Unit 6: Lesson 3 4
Dealing with Incidents Listening Activity News Report: Accident in McConnell This afternoon, around 4:30 pm, a van crashed into the back of a school bus in the McConnell district. The bus number 1064 was taking students home from Bailey Middle School on the second day back after the holidays. The crash happened as the bus was going east on Concord Road, just as it was going to turn right onto Lynbrook Drive. The bus had not yet reached its first stop. There were 50 students on board, who were evacuated from the bus safely and had their names checked off the bus list. No injuries to the passengers or drivers were reported. The crash damaged the front of the van, which was marked with the logo of Anderson Heating and Cooling. It was towed away from the scene. Our reporter did not see any damage to the bus. _________________________________
A summary of an article from DavidsonNews.net, first posted on August 26, 2009, accessed on July 12, 2009 at http://davidsonnews.net
URL to article: http://davidsonnews.net/2009/08/26/no-injuries-in-school-bus-accident/
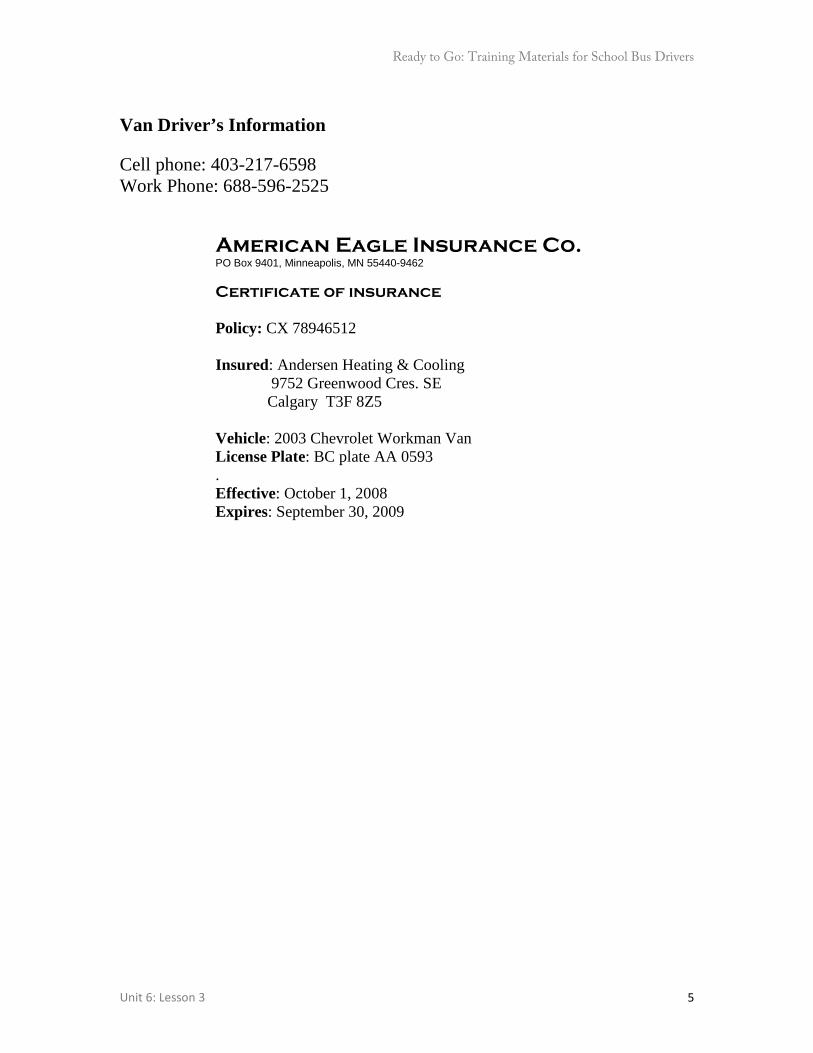
Ready to Go: Training Materials for School Bus Drivers
Unit 6: Lesson 3 5
Van Driver’s Information Cell phone: 403-217-6598 Work Phone: 688-596-2525
American Eagle Insurance Co. PO Box 9401, Minneapolis, MN 55440-9462 Certificate of insurance Policy: CX 78946512 Insured: Andersen Heating & Cooling
9752 Greenwood Cres. SE Calgary T3F 8Z5
Vehicle: 2003 Chevrolet Workman Van License Plate: BC plate AA 0593 . Effective: October 1, 2008 Expires: September 30, 2009
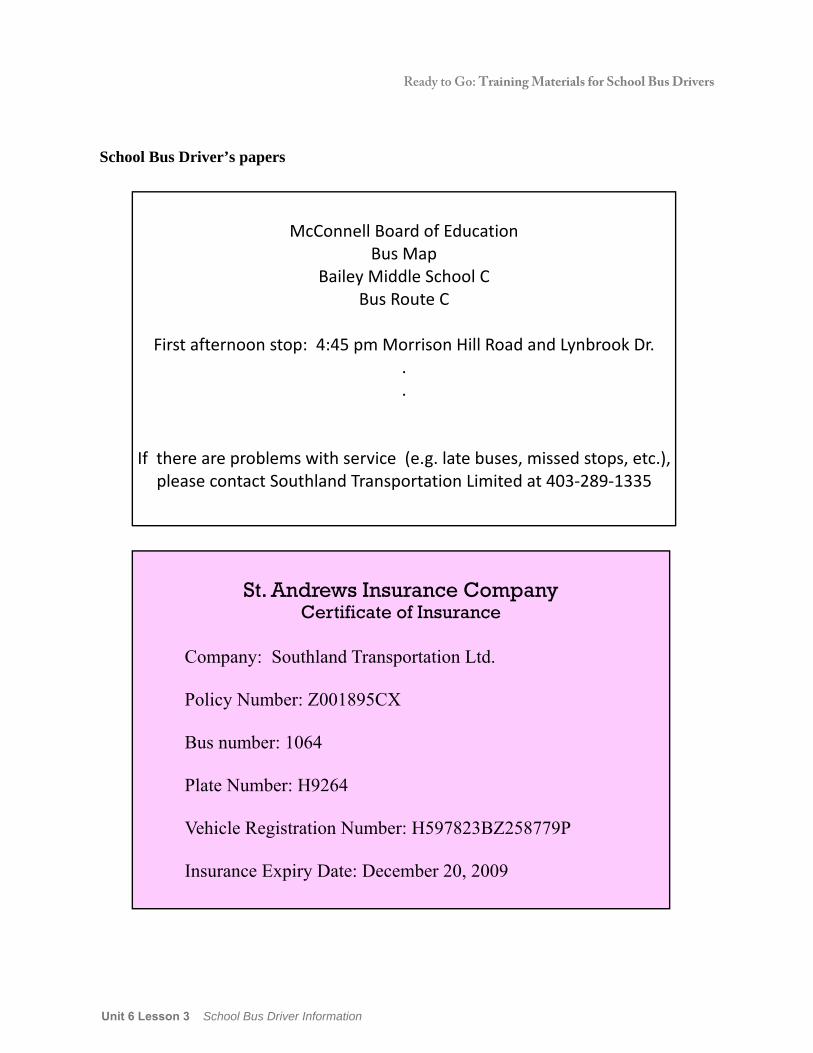
McConnell Board of Education
Bus Map Bailey Middle School C
Bus Route C
First afternoon stop: 4:45 pm Morrison Hill Road and Lynbrook Dr. . .
If there are problems with service (e.g. late buses, missed stops, etc.), please contact Southland Transportation Limited at 403‐289‐1335
St. Andrews Insurance Company
Certificate of Insurance
Company: Southland Transportation Ltd. Policy Number: Z001895CX Bus number: 1064 Plate Number: H9264 Vehicle Registration Number: H597823BZ258779P Insurance Expiry Date: December 20, 2009
Ready to Go: Training Materials for School Bus Drivers
School Bus Driver’s papers
Unit 6 Lesson 3 School Bus Driver Information

Accident in McConnell
Going East on Concord Road, before Lynbrook Drive, Aug. 26 @ 4:30pm
poste
d by Lau
rie Dennis, D
avidsonNews.n
et
Damage to the Anderson Heating & Cooling van, but no injuries
Unit 6: Lesson 3 Report a Collision CIWA
Ready to Go: Training Materials for School Bus Drivers
Appendix 1 Bibliography 1
Bibliography
Essential Skills and Curriculum Development Resources
A Needs Assessment Tool for ESL Programming by D. Seabrook de Vargas and L. Anderson, Norquest College, 2004.
Essential Skill Profile: Bus Driver, dated 10/07/2009, from http://www.hrsdc.g.ca/ES. Essential Skills Training Audit produced by Literacy Alberta, 2008. Facilitator’s Guide: a comprehensive tool to help practitioners, available at
www.facilitatorguide.ca. Integrating Workplace Essential Skills into Curricula: A Process Model by M. Luft, D.
Seabrook de Vargas, AWES, 2005, available at www.nald.ca. Language for Work: CLB and Essential Skills for Trainers/for ESL Instructors by The
Centre for Canadian Language Benchmarks, 2009. Occupation Description: Bus Drivers, dated 2008, by North Carolina Employment
Security Commission, from http://online.onetcenter.org. Opening Doors: A Literacy Audit Tool Kit for Customer Service Excellence, produced by
Literacy Alberta, 2008. Making Meaning, Making Change by Elsa Roberts Auerbach, Center for Applied
Linguistics, 1992. Practice Tests: Reading Skills, Test of Workplace Essential Skills, from
www.measureup.towes.com . Reader’s Guide to Essential Skills Profiles by Essential Skills Research Unit, Human
Resources and Social Development Canada, available at www.hrsdc.g.ca/eng/workplaceskills/essential_skills , accessed 10/7/2009.
Relating Canadian Language Benchmarks to Essential Skills: A Comparative Framework, Centre for Canadian Language Benchmarks, 2005.
Taking Learning to Task: Creative Strategies for Teaching Adults by Jane Vella, Jossey-Bass, 2001.
Tennessee ESOL in the Workplace: A Training Manual for ESOL Supervisors and Instructors by Tennessee Department of Labor, Workforce Development Office of Adult Education and University of Tennessee Center for Literacy Studies, 2003.
Understanding Curriculum Development in the Workplace: A Resource for Educators by Mary Ellen Belfiore, ABC Canada Literacy Foundation, 1996.
Workplace Literacy: Design and Implementation of Workplace Learning Programs by Frontier Press.
Work Ready Guide for Employers, from www.language.ca , accessed 11/15/2009. School Bus Industry and Training Resources Canadian Apprenticeship Forum Report, available at http://www.caf-
fca.org/en/reports/cf_essential_skills.asp , accessed 3/24/2010. Decide Smart, Arrive Safe: Highway-Rail Grade Crossing Training for School Bus Drivers,
Operation Lifesaver, available at www.oli.org/training/bus_safety_tips.htm.

Ready to Go: Training Materials for School Bus Drivers
Appendix 1 Bibliography 2
School Bus Driver Improvement Program: School Bus Operator’s Manual by Alberta Transportation, 2010, available at www.transportation.alberta.ca/4193.htm.
Workplace Plus 4, (book, CD, Teacher’s Guide) by Joan Saslow, Pearson Education Inc., 2005.
Workwrite, volume 1, by Karen Geraci, Preparatory Training Programs, 2002.

Ready to Go: Training Materials for School Bus Drivers
Appendix 1 Bibliography 3