reach user guide - release 1 - ncol.netapr 17, 2013 · reach user guide 1.0 . updated april 17,...
TRANSCRIPT

Allworx® Reach User Guide 1.0
Updated April 17, 2013

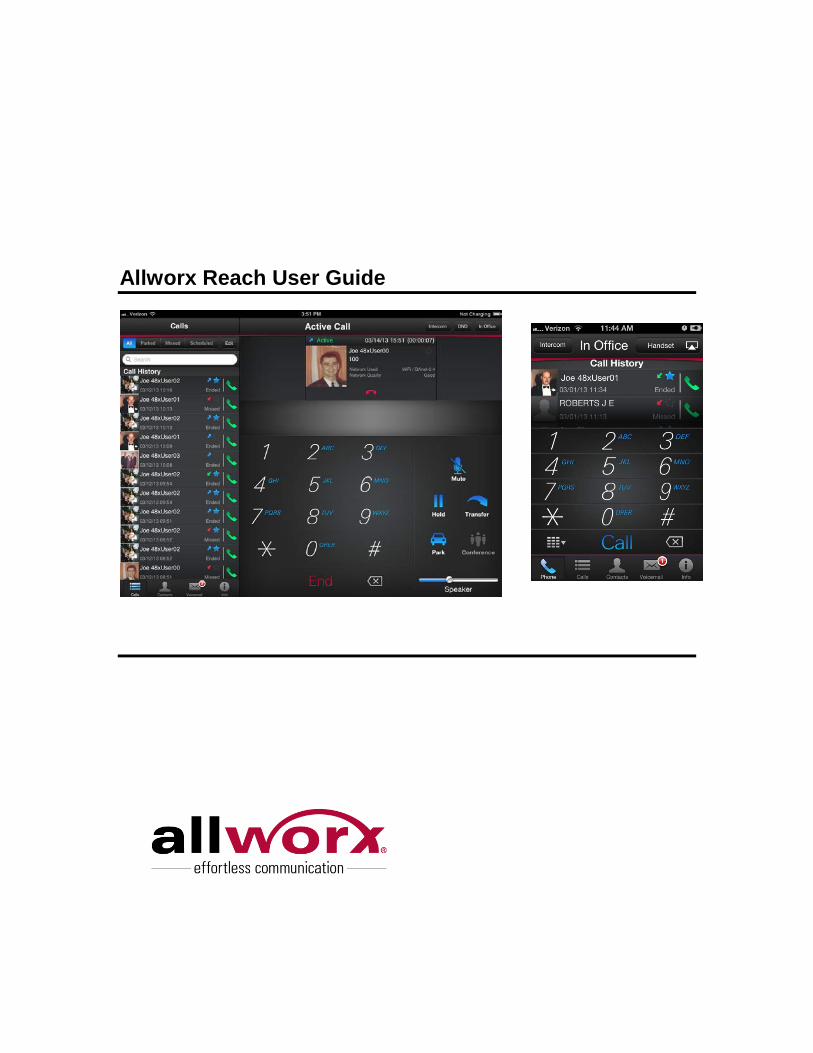
Allworx Reach User Guide
Reach User Guide 1.0
Toll Free 1-866-ALLWORX • 585-421-3850 • www.allworx.com Revised: April 17, 2013
Page ii
© 2013 Allworx Corp, a Windstream company. All rights reserved. No part of this publication may be reproduced, stored in a retrieval system, or transmitted, in any form or by any means, electronic, mechanical, photocopy, recording, or otherwise without the prior written permission of Allworx Corp.
Software in this product is Copyright 2013 Allworx Corp, a Windstream company, or its vendors. All rights are reserved. The software is protected by United States of America copyright laws and international treaty provisions applicable worldwide. Under such laws, the licensee is entitled to use the copy of the software incorporated with the instrument as intended in the operation of the product in which it is embedded. The software may not be copied, decompiled, reverse-engineered, disassembled, or otherwise reduced to human-perceivable form. This is not the sale of the software or any copy of the software; all right, title, ownership of the software remains with Allworx or its vendors.
iPad®, iPhone®, iPod touch®, iOS®, and iTunes® are trademarks of Apple Inc., registered in the U.S. and other countries.
The Bluetooth® word mark and logos are registered trademarks owned by Bluetooth SIG, Inc.
Reach User Guide 1.0
Toll Free 1-866-ALLWORX • 585-421-3850 • www.allworx.com Revised: April 17, 2013
Page iii
Table of Contents
1 Introduction .................................................................................................. 1 2 Setup ............................................................................................................. 3 3 Overview ....................................................................................................... 5
3.1 Layout ........................................................................................................ 5 3.2 Icons ........................................................................................................ 10
4 Device Status .............................................................................................. 11 4.1 Presence .................................................................................................. 11 4.2 Volume Control and Audio Route ............................................................. 11 4.3 Intercom ................................................................................................... 12 4.4 DND (Do not Disturb) ............................................................................... 12
5 Manage Calls .............................................................................................. 13 5.1 Send a Call .............................................................................................. 13 5.2 Receive a Call .......................................................................................... 13 5.3 Transfer a Call ......................................................................................... 14 5.4 Park a Call ............................................................................................... 14 5.5 Conference Call ....................................................................................... 14 5.6 End a Call ................................................................................................ 14 5.7 Call Status ............................................................................................... 15
6 Calls Tab ..................................................................................................... 17 6.1 Filters ....................................................................................................... 17 6.2 Call Details ............................................................................................... 17 6.3 Scheduled Conferences ........................................................................... 17 6.4 Edit Conference Center Information ......................................................... 18
7 Contacts tab ................................................................................................ 19 7.1 Filters ....................................................................................................... 19 7.2 Sorting Contacts ...................................................................................... 19 7.3 New Contacts ........................................................................................... 19 7.4 Edit Contacts ............................................................................................ 20
8 Voicemail Tab ............................................................................................. 21 8.1 Filters ....................................................................................................... 21 8.2 Listen to a Voicemail ................................................................................ 21 8.3 Reply, Forward, or Delete a Voicemail ..................................................... 21 8.4 Create a new Voicemail Message ............................................................ 22
9 Info Tab ....................................................................................................... 23 9.1 Go Offline / Go Online .............................................................................. 23 9.2 My Server ................................................................................................ 23 9.3 My Handset .............................................................................................. 23 9.4 My Settings .............................................................................................. 25 9.5 Report a Problem ..................................................................................... 25
10 Reach Application iOS Settings ................................................................ 27

Reach User Guide 1.0
Toll Free 1-866-ALLWORX • 585-421-3850 • www.allworx.com Revised: April 17, 2013
Page iv
10.1 Notification Center Settings .................................................................. 27 10.2 Privacy Settings .................................................................................... 27 10.3 Other Settings ...................................................................................... 28
11 Troubleshooting ......................................................................................... 29 11.1 Error Conditions.................................................................................... 29 11.2 Other States ......................................................................................... 30
12 Glossary ...................................................................................................... 31
Reach User Guide 1.0
Toll Free 1-866-ALLWORX • 585-421-3850 • www.allworx.com Revised: April 17, 2013
Page 1
1 Introduction
The Allworx Reach application enables users to send or receive business phone calls from their iOS device. By creating a virtual handset on the iOS device, users are able to work from remote locations and continue to send, receive, hold, transfer, and park calls; see the handset’s call history and business/personal contacts; and listen, reply, forward, or create voicemail.
Without creating a handset, users can manage their voicemail using the Allworx Reach application. All options in the voicemail tab are available including listening, creating, and sending messages.
Throughout this document, any term or view labeled as iPhone refers to any iPhone iOS device and the iPod touch iOS device. Any term or view labeled as iPad also refers to the iPad mini iOS device.

Reach User Guide 1.0
Toll Free 1-866-ALLWORX • 585-421-3850 • www.allworx.com Revised: April 17, 2013
Page 2
Reach User Guide 1.0
Toll Free 1-866-ALLWORX • 585-421-3850 • www.allworx.com Revised: April 17, 2013
Page 3
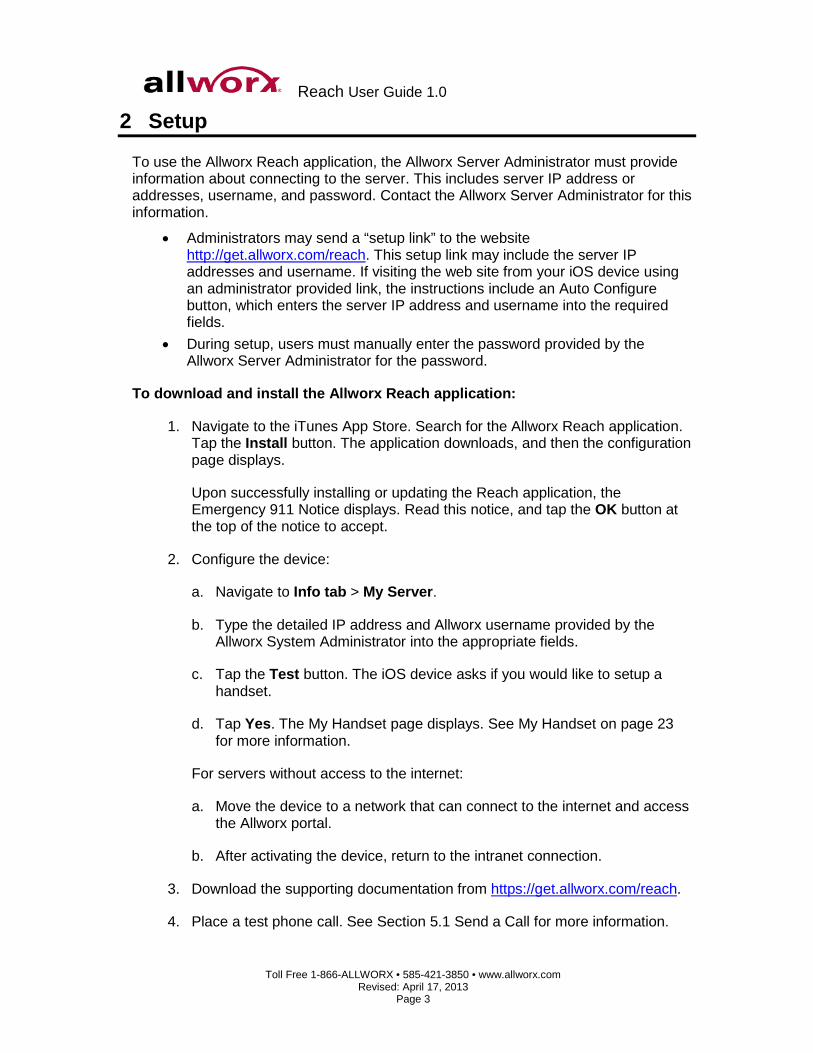
2 Setup
To use the Allworx Reach application, the Allworx Server Administrator must provide information about connecting to the server. This includes server IP address or addresses, username, and password. Contact the Allworx Server Administrator for this information.
• Administrators may send a “setup link” to the website http://get.allworx.com/reach. This setup link may include the server IP addresses and username. If visiting the web site from your iOS device using an administrator provided link, the instructions include an Auto Configure button, which enters the server IP address and username into the required fields.
• During setup, users must manually enter the password provided by the Allworx Server Administrator for the password.
To download and install the Allworx Reach application:
1. Navigate to the iTunes App Store. Search for the Allworx Reach application. Tap the Install button. The application downloads, and then the configuration page displays.
Upon successfully installing or updating the Reach application, the Emergency 911 Notice displays. Read this notice, and tap the OK button at the top of the notice to accept.
2. Configure the device:
a. Navigate to Info tab > My Server.
b. Type the detailed IP address and Allworx username provided by the Allworx System Administrator into the appropriate fields.
c. Tap the Test button. The iOS device asks if you would like to setup a handset.
d. Tap Yes. The My Handset page displays. See My Handset on page 23 for more information. .
For servers without access to the internet:
a. Move the device to a network that can connect to the internet and access the Allworx portal.
b. After activating the device, return to the intranet connection. .
3. Download the supporting documentation from https://get.allworx.com/reach.
4. Place a test phone call. See Section 5.1 Send a Call for more information. 0.

Reach User Guide 1.0
Toll Free 1-866-ALLWORX • 585-421-3850 • www.allworx.com Revised: April 17, 2013
Page 4

Reach User Guide 1.0
Toll Free 1-866-ALLWORX • 585-421-3850 • www.allworx.com Revised: April 17, 2013
Page 5
3 Overview
3.1 Layout
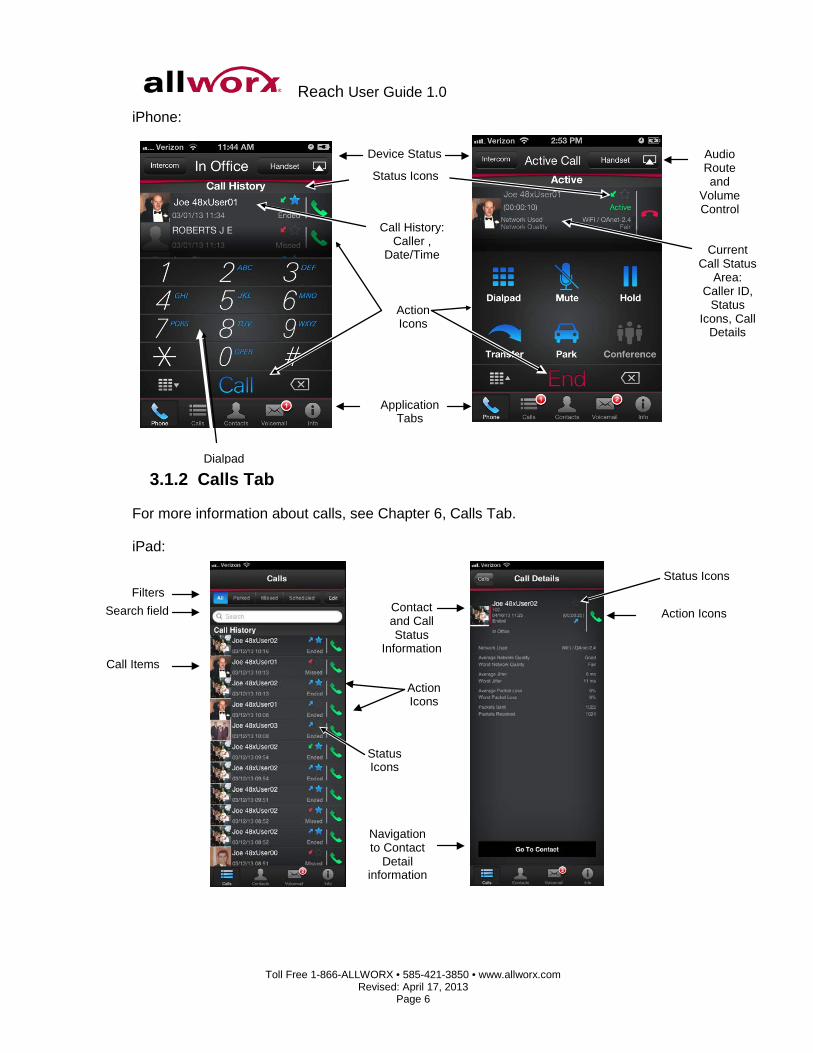
3.1.1 Active Call Details
For more information about active calls, see Chapter 5, Manage Calls.
iPad:
Device Status
Application Tabs
Dialpad / Action Icons
Action Icons
Volume Control and
Audio Route
Current Call Status Area
Call Details / Action Icons
Status Icons
Caller ID
Active Tab Name
Active Tab
Action Area
Reach User Guide 1.0
Toll Free 1-866-ALLWORX • 585-421-3850 • www.allworx.com Revised: April 17, 2013
Page 6
iPhone:
3.1.2 Calls Tab
For more information about calls, see Chapter 6, Calls Tab.
iPad:
Status Icons
Navigation to Contact
Detail information
Call History: Caller ,
Date/Time
Device Status Audio Route and
Volume Control
Current
Call Status Area:
Caller ID, Status
Icons, Call Details
Action Icons
Application Tabs
Status Icons
Action Icons Contact and Call Status
Information
Filters Search field
Call Items
Action Icons
Dialpad
Status Icons
Reach User Guide 1.0
Toll Free 1-866-ALLWORX • 585-421-3850 • www.allworx.com Revised: April 17, 2013
Page 7
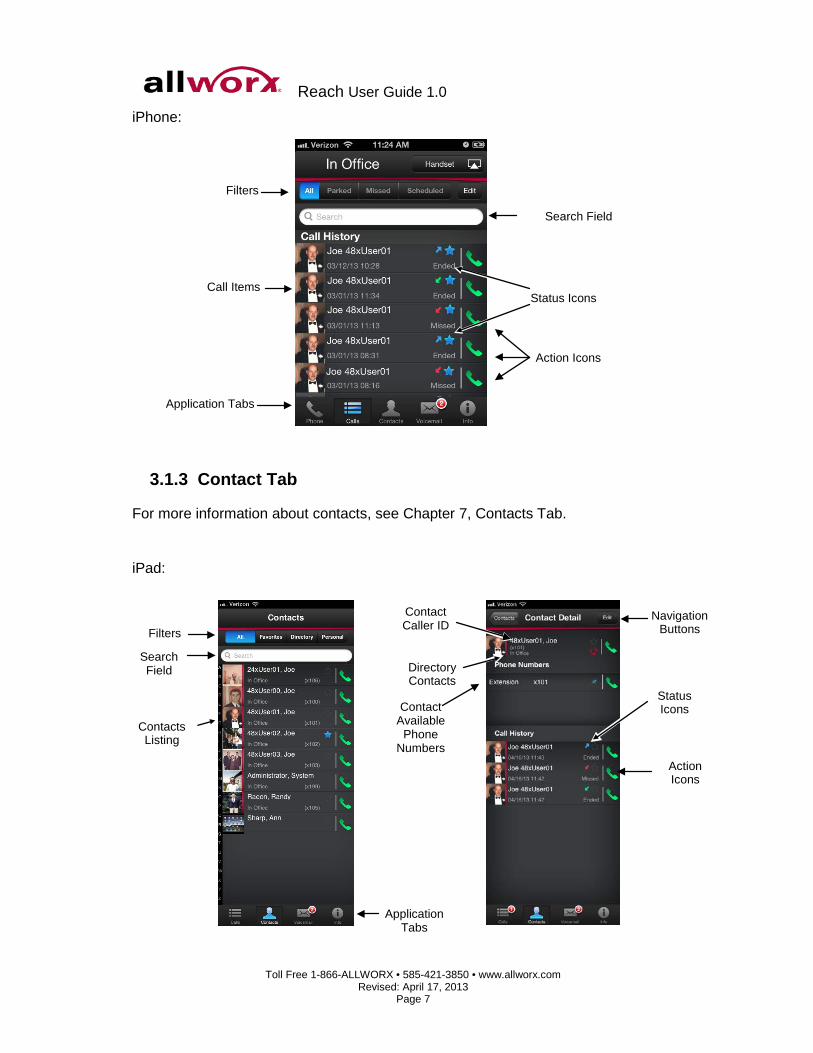
iPhone:
3.1.3 Contact Tab
For more information about contacts, see Chapter 7, Contacts Tab.
iPad:
Navigation Buttons
Directory Contacts
Contact Caller ID
Status Icons
Action Icons
Contact Available
Phone Numbers
Action Icons
Status Icons
Filters
Search Field
Application Tabs
Call Items
Application Tabs
Filters
Search Field
Contacts Listing

Reach User Guide 1.0
Toll Free 1-866-ALLWORX • 585-421-3850 • www.allworx.com Revised: April 17, 2013
Page 8
iPhone:
3.1.4 Voicemail Tab
For more information about voicemail, see Chapter 8, Voicemail Tab.
iPad: iPhone:
Filters
Search Field
Action Icon
Navigation to create voicemail messages
Status Icons
Voicemail Boxes and
Voicemail Item Detail area
Application Tabs
Directory Contacts
Status Icons
Action Icons
Filters
Search Field
Application Tabs
Reach User Guide 1.0
Toll Free 1-866-ALLWORX • 585-421-3850 • www.allworx.com Revised: April 17, 2013
Page 9
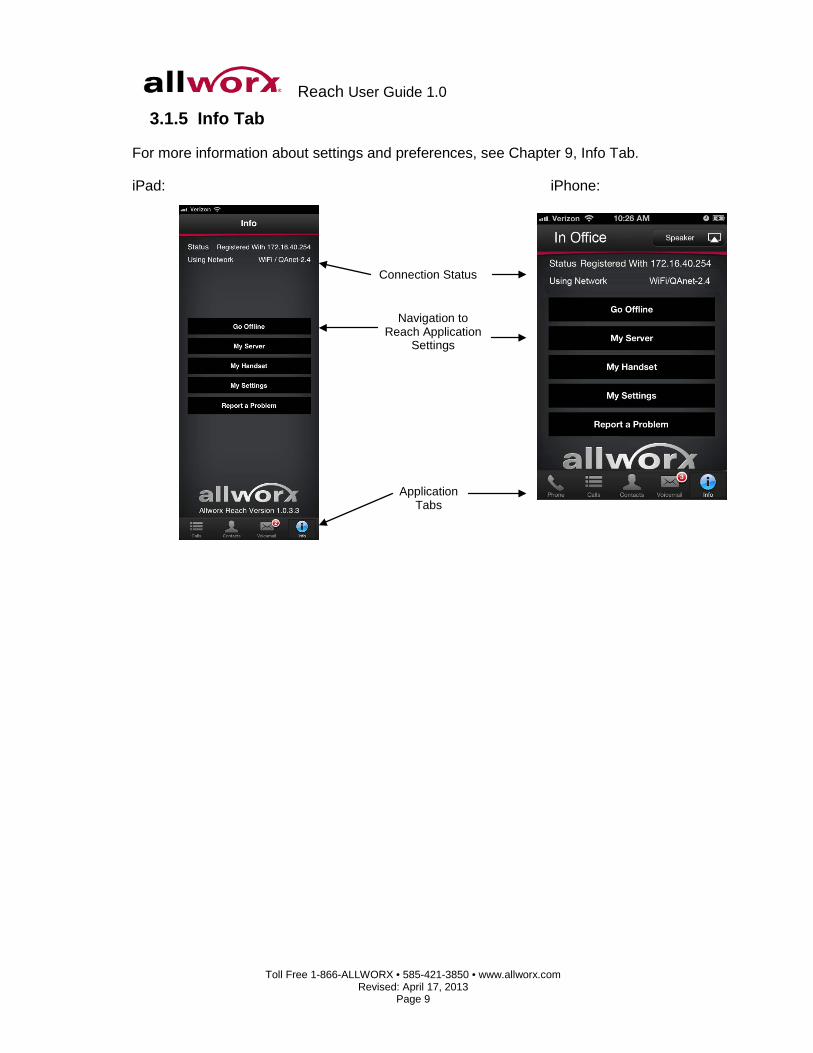
3.1.5 Info Tab
For more information about settings and preferences, see Chapter 9, Info Tab.
iPad: iPhone:
Connection Status
Navigation to Reach Application
Settings
Application Tabs
Reach User Guide 1.0
Toll Free 1-866-ALLWORX • 585-421-3850 • www.allworx.com Revised: April 17, 2013
Page 10
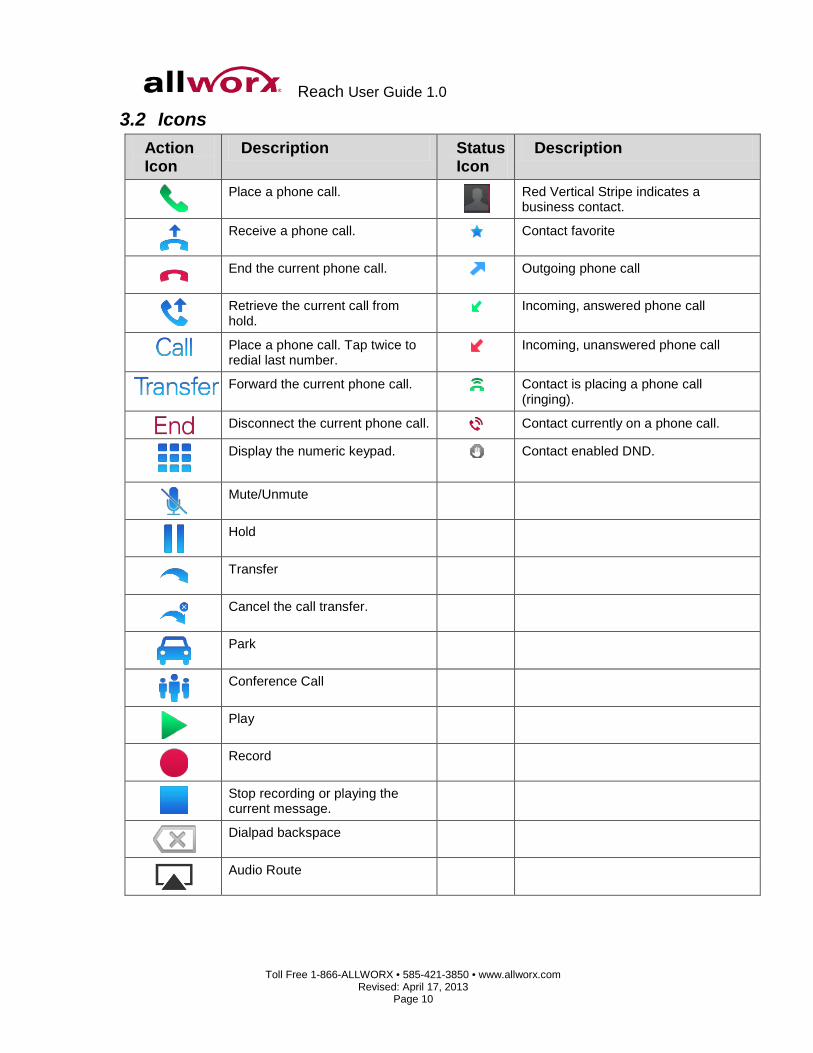
3.2 Icons Action Icon
Description Status Icon
Description
Place a phone call.
Red Vertical Stripe indicates a business contact.
Receive a phone call. Contact favorite
End the current phone call. Outgoing phone call
Retrieve the current call from hold.
Incoming, answered phone call
Place a phone call. Tap twice to redial last number.
Incoming, unanswered phone call
Forward the current phone call. Contact is placing a phone call (ringing).
Disconnect the current phone call. Contact currently on a phone call.
Display the numeric keypad.
Contact enabled DND.
Mute/Unmute
Hold
Transfer
Cancel the call transfer.
Park
Conference Call
Play
Record
Stop recording or playing the current message.
Dialpad backspace
Audio Route
Reach User Guide 1.0
Toll Free 1-866-ALLWORX • 585-421-3850 • www.allworx.com Revised: April 17, 2013
Page 11
4 Device Status
On the iPad, the Device status area displays the active application tab, the username and extension, the Intercom and DND buttons, and the user presence.
On the iPhone, the Device status area displays the user presences and the audio route and volume control. To locate the Intercom button, navigate to the Phone tab. To locate the DND button, tap the presence. The DND button is in the drop-down list.
4.1 Presence
The presence shows user availability status. To change the status, tap the status word, and select an option from the drop-down list.
• In Office
• At a meeting
• On Vacation
• On a Business Trip
• At Home
• Away
• Busy
• Do not Disturb (iPhone only)
A blue checkmark displays next to the selected presence. While the iOS device is searching for or connecting to a network, the presence label is Connecting.
Tap on the iPad screen or the iPhone Done button when complete.
4.2 Volume Control and Audio Route
The volume slide bar enables the user to increase or decrease the iOS device volume.
iPhone: Tap the audio route ( ) action icon; slide the radio button to the left to decrease the volume or to the right to increase the volume.
iPad: Located on the bottom, right side of the Current Call Options; slide the radio button above the Audio Route to the left to decrease the volume or to the right to increase the volume.
Next to the volume slide bar is an audio route action icon, if there is more than one available audio route. Tap this action icon to select the preferred audio route such handset, speaker, or Bluetooth. The indicator displays the active audio currently in use.
• Bluetooth
• Handset
• Speaker
• Headphones
Reach User Guide 1.0
Toll Free 1-866-ALLWORX • 585-421-3850 • www.allworx.com Revised: April 17, 2013
Page 12
4.3 Intercom
Note: For the iPhone, this option is available on the Phone tab. Press the Intercom button, dial the extension, and press call.
1. Start talking when the iOS device displays Active Call. The user of the dialed extension hears the caller.
2. Press the red handset action icon in the call item or the End key in the dial pad to end the call. 0.
To deny an incoming Intercom request, tap Ignore.
4.4 DND (Do not Disturb)
When activating the DND feature, the iOS device does not ring. All calls follow the next step in the active call route. Users can send calls on the iOS device.
To activate the DND option:
iPad:
Tap the DND button. The button changes to blue to indicate it is active. Tap the DND button again. The button changes to black to indicate it is inactive.
iPhone:
1. Tap the presence at the top of the screen. The list of Presence options displays.
2. Tap the Do Not Disturb option. A blue checkmark displays next to the Presence and Do Not Disturb options.
3. Tap Done to exit the screen. The iPhone screen displays the current presence and DND that indicates DND is active. 0.
To turn the DND option off, repeat.

Reach User Guide 1.0
Toll Free 1-866-ALLWORX • 585-421-3850 • www.allworx.com Revised: April 17, 2013
Page 13
5 Manage Calls
Note: Calls may be lost due to a Wi-Fi to cellular network change or if there is no connection between the Wi-Fi access point and the server.
5.1 Send a Call
iPhone: Navigate to the Phone tab.
While dialing, matching contact numbers display in the Call Status section. The backspace action icon removes the last digit. Press and hold to remove all digits.
To dial an external number, access the outside line following the dial plan, dial the phone number, and then tap the Call action icon.
To dial an internal extension, dial the direct extension, and then tap the Call action icon. To redial the last number, tap the Call action icon twice.
5.2 Receive a Call
The application always notifies users of incoming calls. Additionally, users can close the Reach application to use another iOS device application without ending the call.
Device State Lock Screen: User must use the slide bar to unlock the iOS device, and then input a passcode, if required, to unlock the phone and answer the call. The device automatically opens in the Allworx Reach application.
When using another application: User taps the notification display on the device window. The device automatically opens the Allworx Reach application and answers the call.
Changing applications: User changes application by touching the device home button. The Allworx Reach application notifies the user that the device is recording. This indicates that user has not ended the call. The user at the opposite end of the call can still hear the conversation.
iPhone:
iPad:
Home Screen: A pop-up displays with two options. • Ignore: User sends the call to next step on active
call route after the system specified number of rings. • Accept: User answers incoming call. If a second call comes in and the user taps the Accept button, the Allworx Reach application automatically places the first call on hold.
Reach User Guide 1.0
Toll Free 1-866-ALLWORX • 585-421-3850 • www.allworx.com Revised: April 17, 2013
Page 14
5.3 Transfer a Call
1. Tap the Transfer action icon.
2. Select a transfer option.
Option Description Blind Forward the call unannounced to a new extension.
Attended Forward the call announced to a new extension.
To Voicemail Forward the call to the a voicemail box.
To My Cell Phone Forward the call to the current phone user’s cell phone. If there is no cell phone number, a dialog box displays to enter and store the cell phone number.
Cancel iPhone only: reverts back to the keypad
3. Dial the number.
4. Tap the Transfer action icon to complete the transfer. 0.
Tap the cancel transfer ( ) action icon to cancel the active call transfer. Tap the action icon to unhold the call. The display status changes to active call.
5.4 Park a Call
To place the call into a Parking Orbit, press the Park action icon.
To retrieve a call from a Parking Orbit, navigate to the Calls > Parked page. Select the parked call and tap the green handset.
5.5 Conference Call
To connect a conference call after sending or receiving the first call:
1. Place the current, active call on hold.
2. Send or receive the second call, the active calls section displays both calls.
3. Tap the conference action icon to join the two phone calls. This connects both calls to a single, active call. The display shows both calls as active. 0.
If you end the call, you end both active segments of the call. If one party hangs up, that segment drops.
5.6 End a Call
To end the current call, tap End at the bottom of the keypad or tap the red handset action icon in the Call Status section.
Reach User Guide 1.0
Toll Free 1-866-ALLWORX • 585-421-3850 • www.allworx.com Revised: April 17, 2013
Page 15
5.7 Call Status
The call status information contains the contact name or caller ID, a timer, and indicates the current phone call is:
• Incoming – an outside caller is contacting the extension
• Ringing – user is calling another extension or phone number
• Active – handset is currently in use
• On Hold – current call is
• Transferring Blind – forwards the call to another extension without announcing the call
• Transferring Attended – forwards the call to another extension with announcing the the call
• Transferring to Voicemail – forwards the call to the voicemail of another extension
• Transferring to Cell Phone– forwards the call to the user’s cell phone

Reach User Guide 1.0
Toll Free 1-866-ALLWORX • 585-421-3850 • www.allworx.com Revised: April 17, 2013
Page 16
Reach User Guide 1.0
Toll Free 1-866-ALLWORX • 585-421-3850 • www.allworx.com Revised: April 17, 2013
Page 17
6 Calls Tab
A call history specific to the handset displays on the iOS device. The call items display the caller ID, date/time of call, status icons, and action icons. A right-swipe of the action icon enables the user to tap the Delete button and remove the phone call from the listing
6.1 Filters Filter Description
All Display the chronological order of the entire Call History.
Parked Display only the active calls placed into the Parking Orbit.
Missed Display only the unanswered phone calls.
Scheduled Display the conference description, ID number, password, date duration, pre-join time, and repeat information for scheduled conference calls.
6.2 Call Details
The call status information contains the contact name or caller ID, date/time of call, call duration, favorite status, received/sent call, Network used, Packet Loss, Average Jitter, presence (for directory contacts only), and indicates if the current phone call was:
• Ended
• Missed
• Transferred
• Parked at: <Parking Orbit Number>
• Check number
• Dropped
The green phone action icon enables the user to redial the last number.
6.3 Scheduled Conferences
My Allworx manager downloads all scheduled conference calls. To schedule a conference call, go to My Allworx Manager and login. There are no schedule calls downloaded from any other external calendar.
Tapping on a conference call item automatically dials the Conference Bridge. The Autodialing Conference ID and password display in the Call Status area.
Note: After the Conference Bridge answers, the system automatically dials the conference ID and password.
Reach User Guide 1.0
Toll Free 1-866-ALLWORX • 585-421-3850 • www.allworx.com Revised: April 17, 2013
Page 18
6.4 Edit Conference Center Information
Users can edit the Name and Password of scheduled conferences.
To edit the scheduled conference:
1. Navigate to the Calls Tab.
2. Tap the Scheduled filter. A list of scheduled conferences displays in the tab area.
3. Tap the scheduled call, the conference information displays.
4. Tap the Edit button above the right information column.
5. Tap in the field, and type in the new information.
Name – type in a new name for the conference
Password – type in a new numeric password for the conference
6. Tap the Done button above the right information column to save changes. 0.

Reach User Guide 1.0
Toll Free 1-866-ALLWORX • 585-421-3850 • www.allworx.com Revised: April 17, 2013
Page 19
7 Contacts tab
The iOS device displays contacts specific to the handset. Users can filter the contacts by all, favorites, directory, and personal. The iOS device accesses the contact application on the device to provide the personal contacts and accesses the internal business directory for the directory contacts.
The contact item displays Contact photo (if available), Caller ID, presence, favorite status, and availability status. See Section 3.3 Icons for further information.
7.1 Filters Filter Description
All Display the entire contacts list of the device.
Favorites Display contacts with the Favorite status icon.
Directory Display contacts from the business directory.
Personal Display contacts from the Contacts application.
CAUTION: Personal contacts stored on the iOS device are not stored on the Allworx server. Switching to another iOS device deletes all personal contacts and information.
7.2 Sorting Contacts
1. Navigate to the Info tab and tap the My Settings button.
2. Tap the Contact Sort Order.
3. Select the sort order preference. A blue checkmark displays by the choice. 0.
• Last, First – Displays the contact list alphabetically, last name then first name.
• First, Last – Displays the contact list alphabetically, first name then last name.
7.3 New Contacts
To add personal contacts, go to the device Contacts application, and add the appropriate information. If personal contacts do not display, check the privacy settings of the iOS device.
To add directory contacts, the Allworx server automatically adds new directory contacts based on the Allworx Server Administrator updates.
Reach User Guide 1.0
Toll Free 1-866-ALLWORX • 585-421-3850 • www.allworx.com Revised: April 17, 2013
Page 20
7.4 Edit Contacts
To edit existing directory contacts:
1. Tap the contact to open the Contact Detail page.
2. Tap the Edit button. The What do you want to do? dialog box displays.
3. Tap an option. 0.
Option Description Delete Photo Delete the current photo.
Take Photo Open the camera option to capture a new photo to use.
Change Photo Open the Camera Roll application for the user to choose another photo to use.
Cancel iPhone only: exits the edit screen. iPad only: tap outside the dialog box.
To edit existing personal contacts:
1. Tap the contact to open the Personal Contact Detail page.
2. Tap the Edit button. Contact information displays, as well as the option to Send Message, FaceTime, Share Contact, or Add to Favorites (personal contact favorite).
3. Tap the Edit button a second time to add or update contact information. Tap the appropriate field and enter the information or the picture area to change the photo. See options in the table above to change the photo. Tap Cancel to exit the edit screen or Done to save changes.
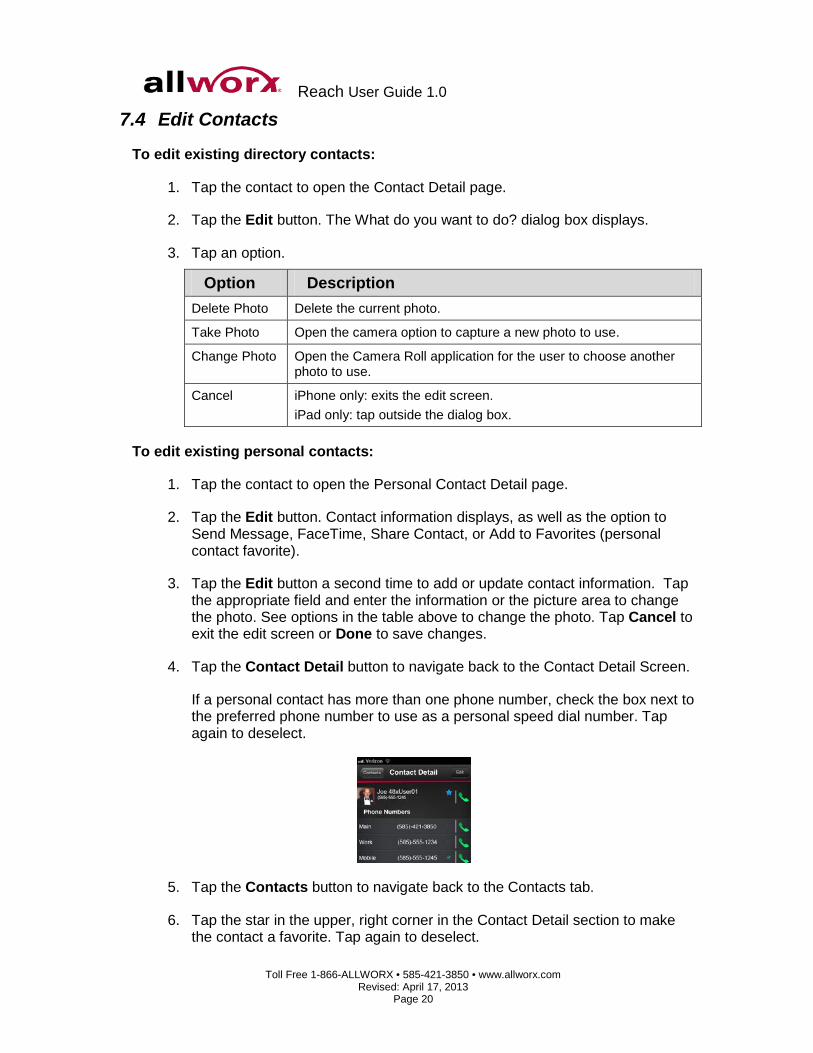
4. Tap the Contact Detail button to navigate back to the Contact Detail Screen.
If a personal contact has more than one phone number, check the box next to the preferred phone number to use as a personal speed dial number. Tap again to deselect.
5. Tap the Contacts button to navigate back to the Contacts tab.
6. Tap the star in the upper, right corner in the Contact Detail section to make the contact a favorite. Tap again to deselect. 0.
Reach User Guide 1.0
Toll Free 1-866-ALLWORX • 585-421-3850 • www.allworx.com Revised: April 17, 2013
Page 21
8 Voicemail Tab
The number in the top, right corner of the Voicemail tab indicates the number of voicemail messages.
The call item displays Caller ID and the date/time of call. Unread messages are in bold text. Tap the green, right arrow to play the message or the blue box to stop playing the message. A right-swipe of a call item enables the user to toggle between the Mark Old, Mark New or Delete the call item. To cancel, right-swipe the call item again.
8.1 Filters Filter Description
All Display the Inbox, Drafts and Sent call items and the Create New option.
In Display the Inbox call items and the Create new option.
Out Display the Drafts and Sent Items and the Create New option.
8.2 Listen to a Voicemail
To listen to the new voicemail, tap the green action icon. To stop playing the message, tap the blue square.
8.3 Reply, Forward, or Delete a Voicemail
Tap the voicemail call item and the voicemail detail screen displays.
Button Action Reply The device goes to the Draft voicemail dialog box.
Forward The device goes to the Draft voicemail dialog box.
Delete Remove the voicemail from the call item listing.
Reach User Guide 1.0
Toll Free 1-866-ALLWORX • 585-421-3850 • www.allworx.com Revised: April 17, 2013
Page 22
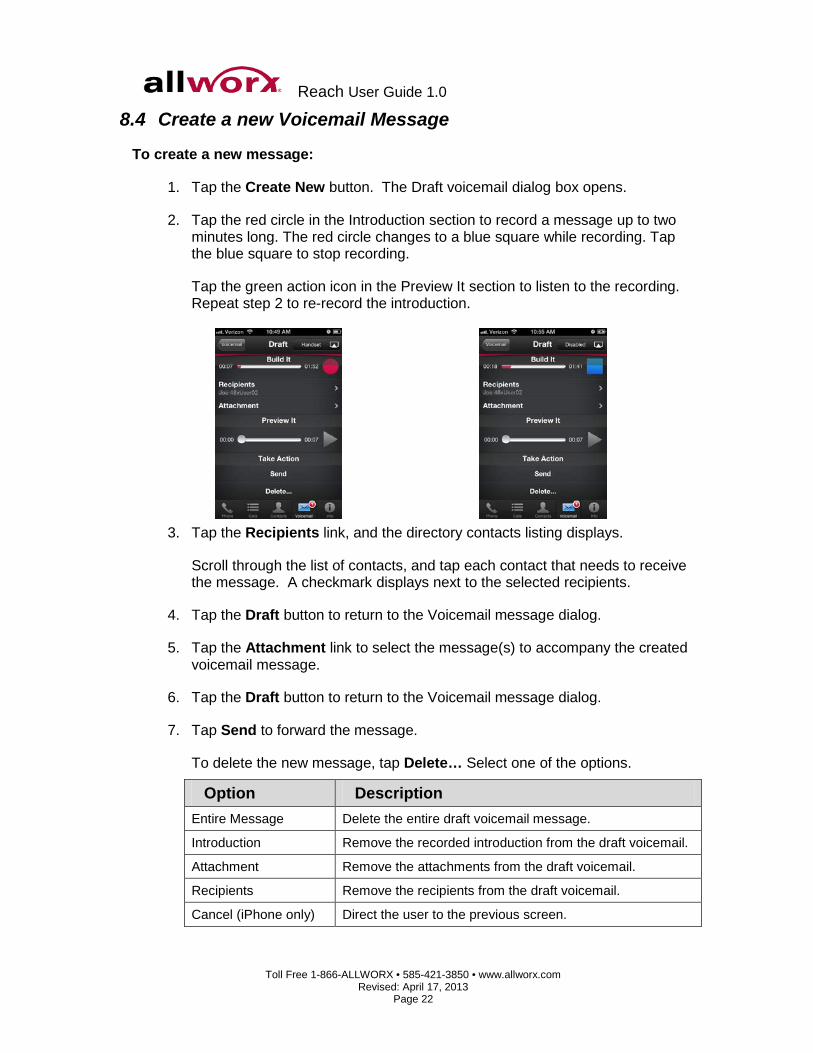
8.4 Create a new Voicemail Message
To create a new message:
1. Tap the Create New button. The Draft voicemail dialog box opens.
2. Tap the red circle in the Introduction section to record a message up to two minutes long. The red circle changes to a blue square while recording. Tap the blue square to stop recording.
Tap the green action icon in the Preview It section to listen to the recording. Repeat step 2 to re-record the introduction.
3. Tap the Recipients link, and the directory contacts listing displays.
Scroll through the list of contacts, and tap each contact that needs to receive the message. A checkmark displays next to the selected recipients.
4. Tap the Draft button to return to the Voicemail message dialog.
5. Tap the Attachment link to select the message(s) to accompany the created voicemail message.
6. Tap the Draft button to return to the Voicemail message dialog.
7. Tap Send to forward the message. 0.
To delete the new message, tap Delete… Select one of the options.
Option Description Entire Message Delete the entire draft voicemail message.
Introduction Remove the recorded introduction from the draft voicemail.
Attachment Remove the attachments from the draft voicemail.
Recipients Remove the recipients from the draft voicemail.
Cancel (iPhone only) Direct the user to the previous screen.
Reach User Guide 1.0
Toll Free 1-866-ALLWORX • 585-421-3850 • www.allworx.com Revised: April 17, 2013
Page 23
9 Info Tab
Users can set the iOS device offline/online, setup the server connections, connect or delete the iOS handset, setup the device personal preferences, or report a problem. The Info tab also displays the connection and network information.
Status Description Registered With Indicate the registered server IP address of the iOS device.
Connecting Indicate the iOS device is locating an available network. The presence label also indicates Connecting status of the device.
Using Network Indicate the network type and the network name the iOS device is using.
9.1 Go Offline / Go Online • Go Offline – stops communication with the server and the calling features are
inactive. iPad only: A dialog box opens to Go Online immediately.
• Go Online – connects to server and all functions are active.
9.2 My Server
Users can input the server information provided by the Allworx Server Administrator. After filling in the fields, tap the Test button.
The SIP Port and the AMDS Port are the TCP ports for communicating with the Allworx Server for SIP phone signaling and for authentication, presence, and voicemail access. In most cases, the default values are correct. However, if your Allworx Server administrator informs you about an unusual firewall configuration that requires accessing these services on different ports, adjust these fields to other values.
Field Input Server IP Address Provided by the Allworx Server Administrator.
Username Provided by the Allworx Server Administrator.
Password Provided by the Allworx Server Administrator.
SIP Port Default value is 5060.
AMDS Port Default value is 8081.
9.3 My Handset
Users can add a new handset or delete an existing handset. When creating a new handset, the system adds the device to the call route of the primary extension.
Reach User Guide 1.0
Toll Free 1-866-ALLWORX • 585-421-3850 • www.allworx.com Revised: April 17, 2013
Page 24
To add a new handset:
1. Tap My Handset and the Install new handset on this device page displays.
2. Select the appropriate option for adding a new handset: 0.
Create New – displays the number of licenses available to the user and the number of available licenses in the system. Tapping this option enables the phone options on the iOS device.
Reserved – indicates the Allworx Server Administrator has saved a license, but the user has not claimed the license.
Migrate handset from another device – displays a list of available iOS devices the user can move the licenses from. Tap an existing iOS device to move the license to the current iOS device.
If there are no eligible licenses available, an error message displays indicating the device is not eligible to install a new handset.
To delete a handset:
1. Tap My Handset and the My Handset page displays.
2. Select the appropriate option for deleting the handset: 0.
Delete handset on this device – removes the handset information from the iOS device. The license is still associated with the extension.
Delete handset on this device and on server - removes devices associated with the extension. The license is no longer dedicated to the extension and becomes available for use by anyone within the system.
Reach User Guide 1.0
Toll Free 1-866-ALLWORX • 585-421-3850 • www.allworx.com Revised: April 17, 2013
Page 25
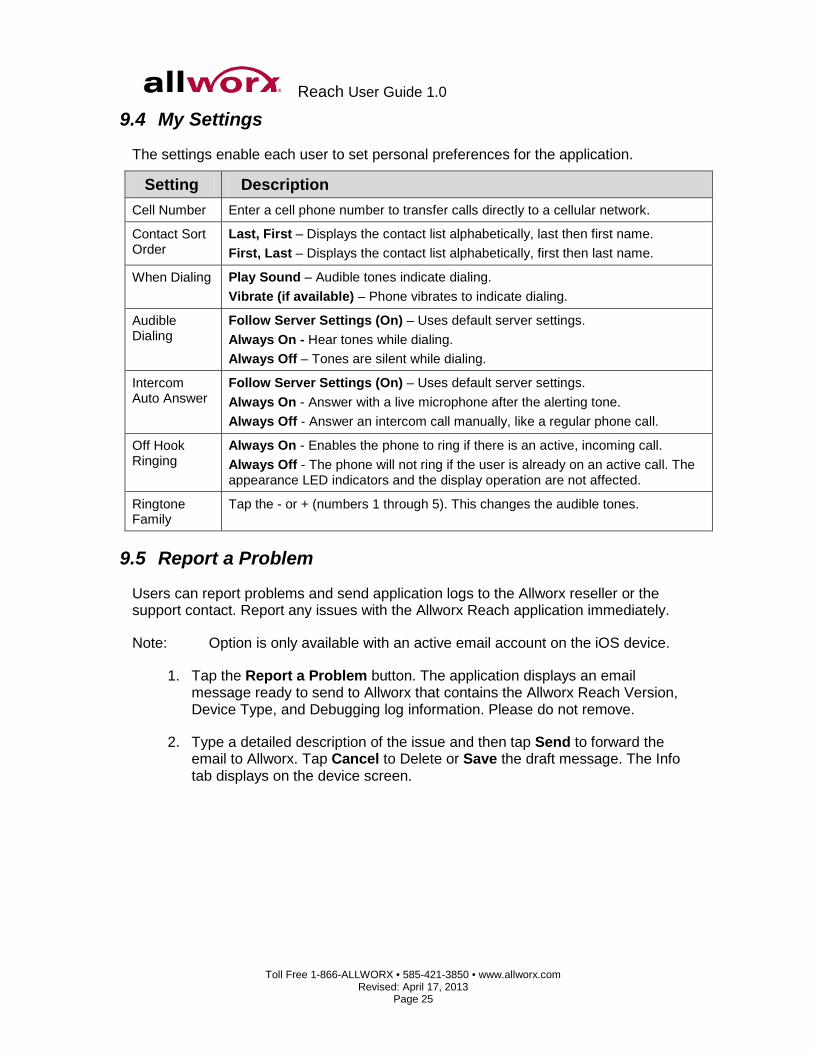
9.4 My Settings
The settings enable each user to set personal preferences for the application.
Setting Description Cell Number Enter a cell phone number to transfer calls directly to a cellular network.
Contact Sort Order
Last, First – Displays the contact list alphabetically, last then first name. First, Last – Displays the contact list alphabetically, first then last name.
When Dialing Play Sound – Audible tones indicate dialing. Vibrate (if available) – Phone vibrates to indicate dialing.
Audible Dialing
Follow Server Settings (On) – Uses default server settings. Always On - Hear tones while dialing. Always Off – Tones are silent while dialing.
Intercom Auto Answer
Follow Server Settings (On) – Uses default server settings. Always On - Answer with a live microphone after the alerting tone. Always Off - Answer an intercom call manually, like a regular phone call.
Off Hook Ringing
Always On - Enables the phone to ring if there is an active, incoming call. Always Off - The phone will not ring if the user is already on an active call. The appearance LED indicators and the display operation are not affected.
Ringtone Family
Tap the - or + (numbers 1 through 5). This changes the audible tones.
9.5 Report a Problem
Users can report problems and send application logs to the Allworx reseller or the support contact. Report any issues with the Allworx Reach application immediately.
Note: Option is only available with an active email account on the iOS device.
1. Tap the Report a Problem button. The application displays an email message ready to send to Allworx that contains the Allworx Reach Version, Device Type, and Debugging log information. Please do not remove.
2. Type a detailed description of the issue and then tap Send to forward the email to Allworx. Tap Cancel to Delete or Save the draft message. The Info tab displays on the device screen.0.

Reach User Guide 1.0
Toll Free 1-866-ALLWORX • 585-421-3850 • www.allworx.com Revised: April 17, 2013
Page 26
Reach User Guide 1.0
Toll Free 1-866-ALLWORX • 585-421-3850 • www.allworx.com Revised: April 17, 2013
Page 27
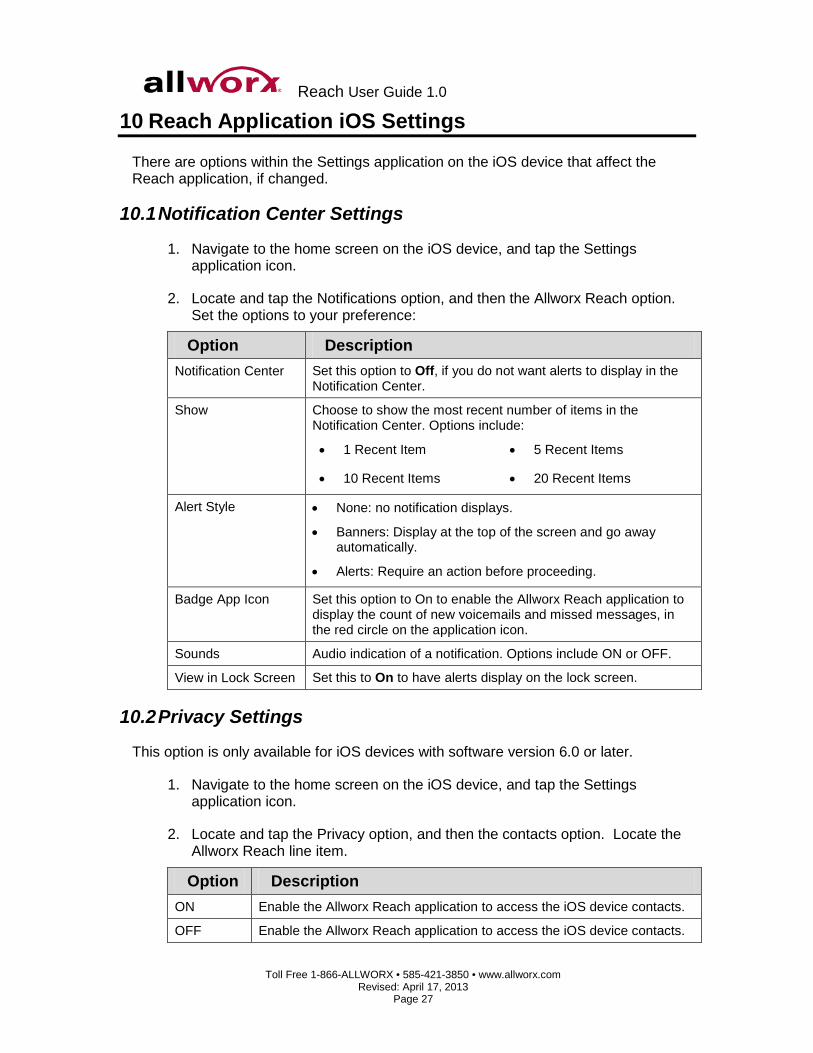
10 Reach Application iOS Settings
There are options within the Settings application on the iOS device that affect the Reach application, if changed.
10.1 Notification Center Settings
1. Navigate to the home screen on the iOS device, and tap the Settings application icon.
2. Locate and tap the Notifications option, and then the Allworx Reach option. Set the options to your preference: 0.
Option Description Notification Center Set this option to Off, if you do not want alerts to display in the
Notification Center.
Show Choose to show the most recent number of items in the Notification Center. Options include:
• 1 Recent Item • 5 Recent Items
• 10 Recent Items • 20 Recent Items
Alert Style • None: no notification displays.
• Banners: Display at the top of the screen and go away automatically.
• Alerts: Require an action before proceeding.
Badge App Icon Set this option to On to enable the Allworx Reach application to display the count of new voicemails and missed messages, in the red circle on the application icon.
Sounds Audio indication of a notification. Options include ON or OFF.
View in Lock Screen Set this to On to have alerts display on the lock screen.
10.2 Privacy Settings
This option is only available for iOS devices with software version 6.0 or later.
1. Navigate to the home screen on the iOS device, and tap the Settings application icon.
2. Locate and tap the Privacy option, and then the contacts option. Locate the Allworx Reach line item. 0.
Option Description ON Enable the Allworx Reach application to access the iOS device contacts.
OFF Enable the Allworx Reach application to access the iOS device contacts.
Reach User Guide 1.0
Toll Free 1-866-ALLWORX • 585-421-3850 • www.allworx.com Revised: April 17, 2013
Page 28
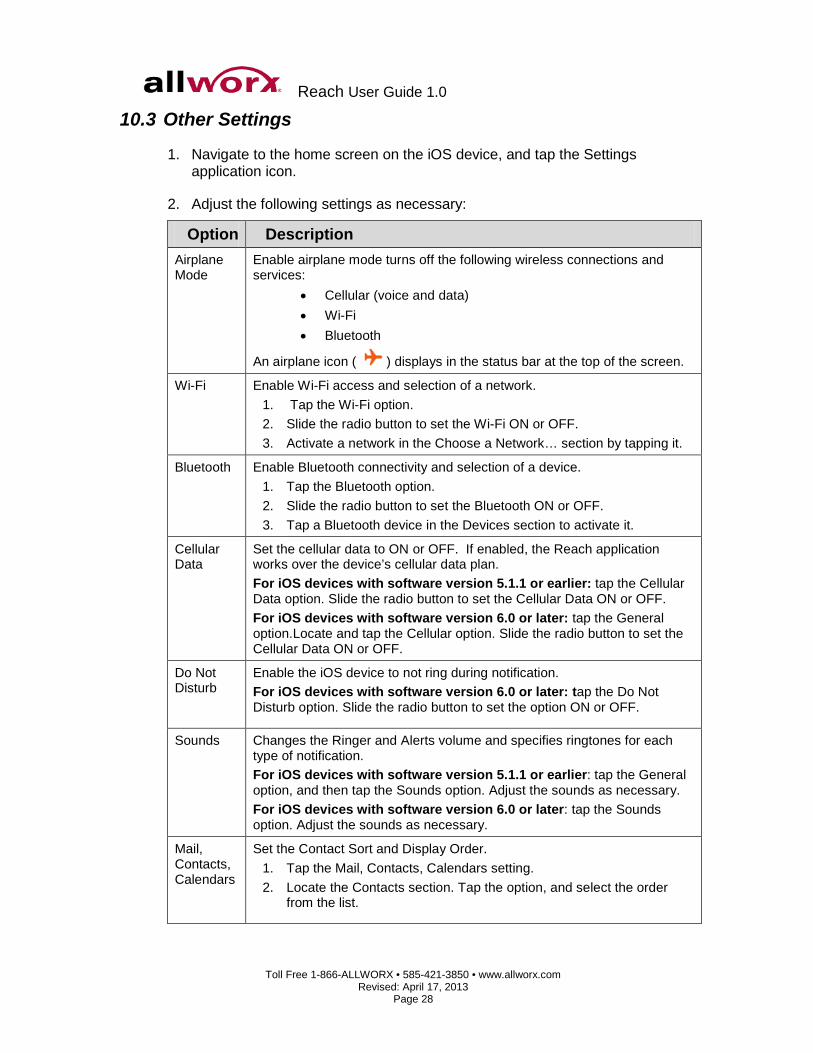
10.3 Other Settings
1. Navigate to the home screen on the iOS device, and tap the Settings application icon.
2. Adjust the following settings as necessary: 0.
Option Description Airplane Mode
Enable airplane mode turns off the following wireless connections and services:
• Cellular (voice and data) • Wi-Fi • Bluetooth
An airplane icon ( ) displays in the status bar at the top of the screen.
Wi-Fi Enable Wi-Fi access and selection of a network. 1. Tap the Wi-Fi option. 2. Slide the radio button to set the Wi-Fi ON or OFF. 3. Activate a network in the Choose a Network… section by tapping it. 0.
Bluetooth Enable Bluetooth connectivity and selection of a device. 1. Tap the Bluetooth option. 2. Slide the radio button to set the Bluetooth ON or OFF. 3. Tap a Bluetooth device in the Devices section to activate it. 0.
Cellular Data
Set the cellular data to ON or OFF. If enabled, the Reach application works over the device’s cellular data plan. For iOS devices with software version 5.1.1 or earlier: tap the Cellular Data option. Slide the radio button to set the Cellular Data ON or OFF. 0. For iOS devices with software version 6.0 or later: tap the General option.Locate and tap the Cellular option. Slide the radio button to set the Cellular Data ON or OFF.
Do Not Disturb
Enable the iOS device to not ring during notification. For iOS devices with software version 6.0 or later: tap the Do Not Disturb option. Slide the radio button to set the option ON or OFF.
Sounds Changes the Ringer and Alerts volume and specifies ringtones for each type of notification. For iOS devices with software version 5.1.1 or earlier: tap the General option, and then tap the Sounds option. Adjust the sounds as necessary. 0. For iOS devices with software version 6.0 or later: tap the Sounds option. Adjust the sounds as necessary.
Mail, Contacts, Calendars
Set the Contact Sort and Display Order. 1. Tap the Mail, Contacts, Calendars setting. 2. Locate the Contacts section. Tap the option, and select the order
from the list. 0.

Reach User Guide 1.0
Toll Free 1-866-ALLWORX • 585-421-3850 • www.allworx.com Revised: April 17, 2013
Page 29
11 Troubleshooting
11.1 Error Conditions Condition Description Solution
Setup Incomplete
User did not complete the set up.
Tap the Configure Now button within the message. The My Server dialog box displays. Follow the steps in the My Server section on page 23 to finish the configuration.
Server Unreachable
User’s device cannot connect to the Allworx server.
Tap the Check Address button within the message. The My Server dialog box displays. Follow the steps in the My Server section on page 23 to check the IP address and the network connection.
Registration Failed
User’s handset did not register with the Allworx Server.
Navigate to the Info tab and tap the My Handset button. Follow the steps in the My Handset section on page 23 to complete the registration.
Server Connection Failed
User’s handset did not connect with the Allworx Server.
Follow the steps in the My Server section on page 23 to check the IP address and the network connection. If this problem persists, contact your Allworx Server Administrator.
Authentication Failed
User entered an invalid username and/or password for the Allworx Server.
Tap the Configure Now button within the message. The My Server dialog box displays. Re-enter the Username and/or Password.
Handset Does Not Exist
The Allworx Server Administrator has deleted the Allworx Reach handset, or it has been migrated to another mobile device.
Tap the Configure Handset button within the message. The My Handset dialog box displays. Remove the handset, and then create a new handset. See My Handset on page 23 for more information.
Handset Invalid
User’s Allworx Reach handset license is no longer valid.
The Allworx Server may be in need of new license keys due to a hardware replacement. Contact your Allworx Server Administrator.
Handset Disabled
The Allworx Server Administrator has temporarily disabled your Allworx Reach handset.
Contact your Allworx Server Administrator.
Reach User Guide 1.0
Toll Free 1-866-ALLWORX • 585-421-3850 • www.allworx.com Revised: April 17, 2013
Page 30
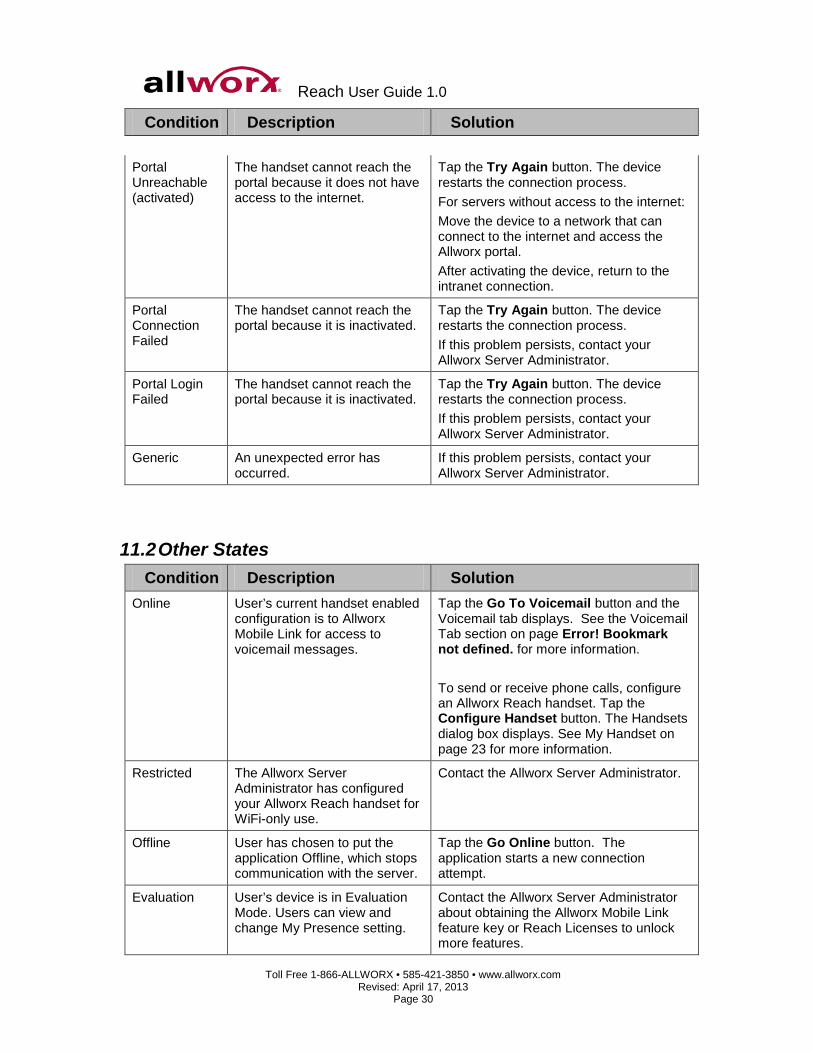
Condition Description Solution
Portal Unreachable (activated)
The handset cannot reach the portal because it does not have access to the internet.
Tap the Try Again button. The device restarts the connection process. For servers without access to the internet: Move the device to a network that can connect to the internet and access the Allworx portal. After activating the device, return to the intranet connection.
Portal Connection Failed
The handset cannot reach the portal because it is inactivated.
Tap the Try Again button. The device restarts the connection process. If this problem persists, contact your Allworx Server Administrator.
Portal Login Failed
The handset cannot reach the portal because it is inactivated.
Tap the Try Again button. The device restarts the connection process. If this problem persists, contact your Allworx Server Administrator.
Generic An unexpected error has occurred.
If this problem persists, contact your Allworx Server Administrator.
11.2 Other States Condition Description Solution
Online User’s current handset enabled configuration is to Allworx Mobile Link for access to voicemail messages.
Tap the Go To Voicemail button and the Voicemail tab displays. See the Voicemail Tab section on page Error! Bookmark not defined. for more information. To send or receive phone calls, configure an Allworx Reach handset. Tap the Configure Handset button. The Handsets dialog box displays. See My Handset on page 23 for more information.
Restricted The Allworx Server Administrator has configured your Allworx Reach handset for WiFi-only use.
Contact the Allworx Server Administrator.
Offline User has chosen to put the application Offline, which stops communication with the server.
Tap the Go Online button. The application starts a new connection attempt.
Evaluation User’s device is in Evaluation Mode. Users can view and change My Presence setting.
Contact the Allworx Server Administrator about obtaining the Allworx Mobile Link feature key or Reach Licenses to unlock more features.

Reach User Guide 1.0
Toll Free 1-866-ALLWORX • 585-421-3850 • www.allworx.com Revised: April 17, 2013
Page 31
12 Glossary DND Do not Disturb
Parking Orbit An extension number specifically designated for any other handset in the system to pick. Calls sit in parking orbits after parked by user with a handset.
iOS Apple OS based device
SIP Session Initiation Protocol
AMDS Apple Mobile Device Service

Reach User Guide 1.0
Toll Free 1-866-ALLWORX • 585-421-3850 • www.allworx.com Revised: April 17, 2013
Page 32


Toll Free 1-866-ALLWORX • 585-421-3850
www.allworx.com Version: 1. Revised: April 17, 2013