r/c handbooksite.petitrc.com/reglages/rc_handbookv3-4.pdfr/c handbook by scott guyatt may 2005 about...
TRANSCRIPT
Scott Guyatt: www.actionrc.com.au 1 V2: Team Associated: V3, V3-2, V3-3 & V3-4: Oople / PetitRC
R/C Handbook
By Scott Guyatt
May 2005
About R/C Handbook
This material first appeared as a printed booklet by Scott Guyatt of Heavy's Hobby Shop, Australia. It was written "to help local kids avoid all the pitfalls we didn't manage to" over eleven years of racing off-road buggies. It proved effective, so he decided to publish it on the web, calling it Oz-R/C Online, Building & Setting Up Your R/C Car.
Associated came across the material and entered into an agreement with Scott to incorporate it into this site. Associated modified the pages of Scott's web site to update it with today's technology and to relate it directly to the concerns of Associated kit owners. With this e-Book, we updated this document a little more, regardless the brand.
Recently, Scott Guyatt wrote a specific booklet about on-road racing car, particularly Touring Car. With Scott Guyatt approval, both booklets have been merged to obtain only one reference R/C Handbook because a RC car still a RC car, the general rules always can be applied. All materials come from Mr Scott Guyatt – and belong to him and only some lines have been added to obtain a consistent document. With this version, the booklet is updated once more.
Have you ever wondered just how the pros always get their cars set up perfectly, choose the right tires, and have just the right motor in their car? Here's the answer: they've practiced and practiced and practiced. We've done that too – practiced and practiced and practiced. Over the last eleven years of racing R/C cars we've learned a thing or two about exactly how to go about setting up the car.
Scott Guyatt: www.actionrc.com.au 2 V2: Team Associated: V3, V3-2, V3-3 & V3-4: Oople / PetitRC
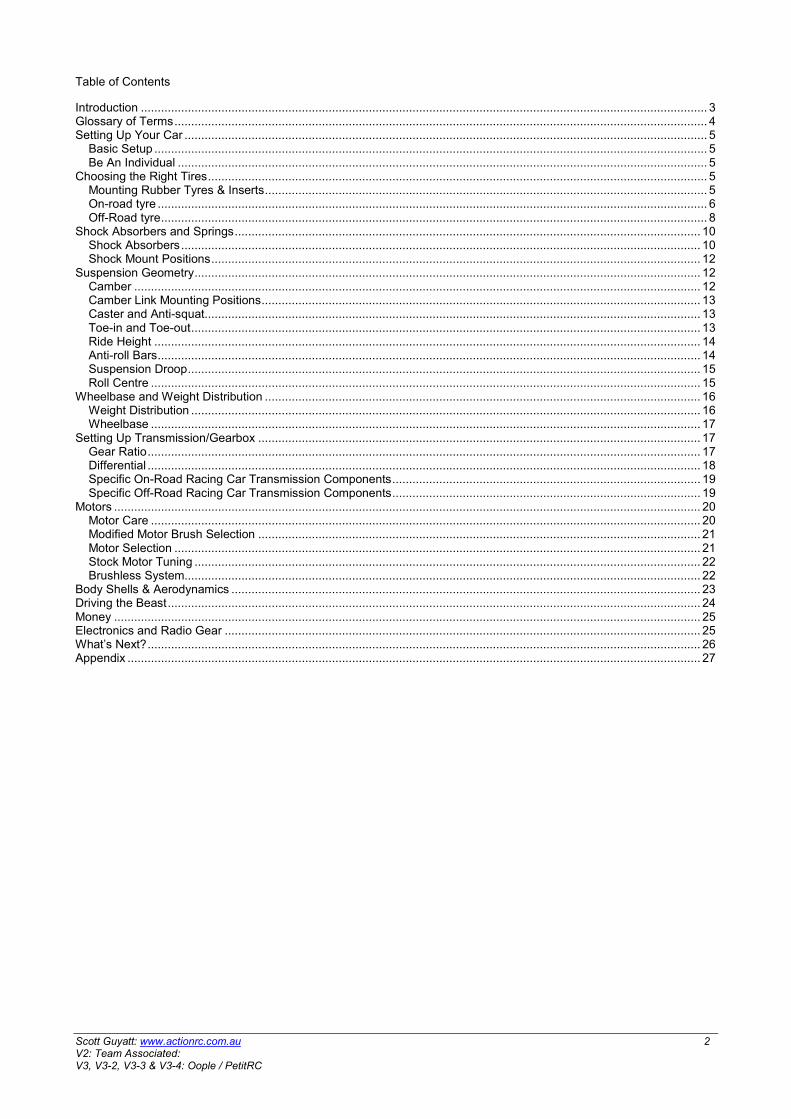
Table of Contents
Introduction ......................................................................................................................................................................... 3 Glossary of Terms............................................................................................................................................................... 4 Setting Up Your Car ............................................................................................................................................................ 5
Basic Setup ..................................................................................................................................................................... 5 Be An Individual .............................................................................................................................................................. 5
Choosing the Right Tires..................................................................................................................................................... 5 Mounting Rubber Tyres & Inserts.................................................................................................................................... 5 On-road tyre .................................................................................................................................................................... 6 Off-Road tyre................................................................................................................................................................... 8
Shock Absorbers and Springs........................................................................................................................................... 10 Shock Absorbers........................................................................................................................................................... 10 Shock Mount Positions.................................................................................................................................................. 12
Suspension Geometry....................................................................................................................................................... 12 Camber ......................................................................................................................................................................... 12 Camber Link Mounting Positions................................................................................................................................... 13 Caster and Anti-squat.................................................................................................................................................... 13 Toe-in and Toe-out........................................................................................................................................................ 13 Ride Height ................................................................................................................................................................... 14 Anti-roll Bars.................................................................................................................................................................. 14 Suspension Droop......................................................................................................................................................... 15 Roll Centre .................................................................................................................................................................... 15
Wheelbase and Weight Distribution .................................................................................................................................. 16 Weight Distribution ........................................................................................................................................................ 16 Wheelbase .................................................................................................................................................................... 17
Setting Up Transmission/Gearbox .................................................................................................................................... 17 Gear Ratio..................................................................................................................................................................... 17 Differential ..................................................................................................................................................................... 18 Specific On-Road Racing Car Transmission Components............................................................................................ 19 Specific Off-Road Racing Car Transmission Components............................................................................................ 19
Motors ............................................................................................................................................................................... 20 Motor Care .................................................................................................................................................................... 20 Modified Motor Brush Selection .................................................................................................................................... 21 Motor Selection ............................................................................................................................................................. 21 Stock Motor Tuning ....................................................................................................................................................... 22 Brushless System.......................................................................................................................................................... 22
Body Shells & Aerodynamics ............................................................................................................................................ 23 Driving the Beast............................................................................................................................................................... 24 Money ............................................................................................................................................................................... 25 Electronics and Radio Gear .............................................................................................................................................. 25 What’s Next?..................................................................................................................................................................... 26 Appendix ........................................................................................................................................................................... 27
Scott Guyatt: www.actionrc.com.au 3 V2: Team Associated: V3, V3-2, V3-3 & V3-4: Oople / PetitRC
Introduction
This booklet is designed to help you learn about setting up, maintaining and driving electric radio controlled touring cars and buggies. R/C car is a complex business, it can take an individual many years to learn the intricacies of building and setting up R/C cars. As a R/C car still a car, the book is aimed for both electric touring cars and buggy, much of the information (particularly as regards suspension settings, geometry and driving) is equally applicable to nitro cars. Just ignore the section on electrics and seek the assistance of somebody wise at your local club to sound out on nitro engine tuning and maintenance.
The most important word in learning about car setup is compromise. Altering one part of your car will always affect another. You will almost always have to make some kind of compromise between two conflicting requirements. The second most important word in learning about car setup is practice. The only real way to learn is to alter your car, drive it, alter it again, drive it again etc.
This publication is not designed to take the place of practice or experimentation – nor should it be considered to be infallible. What we hope to achieve, however, is to give you some ideas to contribute towards your learning about car setup.
We have been racing R/C cars for nearly 20 years and in that time achieved a bit both on and off the track within the sport in Queensland. We make no claim to know everything there is to know about R/C racing, but have collected some knowledge of car preparation and setup during that period. It is this knowledge that we hope to pass on to you.
During my R/C career, we have raced in all classes, with cars from such diverse manufacturers as Tamiya, Kyosho, Marui, Mugen, Schumacher, Team Losi, Yokomo, Team Associated, Traxxas etc. We have used electrical gear (including motors, batteries, speed controllers and radios) from just about every major manufacturer. We hope that we’ll be able to translate some of the information I have been lucky enough to glean through this wide experience into useable data for you.
Action R/C is Queensland’s premier R/C car specialist retailer. Action has been in business since 1994 and proved to be an invaluable source of products, advice, and assistance to Queensland’s R/C racers.
We take this opportunity to wish you all the very best in your R/C racing. Remember above all that we’re here for fun. Race hard, but race clean and walk off the driver’s stand with a smile on your face. We’ll see you at the track....(actually, we’ll race you there!).
Scott Guyatt: www.actionrc.com.au 4 V2: Team Associated: V3, V3-2, V3-3 & V3-4: Oople / PetitRC
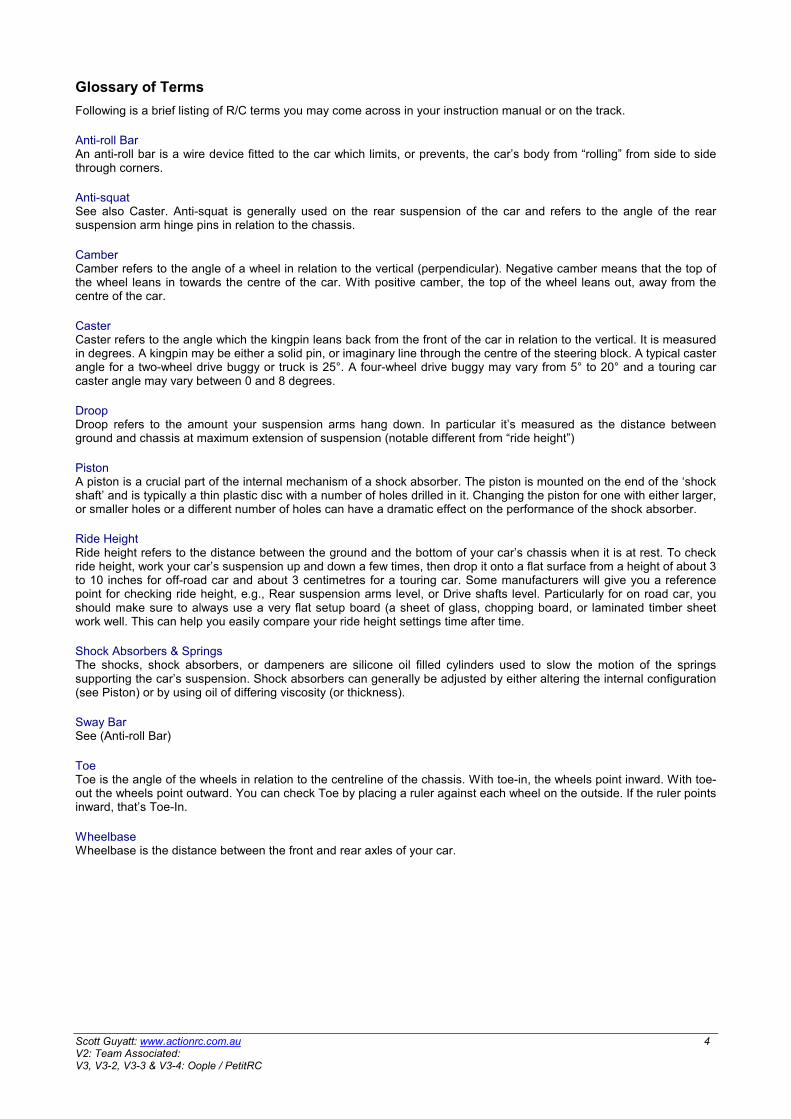
Glossary of Terms
Following is a brief listing of R/C terms you may come across in your instruction manual or on the track.
Anti-roll Bar An anti-roll bar is a wire device fitted to the car which limits, or prevents, the car’s body from “rolling” from side to side through corners.
Anti-squat See also Caster. Anti-squat is generally used on the rear suspension of the car and refers to the angle of the rear suspension arm hinge pins in relation to the chassis.
Camber Camber refers to the angle of a wheel in relation to the vertical (perpendicular). Negative camber means that the top of the wheel leans in towards the centre of the car. With positive camber, the top of the wheel leans out, away from the centre of the car.
Caster Caster refers to the angle which the kingpin leans back from the front of the car in relation to the vertical. It is measured in degrees. A kingpin may be either a solid pin, or imaginary line through the centre of the steering block. A typical caster angle for a two-wheel drive buggy or truck is 25°. A four-wheel drive buggy may vary from 5° to 20° and a touring car caster angle may vary between 0 and 8 degrees.
Droop Droop refers to the amount your suspension arms hang down. In particular it’s measured as the distance between ground and chassis at maximum extension of suspension (notable different from “ride height”)
Piston A piston is a crucial part of the internal mechanism of a shock absorber. The piston is mounted on the end of the ‘shock shaft’ and is typically a thin plastic disc with a number of holes drilled in it. Changing the piston for one with either larger, or smaller holes or a different number of holes can have a dramatic effect on the performance of the shock absorber.
Ride Height Ride height refers to the distance between the ground and the bottom of your car’s chassis when it is at rest. To check ride height, work your car’s suspension up and down a few times, then drop it onto a flat surface from a height of about 3 to 10 inches for off-road car and about 3 centimetres for a touring car. Some manufacturers will give you a reference point for checking ride height, e.g., Rear suspension arms level, or Drive shafts level. Particularly for on road car, you should make sure to always use a very flat setup board (a sheet of glass, chopping board, or laminated timber sheet work well. This can help you easily compare your ride height settings time after time.
Shock Absorbers & Springs The shocks, shock absorbers, or dampeners are silicone oil filled cylinders used to slow the motion of the springs supporting the car’s suspension. Shock absorbers can generally be adjusted by either altering the internal configuration (see Piston) or by using oil of differing viscosity (or thickness).
Sway Bar See (Anti-roll Bar)
Toe Toe is the angle of the wheels in relation to the centreline of the chassis. With toe-in, the wheels point inward. With toe-out the wheels point outward. You can check Toe by placing a ruler against each wheel on the outside. If the ruler points inward, that’s Toe-In.
Wheelbase Wheelbase is the distance between the front and rear axles of your car.
Scott Guyatt: www.actionrc.com.au 5 V2: Team Associated: V3, V3-2, V3-3 & V3-4: Oople / PetitRC
Setting Up Your Car
Learning to tune your car is about practice. There are, however, some basic ground rules which we can lay down, to help you when you go to practice, or tune you car. Take note of these:
Basic Setup
Try to develop for yourself a stock, or basic setup. This is the setting you should use every time you go to a new track, or anytime the conditions at your track are much different from normal (e.g. new surface, new track layout, weather, etc). In most cases, your standard setup should be the kit settings. Manufacturers spend a lot of time establishing a good basic setup - trust them. If however, you find some small changes which really suit your driving style, adopt them into your basic setup.
Be An Individual
It’s good to share setup information with others, particularly if they’re using the same equipment as you. It’s important to recognize, however, that each individual drives a little differently, and prefers a different balance to their car. Once you’ve reached a ballpark setup (usually tires, shocks, and springs), do the fine-tuning on your own. Don’t worry if you’re not using exactly the same settings as the guy next to you; you’re just as likely to be right as he/she is.
Write it down. Get a notebook to take with you to the track. When you change your car, make a note of what you changed, what affect the change had, and the track conditions at the time of the change. Soon you’ll build up a good database of information about what tuning adjustments do to your car’s handling. Ideally, many manufacturers now produce blank setup sheets for their cars. These setup sheets let you mark all your settings in a simple, easy-to-understand manner. Grab a blank sheet, make some photocopies, and keep them in a folder in your track box. After each race day make a note of what settings you ended up using and what the track conditions were like. Again, you’ll soon build up a database of setups for different tracks and track conditions.
Don’t be afraid to ask. Never fear asking for help. If you’ve got some difficulty adapting your car to strange conditions, and you’re just not sure how to change it for more or less - ask. Without exception, top racers are happy to help those less experienced than themselves – until you start beating them! Look around for someone whose car is running hot and ask him for some advice.
Change one thing at a time. One of the most important rules of car setup, is to make changes one at a time. If you changed tires and suspension settings, how will you know which cured your steering problem? If you raised your ride height and added a stiffer spring, how will you know which cured your jumping problem? My advice is to always make one change at a time, then try the car. If it doesn’t work, change it back and try something else. This is the most effective way to track down the correct settings and learn about setting up your car.
Choosing the Right Tires
The choice of tires is probably the single most crucial factor in getting your car to handle well. If you choose the wrong tires, there is often very little you can do to rectify the situation. We’ll cover a number of variables at work in determining the correct tire choice to help you to guess correctly the first time you run on a new track.
Mounting Rubber Tyres & Inserts
Before any comments about each particular tyre – rubber, foam or off-road – you can choose, some statements about how to glue them. I don’t particularly enjoy gluing tyres, but it’s a fairly simple process. Here’s a method you can follow:
1. Using motor spray on a clean rag, wipe the tyre bead, and wheel (where the tyre seats into the rim). This removes any release compound left over from the manufacturing process and gives the glue the best chance of doing its job.
2. Mount the insert inside the tyre – ensuring it is evenly seated the whole way around
3. Mount the tyre to the rim. Check that the tyre bead is evenly seated into the rim right around, and that the insert is not caught between tyre and rim. Some tyres are marked on one sidewall only, and I’ll usually mount all my tyres in the same manner – with the sidewall markings on the outer side of the rim (this is purely for convenience – not performance!)
4. Lay the tyre flat on the table (I usually do this on a clean rag). Pull the tyre bead back from the rim slightly and place one drop of superglue onto the tyre bead before fully reseating the tyre. Turn the wheel/tyre 1/8
th turn and
repeat. Keep going all the way around. Use a good quality superglue – and probable one that will cure fairly quickly. Gel type glues are not ideal.
5. Once you’re complete, wipe off any excess superglue with clean rag, turn over and repeat.
Scott Guyatt: www.actionrc.com.au 6 V2: Team Associated: V3, V3-2, V3-3 & V3-4: Oople / PetitRC
When you’re using superglue be very careful not to stick yourself to tyre or table, and be extremely careful not to get any in or near your eyes. If so, get medical assistance immediately.
When it comes to removing tyres, let me just say it is such a painful job that some people choose to just buy new wheels every time. If you’re on a budget like me, that’s not practical and you have two choices.
Firstly, you can cut away the tyre using (extremely carefully) a hobby knife. Try not to cut the insert so that you can re-use it. Once you’ve removed the tyre you’ll need to then use the knife and/or a file to cleanout remnants of rubber and super glue from the wheel before you’re ready to reuse it. To get thing easier, you can put your wheel on boiling water during 15 minutes, the superglue tends to break after that treatment.
The second alternative is to use acetone. In this case once again, cut open the tyre and try to remove the whole insert. Then put the complete wheel/tyre into a large (sealed) jar of acetone and leave overnight. Acetone basically eats superglue and the tyre and glue residue will basically fall off in your hands. Note carefully however: Acetone is a nasty chemical and you should use gloves and only handle it in open/airy places. If swallowed or you splash some in your eyes, seek medical advice immediately. Note also that acetone will certainly destroy your tyres, and can also react badly with some brands of wheels. The only way to know is to ask around at the track, or to experiment (but be prepared to lose a set of wheels if you guess wrongly). As I noted above Schumacher wheels are ok and that’s one reason they’re my choice of wheel.
On-road tyre
Preliminary note: we will cover what is good to know about tyres. However, if you are a beginner in setting up a racing car and you are a bit confuse about the tyre to select, pick a set of tyres and insert (medium characteristics) and work with the suspensions and geometry setup to understand what happen.
We’ll initially consider rubber tyres, then turn our attention to foam tyres. The choice between foam and rubber is sometimes mandated in your club or national’s rules, other times it’s based on performance.
Let me qualify everything I’m about to say with this comment. Tyre choice and tuning can be a black art – and can be very complex. I’m going to attempt to make it reasonably simple for you to get close to the right tyre for your conditions – but note that there are always some conditions where the complete opposites can apply. These are the methods I personally use to choose my tyres.
Rubber Tyre Compound The ‘compound’ or ‘softness’ of the tyre can often have a major impact on its performance. Most manufacturers rate their tyres according to the track temperature window at which they’ll work at their best. Thus for example a Sorex 28r is a tyre that Sorex believe will work best when track temps are around 28 degrees. Tyre ranges from Sorex and Takeoff are the most popular at present – and range from about 22/24 through to 36/40. For most outdoor racing in Brisbane you’ll want 32-36 in summer and 24-28 in winter.
There are a few simple rules you can follow when choosing tyres:
- the lower the number (eg Sorex 24r vs Sorex 28r) the softer the tyre - the softer the tyre the more grip generated (except in very high traction conditions) - the softer the tyre the more quickly the tyre heats up to optimum temperature - the softer the tyre the more quickly the tyre overheats and loses all grip - almost always use the same tyre all around the car – not different compounds front to rear
So if you choose a tyre too soft for the conditions/temperature it will be great for a few laps, but then go off quickly after that. In practice then you should ensure you run tyres for as close to a full 5 minutes run as possible – don’t just run tyres for two laps and come off thinking “they’re great!”.
Rubber Tyre Inserts As well as choosing the right tyre, you’ve then got to choose the correct insert to go inside the tyre. Each different manufacturer has different ranges, but for the sake of this exercise I’m going to pick Sorex (as a very common and probably most popular range available in south-east Queensland).
The variables in tyre inserts are the softness/hardness of the insert and it’s shape – with particular reference to the size of the “air-gap” between the insert and the tyre.
In Sorex inserts, there are three different shapes – designated A, B & C. Each has a progressively larger air-gap. A larger air-gap (the “C” range) lets the tyre move around and can assist in quickly generating heat inside the tyre (and hence heating up the tyre. Larger air gap can also help cope with small imperfections and bumps in the track surface. For the “A” range the reverse is true. Some 540 racers also find that the A range of inserts can offer slightly lower rolling resistance, but at the cost of overall traction.
For most of us, the B range of inserts is the best place to start. It is an excellent compromise and whilst not always perfect, will usually be pretty close – offering good grip, and reasonable “warming” characteristics.
Scott Guyatt: www.actionrc.com.au 7 V2: Team Associated: V3, V3-2, V3-3 & V3-4: Oople / PetitRC
Once you pick which insert you’ll then need to pick the “softness” – as each shape of insert comes as soft, medium or firm. In many cases the same comments as made earlier about tyre-softness also apply to inserts. One factor to seriously consider is the grip level of your track. The higher the grip level, the harder the insert you’ll want to run. So on very slipper tracks, a soft insert will help the tyre perform to its best, while on very high grip tracks, the firmer insert will assist greatly.
Let me stick my neck out and say that if you don’t want to get into the complex maze of tyre/insert combos, you should opt for Sorex B Medium inserts as an excellent compromise and all-round choice. Then select your tyre compound according to temperature conditions. You won’t be far wrong with those choices.
Wheels Of course the other part of the equation is the wheel. Very good (and I do mean very good) drivers will sometimes choose wheels carefully as part of their tuning package, and will sometimes modify their wheels to suit conditions (typically by adding extra or larger air holes). For most of us this is overkill – pure and simple. I recommend you choose a wheel you like and stick with it.
For me that choice is the Schumacher Rev-Lite. They are light, they are stiff, and most importantly they don’t react to acetone (see tyre mounting section below). They’re also reasonably priced. Sorex rims are fine too – but can react badly to acetone, so you might be up for a new set of wheels if you use that method for removing your tyres.
For foam tyres most racers will choose pre-mounted tyres and hence wheel choice is academic.
Using Rubber Tyres There are a couple of bit of information that might help you to extract the best from your rubber tyres. These relate to (a) traction compound, (b) tyre warmers and (c) usage and habits.
Firstly, traction compound can help to clean and condition the rubber – helping it to perform at it’s best. You can get traction compound/rubber conditioner from a few companies – notably Trinity Death Grip is quite reasonable. But you can also use WD40 to do nearly the same task. To use simply apply all over the surface of the tyre and let sit. About 5 minutes before your next race wipe away all traces of the compound and you are ready to go. Tyre conditioner is always helpful – but particularly so in dirty and low grip conditions.
Tyre warmers are become more common in pit areas and many racers swear by them. They take the form of either a strip wrapped around the tyre and fastened with Velcro, or a cup that fits over the whole tyre/wheel. Either way each tyre warmer will be connected with wires to a plug that you can connect to either your power supply or 7.2v battery. Check the manufacturers recommendations. We recommend fitting tyre warmers about 30 minutes prior to your race and removing at the last possible moment. If you’re using a 7.2v battery be aware that tyre warmers can dump these packs pretty fast! There are a wide range of tyre warmers available, some are simple, others more complex with individually adjustable temps and digital temp gauges. As always it depends on your budget. If you can’t afford tyre warmers, you can at least be sensible – try to leave your tyres sitting in the sun between races, and certainly try to keep them out of any cold, breezy spots. Tyre warmers are particularly valuable on cooler days and with softer tyres. On warm days (eg Queensland summer) the benefits are less.
My final comment relates to what you do with your car on the track. Your tyres are important, and can only work at their best when they are clean and dirt/dust free. This has three implications: Firstly, try not to drive on the “dirty” line or to drive off the track onto dust and grass. The implications are not just lost time on that corner, but also reduced level of grip for a few laps before your tyres “clean up”. Secondly, pre-race it’s great to drive up and down the track and set your trim etc – but stay on the clean race track – don’t drive up and down a dirty pit-lane, or do circles on the outside of a dusty corner. Thirdly, when you put your car down, or pick it up, do your best to do so directly onto the racetrack. Again, try not to use a dirty pit lane, or a dusty access path to the track just because you don’t really feel like walking the 10 extra steps to get right to the track (in addition walking is good for health).
Some racers are so paranoid about not getting rubbish on their tyres, that they’ll never sit the car on its tyres anywhere except a racetrack, or a setup board. In scrutineering you’ll see some drivers put their car on its side just to keep tyres clean. On pit tables, you’ll see car stands that keep wheels and tyres up off the pit table.
These are all small things, but each can make a very real difference to the performance of your tyres.
Two final notes. Firstly, mark your wheel so you know what is what as far as tyre and insert (though some tyres have the compound marked on the sidewall). Secondly, rubber tyres don’t have unlimited life. For club racing you can get heaps of life from a set of rubber tyres, but when you do get serious about winning championships you’ll find they do drop off slightly in performance after the first few runs.
Foam Tyre Choice, Maintenance and Use Like rubber tyres, foam tyres come in a variety of compounds. Instead of a designated “temperature” rating however, manufacturers use a “shore” rating. That’s simply a technical rating of tyre hardness. The higher the number, the harder the tyre.
Scott Guyatt: www.actionrc.com.au 8 V2: Team Associated: V3, V3-2, V3-3 & V3-4: Oople / PetitRC
The most commonly used foam tyres are produced by a company called GRP, but marketed under a range of labels – include Ellegi and Fast. Other companies (eg BSR, Jaco, Orion, Trinity/TRC) have their own ranges of tyres – and sometimes use colours to designate tyre compound.
Mostly in Queensland Ellegi/GRP foam tyres are used. This is partly availability and partly performance related. They’re widely available, come pre-mounted and perform well.
For most people, tyres in the 40 shore range will be perfect. In 540 and stock in particular 40 shore tyres all around will work well in 80% of cases. Sometimes you might try a 42 shore front if you have too much steering. In modified 40 shore will also often work, although some drivers prefer a softer rear tyre in the 35-37 shore range.
The other aspect of foam tyres, is the art of tyre truing, and the variable of tyre size. New foams tyres will often be around 66mm in diameter. If you’re happy to get maximum life from your tyres, start from this size and keep running until you can no longer adjust your car enough to get ride height. Don’t forget to keep checking ride height and gear ratio as your tyre wears.
If you’re after performance however, you’ll find that the tyres start to work really well at around 60mm and keep giving their best down to around 57mm in diameter. You can use (or borrow, or pay someone) a tyre truer to cut your tyres down to this size. If your tyres wear unevenly (from front to rear, or side to side) you can also use a truer to square off and even out your tyres. You should always try to make sure your tyres are all the same diameter. Rotating tyres from side to side can help this (for example, if your track has lots of fast right hand corners, your left hand tyres will wear more quickly).
You can also use traction compound on foam tyres – but again its not always necessary. Foam tyres generate a great deal of traction (provided you keep them clean) and so it’s really only in modified that the slight benefits of tyre goop (as it is called) can be felt. Note that foam tyres require different compounds to rubber tyres – and particularly note that WD40 will not do your foam tyres any good at all!
One of the downsides of foam tyres is that you can easily rip a chunk out of them if you crash. Obviously the solution is not to crash, but that’s sometimes out of our hands. A small chunk is no big deal (particularly on a club day) but a big chunk, or on an important day might mean the tyre gets to spend some quality time in the rubbish bin. Sorry.
One other note – foam tyres all look the same, so be sure to label your wheels so you know what is what. We use a permanent marker to right the compound inside the tyre wheel (eg 40F for a 40 shore front tyre).
For the Pit Box Here’s some idea of a suggested tyre box. This is by no means completely comprehensive but will allow you, in almost all track conditions, to find a tyre which will give a balanced car. Extreme conditions may require other choices. Remember that some clubs and races have controlled tyres – so you don’t have these choices! Some clubs also mandate you must use rubber tyres, others are open to your choice. Check at the track first. Here’s what we recommend as a tyre kit that will cover you for most conditions:
Rubber Tyres: - Sorex 36r with B-Medium Inserts on Schumacher wheels - Sorex 32r with B-medium inserts on Schumacher wheels - Sorex 28r with B-medium inserts on Schumacher wheels
Foam Tyres: - Ellegi/GRP 40 shore and 42 shore front tyres (26mm width) - Ellegi/GRP 40 shore and 37 shore front tyres (26mm width)
Off-Road tyre
First, let’s concentrate on rear tire choice (front tires will be considered near the end of this chapter). I won’t treat truck tires differently; most of the tires listed here have an equivalent in the truck tire range. You just need to check with your retailer as to the approximate truck equivalent.
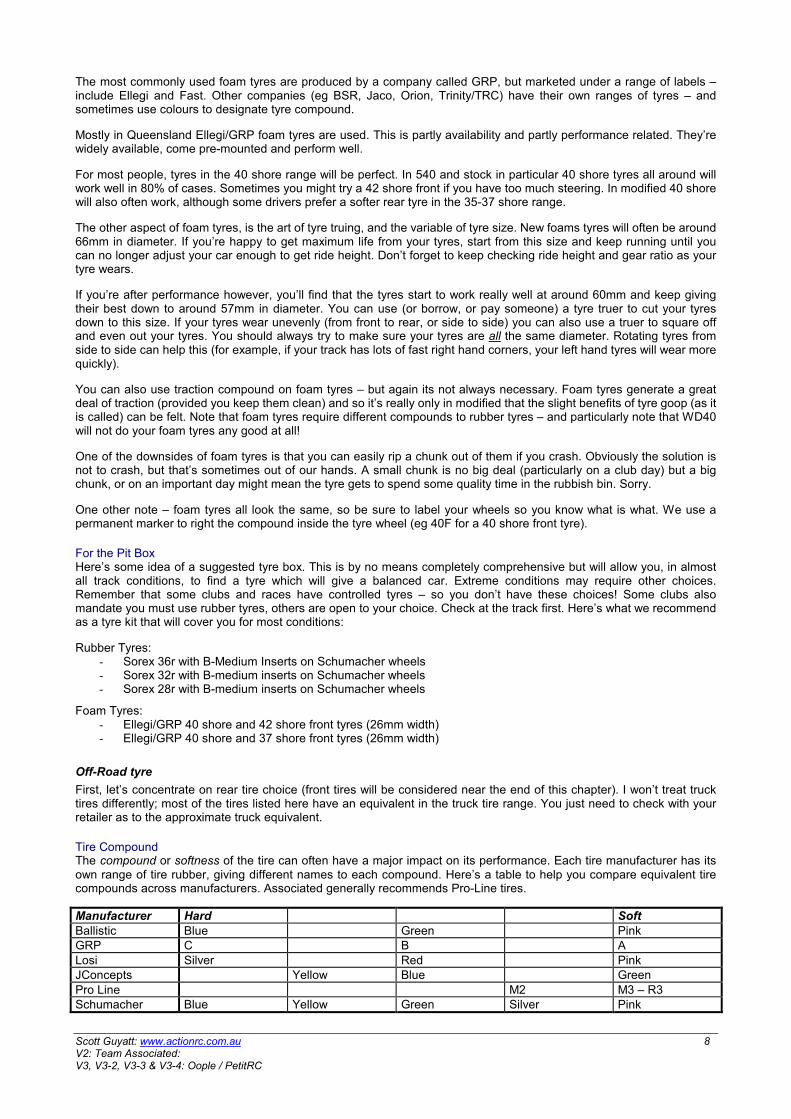
Tire Compound The compound or softness of the tire can often have a major impact on its performance. Each tire manufacturer has its own range of tire rubber, giving different names to each compound. Here’s a table to help you compare equivalent tire compounds across manufacturers. Associated generally recommends Pro-Line tires.
Manufacturer Hard Soft
Ballistic Blue Green Pink GRP C B A
Losi Silver Red Pink JConcepts Yellow Blue Green
Pro Line M2 M3 – R3 Schumacher Blue Yellow Green Silver Pink
Scott Guyatt: www.actionrc.com.au 9 V2: Team Associated: V3, V3-2, V3-3 & V3-4: Oople / PetitRC
A softer tire compound is not necessarily better. The new generation “super soft” compounds such as Pro-Line’s M3 work only in certain situations. Super Soft tires should be used when the track reaches blue groove conditions. (This is when there is practically no dust on the racing surface; just a rock-hard surface where the racing line comes up blue from deposited rubber.). Super Soft tires should be used when the rubber compound generates tire traction.
In general, the soft compound tires will perform best. Well packed track surfaces with some loose material on the surface are particularly well suited to these types of tires. Dusty conditions also suit soft tires.
Medium compound tires can be most effectively used when the track condition is bad. When predominantly loose material is on the surface, when the track starts to break up into rubble or in moderately wet conditions, medium compound tires should be your first choice.
Hard tires are rarely used. Only if the track is particularly wet/muddy, or if the track surface is grass, should hard compound tires be used.
Tire Profile Tire profile or carcass shape can be roughly categorized as square or rounded. There are other profiles and tires which fit between the two extremes.
A square tire is one which has a flat crown. That is, a tire which will stand on it’s own on your pit table and where most of the tire contact patch sits in contact with the table surface. Examples include Pro-Line’s 8083, 8086, 8088, 8089, or 8110. Square profile tires almost always provide excellent forward traction (due to large contact patch). In smooth track conditions, square tires can also provide excellent “through corner” traction. These tires suffer most when tracks start to break up, or in conditions where the car is constantly sliding sideways. In these types of conditions, square tires can slide unpredictably, or can “catch an edge” in ruts and holes, causing the car to flip or get out of shape.
A rounded tire is predicable through corners, and excellent in rough, rutted conditions. While not as good at generating forward traction in smooth conditions, the rounded tire is almost universally chosen when the going gets rough. Examples of rounded tires include Pro-Line’s 8081, 8082, 8087, or Holeshot.
Tread Pattern We’ll categorize the most commonly available tires, and give some description of the conditions in which they’re put to best use.
Buggy/Truck Rear Tires Buggy and Truck rear tires are similar in appearance. In this section I’ll use the accepted buggy tire name/number. If you’re a truck racer you should find that most of the tires I refer to are also available for the truck, usually with the same name. Also, the listed tyres are for the example, some are no longer in production.
Micro spike tires include Pro-Line’s 8081, 8197 Evil Twin and Holeshot, Losi’s Sprint (A-7375), X2000 (A-7369), BK-Bar (A-7271) Taper pin (A-7372) and Schumacher’s Micro spike. These tires are used when track conditions reach, or approach blue groove status. When the track is almost dust free, and fairly smooth, reach for a set of these tires.
Fuzzy tires include Pro-Line’s 8082, 8083 (truck 8092), Losi’s IFMAR Pin (A-7367) and Big shot (A-7368), and Schumacher’s Fuzzy. These tires are most suited to hard packed, but slightly dusty, track surfaces. They work well in blue groove conditions, and can be acceptable in looser conditions. One pair of these tires should definitely be in your pit box.
Mini spike tires include Pro-Line’s 8080,8088 (truck 8090), and Schumacher’s Mini Spike, GRP Conespike. Perhaps the best compromise tire of all, these will work in almost all conditions. This tire choice is most risky in blue groove conditions when low contact patch can count against them but perform well on grass
Stud/Stubby tires include Pro-Line’s 8081, 8186 (truck 96), Losi’s IFMAR Stud (A-7364), and Schumacher’s Square Stubbies. These tires are at their ultimate in loose, broken conditions. When the previously smooth track starts to deteriorate, grab a set of Pro-Line 8081 or Losi IFMAR studs out of your box. These tires have also been known to perform exceptionally well in well-packed track conditions. Pro-Line 8081 in particular lays a lot of rubber on the track through large, round studs and thus can generate traction in most conditions. Again, a tire of this type is worth having in the pit box.
Step Pin tires include Pro-Line’s 8087, 8110 (truck 97), and Losi’s Step Pin (A-7378) and Mini-Step. These tires are perhaps the ultimate compromise tires. At their best in looser conditions, step pins also work well in broken, messy track surfaces and the Mini-Step in particular works well in anything up to blue groove conditions. The 8087 and Mini-step are the pick of the tires. One of these should probably be in your arsenal.
2wd/Truck Front Tires Most 2wd or truck front tires are of the ribbed variety. That is, they feature a series of vertical ribs running the length of the tire. The differences are in the width of tire, shape, height and width of ribs, or external reinforcing braces. There are a couple of other tires not fitting this description, notably Losi’s Diamond and Pro-Line’s Holeshot. These two tires will only work in very specific track conditions (blue groove), and can most easily be left out of general discussion about front tires. 2WD front tires are an individual preference. You should keep a couple of different pairs of front tires in your box,

Scott Guyatt: www.actionrc.com.au 10 V2: Team Associated: V3, V3-2, V3-3 & V3-4: Oople / PetitRC
but don’t be too concerned about what other people are using. Run the front tires which give the level of front grip you feel comfortable with. As a general rule of thumb, run the hardest compound tire you can that provides the necessary traction. There are many setup options in your car that can assist in providing steering - exercise these before moving to softer tires.
Standard Ribs include Pro-Line’s 8175 Rib and Losi’s Wide Body or Standard Rib tires (A-7204, A-7205 and A-7206). These tires feature four square, upright rubber ribs with no external reinforcing or bracing. Standard rib tires are the most commonly used front tires. The tire shape will work in almost all conditions, with compound choice being the critical factor. In looser conditions, opt for the medium or hard compound front tires. These will help the tire ribs stand up under cornering pressure and produce consistent front grip. In dusty or harder track surface conditions, a slightly softer compound may be necessary to generate necessary traction.
Supported ribs include Pro-Line’s Wide 4-Rib, Quattro, Edge, and Losi’s Directional or Wedge. These tires use either shaped ribs or external bracing to help the tire ribs stand up under extreme pressure. In general, these tires can be used in a softer compound and are at their best in hard packed or blue groove conditions.
4WD Front Tires There are only a limited number of options, and choice of front tire very much depends on rear tire choice. There are a number of rules however, which should be followed.
Always run a front tire with the same overall diameter as the rear tire. For example, if you’re running a Pro-Line 8089 rear tire, you should not run a tall front tire like the Pro-Line Stubby. Similarly, with a rear tire such as the Pro-Line 8081, you need to avoid low profile front tires such as the Pro-Line 8135.
Special surfaces Specific surfaces include carpet, hall floor. In those conditions, you could have a try with some Schumacher Mini Pin on both ends. Depending on the grip on the front end, you can modulate with Schumacher Staggered or slim.
Foam Inserts Most rear tires (except hard compound tires) require foam inserts. In most cases, these will be provided with the tires. Foam inserts can generally be used as supplied, with just a minor modification. Cutting the square edge of the outside of a foam insert can produce a slightly softer tire sidewall and slightly more rounded profile when using square tires. This can help to make the tires more consistent through corners, and less likely to grab and roll in rutted conditions.
Softer tires also require denser foam inserts. The inserts included in Pro-Line Holeshot M3 tires, for example, are made of a much denser foam than other Pro-Line inserts. If you’re planning on using the Super Soft compound tires, you should try to make sure that you’ve got a set of dense foams.
Front tires too, will often require foam inserts. Soft and super soft compound tires should always use inserts. You can, however, sometimes get away without inserts in a medium compound tire. Running no insert will result in a slightly softer tire that behaves almost like a tire compound in between medium and soft. They’re sometimes worth a try if you’re not sure of the right front tire compound.
Shock Absorbers and Springs
Shocks and springs are the most misunderstood, yet critical part of any car suspension – even a 1/10th
scale R/C car. When your car can be hitting bumps and turns at up to 60km/h or when your car can be jumping up to three feet into the air or flying up to 10 feet before landing, it’s important that your shock absorbers and springs can control the car and generate the grip and handling you want. The difficulty is that those same shocks and springs must help the car get around corners at different speed and manage many smaller bumps (as well as with ruts, holes, and lumps of rock and dirt on off-road). Sounds like quite a feat!
Perhaps more than any other part of the car setup, choosing the right combination of shock absorber and spring setup is a compromise. You need to weigh very carefully the need to get the car through the corners – for which low ride height, stiff springs and ‘hard’ dampers can help – with the need to help the car soak up bumps (high ride height, softer springs and lighter damping!). Let’s start by taking a look at the shock absorbers and how they work – what each adjustment does
Shock Absorbers
It’s the shock absorbers’ job to control the car’s suspension. While the springs keep the car off the ground, the shocks must control, or slow down, the spring’s action. Just how much to slow down that action is the racer’s dilemma in setting up shock absorbers.
A shock absorber typically contains a number of parts. The shock body keeps it all together and contains the shock oil. The shock shaft protrudes from the shock body and connects the piston at one end and the suspension arm at the other. Shock seals keep all the oil on the inside, and the volume compensator makes allowance for the oil that is displaced when the shock shaft and piston enter the shock body. The dampening effect of a shock absorber comes from the resistance of the piston to moving through the oil-filled shock body.
Scott Guyatt: www.actionrc.com.au 11 V2: Team Associated: V3, V3-2, V3-3 & V3-4: Oople / PetitRC
The variable parts of a shock absorber are the length of the overall unit, length of shock shaft, travel limiters on shock shaft (both inside and outside the shock body), the piston attached to the shock shaft, and finally the viscosity (thickness) of the silicone shock oil. used to fill the shock body. Let’s take a look at each of these adjustments and the likely effect on your car.
Shock oil is the simplest, most universally used adjustment to the shock. Using thicker shock oil will help to slow down the suspension motion of the car. Lighter oil will do the opposite, letting the suspension react more quickly to the demands of the track. Thicker oil is often used when track conditions are smooth and hard packed and traction is high. In these conditions suspension movement detracts from the handling of the car. Thicker oil is also useful for controlling the car when landing off big jumps (off-road) or when hitting big bumps at high speed (on-road). When the going gets rough (off-road) or bumpy (on-road) – if there are numerous ruts and holes or a lot of small jumps, or small bumps, or if the track is particularly slippery lighter shock oil should be used. This will let the car react more quickly to the track, helping to keep the tires in contact with the track. Shock oil viscosity (or thickness) is measured in weights. The higher the number, the thicker the oil, while most company’s shock oil is reasonably close to each other’s, there are variations. For example, Trinity 25 Weight oil appears to be slightly lighter or thinner than Associated 25 Weight oil. Why? I have no idea! The solution is to try to always use oil of the same brand. It doesn’t particularly matter which brand of oil you use (good quality oil is available from Trinity, Losi, Associated or Schumacher), but you should try to always use the same brand
Variables in shock pistons include the size and number of holes in the piston. Pistons with larger holes allow the shock oil to travel through more quickly, and smaller holes will slow the travel of oil through the piston. The difficulty is in knowing how to use this adjustment. In most conditions, your car’s standard piston configuration will be fine. When the track is particularly rough or bumpy, with lots of small to medium bumps and holes, pistons with larger (or more) holes will be helpful. When the track is smooth, or if it has big jumps or drop-offs (off-road) or bigger bumps (on-road), smaller holed pistons could be the go. What is important to remember is that pistons and shock oil have a very close relationship. Sometimes if you change one, you need to change the other. An example of this would be that when fitting larger holed pistons to your car you should probably use slightly thicker shock oil. Most manufacturers offer a range of pistons for their shock absorbers (Schumacher shocks allow for adjustment to the number of piston holes without changing pistons) and there are a number of aftermarket alternatives. Alternatively, some drivers have taken to drilling different sized holes in their pistons. Such fine adjustment is not really necessary for the majority of us and should be left as a last resort. Similarly, the use of dual stage pistons, which have a different action on the up stroke when compared to the down stroke, is not advisable for drivers early in their R/C career. If you wish to try some of these options, then it’s probably best to consult the local experienced driver. They’ll be happy to help you figure out what to try.
Travel Limiters are small spacers placed over the shock shafts to limit the travel of the shock absorber. Limiters placed outside the shock body limit the up travel of the shock absorber, whilst placing spacers inside the shock body limit the down travel (and hence overall length) of the shock absorber. This is not an adjustment commonly used – once set it’s usually forgotten. Adding travel limiters to the inside of the shock absorber can be useful on a very smooth track, while a track with big jumps will probably favour limiters to the outside of the shock absorber to prevent bottoming out of the chassis on landing. Again, this is an adjustment not commonly used in the early stages of your racing. Set the shock limiters according to the manufacturer’s suggestions.
Shock shafts can sometimes longer or shorter if more or less overall travel is required. This type of adjustment is rarely used. The Team Associated RC10B2 is one car that can benefit from the use of longer shock shafts for some tracks. Again, the best advice is to consult your experienced driver and see if he is using longer or shorter shock shafts than the stock ones.
Springs are a very useful adjustment for the suspension of your car. Springs vary in length and stiffness. A stiffer spring is harder to compress between your fingers than a softer spring. Stiffer springs will tend to hold the car off the ground more, while softer springs allow the car to ride lower and to roll from side to side more.
Springs, Jumps and Bumps Springs are often changed to reflect the size and shape of bumps and jumps on a track and the grip level available. If your track is relatively smooth – with lots of big jumps in off-road, you should try a slightly stiffer spring to help the car handle sharply and land off jumps without bottoming out. On the other hand, if the track has lots of bumps and ruts, but no real large jumps, you can try a softer spring to let the suspension soak up the little bumps without effecting the chassis balance too much.
Springs and Handling Funnily enough, the springs you choose heavily influences your car’s handling. Changing to stiffer springs will generally result in lower traction at that end of the car – e.g. putting a stiffer spring on the front of your car will often give you slightly less steering; adding a softer spring to the rear can give more rear grip, to a point. Amazingly, in some conditions, the opposite can be true – stiffer springs can add traction. If you are racing on a high traction track, sometimes adding a stiffer spring can give you more traction by helping the suspension to keep more pressure on the tires. Remember this tip if you’re on a high traction track. Most importantly, when you’re choosing springs, there’s a compromise between handling and ability to cope with bumps and/or jumps. You’ve got to experiment a little to find the right combination for each track.
Many people adjust the compression of their springs by either adding spring clips to the shock body, or moving the spring collar up or down the shock body. This adjustment is only for adjusting the ride height of your car. Adjusting the spring
Scott Guyatt: www.actionrc.com.au 12 V2: Team Associated: V3, V3-2, V3-3 & V3-4: Oople / PetitRC
compression does not stiffen or soften your springs. For more discussion of ride height and its effect on handling, see chapter 6, “Suspension Geometry.”
It’s good to have a range of springs to choose from. Most manufacturers these days tend to colour code their springs to help you identify stiffer and softer springs. There is also a growing trend to identify the spring rate in “Pounds”. Don’t worry too much what that actually means – just know that the lower the number the softer the spring. Also, manufacturers have tables listing their springs in order of stiffness.
Shock Mount Positions
R/C cars offer differing standards of tuning options from manufacturer to manufacturer. Almost all offer alternate mounting options for shock absorbers. Mostly, the options relate to the distance along the suspension arm that the shock mounts, or the angle of the shock (by altering the top shock mount position). These options provide various responses in terms of the handling of your car. Let’s take a look:
Moving the bottom of the shock along the suspension arm basically affects the stiffness and droop of the suspension. Moving the shock mount further out results in a suspension that appears both stiffer (sprung) and harder (dampened). Conversely, moving the shock inward gives a softer feel. The reason for this is simple. The easiest way to explain this is to think back to the playground seesaw of your childhood. When the people on either end don’t weigh the same, by simply moving the heavier person closer to the centre the seesaw can be made to balance. It’s just a question of leverage. As the shock moves out along the arm, it can bring greater leverage to bear on the suspension arm. Moving the bottom of the shock along the arm also affects the suspension droop – further out equals less droop, further in equals more droop. Droop is covered in depth in “Suspension Geometry.”
Moving the top of the shock absorber has a more subtle effect on the car’s suspension. What is changing here is the angle of action of the shock absorber. Changing the angle makes the shock absorber more or less progressive. A progressive suspension setup is when the suspension becomes stiffer as the shock/spring/suspension is compressed. Leaning the shock absorber over further results in a more progressive suspension. This is useful in landing off big jumps (helps stop the car from bottoming out), handling on smooth tracks and handling in high-speed corners. Standing the shocks straighter helps in rough/bumpy conditions, or with tracks with lots of quick changes of direction. Adding interest to this setup option is the fact that standing the shocks up gives some degree of anti-roll effect while laying the shocks down encourages, or allows, more chassis roll. The shock angle you choose can thus be closely related to the use of an anti-roll bar (see Section 6). In the absence of any theory (here) to confirm the following, just recall some observations:
- the more upright your front shocks, the more front grip you will have - the more upright your rear shocks, the more rear grip you will have
Don’t forget that there are always exceptions to every rule!
Suspension Geometry
Try to explain suspension geometry is not an easy thing. We’ll try to give you an overall picture of what ‘geometry’ is and does, and give you some general hints on what changes affect the handling of your car. More than any other section of this book, the motto for this chapter must be: change your car, practice, change your car, practice, change your car, practice…. You’ve sometimes just got to make a change to the car and try it, and do your best to pick out the difference.
Suspension geometry refers to a lot of things. Basically, it is the various angles and mounting points of wheels, axles, suspension arms, and uprights. Shock absorber mounting positions can also be considered to be suspension geometry but we’ve already covered them in Section 5 so we won’t do it again. Words most commonly heard when talking about suspension geometry are camber, caster, ride height, and toe-in. If you don’t understand what’s meant by these terms, look them up in the Glossary (Section 2) before you go any further. Once you start getting highly technical in your setups you’ll also start to hear terms like roll centre, centre of gravity, roll moment and so on. We’ll briefly describe these terms, but not go into too much detail – things can get pretty complex!
Camber
Camber is probably the easiest component of suspension geometry to adjust, if your car is fitted with turnbuckles or some kind of threaded rod for an upper suspension link. You can measure camber using two rulers and basic mathematics – but why bother when RPM manufacture a great, and simple to use, camber gauge. Ask at you local hobby store for info. Here are some general rules of thumb.
On the front of your car or truck. Adding negative camber will, in general, slightly increase steering up to a certain point, and then decrease it after that. That point is around 2 degree for touring car and 3 degree for off road. I would suggest that you start with about 1 degree for touring car and 2 degree for off-road of negative camber (whatever the car) and NEVER adjust it more than 1° either way. Running more negative camber will simply take away too much steering and add unpredictability to your car’s handling, while running positive camber of any kind is generally not a great idea. Positive camber can induce unstable handling and a particular loss of traction for the outside tire in any corner (and the outside tire is the one that does about 80% of the work).
Scott Guyatt: www.actionrc.com.au 13 V2: Team Associated: V3, V3-2, V3-3 & V3-4: Oople / PetitRC
On the rear things get a little more complicated. We need to consider both driving traction and cornering traction. Driving traction is what gets us going in a straight line, the more you have, the faster you can accelerate. Cornering traction is what helps the car to track around corners without the back of the car spinning out. In general (gee, I use those words a lot), the most driving traction comes with the tires at 0° camber, neither positive or negative. This is because the tire is flat to the track with the most possible amount of rubber touching for more grip. Unfortunately, cornering traction can be enhanced by adding a little negative camber, just like the front of the car. Interestingly enough, most cars will run fairly consistently with around 1 degree of negative camber on the rear for an on-road car and 2 degree on an off-road road. Again, as per the front, I would suggest you adjust this by only 1° either way. Again, NEVER run positive camber, it’ll lead to unpredictable driving traction and probably a lot of spinouts in corners.
Camber Link Mounting Positions
Many modern R/C racecars have some options for mounting the camber links in different positions. Manufacturers spend a lot of time testing the cars and the kit settings will be the most consistent for the vast majority of racing conditions. There are no valid generalizations that I can give you to help decide when and how to change the mounting location of your camber links. Suffice to say, that I believe firmly that you should trust the manufacturers’ judgment in this matter. If you feel the need to try some other options, then just try the holes immediately adjacent to the standard position. Really, its a case of try it and see. Read the section on roll centre below for some more ideas in this department.
Caster and Anti-squat
Caster and anti-squat are basically the same thing, except that caster refers to the angle of the suspension ‘upright’ (and is generally used in reference to front suspension), while anti-squat refers to the angle from horizontal of the whole suspension arm mounting pin (and is generally used in reference to rear suspension). Let’s take a look.
Caster adjustment on the front of most cars is by using different front uprights or by moving the mounting point of the upper suspension arm. In most cases, 2wd cars run between 20° and 30° of caster, 4wd cars run a bit less, typically 10° to 15°of caster and touring cars run between 0 and 8 degrees of castor. This is another instance where your manufacturer has done a lot of work to find the best answer. Usually, you should trust them. There are some generalizations that can be made, however. Adding caster (leaning the uprights further back) will generally give less initial turn-in, but more on power steering and better straight line stability, while decreasing caster will generally add some turn-in, but at the expense of on-power steering and straight line stability.
The other possibility is that your car may be fitted with a "variable caster" setup. This means that as the suspension compresses, or extends, that caster automatically changes. While common in on road cars, particularly in 1/8
th nitro
racers, variable (or ‘active’) caster is less common on the dirt and 1/10th
touring cars.
Anti-squat adjustments are available on the rear of most touring cars, buggies and trucks. Anti-squat is typically adjusted by either replacing the rear suspension arm mounts, or placing washers or wedges under one end or the other of the mount before tightening the mounting screws. This results in a change in the angling the suspension arm - lifting the front edge of the arm higher than the rear edge. Anti-squat does exactly what you might guess by its name, it prevents the rear end of the car from squatting under power as the car accelerates and weight transfers rearwards. Anti-squat does also have some other effects (as with any adjustment, there’s always a trade off). Let’s take a look at the effect of altering anti-squat on both acceleration and cornering.
Increasing Anti-squat. If you add anti-squat, your car will (in general) get more ‘driving traction’ and hence accelerate faster. When you come out of corners, you will be able to use more throttle and your car will be more stable. But (and it’s a big But), when you back off to turn into a corner, your car will have less rear grip. This might result in you spinning out when you back off the throttle. Adding anti-squat also affects the way your car drives through bumps on the track. If the track is bumpy right where you want to accelerate, anti-squat is not a good thing, it will make the rear of your car very ‘bouncy.’ On the other hand, if the rough stuff is in a place where you are cruising on constant throttle, or even decelerating, then anti-squat will actually help your car to ‘cruise’ through the bumps more smoothly.
Decreasing Anti-squat. When you decrease anti-squat you lose rear ‘driving’ traction. Your car will be a little more prone to power slides and fishtails. However, you will have more traction on a trailing throttle, resulting in your car being more stable into corners. It will also accelerate better through bumpy parts of the track.
Toe-in and Toe-out
The adjustment of toe is one of the most useful fine-tuning aids in making your car handle just how you like it. On the front of your car, lengthening, or shortening the steering rods adjusts toe, whilst on the rear it is usually adjusted by changing the suspension arm mounts, or using different hub carriers or suspension uprights.
Essentially, toe adjustment works like this. Adding toe-in (front of wheels point inward) adds straight-line stability, while adding toe-out (front of wheels point outward) tends to make the car wander a little. Like all suspension geometry adjustments, this is only true up to a certain point, beyond which the results are generally unpredictable. Let’s look at that in a little more detail.
Front adjustment. Changing toe on the front wheels is probably the best way to get that last little fine tuning adjustment right. Adding a little toe-in will reduce turn in slightly, and produce a car that tracks well in a straight line. On the other hand, reducing toe-in, or adding a little (very little) toe-out can provide a slight increase in steering. As with all suspension
Scott Guyatt: www.actionrc.com.au 14 V2: Team Associated: V3, V3-2, V3-3 & V3-4: Oople / PetitRC
adjustments - go a little at a time. Front toe adjustment should never exceed 2 degrees negative, or 1-degree positive toe (RPM make a great toe-gauge to help you measure exactly what you’ve got).
Rear adjustment. Due to the nature of rear toe-in (adjusted by replacing suspension mounts or hub carriers/uprights), adjustment of rear toe-in is quite uncommon. Just as with the front adjustment, more toe-in will add traction and stability, while less will promote sliding and instability. Rear toe-in should probably never exceed 4° negative or be less than 2° negative on off-road car and for on-road car, never exceed 3 degrees negative or be less than 1 degrees negative. Most modern cars are supplied at 2-3 degree negative and will never need to be changed. The other interesting part of rear toe adjustment is that some cars use different suspension arm mounts to achieve the adjustment, while others use different suspension uprights to make the change. The first case (suspension arm mounts) is called ‘inboard toe-in’ because adjustment is made at the inboard end of the suspension arm and affects the whole arm. Altering the upright is called ‘outboard toe-in’ because (you guessed it) it’s making an adjustment at the outboard end of the arm. Inboard toe-in can produce slightly different handling characteristics to outboard toe-in in rough/bumpy track conditions.
Ride Height
Ride height describes the distance between the track surface and the underside of your car’s chassis. Sounds simple. The simple truth is, ride height adjustment can sometimes be easy to get wrong, and can have a devastating effect on your car when you do get it wrong.
Fortunately, there are some relatively simple rules that you can follow to help make sure you get the ride height right, most of the time.
First, let’s accept this basic fact. Ride height is controlled by the amount of pre-load applied to your springs through the use of spring spacers or the movement of an adjustable spring collar. Adding spring spacers does not stiffen the spring, it just lifts the car higher off the ground. You can also adjust ride height by using travel limiters inside the shock absorber or by selecting different shock mounting positions on some cars. Basically though, spring pre-load is it.
Simple Rule 1: Always run the car with the chassis level. That is, the ride height at the front must equal the ride height at the rear (on-road: max 0.5mm difference, off-road: max 2mm difference). While there may be some very odd circumstances where you’ll want to run the front higher than the rear (or some even more odd circumstances where you’ll want to run the front lower than the rear), it is true for most conditions that the car will be most consistent if the front and rear ride heights are equal.
Simple Rule 2: The rougher the track, the higher the ride height must be. As the race day progresses, if the track starts to break up. One very simple method of adjusting your car to cope is to slightly (and I emphasize the word slightly) raise ride height. On off-road cars, make adjustments on the spring collars of about 2 mm per time and on on-road, make adjustments to ride height of about 0.5mm per time.
Simple Rule 3: The higher the traction, the lower the ride height. If traction is very high (off-road: wet track, or good gripping clay, or ‘blue groove’ conditions) your car will handle best (and resist traction rolling) with a lower ride height. If the track has a lot of grip, and is very rough/bumpy, then you’ve got a typical suspension-tuning situation and you need to compromise. If traction is low, it can sometimes help to lift ride height in order to encourage chassis roll.
Simple Rule 4: Remember that changing tires can drastically change ride height. For example, put a pair of Proline 8089 tires next to a pair of Proline 8081 tires. See the difference in radius of the two tire types? That’s the difference in ride height if you change from one to the other. Other example, changing from 63mm diameter foams to 59 mm diameter foams obviously has a 2mm impact on ride height. Switching from foam to rubber tyres is a classic case of needing to check and reset ride height. When you change your tires, recheck your ride height.
Advice for on-road racing: As a starting point, on a smooth track run ride height around 5mm on front and 5.5mm on rear. On a bumpy track, start at 6mm front and 6.5mm rear. Make adjustments from there.
Anti-roll Bars
Anti-roll bars (or sway bars) do one thing. Prevent, or inhibit, a car’s natural tendency to have chassis ‘roll’ or ‘lean’ towards the outside of a turn. This happens when you ask your car to turn left. A lot of that weight wants to keep going straight ahead, thus throwing more weight onto the right side (or outside) suspension and cause the whole car to ‘lean’ over.
The anti-roll bar prevents this lean by transferring some of the ‘leaning force’ across to the other side of the car. Anti-roll bars (as the name suggests) help your car to sit ‘flatter’ through corners. Anti-roll bars are most useful in high grip, smooth track conditions, and probably in high-speed corners too.
In lower grip, or rougher conditions, anti-roll bars can take away grip from the end of the car you use them on, or simply prevent the suspension from working as freely as it possibly can.
Variables with anti-roll bars include the thickness of the bar, the location of the anti-roll bar mount on the suspension arm, and the location of the mounting joint on the anti-roll bar. To ‘stiffen’ the bar (or increase it’s effectiveness) use a thicker anti-roll bar, mount the anti-roll bar further out on the suspension arms, or mount the connecting joint further ‘up’ the bar (closer to the bend). To ‘soften’ the anti-roll bar, do the opposite: use a thinner bar (or no bar at all), mount closer to the
Scott Guyatt: www.actionrc.com.au 15 V2: Team Associated: V3, V3-2, V3-3 & V3-4: Oople / PetitRC
centre of the car, or further out along the bar itself. Some cars, like the NTC3, have ‘blade’ type anti-roll bars. You rotate the blade and it changes the effect. The flatter the bar (parallel with the ground), the less anti-roll effect. The more you rotate the blade vertically, the more pronounced the anti-roll effect.
For testing purposes, if you’ve got an anti-roll bar fitted to your car and you want to disconnect it, you can simply disconnect one end of the bar. That will remove the ‘anti-roll’ effect and leave you free to try without it. In racing situations, it’s always safer to completely remove the anti-roll bar from the car if you don’t want to use it.
On a 4wd buggy, it is a very good idea to have an anti-roll bar available for the rear of your car. In my experience, 4wd cars use an anti-roll bar at least 50% of the time. 4wd buggy and touring cars are different from 2wd in that the saddle pack battery setup means that more weight is distributed further out along the chassis, thus increasing chassis roll.
On a 2wd you are not going to use an anti-roll bar anywhere near as often. I use a rear anti-roll bar on my XX-CR perhaps 30% of the time, while the front anti-roll bar is connected perhaps 15% of the time. You should be able to race very happily without any form of anti-roll bar on your 2wd (although having said that, a soft anti-roll bar is a very good tuning tool to have, particularly on fast, smooth, high grip tracks).
I have personally never seen an anti-roll bar used on a truck. Not sure why, perhaps trucks tend to sit flatter due to different shock mounting positions. If you’re a truck racer there’s certainly no need to rush out a pick up an anti-roll bar.
Other ways to get anti-roll: use different shock mount positions. This topic is covered in Section 5. Remember that if you change the shock mount positions to get better Anti-roll effect, you’ll probably upset some other part of the suspension setup.
Here are a few simple pointers: - removing front anti-roll bar will generally give more front grip and hence more front turn-in. This can sometimes
be reversed if your springs are too soft - removing rear anti-roll bar will generally give more rear grip and hence less turn-in. This can sometimes be
reversed if your springs are too soft
Suspension Droop
Suspension droop is adjusted by the use of shock travel limiters inside the shock, or by mounting the shocks in different positions on the tower or arm, or by droop screws.
Simply put, on off-road racing, more droop is useful on a rough track, and sometimes on a slippery surface. More droop can also help your car to land better after big jumps. Less droop results in sharper handling and is best used on a smooth, high-speed track. Less droop will help your car to change direction more quickly.
On road racing, the droop is an important setting point. As you increase the droop on the front end – by making the shock longer, your car will be smoother in going into the turn and also increase steering getting out. Conversely, decreasing your front droop, your car will start the turn faster and have reduce steering coming out. For the rear end, increasing the droop will give you a car with more traction – due to an increased load transfer. Decrease the rear droop, will give more responsive but with reduced traction, giving more steering. On low adherence track, you will increase the droop and on high adherence, you will reduce the droop.
Roll Centre
This will be a long section, so settle in. Roll centre is a hard concept to grasp, and a little complex to use as a tuning tool, but let’s give it a go. More than any other section of this manual, roll centre is a very difficult concept to explain, to understand, and to use. You don’t need to go into this until you understand the other settings of you car and are starting to look for more fine tuning options. Alternately, maybe you just like to tinker. Here’s your chance.
The roll centre is the theoretical point around which the car “rolls” as it enters, traverses and leaves a corner. This point is a function of your suspension geometry and is different for every car. The front and rear suspension each have their own roll centre, and the roll axis is the imaginary line connecting the two – but let’s not get too confused by that!
Where the roll centre becomes of value in tuning your car is in managing the amount of chassis roll. The amount of chassis roll is directly related to the distance between the roll centre, and the centre of gravity (trust me, some reference book for full scale car mention this fact). The closer the roll centre is to the centre of gravity, the less the chassis will roll. Conversely, the further the roll centre is from the centre of gravity, the more the chassis will roll. That’s because the chassis rolls around the roll centre, but the “rolling force” is applied at the centre of gravity. Therefore, due to a mechanical principle, more distance between the two, more leverage, more roll. Read that again, and think it through carefully – it’s an important concept to understand.
Now in general, more roll equals more grip.
The great thing about different roll centres at front and rear is that you can adjust the relative grip levels. Adjust the roll centre at the front to give more chassis roll and hence more grip, and you get more steering. The reverse is also true.
OK, so far…so good….
Scott Guyatt: www.actionrc.com.au 16 V2: Team Associated: V3, V3-2, V3-3 & V3-4: Oople / PetitRC
The hard part is in calculating where your car’s roll centre is. Do some web searches on roll centre and you’ll be able to find some useful information and helpful diagrams. Certainly users.pandora.be/elvo/ and www.teamorion.com have roll centre information and some helpful diagrams.
I’ll leave the research on theory and the fancy diagrams to you, but here are some general observations and ideas.
To lower roll centre: - lift the inner pivot point of top suspension link - drop the outer pivot point of top suspension link - drop the inner pivot point of bottom suspension arm - lift the outer pivot point of bottom suspension arm
To lift roll centre: - drop the inner pivot point of top suspension link - lift the outer pivot point of top suspension link - lift the inner pivot point of bottom suspension arm - drop the out pivot point of bottom suspension arm
Now you should also know that adjusting the bottom suspension pivot points results in larger changes to roll centre position, while changes to the top suspension link pivots result in smaller changes to roll centre position.
The next question of course is – what happens when I change roll centre?
If you lift the front roll centre: - less chassis roll at front - less grip at front - less on-power steering at front - more responsive at low speeds and in change of direction (eg chicane)
If you drop the front roll centre - more chassis roll at front - more grip - more steering on power - more stable in high speed turns and less responsive in low speed change of direction
If you lift the rear roll centre: - more responsive and agile handling - good change of direction in chicanes - excellent in high grip conditions
If you drop the rear roll centre: - more on-power grip but less grip under brakes - car generally more “docile” and safe
The other aspect of roll-centre tuning we should point out (if only briefly) is the dynamic nature of roll centres. As your suspension compresses or extends, the roll centre moves. Moving inner pivot points laterally (in and out) effects roll centres dynamically. Lengthening the top link means that as the car begins to roll, the roll centre drops quickly – and the car tends to roll more and more deeply into the corner – ultimately generating more and more traction. Conversely, shortening the top link means that as the car begins to roll, the roll centre can drop slowly or even lift (careful about that) – meaning that the roll slows and the chassis stiffens.
The shorter link therefore might allow for quick initial roll to generate traction, then stiffen up to allow the car to respond quickly – perhaps in a chicane, or opening radius corner. Alternately the longer link might allow the car to roll very deeply into the corner, generating more and more grip – maybe useful in a corner that tightens as you go through it.
Now as with everything, we have to point out that the above observations are generally true – but not always. The art of suspension tuning is the art of compromise. Changing one setting will always alter others. Changing roll centre and hence the roll-characteristics will be impacted by shock mounting positions and angles, anti-roll bars and so on. The rules? Make one change at a time and keep practicing!
Wheelbase and Weight Distribution
Wheelbase and weight distribution are inextricably linked. They are also very useful fine tuning tools. Many modern cars include the ability to alter both wheelbase and weight distribution within the framework of the standard car. Additionally, there are many manufacturers offering longer, or shorter chassis options for their cars.
Weight Distribution
When you’re building your car, you should always do your best to have weight evenly balanced across the car (from side to side). A car that is not balanced from side to side will struggle to jump, accelerate or handle consistently. Side to side weight balance is not a tuning option. You should get it evenly balanced and forget it.
Scott Guyatt: www.actionrc.com.au 17 V2: Team Associated: V3, V3-2, V3-3 & V3-4: Oople / PetitRC
Altering weight balance from front to rear is both more easily achieved, and more useful as a tuning tool. Basically it works like this:
More weight towards the front of the car equals more steering, and less rear grip. Moving the weight up front will also tend to encourage your car to jump more nose down, and stop the car from ‘wheel standing’ in extreme traction conditions. The easiest way to achieve a change in weight balance is by moving batteries forward in the chassis (suitable for XX, B2, XXT, XX4, etc.). Alternately, you can relocate electrical components further forwards but this is both fiddly and time consuming. Battery placement is the way to go.
Moving weight towards the rear of the car adds rear traction, takes away steering, makes the car more stable under both acceleration and braking, and can encourage some degree of wheel standing in extreme traction or rough conditions. Rearward weight balance can also help the car to jump a little flatter if it is jumping ‘nose down’. Altering weight balance to the rear is achieved by moving batteries backwards within the car.
As an alternative, you might want to add more weight to front or rear without taking weight away from the other end (this shift in weight happens when you move the batteries around). In this situation, seriously consider adding some small lead weights. Add this weight at the extreme end of the chassis, and as low as possible. Many 2wd cars and trucks have a perfectly shaped hollow inside the front bulkhead for this purpose. Adding a little weight (probably no more than 10-15 grams) to the front of your car can add a little more steering, and help the car to jump a little more ‘nose low’ but without taking away rear traction.
Wheelbase
Wheelbase can be typically altered in two ways (well, there are probably more, but only two common ways). The first is to add a longer, or shorter, chassis to the car. The second is to move the rear axle forwards or backwards by relocating spacers on the outer hinge pin. These two adjustments do completely different things. Let’s take a look at exactly what.
Changing Chassis Length: This is a major operation. Adding a longer chassis will give you more balance, more stability in high speed corners, slightly more rear traction, slightly slower turn in, better stability on rough tracks, and better jumping. Conversely, adding a shorter chassis will give you more steering and quicker response through corners, particularly when you have to change direction from left to right (and maybe back again). Longer chassis are most often used in a truck, and on bigger, faster tracks. The short chassis option is mostly used only on short, tight, twisty tracks (and usually only with the 2wd buggy).
Changing Rear Axle Location: Most modern R/C cars have the ability to alter wheelbase by changing the spacing of the rear axle. Some cars have two options (short/long) and others will have a medium wheelbase option. The real effect of altering wheelbase in this fashion is to alter the car’s weight distribution. Moving the axle back (longer wheelbase) is, in effect, moving the centre of gravity of the car closer to the front axle (almost like moving the battery a little forward). Conversely, moving the axle forward is just like putting more weight over the rear wheels. A simple rule of thumb: move the axle forward for more rear traction, backward for less.
Setting Up Transmission/Gearbox
The transmission of your R/C car is a piece of fine mechanical design and should be maintained carefully. I don’t intend to go into great detail here about how to clean or rebuild transmission components; your instruction manual should cover that. Suffice to say that you should keep bearings, gears, and diffs as clean and smooth as possible. Let’s take a look at your transmission and see just what kind of tuning options you might have.
Gear Ratio
The primary tuning option relating to your car’s transmission is the ability to change gear ratio by using different spur gears or pinions. Before we talk about the effect of gear ratio changes, let’s spend a moment sorting out the terminology.
Gear ratios are most often quoted in the form “7.8 to 1”. This can be represented in writing as 7.8:1. This means that the motor must rotate 7.8 times for the car’s driven wheels to complete one full revolution. Most instruction manuals should tell you the internal ratio of your car’s gearbox. If not, here’s a list of common cars and internal gear ratios:
Car Gearbox Ratio Car Gearbox Ratio
RC10 Team / Worlds 2.25:1 TC3-TC4 2.5:1
RC10B2-T2 2.4:1 TC5 2:1 RC10B3-T3 2.6:1 RDX 2:1
RC10B4-T4 2.6:1 RDX Phi B44 2.5:1 Pro4 2.4375:1
Ultima RB5 2.6:1 Cyclone 2.4375:1 ZX5 2.5:1 JRX-S 1.83:1
Triple X KE 2.43:1 TF 5 Stallion 1.83:1 Triple X BK2 2.56:1 TRF415 / MSX 2.187:1
Triple X CR TRF415 MSX MRE 2.25:1
Scott Guyatt: www.actionrc.com.au 18 V2: Team Associated: V3, V3-2, V3-3 & V3-4: Oople / PetitRC
Double X4 TA-05 2.25:1
Triple X4 TB Evo 5 2.237:1 GV2 2.42:1 TRF416 2.055:1
SBV2 Pro T1FK05 / T2’007 1.7:1 X6 2.6:1 T2’008
X5 S400 2.18:1 S2 Avid
S4 2.5:1 Mission 2 2.12:1 or 1.8:1 BJ4 2.5:1 Mission 2 EC 2.12:1 or 1.8:1
TRF501X Mission 3 Cyclone D4 Scythe 2.2:1
MR-4 BC 2.2:1 MR-4 SD 2.353:1 MR-4 BX 2.2:1 MR-4 BD 2:1
The formula for calculating gear ratios looks like this:
nionNbrTeethPi
urNbrTeethSparboxRatioInternalGeGearRatio ⋅=
We’ve already seen how gear ratios can be represented as numbers (e.g. 7.8:1). The tricky part is in describing ratio changes in general. If you put a bigger pinion on the car, the ratio will change to a small number (say 7.4:1). Whilst the numerical figure has become smaller, the actual gear ratio 7.4:1 is said to be a ‘higher’ ratio than ‘7.8:1’. Similarly, moving to a smaller pinion will produce a ‘lower’ ratio (say 8.2:1). Without wanting to confuse you, changing the spur gear has the opposite effect. A smaller spur gear will result in a ‘higher’ gear ratio, and a larger spur gear will give you a ‘lower’ gear ratio. Confused? Stay with me.
Gear ratio changes do a couple of things. Let’s look at both the ‘lower’ and ‘higher’ gear ratios separately to see what we find.
A lower gear ratio will mostly give you more run time and more acceleration. It’s also generally easier on your motor.
A higher gear ratio will generally give you more top speed, and less run time. It’s also tougher on your motor. Once you get to a certain ratio point (lets call it the ‘optimum ratio’) continuing to change to a higher ratio will do nothing but damage. It will result in your motor overheating and being damaged, and in extreme cases, your car may actually go slower.
How’s that. Did you understand it all? Have another read, and think about it carefully. Then look at this simple chart, which might help make things clearer.
Pinion Spur Gear Ratio Gearing Top Speed Acceleration Run Time Motor Bigger Smaller Higher Up More Less Less Harder Smaller Bigger Lower Down Less More More Better
Now just to confuse things even more, many on-road racers use a term called “rollout” to describe their gear ratio. A car’s rollout is generally measured in millimetres per rev (or mm/rev). This means the distance (in millimetres) that a car will travel for one revolution of the motor. Rollout is useful because it assists you to understand how to keep a constant gear ratio when changing tyre size (typically in the case of changing or wearing foam tyres to a smaller diameter). A larger rollout (higher mm/rev) is the same as a higher gear ratio. A smaller rollout (lower mm/rev) is the same as a lower gear ratio. Check above for the effects.
Calculating rollout requires a bit of basic mathematics: (Pi approx = 3.14159)
RatioDriveFinal
DiameterTyrePirevmmRollout
__
_)/_( ×=
Many drivers will setup an excel spreadsheet and pre-calculate rollout for a range of pinion/spur/tyre size combos. You can also go to this website to produce such a ratio chart: www.waits.net
Hope that helps! For help on choosing your actual gear ratio for any given motor or track, consult your instruction manual or check with the local fast guys.
Differential
Your buggy, TC or truck gearbox (transmission) is fitted with a differential. The purpose of the differential is to let the wheels turn at slightly different speeds. This is necessary to help the car turn corners. When you car turns a corner, the outside wheel has to travel further than the inside wheel, thus it needs to turn slightly faster to keep up. Differentials (or diffs) in model cars are typical of two kinds. Entry-level cars (from companies such as Tamiya or Kyosho) often use ‘gear
Scott Guyatt: www.actionrc.com.au 19 V2: Team Associated: V3, V3-2, V3-3 & V3-4: Oople / PetitRC
diffs’ while more competition oriented manufacturers use ‘ball diffs’. Both work in the same way, and largely achieve the same thing.
Ball diffs, however, are slightly adjustable. By slightly increasing or decreasing the tension on the diff screw (see your instruction manual for details on how) you can make the diff ‘looser’ or ‘tighter.’ A tighter diff is one that is hard to turn. Tighter diffs help your car to put down power coming out of corners and in a straight line, while looser diffs help your car to turn corners better. If you loosen the diff too far, it will allow the diff to slip, which is a bad thing. Diff slip damages the components of the diff and is inconsistent. Your instruction manual will describe how to tell if your diff is slipping or not. I never recommend running any diff slip.
Specific On-Road Racing Car Transmission Components
One Ways: Some touring cars will be fitted with a front “one-way”. This allows the front wheels to over-rotate and means that the car is essentially two-wheel drive until the rear tyres start to lose traction. The advantages of a one-way are slightly higher top speed, slightly better run-time and better turn-in. The disadvantages are that the car is unstable under brakes (as it is essentially a two-wheel drive at that point) and a bit less generally “stable”. In low grip conditions a one-way can be a liability.
Spools: A more recent innovation is the use of a “spool” or locked front diff. A spool allows for no differential action and means that both front wheels are equally driven 100% of the time. Spools provide benefits in acceleration through and out of a corner, and provide great stability under brakes. The disadvantages of a spool are in loss of initial turn-in and in the incredible stresses put on the drive train. Spool-equipped cars can easily break front drive-shafts, uni-joins and diff outdrives. If you want to run a spool you would be well advised to (a) upgrade your front drive shafts and outdrives to steel or titanium; and (b) be a consistently good driver who doesn’t hit anything.
Some manufacturers offer spools as a replacement for the front diff. For most however it’s a case of converting the diff. The conversion process is relatively simple. To try it, remove and disassemble your front diff. Remove front diff balls, and make two rings matched in size to the diff/drive rings from cardboard (business cards or header cards from spare parts are ideal). Reassemble the diff with theses card rings between the diff pulley/gear and the standard drive rings. Tighten the diff completely and then back out the adjusting screw by about ¾ of a turn. If you want to try this, you should be very careful, seek assistance from someone who has done this task before, and be warned that you very likely will break parts. Converting a gear diff is a different process.
Let me say this. For 90% of racers a spool is a mistake. For most of us the standard kit setup (with either front diff or front one-way) will be more than fine. I strongly encourage you not to go down the “spool” path until you have upgraded your drive-train to cope with the stresses and more importantly have exhausted other setup options to achieve the same result.
Specific Off-Road Racing Car Transmission Components
The slipper clutch, hydra drive and visco drive all have one aim in mind - to help you put the power to the ground more effectively. Most modern R/C cars (well, the race oriented ones anyway) come fitted with a slipper clutch as standard. Team Losi vehicles also include a hydra drive, whilst Schumacher offer a ‘visco drive’ for their cars (and other manufacturer’s cars as well). Let’s take a look at the use of a slipper clutch, and then the hydra/visco drive option.
Slipper clutches are designed to do exactly what you might think by their name, slip. When you jam on the throttle, the slipper clutch is designed to slip a little before transmitting that entire horsepower to your overstressed rear tires. The slipper clutch (or ‘clutch’ as it’s usually known) helps when the track is slippery, or rough, or when you bolt in an enormous motor. The best way to set your clutch is to loosen it right up (‘back it off’ is the term you’ll mostly hear) and place your car on the main straight at your track. When you pull the trigger to accelerate away, the car should move slowly off, with the transmission emitting a loud whining noise. That’s the clutch slipping. Now slowly tighten the clutch about 1/2 a turn at a time (trying a full throttle take off after each adjustment) until the clutch only slips for about one meter (three feet). This is a pretty good setting for most tracks. If the track is particularly high traction, or if you’re not having any problems with too much wheel spin, you might even like to run the clutch tighter still. I would recommend against locking the clutch entirely. Just tighten it enough so that there is no slip on acceleration. This will still let the clutch slip when your car comes down hard off a jump or through rough sections of the track, thus protecting the transmission.
Visco drive & Hydra drive: Losi and Schumacher would probably disagree with my analysis, but the hydra drive and visco drive basically carry out the same function. They’re like a more advanced version of the slipper clutch. They are designed to assist in smooth delivery of power. Each is fluid filled and adjustable. Each is at its best in rough, or broken, track conditions. Each manufacturer provides good instructions on setting up and using their product. My advice to you is to follow the manufacturers’ instructions to the letter. Leave the hydra drive or visco drive on at all times unless the track is very smooth and offers high traction. Then you could consider running without it.
Those days, Hydra-Drive & Visco Drive are not used in off-road racing cars. Those equipments tend to give a higher inertia to the transmission.
Scott Guyatt: www.actionrc.com.au 20 V2: Team Associated: V3, V3-2, V3-3 & V3-4: Oople / PetitRC
Motors
Motors are the driving force behind your R/C car. You need to take care of your motor and treat it with respect. In this section, I’ll give you some basic, no-nonsense guidelines about caring for your motor, and some simple rules for choosing your motor once you graduate into the modified ranks. I’m not a technical guru, and I don’t intend to get technical here, but I’ve raced at the top level of modified in Queensland and Australia with some success using the simple guidelines I’m going to present to you here. Some may disagree with my assessment, but I’m here to tell you this stuff works in real life, which is good enough for most of us!
Motor Care
Stock motors are very easy to care for. After each race, brush the loose dirt and dust off the end bell. After every second or third race, add one drop of light machine oil (Mobil One or any light machine oil) to each bushing. After every second race meeting, take the motor out of the car, and spray it out with R/C motor cleaner. Don’t run the motor while spraying it; don’t dip in water, or any other such things. When you finish spraying out the motor, add a drop of oil to each bushing and work the oil in (by turning the shaft by hand a few times). Then add a drop of Break-In fluid or commutator drops to each brush (inside the motor) and run on a four-cell pack for about 30 seconds. Now replace it in your car. That’s it, simple, quick, and reliable. If you want more performance from your Johnson 540, you can use commutator drops. My advice would be to use them sparingly, only one drop at a time, and preferably only on big race days. For your club racing you should be pretty right without them.
Once you’ve graduated from stock, you’ll move either into a stock or spec-modified class (maybe 19T or equivalent following national rules) or full-blown modified. Now there’s heaps more to maintaining stock or modified motor than a 540, but again - I’ll tell you how I do it - simply, quickly, and relatively cheaply.
Race day maintenance of stock and modified motor is not much more difficult than a 540. After about every three races or so, pull the motor from the car. Start by brushing loose dirt from the end bell and can. Next, remove the brush springs and slide the brushes out. Spray a little motor cleaner spray onto a cotton bud, and slide the cotton bud into the brush hood, pressing firmly to ensure good contact with the commutator. Now rotate the commutator a couple of times. Repeat this process about three or four times (with clean cotton buds each time), ensuring that you use both brush hoods. Now get a new cotton bud, and again, spray with motor cleaner. Use the cotton bud as a cleaning stick, wiping the face of the brush clean of any debris or carbon build up. Take a very fine points file (or a specialist comm cleaning stick from Trinity or similar) and smooth the sharp edges of the brush. Don’t do this on your own for the first time, ask someone experienced to help you. Put the motor back together and back in the car. That’s it. Don’t oil bearings, or spray out the insides of the motor with spray, you can do more harm than good.
After every second race day (or approximately 10 runs), you should disassemble the motor entirely, and give it a full clean. Here’s a basic procedure to follow:
1. Remove the motor from car and brush off any loose dirt and dust
2. Remove the brush springs and slide the brushes out of the hoods
3. Take a hobby knife and mark the can and end bell to ensure you get the timing right when you re-assemble the motor
4. Loosen the timing ring screws (on top of motor), taking care not to damage the capacitors. Twist the end bell and remove from the can. Place the complete end bell on a clean, clear section of your workbench next to the brush springs.
5. Take the motor shims off the top of the armature and place next to the end bell. Be sure to make a note of how many spacers there are and what order they may be in. There will probably be a fiber washer closest to the commutator. This is to trap oil and grease that may leak down from the end bell bearing.
6. Remove the armature by hand from the can. Set it aside on the bench after removing any shims from the shaft. Check inside the can for more shims (they’ll often fall off the shaft and stick to magnets) and place all shaft end shims together on your clear area. Set the can down next to them (again remember to count how many shims there are on that end)
7. Liberally spray the armature with motor cleaner until runoff is clean (do this over a rubbish bin, or outside, it’s not good stuff to get on your carpet). Spray a cotton bud and carefully clean all areas of the commutator.
8. Use a clean tissue to wipe out dust and dirt from inside the motor can and end bell. Don’t use spray.
9. Check motor bearings for wear and dirt. To do this, put the armature through the bearing from outside the can or end bell (do one at a time) and spin the armature. If the armature spins freely and quietly, you’re fine. If it grinds to a noisy, quick halt, chances are your bearings are either very dirty, or just plain stuffed.
10. You can try cleaning your bearings if you like. Remove the bearing from the can/end bell using a ‘Motor Bearing Tool’ from Trinity or similar. Then clean as per other bearings in your car. Oil lightly with a good quality bearing oil (Mobil One is a good alternative) and replace carefully. If you’re not confident about this, ask for help.
Scott Guyatt: www.actionrc.com.au 21 V2: Team Associated: V3, V3-2, V3-3 & V3-4: Oople / PetitRC
11. If you decide that the bearing is stuffed (or you try to clean it and it just doesn’t improve) then it’s time for new bearings. Replacement bearings are available from different companies and can be fitted using a Motor Bearing Tool. Again, if you’re not confident, you can ask for help.
12. When you’re done with all this, reassemble the motor, taking care to get the shims in the correct location, and get the timing back to the original mark. At this stage I’d recommend fitting new brushes, although if your brushes are still smooth, clean and a nice consistent copper colour they’re probably OK. Look at the side of the brush. If it is discoloured at all (maybe purplish, blue, or off-white) then it’s time to replace the brush no argument. Solder new brushes on just where the old ones come off. As always, ask for help if you’re not sure.
13. You’re done!
After two cleaning cycles (about 20 runs), I recommend that you consider having your commutator re-trued. This is done using a purpose built motor lathe (often with a diamond tip). Lathes can cost between $400 and $1000 so the odds are you won’t have one yourself. Some hobby shops may have motor lathes and can do this for you, usually for about $5. Ask around.
Note that in modified touring cars now the motor winds are increasingly wild, and life-span of the motor is as a result increasingly short. With a very high performance modified motor (say 9 turns or less) you should clean it after every run, and probably re-true and replace brushes are no more than 5 runs. The exception to this is the Orion/Peak V2 based motors which are designed for longer life span, and motors fitted with some impressive brushes from CS which are designed to do the same thing.
Modified Motor Brush Selection
When you’re using your modified motor you’ll quickly discover that there are a range of motor brushes available. These might be called soft, hard, cut, timed, serrated, silver, copper, etc. Pretty confusing. Let’s try and give you some very simple guidelines.
Brush compound: some brushes are known as hard or soft. You might liken brushes to tires: the softer the brush compound, the greater the performance, but the greater the wear rate, too. With brushes, however, the performance gain is small, and the increase in wear is great. Only when you’re seeking the ultimate little extra in horsepower is it worth considering a soft brush. The fact is, they’re probably not worth the hassle. You need to clean your motor more often, and change brushes more often, sometimes after just two or three runs. I recommend that you always use hard compound brushes. Fine examples of these brushes are available from Ozcharge (#1130), Trinity (Serrated Face Hard) and Corally (Standard Hard Brush). If you’re desperate to use a softer brush - again these three companies offer a good choice.
Brush material: brushes are a copper colour. That’s because copper is one of the ingredients of the average brush. There’s a whole cocktail of other ingredients that go into every brush. One of the more common ingredients is silver. Brushes with a high silver content are generally expected to perform better, although, as with softer brushes, there’s usually a trade-off for both brush and motor wear. Again, a standard material, standard compound brush is the best choice for consistency and life of the motor.
Brush Shape: brushes can come with different shaped (or ‘cut’) faces. Some have half the face cut away, others have a slot across the centre, or a hole drilled in the centre. There’s even a brush called the ‘H Cut’ (guess what the face of that looks like!). All of these ‘cuts’ are designed for different purposes, often for US style ‘Stock’ racing, or even for on-road. For off-road racing, you are better off sticking to a standard, full-faced brush. Some otherwise full-faced brushes in recent years have a series of small grooves, or serrations across the face. These serrations are designed to help the brush run-in faster. These types of brushes are ok.
Lay Down Brushes: A standard modified motor takes standard ‘upright’ brushes. That describes the brush that is taller than it is wide. Some motors are available with ‘lay down’ brushes, like a normal brush tipped on its side. Additionally, some manufacturers offer ‘lay down’ conversion kits for standard modified motors. In some conditions, lay down brushes can offer a slight performance gain. It’s hard to say when, where, and what those conditions exactly are. It’s mostly a case of experimentation.
In general, let me say this. I very, very rarely use anything other than a standard, full faced, hard, upright brush. Many, many races around the world are won with this type of brush - and you will never go wrong.
Note to that once again this information does not apply to Orion/Peak V2 based motors. These motors take a brush that is round/circular in cross-section and at the time of writing are supplied only by Team Orion or Peak. They supply two types of brush – and Enduro (good for up to 30 runs) and a Sprint (more power but only good for about 5-6 runs).
Motor Selection
In 540, or spec modified classes (such as Club Spec or Group 20), motor choice is very, very easy. Just take it out of the box and bolt it into the car. That’s it.
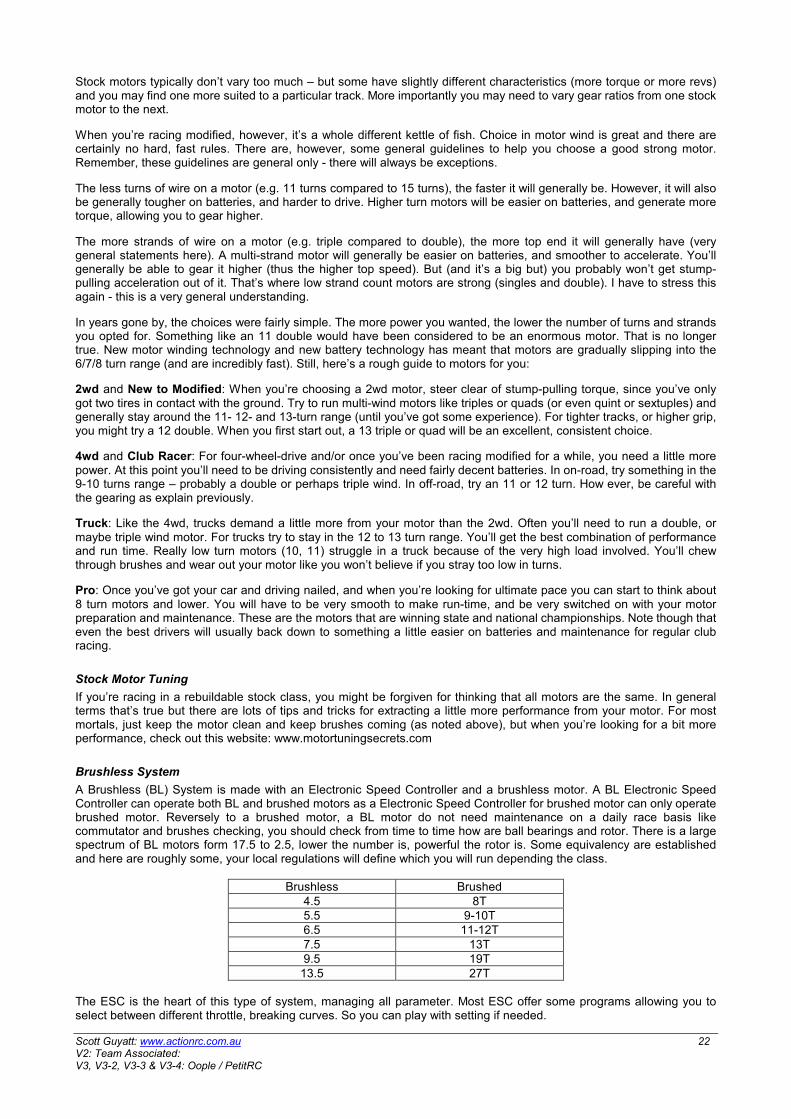
Scott Guyatt: www.actionrc.com.au 22 V2: Team Associated: V3, V3-2, V3-3 & V3-4: Oople / PetitRC
Stock motors typically don’t vary too much – but some have slightly different characteristics (more torque or more revs) and you may find one more suited to a particular track. More importantly you may need to vary gear ratios from one stock motor to the next.
When you’re racing modified, however, it’s a whole different kettle of fish. Choice in motor wind is great and there are certainly no hard, fast rules. There are, however, some general guidelines to help you choose a good strong motor. Remember, these guidelines are general only - there will always be exceptions.
The less turns of wire on a motor (e.g. 11 turns compared to 15 turns), the faster it will generally be. However, it will also be generally tougher on batteries, and harder to drive. Higher turn motors will be easier on batteries, and generate more torque, allowing you to gear higher.
The more strands of wire on a motor (e.g. triple compared to double), the more top end it will generally have (very general statements here). A multi-strand motor will generally be easier on batteries, and smoother to accelerate. You’ll generally be able to gear it higher (thus the higher top speed). But (and it’s a big but) you probably won’t get stump-pulling acceleration out of it. That’s where low strand count motors are strong (singles and double). I have to stress this again - this is a very general understanding.
In years gone by, the choices were fairly simple. The more power you wanted, the lower the number of turns and strands you opted for. Something like an 11 double would have been considered to be an enormous motor. That is no longer true. New motor winding technology and new battery technology has meant that motors are gradually slipping into the 6/7/8 turn range (and are incredibly fast). Still, here’s a rough guide to motors for you:
2wd and New to Modified: When you’re choosing a 2wd motor, steer clear of stump-pulling torque, since you’ve only got two tires in contact with the ground. Try to run multi-wind motors like triples or quads (or even quint or sextuples) and generally stay around the 11- 12- and 13-turn range (until you’ve got some experience). For tighter tracks, or higher grip, you might try a 12 double. When you first start out, a 13 triple or quad will be an excellent, consistent choice.
4wd and Club Racer: For four-wheel-drive and/or once you’ve been racing modified for a while, you need a little more power. At this point you’ll need to be driving consistently and need fairly decent batteries. In on-road, try something in the 9-10 turns range – probably a double or perhaps triple wind. In off-road, try an 11 or 12 turn. How ever, be careful with the gearing as explain previously.
Truck: Like the 4wd, trucks demand a little more from your motor than the 2wd. Often you’ll need to run a double, or maybe triple wind motor. For trucks try to stay in the 12 to 13 turn range. You’ll get the best combination of performance and run time. Really low turn motors (10, 11) struggle in a truck because of the very high load involved. You’ll chew through brushes and wear out your motor like you won’t believe if you stray too low in turns.
Pro: Once you’ve got your car and driving nailed, and when you’re looking for ultimate pace you can start to think about 8 turn motors and lower. You will have to be very smooth to make run-time, and be very switched on with your motor preparation and maintenance. These are the motors that are winning state and national championships. Note though that even the best drivers will usually back down to something a little easier on batteries and maintenance for regular club racing.
Stock Motor Tuning
If you’re racing in a rebuildable stock class, you might be forgiven for thinking that all motors are the same. In general terms that’s true but there are lots of tips and tricks for extracting a little more performance from your motor. For most mortals, just keep the motor clean and keep brushes coming (as noted above), but when you’re looking for a bit more performance, check out this website: www.motortuningsecrets.com
Brushless System
A Brushless (BL) System is made with an Electronic Speed Controller and a brushless motor. A BL Electronic Speed Controller can operate both BL and brushed motors as a Electronic Speed Controller for brushed motor can only operate brushed motor. Reversely to a brushed motor, a BL motor do not need maintenance on a daily race basis like commutator and brushes checking, you should check from time to time how are ball bearings and rotor. There is a large spectrum of BL motors form 17.5 to 2.5, lower the number is, powerful the rotor is. Some equivalency are established and here are roughly some, your local regulations will define which you will run depending the class.
Brushless Brushed 4.5 8T 5.5 9-10T 6.5 11-12T 7.5 13T 9.5 19T
13.5 27T The ESC is the heart of this type of system, managing all parameter. Most ESC offer some programs allowing you to select between different throttle, breaking curves. So you can play with setting if needed.
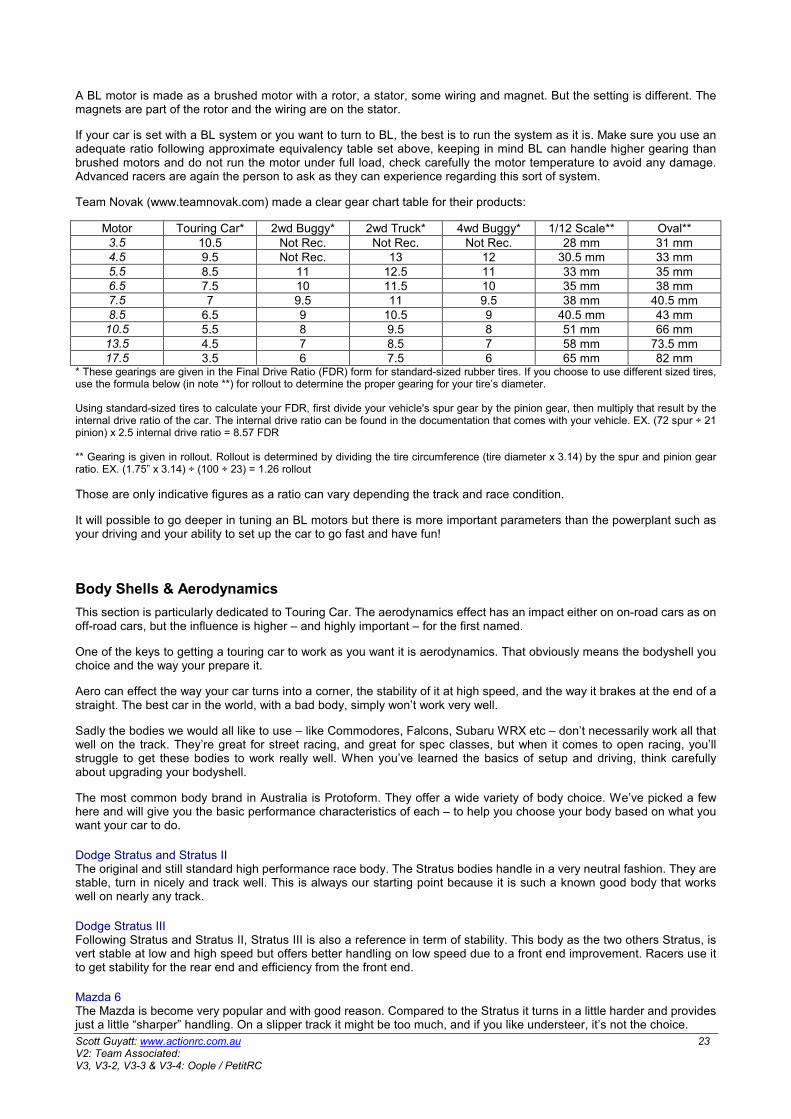
Scott Guyatt: www.actionrc.com.au 23 V2: Team Associated: V3, V3-2, V3-3 & V3-4: Oople / PetitRC
A BL motor is made as a brushed motor with a rotor, a stator, some wiring and magnet. But the setting is different. The magnets are part of the rotor and the wiring are on the stator.
If your car is set with a BL system or you want to turn to BL, the best is to run the system as it is. Make sure you use an adequate ratio following approximate equivalency table set above, keeping in mind BL can handle higher gearing than brushed motors and do not run the motor under full load, check carefully the motor temperature to avoid any damage. Advanced racers are again the person to ask as they can experience regarding this sort of system.
Team Novak (www.teamnovak.com) made a clear gear chart table for their products:
Motor Touring Car* 2wd Buggy* 2wd Truck* 4wd Buggy* 1/12 Scale** Oval** 3.5 10.5 Not Rec. Not Rec. Not Rec. 28 mm 31 mm
4.5 9.5 Not Rec. 13 12 30.5 mm 33 mm
5.5 8.5 11 12.5 11 33 mm 35 mm
6.5 7.5 10 11.5 10 35 mm 38 mm
7.5 7 9.5 11 9.5 38 mm 40.5 mm
8.5 6.5 9 10.5 9 40.5 mm 43 mm
10.5 5.5 8 9.5 8 51 mm 66 mm
13.5 4.5 7 8.5 7 58 mm 73.5 mm
17.5 3.5 6 7.5 6 65 mm 82 mm * These gearings are given in the Final Drive Ratio (FDR) form for standard-sized rubber tires. If you choose to use different sized tires, use the formula below (in note **) for rollout to determine the proper gearing for your tire’s diameter.
Using standard-sized tires to calculate your FDR, first divide your vehicle's spur gear by the pinion gear, then multiply that result by the internal drive ratio of the car. The internal drive ratio can be found in the documentation that comes with your vehicle. EX. (72 spur ÷ 21 pinion) x 2.5 internal drive ratio = 8.57 FDR
** Gearing is given in rollout. Rollout is determined by dividing the tire circumference (tire diameter x 3.14) by the spur and pinion gear ratio. EX. (1.75” x 3.14) ÷ (100 ÷ 23) = 1.26 rollout
Those are only indicative figures as a ratio can vary depending the track and race condition.
It will possible to go deeper in tuning an BL motors but there is more important parameters than the powerplant such as your driving and your ability to set up the car to go fast and have fun!
Body Shells & Aerodynamics
This section is particularly dedicated to Touring Car. The aerodynamics effect has an impact either on on-road cars as on off-road cars, but the influence is higher – and highly important – for the first named.
One of the keys to getting a touring car to work as you want it is aerodynamics. That obviously means the bodyshell you choice and the way your prepare it.
Aero can effect the way your car turns into a corner, the stability of it at high speed, and the way it brakes at the end of a straight. The best car in the world, with a bad body, simply won’t work very well.
Sadly the bodies we would all like to use – like Commodores, Falcons, Subaru WRX etc – don’t necessarily work all that well on the track. They’re great for street racing, and great for spec classes, but when it comes to open racing, you’ll struggle to get these bodies to work really well. When you’ve learned the basics of setup and driving, think carefully about upgrading your bodyshell.
The most common body brand in Australia is Protoform. They offer a wide variety of body choice. We’ve picked a few here and will give you the basic performance characteristics of each – to help you choose your body based on what you want your car to do.
Dodge Stratus and Stratus II The original and still standard high performance race body. The Stratus bodies handle in a very neutral fashion. They are stable, turn in nicely and track well. This is always our starting point because it is such a known good body that works well on nearly any track.
Dodge Stratus III Following Stratus and Stratus II, Stratus III is also a reference in term of stability. This body as the two others Stratus, is vert stable at low and high speed but offers better handling on low speed due to a front end improvement. Racers use it to get stability for the rear end and efficiency from the front end.
Mazda 6 The Mazda is become very popular and with good reason. Compared to the Stratus it turns in a little harder and provides just a little “sharper” handling. On a slipper track it might be too much, and if you like understeer, it’s not the choice.
Scott Guyatt: www.actionrc.com.au 24 V2: Team Associated: V3, V3-2, V3-3 & V3-4: Oople / PetitRC
Alfa Romeo If anything the Alfa goes further down the route of the Mazda. It turns in very hard and is therefore particularly suitable for really tight and twisty tracks. The Alfa is often seen on indoor tracks that are smaller and with lower average speeds.
MG ZT The MG is almost a new Dodge. It’s stable, easy to drive and works well on most places. If anything it understeers a little compared to the Dodge and has very high rear traction thanks to a bigger rear wing. If you’re having trouble with your car oversteering it might be that the MG is a good option to tame your car a little.
Honda Rayspeed New comer for almost one year in competition, this bodyshell get long bonnet, small cabin and long tail with and efficient rear wing. The Honda Rayspeed is commonly used in fast open track.
Nemesis Not homologated for both national and international events, the Nemesis get some interest for race club, for example. It provide an interesting aerodynamics package with a 50/50 front-rear balance (without wing) which make it easy and enjoyable to race
Crowd Pleazer Bodyshell halfway between Stratus II et III but slightly higher, it is very stable but more carpet track orientated.
DNA Bodyshell specifically designed to race on carpet track.
There are a couple of new bodies recently release. We haven’t had enough track time with these to comment, but will update this information once we’re familiar with them.
When preparing your body you need to take note of your club or association rules about body height, wing size and placement, and number/size of holes you cut into the body. Most places also insist you leave windows clear. Other than those you need to cut the body as neatly as possible, you need to mount the body as low and level (front to rear) as possible and make sure that wheel arches clear tyres at all points of suspension and steering travel.
Use light/bright colours if you race at night, and remember that while multi-colour and lots of stickers look good, they are heavy and do nothing for performance. Light coats of paint, minimal stickers and lightweight are good for performance.
Don’t let me make you think you need a different body for every different track. You don’t. Just choose carefully next time you’re replacing your body. I have only one, and it’s a Protoform Dodge Stratus II. That will do me for now.
Driving the Beast
After all this effort setting up your car, you’ve still got to drive it. If I could tell you exactly how to become a perfect driver, I’d be a pro racer on my way to the Worlds. The fact is, we can’t all drive like Masami Hirosaka, Mark Pavidis or Marc Rheinard. We all can, however, improve ourselves. Here are a few tips to keep in mind when you’re striving to improve your driving:
1. Know exactly where you want to drive. Sounds simple, doesn’t it? This means, go for a walk around the track before racing starts. Look out for nasty holes or bumps. Figure out where to hit the jumps and exactly (like down to the inch) what you want your racing line to be. When you go out to drive, try to remember everything that you decided on earlier. Don’t try and think of the whole track in one go; just concentrate on the corner you’re on now and the next two or three corners. If you notice yourself getting off your chosen line, it’s easy to fix: SLOW DOWN until you’re back where you want to be.
2. When you have your first run at a new track, take the first few laps slowly. Try different lines and figure out where your car is best over the jumps and bumps. If you’re having trouble on one particular jump try different lines, different throttle openings - keep experimenting until you have a method of consistently negotiating the whole track.
3. Watch others drive. Next time you’re at a big race meeting, take some time to watch the 2wd or 4wd modified races. Pick out the fast guys and watch them closely. Look at the lines they take; listen for their throttle movements (especially when the car is in the air). I’ll guarantee you, they will be smooth on the throttle, and gentle with the steering. They’ll also be utterly consistent. What you need to learn is this: if your car is consistently on your chosen racing line, you’ll never crash, and you’ll win more than you’ll lose. Simple huh?
4. If you’re attending a big race meeting, try to draw out a complete map of the track on some paper. Mark in corners, jumps, ruts, holes and bumps. Mark in your preferred line and make notes to yourself about things to remember for each corner or jump. Take it home, and spend a little time the night before the race just reading through the comments, memorizing the whole track exactly as you want to drive it.
Scott Guyatt: www.actionrc.com.au 25 V2: Team Associated: V3, V3-2, V3-3 & V3-4: Oople / PetitRC
5. YOU MUST PRACTICE! Race on your own, get to club meetings, drive with other (and better) drivers, race on-road whatever. The more you drive, the better you will drive - provided that you think about what you are doing and strive to improve.
Money
R/C car racing can be a bottomless pit for your money if you let it. My advice to you is to think very carefully before you spend your hard earned bucks on new gear. As a retailer, I’d rather you were careful with your spending, enjoyed your racing, and stayed in the sport for many years, than have you spend heaps of money, get disillusioned, and give up after a few months.
Don’t rush out to buy every option part manufactured for your car. Good car performance comes more from practice and hard work than spending money indiscriminately. There are certainly things you should consider buying, but be sensible and approach it from a cost benefit basis. Here’s a rough priority for spending money on your car:
1. Ball Bearings for Wheels and Transmission. Bearings will enhance run time, performance, reliability, and strength. If your car doesn’t have them, they are your first priority.
2. Spare Batteries & Radio Crystals. If you’re racing with just one battery, you should make it a priority to get two more. Three is ok, but five (enough so that you have a fresh pack for each race on each race day) is ideal. You don’t need big buck matched packs. Pick up a spare set of radio crystals as well. To race, you’ll need at least two pairs, preferably three. They’re cheap. If you take care of them, they’ll last a long time.
3. Spare Pinion & Spur Gears. The ability to alter the gear ratio is very important. Pinions and spurs are relatively cheap, so always carry a range.
4. Spare Tires are very important (possibly the most important) tuning tool you have. As you can afford it, try to build up a range of tire choices. Some races require that you use a particular type of tire.
5. Electronic Speed Control. If you’re struggling with a manual speed control - this will turn your life around. Electronic speedos give more power, more run time, and much more reliability. Best of all, if you sell your old car, you can move your electronic speed control straight into your new one.
6. Spare Springs & Shock Oil. Most manufacturers offer a choice of softer or stiffer springs for your car. Pick up some optional springs and shock oil to help you tune the car. Usually it’s best to get the springs and shock oils that are slightly softer and slightly stiffer than the kit parts.
7. Reliability Parts. By reliability parts, I mean items that will help you car to be stronger, break down less, or be more consistent, not necessarily to perform better. Things like titanium turnbuckles, or ‘un-popable’ ball joints.
8. Performance Parts. Performance parts are items that may help your car to go better, such as lightweight transmission parts, optional graphite chassis parts, different tuning options such as anti-roll bars, or different toe/anti-squat blocks.
9. Appearance of Parts. If you’ve still got money left over, you might want to make you car look better. Anodized alloy screw sets, different bodies, wings, wheels, sticker sets etc. The options are almost endless. You also can save money for another investment.
Let me say one more thing on this topic. If you’re running a cheap low-end buggy not specifically made for racing (say some other non-high-end brands) it’s best for you not to spend too much money trying to hop up your buggy and make it competitive. Instead you should concentrate on saving for a better car. Even a well looked after second hand racecar is a good investment. If you want to go faster, concentrate on items that you can move into another car if/when you save the $$$. Things like batteries, electronic speed controls, radio gear etc. Alternately – you may choose to race in a one make series – like the Tamiya Challenge, or Kyosho Cup. In this case, you’ll have to stick with a pretty much standard car – so you really can save money!
Electronics and Radio Gear
One important policy I’ve always used when buying electronic gear is to get the absolute best equipment I can afford. Electronic gear is not cheap and you don’t want to have to replace it after a year or so if you find that your gear is not up to scratch. A good quality electronic setup will last a long time and deliver good performance. You don’t need to buy the ultimate top of the line equipment, but good mid-range gear that is from a name, quality manufacturer.
Important notes about radio/electronics: the manufacturers who've built your equipment understand everything about it. They designed it, built it, service it, etc. Listen to their instructions. The instruction sheet/booklet you got with your gear is the best advice you can listen to!

Scott Guyatt: www.actionrc.com.au 26 V2: Team Associated: V3, V3-2, V3-3 & V3-4: Oople / PetitRC
What’s Next?
We’ve covered a lot of ground in these pages. You might not have understood it all, and you almost certainly won’t remember it all. Let me encourage you to go back to the section on setting up your car and seek to follow the basic guidelines we presented there. Use this e-book as a reference, but remember, there is no substitute for practice and personal experience. Don’t believe something just because I tell you it’s true. Go out and prove it, or disprove it, for yourself.
Most of all, remember that R/C racing is an enjoyable activity. I’m not trying to take that joy away by making it all hard work. I’m just trying to help you to get your car going a little better, and to therefore enjoy it more. The most enjoyable races for me are those when my car handles just like I want it to. The search to make every race like that has led me to collect the information that’s contained in this e-book.
If you need more help, again, let me encourage you just ask. Ask the guy pitting next to you, ask the local pro. If you want parts or accessories for your car contact your local R/C shop.
I hope you’ve enjoyed reading this e-book and I hope it helps you to enjoy your R/C racing more. I wish you every success in your R/C career.
Scott Guyatt
Action R/C
www.actionrc.com.au
Update: - May 2005: merge Off-Road and On-Road RC Handbook and Update by Arn0. - March 2006: Additional information on TC body shell provided by M. Berty. - April 2008: Update regarding Off-Road tires, TC body shell and BL system (details provided by R. Gayoso and
A. Laurent). - June2009: Appendix added with complementary schemes for page 4, by Arn0.
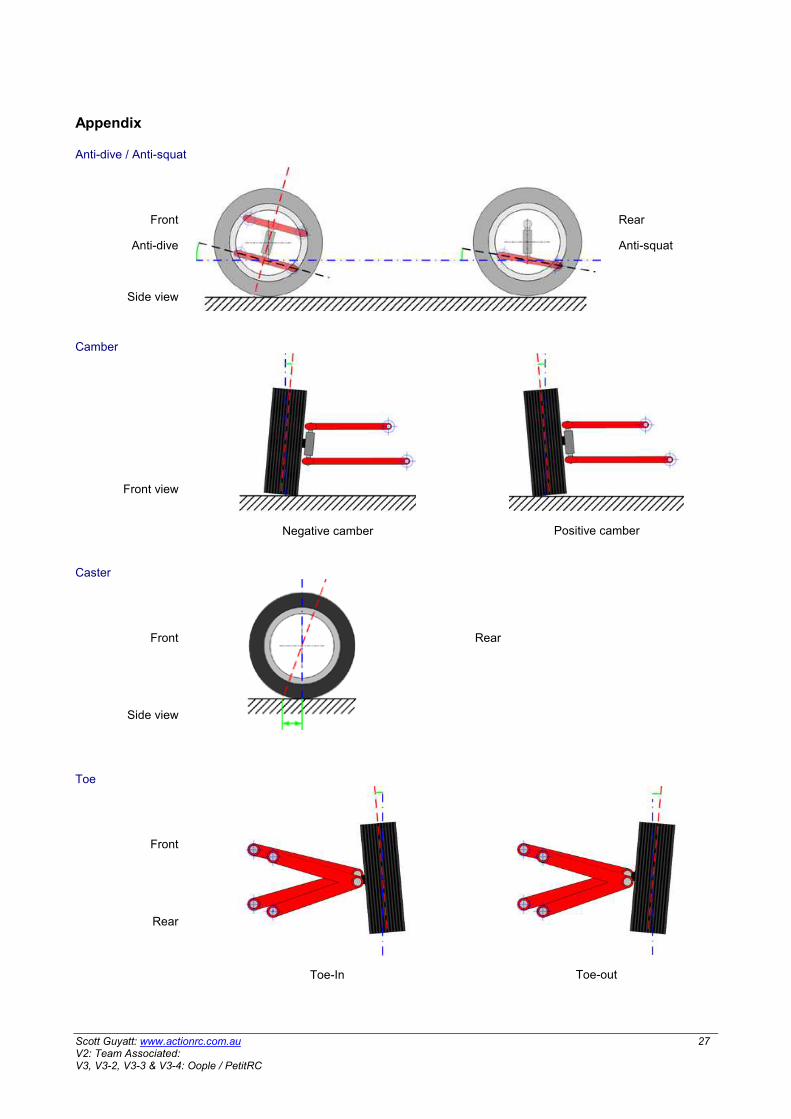
Scott Guyatt: www.actionrc.com.au 27 V2: Team Associated: V3, V3-2, V3-3 & V3-4: Oople / PetitRC
Appendix
Anti-dive / Anti-squat
Front
Anti-dive
Side view
Rear
Anti-squat
Camber
Front view
Negative camber
Positive camber
Caster
Front
Side view
Rear
Toe
Front
Rear
Toe-In
Toe-out

Scott Guyatt: www.actionrc.com.au 28 V2: Team Associated: V3, V3-2, V3-3 & V3-4: Oople / PetitRC
Ackerman angle
Picture for RC-Setup.com
Roll center
Picture for RC-Setup.com