rbs/rbsa retriever maintenance - cosasco maintenance wi... · 2017-03-13 · 5 rbs/rbsa retriever...
TRANSCRIPT

COSASCO® RBS/RBSA RETRIEVER MAINTENANCE Work Instruction
Rohrback Cosasco Systems, Inc. 11841 E. Smith Avenue
Santa Fe Springs, CA 90670 Tel: (562) 949-0123 (800) 635-6898 Fax: (562) 949-3065 www.cosasco.com PN: 741031 Rev.-

COSASCO® RBS/RBSA Retriever Maintenance Work Instruction P/N: 741031 Rev.- Scheduled Review Date: 9/1/2013
Page: 2 of 40Date: 09/01/12
COSASCO® is a registered trademarks of Rohrback Cosasco Systems, Inc. No part of this work instruction may be reproduced or transmitted in any form or by any means, electronic or mechanical, including photocopying and recording, for any purpose, without the express written permission of Rohrback Cosasco Systems, Inc.

COSASCO® RBS/RBSA Retriever Maintenance Work Instruction P/N: 741031 Rev.- Scheduled Review Date: 9/1/2013
Page: 3 of 40Date: 09/01/12
CONTENTS
Page No
1 IMPORTANT INSTRUCTIONS ............................................................................... 5
2 NOTICE ................................................................................................................... 6
3 SAFETY WARNINGS ............................................................................................. 7
4 SCOPE OF DOCUMENT ........................................................................................ 8
5 RBS/RBSA RETRIEVER MAINTENANCE ............................................................ 8
5.1 Sour Gas Service .................................................................................................... 10 5.2 Cleaning and Lubricating Without Disassembly ...................................................... 10 5.3 Retriever Disassembly ............................................................................................ 11 5.4 Retriever Assembly ................................................................................................. 25
6 SERVICING & PRESSURE TESTING OF RETRIEVAL EQUIPMENT .............. 37
6.1 Pressure Testing Procedure ................................................................................... 37

COSASCO® RBS/RBSA Retriever Maintenance Work Instruction P/N: 741031 Rev.- Scheduled Review Date: 9/1/2013
Page: 4 of 40Date: 09/01/12

COSASCO® RBS/RBSA Retriever Maintenance Work Instruction P/N: 741031 Rev.- Scheduled Review Date: 9/1/2013
Page: 5 of 40Date: 09/01/12
1 IMPORTANT INSTRUCTIONS
Rohrback Cosasco Systems is committed to providing the safest and highest quality products, services, and training for the industries it serves. We are committed to ensuring that all users of our equipment work safely and efficiently. We have designed this work instruction to emphasize safe working practices, and as much as possible, to convey the full benefit of our knowledge and collective experience in the maintenance and service of the COSASCO RBS/RBSA Retriever. This work instruction is not meant to be a sole source of instruction or training. Because these tools are used in a broad range of environments and applications, it is important that the owner and operation personnel have been assessed, certified, and deemed competent in all safety, work management and additional risk assessment requirements in the application of this procedure.
WARNING Installing, operating or maintaining a Rohrback Cosasco Systems high pressure retrieval tool improperly could lead to serious injury or death from a surge of pressure into the Retriever during retrieval (causing pistoning). Comply with all information on the product, in this work instruction, and in COSASCO System Safety Awareness Training that apply to the product. Do not allow untrained or inexperienced personnel to work with this product. Use COSASCO parts and work procedures specified in this work instruction.
BE SURE ALL PERSONNEL READ AND FOLLOW THE INSTRUCTIONS IN THIS WORK INSTRUCTION AND ALL PRODUCT WARNINGS.
Product Owners (Purchasers)
1. Use the correct product for the environment and pressures present. If you are unsure, discuss your needs with your RCS representative.
2. Inform, educate, and train all personnel in the proper installation, operation, and maintenance of this product.
3. To ensure proper performance, only competent, field experienced and trained personnel should install, operate, repair and maintain this product.
4. Save this work instruction for future reference. Product Operation Personnel (Personnel):
1. Read and understand all instructions and operating procedures for this product.
2. Follow all warnings, cautions, and notices marked on, and supplied with, this product.
3. Follow all instructions during the installation, operation, and maintenance of this product.

COSASCO® RBS/RBSA Retriever Maintenance Work Instruction P/N: 741031 Rev.- Scheduled Review Date: 9/1/2013
Page: 6 of 40Date: 09/01/12
4. To prevent personal injury, ensure that all components are in place prior to and during
operation of the product.
5. If you do not understand an instruction, or do not feel comfortable following the instructions, contact an RCS service technician for clarification or assistance.
6. If this work instruction is not correct for your RCS product, contact your regional RCS office and RCS will provide you with the requested work instruction.
7. Use only replacement parts specified by RCS. Unauthorized parts and procedures can affect this product’s performance, safety, and invalidate the warranty. “Look-a-like” substitutions may result in improper operation and may result in serious injury or death.
8. Save this work instruction for future reference.
2 NOTICE
Information provided in this work instruction should not be considered as all encompassing or suitable for all situations, conditions or environments. Each individual and the organization he/she represents is responsible for implementing the training provided and its/his/her own safety/injury/illness prevention program in connection with this work instruction, and should consult with their respective legal, medical or other advisors as to the suitability of using the information in connection with this work instruction.
Application of information furnished by this work instruction does not guarantee that the information furnished will meet applicable USA (including OSHA), United Kingdom, or any other country’s health or safety standards or requirements or, by implementing any of the programs, that you or your company will be compliant with such rules and regulations.
Rohrback Cosasco Systems, Inc., and its affiliates assume no liability arising from the use of, or reliance on the information provided in any of the RCS work instructions. Always seek the advice of your legal, medical or other advisors before using this information.
NEITHER ROHRBACK COSASCO® SYSTEMS, INC., NOR ITS INSTRUCTORS ARE RESPONSIBLE FOR THE USE BY ANY ORGANIZATION OF THIS WORK INSTRUCTION OR ANY INFORMATION CONTAINED HEREIN. ANY PERSON OR ORGANIZATION UTILIZING THIS WORK INSTRUCTION, FOR ANY PURPOSE, DOES SO AT ITS/HIS/HER OWN RISK.

COSASCO® RBS/RBSA Retriever Maintenance Work Instruction P/N: 741031 Rev.- Scheduled Review Date: 9/1/2013
Page: 7 of 40Date: 09/01/12
3 SAFETY WARNINGS
1. Safe operation requires two experienced and competent operators.
2. Do not use this retrieval equipment unless you have been trained and are competent
in its safe operation.
3. If it has been longer than 90 days since your last operation, you should review the work instruction and complete an operation on a pressurized test rig.
4. Make sure you have complied with all plant safety requirements and environmental
regulations.
5. Identify the type of media its pressure and temperature. Review material safety data information on the media prior to operation.
6. Ensure you have all the required safety equipment for the given media, "i.e. hard hat,
safety glasses, protective clothing, safety gloves, respirator, spill safety equipment, etc...
7. Any actions which could vary system pressure such as surges caused by opening and
closing of valves and chokes must be delayed until completion of retrieval operations.
8. Insure you have enough clearance for safe operation. Note wind direction prior to starting operations involving hazardous products.
9. Warning: Surface temperature may be hot. Contact may cause burn.
10. Warning: Do not exceed equipment specified pressure rating. Over-pressurization can cause equipment to fail/burst posing a variety of safety hazards.
11. Warning: Be sure to introduce pressure gradually into the tooling by opening the appropriate valve slowly. This safety measure is taken to prevent pistoning. UNCONTROLLED PISTONING MAY CAUSE SERIOUS INJURY OR DEATH!
12. Warning: Do not apply a load of more than 150 pounds, perpendicular to the Retriever body axis, to prevent breakage from bending stresses.
WARNING
It is imperative that the following safety warnings are taken into important consideration before and during use of Retrieval Equipment. Failure to follow these warnings could result in serious injury or death.

COSASCO® RBS/RBSA Retriever Maintenance Work Instruction P/N: 741031 Rev.- Scheduled Review Date: 9/1/2013
Page: 8 of 40Date: 09/01/12
4 SCOPE OF DOCUMENT
This document details the procedure for the maintenance of COSASCO RBS/RBSA Retrieval Tool. This document is not to be used as a training manual in the use of the fore mentioned equipment and is intended for use by Rohrback Cosasco Systems (RCS) trained and qualified personnel or service personnel of clients who have been assessed, certified, and deemed competent in all safety, work management and additional risk assessment requirements in the application of this procedure.
5 RBS/RBSA RETRIEVER MAINTENANCE
The standard RBSA Retrieval tool features a stainless steel outer barrel, Viton o-rings, Teflon back-up rings, and graphite-impregnated Teflon dynamic seals. They are pressure rated to 2500 psi (172 BAR) and have a maximum operating temperature of +400°F (+204°C) and meets NACE MR0175 and MR0103 standards. The standard RBS Retrieval tool features a stainless steel outer barrel, Viton O-rings and graphite impregnated Teflon seals. They are pressure rated up to 6000 psi (413 bar) and have a maximum operating temperature of +450 F (+232 C) and meets NACE MR0175 and MR0103 standards. The Retriever has four main parts as displayed below: Inner and outer barrel, mandrel and socket adapter assembly.
Inner Barrel Outer Barrel
Socket Adapter Assembly
Pressure Gauge Bleed Valve
Hammer Nut
Handle Assembly
Pilot
Outer Barrell
Mandrel Rod

COSASCO® RBS/RBSA Retriever Maintenance Work Instruction P/N: 741031 Rev.- Scheduled Review Date: 9/1/2013
Page: 9 of 40Date: 09/01/12
Retriever Diagram

COSASCO® RBS/RBSA Retriever Maintenance Work Instruction P/N: 741031 Rev.- Scheduled Review Date: 9/1/2013
Page: 10 of 40Date: 09/01/12
The maintenance interval required by either the RBSA or RBS retriever will vary depending upon the service to which it is subjected. Certain fluids will wash out all lubricant from the retriever after one retrieval; others will deposit debris in the retriever making operation difficult. If the retriever has been in use and it is anticipated not being used again for a period longer than one day, it should be completely disassembled, cleaned and lubricated. Also, if in a days operation (because of adverse retrieval environment conditions) the retriever becomes difficult to operate, feels gritty and does not stroke or turn easily, it should first be cleaned and lubricated without disassembly as indicated in Part 8.2 below. If cleaning and lubricating without disassembly does not relieve the difficulties in the retriever operation, it should be completely disassembled, cleaned and lubricated as indicated in either Part 8.3 or 8.4 of this Section. Lubricant choices are many. For a particular service, some experimentation may be necessary. Recommended lubricants are:
1. Motor Oil - (SAE 30 weight or equivalent).
2. Lubriplate (multi-purpose) - A lithium base grease; usually the best choice for most service since it is thin and applies easily. Use for service temperatures of 0° to +350°F (-18° to +177°C). Available as COSASCO 129372.
3. Synthetic lubricant - A molybdenum disulfide grease containing rust and oxidation
inhibitors. It is recommended for use in extreme pressures and temperatures (-40° to +600°F, -40° to +316°C). Available as COSASCO 201688.
5.1 Sour Gas Service
On both the RBS and RBSA retrievers, applicable materials comply with the requirements of NACE standard MR0175, "Sulfide Stress Cracking Resistant Metallic Materials for Oil Field Equipment." As stated in this standard. "Materials ... are resistant to, but not necessarily immune to (sulfide stress cracking) under all service conditions." Thus, when the retriever is used in sour environments, it must be thoroughly cleaned after use to help prevent corrosion and/or damage to internal materials.
5.2 Cleaning and Lubricating Without Disassembly
1. Extend the retriever until the socket adapter is withdrawn into the inner barrel by
approximately 1/2 inch. Place the retriever head end down on a clean surface.
2. Add solvent. Pour approximately one pint (1/2 liter) of solvent into the retriever inner barrel.
3. Collapse the retriever slowly.
4. Extend the retriever slowly. The solvent, while in the process of cleaning and flushing will remove all lubricant or at least emulsify sufficiently to make extension of the retriever difficult.

COSASCO® RBS/RBSA Retriever Maintenance Work Instruction P/N: 741031 Rev.- Scheduled Review Date: 9/1/2013
Page: 11 of 40Date: 09/01/12
5. Turn the retriever end-for-end. With the retriever head end up, let the solvent drain out.
6. Repeat steps 1 through 5.
7. Extend the retriever again as indicated in paragraph 1. The retriever head end
should again be placed down on a clean surface.
8. Pour SAE 30 weight motor oil into the retriever inner barrel (about four ounces - 100 grams).
9. Apply grease to the external surface of the retriever inner barrel.
10. Stroke the retriever. Extend and collapse the retriever until the oil and grease have
been adequately filmed on all working surfaces.
11. Test the retriever operation. If the retriever still has a gritty feel and sound after the stroking procedure indicated above, it must be disassembled for thorough cleaning and lubricating.
5.3 Retriever Disassembly
1. Loosen and remove the Mandrel Rod Stop Nut (15). Remove the Flat Washer (14).

COSASCO® RBS/RBSA Retriever Maintenance Work Instruction P/N: 741031 Rev.- Scheduled Review Date: 9/1/2013
Page: 12 of 40Date: 09/01/12
2. Loosen and remove the four 3/8” Allen Screws using a 5/16” Allen Key. Ensure the
Retriever head (10) is held in place.
3. Remove the Retriever head (10) and the Mandrel Rod Stop Washer (11).
COSASCO® RBS/RBSA Retriever Maintenance Work Instruction P/N: 741031 Rev.- Scheduled Review Date: 9/1/2013
Page: 13 of 40Date: 09/01/12
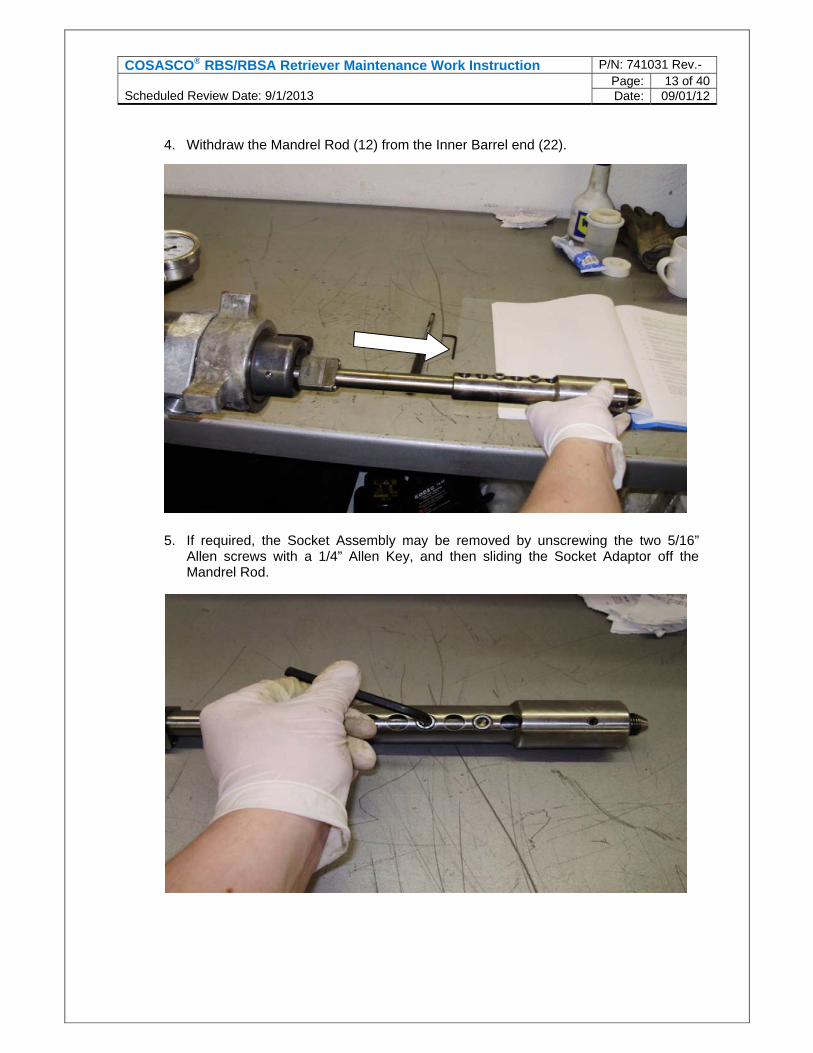
4. Withdraw the Mandrel Rod (12) from the Inner Barrel end (22).
5. If required, the Socket Assembly may be removed by unscrewing the two 5/16” Allen screws with a 1/4” Allen Key, and then sliding the Socket Adaptor off the Mandrel Rod.
COSASCO® RBS/RBSA Retriever Maintenance Work Instruction P/N: 741031 Rev.- Scheduled Review Date: 9/1/2013
Page: 14 of 40Date: 09/01/12
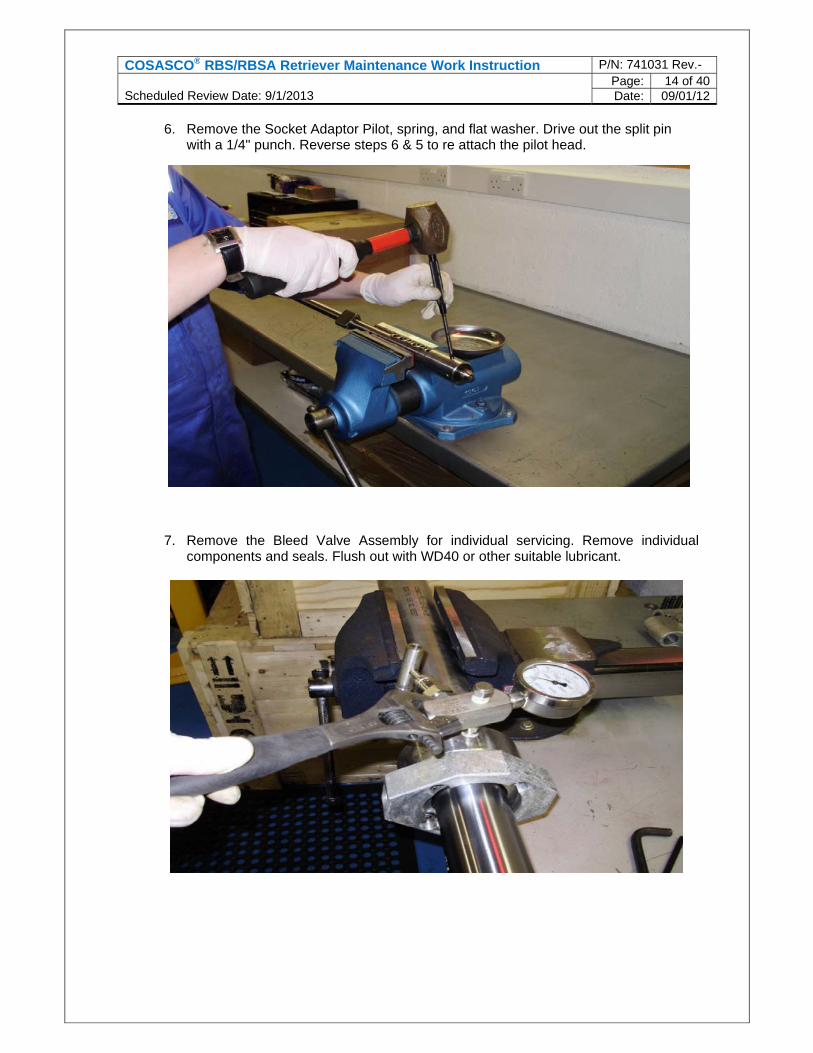
6. Remove the Socket Adaptor Pilot, spring, and flat washer. Drive out the split pin with a 1/4" punch. Reverse steps 6 & 5 to re attach the pilot head.
7. Remove the Bleed Valve Assembly for individual servicing. Remove individual
components and seals. Flush out with WD40 or other suitable lubricant.

COSASCO® RBS/RBSA Retriever Maintenance Work Instruction P/N: 741031 Rev.- Scheduled Review Date: 9/1/2013
Page: 15 of 40Date: 09/01/12
8. Withdraw Inner Barrel from Outer Barrel completely and rotate until the Bleed Valve hole and Socket Head Cap (24) hole align. Insert a 1/4” punch into the holes (should lock the Inner Barrel in place)
9. Loosen and remove the two 1/4" Allen Screws (26) which retain the Thread Adaptor
(8) by using a 1/8” Allen Key.

COSASCO® RBS/RBSA Retriever Maintenance Work Instruction P/N: 741031 Rev.- Scheduled Review Date: 9/1/2013
Page: 16 of 40Date: 09/01/12
10. Using a C Spanner in the holes provided, unscrew the Thread Adaptor (8) from the Inner Barrel.
11. Remove the Hammer Nut (7).

COSASCO® RBS/RBSA Retriever Maintenance Work Instruction P/N: 741031 Rev.- Scheduled Review Date: 9/1/2013
Page: 17 of 40Date: 09/01/12
12. Cover the Hammer Nut threads with PTFE tape and carefully slide the Inner Barrel out through the Retriever Head end.
13. Loosen and remove the four 3/8” Allen screws to remove the Seal Stop Collar.

COSASCO® RBS/RBSA Retriever Maintenance Work Instruction P/N: 741031 Rev.- Scheduled Review Date: 9/1/2013
Page: 18 of 40Date: 09/01/12
14. Gently remove the Seal Retainer and then the Seal Assembly. Care is required to prevent damaging the inner seal upon removal.

COSASCO® RBS/RBSA Retriever Maintenance Work Instruction P/N: 741031 Rev.- Scheduled Review Date: 9/1/2013
Page: 19 of 40Date: 09/01/12
15. Loosen and remove the four Allen Screws from the Socket Head Cap (24) with a 1/4" Allen Key.
16. Remove the Socket Head Cap. If difficult to remove use a pick tool or small slotted screwdriver to gently lever it off.

COSASCO® RBS/RBSA Retriever Maintenance Work Instruction P/N: 741031 Rev.- Scheduled Review Date: 9/1/2013
Page: 20 of 40Date: 09/01/12
17. Carefully remove the Seal Retainer and Seal Assembly by gently prying them out of
the Cap End. If is difficult to remove, use a pick tool to gently lever them out.

COSASCO® RBS/RBSA Retriever Maintenance Work Instruction P/N: 741031 Rev.- Scheduled Review Date: 9/1/2013
Page: 21 of 40Date: 09/01/12
18. Carefully remove the Outer Seal assembly from the cap end. If is difficult to remove, use a pick tool to gently lever it off.
19. Clean and lubricated the Inner and Outer Barrels, inspecting for damage. If chrome surfaces are damaged in a way that affects the Retrievers ability to maintain a seal, these parts may need to be replaced.
20. Clean and wipe down all other parts except the Seal Carrier Assemblies.

COSASCO® RBS/RBSA Retriever Maintenance Work Instruction P/N: 741031 Rev.- Scheduled Review Date: 9/1/2013
Page: 22 of 40Date: 09/01/12
21. Inspect all Seals and O-rings for nicks and abrasions and replace where necessary.

COSASCO® RBS/RBSA Retriever Maintenance Work Instruction P/N: 741031 Rev.- Scheduled Review Date: 9/1/2013
Page: 23 of 40Date: 09/01/12
22. To remove seals from their carriers, use a pick tool or small slotted screwdriver.

COSASCO® RBS/RBSA Retriever Maintenance Work Instruction P/N: 741031 Rev.- Scheduled Review Date: 9/1/2013
Page: 24 of 40Date: 09/01/12
23. To reinstall new seals into carriers apply a liberal amount of grease and be careful not to pinch the seals.
24. Apply liberal amount of grease to all seal retainers and along the outer surface of the
Inner Barrel.
25. Inspect Mandrel Rod for damage and clean with a suitable lubricant.

COSASCO® RBS/RBSA Retriever Maintenance Work Instruction P/N: 741031 Rev.- Scheduled Review Date: 9/1/2013
Page: 25 of 40Date: 09/01/12
5.4 Retriever Assembly
1. Gently reinsert Seal Carrier and then Seal Retainer into cap end of Inner Barrel.
Ensure seal face is facing into the barrel.

COSASCO® RBS/RBSA Retriever Maintenance Work Instruction P/N: 741031 Rev.- Scheduled Review Date: 9/1/2013
Page: 26 of 40Date: 09/01/12
2. Gently reinstall Seal Carrier onto cap end by applying even pressure to either side.
Ensure seal face is facing into the barrel.
3. Reinstall Socket Head Cap (24) again applying even pressure to either side.

COSASCO® RBS/RBSA Retriever Maintenance Work Instruction P/N: 741031 Rev.- Scheduled Review Date: 9/1/2013
Page: 27 of 40Date: 09/01/12
4. Reinstall the four Allen screws into the Socket Head Cap (24) with a 1/4" Allen Key.
5. Slide the Inner Barrel back into the Outer Barrel from the Retriever Head end.

COSASCO® RBS/RBSA Retriever Maintenance Work Instruction P/N: 741031 Rev.- Scheduled Review Date: 9/1/2013
Page: 28 of 40Date: 09/01/12
6. Apply grease to Outer Barrel Seal.
7. Gently slide seal over end of Inner Barrel (22) (spring/open end facing toward
threads).

COSASCO® RBS/RBSA Retriever Maintenance Work Instruction P/N: 741031 Rev.- Scheduled Review Date: 9/1/2013
Page: 29 of 40Date: 09/01/12
8. Gently slide seal over Inner Barrel threads.
9. Slide Seal Carrier over Inner Barrel threads.

COSASCO® RBS/RBSA Retriever Maintenance Work Instruction P/N: 741031 Rev.- Scheduled Review Date: 9/1/2013
Page: 30 of 40Date: 09/01/12
10. Gently press Seal into Seal Carrier
11. Now gently slide carrier w/seals along the Inner Barrel and into Outer Barrel.

COSASCO® RBS/RBSA Retriever Maintenance Work Instruction P/N: 741031 Rev.- Scheduled Review Date: 9/1/2013
Page: 31 of 40Date: 09/01/12
12. Install the Seal Retainer 13. Install the Seal Stop Collar (9). Re-insert the four 3/8" Allen Screws and tighten.

COSASCO® RBS/RBSA Retriever Maintenance Work Instruction P/N: 741031 Rev.- Scheduled Review Date: 9/1/2013
Page: 32 of 40Date: 09/01/12
14. Remove the thread tape from the Inner Barrel threads and clean them with a suitable lubricant.
15. Check O-ring on the Thread Adaptor for nicks or abrasions and change if necessary.
16. Reinstall Thread Adaptor onto Inner Barrel and hand tighten.

COSASCO® RBS/RBSA Retriever Maintenance Work Instruction P/N: 741031 Rev.- Scheduled Review Date: 9/1/2013
Page: 33 of 40Date: 09/01/12
17. Withdraw Inner Barrel from Outer Barrel completely and rotate until the Bleed Valve hole and Socket Head Cap (24) hole align. Insert a 1/4” punch into the holes which should lock the Inner Barrel in place.
18. Using a C Spanner in the holes provided, screw the Thread Adaptor (8) onto the Inner Barrel threads tight.

COSASCO® RBS/RBSA Retriever Maintenance Work Instruction P/N: 741031 Rev.- Scheduled Review Date: 9/1/2013
Page: 34 of 40Date: 09/01/12
19. Reinstall and screw tight the Bleed Valve Assembly.
20. Reinstall the two 1/4" Allen screws (26) which retain the Thread Adaptor (8) by using a 1/8” Allen Key.

COSASCO® RBS/RBSA Retriever Maintenance Work Instruction P/N: 741031 Rev.- Scheduled Review Date: 9/1/2013
Page: 35 of 40Date: 09/01/12
21. Reinsert the Mandrel Rod gently through the Inner Barrel end.
22. Slide on the Retriever Head (10) and the Mandrel Stop Washer (11) onto the Hex end of the Mandrel Rod.

COSASCO® RBS/RBSA Retriever Maintenance Work Instruction P/N: 741031 Rev.- Scheduled Review Date: 9/1/2013
Page: 36 of 40Date: 09/01/12
23. Align the holes on the Retriever Head and Outer Barrel end and tighten the four 3/8” Allen screws using a 5/16” Allen Key.
24. Reinstall the Mandrel stop nut (15) and flat washer (14) onto the Mandrel Rod end and tighten with a shifting spanner.

COSASCO® RBS/RBSA Retriever Maintenance Work Instruction P/N: 741031 Rev.- Scheduled Review Date: 9/1/2013
Page: 37 of 40Date: 09/01/12
25. Re check and tighten all Allen screws on the Retriever.
26. Sit the Retriever on its end and stroke the Inner Barrel to ensure smooth operation.
If not smooth flush tool with a suitable lubricant or apply more grease to the inner barrel.
27. Perform appropriate pressure test for tools operational rating in PSI.
6 SERVICING & PRESSURE TESTING OF RETRIEVAL EQUIPMENT
All Retrieval Tools and Service Valves must be pressure tested prior to use. The Field Technician using the equipment must possess current pressure test certificates for the retrieval equipment prior to commencing on-line retrievals operations. If the pipelines being worked on contain heavy debris, including, but not limited to; iron sulphide, sand, solids and iron oxide, the tool may become contaminated and difficult to use. The Field Technician will determine on a case by case basis if the tool needs to be stripped down or if it can be flushed out with either water or suitable cleaning agent without stripping the tools down. At the end of each major service visit, the tools will be stripped down, cleaned, seals replaced as necessary, re-assembled and pressure tested. See Section 7 for pressure testing procedure.
6.1 Pressure Testing Procedure
RCS Pressure Test Rig
IMPORTANT! Retriever and Service Valve must be pressure tested prior to use to ensure safe operation of tools!

COSASCO® RBS/RBSA Retriever Maintenance Work Instruction P/N: 741031 Rev.- Scheduled Review Date: 9/1/2013
Page: 38 of 40Date: 09/01/12
All Retrieval Tools and Service Valves must be pressure tested prior to use. The Field Technician using the equipment must possess current pressure test certificates for the retrieval equipment prior to commencing on-line retrievals operations.
1. Fit the Service Valve to the access fitting on the pressure test rig by placing the hammer nut end of the valve onto the sealing face of access fitting.
2. Turn the hammer nut clockwise down the external acme thread until the Service Valve is securely seated to the access fitting body.
3. Tighten the hammer nut using a brass or equivalent non sparking hammer. 4. Check that the bypass valve on the Service Valve is closed and the atmospheric
bleed valve(s) is open. 5. The Back Pressure pump should be filled with hydraulic oil and a connecting hose
(of a suitable pressure rating) used to connect the pump outlet to the quick coupler inlet fitted to the test rig.
6. With the pump on "Pressure Hold” and at its low-pressure setting (the button on
the right hand side of the pump body pulled out) hand pump the oil into the pressure test rig, ensuring the isolating valve is opened.
7. Continue pumping until all air is displaced from the atmospheric bleed valve. 8. Continue pumping and during a pump action, close the atmospheric bleed valve. 9. Stop pumping once the oil level has passed the main (bottom valve if testing a
double isolation valve) ball valve and close it. 10. Re-commence pumping and pressurize the assembly to the pressures stated in
step 11. Leave pressurized for 15 minutes during each stage and observe that there is no pressure drop on the pressure test rig gauge.
Note - There may be some drop in pressure during the 15 minute test period due to the compression of air still in the system and also due to water being drawn back into the hand pump. If any pressure loss is due to leakage, this will be visible and immediately apparent.
1. Pressure test the equipment to the following pressures:
5% of pressure rating of equipment. 10% of pressure rating of equipment. 20% of pressure rating of equipment. 50% of pressure rating of equipment. 100% of pressure rating of equipment. 150% of pressure rating of equipment.
IMPORTANT! Retriever and Service Valve must be pressure tested prior to use to ensure safe operation of tools!

COSASCO® RBS/RBSA Retriever Maintenance Work Instruction P/N: 741031 Rev.- Scheduled Review Date: 9/1/2013
Page: 39 of 40Date: 09/01/12
2. After completing all six tests in step 11, release pressure in the hydraulic pump by
turning the pressure hold screw on the left hand side of the pump towards "Pressure Release". Note: this process must be repeated for the top ball valve when testing a double isolation model.
3. Ensure the main (or both) ball valves are opened and place the Retriever tool onto
the Service Valve. Turn the hammer nut union in a clockwise direction. 4. Tighten the hammer nut using a brass or equivalent non sparking hammer. 5. Ensure the bleed to atmosphere valve(s) on the Service Valve is closed and the
Retriever bleed to atmosphere valve is opened. 6. With the hydraulic pump on "Pressure Hold” and at its low-pressure setting (the
button on the right hand side of the pump body pulled out) hand pump the oil through the Service Valve and into the retrieval tool, ensuring the isolating valve is opened.
7. Continue pumping until all air is displaced from the Retriever atmospheric bleed
valve. 8. Continue pumping and during a pump action, close the Retriever atmospheric
bleed valve. 9. Continue pumping and pressurize the assembly to the pressures stated in step 11.
Leave pressurized for 15 minutes during each stage and observe that there is no pressure drop on the pressure test rig gauge. Note: There may be some drop in pressure during the 15 minute test period due to the compression of air still in the system and also due to water being drawn back into the hand pump. If any pressure loss is due to leakage, this will be visible and immediately apparent.
10. During each stage the Retriever requires to be stroked to check the integrity of the
seals over the full travel of the outer barrel. 11. Repeat step 12. 12. Check both the pressure gauges on the test rig and retrieval tool are at zero and
drain off any residual fluid trapped in the retrieval tool and Service Valve. 13. Remove both the retrieval tool and Service Valve from the test rig. 14. Complete a pressure test certificate for both the Retriever and the Service Valve
and file these in the dedicated maintenance folder for each tool. 15. A scanned copy of the original should also be filed accordingly.
Note - There may be some drop in pressure during the 15 minute test period due to the compression of air still in the system and also due to water being drawn back into the hand pump. If any pressure loss is due to leakage, this will be visible and immediately apparent.

Rohrback Cosasco Systems [email protected] www.cosasco.com
Contact Us Corporate Office and Manufacturing Facility Rohrback Cosasco Systems 11841 E. Smith Avenue Santa Fe Springs, CA 90670 USA Toll Free: +1-800-635-6898 Phone: +1-562-949-0123 Regional Office Locations Rohrback Cosasco Systems UK Ltd Units 1 & 2, Technology Centre, Aberdeen Science & Energy Park, Claymore Drive, Bridge of Don, Aberdeen AB23 8GD Phone: +44 (0) 1224 825500 Rohrback Cosasco Systems Inc. Northgreen Business Park 1408 N. Sam Houston Parkway E, Suite 146, Houston, TX 77032 Phone: +1-281-219-8200 Rohrback Cosasco Systems Pte Ltd 51 Goldhill Plaza #14-07/08 Singapore 308900 Phone: +65 6255 2822 Rohrback Cosasco Systems PTY Ltd Level 1, 39 Cedric Street Stirling, Perth, WA 6021 Australia Phone: +61 8 94432396 Rohrback Cosasco Systems China Corporation Room 1008, Tianchen Plaza Yi-12 Chaoyangmen North Street Dongcheng District, Beijing, P.R.China 100020 Phone: +86-10-6551-6135 Cosasco Canada Ltd 2113 84th Avenue Edmonton, Alberta, T6P 1K1 Phone: (780) 467-0949