raspberry pi - stormingrobots.com · raspberry pi last update july 26th, 2019 page 9 of 95 i - 2)...
TRANSCRIPT

Raspberry PI
Last update July 26th, 2019 Page 1 of 95
W E L C O M E T O
R A S P B E R R Y P I

Raspberry PI
Last update July 26th, 2019 Page 2 of 95
Table of Contents
SECTION I - AT STARTUP 7
I - 1) about your Raspberry Pi 3 8
I - 2) Do’s and Don’ts: 9
I - 3) Put the Adafruit case on 10
I - 4) Download the software you need 11
I - 4.A) Steps to install 11
I - 5) Collect your Hardware: 12
I - 6) Let’s connect to the PI like a PC 14
I - 6.A) Startup with default Xsession Desktop 14
I - 6.B) Configuration 14
I - 7) What if you forgot your password? 16
I - 8) Software (coming with Raspbian) that we use 17
I - 8.A) Confusion about the type of CPU architecture: 17
I - 9) Headless connection 18
I - 9.A) Connect to the PI via an ethernet cable 18
I - 9.B) Connect to the PI via an ethernet cable, but access network as well. 18
I - 9.C) Connect your PC to Adafruit console cable 18
SECTION II REMOTE ACCESS 19
II - 1) Remote Access Via SSH (Secure Shell) 20
II - 1.A) Should know about what an IP address is: 20
II - 1.B) Find your PI 20
II - 1.C) Setup up your SSH from your PC 22
II - 1.D) Remote Copy with “pscp.exe” 23
II - 2) Remote Access via VNC 23
II - 2.A) To run VNC client from desktop 23

Raspberry PI
Last update July 26th, 2019 Page 3 of 95
II - 2.B) Enable copy and paste between PI and desktop via VNC viewer 24
II - 2.C) To start and kill connection 24
II - 2.D) To make a certain resolution to be your default VNC client window: 25
II - 2.E) Issues in starting up: 26
II - 2.F) Auto-boot with VNCserver 26
II - 3) Recognize Your Own PI by hostname instead of IP address 27
II - 3.A) In order to be able to ping your PC from your PI: 27
II - 3.B) In order to be able to ping your PI from PC: 27
II - 3.C) Now, you can setup ssh session using IP address or Hostname: 27
SECTION III - BASICS IN THE LINUX OS THAT YOU SHOULD KNOW 29
III - 1) Know about the File system structure 30
III - 1.A) The Folders that you must know 30
III - 1.B) About Files/folders 32
III - 2) Basic Shell Commands You should know 34
III - 2.A) Handy Examples of Process Control 35
III - 2.B) More elaborated commonly used Commands 36
III - 3) Customize your PI Shell environment 37
III - 3.A) Convenient aliases 37
III - 3.B) Change the Prompt Color: 37
III - 3.C) Change the Prompt 38
III - 3.D) make them default for each login 38
III - 4) To do Backup 39
III - 5) Send email 40
III - 6) Miscs 41
III - 6.A) Installing word processing software 41
III - 6.B) Console cable to your PC : 41
SECTION IV – BE YOUR OWN PI ADMINISTRATOR 42

Raspberry PI
Last update July 26th, 2019 Page 4 of 95
IV - 1) Using Text Editor 43
IV - 1.A) Nano 43
IV - 2) Kate 43
IV - 2.A) Vim Editor (not vim-tiny) 44
IV - 2.B) Crash Course to learn Vim 44
IV - 3) Crash Course on writing Script 50
IV - 3.A) The minimal that you should know 50
IV - 3.B) Task Scheduling 51
IV - 3.C) Write your first script. 52
IV - 3.D) Basics stuff with Standard Input/Output 53
IV - 3.E) Basics about String 53
IV - 3.F) Basics in Control Structure 54
IV - 3.G) Numeric Calculation and comparision 57
IV - 3.H) Strange thing about the scope rule on variables 58
IV - 3.I) Strange thing about getting return value from function 59
IV - 3.J) Common errors in parsing 60
IV - 3.K) Scripts Samples 62
IV - 4) Basic Commonly Used System Task control 66
IV - 4.A) Shutdown/reboot 66
IV - 4.B) Start a new bash terminal 66
IV - 5) System default files that you may be more likely to deal with 66
SECTION V – USING GPIO UTILITY 68
V - 1) GPIO pin layout 69
V - 2) Types of signals 70
V - 3) GPIO with WiringPI 71
V - 4) Some basic GPIO script commands 72
V - 5) Using GPIO Pins 73

Raspberry PI
Last update July 26th, 2019 Page 5 of 95
V - 5.A) turn on a LED 73
V - 5.B) Dimming a LED with PWM pin 74
V - 5.C) turn on/off a LED with push button 75
V - 6) know how to read resistors (Ohm's Law) 76
V - 7) GPIO with Python (after intro to python) 78
V - 7.A) Turn On/Off LED using push button with python 78
SECTION VI – PROGRAMMING – I2C INTERFACE 82
VI - 1) What you need to know first? 83
VI - 1.A) Know your binary vs hexadecimal 83
VI - 1.B) What is I2C? 84
VI - 1.C) How and Where to look up the I2C addresses information for a particular
device 85
VI - 1.D) Hook up an i2c device 85
VI - 1.E) I2C Configuration 86
VI - 1.F) I2C Detection 86
VI - 2) Program to communicate with the I2C Device 88
VI - 2.A) Open Connection to the device 89
VI - 2.B) Ioctl – device driver setup 89
VI - 2.C) Read and Write 90
VI - 2.D) Steps To take before start programming with an I2C device: 91
VI - 2.E) Sample Segment to communicate with the Mindensors light array 92
VI - 3) Challenge - Build your own I2C library 94

Raspberry PI
Last update July 26th, 2019 Page 6 of 95
PREFACE
Scope of this document:
Meant for:
- Connect to PI (model 3) as its own computer.
- Perform basic system tasks to administer your PI yourself.
- Know about Linux File System
- Work with GPIO with sensors
- Work with I2C device interface kernel mode programming
Internal References:
- Explore IOT
- Overview of Python for C/C++ programming including basics data structure and numpy
- Learn about OpenCV
External References:
- Programming in Python
- Official Python Documentation
- Official Python Comprehensive Tutorial
- Official comprehensive documentation for Numpy
- Detailed list of functions, modules, and objects included in NumPy

Raspberry PI
Last update July 26th, 2019 Page 7 of 95
SECTION I - AT STARTUP
next>>
At the end of this section, you should learn:
- How to set up PI
- Installing your PI OS
- Basic Configuration
- Do’s and Don’ts to minimize burning your PI

Raspberry PI
Last update July 26th, 2019 Page 8 of 95
I - 1) ABOUT YOUR RASPBERRY PI 3
Image from Unipi.technology
⎯ Wifi – about 150 mbps; Bluetooth enabled
⎯ Armv8 (4-CPUs) (See the bottom of this section for more details.)

Raspberry PI
Last update July 26th, 2019 Page 9 of 95
I - 2) DO’S AND DON’TS:
⎯ Use quality USB Wire.
⎯ Use good-quality power supply that can supply at least 1A at 5V for the Model 3B. If you Pi reboots itself
mysteriously, it can be a symptom of poor quality power supply.
⎯ Watch out for fake micro SD (Secured Digital) card. It has been reported that about 1/3 of the SanDisk micro
SD products are fake. Download the utility H2testw, written by Harald Bögeholz, to verify.
⎯ ALWAYS do graceful shut down on your Raspberry Pi before powering it off.
⎯ Type sudo showdown now and wait for the Pi to signal it is ready to be powered off by flashing the activity
LED.
⎯ Just make sure you discharge yourself by touching the metal work on something like a PC, which should be
earthed. In practice it is very unlikely to happen. Take mild measure anyway, such touch a grounded object
before touching the RPi, such as the metal area
⎯ Avoid working on carpets. Avoid wearing synthetic clothing, such as made of nylon, fleece.
⎯ Other common sense, such as keep away from moisture, do NOT putting it in your pocket, etc.. . Do not go
around rubbing your feet on the carpet then go touch your PI.
⎯ Use the stated power source – 5V/1A to 2A. Minimum 1A. If using additional devices such a CAM, you will
need at least 2A.

Raspberry PI
Last update July 26th, 2019 Page 10 of 95
I - 3) PUT THE ADAFRUIT CASE ON
side view (on the html side)
Top View
side view (on the microSD card slot side)
Work on the bottom plates first. (on gpio pins side)
Work on the top plates after. (on htmi side)

Raspberry PI
Last update July 26th, 2019 Page 11 of 95
I - 4) DOWNLOAD THE SOFTWARE YOU NEED
At your desktop/laptop:
a) Download 7-Zip 16.04 (2016-10-04) for Windows: http://www.7-zip.org/download.html
b) Download the OS Image – Raspbian : https://www.raspberrypi.org/downloads/
Two various downloads. We will download the Raspbian.
Raspbian – the OS NOOBS (Out Of the Box Software)
1) Just the OS with most other basic tools that
we need.
2) Use 7zip to unzip to a *.img
3) Use win32 disk Imager to unpack the entire
packet
4) Copy to the SD Card
5) Expand File system . Otherwise, you are
limited to use 4G
Easy OS Installer which contains Raspbian
already and other selections as well.
NOOBS Lite – does not have Raspbian pre-
loaded
This is pretty big installation. Therefore, we
prefer just installing Raspbian.
c) Download the Win32DiskImager utility from the Sourceforge Project page,
https://sourceforge.net/projects/win32diskimager/, as a zip file; you can run this from a USB drive.
d) For remote access from your computer
- Download vnc for remote access with somewhat gui interface.
- Download putty for ssh (secured shell) remote access for command line interface. We will use
putty.exe, pscp.exe (file copy).
I - 4.A) STEPS TO INSTALL
There are two tools you can choose from :
⎯ Win32Diskimager; OR
⎯ Etcher
If using Win32Diskimager
1. Unzip Win32DiskImager tool to install (write) the OS images onto the SD Card.
2. Insert the SD card into your SD card reader and check which drive letter was assigned. Should not be C: , nor
D:, as usually C: or D: may have been designated as the system drive for Windows OS running on your
desktop/laptop, NOT for the Linux.
3. Extract the executable Win32DiskImager utility executable and run it. You may need to run this as
administrator. Be careful. Now, you are running it as an administrator, that means you may be able to over-
write system files.

Raspberry PI
Last update July 26th, 2019 Page 12 of 95
4. Select the image file you extracted earlier.
5. Important: Select the drive letter of the SD
card in the device box. Be very careful! This
will overwrite the drive. If you are using an SD
card slot in your computer and can't see the
drive in the Win32DiskImager window, try
using an external SD adapter.
6. Click “Write” and wait for the write to
complete.
7. Exit the imager and eject the SD card.
If using Etcher :
Very intuitive gui-based installation. This runs
faster because it burns Raspberry Pi images
without even extracting them.
At dialog window, Click “Flash”, i.e. write . ( “Flash”
is a generic or commonly term used in embedded
system world, such as your SSD, USB Flash drive -
reprogrammable non-volatile memory, etc. )
I - 5) COLLECT YOUR HARDWARE:
To start, we will use this setup. We will explore others later.
While you can use ethernet connection, it is not covered in this document. We’ll first connect PI directly to the
monitor, mouse and keyboard.
5V/2A (usb micro) power source
HDMI cable
Both usb

Raspberry PI
Last update July 26th, 2019 Page 13 of 95
1. Monitor, recommend to use HDMI cable. No separate audio lead is necessary if you're using an HDMI cable
to connect to a monitor with speakers. Otherwise, you will need special configuration – see
https://www.raspberrypi.org/documentation/configuration/audio-config.md. We will not work on this
configuration. It is up to you to explore.
2. USB keyboard
3. USB mouse
4. Micro SD card . a micro SD card reader for your computer
a. Minimum 8G. Recommend 16G or above.
b. Interesting fact about SD card speed : class 4 card will be able to write at 4MB/s, whereas a class 10
should be able to attain 10 MB/s. However, a class 10 card may not always outperform a class 4 card
for general usage. This is because often class 10’s write speed is achieved at the cost of read speed.
Therefore, for general usage when there may be a lot of ‘read’s, class 10 card may actually require
increased seek times.
5. Raspberry PI Model 3.
6. Power supply with micro usb adaptor – the Power source – e.g. AC 5V mini-USB adaptor or a USB 5V/1A
or 2A power bank. However, do not plug this in until after you have all above components are in and ready
to boot up your PI.
Ready to Boot your PI
Now, you are ready to boot up. Connect all hardware, before the power cable.
Pi will automatically boot up with a lxsession desktop This is a session starter and manager for standard LXDE
desktop Terminal by default.
LXDE == Lightweight X11 Desktop Environment

Raspberry PI
Last update July 26th, 2019 Page 14 of 95
I - 6) LET’S CONNECT TO THE PI LIKE A PC
In order to keep things within the scope of this tutorial, we will have cover only two main methods regarding
hookup. For more details, you should reference: https://pihw.wordpress.com/guides/guide-to-ways-to-connect-to-
a-raspberry-pi
*** Power your PI : External power source for your PI.
Remember : red LED on means power on. Green LED on or blinking mean PI OS is running. Even after you do a
graceful shutdown, you must wait until it finishes up blinking before unplugging your power source.
I - 6.A) STARTUP WITH DEFAULT XSESSION DESKTOP
⎯ Connect your hardware as shown in Section I.3.
⎯ PI boots up a default window created by lxsession.
⎯ Set up your wi-fi connection (ask instructor which network & keyword to login).)
⎯ Test it :
⎯ This is a gui-based remote access method. Unless you need to have browse network, you may want to use
SSH method if you have slow network.
I - 6.B) CONFIGURATION
About raspi-config
Enable features such as the camera, and change your specific settings
such as keyboard layout, time zone, etc.. Go ahead to read thru what
are available, and navigation around. Do not change anything yet.
For now, do the following:
⎯ Expand File System
⎯ Enable I2C, SSH, VNC
⎯ Check out your locale | keyboard.
Expanding filesystem.
May also do this via or terminal.
sudo raspi-config

Raspberry PI
Last update July 26th, 2019 Page 15 of 95
Check other defaults:
Some Defaults that you should know:
⎯ hostname = raspberrypi
⎯ User name = pi
⎯ password = raspberry
May change hostname
o by simply changing it thru the raspi-config. Or, you may edit /etc/hostname, if you are more
familiar with the network setup yourself.
o another host can only recognize your PI with your own IP address, not host name.
o Caution: Making other hosts recognizing your PI by its hostname is outside scope of this tutorial.
You should not attempt to do this until you are much more familiar with editor in Linux, backup,
having some level of networking knowledge. Otherwise, you may mess up so badly that you cannot
access your PI via network at all. If that is your case, unless you are familiar with the network
setup, it may be much easier to rebuild your OS – i.e.. go thru the step to install the Linux back on.
o Will talk more about hostname recognition in the later section.
If you want to back up and share content from anywhere on your local network, you will need to install
Samba file server.
sudo apt-get install samba
May change your password:
⎯ passwd pi
o Make sure you remember your password as having to reset it is a hassle. (Do NOT do it now).
o If you are using the PI belonging to SR, Do not change the username and password.!
Get update : (Skip this at workshop)
SKIP this . if you are doing workshop with us.
Do the following ONLY If . you set up a new installation at home:
check all the update:
⎯ Type sudo apt-get update
⎯ Type sudo apt-get upgrade
⎯ Reboot.
a) Now, you are ready to go.
b) If you are setting up your own Pi, you may change both the hostname and password via multiple ways.
Unless you are familiar with Linux configuration, you should just use the raspi-config.

Raspberry PI
Last update July 26th, 2019 Page 16 of 95
I - 7) WHAT IF YOU FORGOT YOUR PASSWORD?
To reset if you are still connected to the pi :
$ start terminal
$ sudo passwd pi
What if you are not connected to the pi, and forgot your password; or X-window fails to autostart for some
reason?!
You will need to make your PI to boot in single user mode:
1) Power down your PI. .
2) Take micro SD card (Secured Digital) out and Read it via a computer
3) Highly recommend to use notepad++ to do the following edit. Edit cmdline.txt and add “init=/bin/sh” to
the end of the file. IMPORTANT: Do not enter this at a different line, or enter any line-break. This allows PI
to boot in a single user mode. The content should like similar to this:
dwc_otg.lpm_enable=0 console=ttyAMA0,115200 console=tty1 root=/dev/mmcblk0p2
rootfstype=ext4 elevator=deadline rootwait init=/bin/sh
4) Watch out for: If you use notepad, the file may look a bit strange. This is because Unix-line-break = 0x0a,
while Window-line-break=0x0d0a. Your expected line break will show up in notepad++.
5) Return the SD card back to your PI and power back on. (in this order)
6) Type in the following at the prompt (if you do not see any, hit enter key):
> mount -rw -o remount /
> passwd pi
Then, type in your new password.
Then:
> sync
> exec /sbin/init
⎯Return to multi users mode:
1) Type “exit” to leave - Graceful shutdown your PI. Then, Remove power code . (MUST be in this order)
2) Take SD card out and Read it via a computer
3) Remove the “init=/bin/sh” from the cmdline.txt file.
Software changes overtime. Therefore, if you still have trouble login, visit www.raspberrypi.org for advice.
For more details : https://pihw.wordpress.com/guides/direct-network-connection/super-easy-direct-network-
connection/

Raspberry PI
Last update July 26th, 2019 Page 17 of 95
I - 8) SOFTWARE (COMING WITH RASPBIAN) THAT WE USE
This is just a heads-up. We will cover these later.
1. Terminal – administrative stuff with Linux
2. GPIO : Raspberry Pi 3
3. Basic I2C programming - kernel mode programming
4. Link to a Python for C/C++ crash course
There are others - https://www.raspberrypi.org/documentation/usage/
I - 8.A) CONFUSION ABOUT THE TYPE OF CPU ARCHITECTURE :
To check the CPUs architecture, you may run any of the following commands:
lscpu
or
cat /proc/cpuinfo
or
uname -a
To build software with 64-bit mode:
-mcpu=cortex-a53
http://elinux.org/RPi_Distributions#Available_ARMv6_Distributions

Raspberry PI
Last update July 26th, 2019 Page 18 of 95
I - 9) HEADLESS CONNECTION
Connect your PI or laptop remotely – go to "REMOTE ACCESS VIA SSH". …
I - 9.A) CONNECT TO THE PI VIA AN ETHERNET CABLE
NOTE: We will not use this configuration throughout the workshop. This is here only for your reference.
What you need:
⎯ This is probably the simplest setup. Need power source, such as the AC adaptor or USB power bank with
minimum 1A output.
⎯ Advantage: You can work on your PI directly hook up to your PC. No additional peripherals are necessary.
⎯ Connect ethernet cable to your PC with the PI.
⎯ Access your PI via SSH or VNC.
⎯ Disadvantage: You will not have internet access; unless you will change the network setup to enable it to
channel thru the internet access via your PC.
I - 9.B) CONNECT TO THE PI VIA AN ETHERNET CABLE , BUT ACCESS NETWORK AS
WELL .
We will skip this now. This setup requires more knowledge in networking. You will need to modify the network
share setup on your Windows, as well as may need to modification to your /etc/network/interfaces.
I - 9.C) CONNECT YOUR PC TO ADAFRUIT CONSOLE CABLE
This sounds nice that you can use laptop’s email and screen as the peripheral devices instead. However, some
reported issues with Windows 8, 10. Therefore, we’ll skip this as well.

Raspberry PI
Last update July 26th, 2019 Page 19 of 95
SECTION II REMOTE ACCESS
<< prev next>>

Raspberry PI
Last update July 26th, 2019 Page 20 of 95
II - 1) REMOTE ACCESS VIA SSH (SECURE SHELL)
Wireless Connection to the PI from your own computer via a software called SSH.
Advantage: You can remotely connect to your PI anywhere within your network domain.
If you have yet done so, you need to Install Putty software. Download putty.exe: http://www.putty.org/ . Get the
official version.
I I - 1.A) SHOULD KNOW ABOUT WHAT AN IP ADDRESS IS :
⎯ Stands for "Internet Protocol” for short.
⎯ Stands for “Transmission Control Protocol/Internet Protocol” = TCP/IP for long.
⎯ Is a unique, and universal number address for your network device, such your network card in your PC.
⎯ Consists of four numbers, one to three digits each. Each number ranges from 0 to 255, such as
192.168.42.100.
⎯ Can be dynamic, and static.
⎯ Can be one of 4 classes, A, B, C, D
o class A : 1-127 : loopback, such as 127.0.0.1
o Class B : 128 – 191 :
o Class C : 192 – 223
o Class D : 224 – 239 : for multicasting
⎯ 10.x.x.x , 127.16.x.x – 17.31.x.x , 192.168.x.x are commonly referred to as "non-routable" addresses
⎯ Network commands you should know:
Ipconfig ; ping | nmap
⎯ More Network commands you less likely use, but useful:
arp -a | nsloopkup | tracert
I I - 1.B) F IND YOUR PI
You will need to find the IP address of your PI.
You may do this via one of the following methods:
a) Find it right at the PI using the utility “ifconfig”.
If you directly access your PI which is connected to the monitor, keyboard, at your PI, type:
Ifconfig

Raspberry PI
Last update July 26th, 2019 Page 21 of 95
You will see something like this:
The IP address of your PI is : 10.0.0.190.
b) From cell phone app
But what if you are not directly hooked up to the PI?
You will have to find its IP address by using some kind of network scanning tool.
I find the software app “Fing” very handy and fast. You will need to download that app onto your
cell phone.
c) From your PC:
Although this is not the ideal way, this is worth to mention: Find the IP address in 2 steps:
Step 1)
c:\mypc\> Ipconfig | find "Default Gateway"
e.g, Default Gateway . . . . . . . . . : 10.0.10.1
Step 2) scan for all reachable host from your computer:
c:\mypc\> nmap -sP 10.0.0.1/24
You will see a list of IP addresses .. Find the one said “raspberry”.
e.g. Nmap scan report for raspberrypi.fios-router.home (10.0.0.26)
Host is up (0.043s latency).
wlan0: flags=4099<UP,BROADCAST,MULTICAST> mtu 1500
inet 10.0.0.190 netmask 255.255.255.0 broadcast 10.0.0.255

Raspberry PI
Last update July 26th, 2019 Page 22 of 95
I I - 1.C) SETUP UP YOUR SSH FROM YOUR PC
Runs Putty.exe
Remote SSH window will pop up:
Login: pi Password: raspberry
More Detailed Reference: https://www.raspberrypi.org/documentation/remote-access/ssh/README.md.
Set up Preference via SSH
Configuration Via ssh
From PI command line :
$ sudo raspi-config
More details: https://www.raspberrypi.org/documentation/linux/usage/users.md
Save the connection with a name
This will allow you to do a “load”
next time you login via putty.
You can set your terminal color here.

Raspberry PI
Last update July 26th, 2019 Page 23 of 95
I I - 1.D) REMOTE COPY WITH “PSCP .EXE”
Copy file from Windows to PI
➢ pscp <source file> <username>@<ipaddress>:<full path to the target file>. E.g.
pscp ip.txt [email protected]:/home/pi/
Pull file down to Windows from PI
➢ pscp - <username>@<ipaddress>:<full path to the source file> <target location to windows>
pscp [email protected]:/home/pi/misc/ti2c.c c:\temp\
Copy file from PI to Windows (issuing copy from PI side)
In order to do so, you must have a daemon/ ssh-server(service) running at the window side. This is really
not a secured thing to do anyway. So, we skip this.
II - 2) REMOTE ACCESS VIA VNC
I I - 2.A) TO RUN VNC CLIENT FROM DESKTOP
⎯ Download vnc client app to your PC from https://www.realvnc.com/download/viewer/windows.
⎯ After download and extract, best is to add a shortcut on your desktop to conveniently connect to it. (default
login: pi pwd : raspberry)
10.0.0.42 : 1
This is a sample PI’s IP address. See the “Find
IP Address” section in this document to see
how you may find your PI’s address.
By default, it is with “:0” as soon as you start
up vncserver process from your PI.

Raspberry PI
Last update July 26th, 2019 Page 24 of 95
I I - 2.B) ENABLE COPY AND PASTE BETWEEN PI AND DESKTOP VIA VNC VIEWER
In order to copy and paste between local desktop and the VNC Terminal window to the PI
sudo apt-get install autocutsel
vi ~/.vnc/xstartup: or use nano to edit
#!/bin/sh
xrdb $HOME/.Xresources
xsetroot -solid grey
autocutsel -fork
# Fix to make GNOME work
export XKL_XMODMAP_DISABLE=1
/etc/X11/Xsession
vncconfig -nowin &
I I - 2.C) TO START AND KILL CONNECTION
To restart the service: e.g:
vncserver :1
To allow another “independent” vnc client, e.g. id 4
vncserver :4
To start the vnc terminal window with a specific size:
vncserver :1 -geometry 1024x768
This will start display #1 with the stated resolution. If you do that, at your VNC client (your desktop/laptop),
you should connect as :

Raspberry PI
Last update July 26th, 2019 Page 25 of 95
If you need to kill one of the connections, best is to kill the vnc server process with the display #.
First to find out what is running :
ps -ef | grep -I vncserver
You may see:
pi 4932 4843 0 09:50 ? 00:00:00 /usr/bin/vncserverui virtual 14
pi 4966 4932 0 09:50 ? 00:00:00 /usr/bin/vncserverui -statusicon 5
pi 8578 483 2 11:09 ? 00:00:00 /usr/bin/vncserverui service 19
pi 8593 8578 0 11:09 ? 00:00:00 /usr/bin/vncserverui -statusicon 5
Let’s say, you want to kill the vncserver process with the particular id:
e.g. for display #1 :
vncserver –kill :1
I I - 2.D) TO MAKE A CERTAIN RESOLUTION TO BE YOUR DEFAULT VNC CLIENT
WINDOW :
At your PI:
sudo raspi-config
⎯ Advanced Option
⎯ Resolution
⎯ Reboot now
10.0.0.42 : 1
This is a sample PI’s IP address. You need to
find yours from “ifconfig” . See the “Find IP
Address” section in this document.
By default, it is with “:0” instead as soon as
you start up vncserver process from your PI.

Raspberry PI
Last update July 26th, 2019 Page 26 of 95
I I - 2.E) ISSUES IN STARTING UP :
1) What if the copy and paste between vnc terminal window and desktop does not work? You may need
to reinstall tightvncserver, reboot it, and again.
sudo apt-get install tightvncserver
sudo raspi-config # you have yet done so, enable VNC.
tightvncserver # start the services as yourself, not root. or
vncserver :1 # start server on PI for display #1.
Note: (vncserver is a softlink to tightvncserver )
-rwxr-xr-x 1 root tightvncserver
lrwxrwxrwx 1 root vncserver -> /etc/alternatives/vncserver
lrwxrwxrwx 1 root /etc/alternatives/vncserver -> /usr/bin/tightvncserver
2) any issue in startup If the vnc or viewer won’t connect, look into the log file in ~/.vnc/*.log for possible
error messages.
3) Possible window id changing “:1”, kept then “:2”, etc. , even when you did not server the vnc service up
with the particular id #. Every additional instance of vncserver process will automatically associate a new
terminal id. For example, if “:1” already exists, it will start with “:2”, etc. Do “ps -ef | grep -i vncserver” to
find out. You probably have some left over corruption, eg. vncsrever app killed abruptly killed, etc. To
resolve this, rm -rf /tmp/.X11-unix/ . Remove all or just remove the unwanted ones.
I I - 2.F) AUTO-BOOT WITH VNCSERVER
Edit ~/.config/autostart/vnc.desktop
This file should contain:
[Desktop Entry]
Type=Application
Name=TightVNC
Exec = /usr/bin/vncserver :1 -geometry 1920x1080 -depth 24 -dpi 96
StartupNotify=false

Raspberry PI
Last update July 26th, 2019 Page 27 of 95
II - 3) RECOGNIZE YOUR OWN PI BY HOSTNAME INSTEAD OF IP ADDRESS
I I - 3.A) IN ORDER TO BE ABLE TO PING YOUR PC FROM YOUR PI:
E.g. your laptop name is “mythinkPad” with IP address : 10.0.0.42
At PI, edit the /etc/hosts.
10.0.0.42 mythinkPad
So, you can refer to your laptop from your PI by the hostname, instead of the IP address.
May want to read about hosts.deny and hosts.allow. Pretty obvious what they are for!
In order to ping your PI from your PC :
At PI, install at your PI:
$ sudo apt-get -y install samba
Now, you should be able to ping the PI by its hostname from your computer.
I I - 3.B) IN ORDER TO BE ABLE TO PING YOUR PI FROM PC:
You need to add the PI’s hostname and its IP address into the following system file:
C:\Windows\System32\drivers\etc\hosts
e.g. add this inside the hosts file to reflect the IP address and the PI hostname
10.0.0.20 pi-name
Do note :
1) You must be namely “Administrator” in order to edit this file
2) PI’s IP address will change once it is on a different network. If your PI is on DHCP (most likely the case), your
PI’s IP address may change even using same network.
3) Unless you will set up a static IP address. This is completely outside the scope of this work; as it will involve
more discussion in networking. Thus, it won’t be covered.
I I - 3.C) NOW , YOU CAN SETUP SSH SESSION USING IP ADDRESS OR HOSTNAME :
e.g. hostname of your PI is “yourPIname”

Raspberry PI
Last update July 26th, 2019 Page 28 of 95
*** You will need to deploy and maintain that file on every host you use. Also, if it is running DHCP, the IP addresses
may change from various connections, depending on how you set up your dhcp. Again, this is completely outside
the scope of this workshop.

Raspberry PI
Last update July 26th, 2019 Page 29 of 95
SECTION III - BASICS IN THE
LINUX OS THAT YOU SHOULD
KNOW
<< prev next>>
At the end of this section, you should be familiar with:
- Do remote access with VNC, or ssh
- Navigating around the file system
- Install and deinstall software
- Know how to set up your profile / bashrc
- Know how to write basic bash script and run it
- Ping hostnames between your own computer and PI, set up hostnames, etc.
- Know basics about VIM editor and customizing it.
- Set up email sender service
- Do backup

Raspberry PI
Last update July 26th, 2019 Page 30 of 95
III - 1) KNOW ABOUT THE FILE SYSTEM STRUCTURE
Raspbian uses a Linux specific filesystem called Ext4.
A file system is a journaling filesystem, i.e. system controls how data is stored and retrieved.
You should have a high-level overview of the file system.
To check which kernel :
uname -a
To check which release of OS image :
cat /etc/os-release or >lsb_release -a
(lsb = Linux Standard Base)
I I I - 1.A) THE FOLDERS THAT YOU MUST KNOW
Check it out:
cd / # .i.e go to the root of the system ls -al $ to see all folders under the root
Directory Description
/ First directory in Linux File System. It is also known as root directory or main directory. All files and
directories are created and managed under this directory.
/home Default directory for user data. Whenever we add a new user, Linux automatically creates a home
directory matching with his username in this directory. Whenever user login, Linux starts his login
session from home directory.
File System : Organizes the data in systematic way
Shell : Provide user interface to run commands
(You will be mainly working in this)
Kernel : the core program which manage system hardware
devices
Hardware

Raspberry PI
Last update July 26th, 2019 Page 31 of 95
/root Home directory for root user. Root user is the super user in Linux. For security reason Linux creates a
separate home directory for root user. Root user account is also being created during the installation
automatically.
/bin Contains standard commands files. Commands stored in this directory are available for all users and
usually do not require any special permission to run.
/sbin Contains system administration commands files. Commands stored in this directory are available only
for root user and usually requires special privilege to run.
/usr Contains user application software files, third party software and scripts, document files and libraries
for programming languages.
/var Stores variable data files such as printing jobs, mail box, installation, reboots, any error logs, etc.
/etc Contains system configuration files such as /etc/profile for all users
/boot Contains Linux boot loader file.
/mnt This directory is used to mount remote file system and temporary devices such as CD, DVD and USB.
/dev Contains device files. Usually files in this directory are dynamically generated and should be never
edited.
/proc Virtual filesystem documentation for the kernel and process status
/tmp This directory provides temporary location for applications.
From Radhat Linux system
https://www.tldp.org/LDP/intro-linux/html/sect_03_01.html

Raspberry PI
Last update July 26th, 2019 Page 32 of 95
I I I - 1.B) ABOUT F ILES/FOLDERS
About naming:
1. Maximum length for file name is 256 characters.
2. File name cannot use question marks, asterisks and slashes.
3. May have any characters or letters, such as comma, semi-colon, etc.… BUT… you should follow the following
rules for each categorization and reducing confusion:
4. starting with dot is a hiddle file; e.g. .bashrc
5. Try not to use embedded space, although allowed.
6. Use the period only before file extensive or hidden file.
7. Should always use file extension (even it is optional) for easy categorization and search.
8. If file name has spaces, it needs to be quoted before we can access it on command prompt.
About Permission on files and directories
e.g. when you type : ls -al
-rwxr-xr-x 1 pi 22 Jul 15 15:25 test.sh
⎯ 1st char : ‘d’ == folder , ‘-‘ a file
⎯ 1st set of rwx : mode for owner
⎯ 2nd set of rwx : mode for group
⎯ 3rd set of rwx : mode for all others.
⎯ Next one shows the number of links that exist to the file.
⎯ Next string identifies the owner of the file
⎯ Next string tells what group the owner of the file is in.
⎯ Date & time the file/directory created
⎯ File/directory name
To change permission sample:
chmod 777 # or chmod +x
means 111 111 111 (binary) == rwx rwx
chmod 660
means 110 110 000 (binary) == rw- rw- ---

Raspberry PI
Last update July 26th, 2019 Page 33 of 95
About Types of Files
⎯Ones that you must know:
- Regular files.
d Directories: files that are lists of other files.
l Links: a system to make a file or directory visible in multiple parts of the system's file tree. We will talk
about links in detail.
⎯More advanced ones:
c Special files: the mechanism used for input and output. Most special files are in /dev, such as /dev/i2c
S Sockets: inter-process-communication using TCP/IP socket layer mechanism. It is protected by the file
system's access control.
P Named pipes: very much like sockets for inter-process-communication; but without using network
socket semantic.
B Block device - a peripheral device

Raspberry PI
Last update July 26th, 2019 Page 34 of 95
III - 2) BASIC SHELL COMMANDS YOU SHOULD KNOW
IMPORTANT: Do not neglect this section. Before you start coding anything on Linux system, you MUST go through
these in section in details.
List of the most commonly used Commands.
Directory operations:
⎯ cd, ls, pwd, mkdir, rmdir
Search and edit files:
⎯ vi, vim, grep, find, whereis, which , wc, more
File Operations:
⎯ cat , cp, mv, head, tail, cmp, diff, touch, rm
⎯ tree (after sudo apt-get install tree -y)
⎯ tar, unzip
Process / System Management:
⎯ ps, pstree,
⎯ kill (use this with care as always)
⎯ cron
⎯ watch
⎯ top
⎯ shutdown
⎯ apt-get
File permissions and about users
⎯ sudo
⎯ chmod, chown (you should not need to use
these until you start to do more administrative
development work).
⎯ Whoami
⎯ sudo ; sudo apt-get ; apt-cache show
⎯ Passwd
Disk management:
⎯ df, du
⎯ dd, free
Some commonly used Operators:
⎯ ‘ > ‘ (redirecting)
⎯ ‘ | ‘ (piping to another command)
⎯ ‘ >> ‘ (redirecting with appending)
⎯ ‘ ; ’ (several commands on a single line)
⎯ ‘& ‘ (running in background)
⎯ fg (put the background job back to the front)
⎯ bg (resume background job, not to the front)
⎯ Ctrl+Z (pause current foreground job)
⎯ Ctrl+R (search command history)
Networking:
⎯ ssh, wget, curl, scp, mget, ftp, ping
⎯ Ping
⎯ Nmap
⎯ Hostname
⎯ Ifconfig
Lookup
⎯ man (commands lookup )
⎯ whatis
Helpful setup:
⎯ alias, date, hwclock
⎯ export
Advanced File editing:
⎯ sed, awk, regex
5.
Most commonly used Advanced Packaging Tool (apt) command line interfaces: (man apt-get)
⎯ apt-get update
⎯ apt-get remove
⎯ apt-get install

Raspberry PI
Last update July 26th, 2019 Page 35 of 95
Detailed Reference: https://www.raspberrypi.org/documentation/linux/software/apt.md
For comprehensive list : http://linuxcommand.org or do “man -?”
Or
https://www.raspberrypi.org/documentation/linux/usage/commands.md)
I I I - 2.A) HANDY EXAMPLES OF PROCESS CONTROL
What files are eating up the disk space?
Our system keeps getting full. You really need to get an idea what files are so huge! Try the following:
(remember that you can use the up-arrow key to get back the last command. Or, type “history” to see previous
ones).
du -sh * | sort -nr | more
du -h -d 3 * | sort -nr | more
du -s * | sort -nr > $HOME/space_report.txt
Who are running what?
ps ef
Control foreground / background process
Run this. This will continuously monitor the process table and update every second.
watch -n 1 "ps ef"
pause it
Ctrl+Z
Put it in background
- find the job id :
jobs -l
you may see something like this: [2]+ 9318 Stopped watch -n 1 "ps ef"
where “2” is the job id.
bg 2
Put it back to the foreground again

Raspberry PI
Last update July 26th, 2019 Page 36 of 95
fg 2
Start a background process: e.g.
watch -n 1 "ps ef" &
I I I - 2.B) MORE ELABORATED COMMONLY USED COMMANDS
Which process(es) hog(s) the system processing time
top
Search words from a file
grep -i hello thisfile.txt -C 3
find all lines with the word ‘hello’ and display 3 lines before and after that.
grep -i hello thisfile.txt -n 1
find all lines with the word ‘hello’ and display one line before and after that.
grep -r write * .[!.]*
Search for a string inside all files in the current and its sub-directories, but excluding “. . “
grep -c "system" /etc/passwd
Find the number of system users.
Do note: “grep” has been aliased as “grep –color=auto”, i.e highlight searched string. See .bashrc.
count # of lines of a file
wc -l *
find out the largest files in your current and its sub-directories
du -a . | sort -nr | head
Display file content with line number
cat -n filename

Raspberry PI
Last update July 26th, 2019 Page 37 of 95
III - 3) CUSTOMIZE YOUR PI SHELL ENVIRONMENT
I I I - 3.A) CONVENIENT ALIASES
To see all current aliases, type:
alias
At your own folder, you should find:
.bashrc : this is your default shell profile. You will learn some basics in setting up your own environment. Notice
this the file preceded with “.”.
When you will customize your shell. Do not edit “.bashrc”. Add customization to .profile or .bash_aliases in your
own root, ~/ (NOT in super user’s). This will be run at everytime you login.
Try the following customization of aliases: (should create this alias file in your home. Type cd ~ or just cd )
a) Try out the following alias:
alias ldir='ls -lR | grep "^\.\|^d"'
b) To dectivate an alias
unalias aliasname
I I I - 3.B) CHANGE THE PROMPT COLOR :
export PS1="\e[1;97;41m\u\W$ \e[0m"
Your prompt will look like this:
⎯ \e[ : escape key
⎯ 1: one of “set/reset”code . for complete reference:
⎯ 97: foreground color code, white in this case. (note.. this has nothing to do with RGB code.)
⎯ 41 : red background
⎯ m : the 1st ‘m’ ist to end the 1st “\e[“ sequence
⎯ \e[0m : end the new color effect.
Reference: https://askubuntu.com/questions/558280/changing-colour-of-text-and-background-of-terminal

Raspberry PI
Last update July 26th, 2019 Page 38 of 95
I I I - 3.C) CHANGE THE PROMPT
PS1 : your prompt
\d date \t Current system time in 24-hr
\w Working folder \@ Current system time in 12-hr
\h hostname \e, \033 Start Ascii escape sequence
\u Username \[ Escape sequence non-printable characters, such as color
Set different colours for different kinds of files
export LS_COLORS='di=1;34;102:fi=0:ex=35:*.rpm=90'
Detailed reference: http://linux-sxs.org/housekeeping/lscolors.html
I I I - 3.D) MAKE THEM DEFAULT FOR EACH LOGIN
MUST KNOW how to read the .bashrc – the default configuration loaded at each time you login.
a) Add all the customized configuration in the file .profile.
b) Add the following into your .bashrc:
. .profile
c) Now, the customized setup will be activated at each time you login.

Raspberry PI
Last update July 26th, 2019 Page 39 of 95
III - 4) TO DO BACKUP
Install Win32DiskImager - https://www.raspberrypi.org/documentation/installation/installing-images/windows.md
All you need is to clone it.
You will need a SD card reader on your PC.
Remember : do a graceful shutdown before you turn off the PI.
e.g. Backup all files in folder wk1 and wk2
cd ~
tar cvfz myBackup.tar.gz ./wk1 ./wk2
Then: (you will be provided a location to save your back up files.)
scp myBackup.tar.gz someUserLogin@someIPAddress:/someRemotePath
Samples:
From your PI, remote copy your backup file to a remote location [email protected]:~/2019/:
scp myBackup.tar.gz [email protected]:~/2019/
From your PC: remote copy the backup file myBackup.tar.gz from your PI (with the IP address “10.0.0.190”) to
your PC.
scp [email protected]:~/myBackup.tar.gz ./

Raspberry PI
Last update July 26th, 2019 Page 40 of 95
III - 5) SEND EMAIL
sudo apt-get install msmtp
sudo touch /etc/msmtprc
sudo vi /etc/msmtprc
What should be in the /etc/msmtprc file:
(Note: [….] : means user input. Do not put the bracket [ ]. E.g.
port 587 NOT port [587] )
account default
host [your domain name, such as stormingrobots.com]
port [the port number for outgoing mail, such as 587]
from [from default user a/c, such as [email protected] ]
auth on
logfile /tmp/msmtp.log
tls off
tls_starttls on
tls_trust_file /etc/ssl/certs/ca-certificates.crt
auth login
user [default sender address such as [email protected]]
password [your password here]
account account2
Now, you are ready to send mail:
>> echo -e "subject: a test mail from pi \n\nThis is the content to you!" | msmtp
Starting from early 2019, the following is outdated due to antispam issue. Skip this section
If you wish to try out sending email to yourself, there are some online suggestions:
https://www.raspberrypi-spy.co.uk/2012/05/send-text-and-html-email-using-python/

Raspberry PI
Last update July 26th, 2019 Page 41 of 95
III - 6) MISCS
I I I - 6.A) INSTALLING WORD PROCESSING SOFTWARE
$sudo apt-get update
$sudo apt-get install abiword
$sudo apt-get install gnumeric
I I I - 6.B) CONSOLE CABLE TO YOUR PC :
You should be aware of this availability; but we won’t cover this topic.
using FTDI friend device (connected via serial)
Use console cable - usb to TTL Serial Cable

Raspberry PI
Last update July 26th, 2019 Page 42 of 95
SECTION IV – BE YOUR OWN
PI ADMINISTRATOR
<<prev next>>

Raspberry PI
Last update July 26th, 2019 Page 43 of 95
*** IMPORTANT: if you still ask simple questions like “how do I know what is running? Or , how to find a file in my
sub-folders, etc “ , you MUST go back to the section learning basic Linux commands.
IV - 1) USING TEXT EDITOR
IV - 1.A) NANO
There is pretty self-explanatory tutorial online. Therefore, we are skipping this. It is equivalent to notepad on
Windows. Nano comes installed with Linux installation.
IV - 2) KATE
This is more like notepad++ in windows comparing plain old notepad.
It does some very useful features such as:
Syntax highlighting
Code folding/collapsing
Show multiple documents at once with window splitting
Bookmarking system with scroll bar marks
Code autocompletion with argument hints
Extensible through plugins and scripting like vim
To install:
sudo apt-get update
sudo apt-get install kate

Raspberry PI
Last update July 26th, 2019 Page 44 of 95
IV - 2.A) V IM EDITOR (NOT VIM-TINY)
To compare Nano vs Vim is like comparing notepad vs notepad++ in Windows OS. You will be able to download
quite various plug-ins for Vim, such as C++ , Java, Python, and many others.
Recommend to use this, as most searching pattern, such as navigating around “man”, will use similar patterns of
keys.
Install vim:
sudo apt-get install vim-gui-common
sudo apt-get install vim-runtime
VIM tool was installed by default. If you wish to install it again :
sudo apt-get install vim
IV - 2.B) CRASH COURSE TO LEARN V IM
General Tips:
- Command mode - allow you to get into varioius mode, typically “insert” mode, “delete” mode, etc.. Your
cursor will be at the bottom of the editor.
- Nearly all commands can be preceded by a number for a repeat count; e.g. 5dd == delete 5 lines.
- <Esc> gets you out of any mode and back to command mode
- Commands preceded by : . are executed on the command line at the bottom of the screen.
- :help : help with any command

Raspberry PI
Last update July 26th, 2019 Page 45 of 95
Most-used keypresses or commands
NAVIGATION
1. Cursor movement: ←h ↓j ↑k l→
2. Move By words:
- W | w : forward
- B | b : backward
3. By line:
- 0 start of line
- ^ first non-whitespace
- $ end of line
4. By paragraph:
- { previous blank line;
- } next blank line
5. By file:
- gg start of file; G end of file
- nG go to specific line number; e.g. 10G == go to line #10
6. By marker:
- mx set mark x; 'x go to mark x
- ' . (note: 2 characters) go to position of last edit
- ' ' (note: 2 characters) go back to last point before jump
7. Scrolling:
- ^F forward full screen; ^B backward full screen
- ^D down half screen; ^U up half screen
FILES
1. :w write file to disk
2. :w filename write file to disk as filename
3. :wq write file to disk and quit
4. :n edit a new file; :n! edit a new file without saving current changes
5. :q quit editing a file; :q! quit editing without saving changes
Note: if the editor is abruptly terminated, there will be a .*.swp temp file saved. You won’t be able to edit the file
again. Therefore, you will need to delete its corresponding .*.swp before you edit the file again. Note that this is a
hidden file, so do “ls -a” ; then it will show up.

Raspberry PI
Last update July 26th, 2019 Page 46 of 95
EDITING
1. u undo;
2. ^R redo
3. . repeat last editing command
INSERTING
1. i insert text at cursor; I insert text at start of line
2. a append text after cursor; A append text after end of line
3. o open new line below; O open new line above
CHANGING
1. r replace single character; R replace multiple characters
2. s change single character
3. cw change word; C change to end of line; cc change whole line
DELETING
1. x delete char
2. dw delete word; D delete to end of line; dd delete whole line
3. d$ : delete the rest of the line.
CUT/COPY AND PASTE
1. yy copy line into paste buffer
2. y copy block into paste buffer, e.g. 4y
3. dd cut line into paste buffer
4. p paste buffer below cursor line; P paste buffer above cursor line
BLOCKS
1. v select from current cursor; V same, except by line
- o toggle between the 2 ends of the block selected.
2. d or x cut block into paste buffer
3. > indent block; < unindent block (need to put in v mode first)
4. gv reselect last visual block

Raspberry PI
Last update July 26th, 2019 Page 47 of 95
⎯Concise lookup sheet:
https://www.cheatography.com/typo209/cheat-sheets/comprehensive-vim-cheat-sheet/pdf/
http://www.nathael.org/Data/vi-vim-cheat-sheet.svg
⎯Interactive vi Editor Tutorial:
http://www.openvim.com/sandbox.html : Here you can practice Vim with context-aware help menu
GLOBAL
1. :%s/old/new/g replace all occurrences of "old" to "new"
a. %s = thru the whole file
b. %n1,n2 = replace from n1 to n2; e.g. :1,5s ==from line 1 to 5.
c. :10s == line#10
d. /g == all occurrences on a line instead of just the current line
SEARCHING
1. / search forward; ? search backward
2. n next match in same direction; N next match in opposite direction
3. fx forward to next character x; Fx backward to previous character x; e.g. fz = find the next ‘z’.
4. ; move again to same character in same direction;
5. , move again to same character in opposite direction
WINDOWS
1. ^Wn new split screen.
2. ^Wj down to next window; ^Wk up to previous window
3. ^W_ maximise current window; ^W= make all windows equal size
4. ^W+ increase window size; ^W- decrease window size

Raspberry PI
Last update July 26th, 2019 Page 48 of 95
⎯Color setup
- Look up the predefined sets of color schemes:
> cd /usr/share/vim/vim<version#>/colors
e.g. /usr/share/vim/vim80/colors or /usr/share/vim/vim74/colors, etc.
You may pick one and edit it. However, I recommend you to just make a copy of one of them that you like and
modify it to your favourite combination.
Typically, you will see:
If you want to see all the default color scheme :
within vi editor, type this if you want to choose, e.g. shine.vim: (make sure you are not in
“insert” mode)
:color then Space shine
:color then Space followed by TAB .
⎯Set up your own vim profile
- Update “.vimrc”
- Ref: https://github.com/amix/vimrc/blob/master/vimrcs/basic.vim
- I highly recommend to change your vim profile to make it more helpful. Suggestion as follow:
NOTE: if you are going to copy and paste, watch out the double quote. You most likely need to manually
type the double quote. Double quote in .vimrc == comment
syntax on
colorscheme shine “ look it up from the /usr/share/vim/vim<#>/colors
set ts=4
set number
set shiftwidth=4
set smartindent
set nocompatible “ if you want other setup from, e.g. plug-insk
set backspace=indent,eol,start
set shiftwidth=4
blue.vim delek.vim evening.vim morning.vim peachpuff.vim shine.vim zellner.vim
darkblue.vim desert.vim industry.vim murphy.vim README.txt slate.vim
default.vim elflord.vim koehler.vim pablo.vim ron.vim torte.vim

Raspberry PI
Last update July 26th, 2019 Page 49 of 95
set tabstop=4
set selectmode=mouse
set autoindent
set expandtab
set ruler
set list
set listchars=tab:>. “ indentation symbol >.. , if you want to see them
set listchars=tab:\ \ ,trail:\ “ indentation with just invisible tabs
set statusline=%f " file name
set statusline+=\ \ \ Line:%l/%L[%p%%]
set laststatus=2
set showmatch
set wrap
set ai
Install C.vim plug-in
This provides very handy features for programmer to speed up writing new code considerably. Important features
such as:
- Statement oriented editing of C / C++ programs
- Preset code snippets, comment, style
- Create professional style
Step 1:
mkdir -p ~/.vim/autoload ~/.vim/bundle
curl -LSso ~/.vim/autoload/pathogen.vim https://tpo.pe/pathogen.vim
cd ~/downloads/ #create one if it does not exist
wget http://www.vim.org/scripts/download_script.php?src_id=9679
ls
# you should see “c.vim.zip”. If not, you may need to rename this to c.vim.zip
mkdir ~/.vim
cd ~/.vim
unzip ../downloads/cvim.zip
ls
# The following folders should be extracted:
# autoload c-support doc ftplugin plugin syntax
Step 2 :
Add filetype plugin on into your .vimrc file.
Learn more about making your “vi” works like a context-sensitive IDE :
- http://www.thegeekstuff.com/2009/04/ctags-taglist-vi-vim-editor-as-sourece-code-browser/
- Vi and Vim Macro Tutorial: How To Record and Play

Raspberry PI
Last update July 26th, 2019 Page 50 of 95
IV - 3) CRASH COURSE ON WRITING SCRIPT
IV - 3.A) THE MINIMAL THAT YOU SHOULD KNOW
Although scripting can be a pain and, honestly, much syntax is really non-intuitive. This section gives you some
The goal of this section is to build fundamental skills to :
- help you administrate your own PI, but not meant for you to learn become advanced administrative tasks.
- Create shell scripts to make your tedious tasks easier, such as trying to set up your profile, or run some
long commands like this:
- du -h -d 3 * | sort -nr | more # to find out which process hawks the CPU
- alias d =” du -h -d 3 * | sort -nr” # after that type ‘d’ instead of the long command
- ps ahuxf | sort | head -5 # to find out which process hawks the disk space
- alias p='f(){ ps ahuxf | sort | head -n $1;}; f 4' # after this, type ‘p’ instead
Before you do this:
⎯ If you have yet tried out or forgot almost all the basic shell commands listed in that section, do it now before
you attempting to write script.
⎯ Many good references for details online. Good reference: http://linuxcommand.org/learning_the_shell.php
and http://www.tldp.org/LDP/Bash-Beginners-Guide/html/.
⎯ Most programmers do not like to write shell scripts due to the awkward syntax. BUT… Do NOT
underestimate the importance of shell commands. This can save hours of work by a simple command line.
You MUST at least do the following:
1) Understand what the .bashrc does
2) How to customize your environment.
3) Schedule your task – crontab
4) Look up network configuration files in folder such as /etc/... You will get to this in the GPIO section.

Raspberry PI
Last update July 26th, 2019 Page 51 of 95
IV - 3.B) TASK SCHEDULING
cron is a daemon process to schedule process to run in the background.
See file /etc/crontab to view the scheduled tasks. Each entry in the /etc/crontab file entry contains six fields
separated by spaces or tabs in the following form:
minute hour day_of_month month weekday user command
Valid values for these fields:
minute 0 through 59
hour 0 through 23
day_of_month 1 through 31
month 1 through 12
weekday 0 (Sun) through 6 (Sat)
command a shell command
Basic rules:
1) You must specify a value for each field.
2) A number in the specified range, e.g. to run a command in May, specify 5 in the month field.
3) Two numbers separated by a dash to indicate an inclusive range
4) A list of numbers separated by commas
5) “*” (no quotes) meaning wildcard values
⎯Sample to set up a task
IMPORTANT: Before you do this, make a backup copy of the schedule file first. ??
crontab -e # of sudo crontab -e if you wish to set up system schedule
crontab -l # display the crontab file if it exists.
At the end of the doc, input your schedule task, e.g.
0 12 * * * pi echo “Go to Lunch!” | /usr/bin/wall
At 1pm every day, Broadcast a message to all users where “pi” is the username
30 6 * * 1,3,5 pi /bin/ps -ef > /home/pi/msg.txt
To run the calendar command at 6:30am. every Mon, Wed, and Fri.
⎯Schedule routine task
May install a gui-based tasks scheduler software: sudo apt-get install gnome-schedule

Raspberry PI
Last update July 26th, 2019 Page 52 of 95
IV - 3.C) WRITE YOUR FIRST SCRIPT .
1. Edit first.sh with either vi or nano.
#!/bin/bash
echo “Hello World”
alias d =” du -h -d 3 * | sort -nr”
alias p='f(){ ps ahuxf | sort | head -n $1; }; f $1'
2. change permission to -rwxr-xr-x
> chmod 755 first.sh
or
> chmod +x first.sh
3. Run it
> first.sh
Now, after you run it, try to run alias “d” and “p 4”. Neither one works . You must load it into your shell:
> source first.sh
or
> . first.sh
After this, you should go thru reading the .bashrc and understand what it does.
The rest of this section is for only those who want to good at administrating their own PI - you need to be good at
scripting.
You may skip right to the GPIO section.

Raspberry PI
Last update July 26th, 2019 Page 53 of 95
IV - 3.D) BASICS STUFF WITH STANDARD INPUT/OUTPUT
Decide which shell
environment
#!/bin/bash
At the top of your script
Echo Echo “enter a word> “
Or
Echo -n “enter a word > “
Watch the quote Echo “\” the sentence \””
Command Separator ; _
Comment # : single line comment
use user input echo $1 $2 $3 etc.
echo $@
args=("$@")
echo ${args[0]} ${args[1]} ${args[2]}
Note: cannot do this if you want the data to be treated as numeric
number of command line
argument
$#
Read user input echo "Enter 2 strings: "
read str1 str2
Read into an array read -a myList
Write out array args echo $myList
With 5 seconds expiration read -t 5 myVar
Run it with line# display >bash -x x.sh
Print multiple variable echo $(print “%d %d” $var1 $var2)
Run a shell command $(ls)
Global variable All variables created, even within functions are considered to be global; unless
you use “local”
Local variable local var=”hello” within { } scope
IV - 3.E) BASICS ABOUT STRING
Assignment var=’hello’
…
echo $var
'STRING' preserves all special characters within STRING. This is a stronger form
of quoting than “STRING".
Display
ascii vs
char
num=9
echo $(printf "it is %s %d" \”$num\" $num)
More about manipulation on strings: www.tldp.org/LDP/abs/html/string-manipulation.html

Raspberry PI
Last update July 26th, 2019 Page 54 of 95
IV - 3.F) BASICS IN CONTROL STRUCTURE
Here will list most commonly used ones. To learn all others :
www.tldp.org/LDP/abs/html/abs-guide.html
IMPORTANT:
- Every symbol such as { [ , etc. should be considered as a command. Therefore, you should always have
spaces before and after.
NOTE: watch your spacing!
if [ $# -gt 1 ]; then
echo $1
fi
must have at one space
Boolean operator for
string
== != < >
e.g. if [ $S1==$S2 ]
Boolean operator for
numeric
-lt -gt -eq -le -ge -ne
if [ … ] then … else … fi
if [ … ] then … elif [ … ] then … else … fi
if [ … ] then … else if [ … ] then … else … fi
if … ; then | fi if [ “$S1” == “$S2” ]
Do use “$S1” instead of $S1; because if $S1 is empty, you will get parsing error.
if [ $number < 2 ]
Sample:
read number
if [ $((number % 2)) -eq 0 ]; then
echo $number “ is an even number.”
fi
if ! read -t 5 number ; then
echo -e "expire\n"
exit
fi

Raspberry PI
Last update July 26th, 2019 Page 55 of 95
Case Variable in case $variable in
1 ) echo “one”;;
2 ) echo “two” ;;
3 ) echo ;;
* ) echo “done”
esac
case $name in
"abc" ) echo "abc";;
"xyz" ) echo "xyz";;
case $singleChar in
[a-z] | [A-Z] ) echo “alpha” ;;
[0-9] ) echo “number”;;
* ) echo “wild”
esac
While loop while [ $num -lt 10 ]; do
…
done
while [ $str = "yes" ]; do
echo -n "enter yes/no: "…
read str
done
while [ $COUNTER -lt 10 ]; do
echo The counter is $COUNTER
let COUNTER=COUNTER+1
done
for (( c=1; c<=5; c++) )
do
echo item: $c
done
for i in $( ls ); do
echo item: $i
done
for i in {0..20..2}
do
echo item: $ i
done

Raspberry PI
Last update July 26th, 2019 Page 56 of 95
if [ ct=$(grep -c "system" /etc/passwd) ]; then
echo “There is $ct system users”
fi
note: ct “is assigned” to the result from grep, NOT compare with the result from grep.

Raspberry PI
Last update July 26th, 2019 Page 57 of 95
IV - 3.G) NUMERIC CALCULATION AND COMPARISION
Declare data type declare -i integerVariable
declare -r readonlyVariable
Numeric comparison -lt -gt -le -ge -eq -ne
if [ $NUM1 -eq $NUM2 ]; then
Basic variable
calculation
e.g.
declare -i n1 n2 n3
n1=10
n2=n1+10
n3=n2+10
echo $n3
output:
30
e.g.
n1=15
let n2=n1+20
echo $n2
output:
35
IMPORTANT!
• With embedded spaces between “=” and “$”, they will be treated as string instead
of numeric values.
• Without “let”, it will be treated as string
Display in Different
base
grade=0x10
perl -e 'printf "%b \n",'$grade
where perl is another type of script shell which is more C-like.
echo "$((2#1000))" output 8
echo "$((16#FF))" output 255
printf '%d\n' "$((2#11110000))" output f0
printf '%x\n' "$((2#11110000))" output 240
printf '%o\n' "$((2#11110000))" output 360

Raspberry PI
Last update July 26th, 2019 Page 58 of 95
IV - 3.H) STRANGE THING ABOUT THE SCOPE RULE ON VARIABLES
func1()
{
Val="set to func 1" # not the Global Val
}
func2()
{
Val="set to func 2" # not the Global Val
}
func3()
{
local Val="Really a local"
echo "1: " $Val
func1
echo "2: " $Val
func2
echo "3: " $Val
}
Val="0:i am Global"
func3
if [ "$Val" == "" ]
then
echo "Val does not exist"
else
echo $Val
fi

Raspberry PI
Last update July 26th, 2019 Page 59 of 95
IV - 3.I) STRANGE THING ABOUT GETTING RETURN VALUE FROM FUNCTION
In order to get the return value, you need to pass in the variable name and use command substitution…..
Exercise:
Modify this script to make it more robust. E.g. What if user did not enter arguments.
# arg 1 & 2 are the numbers to be added
# arg 3 is the variable name to get the result
add() {
local x
x=$(( $1 + $2 ))
eval $3=$x
return $x
}
let a1=$1 # get arg 1
let a2=$2 # get arg 2
add $a1 $a2 Val # pass in the variable to save the result
# or
ret=$? # this will get the return value from last expression
echo $(printf "\r%d+%d=%d" $a1 $a2 $ret)
if [[ $(add 10 30 Val) -lt 10 ]]
then
echo "1: " $Val
else
echo "2: " $Val
fi
add $a1 $a2 Val # pass in the variable to save the result
ret=$? # of get the return value from last expression
echo $(printf "\r%d+%d=%d" $a1 $a2 $Val

Raspberry PI
Last update July 26th, 2019 Page 60 of 95
IV - 3.J) COMMON ERRORS IN PARSING
⎯Spacing Matters
variable=assignment-to-the-variable vs
command =command-with-an-argument
e.g.
if [ $wt = "on" ] # evaluate the value of “wt” comparing with “on”
if [ $wt="on" ] # assigning “on” to “wt”, then evaluate.
x = "abc” # evaluate “abc” as a command, then assign the returning value to
x="abc” # assign “abc” to x
⎯ $var vs. ${var} vs. “$var”
“$var” : treat it as a single word
${var} : is a more readable form of $var
$var : treat as an array of two words
e.g. var="Bot Fun”
for i in "$var"; do
echo $i
done
# Bot Fun # only run once, see Bot Fun in a single line
for i in ${var} ; do # same as $var
echo $i
done
# Bot
# Fun
for i in ${var}”ny” ; do
echo $i
done
# Bot
# Funny
⎯About Array
foo=(a b c)
echo $foo # echo ${foo} will do the same
# a
echo ${foo} falala
# a falala

Raspberry PI
Last update July 26th, 2019 Page 61 of 95
Echo ${foo[@]}
# a b c
⎯Special about “[“ “]”
• '[' is actually separate executable that received the expresson as arguments and returned a result.
• [ $this : $this is treated as an argument to the “boolean test” command.
• [$this (without any space between [ and $test: the script thinks [$this is a command itself which has to exist
in $PATH .

Raspberry PI
Last update July 26th, 2019 Page 62 of 95
IV - 3.K) SCRIPTS SAMPLES
***Don’t forget to always put in #!/bin/bash at the 1st line in your script.
1. Try the following in the terminal windows, and then write these in script to continue displaying until you hit
enter.
> $(date +%Y/%m/%d)
> date +%T
> sleep 4
If you wish to save the date into a string
> str=$(date +%Y/%m/%d)
> echo $str
2. Display “Good Morning”, “Good Afternoon”, or “Good Night” based on user input.
echo ">$0 m | a | <nothing>"
if [ $# -eq 1 ]; then
if [ $1 == "m" ]; then
echo "Good Morning"
else
echo "Good Afternnon"
fi
else
echo "Good Night"
fi
3. Display system time in hr:mm:sec
if [ $# -gt 0 ]; then
secs=$1
else
echo -n "Enter time in seconds > "
read secs
fi
hr=0
min=0
hr=$((secs / 3600))
secs=$((secs % 3600))
min=$((secs / 60))
secs=$((secs % 60))
echo "$hr:$min:$secs"

Raspberry PI
Last update July 26th, 2019 Page 63 of 95
4. Find out number of system users:
if [ ct=$(grep -c "system" /etc/passwd) ]; then
echo “There is $ct system users”
fi
This won’t work as [ ct=$(grep -c "system" /etc/passwd) ] actually gives you back the status of this
expression. 0 means successful. You will not get # found as the “grep” will return.
ct=0
ct=$(grep -c system /etc/passwd)
if [[ $ct -gt 0 ]]; then
echo "There are $ct system"
else
echo "none"
fi
if [[ "$(ct=$(grep -c system /etc/passwd))" == "0" ]]; then
echo "none"
else
echo "There are $ct system"
fi
if [[ $[ct=$(grep -c system /etc/passwd) ] -eq 0 ]]; then
echo "none"
else
echo "There are $ct system"
fi
5. With array and user input
day=0
mon=0
yr=0
echo -ne "Enter Year > "
read yr
echo -ne "Enter Days > "
read days
smon=(jan feb mar apr may jun jul aug sep oct nov dec)
mdays=(31 28 31 30 31 30 31 31 30 31 30 31)
if [ $((yr%4)) -eq 0 ]; then
if [ $((yr%100)) -eq 0 ]; then
if [ $((yr%400)) -eq 0 ]; then
mdays[1]=29
fi

Raspberry PI
Last update July 26th, 2019 Page 64 of 95
else
mdays[1]=29
fi
fi
6. Simple function which accepts user input
func1() {
read val1 val2
echo "you entered " $val1 $val2
declare -i result
let result=$val1+$val2
result=$val1+$val2
}
func1
echo $(printf "%d %d %d " $val1 $val2 $result)

Raspberry PI
Last update July 26th, 2019 Page 65 of 95
7. Another function example:
function func1{
local result=0
local val1, val2
declare -i result
echo -n “Enter 2 values: “
read val1 val2
echo "you entered " $val1 $val2
result=$val1+$val2
# or let result=val+val2 . It will still be treated as a numerical calculation
# because of “declare” declaration
return $result
}
echo $(printf "%d" ${func} )
8. Implicit function signature with ( ) which takes parameters
function add() {
local x
(( x=$1 + $2 ))
return $x
}
mult() {
local x
(( x=$1 * $2 ))
echo $x
}
9. Try out a factorial with recursion 😊 (honestly, I won’t do that, but just for fun!)
function factorial() {
local result
local num=$1
if [ $1 -eq 1 ]
then
echo 1
else
echo $(( $1 * $(factorial $(( $1 - 1 ))) ))
fi
}

Raspberry PI
Last update July 26th, 2019 Page 66 of 95
IV - 4) BASIC COMMONLY USED SYSTEM TASK CONTROL
IV - 4.A) SHUTDOWN/REBOOT
# /sbin/shutdown -r now (shut down now and reboot)
# /sbin/shutdown -h +5 (shut down in 5 minutes & halt)
# /sbin/shutdown -k 17:00(fake a shutdown at 5pm)
halt and reboot are equivalent to shutdown -h and shutdown -r respectively.
If you have to shut a system down extremely urgently or for some reason cannot use shutdown, it is at least a good
idea to first run the command:
# sync
which forces the state of the file system to be brought up to date.
IV - 4.B) START A NEW BASH TERMINAL
To start a new terminal.
lxterminal
In some flavor of Linus - to start a new terminal along with running a script automatically:
lxterminal --title="newWindow" -e "bash -c ./somescript.sh"
If you run your window headless, such as using ssh, this does not work as it is not gui enabled. This works via VNC.
IV - 5) SYSTEM DEFAULT FILES THAT YOU MAY BE MORE LIKELY TO DEAL WITH
Default Startup files:
⎯ /etc/apt/sources.list : lookup sources of the installed software on your Pi.
⎯ /etc/xdg : Default start up by the lxsession:
⎯ /boot/config.txt : This is a very important Raspberry Pi configuration file, locating in /boot/. Unless you are
familiar with the embedded system parameters, do not make changes to this this file. Instead, you should
use the raspi-config instead.
⎯ /etc/network/interfaces : your network interfaces such as dhcp, static IP, wireless setup. Also see :
https://www.raspberrypi.org/documentation/configuration/wireless/wireless-cli.md

Raspberry PI
Last update July 26th, 2019 Page 67 of 95
Detailed reference: https://www.raspberrypi.org/documentation/configuration/
⎯Misc
⎯ More interesting system level communication
o PWM via Direct Memory Access (DMA)
o GPIO interrupts (callbacks when events occur on input gpios)
o TCP socket interrupts (callbacks when tcp socket clients send data)
o Although most libraries provided are in python only. If you wish to stay using C/C++,you will need
to learn more in kernel level system level programming – allowing communication between kernel
devices, such as network adaptors, i2c adaptors, etc.

Raspberry PI
Last update July 26th, 2019 Page 68 of 95
SECTION V – USING GPIO
UTILITY
<<prev next>>
*** IMPORTANT: if you still ask simple questions like “how do I know what is running? Or , how to find a file in my
sub-folders, etc “ , you MUST go back to the section learning basic Linux commands.

Raspberry PI
Last update July 26th, 2019 Page 69 of 95
V - 1) GPIO PIN LAYOUT
The GPIO connector consists of 4 types of connections:
- True GPIO (General Purpose Input Output) pins that you can use to turn LEDs on and off etc.
- I2C interface pins
- SPI interface
- Serial Rx and Tx pins
We will use only the BCM option. See this guide for the pin numbers as they vary by PI version. They are prefixed with GPIO##

Raspberry PI
Last update July 26th, 2019 Page 70 of 95
IMPORTANT: : Before you start, you should always watch out for short circuit
BAD!!! Much Better
Rule of thumb:
- never have any circuit complete from power source to the ground without some sort of resistance in-
between.
- While working with wiring, should always remove the power connection.
V - 2) TYPES OF SIGNALS
Ref: http://www.rfwireless-world.com
Must know about these GPIO Pins:
Only GPIO18 == PWM pin (pin 0 is also a pwm pin, but used for audio)
All others are digital Input and Output pins.
NO analog write nor read. (However, you can use PWM to simulate something like adjusting a led brightness).

Raspberry PI
Last update July 26th, 2019 Page 71 of 95
V - 3) GPIO WITH WIRINGPI
WiringPi packet should be automatically installed with Raspbian. However, if does not for some reason, do the
following:
sudo apt-get install wiringpi
See if you have the help page for gpio:
man gpio
If not, you should add that into your “manual page:
cd ~
git clone git://git.drogon.net/wiringPi
cd wiringPi
cd gpio
sudo cp gpio.1 /usr/local/man/man1/
if man1 does not exist , create one as sudo
sudo cp gpio.1 /usr/local/man/man1/
sudo gzip /usr/local/man/man1/gpio.1
Now, try :
man gpio
WiringPI comes with installation. However, for whatever reason that you do not have the build: you may
have to build it yourself.
cd ./wiringPi
./build
gpio readall

Raspberry PI
Last update July 26th, 2019 Page 72 of 95
V - 4) SOME BASIC GPIO SCRIPT COMMANDS
WiringPi supports digital reading and writing, as well as analog write on the pwm pin. The following includes some basic ones. You should always look them up from
http://wiringpi.com/the-gpio-utility/ site, especially the reference on core-functions .
• gpio mode <pin> in/out/pwm/up/down
This sets the mode of a pin to be input, output, pwm or clock mode, and additionally can set the internal pull-
up/down resistors to pull-up, pull-down or none.
• gpio write <pin> 0/1
This sets an output pin to high (1) or low (0)
• gpio pwm <pin> <value>
Set the pin to a PWM value (0-1023 is supported) . Not meant to run motors. On example to use it : e.g. turn on a
RGB color to red if it detect your favorite stock is going down.
a) gpio read <pin>
Reads and prints the logic value of the given pin. It will print 0 (low) or 1 (high).
gpio -g …
We will always use the BCM_GPIO pin numbers in this document. Make sure you will use option -g flag.

Raspberry PI
Last update July 26th, 2019 Page 73 of 95
V - 5) USING GPIO PINS
V - 5.A) TURN ON A LED
Turn on and off a LED. You will need:
- A standard LED
- 2 male-male jump wires; 1 male-male jump wires–
- a 100ohmz to 500 ohmz resistor will be ok.
- connect GPIO#17 to LED through the resistor to Gnd. (always, use red wire for power, black for ground)
- Write the script to turn the LED on and off.
Let’s look at the following image.
This is the positive end ( Anode) ..
Short end is the negative (Cathode)
IMPORTANT:
Always remove the power source jumper wire before you hook up anything!!!
Make sure you do not have any pin touching each other.
Always use resistors when you hook up to a LED.
Connect this to pin 17

Raspberry PI
Last update July 26th, 2019 Page 74 of 95
Sample script with wiringPi
Sample C programming with wiringPi
#include <wiringPi.h>
int main (void)
{
wiringPiSetupGpio () ;
pinMode (17, OUTPUT) ;
for (;;)
{
digitalWrite (17, HIGH) ; delay (500) ;
digitalWrite (17, LOW) ; delay (500) ;
}
return 0 ;
}
To build:
gcc -Wall -o blink blink.c -lwiringPi
V - 5.B) D IMMING A LED WITH PWM PIN
Write a C program to control LED brightness using PWM pin 18 in 2 ways:
1. pwmWrite, photocell.
2. Using photoresistor as the resistor
Tips : mode: gpio -g mode 17 PWM
To write: gpio -g pwm 17
- Look them up from the online reference
#!/bin/bash
#source gpio
gpio -g mode 17 out
while true; do
gpio -g write 17 1
sleep 0.5
gpio -g write 17 0
sleep 0.5
done

Raspberry PI
Last update July 26th, 2019 Page 75 of 95
V - 5.C) TURN ON/OFF A LED WITH PUSH BUTTON
1) Write a function to constantly reading and displaying the digital value from the push button.
1.a) with the following wiring (pull-up resistor)
1.b) with the following wiring (pull-down resistor)
2) Connect a LED to pin 27. Write a function to allow you turn on/off LED by pushing the button.
You can try it with either 1.a or 1.b type of setup.
IMPORTANT: Don’t forget to use the resistor for the LED
Connect to pin 17 : you will read from this pin
Use your previous read button function again, and
check out the difference.
-
+
+
-
-

Raspberry PI
Last update July 26th, 2019 Page 76 of 95
V - 6) KNOW HOW TO READ RESISTORS (OHM'S LAW)
Ohm's Law deals with the relationship between voltage and current in an ideal conductor.
Ohm's Law is given by: Voltage (V) = Current (I) x Resistance (R)
V = I R
Note that sometimes, Voltage is referred as Energy.
Need to know how to read a resister:

Raspberry PI
Last update July 26th, 2019 Page 77 of 95
Example:
S
The significant digits: Band 1 = Red, Band 2 = Violet, Band 3 = Yellow Multiplier: Band 4 = Orange Tolerance: Band 5 = Silver
The value of this resistor would be:
2 (Red) 7 (Violet) 4 (yellow) x1,000 (Orange)
= 274 x 1,000
= 274 K ohms with a 10% tolerance (silver)
After we have covered Python, we will try out the following 2 sections are

Raspberry PI
Last update July 26th, 2019 Page 78 of 95
V - 7) GPIO WITH PYTHON (AFTER INTRO TO PYTHON)
Go to a crash course of Python for C/C++ programmer.
Now that you have completed GPIO interface in WiringPi/C, and Python, you will do the following mini-challenge
with Python.
V - 7.A) TURN ON/OFF LED USING PUSH BUTTON WITH PYTHON
Reference: https://learn.sparkfun.com/tutorials/raspberry-gpio/python-rpigpio-api
Here is another sample:
# External module imports
import RPi.GPIO as GPIO
import time
butPin = 17 # Broadcom pin 17 (P1 pin 11)
# Pin Setup:
GPIO.setmode(GPIO.BCM) # Broadcom pin-numbering scheme
GPIO.setup(butPin, GPIO.IN, pull_up_down=GPIO.PUD_UP) # Button pin set as input w/ pull-up
print("Here we go! Press CTRL+C to exit")
try:
while 1:
if GPIO.input(butPin): # button is released
print("buttpin high")
else:
print("buttpin low")
time.sleep(1)
except KeyboardInterrupt: # If CTRL+C is pressed, exit cleanly:
GPIO.cleanup() # cleanup all GPIO
Mini-challenge
Using pwm pin to control brightness of the LED.

Raspberry PI
Last update July 26th, 2019 Page 79 of 95
Work with ADC to communicate with analog input device
Raspberry Pi has no on-board analog hardware. Adafruit carries the ADC convertor to allow you to go thru I2C
interface to communicate with I2C device.
Hardware/software specification changes overtime, you should always go to the Adafruit to get detailed
instruction for using its ADC device.
Summarized Steps:
(per 2019-June Adafruit online documentation)
1. Read up the spec.
2. Go to the PI library to download the latest Python library for the ADC interface .
3. As for August of 2017, here lists what you need to do:
sudo apt-get update
sudo apt-get install -y python3 python3-pip python-dev
sudo pip3 install rpi.gpio
sudo pip3 install adafruit-circuitpython-ads1x15
4. Alternative to (3) . Do not do this if (3) works: sudo pip3 install adafruit-ads1x15
5. Check out the wiring sample.
6. Try this simpletest.py. (change it to Get your samples at : https://learn.adafruit.com/raspberry-pi-analog-to-
digital-converters/ads1015-slash-ads1115

Raspberry PI
Last update July 26th, 2019 Page 80 of 95
Exercise: Write a Python program to utilize the potentiometer controlling
brightness of a LED.
a) Write the pi with ADC
https://learn.adafruit.com/adafruit-4-channel-adc-breakouts/python-circuitpython
b) Wire the potentiometer
You may wire the Vout to A1 or A2 instead. The order of “+” and “-“ does not matter. As long as one goes
to “+”, and another one goes to “-“ will be fine.
c) Wire the LED . If you forgot how to wire it, refer to the exercise back in the GPIO section)
+ A0 -

Raspberry PI
Last update July 26th, 2019 Page 81 of 95
Exercise: Write a Python program to utilize a photoresistor controlling
brightness of a LED.
⎯Learn about Voltage Divider
lim𝑅2→∞
(𝑉𝑖𝑛 +𝑅2
𝑅1+𝑅2) means Vout closer to Vin
lim𝑅2→0
(𝑉𝑖𝑛 +𝑅2
𝑅1+𝑅2) means Vout closer to 0
⎯Do some exercises with Voltage Divider:
For the circuit shown, VS = 5 V and R1 = 100 Ω. The voltage across R1 is measured to be 3 V.
Use the voltage divider method to find the value of R2.
Fill in the blank cells:
Vin R1 R2 Vout
10V 100 Ω 10 Ω
10V 100 Ω 50 Ω
10V 100 Ω 100 Ω
Vin R1 R2 Vout
5V 100 Ω 4V
5V 50 Ω 4.5V
5V 100 Ω 3V
5V 25 Ω 2.5V

Raspberry PI
Last update July 26th, 2019 Page 82 of 95
SECTION VI – PROGRAMMING
– I2C INTERFACE
<<prev next>>
*** IMPORTANT: if you still ask simple questions like “how do I know what is running? Or , how to find a file in my
sub-folders, etc “ , you MUST go back to the section learning basic Linux commands.

Raspberry PI
Last update July 26th, 2019 Page 83 of 95
VI - 1) WHAT YOU NEED TO KNOW FIRST?
VI - 1.A) KNOW YOUR BINARY VS HEXADECIMAL
Common Bases :
⎯ Decimal == base-10. Range: 0,…, 9
⎯ Hexadecimal == base-16. Range : 0 … A, B, C, D, E, F
⎯ Octal == base-8, Range: 0, …, 7
⎯ Binary == base-2 . Range: 0, 1
⎯Convert base-10 to other bases
Convert base-10 to base-2 base-10 to base-8 base-10 to base-16
⎯Convert other bases to base-10
Tips:
⎯ A single hex digits == 4 bits
⎯ When converting binary to hex, first break the bits into 4 bits chunk.
e.g. Take 101110010102 , break it into 10 1100 10112 .
Dec value for each chunk … … 2 12 11 10
Hex value = 2 C B 16
101110010112 == 2CB16
Binary to Decimal
1 1 1 1
23 22 21 20 = 1510
Octal to Decimal
1 1 2 1
83 82 81 80 = 59310
Hex to Decimal
1 2 1 1
163 162 161 160 = 462510

Raspberry PI
Last update July 26th, 2019 Page 84 of 95
VI - 1.B) WHAT IS I2C?
It was created by Philips Semiconductor in 2006, is a standardized protocol for bus architecture to connect low-
speed devices like microcontrollers. It stands for Inter-Integrated Circuits – namely with 2 lines – clock and data
signal lines.
Things you should know about a I2C bus for now:
⎯ It is designed with a clock (SCL) and data (SDA)
signal line.
⎯ Each with 7-bit addressing (in our case).
⎯ It has two roles for nodes: master and slave:
o Master node – node that initiates
communication with slaves.
o Slave node – node that receives request and responds back to the master.
⎯ Is a serial communication protocol, i.e . data is transferred bit by bit along a single wire (the SDA line).
⎯ is synchronous, i.e. the output of bits is synchronized to the sampling of bits by a clock signal shared
between the master and the slave.
SDA (Serial Data) – The line for the master and slave to send and receive data.
SCL (Serial Clock) – The line that carries the clock signal.
Maximum speed: standard mode = 100 kbps
Fast mode = 400 kbps
High Speed mode = 3.4 Mbps
Ultra Fast Mode = 5Mbps
Good reference: http://www.circuitbasics.com/basics-of-the-i2c-communication-protocol/
I2C address:
R/W
MSB LSB
27 26 25 24 23 22 21 20
1 1
Ie.. 0x18
address

Raspberry PI
Last update July 26th, 2019 Page 85 of 95
VI - 1.C) HOW AND WHERE TO LOOK UP THE I2C ADDRESSES INFORMATION FOR A
PARTICULAR DEVICE
Let’s use the Mindsensor I2C adapter for EV3 sensor as an example :
Find the Factory Default I2C Addresses.
I2C Bus address: (default) 0x32
I2C Registers (Commands) :
(Again, each register has been programmed by the manufacturer for a set of interpretations and operations.)
VI - 1.D) HOOK UP AN I2C DEVICE
PI’s I2C bus uses 3.3V. All the sensors we use are 5V sensors. Therefore, we’ll have to use a Logic Level Shifter:
More… see online specification for the particular device.

Raspberry PI
Last update July 26th, 2019 Page 86 of 95
VI - 1.E) I2C CONFIGURATION
1) Make sure the I2C interface is enabled via raspi-config – advanced option – I2C
2) Install the I2C tool:
sudo apt-get install -y i2c-tools
3) Check to ensure Kernel support for I2C:
cat /etc/modules
Check to see if “i2c-dev” is in it. If not, insert it at the bottom of the file.
4) Check the config.txt to ensure the following parameters are set. If not add them in:
grep i2c /boot/config.txt
You should see 2 lines:
dtparam=i2c1=on
dtparam=i2c_arm=on
If not, add them into the /boot/config.txt
Remember: these files are owned by root. Therefore, you will need to do :
sudo vi … (if you vi editor)
Or
Sudo nano (if you uuse nano editor
5) sudo reboot now
VI - 1.F) I2C DETECTION
Show all installed I2C buses. In most cases, it I i2c-1:
i2cdetect -l
This runs the i2cdetect command, but passes in the correct parameters for the I2C bus for the Pi’s hardware revision.
i2cdetect -y 1
e.g. you have two devices address 0x40, and 0x70
connected to the PI:

Raspberry PI
Last update July 26th, 2019 Page 87 of 95
Note the 1st two are not checked, it is considered to be non-regular addresses. However, if you do have to interface
with i2c sensors with addresses, e.g. 1, or 2, you can do :
i2cdetect -y -a 1
Show all detailed values in the I2C registers.
e.g. for the hiTechnic IRSeeker with 0x1 I2C address
i2cdump -y -r 0x00-0x10 1 0x08
another example
i2cdump -y -r 0x42-0x47 1 0x08
e.g. for the Mindsensors Light Array with 0x1 I2C address
i2cdump -y -r 0x00-0x10 1 0x04
another example
i2cdump -y -r 0x49-0x4e 1 0x08
Range of registers i2cbus I2C address #
Range of registers i2cbus I2C address #
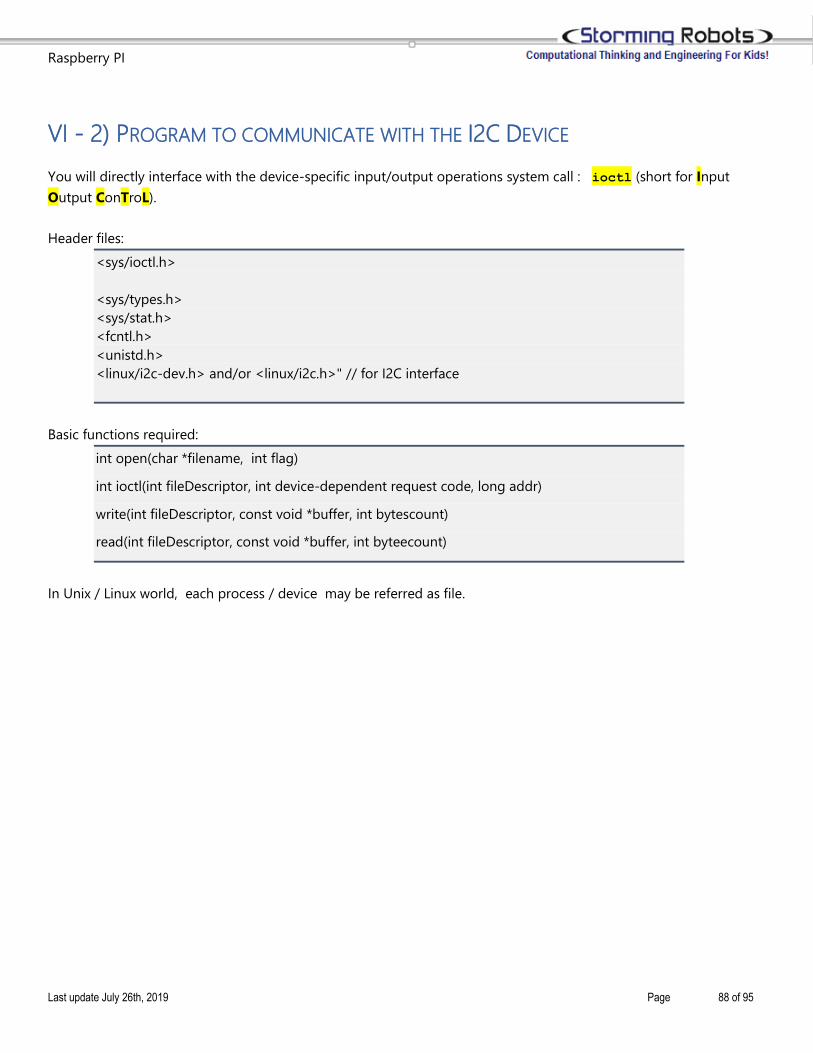
Raspberry PI
Last update July 26th, 2019 Page 88 of 95
VI - 2) PROGRAM TO COMMUNICATE WITH THE I2C DEVICE
You will directly interface with the device-specific input/output operations system call : ioctl (short for Input
Output ConTroL).
Header files:
<sys/ioctl.h>
<sys/types.h>
<sys/stat.h>
<fcntl.h>
<unistd.h>
<linux/i2c-dev.h> and/or <linux/i2c.h>" // for I2C interface
Basic functions required:
int open(char *filename, int flag)
int ioctl(int fileDescriptor, int device-dependent request code, long addr)
write(int fileDescriptor, const void *buffer, int bytescount)
read(int fileDescriptor, const void *buffer, int byteecount)
In Unix / Linux world, each process / device may be referred as file.

Raspberry PI
Last update July 26th, 2019 Page 89 of 95
VI - 2.A) OPEN CONNECTION TO THE DEVICE
For “open(char *filename, int flag)
Filename :
flag : O_RDONLY, O_WRONLY, or O_RDWR
(do look up the online system call tutorial to see all other flags/mode available. They can be bitwise-or’d together)
Return :
Successful : >=0
i.e. The lowest-numbered file descriptor not currently open for the process.
Failure : -1.
“errno” is also set accordingly.
(look up the online system call tutorial to see all possible error values)
Sample Code Segment:
int fd;
char *filename = (char*) "/dev/i2c-1";
// i2cdetect -l : should show the adapter you have only one i2c bus. You must use this as your device file name
if ( (fd = open(filename, O_RDWR) ) < 0 ) {
//always do error handling
printf("Failed to open the i2c bus");
exit(1) ;
}
VI - 2.B) IOCTL – DEVICE DRIVER SETUP
int ioctl(int fileDescriptor, int device-dependent request code, long addr)
Ioctl (file, I2C_SLAVE, long addr)
I2C_SLAVE : (system macro)
Communicate to I2C slave. You must use this macro.
Addr : the device address, e.g. 0x40 found by using i2cdetect
Return :
Success: >=0
0 == success .
1+ == special return value depending the device request.
Failure : -1.
“errno” is also set accordingly.

Raspberry PI
Last update July 26th, 2019 Page 90 of 95
(look up the online system call tutorial to see all possible error values)
(for more details in other I2C specific request code, look at:
http://lxr.free-electrons.com/source/Documentation/i2c/dev-interface)
Sample Code Segment:
// fd is the file descriptor returned by the “open(…)” call
// addr is the i2c address of the device
if (ioctl(fd, I2C_SLAVE, addr) < 0)
{
printf("Failed to acquire bus access and/or talk to slave.\n");
//ERROR HANDLING; you can check errno to see what went wrong
exit(1) ;
}
VI - 2.C) READ AND WRITE
write(int fileDescriptor, const void *buffer, int bytescount)
read(int fileDescriptor, const void *buffer, int byteecount)
fuf : void * … you should initialize your buffer
bytescount : # of bytes to read / write
Return :
Success : 0+
0 == nothing was read/written . 1+ == the # of bytes read/written
Do note: you should ALWAYS check the bytes count. In most cases, if you ask to read/write 2 bytes, you should
get back 2 as the return value.
Failure : -1.
“errno” is also set accordingly.
(look up the online system call tutorial to see all possible error values)
Sample Code Segment:
unsigned char buf[10] ; //arbitrary size
buf[0] = 0x8; //e.g. 8 == command address to obtacin manufacturer’s name for most I2C sensors
length = 1; // send 1 byte
i = write( fd, buf, length );
if (i!= length) {
printf("Failed to write to the i2c bus!\n");
exit(-1);
}
Sample Code Segment:
char replyBuf[10];
length = 6; // expected 6 bytes back
if ( ( i=read(fd, replyBuf, length)) != length) {

Raspberry PI
Last update July 26th, 2019 Page 91 of 95
printf("Failed to read from the i2c bus! \n");
exit(-1);
}
Advice for minimizing memory overwrite:
- read(fd, buf, (length > sizeof(buf) ? sizeof(buf) : length )
VI - 2.D) STEPS TO TAKE BEFORE START PROGRAMMING WITH AN I2C DEVICE :
a. Find the I2C address using i2cdetect. : gpio i2cdetect
Find the I2C registers available for the I2C device, its interpretation and operations from the device
manufacture datasheet or specification documentation.
b. Program: Do the setup with the following 2 steps:
i. Open a file descriptor : fd = open(“/dev/i2c-1”, O_RDWR) . do note that the number is
assigned dynamically. So, you should run i2cdetect -l (it is a lower case L) to verify or
what is in folder /sys/class/i2c-dev/.
ii. Associate the file descriptor with the device you want to communicate.
c. Now you are ready to talk to the I2C. You must carefully review the data specification from each
device. Look up the I2C registers, their interpretation and operations table before you proceed.
For example, you have attached to a Mindsensor light array. Now, you want to get the manufacturer’s name:
i. Create a byte buffer with some length you need, do the following sequence:
1. buf[0]=0x08 ; // get the manufacturer based on the data spec
2. write(fd, buf, 1) // send command over
3. read(fd, buf, 8) // reads the data.
Before you start, you should take caution:
1. ALWAYS do error checking.
2. You will be programming through registers access. This will completely bypass the OS. Therefore, the GPIO
pins can toggle very fast. However, it means you must be cautious in doing this. Remember memory
pointers? The OS prohibits illegal access to important system segments. Imagine your pointers overwriting
the OS.. Well, you know the consequences !
Sample statement to compile and link your *.c or *.cpp file :
# say your file name is test.c
gcc test.c -o test -Wall
# say your file name is test.cpp
g++ test.c -o test -Wall

Raspberry PI
Last update July 26th, 2019 Page 92 of 95
VI - 2.E) SAMPLE SEGMENT TO COMMUNICATE WITH THE M INDENSORS LIGHT ARRAY
⎯Step 1) set up the I2C connection.
- only need to do it once for the duration of the process
⎯Step 2: Initialize the light array sensor by turning the LEDs
- usually only need to do it once for the duration of the process
- unless you want to turn the LED off to save power for the duration of non-usage
-
char *filename = (char*)"/dev/i2c-1";
if ((fd_i2c = open(filename, O_RDWR)) < 0) {
put in error checking code
exit if fail.
}
int addr = 0x01; //<<<<<The I2C address of the slave
if (ioctl(fd_i2c, I2C_SLAVE, addr) < 0)
{
put in error checking code
exit if fail.
}
char buffer[10]; // arbitrary length
buffer[0] = 0x41; // command code required – see the light array specification
buffer[1] = 'P'; // register command to turn on the LEDs
length = 2; // Number of bytes to write
for (int attempts=10; attempts>=0; attempts--) {
ERROR HANDLING: i2c transaction failed
Allow 10 times to re-probe before you claimed it be a failure
if (write(fd_i2c, buffer, length) == length)
it means it is successful, and you should proceed to the next step
IMPORTANT: allow a few millisecond delay in-between probing.
To do milliseconds : usleep( N ) ; where N is micro-seconds

Raspberry PI
Last update July 26th, 2019 Page 93 of 95
⎯Step 3: Read the sensors data
- will need to probe everytime when you want the data.
buffer[0] = 0x41; // command code required – see the light array specification
length = 1;
if (write(fd_i2c, buffer, length) != length)
/* ERROR HANDLING: i2c transaction failed */
//----- Read the 8 bytes -----
…need to Reset the buffer memory to 0 first
length = 8; //<<< Number of bytes to read
if (read(fd_i2c, buffer, length) != length)
//ERROR HANDLING: i2c transaction failed
// print out the 8 bytes numbers
// again, should have a small delay here.
// you may get erroneous data if probing too fast

Raspberry PI
Last update July 26th, 2019 Page 94 of 95
VI - 3) CHALLENGE - BUILD YOUR OWN I2C LIBRARY
If you do that, you will need to bulid your code to become library code. To do so, simply following the methods to
build your set of codes:
1) A few system environment variables you should know:
LD_LIBRARY_PATH
C_INCLUDE_PATH
e.g.
export LD_LIBRARY_PATH=/home/pi/wk/libfolder1;/home/pi/wk/libfolder2
export C_INCLUDE_PATH=/home/pi/wk/inc
2) You should create at least :
⎯ One library *.c or *.cpp file
⎯ One header file containing the applicable global, macros, function prototypes, etc.
3) Compile your library file and make it become a shared library.
e.g. your library files are : fact.c and fib.c
gcc -c -Wall -Werror -fpic fact.c fib.c
gcc -shared -o libSimple.so fact.o fib.o
note that : libSimple.so is the shared library. The extension must be *.so
4) Test your client app test.c:
gcc -Wall -o test test.c -lSimple -L$LD_LIBRARY_PATH
5) If you want to see all the libraries your app is linked to :
ldd /home/pi/wk/test

Raspberry PI
Last update July 26th, 2019 Page 95 of 95
If you try to write your own library, you may want to explore simple C++ structure. Good Simple reference:
https://www.element14.com/community/community/code_exchange/blog/2013/03/06/c-tutorial--classes
For more challenges in using I2C Interface with Python : https://pypi.org/project/smbus2/
With the knowledge this tutorial covers, you should be ready to move onto the computer vision packet, as well as
playing with some Raspberry Pi Projects with some electronic devices.
<<prev >>back to Startup
< End of Document>