raspberry pi manual
TRANSCRIPT

RASPBERRY PI INSTALLATION MANUAL
www.researchdesignlab.com Page 1
RASPBERRY PI INSTALLATION GUIDE

RASPBERRY PI INSTALLATION MANUAL
www.researchdesignlab.com Page 2
REQUIRED ITEMS A Raspberry Pi (Either a Model B or Model B+)
SD Card
o We recommend an 8GB class 4 SD card.
Display and connecting cables
o Any HDMI/DVI monitor or TV should work as a display for the Pi.
o For best results, use one with HDMI input, but other connections are available for older
devices.
Keyboard and mouse
o Any standard USB keyboard and mouse will work with your Raspberry Pi.
Power supply
o Use a 5V micro USB power supply to power your Raspberry Pi. Be careful that whatever
power supply you use outputs at least 5V; insufficient power will cause your Pi to
behave unexpectedly.
Internet connection
o To update or download software, we recommend that you connect your Raspberry Pi to
the internet either via an Ethernet cable or a WiFi adaptor.
Sound
o Headphones, earphones or speakers with a 3.5mm jack will work with your Raspberry
Pi.

RASPBERRY PI INSTALLATION MANUAL
www.researchdesignlab.com Page 3
RASPBERRY PI
INSTALLING RASBIAN DEBIAN WHEEZY OPERATING SYSTEM USING WINDOWS
http://downloads.raspberrypi.org/raspbian_latest
Dowload the file “RASPBIAN Debian Wheezy.zip” and extract the image file.
Insert the SD card into your SD card reader(format the sd card) and check which drive letter was
assigned. You can easily see the drive letter (for example G:) by looking in the left column of
Windows Explorer. You can use the SD Card slot (if you have one) or a cheap SD adaptor in a
USB port.
Download the Win32DiskImager utility from the Sourceforge Project page (it is also a zip file);
you can run this from a USB drive.
http://sourceforge.net/projects/win32diskimager/files/latest/download
Extract the executable from the zip file and run the Win32DiskImager utility; you may need to
run the utility as administrator. Right-click on the file, and select Run as administrator.
Select the image file you extracted above.
Select the drive letter of the SD card in the device box. Be careful to select the correct drive; if
you get the wrong one you can destroy your data on the computer's hard disk! If you are using
an SD card slot in your computer and can't see the drive in the Win32DiskImager window, try
using a cheap SD adaptor in a USB port.
Click Write and wait for the write to complete.
Exit the imager and eject the SD card

RASPBERRY PI INSTALLATION MANUAL
www.researchdesignlab.com Page 4
FORMAT THE SD CARD Locate your SD card drive, in Windows Explorer, and secondary-click the mouse to bring up the
context-senstive menu. From the menu select Format…. Ensure that the option FAT32 (Default) is selected and click Start.
Selecting an SD card to format
A few moments later you will see a confirmation that the format has been completed and you SD card is now ready for the next stage.
Formatting the SD card

RASPBERRY PI INSTALLATION MANUAL
www.researchdesignlab.com Page 5
USING WIN32DISKIMAGER Having plugged in your SD card, (re)start Win32Diskimager. Choose the drive you want to copy the image to (in my case F:).
choose the drive with your SD card to write the OS image on Then click on the folder icon and choose the unzipped .img file from earlier that you want to put on the SD card. Then click Write, to write the Operating system on the card from the .img file.
Write OS image from .img file to SD card You will then be asked to confirm. Check carefully that you are writing to the correct device and if so, click Yes.
Check device and confirm The progress bar will show you how far it’s got.
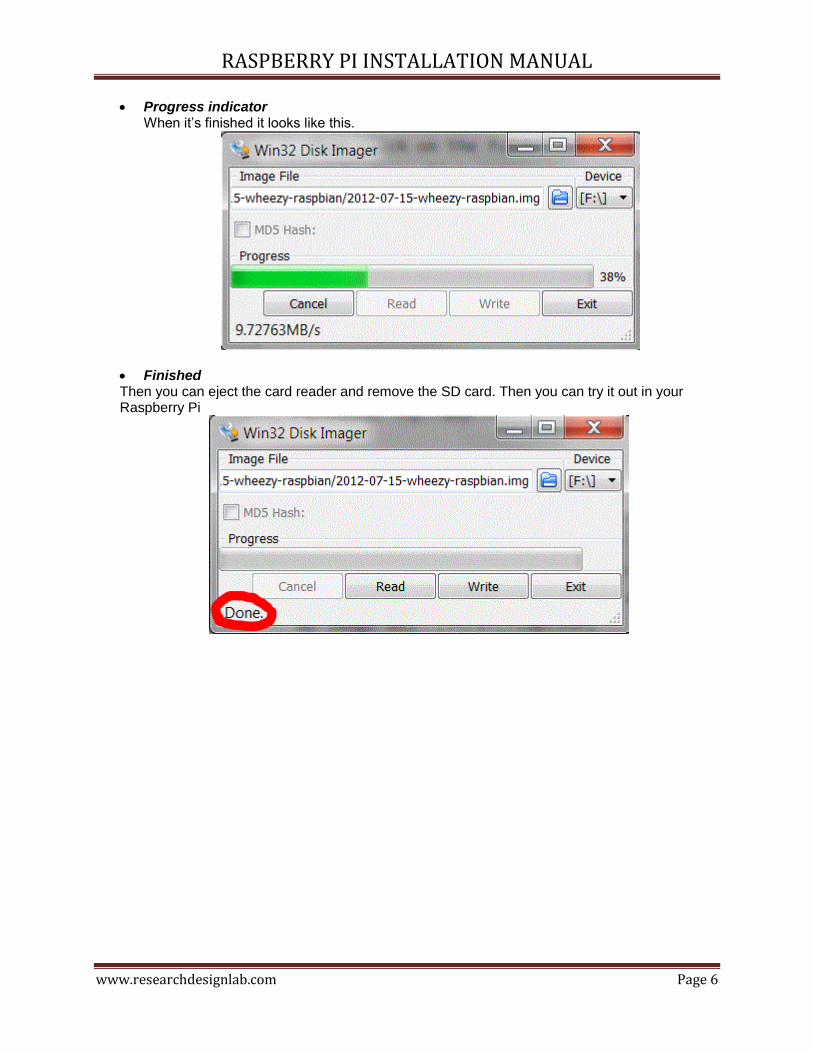
RASPBERRY PI INSTALLATION MANUAL
www.researchdesignlab.com Page 6
Progress indicator When it’s finished it looks like this.
Finished Then you can eject the card reader and remove the SD card. Then you can try it out in your Raspberry Pi

RASPBERRY PI INSTALLATION MANUAL
www.researchdesignlab.com Page 7
PLUGGING IN YOUR RASPBERRY PI 1. Begin by slotting your SD card into the SD card slot on the Raspberry Pi, which will only fit one
way.
2. Next, plug in your USB keyboard and mouse into the USB slots on the Raspberry Pi. Make sure
that your monitor or TV is turned on, and that you have selected the right input (e.g. HDMI 1,
DVI, etc).
3. Then connect your HDMI cable from your Raspberry Pi to your monitor or TV.
4. If you intend to connect your Raspberry Pi to the internet, plug in an Ethernet cable into the
Ethernet port next to the USB ports; if you do not need an internet connection, skip this step.
5. Finally, when you are happy that you have plugged in all the cables and SD card required, plug in
the micro USB power supply. This action will turn on and boot your Raspberry Pi.
6. If this is the first time your Raspberry Pi SD card have been used, then you will have to select an
operating system and configure it.
LOGGING INTO YOUR RASPBERRY PI
1. Once your Raspberry Pi has completed the boot process, a login prompt will appear. The default
login for Raspbian is username pi with the password raspberry. Note you will not see any writing
appear when you type the password. This is a security feature in Linux.
2. After you have successfully logged in, you will see the command line prompt pi@raspberrypi~$.
3. To load the graphical user interface, type startx and press Enter on your keyboard.

RASPBERRY PI INSTALLATION MANUAL
www.researchdesignlab.com Page 8
DOWNLOAD AND INSTALL WIRING PI
WiringPi is maintained under GIT for ease of change tracking, however there is a Plan B if you’re unable
to use GIT for whatever reasons (usually your firewall will be blocking you, so do check that first!)
ONLINE INSTALL If you do not have GIT installed, then under any of the Debian releases (e.g. Raspbian), you can install it with: sudo apt-get install git-core If you get any errors here, make sure your Pi is up to date with the latest versions of Raspbian: sudo apt-get update sudo apt-get upgrade To obtain WiringPi using GIT: git clone git://git.drogon.net/wiringPi If you have already used the clone operation for the first time, then cd wiringPi git pull origin Will fetch an updated version then you can re-run the build script below. To build/install there is a new simplified script: cd wiringPi ./build The new build script will compile and install it all for you – it does use the sudo command at one point, so you may wish to inspect the script before running it.
OFFLINE INSTALL Click on this URL: (it should open in a new page) https://git.drogon.net/?p=wiringPi;a=summary Then look for the link marked snapshot at the right-hand side. You want to click on the top one. This will download a tar.gz file with a name like wiringPi-98bcb20.tar.gz. Note that the numbers and letters after wiringPi (98bcb20 in this case) will probably be different – they’re a unique identifier for each release. You then need to do this to install: tar xfz wiringPi-98bcb20.tar.gz cd wiringPi-98bcb20 ./build Note that the actual filename will be different – you will have to check the name and adjust accordingly.

RASPBERRY PI INSTALLATION MANUAL
www.researchdesignlab.com Page 9
TEST WIRINGPI’S INSTALLATION run the gpio command to check the installation: gpio -v gpio readall That should give you some confidence that it’s working OK. WiringPi is released under the GNU Lesser Public License version 3.
TESTING SERIAL PORT IN RASPBERRY PI A great way to test out the serial port is to use the minicom program. If you dont have this installed run sudo apt-get install minicom Connect your PC to the Raspberry Pi serial port using an appropriate serial port adapter and wiring, then open Putty or a similar serial terminal program on PC side. Setup a connection using the serial port at 9600 baud. Now run up minicom on the Raspberry Pi using minicom -b 9600 -o -D /dev/ttyAMA0 What you type into the minicom terminal screen should appear on the serial PC terminal and vice versa.