raspberry pi as low-cost hd surveillance camera · raspberry pi as low-cost hd surveillance camera...
TRANSCRIPT
Raspberry Pi as low-cost HD surveillancecamera
This article describes how to build a surveillance cam based on a Raspberry Pi micro-computerwhich records HD video when something moves in the monitored area.Live picture can be viewed
from any web browser,even from your mobile while you're on the road.
Written By: Feitan
Raspberry Pi as low-cost HD surveillance camera
© 2017 www.botsbits.org Page 1 of 16

TOOLS:Pliers (1)
Solder (1)
PARTS:Raspberry Pi Model B: (1)
Raspberry Pi Camera Module (1)
A housing for the camera (1)
Power supply (1)
SD card (1)
WiFi USB adapter (1)
Raspberry Pi as low-cost HD surveillance camera
© 2017 www.botsbits.org Page 2 of 16

Step 1 — Raspberry Pi as low-cost HD surveillance camera
At first, you should install the OSand software to the Raspberry Pibefore mounting it all together. AnOS is the basic operating systemsoftware that tells the Raspberryhardware what to do. Linux is perfectfor this. We have chosen Raspbian,as it's one of the most advanced OSfor the Raspberry with loads of helpand tutorials on the internet.
You need to prepare the SD card tobe able to run Raspbian on theRaspberry: this excellent tutorialfrom Adafruit will explain thenecessary steps.
Now temporarily connect yourRaspberry Pi board to LAN cable, amonitor (HDMI TV works out of thebox, but a HDMI-to-DVI cable likethis will do the job as well) and aUSB keyboard for the basic setup.
Insert the prepared SD card with theRaspbian installer on it and attachthe power supply. The Raspberryshould boot up and guide youthrough the setup process asexplained in this Adafruit tutorial.After this, you should have a basicRaspbian OS running.
Be sure to enable SSH in Raspbianso that you are able to control theRaspberry device also when there isno monitor and keyboard attached.
Raspberry Pi as low-cost HD surveillance camera
© 2017 www.botsbits.org Page 3 of 16

Step 2
Now that the basic setup is done,you should connect to yourRaspberry device from yourcomputer. You can connect to Linuxconsole from any computer in yourlocal network and control it like youwhere sitting directly in front of it.This is very important as oncemounted far away from yourdesktop,
you need to be able to make updatesand change the configuration of thiscamera any time later without theneed to detaching it from the walland bringing it back to your desk.
Remember that this cam is not just adump cam device but a verypowerful computer with Linux OSrunning on it. It's not limited to whatwe explain in this article now; it willfollow any development in softwareso that you will be able to installupdated software and more modulesany time later.
First, you need a software toconnect to the Linux console on theRaspberry. For Windows, you willneed the extra (free) softwarePuTTY. Download it from the PuTTYwebsite, install it and connect toyour Raspberry Pi device.
From now on, you don't need anymonitor and keyboard attached tothe Raspberry anymore.
Raspberry Pi as low-cost HD surveillance camera
© 2017 www.botsbits.org Page 4 of 16
Step 3
If you want to run this camera with aWiFi USB dongle (like we'vesuggested above), you will need todo some quick additional steps tomake WiFi work on the Raspberry:From the console (PuTTY window),edit the network properties of theRaspberry:
type: sudo nano/etc/network/interfaces
Now add these lines at the end ofthe file (or change existing lines tomatch these):
type: allow-hotplug wlan0
type: iface wlan0 inet dhcp
type: wpa-ssid "YOUR NETWORKSSID"
type: wpa-psk "WIFI PASSWORD"
Raspberry Pi as low-cost HD surveillance camera
© 2017 www.botsbits.org Page 5 of 16

Step 4
(Fill in the SSID and password foryour WiFi network) Reboot theRaspberry with this command andsee if it correctly connects to yourWiFi network:
type: sudo reboot
Raspberry Pi as low-cost HD surveillance camera
© 2017 www.botsbits.org Page 6 of 16

Step 5
Now it's time to assemble all the hardware components together into the housing. Depending on thehousing, this should not be a too complicated job (look at first pic)
As our housing had a very large glass window at the front, we have closed it with a black paperwith a hole in it (look at second picture)
This also has the advantage that the red recording light of the Raspberry Pi camera module is notvisible anymore. If you like the camera recording led to be visible, don't cover it. Whenever thecamera is detecting any motion or is recording, the led light will glow in a very bright red.
Raspberry Pi as low-cost HD surveillance camera
© 2017 www.botsbits.org Page 7 of 16

Step 6
A very good (and free) motiondetection/surveillance software withmany configuration options ismotion. As the current version ofthis software does not support theRaspberry camera module yet,we've followed this specialinstructions to download and install aspecial build with support for thiscamera module.
This motion-mmal build from this linkis a replacement for the motionpackage. Install it replacing motion ifyou've already installed it. Renameall "motion-mmal" to "motion". We'repretty sure that the official build ofmotion will shortly also support theRaspberry camera module as well.
A very important command to editthe motion configuration file is
type: sudo nano /etc/motion.conf
We've made some changes to themotion.conf file to fit our needs. Ourcurrent motion.conf file can bedownloaded here:raspberry_surveillance_cam_scavix.zip
Some of the main changes are:Make sure that motion is alwaysrunning as a daemon in thebackground:
type: daemon on
Raspberry Pi as low-cost HD surveillance camera
© 2017 www.botsbits.org Page 8 of 16
Step 7
As we want to use a high qualitysurveillance video, we've set theresolution to 1280x720:
type: width 1280
type: height 720
We don't need real-time video, 2pictures per second are totally ok forour needs:
type: framerate 2
This is a very handy feature of themotion software: record some (2 inour configuration) frames before andafter the motion in the image wasdetected:
type: pre_capture 2
type: post_capture 2
Raspberry Pi as low-cost HD surveillance camera
© 2017 www.botsbits.org Page 9 of 16

Step 8
We don't want endless movies.Instead, we want to have max. 10minutes slices of the motion videos:
type: max_movie_time 600
As some media players like VLC areunable to play the recorded movies,we've changed the codec tomsmpeg4. Then, the movies playcorrectly in all players:
type: ffmpeg_video_codec msmpeg4
Raspberry Pi as low-cost HD surveillance camera
© 2017 www.botsbits.org Page 10 of 16

Step 9
Enable access to the live streamfrom anywhere. Otherwise onlylocalhost (= the Raspberry device)would be allowed to access the livestream:
type: stream_localhost off
If you want to protect the live streamwith a username and password, youshould enable this:
type: stream_auth_method 2
type: stream_authenticationSOMEUSERNAME:SOMEPASSWORD
All configuration parameters areexplained in detail in the motionconfig documentation.
Raspberry Pi as low-cost HD surveillance camera
© 2017 www.botsbits.org Page 11 of 16

Step 10
As the SD card of the Raspberry Piis a pretty limited resource, we'vedecided to let the Raspberry camstore the videos on one of ourWindows Servers. This is prettyeasy:
First share a folder from someWindows machine. Just follow someguides on the internet if you've nevershared a folder from a Windowsmachine before.
Then open the fstab configuration onyour Raspberry from a PuTTYconsole or directly from the device:
type: sudo nano /etc/fstab
Now add an extra line with theconfiguration of your Windowsnetwork shared folder:
type://YOURSERVERNAME/YOURSHAREDFOLDERNAME /mnt/camsharecifsusername=YOURSHAREDFOLDERUSERNAME,password=YOURSHAREDFOLDERPASSWORD,iocharset=utf8,file_mode=0777,dir_mode=07770 0
After a reboot, the Raspberry shouldhave an extra folder /mnt/camsharemounted to the Windows sharedfolder. You should now set in yourmotion.conf:
Raspberry Pi as low-cost HD surveillance camera
© 2017 www.botsbits.org Page 12 of 16

Step 11
type: target_dir /mnt/camshare
so that motion saves all movies tothe shared folder on the Windowsmachine.
Raspberry Pi as low-cost HD surveillance camera
© 2017 www.botsbits.org Page 13 of 16

Step 12
We had some trouble that motion was not automatically started on a reboot of the Raspberry.We've found out that this was because the mounted folder of the Windows machine was not yetready when motion tried to access it. A very quick fix solved our problem:
Just edit the motion file with
type: sudo nano /etc/init.d/motion
and add the line
type: sleep 30
to the start-sequence:(refer to pic number 2)
Our changed /etc/init.d/motion script can be found in the attachedraspberry_surveillance_cam_scavix.zip
Raspberry Pi as low-cost HD surveillance camera
© 2017 www.botsbits.org Page 14 of 16

Step 13
After all these steps, you can finallymount the surveillance camera tothe destination point.
Some helpful hints:
Be sure to place the power supply ina dry and safe place
Keep an eye on the WiFi signal: ifyou mount the camera out of rangeof the WiFi, it won't be able to sendany video and motion videos
Raspberry Pi as low-cost HD surveillance camera
© 2017 www.botsbits.org Page 15 of 16
What you will get:
See live stream in any web browser from anywhere
Record any motion into video file
Usually, such a cam will cost you around US$1.000, but with the result from this article, you will get sucha cam for only about US$100.
This document was last generated on 2017-06-23 07:43:40 AM.
Step 14
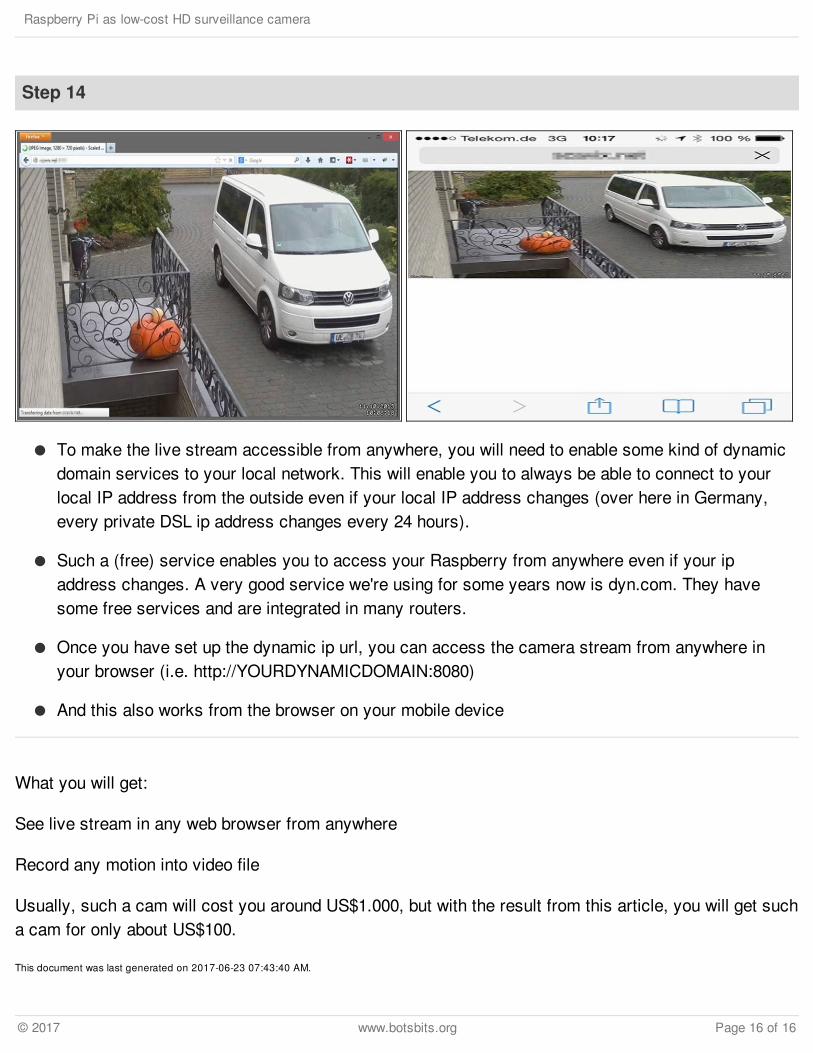
To make the live stream accessible from anywhere, you will need to enable some kind of dynamicdomain services to your local network. This will enable you to always be able to connect to yourlocal IP address from the outside even if your local IP address changes (over here in Germany,every private DSL ip address changes every 24 hours).
Such a (free) service enables you to access your Raspberry from anywhere even if your ipaddress changes. A very good service we're using for some years now is dyn.com. They havesome free services and are integrated in many routers.
Once you have set up the dynamic ip url, you can access the camera stream from anywhere inyour browser (i.e. http://YOURDYNAMICDOMAIN:8080)
And this also works from the browser on your mobile device
Raspberry Pi as low-cost HD surveillance camera
© 2017 www.botsbits.org Page 16 of 16