rapid… · rapid shredder 2400w specifications motor power: 2400w (s6 40%) 2000w (s1) no load...
TRANSCRIPT

RAPID SHREDDER2400W
SPECIFICATIONSMotor Power: 2400W (S6 40%) 2000W (S1)No Load Speed: 3910/minMax Cutting Ø: 40mmNoise Level: 108 dB
Blades: ReversibleWeight: 11 kg
RSH-100U
WHAT’S IN THE BOX
WARRANTY
1116
Wheel Caps x 2
Spanner/Screwdriver Hex Key
Wheel Axle
Push Stick
Hopper Wheels
Push Stick Holder
Stand
Washers (12.5 & 8.2mm) x 2
Bush Bearing x 2 Locking Nuts x 2
Screw & Washers x 2
OZITO UK Unit 9 Stadium Court, Wirral International Business Park, Plantation Road, Bromborough, Wirral, CH62 3QG
All of our products undergo strict quality checks to ensure that they reach you in perfect condition. In the unlikely event that your device develops a fault, please contact our service department at the address shown on this guarantee card. You can also contact us by telephone using the customer service number shown. Please note the following terms under which guarantee claims can be made:
1. These warranty terms regulate additional warranty services, which the manufacturer mentioned below promises to buyers of its new products in addition to their statutory guarantee claims are not affected by this guarantee. Our guarantee is free of charge to you.
2. The warranty services only covers defects due to material or manufacturing faults on a product which you have bought from the manufacturer mentioned below are limited to either the rectification of said defects on the product or the replacement of the product, whichever we prefer. Please note that our devices are not designed for use in commercial, trade or professional applications. A guarantee contract will not be created if the device has been used by commercial, trade or industrial business or has been exposed to similar stresses during the guarantee period.
3. The following are not covered by our guarantee: - Damage to the device caused by a failure to follow the assembly instructions or due to incorrect installation, a failure to follow the operating instructions (for example connecting it to an incorrect mains voltage or current type) or a failure to follow the maintenance and safety instructions or by exposing the device to abnormal environmental conditions or by lack of care and maintenance. - Damage to the device caused by abuse or incorrect use (for example overloading the device or the use or unapproved tools or accessories), ingress of foreign bodies into the device (such as sand, stones or dust, transport damage), the use of force or damage caused by external forces (for example by dropping it). - Damage to the device or parts of the device caused by normal or natural wear or tear or by normal use of the device.
4. Your Product is guaranteed for a period of 36 months from the original date of purchase and is intended for DIY (Do It Yourself) use only. Warranty excludes consumable parts. Guarantee claims should be submitted before the end of the guarantee period within two weeks of the defect being noticed. No guarantee claims will be accepted after the end of the guarantee period. The original guarantee period remains applicable to the device even if repairs are carried out or parts are replaced. In such cases, the work performed or parts fitted will not result in an extension of the guarantee period, and no new guarantee will become active for the work performed or parts fitted. This also applies if an on-site service is used.
IN ORDER TO MAKE A CLAIM UNDER THIS WARRANTY YOU MUST RETURN THE PRODUCT TO THE PLACE OF PURCHASE WITH YOUR REGISTER RECEIPT.
Please refer to the restrictions of this warranty concerning wearing parts, consumables and missing parts as set out in the service information in these operating instructions.
CUSTOMER SERVICE HELPLINE GB: 0151 294 4488 IRL: 1850 882711 Ozito-diy.co.uk
ozito-diy.co.uk
ORIGINAL INSTRUCTIONS

3
ONLINE MANUALScan this QR Code with your mobile device to take you to the online manual.
After removing the shredder from the carton, check that the shredder has not been damaged. Unpack the contents.
Fitting the wheels and stand1. Carefully place the shredder housing
upside down on a flat surface. Place each leg of the stand into the two holes at the base of the shredder housing.
2. Using the spanner/screwdriver secure the legs using the two screws and washers provided, turn in a clockwise direction.
3. Thread the wheel axle through the leg stand.
4. Insert the large washer onto the wheel axle.
1. Hopper2. Transport handle3. Locking knob4. On/off switch
5. Power cord6. Push stick holder7. Wheel cap8. Wheel
9. Push stick10. Hex key
11. Spanner/screwdriver
RAPID SHREDDER
ACCESSORIES
KNOW YOUR PRODUCT
1. WHEELS & STAND
ASSEMBLY
1 2 3 4
5
6
7
8
11
WARNING! THE SHREDDER MAY REQUIRE A TWO PERSON LIFT. KEEP YOUR FEET APART SO THAT
YOU HAVE A STABLE POSITION, BEND AT THE KNEES AND KEEP YOUR BACK STRAIGHT.
9 10
WARNING! ENSURE THE TOOL IS TURNED OFF AND DISCONNECTED FROM THE POWER SUPPLY
BEFORE PERFORMING ANY OF THE FOLLOWING OPERATIONS.

Starting the shredder
1. Connect the power cord to an appropriate extension cord and plug the extension cord into the mains power point.
2. To start the shredder move the on/off switch to the
ON “I” position. When the shredder is turned on there will be a short delay before the motor starts and the speed will fluctuate for a few seconds.
This is normal as the shredder is fitted with a preset speed controller designed to keep the speed optimal in use.
3. To stop the shredder move the on/off switch to the OFF “O” position.
5. Place the bush bearing onto the wheel axle.
6. Insert the wheel over the bush bearing ensuring that the larger inner diameter of the wheel is facing outwards. This allows the wheel cap to be fitted.
7. Place the small washer onto the wheel axle followed by the locking nut. Secure the flat of the wheel axle with a 10mm spanner (not included) and tighten the locking nut using the spanner/screwdriver, turn in a clockwise direction.
8. Place the wheel cap onto the wheel and click in place.
9. Repeat steps 4 to 8 for the opposite wheel.
2. STARTING
OPERATION
WARNING! PRIOR TO STARTING THE MOTOR ENSURE THE SHREDDER IS EMPTY. ENSURE
YOU WEAR SAFETY GLOVES, SAFETY GLASSES AND EARMUFFS WHEN THE SHREDDER IS IN USE.
I II
I II
WARNING! THE POWER SUPPLY FOR THIS PRODUCT SHOULD BE PROTECTED BY A
RESIDUAL CURRENT DEVICE RATED AT 30MA OR LESS.

3. OPERATING THE SHREDDER
Overload Protection1. The shredder is equipped with a built in motor protection system that
prevents the motor from being overloaded. The motor will switch off automatically in the event of overloading.
2. If overloading occurs wait 1-5 minutes and allow the motor to cool down before restarting the shredder.
3. If the shredder motor does not restart disconnect from the mains power supply.
Note: Refer to Cleaning out plate hopper section or Troubleshooting.
Safety InterlockThe shredder is fitted with a safety switch on the closure between the shredder housing and motor housing.
This acts as a safety mechanism to prevent the shredder from operating if it is not closed correctly.
- If the housing is not closed correctly and secured with the locking knob, the safety switch will prevent the shredder from being turned on.
- If this occurs disassemble the housing and ensure the contact surfaces are clean. Refit and tighten the locking knob in a clockwise direction. Take care to correctly line up the thread on the locking knob before tightening to avoid cross threading.
Shredding
The following types of material can be used in the shredder:
• Twigs
• Branches
• Waste from cut bushes
• Waste from hedge trimming
1. Feed the material to be shredded into the feeding hopper.
2. The shredder will automatically pull the material through the feeding hopper. The push stick can be used to assist in feeding the garden material.
Note: The shredder may clog if too much fine material is fed in. To prevent clogging, mix fine material with larger material.
WARNING! THE SHREDDER IS NOT SUITABLE FOR MATERIALS INCLUDING GLASS, METAL, PLASTIC
BAGS, STONES, FABRIC, EARTH COVERED ROOTS, SOFT LEAFY MATERIAL AND WASTE WITHOUT A FIRM CONSISTENCY (EG. KITCHEN WASTE).
WARNING! TO PREVENT DAMAGE TO THE SHREDDER IT IS RECOMMENDED THAT GARDEN
MATERIAL GREATER THAN 35MM IN DIAMETER IS NOT FED INTO THE SHREDDER.
40mm Ø
35mm Ø
MAX
CAUTION! NEVER LOOSEN THE LOCKING KNOB WHEN THE POWER IS ON. ALWAYS ENSURE THE POWER IS TURNED OFF AND PULLED OUT OF THE MAINS POWER.
I II
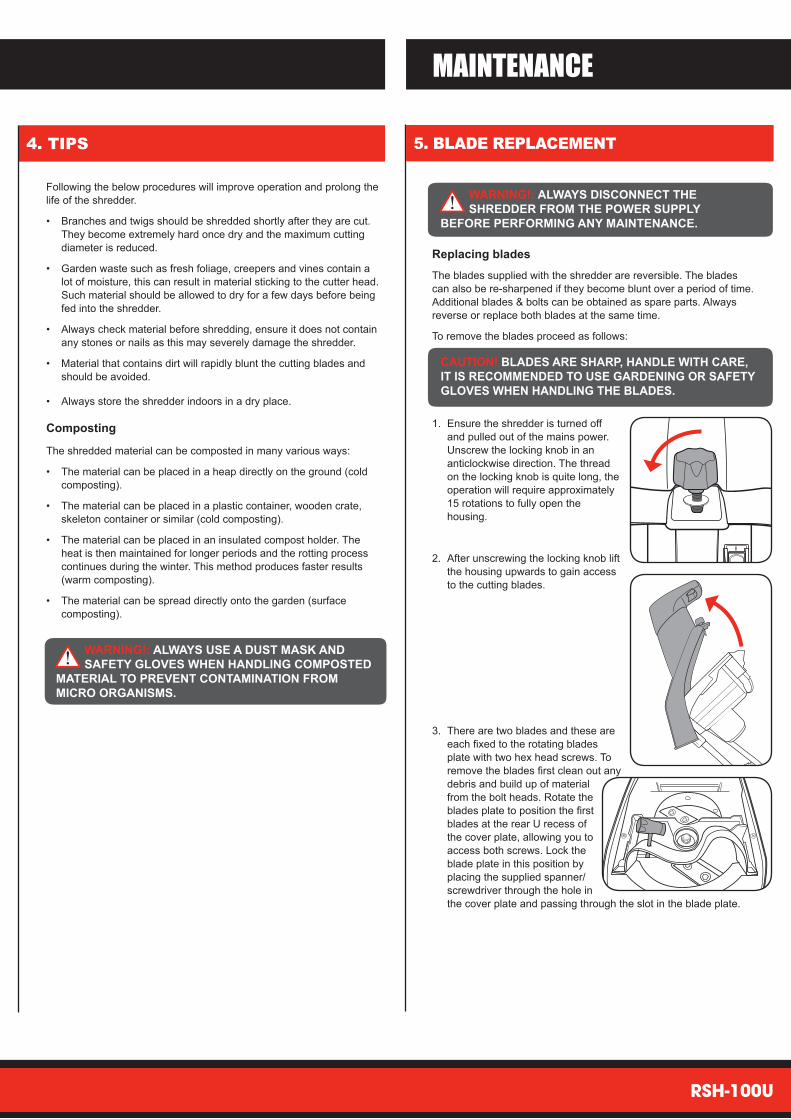
Replacing bladesThe blades supplied with the shredder are reversible. The blades can also be re-sharpened if they become blunt over a period of time. Additional blades & bolts can be obtained as spare parts. Always reverse or replace both blades at the same time.
To remove the blades proceed as follows:
1. Ensure the shredder is turned off and pulled out of the mains power. Unscrew the locking knob in an anticlockwise direction. The thread on the locking knob is quite long, the operation will require approximately 15 rotations to fully open the housing.
2. After unscrewing the locking knob lift the housing upwards to gain access to the cutting blades.
3. There are two blades and these are each fixed to the rotating blades plate with two hex head screws. To remove the blades first clean out any debris and build up of material from the bolt heads. Rotate the blades plate to position the first blades at the rear U recess of the cover plate, allowing you to access both screws. Lock the blade plate in this position by placing the supplied spanner/ screwdriver through the hole in the cover plate and passing through the slot in the blade plate.
RSH-100U
4. TIPS
MAINTENANCE
5. BLADE REPLACEMENT
CAUTION! BLADES ARE SHARP, HANDLE WITH CARE, IT IS RECOMMENDED TO USE GARDENING OR SAFETY GLOVES WHEN HANDLING THE BLADES.
WARNING!: ALWAYS USE A DUST MASK AND SAFETY GLOVES WHEN HANDLING COMPOSTED
MATERIAL TO PREVENT CONTAMINATION FROM MICRO ORGANISMS.
Following the below procedures will improve operation and prolong the life of the shredder.
• Branches and twigs should be shredded shortly after they are cut. They become extremely hard once dry and the maximum cutting diameter is reduced.
• Garden waste such as fresh foliage, creepers and vines contain a lot of moisture, this can result in material sticking to the cutter head. Such material should be allowed to dry for a few days before being fed into the shredder.
• Always check material before shredding, ensure it does not contain any stones or nails as this may severely damage the shredder.
• Material that contains dirt will rapidly blunt the cutting blades and should be avoided.
• Always store the shredder indoors in a dry place.
Composting
The shredded material can be composted in many various ways:
• The material can be placed in a heap directly on the ground (cold composting).
• The material can be placed in a plastic container, wooden crate, skeleton container or similar (cold composting).
• The material can be placed in an insulated compost holder. The heat is then maintained for longer periods and the rotting process continues during the winter. This method produces faster results (warm composting).
• The material can be spread directly onto the garden (surface composting).
I
WARNING!: ALWAYS DISCONNECT THE SHREDDER FROM THE POWER SUPPLY
BEFORE PERFORMING ANY MAINTENANCE.
6. CLEANING
MAINTENANCE cont.
Cleaning
Always clean the shredder after each use.
Cleaning the hopper plate
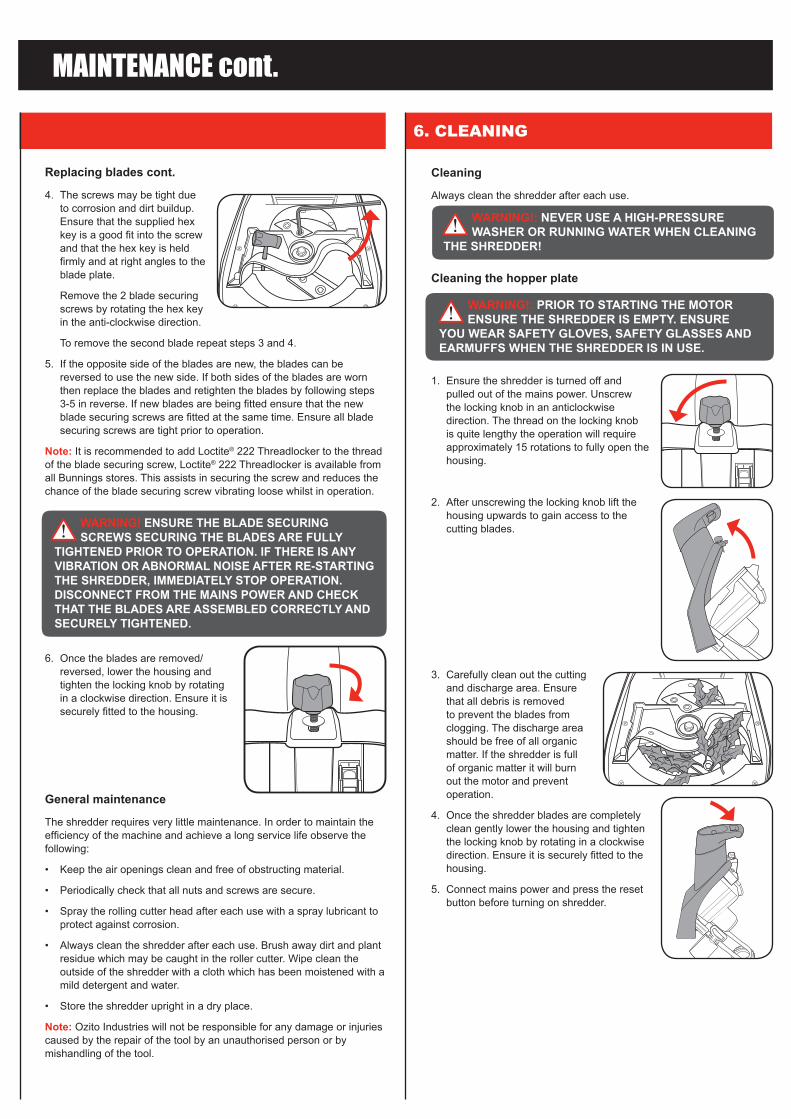
1. Ensure the shredder is turned off and pulled out of the mains power. Unscrew the locking knob in an anticlockwise direction. The thread on the locking knob is quite lengthy the operation will require approximately 15 rotations to fully open the housing.
2. After unscrewing the locking knob lift the housing upwards to gain access to the cutting blades.
3. Carefully clean out the cutting and discharge area. Ensure that all debris is removed to prevent the blades from clogging. The discharge area should be free of all organic matter. If the shredder is full of organic matter it will burn out the motor and prevent operation.
4. Once the shredder blades are completely clean gently lower the housing and tighten the locking knob by rotating in a clockwise direction. Ensure it is securely fitted to the housing.
5. Connect mains power and press the reset button before turning on shredder.
WARNING!: NEVER USE A HIGH-PRESSURE WASHER OR RUNNING WATER WHEN CLEANING
THE SHREDDER!
WARNING!: PRIOR TO STARTING THE MOTOR ENSURE THE SHREDDER IS EMPTY. ENSURE
YOU WEAR SAFETY GLOVES, SAFETY GLASSES AND EARMUFFS WHEN THE SHREDDER IS IN USE.
Replacing blades cont.
4. The screws may be tight due to corrosion and dirt buildup. Ensure that the supplied hex key is a good fit into the screw and that the hex key is held firmly and at right angles to the blade plate.
Remove the 2 blade securing screws by rotating the hex key in the anti-clockwise direction.
To remove the second blade repeat steps 3 and 4.
5. If the opposite side of the blades are new, the blades can be reversed to use the new side. If both sides of the blades are worn then replace the blades and retighten the blades by following steps 3-5 in reverse. If new blades are being fitted ensure that the new blade securing screws are fitted at the same time. Ensure all blade securing screws are tight prior to operation.
Note: It is recommended to add Loctite® 222 Threadlocker to the thread of the blade securing screw, Loctite® 222 Threadlocker is available from all Bunnings stores. This assists in securing the screw and reduces the chance of the blade securing screw vibrating loose whilst in operation.
6. Once the blades are removed/reversed, lower the housing and tighten the locking knob by rotating in a clockwise direction. Ensure it is securely fitted to the housing.
General maintenance
The shredder requires very little maintenance. In order to maintain the efficiency of the machine and achieve a long service life observe the following:
• Keep the air openings clean and free of obstructing material.
• Periodically check that all nuts and screws are secure.
• Spray the rolling cutter head after each use with a spray lubricant to protect against corrosion.
• Always clean the shredder after each use. Brush away dirt and plant residue which may be caught in the roller cutter. Wipe clean the outside of the shredder with a cloth which has been moistened with a mild detergent and water.
• Store the shredder upright in a dry place.
Note: Ozito Industries will not be responsible for any damage or injuries caused by the repair of the tool by an unauthorised person or by mishandling of the tool.
WARNING! ENSURE THE BLADE SECURING SCREWS SECURING THE BLADES ARE FULLY
TIGHTENED PRIOR TO OPERATION. IF THERE IS ANY VIBRATION OR ABNORMAL NOISE AFTER RE-STARTING THE SHREDDER, IMMEDIATELY STOP OPERATION. DISCONNECT FROM THE MAINS POWER AND CHECK THAT THE BLADES ARE ASSEMBLED CORRECTLY AND SECURELY TIGHTENED.
I
I
DESCRIPTION OF SYMBOLS
SPARE PARTS
Read instructions
V Volts Hz Hertz
~ Alternating current W Watts
/min Revolutions or reciprocation per minute no No load speed
Warning
Do not expose to rain
dB Decibel (noise) rating
Beware of debris beingejected from the shredder
Keep by standers away
Wear eye and ear protection Wear safety gloves
Sound power level
Danger - Rotating blades. Keep hands and feet out of openings while machine is running
108Disconnect and discontinue use should the power cord be damaged
Double insulated
Problem Cause SolutionsThe motor does not run
The shredder may have been overloaded.
Turn the shredder off and allow it to cool down for 1-5 minutes. Press the reset button and turn on the shredder.
The closure between the shredder housing and motor housing has not been closed correctly.
The safety interlock will not allow power to the shredder. Open the housing and ensure the contact surfaces are clean. Refit and tighten the locking knob in a clockwise direction.
Power failure. Check the power supply/cord and house fuse.
The material to be shredded is not pulling through the unit
The hopper plate is blocked.
Disconnect all power and unscrew the locking knob. Carefully clean all debris and free organic matter from the discharge area.Lower the housing and tighten the locking knob to ensure it is secure.
The blades are blunt and need to be changed.
Reverse or replace the blades.
The motor is cutting out on overload
The blades are blunt and need to be changed.
Reverse or replace the blades.
Smoke is coming out of the hopper
The cutter assembly is clogged.
Open the shredder and clean out the hopper.
TROUBLESHOOTING
Spare parts can be ordered from the Special Orders Desk at your local Bunnings Warehouse or Homebase store. For further information, or any parts visit www.ozito-diy.co.uk or contact Ozito Customer Service: Great Britain: 0151 294 4488 Ireland: 1850 882711 E-mail: [email protected]

This appliance is not intended for use by persons (including children) with reduced physical, sensory or mental capabilities, or lack of experience and knowledge, unless they have been given supervision or instruction concerning use of the appliance by a person responsible for their safety.Recommendations for the use of a residual current device with a rated residual current of 30mA or less.• Only use the shredder in dry conditions and never outdoors when it is raining.• Do not allow children or any person who has not read this instruction manual or who
is not familiar with the shredder.• Remember that the operator may be held responsible for accidents or hazards occurring
to other people and/or their property.• Ensure the shredder is placed on a firm and level surface prior to using.• Before starting the shredder, ensure the chute is empty.• Never use the shredder with damaged safety devices or without protection.• Never operate the shredder unless the chute is in place and securely fastened.• Wear ear protection when operating the shredder.• Never look directly into the outlet while the shredder is running as loose debris
may be ejected.• Do not allow processed material to build up in the discharge chute. This may prevent
proper discharge and can result in kickback of material through the feeding hopper.
• If the machine becomes clogged, switch off the machine and disconnect from the power. Allow the cutter to come to a stop. Clear debris from the cutter assembly.
• Never attempt to shred bones, stone, glass, metals, plastic or rags.• Ensure the customer assembled screws and nuts are properly tightened.• Wear protective gloves, safety glasses and avoid loose clothing.
WARNING! Rotating cutter head. Keep hands and feet out of openings
• Store shredder upright in a dry place when not in use.• Never put your hands in the cutter area while the cutter assembly is running or the shredder
is plugged in. The cutter continues to run for a few seconds after the shredder has been switched off.
• If the cutter strikes any foreign objects or if the shredder starts making any unusual noise or vibration, switch off the shredder immediately and disconnect the power.
Allow the cutter to come to a stop and take the following steps: - Inspect for damage - Check and tighten any loose parts - Have any damaged parts replaced and/or repaired by an electrician or power tool repairer.• Always switch off the shredder and disconnect the power whenever you leave the work area.
WARNING! Read all safety warnings and all instructions. Failure to follow the warnings and instructions may result in electric shock, fire and/or serious injury.Save all warnings and instructions for future reference.
The term “power tool” in the warnings refers to your mains-operated (corded) power tool or battery-operated (cordless) power tool.1. Work area safetya. Keep work area clean and well lit. Cluttered or dark areas invite accidents.b. Do not operate power tools in explosive atmospheres, such as in the presence of
flammable liquids, gases or dust. Power tools create sparks which may ignite the dust or fumes.
c. Keep children and bystanders away while operating a power tool. Distractions can cause you to lose control.
2. Electrical safetya. Power tool plugs must match the outlet. Never modify the plug in any way. Do not use
any adapter plugs with earthed (grounded) power tools. Unmodified plugs and matching outlets will reduce risk of electric shock.
b. Avoid body contact with earthed or grounded surfaces, such as pipes, radiators, ranges and refrigerators. There is an increased risk of electric shock if your body is earthed or grounded.
c. Do not expose power tools to rain or wet conditions. Water entering a power tool will increase the risk of electric shock.
d. Do not abuse the cord. Never use the cord for carrying, pulling or unplugging the power tool. Keep cord away from heat, oil, sharp edges or moving parts. Damaged or entangled cords increase the risk of electric shock.
e. When operating a power tool outdoors, use an extension cord suitable for outdoor use. Use of a cord suitable for outdoor use reduces the risk of electric shock.
f. If operating a power tool in a damp location is unavoidable, use a residual current device (RCD) protected supply. Use of an RCD reduces the risk of electric shock.
3. Personal safetya. Stay alert, watch what you are doing and use common sense when operating a power
tool. Do not use a power tool while you are tired or under the influence of drugs, alcohol or medication. A moment of inattention while operating power tools may result in serious personal injury.
b. Use personal protective equipment. Always wear eye protection. Protective equipment such as dust mask, non-skid safety shoes, hard hat, or hearing protection used for appropriate conditions will reduce personal injuries.
c. Prevent unintentional starting. Ensure the switch is in the off-position before connecting to power source and/or battery pack, picking up or carrying the tool.
Carrying power tools with your finger on the switch or energising power tools that have the switch on invites accidents.
d. Remove any adjusting key or wrench before turning the power tool on. A wrench or a key left attached to a rotating part of the power tool may result in personal injury.
e. Do not overreach. Keep proper footing and balance at all times. This enables better control of the power tool in unexpected situations.
f. Dress properly. Do not wear loose clothing or jewellery. Keep your hair, clothing and gloves away from moving parts. Loose clothes, jewellery or long hair can be caught in moving parts.
g. If devices are provided for the connection of dust extraction and collection facilities, ensure these are connected and properly used. Use of dust collection can reduce dust-related hazards.
4. Power tool use and carea. Do not force the power tool. Use the correct power tool for your application. The correct
power tool will do the job better and safer at the rate for which it was designed.b. Do not use the power tool if the switch does not turn it on and off. Any power tool that
cannot be controlled with the switch is dangerous and must be repaired.c. Disconnect the plug from the power source and/or the battery pack from the power tool
before making any adjustments, changing accessories, or storing power tools. Such preventive safety measures reduce the risk of starting the power tool accidentally.
d. Store idle power tools out of the reach of children and do not allow persons unfamiliar with the power tool or these instructions to operate the power tool. Power tools are dangerous in the hands of untrained users.
e. Maintain power tools. Check for misalignment or binding of moving parts, breakage of parts and any other condition that may affect the power tool’s operation. If damaged, have the power tool repaired before use. Many accidents are caused by poorly maintained power tools.
f. Keep cutting tools sharp and clean. Properly maintained cutting tools with sharp cutting edges are less likely to bind and are easier to control.
g. Use the power tool, accessories and tool bits etc. in accordance with these instructions, taking into account the working conditions and the work to be performed. Use of the power tool for operations different from those intended could result in a hazardous situation.
5. Servicea. Have your power tool serviced by a qualified repair person using only identical
replacement parts. This will ensure that the safety of the power tool is maintained.b. If the supply cord is damaged, it must be replaced by the manufacturer, its service agent
or similarly qualified persons in order to avoid a hazard.
GENERAL POWER TOOL SAFETY WARNINGS
ADDITIONAL SAFETY INSTRUCTIONS FOR SHREDDERS
ELECTRICAL SAFETY WARNING! When using mains-powered tools, basic safety precautions, including
the following, should always be followed to reduce risk of fire, electric shock, personal injury and material damage.
Read the whole manual carefully and make sure you know how to switch the tool off in an emergency, before operating the tool. Save these instructions and other documents supplied with this tool for future reference.The manufacturer cannot accept any liability for damage or accidents which arise due to a failure to follow these instructions and the safety information.Before you connect the equipment to mains supply make sure that the data on the rating plate are identical to the mains data.
This tool is double insulated; therefore no earth wire is required.
The power supply for this product should be protected by a residual current device (rated at 30mA or less). A residual current device reduces the risk of electric shock.If the supply cord is damaged, it must be replaced by an electrician or a power tool repairer in order to avoid a hazard.Note: Double insulation does not take the place of normal safety precautions when operating this tool. The insulation system is for added protection against injury resulting from a possible electrical insulation failure within the tool.Using an Extension LeadAlways use an approved extension lead suitable for the power input of this tool. Before use, inspect the extension lead for signs of damage, wear and ageing. Replace the extension lead if damaged or defective. When using an extension lead on a reel, always unwind the lead completely. Use of an extension lead not suitable for the power input of the tool or which is damaged or defective may result in a risk of fire and electric shock.