ram air gear dryers user manual€¦ · · 2017-12-09ram air gear dryers user manual models...
TRANSCRIPT

RAM AIR GEAR DRYERSUSER MANUALMODELS T4-MU, T6-MU AND T4-IHT
TABLE OF CONTENTS:
Please read this manual carefully before operating your Ram Air Gear Dryer and retain it for future reference.
1 SAFETY INSTRUCTIONS
2 TECHNICAL SPECIFICATIONS
3 OPERATION INSTRUCTIONS
4 TOUCHSCREEN CONTROL
5 TROUBLESHOOTING
6 CLEANING AND MAINTENANCE
7 WARRANTY INFORMATION

1 IMPORTANT SAFETY INSTRUCTIONS
855-393-3379 (USA) | 888-393-3379 (Canada) | www.ramairgeardryer.comQUESTIONS? CONTACT US.
1. Read all instructions before installing or using this dryer.2. Extreme caution is necessary when used by or near children or invalids and whenever the dryer
is left operating and unattended.3. Do not operate dryer after it malfunctions. Unplug from outlet and have dryer inspected by
an authorized service facility.4. Do not use outdoors.5. To disconnect power, press Start/Stop button and unplug dryer/heater from the outlet.6. Use this dryer only as described in this manual, Any other use not recommended by the manufacturer.7. WARNING: Risk of fire. Do not use in a residential or household locations.8. WARNING: Hazardous Voltage, Electrical shock Hazard. This unit is to be serviced by a
trained personnel only.9. WARNING: Unplug the appliance from the power supply before servicing.10. WARNING: To reduce the risk of fire or electrical shock, do not use this appliance with
a solid-state speed control device.11. Do not operate the blower when not properly secured on the pipe.12. To reduce the risk of injury, disconnect from power supply before servicing.13. Do not operate fan with a damaged cord or plug. Return to an authorized service facility
for examination and/or repair.14. Do not cover cord with any type of floor covering including carpeting, rugs or runners. Do not
run cord under furniture or appliance. Keep cord away from traffic areas or where it may be a tripping hazard.
15. To reduce the risk of electrical shock, do not expose to water or rain.16. Do not use an extension cord.17. Do not unplug by pulling on cord. Grasp plug and remove from receptacle or outlet device.18. Use this unit only in the manner intended by the manufacturer. If you have any questions,
contact the manufacturer.19. If connected to a circuit protected by fuses use time delay fuses with this appliance.20. Use a dedicated outlet and breaker for this appliance.21. Rotating blades. Keep hands and feet away from unguarded openings.22. WARNING: to reduce the risk of fire, do not store or use gasoline or other flammable vapors
and liquids in the vicinity of the dryer. 23. Ensure garments are secure and will not fall off dryer. Damage may result to articles falling
off dryer.24. To reduce the risk of Fire, Electrical shock, or injury to persons: do not tamper with this device25. Do not disassemble or modify the dryer or controls.26. Do not use any power cord other than that provided with this dryer. Do not touch the power
cord with a wet hand. Ensure that the power plug is easily accessible.27. Do not climb or allow children to climb on dryer.28. Unplug this apparatus during lighting storms or when unused for long periods of time.29. Operate dryer indoors, in a warm, clean, dry, humidity controlled environment.30. Do not operate dryer in a location where UV damage may occur.31. Wear hearing protection while working in the vicinity of an operating dryer.32. If an object gets inside the dryer, or if the enclosure becomes damaged, unplug the power supply
cord immediately. Contact an Authorized service center for an evaluation.

2 TECHNICAL SPECIFICATIONS
80 in(2032 mm)
28.6 in(726 mm)
90 in(2286 mm)
32.4 in(822 mm)
Specifications subject to change without notice. Please visit www.ramairgeardryer.com or contact Ram Air for most current specifications.
T4-MU
Max Number of Gear Sets 4
Number of Accessory Drying Ports 12
Machine Dimensions (WxDxH)90-1/8 x 28 x 80 in
(2289 x 711 x 2032 mm)
Shipping Dimensions (WxDxH)93 x 30 x 39-1/2 in
(2362 x 762 x 1003 mm)
Machine Weight 352.5 lbs (159.9 kg)Shipping Weight 402 lbs (182.3 kg)Construction Material 12 gauge steel/powder coated paintShut-off Valve Diameter 2 in (51mm)Caster Type 360˚ swivelHose Barb Attachment Diameter 4- or 6-inch (102 or 152 mm)Motor Power 1 HPMotor Speed 3450 rpmAir Flow 800 cfmAvailable Voltages (Volts/Hertz/Phase) 120/60/1Fan Diameter 10-5/8 inch (270 mm)Fan Wheel Bore 5/8 inch (16 mm)Thermal Protection 115 voltsControl Type Touchscreen

2 TECHNICAL SPECIFICATIONS (continued)
855-393-3379 (USA) | 888-393-3379 (Canada) | www.ramairgeardryer.comQUESTIONS? CONTACT US.
120.5 in(3061 mm)
80 in(2032 mm)
30 in(762 mm)
32.4 in(822 mm)
Specifications subject to change without notice. Please visit www.ramairgeardryer.com or contact Ram Air for most current specifications.
T6-MU
Max Number of Gear Sets 6
Number of Accessory Drying Ports 18
Machine Dimensions (WxDxH)120-1/4 x 28 x 80 in
(3054 x 711 x 2032 mm)
Shipping Dimensions (WxDxH)123-1/4 x 30 x 39-1/2 in (3131 x 762 x 1003 mm)
Machine Weight 458 lbs (207.8 kg)Shipping Weight 527 lbs (239 kg)
Construction Material 12 gauge steel/powder coated paint
Shut-off Valve Diameter 2 in (51mm)Caster Type 360˚ swivel
Hose Barb Attachment Diameter 4- or 6-inch (102 or 152 mm)
Motor Power 1 HPMotor Speed 3450 rpmAir Flow 800 cfmAvailable Voltages (Volts/Hertz/Phase) 1240/60/1Fan Diameter 10-5/8 inch (270 mm)Fan Wheel Bore 5/8 inch (16 mm)Thermal Protection 115 voltsControl Type Touchscreen

80 in(2032 mm)
81 in(2057 mm)
97 in(2463 mm)
81 in(2057 mm)
28 in(711 mm)
32.4 in(822 mm)
Specifications subject to change without notice. Please visit www.ramairgeardryer.com or contact Ram Air for most current specifications.
T4-IHT
Max Number of Gear Sets 4
Number of Accessory Drying Ports 12
Machine Width 80 in (2032 mm)Machine Depth 28 in (711 mm)Machine Height adjustable up to 97 in (2463 mm)
Shipping Dimensions (WxDxH)93 x 30 x 39-1/2 in
(2362 x 762 x 1003 mm)Machine Weight 418.5 lbs (190 kg)Shipping Weight 479 lbs (217 kg)Construction Material 12 gauge steel/powder coated paintCaster Type 360˚ swivelHose Barb Attachment Diameter 4- or 6-inch (102 or 152 mm)Motor Power 1 HPMotor Speed 3450 rpmAir Flow 800 cfmAvailable Voltages (Volts/Hertz/Phase) 120/60/1Fan Diameter 10-5/8 inch (270 mm)Fan Wheel Bore 5/8 inch (16 mm)Thermal Protection 115 voltsControl Type Touchscreen

3 OPERATION INSTRUCTIONS – T4-MU/T6-MU
STEP ONEfor gear with built-in suspendersPlace clean, wet gear pants onto stickmen using gear suspenders. Adjust so that leg of pants are
just above dryer base.
STEP ONEfor gear without built-in suspendersUse temporary suspenders to hang pants as shown. Wrap cord around stickmen neck until leg of pants are
just above dryer base.
STEP TWOPlace clean, wet gear jackets onto stickmen. Fasten all jacket closures.
Note: Hang inside liner and outer shell separate for optimum
drying times.
STEP THREEIf drying boots, place boots on
the dryer base under stickman and insert a stickman leg into
each boot.
STEP FOURLoad accessory drying ports with gloves, helmets, face masks and balaclavas. Close all accessory
port valves not in use.
STEP FIVETap to wake touchscreen control.Normal drying mode should be lit
for all non-heated models.
STEP SEVENMonitor drying progress– checking hard-to-dry areas
(armpits, fingertips, etc.). Adjust dry time until gear is fully dry.
STEP EIGHTRemove dried items and
shut down the dryer.
SELECT TIME
PRESS START
STEP SIXSelect desired dry time using the
timer presets and press start.

3 OPERATION INSTRUCTIONS – T4-IHT
STEP ONERemove stickman from the
unit by lifting straight up. Lay the stickman next to garment
to be dried to guage the appropriate height of the
adjustable stickman.
STEP TWOAdjust the height of the
stickman to match the gar-ment length by aligning the adjustment pin with the ap-
propriate hole on the stickmen legs.
STEP THREEfor PPE with built-in suspendersPlace clean, wet gear pants
on stickmen using gear suspenders. Adjust so leg
of pants is just above the dryer base.
STEP THREEfor PPE without suspenders
Use temporary suspenders to hang pants as shown. Wrap cord around stickmen neck until leg of pants are just
above dryer base.
STEP FOUR Place clean, wet gear turnout gear jackets onto stickmen. Fasten all jacket closures.
Insert dressed stickmen into base of gear dryer.
STEP FIVEPlace hazmat, immersion
and/or ice-rescue suits onto stickmen. Invert stickmen and insert into base of
gear dryer.
STEP SIXIf drying boots, place boots
inverted on top of stickmen as shown. Note: A boot drying accessory is available for
drying multiple boots.
STEP SEVENReplace caps on any
stickmen ends not in use.
SELECT TIME
PRESS START
STEP EIGHTLoad accessory drying ports with gloves, helmets, face masks and balaclavas. Close all accessory port
valves not in use.
STEP NINETap to wake touchscreen control. Select desired dry time using the timer presets
and press start.
STEP TENMonitor drying progress–checking hard-to-dry areas (armpits, fingertips, etc.).
Adjust dry time until gear is fully dry. Remove dried items
and shut down dryer.
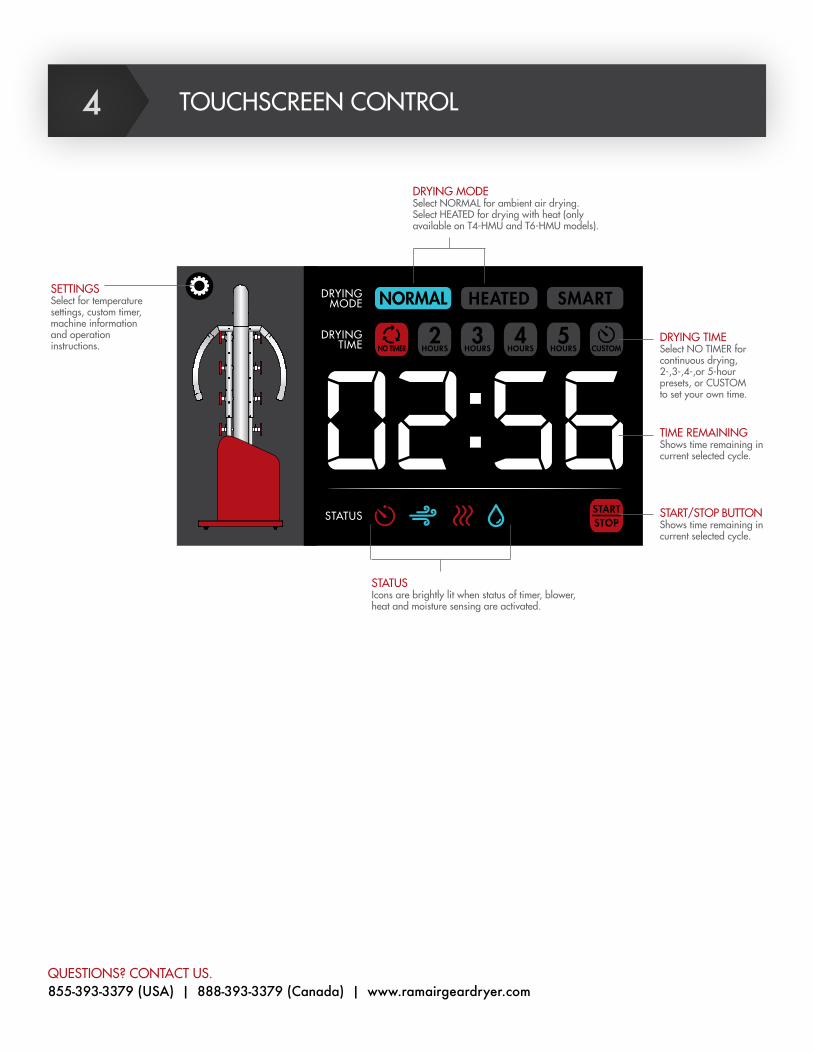
4 TOUCHSCREEN CONTROL
855-393-3379 (USA) | 888-393-3379 (Canada) | www.ramairgeardryer.comQUESTIONS? CONTACT US.
SETTINGS Select for temperature settings, custom timer, machine information and operation instructions.
DRYING MODE Select NORMAL for ambient air drying. Select HEATED for drying with heat (only available on T4-HMU and T6-HMU models).
DRYING TIME Select NO TIMER for continuous drying, 2-,3-,4-,or 5-hour presets, or CUSTOM to set your own time.
TIME REMAINING Shows time remaining in current selected cycle.
START/STOP BUTTON Shows time remaining in current selected cycle.
STATUS Icons are brightly lit when status of timer, blower, heat and moisture sensing are activated.

Please follow the steps below to troubleshoot your Ram Air Gear Dryer if it is not operating as expected:
1. Make sure the unit’s power cable or plug is not broken and that it is properly plugged into a power outlet and turned on.
2. Make sure the power outlet is not tripped due to overload or overheating.3. About one minute after the dryer starts up, look at the LCD panel.
4. If there is no GUI displayed and the screen is totally blank, turn off all the lights in the room to see if the LCD backlight is still on. If the LCD backlight is on but no display can be seen, contact your vendor to verify your dryer’s operating system. If LCD is totally dark with no backlight at all, contact your vendor to obtain a replacement LCD panel.
5. If the LCD panel is working properly, select mode, then select and press to start the dryer.
If you hear a confirmation beep but the blower doesn’t start up, listen to see if you can hear a clicking sound from the blower relay. Press the several times to test this.
If you hear a clicking sound but the blower does not turn on, check for the safety fuse of the blower fan motor. If the fuse is blown, replace it with a new similar rating fuse. If the fuse is good, then the fan motor itself may be faulty. Contact your vendor for a motor replacement.
If you do not hear a clicking sound, then the power controller board may be faulty. Contact your vendor to replace the controller board
8. If everything above is good and the dryer is still not operating as expected, contact your vendor for a detailed inspection and to replace or fix any faulty parts.
The panel should be displaying the dryer’s graphic user interface (GUI) for operation as show above.
Note: If the unit is sitting idle for some time, the screen may show a screensaver with a floating Ram Air logo as shown above. Touching the LCD Panel brings the GUI back.
5 TROUBLESHOOTING

855-393-3379 (USA) | 888-393-3379 (Canada) | www.ramairgeardryer.comQUESTIONS? CONTACT US.
7 CLEANING AND MAINTENANCE
1. Before cleaning, make sure the power has been turned off at the circuit breaker panel and that the heating element of the heater is cool.
2. Before cleaning, disconnect power to the dryer/heater by pressing Start/Stop button and unplugging the dryer from outlet.
3. If the dryer becomes dirty, wipe it with a soft, dry cloth.
4. If the surface is particularly dirty, after cleaning up the dust, soak a soft, lint-free cloth in diluted, mild liquid dish soap (1 part mild liquid dish soap diluted by 100 times the amount of water), and then wring the cloth to remove excess liquid. Use this cloth to wipe the surface of the dryer, then wipe it evenly with a dry cloth of the same type until the surface is dry.
5. Wipe plug with a dry cloth.
6. Do not spray or soak dryer with water.
7. Bearings are prelubricated. No further lubrication necessary.
8. Have the dryer serviced by a qualified authorized technician.

6 WARRANTY INFORMATION
Ram’d Air Gear dryer warrants the Products to be free from material defects for a period of one year from date of Purchase (extended to three years in the case of motors, fans and timers forming part of the Products), provided they are used for their intended purpose, and under normal operating conditions. During that year, in the event of mechanical failure of the Products or its components, Ram’d shall, at its option, either provide replacement parts as are reasonably necessary for the Product to resume its intended function, or may replace the Product.
Warranty Provisions:
1. The warranty does not apply to any labor or other costs of installing or replacing the parts, and the warranty shall nonetheless remain one year (or three years in the case of motors, fans and timers forming part of the Products) from its original purchase date, and there shall be no further warranty despite the provision of parts or replacement of the Product during that period.
2. There shall be no other warranties whatsoever, whether oral, written, express, implied or statutory.
3. The warranty is limited to use within Canada or the United States of America only and Ram-d pro-vides no warranty whatsoever for any use outside of Canada or the United States.
4. The warranty is void if the Product is used under extreme conditions, or altered in any way and/or used for any purposes not otherwise intended or advertised by Ram-d for the Products intended use.

WE PROMISE TO PROVIDE THE BEST, MOST STRUCTURALLY SUPERIOR GEAR DRYERS AVAILABLE…
A firefighter-owned company, Ram Air provides a full range of dryers made exclusively for drying personal protective equipment including bunker gear, immersion/hazmat suits, helmets, gloves, boots, face masks and SCBAs. Our patented dryers are designed to dry gear quickly—getting firefighters back to action fast. NFPA compliant, Ram Air Gear Dryers are built with the highest quality components. We strive to set standards beyond any other competitor’s products. Our goal is to provide unmatched customer service and quality products that ensure gear is in top operating condition— ultimately preserving the safety of firefighters and those they serve. Ram Air Gear Dryers are built to dry and built to last!
855-393-3379 (USA) | 888-393-3379 (Canada) | www.ramairgeardryer.comQUESTIONS? CONTACT US.