rakusu pattern book final - upaya zen center · rakusu pattern book. a a ... sewing the pine twig...
TRANSCRIPT
Rakusu Pattern Book

A A
C C D
1” 1” 2 3/4” 1 1/2” 1 1/2”
15 1/4”
1 1/2”
9 1/2” 8 1/2”
90º
1 1/2”2 1/4” 2 1/4”
B B B B
7 1/2”
* Please note that this illustration is to be used as a guideline only. The template above is 50% of the �nal size.

2 1/4”
9.5”
2 1/4”
1/2”
1/2”
1/2”
1/2”
1”
2”
5/16”
Stitc
hing
line
A1
A and A areexactly the
same, exceptthe seam
allowance isreversed.
Arrowsindicate the direction in
which to press the tucks.
1 2
Direction to press tucksin A 1
7
< 8
<
1
2
3
4
5
6
<
<
<
<
<
<
1/4”1/2” * Please draw seam lines on the back of each strip, the side that will face your body.
1 15/16”
A1

9.5”
2 1/4”
1/2”1/4”
Directionof Folds
Stitc
hing
line
1/2”
1/2”
1/2”
1/2”
1”
2”
5/16”
A2
A and A areexactly the
same, exceptthe seam
allowance isreversed.
Arrowsindicate the direction in
which to press the tucks.
1 2
< 6
<
1
2
3
4
5
7
8
<
<
<
<
<
<
* Please draw seam lines on the back of each strip, the side that will face your body.
Direction to press tucksin A 2
2 1/4”
1 15/16”
A2
8.5”
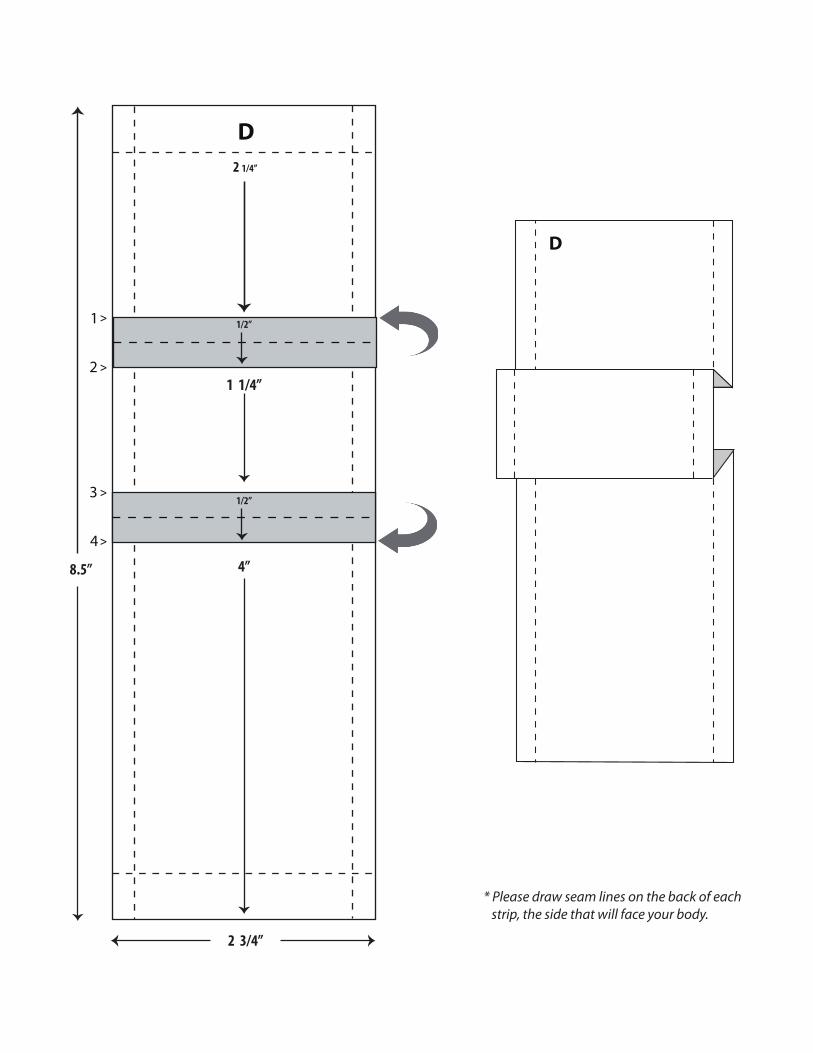
2 3/4”
D2 1/4”
1/2”
1/2”
4”
1 1/4”
>
1
2
3
4
>
>
>
* Please draw seam lines on the back of each strip, the side that will face your body.
D

1”
C
8.5”
Direction to press tucksin C
4 5/8”
1/2”
1/2”
7/8”
2”
B
1 1/2”
7.5”
* Please draw seam lines on the back of each strip, the side that will face your body.
1 >
2 >
3 >
>4
C

2.5”
1 2
3
4
5
6
7
SEWING THE PINE TWIG STITCHCut out the above rectangle and lay it over your tab (plaquet), centering it if they don’t quite match in size.Using a pin, punch a tiny hole through each of the seven numbered points. then twirl a cloth marking pencil in the holes, to leave a tiny pinpoint mark on the tab cloth. Using these points, following the intstructions below:
1) FIRST STITCH FROM INSIDE OF THE CLOTH TO POINT 1
2) THEN AT THE RIGHT SIDE OF 1 STITCH TO POINT 2
3) THEN AT THE BACK SIDE BACK TO POINT 1
4) AT THE FRONT SIDE GO FROM POINT 1 TO POINT 3
5) AT THE BACK SIDE GO TO POINT 4
6) AT THE FRONT SIDE GO FROM POINT 4 TO POINT 3
7) AT THE BACK SIDE GO TO POINT 1
8) AT THE FRONT SIDE GO FROM POINT 1 TO POINT 5
9) AT THE BACK SIDE GO TO POINT 1
10) AT THE FRONT SIDE GO FROM POINT 1 TO POINT 6
11) AT THE BACK SIDE GO TO POINT 1
12) AT THE FRONT SIDE GO FROM POINT 1 TO POINT 7
13) AT THE BACK SIDE GO TO POINT 1
14) THEN COME UP JUST THROUGH ONE PART OF THE CLOTH AND MAKE A FEW STITCHES ON TOP OF EACH OTHER, WHERE NOBODY CAN SEE THEM.
3.5”
4”