rainbow tv · thank you for subscribing to rainbow tv! ... we created this rainbow tv user’s...
TRANSCRIPT

Rainbow TVUser Guide

2
Thank you for subscribing to Rainbow TV! The result of Rainbow’s state-of-the-art fiber optic network, Rainbow TV delivers an enhanced television viewing experience with crystal-clear picture and sound quality. We know you’ll enjoy the outstanding features of Rainbow TV that satellite and cable simply can’t beat. They include:
• Clear picture in every kind of weather• Expanded channel line-up with exclusive HD programming• Wide variety of premium channels• Lots of convenient tools like TV Caller ID, parental controls,
and Internet widgets• DVR (Digital Video Recorder) enables you to easily record the programs you
want to watch and then view them from any room in your home, whenever it’s convenient for you
We created this Rainbow TV User’s Guide to help you understand and take advantage of the many viewing options now available to you. If you have questions or need additional assistance, please call us at 800-892-0163.
InTR
o

3
Table of Contents Symbols Used on the Guide..................................................................................................4
Interactive Guide ............................................................................................................. 5-6
Infobar ..............................................................................................................................7-8
Menubar ..............................................................................................................................9
Reminder and Autotune Timers .....................................................................................10-12
DVR ..............................................................................................................................13-20
My Library ....................................................................................................................21-22
Parental Controls and Settings ...........................................................................................23
Settings ........................................................................................................................24-26
Favorites and Search .....................................................................................................27-29
Widgets .............................................................................................................................30
HDTV Display Questions .....................................................................................................31
TabLE o
f Con
TEnTs

4
You may see these symbols on the Interactive Program Guide:
• new Episode – It is not a re-run. • High Definition – The program is broadcasted in High Definition. HD Programming Fee
required for HD channels.• auto Tune Reminder – A reminder timer is set for this program.• Record* – A DVR recording is set for this program.• series-Record* – A DVR recording is set for the series of this program.• series Record Episode skipped* – A DVR recording is set for the series of this
program, but this episode is skipped. Closed Captioned – The channel has text subtitles for hearing-impaired viewers.
This option only applies to channels that offer closed captioning. Dolby Digital audio – The channel is delivering Dolby Digital 5.1 channel
surround sound. secondary audio – SAP is currently unavailable. favorite Channel – The channel is included in your list of favorite channels. blocked by Parental Controls – Parental Control is on.
Symbols Used On the Guide
sym
boLs
UsE
D o
n T
HE
GU
IDE

5
• Current Time• Program Name• Length of Program• Rating• Program Description • Closed Captioning• Secondary Audio• Guide Title• Guide Date• Channel Number and Name• New• HD
Interactive Guide
InTERa
CTIVE GU
IDE
1
1
2
2
3
3
4
4
5
5
6
6
8
8
9
9
10
10
12
12
11
11
7
7

6
InTE
RaCT
IVE
GU
IDE
Interactive GuideYou can access the Interactive Guide two ways. Press the Guide button on your remote control to launch the Guide. Continuing to press the Guide button will switch the Guides to all, subscribed, HD, and any favorites lists that you create. You can also access the Guide by pressing the menu button on your remote control, navigating to the Guide icon, and pressing oK. Once you are in the Guide, the program you are currently watching remains in the upper-left corner of your screen.
Note: The name of the Guide appears on the left side of the Guide below the video image and above the date. If you are only able to scroll through a limited amount of channels, verify that your Guide is set to all or subscribed and not on HD or a favorites list.
navigate the Guide
a) Navigate to a channel on the Guide by entering the channel number using the remote.b) Use the arrow buttons on the remote to move the highlight through the Guide, channel
by channel. c) Press the Up or Down arrows to move the highlight through the Guide to view what
programs are currently showing on different channels. d) Press the Left or Right arrows to move the highlight through the Guide to view what
programs will be showing on different channels in the future. e) Press the Page Up/Page Down buttons to move through the Guide page by page.
You can view Guide date for programs up to 3 days into the future.f) Press oK to preview a highlighted show on the Guide in the upper-left corner of your
TV screen. To tune to the channel, press oK again.g) Press Exit on the remote to leave the Guide or repeatedly press the Guide button on
your remote to cycle through all of the available Guides (all, subscribed, HD, and any favorites lists) and it will disappear.

7
InfobarThe InfoBar provides quick access to information about the programs that are on now or will be on in the future.
Info
baR
You can access the Infobar three ways:
1. Press Info on your remote control. Press Info again to display a more detailed program description.
2. Press the Up/Down buttons on your remote control. 3. When changing channels, the Infobar will appear automatically.
8
Info
baR
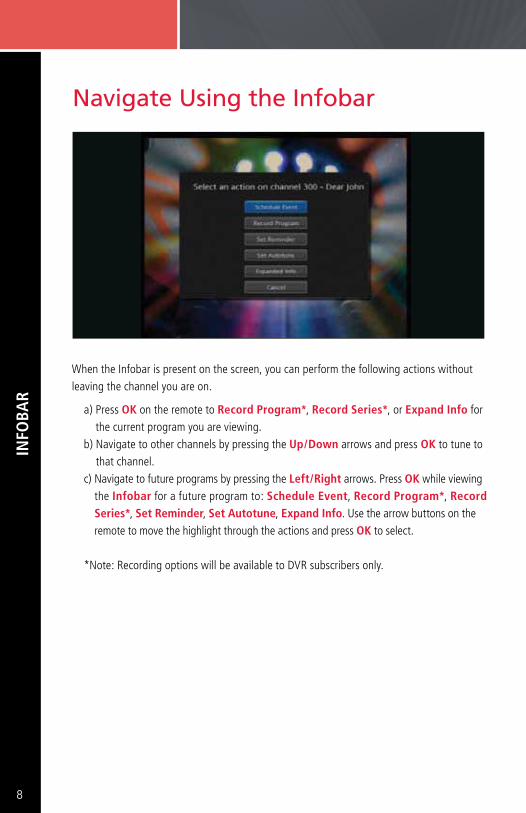
When the Infobar is present on the screen, you can perform the following actions without leaving the channel you are on.
a) Press oK on the remote to Record Program*, Record series*, or Expand Info for the current program you are viewing.
b) Navigate to other channels by pressing the Up/Down arrows and press oK to tune to that channel.
c) Navigate to future programs by pressing the Left/Right arrows. Press oK while viewing the Infobar for a future program to: schedule Event, Record Program*, Record series*, set Reminder, set autotune, Expand Info. Use the arrow buttons on the remote to move the highlight through the actions and press oK to select.
*Note: Recording options will be available to DVR subscribers only.
Navigate Using the Infobar

9
The menubar provides quick access to the settings, favorites, search, Widgets, Guide, DVR, my Library, and Parental Control features of Rainbow TV.
• settings – Access Settings for TV Caller ID, Channel Blocking, Parental Controls, and Hardware.
• favorites – Create or Edit a favorite channels list.• search – Find your favorite programs by title or key word.• Widgets – Access Widgets for Sports, Stocks, Twitter, Weather, Finance, and News.• Guide – Launch the interactive program Guide.• DVR – Watch, Edit, and create DVR recordings.* • my Library – Review Upcoming Pay-Per-View events, scheduled Reminders,
system messages, and TV Caller ID history.• Parental Controls on/off – Turn On or OFF Parental Controls to block
programs by program rating. The Parental Controls option will only appear if the Parental Controls box is checked in Settings.
*NOTE: Recording options will be available to DVR subscribers only.
To access the menubar:
a) Press menu on your remote control. Press menu again to exit or press Exit on your remote control.
b) Press the Left/Right buttons on your remote control to navigate the highlight through the menu.
Menubar
mEn
Uba
R

10
Reminder & Autotune TimersYou can set timers to remind you of the programs you want to watch.
setting a Reminder Timer
a) Press the Guide button on the remote control. b) Navigate to future programs by using the arrow buttons on the remote to move the
highlight through the Guide. c) Press oK on the program that you want to set the reminder for. Select set Reminder.
A yellow clock symbol on the Guide indicates that a Reminder Timer is set. REm
InD
ER &
aU
ToTU
nE
TIm
ERs
• Reminder • Autotune • Multiple Reminder • Multiple Autotune
Timer symbols

11
A Reminder Timer message will appear on your screen reminding you of the program just before it begins. Press Info to view the Reminder or press Cancel to exit out of the Reminder. When you press Info on the Reminder message, press oK on the program name to tune to the program.
setting an autotune Timer
a) Press the Guide button on the remote control.b) Navigate to future programs by using the arrow buttons on the remote to move the
highlight through the Guide. c) Press oK on the program that you want to set the autotune timer for. Select set autotune.
An orange circle symbol on the Guide indicates that an autotune Timer is set. d) Press Exit to return to watching TV.
d) Press Exit to return to watching TV.
REmIn
DER &
aU
ToTU
nE TIm
ERs
12
REm
InD
ER &
aU
ToTU
nE
TIm
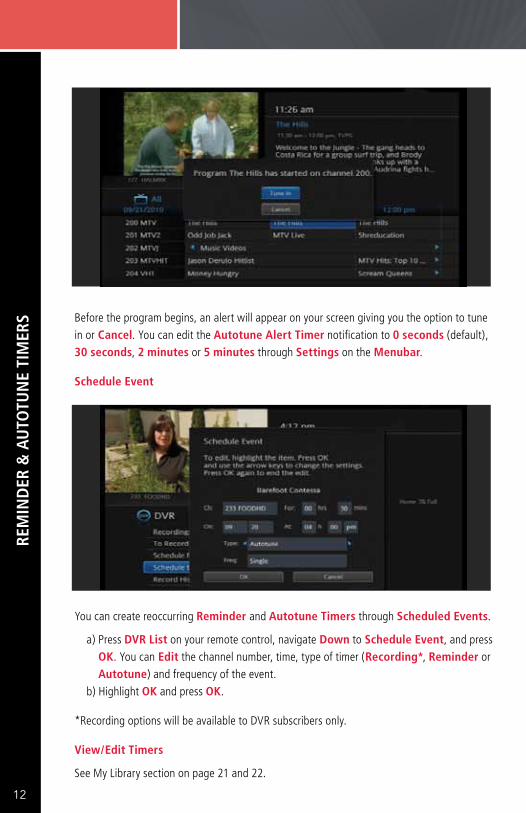
ERs Before the program begins, an alert will appear on your screen giving you the option to tune
in or Cancel. You can edit the autotune alert Timer notification to 0 seconds (default), 30 seconds, 2 minutes or 5 minutes through settings on the menubar.
schedule Event
You can create reoccurring Reminder and autotune Timers through scheduled Events.
a) Press DVR List on your remote control, navigate Down to schedule Event, and press oK. You can Edit the channel number, time, type of timer (Recording*, Reminder or autotune) and frequency of the event.
b) Highlight oK and press oK.
*Recording options will be available to DVR subscribers only.
View/Edit Timers
See My Library section on page 21 and 22.

13
DVR
DVR (Digital Video Recorder)TV on your Terms
Between going to work, chasing the kids, running errands, and cheering on your favorite teams, you may think watching your favorite TV shows is difficult (if not impossible) to fit into your schedule. Think again! With your Rainbow TV’s unique DVR (Digital Video Recorder), you can easily record the programs you want to watch and then view them from any room in your home, whenever it’s convenient for you. Plus, a DVR lets you pause, rewind, and replay the action during live TV.
You have three video streams to record and watch on your main DVR box. You can watch one channel and record two shows. Your DVR can store approximately 40 hours of HD recordings or approximately 125 hours of standard definition recordings.*
Rainbow TV’s DVR makes it easier than ever to choose what and when you watch TV on your terms.
*Subject to change.
DVR Icons
• Record• Series Record
• Play Pause
Fast Forward Rewind
Lock

14
DVR Using your DVR
Record Live TV
Record the show you are watching by pressing the Record button. The show will be recorded until it is scheduled to finish. To manually stop the recording before it is scheduled to finish, press stop.
Record from Guide
Use the Guide to navigate to the show you want to record. Press the Record button on your remote control to record the show.
DVR/Pause Live TV Playback bar

15
DVR
Record by search
a) Navigate to the menubar by pressing the menu button, highlighting the search icon, and pressing oK.
b) Press oK again to launch the on-screen keyboard and enter the first four letters of a show’s title. Press Done.
d) Navigate to the program you want to record, highlight it, and press oK. e) Arrow Down to Record Program for a one-time recording and press oK. Or arrow
Down and highlight Record series to record all episodes of the show.
c) Arrow Down and highlight search Guide and press oK.

16
DVR
a) Press the DVR List button on your remote control to launch the DVR menu. b) Navigate to the show you want to view and press oK. c) Play Recording will be highlighted, press oK again to view the show. d) Press fast forward to advance the program. Press fast forward repeatedly to
change the fast forward speed by 2, 4, 10, or 25 times. Rapid fast forward will advance the program 30 seconds.*
e) Press Rewind to reverse the program. Press Rewind repeatedly to change the fast forward speed by 2, 4, 10, or 25 times. Rapid Rewind will rewind the program 60 seconds.*
Create a series Recording
a) Use the Guide to navigate to the show you want to record. Highlight the show and press oK.
View Recordings

17
DVR
b) Highlight the option Record series and press oK. Press oK again and highlight Edit series Recording and press oK. This menu allows you to choose if you want to record all or new only episodes to skip re-runs. You can also edit start and stop times for a series recording.
Delete a show
a) Press the DVR List button on your remote control to launch the DVR menu. b) Navigate to the show you want to delete. Highlight Delete Recording and press oK.
This option is available only on the DVR digital boxes. You cannot control Live TV from remote digital boxes.
a) Press Pause on your remote control to pause the program. Programs can be paused for up to 30 minutes as long as the current channel is not changed.
b) To resume watching the program, press Play. c) Press Rewind to reverse live TV or a recorded program. d) Press Rewind repeatedly to change the rewind speed by 2, 15, 50, or 300 times.
Rapid Rewind will reverse live TV 60 seconds.*e) Follow the same process to fast forward live TV that has been paused.*f) Press stop on your remote control to return to Live TV.
*Rapid Fast Forward and Rapid Rewind are not available on all DVR boxes and on all remote controls.
Control Live TV

18
DVR
manage DVR Recordings
To access your DVR recordings, press DVR List on your remote control or press menu on the remote and arrow to select DVR. Here you can view current and future recordings, edit and cancel recordings, sort and prioritize recordings, schedule future events and timers, and review your DVR history.
View Recordings
a) Arrow Down and highlight Recordings on the left menu and press oK. Next you have the option to sort your recordings by all, Date, Title, Channel and Viewed/not.
b) Arrow Right and highlight the recording you want to view and press oK. c) For a recording in progress, arrow Up/Down and highlight Play Recording, Lock, or
stop Recording. d) For completed recordings, arrow Up/Down and highlight Play Recording, Lock,
Delete Recording, or Edit series Recording and press oK.
sort future Recordings
a) Arrow Down and highlight To Record on the left menu and press oK. Next you have the option to sort your future recordings by Date, Title, Channel, skipped/not.
b) Arrow Right and arrow Up/Down to view future recordings. Press Page Up/Down on the remote to navigate through the list one page at a time.
c) To edit a future recording, highlight the recording on the right menu and press oK. d) For series Recordings, arrow Up/Down and highlight Edit Recording and press
oK to change the start and end time. e) Highlight Edit series Recording and press oK to change the channels on which
to record the program, whether the program should record in standard or High Definition, to record new only or all Episodes, to start the program early or End the program late, and to Limit the number of episodes to record.

19
DVR
a) Arrow Down and highlight Schedule Priority on the Left menu and press oK. Next, you have the option to change the priority of your scheduled recordings.
b) Highlight the recording, press oK, next arrow Down the list to either Move Down, Move Up, Edit Series Recording, or Cancel Series Recording, and press oK. The list is sorted with the highest priority recordings at the top of the list. In the event of a scheduling conflict, the programs with higher priority will record instead of a lower priority program.
schedule Event
a) Scheduling an event is ideal when you want to record or watch only a portion of a program on a reoccurring basis.
b) Arrow Down and highlight Schedule Event on the Left menu and press oK. The Scheduled Events screen lists all the information about the start and end time, date and the correct channel for your program. If anything is not correct, highlight the incorrect item and press oK.
c) Arrow Left or Right to enter the correct information and press oK.
set the Event
a) Arrow Down and highlight Type and press oK. The highlight will become Left/Right arrows.
b) Arrow Left or Right until you see the event type you want (Recording, autotune, Reminder), then press oK.
NOTE: The set Recording option will be available to DVR subscribers only.
schedule Priority
20
DVR
set Event frequency
a) Arrow Down and highlight Freq and press oK. The highlight will become Left/Right arrows.
b) Arrow Left or Right until you see the frequency you want (single, Weekly, m-f, Every Day), then press oK.
c) Arrow Down and highlight oK on the Schedule Event screen and press oK. You will be returned to DVR menu and press Exit.
Record History
Arrow Down to Record History and press oK. Arrow Down the list to see the log of the past 25 DVR events that were started, stopped, skipped, or deleted.
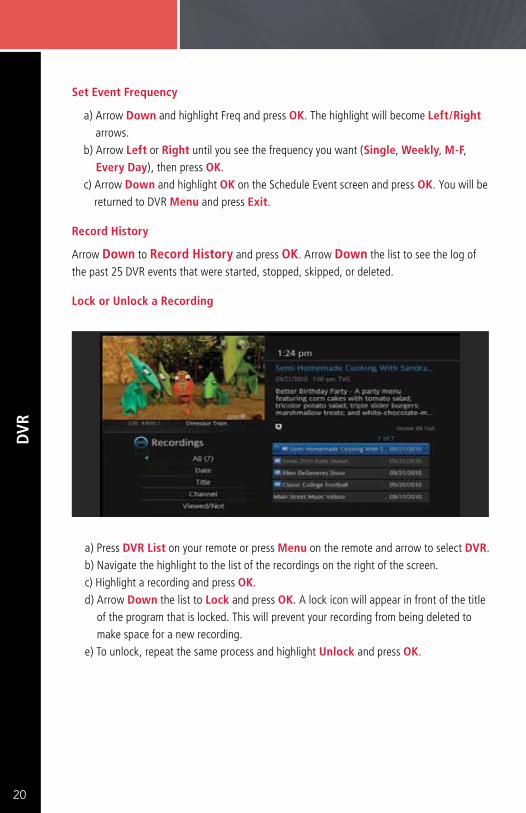
Lock or Unlock a Recording
a) Press DVR List on your remote or press menu on the remote and arrow to select DVR. b) Navigate the highlight to the list of the recordings on the right of the screen. c) Highlight a recording and press oK. d) Arrow Down the list to Lock and press oK. A lock icon will appear in front of the title
of the program that is locked. This will prevent your recording from being deleted to make space for a new recording.
e) To unlock, repeat the same process and highlight Unlock and press oK.

21
a) Arrow Down to Reminders on the left menu and press oK. You will see a list of future Reminder and autotune timers on the right menu.
b) To Cancel a future timer, highlight the program and press oK. c) Highlight Cancel Timer/Reminder and press oK.
View messages
a) Arrow Down to Messages on the Left menu and press oK. You will see a list of messages related to DVR recordings, system announcements, or billing alerts on the Right menu.
b) To read or delete the message, highlight it and press oK. c) On the box, highlight Delete to delete the message or full message to read it in full
and press oK.
my LIbRa
Ry
My Library Press menu on your remote control, navigate the highlight to my Library and press oK.
View/Edit Reminders

22
my
LIbR
aRy
Whenever you receive a new message an alert will appear on your screen. Press Info on your remote to display the message, or press Exit to ignore the alert and view the message later.
TV Caller ID
If you subscribe to Caller ID from Rainbow Communications, an alert will appear in the upper corner of your screen when you receive a call. The alert will disappear after a few seconds or you can press Exit on your remote control to remove the alert.
View Caller ID History
To review a list of recent calls, go to Caller ID History in my Library.
a) Arrow Down to Caller ID on the left menu and press oK. You will see a list of received calls appears on the right menu.
b) Highlighting a Caller ID log entry will display the name and number of the caller, and the date and time of the call in the upper right section of the screen.
c) Press oK for the option to Delete, Delete all, Cancel, highlight the option, and press oK.
23
PaREn
TaL Co
nTRo
Ls/ sETTInG
s
Parental Controls Many parents are concerned about their children watching unsuitable programming. To offer parents more control over the programming and content their children can access, Rainbow Communications offers Rainbow TV Parental Controls that enables parents to selectively block programming by channel or rating.
Note: Parental Controls will not appear until you have created Parental Control in Settings.
Turn Parental Controls off/on
Parental Controls are active once you have enabled them in the settings menu. See Enable Parental Controls in the Settings section for instructions.
a) To turn Parental Controls off or on, press menu on the remote control, navigate the highlight to Control on/off, and press oK.
a) Enter your account password and press oK to update the Parental Controls status. b) Press Exit on your remote control to leave the menu.
Settings The Settings menu enables you to set viewing and hardware preferences for your Rainbow TV service. You can change the settings for Caller ID, Parental Controls, and Autotune Alerts. This is where you also go to adjust your audio, video, and captioning settings and to reboot your digital box.
To access Settings, press menu on your remote control, navigate the highlight to settings and press oK. Next, enter your account password provided by Rainbow Communications.

24
sETT
InG
s
a) Press menu on your remote control, navigate the highlight to settings and press oK on the remote control.
b) Enter your account password provided to you by Rainbow Communications and press oK. c) Navigate the highlight to Parental Control under the main Preferences, press oK
to check the box, navigate the highlight to submit and press oK.
Enable Parental Controls

25
sETTInG
s
a) Navigate back to settings and enter your account password. Arrow Down to Users and press oK. Arrow Down and highlight Users, press oK.
b) Arrow Right and highlight Parental Control, press oK. c) Arrow Right and Up/Down to check the controls you want to activate for your family.
Once you have finished your selections, arrow Down to submit, and press oK. d) Press Exit on your remote control to leave settings.
Turn Parental Controls off/on
Parental Controls are active once you have enabled them in the settings menu.
b) To turn Parental Controls off or on, press menu on the remote control, navigate the highlight to Control on/off, and press oK.
c) Enter your account password and press oK to update the Parental Controls status. d) Press Exit on your remote control to leave the menu.
modify Parental Controls settings
26
sETT
InG
s
d) Once you have finished your selections, arrow Down to Update, and press oK. e) Arrow Down and highlight submit, press oK.
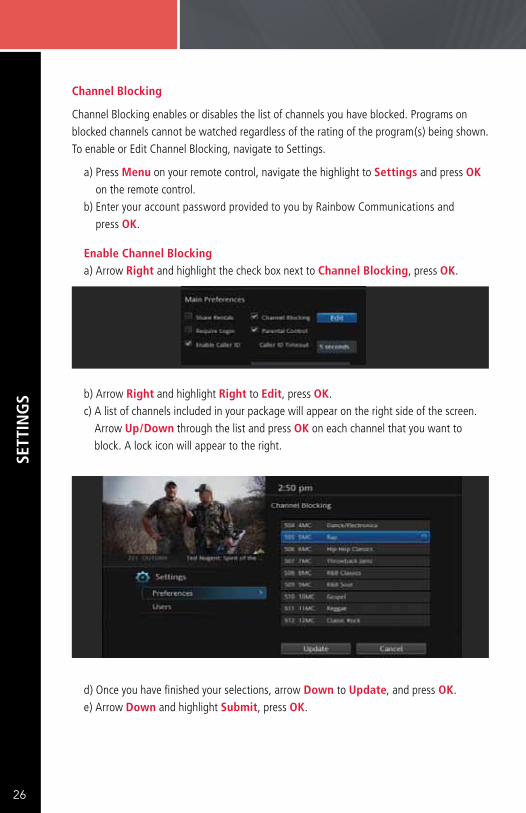
Channel blocking
Channel Blocking enables or disables the list of channels you have blocked. Programs on blocked channels cannot be watched regardless of the rating of the program(s) being shown. To enable or Edit Channel Blocking, navigate to Settings.
a) Press menu on your remote control, navigate the highlight to settings and press oK on the remote control.
b) Enter your account password provided to you by Rainbow Communications and press oK.
Enable Channel blockinga) Arrow Right and highlight the check box next to Channel blocking, press oK.
b) Arrow Right and highlight Right to Edit, press oK. c) A list of channels included in your package will appear on the right side of the screen.
Arrow Up/Down through the list and press oK on each channel that you want to block. A lock icon will appear to the right.

27
faVoRITEs
Favorites It’s easy to enjoy the channels you watch the most with personalized favorites lists. You can even create multiple lists for everyone’s favorites and change the Guide to display one of the favorites lists instead of the complete Guide.
Create/Edit a favorites List
a) Press menu on your remote control, navigate the highlight to favorites, and press oK on the remote control.
b) Arrow Down, highlight Create, and press oK.
c) Press oK again to edit your favorites name. Navigate the highlight to Clear, next use the Up/Down/Left/Right arrows to highlight the letters on the on-screen keyboard to enter the name of the list.
d) Navigate the highlight to Done and press oK. e) Arrow Up/Down to select the channels you want to add to your list. Highlight the
channel, press oK on the remote control, and the favorites icon will appear on the right of the channel you select. Continue to add or remove channels from your favorites lists by repeating these steps.

28
faVo
RITE
s/ s
EaRC
H
f) When you are finished making your selections, arrow Right, highlight Update, and press oK.
Now you can view only your favorite channels in the Interactive Guide. Repeatedly press Guide on your remote control to cycle through your favorites lists. Once you have cycled through all favorites lists, the Guide will Exit.
Delete a favorites List
a) Press menu on your remote control, navigate the highlight to favorites, and press oK on the remote control.
b) Arrow Down, highlight Delete, and press oK. c) Arrow Up/Down to select the favorite list to delete and press oK to highlight the list.
Navigate the highlight Down to oK, and press oK on your remote control.d) A box will appear asking you to confirm that you want to delete the selected favorites list.
Highlight yes to delete or no to Cancel, and press oK.
Search Search by show, actor, or description of a program you are looking for and have your service find any program matching the text you enter.
search Guide
a) Press menu on your remote control, navigate the highlight to search, and press oK on the remote control.
b) The Enter Text box is highlighted. Press oK.c) Use the Up/Down/Left/Right arrows to highlight the letters on the on-screen
keyboard to enter the search keyword. The fewer letters used in the search, the better chance you have of finding what you want.
d) Navigate the highlight to Done and press oK.

29
sEaRCH
e) Arrow Down so search Guide is highlighted and press oK. f) Arrow Down, highlight the type of search you want, and press oK. g) The search results in order of date will appear on the right side of the screen. Navigate
the highlight to the list and press oK to:a. Tune to a program if it is currently on.
oRb. A menu will appear that will enable you to schedule Event, Record Program,
set Reminder, set autotune, and view Expanded Info for the program you highlighted. Arrow Down and highlight the command or highlight Cancel and press oK to return to the search results.

30
WID
GET
s
b) Arrow Left/Right to navigate the highlight to sports, stocks, Twitter, Weather, finance, or news and press oK.
c) Arrow Left/Right to navigate through news and sports stories. Use the on-screen keyboard to enter stock ticker symbols and to log in to your Twitter account.
d) Press Exit to return to watching TV.
Widgets Rainbow TV’s Internet Widgets make your service even more fun and useful. You can access current weather conditions, news headlines, sports scores, Twitter, stocks and more – all on your TV screen.
a) Press menu on your remote control, navigate the highlight to Widgets, and press oK on the remote control.

31
HD
TV DIsPLay Q
UEsTIo
ns
Wide-Screen HDTV Display Questions"How do I get rid of those vertical black bars on my wide-screen TV?"
The black (or gray) bars on the left and right sides of the screen appear when you are watching standard definition or non-HD program on a wide-screen HDTV. This is called pillarboxing.
"The show I'm watching on abC is has black bars on all four sides. How do I fix it?"
The black bars on the left and right sides of the screen and at the top and bottom appear when you are watching standard definition or non-HD program on a wide-screen HDTV. This is called windowboxing.
Rainbow Communications recommends viewing the channel without distortion. for the best picture quality, you should subscribe to HD programming if you have a wide-screen HDTV. also, watch the HD version of the channel if the show is broadcasted in HD.
You can remove the black bars from the display by adjusting the TV or digital box video settings, but adjusting your picture can distort and degrade the quality of your picture. Choose the option that is most visually pleasing to you.
1. Use the zoom control on the TV blow up the image, eliminating the vertical bars and removing (or at least minimizing) the horizontal ones.
2. Change the digital box video settings to Widescreen 16:9 (stretch 4:3)3. Set the TV's aspect-ratio control to Stretch or Full.4. If available, watch the HD version of the channel if the show or is broadcasted in HD.
Upside: The image will fill the screen.
Downside:
• You'll miss any action at the extreme top and bottom of the screen, which will be cut off—bad news if you're looking at the Interactive Guide, stock ticker, news crawl, or subtitles. Furthermore, the picture will appear softer because it's being electronically blown up, just like the muddy images one gets when using the digital zoom function on a digital camera.
• The black bars are gone, but to fit the square 4:3 image to the wider screen, the picture has been stretched horizontally, making everyone appear squat and bloated.
• For windowboxing, there's nothing to miss at the top and bottom of the screen, with the possible exception of subtitles or closed captioning, which may be cut off by zooming. Furthermore, the picture will appear softer.
*This information was compiled from C-Net’s “Quick Guide to Aspect Ratio”.

Corn
erst
one
Grou
p ©
2011
1-800-892-0163 • www.rainbowtel.net
608 Main Street • Everest, KS 66424