raf martlesham heath structures, martlesham, mrm 140
TRANSCRIPT

RAF Martlesham Heath structures, Martlesham, MRM 140
Archaeological Building Record
SCCAS Report No. 2012/002
Client: Brett Aggregates Limited Author: Rob Brooks
May/2012


RAF Martlesham Heath structures, Martlesham, MRM 140
Archaeological Monitoring Report
SCCAS Report No. 2012/002
Author: Rob Brooks
Contributions By: Mo Muldowney and Alan Smith
Illustrator: Ellie Hillen and Crane Begg
Editor: Richenda Goffin
Report Date: May/2012
© SCCAS

HER Information
Report Number: 2012/002 Site Name: Martlesham Heath WWII structures Date of Fieldwork: 28-30/10/2008 and 07/12/2011 Grid Reference: Type 22 pillbox TM 24955 44592 HFDF wall and foundations TM 25034 44514 Brick hut TM 25135 44513 Client/Funding Body: Andy Josephs Associates on behalf of Brett
Aggregates Limited Client Reference: N/A Curatorial Officer: Edward Martin Project Officer: Rob Brooks Oasis Reference: suffolkc1-116264 Site Code: MRM 140 Digital report submitted to Archaeological Data Service:
http://ads.ahds.ac.uk/catalogue/library/greylit
Disclaimer
Any opinions expressed in this report about the need for further archaeological work are those of the Field
Projects Team alone. Ultimately the need for further work will be determined by the Local Planning
Authority and its Archaeological Advisors when a planning application is registered. Suffolk County
Council’s archaeological contracting services cannot accept responsibility for inconvenience caused to
the clients should the Planning Authority take a different view to that expressed in the report.
Prepared By: Rob Brooks
Date: 22/05/2012
Approved By: David Gill
Position: Senior Project Officer
Date: 22/05/2012
Signed:

Contents
Summary
1. Introduction 1
2. Topography and landscape 1
3. Archaeology and historical background 3
4. Methodology 7
5. Results 9
5.1 Brick hut 9
5.2 High Frequency Direction Finding tower curtain wall and foundations 12
5.3 Type 22 pillbox 15
6. Archive deposition 19
7. Acknowledgements 19
8. Bibliography 19
List of Figures
Figure 1. Location plan showing the three buildings (red) 2
Figure 2. Plan of RAF Martlesham with structures highlighted in red and probable Bulk Oil Installation labelled as ‘194’ 5
Figure 3. 1946 aerial photograph of the airfield and surrounding landscape, with the three structures highlighted (red) 6
Figure 4. Brick hut plan and elevations 11
Figure 5. HFDF curtain wall and foundations plan and elevations 14
Figure 6. Type-22 pillbox and surrounding slit trenches, outworks and gun emplacements 17
Figure 7. Type 22 pillbox plan and elevation 18
Figure 8. Key for the following photographs of the Type 22 pillbox showing wall numbers referenced in Table 1 and the descriptions (Appendix 1)
List of Tables Table 1. Type-22 graffiti descriptions (plates included in Appendix 1) 16

List of Appendices
Appendix 1. Selected plates
Appendix 2. OASIS form
Appendix 3. BGL 008 report text

Summary
A building record was undertaken of three structures dating from the inter-war period to
WWII as required in a Brief and Specification by Edward Martin of Suffolk County
Council Archaeological Service Conservation Team. These buildings formed part of
RAF Martlesham, which from 1917 housed the Armament Experimental Flight and the
Aircraft Testing Flight, later to become the Aeroplane and Armament Experimental
Establishment. The airfield also became actively involved in combat operations during
WWII.
A Type-22 pillbox (constructed on top of a Bronze Age barrow mound and surrounded
by revetment walls and a gun emplacement), a brick hut which possibly functioned as a
stand-by set house for the HFDF tower, and an octagonal wall for a High Frequency
Direction Finding (HFDF) tower were recorded. The latter building is a brick curtain wall,
functioning as a protective structure for a wooden HFDF beacon tower, from which only
the concrete and metal foundations still remain. The three buildings were in various
states of repair, although the Type-22 pillbox was the best preserved and still contained
graffiti from WWII, as well as later graffiti thought to be contemporary with the nearby
housing estate. The structures would have functioned within part of the defensive
network associated with the airfield, and the HFDF structure and the brick hut possibly
played a part in the installation’s experimental work too.


1. Introduction
An English Heritage Level 3 building record was carried out in two stages for one
pillbox, a brick hut and a high frequency direction finding (HFDF) beacon wall, ahead of
quarrying as part of the Waldringfield Quarry on Martlesham Heath, just east of the A12
and south of Martlesham, Suffolk (Fig. 1). However, only the brick hut will be directly
affected by the quarrying activities, as it is to be demolished. The building surveys on
this site are required as part of a planning condition on Planning Application C/10/1441.
The first stage of work was carried out on the 28-30th October, 2008, and the second
on the 7th December, 2011. This was undertaken in accordance with guidance from
Edward Martin (Suffolk County Council Archaeology Service, Conservation Team). A
CD of photographs accompanies the report. The work was commissioned by Andy
Josephs Associates on behalf of Brett Aggregates Limited. A further set of structures to
the north of the pillbox, comprising a barrow with an infantry strong point, a Type-23
pillbox, a shelter and associated weapons pits and trenches were not recorded, as this
was not required within the scope of the Brief and Specification.
2. Topography and landscape
The three structures are located on a relatively level area known as both Brightwell
Heath and The Swale, within Martlesham Heath. The landscape slopes off to the south
and east at some distance from the site and is quite open, which would obviously have
been a useful attribute for the positioning of the pillbox.
1

Tower
Sheep-Drift
1 Farm
Mynydd
Farm House
5
Sheep Drift
SubEl
Sta
32
15
20
6867
Brightwell Court
4229
1
Drain
Pond
Pond
Brightwell Heath
Brightwell HeathBrightwell Heath
Ward Bdy
Und
Und
CRWard Bdy
CR
Track
Trac
k
Track
Track
Track
Track
Lay By
Lay-by
Lay-
by
Track
Track
El Sub Sta
Weir
The Swale
A 12
Stone
26.8m
20.8m
23.9m
244200
244300
244400
244500
244600
244700
244800
624700
624800
624900
625000
625100
625200
625300
A 12
Brightwell Heath
Driv
eLa
ncas
ter
HousePump
The Swale
Type 22 pillbox
HFDF remainsBrick hut
TM
BBN
0 200m
B
0 2 km
A
A
Norfolk
SUFFOLK
Essex
0 25 km
© Crown Copyright. All rights reserved. Suffolk County Council Licence No. 100023395 2011© Crown Copyright. All rights reserved. Suffolk County Council Licence No. 100023395 2011
Figure 1. Location plan showing the three buildings (red)
2

3. Archaeology and historical background
Each of the structures is associated with RAF Martlesham, which is recorded as MRM
083 on the Suffolk Historic Environment Record. In 1915 the Armament Experimental
Flight from the Experimental Squadron was moved to Orford Ness in Suffolk from
Upavon, Wiltshire. However, by the winter of 1916 it was decided that the Aircraft
Testing Flight should also be moved to Suffolk and that the nearby site of Martlesham
Heath was a suitable location for both groups. Experimental work continued at Orford
Ness simultaneously into the inter-war period though, including testing of ‘aerial
machine guns, bombs, navigation, and photography’, with radar testing starting at
Orford Ness from 1935 (Cocroft and Alexander, 2009). Operations at Martlesham Heath
commenced on 16th January, 1917 with experimental aircraft and armament testing for
military and civil aircraft, engines, aircraft guns and turrets, bombs and other equipment.
This included the Sopwith Camel, Vickers Wimy, Westland Westbury and Hawker
Hurricane. In 1917 the unit’s name was changed to the Aeroplane Experimental Unit,
Royal Flying Corps, but in 1924 it was substantially enlarged to become the Aeroplane
and Armament Experimental Establishment (AAEE). At this point the AAEE had
become a well known and respected unit, both nationally and internationally, and
continued in its experimental work at Martlesham Heath until the outbreak of war when
it moved to Boscombe Down. From 1939 the first fighter squadron was stationed on the
airfield with a permanent squadron from 1940 and throughout the Second World War,
being used by the RAF and from 1943 by elements of the US air force. The airfield
reverted to RAF use after the war and was finally closed in 1973 (Smith, 1995 and
Kinsey, 1983).
The three structures recorded in this report are immediately south of the built-up
industrial estate known as Adastral Park, which occupies the south-eastern third of the
former main runway and includes parts of the former airfield immediately to the north
and south (Fig. 1). It now houses electronic research laboratories and has been heavily
redeveloped over the last few years, slowly erasing any remnants of the former airfield.
The site also falls within a prehistoric landscape including several Bronze Age round
barrows across Martlesham and Brightwell Heath (BGL 006, 007, 008, 009 and 041), a
ring ditch (BGL 021) and a Palaeolithic hand-axe (BGL 025), which all fall within
3

approximately 350m of the structures. The Type-22 pillbox is set within the top of one of
the Bronze Age barrows (BGL 008), which was partially excavated in 1991 by SCCAS,
which involved a plan being made of the earthwork and its WWII additions (Fig. 6), as
well as a contour survey. The text from this report is included as Appendix 3.
RAF plans of the site, as provided by the RAF Museum, London, do not clearly indicate
the functions of the three structures. The air raid shelter barrow is shown on one of the
plans from 1945 (Fig. 2). Although the legibility of the plan is rather unclear, it also
seems to indicate a structure to the north-east labelled as ‘194’, which is recorded as a
bulk oil installation.
A search of the Suffolk HER 1945 aerial photography collection showed that the
coverage does not extend to this area. However, an Ordnance Survey photograph from
1946 reveals that the structures were located in an area labelled as the ‘sewage works’
and that the HFDF remains and the brick hut were on part of the site’s road network
(taken from Freeman, 1978 and reproduced here as Fig. 3).
4

Figure 2. Plan of RAF Martlesham with structures highlighted in red and probable Bulk Oil Installation labelled as ‘194’.
N
The drawing number is 6257/45(?), and the plan is thought to date to 1945. Reproduced with permission of the Royal Air Force Museum, London.
5
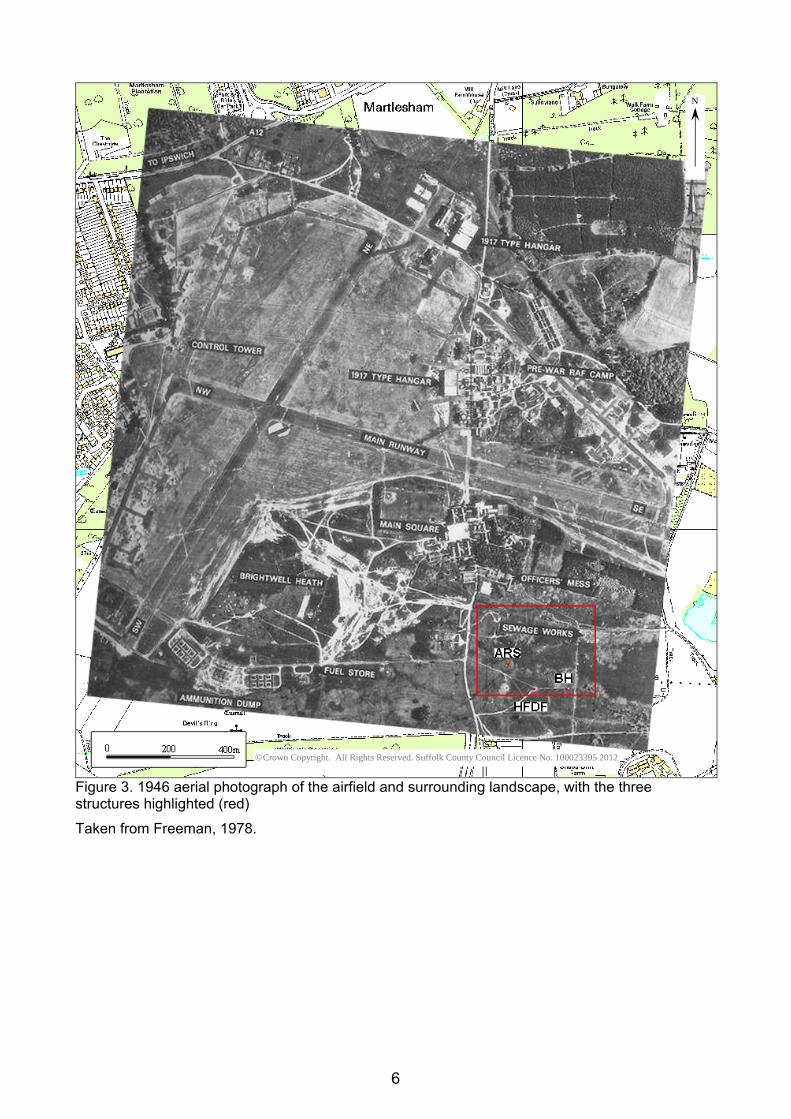
Figure 3. 1946 aerial photograph of the airfield and surrounding landscape, with the three structures highlighted (red)
N
©Crown Copyright. All Rights Reserved. Suffolk County Council Licence No. 100023395 2012
Taken from Freeman, 1978.
6

4. Methodology
In order to fulfil the Brief and Specification by Edward Martin (SCCAS Conservation
Team) a Level 3 building record (as specified by English Heritage) was required. This
entailed the creation of measured plans and elevations, as well as a photographic
record, for three structures. An initial English Heritage Level 1 survey was undertaken in
October 2008, which was carried out and written up by Mo Muldowney in SCCAS
Report No. 2008/275. During this work a visit to the site was made by Roger Thomas of
English Heritage to provide advice regarding the structures. This stage of work included
the survey of the plans of the structures, which were made using a GPS (working within
accuracy tolerances of 0.05m), and a Total Station Theodolite (TST). An internal and
external photographic record, including images showing the buildings within their wider
context/landscape was also taken, using a digital SLR. This included a particularly
detailed internal record of the Type 22 pillbox, which contained a lot of graffiti
contemporary with its use in WWII, as well as more recent instances which appear to
correspond in date with the construction of nearby housing. Due to the time of year at
which the surveys had to be carried out, the lighting conditions for the photographic
recording were not ideal.
In December 2011 the elevations of the structures were drawn using a TST and a
further series of located photographs was taken to supplement the initial record. It was
noted during this more recent visit that some of this graffiti was in a poorer condition
than it had been during the initial survey (Van Jennians, pers. comm.).
As is demonstrated by the photographic record, the internal area of the HFDF tower
base, as well as the earthwork around the Type-22 pillbox, were heavily overgrown by
the time of the 2011 survey. This made it impossible to enter the former or to record any
structures surrounding the latter. The result of this is that it has only been possible to
reproduce the earlier plans created in 2008 for the HFDF structure, with a combination
of plans from the 1991 and 2008 surveys being used for the Type-22 pillbox (Fig. 6).
The survey data, photographs and records have been archived in the main stores of
Suffolk County Council Archaeological Service at Bury St Edmunds and with the County
7

Historic Environment Record under the site code MRM 140. A copy of the report will be
uploaded to the OASIS on-line database (suffolkc1-116264).
Discussions with the Martlesham Heath Aviation Society, who run the Martlesham
Heath Control Tower Museum, revealed that they hold no maps or aerial photographs of
this particular part of the site. However the author acknowledges the assistance
provided by several of the Society’s members, particularly Alan Smith for his help
regarding the function of HFDF towers.
8
5. Results
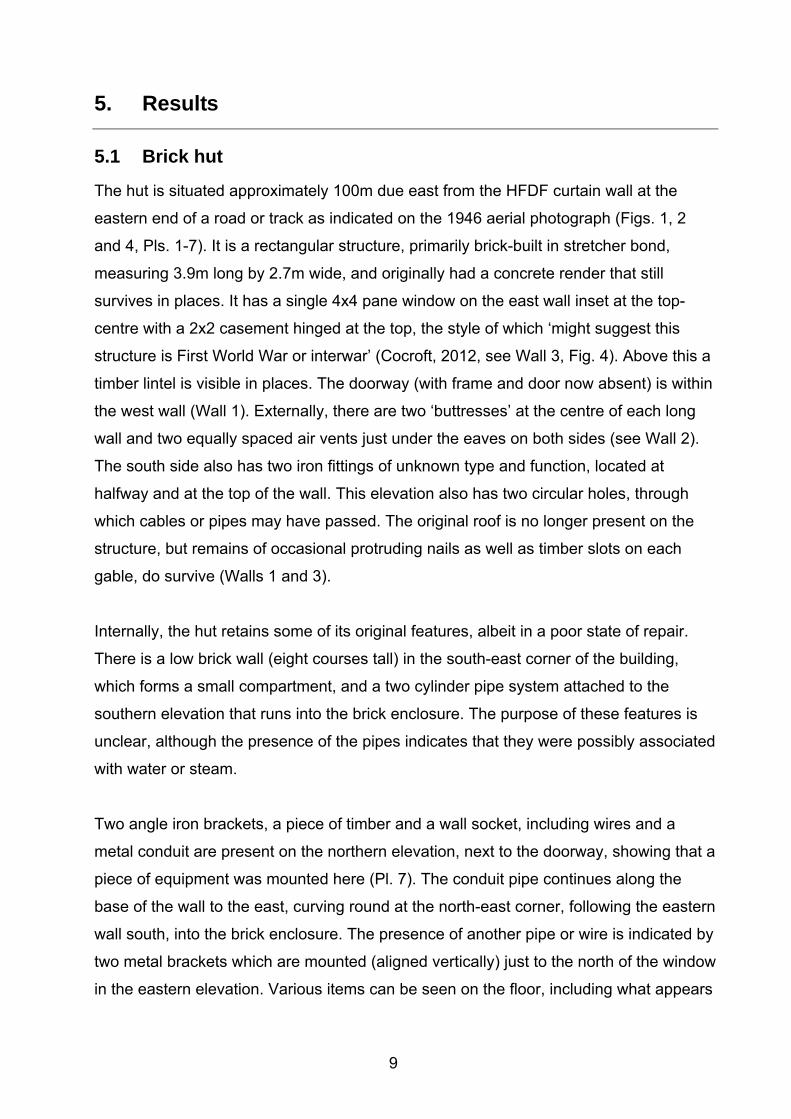
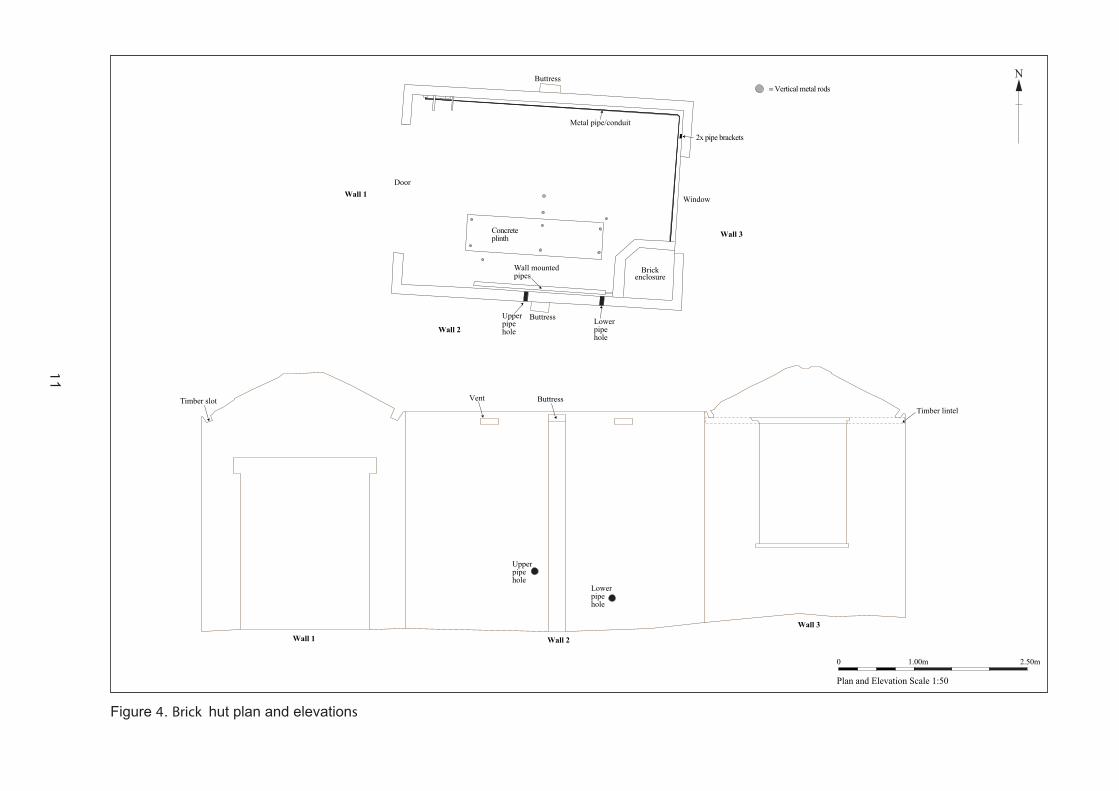
5.1 Brick hut
The hut is situated approximately 100m due east from the HFDF curtain wall at the
eastern end of a road or track as indicated on the 1946 aerial photograph (Figs. 1, 2
and 4, Pls. 1-7). It is a rectangular structure, primarily brick-built in stretcher bond,
measuring 3.9m long by 2.7m wide, and originally had a concrete render that still
survives in places. It has a single 4x4 pane window on the east wall inset at the top-
centre with a 2x2 casement hinged at the top, the style of which ‘might suggest this
structure is First World War or interwar’ (Cocroft, 2012, see Wall 3, Fig. 4). Above this a
timber lintel is visible in places. The doorway (with frame and door now absent) is within
the west wall (Wall 1). Externally, there are two ‘buttresses’ at the centre of each long
wall and two equally spaced air vents just under the eaves on both sides (see Wall 2).
The south side also has two iron fittings of unknown type and function, located at
halfway and at the top of the wall. This elevation also has two circular holes, through
which cables or pipes may have passed. The original roof is no longer present on the
structure, but remains of occasional protruding nails as well as timber slots on each
gable, do survive (Walls 1 and 3).
Internally, the hut retains some of its original features, albeit in a poor state of repair.
There is a low brick wall (eight courses tall) in the south-east corner of the building,
which forms a small compartment, and a two cylinder pipe system attached to the
southern elevation that runs into the brick enclosure. The purpose of these features is
unclear, although the presence of the pipes indicates that they were possibly associated
with water or steam.
Two angle iron brackets, a piece of timber and a wall socket, including wires and a
metal conduit are present on the northern elevation, next to the doorway, showing that a
piece of equipment was mounted here (Pl. 7). The conduit pipe continues along the
base of the wall to the east, curving round at the north-east corner, following the eastern
wall south, into the brick enclosure. The presence of another pipe or wire is indicated by
two metal brackets which are mounted (aligned vertically) just to the north of the window
in the eastern elevation. Various items can be seen on the floor, including what appears
9

to be a metal pump with electrical wires leading from it (Pl. 8), as well as pieces of
timber frame, which may be the remains of the doorframe.
There is a concrete plinth occupying much of the floor space of the hut, running east to
west near the southern edge of the hut (1.85m long x 0.5m wide). There are three pairs
of rods emerging from it; one pair at each end and another pair slightly offset from the
centre. This appears to be the base or stand for a piece of equipment. Two similar but
slightly larger ‘stands’ were recorded on top of a bulk fuel installation on RAF Feltwell
(Pl. 6). These had similarly positioned metal points, but also had metal casings surviving
in places which covered these points, and it is suggested that a similar casing may have
originally covered the example recorded in the brick hut. The plinth recorded in the hut
also has four further surviving iron rods emerging from the floor beside it. These are
clearly associated due to their proximity and similar size. Their function is unclear,
although they possibly indicate that further concrete plinths were located there.
The size of the window shows that the hut was well-lit for such a small building, and
combined with the ventilation grates this indicates that people were frequently present in
the room. The vents also suggest that the building needed to be kept cool and/or that
noxious smells were present as a result of the hut’s functions. The door of the building
is notably large at 2.27m tall x 1.67m wide, presumably indicating that the structure was
either simultaneously used by several people, or that sizeable equipment was installed
therein, perhaps corresponding with the concrete plinth.
Although the function of the building is somewhat unclear, it is notable that it clearly
contained installed equipment. It was also close to a bulk oil installation, and the
similarity of its plinth feature to those recorded on a bulk diesel fuel installation on RAF
Feltwell may indicate an associated use, perhaps as a pump house for an as yet
undiscovered fuel tank. However, the hut is more likely to have been associated with
the nearby HFDF tower (Thomas, 2012). This is thought to be the case partly because it
was not only constructed of similar bricks, but also as the ‘Black Beacon’ direction
finding tower at Orford Ness had an associated brick generator house ‘to provide power
for it and other range infrastructure’ (Cocroft and Alexander, 2009). As such this hut
probably fulfilled a similar purpose, as a stand-by set house, although it is at some
distance from the HFDF remains.
10
N
Timber slot Vent ButtressTimber lintel
Wall 1 Wall 2
Wall 3
Buttress
Buttress
Window
Brickenclosure
Door
Plan and Elevation Scale 1:50
0 2.50m1.00m
Figure 4. Brick hut plan and elevations
11
Metal pipe/conduit
Concreteplinth
Wall mountedpipes
Upperpipehole
Lowerpipehole
= Vertical metal rods
2x pipe brackets
Wall 1
Wall 2
Wall 3
Upperpipehole
Lowerpipehole

5.2 High Frequency Direction Finding tower curtain wall and foundations
An octagonal wall and several concrete and steel rod foundations form the remnants of
a High Frequency Direction Finding (HFDF) tower that is located at grid reference TM
25034 44514 (Figs. 1 and 5, Pls. 9-14). HFDF towers functioned to help pilots navigate.
This was done by a series of transmissions between three towers and an aircraft in
order to triangulate the position of the aircraft in relation to the towers. These structures
were relatively rare even during WWII, and the survival of this example is rarer still.
Alternatively it is possible that the structure recorded here functioned in correspondence
or in an associated experimental role with the ‘Black Beacon’; a hexagonal tower with a
rotating radio beacon transmitter, constructed around 1930 at Orford Ness. At this point
the Air Ministry had become interested in this technology because of its potential for
direction finding, as it had previously only been used on ships. As a result of this
experimentation the system was later developed and deployed for more widespread
airfield homing beacons (Cocroft and Alexander, 2009).
The wall of the building forms an open octagonal structure with no roof and is made
from red brick in Old English bond. The walls are 0.3m thick and at least twenty-six
courses high, with an additional ‘capping’ course of bricks laid at right-angles to the
main walls. The bricks are similar to those used in the brick hut, but differ from those
used in the pillbox, probably indicating different phases of construction, but also that the
pillbox was built to withstand more sustained attacks. All the walls are 2.5m long, with
the exception of the north-west wall (Wall 6a/6b, Fig. 5), which forms a short concealed
(and protected) entrance with the north wall (Wall 5). There are small loopholes within
each wall (see Wall 4), except in the north side. The loopholes are approximately 0.43m
long by 0.1m high and splayed with a concrete ‘sill’.
Internally, unlike the Type 22, this structure has no shelves or other supports under the
loopholes, indicating that they were not manned as they would be in a pillbox. However,
there is an iron bracket on the eastern wall and the west wall also retains an upright
wooden 3”x1” bracket or strut to the left of the loophole, although no similar item is
present on the right hand side. It is unclear what function these had. The lower half of
the west wall (below the loophole) was painted white. The condition of the curtain wall
was poor, with part of the internal north wall missing and a large crack at the corner of
12
the east and south-east facing walls. In addition much of the brickwork itself is
crumbling, both internally and externally and the topping bricks are also badly eroded.
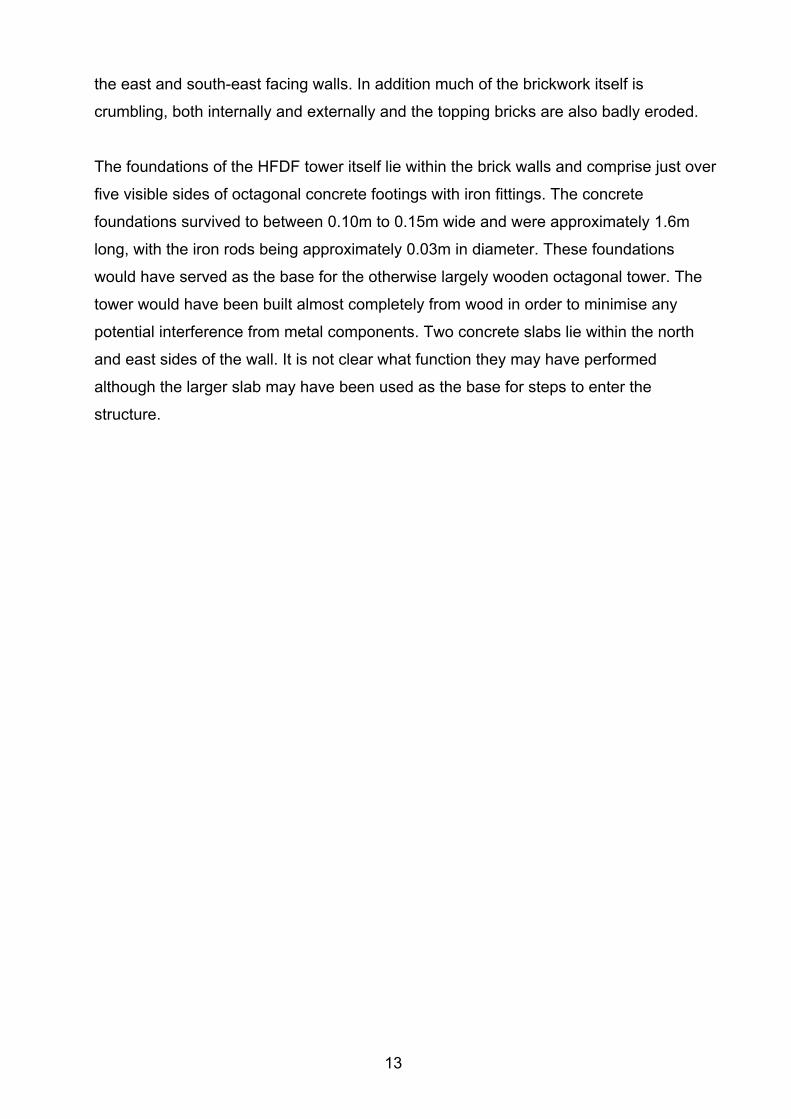
The foundations of the HFDF tower itself lie within the brick walls and comprise just over
five visible sides of octagonal concrete footings with iron fittings. The concrete
foundations survived to between 0.10m to 0.15m wide and were approximately 1.6m
long, with the iron rods being approximately 0.03m in diameter. These foundations
would have served as the base for the otherwise largely wooden octagonal tower. The
tower would have been built almost completely from wood in order to minimise any
potential interference from metal components. Two concrete slabs lie within the north
and east sides of the wall. It is not clear what function they may have performed
although the larger slab may have been used as the base for steps to enter the
structure.
13

Wall 5
Radar towerfoundations
Iron rod
Wall 4Wall 6a
Wall 6b
Iron bracket
3" x 1" wooden bracket/strut
Concrete slab
Concrete slab
Loophole
Loophole
Wall 4Wall 5 Wall 6a Wall 6b
N
Plan Scale 1:100
0 5m
Elevation Scale 1:50
0 2.50m1.00m
Figure 5. HFDF curtain wall and foundations plan and elevation
14

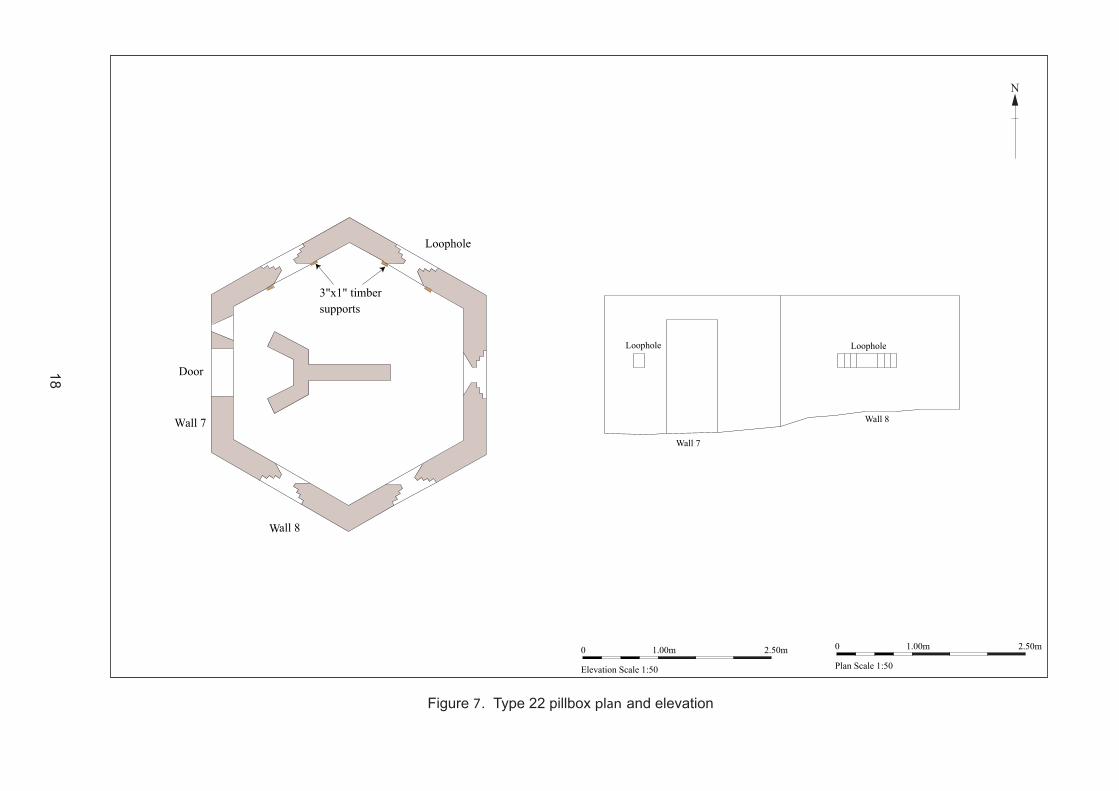
5.3 Type 22 pillbox
The Type 22 hexagonal pillbox (also known as a FW3/22) is situated atop a Bronze Age
burial mound (SAM 21267) at grid reference TM 24955 44592 (Figs. 1, 6, 7 and 8, Pls.
15-29). It is constructed primarily of brick in stretcher bond with an external concrete
‘skin’. These bricks are ‘laid to a very high standard’ from a yellow brick that ‘is common
to the area, and clearly more durable than the Phorpres Flettons that were so commonly
used in pillboxes’ (Thomas, 2012). The walls are approximately 0.3m thick x 1.8m long.
The thickness of the walls indicates that this was one of the original designs for the
Type 22 with bulletproof walls, as many later designs had 42”/1.07m thick shellproof
walls. Internally, the maximum height of the structure is 1.86m, although it has been
partially infilled by sand so the true height is unclear. Externally it is 1.82m tall, having
been built slightly sunken into the top of the mound.
There is a rectangular splayed single loophole on the door elevation to the left-hand
side of the entrance (Wall 7, Fig. 7). Five other loopholes are present on the remaining
identical elevations and these are of the ‘stepped splay’ design (Wall 8). On the roof of
the pillbox there is a small, somewhat eroded, mound of earth and grass which served
as a means of camouflage.
Internally the pillbox has a central brick ricochet wall and below two of the loopholes
wooden shelf brackets still survive. The shelves would have functioned as supports for
the five light machine guns and one rifle that were supposed to be stationed within.
Further points of interest within the pillbox include a series of graffiti from both the
Second World War and more recent years (Appendix 1, Pls. 19-29). Several of the
images which are likely to be contemporary with the pillbox’s use are listed below. A key
to the location of the internal wall numbers featuring these pictures and text can be seen
in Appendix I to accompany the photographs (Fig. 8). The WWII examples include
details of individuals who were presumably based at Martlesham, as well as images of a
dreadnought battleship and a rare M-Class submarine, which appear to have been
drawn in pencil or ink. The more recent graffiti mainly consists of names and dates (the
earliest example of which was from 1989) and these tend to be inscribed into the brick.
The other recent graffiti consists of expletives and some of this, along with three
15
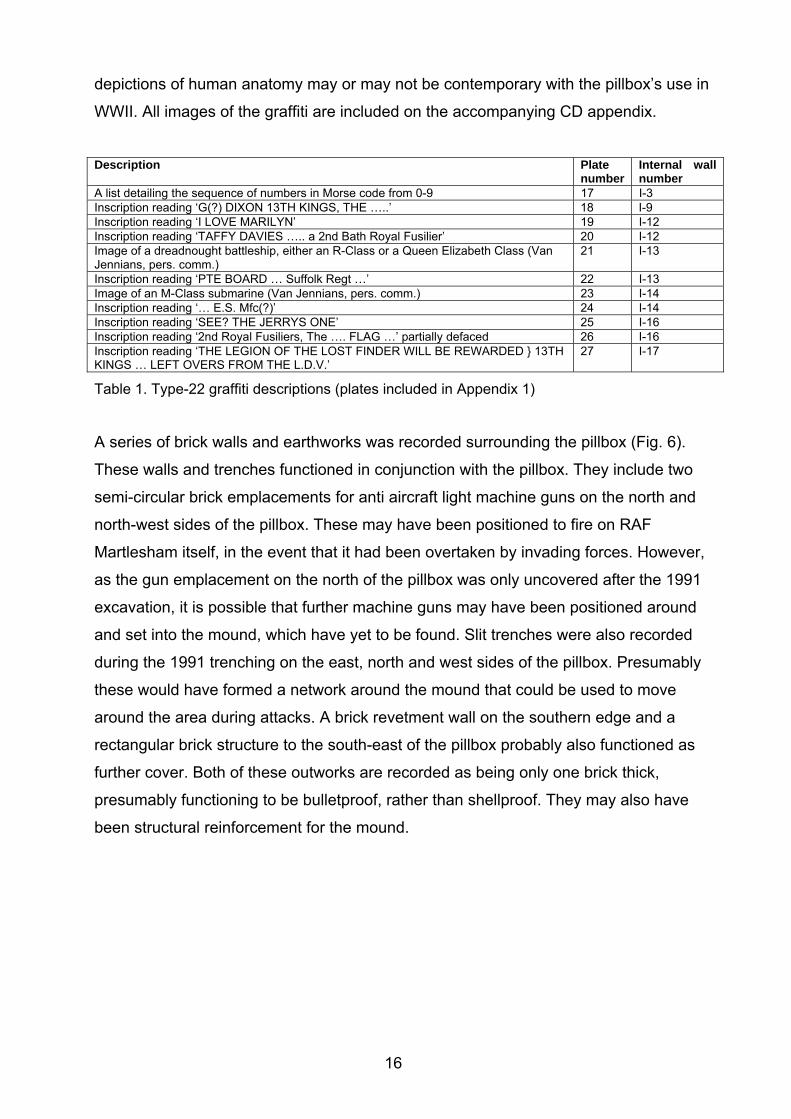
depictions of human anatomy may or may not be contemporary with the pillbox’s use in
WWII. All images of the graffiti are included on the accompanying CD appendix.
Description Plate
number Internal wall number
A list detailing the sequence of numbers in Morse code from 0-9 17 I-3 Inscription reading ‘G(?) DIXON 13TH KINGS, THE …..’ 18 I-9 Inscription reading ‘I LOVE MARILYN’ 19 I-12 Inscription reading ‘TAFFY DAVIES ….. a 2nd Bath Royal Fusilier’ 20 I-12 Image of a dreadnought battleship, either an R-Class or a Queen Elizabeth Class (Van Jennians, pers. comm.)
21 I-13
Inscription reading ‘PTE BOARD … Suffolk Regt …’ 22 I-13 Image of an M-Class submarine (Van Jennians, pers. comm.) 23 I-14 Inscription reading ‘… E.S. Mfc(?)’ 24 I-14 Inscription reading ‘SEE? THE JERRYS ONE’ 25 I-16 Inscription reading ‘2nd Royal Fusiliers, The …. FLAG …’ partially defaced 26 I-16 Inscription reading ‘THE LEGION OF THE LOST FINDER WILL BE REWARDED } 13TH KINGS … LEFT OVERS FROM THE L.D.V.’
27 I-17
Table 1. Type-22 graffiti descriptions (plates included in Appendix 1)
A series of brick walls and earthworks was recorded surrounding the pillbox (Fig. 6).
These walls and trenches functioned in conjunction with the pillbox. They include two
semi-circular brick emplacements for anti aircraft light machine guns on the north and
north-west sides of the pillbox. These may have been positioned to fire on RAF
Martlesham itself, in the event that it had been overtaken by invading forces. However,
as the gun emplacement on the north of the pillbox was only uncovered after the 1991
excavation, it is possible that further machine guns may have been positioned around
and set into the mound, which have yet to be found. Slit trenches were also recorded
during the 1991 trenching on the east, north and west sides of the pillbox. Presumably
these would have formed a network around the mound that could be used to move
around the area during attacks. A brick revetment wall on the southern edge and a
rectangular brick structure to the south-east of the pillbox probably also functioned as
further cover. Both of these outworks are recorded as being only one brick thick,
presumably functioning to be bulletproof, rather than shellproof. They may also have
been structural reinforcement for the mound.
16

Figure 6. Type-22 pillbox and surrounding slit trenches, outworks and gun emplacements (Plans combined from Tester, 1991, and Muldowney, 2008)
17
Wall 7
Wall 8
LoopholeLoophole
Door
Loophole
3"x1" timbersupports
N
Elevation Scale 1:50
0 2.50m1.00m
18
Figure 7. Type 22 pillbox plan and elevation
Wall 7
Wall 8
Plan Scale 1:50
0 2.50m1.00m

6. Archive deposition
Paper and site record archive: SCCAS Bury St Edmunds
Digital archive: SCCAS
7. Acknowledgements
The building record was carried out by various members of staff (Rob Brooks, Jonathan
Van Jennians, Mo Muldowney, Anna West and Sabra Hennessey) all from the Suffolk
County Council Archaeological Service, Field Team. The 2008 survey was directed by
Mo Muldowney and the 2011 survey by Rob Brooks. The project was managed by
David Gill, who also provided advice during the production of the report. The production
of digital site plans and sections was carried out by Ellie Hillen, Gemma Adams, Rob
Brooks and Crane Begg. The report was checked by David Gill and Richenda Goffin.
8. Bibliography
Brooks, R., 2009, Building Recording Report, Air-raid shelter, bulk fuel installation and water tank, RAF Feltwell, NHER 4942, SCCAS Report No. 2009/233, Bury St Edmunds: SCCAS Cocroft, W. and Alexander, M., 2009, Atomic Weapons Research Establishment, Orford Ness, Suffolk, Cold War Research & Development Site, Survey Report, Research Department Report Series No. 10-2009, Swindon: English Heritage Cocroft, W., 2012, personal communication via email from W. Cocroft, Senior Archaeological Investigator for English Heritage (24/02/2012) Freeman, Roger A., 1978, Airfields of the Eighth, Then and Now, London: Battle of Britain Prints Kinsey, G., 1983, Martlesham Heath, The Story of the Royal Air Force Station 1917-1973, revised edition, Lavenham: Terence Dalton Limited Muldowney, M., 2008, Building Recording Report, World War II Defences on The Swale, Brightwell Heath, Ipswich, MRM 140, SCCAS Report No. 2008/275, Bury St Edmunds: SCCAS Smith, G., 1995, Suffolk Airfields in the Second World War, Newbury: Countryside Books Thomas, R., 2012, personal communication via email from R. Thomas, English Heritage (24/02/2012)
19

20
Appendix 1. Selected plates
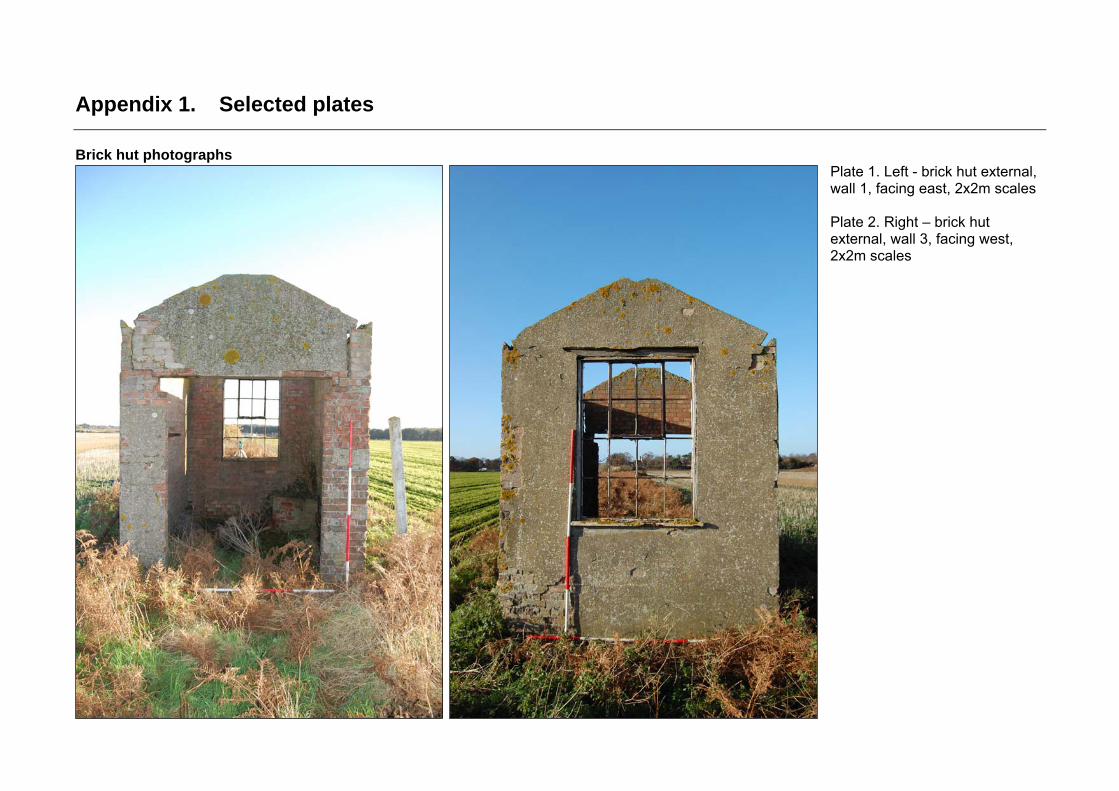
Brick hut photographs Plate 1. Left - brick hut external, wall 1, facing east, 2x2m scales Plate 2. Right – brick hut external, wall 3, facing west, 2x2m scales

Plate 3. Brick hut, wall 2, facing north, 2x2m scales
Plate 4. Brick hut, facing south-west, showing the structure in its current context (A12 in background)

Plate 5. Left - brick hut internal, concrete stand, brick enclosure, wall mounted metal pipes and low brick partition parallel to wall, facing east, 1x2m scale, Plate 6. Right - metal ‘stand’ as recorded on a bulk fuel installation at RAF Feltwell (Brooks, 2009)

Plate 7. Left - brick hut internal, shelf brackets and wiring, facing north-west, 1x2m scale Plate 8. Right - metal ‘pump’ found on floor of brick hut

HFDF Curtain wall and tower foundations photographs
Plate 9. HFDF curtain wall, typical elevation with loophole, facing north-east (photo edited to compensate for low light conditions)
Plate 10. HFDF curtain wall, walls 5, 6a and b/entrance, facing south-east (photo edited to compensate for low light conditions)

Plate 11. HFDF curtain wall to the left with the Type 22 pillbox on a barrow to the right, showing the structures in cont
Plate 12. HFDF tower foundation
ext, facing west towards A12
s, concrete sill and iron fittings

Plate 13. Left – HFDF curtain wall & foundations entrance, with concrete slab and octagonal internal foundation, facing east (photo colours edited to compensate for low light conditions) Plate 14. Right – HFDF curtain wall, east wall showing iron bracket and poor condition of structure, facing east (photo colours edited to compensate for low light conditions)

I-5.
I-3.
I-4.
I-10.
I-11.I-12.
I-13.
I-14.I-15.
I-16.I-17.
I-18.
I-9.
I-8.
I-1.
I-2.
I-6.
I-7.
Type-22 pillbox photo key and photographs
Figure 8. Key for the following photographs of the Type 22 pillbox showing wall numbers referenced in Table 1 and the descriptions (schematic image)
N

Plate 15. Type 22 pillbox, showing doorway and small loophole, facing east, 2x2m scales
Plate 16. Type 22 pillbox, showing typical elevation, facing north-east, 2x2m scales
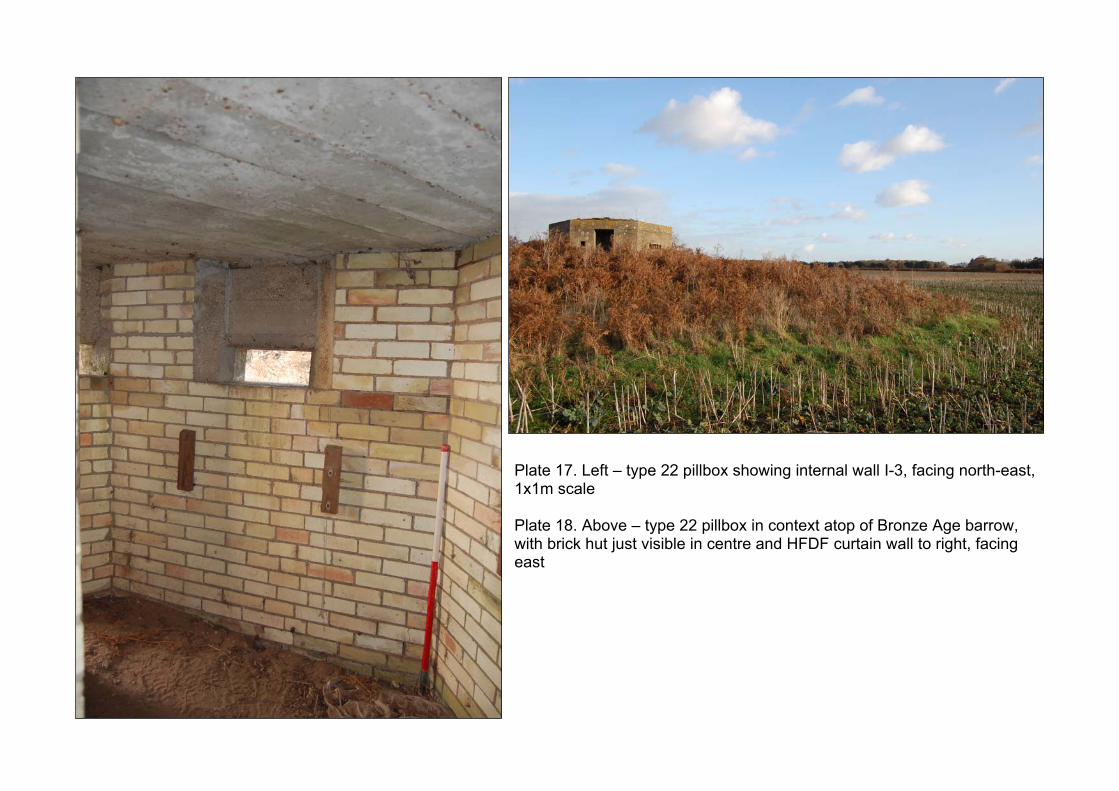
Plate 17. Left – type 22 pillbox showing internal wall I-3, facing north-east, 1x1m scale Plate 18. Above – type 22 pillbox in context atop of Bronze Age barrow, with brick hut just visible in centre and HFDF curtain wall to right, facing east

Plate 19. Type 22 pillbox internal, Morse code list on wall I-3
Plate 20. Type 22 pillbox internal, inscription on wall I-9
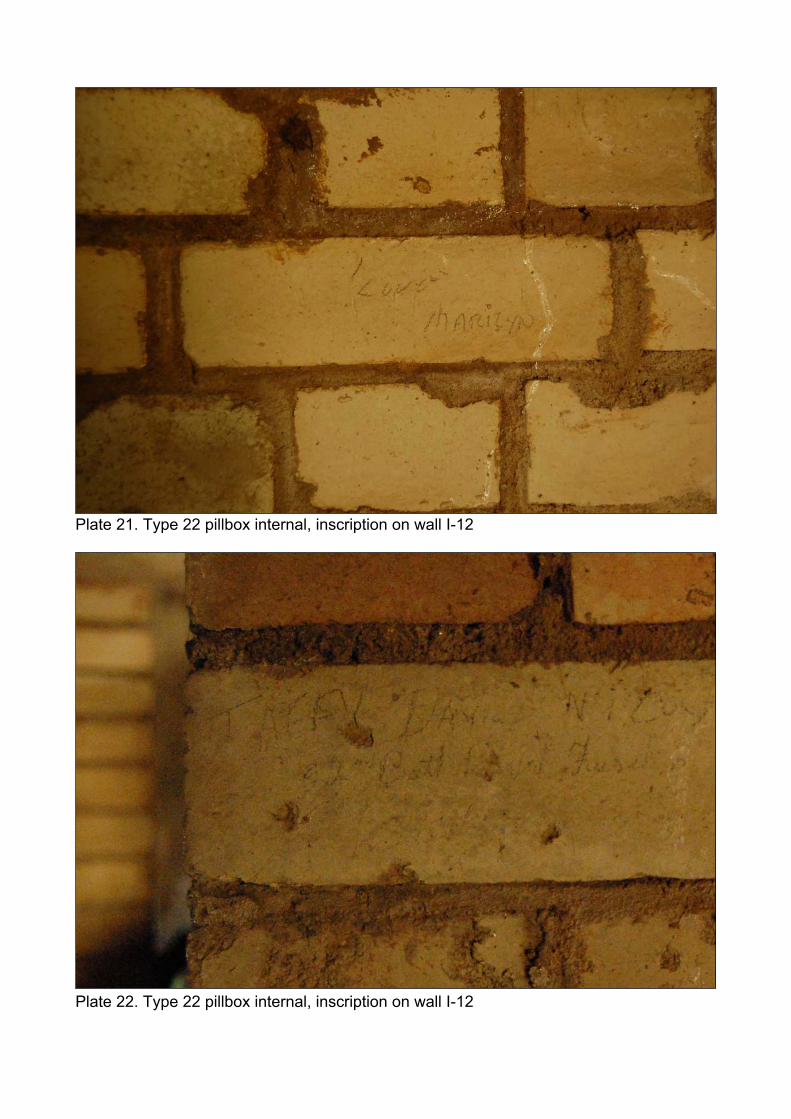
Plate 21. Type 22 pillbox internal, inscription on wall I-12
Plate 22. Type 22 pillbox internal, inscription on wall I-12
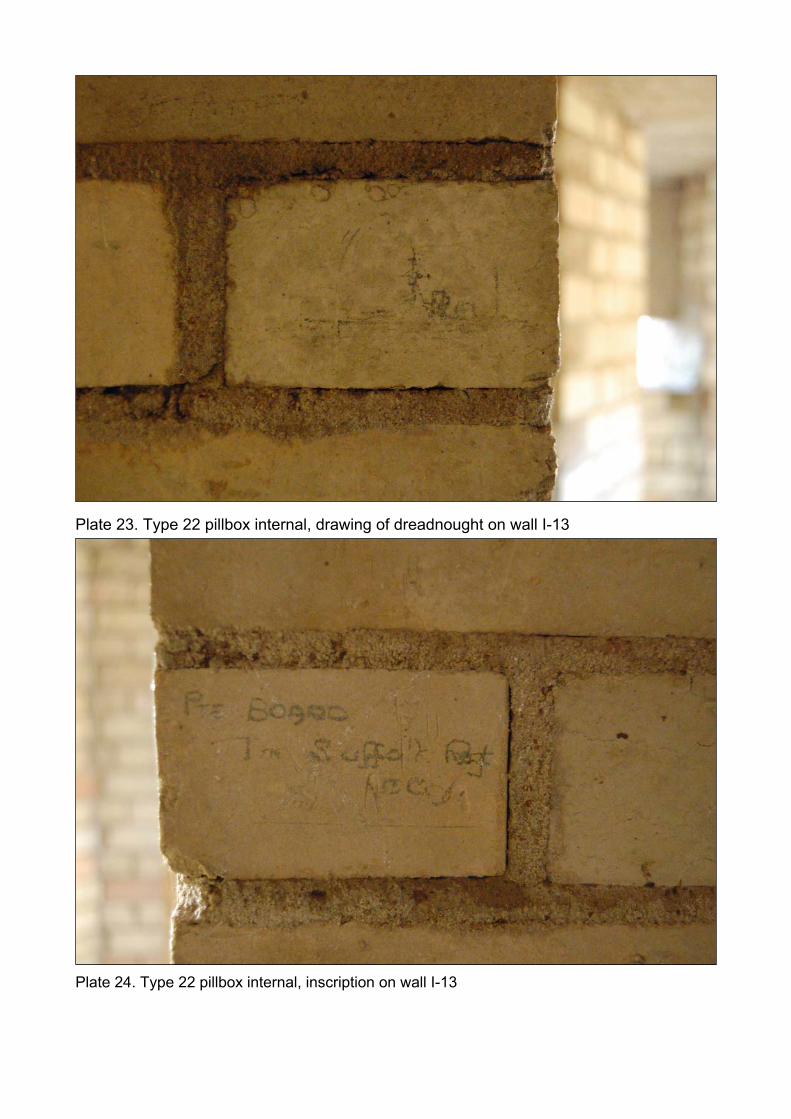
Plate 23. Type 22 pillbox internal, drawing of dreadnought on wall I-13
Plate 24. Type 22 pillbox internal, inscription on wall I-13
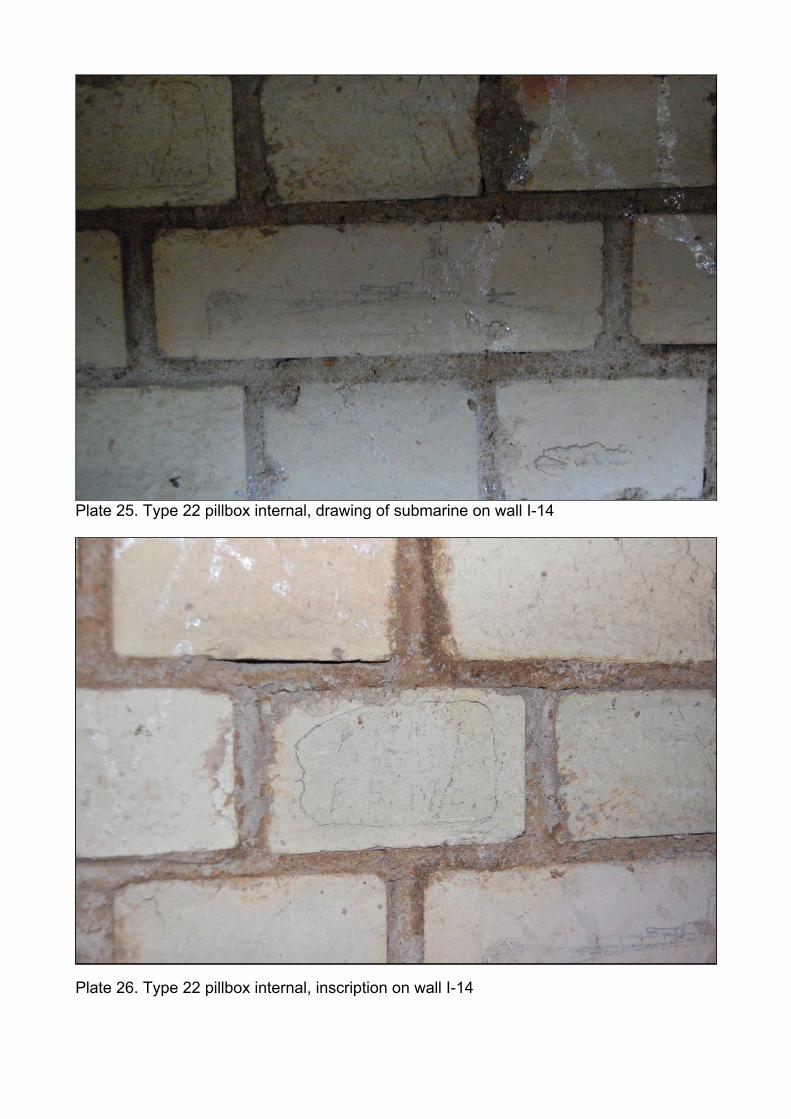
Plate 25. Type 22 pillbox internal, drawing of submarine on wall I-14
Plate 26. Type 22 pillbox internal, inscription on wall I-14

Plate 27. Type 22 pillbox internal, inscription on wall I-16
Plate 28. Type 22 pillbox internal, inscription on wall I-16

Plate 29. Type 22 pillbox, inscription on wall I-17

Appendix 2. OASIS form
OASIS ID: suffolkc1-116264
Project details
Project name MRM 140 Martlesham Heath WWII Structures Building Recording
Short description of the project
A building recording was undertaken of three structures dating from the inter-war period to WWII as required in a Brief and Specification by Edward Martin of Suffolk County Council Archaeological Service Conservation Team. These buildings formed part of RAF Martlesham, which from 1917 housed the Armament Experimental Flight and the Aircraft Testing Flight, later to become the Aeroplane and Armament Experimental Establishment. The airfield also became actively involved in combat operations during WWII. A Type-22 pillbox (constructed on top of a Bronze Age barrow mound and surrounded by revetment walls and a gun emplacement), a brick hut which possibly functioned as a stand-by set house for the HFDF tower, and an octagonal wall for a High Frequency Direction Finding (HFDF) tower were recorded. The latter building is a brick curtain wall, functioning as a protective structure for a wooden HFDF beacon tower, from which only the concrete and metal foundations still remain. The three buildings were in various states of repair, although the Type-22 pillbox was the best preserved and still contained graffiti from WWII, as well as later graffiti thought to be contemporary with the nearby housing estate. The structures would have functioned within part of the defensive network associated with the airfield, and the HFDF structure and the brick hut possibly played a part in the installation's experimental work too.
Project dates Start: 28-10-2008 End: 07-12-2011
Previous/future work
Yes / Yes
Any associated project reference codes
MRM 140 - HER event no.
Any associated project reference codes
MRM 140 - Sitecode
Any associated project reference codes
2012/002 - Contracting Unit No.
Type of project Building Recording
Current Land use Other 3 - Built over
Monument type PILLBOX Modern
Monument type HIGH FREQUENCY DIRECTION FINDING TOWER Modern
Monument type STAND BY SET HOUSE Modern
Significant Finds NONE None
Methods & techniques
'Annotated Sketch','Measured Survey','Photographic Survey','Survey/Recording Of Fabric/Structure'

Prompt Direction from Local Planning Authority - PPS
Project location
Country England
Site location SUFFOLK SUFFOLK COASTAL MARTLESHAM MRM 140 Martlesham Heath WWII Structure Building Record
Postcode IP5
Study area 67.00 Square metres
Site coordinates TM 24955 44592 52.0534130061 1.281483928160 52 03 12 N 001 16 53 E Point
Site coordinates TM 25034 44514 52.0526805520 1.282582910140 52 03 09 N 001 16 57 E Point
Site coordinates TM 25135 44513 52.0526303067 1.284052929070 52 03 09 N 001 17 02 E Point
Project creators
Name of Organisation
Suffolk County Council Archaeological Service
Project brief originator
Local Authority Archaeologist and/or Planning Authority/advisory body
Project design originator
Edward Martin
Project director/manager
Stuart Boulter
Project supervisor
Rob Brooks
Type of sponsor/funding body
Quarry
Name of sponsor/funding body
Brett Aggregates
Project archives
Physical Archive Exists?
No
Digital Archive recipient
Suffolk County Council Archaeological Service
Digital Archive ID MRM 140
Digital Contents 'Survey','other'
Digital Media available
'Images raster / digital photography','Survey','Text'
Paper Archive recipient
Suffolk County Council Archaeological Service
Paper Archive ID MRM 140
Paper Contents 'Survey','other'
Paper Media available
'Correspondence','Notebook - Excavation',' Research',' General Notes','Report'
Project bibliography 1

Publication type
Grey literature (unpublished document/manuscript)
Title Martlesham Heath WWII structures, Martlesham, MRM 140, Archaeological Building Record
Author(s)/Editor(s)
Brooks, R.
Other bibliographic details
SCCAS Report No. 2012/002
Date 2012
Issuer or publisher
SCCAS
Place of issue or publication
Bury St Edmunds
Description A4, comb bound, white cover, in colour, with two appendices (also available as a pdf)
Entered by Rob Brooks ([email protected])
Entered on 4 May 2012
OASIS: Please e-mail English Heritage for OASIS help and advice © ADS 1996-2006 Created by Jo Gilham and Jen Mitcham, email Last modified Friday 3 February 2006 Cite only: http://www.oasis.ac.uk/form/print.cfm?ID=125114 for this page


Appendix 3. BGL 008 report text
Report text by Andrew Tester of SCCAS Field Team, 1991 ROUND BARROW AT BRIGHTWELL, SUFFOLK (TM 2495 4459) COUNTY SMR NO. BGL 008; SAM NO. 94C SUFFOLK Following the unauthorised partial flattening of this Scheduled Ancient Monument, a limited excavation was undertaken by the Suffolk Archaeological Unit in July 1991. Its objectives were to: A. Record the extent of the damage to the standing earthwork. B. Determine the condition and extent of archaeological deposits within the damaged area. SUMMARY - SITE HISTORY This round barrow was recorded by the Ordnance Survey in 1927 as one from a group of eight within the area. During World War II a concrete and brick pill box with adjoining earthworks and gun emplacements was built on top of the barrow. The barrow was subsequently scheduled as an ancient monument, 14 December 1960. METHOD OF SURVEY A detailed plan was made of the undamaged earthworks together with a 10cm interval contour survey on a 1m grid of the scheduled area. Three radiating trenches were hand dug through the damaged area, which included two narrower sections to the base of the subsoil. RESULTS TRENCH 0002 This trench was 11.80m long x 2m wide and was cut from the damaged east face of the mound. SECTION 0015 (TRENCH 0002) The eastern 1.25m of this section cut a clean yellow sand located just 0.10m below the broken turf line. The sand was cut by a World War II slit trench, 1.2m wide which completely truncated the section. East of this trench the topsoil/disturbance layer was 0.25m deep, overlaying pale yellow sand. This layer was 0.45m deep coming down to a coarse sand and gravel band. As the section dropped away eastward, at about 4m, the yellow sand gave way to a very dark purple sand (0012) below a greater depth of disturbed soil (up to 0.35m). The purple sand was up to 0.35m deep but levelled out to an average depth of 25cm. At 8.3m the section was interrupted for 40cm by a line of elder roots, east of these roots, 15cm of topsoil/disturbance overlay an homogeneous plough soil which came down onto the natural yellow sand. The profile of the section dropped away from 1.6m at the western end dropping to 0.70m. East of the World War II slit trench and 0.5m before the section was truncated by roots and ploughsoil, (measurements taken from the gravel interface over the yellow sand, which was at a constant level). In plan the elder stumps can be seen to form a line separating the plough soil from the undisturbed purple sand. This layer was clearly truncated as was the inner yellow sand principally by the World War II slit trench.

TRENCH 0003 The trench measured 10m x 1.5m extending west of the exposed face of the mound, opposite the entrance to the central pill box. SECTION 0016 (TRENCH 0003) Extending west of this section for 0.90m was a backfilled World War II slit trench. The following 2.10m was made up of yellow/brown sand below 0.1m of disturbed soil, the sand was only excavated to a depth of 0.1m. Between 2.20m and 7.3m, the section was cut down 0.8m to explore the possibility of a ditch surrounding the mound. The upper 0.10m of section was disturbed soil above 0.5m of purple/brown sand (up to 6m) which had been severely animal disturbed. At 6m the surface disturbance increased in depth up to 0.35m overlying an homogeneous plough soil for the remainder of the trench. Below both the purple sand and plough soil were layers of coarse yellow sand with gravel and some panning. TRENCH 0018 This trench measured 10.5m x 1.25m extending approximately NNE from the exposed face of the mound. Following the removal of the uppermost disturbed soil, an extensive World War II earthwork was uncovered and no further excavations took place. Measuring from the central mound, a fine yellow sand with some animal disturbance was exposed over the first 2.75m. The World War II disturbance, which consisted of a slit trench with a circular brick revetted exterior, extended from 2.75m to 6.8m. At 6.8m a surface of purple brown sand was exposed continuing to 9.5m where a ploughed soil was exposed to the end of the trench. FINDS Four sherds of pottery were recovered within Trench 0002. One Bronze Age sherd (0007) was recovered from the yellow sand of the central mound (0004). The other three sherds were probably Iron Age in date: sherds 0010 and 0011 were recovered from the base of the purple brown sand (0012) in trench 0002; 0014 was less precisely recorded in the same area. A small collection of struck flint was recovered, some of which may have been modern. Eleven flakes were recovered from clearing layer 0008 (above purple brown sand 0012), compared with four from the mound material 0004, where the stratigraphy was more secure. Layer 0009 (part of 0012) produced nine fragments of burnt flint. INTERPRETATION TRENCH 0002 (SECTION 0013) The fine yellow sand at the west end of this trench is probably the remains of the original mound, this material contained old and modern animal disturbances clearly pre-dating any 20th century interference. The mound was partially overlain by a later purple/brown sandy soil truncated in the section by the recent disturbance and wartime activity. The elder roots marked the limit of preserved stratigraphy. The small sections dug through the purple/brown sand and part of the mound material revealed a layer of flints over coarse sand which is probably all that remains of the pre-mound turf line. Two (possibly three) of the four sherds of pottery recovered (0010 and 0011) were from the interface between the purple/brown sand and the gravel and sand below. TRENCH 0003 (SECTION 0016) The layers from Trench 0003 correlate with those from 0002. The yellow sand at the eastern end of the section is the severely truncated remains of the central mound, which is partially overlain by a purple brown soil. The interface between the purple sand and the natural coarse sand was less clear than in Trench 0002. The small area of vertical mound fence visible in Section 0020, which was undisturbed, was 1.3m deep from the turf to the coarse gravelly sand natural with the top 0.5m being very animal disturbed. TRENCH 0018 In this trench, the fine sand exposed at the south end was the remains of the mound and, the purple/brown sand correlates with the similar material overlaying the mound in Trenches 0002 and 0003. It may be assumed from the other trenches that the prehistoric ground level remains undisturbed at the base of the purple/brown sand.

CONCLUSIONS The excavation showed that a considerable amount of the prehistoric barrow had survived, despite the construction of the war-time pill box with its associated trenches and the more recent machine damage. Part of the mound adjoining the pill box on the west, north and east sides had been removed by the recent machinery, but the bulk of this material appears to have been redeposited sand and rubble from the construction of the pill box. On the south side of the pill box the mound survives to a height of 71.65 MOD, approximately 1.5m above the height of the surrounding field. Excavation showed that the pre-mound surface, in section 0015, was fairly level at 69.95m, suggesting a maximum surviving height of 1.7m. The pill box floor, which occupies an area of about 10m square, was set into the mound and its concrete floor was at 70.86 MOD, indicating the likely survival of 0.91m of mound material beneath the floor. The recent machining penetrated to a depth of about 70.3 MOD, suggesting that it failed to expose the pre-mound surface and that some mound material survives even in the `flattened' areas. However, considerable rabbit disturbance to the mound was evident in most parts, being particularly noticeable in section 0015. Assuming that the pill box was placed more or less centrally on the mound and by measuring the extent of the mound material in Trenches 0002 and 0003, it is possible to suggest a diameter of 16.5m for the original prehistoric mound. There was no evidence in either trench for an encircling ring ditch. Excavation also showed that the bases of the complex system of military trenches around the pill box also survived the attempted flattening.


Archaeological services Field Projects Team Delivering a full range of archaeological services
• Desk-based assessments and advice
• Site investigation
• Outreach and educational resources
• Historic Building Recording
• Environmental processing
• Finds analysis and photography
• Graphics design and illustration
Contact:
Rhodri Gardner Tel: 01473 581743 Fax: 01473 288221 [email protected] www.suffolk.gov.uk/Environment/Archaeology/