r200s-ii user manual end - modownload.mo.ro/public/user-manual/3726/r200s-ii-user-manual-end... ·...
TRANSCRIPT
User Manual
32 / 32
User Manual
1 / 32

User Manual
2 / 32
User Manual
31 / 32
Certification CE/FCC/RoHS
* Only for R200S-II

User Manual
30 / 32
Audio Output via HDMI 1.4b, optical SPDIF
Picture Supported JPG,BMP,PNG,GIF
Subtitle Supported SRT / ASS / PGS
Subtitle Codec UTF-8
OS Android 4.4 Kitkat OS
File System FAT32,NTFS
Interface
1 x USB 3.0 host
1 x USB 2.0 host *
2 x USB 2.0 host
1 x HDD mobile rack with SATA slot for 3.5" HDD *
1 x RJ-45 Ethernet Jack (10/100Mbps)
1 x HDMI 1.4b output jack, up to 3840 x 2160 30fps
1 x Optical SPDIF
1 x DC in Jack
1 x Power button (physical button) *
1 x Update button (via one pin hole)
1 x White LED panel *
1 x IR sensor
1 x Power LED indicator
1 x Fan *
What's in the packing box
1 x 4K UHD Media Player
1 x IR remote control
1 x DC power adapter (CE, FCC, CCC Certified)
1 x HDMI cable, 1.5M
1 x User Manual
Operating Temperature 0~70℃
Storage Temperature 10~35℃
Power Supply DC 12V 2A *
DC 5V 2A
Overall Power Consumption <12W
Standby Power Consumption <0.5W
User Manual
3 / 32
Welcome Thank you for choosing Egreat products. Egreat Technology Co., Ltd is the professional media player manufacturer which is founded in 2006. Located in SZ, China.As the leading supplier in consumer electronics industry, Egreat products cover 4K UHD media player, HD media player, android TV box, Mini PC, wireless keyboard and other accessories etc. Egreat is the key High-Tech company authorised by SZ government of China, Egreat has built up the long term relationship with Mstar, Realtek, Amlogic, Rockchip, Allwinner, to meet the various requirements of the market. With the advantage of strict and scientific quality control system, Egreat products are all approved with FCC, CE, ROHS certifications. Egreat has a good reputation in the market and continue providing customers the best quality products and best user experience. This is user manual with all detailed specification. In order to make you learn about how to use this 4K UHD media player,please read it carefully before using.

User Manual
4 / 32
License Notice and Trademark Acknowledgement. Manufactured under license from Dolby Laboratories. Dolby and the double-D symbol are trademarks of Dolby Laboratories.
Manufactured under license under U.S. Patent #""s: 5,451,942; 5,956,674; 5,974,380; 5,978,762; 6,487,535 & other U.S. and worldwide patents issued & pending. DTS and the Symbol are registered trademarks, & DTS 2.0+ Digital Out and the DTS logos are trademarks of DTS, Inc. Product includes software. DTS, Inc. All Rights Reserved.
User Manual
29 / 32
Chapter 9. Specifications
Brand Egreat
Product Type 4K UHD Media Player
Case Material Aluminium & Metal
Color Black
CPU Brands Hi3797M ARM cortex A7 processor
CPU Cores Quad core
GPU Quad core Mali-450MP4 GPU
Memory 1GB DDR3
Internal Storage 8GB eMMC Flash
Expand Storage
1 x HDD mobile rack with SATA slot, support 3.5" HDD
inside *
1 x USB 3.0 host
1 x USB 2.0 host *
2 x USB 2.0 host
WiFi Connectivity 802.11 a/b/g/n, 2.4GHz 150M WiFi
WiFi Antenna 2 x 3dB Antenna *
1 x 3Db Antenna
Network 10/100Mbps, supports hotspot sharing via WiFi
Video Supported
DAT/ MPEG/ MPE/ MPG/ TS/ TP/ VOB/ ISO/ AVI/ MP4/ MOV/
3GP/ FLV/
MKV/ M2TS/ MTS/ M4V/ WMV/ ASF"
3D Video Supported FramePackaging 3D, Left / Right Side-by-Side 3D, Up / Down
Side-by-Side 3D
Video Output HDMI 1.4b, up to 4K*2K @ 30fps
Audio Supported DD/ DD+/ Dolby True-HD/ DTS/ DTS-HD MA/ MP2/ MP3/
WMA/ WAV/ OGG/ OGA/ FLAC/ ALAC/ APE/ AAC
Audio Pass-Through Dolby Digital, Dolby Digital Plus, Dolby True-HD,DTS, DTS-
HD MA
User Manual
28 / 32
Chapter 8. System Upgrade 1. User can visit Egreat official website and download the latest software, file
name should be xxx.zip, then copy it by USB stick; System restore 2. If for some reason, the media player can not enter the home page, or the
occurrence of serious errors, please use system restore function. 3. To visit Egreat official website and download the restore tool, Extract all
the files and copy it to the USB stick (please make sure USB stick is FAT32 format);
4. Power off the media player, insert USB stick into USB host, 5. press on "RST" or "Restore" key of the media player, and power on the
player( don't loosen "RST" or "Restore" key), keep press "RST" or "Restore" key until the restore tips appears on the screen.
6. the restore process will be started, the system will be automatically
refreshed and restored through the software. Note: Don't power off during restore.
User Manual
5 / 32
Content
Chapter 1. Interface .................................................................................................... 6
I. Machine Interface...................................................................................... 6
II. Remote Control Button ........................................................................... 9
Chapter 2. Product connection ........................................................................... 11
Chapter 3. Home page ............................................................................................ 13
I. Home page introduction ..................................................................... 13
II. Shortcut function ................................................................................... 14
III. APPs manage function ......................................................................... 15
Chapter 4. System setup ........................................................................................ 17
I. Network Setup ......................................................................................... 17
II. Video Output Setup ............................................................................... 17
III. Audio Output Setup .............................................................................. 18
Chapter 5. Using guide of local media play .................................................... 20
I. Browsing file ............................................................................................. 20
II. Video play .................................................................................................. 20
III. Music Play .................................................................................................. 22
IV. Photo play ................................................................................................. 23
Chapter 6. Vidon.me kodi ...................................................................................... 24
Chapter 7. How to install APPs ............................................................................. 26
Chapter 8. System Upgrade .................................................................................. 28
Chapter 9. Specifications ....................................................................................... 29

User Manual
6 / 32
Chapter 1. Interface I. Machine Interface
Different types of devices with different interfaces, please refer to the following schematic (the upper picture is R6S-II, the lower picture is R200S-II).
Front:
1. Working indicator 2. LED status panel 3. Remote control receiver port
User Manual
27 / 32
to reset the device.

User Manual
26 / 32
Chapter 7. How to install APPs APP installation The Android applications(APP) can be installed in this device. Navigate to Home page -> file explorer, browser and choose the APP file which you want to install, system will guide you to install step by step till finished.
Note: * Not all APPs can be installed, due to different software developed in different way. * Some APPs are not developed for TV, remote control may not work properly, you may use mouse for further control. * Regarding the third-party APPs, in case of any issues when you use these APPs, please check with these software R&D, Egreat will not provide technical support for these APPs which provided by third party. * Excessive APPs will take up a lot of memory & performance of the media player, causing the media player to run inefficient. * Some APPs may make the system can not work smoothly, or device can not be turned on, please uninstall these APPs or use enforced recovery function
User Manual
7 / 32
Back:
1. Power switch 2. DC input 3. Restore key 4. SPDIF out 5. HDMI 4K output
6. 100M LAN 7. USB2.0 8. USB2.0 9. Wi-Fi & antenna

User Manual
8 / 32
Side:
��
1. USB 2.0 2. USB 3.0
�
�
1. 3.5” HDD tray
User Manual
25 / 32

User Manual
24 / 32
Chapter 6. Vidon.me kodi XBMC/KODI in media player is special customized version base on KODI XBMC, which support almost all hardware decoding of the video and audio format. With its powerful extended function(Add-on), this media player even be used as OTT box or internet TV box.
Vidon.me XBMC specially optimized for Mstar processor, it support full specification blu-ray menu, video hardware decoding of full format, Dolby TrueHD & DTS-HD MA RAW audio passthrough, the vast amount of add-ons, and more valuable functions.
User Manual
9 / 32
II. Remote Control Button
1. Power key 2. Learning key area 3. Mute key 4. Vol - key 5. Next key 6. Vol + key 7. Prev key 8. Home key
9. Return key 10. OK key 11. Up/ Down/ Left/ Right key 12. Menu key 13. Mouse key 14. 0~9 number key 15. Help / Subtitle key 16. Delete / Audio key

User Manual
10 / 32
Learning Function of Remote Control Learning function can let media player remote control copy the common function of TV remote control. Introductions:
1. hold “power” key in the learning keys area, wait 5 seconds until red LED learning indicator keeps lighting on, remote control into learning mode.
2. Making head to head by both of remote control within the distance of 3-5 cm.
3. For example, we want to learning “source” key. then press the “source” key of the media player remote control, when the learning indicator flashes one time, press the “source” key of the tv remote control, when the learning indicator flashes three times, it shows learning process is completed.
4. If you need to learn other keys please copy steps 3 5. When the learning process is completed, press any other key out of the
learning area, the indicator will be off, remote control exit the learning mode."
User Manual
23 / 32
art on screen. When music file playing: * Press “Prev/ Next” key to jump last or next music. * Press “Vol+/ Vol-” button to increase or decrease volume. * Press “OK” key to pause/play music file. IV. Photo play
Install HDD or USB storage device which included various photo files into the media player. e.g., JPEG, BMP etc. Navigate to “Home page” -> “photo” to browser & choose a photo file, press “OK” key to view the photo.
When viewing the photo: * Press “OK” key ,the player will slide show all pictures in sequence with motion effect.
User Manual
22 / 32
1. Subtitle Options: select embed subtitle, or load external subtitle. 2. Audio Options: select audio track 3. 3D Timing: select 3D mode 4. 3D Mode: select 3D mode 5. Jump Time: jump to a specified time. 6. Advanced Settings: you can open more options settings, such as breakpoints, single step, 3D MVC adaptive functions, etc. III. Music Play
Install HDD or USB storage device which included various audio files into the media player. e.g., MP3,WMA, AAC,APE,FLAC etc. Navigate to “Home page” -> “music”, press “OK” key to play music file.
Media player can support LRC lyrics file format, please adjust the lyrics and music to keep the same file name and put together.Or save LRC information in the mp3 files directly. APE + CUE, FLAC + CUE, WAV + CUE format, please select the cue file, then start playing. When play a mp3 file with embed cover of the album, it will show the album
User Manual
11 / 32
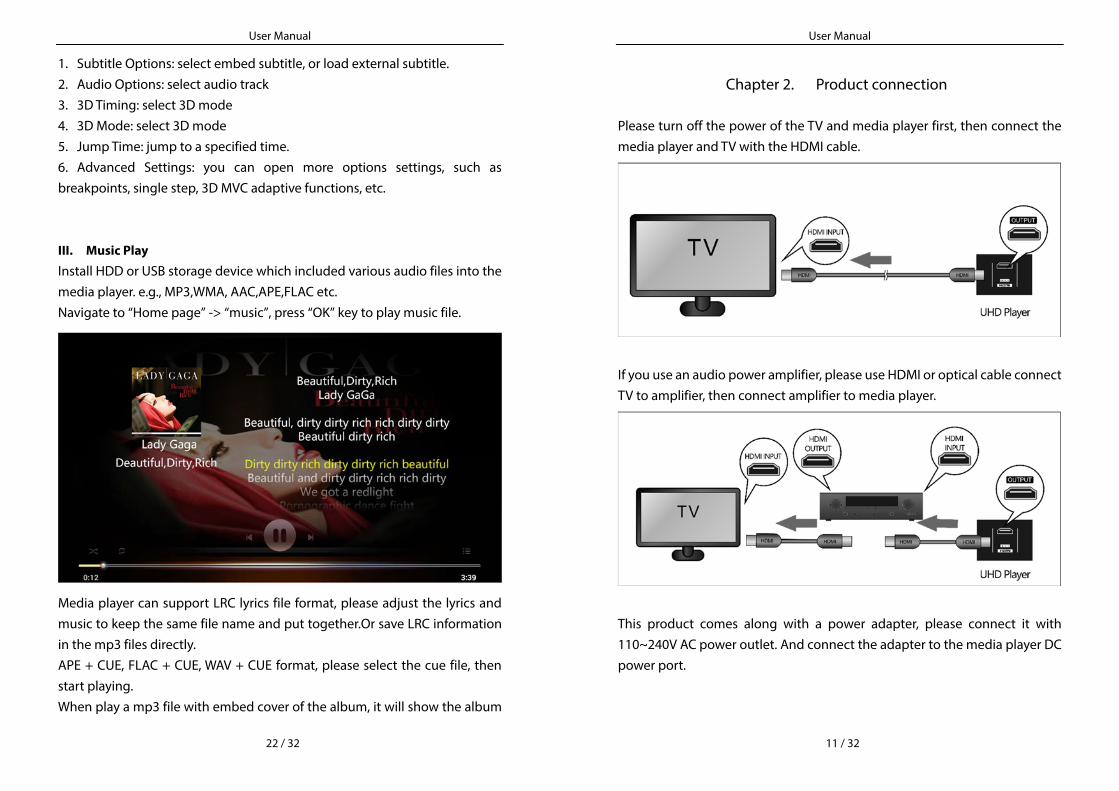
Chapter 2. Product connection Please turn off the power of the TV and media player first, then connect the media player and TV with the HDMI cable.
If you use an audio power amplifier, please use HDMI or optical cable connect TV to amplifier, then connect amplifier to media player.
This product comes along with a power adapter, please connect it with 110~240V AC power outlet. And connect the adapter to the media player DC power port.

User Manual
12 / 32
User Manual
21 / 32
movie folder and movie file, press “OK” or “Play/ Pause” key to play.
When video file playing: * Press “OK” key to pause/play file. * Long press “Left” key or “Right” key to seek a playback time. * Press “Menu” key to display playing options menu on the left side of screen.
playing options menu as follows:

User Manual
20 / 32
Chapter 5. Using guide of local media play I. Browsing file
“Home page” -> “file explorer”, all storage device will be listed.
Select one storage device, press “OK” to access, system will list all the files/folders. Press the left and right key to switch in the local storage, local area network and NFS service file list. When browsing files: * Select file by up/ down/ left/ right keys. * Press “Prev/ Next” key Page up/ down. * Press “OK” key to browse file list or play current file. * Press “Menu” key to display function options menu on the bottom of screen. II. Video play
Install HDD or USB storage device which included multi-media files into the media player. Navigate to “Home page” -> “video” -> device, select a storage device, find
User Manual
13 / 32
Chapter 3. Home page I. Home page introduction
Turn on the media player , and you will see boot screen, after 20~30 seconds, system will access Home page, as below:
In the top left corner of Home page, will display the current location/weather forecasts/time/week information. In the middle of Home page,there are 6 function icons as follows: 1. File explorer: to browse/play multi-media files from various storage device. 2. Video: list all movie files, and play movie files by video player.it support
almost all of video format like DAT/ MPEG/ MPE/ MPG/ TS/ TP/ VOB/ ISO/ AVI/ MP4/ MOV/ 3GP/ FLV/ MKV/ M2TS/ MTS/ M4V/ WMV/ ASF etc.
3. Music: list all music files, and play music files by music player.it support almost all of music format like MP3/ WMA/ WAV/ OGG/ OGA/ FLAC/ ALAC/ APE/ AAC etc.
4. Photo: list all photo files, and play photo files by photo player.it support almost all of photo format like JPG/BMP/PNG/GIF etc.
5. XBMC: a specially optimized XBMC APP, it supported full format video by

User Manual
14 / 32
hardware decoding, Dolby TrueHD & DTS-HD MA RAW audio passthrough, a vast amount of add-ons, and more valuable features. 6. Shortcut: list your favorite application here . In the lower left corner of Home page, there are 3 tools/settings by quick launch icon as follows: 1. All APPs: to view/launch all APPs installed. 2. Clean: release the space & remove system resources & kill background
course , improve the performance of the media player. 3. Settings: into network/video/audio/other settings. II. Shortcut function
Shortcut function like favorite, it allows user to add common using here.
To select & press “Add” icon in shortcut page, in the bottom of the screen, it will list all installed APPs. To select & press the APPs icon you want, then add a new shortcut. Press “Menu” key ,popup function options menu on the right , You can set top/ forward/ backward/ remove operations on shortcuts in all APPs.
User Manual
19 / 32
If your amplifier support 7.1 CH (Dolby True-HD or DTS-HD MA),pls connect them with HDMI cable, then select "RAW" in HDMI option and select "RAW7.1" in HBR option under output mode. If your amplifier support 7.1 CH (Dolby True-HD or DTS-HD MA),pls connect them with HDMI cable, then select "RAW" in HDMI option or select "RAW" in SPDIF option. Meanwhile select "RAW5.1" in HBR option for all. If your media player connect to TV directly, please select “Auto” audio mode. and select "Auto" in HBR option under output mode.

User Manual
18 / 32
Please select “Settings” on home page and choose “Display setting”, then select the suitable resolution according to your display device.
III. Audio Output Setup
Media player connect to TV: no need to setup audio. Media player connect to an audio power amplifier, and amplifier connect to TV: pls select a suitable audio mode to get the best audio status. Please select “Settings” on home page and choose “Audio setting”, then select the suitable audio output mode according to your audio connect method.
User Manual
15 / 32
III. APPs manage function
Go to all APPs page, press “Menu” key, popup function options menu on the right, You can manage all APPs installed.

User Manual
16 / 32
1. Set boot: set specific APP to run automatically after boot. 2. Uninstall: remove this APP from the media player. 3. Details: to display memory occupancy, operational requirements etc. 4. Clear data: when APP meet the data errors, do this function will return the APP to the original state. 5. Sort: sort all APPs icon.
User Manual
17 / 32
Chapter 4. System setup For a better users experience, please connect to internet and select the most suitable modes according to your video and audio devices. I. Network Setup
“Settings” -> “Network Setting” If you use wireless network, please select and turn on “Wi-Fi” in “Network Setting”, the system will search and list all nearby Wi-Fi signals after a while. Please select the right one and login with your password."
If you use cable network, please select and turn on “LAN” in “Network Setting”, then the system will connect to internet automatically. Under the “manual network setting mode”, please input the information as per requested; you may check with network administrator if necessary. II. Video Output Setup
Our device can auto-detect the best video resolution output when connect to TV by HDMI cable.when other connecting, pls manually adjust video resolution output to the best status.