r14.1 - hk.nec.com · sap erp, sap netweaver bw and ... (japanese only) document title overview...
TRANSCRIPT

R14.1<Installation Guide>

ii
■Windows, Windows Vista and Windows Server are trademarks or registered trademarksof Microsoft Corporation in the United States and other countries.
■UNIX is exclusively licensed by The Open Group which is a registered trademark in theUnited States and other countries.
■Solaris is a trademark of Sun Microsystems.
■HP-UX is a trademark of Hewlett-Packard.
■AIX is a trademark of IBM Corporation.
■Linux is a registered trademark of Linus Torvalds in the United States and other countries.
■Oracle Linux, Oracle Clusterware and Java are registered trademarks of Oracle and/orits affiliates.
■Red Hat is a registered trademark of Red Hat, Inc.
■SUSE is a registered trademark of Novell, Inc.
■NQS is a Network Queuing System that was developed by Sterling Software for NASAAmes Research Center.
■Microsoft Excel and Internet Explorer are trademarks or registered trademarks ofMicrosoft Corporation in the United States and other countries.
■SAP ERP, SAP NetWeaver BW and ABAP are trademarks or registered trademarks of SAPAG.
■All other software and hardware products mentioned herein are trademarks or registeredtrademarks of their respective owners.
The symbols (R), TM, and (c) are omitted in this document.
Precautions on exporting
This product (software) falls under a category of technology whereestablishment specified in the foreign exchange currency law is regulated.
Please file necessary applications, such as permission for trade, withthe Japanese government prior to exporting this product. Contact thedealer where you purchased the product or our nearest sales officefor information on documents necessary for filing such applications.

iii
IntroductionThis manual is to describe how to install and upgrade JobCenter. Note that the screenscontained in this manual may differ from actual screens.
Note that this document is subject to change without prior notice.

Introduction
iv
1. How to read the JobCenter manualsIf you are installing JobCenter or upgrading it
→ Read this manual.
If you are using JobCenter for the first time
→ Read the Quick Start Guide in the order of its contents.
If you wish to understand the basic operating methods of JobCenter
→ Read the Basic Guide in the order of its contents.
If you wish to understand the construction of environments and the setting of variousfunctions
→ Refer to the Environment Guide.
If you wish to know about other functions
→ Read the related manuals, referring to the manuals pertaining to particular functionsto be used.

Introduction
v
2. LegendThe legend used in this manual is explained below.
Information that you should pay attention to.
Supplementary information about a description in the text.
Note Explanation of a note that appears in the text.__ The underlined parts in the descriptions for the installation window for
UNIX mean inputs from a keyboard.

Introduction
vi
3. Related manualsThe following are manuals related to JobCenter. They are contained in JobCenter Media.
For information on the latest manuals, refer to the download page of the JobCenter productsite.
http://www.nec.co.jp/middle/WebSAM/products/JobCenter/download.html (Japanese only)
Document title OverviewJobCenter Installation Guide Describes how to newly install JobCenter or
upgrade it.JobCenter Quick Start Guide (Japanese only) Describes the basic functions of JobCenter,
as well as a complete set of operations, forfirst-time users of JobCenter.
JobCenter Basic Guide Describes the basic functions of JobCenter,as well as how to operate it.
JobCenter Environment Guide Describes various setting methods onthe construction of environments requiredfor using JobCenter, transferring ofenvironment, linkage with other products,etc.
JobCenter Guide for using NQS function(Japanese only)
Describes methods of using NQS functions,the basis of JobCenter, from JobCenter.
JobCenter Guide for using operation logs andexecution logs
Describes the functions for acquiringoperation logs and job network executionlogs from JobCenter CL/Win, as well as howto set the functions.
JobCenter Command Reference (Japaneseonly)
Describes JobCenter commands forperforming job network entry and executionstate referencing, etc. from the commandline like a GUI.
JobCenter Guide for using Cluster function Describes linkage methods for operatingJobCenter in the cluster system.
JobCenter Guide for using Helper function(Japanese only)
Describes the following three functionsthat enable efficient operation ofJobCenter using Excel: JobCenter DefinitionHelper (definition information maintenance),JobCenter Report Helper (business reportcreation), and JobCenter Analysis Helper(performance analysis).
JobCenter Guide for using SAP function(Japanese only)
Describes how to link JobCenter and SAP.
JobCenter Guide for using WebOTX BatchServer linkage function (Japanese only)
Describes how to link JobCenter and WebOTXBatch Server.
JobCenter Guide for Using the Web Function Describes JobCenter CL/Web that is afunction to monitor jobs by using a webbrowser.
JobCenter Guide for using the textdefinition function (Japanese only)
Describes how to define a job network,schedule, calendar, custom job template byusing a text file.

Introduction
vii
JobCenter Guide for upgrading the versionand applying the patches in a clusterenvironment (Japanese only)
Describes how to upgrade the version ofJobCenter and apply the patches in a clusterenvironment.
JobCenter R14.1 Release Notes Provides the information specific toJobCenter R14.1.

Introduction
viii
4. Revision historyEdition Date of revision Item Format Contents of revision
1 August 24, 2015 New - First Edition

ix
Table of ContentsIntroduction ...................................................................................................................... iii
1. How to read the JobCenter manuals ................................................................... iv2. Legend ................................................................................................................... v3. Related manuals ................................................................................................... vi4. Revision history ................................................................................................. viii
1. Operating Environment of JobCenter .......................................................................... 12. Installation ................................................................................................................... 2
2.1. Preparations for Installation ............................................................................ 32.1.1. Checking Notes in Advance .................................................................... 32.1.2. Setting Up a Network ............................................................................ 92.1.3. Assigning Machine IDs .......................................................................... 10
2.2. Installing LicenseManager ................................................................................ 122.2.1. HP-UX (IPF) Version ............................................................................. 122.2.2. Solaris (SPARC) Version ........................................................................ 122.2.3. Linux Version ........................................................................................ 142.2.4. AIX Version ........................................................................................... 162.2.5. Windows Version ................................................................................... 16
2.3. Codeword Registration .................................................................................... 202.3.1. Procedure for Registering a Codeword ................................................ 202.3.2. Messages That May Appear After LicenseManager Is Installed ............ 22
2.4. Installing JobCenter MG/SV ............................................................................ 242.4.1. HP-UX Version ...................................................................................... 242.4.2. Solaris Version ...................................................................................... 242.4.3. Linux Version ........................................................................................ 252.4.4. AIX Version ........................................................................................... 262.4.5. Windows Version (Normal Installation) ................................................ 272.4.6. Windows Version (Silent installation) .................................................. 39
2.5. Installing JobCenter CL/Win ........................................................................... 422.5.1. Normal Installation ............................................................................... 422.5.2. Silent Installation ................................................................................. 48
3. Setting Up the Execution Environment (UNIX Version) ............................................. 493.1. Setting Up JobCenter ...................................................................................... 50
3.1.1. Executing nssetup (Setup Command) .................................................... 503.1.2. Setting the Machine ID of JobCenter .................................................. 503.1.3. Selecting the Language Environment Used by JobCenter ..................... 513.1.4. Setting Up the UMS Environment ......................................................... 523.1.5. Changing the Administrator User Settings .......................................... 533.1.6. Setting a Password .............................................................................. 543.1.7. Setting Up the .rhosts File .................................................................. 55
3.2. Work Necessary After JobCenter Setup ......................................................... 563.3. Setting Up the IPv6 Environment ................................................................... 58
4. Uninstallation ............................................................................................................. 594.1. Uninstalling LicenseManager ............................................................................ 60
4.1.1. UNIX Version ......................................................................................... 604.1.2. Windows Version ................................................................................... 60
4.2. Uninstalling JobCenter MG and JobCenter SV ................................................ 624.2.1. UNIX Version ......................................................................................... 624.2.2. Windows Version ................................................................................... 63
4.3. Uninstalling JobCenter CL/Win ....................................................................... 664.3.1. Uninstalling the Packages .................................................................... 664.3.2. Deleting Registry-Related Data ............................................................ 66
5. Version Upgrade ......................................................................................................... 685.1. UNIX Version .................................................................................................... 69
5.1.1. Version Upgrade with Inheriting NQS-Related Data ............................. 695.1.2. Version Upgrade without Inheriting NQS-Related Data ........................ 72

<Installation Guide>
x
5.2. Windows Version ............................................................................................. 735.2.1. Version Upgrade with Inheriting NQS-Related Data ............................. 745.2.2. Version Upgrade without Inheriting NQS-Related Data ........................ 78
6. Checking the Version ................................................................................................. 796.1. UNIX Version .................................................................................................... 80
6.1.1. JobCenter MG/SV ................................................................................. 806.2. Windows Version ............................................................................................. 81
6.2.1. JobCenter SV ........................................................................................ 816.2.2. CL/Win .................................................................................................. 81

xi
List of Figures2.1. Installation flow ........................................................................................................ 22.2. Welcome dialog box of the installation wizard ...................................................... 172.3. Installation folder specification dialog box ............................................................ 172.4. Confirmation dialog box .......................................................................................... 182.5. Completion dialog box ............................................................................................. 182.6. Display Example ....................................................................................................... 192.7. JobCenter setup window ......................................................................................... 312.8. Installation type specification dialog box .............................................................. 312.9. Installation language specification dialog box ........................................................ 322.10. Installation folder specification dialog box .......................................................... 322.11. Definition information inheritance dialog box ...................................................... 332.12. Program folder specification dialog box ............................................................... 332.13. JobCenter administrator specification dialog box ................................................ 342.14. IP address specification dialog box ...................................................................... 352.15. IP address confirmation dialog box ...................................................................... 352.16. Port specification dialog box ................................................................................ 362.17. Machine ID and character code specification dialog box ...................................... 372.18. Confirmation dialog box ........................................................................................ 372.19. Installation execution dialog box .......................................................................... 382.20. JobCenter setup window ....................................................................................... 432.21. Installation language specification dialog box ...................................................... 432.22. Installation folder specification dialog box .......................................................... 442.23. Program folder specification dialog box ............................................................... 452.24. Operation mode specification dialog box .............................................................. 452.25. Shortcut creation specification dialog box ........................................................... 462.26. Port specification dialog box ................................................................................ 462.27. Confirmation dialog box ........................................................................................ 472.28. Installation completion dialog box ........................................................................ 474.1. Package deletion dialog box .................................................................................... 614.2. Package deletion confirmation dialog box .............................................................. 614.3. Package deletion dialog box .................................................................................... 644.4. Package deletion dialog box .................................................................................... 665.1. Upgrade confirmation dialog box ............................................................................ 755.2. Installation completion dialog box .......................................................................... 755.3. Upgrade notes dialog box ....................................................................................... 766.1. Version information selection window .................................................................... 816.2. Version information selection window .................................................................... 82

xii
List of Tables2.1. Fixed disk size and memory size (Solaris version) .................................................. 132.2. Fixed disk size and memory size (Linux version) .................................................... 142.3. Fixed disk size and memory size (Windows version) ............................................... 162.4. Operation modes and possible operations .............................................................. 452.5. Window to use and shortcut to create .................................................................. 464.1. Package names required to be removed and remove commands for the packagesfor each OS ..................................................................................................................... 626.1. Version check command of JobCenter for each OS ................................................. 80

1
Chapter 1. Operating Environment ofJobCenter
For information on the operating environment of JobCenter and the supported operatingsystems, refer to Chapter 3, "Operating Environment" in <Release Notes>.

2
Chapter 2. InstallationThis chapter describes how to install LicenseManager, JobCenter MG/SV, and JobCenterCL/Win. To do this, follow the steps below.
Preparations for Installation : 2.1
LicenseManager Installation : 2.2
Codeword Registration : 2.3
JobCenter MG/SV Installation : 2.4
JobCenter CL/Win Installation : 2.5Install only the necessarypackages.
Figure 2.1. Installation flow
To install any JobCenter product other than those mentioned above, refer tothe installation procedure described in the manual of that product.
Installation
3
2.1. Preparations for InstallationMake the necessary settings before starting installation.
2.1.1. Checking Notes in Advance
■In JobCenter, user names that meet any of the following conditions cannot be used.
▪ "CommonJNW"
▪ Same as the host name or computer name.
▪ Longer than 15 bytes
▪ The first character is a one-byte numeral.
▪ Includes multiple-byte characters, spaces or tabs.
▪ Includes one of the following symbols: ! " # $ % & ' ( ) * , . / : ; < = > ? @ [ \ ] ̂ ̀ { | } ~
■Notes for UNIX
▪ LDAP linkage is not directly supported. However, if the LDAP server passwordencryption format is crypt and it is possible to access the user name by using the OSlibrary function getpwnam or getpwent in the same way as when performing normalmanagement by using /etc/passwd, LDAP linkage can be handled as a general user.
▪ Environments in which access control is specified on an individual user basis, such asHP-UX SMSE (Standard Mode Security Extensions), are not directly supported. However,if JobCenter is able to access the user name by using getpwnam or getpwent, in thesame way as when performing normal management by using /etc/passwd, LDAP linkagecan be handled as a general user.
In this case, the security functions provided in the SMSE environment, such as accountlocking, are not supported. Therefore, the number of times password authenticationfailed when logging into or connecting to MG or SV using CL/Win is not counted, noris the login failure recorded.
▪ The 755 access right is necessary as the installation directory permission. Therefore, donot mask the access right for which the root user’s umask value is 755 at installation.
▪ If you are to set queue access restrictions or such on a group, using NQS settingsof JobCenter, you need to use the same group name and the same gid for all nodescomprising the cluster site.
▪ All the names and uids of the accounts that use JobCenter must be unified with theOS function on all nodes that make up the cluster site.
Otherwise, the user mapping might not match, making it impossible to continue jobexecution if the cluster package fails over.
▪ Operation is not guaranteed if an initialization file in the JobCenter installationdirectory is changed in a way that is outside the manual specification range.
▪ The Linux version of JobCenter does not support SELinux. The SELinux setting must bepermissive or disabled. If the setting is enforcing, jobs might not be executed normally.
■Notes for Windows

Installation
4
▪ The disk area used by JobCenter (both local and cluster sites) must be formatted asNTFS (the FAT32 format cannot be used).
Note, however, that unless the automatic creation of 8.3, "Short file name" is set toOFF, the performance of NTFS file systems drops significantly when a large number offiles (10,000 or so) are created in a single folder.
In an environment in which a large number of trackers are created in a short time ora large-scale job network is created and input, it might be necessary to disable 8.3short file name by using the fsutil behavior command of the OS (by specifying fsutilbehavior set disable8dot3 1).
▪ Because JobCenter is a multi-platform linkage product, a host name starting with anumber cannot be used. In addition, a single-character host name is interpreted as adrive name, and installation is not performed in this case.
▪ The account specified as the JobCenter administrator must belong to theAdministrators group on the local machine.
▪ If the local site and cluster site are operated at the same time, the JobCenteradministrator at the local site serves as the JobCenter administrator at the clustersite. Carefully consider this before installation.
▪ If a local user is selected as the JobCenter administrator in the domain environment,only local users can use JobCenter. If the JobCenter administrator is a domain user,both local and domain users can use JobCenter.
▪ If a domain user is selected as the JobCenter administrator in a domain environment,the domain server (PDC or BDC) must be accessible via the network when a local servicefirst starts during JobCenter setup, or when first connecting to MG/SV as a new domainuser using CL/Win. If PDC or BDC is inaccessible, service activation or connection usingCL/Win fails due to account authentication failure.
▪ An account using JobCenter belongs to the local JobCenter group. However, a local userand domain user with the same account name spelling or users in different domainsbut with the same account name spelling cannot belong to a JobCenter group at thesame time (Only one of them can be used.) If a local user and domain user with thesame account name spelling belong to a JobCenter group at the same time, JobCentermight not operate normally. (This also applies to the same account name spelling acrossmultiple domains.)
▪ For a domain environment, there are restrictions on the combinations of nodes thatmake up a cluster site. You cannot combine a PDC and a member server together or aBDC and a member server together.
▪ The DNS is required in the domain environment. Set up the hosts file (or the resolv.deffile installed on the JobCenter side) so that the name can be resolved even ifcommunication with the DNS server fails and JobCenter can no longer resolve the name,thereby performing proper termination processing.
▪ If the network that the installation machine joins is operated in the spanning tree, theNIC links up late, making it impossible for JobCenter to confirm the licensed IP addressduring machine startup, which might cause automatic service startup to fail. In sucha case, adjust the startup retry setting according to Section 5.5, “License Check atStartup of JobCenter” in <Environment Guide>.
▪ If any directories used by JobCenter are subject to on-access virus scanning, jobs mightnot execute successfully. Therefore, exclude directories used by JobCenter from thetargets of the on-access scan.

Installation
5
• Installation directory
• Cluster database directory (in the case of a cluster environment)
• %SystemDrive%\Users Directory
You can also narrow down the directories to be excluded from the directoriessubject to the on-access scan to the following paths for users that are usedby JobCenter, rather than the entire %SystemDrive%\Users directory:
%SystemDrive%\Users\<user-name>\ntuser.*
%SystemDrive%\Users\<user-name>\AppData\Local\Microsoft\Windows\UsrClass.*
▪ If a user profile is scanned for viruses at the same time that user profile is loadedduring the execution of a JobCenter job, the NQS queue may stop, potentially halting thejob execution. After the installation is complete, configure the settings related to theloading of user profiles if necessary. For details, refer to Section 12.3.3, “Specifyingjob execution settings” in <Environment Guide>.
If a user command that is executed from a job requires loading a user profile,some action, such as excluding user profiles from the virus scan target, mayneed to be taken on the system side.
▪ To install or operate JobCenter, the Server service and Windows ManagementInstrumentation service must be operating.
Select [Start] followed by [Run], and then execute [services.msc]. When the [Services]dialog box is displayed, make sure that the statuses of these services are "Started"and [Startup Type] is "Automatic". (These are the default settings.)
▪ Installing/operating JobCenter requires that in the properties of the network used byJobCenter, [File and Printer Sharing for Microsoft Networks] be set to ON. (By default,it is set to ON.)
▪ Operation is not guaranteed if an initialization file or registry information in theJobCenter installation directory or Windows directory is changed in a way outside themanual specification range.
▪ Environment variables temp and tmp
To use JobCenter, the environment variables TEMP and TMP need to be specified andthe specified folder needs to actually exist.
If the locations referenced by TEMP and TMP do not exist, the userapplication commands may not work normally.
The environment variables TEMP and TMP to be specified at the time of job executionvary depending on the JobCenter startup method and job execution settings. Thelocations referenced by the environment variables TEMP and TMP in different settingsare as follows. For details of job execution settings, refer to Section 12.3.3, “Specifyingjob execution settings” in <Environment Guide>.

Installation
6
• When the user environment variables are specified (default)
• Service startup
Values of the user environment variables TEMP and TMP of the job execution user
(%USERPROFILE%\AppData\Local\Temp)
• cjcpw startup
Values of the user environment variables TEMP and TMP of the job execution user
(%USERPROFILE%\AppData\Local\Temp)
• When the user environment variables are not specified
• Service startup
Values of the user environment variables TEMP and TMP of the local system account
(%SystemRoot%\system32\config\systemprofile\AppData\Local\Temp)
• cjcpw startup
Values of the user environment variables TEMP and TMP of the user who has startedJobCenter using cjcpw
(%USERPROFILE%\AppData\Local\Temp)
If creating the above folder poses a challenge, create a folder in any location not relatedwith JobCenter, and then specify the created folder as the value of the environmentvariables temp and tmp in the environment variable configuration file called the envvarsfile.
Setting exampletemp=<actual folder that can be temporarily used>tmp=<actual folder that can be temporarily used>
For details about the envvars file, refer to Section 14.2.3.2, “For setting on JobCenterSV (envvars file)” in <Environment Guide>.
■Notes on Windows cluster environments
▪ Set up the JobCenter administrator by using the same user name on all nodes thatmake up the cluster site. The local administrator permissions for the relevant node arerequired as described in "General note" in "Windows Version" in this guide.
▪ If the local site and cluster site are operated at the same time, the JobCenteradministrator at the local site serves as the JobCenter administrator at the clustersite. Take this into account before installation.
▪ In addition to the JobCenter administrator, other users must also have a unique username and uid on all nodes that make up the cluster site.
Otherwise, the user mapping might not match, making it impossible to continue jobexecution if a cluster package failover occurs.
To change the uid, use [Environment Setting] in JobCenter. For details on how to changethe uid, refer to Section 12.4.1, “Specifying properties of a user” in <EnvironmentGuide>.

Installation
7
▪ For a domain environment, there are restrictions on the combinations of nodes thatmake up a cluster site.
You cannot combine a PDC and a member server together or a BDC and a member servertogether.
■Notes for a UNICODE environment (only Japanese environment)
Note the following when setting up JobCenter in a UNICODE environment:
▪ Be sure to select non-UNICODE (Non-Unicode Mode) for combinations of an EnglishOS and the English version of JobCenter and a Chinese OS and the Chinese versionof JobCenter. Operation is not guaranteed if installation is performed with UNICODE(Unicode Mode) selected.
▪ Character sets that can be used for input/output
Input values such as job network name, parts name, comment, and unit job script
→ The above values can be entered only within the JIS90-compatible character range.
Unit job standard output, standard error output
→ All the characters defined in JIS2004 can be output (these characters can bedisplayed by CL/Win).
• Displaying JIS2004 extended characters requires that the font packagethat can display these characters be installed on the OS.
• The following characters that JobCenter cannot handle are converted to ?when displayed.
• Characters outside the JIS90-compatible character range
• JIS2004 extended characters when the font package is not installed onthe OS
• Be sure to set up JobCenter in a non-UNICODE environment with theJobCenter language settings when using the SAP ERP Option function orBI Option function. These functions are not usable in a JobCenter instanceset up in a UNICODE environment.
In addition, set up the environment variable SAP_CODEPAGE on themachine where JobCenter operates if the destination SAP system is theUnicode version. For details, refer to <Guide for using JobCenterSAPfunction> (Japanese only).
▪ Character codes output from jobs
Set the character code to be used to output job results to UTF-8 for the UNIX versionof JobCenter and UTF-16 for the Windows version of JobCenter. If any other charactercode is used for output (including a mix of character codes), there is a possibility thatthe characters will be corrupted.
▪ Event linkage
If EVENTIF is SS (default) in event linkage setting, it cannot be used in the UNICODEenvironment.
Installation
8
For SystemManager, some platforms support the UTF-8 text log monitoringfunction. In these platforms, event linkage may be enabled.
For details, refer to the SystemManager manuals.
▪ Logs
Note that the character codes used for the text log output, operation and executionlog, and error log of the event previously explained depend on the UNIX version orWindows version.
UNIX version Depends on character codes during setupWindowsversion
Always SJIS
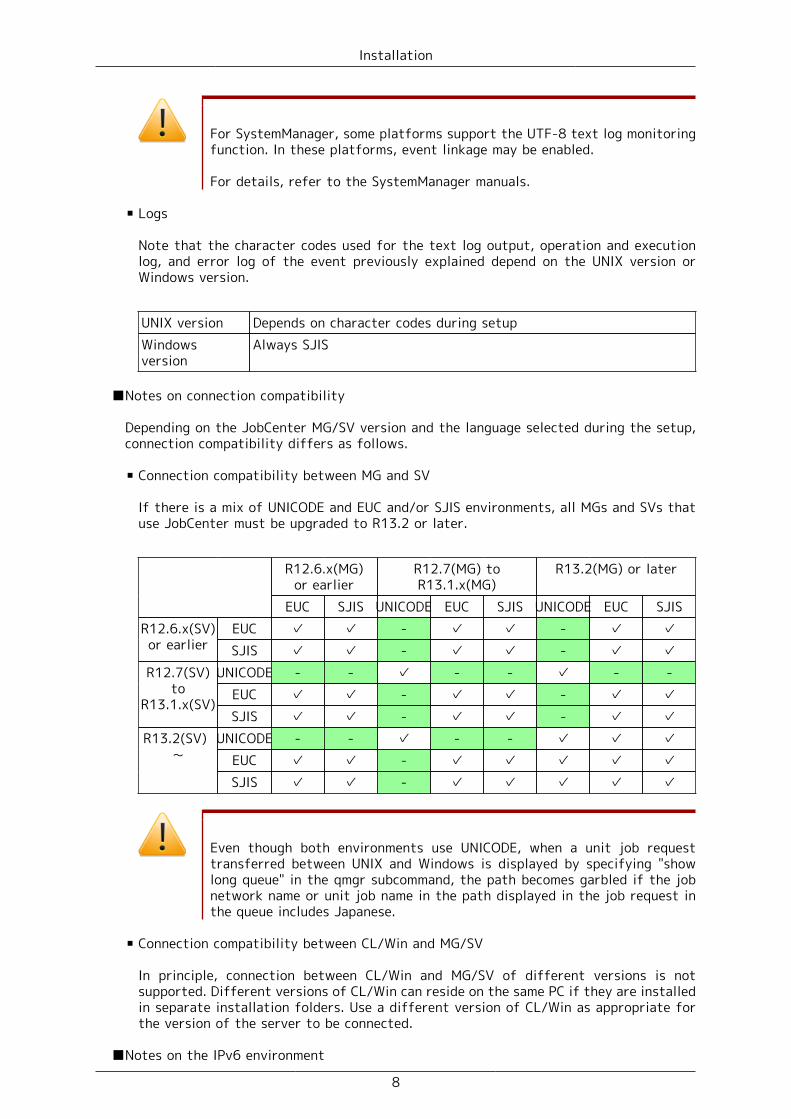
■Notes on connection compatibility
Depending on the JobCenter MG/SV version and the language selected during the setup,connection compatibility differs as follows.
▪ Connection compatibility between MG and SV
If there is a mix of UNICODE and EUC and/or SJIS environments, all MGs and SVs thatuse JobCenter must be upgraded to R13.2 or later.
R12.6.x(MG)or earlier
R12.7(MG) toR13.1.x(MG)
R13.2(MG) or later
EUC SJIS UNICODE EUC SJIS UNICODE EUC SJISEUC ✓ ✓ - ✓ ✓ - ✓ ✓R12.6.x(SV)
or earlier SJIS ✓ ✓ - ✓ ✓ - ✓ ✓UNICODE - - ✓ - - ✓ - -
EUC ✓ ✓ - ✓ ✓ - ✓ ✓R12.7(SV)
toR13.1.x(SV)
SJIS ✓ ✓ - ✓ ✓ - ✓ ✓UNICODE - - ✓ - - ✓ ✓ ✓
EUC ✓ ✓ - ✓ ✓ ✓ ✓ ✓R13.2(SV)
~
SJIS ✓ ✓ - ✓ ✓ ✓ ✓ ✓
Even though both environments use UNICODE, when a unit job requesttransferred between UNIX and Windows is displayed by specifying "showlong queue" in the qmgr subcommand, the path becomes garbled if the jobnetwork name or unit job name in the path displayed in the job request inthe queue includes Japanese.
▪ Connection compatibility between CL/Win and MG/SV
In principle, connection between CL/Win and MG/SV of different versions is notsupported. Different versions of CL/Win can reside on the same PC if they are installedin separate installation folders. Use a different version of CL/Win as appropriate forthe version of the server to be connected.
■Notes on the IPv6 environment

Installation
9
▪ Restrictions on the Windows version
The Windows version does not support an IPv6 address-only environment. IPv4addresses are always required.
JobCenter requires an environment that supports lookup and reverse lookupof a host name and IPv4/IPv6 address.
▪ Combinations of CL/Win and MG/SV that can be connected
The following table shows the combinations of the IP address that MG/SV uses whenwaiting for communication with a remote machine or CL/Win and the IP address thatis valid in the machine that uses CL/Win.
MG/SV IPv4 only IPv4/IPv6 IPv6 only
IPv4 only ✓ ✓ -IPv4/IPv6 ✓ ✓ ✓
CL/Win
IPv6 only - ✓ ✓
For information about how to set the IP address that MG/SV uses whenwaiting for communication with a remote machine or CL/Win, refer toSection 5.2, “Available Parameters of a Daemon Configuration File” in<Environment Guide>.
2.1.2. Setting Up a NetworkJobCenter operates on the assumption that a TCP/IP network is correctly set up.
JobCenter determines an IP address from the official host name of the machine, and itcannot operate if the host name obtained from the IP address does not match the officialhost name. JobCenter even checks whether domains exist and, therefore, sets up a networkto achieve an exact match.
Operating JobCenter on multiple machines requires host names and IP address data to bematched among all machines. Care must, therefore, be taken to prevent omission in the hostfile updates or the like. Therefore, be careful to correctly update the DNS and hosts file.
If multiple network cards are installed with the CJC option not being used, operation iscarried out on the network card having the highest priority. In the UNIX environment, forexample, JobCenter operates using the host name returned by the hostname command.
For details on setting up a network, refer to Chapter 2, "Building a Network Environment"in <Environment Guide>.
In a UNIX environment, if the same host name and IP address are assigned tomultiple network cards, they may be installed and initialized in some cases;however, such installation and initialization should be avoided to preventmalfunctions.
In a Windows environment, a specification in the resolv.def file might be required forcorrect name resolution. For details, refer to Section 2.3, “Resolving Names in Windows”in <Environment Guide>.

Installation
10
Note the following when setting up a network:
■Forward lookup/reverse lookup must be available for name resolution of host names.
■A name obtained by forward lookup/reverse lookup must match the official name of thehost, not an alias.
■If multiple network cards are installed, a unique host name/IP address must have beenassigned to each of them.
■Host name/IP address data must match between hosts linking via JobCenter.
■If a firewall exists between hosts where JobCenter is set up, you need to performoperation to make holes for network ports that JobCenter uses.
■When you set up JobCenter MG/SV in Windows Server 2008 or later, you need to makeexception settings for Windows Firewall.
For information on port numbers when making exception settings for Windows Firewall,refer to Section 2.1, “TCP Ports Used by the JobCenter” in <Environment Guide>.
■The TCP/IP port number used must not conflict with other services. For details on howto change the port number setting used in JobCenter, refer to Section 2.1, “TCP PortsUsed by the JobCenter” in <Environment Guide>.
When you connect to MG/SV using CL/Win after completing installation andsetup, two machine icons, one showing the host name only and one showingthe FQDN, might be displayed for the same machine in the machine list. This isbecause an alias name only containing the host name is automatically set forthe machine recognized by the FQDN during setup or when a machine is addedto the machine group.
Alias names can be used to identify machines by their operational role in[Machine List] in the Manager Frame or to improve the user-friendliness of thenmapmgr and qmgrsub commands (Note, however, that alias names are only validwithin your own machine (site). They cannot be used for name resolution duringcommunication.)
Alias names can be deleted by using the nmapmgr command (not from CL/Win) ifthey are not required. Refer to "Delete Name $alias" in <Command Reference>(Japanese only).
2.1.3. Assigning Machine IDs
When installed, JobCenter needs to assign machine IDs that are unique within the system.The valid range for machine IDs is from 1 to 2147483647.
Note the following when assigning machine IDs:
■If JobCenter is used in multiple machines, no machine ID may be duplicated.
For example, when unit jobs are transferred from a UNIX manager machine to multipleWindows server machines, duplication of the machine ID causes unusual operation.
Duplication is not allowed, even between a local site and a cluster site.
■First determine operating rules for preventing machine IDs from being changed aftersetup.

Installation
11
Each machine holds the machine IDs of different machines. If information on the machineIDs does not match among the machines, unexpected operation may occur.
When the machine ID of a local or cluster site is changed on each machine in the system,the job transfer destination queue might not be recognized or another malfunction mightoccur if some of the machines are not updated due to incomplete operating rules.

Installation
12
2.2. Installing LicenseManagerLicenseManager is a product for license management. JobCenter uses LicenseManager toperform license checks.
Install LicenseManager before installing JobCenter products. Decide whether thisinstallation is necessary based on the figure below.
Does the machine in which JobCenteris installed operate on one of thefollowing operating systems?Solaris (SPARC) LinuxWindows
NOLicenseManager does not have to beinstalled.Register only the codeword.
YES
Is LicenseManager installed? NO LicenseManager R1.8 must be installed.
YES
Is the version of the installedLicenseManager R1.8?
NO Upgrading LicenseManager to R1.8 isrecommended.
YES
Use the installed LicenseManager.
For details on how to check whether LicenseManager has been installed and the version,refer to the description for your OS in the next and following sections.
For LicenseManager R1.8, the specifications have been changed and the platformhas been expanded as described below. If LicenseManager of a version earlierthan R1.8 is installed, be sure to upgrade it to R1.8.
■During a license check, whether the IP address specified when applying forthe codeword is valid on the machine is no longer checked.
■RedHat Linux 7 is supported.
2.2.1. HP-UX (IPF) VersionLicenseManager does not need to be installed.
Register only the codeword to the .lockinfo file, as instructed in Section 2.3, “CodewordRegistration”.
2.2.2. Solaris (SPARC) Version1. Required disk and memory capacity
Installing and using LicenseManager requires the fixed disk size and memory size shownin the table below.

Installation
13
Table 2.1. Fixed disk size and memory size (Solaris version)
Fixed disk size /opt: 1 MB/etc: 1 MB
Memory size 1 MB
2. Installing LicenseManager
To install LicenseManager, follow the steps below.
a. Checking LicenseManager
i. Start up the machine and log in with the login name "root".
login:root ↵
ii. Before installing LicenseManager, check whether LicenseManager has already beeninstalled.
root> /bin/pkginfo -l NECWSLM ↵
■If the following appears, LicenseManager need not be installed.
<If LicenseManager R1.8 is already installed>
PKGINST: NECWSLM NAME: WebSAM License ManagerCATEGORY: application ARCH: Solaris VERSION: 1.8
--(Following text omitted)--
■If the text below is displayed, upgrade the version of LicenseManager.
<When a version of LicenseManager older than R1.8 is installed>
PKGINST: NECWSLM NAME: WebSAM License ManagerCATEGORY: application ARCH: Solaris VERSION: 1.7
--(Following text omitted)--
In the above example, 1.7 is shown for VERSION. If a value other than1.8 is shown here, the version is old.
To upgrade LicenseManager, uninstall the old version, and then install the new one.For details on how to uninstall LicenseManager, refer to Section 4.1, “UninstallingLicenseManager”.
■If the following appears, proceed with the installation of LicenseManager.
<If the LicenseManager package has not been installed>

Installation
14
ERROR: information for "NECWSLM" was not found
b. Installing LicenseManager
LicenseManager comes bundled with the JobCenter media (DVD-ROM). Follow the stepsbelow to install it.
i. Insert and mount the JobCenter media (DVD-ROM). For details on how to mount theDVD-ROM, refer to the Solaris product manuals.
ii. Execute the following command for installation.
root> /usr/sbin/pkgadd -d <WSLM_PRODUCT_PATH> ↵
<WSLM_PRODUCT_PATH> is the file path for the product. For detailsabout the actually entered value, refer to the Release Notes (RELMEMO)in the JobCenter media.
Messages are displayed during installation, but the installation finishes successfullyif no errors are displayed.
If the installation fails due to a pkgadd error, refer to the installer log file andtake action according to the Solaris product manual or other documentation.
iii. Execute the following command to check the installation results.
root> /bin/pkginfo -l NECWSLM ↵
If item STATUS: appears as follows, this indicates that installation has completednormally.
STATUS: completely installed
2.2.3. Linux Version
1. Required disk and memory capacity
Installing and using LicenseManager requires the fixed disk and memory sizes shown inthe table below.
Table 2.2. Fixed disk size and memory size (Linux version)
Fixed disk size /opt: 1 MB/etc: 1 MB
Memory size 2 MB
2. Installing LicenseManager
To install LicenseManager, follow the steps below.
a. Installing the 32-bit package (for the x64 environment of RHEL6 or later)
Because the package for supporting the compatible architecture is not provided forRed Hat Enterprise Linux 6 or later, the i686 architecture version of the packagebelow must be installed.
■glibc

Installation
15
■nss-softokn-freebl
b. Checking LicenseManager
i. Start up the machine and log in with the login name "root".
login: root ↵
ii. Before installing LicenseManager, check whether LicenseManager has already beeninstalled.
root> /bin/rpm -qa NECWSLM ↵
■If the following appears, LicenseManager does not need to be installed.
If LicenseManager R1.8 is already installed:
NECWSLM-1.8-1
■If the text below is displayed, upgrade the version of LicenseManager.
If a version of LicenseManager older than R1.8 is installed:
NECWSLM-1.7-1
In the above example, 1.7 is shown for the version. If a value otherthan 1.8 is shown here, the version is old.
To upgrade LicenseManager, uninstall the old version, and then install the new one.For details on how to uninstall LicenseManager, refer to Section 4.1, “UninstallingLicenseManager”.
■If nothing appears, LicenseManager has not been installed. Proceed with theinstallation of LicenseManager.
c. Installing LicenseManager
LicenseManager comes bundled with the JobCenter media (DVD-ROM). Follow the stepsbelow to install it.
i. Insert and mount the JobCenter media (DVD-ROM). For details on how to mount theDVD-ROM, refer to the Linux product manuals.
ii. Execute the following command to install LicenseManager.
■For IA-32 or EM64T
root> /bin/rpm -i <WSLM_PRODUCT_PATH> ↵
<WSLM_PRODUCT_PATH> is the file path for the product. For detailsabout the value to actually enter, refer to the Release Notes(RELMEMO) in the JobCenter media.
■If the message below appears, this indicates that installation has completednormally.
****** now installing ******

Installation
16
Installation was successful.
If the installation fails due to an rpm error, refer to the installer log file andtake action according to the Linux product manual or other documentation.
iii. Execute the following command to check the installation results.
root> /bin/rpm -qa NECWSLM ↵
If the message below appears, this indicates that installation has completednormally.
NECWSLM-1.8-1
2.2.4. AIX Version
LicenseManager need not be installed.
Just register the codeword into the .lockinfo file in accordance with Section 2.3, “CodewordRegistration”.
2.2.5. Windows Version
1. Required disk and memory capacity
Installing and using LicenseManager requires the fixed disk size and memory size shownin the table below.
Table 2.3. Fixed disk size and memory size (Windows version)
Fixed disk size 2 MBMemory size 3 MB
2. Installing LicenseManager
To install LicenseManager, follow the steps below.
a. Checking LicenseManager
i. Start up the machine, and log in as a user who has Administrator permissions.
ii. Before installing LicenseManager, check whether LicenseManager has already beeninstalled.
In the [Programs and Features] dialog box in Control Panel, check that there is noentry for [WebSAM LicenseManager].
iii. If LicenseManager already exists, check the version as described below.
In the [Programs and Features] dialog box, choose [Choose Details] from the[View(V)] menu and check the [Version] box. The version information is displayed.
If the version is not 1.8, upgrade the version of LicenseManager.
To upgrade LicenseManager, uninstall the old version, and then install the new one.For details on how to uninstall LicenseManager, refer to Section 4.1, “UninstallingLicenseManager”.
iv. If LicenseManager does not exist, proceed with the installation of LicenseManager.

Installation
17
b. Installing LicenseManager
LicenseManager comes bundled with the JobCenter media (DVD-ROM). Follow the stepsbelow to install it.
i. Copy the package file (32-bit version: setup.exe and lmsetup.msi, 64-bit version:setup.exec and lmsetup-x64.msi) to any folder on the local disk from theJobCenter media (DVD-ROM). In this example, copy it to "C:\setup.exe," and "C:\lmsetup.msi" (32-bit version) or "C:\lmsetup-x64.msi" (64-bit version).
ii. Execute the just-copied setup.exe file to start the LicenseManager installer.
iii. The screen below appears. Click the [Next] button.
Figure 2.2. Welcome dialog box of the installation wizard
iv. The "Select Installation Folder" screen appears. Decide the folder to install, andthen click the [Next] button.
Figure 2.3. Installation folder specification dialog box

Installation
18
To change the installation folder, click the [Browse] button, select afolder in accordance with the instructions displayed in the dialog box,and then click the [OK] button.
v. The "Confirm Installation" screen appears. Check the settings that you have madeso far. When the settings are completed, click the [Next] button.
To change any of the settings, click the [Back] button to return to the desiredscreen and make the settings again.
Figure 2.4. Confirmation dialog box
vi. When all necessary components have been installed, the screen below appears. Clickthe [Close] button.
Figure 2.5. Completion dialog box

Installation
19
If a message asking you to restart is displayed, be sure to restart thesystem before installing a JobCenter product.
The steps for installing "LicenseManager" are now completed.
Check that installation has completed normally.
vii. Select [Start] and then [Control Panel] on Windows, and then open the [Add orRemove Programs] (or [Programs and Features]) dialog box.
If an entry of "WebSAM LicenseManager" is displayed as shown below, installationhas completed normally.
Figure 2.6. Display Example

Installation
20
2.3. Codeword RegistrationWhen you have finished installing LicenseManager, register the codeword for licensingbefore setting up JobCenter.
2.3.1. Procedure for Registering a Codeword1. Register a codeword in the file below. Obtain the codeword in advance by applying to
the codeword center.
UNIX /etc/opt/wsnlesd/.lockinfoWindows %InstallDirectory%\wsnlesd\etc\opt\wsnlesd\lockinfo
%InstallDirectory% is the directory in which LicenseManager has beeninstalled. By default, it is "\Program Files" in the drive in which the OS isinstalled.
If using a platform for which installing LicenseManager is unnecessary (HP-UX (IPF) orAIX), the installation of LicenseManager is not required. Register the codeword only.Create the directory and the lockinfo file in the text format on the above path beforeexecuting the following step.
In UNIX, create the above subdirectory if it does not exist.
In each .lockinfo file, register a codeword in the format of "<model-number><codeword>". As shown in the example below, <model-number> and <codeword> must beseparated by one or more spaces or tabs.
<Example of registration in the .lockinfo (lockinfo) file>
UQ4322-H0C4A1 reYrD4EyhOViab9BCPnw0RzmlG76acjKHRV9Vp%YyrOlUQ4370-H0C1B1 u4v%daE6VNGKk2VdrS50yQwuoFQCbb0#lSUVDqv4Pi8zUQ4343-H0C1A1 Ses3s1VedNUShcoJkYR46MjqHDTKpdj#dQXZEvtMVrxz... ......
■Be careful to correctly transcribe 0 (zero) and O (uppercase letter O), 1(one) and l (lowercase letter l), and other confusing characters when writingthe codeword.
■Registration of a codeword applied for using a model number different fromthat of the purchased product is invalid.
■Without codeword registration, JobCenter provides 60 days trial. If thetrial period expires, you cannot restart JobCenter until the codeword isregistered.
■The wsnlcheck command can be used to check how many days remain in thetrial period. For information about how to use this command, refer to thefollowing.
2. Checking the codeword

Installation
21
Use the command below to check whether the license was unlocked correctly.
■UNIX
root> /opt/wsnlesd/bin/wsnlcheck <model-number> ↵
■Windows
C:\> %InstallDirectory%\wsnlesd\bin\wsncheck <model-number> ↵
If LicenseManager is installed under a system-protected folder in Windows,choose [Run as administrator] from the shortcut menu when opening thecommand prompt and start LicenseManager.
A system-protected folder refers to a folder under "system-drive\Windows","system-drive\Program Files", or "system-drive\Program files (x86)" (in thecase of the 64-bit version).
If the OS is HP-UX (IPF) or AIX, the above check step is not necessary. Thereis no means to check the accuracy of the codeword because LicenseManageris not installed. There are no problems if JobCenter normally starts and runs.
However, be sure to create the .lockinfo file in the specified location accordingto the steps in the previous section and correctly make a note of the codewordin case the implementation changes in the future.
The output results as well as their meanings and actions are listed in the table below.(Here, XXXXXX-XXXXXX is the model number.)
Output result Meaning and actionXXXXXX-XXXXXX "LICENSED"
Output example:UQ4321-X0Y1Z2 "LICENSED"
The license was correctly unlocked.
No license of XXXXXX-XXXXXX
Example:No license of UQ4321-X0Y1Z2
There is no license information for thespecified model number.
This is displayed if the codeword hasnot been registered and JobCenter is notinstalled. If this message is displayedafter registering the codeword, thecodeword was not correctly recognized.Check the following items:
■Is the codeword registered in .lockfile(or lockfile) correct?
■Does the model number registeredin .lockfile (or lockfile) match the oneused when applying for the codeword?
XXXXXX-XXXXXX "TRIAL" (until YYYY/MM/DD)
The trial period is until YYYY/MM/DD.
If this message is displayed afterregistering the codeword, the codeword

Installation
22
Output example:UQ4321-X0Y1Z2 "TRIAL" (until2009/08/31)
was not correctly recognized. Check thefollowing items:
■Are the directory and file namefor .lockfile (or lockfile) correct?
■Is the model number registeredin .lockfile (or lockfile) correct?
XXXXXX-XXXXXX "NOLICENSE(TRIAL)" (expired YYYY/MM/DD)
Output example:UQ4321-X0Y1Z2 "NOLICENSE(TRIAL)" (expired 2009/08/31)
The trial period ended on YYYY/MM/DD.
2.3.2. Messages That May Appear After LicenseManager IsInstalled
After LicenseManager has been installed, the messages shown below may appear in syslog(or event log for Windows).
■For UNIX:
<date time host-name> wsnlesd: The license of this <model-number>-* is invalidated on YYYY/MM/DD.
"<model-number>-*" indicates what precedes the hyphen ("-") in a productmodel number such as "UW0312-H2NA00".
In the message, it is displayed as "UW0312-*".
■For Windows:
The license of this <model-number>-* is invalidated on YYYY/MM/DD.
The above message indicates that the product "<model-number>-*" is under a trial period,as well as the expiration date.
They are to be output for each model number of JobCenter products without codewordregistration, and are not to be output if the codeword for the relevant model number"<model-number>-*" has been registered correctly.
If the above message appears after license registration, check whether the model numberin the message matches the model number of the codeword registered in the .lockinfo (orlockinfo) file.
■If the above message appears for a registered model number
The codeword may not have been entered correctly. Check the registration status ofthe codeword again by using the wsnlesd command in accordance with Section 2.3.1,“Procedure for Registering a Codeword”.
■If the model number of the registered codeword does not match any "<model-number>-*" of output messages
The above message can be ignored. The license lock has been unlocked by the registeredcodeword. This message will not appear after the expiration date mentioned in the

Installation
23
message. (Note that there is no way to prevent the above warning message indicatingexpiration from being output.)
A message output example is shown below.
1. The following codeword is registered.
UW0312-H2NA00 reYrD4EyhOViab9BCPnw0RzmlG76acjKHRV9Vp%YyrOl
2. A message as shown below is output to syslog.
Mar 1 15:35:02 shaker wsnlesd: The license of this UQ4321-* is invalidated on 2005/04/30.Mar 1 15:35:02 shaker wsnlesd: The license of this UQ4322-* is invalidated on 2005/04/30.
3. In this case, the output message is not related to "UW0312-*", and this message canbe ignored.
For "UW0312-*", JobCenter will start without any problem because the license lock hasbeen unlocked.

Installation
24
2.4. Installing JobCenter MG/SVJobCenter MG and SV are common packages. They are referred to as "JobCenter MG/SV" inthe remainder of this manual. The installation procedure is described below.
Even if a single machine is to serve both as MG and SV, perform theinstallation procedure only once. The codeword must, however, be registeredtwice separately for JobCenter MG and JobCenter SV.
2.4.1. HP-UX VersionThe following describes the procedure for installing the HP-UX version of JobCenter MG/SV.
Because the JobCenter media is in the Rock Ridge format, use the mount command as followsto mount the DVD-ROM in HP-UX.
1. Log in as a root user, and then execute the ioscan command to check the device name.
root> /usr/sbin/ioscan -fnu -Cdisk ↵
2. Insert the JobCenter media (DVD-ROM), and execute the following command.
root> /usr/sbin/mount -F cdfs -o rr <device-name> <mount-point> ↵
Change the mount point (<mount-point>) and the device name (<device-name>) to fit your system.
3. Execute the following command for installation.
root> /usr/sbin/swinstall -s <HP_PRODUCT_PATH> NECJCpkg ↵
<HP_PRODUCT_PATH> is the file path for the product. For details aboutthe actually entered value, refer to the Release Notes (RELMEMO) in theJobCenter media.
4. After command execution, the installer displays a message. If no errors occur, theinstaller displays the following message and completes the installation normally.
* Execution succeeded.
If the installation fails due to an swinstall error, refer to the installer log file and takeaction according to the HP-UX product manual or other documentation.
5. If you have finished the above-mentioned steps, proceed to Chapter 3, "Setting Up theExecution Environment (UNIX Version)" .
2.4.2. Solaris VersionThe following describes the procedure for installing the Solaris version of JobCenter MG/SV.
1. Insert and mount the JobCenter media (DVD-ROM). For details on how to mount the DVD-ROM, refer to the Solaris product manuals.
2. Execute the following command for installation.
root> /usr/sbin/pkgadd -d <SUN_PRODUCT_PATH> ↵

Installation
25
<SUN_PRODUCT_PATH> is the file path for the product. For details aboutthe actually entered value, refer to the Release Notes (RELMEMO) in theJobCenter media.
3. After executing the command, the system waits entry, displaying the following messageto indicate that the JobCenter software package can be installed.
The following packages are available: 1 NECJCpkg JobCenter MG/SV package for Solaris (Solaris(XXXX)) YYYYSelect package(s) you wish to process (or 'all' to processall packages). (default: all) [?,??,q]:
The above XXXX indicates the architecture (sparc or x86).
Read the above YYYY as the JobCenter version.
4. To install the package(s), select "1", and then press the [Enter] key. Afterwards, installthe package(s) according to installer indication.
If the installation fails due to a pkgadd error, refer to the installer log file and takeaction according to the Solaris product manual or other documentation.
5. If you have finished the above-mentioned steps, proceed to Chapter 3, "Setting Up theExecution Environment (UNIX Version)" .
2.4.3. Linux VersionThe following describes the procedure for installing the Linux version of JobCenter MG/SV.
2.4.3.1. Installing the 32-bit Package (for the x64 Environment of RHEL6 orLater)
Because the package for supporting the compatible architecture is not provided for RedHat Enterprise Linux 6 or later, the i686 architecture version of the package below mustbe installed.
■RHEL6
▪ glibc
▪ nss-softokn-freebl
▪ ncurses-libs
▪ pam
▪ audit-libs
▪ cracklib
▪ db4
▪ libselinux
■RHEL7

Installation
26
▪ glibc
▪ nss-softokn-freebl
▪ ncurses-libs
▪ libgcc
▪ libstdc++
▪ pam
▪ audit-libs
▪ cracklib
▪ libdb
▪ libselinux
▪ pcre
▪ xz-libs
▪ zlib
2.4.3.2. Installing JobCenter
1. Insert and mount the JobCenter media (DVD-ROM). For details on how to mount the DVD-ROM, refer to the Linux product manuals.
2. Execute the following command for installation.
■For a 32-bit platform or EM64T
root> /bin/rpm -i <LINUX_PRODUCT_PATH> ↵
<LINUX_PRODUCT_PATH> is the file path for the product. For details aboutthe actually entered value, refer to the Release Notes (RELMEMO) in theJobCenter media.
If error messages are not output after the execution of the command, the installationhas been completed.
If the installation fails due to an rpm error, refer to the installer log file and take actionaccording to the Linux product manual or other documentation.
3. If you have finished the above-mentioned steps, proceed to Chapter 3, "Setting Up theExecution Environment (UNIX Version)" .
2.4.4. AIX VersionThe following describes the procedure for installing the AIX version of JobCenter MG/SV.
In the AIX environment, it is not automatically checked whether the same productpackage has been installed, so that any previously installed package may beoverwritten.

Installation
27
Be sure to check that another JobCenter MG/SV package has not been installed.
1. Insert and mount the JobCenter media (DVD-ROM). For details on how to mount the DVD-ROM, refer to the AIX product manuals.
2. Use the following command to expand the AIM version package in the media to anappropriate directory.
root> cd <directory-to-which-to-expand-the-package>root> /usr/bin/tar xvf <AIX_PRODUCT_PATH> ↵
<AIX_PRODUCT_PATH> is the file path for the product. For details aboutactually entered value, refer to the Release Notes (RELMEMO) in theJobCenter media.
3. The above command develops the following two files.
.tocNECJCpkg.XXXX.bff
Read the above XXXX as the JobCenter version.
4. On the directory decompressed in step 3, execute the following command to install thepackage.
root> /usr/sbin/installp -a -d. NECJCpkg ↵
5. After command execution, the installer displays the following message if no errors occur.
NECJCpkg.base XXXX USR APPLY SUCCESS
If the installation fails due to an installp error, refer to the installer log file and takeaction according to the AIX product manual or other documentation.
6. Add the JobCenter termination process to the /etc/rc.shutdown file.
If the /etc/rc.shutdown file does not exist, create the file according to the followinginstructions.
touch /etc/rc.shutdownchmod 550 /etc/rc.shutdownchown root:system /etc/rc.shutdown
Add the following to the /etc/rc.shutdown file.
# Stop JobCenterif [ -x /usr/lib/nqs/util/rc.nqs ]; then /usr/lib/nqs/util/rc.nqs stop > /dev/null 2>&1fi
7. If you have finished the above-mentioned steps, proceed to Chapter 3, "Setting Up theExecution Environment (UNIX Version)" .
2.4.5. Windows Version (Normal Installation)Normal installation procedure for Windows JobCenter MG is shown below. For the Windowsversion, installation and setup are performed by following a flow of sequences.

Installation
28
JobCenter MG and SV are provided in the same package, and adopt the same installationprocedure. To install JobCenter SV, follow the installation procedure for JobCenter MG.
Before starting installation, be sure to read the following notes.
■General note
▪ Before installation, exit all applications in progress for smooth installation.
▪ As a user belonging to the local Administrators group, log in to the machine in whichJobCenter has been installed.
▪ To set up JobCenter in the Domain environment, also log in as a user belonging to theAdministrators group before performing the operation below.
▪ To specify a domain user as the JobCenter administrator, log into Windows as a domainuser that belongs to the local Administrators group. In this case, a local user with thesame account name spelling cannot belong to the JobCenter group.
▪ The "User Type" ("Local" or "Domain") for setup cannot be selected when JobCenter isinstalled on the domain controller (PDC/BDC) (The setting is fixed to "Domain".)
%InstallDirectory% represents the installation directory for JobCenter itself.(The default value is "C:\JobCenter\SV".)
■Note on environment variables
When the environment variable NQS_SITE is set, setup cannot be performed normally.Check whether NQS_SITE is specified (for example, by using a system environmentvariable) and, if it is, delete it before installation.
■Notes on permissions
For JobCenter to run correctly, permissions must be granted to the JobCenteradministrator and to other JobCenter users.
These permissions can normally be specified by selecting [Administrative Tools] andthen [Local Security Policy]. (For a domain environment user, permissions are specifiedby selecting [Domain Security Policy] for the domain controller and [Domain ControllerSecurity Policy].) Permissions are normally granted without any particular problems, butthey might not be granted depending on the security policy for the target system.
Specify settings so that the following permissions are assigned.
1. The permissions required by JobCenter users are as follows (these are normally assignedby the OS by default).
Permissions MeaningSeBatchLogonRight Log on as batch jobSeInteractiveLogonRight Log on locally
▪ During the setup of JobCenter, the JobCenter administrator isautomatically assigned the two permissions above.
▪ If the JobCenter administrator is a domain environment user, the policiesto be automatically assigned are as follows.

Installation
29
Machine on whichJobCenter is set up
Policy
Domain controller Domain controller security policyDomain member server Local security policy
2. In addition to 1., the permissions required by JobCenter administrators are as follows(these are normally assigned by the OS by default).
Permissions MeaningSeBackupPrivilege Back up files and directoriesSeChangeNotifyPrivilege Scan check bypassSeCreateGlobalPrivilege Creation of global objectsSeDebugPrivilege Program debuggingSeIncreaseQuotaPrivilege Addition of memory quota for processSeNetworkLogonRight Access this computer from the networkSeRestorePrivilege Restoration of files and directoriesSeSecurityPrivilege Management of monitoring and security logsSeSystemEnvironmentPrivilege Modification of firmware environment valuesSeTakeOwnershipPrivilege Acquisition of ownership of files and other objects
Note that of the above, SeCreateGLobalPrivilege is not subject to checkingby the setting check commands (jc_check and jc_getinfo). However, thispermission is required by JobCenter administrators, so be sure to assign it.
3. In addition to 1. and 2., the permissions required by JobCenter administrators are asfollows (these are automatically assigned by during JobCenter Setup).
Permissions MeaningSeAssignPrimaryTokenPrivilege Replace a process level tokenSeServiceLogonRight Log on as a serviceSeTcbPrivilege Act as part of the operating system
If the JobCenter administrator is a domain environment user, the policiesto be automatically assigned are as follows.
Machine on which JobCenteris set up
Policy
Domain controller Domain controller security policyDomain member server Local security policy
4. Permissions that should preferably be assigned to the Administrators group (assignedby the OS by default)
Permissions MeaningSeCreatePagefilePrivilege Creation of page fileSeIncreaseBasePriorityPrivilege Raising scheduling priority

Installation
30
SeLoadDriverPrivilege Loading and unloading device driversSeProfileSingleProcessPrivilege Profile of single processSeRemoteShutdownPrivilege Forced shutdown from remote computerSeShutdownPrivilege System shutdownSeSystemProfilePrivilege Profile of system performanceSeSystemtimePrivilege Changing system time
The operation of JobCenter itself will not be affected if these permissionsare not assigned. However, if a command that launches from a JobCenterjob requires the Administrators default permissions, not assigning thesepermissions might affect the operation of JobCenter. It is thereforerecommended to assign these permissions.
For the requirements for the JobCenter user in Windows, refer to "Notes for Windows"in Section 2.1.1, “Checking Notes in Advance”.
■Notes on the MFSC (MSCS) cluster environment
For an MFSC (MSCS) cluster environment, a special procedure is necessary to uninstallthe old version and then install a new one.
For details, refer to <Guide for using Cluster function> (Japanese only).
■Notes on creating the configuration file for silent installation
To use the configuration file for silent installation created in step 12 on other machines,note the following points:
▪ Always select [Auto] when specifying the IP address used by JobCenter in step 8.
▪ To avoid duplicating machine IDs, go back to step 11 every time you save theconfiguration file, change the machine ID, change the file name, and then save the file.
▪ The configuration file cannot be saved under different JobCenter administrators,passwords, or JobCenter groups on each machine on which JobCenter is installed.(Specify the user as the local user using the same account name and password on eachmachine or specify the domain account as the JobCenter administrator.)
Normal installation procedure is described below.
1. Insert the JobCenter media (DVD-ROM), and then select [Start] followed by [Run]. If theCD/DVD-ROM drive is assigned to a different drive, read the description accordingly.
Specify one of the following file names, and then click the [OK] button. If the CD/DVD-ROM drive is assigned to a drive other than the Q: drive, read the description accordingly.
■32-bit native binary for IA-32
Q:\PACKAGE\JB\WINDOWS\MGSV\x86\jcsetup.exe
■64-bit native binary for x64 (EM64T or AMD64)
Q:\PACKAGE\JB\WINDOWS\MGSV\x64\jcsetup.exe
2. The JobCenter Setup window is displayed. Click the [Next] button.

Installation
31
Figure 2.7. JobCenter setup window
3. The configuration file in which the settings specified during the last installation aresaved can be loaded. (However, a configuration file saved in another PC cannot be used.)
To load this file, select [Read config file created already], click the [Browse] button,and then specify the file in accordance with the displayed instructions.
If you do not want to load the file, click the [Next] button without selecting the checkbox.
Figure 2.8. Installation type specification dialog box
This configuration file can be created using the Confirmation window in step12.
4. Next window is displayed, and then click the [Next] button.

Installation
32
Figure 2.9. Installation language specification dialog box
5. Select the installation folder, and then click the [Next] button.
The default installation folder is "C:\JobCenter\SV".
To change this folder, click the [Browse] button, select a folder in accordance with theinstructions displayed in the dialog box, and then click the [OK] button.
Figure 2.10. Installation folder specification dialog box
Do not use tabs or special characters such as "%", "(", ")", "^", ";", "&", "=",and "," for the name of the installation folder.
Japanese cannot be used to specify installation path.
When you click the [Next] button, the dialog box below might be displayed if youspecified a directory containing user-defined information for the old version or if youare reinstalling JobCenter in the same directory it is already installed in.
To inherit the defined information, click the [Yes] button.
To delete the information and then perform the installation, click the [No] button.

Installation
33
To change to a different directory, click the [Cancel] button, and then change theinstallation directory.
Figure 2.11. Definition information inheritance dialog box
6. Enter the program folder, and then click the [Next] button.
The default folder to which the shortcut links is "JobCenter\SV".
Figure 2.12. Program folder specification dialog box
Japanese cannot be used in the program folder name.
7. Register the administrator used for JobCenter.
Enter the administrator name, administrator password (twice), JobCenter group name,and domain name and then click the [Next] button.
If you enter information about an account that does not exist, the account is created.
If you enter the name of a group that does not exist, the group is created.
If [Domain user] is selected, trusted users from a different domain can also be registeredas the administrator.

Installation
34
Figure 2.13. JobCenter administrator specification dialog box
■The maximum length for a user name is 15 bytes.
■To make a new user a JobCenter administrator, the user installing JobCenteron a computer (local or domain) requires permissions to add a user to thecomputer.
If the user does not have these permissions, processing to add a new userduring installation cannot be performed, and installation fails.
■Japanese cannot be used in the JobCenter group name.
For installation in a domain environment, you can select whether theJobCenter administrator is to be registered as a local user or domain user.
If the JobCenter administrator is a local user, only local users can useJobCenter.
If the administrator is a domain user, both local users and domain users canuse JobCenter.
8. Specify the IP addresses used by JobCenter, and then click the [Next] button.
To automatically determine the addresses, select [Auto].
■IPv6 addresses cannot be set using [Auto].
■If you choose [Auto] for a machine having multiple IP addresses, the IPv4address having the highest priority determined by the OS is used.
If the machine has multiple IP addresses and you want to use a specific one, choose[Manual] and then enter the IP address you want to use.
Use the [IPv4] tab to enter an IPv4 address and the [IPv6] tab to enter an IPv6 address.You can specify up to five IPv4 addresses and up to five IPv6 addresses.

Installation
35
Figure 2.14. IP address specification dialog box
9. The result of resolving the IP address specified in the [Set IP Address] dialog box instep 8 to a name is displayed.
If there are no problems with the IP address and host name to be used, click the [Next]button.
Figure 2.15. IP address confirmation dialog box
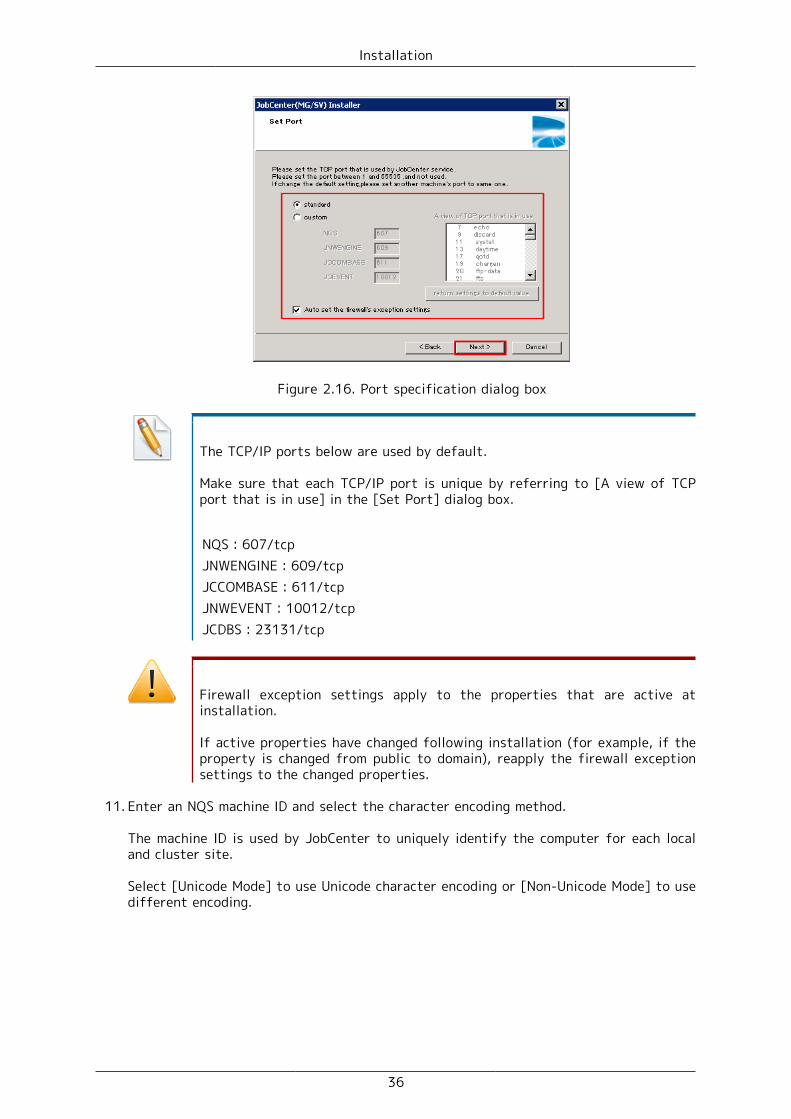
10. Specify the TCP/IP ports and Windows firewall exception setting used by JobCenter, andthen click the [Next] button.
To specify that JobCenter MG/SV use TCP/IP ports other than the default, select the[custom] check box, and then specify the port numbers used by each service.
For details about the default TCP/IP ports, refer to the remark below.
Installation
36
Figure 2.16. Port specification dialog box
The TCP/IP ports below are used by default.
Make sure that each TCP/IP port is unique by referring to [A view of TCPport that is in use] in the [Set Port] dialog box.
NQS:607/tcpJNWENGINE:609/tcpJCCOMBASE:611/tcpJNWEVENT:10012/tcpJCDBS:23131/tcp
Firewall exception settings apply to the properties that are active atinstallation.
If active properties have changed following installation (for example, if theproperty is changed from public to domain), reapply the firewall exceptionsettings to the changed properties.
11. Enter an NQS machine ID and select the character encoding method.
The machine ID is used by JobCenter to uniquely identify the computer for each localand cluster site.
Select [Unicode Mode] to use Unicode character encoding or [Non-Unicode Mode] to usedifferent encoding.

Installation
37
Figure 2.17. Machine ID and character code specification dialog box
■Avoid duplicating machine IDs between machines in which JobCenter isinstalled. By default, "1" is set.
■Once set, the character code cannot be changed later.
For an explanation of notes on using [Unicode Mode], refer to Section 2.1.1,“Checking Notes in Advance”.
12. Check the specified settings, and then click the [Next] button to start installation ifthere are no problems.
You can save the settings by clicking the [Save] button.
The saved file can be used for a silent installation.
Figure 2.18. Confirmation dialog box
13. When installing JobCenter (MG/SV) is complete, the [Finish] button becomes active.

Installation
38
Figure 2.19. Installation execution dialog box
When you install JobCenter (MG/SV) R12.8 or later, the Microsoft Visual C++ 2008 SP1 redistributable package is automatically installed if this packageis not included.
■R12.8 to R13.1.x
Microsoft Visual C++ 2008 SP1 redistributable package
■R13.2 or later
Microsoft Visual C++ 2012 redistributable package
It is normal for this installation to take several minutes.
Installing JobCenter (MG/SV) might fail, resulting in the display of"error:3010", during this processing. This is because the system must berestarted to install the distribution package. In such a case, restart thesystem, and then install JobCenter (MG/SV) again.
When installing in a domain environment, it is also normal for the additionof users to take several minutes.
When the installation finishes, the warning messages below might bedisplayed. Check the system in accordance with the contents of the warning.
■"The exception setting of the firewall is failed."
Make sure that the Windows firewall is enabled.
To use the firewall, enable it, and then register the port numbers used byJobCenter (specified in the "Set Port" dialog box in step 10) as exceptions.
■"Failed to configure the DLL for Cluster."
Replacing the JobCenter DLLs for the cluster software MSCS or MSFC failed.
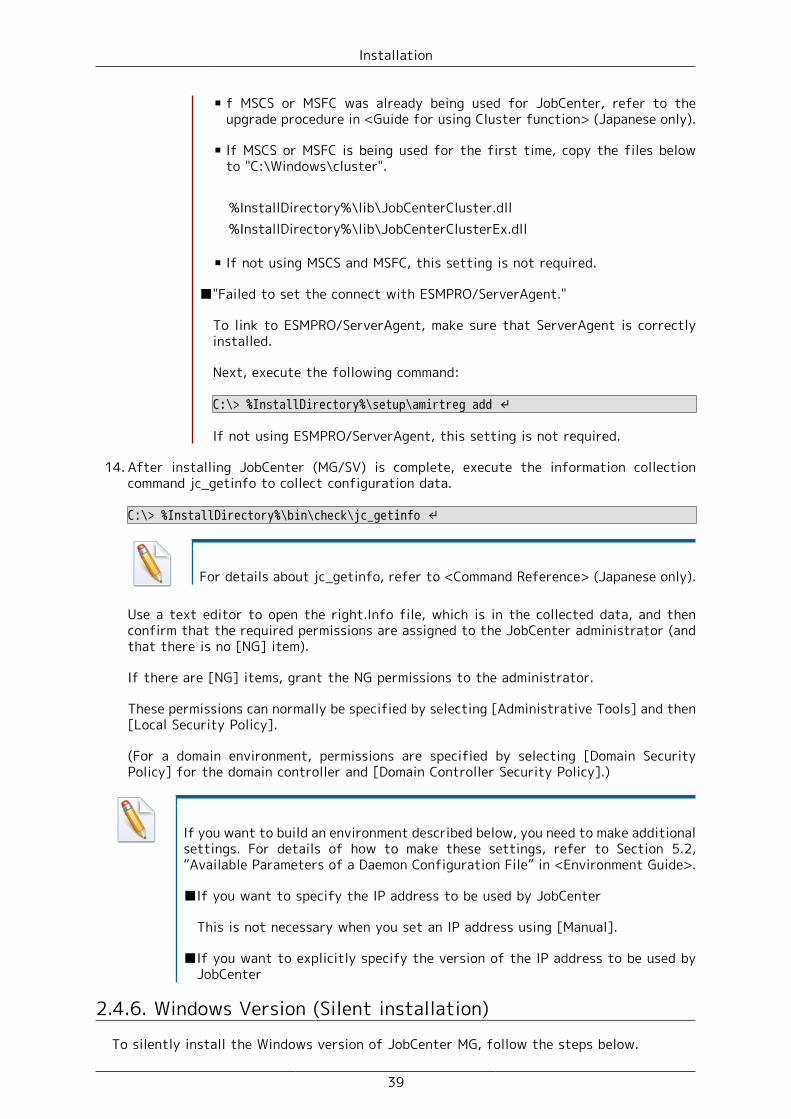
Installation
39
▪ f MSCS or MSFC was already being used for JobCenter, refer to theupgrade procedure in <Guide for using Cluster function> (Japanese only).
▪ If MSCS or MSFC is being used for the first time, copy the files belowto "C:\Windows\cluster".
%InstallDirectory%\lib\JobCenterCluster.dll%InstallDirectory%\lib\JobCenterClusterEx.dll
▪ If not using MSCS and MSFC, this setting is not required.
■"Failed to set the connect with ESMPRO/ServerAgent."
To link to ESMPRO/ServerAgent, make sure that ServerAgent is correctlyinstalled.
Next, execute the following command:
C:\> %InstallDirectory%\setup\amirtreg add ↵
If not using ESMPRO/ServerAgent, this setting is not required.
14. After installing JobCenter (MG/SV) is complete, execute the information collectioncommand jc_getinfo to collect configuration data.
C:\> %InstallDirectory%\bin\check\jc_getinfo ↵
For details about jc_getinfo, refer to <Command Reference> (Japanese only).
Use a text editor to open the right.Info file, which is in the collected data, and thenconfirm that the required permissions are assigned to the JobCenter administrator (andthat there is no [NG] item).
If there are [NG] items, grant the NG permissions to the administrator.
These permissions can normally be specified by selecting [Administrative Tools] and then[Local Security Policy].
(For a domain environment, permissions are specified by selecting [Domain SecurityPolicy] for the domain controller and [Domain Controller Security Policy].)
If you want to build an environment described below, you need to make additionalsettings. For details of how to make these settings, refer to Section 5.2,“Available Parameters of a Daemon Configuration File” in <Environment Guide>.
■If you want to specify the IP address to be used by JobCenter
This is not necessary when you set an IP address using [Manual].
■If you want to explicitly specify the version of the IP address to be used byJobCenter
2.4.6. Windows Version (Silent installation)
To silently install the Windows version of JobCenter MG, follow the steps below.

Installation
40
The notes on installation are the same as those provided in Section 2.4.5, “Windows Version(Normal Installation)”.
In Windows Server 2008 or later, choose [Run as administrator] from theshortcut menu when opening the command prompt and start LicenseManager.
1. Create the configuration file for a silent installation.
To create this configuration file, enter the configuration details of the machine wheresilent installation will be performed on an appropriate machine according to Section 2.4.5,“Windows Version (Normal Installation)”.
Next, click the [Save] button on the screen in step xii to create the configuration filefor a silent installation.
■Do not modify the created configuration file by using an editor or othertool.
■To use the created configuration file for silent installation on othermachines, perform the following steps:
▪ Always select [Auto] when specifying the IP address used by JobCenterin step 8 in Section 2.4.5, “Windows Version (Normal Installation)”.
▪ To avoid duplicating machine IDs, go back to step 11 every time you savethe configuration file, change the machine ID, change the file name, andthen save the file.
▪ The configuration file cannot be saved under different JobCenteradministrators, passwords, or JobCenter groups on each machine on whichJobCenter is installed. (Specify the user as the local user using the sameaccount name and password on each machine or specify the domain accountas the JobCenter administrator.)
■The password of the JobCenter administrator on the machine where thesilent installation will be performed must match that of the JobCenteradministrator specified when creating the configuration file.
Therefore, if you change the OS password of the JobCenter administrator onthe machine where the configuration file was created or the machine wherethe silent installation will be performed after creating the configurationfile, create the configuration file again before starting the silentinstallation.
2. Insert the JobCenter media (DVD-ROM), and then open a command prompt. You can opena command prompt by selecting [Start], [All Programs], and then [Accessories].
3. Enter the following command to change the current directory:
■For an IA-32 environment
C:\> Q: ↵Q:\> cd Q:\PACKAGE\JB\WINDOWS\MGSV\x86\script ↵
■For an EM64T or AMD64 environment
C:\> Q: ↵

Installation
41
Q:\> cd Q:\PACKAGE\JB\WINDOWS\MGSV\x64\script ↵
In the following description, Q: is assumed to be the CD/DVD-ROM drive.
If the CD/DVD-ROM drive is assigned to a different drive, read the descriptionaccordingly.
4. Enter the following command to start the installation:
Q:\> install.bat <jcsetup.conf> ↵
When the installation finishes successfully, "Install finished successfully" is displayed.
Enter the full path of the previously created configuration file for<jcsetup.conf>.
5. After completing installation, collect information as described in 14, “Informationcollection command” in Section 2.4.5, “Windows Version (Normal Installation)” to checkwhether the necessary permissions are assigned to the JobCenter administrator. Assignany permission that is not yet assigned.
If you want to build an environment described below, you need to make additionalsettings. For details of how to make these settings, refer to Section 5.2,“Available Parameters of a Daemon Configuration File” in <Environment Guide>.
■If you want to specify the IP address to be used by JobCenter
This is not necessary when you set an IP address using [Manual].
■If you want to explicitly specify the version of the IP address to be used byJobCenter

Installation
42
2.5. Installing JobCenter CL/WinJobCenter CL/Win (viewer) is the Windows GUI that connects JobCenter MG (manager) andJobCenter SV (server) together.
Installation and setup are performed by following a flow of sequences.
Different versions of CL/Win (such as R12.7 and R12.8) can be installed by using differentinstallation folders.
■In order to facilitate the installation of the runtime libraries, before installingJobCenter CL/Win, be sure to terminate all active applications.
■Screen drawing may be slow in Windows Vista and later.
Refer to Q.12 [CL/Win screen drawing is slow in Windows Vista and later]Section 18.1, “Troubleshooting Q&A” in <Environment Guide>.
2.5.1. Normal Installation
■Before installation, exit all applications in progress for smooth installation.
■As a user belonging to the local Administrators group, log in to the machinein which JobCenter has been installed.
To set up JobCenter in the Domain environment, also log in as a user belongingto the Administrators group before performing the operation below.
1. Insert the JobCenter media (DVD-ROM).
Select [Start] followed by [Run] on Windows. Specify the following file name, and thenclick the [OK] button.
Q:\PACKAGE\JB\WINDOWS\CLWIN\clsetup.exe
In the following description, Q: is assumed to be the CD/DVD-ROM drive.
If the CD/DVD-ROM drive is assigned to a different drive, read the descriptionaccordingly.
2. The JobCenter Setup window is displayed. Click the [Next] button.

Installation
43
Figure 2.20. JobCenter setup window
3. Select the language used for JobCenter CL/Win (Japanese or English), and then click the[Next] button.
Figure 2.21. Installation language specification dialog box
4. Select the installation folder.
The default installation folder is "C:\JobCenter\CLXX.YY".
To change this folder, click the [Browse] button, select a folder in accordance with theinstructions displayed in the dialog box, and then click the [OK] button.
Directly enter the path to create a new folder (such as when installing different versionsof CL/Win).
After specifying the installation folder, click the [Next] button.
XX.YY represents the version number.

Installation
44
Figure 2.22. Installation folder specification dialog box
■Tabs and special characters such as "%", "(", ")", "^", ";", "&", "=", and ","cannot be used for the installation folder name.
■In the case of Windows Vista or a later version of the Windows OS in whichUser Account Control is enabled, specify a folder other than a system-protected folder as the installation folder of CL/Win.
A system-protected folder refers to a folder under "system-drive\Windows", "system-drive\Program Files", or "system-drive\Program files(x86)" (in the case of the 64-bit version).
5. Select the folder for storing the JobCenter CL/Win shortcut.
The default value for the folder is "JobCenter\CL XX.YY".
To change this folder, enter the name of any folder under [Select Destination Folder].
Be sure to use different shortcut folders when installing different versions of CL/Win.
After specifying the folder, click the [Next] button.
XX.YY represents the version number.

Installation
45
Figure 2.23. Program folder specification dialog box
6. When using JobCenter CL/Win, select one of the following modes, and then click the[Next] button.
Figure 2.24. Operation mode specification dialog box
Table 2.4. Operation modes and possible operations
Operationmode
Creating, deleting, andchanging job networks
Controlling jobnetworks and jobs
Edit Mode ✓ ✓View Mode - ✓ReferenceMode
- -
7. Select the shortcut of the window displayed immediately after JobCenter CL/Win isstarted, and then click the [Next] button.

Installation
46
Figure 2.25. Shortcut creation specification dialog box
Table 2.5. Window to use and shortcut to create
Window to use Shortcut to createMaintain User(administrator)
A shortcut is created that causes the [JNW List] window toopen immediately after JobCenter CL/Win is started.
End User A shortcut is created that causes the [User Menu] window toopen immediately after JobCenter CL/Win is started.
Maintain User and EndUser
Two shortcuts are created that causes the [JNW List] windowand the [User Menu] window to open when JobCenter CL/Winis started.
8. Specify the port (JCCOMBASE) for communicating with JobCenter MG/SV.
If you do not want to change the port used by the server, select [standard] (number 611).
To change the port, select [custom], and then enter the port value.
After specifying the setting, click the [Next] button.
Figure 2.26. Port specification dialog box

Installation
47
9. Check the specified settings, and then click the [Next] button to start installation ifthere are no problems.
Click the [Save] button to save the settings. The saved file can be used for a silentinstallation.
Figure 2.27. Confirmation dialog box
10. When installation of JobCenter (CL/Win) is complete, the [Finish] button becomes active.Click this button to complete setup.
Figure 2.28. Installation completion dialog box
The following warning message might appear when installation is complete.
"jobcenter.def is not automatically copied. Manually copy this file by referringto the manual if necessary."
Follow the warning message and note the following points.
■This warning is displayed when CL/Win is installed on a machine whereUXServerManager (Viewer) is installed.

Installation
48
■When using UXServerManager (Viewer) for monitoring, specify settingsaccording to Section 11.2.4, “Setting Viewer Machine” in <EnvironmentGuide>.
2.5.2. Silent InstallationTo silently install JobCenter CL/Win, follow the steps below. The notes on installation arethe same as those provided in Section 2.5.1, “Normal Installation”.
In Windows Server 2008 or later, choose [Run as administrator] from theshortcut menu when opening the command prompt and perform the installation.
1. Create the configuration file for a silent installation.
To create this file, enter the configuration details of the machine where the silentinstallation will be performed and click [Save] when performing installation in anappropriate machine, as described in step 12 "Checking the specified setting" inSection 2.4.5, “Windows Version (Normal Installation)”.
Do not modify the created configuration file by using an editor or other tool.
When creating a configuration file for multiple machines, set up theinstallation machine from the GUI and save the configuration file.
2. Insert the JobCenter media (DVD-ROM), and then open a command prompt. You can openthe command prompt by selecting [Start], [All Programs], and then [Accessories].
3. Enter the following command to change the current directory:
C:\> Q: ↵Q:\> cd Q:\PACKAGE\JB\WINDOWS\CLWIN\script ↵
In the following description, Q: is assumed to be the CD/DVD-ROM drive.
If the CD/DVD-ROM drive is assigned to a different drive, read the descriptionaccordingly.
4. Enter the following command to start installation:
Q:\> install.bat <clsetup.conf> ↵
When installation finishes successfully, "Install finished successfully" is displayed.
Enter the full path of the previously created configuration file for<clsetup.conf>.

49
Chapter 3. Setting Up the ExecutionEnvironment (UNIX Version)
Set up the JobCenter execution environment (UNIX version).
For the Windows version, setup is performed in a flow of sequences during installation.

Setting Up the Execution Environment (UNIX Version)
50
3.1. Setting Up JobCenter
3.1.1. Executing nssetup (Setup Command)
Execute the nssetup command with root permissions.
root> /opt/netshep/nssetup ↵
When HP-UX operates in the high reliability mode, and you execute the abovenssetup command before adding the JobCenter administrator user (nsumsmgr),who must be set up as described in Section 3.1.4, “Setting Up the UMSEnvironment”, to the OS, user creation may fail, making it impossible tosuccessfully terminate the nssetup command.
Add the nsumsmgr user by using the useradd command before executing nssetupin an environment in which HP-UX operates in the high reliability mode.
However, execute this command as shown below in Linux.
root> /usr/local/netshep/nssetup ↵
If there is a previous JobCenter spool directory due to an upgrade, etc., the message belowappears. (Otherwise, nothing appears.)
[Warning] JobCenter spool directory(/usr/spool/nqs) is already exist.Do you use the old spool directory? [y/n](default: n)
To use the existing directory, select y. (The operation is the same as that of R12.6 orearlier.)
For the upgrade procedure, refer to Chapter 5, "Version Upgrade" .
If you select n, the existing spool directory is renamed in the format below and a newsetup process starts.
/usr/spool/nqs_YYYYMMDDhhmmss
After the setup is complete, check that the new environment operates normally and thendelete the above directory manually.
For information on the contents of the spool directory, refer to Section 3.2.3.1, “Spooldirectory” in <Release Notes>.
3.1.2. Setting the Machine ID of JobCenter
Execution of the nssetup command automatically creates a directory, putting the systemin waiting status for entry of the NQS machine ID. (A machine ID is a unique integer inthe range from 1 to 2,147,483,647.)
Setting NQS machine ID.INPUT: Machine-id of this machine (default:1)=
Here, enter the predetermined NQS machine ID (such as 1234).

Setting Up the Execution Environment (UNIX Version)
51
INPUT: Machine-id of this machine (default:1)= 1234 ↵
Avoid duplicating machine IDs between machines in which JobCenter is installed."1" is specified as the ID by default for the nssetup command.
The setup program adds the TCP port entry used by JobCenter to /etc/servicesat this point. If there are no entries for 607/tcp, 611/tcp, and 10012/tcp, thesystem shows that port numbers have been added as shown below.
Add entry of nqs service port to /etc/services.Add entry of jccombase service port to /etc/services.Add entry of jcevent service port to /etc/services.
■If a different application is already using the port to be used by JobCenter,edit /etc/services after setting up to change the port number to an availablenumber, and then restart JobCenter.
Change /etc/services for all the linked JobCenter servers.
In the case of Linux in particular, the jccombase service 611/tcp conflicts withthe existing npmp-gui service, so either comment out the npmp-gui serviceentry or change the number of the jccombase service.
■When changing the number to which the jccombase service is allocated, changethe port number of the following registry key from 611 to another numberas required. (Enter the corresponding setup JobCenter version for RXX.YY.)
▪ IA-32 environment
Value of HKEY_LOCAL_MACHINE\SOFTWARE\NEC\JobCenter(CL/Win)\RXX.YY\ComBasePort
▪ x64 environment
Value of HKEY_LOCAL_MACHINE\SOFTWARE\Wow6432Node\NEC\JobCenter(CL/Win)\RXX.YY\ComBasePort
For details, refer to Section 2.1, “TCP Ports Used by the JobCenter” in<Environment Guide>.
3.1.3. Selecting the Language Environment Used by JobCenter
You can select a language for JobCenter to use that is separate from the language set upfor the OS. When using this computer to start or set up a GUI or job network, only thecharacter encoding specified here can be used.
Select language code for JobCenter.0 - English1 - EUC2 - Shift-JIS (MS-kanji)3 - Chinese (GB18030)4 - JP.UTF-8Which language code do you use in this system ? (0/[1]/2/3/4)
If set values for environment variable LANG have been changed in script or LANG initialvalue of the shell for script execution is incorrect, garbled characters may appear.

Setting Up the Execution Environment (UNIX Version)
52
(The character code selected by default differs with the value of the environment variableLANG.)
Which language code do you use in this system ? (0/[1]/2/3/4) 1 ↵
■If you use the existing spool directory for the setup, you need to select thesame language environment that is set up for the existing spool.
■There are several notes on using JP.UTF-8 (UNICODE environment). Make thenecessary settings according to Section 2.1.1, “Checking Notes in Advance”.
3.1.4. Setting Up the UMS EnvironmentThe UMS environment is used to manage the JobCenter system.
In this environment, a message is displayed to ask you whether to automatically createa new nsumsmgr account for the JobCenter administrator. (The user name "nsumsmgr" isfixed and unchangeable.)
However, if the nsumsmgr account already exists, this message is skipped and not displayed.
Start NQS daemon.making UMS environment..JobCenter needs new user "nsumsmgr".Do you want to create user "nsumsmgr" automatically ? ([y]/n)
■If creating an administrator use
Type y, and then press the [Enter] key to proceed with setup.
The system status is checked and the message shown below is output. (User IDs and othersettings differ for each computer.)
Create new user "nsumsmgr" as following:(1)USER ID : 738 (nsumsmgr)(2)GROUP ID : 1 (other)(3)HOME DIRECTORY : /home/nsumsmgrSHELL : /sbin/shCOMMENT : JobCenter managerOK? (y/1/2/3/q) :
User ID, group ID, home directory, shell, and comment are given in order from above. Ofthem, three items can be corrected: user ID, group ID, and home directory.
Enter the number placed in parentheses at the place of correction, and then press the[Enter] key to enter correction mode. Proceed to the next step, Section 3.1.5, “Changingthe Administrator User Settings”.
After confirming that the current settings are correct, type y, and then press the [Enter]key to proceed to Section 3.1.6, “Setting a Password”.
If, for some reason, you wish to interrupt the work, type q, and then press the [Enter]key.
If you interrupt the work, be sure to create the nsumsmgr account with the OS command,specify the password, and set up the environment with /usr/lib/nqs/gui/bin/mkumsenvshlater as described in "If not automatically setting an administrator user" below.
■If not automatically setting an administrator user

Setting Up the Execution Environment (UNIX Version)
53
Type n, and then press the [Enter] key. Perform this step if not automatically specifyingthe administrator user, such as when installing the software in the NIS operationenvironment, specifying a login shell other than /sbin/sh, or for some other reason.
The installation ends with the following message displayed.
You must create new user nsumsmgr manually,And execute "/usr/lib/nqs/gui/bin/mkumsenvsh" .
If you do not want to specify administrator settings here, be sure to createthe nsumsmgr account by using the OS command, specify the password, andexecute /usr/lib/nqs/gui/bin/mkumsenvsh after installation.
3.1.5. Changing the Administrator User Settings■Changing the user ID
OK? (y/1/2/3/q) :1 ↵
Type 1, and then press the [Enter] key. The following message is displayed, promptingyou to enter the user ID.
Set USER ID: 500 ↵
Enter the user ID you want to set. The system then checks whether or not the user IDhas already been used.
If the user ID has been used, the following message appears, requesting you to enteranother user ID.
USER ID: 500 is already in use.Set USER ID:
Entry of a consistent user ID returns to the following screen. (This example changes userID from 738 to 501.)
Create new user "nsumsmgr" as following:(1)USER ID : 501 (nsumsmgr)(2)GROUP ID : 1 (other)(3)HOME DIRECTORY : /home/nsumsmgrSHELL : /sbin/shCOMMENT : JobCenter managerOK? (y/1/2/3/q) :
■Changing the group ID
OK? (y/1/2/3/q) :2 ↵
On the previous screen (the user ID change completion screen), type 2, and then pressthe [Enter] key to modify the group ID.
The following screen is displayed first.
OK? (y/1/2/3/q) :2Possible GROUP ID is following:root : 0other : 1bin : 2

Setting Up the Execution Environment (UNIX Version)
54
sys : 3..Set GROUP ID:
Because you can change only the group IDs that currently exist, the system first displaysa list of the group IDs currently set up and finally outputs a message requesting youto enter a group ID.
Referring to the list of group IDs, enter a correct ID.
■Changing the home directory
OK? (y/1/2/3/q) :3 ↵
On the user ID change completion screen, type 3, and then press the [Enter] key. Thefollowing message is displayed, prompting you to enter a directory.
Set directory:
Enter an appropriate directory. If you enter an existing directory, the following messageappears.
Directory "/home/nsumsmgr" exists.OK? (y/[n]) :
Type y, and then press the [Enter] key to change to the directory.
▪ If an existing directory is specified for "(3) HOME DIRECTORY" in "If creatingan administrator user", the user ID and group ID of the owner of all thefiles in the directory and the directory itself are changed to those of theadministrator user.
▪ If, on Linux and AIX machines, you change the home directory, the defaulthome directory may be created. Check the default home directory of thesystem, and if an unnecessary nsumsmgr directory exists, delete it manually.
3.1.6. Setting a PasswordHere, specify the password of the administrator user "nsumsmgr".
OK? (y/[n]) :y ↵
After changing the nsumsmgr user settings, continue to the password setting by entering"y" as shown above and then pressing the return key.
When the following message appears, enter the new password.
Set password of "nsumsmgr"New password: xxxxxx ↵
After the end of entry, a message appears asking you to check the password again. Enterthe same password.
Re-enter new password: xxxxxx ↵
A password must be specified for the JobCenter administrator account tooperate the JobCenter system. Do not forget to specify the password.
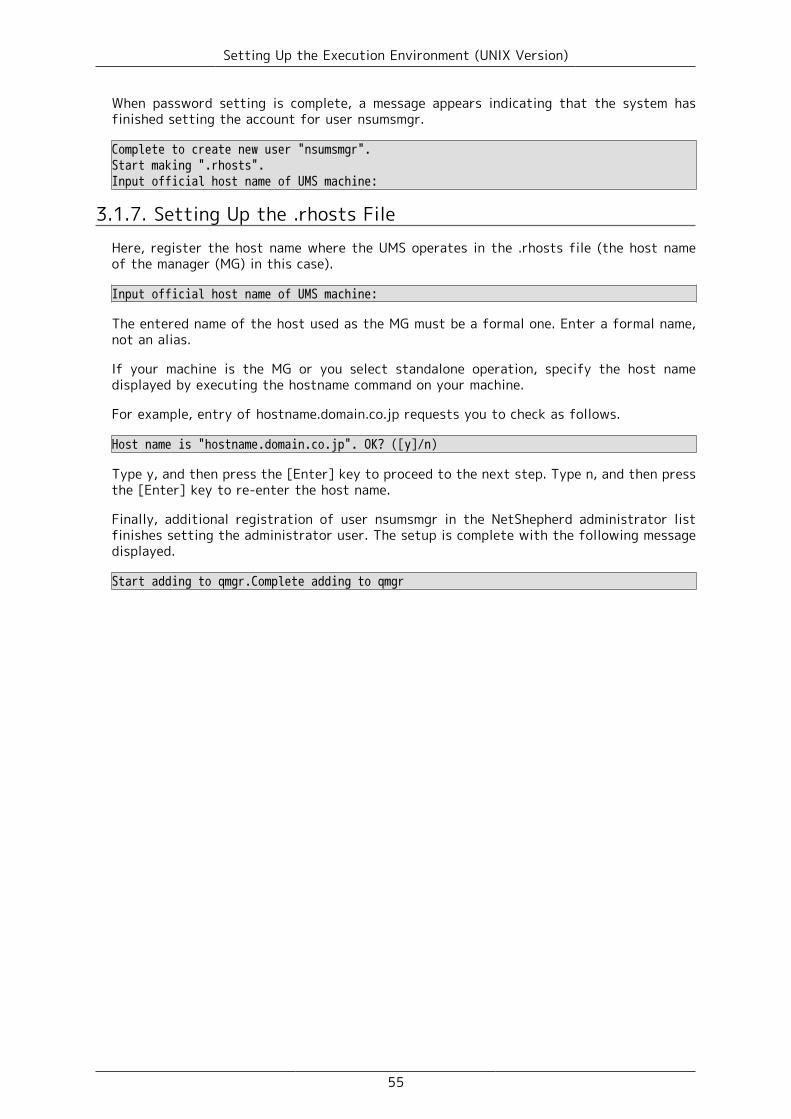
Setting Up the Execution Environment (UNIX Version)
55
When password setting is complete, a message appears indicating that the system hasfinished setting the account for user nsumsmgr.
Complete to create new user "nsumsmgr".Start making ".rhosts".Input official host name of UMS machine:
3.1.7. Setting Up the .rhosts FileHere, register the host name where the UMS operates in the .rhosts file (the host nameof the manager (MG) in this case).
Input official host name of UMS machine:
The entered name of the host used as the MG must be a formal one. Enter a formal name,not an alias.
If your machine is the MG or you select standalone operation, specify the host namedisplayed by executing the hostname command on your machine.
For example, entry of hostname.domain.co.jp requests you to check as follows.
Host name is "hostname.domain.co.jp". OK? ([y]/n)
Type y, and then press the [Enter] key to proceed to the next step. Type n, and then pressthe [Enter] key to re-enter the host name.
Finally, additional registration of user nsumsmgr in the NetShepherd administrator listfinishes setting the administrator user. The setup is complete with the following messagedisplayed.
Start adding to qmgr.Complete adding to qmgr

Setting Up the Execution Environment (UNIX Version)
56
3.2. Work Necessary After JobCenter Setup■Work necessary when setting up the cluster site
After nssetup is executed, the local site is opened and the process resides on it. Toset up the cluster site (by using cjcmksite), stop the local site, and then specify thelocal_daemon parameter in daemon.conf so that the local site is opened in the “site mode”.
For details, refer to Section 2.3.4, “Stopping JobCenter (Active and Standby Servers)”in <Guide for using Cluster function> and Section 2.3.6, “Building the Site (Active andStandby Servers)” in <Guide for using Cluster function>.
■Specifying the environment variable, TZ
Specify the environment variable TZ after setting up the Linux, Solaris, or AIX versionof JobCenter. For details, refer to Section 14.1.5, “Notes on the Environment VariableTZ (Linux, Solaris, and AIX Versions)” in <Environment Guide>.
■Work necessary for using JobCenter in a time zone different from Japan
When using JobCenter in a time zone different from Japan or using the multi time zonefunction added as of R12.8.2, make additional settings referring to Chapter 15, "Usagein a Non-Japanese Time Zone" in <Environment Guide>.
■Work necessary for linking BASECenter/SystemManager (MG)
After JobCenter(MG) is set up completely, reactivate ssEventD to register theSystemScope drop-in icon according to the following procedure.
root> /opt/OV/bin/ovstop ssEventD ↵root> /opt/OV/bin/ovstart ssEventD ↵
Also reactivate ssEventD in the same way after the JobCenter(MG) package is removed.
■Work necessary for event linkage using BASECenter/SystemManager in AIX
If AIX is adopted for the OS of the machine in which JobCenter and BASECenter/SystemManager have been installed, JNW event transmission daemon needs to be replaced.
Follow the procedure shown below. For details, refer to Section 11.2.1, “Linkage UsingBASECenter/SystemManager” in <Environment Guide>.
1. Stop the JobCenter service.
root> /usr/lib/nqs/nqsstop ↵
2. Save the files.
root> /usr/bin/cp -p /usr/lib/nqs/jnwcaster /usr/lib/nqs/jnwcaster.bk ↵
To link events except for BASECenter/SystemManager, the jnwcaster fileneeds to be returned to the original file. Be sure to save the file.
3. Replace the files.
root> /usr/bin/cp -p /usr/lib/nqs/jnwcasterBASE /usr/lib/nqs/jnwcaster ↵
4. Start the JobCenter service.

Setting Up the Execution Environment (UNIX Version)
57
root> /usr/lib/nqs/nqsstart ↵
■Tuning the OS kernel parameters
When generating and executing a large number of job requests in JobCenter in a shortperiod of time, the upper limit values of various OS kernel parameters might be exceeded.(Examples include nproc, maxuprc, nfile, and ninode in HP-UX.)
Chapter 17, "System Usage Resources" in <Environment Guide> When intensively executingjob requests, adjust the kernel parameters of the consumed resources, referring tothe resource usage described in Chapter 17, "System Usage Resources" in <EnvironmentGuide>.

Setting Up the Execution Environment (UNIX Version)
58
3.3. Setting Up the IPv6 EnvironmentBy default, IPv4 addresses are given precedence as the IP addresses used by MG/SV.Therefore, additional settings need to be made for the following environments:
■When IPv6 addresses are used in the IPv4/IPv6 dual stack environment
■When the machine has multiple IP addresses and specific IP addresses are used
For information about the setting, refer to Section 5.2, “Available Parameters of a DaemonConfiguration File” in <Environment Guide>.

59
Chapter 4. UninstallationThis chapter describes how to uninstall LicenseManager, JobCenter MG/SV, and JobCenterCL/Win.

Uninstallation
60
4.1. Uninstalling LicenseManager4.1.1. UNIX Version
If any products are dependent on LicenseManager, remove them first.
Because JobCenter is also dependent on LicenseManager, it must be uninstalled beforeLicenseManager.
If you uninstall LicenseManager before removing the products that aredependent on it, the operation of those products might be affected.
Log in with the login name "root".
login:root ↵
4.1.1.1. Solaris (SPARC) Version
1. Execute the following command to remove this package.
root> /usr/sbin/pkgrm NECWSLM ↵
Confirmation messages appear several times during removal. Type "y" for them tocontinue the processing.
2. The following message appears when the package is successfully removed.
Removal of <NECWSLM> was successful.
3. Execute the following command for confirmation.
root> /bin/pkginfo NECWSLM ↵
4. If the following message appears, this package has been removed normally.
ERROR: information for "NECWSLM" was not found
4.1.1.2. Linux Version
1. Execute the following command to remove this package.
root> /bin/rpm -e NECWSLM ↵
2. If the following message appears, this package has been removed normally.
******now removing *******Uninstallation was successful.
4.1.2. Windows VersionIf any products are dependent on LicenseManager, remove them first.
Because JobCenter is also dependent on LicenseManager, it must be uninstalled beforeLicenseManager.
If LicenseManager is uninstalled without deleting the dependent packages, theoperation of the dependent products might be affected. Therefore, make surethat such packages have been deleted before uninstallation.

Uninstallation
61
Follow the procedure below to remove a WebSAM LicenseManager(MainPart) product.
1. Start up the machine, and log in as a user who has Administrator permissions.
2. Select [Start] and then [Control Panel] on Windows, and then execute [Add or RemovePrograms] (or [Programs and Features]) to display the screen below. Click the [Remove](or [Uninstall]) button.
Figure 4.1. Package deletion dialog box
3. The dialog box below appears. Click the [Yes] button to remove the application.
Figure 4.2. Package deletion confirmation dialog box
4. The [Add or Remove Programs] (or [Programs and Features]) window is displayed again.If the [WebSAM LicenseManager] entry is gone, the application has been deleted.

Uninstallation
62
4.2. Uninstalling JobCenter MG and JobCenter SV
4.2.1. UNIX Version
4.2.1.1. Uninstalling the Packages
According to Table 4.1, “Package names required to be removed and remove commands forthe packages for each OS”, remove the packages of the old version of JobCenter.
For each OS, the packages to remove differ depending on the JobCenter type (MG or SV).Check the name of the packages that are actually installed before starting removal.
For details how to check the names of the package, refer to Section 6.1, “UNIX Version”.
Table 4.1. Package names required to be removedand remove commands for the packages for each OS
OS Package name (12.6.x orearlier)
Package name (12.7 orlater)
Remove command forpackage
HP-UX NECSSJBmg (MG)NECSSJBag (SV)NECSSJBpt(accumulated patch)
NECJCpkg (common toMG/SV)NECJCpt (accumulatedpatch)
swremove <pkgname>
Solaris NECSSJBmg (MG)NECSSJBag (SV)NECSSJBpt(accumulated patch)
NECJCpkg (common toMG/SV)NECJCpt (accumulatedpatch)
pkgrm <pkgname>
AIX NECSSJBag (common toMG/SV)NECSSJBpt(accumulated patch)
NECJCpkg (common toMG/SV)NECJCpt (accumulatedpatch)
installp -u <pkgname>
Linux NECSSJBag (common toMG/SV)NECSSJBpt(accumulated patch)
NECJCpkg (common toMG/SV)NECJCpt (accumulatedpatch)
rpm -e <pkgname>
■The accumulated patch package depends on the package of MG/SV itself.Therefore, when deleting a package from a system to which an accumulatedpatch has been applied, delete the accumulated patch package before thepackage of MG/SV itself.
■In HP-UX and Solaris versions before R12.7, both the MG and SV packagesare installed on the MG machine. In this case, uninstall the MG package firstbecause the MG package depends on the SV package.
4.2.1.2. Deleting Spool Area Data (Local Site)
The data in the spool area is not deleted just by uninstalling the package. This area containsall the data configured or set after the setup of JobCenter, including NQS-related datasuch as machine and queue settings, in addition to job network definitions and schedules,trackers, and other user data. To delete these types of data, delete the following directory:

Uninstallation
63
/usr/spool/nqs
4.2.1.3. Deleting Cluster-Related Data
When deleting cluster-related data, delete the directory and symbolic link file below.
<cluster-database-path>/nqs/usr/spool/nqs/<IP-address>
<IP-address> should be replaced by one of the items described below, dependingon the IP address corresponding to the name of the cluster site where JobCenteris running.
IP address version Content of <IP-address>IPv4 Character string representing the IP address in
hexadecimal notationIPv6 IPv6 address excluding ":" (in hexadecimal notation)
Note that, when a cluster-related database is deleted, all user-related data in the databaseis also deleted.
4.2.1.4. Deleting the JobCenter Termination Process from the /etc/rc.shutdown File (Only for AIX)
If the operating system is AIX, delete the JobCenter termination process that was addedto the /etc/rc.shutdown file during installation.
4.2.2. Windows Version
To perform the operations below, first log in as a user who has Administrator permissions.
%InstallDirectory% represents the installation directory for JobCenter itself.(The default value is C:\JobCenter\SV.)
4.2.2.1. Uninstalling the Packages
Choose [Start], [Control Panel], and then [Programs and Features]. In the resulting dialogbox, choose JobCenter(MG/SV) RXX.YY and click [Uninstall/Change].
XX.YY is the version number.

Uninstallation
64
Figure 4.3. Package deletion dialog box
4.2.2.2. Deleting Spool Area Data (Local Site)
This area contains all the data configured or set after the setup of JobCenter, includingNQS-related data such as machine and queue settings, in addition to job network definitionsand schedules, trackers, and other user data. To delete these types of data, delete thefollowing directory:
%InstallDirectory%
By default, %InstallDirectory% is set to "C:\JobCenter\SV".
4.2.2.3. Deleting Cluster-Related Data
When deleting cluster-related data, delete the whole cluster database directory.
Note that, when a cluster-related database is deleted, all user-related data inthe database is also deleted.
4.2.2.4. Deleting Registry-Related Data
To delete registry-related data, follow the steps below.
1. Select [Start] followed by [Run] on Windows. In the Run window, enter "regedit" andthen click the [OK] button. The [Registry Editor] dialog box appears.
2. In the left pane of the ]Registry Editor] dialog box, right-click the following key andthen select [Delete] from the shortcut menu.

Uninstallation
65
HKEY_LOCAL_MACHINE\SOFTWARE\NEC\NetShepherd/SV
4.2.2.5. Deleting the Setting of an Environment Variable
If you have used JobCenter in a cluster environment, check whether the environment variableNQS_SITE is set. If NQS_SITE is set, remove it.
■The message "Uninstall finished. Please reboot OS to complete uninstallation."might appear and bin and lib might not be deleted from %InstallDirectory% if,for example, a file was being used while uninstalling JobCenter. In such a case,restart the OS, and then delete them by using Explorer or another application.
4.2.2.6. Deleting the Dependent Package
The Microsoft Visual C++ redistributable package remains undeleted even after youuninstall JobCenter. If this package is not necessary, delete the package having the nameshown below, by using "Programs and Features".
Microsoft Visual C++ 2012 Redistritutable (x86) - 11.0.51106
In the case of the 64-bit version, replace x86 with x64.
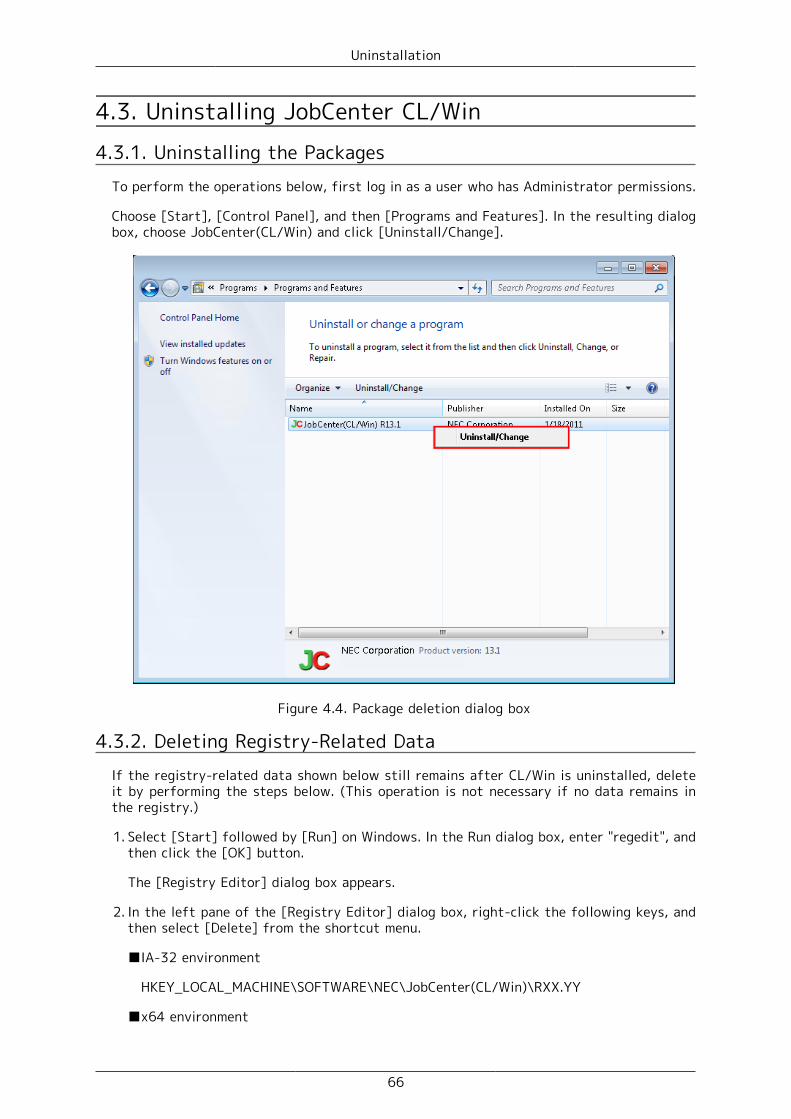
Uninstallation
66
4.3. Uninstalling JobCenter CL/Win
4.3.1. Uninstalling the PackagesTo perform the operations below, first log in as a user who has Administrator permissions.
Choose [Start], [Control Panel], and then [Programs and Features]. In the resulting dialogbox, choose JobCenter(CL/Win) and click [Uninstall/Change].
Figure 4.4. Package deletion dialog box
4.3.2. Deleting Registry-Related DataIf the registry-related data shown below still remains after CL/Win is uninstalled, deleteit by performing the steps below. (This operation is not necessary if no data remains inthe registry.)
1. Select [Start] followed by [Run] on Windows. In the Run dialog box, enter "regedit", andthen click the [OK] button.
The [Registry Editor] dialog box appears.
2. In the left pane of the [Registry Editor] dialog box, right-click the following keys, andthen select [Delete] from the shortcut menu.
■IA-32 environment
HKEY_LOCAL_MACHINE\SOFTWARE\NEC\JobCenter(CL/Win)\RXX.YY
■x64 environment
Uninstallation
67
HKEY_LOCAL_MACHINE\SOFTWARE\Wow6432Node\NEC\JobCenter(CL/Win)\RXX.YY
Enter the corresponding setup JobCenter version for RXX.YY.

68
Chapter 5. Version UpgradeThis chapter describes how to upgrade JobCenter. For details on how to upgrade theWindows cluster environment, refer to <JobCenter Guide for upgrading the version andapplying the patches in a cluster environment> (Japanese only).

Version Upgrade
69
5.1. UNIX Version
■During uninstallation, user-created Job Network definition data is inherited.Requests or trackers in progress are, however, not inherited.
Setting values associated with NQS, such as proprietary queue, machineinformation for forwarding requests, and user mapping, are all deleted.Therefore, reconfiguration is required after the installation of the newversion.
To inherit settings associated with NQS, refer to Section 5.1.1, “VersionUpgrade with Inheriting NQS-Related Data”.
■If inherited user data contains a lot of unachieved trackers after upgrading,delete them immediately because these trackers cannot be inherited asdescribed above.
■In R12.5 or later, there is no shared job network.
Thus, when upgrading JobCenter R12.4.x or earlier to R12.6 or later, move alljob networks in the shared job network of the previous version to the jobnetwork group of an appropriate user before upgrading.
■In R12.5 or later, there is no "job network execution regulation" function.JobCenter of R12.5 or later supports an extended access authority (permissionsetting) function, which enables job network execution regulation as well.Because of the difference in concept, however, the settings of theconventional execution regulation function are not inherited automatically.Therefore, in order to continue execution regulation after the version upgrade,write down the existing settings in advance and set permissions afterupgrading the version. This is not necessary when the job network executionregulation function is not in use before the version upgrade.
For details about permission setting, refer to Chapter 9, "User Authority(Permission)" in <Environment Guide>.
■Once upgraded, user data might no longer be compatible and not operatenormally even if the system is downgraded. Before upgrading the version, backup the user data (download all definitions) using the Helper function. Forinformation about how to download definition data, refer to Section 2.4.1,"Downloading definition information" in <Guide for using Helper function>(Japanese only).
5.1.1. Version Upgrade with Inheriting NQS-Related Data
To upgrade the version with inheriting NQS-related data, follow the steps below.
1. Stop JobCenter by using nqsstop. (Stop the cluster environment by using cjcpw -stop<site name>.)
root> /usr/lib/nqs/nqsstop ↵
2. Take backup copies of files under the directories below.
/usr/spool/nqs/nmap/usr/spool/nqs/private

Version Upgrade
70
3. If a common daemon configuration file is used, back up the following file.
/usr/lib/nqs/rc/daemon.conf
■This file is a daemon configuration file provided only by the UNIX versionof JobCenter, and common to the local sites and cluster sites. This file isdeleted when JobCenter is uninstalled.
■The daemon configuration files for each site are inherited so there is noneed to back them up.
4. Remove a package of the old version of JobCenter. For details on how to remove the oldpackage, refer to Section 4.2.1.1, “Uninstalling the Packages”.
5. Install the new version of JobCenter. Use nssetup to set up the execution environment.
root> /opt/netshep/nssetup ↵
When a message asks whether to use the old spool directory, select "y" to use the oldspool directory and continue the setup.
[Warning] JobCenter spool directory(/usr/spool/nqs) is already exist.Do you use the old spool directory? [y/n](default: n) y↵
After the setup is complete, use nqsstop to stop JobCenter.
root> /usr/lib/nqs/nqsstop ↵
6. Restore the files under /usr/spool/nqs/nmap and /usr/spool/nqs/private that you backedup in 2 above.
Remove the files and directories below after the restoration if they exist. (Otherwise,the consistency of the NQS database is not guaranteed, which makes normal operationimpossible.)
/usr/spool/nqs/private/root/transfileAll files under /usr/spool/nqs/private/root/control/(directories)All files under /usr/spool/nqs/private/root/data/(directories)/usr/spool/nqs/private/root/tracking
For usr/spool/nqs/private/root/tracking, delete the entire directory.
7. Delete the tracking file with the trfdelete command. Refer to Section 3.25 "trfdeleteDeleting Tracking Files" in <Command Reference> (Japanese only) for details on thetrfdelete command.
8. If the common daemon configuration file was backed up in step 3 above, restore thebacked up /usr/lib/nqs/daemon.conf file.
9. In order to upgrade from R12.10.x or earlier to R13.x or later, you need to convert thespool area definition. Otherwise, skip this step.
To use the user definition data in R13.x or later, upgrade the version of the site databaseby using the spoolconv command. For details about the spoolconv command, refer toSection 3.22, "spoolconv" in <Command Reference> (Japanese only).

Version Upgrade
71
An example of upgrading the version of the site database is shown below.
root> /usr/lib/nqs/gui/bin/spoolconv ↵Do you convert the spool directory for SITE [local] ?[y/n](default: n) y↵start convert spool directory. : : :end convert spool directory.
For an example of upgrading the version of the site database in a cluster environment,refer to Section 2.6.2.2, “Upgrading the Site Database (UNIX Version)” in <Guide forusing Cluster function>.
■When the command is executed, the name of the site whose database is tobe upgraded is displayed. Before executing the command, check that [local]is specified.
■The user definitions present before the version upgrade are not changed ordeleted. After the version upgrade is complete, check whether JobCenteroperates normally and, if necessary, delete the user definitions.
■If the following warning message is displayed in the setup log, the host nameand event ID of the corresponding user in [Default Parameters] - [EventReception Parts] will not be inherited. In order to cope with this, set thedefault parameters for each corresponding user after CL/Win is connected.
Warning : Convert Skip ([DefaultParameter]EventReceive user="username" hostname="hostname-specified-in-default-parameters" eventid="evenid-specified-in-default-parameters")
10. Activate JobCenter with nqsstart. (Start the cluster environment by using cjcpw <sitename> <DB path>.)
root> /usr/lib/nqs/nqsstart ↵
11. Make sure that all the users who have been using the old version of JobCenter canestablish connection and log in successfully using CL/Win.
JobCenter is now upgraded completely.
■When the local host name is changed, only data related to job networkdefinition information can be inherited. For details on how to inherit data,refer to Chapter 13, "Environment Migration" in <Environment Guide>.
■The settings are not inherited if the system is downgraded.
■If a user does not establish connection using CL/Win after upgrading, the newversion of MG/SV may not be able to recognize the user as a JobCenter user.Therefore, always check that all the users can establish connection using CL/Win.

Version Upgrade
72
5.1.2. Version Upgrade without Inheriting NQS-Related DataIf there is no need to inherit NQS-related data, follow the steps described in Section 5.1.1,“Version Upgrade with Inheriting NQS-Related Data”, excluding steps 2, 6, and 7.

Version Upgrade
73
5.2. Windows Version
■During uninstallation, user-created Job Network definition data is inherited.Requests or trackers in progress are, however, not inherited.
If you upgraded the version without inheriting the NQS-related data, thesetting values associated with NQS, such as proprietary queue, machineinformation for forwarding requests, and user mapping, are all deleted.Therefore, reconfiguration is required after the installation of the newversion.
To inherit settings associated with NQS, refer to Section 5.2.1, “VersionUpgrade with Inheriting NQS-Related Data”.
■If inherited user data contains a lot of unachieved trackers after upgrading,delete them immediately because these trackers cannot be inherited asdescribed above.
■In R12.5 or later, there is no shared job network.
Thus, when upgrading JobCenter R12.4.x or earlier to R12.6 or later, move alljob networks in the shared job network of the previous version to the jobnetwork group of an appropriate user before upgrading.
■Special procedures are necessary to delete the previous version and install thenew version in an MSFC (MSCS) cluster environment.
For details, refer to <JobCenter Guide for upgrading the version and applyingthe patches in a cluster environment> (Japanese only).
■If the previous version of JobCenter operates in a cluster environment, checkwhether the environment variable NQS_SITE was specified after uninstallationand delete it if it was.
If the environment variable NQS_SITE is specified, the new version ofJobCenter cannot be correctly set up.
■Because the file paths are different in R12.8, the directories under JobCenterare rebuilt during upgrading. It is not possible to restore the previousdirectory structure once setup is complete. Therefore, downgrading is notsupported.
Be sure to back up files before upgrading the version. For the files to backup, refer to the backup procedure guide provided by the maintenance center.(Back up the user data (download all definitions) using the Helper function.)For information about how to download definition data, refer to Section 2.4.1,"Downloading definition information" in <Guide for using Helper function>(Japanese only)
In a cluster environment, the version of the database must also be upgradedon the cluster site as well. For details, refer to the <Guide for using Clusterfunction>.
■From R12.8, the cjcpw file path has changed as follows:
%InstallDirectory%\bin\cluster\cjcpw.exe

Version Upgrade
74
If clusters were operated in versions before R12.8, it is necessary to modifythe cjcpw file version upgrade path that is described in the JobCenter startupand termination scripts that are registered in the cluster software. Refer to<Guide for using Cluster function> for details on the startup and terminationscripts.
■When the version is upgraded, the default port 23131/tcp is automaticallyselected as the port to be used by the jcdbs process newly added to R13.1.When changing the port number, check that there is no other service whosename is identical to the service name "jcdbs" of the file shown below. Beforemaking a change, make sure that the JobCenter process is stopped.
%windir%\system32\drivers\etc\services
5.2.1. Version Upgrade with Inheriting NQS-Related DataThe upgrade method differs depending on the version of JobCenter to remove.
After the execution of upgrading, select [Start], [All Programs], [JobCenter], [SV], andthen [Environment Setting], and then click the [User] button to check that in the JobCenterUser Management dialog box, the password field for each user indicates "OK".
If there are any users for whom "Not Set" is indicated, reenter the user name and thepassword and check that the password field displays "OK".
5.2.1.1. Upgrading from R12.2 or Later
Installation by overwriting (upgrade) is possible. When upgrading, NQD related settings willbe automatically inherited. Follow the steps below.
Be sure to perform the following steps and checks before this work (upgrade).
1. Stop the JobCenter services and cluster site.
2. Make sure that no files in <JobCenterMG/SV installation directory> are beingaccessed.
3. Make sure that the drive where JobCenter MG/SV is installed has enough freespace (more than the size used by the installed JobCenter MG/SV).
1. Insert the JobCenter media (DVD-ROM), and then select [Start] followed by [Run].
Specify one of the following file names, and then click the [OK] button.
■32-bit native binary for IA-32
Q:\PACKAGE\JB\WINDOWS\MGSV\x86\jcsetup.exe
■64-bit native binary for x64 (EM64T or AMD64)
Q:\PACKAGE\JB\WINDOWS\MGSV\x64\jcsetup.exe
In the following description, Q: is assumed to be the CD/DVD-ROM drive.
If the CD/DVD-ROM drive is assigned to a different drive, read the descriptionaccordingly.
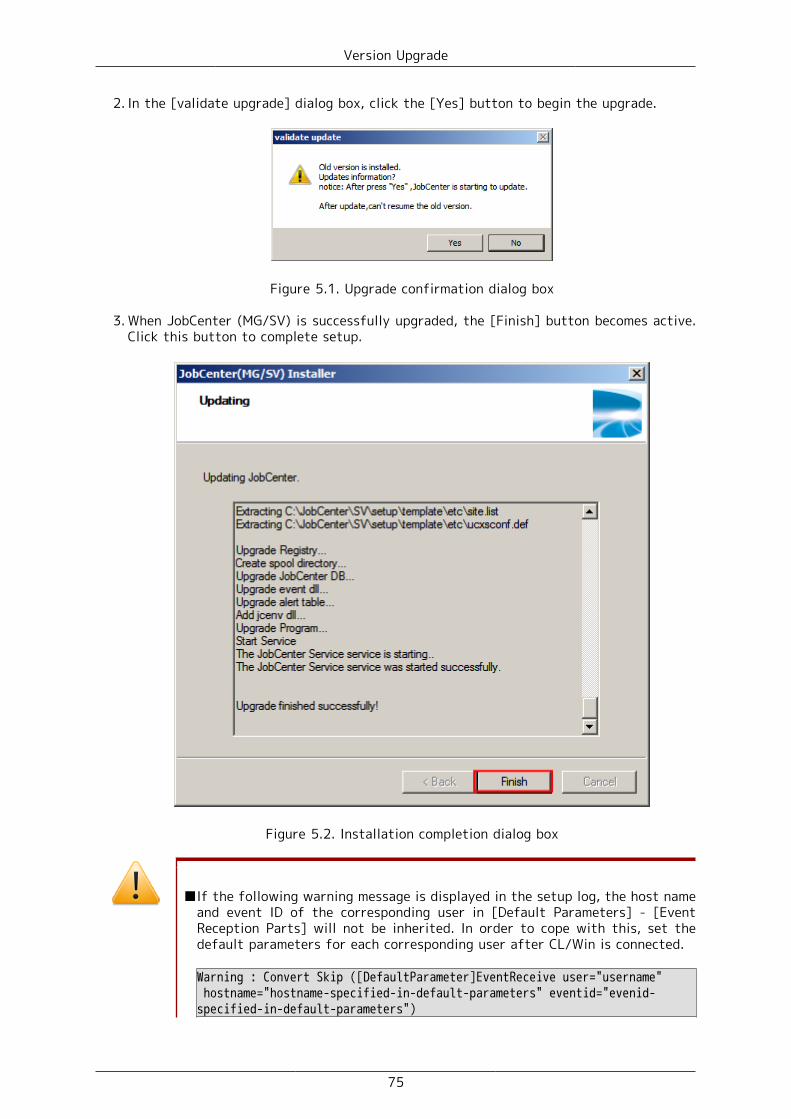
Version Upgrade
75
2. In the [validate upgrade] dialog box, click the [Yes] button to begin the upgrade.
Figure 5.1. Upgrade confirmation dialog box
3. When JobCenter (MG/SV) is successfully upgraded, the [Finish] button becomes active.Click this button to complete setup.
Figure 5.2. Installation completion dialog box
■If the following warning message is displayed in the setup log, the host nameand event ID of the corresponding user in [Default Parameters] - [EventReception Parts] will not be inherited. In order to cope with this, set thedefault parameters for each corresponding user after CL/Win is connected.
Warning : Convert Skip ([DefaultParameter]EventReceive user="username" hostname="hostname-specified-in-default-parameters" eventid="evenid-specified-in-default-parameters")

Version Upgrade
76
After the upgrade finishes from R12.7.x or earlier, the backup directory used before theupgrade is displayed as shown below. This is due to a change of the directory structureat R12.8.
After the upgrade finishes, make sure that everything is working correctly, such assubmitting a test job, and then delete this directory.
Figure 5.3. Upgrade notes dialog box
When the installation finishes, the warning messages below might be displayed.Check the system in accordance with the contents of the warning.
■"Failed to set the connect with ESMPRO/ServerAgent."
To link to ESMPRO/ServerAgent, make sure that ServerAgent is correctlyinstalled.
Next, execute the following commands:
C:\> %InstallDirectory%\setup\amirtreg del ↵C:\> %InstallDirectory%\setup\amirtreg add ↵
If not using ESMPRO/ServerAgent, this setting is not required.
5.2.1.2. Upgrading from R12.1.x or Earlier
When the version is upgraded from R12.1.x or earlier, the previously installed packagecannot be overwritten. If you want data associated with NQS to be inherited even afterupgrading, follow the steps below.
■%InstallDirectory% represents the installation directory for JobCenter itself.(The default value is "C:\JobCenter\SV".)
■The version of the site database must be upgraded in a cluster environment.For details, refer to Section 2.6.2.1, “Upgrading the Site Database (WindowsVersion)” in <Guide for using Cluster function>.
1. From [Services] of [Control Panel], stop services associated with JobCenter by followingthe order listed below. Some services might not exist depending on the version. Skip sucha service and stop the next service.
Sclaunch ServiceComagent Servicejnwengine serviceNetShepherd
2. Take backup copies of files under the directories listed below.

Version Upgrade
77
%InstallDirectory%\etc%InstallDirectory%\nmap%InstallDirectory%\spool\private\root
3. Remove a package of the old version of JobCenter. For details on how to remove thepackage, refer to Section 4.2.2.1, “Uninstalling the Packages”.
4. After installing a new version of JobCenter, restart the machine.
5. After restarting a computer, stop the following JobCenter-related service from[Services] of [Control Panel].
JobCenter Service
6. Restore the backup files to the appropriate directory according to the following table:
Backed up in Restored to%InstallDirectory%\etc %InstallDirectory%\etc%InstallDirectory%\nmap %InstallDirectory%\spool\nmap%InstallDirectory%\spool\private\root %InstallDirectory%\spool\private\root
7. If the following files and directories exist, remove them after restoration in the previousstep. (Otherwise, consistency of the NQS database is not guaranteed, which makes normaloperation impossible)
%InstallDirectory%\spool\private\root\transfileAll files under %InstallDirectory%\spool\private\root\control\(directories)All files under %InstallDirectory%\spool\private\root\data\(directories)%InstallDirectory%\spool\private\root\tracking
In the above description, the word (directories) indicates all existingdirectories. It does not mean to "remove the directories". Delete only the filesin the directories.
For %InstallDirectory%\spool\private\root\tracking, delete the entiredirectory.
8. Delete the tracking file with the trfdelete command. Refer to Section 3.25 "trfdeleteDeleting Tracking Files" in <Command Reference> (Japanese only) for details in thetrfdelete command.
9. From [Services] of [Control Panel], start the following JobCenter-related service.
JobCenter Service
10. Make sure that all the users who have been using the old version of JobCenter canestablish connection and log in successfully using CL/Win.
JobCenter is now upgraded completely.
■The settings are not inherited if the system is downgraded. Restore thesettings from the previously backed up file.

Version Upgrade
78
■If a user does not establish connection using CL/Win after upgrading, the newversion of MG/SV may not be able to recognize the user as a JobCenter user.Therefore, always check that all the users can establish connection using CL/Win.
5.2.2. Version Upgrade without Inheriting NQS-Related DataThe old version of JobCenter must be uninstalled. Follow the steps below.
1. Remove a package of the old version of JobCenter. For details on how to remove thepackage, refer to Section 4.2.2.1, “Uninstalling the Packages”.
2. Install a new version of JobCenter.

79
Chapter 6. Checking the VersionTo check the version of JobCenter, follow the steps in this chapter.
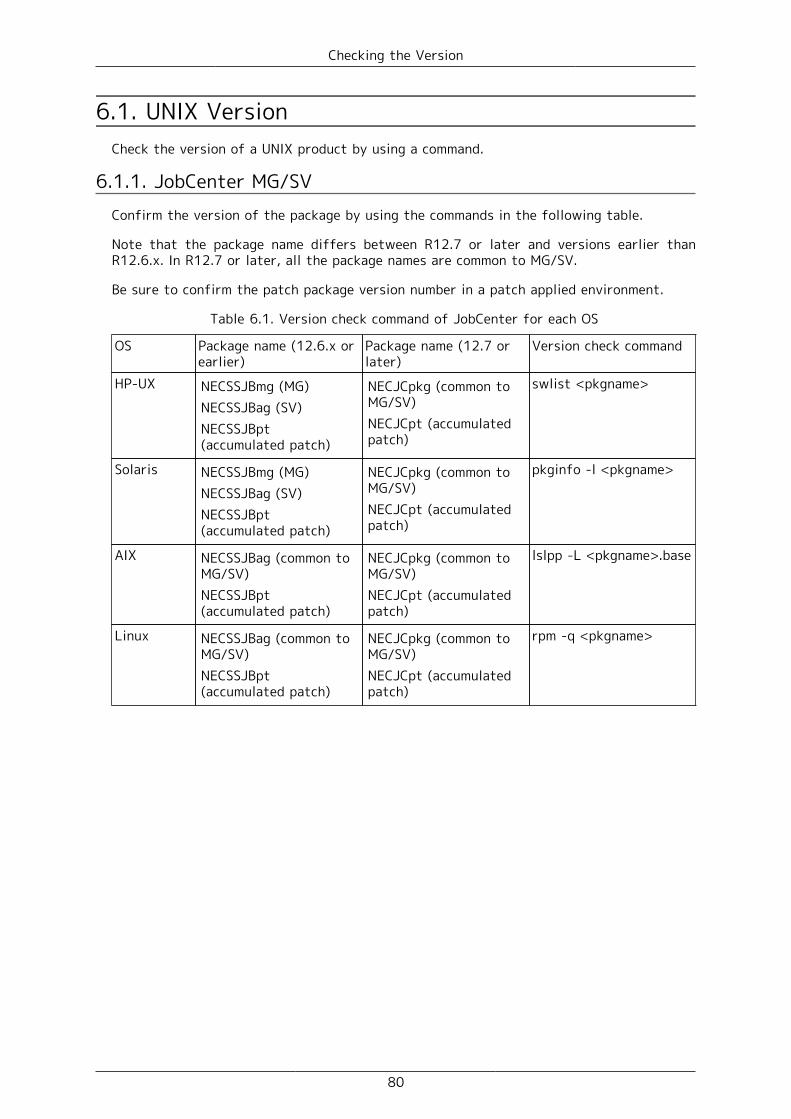
Checking the Version
80
6.1. UNIX VersionCheck the version of a UNIX product by using a command.
6.1.1. JobCenter MG/SVConfirm the version of the package by using the commands in the following table.
Note that the package name differs between R12.7 or later and versions earlier thanR12.6.x. In R12.7 or later, all the package names are common to MG/SV.
Be sure to confirm the patch package version number in a patch applied environment.
Table 6.1. Version check command of JobCenter for each OS
OS Package name (12.6.x orearlier)
Package name (12.7 orlater)
Version check command
HP-UX NECSSJBmg (MG)NECSSJBag (SV)NECSSJBpt(accumulated patch)
NECJCpkg (common toMG/SV)NECJCpt (accumulatedpatch)
swlist <pkgname>
Solaris NECSSJBmg (MG)NECSSJBag (SV)NECSSJBpt(accumulated patch)
NECJCpkg (common toMG/SV)NECJCpt (accumulatedpatch)
pkginfo -l <pkgname>
AIX NECSSJBag (common toMG/SV)NECSSJBpt(accumulated patch)
NECJCpkg (common toMG/SV)NECJCpt (accumulatedpatch)
lslpp -L <pkgname>.base
Linux NECSSJBag (common toMG/SV)NECSSJBpt(accumulated patch)
NECJCpkg (common toMG/SV)NECJCpt (accumulatedpatch)
rpm -q <pkgname>

Checking the Version
81
6.2. Windows VersionUse the GUI to check the version of the Windows version of JobCenter.
6.2.1. JobCenter SV
1. Select [Start], [All Programs], [JobCenter], [SV], and then [Environment Setting] onWindow to execute server configuration.
2. The [Environment Setting] dialog box appears. Select [Help] and then [About JobCenterserver environment settings] to check the version information.
Figure 6.1. Version information selection window
6.2.2. CL/Win
1. Select [Start], [All Programs], [JobCenter], [CL XX.YY], and then [JobCenter ClientXX.YY] on Windows to start JobCenter Client.
XX.YY represents the version number.
2. The CL/Win window appears. From the menu bar, select [Help] and then [AboutJobCenter] to check the version information.

Checking the Version
82
Figure 6.2. Version information selection window

Date of Issue August 2015NEC Corporation 2015