quilt as you go
TRANSCRIPT

“Quilt as You Go” Instructions Page 1 of 9
“QUILT AS YOU GO” INSTRUCTIONS
OVERVIEW
The basic design of the Quilt as You Go is to create strips of fabric that are sewn together as you work vertically
from the bottom edge of the quilt to the top edge. These strips can be one piece of fabric each, or a multiple of
pieces of fabrics or squares of fabrics sewn into the strips and then assembled. See the following examples of
finished quilts.
FABRICS - Batting: 36-in. x 44 3/4-in. - Backing (this fabric will be top side when finished): Pre-
washed woven cotton - A minimum piece that is at least 39-in. x 48-in. Note: A larger piece of fabric (by a few inches on length and width) may be easier to work with because of the sewing as you go technique.
- Fabric strips (these strips will be the bottom side when finished): Pre-washed woven cotton or pre-washed flannel -
9 strips that are 5.25-in. by longer than 36-in. Note: Many of the woven cotton fabrics are 44-in. wide. Do not cut shorter. Use the full width. The extra length will be trimmed in the final stages and these trimming can be used
in other projects.
MACHINES Sewing machine
GENERAL INSTRUCTIONS
When sewing fabric strips into place, do NOT back stitch at the beginning or ending of
the sewing. The strips will be securely sewn into place when the binding is sewn.
Photo 1 - One-Piece Fabric Strip Construction
Photo 2 - Reverse Side of One-Piece Fabric Strip Construction
Photo 3 - Multiple Fabric Strips Sewn Together to Create 9 Strips of Fabric
Photo 1 - Multiple Squares of Fabric Sewn Together to Create 9 Strips of Fabric

“Quilt as You Go” Instructions Page 2 of 9
CONSTRUCTION
CUTTING
1. Cut the batting 36-in. x 44.75-in.
2. Cut the backing (top side of quilt) to a workable piece that is larger than 39-in. x 48-in.
3. Cut 9 fabric strips that are 5.25-in. by the width of the yardage you are using, but at least 38-in. wide.
SEWING
1. Lay the backing fabric (top side of quilt) right-side down.
2. Lay the batting on top of the fabric with the batting off-set from the backing fabric by 2-in. on each side of a lower corner.
3. Pin the batting all the way around to secure it to the backing.
4. Lay the first fabric strip right-side UP to line up with the corner edge of the batting.

“Quilt as You Go” Instructions Page 3 of 9
5. Measure 36-in. on the fabric strip from the aligned corner to the opposite end of the strip and mark this measurement.
6. Pin the lower edge of the fabric strip through all layers, but do not sew.
7. Lay the second fabric strip right-side DOWN on top of Fabric Strip 1.
a. Measure 36-in. from aligned corner and mark fabric.
b. Pin a couple of places to hold fabric while sewing.
c. Being careful not to sew over any pins, sew ¼-in. seam at the top edge of Fabric Strip 2, sewing through all the layers of fabric starting at the aligned edge and stopping at the 36-in. mark (see diagram below). IMPORTANT: Do not back stitch at the start or end of this seam.
d. On each end, pull the bobbin thread to the top of the fabric, tie a double knot with the upper thread to secure the threads, and then trim the threads to ½-inch. Note: These ends will be hidden inside the binding.
“Quilt as You Go” Instructions Page 4 of 9
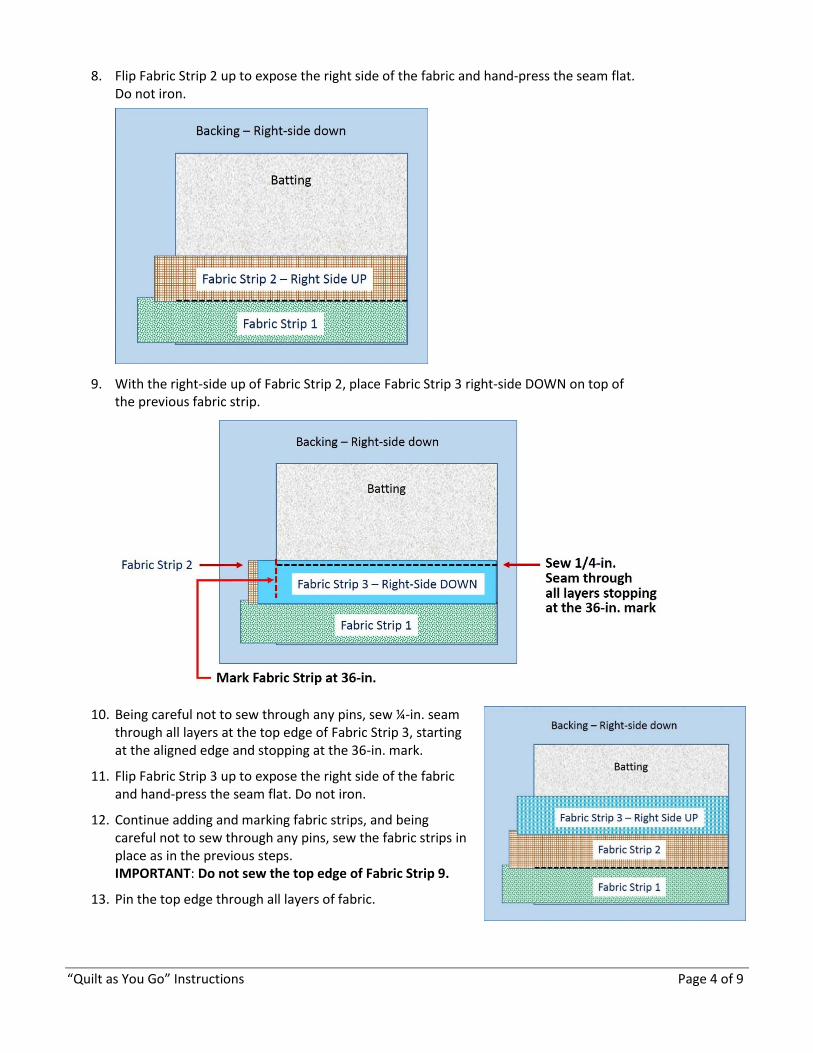
8. Flip Fabric Strip 2 up to expose the right side of the fabric and hand-press the seam flat. Do not iron.
9. With the right-side up of Fabric Strip 2, place Fabric Strip 3 right-side DOWN on top of the previous fabric strip.
10. Being careful not to sew through any pins, sew ¼-in. seam through all layers at the top edge of Fabric Strip 3, starting at the aligned edge and stopping at the 36-in. mark.
11. Flip Fabric Strip 3 up to expose the right side of the fabric and hand-press the seam flat. Do not iron.
12. Continue adding and marking fabric strips, and being careful not to sew through any pins, sew the fabric strips in place as in the previous steps. IMPORTANT: Do not sew the top edge of Fabric Strip 9.
13. Pin the top edge through all layers of fabric.

“Quilt as You Go” Instructions Page 5 of 9
14. Trim all fabric strips to the 36-in. mark. IMPORTANT: When trimming the fabric strips, do NOT cut through the batting or the backing fabric.
15. Trim the backing on the remaining two sides to 2-in. from the batting.
BINDING
1. Fold the raw edge of the backing fabric up to the batting.
2. Fold the backing fabric up once more over the fabric strips by 1/4-in. and finger press in place. Pin the edges as you go; however, leave the corners unpinned so that you can miter the corners.

“Quilt as You Go” Instructions Page 6 of 9
3. Repeat steps 1 and 2 in this Binding section for all sides.
4. Miter corners and sew all binding edges. For instructions to miter the corners, go to the Mitering Corners section below.

“Quilt as You Go” Instructions Page 7 of 9
MITERING CORNERS
This section explains how to miter the corners of the quilt. I have copied screen shots from a You Tube site. You
can view the You Tube video by keying in the following URL: https://www.youtube.com/watch?v=strLQjdYPcY.
Although I have used the screen captures to provide instructions, some of the measurements in these images do
not match the instructions for creating the Quilt As You Go.
1. After you have finger pressed and pinned the binding, you are ready to sew the mitered corners. In the following instructions, the First Fold is created when you fold the raw edge of the backing fabric up against the batting fabric. The Second Fold is created when you fold the remaining backing fabric up and over the fabric strips. See the following illustrations.
2. Fold back the two sides at the corner so that the First Fold edges of the bottom and side of the backing fabric align. Keep the First Fold edge folded up.
3. Align the first folds so that the actual corner of the fabric creates a little point.

“Quilt as You Go” Instructions Page 8 of 9
4. Locate the finger-pressed crease line made at the Second Fold. You will be sewing along this crease line.
5. Sew along the Second Fold crease line. Note: In this picture, the sewing machine foot appears to be at an incorrect angle. This is because the sewing machine in this video has a feature that allows sewing at an angle.
6. Cut the backing fabric 1/4-in. from the sewn seam line.

“Quilt as You Go” Instructions Page 9 of 9
7. Finger-press the seam open.
8. After finger-pressing the seam, flip the seam to the inside so that a corner is created.
9. Pin corners and sew around the edges of the quilt, being sure to overlap the folded edge ¼-in. on top of the fabric strips.