quickstart guide guida rapida - ion audio - dedicated to …€¦ · · 2017-09-15box contents...
TRANSCRIPT

Digital LP
Quickstart Guide English ( 3 – 10 )
Guía de inicio rápido Español ( 11 – 18 )
Guide d’utilisation rapide Français ( 19 – 26 )
Guida rapida Italiano ( 27 – 34 )
Schnellstart-Anleitung Deutsch ( 35 – 42 )
Snelstartgids Nederlands ( 43 – 50 )
Appendix English ( 51 )

2

3
Quickstart Guide (English) Introduction Box Contents Digital LP
Power Adapter
45 RPM Adapter
Slipmat
Software Download Card
Quickstart Guide
Safety & Warranty Manual
Support For the latest information about this product (documentation, technical specifications, system requirements, compatibility information, etc.) and product registration, visit ionaudio.com.
For additional product support, visit ionaudio.com/support.
Setup Items not listed under Introduction > Box Contents are sold separately.
Speakers
Computer
Tablet
4
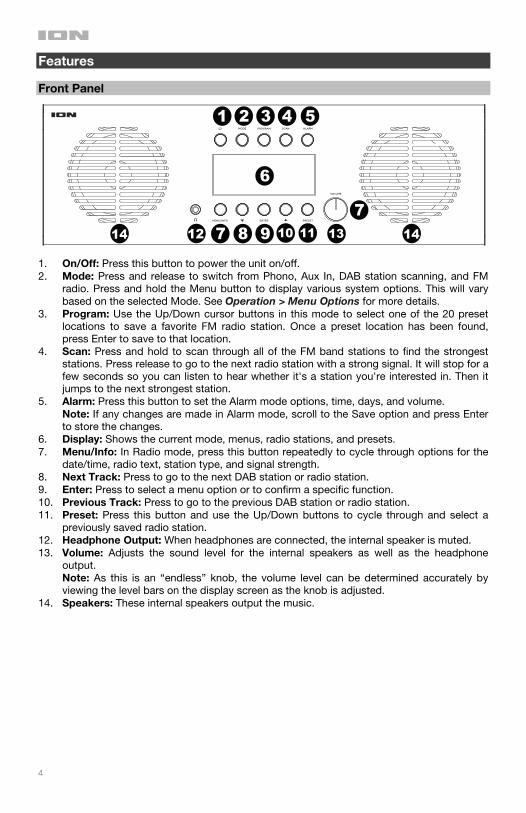
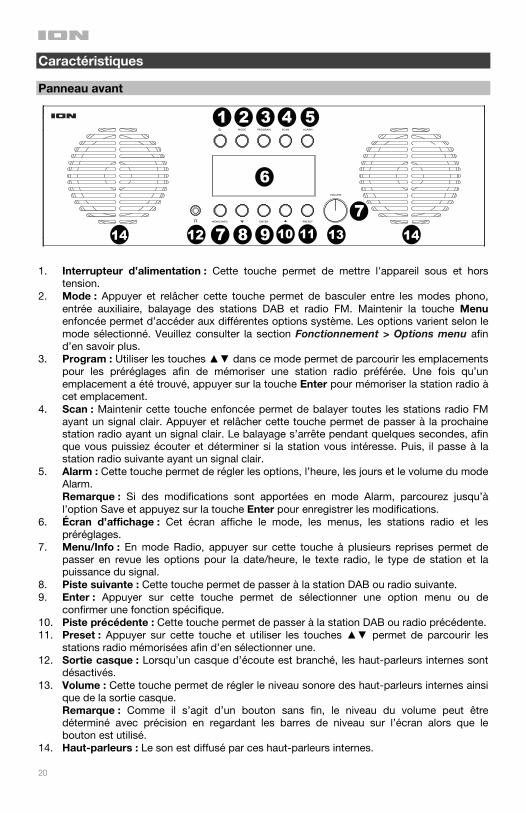
Features Front Panel
1. On/Off: Press this button to power the unit on/off. 2. Mode: Press and release to switch from Phono, Aux In, DAB station scanning, and FM
radio. Press and hold the Menu button to display various system options. This will vary based on the selected Mode. See Operation > Menu Options for more details.
3. Program: Use the Up/Down cursor buttons in this mode to select one of the 20 preset locations to save a favorite FM radio station. Once a preset location has been found, press Enter to save to that location.
4. Scan: Press and hold to scan through all of the FM band stations to find the strongest stations. Press release to go to the next radio station with a strong signal. It will stop for a few seconds so you can listen to hear whether it's a station you're interested in. Then it jumps to the next strongest station.
5. Alarm: Press this button to set the Alarm mode options, time, days, and volume. Note: If any changes are made in Alarm mode, scroll to the Save option and press Enter to store the changes.
6. Display: Shows the current mode, menus, radio stations, and presets. 7. Menu/Info: In Radio mode, press this button repeatedly to cycle through options for the
date/time, radio text, station type, and signal strength. 8. Next Track: Press to go to the next DAB station or radio station. 9. Enter: Press to select a menu option or to confirm a specific function. 10. Previous Track: Press to go to the previous DAB station or radio station. 11. Preset: Press this button and use the Up/Down buttons to cycle through and select a
previously saved radio station. 12. Headphone Output: When headphones are connected, the internal speaker is muted. 13. Volume: Adjusts the sound level for the internal speakers as well as the headphone
output. Note: As this is an “endless” knob, the volume level can be determined accurately by viewing the level bars on the display screen as the knob is adjusted.
14. Speakers: These internal speakers output the music.
1 2 3 4 5
6
7 8 9 10 11 131214 14
7

5
Top Panel 1. Platter: Place your record here.
2. Tonearm: The fixed tonearm can be raised and lowered by hand, or by pressing the raise / lower lever.
3. Arm Clip: This arm clip secures the tonearm while at rest or when not in use. The arm clip has been designed to remain in the up position while unlocked.
4. 33 / 45 / 78 Switch: This switch controls the speed of the turntable platter.
Note: For best results when playing 78 RPM vinyl records, use a 78 RPM stylus (sold separately). Only use a 78 RPM stylus with 78 RPM vinyl records.
5. Autostop switch: This switch turns autostop on or off. When autostop is on, the platter will start spinning when the tonearm is placed over the record and stop spinning when the record has reached the end. (When Autostop is off, the platter will always spin regardless of the position of the tonearm.)
Note: If your vinyl record stops before it reaches the end of the music, turn Autostop to the off position for this particular record. This is generally recommended for 45 RPM records.
IMPORTANT: Remove the plastic cartridge cover (needle cover) before operating the turntable.
*WARNING: The RCA outputs are LINE level. Please only connect these to LINE level inputs. You may damage your receiver if you plug in a LINE level device into a PHONO level input.
IMPORTANT: Place the included felt slipmat on the platter; then place your record on the felt slipmat to carefully hold your records.
1
2
345

6
Rear Panel
1. USB: Use a USB cable to connect your turntable to your computer. The USB connection will send audio from the turntable to your computer. Please see the Using Digital LP With Your Computer section of this manual for information.
2. Aux In: Connect the output from a line-level device to this input, such as from a smartphone, media player, tablet, etc.
3. Line Output: Connect external speakers to this output.
4. FM Antenna: Adjust this for better FM radio reception.
1
2
3
4
7
Operation
Turntable Playback
Before use, please make sure to:
• Remove the stylus protector. Reconnect the protective cap on the stylus when not in use. • Ensure the tonearm is free to move from the tonearm rest. Lock the tonearm in place again when not
in use.
1. Set the Mode to Phono and lift the turntable dust cover. 2. Place a record on the turntable, over the central spindle on the slipmat. 3. Set the Speed selector to 33, 45, or 78 rpm depending on the record. 4. Lift the tonearm from the tonearm rest and slowly move it over the record. The turntable platter will
start turning. 5. Place the tonearm on the desired location of the record. 6. Gently lower the tonearm onto the record to start playing. 7. When the record is finished playing, the tonearm will automatically stop. Lift the tonearm from the
record and put it back on the rest. 8. To manually stop the record, lift the tonearm from the record and return it to the rest.
Note: Do not stop or turn the platter manually. Moving or jarring the turntable without securing the tonearm clamp could result in damage to the tonearm.
Auto-stop Switch Operation Certain types of records may have an auto-stop area outside the pre-set limit, so the turntable may stop before the last track finishes. If this occurs, set the Auto-stop switch to the Off position. This allows the record to play to the end, but it will not stop automatically. You must manually raise the tonearm and place it back in the rest and then turn the power off to stop the turntable from spinning. Aux In Playback 1. Press the Mode button to select Aux In. 2. Connect an 1/8” (3.5 mm) stereo audio cable (not included) from the Aux In to the line output or
headphone output of your external audio device to be able to listen to the external source through Digital LP’s internal speakers.
3. Adjust the volume on Digital LP to the desired level. Note: If the line output of your external device is connected, you only need to adjust the system’s volume control. If your external device’s headphone output is connected, you may need to adjust the volume control on both your external device and Digital LP to achieve the desired volume.
Listening to FM Radio 1. Press the Mode button repeatedly to cycle though and select the FM radio. 2. Select the FM radio station using the ▲▼ buttons. 3. Adjust the Volume knob to the desired level. DAB Station Scanning DAB (Digital Audio Broadcasting) broadcasts radio via a network of transmitters. This provides listeners with more broadcast selections (where available) and clear sound quality. 1. Press the Mode button repeatedly to cycle through and select DAB. 2. Use the ▲▼ buttons to select Station Scan and press Enter. 3. Select from the following scanning options using the▲▼ buttons.
• Local Scan: The unit will scan local DAB bands between 10A and 13F to look for broadcasts. • Full Scan: The unit will scan all DAB bands to look for broadcasts. • Manual Tune: Select the desired specific frequency band to look for a broadcast.
4. Press Enter to select the desired option. Note: The signal strength indicator will be shown on the display.

8
Setting the Alarm 1. Press the Alarm button. 2. Use the ▲▼ buttons to select the Mode (DAB or Buzzer), Alarm, Alarm Time, and Volume. Press
Enter to confirm the selection. 3. Adjust the settings using the Up/Down buttons and press Enter to confirm the settings. 4. Select the Save option and press Enter to store the changes.
Menu Options
Press and hold Menu/Info in each of the modes to adjust the following options: Phono and Aux In modes Time Setup: set the clock time, date, auto update, and time display (12 hour or 24 hour time)
Factory Reset: Select to reset the unit back to factory default settings.
SW Version: Select to view the current software version.
FM mode Audio Setting: Select the audio output to be stereo or mono, or mono only for radio stations. DAB mode Station Scanning: Scans for available DAB stations
Using Digital LP With Your Computer
Recording
To record music to your computer, you can use ION EZ Vinyl/Tape Converter and a USB cable. EZ Vinyl/Tape Converter conveniently saves your recordings to your computer. After you finish converting your vinyl, you can then burn to CD or load onto portable media devices. Follow the instructions on the included software download card for installing EZ Vinyl/Tape Converter. 1. With EZ Vinyl/Tape Converter installed on your computer, use a USB cable to connect Digital LP's USB
port to an available USB port on your computer.
2. On your computer, you can open EZ Vinyl/Tape Converter by going to Start Menu All Programs (Windows) or the Applications menu (Mac).
3. Follow the on-screen instructions to set up your recording. When prompted to play your music, move Digital LP's tonearm over the record to start playback.
Note: To listen to a record while it’s playing, listen through your computer's speakers, or connect Digital LP's RCA outputs to a stereo system or powered speakers. Do not connect them to phono-level inputs; Digital LP's RCA outputs are line-level and could damage a device with phono-level inputs.
4. When you have finished recording, raise Digital LP's tonearm from the record and return it to its arm clip.
Tip: If the program is not recognizing audio from Digital LP, try turning the volume knob on Digital LP clock-wise.
Visit ionaudio.com/computer-optimization for more information on optimizing your computer for audio.
Visit ionaudio.com/ezvc to download the latest version of EZ Vinyl/Tape Converter software or for helpful troubleshooting guide and additional support.
9
Playback You can listen to the music on your computer through its internal speakers or through headphones connected to it. (Digital LP cannot be used as a playback device for your computer's audio.) To listen to a record while it's playing, listen through your computer's speakers, or connect Digital LP's RCA outputs to a stereo system or powered speakers. Do not connect them to phono-level inputs; Digital LP's RCA outputs are line-level and could damage a device with phono-level inputs. Tip: If there is no sound being heard through your external speakers (not Digital LP), try turning the volume knob on Digital LP clock-wise.
Troubleshooting
If you experience any difficulties, please refer to the troubleshooting steps below as well as those in the EZ Vinyl/Tape Converter manual included with this product. If you are recording to a computer:
o Make sure that Digital LP is powered on and that the needle is on the record. o Make sure Digital LP is selected as your computer's default recording device (see the instructions
below). o If you are listening through your computer's speakers, make sure those speakers are selected as your
computer's default playback device (see the instructions below). Alternatively, you could connect Digital LP's RCA outputs to a stereo system or powered speakers. Do not connect them to phono-level inputs; Digital LP's RCA outputs are line-level and could damage a device with phono-level inputs. (Note: The RCA outputs monitor the signal coming out of the turntable, not the signal coming from your computer.)
o Disconnect then reconnect the USB cable connecting Digital LP to your computer. I'm not hearing any audio when playing music:
• If you are playing music from vinyl: o Make sure that Digital LP is powered on and that the needle is on the record. o Connect Digital LP's RCA outputs to a stereo system or powered speakers. (Do not connect them to
phono-level inputs; Digital LP's RCA outputs are line-level and could damage a device with phono-level inputs.)
• If you are playing music from your computer: o Make sure your software music player's volume is turned up. o Make sure your computer's volume is turned up. o Make sure your computer's speakers are selected as your computer's default playback device (see the
instructions below). (Digital LP cannot be used as a playback device for your computer's audio.) I am hearing a hum through my speaker or laptop when using the turntable:
• If you are recording to a laptop: o Please connect the laptop to a grounded power supply (3 prong)
• If you are playing through a speaker: o Please connect to a grounded (3 prong) power supply.
My record is not playing at the correct speed; its pitch is too high or too low:
o Ensure the 33 / 45 / 78 switch is set to the correct speed for your record. The front panel display stays on the time/date and is unresponsive when buttons are pressed:
o The unit is in ERP standby mode. Press and release the power button to resume normal operation. “No DAB Station” is seen on the display screen:
o Adjust the antenna and rescan for DAB stations. o There are no DAB stations in your area.

10
Setting Digital LP as the Default Recording Device
• Windows XP: Click Start Menu Control Panel (or Settings Control Panel in Classic View) Sound and Audio Devices. Click the Audio tab and under Sound recording, select USB PnP Audio Device as the default device.
• Windows Vista: Click Start Menu Control Panel (or Settings Control Panel in Classic View) Hardware and Sound Sound. Click the Recording tab and select USB PnP Audio Device as the default device.
• Windows 7: Click Start Menu Control Panel Sound. Click the Recording tab and select USB PnP Audio Device as the default device.
• Windows 8: From the Start Menu, click the lower-left corner of the screen to bring yourself to the Desktop. In the bottom-right corner of the Taskbar, locate the Volume Control "Speaker" icon. Right-click the speaker and select Playback Devices. In the Windows Sound control panel select the Recording tab. If USB PnP Audio Device does not have a green "check mark" symbol next to it, right-click it and select "Set as Default Device".
• Windows 10: Click Start Menu Control Panel (or Settings Control Panel in Classic View) Hardware and Sound Sound. In the Windows Sound control panel select the Recording tab. If USB Audio Codec does not have a green "check mark" symbol next to it, right-click it and select "Set as Default Device". Select Properties and click the Advanced tab to select the Default Format, 44100 Hz or 48000 Hz.
• Mac OS X 10.4-10.11: Click the upper-left "apple" icon then click System Preferences Sound. Click the Input tab. From the menu, select USB Audio Codec as the device. Under Format, select 44100 Hz or 48000 Hz.
Setting Your Computer's Soundcard as the Default Playback Device
• Windows XP: Click Start Menu Control Panel (or Settings Control Panel in Classic View) Sound and Audio Devices. Click the Audio tab and under Sound playback, select your computer's soundcard as the default device.
• Windows Vista: Click Start Menu Control Panel (or Settings Control Panel in Classic View) Hardware and Sound Sound. Click the Playback tab and select your computer's soundcard as the default device.
• Windows 7: Click Start Menu Control Panel Sound. Click the Playback tab and select your computer's soundcard as the default device.
• Windows 8: From the Start menu, click the lower-left corner of the screen to bring yourself to the Desktop. In the bottom-right corner of the Taskbar, locate the Volume Control "Speaker" icon. Right-click the speaker and select Playback Devices. The Windows Sound control panel should appear set on the Playback tab. If your computer’s soundcard does not have a green "check mark" symbol next to it, right-click it and select "Set as Default Device".
• Windows 10: Click Start Menu Control Panel Sound. Click the Playback tab and select your computer's soundcard as the default device.
• Mac OS X 10.4-10.11: Click the upper-left "apple" icon then click System Preferences Sound. Click the Output tab. From the menu, select Internal Speakers if you are using the computer's internal speakers or select Headphones if you are using speakers or headphones attached to the computer's 1/8" headphone output.
BEFORE RETURNING THE PRODUCT, please contact ION Audio for technical support. Contact information can be found in the Safety & Warranty manual included with this product.
ionaudio.com/support
11
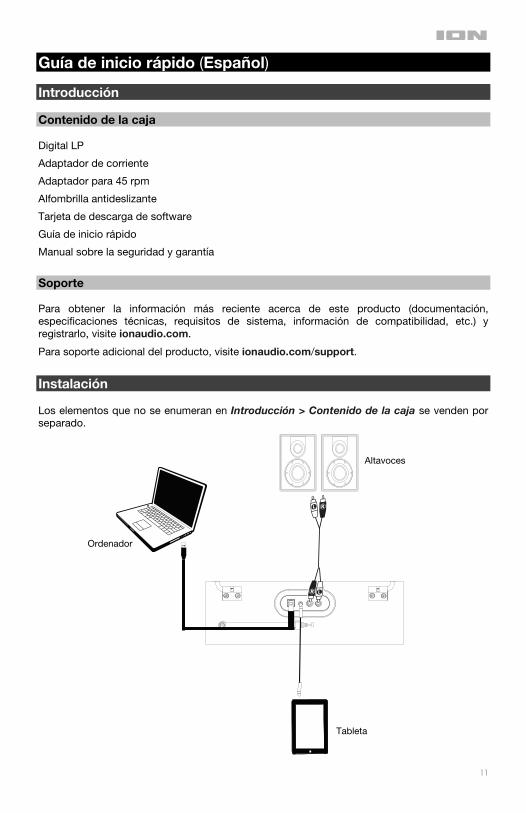
Guía de inicio rápido (Español) Introducción Contenido de la caja Digital LP
Adaptador de corriente
Adaptador para 45 rpm
Alfombrilla antideslizante
Tarjeta de descarga de software
Guía de inicio rápido
Manual sobre la seguridad y garantía
Soporte Para obtener la información más reciente acerca de este producto (documentación, especificaciones técnicas, requisitos de sistema, información de compatibilidad, etc.) y registrarlo, visite ionaudio.com.
Para soporte adicional del producto, visite ionaudio.com/support.
Instalación Los elementos que no se enumeran en Introducción > Contenido de la caja se venden por separado.
Altavoces
Ordenador
Tableta

12
Características Panel frontal
1. Encendido/Apagado: Pulse este botón para encender y apagar la unidad. 2. Mode: Púlselo y suéltelo para alternar entre la entrada fonográfica, entrada auxiliar,
exploración de estaciones de DAB y radio FM. Mantenga pulsado el botón Menu para mostrar las diversas opciones del sistema. Esto varía en función del modo seleccionado. Consulte Funcionamiento > Opciones del menú para conocer más detalles.
3. Program: Utilice los botones arriba/abajo del cursor en este modo para seleccionar una de las 20 ubicaciones de presets a fin de guardar una estación de radio FM favorita. Una vez encontrada una estación favorita, pulse Enter para guardar a esa ubicación.
4. Scan: Manténgalo pulsado para recorrer todas las estaciones de la banda FM y encontrar aquellas con señal más fuerte. Púlselo y suéltelo para pasar a la siguiente estación de radio con señal fuerte. Permanecerá en esa estación unos segundos para que pueda escucharla y decidir si le interesa. Luego salta a la siguiente estación con señal fuerte.
5. Alarm: Pulse este botón para ajustar las opciones del modo de alarma, tiempo, días y volumen. Nota: Si se realiza algún cambio en el modo Alarma, desplácese hasta la opción Guardar y pulse Enter para almacenar los cambios.
6. Pantalla: Muestra el modo, menús, estaciones de radio y presets actuales. 7. Menu/Info: En modo Radio, pulse este botón repetidamente para recorrer las opciones
para la fecha/hora, texto de la radio, tipo de estación y fuerza de la señal. 8. Pista siguiente: Púlselo para pasar a la siguiente estación de DAB o radio. 9. Enter: Púlselo para seleccionar una opción del menú o para confirmar una función
específica. 10. Pista anterior: Púlselo para pasar a la anterior estación de DAB o radio. 11. Preset: Pulse este botón y utilice los botones subir/bajar para recorrer y seleccionar una
estación de radio previamente guardada. 12. Salida para auriculares: Cuando se conectan auriculares, el altavoz interno se silencia. 13. Volume: Ajusta el nivel de sonido de los altavoces internos así como también la salida
para auriculares. Nota: Dado que esta es una perilla "infinita", el nivel de volumen se puede determinar con precisión observando las barras de nivel que se muestran en la pantalla medida que se gira la perilla.
14. Altavoces: Estos altavoces internos emiten la música.
1 2 3 4 5
6
7 8 9 10 11 131214 14
7

13
Panel superior 1. Plato: Coloque aquí su disco.
2. Brazo de lectura: El brazo fijo se puede subir y bajar a mano o presionando la palanca de subir / bajar.
3. Clip del brazo: Este clip fija el brazo mientras está en reposo o no se usa. El clip ha sido diseñado para que permanezca hacia arriba mientras está desbloqueado.
4. Conmutador de 33 / 45 / 78: Estos botones controlan las RPM del plato del giradiscos.
Nota: Para obtener los mejores resultados al reproducir discos de vinilo de 78 RPM, use una púa para 78 RPM (que se vende por separado). Use sólo una púa para 78 RPM con los discos de vinilo de 78 RPM.
5. Interruptor de parada automática: Este interruptor activa y desactiva la parada automática. Cuando la parada automática está activada, el plato comienza a girar cuando el brazo se coloca sobre el disco y se detiene cuando llega al final del mismo. (Si está desactivada, el plato gira siempre, independientemente de la posición del brazo).
Nota: Si su disco de vinilo se detiene antes de llegar al final de la música, gire Autostop a la posición de desactivado para este disco en particular. Esto se recomienda en general para los discos de 45 RPM.
IMPORTANTE: Retire la cubierta plástica de la cápsula (cubierta de la púa) antes de hacer funcionar el giradiscos.
*ADVERTENCIA: Las salidas RCA son para nivel de LÍNEA. Conéctelas sólo a las entradas de nivel de línea (LINE). Puede dañar el receptor si enchufa un dispositivo de nivel de línea en una entrada de nivel fonográfico (PHONO).
IMPORTANTE: Coloque la almohadilla antideslizante de fieltro incluida sobre el plato y coloque su disco encima de ella para que sus discos queden sostenidos cuidadosamente.
1
2
345

14
Panel trasero
1. USB: Utilice un cable USB para conectar su giradiscos a su ordenador. La conexión USB envía audio desde el giradiscos a su ordenador. Consulte la sección Cómo utilizar el Digital LP con su ordenador de este manual para más información.
2. Entrada auxiliar: Conecte a esta entrada la salida de un dispositivo de nivel de línea, como por ejemplo un smartphone (teléfono inteligente), reproductor de medios, tableta, etc.
3. Salida de línea: Conecte altavoces externos a esta salida.
4. Antena de FM: Ajústela para una mejor recepción de radio FM.
1
2
3
4

15
Funcionamiento
Reproducción del giradiscos
Antes de utilizarlo, asegúrese de:
• Retirar el protector de la púa. Volver a colocar la tapa protectora en la púa cuando no lo utilice. • Asegúrese de que el brazo de lectura puede moverse libremente desde su soporte. Trabe el brazo de
lectura en su lugar nuevamente cuando no lo utilice.
1. Ajuste el Modo a Phono y levante la cubierta antipolvo del giradiscos. 2. Coloque un disco en el giradiscos sobre el eje central en la almohadilla antideslizante. 3. Ajuste el selector de velocidad a 33, 45 o 78 rpm dependiendo del disco. 4. Levante el brazo de lectura de su soporte y muévalo lentamente sobre el disco. El plato del giradiscos
comenzará a girar. 5. Coloque el brazo de lectura sobre la ubicación deseada del disco. 6. Baje lentamente el brazo de lectura sobre el disco para que comience a reproducirlo. 7. Cuando se termina de reproducir el disco, el brazo de lectura se detendrá automáticamente. Levante
el brazo de lectura del disco y colóquelo nuevamente en su soporte. 8. Para detener el disco manualmente, levante el brazo de lectura del disco y regréselo a su soporte.
Nota: No detenga ni gire el plato manualmente. Mover o sacudir el giradiscos sin sujetar la abrazadera del brazo de lectura puede dar como resultado daños en el brazo.
Funcionamiento del interruptor de parada automática Ciertos tipos de disco pueden tener un área de parada automática fuera del límite predefinido, de manera que el giradiscos podría parar antes del final de la última pista. Si esto ocurriera, ajuste el interruptor de parada automática a la posición Off (apagado). Esto permite reproducir el disco hasta el final, pero no se detendrá automáticamente. Debe levantar manualmente el brazo de lectura y colocarlo nuevamente en su soporte y luego apagar la unidad para detener el movimiento del giradiscos. Reproducción de la entrada auxiliar 1. Pulse el botón Mode para seleccionar Aux In. 2. Conecte un cable de audio estéreo de 3,5 mm (1/8 pulg.) (no incluido) desde la entrada auxiliar hasta
la salida de línea o salida para auriculares de su dispositivo de audio externo para poder escuchar esa fuente externa a través de los altavoces internos del Digital LP.
3. Ajuste el volumen del Digital LP al nivel deseado. Nota: Si la salida de línea de su dispositivo externo está conectada, sólo necesitará ajustar el control de volumen del sistema. Si la salida para auriculares de su dispositivo externo está conectada, puede que necesite ajustar el control de volumen tanto en su dispositivo externo como en el Digital LP para lograr el volumen deseado.
Cómo escuchar radio FM 1. Pulse el botón Mode repetidamente para recorrer y seleccionar radio FM. 2. Seleccione la estación de radio FM utilizando los botones ▲▼. 3. Ajuste la perilla Volume al nivel deseado. Exploración de estaciones de DAB DAB (Transmisión de Audio Digital) transmite radio a través de una red de emisoras. Esto le brinda a los oyentes una mayor selección de emisoras (en donde estén disponibles) y una alta calidad de sonido. 1. Pulse el botón Mode repetidamente para recorrer y seleccionar DAB. 2. Utilice los botones ▲▼ para seleccionar Station Scan y pulse Enter. 3. Seleccione una de las siguientes opciones de exploración utilizando los botones ▲▼.
• Local Scan: La unidad explorará las bandas locales de DAB entre 10A y 13F buscando emisoras.
• Full Scan: La unidad explorará todas las bandas de DAB buscando emisoras. • Manual Tune: Seleccione la banda de frecuencia específica deseada en la cual buscar
emisoras. 4. Pulse Enter para seleccionar la opción deseada.
Nota: El indicador de intensidad de la señal aparecerá en la pantalla.
16
Cómo ajustar la alarma 1. Pulse el botón Alarm. 2. Utilice los botones ▲▼ para seleccionar el Mode (DAB o Buzzer), Alarm, Alarm Time y Volume.
Pulse Enter para confirmar la selección. 3. Modifique los ajustes utilizando los botonesUp/Down y pulse Enter para confirmarlos. 4. Seleccione la opción Save y pulse Enter para almacenar los cambios. Menú de opciones
Mantenga pulsado Menu/Info en cada uno de los modos para ajustar las siguientes opciones: Modos Phono e Aux In Time Setup: Ajuste el día y hora del reloj, la actualización automática y visualización del tiempo (12 o 24 horas).
Factory Reset: Selecciónelo para regresar la unidad a sus valores predeterminados de fábrica.
SW Version: Selecciónelo para visualizar la versión actual del software.
Modo FM Audio Setting: Ajuste la salida de audio a estéreo o mono, o a mono solamente para estaciones de radio. Modo DAB Station Scanning: Explora las estaciones de DAB disponibles.
Uso del Digital LP con su ordenador
Grabación Para grabar música en su ordenador, puede usar el ION EZ Vinyl/Tape Converter y un cable USB. EZ Vinyl/Tape Converter guarda convenientemente sus grabaciones en su ordenador. Después de terminar de convertir su vinilo, puede quemarlo en CD o cargarlo en dispositivos de medios portátiles. Siga las instrucciones de la tarjeta de descarga de software incluida para instalar el EZ Vinyl/Tape Converter. 1. Con el EZ Vinyl/Tape Converter instalado en su ordenador, utilice un cable USB para conectar el puerto
USB del Digital LP a un puerto USB disponible de su ordenador.
2. En su ordenador, puede abrir el EZ Vinyl/Tape Converter accediendo a Start Menu All Programs (Windows) o al menú Applications (Mac).
3. Siga las instrucciones de la pantalla para preparar su grabación. Cuando se le indique que reproduzca su música, lleve el brazo de lectura del Digital LP sobre el disco para iniciar la reproducción.
Nota: Para escuchar el disco mientras se reproduce, óigalo por los altavoces de su ordenador o conecte las salidas RCA del Digital LP a un sistema estéreo o altavoces alimentados. No las conecte a entradas de nivel fonográfico; las salidas RCA del Digital LP son de nivel de línea y podrían dañar un dispositivo con entradas de nivel fonográfico.
4. Cuando termine de grabar, levante el brazo de lectura del Digital LP del disco y colóquelo en su clip. Consejo: Si el programa no reconoce el audio que proviene del Digital LP, intente girar la perilla de volumen del Digital LP en sentido horario. Visite ionaudio.com/computer-optimization para más información sobre la optimización de su ordenador para grabar audio.
Visite ionaudio.com/ezvc para descargar la versión más reciente del software EZ Vinyl/Tape Converter o para obtener unas guías útiles de solución de problemas y soporte adicional.
17
Reproducción Puede escuchar la música en su ordenador a través de su altavoz interno o de auriculares conectados a la misma. (Digital LP no se puede usar como dispositivo de reproducción para el audio de su computadora.) Para escuchar un disco mientras se reproduce, óigalo por los altavoces de su ordenador o conecte las salidas RCA del Digital LP a un sistema estéreo o altavoces alimentados. No las conecte a entradas de nivel fonográfico; las salidas RCA del Digital LP son de nivel de línea y podrían dañar un dispositivo con entradas de nivel fonográfico. Consejo: Si no se escucha ningún sonido a través de sus altavoces externos (no del Digital LP), intente girar la perilla de volumen del Digital LP sentido horario.
Solución de problemas Si experimenta alguna dificultad, consulte los pasos de solución de problemas que se indican a continuación, como también el manual del EZ Vinyl/Tape Converter incluido con este producto. Si está grabando en un ordenador:
o Asegúrese de que el Digital LP esté encendido y que la púa esté sobre el disco. o Asegúrese de que el Digital LP esté seleccionado como dispositivo de grabación predeterminado en su
ordenador (consulte las instrucciones de más abajo). o Si está escuchando por los altavoces de la computadora, asegúrese de que estos estén seleccionados
como dispositivo de reproducción predeterminado de la misma (consulte las instrucciones de más abajo). Como alternativa, puede conectar las salidas RCA del Digital LP a un sistema estéreo o altavoces alimentados. No las conecte a entradas de nivel fonográfico; las salidas RCA del Digital LP son de nivel de línea y podrían dañar un dispositivo con entradas de nivel fonográfico. (Nota: Las salidas RCA monitorean la señal proveniente del giradiscos y no la señal proveniente de su ordenador.)
o Desconecte y vuelva a conectar el cable USB del Digital LP a su ordenador. No oigo ningún audio cuando reproduzco la música:
• Si está reproduciendo música con un disco de vinilo: o Asegúrese de que el Digital LP esté encendido y que la púa esté sobre el disco. o Conecte las salidas RCA del Digital LP a un sistema estéreo o altavoces alimentados. No las conecte a
entradas de nivel fonográfico; las salidas RCA del Digital LP son de nivel de línea y podrían dañar un dispositivo con entradas de nivel fonográfico
• Si está reproduciendo música con un ordenador: o Asegúrese de que el volumen del reproductor de música del software esté ajustado a un valor alto. o Asegúrese de que el volumen de su ordenador esté ajustado a un valor alto. o Asegúrese de que los altavoces de su ordenador estén seleccionados como dispositivo de
reproducción predeterminado de la misma (consulte las instrucciones de más abajo). (Digital LP no se puede usar como dispositivo de reproducción para el audio de su computadora.)
Escucho un zumbido en mi altavoz u ordenador portátil cuando utilice el giradiscos:
• Si está grabando en un ordenador portátil: o Conecte el ordenador portátil a una fuente de corriente con conexión a tierra (3 clavijas)
• Si está reproduciendo a través de un altavoz: o Conéctelo a una fuente de corriente con conexión a tierra (3 clavijas).
Mi disco no se reproduce a la velocidad correcta. Su tono es demasiado alto o bajo:
o Asegúrese de que el interruptor 33 / 45 / 78 esté colocado en la velocidad correcta para su disco. La pantalla del panel delantero se queda mostrando la fecha y hora y no responde cuando se pulsa en los botones:
o La unidad se encuentra en modo de espera de ERP. Pulse y suelte el botón de encendido para reanudar el funcionamiento normal.
Aparece “No DAB Station” en la pantalla:
o Ajuste la antena y vuelva a explorar las estaciones de DAB. o No hay estaciones de DAB en su área.
18
Cómo ajustar el Digital LP como dispositivo de grabación predeterminado
• Windows XP: Haga clic en el menú Start (Inicio) Control Panel (Panel de control) (o Settings [Ajustes] Control Panel [Panel de control] en la vista clásica) Sound and Audio Devices (Dispositivos de sonido y audio). Haga clic en la pestaña Audio bajo Sound recording (Grabación de sonido), seleccione USB PnP Audio Device, seleccione como dispositivo predeterminado.
• Windows Vista: Haga clic en el menú Start (Inicio) Control Panel (Panel de control) (o Settings Control Panel [Configuración > Panel de control] en la vista clásica) Hardware and Sound (Hardware y sonido) Sound (Sonido). Haga clic en la pestaña Recording (Grabación) y seleccione USB PnP Audio Device como el dispositivo predeterminado.
• Windows 7: Haga clic en el menú Start (Inicio) Control Panel (Panel de control) Sound (Sonido). Haga clic en la pestaña Recording (Grabación) y seleccione USB PnP Audio Device como el dispositivo predeterminado.
• Windows 8: Desde el menú Start (Inicio), haga clic en la esquina inferior izquierda de la pantalla para entrar al escritorio. En la esquina inferior derecha de la barra de tareas, localice el icono del "Altavoz" de control de volumen. Haga clic derecho en el altavoz y seleccione Playback Devices (Dispositivos de reproducción). En el panel de controlWindows Sound (Sonido de Windows), seleccione la pestaña Recording. Si el dispositivo USB PnP Audio Device no tiene el símbolo de la "marca de verificación" verde junto a ella, haga clic derecho en la misma y seleccione "Set as Default Device" (Configurar como dispositivo predeterminado).
• Windows 10: Haga clic en el menú Start (Inicio) Control Panel (Panel de control) (o Settings Control Panel [Configuración > Panel de control] en la vista clásica) Hardware and Sound (Hardware y sonido) Sound (Sonido). En el panel de control Windows Sound (Sonido de Windows), seleccione la pestaña Recording. Si el Códec de audio USB no tiene el símbolo de la "marca de verificación" verde junto a ella, haga clic derecho en la misma y seleccione "Set as Default Device" (Configurar como dispositivo predeterminado). Seleccione Properties (Propiedades) y haga clic en la pestaña Advanced (Avanzado) para seleccionar el formato predeterminado, 44100 o 48000 Hz.
• Mac OS X 10.4-10.11: Haga clic en el icono superior izquierdo de la "manzana" y luego en System Preferences (Preferencias del sistema) Sound (Sonido). Haga clic en la pestaña Input. En el menú seleccione USB Audio Codec (Códec de audio USB) como dispositivo. En Format (Formato), seleccione 441000 o 48000 Hz.
Cómo configurar la tarjeta de sonido de su ordenador como dispositivo de reproducción predeterminado
• Windows XP: Haga clic en el menú Start (Inicio) Control Panel (Panel de control) (o Settings [Ajustes] Control Panel [Panel de control] en la vista clásica) Sound and Audio Devices (Dispositivos de sonido y audio). Haga clic en la pestaña Audio y bajo Sound playback (Reproducción de sonido), seleccione la tarjeta de sonido de su ordenador como dispositivo predeterminado.
• Windows Vista: Haga clic en el menú Start (Inicio) Control Panel (Panel de control) (o Settings Control Panel [Configuración > Panel de control] en la vista clásica) Hardware and Sound (Hardware y sonido) Sound (Sonido). Haga clic en la pestaña Playback (Reproducción) y seleccione la tarjeta de sonido de su ordenador como dispositivo predeterminado.
• Windows 7: Haga clic en el menú Start (Inicio) Control Panel (Panel de control) Sound (Sonido). Haga clic en la pestaña Playback (Reproducción) y seleccione la tarjeta de sonido de su ordenador como dispositivo predeterminado.
• Windows 8: Desde el menú Start (Inicio), haga clic en la esquina inferior izquierda de la pantalla para entrar al escritorio. En la esquina inferior derecha de la barra de tareas, localice el icono del "Altavoz" de control de volumen. Haga clic derecho en el altavoz y seleccione Playback Devices (Dispositivos de reproducción). El panel de control Windows Sound (Sonido de Windows) debe aparecer en la pestaña Playback (Reproducción). Si la tarjeta de sonido de su ordenador no tiene el símbolo de la "marca de verificación" verde junto a ella, haga clic derecho en la misma y seleccione "Set as Default Device" (Configurar como dispositivo predeterminado).
• Windows 10: Haga clic en el menú Start (Inicio) Control Panel (Panel de control) Sound (Sonido). Haga clic en la pestaña Playback (Reproducción) y seleccione la tarjeta de sonido de su ordenador como dispositivo predeterminado.
• Mac OS X 10.4-10.11: Haga clic en el icono superior izquierdo de la "manzana" y luego en System Preferences (Preferencias del sistema) Sound (Sonido). Haga clic en la pestaña Output. En el menú, seleccione Internal Speakers (Altavoces internos) si va a usar los altavoces internos del ordenador o Headphones (Auriculares) si va a usar altavoces o auriculares conectados a la salida para auriculares de 1/8" de la computadora.
ANTES DE DEVOLVER ESTE PRODUCTO, comuníquese con ION Audio para obtener soporte técnico. La información de contacto se encuentra en el manual de seguridad y garantía incluido con este producto.
ionaudio.com/support

19
Guide d’utilisation rapide (Français) Présentation Contenu de la boîte Digital LP
Câble d’alimentation
Adaptateur pour 45 tours
Tapis
Carte de téléchargement de logiciel
Guide d’utilisation rapide
Consignes de sécurité et informations concernant la garantie
Assistance technique Pour les toutes dernières informations concernant la documentation, les spécifications techniques, la configuration requise, la compatibilité et l’enregistrement du produit, veuillez visiter ionaudio.com.
Pour de l’assistance supplémentaire, veuillez visiter ionaudio.com/support.
Installation Les articles qui ne figurent pas dans la section Présentation > Contenu de la boîte sont vendus séparément.
Enceintes
Ordinateur
Tablette
20
Caractéristiques Panneau avant
1. Interrupteur d’alimentation : Cette touche permet de mettre l'appareil sous et hors
tension. 2. Mode : Appuyer et relâcher cette touche permet de basculer entre les modes phono,
entrée auxiliaire, balayage des stations DAB et radio FM. Maintenir la touche Menu enfoncée permet d’accéder aux différentes options système. Les options varient selon le mode sélectionné. Veuillez consulter la section Fonctionnement > Options menu afin d’en savoir plus.
3. Program : Utiliser les touches ▲▼ dans ce mode permet de parcourir les emplacements pour les préréglages afin de mémoriser une station radio préférée. Une fois qu’un emplacement a été trouvé, appuyer sur la touche Enter pour mémoriser la station radio à cet emplacement.
4. Scan : Maintenir cette touche enfoncée permet de balayer toutes les stations radio FM ayant un signal clair. Appuyer et relâcher cette touche permet de passer à la prochaine station radio ayant un signal clair. Le balayage s’arrête pendant quelques secondes, afin que vous puissiez écouter et déterminer si la station vous intéresse. Puis, il passe à la station radio suivante ayant un signal clair.
5. Alarm : Cette touche permet de régler les options, l’heure, les jours et le volume du mode Alarm. Remarque : Si des modifications sont apportées en mode Alarm, parcourez jusqu’à l’option Save et appuyez sur la touche Enter pour enregistrer les modifications.
6. Écran d’affichage : Cet écran affiche le mode, les menus, les stations radio et les préréglages.
7. Menu/Info : En mode Radio, appuyer sur cette touche à plusieurs reprises permet de passer en revue les options pour la date/heure, le texte radio, le type de station et la puissance du signal.
8. Piste suivante : Cette touche permet de passer à la station DAB ou radio suivante. 9. Enter : Appuyer sur cette touche permet de sélectionner une option menu ou de
confirmer une fonction spécifique. 10. Piste précédente : Cette touche permet de passer à la station DAB ou radio précédente. 11. Preset : Appuyer sur cette touche et utiliser les touches ▲▼ permet de parcourir les
stations radio mémorisées afin d’en sélectionner une. 12. Sortie casque : Lorsqu’un casque d’écoute est branché, les haut-parleurs internes sont
désactivés. 13. Volume : Cette touche permet de régler le niveau sonore des haut-parleurs internes ainsi
que de la sortie casque. Remarque : Comme il s’agit d’un bouton sans fin, le niveau du volume peut être déterminé avec précision en regardant les barres de niveau sur l’écran alors que le bouton est utilisé.
14. Haut-parleurs : Le son est diffusé par ces haut-parleurs internes.
1 2 3 4 5
6
7 8 9 10 11 131214 14
7

21
Panneau supérieur 1. Plateau : Placez le disque vinyle à cet
endroit.
2. Bras de lecture : Le bras de lecture peut être levé ou abaissé manuellement ou en utilisant le bouton du levier de commande.
3. Serre-bras : Ce serre-bras est conçu spécialement afin de maintenir en place le bras de lecture lorsque la platine n’est pas utilisée. Le serre-bras a été conçu pour rester en position élevée lorsqu’il est déverrouillé.
4. Sélecteur de vitesse 33/45/78 : Ce sélecteur régit la vitesse de rotation du plateau.
Remarque : Pour de meilleurs résultats lors de la lecture de disques vinyles de 78 tr/min, utilisez une pointe de lecture 78 tr/min (vendue séparément). Utilisez uniquement une pointe de lecture 78 tr/min pour les disques vinyles de 78 tr/min.
5. Commutateur d’arrêt automatique : Ce commutateur permet d'activer et de désactiver la fonction d’arrêt automatique. Lorsqu’elle est activée, le plateau commence à tourner dès que le bras de lecture est placé au-dessus du disque et s’arrête lorsque l’aiguille a atteint la fin du disque. (Lorsqu'elle est désactivée, le plateau tourne, peu importe l’emplacement du bras de lecture.)
Remarque : Si le disque s'arrête avant la fin de la musique, désactivez la fonction d’arrêt automatique pour ce disque. Ceci est généralement recommandé pour les disques 45 tours.
IMPORTANT : Retirez le couvercle de plastique de la cartouche (qui protège la pointe de lecture) avant d’utiliser la platine.
* MISE EN GARDE : Les sorties RCA sont de niveau ligne. Veuillez ne les raccorder qu’à des entrées à niveau ligne. Vous pourriez endommager votre récepteur si un appareil À NIVEAU LIGNE est branché à une entrée PHONO.
IMPORTANT : Placez le tapis de feutrine fourni sur le plateau ; placez ensuite votre disque sur le tapis afin de le maintenir en place.
1
2
345

22
Panneau arrière
1. USB : Ce port USB permet de brancher la platine vinyle à un ordinateur en utilisant un câble USB. La connexion USB permet d’acheminer l’audio de la platine vinyle vers un ordinateur. Veuillez consulter la section Utilisation de la Digital LP avec un ordinateur de ce guide pour en savoir plus.
2. Entrée auxiliaire : Cette entrée permet de brancher la sortie à niveau ligne d'un appareil, tel que smartphone, lecteur multimédia, tablette, etc.
3. Sortie ligne : Cette sortie ligne permet de brancher des enceintes externes.
4. Antenne FM : L’ajustement de cette antenne permet d’obtenir une meilleure réception radio FM.
1
2
3
4

23
Fonctionnement
Lecture de la platine vinyle Avant d'utiliser la platine vinyle, veuillez vous assurer de : • Retirer le protège-pointe. Remettre le protège-pointe lorsque vous n’utilisez pas la platine vinyle. • Déverrouiller le bras de lecture avant de l'utiliser. Verrouiller le bras de lecture sur le serre-bras lorsque
vous n’utilisez pas la platine vinyle. 1. Réglez la touche Mode sur Phono et relevez le couvercle de protection de la platine vinyle. 2. Placez un disque sur l'axe central et la feutrine du plateau. 3. Réglez le sélecteur de vitesse à la vitesse désirée, 33, 45, 78 t/min., selon le disque. 4. Soulevez le bras de lecture du support et déplacez-le lentement au-dessus du disque. Le plateau
commencera à tourner. 5. Placez le bras de lecture au-dessus du sillon désiré sur le disque. 6. Abaissez le bras de lecture sur le disque afin de lancer la lecture. 7. Lorsque la lecture du disque est terminée, le bras de lecture arrêtera automatiquement. Soulevez le
bras de lecture et remettez-le sur le support. 8. Pour arrêter manuellement la lecture, soulevez le bras de lecture et remettez-le sur le support.
Remarque : N'arrêtez pas ou ne tournez pas le plateau manuellement. Déplacer le plateau sans verrouiller le bras de lecture sur le support pourrait endommager le bras de lecture.
Fonction d’arrêt automatique Certains types de disques peuvent avoir une zone d'arrêt automatique à l'extérieur de la limite prédéfinie, donc la platine peut s'arrêter avant que la dernière piste se termine. Pour désactiver la fonction d’arrêt automatique, réglez le commutateur sur la position Off. Cela permet au disque de jouer jusqu'au bout, mais il ne s'arrêtera pas automatiquement. Vous devez soulever le bras de lecture et le placer sur son support et mettre l’interrupteur d’alimentation hors tension afin d'arrêter le plateau. Lecture à partir de l’entrée auxiliaire 1. Appuyez sur la touche Mode pour sélectionner Aux In. 2. Branchez un câble audio stéréo 3,5 mm (non fourni) à l’entrée auxiliaire de la Digital LP et à la sortie
ligne ou à la sortie casque de votre appareil audio externe afin de pouvoir écouter la source externe par le biais des haut-parleurs internes de la Digital LP.
3. Réglez le volume de la Digital LP au niveau désiré. Remarque : Si la sortie de l'appareil externe est branchée, il vous suffit d'ajuster le réglage du volume du système. Si la sortie casque de votre appareil externe est branchée, vous devrez peut-être ajuster la commande de volume sur votre appareil externe et sur la Digital LP afin d'obtenir le volume souhaité.
Écouter la radio FM 1. Appuyez sur le bouton Mode à plusieurs reprises afin de parcourir les modes et sélectionner FM
radio. 2. Sélectionnez une station radio FM en utilisant les touches ▲▼. 3. Réglez le volume au niveau désiré en utilisant le bouton Volume.
Balayage des stations DAB Les stations DAB (Digital Audio Broadcasting) diffusent des signaux radio numériques via un réseau d’émetteurs. Elles offrent plus de choix d'émission (là où le service est offert) et une meilleure qualité audio.
1. Appuyez sur le bouton Mode à plusieurs reprises afin de parcourir les modes, puis sélectionnez DAB. 2. Utilisez les touches ▲▼ pour sélectionner Station Scan, puis appuyez sur la touche Enter. 3. Sélectionnez une option de balayage en utilisant les touches ▲▼.
• Local Scan : Cette option permet de lancer le balayage des bandes DAB locales entre 10A et 13F à la cherche d’émissions.
• Full Scan : Cette option permet de lancer le balayage de toutes les bandes DAB à la cherche d’émissions.
• Manual Tune : Cette option permet de sélectionner la bande de fréquences spécifique à rechercher pour des émissions.
4. Appuyez sur la touche Enter pour sélectionner l’option souhaitée. Remarque : L’indicateur de puissance du signal s’affichera.

24
Réglage de l’alarme 1. Appuyez sur la touche Alarm. 2. Utilisez les touches ▲▼ pour sélectionner Mode (DAB ou Buzzer), Alarm, Alarm Time ou Volume.
Appuyez sur la touche Enter afin de confirmer la sélection. 3. Utilisez les touches ▲▼, puis appuyez sur la touche Enter afin de confirmer la sélection. 4. Sélectionnez l’option Save et appuyez sur la touche Enter pour enregistrer les modifications.
Options menu
Maintenez la touche Menu/Info enfoncée pour chaque mode afin d’accéder options suivantes : Modes Phono et Aux In Time Setup : Cette option permet de régler l’heure de l’horloge, la date, la mise à jour automatique et le format d’affichage de l’heure (12 heures ou 24 heures)
Factory Reset : Cette option permet de réinitialiser les paramètres d’usine.
SW Version : Cette option permet d’afficher la version du logiciel.
Mode FM Audio Setting : Cette option permet de sélectionner la sortie audio : stéréo, mono ou mono uniquement pour les stations de radio. Mode DAB Station Scanning : Cette option permet de lancer le balayage des stations DAB.
Utilisation de la Digital LP avec un ordinateur
Enregistrement Pour enregistrer de la musique sur votre ordinateur, vous pouvez utiliser le logiciel EZ Vinyl/Tape Converter de ION et un câble USB. Le EZ Vinyl/Tape Converter permet de sauvegarder vos enregistrements sur votre ordinateur. Une fois la conversion du disque vinyle terminée, vous pouvez graver les fichiers sur CD ou les transférer sur des lecteurs multimédia. Veuillez suivre les instructions sur la carte de téléchargement de logiciel afin d’installer le EZ Vinyl/Tape Converter. 1. Une fois le logiciel EZ Vinyl/Tape Converter installé sur votre ordinateur, reliez le port USB de la Digital
LP au port USB de votre ordinateur en utilisant un câble USB.
2. Sur votre ordinateur, vous pouvez lancer le logiciel EZ Vinyl/Tape Converter en allant dans le menu Démarrer Tous les programmes (Windows) ou dans le menu Applications (Mac).
3. Suivez ensuite les instructions à l’écran afin de configurer l’enregistrement. Lorsque vous êtes invité à faire jouer votre musique, déplacez le bras de lecture de la Digital LP sur le disque afin de démarrer la lecture.
Remarque : Pour écouter un disque durant la lecture, vous pouvez utiliser les haut-parleurs de votre ordinateur, ou encore brancher les sorties RCA de la Digital LP à une chaîne stéréo ou à des enceintes amplifiées. (Ne tentez pas de les brancher à des entrées phono ; les sorties RCA de la Digital LP sont à niveau ligne et pourraient endommager un appareil phono.)
4. Une fois l’enregistrement terminé, soulevez le bras de lecture de la Digital LP et remettez-le sur le serre-bras.
Astuce : Si le logiciel ne parvient pas à reconnaître le signal de la Digital LP, essayez de tourner le bouton du volume de la Digital LP dans le sens horaire. Veuillez visiter le site ionaudio.com/computer-optimization afin obtenir plus d’information sur comment optimiser votre ordinateur pour une meilleure qualité audio.
Veuillez visiter ionaudio.com/ezvc pour télécharger la toute dernière version du logiciel EZ Vinyl/Tape Converter, ou afin d’accéder au guide de dépannage ou d’obtenir de l’aide supplémentaire.
25
Lecture Vous pouvez écouter de la musique sur votre ordinateur par l'intermédiaire de ses haut-parleurs internes ou en branchant un casque d’écoute. (La Digital LP ne peut être utilisée comme périphérique de lecture pour votre ordinateur.) Pour écouter un disque durant la lecture, vous pouvez utiliser les haut-parleurs de votre ordinateur, ou encore brancher les sorties RCA de la Digital LP à une chaîne stéréo ou à des enceintes amplifiées. (Ne tentez pas de les brancher à des entrées phono ; les sorties RCA de la Digital LP sont à niveau ligne et pourraient endommager un appareil phono.) Astuce : S’il n’y a aucun son provenant des enceintes externes (pas de la Digital LP), essayez de tourner le bouton du volume de la Digital LP dans le sens horaire.
Dépannage Si vous éprouvez des difficultés, veuillez consulter les consignes de dépannage ci-dessous ainsi que celles dans le guide du EZ Vinyl/Tape Converter inclus avec ce produit. Si vous enregistrez sur un ordinateur :
o Veuillez vous assurer que la Digital LP est sous tension et que la pointe de lecture est bien sur le disque. o Veuillez vous assurer que la Digital LP est sélectionnée comme périphérique d'enregistrement par
défaut de votre ordinateur (voir les instructions ci-dessous). o Si vous écoutez la musique via les haut-parleurs de votre ordinateur, assurez-vous que ces haut-
parleurs sont sélectionnés comme dispositif de lecture par défaut de votre ordinateur (voir les instructions ci-dessous). Vous pourriez également brancher les sorties RCA de la Digital LP à une chaîne stéréo ou à des enceintes amplifiées. (Ne tentez pas de les brancher à des entrées phono ; les sorties RCA de la Digital LP sont à niveau ligne et pourraient endommager un appareil phono.) (Remarque : Les sorties RCA contrôlent le signal sortant de la platine vinyle, mais pas le signal provenant de votre ordinateur).
o Débranchez, puis rebranchez le câble USB branché à la Digital LP et à votre ordinateur. Je n’entends pas de signal audio lors de la lecture :
• Si vous faites la lecture à partir d’un vinyle : o Veuillez vous assurer que la Digital LP est sous tension et que la pointe de lecture est bien sur le disque. o Branchez les sorties RCA de la Digital LP à une chaîne stéréo ou à des enceintes amplifiées. (Ne tentez
pas de les brancher à des entrées phono ; les sorties RCA de la Digital LP sont à niveau ligne et pourraient endommager un appareil phono.)
• Si vous faites la lecture à partir de votre ordinateur : o Veuillez vous assurer que le niveau du volume du logiciel soit assez élevé. o Veuillez vous assurer que le niveau du volume de l'ordinateur soit assez élevé. o Veuillez vous assurer que les haut-parleurs de votre ordinateur soient sélectionnés comme dispositif de
lecture par défaut de votre ordinateur (voir les instructions ci-dessous). (La Digital LP ne peut être utilisée comme périphérique de lecture pour votre ordinateur.)
Il y a un bourdonnement provenant de l’enceinte ou de l’ordinateur portable lorsque j’utilise la platine vinyle :
• Si vous enregistrez sur un ordinateur portable : o Veuillez brancher l’ordinateur à un câble d’alimentation avec mise à la terre (3 broches).
• Si vous utilisez une enceinte : o Veuillez brancher l’enceinte à un câble d’alimentation avec mise à la terre (3 broches).
Le disque ne joue pas à la bonne vitesse, la tonalité est trop haute ou trop basse :
o Veuillez vous assurer que le sélecteur de vitesse 33/45/78 est réglé sur la bonne vitesse pour le disque. L’écran affiche l’heure et la date et ne répond pas lorsque les touches sont enfoncées :
o L’appareil est en mode veille ErP. Appuyez et relâchez la touche d'alimentation afin de revenir au mode de fonctionnement normal.
Le message « No DAB Station » s’affiche :
o Ajustez l’antenne et relancez le balayage des stations DAB. o Il n'y a aucune station DAB dans votre région.

26
Configuration de la Digital LP comme l’appareil d’enregistrement par défaut
• Windows XP : Cliquez sur Démarrer Panneau de configuration (ou Paramètres Panneau de configuration en Affichage classique) Sons et périphériques audio. Cliquez sur l’onglet Audio sous Enregistrement audio et sélectionnez USB PnP Audio Device comme périphérique par défaut.
• Windows Vista : Cliquez sur Démarrer Panneau de configuration (ou Paramètres Panneau de configuration en Affichage classique) Matériel et audio Son. Cliquez sur l’onglet Enregistrement et sélectionnez USB PnP Audio Device comme périphérique par défaut.
• Windows 7 : Cliquez sur Démarrer Panneau de configuration Son. Cliquez sur l’onglet Enregistrement et sélectionnez USB PnP Audio Device comme périphérique par défaut.
• Windows 8 : Dans le menu Démarrer, cliquez sur le coin inférieur gauche de l'écran pour afficher le bureau. Dans le coin inférieur droit de la barre des tâches, recherchez l’icône de la commande de volume « haut-parleur ». Faites un clic droit sur l’icône du haut-parleur et sélectionnez Périphériques de lecture. Dans le panneau de configuration Son Windows, sélectionnez l'onglet Enregistrement. Si le champ USB PnP Audio Device ne dispose pas d’un crochet vert, faites un clic droit et sélectionnez « Définir comme périphérique par défaut ».
• Windows 10 : Cliquez sur Démarrer Panneau de configuration (ou Paramètres Panneau de configuration en Affichage classique) Matériel et audio Son. Dans le panneau de configuration Son Windows, sélectionnez l'onglet Enregistrement. Si le champs USB Audio Codec ne dispose pas d’un crochet, faites un clic droit et sélectionnez « Définir comme périphérique par défaut ». Sélectionnez Propriétés et cliquez sur l’onglet Advancé afin de sélectionner le format par défaut, 44 100 Hz ou 48 000 Hz.
• Mac OS X 10.4-10.11 : Cliquez sur la pomme Apple située dans le coin supérieur gauche de l’écran et sélectionnez Préférences Système Sons. Cliquez sur l’onglet Entrée. À partir du menu, sélectionnez USB Audio Codec comme périphérique par défaut. Sous le Format, sélectionnez 44 100 Hz ou 48 000 Hz.
Configuration de la carte son de l’ordinateur comme périphérique de lecture audio par défaut
• Windows XP : Cliquez sur Démarrer Panneau de configuration (ou Paramètres Panneau de
configuration en Affichage classique) Sons et périphériques audio. Cliquez sur l’onglet Audio et sous Lecture audio, sélectionnez la carte son de l’ordinateur comme périphérique de lecture audio par défaut.
• Windows Vista : Cliquez sur Démarrer Panneau de configuration (ou Paramètres Panneau de configuration en Affichage classique) Matériel et audio Son. Cliquez sur l'onglet Lecture et sélectionnez la carte son de l’ordinateur comme périphérique de lecture audio par défaut.
• Windows 7 : Cliquez sur Démarrer Panneau de configuration Son. Cliquez sur l'onglet Lecture et sélectionnez la carte son de l’ordinateur comme périphérique de lecture audio par défaut.
• Windows 8 : Dans le menu Démarrer, cliquez sur le coin inférieur gauche de l'écran pour afficher le bureau. Dans le coin inférieur droit de la barre des tâches, recherchez l’icône de la commande de volume « haut-parleur ». Faites un clic droit sur l’icône du haut-parleur et sélectionnez Périphériques de lecture. Le panneau de configuration Sons Windows devrait s’afficher sur l'onglet Lecture. Si la carte son de votre ordinateur ne dispose pas d’un crochet vert, faites un clic droit et sélectionnez « Définir comme périphérique par défaut ».
• Windows 10 : Cliquez sur Démarrer Panneau de configuration Son. Cliquez sur l'onglet Lecture et sélectionnez la carte son de l’ordinateur comme périphérique de lecture audio par défaut.
• Mac OS X 10.4-10.11 : Cliquez sur la pomme Apple située dans le coin supérieur gauche de l’écran et sélectionnez Préférences Système Sons. Cliquez sur l’onglet Sortie. À partir du menu, sélectionnez Haut-parleurs internes si vous utilisez les haut-parleurs internes de l’ordinateur, ou sélectionnez Écouteurs si vous utilisez des haut-parleurs ou un casque d’écoute branché à la sortie casque 3,5 mm de votre ordinateur.
AVANT DE RETOURNER CE PRODUIT, veuillez communiquer avec le service d’assistance technique de ION Audio. Vous trouverez les coordonnées pour nous rejoindre dans le livret des Consignes de sécurité inclus avec ce produit.
ionaudio.com/support
27
Guida rapida (Italiano) Introduzione Contenuti della confezione Digital LP
Adattatore di alimentazione
Adattatore 45 giri
Tappetino
Scheda di download del Software
Guida rapida
Istruzioni di sicurezza e garanzia
Assistenza Per le ultime informazioni in merito a questo prodotto (documentazione, specifiche tecniche, requisiti di sistema, informazioni sulla compatibilità, ecc.) e per effettuarne la registrazione, recarsi alla pagina ionaudio.com.
Per ulteriore assistenza sul prodotto, recarsi alla pagina ionaudio.com/support.
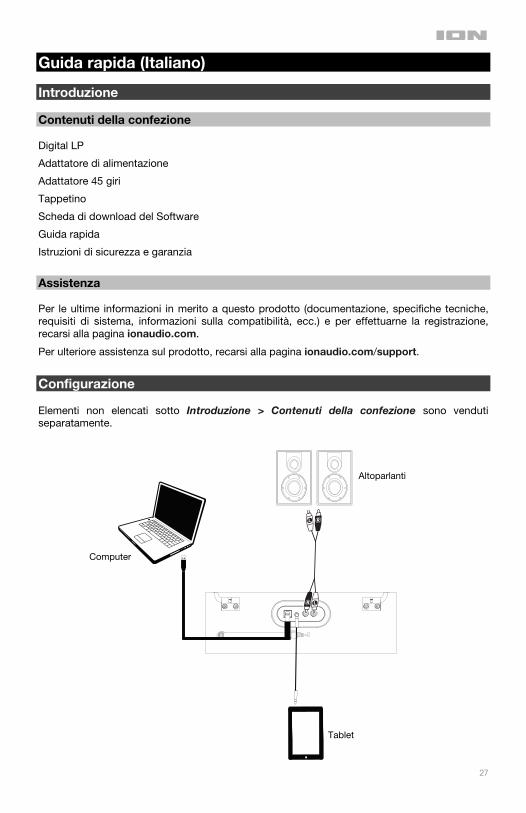
Configurazione Elementi non elencati sotto Introduzione > Contenuti della confezione sono venduti separatamente.
Computer
Tablet
Altoparlanti

28
Caratteristiche Pannello anteriore
1. On/Off: premere questo tasto per accendere e spegnere l’apparecchio. 2. Mode: premere e rilasciare questo tasto per commutare tra ingresso Phono, ingresso
Aux, scansione stazioni DAB e radio FM. Tenere premuto il tasto Menu per visualizzare a display diverse opzioni di sistema. Queste varieranno a seconda della modalit selezionata. Si veda Operazione > Opzioni menu per maggiori dettagli.
3. Program: servirsi dei tasti cursore su/giù in questa modalità per selezionare uno dei 20 preset in cui salvare una stazione radio FM preferita. Una volta trovato un preset, premere Enter per salvare la stazione in quel punto.
4. Scan: tenere premuto questo tasto per scorrere lungo tutte le stazioni FM e trovare quelle dal segnale più potente. Premere e rilasciare per passare alla stazione radio successiva dal segnale potente. Il comando si fermerà per alcuni secondi su tale stazione in modo da consentire all’utente di sentire se si tratta di una stazione radio cui possa essere interessato.
5. Alarm: premere questo tasto per impostare le opzioni della modalità allarme, ora, giorno e volume. Nota bene: se vengono apportate modifiche in modalità allarme (Alarm), scorrere fino all’opzione Salva (Save) e premere Enter per memorizzarle.
6. Display: mostra la modalità corrente, i menù, le stazioni radio e i preset. 7. Menu/Info: In modalità Radio, premere più volte questo tasto per scorrere lungo le
opzioni di data/ora, testo radio, tipo di stazione e forza del segnale. 8. Next Track (traccia successiva): premere questo comando per passare alla stazione
DAB o radio successiva. 9. Enter (invio): premere questo tasto per selezionare un’opzione del menù o per
confermare una funzione specifica. 10. Traccia precedente: premere questo comando per passare alla stazione DAB o radio
precedente. 11. Preset: premere questo tasto e servirsi dei tasti su/giù per scorrere tra le stazioni radio
salvate in precedenza e selezionarne una. 12. Uscita cuffie: quando le cuffie sono inserite, l'altoparlante interno viene silenziato. 13. Volume: regola il livello dell'audio degli altoparlanti interni, oltre che dell'uscita cuffie.
Nota bene: poiché si tratta di una manopola “senza fine”, il livello del volume può essere stabilito con precisione visualizzando le barre di livello sul display man mano che si effettua la regolazione con la manopola.
14. Altoparlanti: queste casse interne emettono la musica.
1 2 3 4 5
6
7 8 9 10 11 131214 14
7

29
Pannello superiore 1. Piatto: collocare qui il disco.
2. Braccio: il braccio fisso può essere alzato e abbassato a mano, oppure premendo la levetta di sollevamento / abbassamento.
3. Fermabraccio: questo fermabraccio fissa il braccio quando è a riposo o quando non è in uso. Il fermabraccio è stato progettato in modo che resti sollevato quando sbloccato.
4. Interruttore 33 / 45 / 78: questo interruttore controlla la velocità del piatto del giradischi.
Nota bene: per i migliori risultati durante la riproduzione di dischi in vinile a 78 giri, servirsi di una puntina 78 (venduta separatamente). Servirsi unicamente di una puntina 78 con dischi in vinile a 78 giri.
5. Interruttore di arresto automatico (Autostop): accende o spegne la funzione di arresto automatico, "autostop". Quando la funzione "autostop" è attiva, il piatto inizia a girare quando il braccio è posato sul disco e smette di girare quando il disco arriva alla fine. (Quando la funzione autostop è disattiva, il piatto continuerà a girare, indipendentemente dalla posizione del braccio.)
Nota bene: se il vinile si ferma prima di raggiungere la fine della musica, spegnere la funzione Autostop per quel particolare disco. Di solito, ciò è consigliato per i dischi a 45 giri.
IMPORTANTE: rimuovere il cappuccio della cartuccia (copripuntina) prima di utilizzare il giradischi.
*AVVERTENZA: le uscite RCA sono a livello di LINEA. Collegarle unicamente a ingressi a livello di LINEA. Si rischia di danneggiare il ricevitore collegando un dispositivo a livello di LINEA in un ingresso PHONO.
IMPORTANTE: collocare il tappetino in feltro in dotazione sul piatto; quindi posizionare il disco sul tappetino in modo che venga retto in maniera accurata.
1
2
345
30
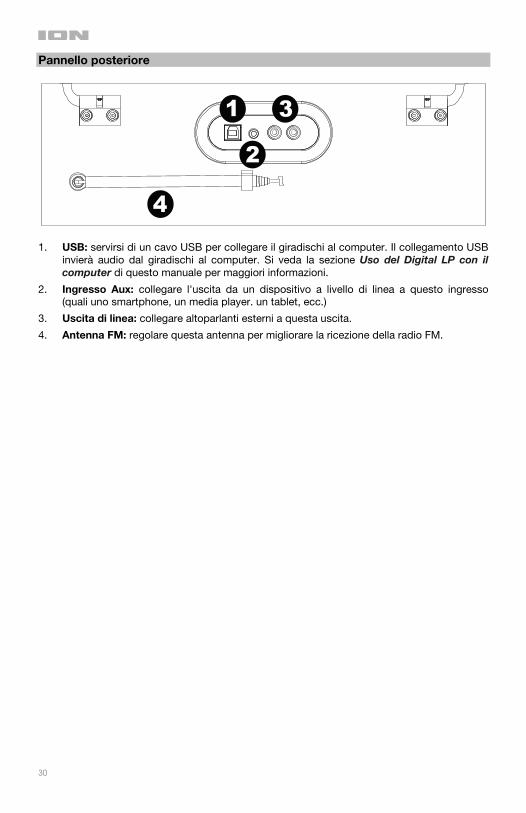
Pannello posteriore
1. USB: servirsi di un cavo USB per collegare il giradischi al computer. Il collegamento USB invierà audio dal giradischi al computer. Si veda la sezione Uso del Digital LP con il computer di questo manuale per maggiori informazioni.
2. Ingresso Aux: collegare l'uscita da un dispositivo a livello di linea a questo ingresso (quali uno smartphone, un media player. un tablet, ecc.)
3. Uscita di linea: collegare altoparlanti esterni a questa uscita.
4. Antenna FM: regolare questa antenna per migliorare la ricezione della radio FM.
1
2
3
4

31
Operazione
Riproduzione del giradischi Prima dell'uso, assicurarsi di: • Rimuovere la protezione della puntina. Mettere il cappuccio di protezione sulla puntina quando non è
in uso. • Assicurarsi che il braccio sia libero di muoversi dal poggiabraccio. Fissare nuovamente il braccio in
posizione quando non è in uso. 1. Impostare la modalità su Phono e sollevare il coperchio antipolvere del giradischi. 2. Collocare un disco sul giradischi, sull'asse centrale sul tappetino. 3. Impostare il selettore di Velocità su 33, 45 o 78 giri a seconda del disco. 4. Sollevare il braccio dal poggiabraccio e portarlo lentamente sul disco. Il piatto del giradischi inizia a
girare. 5. Collocare il braccio sul punto desiderato sul disco. 6. Abbassare delicatamente il braccio sul disco per avviare la riproduzione. 7. Quando la riproduzione del disco è conclusa, il braccio si ferma automaticamente. Sollevare il braccio
dal disco e posizionarlo nuovamente sul poggiabraccio. 8. Per fermare manualmente il disco, sollevare il braccio dal disco e riposizionarlo sul poggiabraccio.
Nota bene: non arrestare né far girare il piatto manualmente. Spostare o urtare il giradischi senza aver fissato il fermabraccio può causare danni al braccio stesso.
Funzionamento dell'interruttore Auto-stop (arresto automatico) Alcuni tipi di dischi possono presentare un'area di arresto automatico al di fuori del limite predefinito, quindi il giradischi si può fermare prima del termine dell'ultima traccia. Se ciò accade, impostare l'interruttore Auto-stop su Off. Ciò consente al disco di essere riprodotto fino alla fine, ma questo non si fermerà automaticamente. Occorre alzare il braccio manualmente e collocarlo sul portabraccio, quindi spegnere l'alimentazione per far fermare il giradischi. Riproduzione dall'ingresso Aux: 1. Premere il tasto Mode per selezionare “Aux In”. 2. Collegare un cavo audio stereo da 1/8” (3,5 mm) (non in dotazione) dall'ingresso Aux all'uscita di linea
o all'uscita cuffie del dispositivo audio esterno per ascoltare la fonte esterna tramite le casse interne del Digital LP.
3. Regolare il volume del Digital LP sul livello desiderato. Nota bene: se l'uscita di linea del dispositivo esterno è collegata, occorre solo regolare il comando di volume del sistema. Se l'uscita cuffie del dispositivo esterno è collegata, può essere necessario regolare il volume sia sul dispositivo esterno sia sul Digital LP per ottenere il volume desiderato. Ascoltare la radio FM 1. Premere più volte il tasto Mode per scorrere tra le modalità e selezionare la radio FM. 2. Selezionare la stazione radio FM servendosi dei tasti ▲▼. 3. Regolare la manopola Volume come desiderato. Scansione stazioni DAB Il DAB (Digital Audio Broadcasting) trasmette la radio tramite una rete di trasmettitori. Questo offre agli ascoltatori una più ampia scelta di trasmissioni (dove disponibile) e una qualità limpida del suono. 1. Premere più volte il tasto Mode per scorrere tra le modalità e selezionare DAB. 2. Servirsi dei tasti ▲▼ per selezionare Station Scan e premere Enter. 3. Scegliere una delle seguenti opzioni di scansione servendosi dei tasti ▲▼.
• Local Scan: l’apparecchio effettuerà la scansione delle bande DAB locali comprese tra 10A e 13F per cercare trasmissioni.
• Full Scan: l’apparecchio effettuerà la scansione di tutte le bande DAB per cercare trasmissioni. • Manual Tune: selezionare la banda di frequenza specifica desiderata per cercare una
trasmissione. 4. Premere Enter per selezionare l’opzione desiderata.
Nota bene: l’indicatore della forza del segnale comparirà sul display.

32
Impostazione dell'allarme 1. Premere il tasto Alarm. 2. Servirsi dei tasti ▲▼ per selezionare Mode (DAB o Buzzer), Alarm, Alarm Time e Volume (modalità,
allarme, ora dell’allarme e volume). Premere Enter per confermare la scelta. 3. Regolare le impostazioni servendosi dei tasti Up/Down e premere Enter per confermare. 4. Selezionare l’opzione Save (salva) e premere Enter per memorizzare i cambiamenti. Opzioni menu: Premere e tenere premuto Menu/Info in ciascuna delle modalità per regolare le seguenti opzioni: Modalità Phono e Aux In Time Setup: imposta ora, data, aggiornamento automatico e orario a display (12 ore o 24 ore)
Factory Reset: azzera l'apparecchio riportandolo ai valori predefiniti di fabbrica.
SW Version: consente di visualizzare la versione software corrente.
Modalità FM Audio Setting: selezionare l’uscita audio come stereo o mono, o solo mono per le stazioni radio. Modalità DAB Station Scanning: effettua la scansione alla ricerca delle stazioni DAB disponibili.
Uso del Digital LP con il computer
Registrazione Per registrare musica sul computer, è possibile utilizzare il programma ION EZ Vinyl/Tape Converter e un cavo USB. L’EZ Vinyl/Tape Converter salva comodamente le registrazioni sul computer. Una volta terminato di convertire il vinile, lo si può masterizzare su un CD o caricare su dispositivi media portatili. Seguire le istruzioni presenti nella scheda di download del software in dotazione per installare l’EZ Vinyl/Tape Converter. 1. Una volta installato l'EZ Vinyl/Tape Converter sul computer, servirsi di un cavo USB per collegare la
porta USB del Digital LP ad una porta USB disponibile del computer.
2. Sul computer, è possibile aprire l’EZ Vinyl/Tape Converter recandosi su Start Tutti i programmi (Windows) o su Applications (Mac).
3. Seguire le istruzioni su schermo per configurare la registrazione. Quando viene richiesto di riprodurre la musica, muovere il braccio del Digital LP sul disco per iniziare la riproduzione.
Nota bene: per ascoltare un disco mentre viene riprodotto, servirsi delle casse del computer o collegare le uscite RCA del Digital LP a un impianto stereo o ad altoparlanti. Non collegarli a ingressi a livello phono; le uscite RCA del Digital LP sono a livello di linea e potrebbero danneggiare un dispositivo dotato di ingressi a livello phono.
4. Una volta terminato di registrare, alzare il braccio del Digital LP dal disco e riportarlo sul poggiabraccio. Suggerimento: se il programma non riconosce l’audio proveniente dal Digital LP, provare a girare la manopola volume sul Digital LP in senso orario. Recarsi alla pagina ionaudio.com/computer-optimization per maggiori informazioni su come ottimizzare il computer per l’audio.
Recarsi alla pagina ionaudio.com/ezvc per scaricare l’ultima versione del software EZ Vinyl/Tape Converter o per utili consigli per la risoluzione di problemi o ulteriore assistenza.

33
Riproduzione È possibile ascoltare la musica sul computer tramite l'altoparlante interno o tramite un paio di cuffie ad esso collegate (Il Digital LP non può essere utilizzato come dispositivo di riproduzione dell'audio del computer.) Per ascoltare un disco mentre viene riprodotto, servirsi delle casse del computer o collegare le uscite RCA del Digital LP a un impianto stereo o ad altoparlanti. Non collegarli a ingressi a livello phono; le uscite RCA del Digital LP sono a livello di linea e potrebbero danneggiare un dispositivo dotato di ingressi a livello phono. Suggerimento: se dagli altoparlanti esterni non provengono suoni (diversi dal Digital LP), provare a girare la manopola del volume sul Digital LP in senso orario.
Risoluzione di problemi In caso di problemi, fare riferimento alle fasi di risoluzione dei problemi indicate qui di seguito, nonché a quanto indicato nel manuale dell'EZ Vinyl/Tape Converter in dotazione con il presente prodotto. Se si registra su un computer:
o Assicurarsi che il Digital LP sia acceso e che la puntina sia sul disco. o Assicurarsi che il Digital LP sia selezionato come dispositivo di registrazione predefinito del computer (si
vedano le istruzioni qui di seguito). o Se si ascolta tramite le casse del computer, assicurarsi che siano selezionate come periferica di
riproduzione predefinita del computer (si vedano le istruzioni qui di seguito). Alternativamente, collegare le uscite RCA del Digital LP ad un impianto stereo o ad altoparlanti. Non collegarle a ingressi a livello phono; le uscite RCA del Digital LP sono a livello di linea e potrebbero danneggiare un dispositivo dotato di ingressi a livello phono. (Nota bene: le uscite RCA monitorano il segnale che esce dal giradischi, non quello proveniente dal computer.)
o Scollegare e ricollegare inoltre il cavo USB che unisce il Digital LP al computer. Non sento alcun audio durante la riproduzione di musica: • Se si riproduce musica da vinile:
o Assicurarsi che il Digital LP sia acceso e che la puntina sia sul disco. o Collegare le uscite RCA del Digital LP ad un impianto stereo o ad altoparlanti. (Non collegarle a ingressi
a livello phono; le uscite RCA del Digital LP sono a livello di linea e potrebbero danneggiare un dispositivo dotato di ingressi a livello phono.)
• Se si riproduce musica da computer: o Assicurarsi che il volume del proprio lettore musicale software sia acceso. o Assicurarsi che il volume del computer sia acceso. o Assicurarsi che le casse del computer siano selezionate come dispositivo di riproduzione predefinito del
computer (si vedano le istruzioni qui di seguito). (Il Digital LP non può essere utilizzato come dispositivo di riproduzione dell'audio del computer.)
Durante l'uso del giradischi sento un ronzio tramite l'altoparlante o il portatile.
• Se si registra su un portatile: o collegare il computer ad un'alimentazione con messa a terra (3 denti)
• Se si sta riproducendo musica con un altoparlante: o collegare il dispositivo ad un'alimentazione con messa a terra (3 denti).
Il mio disco non suona alla giusta velocità; il pitch è troppo alto o troppo basso:
o Assicurarsi che l'interruttore 33 / 45 / 78 sia impostato sulla velocità giusta per il disco specifico. Il display sul pannello anteriore rimane su ora/data e non risponde quando vengono premuti tasti:
o L’apparecchio è in modalità standby ERP. Premere e rilasciare il tasto di alimentazione per riprendere il funzionamento normale.
A display compare la scritta “No DAB Station” (nessuna stazione DAB):
o Regolare l’antenna ed effettuare una nuova scansione alla ricerca di stazioni DAB. o Non ci sono stazioni DAB nella zona.
34
Configurare il Digital LP come dispositivo di registrazione predefinito
• Windows XP: Cliccare sul Menu Start Pannello di controllo (o Impostazioni Pannello di controllo nella vista Classica) Suoni e periferiche audio. Cliccare sulla scheda Audio e selezionare USB PnP Audio Device come periferica predefinita sotto Registrazione suoni.
• Windows Vista: Cliccare sul menu Start Pannello di controllo (o Impostazioni Pannello di controllo nella vista Classica) Hardware e suoni Suoni. Cliccare sulla scheda Registrazione e selezionare USB PnP Audio Device come periferica predefinita.
• Windows 7: Cliccare sul menu Start Pannello di controllo Audio. Cliccare sulla scheda Registrazione e selezionare USB PnP Audio Device come periferica predefinita.
• Windows 8: Nel menu Start, cliccare sull'angolo inferiore sinistro dello schermo per passare al Desktop. Nell'angolo inferiore destro della Barra delle applicazioni, individuare l'icona "Speaker" di controllo del Volume. Fare clic col tasto destro del mouse e selezionare Dispositivi di riproduzione. Nel pannello di controllo Audio di Windows selezionare la scheda Registrazione. Se USB PnP Audio Device non presenta un segno di spunta verde, fare clic col destro e selezionare "Imposta come dispositivo predefinito".
• Windows 10: Cliccare sul menu Start Pannello di controllo (o Impostazioni Pannello di controllo nella vista Classica) Hardware e suoni Suoni. Nel pannello di controllo Audio di Windows selezionare la scheda Registrazione. Se l'USB Audio Codec non presenta un segno di spunta verde, fare click col destro e selezionare "Imposta come dispositivo predefinito". Selezionare Proprietà e cliccare sulla scheda Avanzate per selezionare il formato predefinito, 44100 Hz o 48000 Hz.
• Mac OS X 10.4-10.11: Cliccare sull'icona della mela nell'angolo superiore sinistro, quindi cliccare su System Preferences Sound. Fare clic sulla scheda “Ingresso”. Dal menu, selezionare “USB Audio Codec” come periferica. Sotto Format, selezionare 44100 Hz o 48000 Hz.
Configurazione della scheda audio del computer come dispositivo di riproduzione predefinito
• Windows XP: Cliccare sul Menu Start Pannello di controllo (o Impostazioni Pannello di controllo
nella vista Classica) Suoni e periferiche audio. Cliccare sulla scheda Audio e in Riproduzione suoni selezionare la scheda audio del computer come periferica predefinita.
• Windows Vista: Cliccare sul menu Start Pannello di controllo (o Impostazioni Pannello di controllo nella vista Classica) Hardware e suoni Suoni. Cliccare sulla scheda Riproduzione e selezionare la scheda audio del computer come periferica predefinita.
• Windows 7: Cliccare sul menu Start Pannello di controllo Audio. Cliccare sulla scheda Riproduzione e selezionare la scheda audio del computer come periferica predefinita.
• Windows 8: Nel menu Start, cliccare sull'angolo inferiore sinistro dello schermo per passare al Desktop. Nell'angolo inferiore destro della Barra delle applicazioni, individuare l'icona "Speaker" di controllo del Volume. Fare clic col tasto destro del mouse e selezionare Dispositivi di riproduzione. Il pannello di controllo Audio di Windows dovrebbe comparire sulla scheda Riproduzione. Se la scheda audio del computer non presenta un segno di spunta verde, fare click col destro e selezionare "Imposta come dispositivo predefinito"
• Windows 10: Cliccare sul menu Start Pannello di controllo Audio. Cliccare sulla scheda Riproduzione e selezionare la scheda audio del computer come periferica predefinita.
• Mac OS X 10.4-10.11: Cliccare sull'icona della mela nell'angolo superiore sinistro, quindi cliccare su System Preferences Sound. Fare clic sulla scheda “Output” (uscita). Dal menu, selezionare Altoparlanti interni se si utilizzano gli altoparlanti interni del computer oppure selezionare Cuffie se si utilizzano altoparlanti o cuffie collegati all'uscita da 1/8" del computer.
PRIMA DI RENDERE QUESTO PRODOTTO, contattare ION Audio per ricevere assistenza tecnica:. I dati di contatto si trovano nel libretto di istruzioni di sicurezza e garanzia in dotazione con il prodotto.
ionaudio.com/support
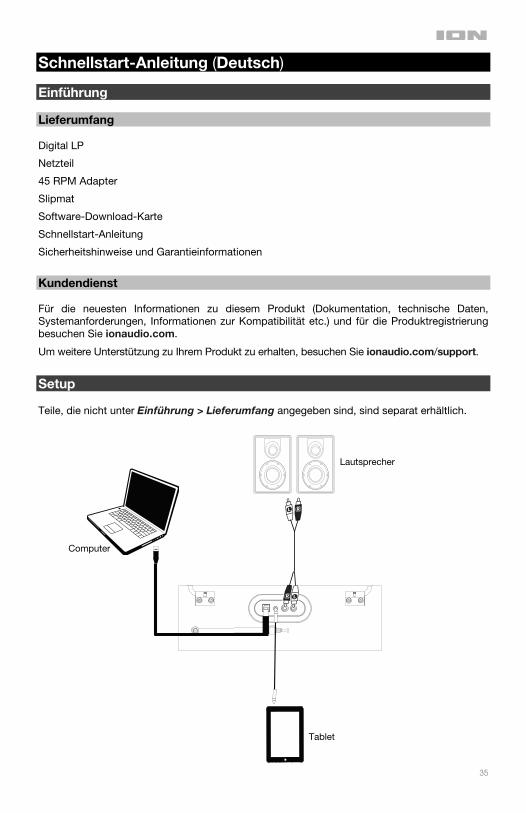
35
Schnellstart-Anleitung (Deutsch) Einführung Lieferumfang Digital LP
Netzteil
45 RPM Adapter
Slipmat
Software-Download-Karte
Schnellstart-Anleitung
Sicherheitshinweise und Garantieinformationen
Kundendienst Für die neuesten Informationen zu diesem Produkt (Dokumentation, technische Daten, Systemanforderungen, Informationen zur Kompatibilität etc.) und für die Produktregistrierung besuchen Sie ionaudio.com.
Um weitere Unterstützung zu Ihrem Produkt zu erhalten, besuchen Sie ionaudio.com/support.
Setup Teile, die nicht unter Einführung > Lieferumfang angegeben sind, sind separat erhältlich.
Lautsprecher
Computer
Tablet

36
Funktionen Vorderseite
1. Ein/Aus: Mit dieser Taste schalten Sie das Gerät ein und aus. 2. Mode: Durch kurzes Drücken wechseln Sie zwischen Phono, Aux In, DAB Station-
Scannen und FM Radio. Halten Sie die Menütaste gedrückt, um verschiedene Systemoptionen anzuzeigen. Dies variiert je nach gewähltem Modus. Weitere Informationen finden Sie unter Betrieb > Menüoptionen.
3. Program: Verwenden Sie die Aufwärts-/Abwärts-Cursortasten in diesem Modus, um einen der 20 voreingestellten Presets auszuwählen, um Ihren bevorzugten FM-Radiosender zu speichern. Sobald ein Preset gefunden wurde, drücken Sie die Eingabetaste, um diese Stelle zu speichern.
4. Scan: Halten Sie diese Taste gedrückt, um alle FM-Bandsender zu durchsuchen und die stärksten Sender zu finden. Drücken Sie diese Taste kurz, um zum nächsten Radiosender mit einem starken Signal zu gelangen. Die Suche wird ein paar Sekunden lang gestoppt, so dass Sie hören können, ob es sich um einen interessanten Sender handelt. Dann springt das Gerät zum nächststärksten Sender.
5. Alarm: Drücken Sie diese Taste, um die Optionen für Alarmmodus, Uhrzeit, Tage und Lautstärke einzustellen. Hinweis: Wenn im Alarmmodus Änderungen vorgenommen werden, blättern Sie zur Option Speichern und drücken Sie Enter, um die Änderungen zu speichern.
6. Display: Zeigt den aktuellen Modus, Menüs, Radiosender und Presets an. 7. Menu/Info: Im Radiomodus drücken Sie diese Taste wiederholt, um die Optionen für
Datum/Uhrzeit, Radiotext, Senderart und Signalstärke zu durchlaufen. 8. Nächster Track: Drücken Sie diese Taste, um zum nächsten DAB-Sender oder
Radiosender zu wechseln. 9. Enter: Drücken Sie diese Taste, um eine Menüoption auszuwählen oder eine bestimmte
Funktion zu bestätigen. 10. Vorheriger Track: Drücken Sie diese Taste, um zum vorherigen DAB-Sender oder
Radiosender zu wechseln. 11. Preset: Drücken Sie diese Taste und verwenden Sie die Aufwärts-/Abwärts-Tasten, um
zu blättern und einen zuvor gespeicherten Radiosender auszuwählen. 12. Kopfhörerausgang: Wenn Kopfhörer angeschlossen sind, wird der interne Lautsprecher
stumm geschaltet. 13. Volume: Stellt die Lautstärke für die internen Lautsprecher und den Kopfhörerausgang
ein. Hinweis: Da es sich hierbei um einen „Endlos-Regler“ handelt, kann die Lautstärke durch Prüfen der Pegelbalken am Display bei der Einstellung des Reglers genau bestimmt werden.
14. Lautsprecher: Diese internen Lautsprecher geben die Musik wieder.
1 2 3 4 5
6
7 8 9 10 11 131214 14
7

37
Oberseite 1. Plattenteller: Legen Sie Ihre Platte hier auf.
2. Tonarm: Der fixe Tonarm kann mit der Hand oder durch Drücken des entsprechenden Hebels angehoben und abgesenkt werden.
3. Arm-Clip: Dieser Arm-Clip sichert den Tonarm, wenn er nicht verwendet wird. Der Arm-Clip wurde so designt, dass er in der oberen Position bleibt, wenn er entsperrt ist.
4. 33 / 45 / 78 Schalter: Regelt die Geschwindigkeit des Plattentellers.
Hinweis: Für die Wiedergabe von 78 RPM Schallplatten verwenden Sie idealerweise eine 78 RPM-Nadel (separat erhältlich). Verwenden Sie für 78 RPM Schallplatten ausschließlich 78 RPM-Nadeln.
5. Autostop-Schalter: Dieser Schalter schaltet Autostop ein oder aus. Wenn Autostop eingeschaltet ist, wird der Plattenteller zu rotieren beginnen, sobald der Tonarm über die Schallplatte gelegt wird und stoppen, wenn die Platte das Ende erreicht hat. (Wenn Autostop ausgeschaltet ist, wird sich der Plattenteller immer und unabhängig von der Position des Tonarms drehen.)
Hinweis: Wenn Ihre Schallplatte stoppt, bevor sie das Ende des Songs erreicht hat, bringen Sie Autostop für diese spezielle Schallplatte in die Position AUS. Dies wird in der Regel für 45 RPM Schallplatten empfohlen.
WICHTIG: Entfernen Sie die Plastikabdeckung des Tonabnehmers (Nadelabdeckung) bevor Sie den Plattenspieler verwenden.
*WARNUNG: Die Cinch-Ausgänge sind LINE-Level. Bitte schließen Sie sie nur an LINE-Level-Eingänge an. Sie können Ihren Receiver beschädigen, wenn Sie ein LINE-Level-Gerät an einen PHONO-Level-Eingang anschließen.
WICHTIG: Legen Sie die mitgelieferte Filz-Slipmat auf den Plattenteller. Anschließend legen Sie Ihre Platte auf die Filz-Slipmat, um einen sicheren Sitz zu gewährleisten.
1
2
345

38
Rückseite
1. USB: Schließen Sie Ihren Plattenspieler mit einem USB-Kabel an Ihren Computer an. Die
USB-Verbindung sendet das Audiosignal vom Plattenspieler an Ihren Computer. Bitte beachten Sie den Abschnitt So verwenden Sie Digital LP mit Ihrem Computer in diesem Handbuch für weitere Informationen.
2. Aux-Eingang: Verbinden Sie den Ausgang eines Line-Level-Geräts mit diesem Eingang, beispielsweise von einem Smartphone, Media-Player, Tablet etc.
3. Line-Ausgang: Schließen Sie externe Lautsprecher an diesen Ausgang an.
4. FM-Antenne: Richten Sie diese Antenne aus, um den optimalen FM-Radioempfang zu erzielen.
1
2
3
4
39
Betrieb
Wiedergabe über den Plattenspieler
Führen Sie vor der Anwendung folgende Schritte aus:
• Entfernen Sie den Nadelschutz. Setzen Sie die Schutzkappe wieder auf die Plattennadel auf, wenn Sie das Gerät nicht verwenden.
• Achten Sie darauf, dass sich der Tonarm frei vom Tonarmhalter entfernen lässt. Verriegeln Sie den Tonarm wieder am Halter, wenn er nicht in Gebrauch ist.
1. Stellen Sie den Modus auf Phono und heben Sie die Abdeckung des Plattenspielers an. 2. Legen Sie eine Platte über die mittige Spindel auf die Slipmat am Plattenteller. 3. Stellen Sie den Geschwindigkeitsregler je nach Platte auf 33, 45 oder 78 Umdrehungen pro Minute. 4. Heben Sie den Tonarm vom Tonarmhalter und bringen Sie ihn behutsam über die Platte. Der Plattenteller
beginnt sich zu drehen. 5. Setzen Sie den Tonarm auf die gewünschte Stelle auf der Platte. 6. Senken Sie den Tonarm behutsam auf die Platte, um die Wiedergabe zu beginnen. 7. Wenn das Ende der Platte erreicht ist, stoppt der Tonarm automatisch. Heben Sie den Tonarm von der Platte
und setzen ihn wieder in den Halter zurück. 8. Um die Platte manuell zu stoppen, heben Sie den Tonarm von der Platte und setzen ihn wieder in den Halter
zurück. Hinweis: Versuchen Sie nie, den Plattenteller manuell anzuhalten oder zu drehen. Ist der Tonarm nicht im Halter gesichert können Bewegungen oder Erschütterungen des Plattenspielers den Tonarm beschädigen.
Auto-Stopp-Betrieb Bestimmte Platten haben einen Auto-Stopp-Bereich außerhalb der voreingestellten Grenze. Der Plattenspieler beendet die Wiedergabe in diesem Fall vielleicht schon vor dem Ende des letzten Tracks. Ist dies der Fall, stellen Sie den Auto-Stopp-Schalter in die Position Aus. So kann eine Platte ohne automatisches Stoppen zu Ende gespielt werden. Sie müssen den Tonarm manuell anheben, wieder in den Halter legen und das Gerät ausschalten, damit sich der Plattenspieler nicht dreht. Wiedergabe über den Aux-Eingang 1. Drücken Sie die Taste Mode, um Aux In auszuwählen. 2. Stecken Sie ein 1/8" (3,5 mm) Stereo-Audiokabel (nicht enthalten) in den Aux-Eingang und verbinden es mit
dem Line-Ausgang oder Kopfhörerausgang Ihres externen Audio-Geräts, um eine externe Quelle über die im Digital LP integrierten Lautsprecher zu hören.
3. Stellen Sie die Lautstärke am Digital LP auf das gewünschte Niveau. Hinweis: Wenn der Line-Ausgang Ihres externen Gerätes angeschlossen ist, müssen Sie nur den Lautstärkeregler des Systems anpassen. Wenn der Kopfhörerausgang Ihres externen Gerätes in Verwendung ist, müssen Sie möglicherweise die Lautstärke sowohl auf dem externen Gerät als auch am Digital LP anpassen, um den gewünschten Pegel zu erreichen. FM-Radio hören 1. Drücken Sie wiederholt die Mode-Taste, um zu blättern und das FM-Radio auszuwählen. 2. Wählen Sie mit den Tasten ▲ ▼ den FM-Radiosender aus. 3. Bringen Sie den Volume-Regler auf das gewünschte Niveau. DAB Station-Scannen DAB (Digital Audio Broadcasting) sendet Radiowellen über ein Netzwerk von Sendern. Dies bietet den Hörern mehr Sendemöglichkeiten (soweit verfügbar) und klare Klangqualität. 1. Drücken Sie wiederholt die Mode-Taste, um zu blättern und wählen Sie DAB. 2. Drücken Sie die Tasten ▲▼, um Station Scan auszuwählen und drücken Sie anschließend Enter. 3. Wählen Sie mit den ▲▼-Tasten aus den folgenden Scan-Optionen aus.
• Local Scan: Das Gerät scannt lokale DAB-Bänder zwischen 10A und 13F, um nach Sendungen zu suchen.
• Full Scan: Das Gerät scannt alle DAB-Bänder, um nach Sendungen zu suchen. • Manual Tune: Wählen Sie das gewünschte Frequenzband aus, um nach einer Sendung zu suchen.
4. Drücken Sie Enter, um die gewünschte Option auszuwählen. Hinweis: Die Signalstärkeanzeige wird im Display angezeigt.
40
Einstellen des Alarms 1. Drücken Sie die Alarmtaste. 2. Verwenden Sie die Tasten ▲▼, um Mode (DAB oder Buzzer), Alarm, Alarm Time und Volume
auszuwählen. Drücken Sie Enter, um die Auswahl zu bestätigen. 3. Passen Sie die Einstellungen mit den Aufwärts-/Abwärts-Tasten an und drücken Sie Enter, um die
Einstellungen zu bestätigen. 4. Wählen Sie die Option Save und drücken Sie Enter, um die Änderungen zu speichern. Menüoptionen Halten Sie Menu/Info in jedem der Modi gedrückt, um die folgenden Optionen anzupassen: Phono und Aux In-Modi Time Setup: stellen Sie Uhrzeit, Datum, automatische Aktualisierung und Zeitanzeige ein (12- oder 24-Stunden-Zeitformat)
Factory Reset: Wählen Sie diese Option, um das Gerät wieder auf die Werkseinstellungen zurückzusetzen.
SW Version: Wählen Sie diese Option, um die aktuelle Softwareversion anzuzeigen.
FM-Modus Audio Setting: Stellen Sie ein, ob die Audio-Ausgabe für Radiosender Stereo oder Mono oder nur Mono sein soll. DAB-Modus Station-Scannen: Scannt nach verfügbaren DAB-Sendern
Einsatz des Digital LP mit Ihrem Computer
Aufnahme Um Musik mit Ihrem Computer aufzunehmen, können Sie ION EZ Vinyl/Tape Converter und ein USB-Kabel verwenden. EZ Vinyl/Tape Converter speichert Ihre Aufnahmen auf Ihrem Computer. Nachdem Sie Ihre Schallplatten konvertiert haben, können Sie sie auf CD brennen oder auf tragbare Mediengeräte laden. Folgen Sie den Anweisungen auf der mitgelieferten Software-Download-Karte zur Installation des EZ Vinyl/Tape Converter. 1. Wenn Sie EZ Vinyl/Tape Converter auf Ihrem Computer installiert haben, verwenden Sie das mitgelieferte USB-
Kabel, um den USB-Port des Digital LP mit einem freien USB-Port Ihres Computers zu verbinden.
2. Um EZ Vinyl/Tape Converter auf Ihrem Computer zu öffnen, wählen Sie Startmenü Alle Programme (Windows) oder das Anwendungen-Menü (Mac).
3. Befolgen Sie die Anweisungen auf dem Bildschirm, um Ihre Aufnahme vorzubereiten. Wenn Sie aufgefordert werden, Ihre Musik zu spielen, bringen Sie den Tonarm des Digital LP über die Platte und starten die Wiedergabe.
Hinweis: Um sich eine Platte während der Wiedergabe anzuhören, können Sie die Lautsprecher Ihres Computers verwenden oder die Cinch-Ausgänge des Digital LP an eine Stereoanlage oder Aktivlautsprecher anschließen. Verbinden Sie sie nicht mit Phono-Eingängen; Die Cinch-Ausgänge des Digital LP sind Line-Verbindungen und könnten ein Gerät mit Phono-Eingängen beschädigen.
4. Wenn Sie die Aufnahme beendet haben, heben Sie den Digital LP-Tonarm von der Platte und setzen ihn zurück in den Arm-Clip.
Tipp: Wenn das Programm keine Audiodaten von Digital LP erkennt, versuchen Sie, den Lautstärkeregler am Digital LP im Uhrzeigersinn zu drehen. Besuchen Sie ionaudio.com/computer-optimization für weitere Informationen zur Optimierung Ihres Computers für die Audioverarbeitung.
Besuchen Sie ionaudio.com/ezvc, um die neueste Version der EZ Vinyl/Tape Converter Software herunter zu laden oder um hilfreiche Anleitungen zur Fehlerbehebung bzw. zusätzliche Unterstützung zu erhalten.
41
Wiedergabe Sie können die Musik auf Ihrem Computer über seine internen Lautsprecher oder über die angeschlossen Kopfhörer hören. (Digital LP kann nicht als Abspielgerät für Audio Ihres Computers verwendet werden.) Um sich eine Platte während der Wiedergabe anzuhören, können Sie die Lautsprecher Ihres Computers verwenden oder die Cinch-Ausgänge des Digital LP an eine Stereoanlage oder Aktivlautsprecher anschließen. Verbinden Sie sie nicht mit Phono-Eingängen; Die Cinch-Ausgänge des Digital LP sind Line-Verbindungen und könnten ein Gerät mit Phono-Eingängen beschädigen. Tipp: Wenn kein Ton über Ihre externen Lautsprecher (nicht Digital LP) zu hören ist, versuchen Sie, den Lautstärkeregler am Digital LP im Uhrzeigersinn zu drehen.
Fehlerbehebung Wenn Sie irgendwelche Schwierigkeiten haben, lesen Sie die folgenden Schritte zur Fehlerbehebung sowie das beigefügte EZ Vinyl/Tape Converter-Handbuch. Wenn Sie auf einen Computer aufnehmen:
o Stellen Sie sicher, dass Digital LP eingeschaltet und die Nadel auf der Schallplatte ist. o Stellen Sie sicher, dass Digital LP auf Ihrem Computer als standardmäßiges Aufnahmegerät ausgewählt
ist (siehe Anleitung unten). o Wenn Sie die Musik über die Lautsprecher Ihres Computers hören möchten, stellen Sie sicher, dass
diese Lautsprecher als Standard-Wiedergabegerät des Computers ausgewählt sind. Wahlweise können Sie die Cinch-Ausgänge des Digital LP mit einer Stereoanlage oder Aktivlautsprechern verbinden. Verbinden Sie sie nicht mit Phono-Eingängen; Die Cinch-Ausgänge des Digital LP sind Line-Verbindungen und könnten ein Gerät mit Phono-Eingängen beschädigen. (Hinweis: Die Cinch-Ausgänge überwachen das Signal vom Plattenspieler, nicht das Signal Ihres Computers.)
o Stecken Sie auch das USB-Kabel, das den Digital LP mit Ihrem Computer verbindet, zuerst ab und anschließend wieder ein.
Ich kann bei der Musikwiedergabe nichts hören:
• Wenn Sie eine Vinylplatte abspielen: o Stellen Sie sicher, dass Digital LP eingeschaltet und die Nadel auf der Schallplatte ist. o Verbinden Sie die Cinch-Ausgänge des Digital LP mit einer Stereoanlage oder mit Aktivlautsprechern.
(Verbinden Sie sie nicht mit Phono-Eingängen; Die Cinch-Ausgänge des Digital LP sind Line-Verbindungen und könnten ein Gerät mit Phono-Eingängen beschädigen.)
• Wenn Sie Musik von Ihrem Computer spielen: o Achten Sie darauf, dass die Lautstärke Ihres Musik-Players aufgedreht ist. o Stellen Sie sicher, dass die Lautstärke Ihres Computers aufgedreht ist. o Wenn Sie die Musik über die Lautsprecher Ihres Computers hören möchten, stellen Sie sicher, dass
diese Lautsprecher als Standard-Wiedergabegerät des Computers ausgewählt sind (siehe Anweisungen weiter unten). (Digital LP kann nicht als Abspielgerät für Audio Ihres Computers verwendet werden.)
Wenn ich den Plattenspieler verwende, höre ich ein Summen durch meine Lautsprecher oder meinen Laptop:
• Wenn Sie mit einem Laptop aufnehmen: o Bitte verbinden Sie den Laptop an eine geerdete Stromquelle (3 polig)
• Wenn Sie über einen Lautsprecher spielen: o Bitte verbinden Sie diesen mit einer geerdeten (3 poligen) Stromquelle.
Meine Schallplatte wird nicht mit der richtigen Geschwindigkeit wiedergegeben. Die Tonlage ist zu hoch oder zu tief:
o Stellen Sie sicher, dass der 33/45/78-Schalter für diese Schallplatte auf die entsprechende Geschwindigkeit eingestellt ist.
Das Display an der Vorderseite verbleibt auf der Uhrzeit/Datumsanzeige und reagiert nicht, wenn die Tasten gedrückt werden:
o Das Gerät befindet sich im ERP-Standby-Modus. Drücken Sie kurz den Netzschalter, um den normalen Betrieb wieder aufzunehmen.
Auf dem Display wird „Kein DAB-Sender“ angezeigt:
o Antenne einstellen und DAB-Sender neu scannen. o Es gibt keine DAB-Sender in Ihrer Region.
42
Digital LP als Standardaufnahmegerät einstellen
• Windows XP: Klicken Sie auf Startmenü Systemsteuerung (oder Einstellungen Systemsteuerung in der klassischen Ansicht) Sound und Audiogeräte. Klicken Sie auf die Registerkarte Audio unter Aufnahme und wählen USB PnP Audio Device als Standard-Gerät aus.
• Windows Vista: Klicken Sie auf Startmenü Systemsteuerung (oder Einstellungen Systemsteuerung in der klassischen Ansicht) Hardware und Sound Ton. Klicken Sie auf die Registerkarte Aufnahme und wählen Sie USB PnP Audio Device als Standard-Gerät aus.
• Windows 7: Wählen Sie Startmenü Systemsteuerung Ton. Klicken Sie auf die Registerkarte Aufnahme und wählen Sie USB PnP Audio Device als Standard-Gerät aus.
• Windows 8: Klicken Sie im Startmenü auf die linke untere Ecke des Bildschirms, um zum Desktop zu gelangen. Klicken Sie in der rechten unteren Ecke der Taskleiste auf das „Lautsprechersymbol“. Klicken Sie mit der rechten Maustaste auf den Lautsprecher und wählen Wiedergabegeräte. In der Windows-Systemsteuerung für Sound wählen Sie die Registerkarte Aufnahme. Wenn neben USB PnP Audio Device kein grünes „Häkchen“-Symbol angezeigt wird, klicken Sie mit der rechten Maustaste auf das Gerät und wählen „Als Standardgerät festlegen“.
• Windows 10: Klicken Sie auf Startmenü Systemsteuerung (oder Einstellungen Systemsteuerung in der klassischen Ansicht) Hardware und Sound Ton. In der Windows-Systemsteuerung für Sound wählen Sie die Registerkarte Aufnahme. Wenn neben USB Audio Codec kein grünes „Häkchen“-Symbol angezeigt wird, klicken Sie mit der rechten Maustaste auf das Gerät und wählen „Als Standardgerät festlegen“. Wählen Sie Eigenschaften aus und klicken Sie auf die Registerkarte Erweitert, um das Standardformat 44100 Hz oder 48000 Hz auszuwählen.
• Mac OS X 10.4-10.11: Klicken Sie auf das obere linke „Apfel“-Symbol und klicken dann auf Systemeinstellungen Ton. Klicken Sie auf die Registerkarte Input. Aus dem Menü wählen Sie USB Audio Codec als Gerät. Unter Format wählen Sie 44100,0 Hz oder 48000,0 Hz.
Einrichten Ihrer Computer-Soundkarte als Standardwiedergabegerät
• Windows XP: Klicken Sie auf Startmenü Systemsteuerung (oder Einstellungen Systemsteuerung in der klassischen Ansicht) Sound und Audiogeräte. Klicken Sie auf die Registerkarte Audio und wählen unter Soundwiedergabe Ihre Computer-Soundkarte als Standardgerät.
• Windows Vista: Klicken Sie auf Startmenü Systemsteuerung (oder Einstellungen Systemsteuerung in der klassischen Ansicht) Hardware und Sound Ton. Klicken Sie auf die Registerkarte Wiedergabe und wählen Ihre Computer-Soundkarte als Standardgerät.
• Windows 7: Wählen Sie Startmenü Systemsteuerung Ton. Klicken Sie auf die Registerkarte Wiedergabe und wählen Ihre Computer-Soundkarte als Standardgerät.
• Windows 8: Klicken Sie im Startmenü auf die linke untere Ecke des Bildschirms, um zum Desktop zu gelangen. Klicken Sie in der rechten unteren Ecke der Taskleiste auf das „Lautsprechersymbol“. Klicken Sie mit der rechten Maustaste auf den Lautsprecher und wählen Wiedergabegeräte. Die Windows-Systemsteuerung für Sound sollte nun unter der Registerkarte Wiedergabe aufscheinen. Wenn neben der Soundkarte Ihres Computers kein grünes „Häkchen“-Symbol aufscheint, klicken Sie mit der rechten Maustaste auf die Soundkarte und wählen „Als Standardgerät festlegen“.
• Windows 10: Wählen Sie Startmenü Systemsteuerung Ton. Klicken Sie auf die Registerkarte Wiedergabe und wählen Ihre Computer-Soundkarte als Standardgerät.
• Mac OS X 10.4-10.11: Klicken Sie auf das obere linke „Apfel“-Symbol und klicken dann auf Systemeinstellungen Ton. Klicken Sie auf die Registerkarte Ausgabe. Aus diesem Menü wählen Sie Interne Lautsprecher, wenn Sie die internen Lautsprecher des Computers verwenden oder Kopfhörer, wenn Sie Lautsprecher oder Kopfhörer verwenden, die an den 1/8"-Kopfhörerausgang des Computers angeschlossen sind.
BEVOR SIE DIESES PRODUKT EINSENDEN, kontaktieren Sie bitte ION Audio für technischen Support: Kontaktinformationen finden Sie in den beigefügten Sicherheitshinweisen und Garantieinformationen.
ionaudio.com/support

43
Snelstartgids (Nederlands) Inleiding Inhoud van de doos Digital LP
Stroomadapter
45-toerenadapter
Slipmat
Kaart voor softwaredownloads
Snelstartgids
Veiligheids- en garantiehandleiding
Ondersteuning Raadpleeg voor de laatste informatie over dit product (documentatie, technische specificaties, systeemvereisten, compatibiliteitsinformatie, enz.) en productregistratie ionaudio.com.
Raadpleeg voor extra productondersteuning ionaudio.com/support.
Installatie Artikels die niet zijn opgesomd in Inleiding > Inhoud van de doos zijn afzonderlijk verkrijgbaar.
Luidsprekers
Computer
Tablet

44
Kenmerken Voorpaneel
1. Aan/uit: Druk op deze knop om het apparaat aan of uit te zetten. 2. Mode: Indrukken en loslaten om te schakelen tussen Phono, Aux In, zoeken naar DAB-
zenders en FM-radio. De Menu-knop indrukken en vasthouden om de verschillende systeemopties weer te geven. Dit varieert naargelang de geselecteerde modus. Zie Bediening > Menuopties voor meer details.
3. Program: Gebruik in deze modus de cursortoetsen omhoog/omlaag om een van de 20 voorkeursinstellingen te selecteren en een favoriete FM-radiozender op te slaan. Zodra u de juiste locatie hebt gevonden, drukt u op Enter om de zender hier op te slaan.
4. Scan: Deze toets indrukken en vasthouden om de FM-zenders met het beste signaal te vinden. Deze toets indrukken en loslaten om naar de volgende zender met een sterk signaal te gaan. De functie stopt een aantal seconden zodat u kunt bepalen of u in deze zender bent geïnteresseerd. Vervolgens springt de functie naar de volgende sterke zender.
5. Alarm: Druk op deze knop om de opties voor de alarmmodus in te stellen: uur, dagen en volume. Opmerking: Als u wijzigingen maakt in alarmmodus, navigeer dan naar de optie Save en druk op Enter om de wijzigingen op te slaan.
6. Display: Geeft de huidige modus weer, de menu's, radiozenders en voorkeursinstellingen.
7. Menu/Info: Druk in radiomodus meermaals op deze knop om te bladeren door de opties voor datum/uur, radio tekst, zendertype en signaalsterkte.
8. Volgend nummer: Druk deze toets in om de volgende DAB-zender of radiozender te beluisteren.
9. Enter: Druk deze toets in om een menuoptie te selecteren of een bepaalde functie te bevestigen.
10. Vorig nummer: Druk deze toets in om de vorige DAB-zender of radiozender te beluisteren.
11. Preset: Druk op deze toets en gebruik de toetsen omhoog/omlaag om de vorige opgeslagen radiozenders te doorbladeren en te selecteren.
12. Koptelefoonuitgang: Wanneer een koptelefoon is aangesloten, wordt de interne luidspreker gedempt.
13. Volume: Past het geluidsniveau aan voor zowel de interne luidsprekers als de koptelefoonuitgang. Opmerking: Omdat dit een "eindeloze" knop is, kan het volumeniveau nauwkeurig worden bepaald door te kijken naar de volumebalken op het scherm wanneer u de knop bijstelt.
14. Luidsprekers: De muziek wordt afgespeeld door deze interne luidsprekers.
1 2 3 4 5
6
7 8 9 10 11 131214 14
7

45
Bovenpaneel 1. Draaiplateau: Leg hier uw plaat op.
2. Toonarm: De vaste toonarm kan zowel met de hand als met de toonarmhendel worden opgetild of neergelaten.
3. Armklem: Deze armklem beveiligt de toonarm wanneer die niet in gebruik is. De armklem werd ontworpen om in ontgrendelde positie geopend te blijven.
4. Schakerlaar 33 / 45 / 78 toeren: Deze schakelaar bedient de snelheid van het draaiplateau.
Opmerking: Gebruik voor optimale resultaten bij het afspelen van 78-toerenplaten een stylus voor 78 toeren (afzonderlijk verkrijgbaar). Gebruik alleen een stylus voor 78 toeren met 78-toerenplaten.
5. Autostopschakelaar: Deze schakelaar zet autostop aan of uit. Wanneer Autostop aanstaat, dan begint het draaiplateau te draaien wanneer de toonarm over de plaat wordt bewogen en stopt het draaiplateau met draaien wanneer de toonarm het einde heeft bereikt. (Wanneer Autostop uitstaat, blijft het draaiplateau altijd draaien, ongeacht de stand van de toonarm.)
Opmerking: Als uw vinylplaat stopt voordat het einde van de muziek is bereikt, zet dan voor deze concrete plaat de Autostop-functie uit. In het algemeen bevelen wij dit aan voor 45-toerenplaten.
BELANGRIJK: Verwijder de plastic cartridgekap (naaldkap) voordat u de draaitafel bedient.
*WAARSCHUWING: De RCA-uitgangen zijn op lijnniveau. Sluit deze alleen aan op ingangen op lijnniveau. U kunt uw versterker beschadigen als u een apparaat op lijnniveau aansluit op een ingang op phononiveau.
BELANGRIJK: Plaats de meegeleverde vilten slipmat op het draaiplateau en leg vervolgens uw plaat op de slipmat, om uw platen met zorg te behandelen.
1
2
345

46
Achterpaneel
1. USB: Gebruik een USB-kabel om uw draaitafel aan te sluiten op uw computer. De USB-
aansluiting verstuurt audio van de draaitafel naar uw computer. Zie het hoofdstuk Digital LP gebruiken met uw computer van deze handleiding voor meer informatie.
2. Aux-ingang: Sluit op deze ingang de uitgang van een apparaat op lijnniveau aan, zoals een smartphone, Media Player, tablet, enz.
3. Lijnuitgang: Sluit op deze uitgang externe luidsprekers aan.
4. FM-antenne: Stel deze bij voor een betere ontvangst van FM-zenders.
1
2
3
4

47
Bediening
Muziek afspelen van de platenspeler Voor gebruik: • De styluskap verwijderen. De beschermkap terugplaatsen op de stylus wanneer u deze niet gebruikt. • Controleer of de toonarm vrij de armklem kan verlaten. Vergrendel de toonarm wanneer u deze niet
gebruikt. 1. Activeer de Phono-modus en til de stofkap van de draaitafel op. 2. Leg een plaat op de draaitafel, over de centrale spindel op de slipmat. 3. Kies afhankelijk van de plaat voor een snelheid van 33, 45 of 78 toeren. 4. Til de toonarm op van de armklem en beweeg deze traag over de plaat. Het draaiplateau begint te
draaien. 5. Plaats de toonarm op de gewenste plaats op de plaat. 6. Laat de toonarm zacht zakken op de plaat om de muziek af te spelen. 7. Wanneer de plaat is afgespeeld, zal de toonarm automatisch stoppen. Til de toonarm van de plaat en
plaats deze terug op de armklem. 8. De plaat handmatig stoppen: til de toonarm van de plaat en plaats deze terug op de armklem.
Opmerking: Het draaiplateau niet handmatig stoppen of draaien. De draaitafel bewegen of schokken zonder de toonarmklem te vergrendelen, kan de toonarm beschadigen.
Werking van de autostopschakelaar Sommige platen hebben een autostopzone buiten de vooringestelde limiet. Hierdoor kan de draaitafel stoppen voordat het laatste nummer is afgespeeld. Als dit gebeurt, zet dan de autostopschakelaar in de Uit-stand. Hierdoor blijft de plaat tot het einde spelen, maar stopt deze niet automatisch. U moet de toonarm handmatig optillen en terugplaatsen op de armklem en vervolgens de draaitafel uitzetten, zodat deze stopt met draaien. Muziek afspelen via de Aux-ingang 1. Druk op de Mode-knop om Aux In te selecteren. 2. Verbind met een stereo audiokabel van 1/8” (3,5 mm) (afzonderlijk verkrijgbaar) de Aux-ingang met de
lijnuitgang of koptelefoonuitgang van uw extern audio-apparaat om via de interne luidsprekers van de Digital LP te luisteren naar een externe geluidsbron.
3. Zet het volume van de Digital LP op het gewenste niveau. Opmerking: Als de lijnuitgang van uw extern apparaat is verbonden, moet u alleen de volumeregeling van het systeem bijstellen. Als de koptelefoonuitgang van uw extern apparaat is verbonden, moet u mogelijk zowel het volume op uw extern apparaat als op de Digital LP bijstellen om het gewenste volume te bereiken. Luisteren naar FM-radio 1. Druk meermaals op de Mode-knop om FM-radio te selecteren. 2. Selecteer de FM-radiozender met de knoppen ▲▼. 3. Zet de Volume-knop op het gewenste niveau. Zoeken naar DAB-zenders DAB (Digital Audio Broadcasting) zendt radiosignalen uit via een netwerk van zenders. Dit geeft luisteraars een ruimere keuze (waar beschikbaar) en een heldere geluidskwaliteit. 1. Druk meermaals op de Mode-knop om DAB te selecteren. 2. Gebruik de ▲▼-knoppen om Station Scan te selecteren en druk op Enter. 3. Selecteer een van de volgende zoekopties met de ▲▼-knoppen.
• Local Scan: Het apparaat gaat op zoek naar uitzendingen op plaatselijke DAB-frequenties tussen 10A en 13F.
• Full Scan: Het apparaat doorzoekt alle DAB-frequenties om uitzendingen te vinden. • Manual Tune: Selecteer de gewenste specifieke frequentie om een uitzending te zoeken.
4. Druk op Enter om de gewenste optie te selecteren. Opmerking: Op het scherm verschijnt de signaalsterkte-indicator.
48
Het alarm instellen 1. Druk op de Alarm-knop. 2. Gebruik de ▲▼-knoppen om de Mode te selecteren (DAB of Buzzer), Alarm, Alarm Time en
Volume. Druk op Enter om de selectie te bevestigen. 3. Pas de instellingen aan met de knoppen Omhoog/Omlaag en druk op Enter om de selectie te
bevestigen. 4. Selecteer de optie Save en druk op Enter om de wijzigingen op te slaan. Menuopties In elke modus de knop Menu/Info indrukken en vasthouden om de volgende opties te wijzigen: De modi Phono en Aux In Time Setup: de tijd instellen van de klok, de datum, automatisch bijwerken en tijdsweergave (12 of 24 uur)
Factory Reset: Dit selecteren om het apparaat terug te zetten naar de standaard fabrieksinstellingen.
SW Version: Dit selecteren om de huidige softwareversie te raadplegen.
FM-modus Audio Setting: Selecteer of de audio-uitvoer voor radiozenders stereo of mono moet zijn, of alleen mono. DAB-modus Station Scanning: Zoekt naar beschikbare DAB-zenders
De Digital LP gebruiken met uw computer
Opnemen Om muziek op te nemen op uw computer, kunt u de ION EZ Vinyl/Tape Converter en een USB-kabel gebruiken. Met EZ Vinyl/Tape Converter slaat u gemakkelijk uw opnames op computer op. Nadat u uw platen hebt geconverteerd, kunt u ze branden op een cd of uploaden op draagbare media-apparaten. Volg de instructies op de meegeleverde kaart voor softwaredownloads om EZ Vinyl/Tape Converter te installeren. 1. Met EZ Vinyl/Tape Converter geïnstalleerd op uw computer kunt u met een USB-kabel de USB-poort
van de Digital LP verbinden met een beschikbare USB-poort op uw computer.
2. Open op uw computer EZ Vinyl/Tape Converter door te klikken op Startmenu Alle programma's (Windows) of het menu Toepassingen (Mac).
3. Volg de instructies die verschijnen op het scherm om de opname in te stellen. Wanneer u wordt gevraagd om uw muziek af te spelen, plaatst u de toonarm van de Digital LP op de plaat om de plaat af te spelen.
Opmerking: Om een spelende plaat te beluisteren, kunt u luisteren door de luidsprekers van uw computer of kunt u de RCA-uitgangen van de Digital LP aansluiten op een stereoketen of actieve luidsprekers. Sluit ze niet aan op ingangen op phononiveau; De RCA-uitgangen van Digital LP zijn op lijnniveau en kunnen een apparaat met ingangen op phononiveau beschadigen.
4. Als u de opname hebt voltooid, til dan de toonarm van de Digital LP op van de plaat en plaats deze terug op de armklem.
Tip: Als het programma geen audio van Digital LP herkent, probeer dan de volumeknop op de Digital LP rechtsom te draaien. Ga naar ionaudio.com/computer-optimization voor meer informatie over het optimaliseren van uw computer voor audio.
Ga naar ionaudio.com/ezvc om de laatste versie van de EZ Vinyl/Tape Converter-software te downloaden of voor hulp bij probleemoplossing en extra ondersteuning.

49
Afspelen U kunt naar de muziek luisteren op uw computer door de interne luidsprekers of door een aangesloten koptelefoon. (Digital LPkan niet worden gebruikt als een afspeelapparaat voor de audio van uw computer.) Om een spelende plaat te beluisteren, luistert u door de luidsprekers van uw computer of sluit u de RCA-uitgangen van de Digital LP aan op een stereoketen of actieve luidsprekers. Sluit ze niet aan op ingangen op phononiveau; De RCA-uitgangen van Digital LP zijn op lijnniveau en kunnen een apparaat met ingangen op phononiveau beschadigen. Tip: Als u geen geluid gehoord via uw externe luidsprekers (niet die van Digital LP), probeer dan de volumeknop op Digital LP rechtsom te draaien.
Problemen oplossen Als u problemen ondervindt, raadpleeg dan de onderstaande stappen voor probleemoplossing, alsook de stappen in de met dit product meegeleverde handleiding voor EZ Vinyl/Tape Converter. Als u de muziek opneemt op een computer:
o Controleer of de Digital LP is ingeschakeld en of de naald zich op de plaat bevindt. o Controleer of de Digital LP is geselecteerd als het standaardopnameapparaat van uw computer (zie de
instructies hieronder). o Als u luistert door de luidsprekers van uw computer, controleer dan of die luidsprekers zijn geselecteerd
als het standaardafspeelapparaat van uw computer (zie de instructies hieronder). Ook kunt u de RCA-uitgangen van de Digital LP aansluiten op een stereoketen of op actieve luidsprekers. Sluit ze niet aan op ingangen op phononiveau; De RCA-uitgangen van Digital LP zijn op lijnniveau en kunnen een apparaat met ingangen op phononiveau beschadigen. (Opmerking: De RCA-uitgangen luisteren naar het signaal dat afkomstig is van de draaitafel, niet naar het signaal van uw computer).
o Ontkoppel en verbind vervolgens opnieuw de USB-kabel waarmee de Digital LP is aangesloten op uw computer.
Ik hoor geen audio wanneer ik muziek afspeel:
• Als u een plaat afspeelt: o Controleer of de Digital LP is ingeschakeld en of de naald zich op de plaat bevindt. o Sluit de RCA-uitgangen van de Digital LP aan op een stereoketen of actieve luidsprekers. (Sluit ze niet
aan op ingangen op phononiveau; De RCA-uitgangen van Digital LP zijn op lijnniveau en kunnen een apparaat met ingangen op phononiveau beschadigen.)
• Als u muziek afspeelt vanaf uw computer: o Controleer of het volume van uw muzieksoftware aan staat. o Controleer of het volume van uw computer aan staat. o Controleer of uw computerluidsprekers zijn geselecteerd als standaardafspeelapparaat van uw
computer (zie de onderstaande instructies). (Digital LPkan niet worden gebruikt als een afspeelapparaat voor de audio van uw computer.)
Ik hoor gezoem door mijn luidsprekers of laptop wanneer ik de draaitafel gebruik:
• Als u opneemt met een laptop: o Sluit de laptop aan op een geaard stopcontact (met 3 contacten)
• Als u muziek afspeelt door luidsprekers: o Sluit het apparaat aan op een geaard stopcontact (met 3 contacten).
Mijn plaat speelt niet met de juiste snelheid; de toonhoogte is te hoog of te laag:
o Controleer of de keuzeschakelaar 33/45/78 toeren op de juiste snelheid staat voor uw plaat. Het scherm op het voorpaneel blijft het uur en de datum weergeven en reageert niet wanneer ik op een knop druk:
o Het apparaat bevindt zich in ERP-stand-bymodus. De aan-uitknop indrukken en loslaten om de normale werking te hervatten.
Op het scherm verschijnt “No DAB Station”:
o Stel de antenne bij en zoek opnieuw naar DAB-zenders. o Er zijn geen DAB-zenders in uw gebied.

50
De Digital LP instellen als standaardopnameapparaat
• Windows XP: Klik op Startmenu Configuratiescherm (of Instellingen Configuratiescherm in klassieke weergave) Geluid en audioapparaten. Klik op het tabblad Audio onder Geluid opnemen, selecteer USB PnP-audioapparaat als standaardapparaat.
• Windows Vista: Klik op Startmenu Configuratiescherm (of Instellingen Configuratiescherm in klassieke weergave) Hardware en geluid Geluid. Klik op het tabblad Opnemen en selecteer USB PnP-audioapparaat als standaardapparaat.
• Windows 7: Klik op Startmenu Configuratiescherm Geluid. Klik op het tabblad Opnemen en selecteer USB PnP-audioapparaat als standaardapparaat.
• Windows 8: Klik in het Startmenu op de hoek linksonder het scherm om naar het Bureaublad te gaan. Zoek in de hoek rechts onderaan de Taakbalk het pictogram met de luidspreker. Klik met de rechtermuisknop op de luidspreker en selecteer Afspeelapparaten. Selecteer in het configuratiescherm Geluid van Windows het tabblad Opnemen. Als USB Pnp-audioapparaat niet groen is afgevinkt, druk er dan op met de rechtermuisknop en selecteer "Als standaardapparaat instellen".
• Windows 10: Klik op Startmenu Configuratiescherm (of Instellingen Configuratiescherm in klassieke weergave) Hardware en geluid Geluid. Selecteer in het configuratiescherm Geluid van Windows het tabblad Opnemen. Als USB-audiocodec niet groen is afgevinkt, druk er dan op met de rechtermuisknop en selecteer "Als standaardapparaat instellen". Selecteer Eigenschappen en klik op het tabblad Geavanceerd om de standaardindeling te selecteren: 44100 Hz of 48000 Hz.
• Mac OS X 10.4-10.11: Klik op het Apple-pictogram bovenaan links en klik vervolgens op Systeemvoorkeuren Geluid. Klik op het tabblad Invoer. Selecteer in het menu USB-audiocodec als het apparaat. Selecteer onder Indeling 44100 Hz of 48000 Hz.
De geluidskaart van uw computer instellen als standaardafspeelapparaat
• Windows XP: Klik op Startmenu Configuratiescherm (of Instellingen Configuratiescherm in klassieke weergave) Geluid en audioapparaten. Klik op het tabblad Audio onder Geluid afspelen en selecteer de geluidskaart van uw computer als standaardapparaat.
• Windows Vista: Klik op Startmenu Configuratiescherm (of Instellingen Configuratiescherm in klassieke weergave) Hardware en geluid Geluid. Klik op het tabblad Afspelen en selecteer de geluidskaart van uw computer als standaardapparaat.
• Windows 7: Klik op Startmenu Configuratiescherm Geluid. Klik op het tabblad Afspelen en selecteer de geluidskaart van uw computer als standaardapparaat.
• Windows 8: Klik in het Startmenu op de hoek linksonder het scherm om naar het Bureaublad te gaan. Zoek in de hoek rechts onderaan de Taakbalk het pictogram met de luidspreker. Klik met de rechtermuisknop op de luidspreker en selecteer Afspeelapparaten. Het Windows-configuratiescherm Geluid moet verschijnen, ingesteld op het tabblad Afspelen. Als de geluidskaart van uw computer niet groen is afgevinkt, druk er dan op met de rechtermuisknop en selecteer "Als standaardapparaat instellen".
• Windows 10: Klik op Startmenu Configuratiescherm Geluid. Klik op het tabblad Afspelen en selecteer de geluidskaart van uw computer als standaardapparaat.
• Mac OS X 10.4-10.11: Klik op het Apple-pictogram bovenaan links en klik vervolgens op Systeemvoorkeuren Geluid. Klik op het tabblad Uitvoer. Selecteer Interne luidsprekers in het menu als u de interne luidsprekers van uw computer gebruikt of selecteer Koptelefoon als u een koptelefoon of luidsprekers gebruikt die zijn aangesloten op de 1/8" koptelefoonuitgang van uw computer.
VAARDAT U HET PRODUCT RETOURNEERT: neem contact op met ION Audio voor technische ondersteuning. De contactgegevens vindt u in de Veiligheids- en garantiehandleiding, meegeleverd bij dit product.
ionaudio.com/support
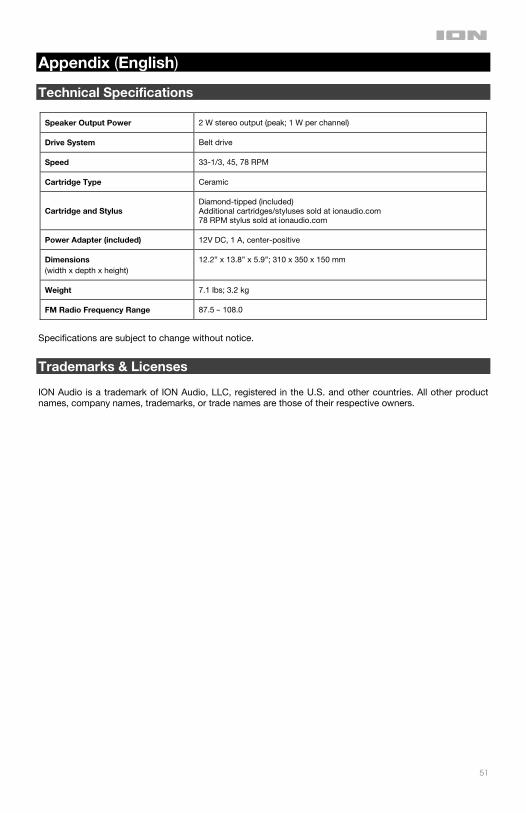
51
Appendix (English) Technical Specifications
Speaker Output Power 2 W stereo output (peak; 1 W per channel)
Drive System Belt drive
Speed 33-1/3, 45, 78 RPM
Cartridge Type Ceramic
Cartridge and Stylus Diamond-tipped (included)Additional cartridges/styluses sold at ionaudio.com 78 RPM stylus sold at ionaudio.com
Power Adapter (included) 12V DC, 1 A, center-positive
Dimensions (width x depth x height)
12.2” x 13.8” x 5.9”; 310 x 350 x 150 mm
Weight 7.1 lbs; 3.2 kg
FM Radio Frequency Range 87.5 – 108.0
Specifications are subject to change without notice.
Trademarks & Licenses ION Audio is a trademark of ION Audio, LLC, registered in the U.S. and other countries. All other product names, company names, trademarks, or trade names are those of their respective owners.
ionaudio.com
Manual Version 1.0