quickguide and admin manual - · pdf filekeytalk it security bv | | page 1 quickguide and...
TRANSCRIPT

KeyTalk IT Security BV | www.keytalk.com | Page 1
Quickguide and admin manual
Company KeyTalk IT Security BV
Author MR vd Sman
Creation date 09 May 2017
Last updated 08 January 2018
Product KeyTalk application server (certificate and key management & enrollment)
Software/firmware version 5.2.3
Manual version 5.2.3.4

KeyTalk IT Security BV | www.keytalk.com | Page 2
Contents 1. Quickguide Introduction and download ................................................................................................................... 3
2. Quickguide Resource requirements ......................................................................................................................... 3
3. Quickguide Secure client communication ................................................................................................................ 4
4. Quickguide System admin login ................................................................................................................................ 4
5. Quickguide Manually changing addresses and default gateway .............................................................................. 5
6. Quickguide: Getting started ...................................................................................................................................... 6
Step 1: Change your admin and root password ................................................................................................... 6
Step 2: Ensure your KeyTalk license is valid ......................................................................................................... 6
Step 3: Ensure that all daemons are running (an expired license will stop de CA daemon) ............................... 6
Step 4: Configure your network ........................................................................................................................... 6
Step 5: Set time and NTP ...................................................................................................................................... 6
Step 6: Generate your unique Certificate Authority and keys, or import it ........................................................ 6
Step 7: Add one or more certificate templates in SERVICES ................................................................................ 7
Step 8: Set Multi Factor Authentication details: hardware recognition options per SERVICE ............................ 7
Step 9: Connect a SERVICE to your Identity Provider and (de)activate hardware recognition ........................... 8
Step 10: Create KeyTalk app/client configuration file ........................................................................................ 9
Step 11 Backup your KeyTalk configuration settings ......................................................................................... 9
7. Quickguide: Upgrading from KeyTalk 4 to KeyTalk 5 ................................................................................................ 9
8. Quickguide: Major improvements KeyTalk 5 compared to KeyTalk 4 .................................................................... 10
9. Quickguide: Frequently encountered setup issues ................................................................................................ 10
10. Introduction: KeyTalk certificate & key management and enrollment .............................................................. 12
11. Setting up your KeyTalk private Certificate Authority ........................................................................................ 13
12. Issuing certificates to end-points ........................................................................................................................ 16
12.1 KeyTalk SERVICE settings: certificate Registration Authority basic settings .............................................. 17
12.2 KeyTalk SERVICE settings: your default certificate meta-data, and certificate policies ............................ 18
12.3 KeyTalk SERVICE settings: trusted device slot assignment to end-points ................................................. 20
13. Certificate renewal automation parameters ...................................................................................................... 21
14. End-point user/device administration and extra auth factor ............................................................................. 23
15. KeyTalk in a network ........................................................................................................................................... 26
16. KeyTalk webUI management roles and strong authentication .......................................................................... 27
17. Log files and reports ........................................................................................................................................... 28
18. Client certificate use cases .................................................................................................................................. 29
19. Server certificate use cases ................................................................................................................................. 30
20. KeyTalk contact details ....................................................................................................................................... 32

KeyTalk IT Security BV | www.keytalk.com | Page 3
1. Quickguide Introduction and download The KeyTalk automated client, server and IoT device certificate enrollment solution requires minimally 1 KeyTalk virtual application server. For production purposes an external MySQL Database can be added. This MySQL Db is used to store configuration settings etc, as a central repository for the KeyTalk virtual application server(s), allowing you to setup a 3rd party LoadBalancer and multiple KeyTalk application servers for scalability purposes. Download your preferred KeyTalk virtual appliance in OVF/VMDK or VHD here: https://www.keytalk.com/download#firmware You can obtain the KeyTalk client/application as well as the development and sample code here: https://www.keytalk.com/download#clients and https://www.keytalk.com/download#sdks
2. Quickguide Resource requirements KeyTalk’s virtual front-end application server is based upon Ubuntu and requires:
➢ 20 Gb diskspace ➢ 2 CPU’s with 2 cores ➢ 4 Gb memory ➢ 1 IPv4 and/or IPv6 address (default assigned through DHCP)
KeyTalk’s external MySQL can be any customer preferred edition: Cluster CGE, Enterprise (KeyTalk recommended),
Standard or Community edition, as long as long as its minimally version 5.7.8!! The database itself is provided by KeyTalk for import purposes and will grow with each user by roughly 2 kB (kilobyte)
➢ 160 MB (megabyte) diskspace per 100.000 users (including 1 million trusted device hashes) ➢ 2 CPU’s with 2 cores ➢ 8 Gb memory ➢ 1 IPv4 and/or IPv6 address
The following list allows for a quick overview of used ports to define firewall rules prior to setup
Port Function
Default Gateway n.a. Gateway
KeyTalk IP address 80 KeyTalk 4 legacy client secure client communication (can be disabled) *.ubuntu.com (Ubuntu package updates)
443 KeyTalk 5 secure KeyTalk client communication pypi.python.org (Python package updates) GlobalSign platform communication: Testbed: https://test-gcc.globalsign.com/kb/ws/v1/ManagedSSLService Production: https://system.globalsign.com/kb/ws/v1/ManagedSSLService
[coming soon] optional KeyTalk appliance firmware upgrade server : https://ktupgrade.keytalk.com IPv4: 95.142.98.26 IPv6: 2a00:1188:c::26

KeyTalk IT Security BV | www.keytalk.com | Page 4
53 DNS
123 NTP
389 AD/LDAP non-secure (optional)
636 AD/LDAP secure (optional)
1812 RADIUS authentication communication (optional)
3000 Admin interface
3306 MySQL communication
Note: Setting up the MySQL Db server or just the Db in your existing MySQL environment is covered in the
separate included manual keytalkMySQL.svr.doc-versionnumber>.tar as found in the virtual appliance download
3. Quickguide Secure client communication KeyTalk’s default communication protocol makes use of TLS 1.2 with certificate/key pinning. As our client software TLS enforcement is very strict, it is necessary to ensure that the FQDN and/or IP address(es) of the KeyTalk application server matches with the SubjectAlternativeName value set in the certificate configured for the KeyTalk application server (client-server-certificate as found under certificates and keys.) When using the KeyTalk REST API to integrate KeyTalk functionality into your own app/software, it is highly recommended to enforce similar strict matching criteria and for example not disregard a CN or SAN mismatch!
4. Quickguide System admin login To login as KeyTalk admin from the Hypervisor CLI use: Username: keytalk Password: change!
To see what IP address was assigned from your DHCP server, type the command: ifconfig Since ROOT is disabled on both system- and SSH-level, when entering CLI commands use “sudo”
To verify that indeed your root account is disabled, type: sudo grep root /etc/shadow You will get a line beginning like the following: 'root:!: ......' where the ! or a * signalize that the account is disabled.
To verify the same on an SSH-level, type: sudo grep Login /etc/ssh/sshd_config
Login into the Admin Graphical User Interface from a browser using: https://<myipaddress>:3000 Username: admin Password: change! NOTE: As KeyTalk ships with a self-signed SSL certificate, your browser will give a security trust warning! NOTE: Strong authentication for the management GUI is supported under the menu item: Admin , and
requires a proper matching trusted client certificate as issued under the KeyTalk Signing CA

KeyTalk IT Security BV | www.keytalk.com | Page 5
5. Quickguide Manually changing addresses and default gateway When you do not make use of a DHCP server, you need to configure the IP address manually. Simply launch the following command from your console:
sudo /usr/local/bin/keytalk/netconf
To change IPs for IPv6 use the link-local IPv6 Alternatively, you can change the IPs in a more elaborate manner by using:
edit /etc/network/interfaces auto eth0 allow-hotplug eth0 iface eth0 inet static address 192.168.33.102 netmask 255.255.255.0 gateway 192.168.33.1 iface eth0 inet6 static address 2a00:1188:c::242 netmask 64 save it and run: service networking restart
To delete an entry use: d <arrow> To insert an entry use: insert To quit without saving use: <ESC> :q! To quit and save use: <ESC> :wq Several admins prefer another editor such as Nano. To install the Nano editor:
sudo apt install -y nano

KeyTalk IT Security BV | www.keytalk.com | Page 6
6. Quickguide: Getting started
Step 1: Change your admin and root password
From the GUI you can change your KeyTalk admin password. From your console you can change your root password using:
passwd
Ensure you remember the set console password as there is no way to undo a console password change when you forgot it!!
Step 2: Ensure your KeyTalk license is valid
Step 3: Ensure that all daemons are running (an expired license will stop de CA daemon)
Step 4: Configure your network
Step 5: Set time and NTP
Step 6: Generate your unique Certificate Authority and keys, or import it
NOTE: Ensure that at least the CLIENT-SERVER certificate is configured with a proper Common Name (ie the FQDN of your KeyTalk instance) and/or a proper Subject Alternative Name.
Especially for Proof of Concept purposes it is advisable to include in the SAN the Public and or Internal IP address of the KeyTalk server, this is explained in the tiptool or “i” mouse-over. When the CN or SAN value is incorrect, then the KeyTalk client will fail to connect due to TLS being very strictly enforced. After GENERATE the CA will be created. Once ready select INSTALL to effectuate your unique Certificate Authority, and optionally delete the Primary CA private key.

KeyTalk IT Security BV | www.keytalk.com | Page 7
Step 7: Add one or more certificate templates in SERVICES
A KeyTalk SERVICE is a certificate template and links to the defined Certificate Authority source.
Note: Default certificate fields and (extended-) key-usage can be optionally overwritten with mapped data coming from the external authentication module (LDAP/AD/MySQL etc), provided the target CA allows for it. For example, (Q)TCSPs such as GlobalSign or QuoVadis will enforce predefined certificate profiles.
Note For developers using the REST API: The client hardware component numbers defined in HWSIG are an implementation for use with the KeyTalk clients/apps only. Developers are free to add any numeric information in the HWSIG field, or even disregard it, and generate their own Hardware Signature hash, usable with the DEVID USER administration within KeyTalk.
Step 8: Set Multi Factor Authentication details: hardware recognition options per SERVICE
KeyTalk’s DEVice IDentification allows for added Multi-Factor- Authentication based on hardware recognition of a user-device as defined in the HWSIG field of the SERVICE.
It can always be learned automatically for an unknown, but first time positively authenticated users (on), or manually (off), or scheduled ie automatic learning for a period of time only. Each slot represents 1 stored device SHA2 hash, whereby each hash effectively becomes a static pre-shared secret. The timers allow for the automated closing of a Learn-Once slot. Ie when a device hasn’t been learned within the timer period, it will close automatically.

KeyTalk IT Security BV | www.keytalk.com | Page 8
Step 9: Connect a SERVICE to your Identity Provider and (de)activate hardware recognition
KeyTalk allows the Admin to connect a SERVICE, ie certificate template, CA source and Hardware Recognition settings, to an Identity Provider. Commonly LDAP (including Active Directory), RADIUS (including SafeNet/Gemalto, RSA, Vasco tokens), MySQL are used by the majority of customers Other Identity Provider solutions can either be supported using our back-end API using the Relay Module, or request KeyTalk IT Security BV to add your preferred Identity Provider(s) to the solution. KeyTalk strongly advises to start with a basic connector and TEST/CHECK the connection using our inbuilt internal database feature, to ensure the connection works, before using the more advanced settings such as secure connections over LDAPS or EAP, or even certificate field mapping (allowing SERVICE certificate template default value to be overwritten with user unique information from your IDP source) For virtually all Active Directories as of Server 2008, the BIND setup process looks like: 1) Edit the LDAP/AD server as defined under the LDAP authentication module 2) BIND DN: $(userid)@mydomain.com 3) BIND password: $(password) 4) Allow empty password: UNCHECK! (this prevents potential anonymous BINDs) 5) BASE DN: dc=mydomain,dc=com This results in a positive certificate request when the BIND is successful over either LDAP or LDAPS protocol, based on a user’s AD username and its corresponding password. Based on this minimal defined BIND and Admin can tweak the BIND to restrict it further when need be. Using LDAPS is recommended from a secure communication point of view. When using LDAPS ensure first that the BIND works using LDAP communication. When this works enable LDAPS, which requires an ldap server url update to include ldaps & port number 636 AND have the LDAPS parent certificate uploaded to the KeyTalk authentication module (just the parent certificate NOT the private key). Certificate Field mapping is a powerful tool, allowing for default certificate template settings (ie KeyTalk SERVICE settings) to be overwritten with values coming from a user’s account. For example, attributes in an Active Directory or field names in a MySQL Db. This allows for unique SAN values per unique Common Name, or even [email protected] to be mapped to “[email protected]” or “name” as the certificate CN value.

KeyTalk IT Security BV | www.keytalk.com | Page 9
Step 10: Create KeyTalk app/client configuration file
This will result in a .rccd (real client configuration data) file bound to the chosen SERVICES and needs to be imported into a KeyTalk client, (or some of it content is used with the REST API), in order to obtain a certificate and private key from your KeyTalk environment. More information on the contents of the .rccd file can be found here (page 5): https://downloads.keytalk.com/downloads/KeyTalkClientAPI.pdf
Step 11 Backup your KeyTalk configuration settings
IMPORTANT : This backup also contains any set local sys-admin passwords and CA private keys (unless stored on an HSM for example) so treat as confidential information!!
7. Quickguide: Upgrading from KeyTalk 4 to KeyTalk 5 KeyTalk 5 is backwards compatible with the backup files generated by KeyTalk 4.6.x and DevID 1.4.1
KeyTalk 5 is also backwards compatible with your existing KeyTalk client software, so no changes are required client
side.
The following steps should be taken:
1) Ensure your KeyTalk 4.x environment is updated to version 4.6.x
2) Ensure your DevID 1.x environment is updated to version 1.4.1
3) Backup your KeyTalk 4.6.x. virtual appliance using the backup function
4) Backup your DevID 1.4.1 virtual appliance trusted hardware administration using the “group” user
5) Optionally cleanup your DevID trusted hardware administration backup
6) Configure your KeyTalk 5 environment
7) Import in KeyTalk 5, the KeyTalk 4.6.x backup under “system”
8) Import in KeyTalk 5, the DevID 1.4.1 hardware administration backup under “DEVID USERS”
9) Update your imported KeyTalk 4 Certificate Authority with appropriate SAN settings, see chapter 6 step 6.
10) Test your KeyTalk 5 environment to be working in accordance to your expectations
11) Change your DNS to have the KeyTalk 4 FQDN point to KeyTalk 5

KeyTalk IT Security BV | www.keytalk.com | Page 10
8. Quickguide: Major improvements KeyTalk 5 compared to KeyTalk 4
▪ 64 bit Ubuntu 16.04 LTS based
▪ Compatible with all major hypervisor/cloud solutions
▪ Certificate Authority root support up to 8192 bit RSA
▪ DevID read speed x30 due to optimized MySQL Db usage
▪ High Availability based on 3rd party Load Balancer technology (ie CARP is no longer supported)
▪ Integrated trusted hardware administration (ie no longer is DeVID a separate installation)
▪ semi-automated KeyTalk firmware upgrade distribution to all KeyTalk instances (ie admin uploads the
firmware and the MySQL 5.7.8 distributes it to the other KeyTalk instances)
▪ Much smaller firmware upgrades (Megabytes instead of Gigabytes)
▪ TCSP compatible, including CAA DNS record support (https://support.dnsimple.com/articles/caa-record/)
9. Quickguide: Frequently encountered setup issues
a) I can ping the KeyTalk admin IP address, but am unable to login as a KeyTalk admin!!
Very likely you are trying to login just after the KeyTalk application server started. Wait 1 minute to have the
KeyTalk Daemon start properly and retry.
b) KeyTalk is up and running, but my KeyTalk app/clients are unable to obtain a certificate!!
Very likely your KeyTalk license expired, or after uploading a valid license the CA Daemon did not get
started.
To resolve this issue: upload a valid KeyTalk license and start the CA Daemon.
c) My Active Directory BIND settings are 100% correct, yet KeyTalk refuses to connect to it!!
KeyTalk makes use of a BIND to your AD based on the user’s username/password. Make sure your BIND
works properly without LDAPS, once the BIND is successful, activate LDAPS.
When the BIND fails using LDAPS your LDAPS certificate on your AD and/or LoadBalancer is likely
considered invalid. Possibly it expired, or does not contain the proper FQDN in the SAN, OR your LDAPS
certificate does not have a parent CA.
To resolve ensure your LDAPS certificate is valid, has a parent CA, and contains the proper FQDN in the
SAN.
Some customers tend to only make use of internal IP address, resulting in a failed LDAPS connection. In
these cases, you should add the IP address to the SAN entry of your LDAPS certificate. Alternatively, you
could update KeyTalk’s “Local DNS Lookup Database” as found under NETWORK -> DNS
d) Server certificates issued by KeyTalk to Apache or IIS servers do not bind to the server!!
The most common cause of this problem is the fact that the certificate template (ie the SERVICE) does not
have the Enhanced Key Usage “Server Authentication” activated.
e) My server certificate as issued by KeyTalk isn’t trusted in my browser!!
The browser does not trust the KeyTalk or Trusted CSPs CA tree. To resolve this issue import the CA tree in
the client’s browser to resolve this issue. When using the KeyTalk client/app the KeyTalk CA trust is
automatically added to your local OS.
Alternatively, in May 2017 several browsers were updated to REQUIRE a server certificate’s FQDN to be
part of the DNS name entry in the certificate’s Subject Alternative Name, ie the CommonName value is
disregarded. To resolve this issue, map your preferred SAN entry to an Active Directory Attribute using
KeyTalk’s certificate field mapping feature.

KeyTalk IT Security BV | www.keytalk.com | Page 11
f) KeyTalk is a great product, but it definitely lacks functionality!!
Should you have a need for specific functionality, then it’s very likely that other companies do too.
To resolve this issue, let us know and based on your business case KeyTalk IT Security BV can add the
functionality to improve our product and meet your and future customer needs.
g) I’m using a LoadBalancer for KeyTalk and/or LDAP/RADIUS etc, and connections fail!!
KeyTalk enforces strict TLS requirements when using LDAPS/HTTPS. Ensure your LoadBalancer SSL
certificate has the correct FQDN/SAN entries, similarly your target authentication solution requires proper
FQDN/SAN entries AND requires its SSL/TLS certificate to be issued under a parent CA.
h) My SysAdmin settings did not synch from the KeyTalk application server to the KeyTalk cluster!!
This is currently expected behavior. SysAdmin settings are not synched across the cluster only other role
settings are synched in order to prevent a lockout situation due to accidental mistakes. In the near future
KeyTalk will support a push enforce mechanism to allow for SysAdmin settings to be synched as well.
i) The KeyTalk app/client connects properly to the KeyTalk application server but authentication fails!!
Authentication will fail under 3 conditions: 1) The entered user credentials were incorrect. Resolve by using the proper user credentials 2) The sent Hardware Signature, does not match. Resolve by disabling the HwSignature verification
under the appropriate Authentication Module as connected to the used SERVICE. Or resolve by adding an additional DEVID USER slot to a specific user, as the initially learned HwSignature might have been learned under Wifi conditions and the user device now uses 3G/4G (which affect the measured MAC address when the Admin chose to make AC address part of the generated HwSignature)
3) The URI as set in the used SERVICE mismatches on a DNS lookup level between the client and the KeyTalk application server. Resolve y either ensuring that the external and internal used DNS values or match, or by disabling CHECK URI in the used SERVICE

KeyTalk IT Security BV | www.keytalk.com | Page 12
10. Introduction: KeyTalk certificate & key management and enrollment
KeyTalk is a Certificate Authority vendor neutral PKI certificate & keypair management and secure enrollment
solution.
The KeyTalk solution can manage and (re-)enroll certificates and keys securely to end-points under:
✓ Its own OpenSSL based internal CA
✓ A third party private CA
✓ Any (Qualified) Trusted Certificate Service Provider
A customer using the KeyTalk solution does not need to choose which of these CA’s are used. KeyTalk enables
parallel use of all of them for the customer’s user group, and even to multiple customer user groups, ie the KeyTalk
solution is multi-tenant.
Because of KeyTalk’s unique vendor neutral position, a customer can also change with the flip of a checkmark the
CA source for an entire customer group. Allowing a customer to seamlessly transition from one CA vendor to another
without a major impact on her end-point community.
Enrollment of certificates and keys is done to client end-points independent upon the network domain these client-end
points are in.
Currently KeyTalk supports user end-points: Windows 7-10 (and legacy XP SP3), MacOSX, various flavors of Linux
iOS 9+, and Android 4+.
Server end-points which are supported are: Windows server 2012, 2016 IIS 7-8 , and various Linux flavors with
Apache.
Internet of Things devices are supported using our Linux client and/or REST API. Additionally, legacy IoT devices
are supported through our partner Factic using their KeyTalk embedded S.I.M.O.N. physical IoT connector.
Operating Systems which are not supported can always make use of our open published REST API.
For a complete list of supported OSs kindly visit: https://www.keytalk.com/download
Contrary to our competition, KeyTalk does not rely on Microsoft network domain based “clientless” enrollment, or
encrypted email based PFX certificate enrollment, as it restricts the target devices customers wish their certificates to
be enrolled to. Nor does KeyTalk rely on 3rd party Mobile Device Management solutions to enroll these certificates,
as this would restrict the target audience and end-point devices as well.
Instead KeyTalk relies on its REST API, or KeyTalk app to enroll certificates and keys to user devices, servers and
IoT end-points, whereby the KeyTalk solution relies on a customer’s existing Identity Provider(s) such as Active
Directory, LDAP, Radius (including Vasco, RSA, Gemalto tokens), MySQL etc as the customer trusted Registration
Authority and we optionally leverage the authentication with trusted end-point device recognition (a SHA2 hash
calculated over all unique components).
By making all our client code and REST API details OpenSource, customer auditors and security professionals can
easily confirm the high security standard we enforce and ensure that their certificates and keys are properly dealt with
in line with the customer’s security and rules®ulations requirements.
The KeyTalk solution houses many features which have grown into our product based on customer demand. As a
result, KeyTalk not only connects to various CA and (Q)TCSP solutions but also has the capability to connect to 3rd
party HSMs (such as Safenet Luna) as well as third party Key Management Systems.
When a customer has a need to connect another 3rd party product not yet covered by us, we at KeyTalk IT Security
BV will gladly discuss your business case and add the needed connectors to ensure your and our success.
KeyTalk IT Security BV | www.keytalk.com | Page 13
11. Setting up your KeyTalk private Certificate Authority The KeyTalk solution uses defacto its own Certificate Authority for secure communication purposes in between the
virtual KeyTalk application server cluster and the client end-points it serves with end-point-certificates coming from
any configured Certificate Authority source.
To keep the private CA affordable and easy to setup, similar to a Microsoft CA, KeyTalk does not enforce the use of
an HSM, and stores the KeyTalk private CA public and private key-pairs on the KeyTalk virtual application server
instance. The CA-tree details are not shared through the connected MySQL Db in case KeyTalk is setup as a High
Availability cluster and must thus be configured separately for each KeyTalk application server instance by means of
an Admin based import or by means of a KeyTalk application server generic enrollment copy on the Hypervisor.
HSMs can be optionally configured under CERTIFICATES AND KEYS -> HSM , allowing the private keys to be
securely generated and stored.
For this purpose, a KeyTalk System Administrator generates its own KeyTalk CA within minutes using the following
steps:
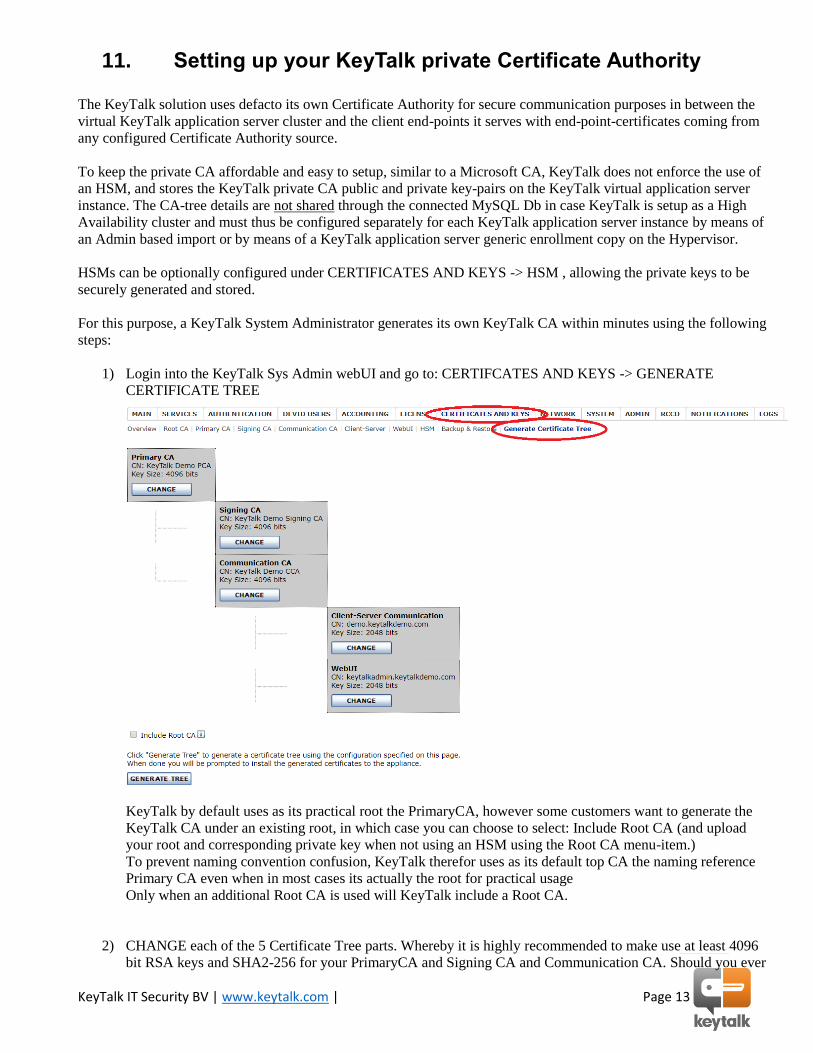
1) Login into the KeyTalk Sys Admin webUI and go to: CERTIFCATES AND KEYS -> GENERATE
CERTIFICATE TREE
KeyTalk by default uses as its practical root the PrimaryCA, however some customers want to generate the
KeyTalk CA under an existing root, in which case you can choose to select: Include Root CA (and upload
your root and corresponding private key when not using an HSM using the Root CA menu-item.)
To prevent naming convention confusion, KeyTalk therefor uses as its default top CA the naming reference
Primary CA even when in most cases its actually the root for practical usage
Only when an additional Root CA is used will KeyTalk include a Root CA.
2) CHANGE each of the 5 Certificate Tree parts. Whereby it is highly recommended to make use at least 4096
bit RSA keys and SHA2-256 for your PrimaryCA and Signing CA and Communication CA. Should you ever

KeyTalk IT Security BV | www.keytalk.com | Page 14
intend on issuing 8192 it RSA keys with the certificates to end-points (not a very common choice), you must
ensure that at least the optional Root and Primary CA and Signing CA make use of 8192 bit keys.
SHA1 has only been made possible for customers who need legacy support for SHA1, for modern
environments. SHA1 should NOT be used in modern production environments!
End-point devices that obtain their client or server certificate under the KeyTalk private CA, are issued under
the Signing CA with its parent Primary CA, so ensure Common Name naming convention wise it makes
sense to an end-user or network admin, as they will see the Primary and Signing CA in their trusted
certificates list should they ever look for it.
The KeyTalk Communication CA is used to generate the KeyTalk client/app (including the REST API)
Client-Server Communication certificate and key-pair, as well as the KeyTalk management WebUI certificate
and key-pair.
This KeyTalk Communication CA is also readable to anyone checking their trusted certificates on a device, so
again ensure the Common Name makes sense.
When generating the CA-tree, ensure that the Time to Live meets your demands. Most customers choose a
10-year validity period, ie 315360000 seconds (our default) but nothing is stopping you to change this validity
period to any other value, for example 1576800000 seconds (50 years), or 157680000 seconds (5 years).
Just be mindful of the impact of this choice, such as for example when the KeyTalk private CA requires to be
renewed and the new CA has to have its trust pushed to all end-points.
The minimally required values in the private CA are starred red and to most Sys Admins will make sense. To
understand what some of the other values exactly mean, kindly refer to https://www.ietf.org/rfc/rfc5280.txt
and https://www.ietf.org/rfc/rfc2459.txt
3) Review your CA generation settings, preferably have another person review them, and when you agree they
are correct, select GENERATE TREE
4) Once generated select INSTALL to effectuate your new private CA tree
5) When not using an HSM: It is recommended to DESTROY the private keys of your PrimaryCA (and when
applicable your Root CA), as its good practice and keeping them on the KeyTalk application server is a
potential security risk. Alternatively off-line ackup your private keys and then destroy them.
To destroy your PrimaryCA and optional RootCA private keys, select CERTIFICATES AND KEYS ->
PrimaryCA -> REMOVE KEY ONLY

KeyTalk IT Security BV | www.keytalk.com | Page 15
6) Backup your CA-tree for future usage and ensure the backup is stored on a secure location accessible only to
those authorized. Note that when using an HSM this backup will not contain your CA private keys.
.
IMPORTANT: The KeyTalk app/clients and REST API enforce proper TLS 1.2 communication. As a result, it is required to have a proper FQDN defined in either the CommonName, and/or SAN value of the KeyTalk Client-Server Communication certificate. Failing to have a proper CN/SAN value will result in communication failure! Should there be a need to update your KeyTalk Client-Server Communication certificate, simply select REGENERATE and add the proper details. This will result in a new KeyTalk Client-Server Communication certificate signed by the existing KeyTalk Communication CA. After creation deploy it to your other KeyTalk application servers.

KeyTalk IT Security BV | www.keytalk.com | Page 16
12. Issuing certificates to end-points
After setting up the KeyTalk application server, generating your unique KeyTalk internal Certificate Authority, and
optionally a KeyTalk application server cluster in combination with the MySQL Db and a load-balancer, certificates
need to be enrolled to end-points.
The end-point is required to have the KeyTalk REST API somewhere in a piece of software or firmware, or have the
KeyTalk client/app installed. KeyTalk clients/apps can be found here: https://www.keytalk.com/download
The KeyTalk REST API or KeyTalk app is configured with public information, ie the KeyTalk Application Server
FQDN or IP, one or more KeyTalk SERVICE template references, and ofcourse a trust to the KeyTalk private CA-
tree. All these requirements are automatically dealt with using the KeyTalk app/client and a KeyTalk client
configuration file.
To obtain this configuration information, simply have your designated KeyTalk SysAdmin, or KeyTalk Service
Operator generate this configuration file under SERVICES. It’s referred to as KeyTalk Real Client Configuration
Data or RCCD, and make this configuration file available in any way you see fit for example from a web-url on your
server. Most (Desktop) Support Technicians in companies choose to silently embed this configuration file when
deploying the KeyTalk client/app using their corporate deployment solutions.
To request a certificate, obviously a Certificate Signing Request is required and the resulting certificate and key need
to be installed in the appropriate key-chain or certificate-store of the OS.
KeyTalk automates the CSR generation either by generating the CSR on its KeyTalk application server and pushing
the signed certificate and keypair in a secure manner in the correct certificate format to the end-point (the default
setting).
Or the KeyTalk application server sends the CSR details to the client, where the client can generate the CSR and
corresponding key-pair, send the CSR to the KeyTalk application server which verifies the CSR content and sends the
client an appropriate CA signed certificate.
In either case, the KeyTalk app will pick up the received certificate and key-pair, uninstall the old one that gets
replaced and install the new certificate and keypair. When creating your own software using the REST API these
(un)installation steps need to be programmed separately.
In order for an end-point to generate a strong crypto key-pair, sufficient entropy is required.
The company KeyTalk filed and was granted an international patent in 2006 describing a method to generate a key-
pair and certificate network-side and push it in a secure manner to an end-point.
By generating the CSR network-side with KeyTalk, or choosing to generate it client side, the customer is in full
control of the generated keypair entropy.
To the end point the process before being able to request a certificate works like this:
Step 1:(Silent) install KeyTalk app
Step 2:(Silent) configure the KeyTalk
app with the appropriate RCCD configuration file(s)
Step 3:Authenticate using the KeyTalk
app
While a human end-user will be asked to authenticate manually to request a new certificate when using the KeyTalk app, a server or IoT device makes use of the KeyTalk certificate validity verification scripts which check the renewal parameters every 60 seconds. These renewal parameters are covered in chapter 13. Do note that some end-user Operating Systems allow for seamless certificate (de)installation while others demand some user interaction as indicated by the KeyTalk app.

KeyTalk IT Security BV | www.keytalk.com | Page 17
12.1 KeyTalk SERVICE settings: certificate Registration Authority basic settings
KeyTalk allows the Admin to connect a SERVICE, ie certificate template, CA source and Hardware Recognition settings to a configured Identity Provider (LDAP/AD Radius etc) Multiple SERVICEs can be used by a single end-point in need of client or server certificates. A SERVICE has an alphanumeric name, and is unique to a KeyTalk cluster. When you want a SERVICE to issue certificates without username/password authentication, simply use the default USERID+HWSIG but ensure the username can be looked-up by the configured authentication module (the Identity Provider) :
To use an LDAP or Active Directory or OTP token based authentication additionally select PASSWD Additionally, PIN is supported, as well as CHALLENGE RESPONSE as provided by some advanced
token solutions. When using CHALLENGE RESPONSE do NOT select PASSWD or PIN
The URI is used to have a KeyTalk client trigger its certificate retrieval request and corresponding authentication in some KeyTalk client/app versions such as with Windows and IE as well as MacOSX
Placing a checkmark in Check URI triggers a DNS lookup and matching between the KeyTalk application server and the client/app. The HWSIG formula defines in what order and how often which components for what Operating Systems need to be made part of the KeyTalk end-point trusted device hardware recognition hash.
Do note that using for example MAC address is prone to a different value under Wifi or 4G, thus requiring 2 trusted hardware recognition hash slots per user end-point to be configured on KeyTalk when applicable. An Admin in KeyTalk can define which components are used for what Operating Systems and in what order affecting the generated SHA2 hash of a client device requesting the certificate.
KeyTalk IT Security BV | www.keytalk.com | Page 18
Split domain and UserID allows the optional splitting of the username and password on a username input before the result is sent to for example the Active Directory BIND. Do note that the full user input is used in the CN value of the issued certificate unless overwritten by the optional certificate field mapping feature.
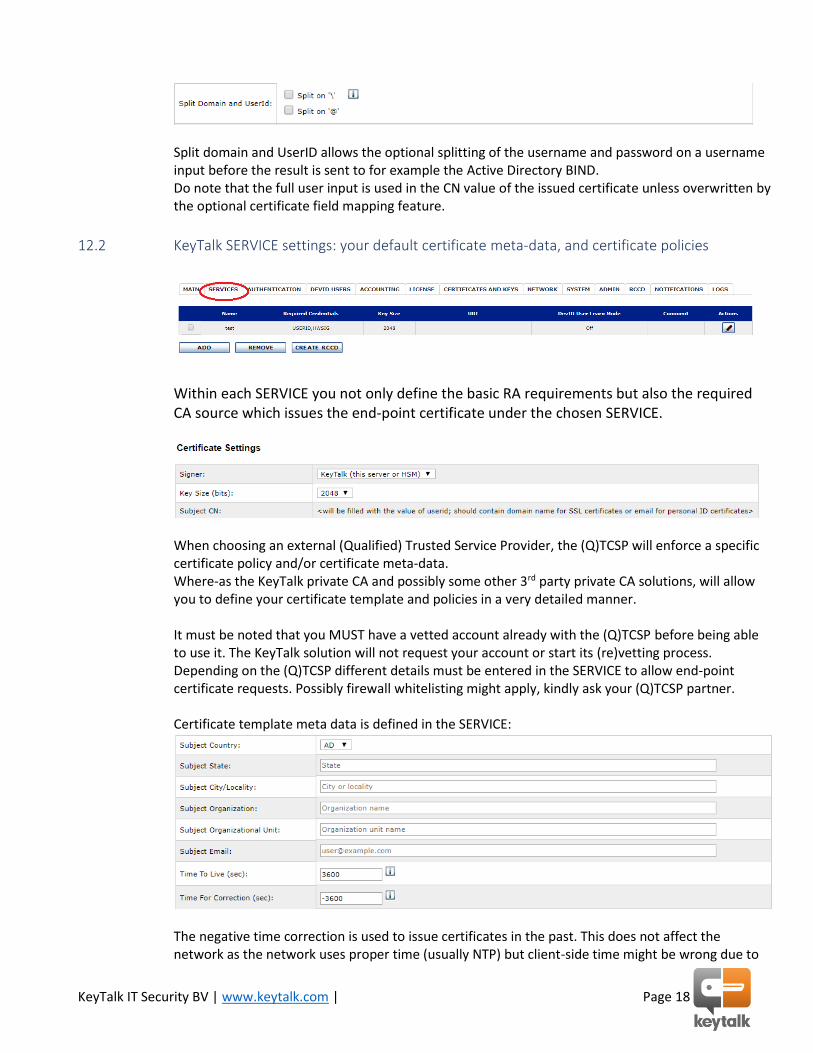
12.2 KeyTalk SERVICE settings: your default certificate meta-data, and certificate policies
Within each SERVICE you not only define the basic RA requirements but also the required CA source which issues the end-point certificate under the chosen SERVICE.
When choosing an external (Qualified) Trusted Service Provider, the (Q)TCSP will enforce a specific certificate policy and/or certificate meta-data. Where-as the KeyTalk private CA and possibly some other 3rd party private CA solutions, will allow you to define your certificate template and policies in a very detailed manner. It must be noted that you MUST have a vetted account already with the (Q)TCSP before being able to use it. The KeyTalk solution will not request your account or start its (re)vetting process. Depending on the (Q)TCSP different details must be entered in the SERVICE to allow end-point certificate requests. Possibly firewall whitelisting might apply, kindly ask your (Q)TCSP partner. Certificate template meta data is defined in the SERVICE:
The negative time correction is used to issue certificates in the past. This does not affect the network as the network uses proper time (usually NTP) but client-side time might be wrong due to

KeyTalk IT Security BV | www.keytalk.com | Page 19
end-user choices. Using negative time correction ensures that a received end-point certificate isn’t considered expired/invalid due to a few seconds or minutes time mismatch.
Certificate policies are set in KeyTalk using checkmarks for the most commonly used ones:
More advanced Extended Key Usages can simply be included by adding the appropriate Object IDentifier. For example, add 1.3.6.1.4.1.311.67.1.1 for use with, and add 1.3.6.1.4.1.311.20.2.2 to enable the certificate smartcard property. The input in the SERVICE would look like:
1.3.6.1.4.1.311.20.2.2,1.3.6.1.4.1.311.67.1.1
No matter what choice you make all these values (provided the (Q)TCSP and 3rd party CA product allows for it), can be overwritten on a unique end-point CommonName level, by making use of the advanced feature: AUTHENTICATION MODULE CERTIFICATE ATTRIBUTE MAPPING:

KeyTalk IT Security BV | www.keytalk.com | Page 20
In the above example my SERVICE default value for Organization Unit is overwritten (provided a valid value exists) with a value coming from my AD/LDAP attribute field “company” for any particular account positively authenticating against the chosen SERVICE RA. BASIC CONSTRAINTS by default is always CA:FALSE This means that no new certificates can be issued under your issued end-point certificate it is highly advised to keep this value always at CA:FALSE! Only in rare use-cases and only when you know exactly what you are doing should you set the value to TRUE which will enable a plethora of other options:
12.3 KeyTalk SERVICE settings: trusted device slot assignment to end-points
Within each SERVICE also define the amount of trusted device slots an and-point account is allowed to use, when LEARN MODE is set to ON.
Details are covered in chapter 14

KeyTalk IT Security BV | www.keytalk.com | Page 21
13. Certificate renewal automation parameters As covered in chapter 12, the KeyTalk app automates the certificate renewal on a just-on-time basis on servers, or
manually for end-user devices.
Servers make use of a Bash script on Linux, or a scheduled task on Windows which are automatically added and
activated once the KeyTalk client/app is activated on said server.
With the KeyTalk solution able to automatically renew and activate new server or client certificates, this means that
certificates can be effectively given a relatively short lifespan of a few seconds, up to several years.
Since Microsoft scheduled tasks can minimally be triggered once per minute, it is advisable to set certificate validity
periods at least to 61 seconds, unless working with Linux where it is recommended to minimally use 3 second validity
periods. Arguably for practical reasons most customers choose a minimal validity period of 5-10 minutes.
Validity periods are expressed in a KeyTalk SERVICE template in seconds:
3600 = 1 hours
43200 = 12 hours
86400 = 1 day
604800 = 7 days
31536000 = 1 year
Most (Qualified) Trusted Certificate Providers will enforce a certain certificate validity period such as 3, 6 months or
1 year. The KeyTalk SERVICE CA selector will properly show what can and what cannot apply.
The major benefit of using short lived certificates ie certificates with a validity of less than 24 hours, require no CRL
update administration as most CRLs are pushed once every 24 hours.
OCSP is a nice alternative, but practically most OCSP revocations happen roughly 1-3 days after an incident would
require a certificate to be revoked.
So why are KeyTalk SERVICE template (or the overwrite value coming from the customer’s IDP certificate field
mapping feature) validity times so important?
KeyTalk server-side or IoT scripts, trigger a renewal on one of 3 factors:
1) Revocation Pointers in the certificate indicate the certificate is no longer valid
2) A certificate validity percentage hits its threshold
3) The certificate is missing
The certificate validity percentage is defined when creating the RCCD (the KeyTalk client configuration file).
It reflects when the renewal script must request a new certificate, based the remaining percentage of time of the
original total validity period of the certificate.
So say your certificate is valid for 3153600 seconds, and you created your RCCD with a validity percentage of 10 (the
default value), then the KeyTalk script will trigger 3153600 seconds (36.5 days) BEFORE the certificate will expire.
In conclusion most admins will change the validity percentage to 1 in the RCCD when 1 year valid certificates are
issued to ensure renewal doesn’t happen until 3.65 days before expiry.
Say your certificate is valid for 36000 seconds, and you created your RCCD with a validity percentage of 10 (the
default), then the KeyTalk script will trigger 3600 seconds (1 hour) BEFORE the certificate will expire.
The certificate validity percentage can be set under SERVICES -> CREATE RCCD -> EDIT

KeyTalk IT Security BV | www.keytalk.com | Page 22
Should a KeyTalk server app/client be triggered to renew the certificate and for whatever reason fail its certificate
request, an email is sent to the predefined admin email address provided this feature was configured during the server
client configuration and provided the KeyTalk client was actually triggered. (in some cases on for example Windows
Servers the Scheduled Tasks option needs to be activated first)

KeyTalk IT Security BV | www.keytalk.com | Page 23
14. End-point user/device administration and extra auth factor The KeyTalk solution will keep track of every attempt to request a certificate in the logfiles, and it also represents this
information in its DEVice IDentification USER database on a SERVICE level.
When defining the SERVICE template, the System Admin, or once the role has been activated also the Service
Operator, can state that device end-points must be tracked per user account which successfully request a certificate
under that SERVICE.
In KeyTalk 5.2.3 a maximum of 10 device slots can be assigned to a single user.
A user uses 1 license in KeyTalk, and is defined as a unique positively authenticated username under a given
SERVICE.
So, a user in KeyTalk does not need to be a human, it can be a server or an IoT device as well. However typically a
server or an IoT device will be assigned a single device slot in the SERVICE configuration, where-as a human can be
assigned up to 10 device slots (in most cases 10 devices) without expending more than 1 KeyTalk license.
A KeyTalk SERVICE can be configured to automatically learn new users (learn mode=on), or enforce only manual
new entries as trusted user/device combinations (learn mode=off).
In learn mode=on, a username which doesn’t exist yet in the DEVID USER administration for a given SERVICE will
be automatically added provided the authentication of that user was considered positive by the configured IDP (ie in
KeyTalk the Authentication module connected to the SERVICE).
Once learned, a user is assigned the device slots as configured in the SERVICE template.
In the below example, the SERVICE template assigns 2 LEARN-ONCE device slots to a newly learned user, and
disallows further devices to be learned (ie locked)

KeyTalk IT Security BV | www.keytalk.com | Page 24
Furthermore the 2 configured timers allow for:
- an additional 1 hour for the user to register his second device from the moment he first authenticated
positively from his first device. When the second slot is not used within this 1 hour it automatically locks,
preventing possible abuse.
- an automated 15-minute timed window of opportunity to register another device when someone (for example
a Service Operator or in the near future the user himself using the KeyTalk self-service portal when enabled)
manually sets one of the slots to learn-once.
When looking up a user for a particular SERVICE under DEVID USERS, certificate issuance specifics can be
viewed, such as when was a device registered, or when did it last authenticate positively and obtain as certificate.

KeyTalk IT Security BV | www.keytalk.com | Page 25
As of KeyTalk 5.3.0 , additional options become available to see in this overview per device slot also all relevant
current certificate details such as serial number, issuing CA, key-length, hashing algo, revocation status, option to
revoke a certificate, see historic issued certificates to each device slot, and when the Sys Admin allows for it also
download a certificate and keypair using a 4-eye principle.
Note that the HWSignature that is shown for each device slot is a SHA2 of the total, in-order of request, device components as defined in the relevant SERVICE (provided a KeyTalk app was used) or it’s something generated by the software a third party built using the KeyTalk REST API.
With KeyTalk learning what devices belong to a user, the DEVID USER HW Signatures can optionally (arguably most
customers use it) be used to enforce an additional authentication factor when requesting a certificate.
To enforce trusted hardware recognition, ie allowing only certificate requests to be approved when a positive IDP
authentication comes from a trusted registered device, the System Administrator enforces this feature in any of the
configured Authentication modules connected to a SERVICE by switching HwSig Verification to ON

KeyTalk IT Security BV | www.keytalk.com | Page 26
15. KeyTalk in a network While in its most simple form a single KeyTalk application server is used with an internal database user entry, and
just a client end-point, most production environments will run KeyTalk in a High Availability setup with multiple
connected components.
It can look like: https:/downloads.keytalk.com/ktoverview.jpg
The amount of KeyTalk application servers needed in a given network environment strongly depends on many factors, most notably the required certificate key-length when KeyTalk is required to generate the key-pair on-demand, instead of the client generating it. In idle time, one hundred 2048 it RSA keys are pre-generated in memory per application server, and a few less for other key lengths. As a result, a single KeyTalk application server can on average issue around 10 certificates per second. The major bottleneck often lies in the speed of the configured IDP handling the authentication request, and an external CA source or chosen HSM handling the consecutive certificate signing request. Most customers with tens of thousands of users requesting 12 hour valid 2048 bit key based certificates tend to use 2-3 KeyTalk application servers and a (HA clustered) MySQL.

KeyTalk IT Security BV | www.keytalk.com | Page 27
16. KeyTalk webUI management roles and strong authentication
The default KeyTalk application server comes with 1 single SysAdmin username and password.
To prevent accidental lockout, the current version of KeyTalk (ie 5.2.3) does not sync the sysadmin settings to other
KeyTalk virtual application servers within the configured cluster!
All other KeyTalk management role settings and accounts are synchronized.
KeyTalk currently differentiates the following roles:
Role Authorization
System Administrator Full read/write access
Network Administrator Read/write access to Network, System, and local logs
Service Operator Read/write access to designated SERVICEs and corresponding DevID user
administration. At least 1 SERVICE must be assigned, or the account is considered
inactive.
As of KeyTalk 5.3.0 (Feb 2018) also stored certificates, and 4-eye principle based key-
roll-over certificate & key downloads are supported
Auditor Full read only access (except for passwords and private keys)
While username/password based authentication is a basic necessity for initial setup, it is strongly advised to enable
strong authentication to the webUI for all roles.
KeyTalk enforces valid client certificate based authentication issued under the KeyTalk private CA, to its webUI
when strong authentication is enabled by the System Administrator.
To enable strong authentication, have the System Administrator enable it on all active KeyTalk application servers:
and define the corresponding mandatory certificate Organization value and Organizational Unit value for the user
“admin” (ie ensure the user “admin” exists on your IDP)
Since client certificates are used for strong authentication, the System Administrator can choose to use whatever IDP
source is used such as the KeyTalk internal Db, Active Directory, or existing Radius based tokens, and optionally
leverage this authentication with an additional KeyTalk hardware recognition authentication factor.
Should a System Administrator ever be locked out of a KeyTalk application server, then login using the KeyTalk CLI
Admin and run: /usr/local/bin/keytalk/www/reset-admin-passwd

KeyTalk IT Security BV | www.keytalk.com | Page 28
17. Log files and reports
Each KeyTalk application server keeps track of 1 log file per Daemon:
Daemon Purpose
AuthD Deals with all incoming and outgoing authentication requests
CAD Deals with anything Certificate Authority related, both internal CA and external CA
RDD KeyTalk’s daemon traffic cop, it ensures inter daemon traffic gets properly regulated and enforces
only valid traffic to pass
WebUI Tracks any changes made through KeyTalk’s administration webUI
While the KeyTalk application server does keep local logfiles for immediate trouble shooting purposes by either the
Network Admin or the Sys Admin, these local logfiles do rotate every 1500 lines, whereby only the last 4 rotated logs
are stored, only the youngest log is visible in the WebUI.
Depending on the chosen loglevel the local logfile rotation will happen sooner or later
In order to provide proper support, monitoring and auditing, it is highly advisable for production purposes to
configure the KeyTalk application server(s) to send their logfiles to a remote syslogserver.
From the remote syslog or SIEM server, logfiles can be concatenated, analyzed and report information can be directly
extracted.
With time being very important for the issuance of X.509 certificates, KeyTalk enforces the use of UTC across its
solution. However, the Network Admin or Sys Admin can set a time zone correction for logfile purposes when the
rest of their network logfiles use for example local time only, this results in 2 timestamps in your logfiles.
KeyTalk IT Security BV | www.keytalk.com | Page 29
18. Client certificate use cases
In my company I want to issue short lived client certificates to my users based on my KeyTalk private CA using my
AD so my users can authenticate to my corporate VPN and SharePoint from just 2 corporate trusted devices, and I
want to issue globally trusted personal certificates for S/MIME purposes on my .COM domain to my end-users from a
Trusted Certificate Service Provider using my RSA number generator tokens to only 1 trusted corporate device.
I configure in KeyTalk 2 SERVICE templates:
The first SERVICE I name: Daily_AD_Authentication
The second SERVICE I name: GlobalSign_email_certificates
SERVICE 1:
I configure Daily_AD_Authentication to request against the KeyTalk private CA, and configure with UserID +
HWSignature + Password, set a lifespan of 32400 seconds (9 hours) and set Extended Key Usage to clientAuth. , and
enforce Learnmode=on with 2 learn-once slots.
I connect my AD to this Daily_AD_Authentication SERVICE in LDAP Authentication Modules. And enforce
HWSig verification.
The AD BIND that I use is: Bind DN: $(userid)@mydomain.com and Base DN: dc=mydomain,dc=local
I generate the RCCD for SERVICE Daily_AD_Authentication and set the validity percentage to 10.
To my end-users I deploy the KeyTalk app/client and configure it with the RCCD of Daily_AD_Authentication
As a result every day anyone who has an active account in my AD can obtain a 1 day valid certificate.
Now I configure my VPN to require client certificates and only trust my private KeyTalk CA.
Additionally I feed my AD with additional certificate information in the attribute AltSecurityIdentifier (see KeyTalk
download page ->useful software to obtain this Powershell script) and configure my IIS to require client certificates
with a trust on y KeyTalk internal CA.
As a result my users experience SSO to both my VPN and my SharePoint.
SERVICE 2:
I configure GlobalSign_email_certificates to request against the GlobalSign ePKI Personal production, for the .com
domain account, and 12 month validity, and configure with UserID + HWSignature + Password, and enforce
Learnmode=on with 1 learn-once slot.
I connect my Radius to this GlobalSign_email_certificates SERVICE in Radius Authentication Modules.
The Redius gets connected using EAP Auto-Password, and the password prompt I change from “password” to read
“RSA Token”, and enforce HW Sig verification.
I generate the RCCD for SERVICE GlobalSign_email_certificates and set the validity percentage to 10.
To my end-users I deploy the KeyTalk app/client and configure it with the RCCD of GlobalSign_email_certificates
and inform my users to authenticate with username=my email address
As a result once a year anyone who has an active account on my RSA-token environment can obtain a 1 year valid
globally trusted certificate for SIME purposes
Now I of course still need to configure the mail client to actually use the received S/MIME certificate but I choose to
do so using a non-encrypted 😊 e-mail based instruction.

KeyTalk IT Security BV | www.keytalk.com | Page 30
Question 1: Can a user receive and have active multiple certificates?
Answer 1: Yes, provided that multiple SERVICES have been imported as part of a single or multiple RCCDs.
Each KeyTalk app/client can contain 1 certificate per configured SERVICE.
Question 2: Can I use a client certificate as issued by KeyTalk from a public or private CA also for seamless
secure access to Wifi or wired networks?
Answer 2: The used protocol is 802.1x EAP/TLS which is usually dependent upon a Radius for certificate
verification. So, the short answer is yes, provided the issuing CA is trusted.
However, do note that in order to obtain a certificate using KeyTalk, or any online certificate
distribution mechanism, you will first need an Internet connection.
Most customers resolve this chicken-egg problem by issuing the certificate over another channel like
3G/4G or another Wifi SSID, before having the user switch to the secured SSID. Some connectivity
solution providers such as Cisco Meraki support this type of smart switching out of the box.
Question 3: Can I deploy my S/MIME certificate to multiple devices?
Answer 3: Not right now, but as of KeyTalk 5.3.0 (Feb 2018), this feature is supported by means of secure
certificate and key-roll over.
19. Server certificate use cases
In my company I want to issue server certificates to my internal servers based on my KeyTalk private CA, and I want
to issue certificates to my world facing server for both my ORG and my COM domains from a Trusted Certificate
Service Provider.
I configure in KeyTalk 3 SERVICE templates:
The first SERVICE I name: Internal_Server_Certificates
The second SERVICE I name: GlobalSign_mSSL_Certificates_MYDOMAINCOM
The third SERVICE I name: GlobalSign_mSSL_Certificates_MYDOMAINORG
SERVICE 1:
I configure Internal_Server_Certificates to request against the KeyTalk private CA, and configure with UserID +
HWSignature + Password, set a lifespan of 86400 seconds (1 day) and set Extended Key Usage to serverAuth.
I connect my AD to this Internal_Server_Certificates SERVICE, and ensure that all my server FQDNs are available as
user accounts under OU=SERVERS in my AD
The AD BIND that I use is: Bind DN: $(userid)@mydomain.local and Base DN: ou=servers,dc=mydomain,dc=local
Because I often connect to my internal servers not on a FQDN level but instead on an IPv4 level, I decide to use the
AD attribute PO Box since its not being used anyhow to store my SAN attributes for my servers. So I added in this
attribute by value of “IP:192.168.1.xxx” (without quotes).
I configure the LDAP Attribute mapping in the LDAP Authentication module for Internal_Server_Certificates to:
Filter: (cn=$(userid))
And checkmark Subject Alternative Name to match to LDAP attributename: postOfficeBox
I generate the RCCD for SERVICE Internal_Server_Certificates and set the validity percentage to 2.
My internal servers I deploy the KeyTalk app/client and configure it with the RCCD of Internal_Server_Certificates
and the appropriate FQDN as a username and the relevant password.
As a result, every day my internal servers fetch a new certificate, install and activate it, 1728 seconds before the
certificate expires

KeyTalk IT Security BV | www.keytalk.com | Page 31
SERVICE 2:
I configure GlobalSign_mSSL_Certificates_MYDOMAINCOM to request against the GlobalSign production
Organization SSL, choose 12-month validity and configure with UserID + HWSignature + Password, and ensure the
GlobalSign account details refer to the GlobalSign account details for my .com domain!
I connect my AD to this GlobalSign_mSSL_Certificates_MYDOMAINCOM SERVICE, and ensure that all my
server FQDNs are available as user accounts under OU=SERVERS in my AD
The AD BIND that I use is: Bind DN: $(userid)@mydomain.local and Base DN: ou=servers,dc=mydomain,dc=local
Because I often connect to my worldfacing servers with other FQDNs as well, I decide to use the AD attribute PO
Box since its not being used anyhow to store my SAN attributes for my servers. So I added in this attribute by value
of “DNS:myothername.mydomain.com, DNS:myothername1234.mydomain.com:” (without quotes).
I configure the LDAP Attribute mapping in the LDAP Authentication module for
GlobalSign_mSSL_Certificates_MYDOMAINCOM to:
Filter: (cn=$(userid))
And checkmark Subject Alternative Name to match to LDAP attributename: postOfficeBox
I generate the RCCD for SERVICE GlobalSign_mSSL_Certificates_MYDOMAINCOM and set the validity
percentage to 1.
My worldfacing .com servers I deploy the KeyTalk app/client and configure it with the RCCD of
GlobalSign_mSSL_Certificates_MYDOMAINCOM and the appropriate FQDN as a username and the relevant
password.
As a result, every year my world facing .com servers fetch a new certificate, install and activate it, 315360 seconds
(3.65 days) before the certificate expires
SERVICE 3:
I configure GlobalSign_mSSL_Certificates_MYDOMAINORG to request against the GlobalSign production
Organization SSL, choose 12-month validity and configure with UserID + HWSignature + Password, and ensure the
GlobalSign account details refer to the GlobalSign account details for my .com domain!
I connect my AD to this GlobalSign_mSSL_Certificates_MYDOMAINORG SERVICE, and ensure that all my server
FQDNs are available as user accounts under OU=SERVERS in my AD
The AD BIND that I use is: Bind DN: $(userid)@mydomain.local and Base DN: ou=servers,dc=mydomain,dc=local
Because I often connect to my worldfacing servers with other FQDNs as well, I decide to use the AD attribute PO
Box since its not being used anyhow to store my SAN attributes for my servers. So I added in this attribute by value
of “DNS:myothername.mydomain.com, DNS:myothername1234.mydomain.com:” (without quotes).
I configure the LDAP Attribute mapping in the LDAP Authentication module for
GlobalSign_mSSL_Certificates_MYDOMAINORG to:
Filter: (cn=$(userid))
And checkmark Subject Alternative Name to match to LDAP attributename: postOfficeBox
I generate the RCCD for SERVICE GlobalSign_mSSL_Certificates_MYDOMAINORG and set the validity
percentage to 1.
My worldfacing .com servers I deploy the KeyTalk app/client and configure it with the RCCD of
GlobalSign_mSSL_Certificates_MYDOMAINORG and the appropriate FQDN as a username and the relevant
password.
As a result, every year my world facing .com servers fetch a new certificate, install and activate it, 315360 seconds
(3.65 days) before the certificate expires

KeyTalk IT Security BV | www.keytalk.com | Page 32
Question 1: Can I enforce the Hardware Signature of the servers as well?
Answer 1: Yes, you can, simply enforce it by configuring it in your LDAP authentication module
Question 2: Can I just authenticate using HwSig and server FQDN as the username, so without password?
Answer 2: Yes, you can, but not in combination with LDAPAD. Simply don’t enforce password in the
SERVICE and ensure your FQDNs are registered in the internal Db of KeyTalk and configure it to
enforce Hw Sig verification
Question 3: Can I use a KeyTalk to IIS deployed, installed, activated certificate also for SharePoint SSL
purposes??
Answer 3: Yes, you can, but not using our default deployed script. Reason being that our scripts update IIS, but
SharePoint itself requires also an SSL configuration which is not covered yet as part of our scripts.
Our certificate update PowerShell scripts, just like all our clients. are OpenSource, so you can change
or update them anyway you like to make them work with any application fitting your needs.
20. KeyTalk contact details
KeyTalk IT Security BV is registered with the Dutch chamber of commerce under: 59072555
with registered VAT number: NL853305766B01
Our office address:
Arena 300
1213 NW Hilversum
The Netherlands
Phone: +31 88 KEYTALK or +31 88 5398255
Email: [email protected]
Opening hours: Mo-Fr 08:00 – 18:00
Customer and partner technical support
Phone: +31 88 KEYTALK or +31 88 5398255
Email: [email protected]
Opening hours: Mo-Su 00:00 – 24:00 (24/7)
Website: https://www.keytalk.com
Firmware/software: https://www.keytalk.com/download