quick start: using rubics in blackboard
TRANSCRIPT

Page | 1
QUICK START: USING RUBICS IN BLACKBOARD Santa Ana College Distance Education, Cesar Chavez Building Room A-101, (714) 564-6725, [email protected]
USING RUBRICS IN BLACKBOARD A rubric is essentially a scoring guide that provides students with an outline of what is needed to achieve a specific grade. The benefits of using a rubric is that it provides a clear expectation for students, makes grading easier, takes the subjectivity out of the grading process as everyone is evaluated using the same criteria. There are two types of rubrics:
• Holistic: Evaluates the whole product • Analytic: Evaluates specific component(s) or skill(s)
Every rubric will contain: • Criterion: What the student needs to demonstrate • Level of Achievement: The mastery level at which the student demonstrates the
criterion Creating a Rubric Criteria: The first step in creating a rubric is to determine what criteria the students will need to demonstrate. Some example criteria are: Word Choice, Organization, Mechanics (Grammar / Spelling), Supporting Details, Citation, Graphic, Formatting (MLA / APA), Stated Thesis. Criteria can also be course or assignment specific, for example for a Discussion Board the criteria may include Posted Required Replies, Adhered to Netiquette Rules, or Thread Answered Prompt Question.
Best Practices: • Specific – Criteria should assess a specific skill or component. • Simple – A rubric does not need to be large and complex, only a few significant criteria are
needed. • Descriptive – Ensure that criteria labels are descriptive. Include a longer description that
provides specific details so the expectation is clear to students.
Mastery Level: The second step in creating a rubric is to determine the mastery levels or levels of achievement in order to evaluate how well the students demonstrated the criteria. There are a two distinct types of mastery levels:
• Absolute: Satisfactory / Unsatisfactory – an absolute right and wrong • Performance Based: How well the student demonstrated the criteria. Some examples of
performance based mastery levels are Strong, Average, Basic or Advanced, Competent, Rudimentary, Minimal.

Page | 2
Best Practices: • Avoid Negative Language if possible, such as using “Basic” instead of “Weak” or “Below
Average” • Address all appropriate levels that students may demonstrate. • Include a “Zero” mastery level for students who either did not complete the assignment or
who did not meet the lowest criteria. • Specific – Mastery Levels should be concise and specific, ensure that they are not too
broad or vague. • Simple – While all levels of achievement should be represented, avoid having too many.
All mastery levels should be able to be represented in 3 – 6 levels. • Descriptive – Ensure that labels are descriptive. Include a longer description that provides
specific details so the expectation is clear to students.
Example Discussion Board Rubric
Advanced (100%)
Competent (75%)
Rudimentary (50%) Minimal (25%) Zero (0%)
Responsiveness to Discussion Prompt (30%)
All components of discussion
prompt addressed
Up to 90% of the components
of discussion prompt were addressed
Up to 75% of the components
of discussion prompt were addressed
Up to 50% of the components
of discussion prompt were addressed
No submission or the
components of the discussion post were not
addressed
Application of Assigned
Readings (30%)
Very Clear that readings were
understood and incorporated
into posts
The readings were
understood and incorporated
into posts
The readings were not fully
understood and / or not
incorporated into posts
The readings were clearly not understood and
/ or not incorporated
into posts
No submission or not evidence
that the readings were understood at any level or incorporated
into posts
Responsiveness to Other's Posts
(30%)
Responses to posts included
multiple supporting facts and arguments
in support or opposition of
original opinion.
Responses to posts included
some supporting facts or arguments in
support or opposition of original post
Responses to posts included few supporting
facts or arguments in
support or opposition of original post
Responses to posts did not
include supporting facts or arguments in
support or opposition of original post
No submission or posts did not
address the original post or provide facts or arguments in
support or opposition of original post
Quantity of Contributions
(5%)
Posts exceeded the minimum requirement
Posts were equal to the
minimum requirement
Posts were 50%-99% of the
minimum requirement
Posts were less than 50% of the
minimum requirement
No submission
Adherence to Netiquette Rules
(5%)
All on-line protocols were
followed
Up to 90% of the on-line
protocols were followed
Up to 75% of the on-line
protocols were followed
Up to 50% of the on-line
protocols were followed
No submission or the on-line
protocols were not followed

Page | 3
Creating a Rubric in Blackboard Rubrics can be added to a course or assignment. Multiple assignments can be associated with a single rubric. Multiple rubrics can be associated with a single assignment (though a primary rubric must be selected). Rubrics can be created independently, or while an assignment is being created. To create a rubric from the Course Management Menu, click Course Tools to expand the section, then select “Rubrics.” Click the “Create Rubric” icon in the upper left of the page.
Complete the “Name” and “Description” fields in the “Rubric Information” section. Descriptions are only visible to the instructor, and are not intended for student use.
The rubric detail can be customized to the course or assignment. Columns and rows can be added, deleted and edited. To add a row or a column, click the “Add Row” or “Add Column” icon. The new row / column will be added at the end. To edit or delete a column or row, click the down arrow (v) or chevron next to the header. Select “Edit” or “Delete this column” from the pull down menu. To edit, type the new header name into the dialog box, then click “Save.” Click “Cancel” to return to the rubric detail with no changes. There are multiple rubric types: No Points, Points, Point Range, Percent, and Percent Range. The default is Percent. To change the rubric type, click the down arrow (v) or chevron next to “Rubric Type.” Select the desired type from the pull down menu. Each row has a percentage of the total points assigned. Enter the desired percentage in the “Weight” field for each row. Each column also has a percentage of the total row points assigned. Enter the desired percentage in the “Percent” field. There is a text box for each column in a row. The grading criteria can be entered here. When the rubric is complete, click “Submit” to create it. Click “Cancel” to return to the menu with no changes.
Enter rubric name
Enter description (instructor view only)

Page | 4
A green confirmation will appear at the top of the screen if the rubric was successfully created.
Click to access menu
Click to add a row or column
Enter row percentage
Enter column percentage
Enter grading criteria
Total must = 100%

Page | 5
Adding a Rubric to an Assignment
One Rubric can be used for multiple assignments or assessments, it is not necessary to create a rubric for each assignment or assessment.
Rubrics can be added to assignments, assessments or any other activity (e.g. Discussion Boards, Blogs, Journal, etc.) that is graded. On the Create page, in the grading section, click the “Add Rubric” button.
From the menu, choose “Select Rubric” for an existing rubric, “Create New Rubric” to create a new rubric, or “Create From Existing” to create a new rubric with components from existing rubrics.
To select an existing rubric, click the check box next to the rubric(s) to be added to the assignment. Click the “Submit” button located at bottom right of the page to add the rubric to the assignment.
Click to add rubric

Page | 6
The name of the rubric selected will appear in the grading section. The rubric can be removed, viewed and edited by clicking the icons to the left of the rubric name. The “Show Rubric to Students” column allows the instructor to select if and how much of the rubric can be viewed by students. Students must be able to view the rubric to see any instructor comments that are left during grading. Click the icon to change the setting.
Click a check box to select a rubric
Click to allow students to view Added rubric
Click to view rubric
Click to remove rubric
Click to edit rubric

Page | 7
Grading Using a Rubric Access the item to be graded. Click the down arrow (v) or chevron next to the assignment or “Item Name.” Select “Grade All Users.” “Grade Anonymously” allows instructors to grade assessments without seeing the student identity.
This will access the assignment. The student’s uploaded content will be displayed on the left side of the screen. The grading tools will be in the right margin.
NOTE: If the student work contains special fonts, formatting, or some image types that are unique or uncommon, the fonts or images may not display properly in the preview. These will display correctly if the assignment is downloaded.
The Assignment Details can be accessed by clicking the down arrow. “Grade” allows a manual override grade to be entered. Click the Edit (pencil) icon and enter the total points awarded in the
Student document

Page | 8
box. Click “Save” to submit the grade. Click “Cancel” to exit the grade manual grade box. Comments for the student can be left in the “Grader Feedback” field. The student’s document is under the “Submissions” section. The original document can be downloaded if necessary by clicking the download icon at the far right.
“Attempt” shows the date and time the student submitted the assignment. In the example below, it was after the due date – indicated by the “(Late).” Grading Notes, visible only to the instructor, can be added by clicking the icon next to the grading box. Click the “Rubric” icon in the grading box.
A new page will open with the Rubric Detail. Select the student’s performance for each row of the rubric. The percentage and total points assigned for each row and column will be displayed. Once selected, a green checkbox will appear next to the column and a “Feedback” field will be provided for each row. Comments can be entered for the student. The “Raw Total” will provide the total of the points based on the columns in the rubric. The raw total score can be overridden by entering the score in the “Change the number of point out of 10.0 to:” field. There is a “Feedback” text box where additional comments can be provided for the students. However, this field will not be visible to students unless the grading score has been set as visible in the rubric properties. Once the rubric
Click to download original document
Provide student feedback
Click to add Grading Notes
Click to access Rubric

Page | 9
has been completed, click “Save” to submit. Click “Cancel” to return to the menu with no changes. Once saved, the Rubric can be edited by clicking on the Rubric icon again.
Assignment name and description
Points based on column selection
Points awarded for column
Click to select column grade
Enter student feedback
Use to enter override score
Page | 10
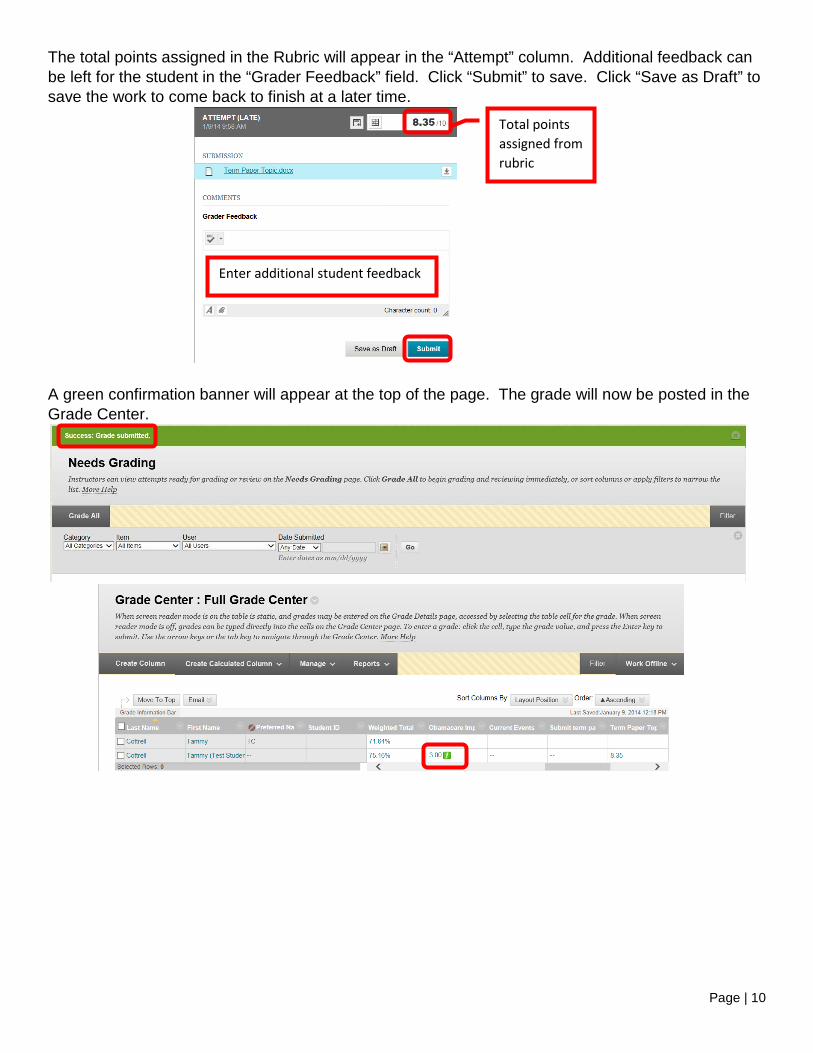
The total points assigned in the Rubric will appear in the “Attempt” column. Additional feedback can be left for the student in the “Grader Feedback” field. Click “Submit” to save. Click “Save as Draft” to save the work to come back to finish at a later time.
A green confirmation banner will appear at the top of the page. The grade will now be posted in the Grade Center.
Total points assigned from rubric
Enter additional student feedback