quick start guide the evolution outdoor dome camera is ip
TRANSCRIPT
WelcomeThe Oncam Evolution 12 Outdoor 360° camera is designed to be connected to an IP network. Configure and operate the camera using a standard internet browser.
Described are the installation and configuration procedures for a standard surface mount camera application.
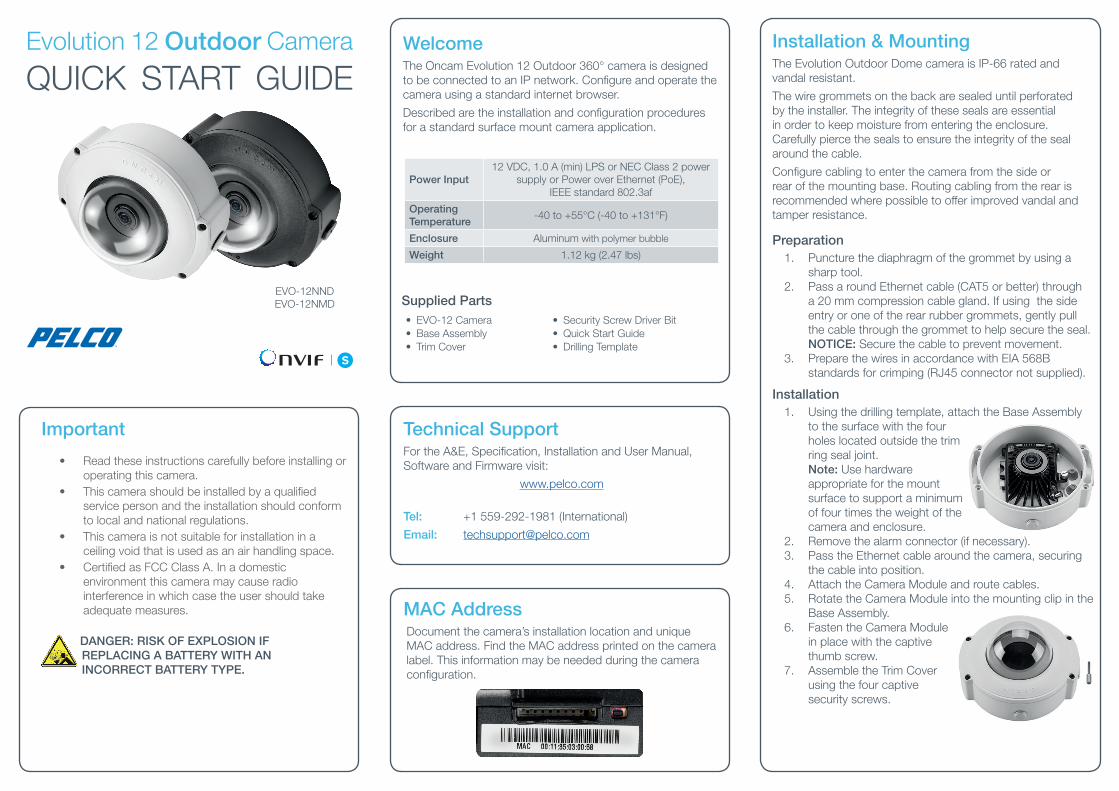
Evolution 12 Outdoor Camera
QUICK START GUIDEInstallation & MountingThe Evolution Outdoor Dome camera is IP-66 rated and vandal resistant.
The wire grommets on the back are sealed until perforated by the installer. The integrity of these seals are essential in order to keep moisture from entering the enclosure. Carefully pierce the seals to ensure the integrity of the seal around the cable.
Configure cabling to enter the camera from the side or rear of the mounting base. Routing cabling from the rear is recommended where possible to offer improved vandal and tamper resistance.
Preparation1. Puncture the diaphragm of the grommet by using a
sharp tool.2. Pass a round Ethernet cable (CAT5 or better) through
a 20 mm compression cable gland. If using the sideentry or one of the rear rubber grommets, gently pullthe cable through the grommet to help secure the seal.NOTICE: Secure the cable to prevent movement.
3. Prepare the wires in accordance with EIA 568Bstandards for crimping (RJ45 connector not supplied).
Installation1. Using the drilling template, attach the Base Assembly
to the surface with the fourholes located outside the trimring seal joint.Note: Use hardwareappropriate for the mountsurface to support a minimumof four times the weight of thecamera and enclosure.
2. Remove the alarm connector (if necessary).3. Pass the Ethernet cable around the camera, securing
the cable into position.4. Attach the Camera Module and route cables.5. Rotate the Camera Module into the mounting clip in the
Base Assembly.6. Fasten the Camera Module
in place with the captivethumb screw.
7. Assemble the Trim Coverusing the four captivesecurity screws.
Power Input12 VDC, 1.0 A (min) LPS or NEC Class 2 power
supply or Power over Ethernet (PoE), IEEE standard 802.3af
Operating Temperature
-40 to +55°C (-40 to +131°F)
Enclosure Aluminum with polymer bubble
Weight 1.12 kg (2.47 lbs)
Important
• Read these instructions carefully before installing oroperating this camera.
• This camera should be installed by a qualifiedservice person and the installation should conformto local and national regulations.
• This camera is not suitable for installation in aceiling void that is used as an air handling space.
• Certified as FCC Class A. In a domesticenvironment this camera may cause radiointerference in which case the user should takeadequate measures.
DANGER: RISK OF EXPLOSION IFREPLACING A BATTERY WITH ANINCORRECT BATTERY TYPE.
MAC AddressDocument the camera’s installation location and unique MAC address. Find the MAC address printed on the camera label. This information may be needed during the camera configuration.
Supplied Parts• EVO-12 Camera • Security Screw Driver Bit• Base Assembly • Quick Start Guide• Trim Cover • Drilling Template
EVO-12NNDEVO-12NMD
Technical SupportFor the A&E, Specification, Installation and User Manual, Software and Firmware visit:
www.pelco.com
Tel: +1 559-292-1981 (International)
Email: [email protected]
Download our FREE OnVu360 mobile application andput the 360° real time monitoring experience right at
your fingertips.
Scan the QR Code to get it now.
Android iOS
Copyright 2015-2017 by Oncam Global Group AG. Oncam is a trading name of Oncam Global Group AG. All rights reserved. All screen images are simulated. Specifications and configurations subject to change without notice. Legal Notice: Parts of this product are protected by patents.
C5675M-B | Outdoor | 5/2017
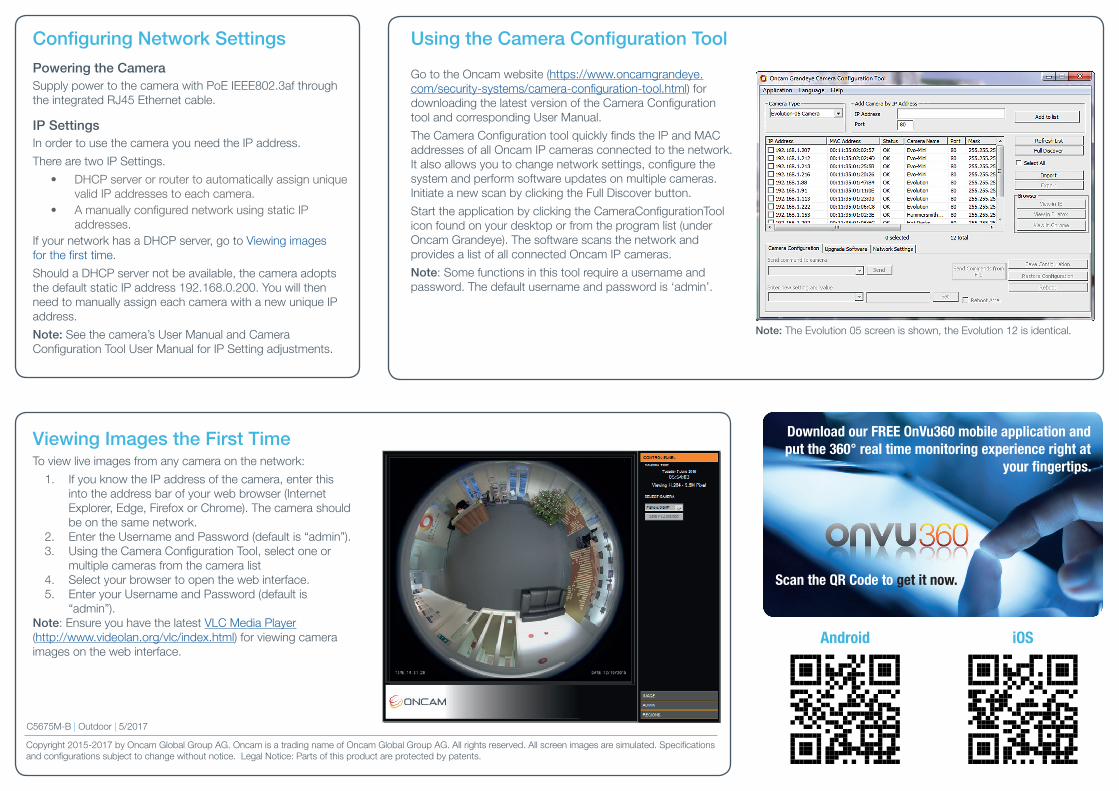
Note: The Evolution 05 screen is shown, the Evolution 12 is identical.
Configuring Network Settings
Powering the CameraSupply power to the camera with PoE IEEE802.3af through the integrated RJ45 Ethernet cable.
IP SettingsIn order to use the camera you need the IP address.
There are two IP Settings.
• DHCP server or router to automatically assign unique valid IP addresses to each camera.
• A manually configured network using static IP addresses.
If your network has a DHCP server, go to Viewing images for the first time.
Should a DHCP server not be available, the camera adopts the default static IP address 192.168.0.200. You will then need to manually assign each camera with a new unique IP address.
Note: See the camera’s User Manual and Camera Configuration Tool User Manual for IP Setting adjustments.
Using the Camera Configuration Tool
Go to the Oncam website (https://www.oncamgrandeye.com/security-systems/camera-configuration-tool.html) for downloading the latest version of the Camera Configuration tool and corresponding User Manual.
The Camera Configuration tool quickly finds the IP and MAC addresses of all Oncam IP cameras connected to the network. It also allows you to change network settings, configure the system and perform software updates on multiple cameras. Initiate a new scan by clicking the Full Discover button.
Start the application by clicking the CameraConfigurationTool icon found on your desktop or from the program list (under Oncam Grandeye). The software scans the network and provides a list of all connected Oncam IP cameras.
Note: Some functions in this tool require a username and password. The default username and password is ‘admin’.
Viewing Images the First TimeTo view live images from any camera on the network:
1. If you know the IP address of the camera, enter this into the address bar of your web browser (Internet Explorer, Edge, Firefox or Chrome). The camera should be on the same network.
2. Enter the Username and Password (default is “admin”).3. Using the Camera Configuration Tool, select one or
multiple cameras from the camera list4. Select your browser to open the web interface. 5. Enter your Username and Password (default is
“admin”).Note: Ensure you have the latest VLC Media Player (http://www.videolan.org/vlc/index.html) for viewing camera images on the web interface.