quick start guide - farnell element14 | electronic ... · j2 1–2 j3 1–2 j10 1–2 ... the...
TRANSCRIPT

Quick Start Guide
TWR-KV31F120M Development Kit for Kinetis KV3x Family
TOWER SYSTEM
2
Quick Start Guide
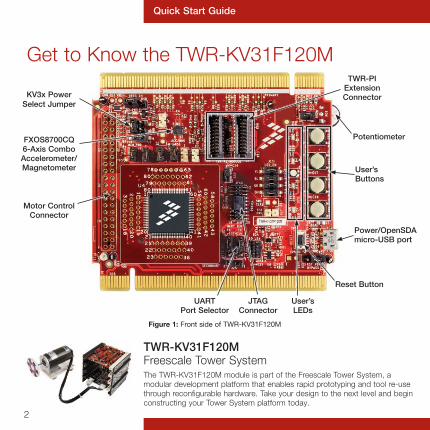
Get to Know the TWR-KV31F120M
TWR-KV31F120M Freescale Tower SystemThe TWR-KV31F120M module is part of the Freescale Tower System, a modular development platform that enables rapid prototyping and tool re-use through reconfigurable hardware. Take your design to the next level and begin constructing your Tower System platform today.
KV3x PowerSelect Jumper
Reset Button
Potentiometer
User’s LEDs
JTAG Connector
UART Port Selector
User’s Buttons
Motor ControlConnector
Power/OpenSDA micro-USB port
TWR-PI Extension Connector
FXOS8700CQ 6-Axis ComboAccelerometer/Magnetometer
Figure 1: Front side of TWR-KV31F120M

3
TOWER SYSTEM
TWR-KV31F120M FeaturesThe TWR-KV31F120M is a standalone development kit that can be used in conjunction with the Tower System development platform and the TWR-MC-LV3PH motor control module. To watch a video on how to configure the board, go to freescale.com/TWR-KV31F120M.
This Quick Start Guide will teach you to:• Easily program precompiled examples for the KV3x MCU• Run an IAR Embedded Workbench project featuring an A/D conversion application• Spin the 3-phase motor included in the TWR-MC-LV3PH kit with a PMSM sensorless
FOC control algorithm while monitoring the motor with the FreeMASTER tool
Tower System Module• KV31F512VLL12 MCU (ARM® Cortex®-M4 120MHz with FPU, 512KB flash, 96KB RAM,
2x 16-bit ADCs, 4x FlexTimer/PWM with up to 20 ch, 2x 12-bit DACs, 100 LQFP)• OpenSDA(1) debug circuit with Micro USB connector and virtual serial port• FXOS8700CQ 6-axis combining accelerometer and magnetometer sensors• Four user LEDs• Four pushbuttons for user input or interrupts• One potentiometer• One motor control auxiliary connector and general-purpose Tower Plug-in
(TWRPI) socket
Tools Required• IAR Embedded Workbench V7.10 or higher• Freescale FreeMASTER for real-time debug monitoring and data visualization
(1) Refer to the OpenSDA User Guide available at freescale.com

4
Step-by-Step Installation Instructions
2 Install the Software and Tools
• Download and install the IDE toolchain IAR Embedded Workbench® for ARM® v7.10 or later, 30-day free evaluation license, at iar.com/Freescale.
• Download and install the PEMicro Windows® USB Drivers at pemicro.com/OpenSDA.
Quick Start Guide
1
Download Software and Tools
Download installation software and documentation under “Jump Start Your Design” at freescale.com/TWR-KV31F120M.
• Download and install the free debug monitoring and data visualization tool Freescale FreeMASTER v1.4 or later, at freescale.com/FreeMASTER.

5
TOWER SYSTEM
3 Default Jumper Settings
See the default jumper settings in the table below. Refer to the TWR-KV31F120M User Guide at freescale.com/TWR-KV31F120M for detailed jumper descriptions.
Option Setting
J1 1–2
J3 ON
J4 OPEN
J5 1–3
J8 OPEN
J9 ON
J10 OPEN
J11 OPEN
J12 ON
Option Setting
J13 ON
J14 ON
J15 ON
J17 1–2, 3–4, 5–6, 7–8
J20 OPEN
J22 2–3
J23 2–3
J25 1–2
J26 1–2
4 Tilt the Board
TWR-KV31F120M comes preloaded with the P&E OpenSDA Applications (MSD flash programmer and debug) and the accelerometer demo. Plug in the USB cable and angle the board left or right to make the corresponding pair of LEDs blink.

6
Quick Start Guide
5 Program a Precompiled Example Using the
OpenSDA MSD Application 1) Launch the Bootloader Mode
Press and hold the reset (SW5) button while plugging in the USB cable; then release it. Windows will detect a new BOOTLOADER drive and automatically install requested drivers.
2) Load the OpenSDA P&E Applications
Copy to the BOOTLOADER drive the MSD-DEBUG-TWR-KV31F120M_Pemicro.SDA file from the OpenSDA Applications folder of the Quick Start Package, then unplug and replug the USB cable.
Windows will detect a new TWR-KV31F12 drive, a PEMicro OpenSDA Debug peripheral, an OpenSDA CDC Serial Port and will automatically install the requested drivers.
3) Program a Precompiled Example for the KV3x
In the TWR-KV31F12 drive, copy any SREC file from the Precompiled Examples folder of the Quick Start Package. Demo will start automatically when the download is complete. To program a new demo, just repeat the previous step. It is not necessary to disconnect the USB cable.

7
TOWER SYSTEM
6 Debug Your First IAR Project
1) Load the OpenSDA P&E Debug Application
If you followed the previous exercise, you can jump directly to the following instruction; otherwise, follow Step 5 to load the OpenSDA P&E Applications.
2) Launch IAR EWARM 7.10 and Build the Potentiometer_lab Project
Open the IAR project file potentiometer_demo.eww following the path Project Labs\build\iar\kv31\Potentiometer_lab in the Quick Start Package.
Clean the project before selecting the action Rebuild All.
Note: The compilation may return warning messages without consequence.
3) Run IAR EWARM V7.10, or later Debug Mode
From the toolbar, click on Download and Debug.
Note: If a Connection Manager window appears, check that your board is configured with the OpenSDA P&E Debug Application, then connect to the Interface OpenSDA Embedded Tower Debug-USB Port.
Start the debug session by selecting the GO option from the toolbar. Rotate the potentiometer to turn on LEDs D3, D4, D6 and D7. From the toolbar, suspend the demo using the Break option. Select Stop to return to the Edition Mode.

8
Quick Start Guide
7 Spin the TWR-MC-LV3PH 3-phase Motor
with a PMSM Sensorless FOC Control Algorithm and Monitor it with the FreeMASTER Tool1) Load the OpenSDA P&E Debug Application
If you followed the previous exercise, you can jump directly to the following instruction; otherwise, follow Step 5 to load the OpenSDA P&E applications.
2) Connect the boards and the motor
Connect TWR-KV31F120M and TWR-MC-LV3PH with the jumper setup shown in the table below following the black and white markings on the Tower System elevators.
Connect the motor to the three-prong connectors (J5) of the motor module.
First, plug the 24V power supply included in the TWR-MC-LV3PH kit into the barrel connector (J1) of the motor module. Then, connect the USB cable to TWR-KV31F120M and the computer.
Note: Refer to the TWR-KV31F120M User Guide at freescale.com/TWR-KV31F120M for detailed jumper description.
Option SettingJ2 1–2
J3 1–2
J10 1–2
J11 1–2
TWR-MC-LV3PH: Jumper Settings
Option SettingJ12 1–2
J13 1–2
J14 1–2
3) Compile the PMSM Sensorless FOC Demo with IAR EWARM v7.10, or later
Open the IAR project file PMSM_Sensorless_FOC.eww following the path Project Labs\build\iar\kv31\ PMSM_Sensorless_FOC in the Quick Start Package.

9
TOWER SYSTEM
Clean the project before selecting the action Rebuild All.
Note: The compilation may return warning messages without consequence.
4) Run IAR EWARM V7.10, or later Debug Mode
From the toolbar, click on Download and Debug.
Start the debug session by selecting the GO option.
5) Monitor the Project with Freescale FreeMASTER v1.4 or later
Launch Freescale FreeMASTER v1.4 or later from the Windows Start menu.
Note: At first start-up, you may have an error message regarding the COM connection.
Open the FreeMASTER project file PMSM_Sensorless_FOC.pmp following the path Project Labs\Freemaster\PMSM_Sensorless_FOC in the Quick Start Package. The application interface, PMSM Sensorless Vector Control on Kinetis KV31, will appear in FreeMASTER.
The speed, position, voltage and current consumption of the motor can be monitored and controlled.
.
In the Project Options, set the COM port affected to the OpenSDA -CDC Serial Port (info available in Device Manager) and set the baud rate/speed to 19200 bps (check the option Do not Open Port at Startup to avoid error messages at FreeMASTER startup).

10
Quick Start Guide
From the toolbar, select the action File->Start the communication.
Press button SW1 of the TWR-KV31F120M board to spin the motor counterclockwise. Press the SW1 button again to increase the speed of the motor. Press button SW2 to decrease the speed and stop the motor.
Or, in FreeMASTER speedometer or speed selector box, select the requested speed and the motor will spin automatically counterclockwise or clockwise.
In IAR EWARM, from the toolbar, suspend the demo using the Break option, or select Stop to return to the Edition Mode.

11
TOWER SYSTEM
TWR-KV31F120M Jumper Map

For more information, visit freescale.com/ TWR-KV31F120M, freescale.com/Kinetis or freescale.com/Tower
Join the online Tower community at towergeeks.orgFreescale, the Freescale logo and Kinetis are trademarks of Freescale Semiconductor, Inc., Reg. U.S. Pat. & Tm. Off. Tower is a trademark of Freescale Semiconductor, Inc. ARM and Cortex are registered trademarks of ARM Limited (or its subsidiaries) in the EU and/or elsewhere. All rights reserved. All other product or service names are the property of their respective owners. © 2014 Freescale Semiconductor, Inc.
Doc Number: KINKV3XQSG REV 0 Agile Number: 926-78855 Rev A
SupportVisit freescale.com/support for a list of phone numbers within your region.
WarrantyVisit freescale.com/warranty for complete warranty information.
Quick Start Guide
Get StartedDownload installation software and documentation under “Jump Start Your Design” at freescale.com/TWR-KV31F120M.
Quick Start Guide