quick setup connect your video source choose a …quick setup choose a location the projector...
TRANSCRIPT
QuickSetup Choose a locationTheprojectorsupports4viewingsetups.Choosethebestoneforyourenvironment.Ifyouinstalltheprojectorinarearoroverheadposition,you’llneedtochoosethecorrectprojectionoption,identifiedbelow,fromtheExtendedmenu.SeetheUser’s GuideonyourCD-ROMforinstructions.
Table Convenientfortemporaryfrontprojection. ChooseFrontfromthemenu.
Ceiling Professionalinstallationrecommended. ChooseFront/Ceilingfromthemenu.
Rear Forinstallationbehindatranslucentscreen.
ChooseRearfromthemenu.
Rear/Ceiling Professionalinstallationrecommended.
ChooseRear/Ceilingfromthemenu.
Thedistancebetweentheprojectorandthescreendeterminesthesizeoftheimage.Thediagrambelowshowsapproximatelyhowbigyourimagewillbe(diagonally),basedonwhereyousetuptheprojector.(Formorehelpdeterminingthesizeofyourimage,trytheImageSizeCalculatorontheMultimediaProjectorspageonEpson’swebsite.)
2Connect your video sourceConnecttheprojectortoacomputerorvideosourceusinganyoftheavailableconnectionsshownbelow.
• Checktheconnectorsonyourvideoequipment.Ifmorethanone connectionisavailable,choosetheonethatprovidesthebestquality. Theprojectorconnectorsfromhighesttolowestqualityare Computer(ComponentVideo),S-Video,andVideo.
• Acomputercableisincluded.YoucanpurchaseoptionalvideoandaudiocablesthroughEpsonoranelectronicsstore.
• Youcanconnectupto4videodevicesandusetheremotecontroltoswitchbetweenthem.
Youcanalsoconnectanexternalmonitortowatchthedisplayonyourcomputermonitorwhilewatchingtheprojectionscreen(whenthecomputercableisconnectedtotheComputer1port).Toenhancethesoundinyourpresentation,youcanconnectexternalspeakers.SeetheUser’s GuideonyourCD-ROMforinstructions.
3Set up the remote control1 Removethebatterycover.
2 Insertthebatteries.
3 Replacethebatterycover.
Theremotecontrolisreadyforuse.
Turn over
PowerLite® 822+/83+
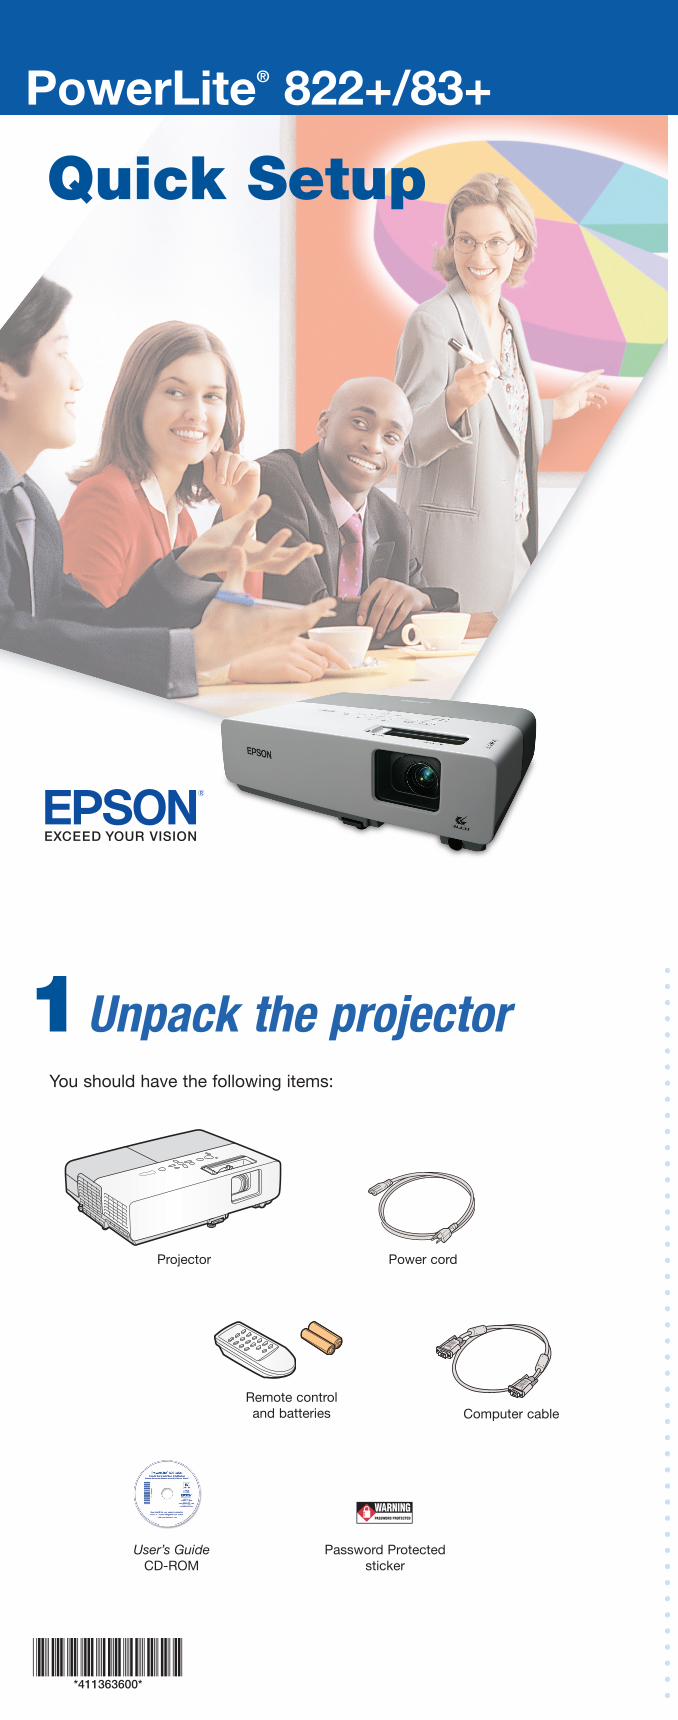
1 Unpack the projector Youshouldhavethefollowingitems:
Projector Powercord
Computercable
User’s GuideCD-ROM
PasswordProtectedsticker
Remotecontrolandbatteries
RCAvideocable(compositevideo)
(optional)
S-Videocable
(optional)
Componentvideoto
VGAcable(optional)
Computercable
(included)
L-Audio-Rports
Audio2andAudio1ports

QuickSetup Choose a locationTheprojectorsupports4viewingsetups.Choosethebestoneforyourenvironment.Ifyouinstalltheprojectorinarearoroverheadposition,you’llneedtochoosethecorrectprojectionoption,identifiedbelow,fromtheExtendedmenu.SeetheUser’s GuideonyourCD-ROMforinstructions.
Table Convenientfortemporaryfrontprojection. ChooseFrontfromthemenu.
Ceiling Professionalinstallationrecommended. ChooseFront/Ceilingfromthemenu.
Rear Forinstallationbehindatranslucentscreen.
ChooseRearfromthemenu.
Rear/Ceiling Professionalinstallationrecommended.
ChooseRear/Ceilingfromthemenu.
Thedistancebetweentheprojectorandthescreendeterminesthesizeoftheimage.Thediagrambelowshowsapproximatelyhowbigyourimagewillbe(diagonally),basedonwhereyousetuptheprojector.(Formorehelpdeterminingthesizeofyourimage,trytheImageSizeCalculatorontheMultimediaProjectorspageonEpson’swebsite.)
2Connect your video sourceConnecttheprojectortoacomputerorvideosourceusinganyoftheavailableconnectionsshownbelow.
• Checktheconnectorsonyourvideoequipment.Ifmorethanone connectionisavailable,choosetheonethatprovidesthebestquality. Theprojectorconnectorsfromhighesttolowestqualityare Computer(ComponentVideo),S-Video,andVideo.
• Acomputercableisincluded.YoucanpurchaseoptionalvideoandaudiocablesthroughEpsonoranelectronicsstore.
• Youcanconnectupto4videodevicesandusetheremotecontroltoswitchbetweenthem.
Youcanalsoconnectanexternalmonitortowatchthedisplayonyourcomputermonitorwhilewatchingtheprojectionscreen(whenthecomputercableisconnectedtotheComputer1port).Toenhancethesoundinyourpresentation,youcanconnectexternalspeakers.SeetheUser’s GuideonyourCD-ROMforinstructions.
3Set up the remote control1 Removethebatterycover.
2 Insertthebatteries.
3 Replacethebatterycover.
Theremotecontrolisreadyforuse.
Turn over
PowerLite® 822+/83+
1 Unpack the projector Youshouldhavethefollowingitems:
Projector Powercord
Computercable
User’s GuideCD-ROM
PasswordProtectedsticker
Remotecontrolandbatteries
RCAvideocable(compositevideo)
(optional)
S-Videocable
(optional)
Componentvideoto
VGAcable(optional)
Computercable
(included)
L-Audio-Rports
Audio2andAudio1ports

Where to get help Internet support VisitEpson’ssupportwebsiteatepson.com/supportandselectyour
productforsolutionstocommonproblems.Youcandownloadutilitiesanddocumentation,getFAQsandtroubleshootingadvice,ore-mailEpsonwithyourquestions.
Visithttp://www.presentersonline.comtoaccesstips,templates,andtrainingfordevelopingsuccessfulpresentations.
Speak to a support representative TousetheEpsonPrivateLine®Supportservice,call(800)637-7661
andenterthePINontheincludedEpsonPrivateLineSupportcard.Thisserviceisavailable6AMto6PM,PacificTime,MondaythroughFriday,forthedurationofyourwarrantyperiod.Youmayalsospeakwithaprojectorsupportspecialistbydialingoneofthefollowingnumbers.(Daysandhoursofsupportaresubjecttochangewithoutnotice.Tollorlongdistancechargesmayapply.)
U.S.: (562)276-4394,6AMto6PM,PacificTime,Monday-Friday
Canada:(905)709-3839,6AMto6PM,PacificTime,Monday-Friday
Purchase supplies and accessories Youcanpurchasescreens,carryingcases,andotheraccessories
fromanEpsonauthorizedreseller.Tofindthenearestreseller,call800-GO-EPSON(800-463-7766).Oryoucanpurchaseonlineatwww.epsonstore.com(U.S.sales)orwww.epson.ca(Canadiansales).
5Adjust the image 1 Toraisetheimage,standbehindthe
projector,thenpressthefootreleaseleverandliftthefrontoftheprojector.Releasethelevertolockthefootinthepositionyouwant.
2 Rotatethefocusringtosharpentheimage,andthezoomringto
enlargeorreduceit.
3 Ifyourimagelookslike or ,firstmakesuretheprojector
isfacingthescreensquarely.Then,ifnecessary,pressthe or buttonsontheprojector’scontrolpaneluntiltheimageiscorrected.
4 Toselectthebestcolormode,presstheColor Modebuttonontheremotecontrolrepeatedlytomovethroughtheoptions.
SeeyourUser’s GuideontheCD-ROMformoreinformationaboutimageadjustments.
6Install your User’s Guide and register your projector
1 InsertthePowerLiteProjectorCD-ROMinyourdrive.Iftheinstallerdoesn’topenautomatically,double-clicktheEpsonCD-ROMicon,thendouble-clicktheEpsoninstallericon.
2 Chooseyourprojector,thenfollowtheinstructionsonthescreentoregister.
Youcanalsoregisteratwww.epson.com/webreg.
3 Afteryouregistertheprojector,clickUser’s Guidetoinstallit.(Ifyoudon’talreadyhaveAdobe®Reader,®clickAdobe Readerandfollowtheon-screeninstructionstoinstallit.)
4 Whenyou’redone,clickExit.
ToopenyourUser’s Guide,double-clickthePL 822+ 83+ User’s Guideicononyourdesktop.
4Plug in and turn on 1 OpentheA/V Muteslide (lenscover).
2 Connectthepowercordtotheprojectorandplugtheotherendintoanelectricaloutlet.
The Powerlightontheprojectorturnsorange.
3 Turnonyourcomputerorvideosource.
4 Pressthe Powerbuttonontheprojectororremotecontrol.Theprojectorbeeps,the Powerlightflashesgreen,andtheprojectorlampcomesoninabout5seconds.The Powerlightstaysgreen.
5 Startyourvideoorpresentation.Ifyouhaveconnectedmorethanonevideosource,usetheSource Searchbuttonontheprojectororremotecontroltoselecttheoneyouwanttowatch.
Ifyourimagedoesnotappearonthescreen,seetheTroubleshootingsectionforhelp.
Turning off the projector 1 Ifyou’reusingacomputer,shutitdownfirst,whileyoucan
stillseethedisplay.
2 Pressthe Powerbuttonontheprojectororremotecontrol.
3 Whenyouseetheconfirmationmessage,pressthe Powerbuttonagain.Theprojectorbeepstwiceandthe Powerlightturnsorange.
WithEpson’sInstantOff®technology,there’snocool-downperiod.Whenyou’redone,justunplugtheprojectorandit’sreadytotravel.
TroubleshootingIf you see a blank screenIfyouseeablankscreenortheNo signalmessageafterturningonyourcomputerorvideosource,checkthefollowing:
Makesurethe PowerlightontheprojectorisgreenandnotflashingandtheA/V Muteslide(lenscover)isopen.
Makesurethecablesareconnectedcorrectly.(SeetheUser’s Guideformoreinformation.)
Ifyou’veconnectedmorethanonevideosource,youmayneedtopresstheSource Searchbuttonontheprojectorortheremotecontroltoselecttheoneyouwanttowatch.(Allowafewsecondsfortheprojectortosyncupafterpressingit.)
If the projector and the notebook don’t display the same image
If you’re using a Windows® notebook:
HolddowntheFnkeyandpressthefunctionkey(suchas orCRT/LCD)thatletsyoudisplayonanexternalmonitor.Onmostsystems,the orCRT/LCDkeyletsyoutogglebetweentheLCDscreenandtheprojector,ordisplayonbothatthesametime.
CheckyourmonitorsettingstomakesureboththeLCDscreenandtheexternalmonitorportareenabled.FromtheControlPanel,opentheDisplayutility.ClicktheSettingstab,thenclickAdvanced.Themethodforadjustingthesettingsvariesbybrand;youmayneedtoclickaMonitortab,thenmakesuretheexternalMonitorportissetasyourprimarydisplayand/orenabled.Seeyourcomputer’sdocumentationoronlinehelpfordetails.
If you’re using a Macintosh® notebook with OS X:
1 FromtheApple®menu,selectSystem Preferences,thenclickDisplay orDisplays.
2 SelectVGA DisplayorColor LCD,clickArrangementorArrange,andmakesureMirror Displays ischecked.
EpsonandInstantOffareregisteredtrademarksandEpsonExceedYourVisionisatrademarkofSeikoEpsonCorporation.PowerLiteandPrivateLineareregisteredtrademarksandEpsonStoreisaservicemarkofEpsonAmerica,Inc.GeneralNotice:Otherproductnamesusedhereinareforidentificationpurposesonlyandmaybetrademarksoftheirrespectiveowners.Epsondisclaimsanyandallrightsinthosemarks.Thecontentsofthismanualaresubjecttochangewithoutnotice.©2007EpsonAmerica,Inc.12/07PrintedinXXXXXX CPD-25115
ColorModebutton
FocusringZoomring