quick installation guide - eu.dlink.com · d-link dcs-6511 quick install guide 1 english dcs-6511...
TRANSCRIPT

This document will guide you through the basic installation process for your new D-Link Network Camera.
DCS-6511
Documentation also available on CD and via the D-Link Website
Quick Installation GuideHD Day & Night Vandal-Proof Fixed Dome Network Camera
Quick Installation GuideInstallationsanleitungGuide d’installationGuía de instalaciónGuida di Installazione
DCS-6511_A1_QIG_v1.00(EU).indd 1 2010/10/13 上午 11:19:53

DCS-6511_A1_QIG_v1.00(EU).indd 2 2010/10/13 上午 11:19:54

D-Link DCS-6511 Quick Install Guide 1
EN
GLIS
H
DCS-6511 Quick Install GuideThis installation guide provides basic instructions for installing the DCS-6511 Network Camera on your network. For additional information about how to use the camera, please see the User’s Manual which is available on the CD included in this package or from the D-Link support website.
Installation Steps1. Verify the package contents against the list below.2. Hardware Overview3. SD Card Installation4. Hardware Installation5. Configuration with Wizard 6. Adjusting the lens 3-axis angel
1. Package Contents � DCS-6511 Network Camera � Manual and Software on CD-ROM � Quick Install Guide � Power Adapter � AV & Power Cables � Security Wrench � CAT-5 Ethernet Cable � Extension Adapter � Cable Cover � Mounting Bracket and Screws � Rubber Plug
If any of the above items are missing, please contact your reseller.
Safety Notice:Installation and servicing should be done by certified technicians so as to conform to all local codes and prevent voiding your warranty.
DCS-6511_A1_QIG_v1.00(EU).indd 1 2010/10/13 上午 11:19:55

D-Link DCS-6511 Quick Install Guide
2
EN
GLI
SH 2. Hardware Overview
Power ConnectorConnects to 12 V DC power
24 V Power ConnectorConnects to 24 V AC power
Ethernet JackRJ-45 connector for Ethernet which can also be used to power the camera using Power over Ethernet (PoE)
Audio InConnects to a microphone DI/DO Wiring, 12V DC output
I/O connectors for external devices
Install the SD CardPush the SD card into the camera with the gold contacts oriented towards the base of the camera. To eject the SD card, push the SD card into the slot.
3. SD Card InstallationDisassemble the CameraOpen the camera enclosure by loosen the 4 screws. Lift the dome off the base of the camera.
Audio OutConnects to speakers
DCS-6511_A1_QIG_v1.00(EU).indd 2 2010/10/13 上午 11:19:55
D-Link DCS-6511 Quick Install Guide 3
EN
GLIS
H
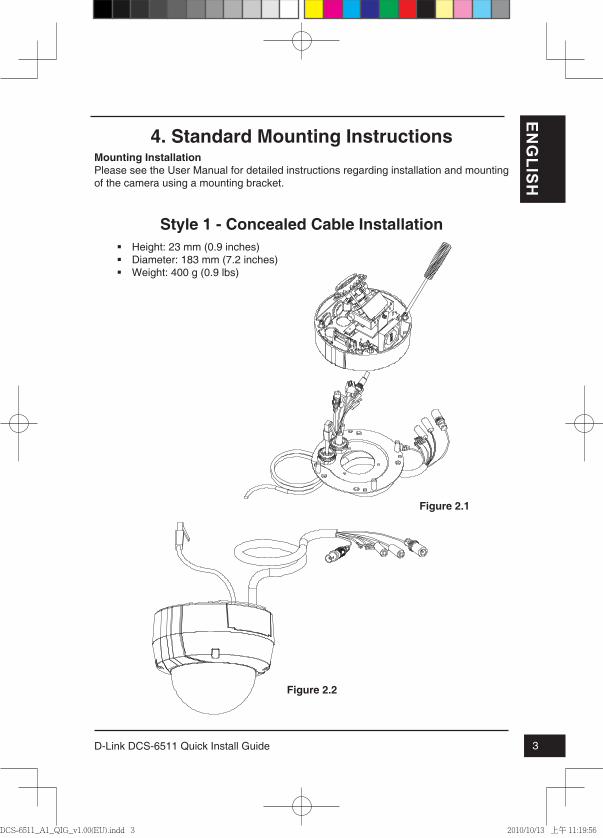
4. Standard Mounting InstructionsMounting InstallationPlease see the User Manual for detailed instructions regarding installation and mounting of the camera using a mounting bracket.
Style 1 - Concealed Cable Installation � Height: 23 mm (0.9 inches) � Diameter: 183 mm (7.2 inches) � Weight: 400 g (0.9 lbs)
Figure 2.1
Figure 2.2
DCS-6511_A1_QIG_v1.00(EU).indd 3 2010/10/13 上午 11:19:56
D-Link DCS-6511 Quick Install Guide4
EN
GLI
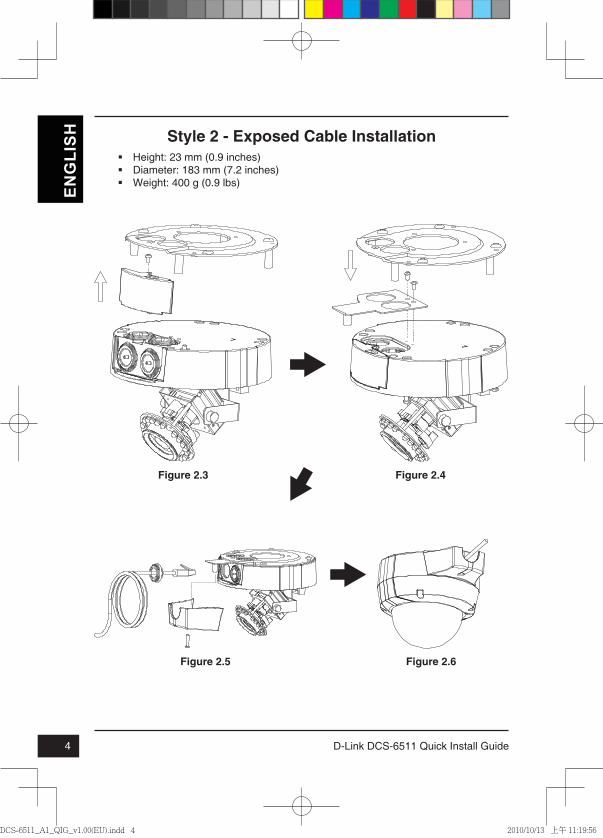
SH Style 2 - Exposed Cable Installation
� Height: 23 mm (0.9 inches) � Diameter: 183 mm (7.2 inches) � Weight: 400 g (0.9 lbs)
Figure 2.3 Figure 2.4
Figure 2.5 Figure 2.6
DCS-6511_A1_QIG_v1.00(EU).indd 4 2010/10/13 上午 11:19:56

D-Link DCS-6511 Quick Install Guide 5
EN
GLIS
H
Pendant Mount (DCS-34-2) � Height: 201 mm (7.9 inches) � Diameter: 150 mm (5.9 inches) � Weight: 665 g (1.45 lbs)
Figure 3.4
Pendant Bracket
Bracket Cap
Rubber Seal
Figure 3.2
Figure 3.3
Figure 3.1
Bracket Cap
Mounting Plate
DCS-6511_A1_QIG_v1.00(EU).indd 5 2010/10/13 上午 11:19:56

D-Link DCS-6511 Quick Install Guide6
EN
GLI
SH Bent Mount (DCS-34-3)
� Height: 253 mm (9.96 inches) � Diameter: 150 mm (5.9 inches) � Weight: 770 g (1.7 lbs)
Bracket Cap
Bent Bracket
Figure 4.2
Figure 4.4
Dome Camera
Bent Bracket
Figure 4.3
Figure 4.1
Bracket Cap
Mounting Plate
DCS-6511_A1_QIG_v1.00(EU).indd 6 2010/10/13 上午 11:19:56
D-Link DCS-6511 Quick Install Guide 7
EN
GLIS
H
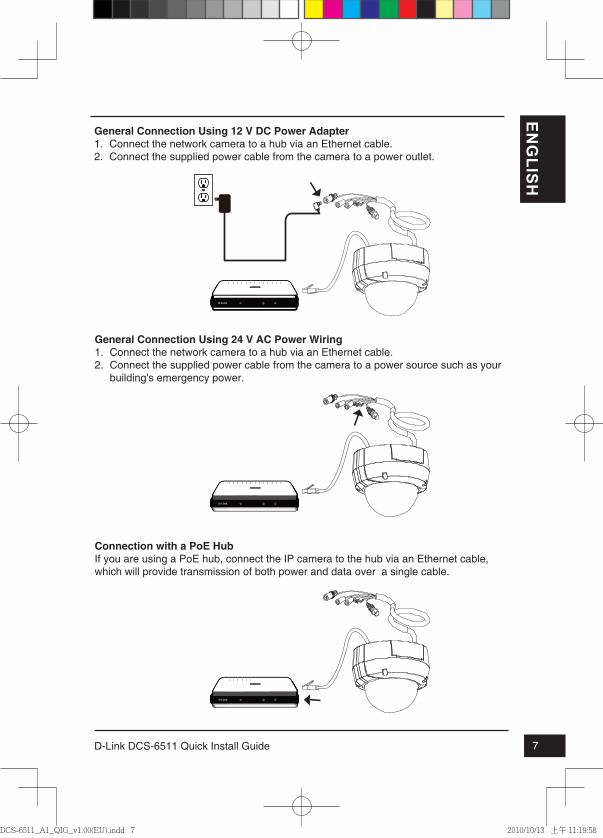
Connection with a PoE HubIf you are using a PoE hub, connect the IP camera to the hub via an Ethernet cable, which will provide transmission of both power and data over a single cable.
General Connection Using 24 V AC Power Wiring1. Connect the network camera to a hub via an Ethernet cable.2. Connect the supplied power cable from the camera to a power source such as your
building's emergency power.
General Connection Using 12 V DC Power Adapter1. Connect the network camera to a hub via an Ethernet cable.2. Connect the supplied power cable from the camera to a power outlet.
DCS-6511_A1_QIG_v1.00(EU).indd 7 2010/10/13 上午 11:19:58

D-Link DCS-6511 Quick Install Guide8
EN
GLI
SH 5. Configuration with Wizard
Click Setup Wizard to begin the installation.
Insert the DCS-6511 CD into your computer's CD-ROM drive to begin the installation. If the Autorun function on your computer is disabled, or if the D-Link Launcher fails to start automatically, click Start > Run. Type D:\autorun.exe, where D: represents the drive letter of your CD-ROM drive.
After clicking Setuop Wizard, the following window will open.
Click Next to continue.
Click Yes to accept the License Agreement.
Click Finish to complete the installation.
To start the installation process, click Next.
Note: The installation may take several minutes to finish.
DCS-6511_A1_QIG_v1.00(EU).indd 8 2010/10/13 上午 11:19:59

D-Link DCS-6511 Quick Install Guide 9
EN
GLIS
H
Click on the D-Link Setup Wizard SE icon that was created in your Windows Start menu.
Start > D-Link > Setup Wizard SE
Take a moment to confirm your settings and click Restart.
Select DHCP if your camera obtains an IP address automatically when it boots up. Select static IP if the camera will use the same IP address each time it is started.
Click Next, to proceed to the next page.
Enter the Admin ID and password. When logging in for the first time, the default Admin ID is admin with the password left blank.
Click Next, to proceed to the next page.
The Setup Wizard will appear and display the MAC address and IP address of your camera(s). If you have a DHCP server on your network, a valid IP Address will be displayed. If your network does not use a DHCP server, the network camera's default static IP 192.168.0.20 will be displayed.
Click the Wizard button to continue.
DCS-6511_A1_QIG_v1.00(EU).indd 9 2010/10/13 上午 11:20:00
D-Link DCS-6511 Quick Install Guide10
EN
GLI
SH
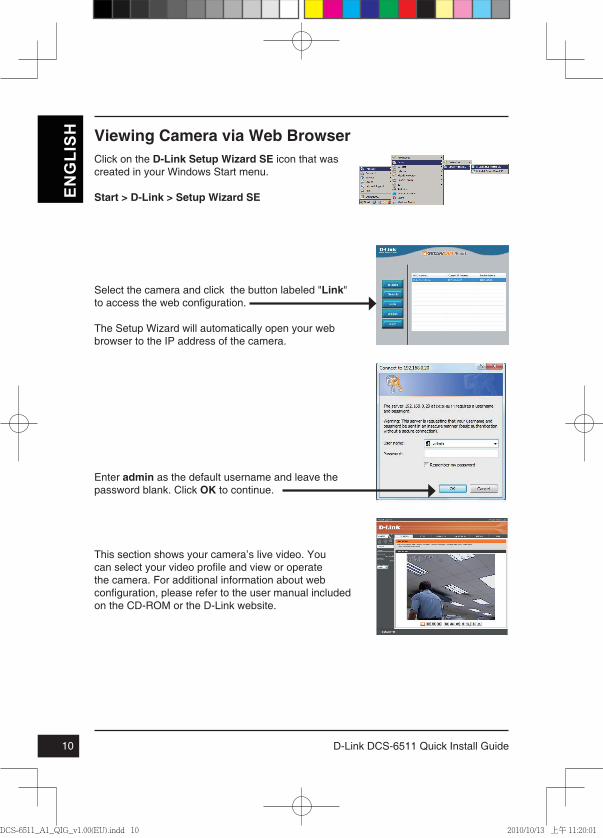
Click on the D-Link Setup Wizard SE icon that was created in your Windows Start menu.
Start > D-Link > Setup Wizard SE
Viewing Camera via Web Browser
This section shows your camera’s live video. You can select your video profile and view or operate the camera. For additional information about web configuration, please refer to the user manual included on the CD-ROM or the D-Link website.
Enter admin as the default username and leave the password blank. Click OK to continue.
Select the camera and click the button labeled "Link" to access the web configuration.
The Setup Wizard will automatically open your web browser to the IP address of the camera.
DCS-6511_A1_QIG_v1.00(EU).indd 10 2010/10/13 上午 11:20:01

D-Link DCS-6511 Quick Install Guide 11
EN
GLIS
HAdjus the Viewing Angle of the 3-axisMechanismTurn the lens module left and right until the desired position is achieved; tighten the pan screw once completed.
Loosen the tilt screws on both sides of the camera, and turn the lens module up and down until the desired position is achieved; tighten the tilt screws once completed.
Turn the lens to adjust the IP camera’s image until the desired orientation is achieved, tighten the image adjustment screw once completed.
6. Adjusting the lens 3-axis angel
TECHNICAL SUPPORT
United Kingdom (Mon-Fri) website: http://www.dlink.co.uk FTP: ftp://ftp.dlink.co.ukHome Wireless/Broadband 0871 873 3000 (9.00am–06.00pm, Sat 10.00am-02.00pm)Managed, Smart, & Wireless Switches, or Firewalls 0871 873 0909 (09.00am- 05.30pm) (BT 10ppm, other carriers may vary.)
Ireland (Mon-Fri) All Products 1890 886 899 (09.00am-06.00pm, Sat 10.00am-02.00pm) Phone rates: €0.05ppm peak, €0.045ppm off peak times
DCS-6511_A1_QIG_v1.00(EU).indd 11 2010/10/13 上午 11:20:01
NOTES
DCS-6511_A1_QIG_v1.00(EU).indd 12 2010/10/13 上午 11:20:01

D-Link DCS-6511 Quick Install Guide 13
DE
UTS
CH
DCS-6511 InstallationsanleitungDiese Installationsanleitung bietet Ihnen grundlegende Anleitungen zur Installation der DCS-6511 Netzwerkkamera in Ihrem Netzwerk. Zusätzliche Informationen zur Verwendung der Kamera finden Sie im Benutzerhandbuch, das Ihnen auf der CD, die diesem Paket beiliegt, oder über die D-Link Support-Website zur Verfügung steht.
Installationsschritte1. Prüfen Sie den Packungsinhalt, ob er mit den auf der Liste unten aufgeführten
Artikeln übereinstimmt.2. Hardware-Überblick3. SD-Karteninstallation4. Hardware-Installation5. Konfiguration mithilfe des Assistenten 6. 3-Achsenwinkel des Objektivs einstellen
1. Packungsinhalt � DCS-6511 Netzwerkkamera � CD-ROM mit Software und Handbuch � Schnellinstallationsanleitung � Stromadapter/Netzteil � AV- & Stromkabel � Sicherheitsschraubendreher � CAT -5 Ethernet-Kabel � Adapter für Erweiterung � Kabelmantel � Befestigungsklammer und Schrauben � Gummistopfen
Sollte einer der oben aufgeführten Artikel fehlen, wenden Sie sich bitte an Ihren Fachhändler.
Sicherheitshinweis:Installation und Wartungsarbeiten sollten nur von zertifizierten Technikern vorgenommen werden, zu jeder Zeit allen örtlich geltenden Richtlinien und Anforderungen entsprechen sowie verhindern, dass Ihr Garantieanspruch erlischt.
DCS-6511_A1_QIG_v1.00(EU).indd 13 2010/10/13 上午 11:20:01
D-Link DCS-6511 Quick Install Guide14
DE
UTS
CH
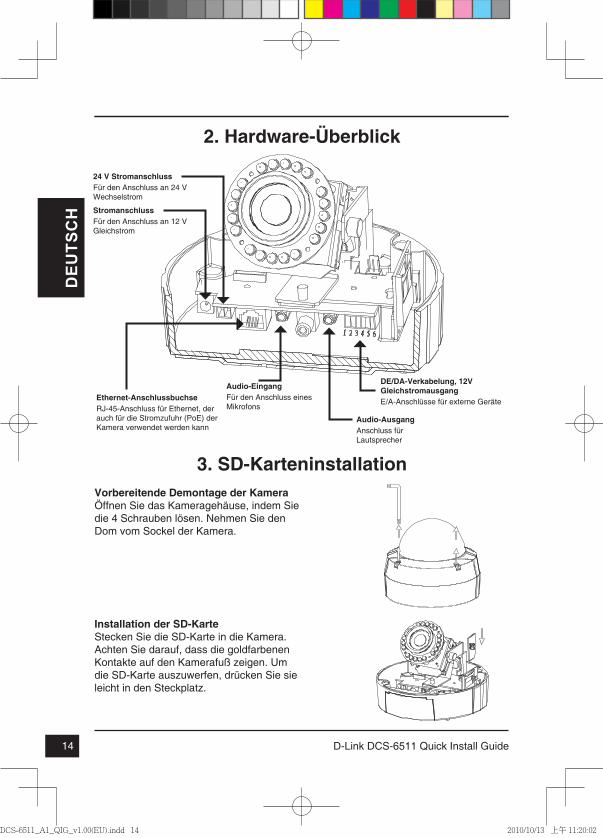
2. Hardware-Überblick
StromanschlussFür den Anschluss an 12 V Gleichstrom
24 V StromanschlussFür den Anschluss an 24 V Wechselstrom
Ethernet-AnschlussbuchseRJ-45-Anschluss für Ethernet, der auch für die Stromzufuhr (PoE) der Kamera verwendet werden kann
Audio-EingangFür den Anschluss eines Mikrofons
DE/DA-Verkabelung, 12V GleichstromausgangE/A-Anschlüsse für externe Geräte
Installation der SD-KarteStecken Sie die SD-Karte in die Kamera. Achten Sie darauf, dass die goldfarbenen Kontakte auf den Kamerafuß zeigen. Um die SD-Karte auszuwerfen, drücken Sie sie leicht in den Steckplatz.
3. SD-KarteninstallationVorbereitende Demontage der KameraÖffnen Sie das Kameragehäuse, indem Sie die 4 Schrauben lösen. Nehmen Sie den Dom vom Sockel der Kamera.
Audio-AusgangAnschluss für Lautsprecher
DCS-6511_A1_QIG_v1.00(EU).indd 14 2010/10/13 上午 11:20:02
D-Link DCS-6511 Quick Install Guide 15
DE
UTS
CH
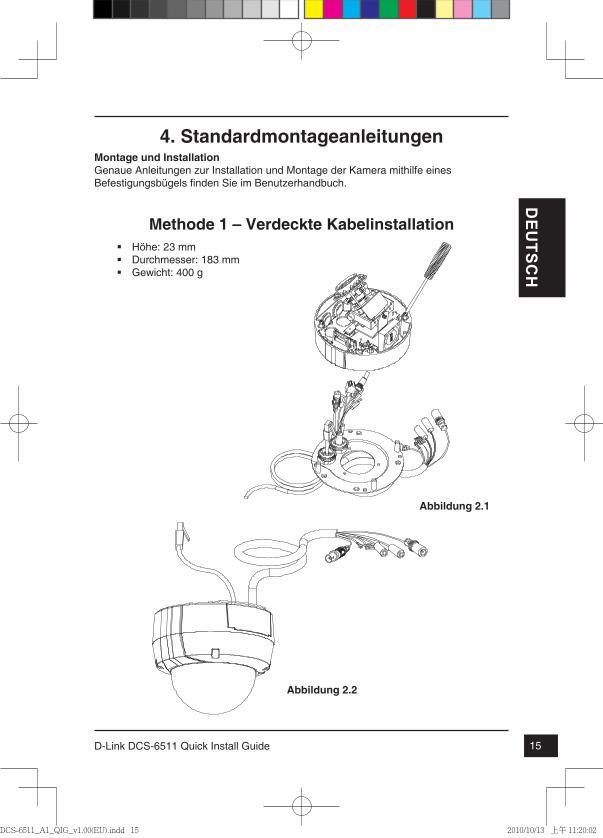
4. StandardmontageanleitungenMontage und InstallationGenaue Anleitungen zur Installation und Montage der Kamera mithilfe eines Befestigungsbügels finden Sie im Benutzerhandbuch.
Methode 1 – Verdeckte Kabelinstallation � Höhe: 23 mm � Durchmesser: 183 mm � Gewicht: 400 g
Abbildung 2.1
Abbildung 2.2
DCS-6511_A1_QIG_v1.00(EU).indd 15 2010/10/13 上午 11:20:02
D-Link DCS-6511 Quick Install Guide16
DE
UTS
CH
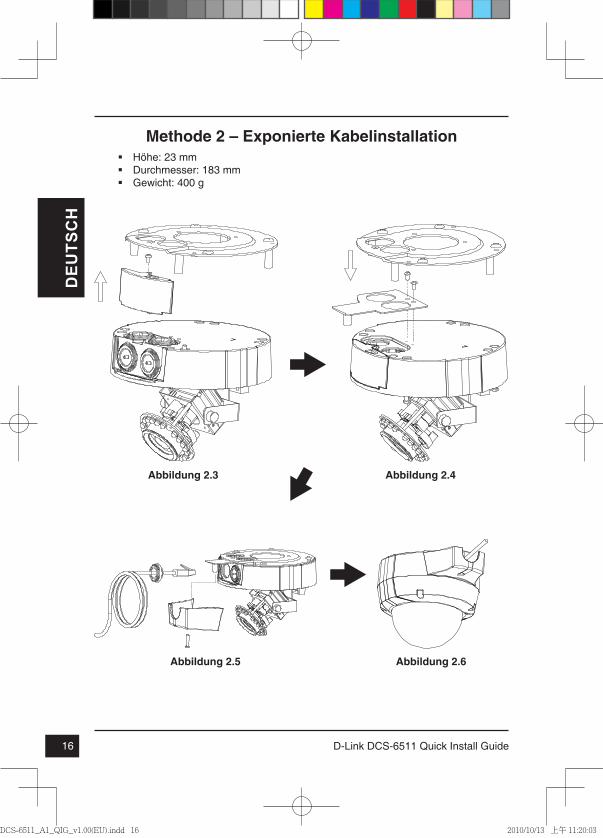
Methode 2 – Exponierte Kabelinstallation � Höhe: 23 mm � Durchmesser: 183 mm � Gewicht: 400 g
Abbildung 2.3 Abbildung 2.4
Abbildung 2.5 Abbildung 2.6
DCS-6511_A1_QIG_v1.00(EU).indd 16 2010/10/13 上午 11:20:03
D-Link DCS-6511 Quick Install Guide 17
DE
UTS
CH
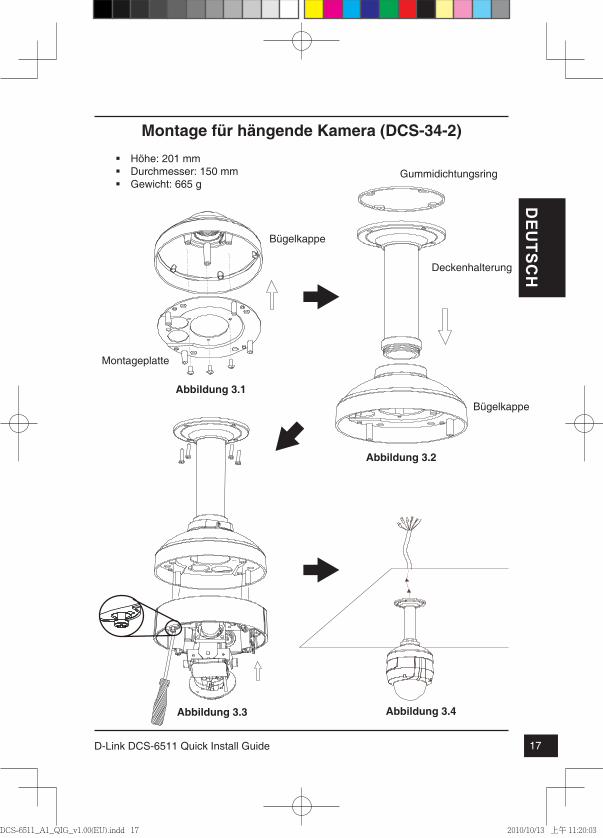
Montage für hängende Kamera (DCS-34-2) � Höhe: 201 mm � Durchmesser: 150 mm � Gewicht: 665 g
Abbildung 3.4
Deckenhalterung
Bügelkappe
Gummidichtungsring
Abbildung 3.2
Abbildung 3.3
Abbildung 3.1
Bügelkappe
Montageplatte
DCS-6511_A1_QIG_v1.00(EU).indd 17 2010/10/13 上午 11:20:03

D-Link DCS-6511 Quick Install Guide18
DE
UTS
CH
Montage für gebogene Kamerabügelhalterung (DCS-34-3) � Höhe: 253 mm � Durchmesser: 150 mm � Gewicht: 770 g
Bügelkappe
Gebogene Bügelhalterung
Abbildung 4.2
Abbildung 4.4
Dome-Kamera
Gebogene Bügelhalterung
Abbildung 4.3
Abbildung 4.1
Bügelkappe
Montageplatte
DCS-6511_A1_QIG_v1.00(EU).indd 18 2010/10/13 上午 11:20:03

D-Link DCS-6511 Quick Install Guide 19
DE
UTS
CH
Anschluss an einen PoE-HubWenn Sie einen PoE-Hub verwenden, schließen Sie die IP-Kamera mit dem Ethernetkabel an den Hub an, so dass Strom und Daten über ein einziges Kabel übertragen werden.
Allgemeiner Anschluss mit 24 V Wechselstromverkabelung1. Schließen Sie die Netzwerkkamera mit dem Ethernetkabel an einen Hub an.2. Schließen Sie das im Lieferumfang des Produkts enthaltene Stromkabel von der
Kamera an eine Stromquelle an, wie beispielsweise an die Notfallstromzufuhr Ihres Gebäudes.
Allgemeiner Anschluss mit 12 V Gleichstrom-Netzteil/Stromadapter1. Schließen Sie die Netzwerkkamera mit dem Ethernetkabel an einen Hub an.2. Schließen Sie die Kamera mit dem mitgelieferten Stromkabel an eine Steckdose an.
DCS-6511_A1_QIG_v1.00(EU).indd 19 2010/10/13 上午 11:20:05

D-Link DCS-6511 Quick Install Guide20
DE
UTS
CH
5. Konfiguration mithilfe des Assistenten
Klicken Sie auf Setup Wizard (Setup-Assistent), um die Installation zu beginnen.
Legen Sie die DCS-6511 CD in das CD-ROM-Laufwerk Ihres Computers, um die Installation zu beginnen. Sollte die CD auf Ihrem Computer nicht automatisch ausgeführt werden oder der D-Link Launcher startet nicht automatisch, klicken Sie auf Start > Ausführen. Geben Sie D:\autorun.exe ein, wobei D: für den Laufwerkbuchstaben Ihres CD-ROM-Laufwerks steht.
Nachdem Sie auf 'Setup Wizard' (Setup-Assistent) geklickt haben, wird das folgende Fenster geöffnet.
Klicken Sie auf Next(Weiter), um fortzufahren.
Klicken Sie auf Yes (Ja), um die Lizenzvereinbarung zu akzeptieren.
Klicken Sie auf Finish (Fertig stellen), um die Installation abzuschließen.
Um den Installationsprozess zu starten, klicken Sie auf Next (Weiter).
Hinweis: Der Installationsvorgang kann mehrere Minuten dauern.
DCS-6511_A1_QIG_v1.00(EU).indd 20 2010/10/13 上午 11:20:05

D-Link DCS-6511 Quick Install Guide 21
DE
UTS
CH
Klicken Sie auf das Symbol für den D-Link SE Setup-Assistenten, der in Ihrem Windows-Startmenü erstellt wurde.
Start > D-Link > Setup Wizard SE
Prüfen Sie Ihre Einstellungen und klicken Sie dann auf Restart (Neustart).
Wählen Sie DHCP, wenn Ihrer Kamera bei Systemstart automatisch eine IP-Adresse zugewiesen wird. Wählen Sie statische IP, wenn die Kamera bei jedem Neustart die gleiche IP-Adresse verwendet.
Klicken Sie auf Next (Weiter), um die nächste Seite anzuzeigen.
Geben Sie die Administratorkennung und das Kennwort ein. Bei Erstanmeldung ist die standardmäßige Administratorkennung admin. Das Feld <password> (Kennwort) bleibt leer.
Klicken Sie auf Next (Weiter), um die nächste Seite anzuzeigen.
Der Setup-Assistent wird aufgerufen und zeigt die MAC- und IP-Adresse Ihrer Kamera(s) an. Wenn in Ihrem Netzwerk ein DHCP-Server vorhanden ist, wird eine gültige IP-Adresse angezeigt. Weist Ihr Netzwerk keinen DHCP-Server auf, wird die standardmäßige statische IP-Adresse 192.168.0.20 der Netzwerkkamera angezeigt.
Klicken Sie auf Wizard (Assistent), um fortzufahren.
DCS-6511_A1_QIG_v1.00(EU).indd 21 2010/10/13 上午 11:20:06
D-Link DCS-6511 Quick Install Guide22
DE
UTS
CH
Klicken Sie auf das Symbol für den D-Link SE Setup-Assistenten, der in Ihrem Windows-Startmenü erstellt wurde.
Start > D-Link > Setup Wizard SE
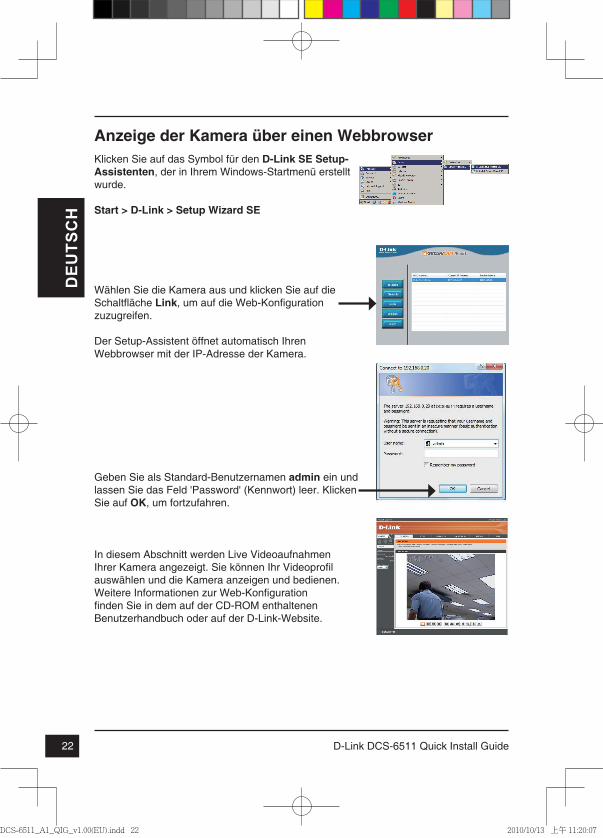
Anzeige der Kamera über einen Webbrowser
In diesem Abschnitt werden Live Videoaufnahmen Ihrer Kamera angezeigt. Sie können Ihr Videoprofil auswählen und die Kamera anzeigen und bedienen. Weitere Informationen zur Web-Konfiguration finden Sie in dem auf der CD-ROM enthaltenen Benutzerhandbuch oder auf der D-Link-Website.
Geben Sie als Standard-Benutzernamen admin ein und lassen Sie das Feld 'Password' (Kennwort) leer. Klicken Sie auf OK, um fortzufahren.
Wählen Sie die Kamera aus und klicken Sie auf die Schaltfläche Link, um auf die Web-Konfiguration zuzugreifen.
Der Setup-Assistent öffnet automatisch Ihren Webbrowser mit der IP-Adresse der Kamera.
DCS-6511_A1_QIG_v1.00(EU).indd 22 2010/10/13 上午 11:20:07

D-Link DCS-6511 Quick Install Guide 23
DE
UTS
CH
Einstellen des Sichtwinkels des 3-Achsenmechanismus Drehen Sie das Objektivmodul soweit nach links bzw. rechts, bis die gewünschte Position erreicht ist. Ziehen Sie dann die Schwenkfeststellschraube an.
Lösen Sie die Neigefeststellschrauben auf beiden Seiten der Kamera. Bewegen Sie das Objektivmodul nach oben bzw. unten, bis die gewünschte Position eingestellt ist. Ziehen Sie dann die Neigefeststellschrauben fest an.
Drehen Sie das Objektiv zur Einstellung des Bildes der IP-Kamera bis die gewünschte Ausrichtung erreicht ist. Ziehen Sie dann die Bildeinstellungsschraube fest an.
6. 3-Achsenwinkel-Objektiv einstellen
TECHNISCHE UNTERSTÜTZUNG
Deutschland: Web: http://www.dlink.de Telefon: +49(0)1805 2787 0,14 € pro Minute Zeiten: Mo. –Fr. 09:00 – 17:30 Uhr
Österreich: Web: http://www.dlink.at Telefon: +43(0)820 480084 0,116 € pro Minute Zeiten: Mo. –Fr. 09:00 – 17:30 Uhr
Schweiz: Web: http://www.dlink.ch Telefon: +41(0)848 331100 0,08 CHF pro Minute Zeiten: Mo. –Fr. 09:00 – 17:30 Uhr* Gebühren aus Mobilnetzen und von anderen Providern können abweichen.
DCS-6511_A1_QIG_v1.00(EU).indd 23 2010/10/13 上午 11:20:07

NOTES
DCS-6511_A1_QIG_v1.00(EU).indd 24 2010/10/13 上午 11:20:08
D-Link DCS-6511 Quick Install Guide 25
FRA
NÇ
AIS
Guide d'installation rapide - DCS-6511Ce guide d'installation fournit des instructions élémentaires qui vous aideront à installer la caméra réseau DCS-6511 sur votre réseau. Pour obtenir des informations complémentaires sur l'utilisation de la caméra, consultez le Manuel d'utilisation, disponible sur le CD joint à ce coffret, ou sur le site de support en ligne D-Link.
Procédure d'installation1. Vérifiez le contenu de la boîte par rapport à la liste ci-dessous.2. Description du matériel3. Installation de la carte SD4. Installation du matériel5. Configuration à l'aide de l'assistant 6. Réglage de l'angle de lentille à 3 axes
1. Contenu de la boîte � Caméra réseau DCS-6511 � Manuel et logiciel sur CD-ROM � Guide d’installation rapide � Adaptateur secteur � Câbles AV et d'alimentation � Clé de sécurité � Câble Ethernet CAT -5 � Adaptateur de rallonge � Cache-câble � Support de fixation et vis � Prise en caoutchouc
Contactez votre revendeur s'il manque l'un des éléments ci-dessus.
Remarque de sécurité :L'installation et l'entretien doivent être réalisés par des techniciens qualifiés afin d'être conformes à tous les codes locaux et d'éviter d'annuler votre garantie.
DCS-6511_A1_QIG_v1.00(EU).indd 25 2010/10/13 上午 11:20:08
D-Link DCS-6511 Quick Install Guide26
FRA
NÇ
AIS
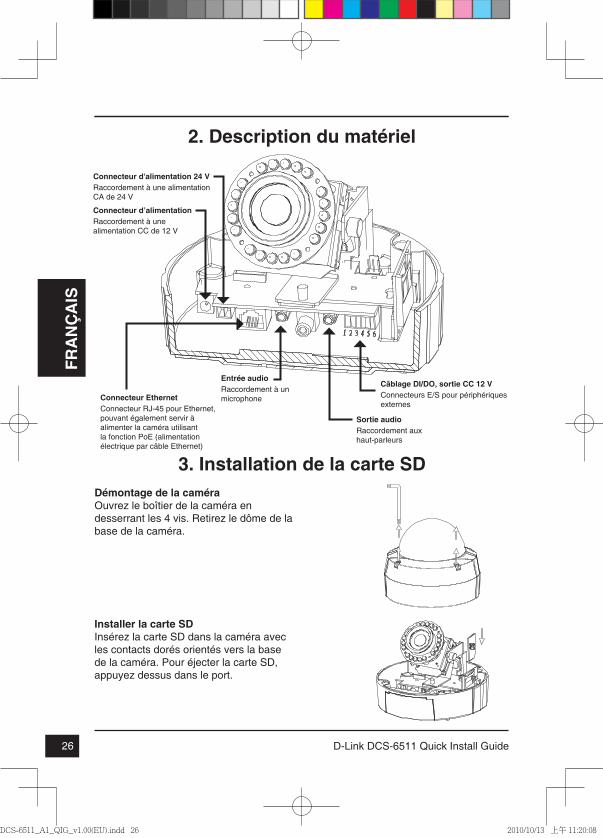
2. Description du matériel
Connecteur d’alimentationRaccordement à une alimentation CC de 12 V
Connecteur d'alimentation 24 VRaccordement à une alimentation CA de 24 V
Connecteur EthernetConnecteur RJ-45 pour Ethernet, pouvant également servir à alimenter la caméra utilisant la fonction PoE (alimentation électrique par câble Ethernet)
Entrée audioRaccordement à un microphone
Câblage DI/DO, sortie CC 12 VConnecteurs E/S pour périphériques externes
Installer la carte SDInsérez la carte SD dans la caméra avec les contacts dorés orientés vers la base de la caméra. Pour éjecter la carte SD, appuyez dessus dans le port.
3. Installation de la carte SDDémontage de la caméraOuvrez le boîtier de la caméra en desserrant les 4 vis. Retirez le dôme de la base de la caméra.
Sortie audioRaccordement aux haut-parleurs
DCS-6511_A1_QIG_v1.00(EU).indd 26 2010/10/13 上午 11:20:08
D-Link DCS-6511 Quick Install Guide 27
FRA
NÇ
AIS
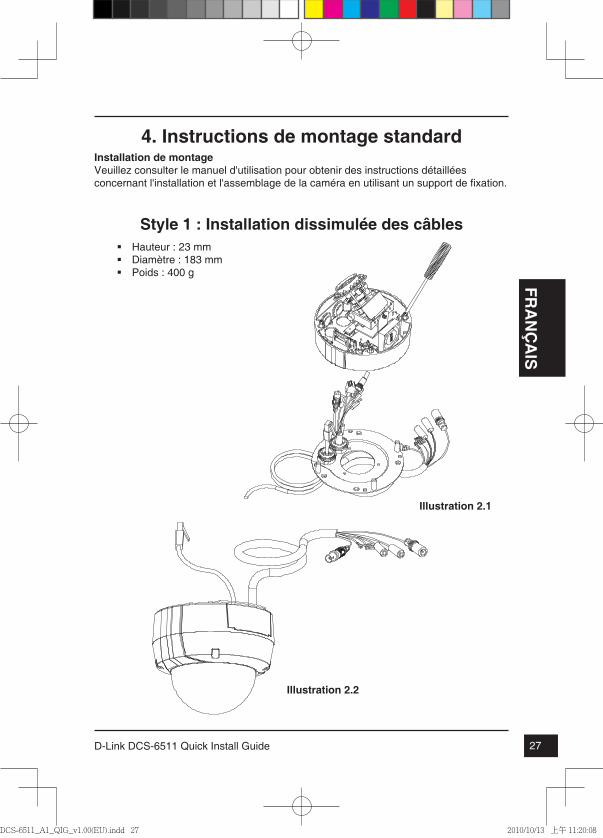
4. Instructions de montage standardInstallation de montageVeuillez consulter le manuel d'utilisation pour obtenir des instructions détaillées concernant l'installation et l'assemblage de la caméra en utilisant un support de fixation.
Style 1 : Installation dissimulée des câbles � Hauteur : 23 mm � Diamètre : 183 mm � Poids : 400 g
Illustration 2.1
Illustration 2.2
DCS-6511_A1_QIG_v1.00(EU).indd 27 2010/10/13 上午 11:20:08

D-Link DCS-6511 Quick Install Guide28
FRA
NÇ
AIS
Style 2 : Installation exposée des câbles � Hauteur : 23 mm � Diamètre : 183 mm � Poids : 400 g
Illustration 2.3 Illustration 2.4
Illustration 2.5 Illustration 2.6
DCS-6511_A1_QIG_v1.00(EU).indd 28 2010/10/13 上午 11:20:09
D-Link DCS-6511 Quick Install Guide 29
FRA
NÇ
AIS
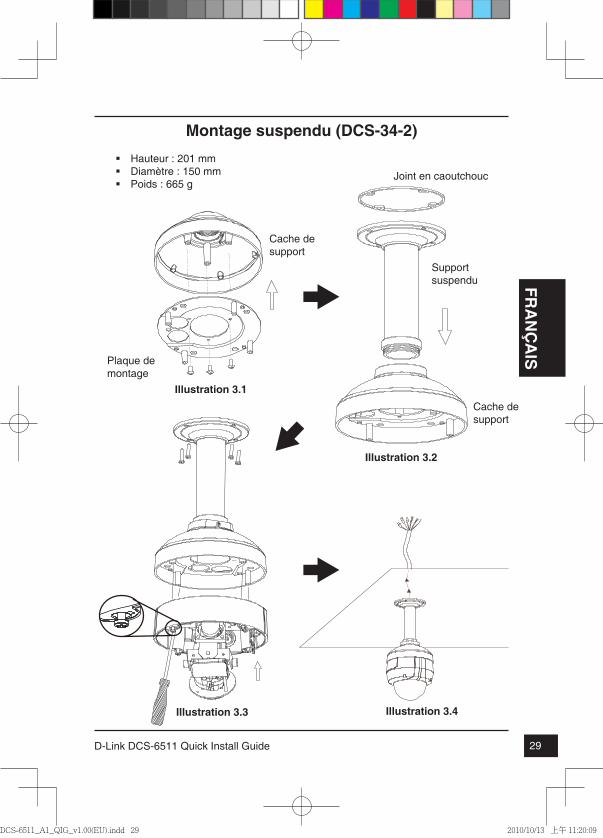
Montage suspendu (DCS-34-2) � Hauteur : 201 mm � Diamètre : 150 mm � Poids : 665 g
Illustration 3.4
Support suspendu
Cache de support
Joint en caoutchouc
Illustration 3.2
Illustration 3.3
Illustration 3.1
Cache de support
Plaque de montage
DCS-6511_A1_QIG_v1.00(EU).indd 29 2010/10/13 上午 11:20:09

D-Link DCS-6511 Quick Install Guide30
FRA
NÇ
AIS
Montage du coude (DCS-34-3) � Hauteur : 253 mm � Diamètre : 150 mm � Poids : 770 g
Cache de support
Support coudé
Illustration 4.2
Illustration 4.4
Caméra à dôme
Support coudé
Illustration 4.3
Illustration 4.1
Cache de support
Plaque de montage
DCS-6511_A1_QIG_v1.00(EU).indd 30 2010/10/13 上午 11:20:09

D-Link DCS-6511 Quick Install Guide 31
FRA
NÇ
AIS
Connexion avec un concentrateur Ethernet PoESi vous utilisez un concentrateur Ethernet PoE pour alimenter la caméra, connectez celle-ci au concentrateur à l'aide du câble Ethernet fourni, qui sert à la fois de câble pour l'alimentation et les données.
Connexion générale utilisant un câblage électrique (CA 24 V)1. Connectez la caméra réseau à un concentrateur par l'intermédiaire du câble
Ethernet.2. Branchez le câble d'alimentation fourni à la caméra et à une prise secteur telle que
l'alimentation de secours de votre bâtiment.
Connexion générale utilisant un adaptateur électrique (CC 12 V)1. Connectez la caméra réseau à un concentrateur par l'intermédiaire du câble
Ethernet.2. Branchez le câble d'alimentation fourni à la caméra et à une prise secteur.
DCS-6511_A1_QIG_v1.00(EU).indd 31 2010/10/13 上午 11:20:11
D-Link DCS-6511 Quick Install Guide32
FRA
NÇ
AIS
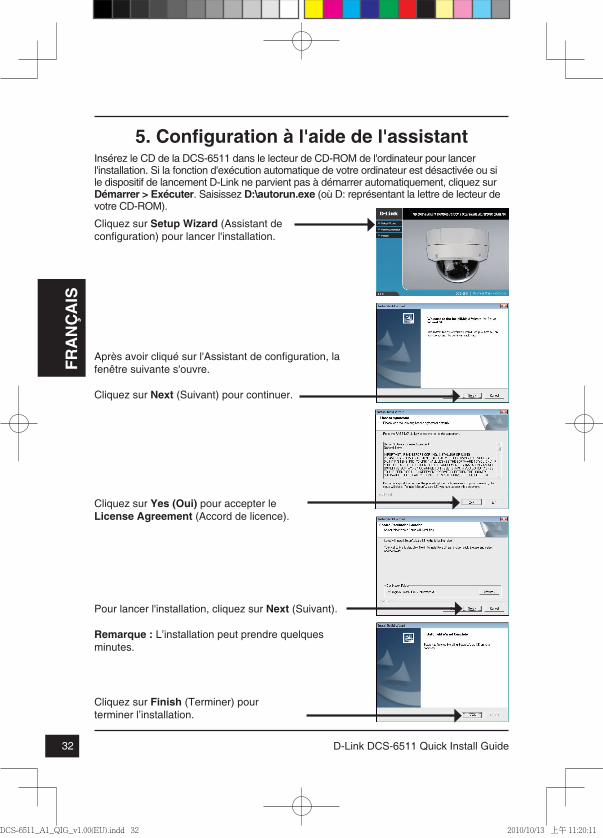
5. Configuration à l'aide de l'assistant
Cliquez sur Setup Wizard (Assistant de configuration) pour lancer l'installation.
Insérez le CD de la DCS-6511 dans le lecteur de CD-ROM de l'ordinateur pour lancer l'installation. Si la fonction d'exécution automatique de votre ordinateur est désactivée ou si le dispositif de lancement D-Link ne parvient pas à démarrer automatiquement, cliquez sur Démarrer > Exécuter. Saisissez D:\autorun.exe (où D: représentant la lettre de lecteur de votre CD-ROM).
Après avoir cliqué sur l'Assistant de configuration, la fenêtre suivante s'ouvre.
Cliquez sur Next (Suivant) pour continuer.
Cliquez sur Yes (Oui) pour accepter le License Agreement (Accord de licence).
Cliquez sur Finish (Terminer) pour terminer l’installation.
Pour lancer l'installation, cliquez sur Next (Suivant).
Remarque : L’installation peut prendre quelques minutes.
DCS-6511_A1_QIG_v1.00(EU).indd 32 2010/10/13 上午 11:20:11

D-Link DCS-6511 Quick Install Guide 33
FRA
NÇ
AIS
Cliquez sur l'icône D-Link Setup Wizard SE (Assistant de configuration D-Link SE) créée dans le menu Démarrer.
Démarrer > D-Link > Setup Wizard SE (Assistant de configuration SE)
Prenez le temps de vérifier vos paramètres, puis cliquez sur Restart (Redémarrer).
Sélectionnez DHCP si la caméra obtient une adresse IP automatiquement au démarrage. Sélectionnez Static IP (Adresse IP statique) si la caméra utilise la même adresse IP à chaque démarrage.
Cliquez sur Next (Suivant) pour passer à la page suivante.
Saisissez l'ID admin et le mot de passe. Lorsque vous vous connectez pour la première fois, l'ID Admin par défaut est admin et le mot de passe est vierge.
Cliquez sur Next (Suivant) pour passer à la page suivante.
L'Assistant de configuration s'ouvre et affiche les adresses MAC et IP de votre ou vos caméras. Si un serveur DHCP se trouve sur votre réseau, une adresse IP valide s’affiche. Si votre réseau n'utilise pas de serveur DHCP, l'adresse IP statique par défaut de la caméra réseau (192.168.0.20) s'affiche.
Cliquez sur Wizard (Assistant) pour continuer.
DCS-6511_A1_QIG_v1.00(EU).indd 33 2010/10/13 上午 11:20:12

D-Link DCS-6511 Quick Install Guide34
FRA
NÇ
AIS
Cliquez sur l'icône D-Link Setup Wizard SE (Assistant de configuration D-Link SE) créée dans le menu Démarrer.
Démarrer > D-Link > Setup Wizard SE (Assistant de configuration SE)
Affichage de la caméra dans un navigateur Web
Cette section présente la vidéo en direct de votre caméra. Vous pouvez sélectionner votre profil vidéo et voir ou utiliser la caméra. Pour obtenir des informations complémentaires sur la configuration Web, reportez-vous au manuel d'utilisation du CD-ROM ou sur le site Web D-Link.
Saisissez admin comme nom d'utilisateur par défaut et laissez le mot de passe vide. Cliquez sur OK pour continuer.
Sélectionnez la caméra, puis cliquez sur le bouton « Link » (Connexion) pour accéder à la configuration Web.
L'Assistant de configuration ouvre automatiquement votre navigateur Web à l'adresse IP de la caméra.
DCS-6511_A1_QIG_v1.00(EU).indd 34 2010/10/13 上午 11:20:13

D-Link DCS-6511 Quick Install Guide 35
FRA
NÇ
AIS
Réglez l'angle de vue en jouant sur le mécanisme à 3 axes.Tournez l'objectif vers la gauche ou la droite jusqu'à obtenir la position souhaitée ; serrez la vis du panoramique une fois la procédure terminée.
Desserrez les vis d'inclinaison des deux côtés de la caméra, et faites pivoter l'objectif vers le haut et vers le bas jusqu'à obtenir la position souhaitée ; serrez les vis d'inclinaison une fois la procédure terminée.
Tournez l'objectif pour régler l'image de la caméra IP jusqu'à obtenir l'orientation souhaitée ; serrez la vis de réglage d'image une fois la procédure terminée.
6. Réglage de l'angle de lentille à 3 axes
ASSISTANCE TECHNIQUE
Assistance technique D-Link sur internet :http://www.dlink.frAssistance technique D-Link par téléphone : 0820 0803 03 0.12 € TTC/min depuis un poste fixe Du lundi au vendredi de 9h à 19h (hors jours fériés)
DCS-6511_A1_QIG_v1.00(EU).indd 35 2010/10/13 上午 11:20:13

NOTES
DCS-6511_A1_QIG_v1.00(EU).indd 36 2010/10/13 上午 11:20:13

D-Link DCS-6511 Quick Install Guide 37
ES
PA
ÑO
L
Guía de instalación rápida de DCS-6511Esta guía de instalación proporciona instrucciones básicas para la instalación de la cámara de red DCS-6511 en su red. Para obtener información adicional acerca de cómo utilizar la cámara, consulte el Manual del usuario disponible en el CD incluido en el paquete o en el sitio web de asistencia de D-Link.
Pasos para la instalación1. Verifique el contenido de la caja con la lista que aparece a continuación.2. Descripción general del hardware3. Instalación de tarjeta SD4. Instalación del hardware5. Configuración con el asistente 6. Ajuste del ángulo de los 3 ejes de la lente
1. ¿Qué contiene la caja? � Cámara de red DCS-6511 � Manual y software en CD-ROM � Guía de instalación rápida � Adaptador de alimentación � AV y cables de alimentación � Llave de seguridad � Cable Ethernet CAT-5 � Adaptador de extensión � Tapa de cables � Soporte de montaje y tornillos � Tapón de goma
Si falta cualquiera de los componentes anteriores, póngase en contacto con el proveedor.
Aviso de seguridad:La instalación y el mantenimiento deben realizarlo técnicos cualificados con el fin de cumplir con todos los códigos locales y evitar la anulación de la garantía.
DCS-6511_A1_QIG_v1.00(EU).indd 37 2010/10/13 上午 11:20:14

D-Link DCS-6511 Quick Install Guide38
ES
PA
ÑO
L
2. Descripción general del hardware
Conector de alimentaciónSe conecta a la alimentación de 12 V CC
Conector de alimentación de 24 VSe conecta a la alimentación de 24 V CA
Clavija EthernetConector RJ-45 para Ethernet que se puede utilizar también para alimentar la cámara usando alimentación a través de Ethernet (PoE)
Entrada de audioSe conecta al micrófono Conexiones DI/DO, salida de 12 V CC
Conectores de E/S para dispositivos externos
Instale la tarjeta SDEmpuje la tarjeta SD en la cámara, con los contactos dorados orientados hacia la base de la cámara. Para expulsar la tarjeta SD, empuje la tarjeta SD en la ranura.
3. Instalación de la tarjeta SDDesmonte la cámaraAbra la carcasa de la cámara aflojando los 4 tornillos. Levante el domo separándolo de la base de la cámara.
Salida de audioSe conecta a los altavoces
DCS-6511_A1_QIG_v1.00(EU).indd 38 2010/10/13 上午 11:20:14

D-Link DCS-6511 Quick Install Guide 39
ES
PA
ÑO
L
4. Instrucciones de montaje estándarMontaje de la instalaciónConsulte el Manual de usuario para obtener instrucciones detalladas relativa a la instalación y montaje de la cámara utilizando un soporte de montaje.
Estilo 1 – Instalación de cables oculta � Altura: 23 mm (0,9 pulgadas) � Diámetro: 183 mm (7,2 pulgadas) � Peso: 400 g (0,9 libras)
Figura 2.1:
Figura 2.2:
DCS-6511_A1_QIG_v1.00(EU).indd 39 2010/10/13 上午 11:20:14

D-Link DCS-6511 Quick Install Guide40
ES
PA
ÑO
L
Estilo 2 – Instalación de cables visible � Altura: 23 mm (0,9 pulgadas) � Diámetro: 183 mm (7,2 pulgadas) � Peso: 400 g (0,9 libras)
Figura 2.3: Figura 2.4:
Figura 2.5: Figura 2.6:
DCS-6511_A1_QIG_v1.00(EU).indd 40 2010/10/13 上午 11:20:15
D-Link DCS-6511 Quick Install Guide 41
ES
PA
ÑO
L
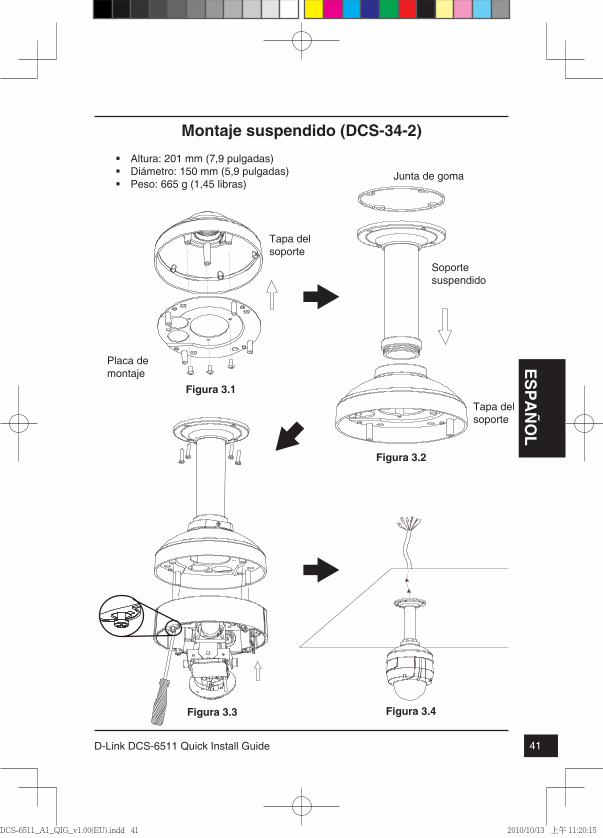
Montaje suspendido (DCS-34-2) � Altura: 201 mm (7,9 pulgadas) � Diámetro: 150 mm (5,9 pulgadas) � Peso: 665 g (1,45 libras)
Figura 3.4
Soporte suspendido
Tapa del soporte
Junta de goma
Figura 3.2
Figura 3.3
Figura 3.1
Tapa del soporte
Placa de montaje
DCS-6511_A1_QIG_v1.00(EU).indd 41 2010/10/13 上午 11:20:15

D-Link DCS-6511 Quick Install Guide42
ES
PA
ÑO
L
Montaje curvado (DCS-34-3) � Altura: 253 mm (9,96 pulgadas) � Diámetro: 150 mm (5,9 pulgadas) � Peso: 770 g (1,7 libras)
Tapa del soporte
Soporte curvado
Figura 4.2
Figura 4.4
Cámara domo
Soporte curvado
Figura 4.3
Figura 4.1
Tapa del soporte
Placa de montaje
DCS-6511_A1_QIG_v1.00(EU).indd 42 2010/10/13 上午 11:20:15
D-Link DCS-6511 Quick Install Guide 43
ES
PA
ÑO
L
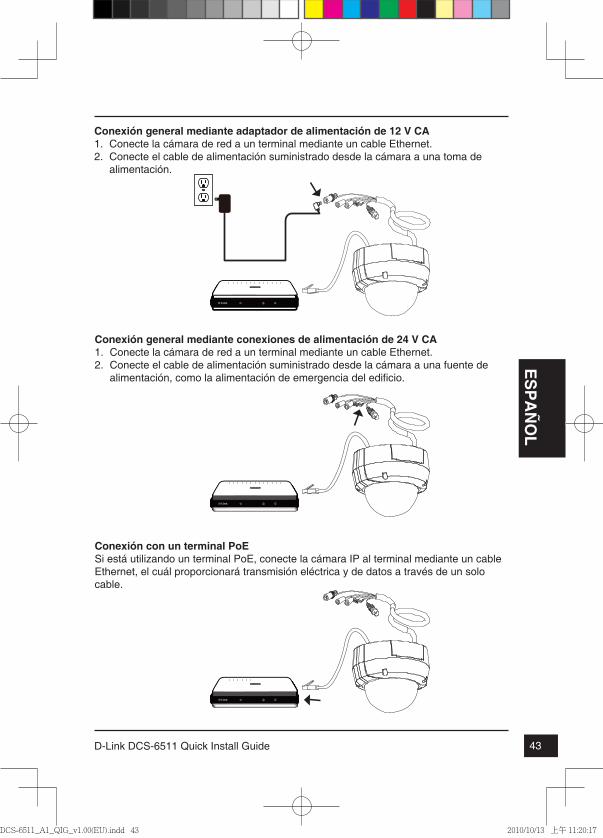
Conexión con un terminal PoESi está utilizando un terminal PoE, conecte la cámara IP al terminal mediante un cable Ethernet, el cuál proporcionará transmisión eléctrica y de datos a través de un solo cable.
Conexión general mediante conexiones de alimentación de 24 V CA1. Conecte la cámara de red a un terminal mediante un cable Ethernet.2. Conecte el cable de alimentación suministrado desde la cámara a una fuente de
alimentación, como la alimentación de emergencia del edificio.
Conexión general mediante adaptador de alimentación de 12 V CA1. Conecte la cámara de red a un terminal mediante un cable Ethernet.2. Conecte el cable de alimentación suministrado desde la cámara a una toma de
alimentación.
DCS-6511_A1_QIG_v1.00(EU).indd 43 2010/10/13 上午 11:20:17
D-Link DCS-6511 Quick Install Guide44
ES
PA
ÑO
L
5. Configuración con el asistente
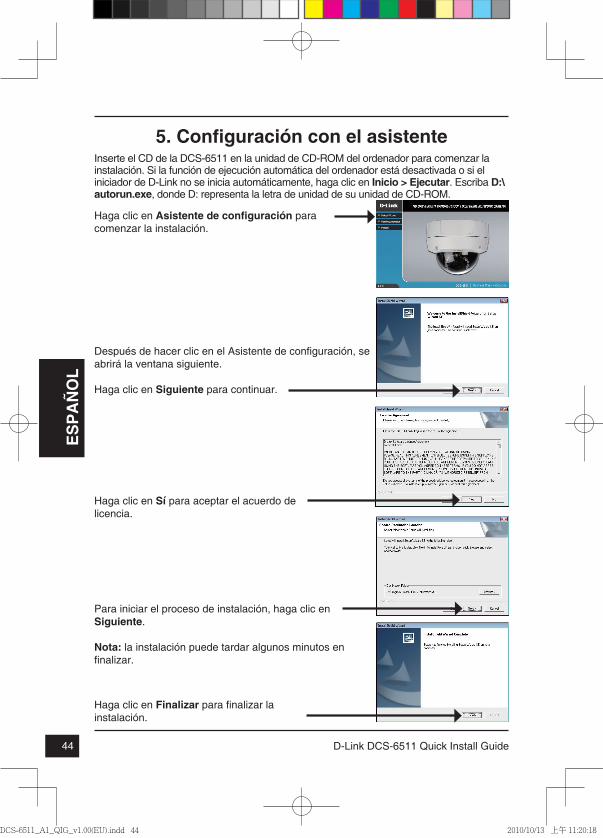
Haga clic en Asistente de configuración para comenzar la instalación.
Inserte el CD de la DCS-6511 en la unidad de CD-ROM del ordenador para comenzar la instalación. Si la función de ejecución automática del ordenador está desactivada o si el iniciador de D-Link no se inicia automáticamente, haga clic en Inicio > Ejecutar. Escriba D:\autorun.exe, donde D: representa la letra de unidad de su unidad de CD-ROM.
Después de hacer clic en el Asistente de configuración, se abrirá la ventana siguiente.
Haga clic en Siguiente para continuar.
Haga clic en Sí para aceptar el acuerdo de licencia.
Haga clic en Finalizar para finalizar la instalación.
Para iniciar el proceso de instalación, haga clic en Siguiente.
Nota: la instalación puede tardar algunos minutos en finalizar.
DCS-6511_A1_QIG_v1.00(EU).indd 44 2010/10/13 上午 11:20:18

D-Link DCS-6511 Quick Install Guide 45
ES
PA
ÑO
L
Haga clic en el icono Asistente de configuración SE D-Link que se creó en el menú de inicio de Windows.
Inicio > D-Link > Asistente de configuración SE
Tómese un tiempo para confirmar la configuración y haga clic en Reiniciar.
Seleccione DHCP si la cámara obtiene automáticamente una dirección IP al reiniciarse. Seleccione IP estática si la cámara utilizará la misma dirección IP cada vez que se inicia.
Haga clic en Siguiente para ir a la página siguiente.
Introduzca el ID de administrador y la contraseña. Al iniciar sesión por primera vez, el ID de administrador predeterminado es admin, con la contraseña en blanco.
Haga clic en Siguiente para ir a la página siguiente.
Aparecerá el asistente de configuración y mostrará la dirección MAC y la dirección IP de la cámara. Si tiene un servidor DHCP en la red, se mostrará una dirección IP válida. Si la red no utiliza un servidor DHCP, se mostrará la dirección de IP estática 192.168.0.20 predeterminada de la cámara.
Haga clic en el botón Asistente para continuar.
DCS-6511_A1_QIG_v1.00(EU).indd 45 2010/10/13 上午 11:20:19

D-Link DCS-6511 Quick Install Guide46
ES
PA
ÑO
L
Haga clic en el icono Asistente de configuración SE D-Link que se creó en el menú de inicio de Windows.
Inicio > D-Link > Asistente de configuración SE
Visualización de la cámara a través del explorador de web
Esta sección muestra el vídeo en directo de la cámara. Puede seleccionar el perfil de vídeo y ver o utilizar la cámara. Para obtener información adicional acerca de la configuración de web, consulte el manual de usuario incluido en el CD-ROM o el sitio web de D-Link.
Escriba admin como nombre de usuario predeterminado y deje la contraseña en blanco. Haga clic en Aceptar para continuar.
Seleccione la cámara y haga clic en el botón con la etiqueta "Vínculo" para acceder a la configuración web.
El asistente de configuración abrirá automáticamente el explorador de web en la dirección IP de la cámara.
DCS-6511_A1_QIG_v1.00(EU).indd 46 2010/10/13 上午 11:20:20

D-Link DCS-6511 Quick Install Guide 47
ES
PA
ÑO
L
Ajuste el ángulo de visualización del mecanismode los 3 ejesGire el módulo de la lente a derecha e izquierda hasta que alcance la posición deseada; una vez finalizado, apriete tornillo de panorámica.
Afloje los tornillos de inclinación a ambos lados de la cámara y gire el módulo de la lente hacia arriba y hacia abajo hasta se alcance la posición deseada; una vez finalizado, apriete los tornillos de inclinación.
Gire la lente para ajustar la imagen de la cámara IP hasta alcanzar la orientación deseada; una vez finalizado, apriete una vez el tornillo de ajuste de la imagen.
6. Ajuste del ángulo de los 3 ejes de la lente
ASISTENCIA TÉCNICA
http://www.dlink.esAsistencia Técnica Telefónica de D-Link: +34 902 30 45 45 0,067 €/minDe Lunes a Viernes de 9:00 a 19:00
DCS-6511_A1_QIG_v1.00(EU).indd 47 2010/10/13 上午 11:20:20
NOTES
DCS-6511_A1_QIG_v1.00(EU).indd 48 2010/10/13 上午 11:20:20
D-Link DCS-6511 Quick Install Guide 49
ITALIA
NO
DCS-6511In questa guida di installazione sono riportate le istruzioni di base per installare la videocamera DCS-6511 Network Camera in rete. Per ulteriori informazioni sull'utilizzo della videocamera, consultare il manuale utente disponibile sul CD incluso nella confezione o scaricabile dal sito Web di supporto di D-Link.
Procedura di installazione1. Verificare il contenuto della confezione in base all'elenco seguente.2. Panoramica hardware3. Installazione della scheda SD4. Installazione dell'hardware5. Procedura guidata di configurazione 6. Regolazione dell'angolo a tre assi dell'obiettivo
1. Contenuto della confezione � DCS-6511 Network Camera � Manuale e software su CD-ROM � Guida di installazione rapida � Alimentatore � Cavi AV e di alimentazione � Chiave di sicurezza � Cavo Ethernet CAT-5 � Adattatore prolunga � Copricavi � Staffa e viti di montaggio � Tappo in gomma
Se uno o più degli articoli sopra elencati risultano mancanti, rivolgersi al rivenditore.
Nota relativa alla sicurezza:Per evitare di invalidare la garanzia, l'installazione e le riparazioni devono essere effettuate da tecnici qualificati in conformità alle normative locali.
DCS-6511_A1_QIG_v1.00(EU).indd 49 2010/10/13 上午 11:20:20

D-Link DCS-6511 Quick Install Guide50
ITA
LIA
NO
2. Panoramica hardware
Connettore di alimentazionePer il collegamento all'alimentazione CC 12 V
Connettore di alimentazione 24 VPer il collegamento all'alimentazione CA 24 V
Spinotto EthernetConnettore RJ-45 per Ethernet che può essere utilizzato anche per alimentare la videocamera quando si utilizza PoE (Power over Ethernet)
Ingresso audioPer il collegamento a un microfono
Cavi DI/DO, uscita CC 12 VConnettori I/O per dispositivi esterni
Installare la scheda SDInserire la scheda SD nella videocamera con i contatti dorati rivolti verso la base della videocamera. Per espellere la scheda, spingerla nell'alloggiamento.
3. Installazione della scheda SDDisassemblare la videocameraAllentare le quattro viti per aprire l'involucro protettivo della videocamera. Staccare la cupola dalla base della videocamera.
Uscita audioPer la connessione agli altoparlanti
DCS-6511_A1_QIG_v1.00(EU).indd 50 2010/10/13 上午 11:20:21
D-Link DCS-6511 Quick Install Guide 51
ITALIA
NO
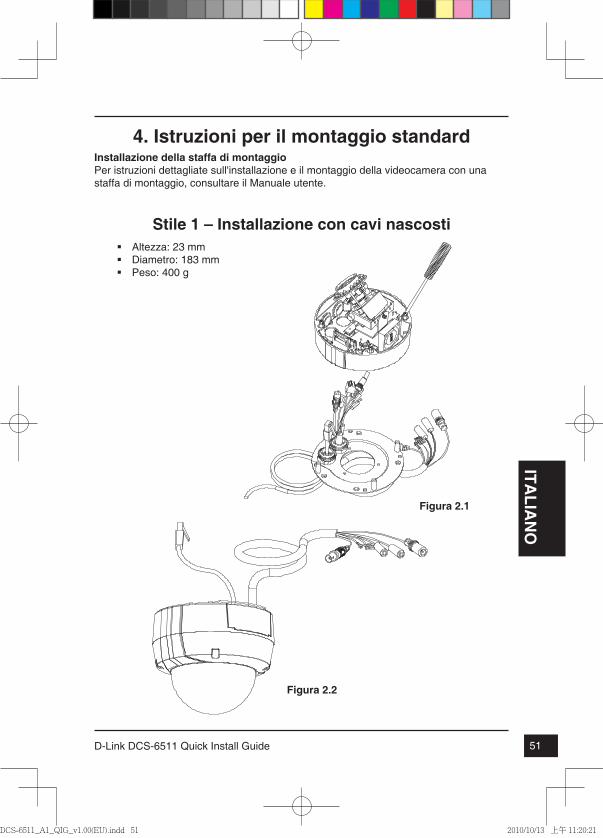
4. Istruzioni per il montaggio standardInstallazione della staffa di montaggioPer istruzioni dettagliate sull'installazione e il montaggio della videocamera con una staffa di montaggio, consultare il Manuale utente.
Stile 1 – Installazione con cavi nascosti � Altezza: 23 mm � Diametro: 183 mm � Peso: 400 g
Figura 2.1
Figura 2.2
DCS-6511_A1_QIG_v1.00(EU).indd 51 2010/10/13 上午 11:20:21
D-Link DCS-6511 Quick Install Guide52
ITA
LIA
NO
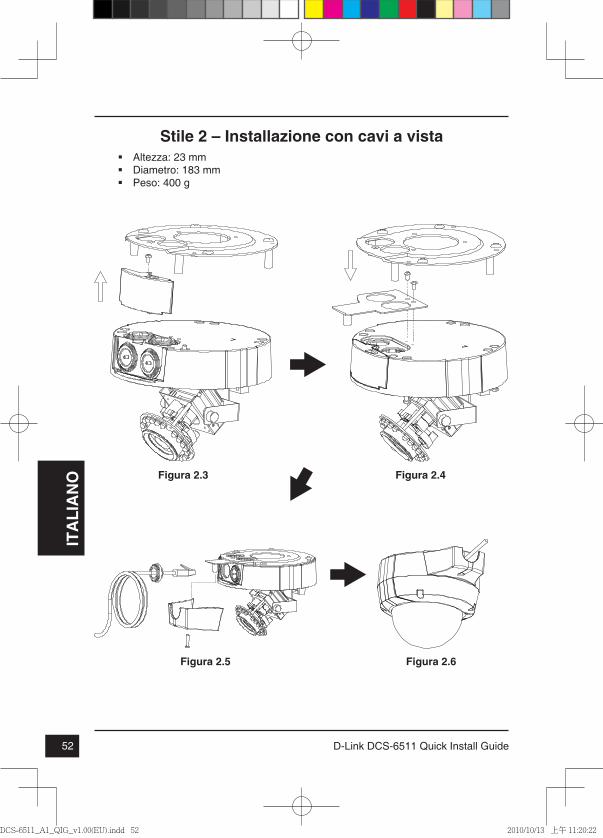
Stile 2 – Installazione con cavi a vista � Altezza: 23 mm � Diametro: 183 mm � Peso: 400 g
Figura 2.3 Figura 2.4
Figura 2.5 Figura 2.6
DCS-6511_A1_QIG_v1.00(EU).indd 52 2010/10/13 上午 11:20:22

D-Link DCS-6511 Quick Install Guide 53
ITALIA
NO
Montaggio sospeso (DCS-34-2) � Altezza: 201 mm � Diametro: 150 mm � Peso: 665 g
Figura 3.4
Staffa per montaggio sospeso
Tappo per staffa
Guarnizione in gomma
Figura 3.2
Figura 3.3
Figura 3.1
Copertura staffa
Piastra di montaggio
DCS-6511_A1_QIG_v1.00(EU).indd 53 2010/10/13 上午 11:20:22
D-Link DCS-6511 Quick Install Guide54
ITA
LIA
NO
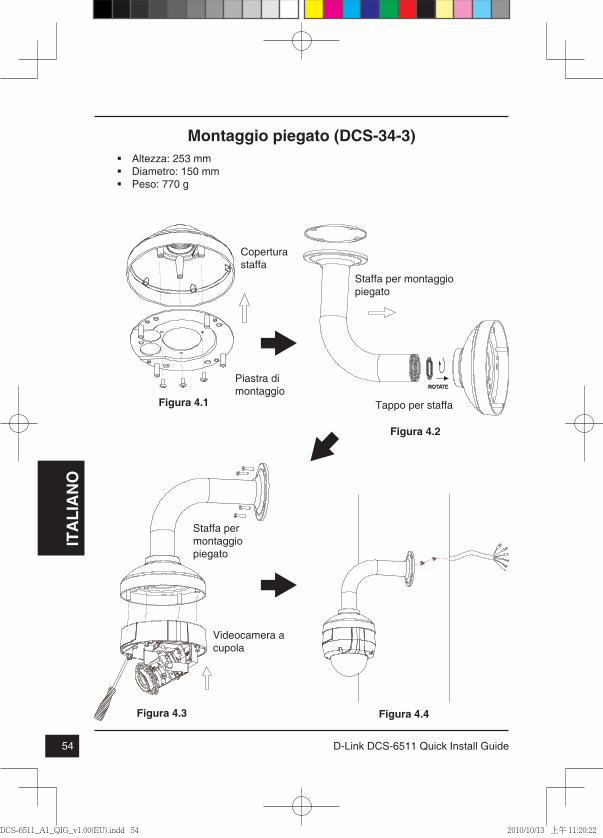
Montaggio piegato (DCS-34-3) � Altezza: 253 mm � Diametro: 150 mm � Peso: 770 g
Tappo per staffa
Staffa per montaggio piegato
Figura 4.2
Figura 4.4
Videocamera a cupola
Staffa per montaggio piegato
Figura 4.3
Figura 4.1
Copertura staffa
Piastra di montaggio
DCS-6511_A1_QIG_v1.00(EU).indd 54 2010/10/13 上午 11:20:22
D-Link DCS-6511 Quick Install Guide 55
ITALIA
NO
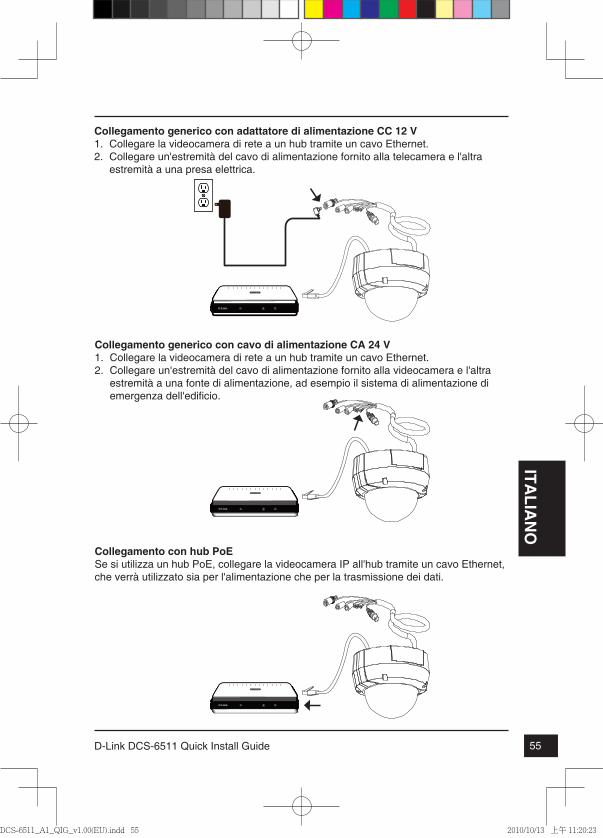
Collegamento con hub PoESe si utilizza un hub PoE, collegare la videocamera IP all'hub tramite un cavo Ethernet, che verrà utilizzato sia per l'alimentazione che per la trasmissione dei dati.
Collegamento generico con cavo di alimentazione CA 24 V1. Collegare la videocamera di rete a un hub tramite un cavo Ethernet.2. Collegare un'estremità del cavo di alimentazione fornito alla videocamera e l'altra
estremità a una fonte di alimentazione, ad esempio il sistema di alimentazione di emergenza dell'edificio.
Collegamento generico con adattatore di alimentazione CC 12 V1. Collegare la videocamera di rete a un hub tramite un cavo Ethernet.2. Collegare un'estremità del cavo di alimentazione fornito alla telecamera e l'altra
estremità a una presa elettrica.
DCS-6511_A1_QIG_v1.00(EU).indd 55 2010/10/13 上午 11:20:23
D-Link DCS-6511 Quick Install Guide56
ITA
LIA
NO
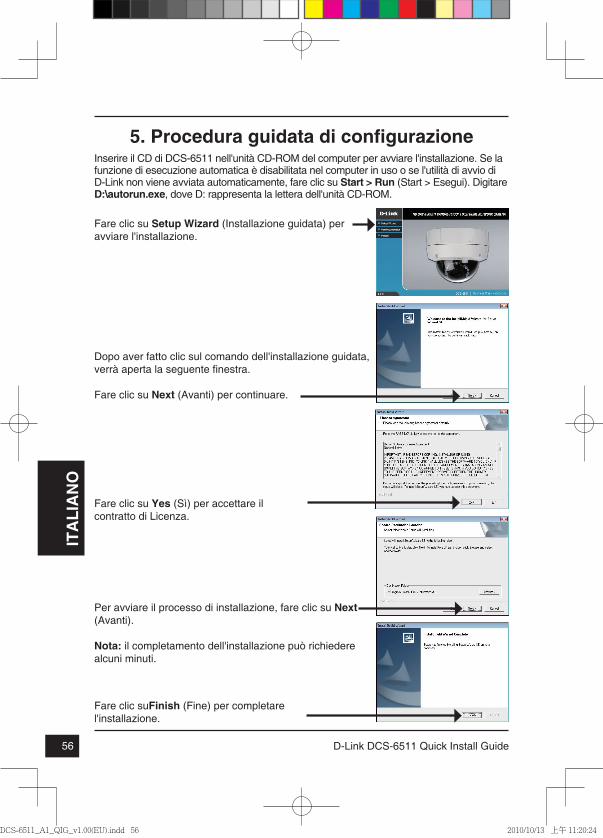
5. Procedura guidata di configurazione
Fare clic su Setup Wizard (Installazione guidata) per avviare l'installazione.
Inserire il CD di DCS-6511 nell'unità CD-ROM del computer per avviare l'installazione. Se la funzione di esecuzione automatica è disabilitata nel computer in uso o se l'utilità di avvio di D-Link non viene avviata automaticamente, fare clic su Start > Run (Start > Esegui). Digitare D:\autorun.exe, dove D: rappresenta la lettera dell'unità CD-ROM.
Dopo aver fatto clic sul comando dell'installazione guidata, verrà aperta la seguente finestra.
Fare clic su Next (Avanti) per continuare.
Fare clic su Yes (Sì) per accettare il contratto di Licenza.
Fare clic suFinish (Fine) per completare l'installazione.
Per avviare il processo di installazione, fare clic su Next (Avanti).
Nota: il completamento dell'installazione può richiedere alcuni minuti.
DCS-6511_A1_QIG_v1.00(EU).indd 56 2010/10/13 上午 11:20:24
D-Link DCS-6511 Quick Install Guide 57
ITALIA
NO
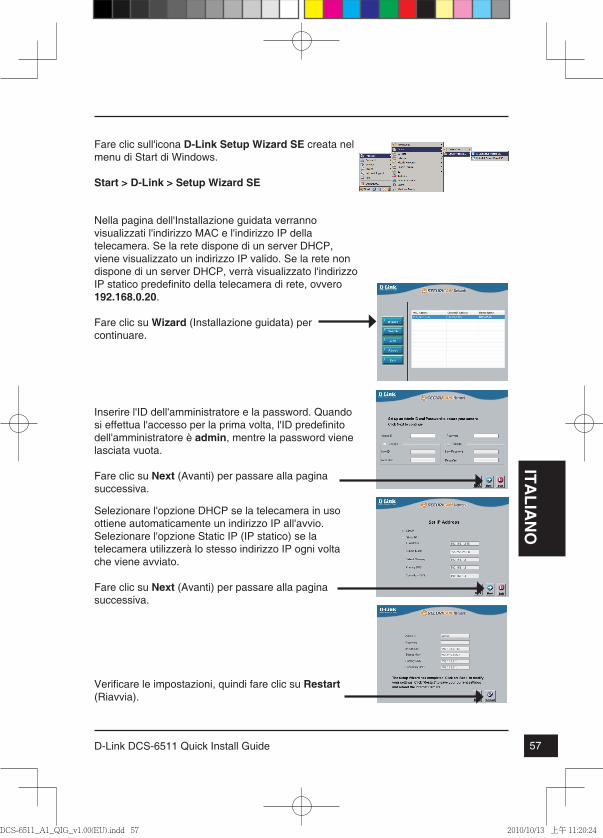
Fare clic sull'icona D-Link Setup Wizard SE creata nel menu di Start di Windows.
Start > D-Link > Setup Wizard SE
Verificare le impostazioni, quindi fare clic su Restart (Riavvia).
Selezionare l'opzione DHCP se la telecamera in uso ottiene automaticamente un indirizzo IP all'avvio. Selezionare l'opzione Static IP (IP statico) se la telecamera utilizzerà lo stesso indirizzo IP ogni volta che viene avviato.
Fare clic su Next (Avanti) per passare alla pagina successiva.
Inserire l'ID dell'amministratore e la password. Quando si effettua l'accesso per la prima volta, l'ID predefinito dell'amministratore è admin, mentre la password viene lasciata vuota.
Fare clic su Next (Avanti) per passare alla pagina successiva.
Nella pagina dell'Installazione guidata verranno visualizzati l'indirizzo MAC e l'indirizzo IP della telecamera. Se la rete dispone di un server DHCP, viene visualizzato un indirizzo IP valido. Se la rete non dispone di un server DHCP, verrà visualizzato l'indirizzo IP statico predefinito della telecamera di rete, ovvero 192.168.0.20.
Fare clic su Wizard (Installazione guidata) per continuare.
DCS-6511_A1_QIG_v1.00(EU).indd 57 2010/10/13 上午 11:20:24
D-Link DCS-6511 Quick Install Guide58
ITA
LIA
NO
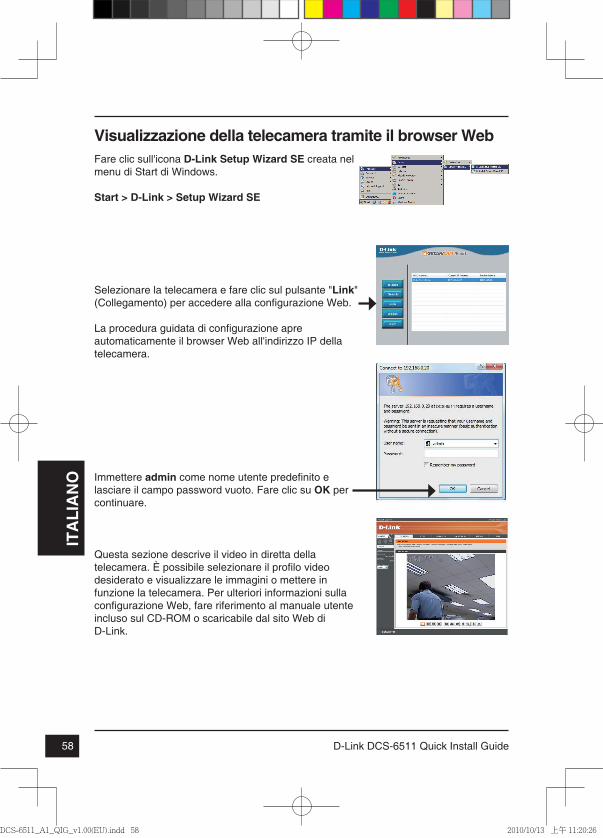
Fare clic sull'icona D-Link Setup Wizard SE creata nel menu di Start di Windows.
Start > D-Link > Setup Wizard SE
Visualizzazione della telecamera tramite il browser Web
Questa sezione descrive il video in diretta della telecamera. È possibile selezionare il profilo video desiderato e visualizzare le immagini o mettere in funzione la telecamera. Per ulteriori informazioni sulla configurazione Web, fare riferimento al manuale utente incluso sul CD-ROM o scaricabile dal sito Web di D-Link.
Immettere admin come nome utente predefinito e lasciare il campo password vuoto. Fare clic su OK per continuare.
Selezionare la telecamera e fare clic sul pulsante "Link" (Collegamento) per accedere alla configurazione Web.
La procedura guidata di configurazione apre automaticamente il browser Web all'indirizzo IP della telecamera.
DCS-6511_A1_QIG_v1.00(EU).indd 58 2010/10/13 上午 11:20:26
D-Link DCS-6511 Quick Install Guide 59
ITALIA
NO
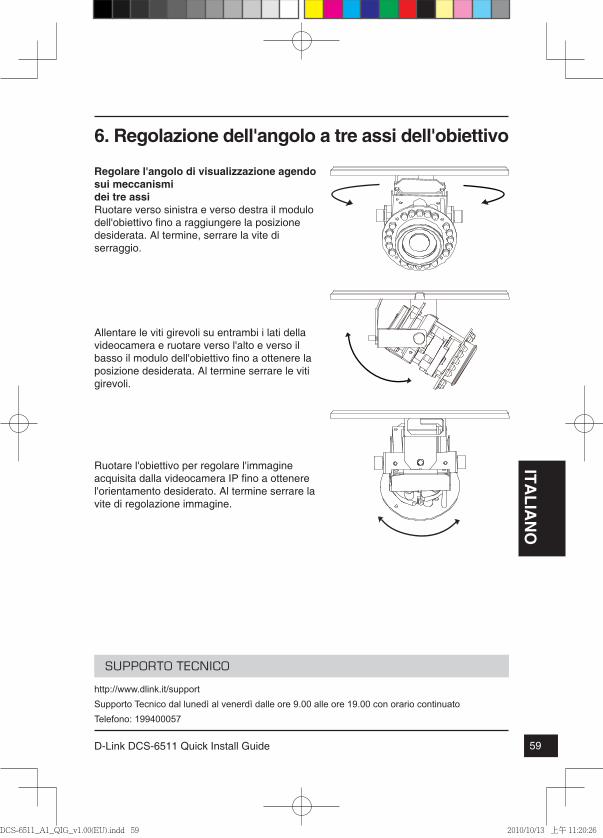
Regolare l'angolo di visualizzazione agendo sui meccanismidei tre assiRuotare verso sinistra e verso destra il modulo dell'obiettivo fino a raggiungere la posizione desiderata. Al termine, serrare la vite di serraggio.
Allentare le viti girevoli su entrambi i lati della videocamera e ruotare verso l'alto e verso il basso il modulo dell'obiettivo fino a ottenere la posizione desiderata. Al termine serrare le viti girevoli.
Ruotare l'obiettivo per regolare l'immagine acquisita dalla videocamera IP fino a ottenere l'orientamento desiderato. Al termine serrare la vite di regolazione immagine.
6. Regolazione dell'angolo a tre assi dell'obiettivo
SUPPORTO TECNICO
http://www.dlink.it/supportSupporto Tecnico dal lunedì al venerdì dalle ore 9.00 alle ore 19.00 con orario continuatoTelefono: 199400057
DCS-6511_A1_QIG_v1.00(EU).indd 59 2010/10/13 上午 11:20:26

NOTES
DCS-6511_A1_QIG_v1.00(EU).indd 60 2010/10/13 上午 11:20:26

NOTES
DCS-6511_A1_QIG_v1.00(EU).indd 61 2010/10/13 上午 11:20:26
Ver.1.00(EU)2010/10/11
RMN0100500
DCS-6511_A1_QIG_v1.00(EU).indd 62 2010/10/13 上午 11:20:26