quick guides for store-forward teledermatology and live
TRANSCRIPT

Quick Guides for Store-Forward Teledermatology and Live-Interactive TeledermatologyApril 2012
Quality Healthcare Through Telecommunications Technology

Funding support for this initiative was provided by United Health Foundation

Quick Guide to Store-Forward Teledermatology for Referring Providers © American Telemedicine Association (April 2012)
Quick Guide to Store-Forward Teledermatology for Referring Providers
Karen McKoy, MD, Scott Norton, MD, Charles Lappan, MBA, MPA ATA Teledermatology Special Interest Group
April 2012 1. WORK FLOW
2. CAMERA
Digital (avoid PDAs; use only high quality image capable cell phone if this is the only camera option available)
Minimum 800 X 600 pixels; preferred resolution of 1024 X 768 pixels or greater (about 0.8 Megapixels)
Macro mode capability is ideal (“flower” image)
3. TAKING THE IMAGE
Background - Use a solid, neutral color perpendicular to camera angle.
Lighting - Diffuse, indirect light is best. Avoid shadows. Indoors – fluorescent day-light or full spectrum bulbs are best (avoid incandescent). Outdoors – use well-lit, but evenly shaded area if sunny.
Flash - Helps to eliminate shadows. Test to see if needed. May cause white-out if too close.
Compression - Use JPEG medium or low setting (no more than 20:1).
Focus - Adjust camera and patient to have camera angle perpendicular to the skin lesions being imaged. Use auto-focus with area of interest in center of frame. If not possible, focus first on the area of interest, depress shutter button half-way to focus, then move the camera to center the image before fully depressing shutter button.
Views - Take to show location and arrangement of lesions. Take several views o Far - entire body or obvious region o Medium - area involved central but include an anatomical landmark such as the navel or hand o Close-Up - if you have a macro capacity–the “flower” image, this can be taken under 18 inches from
the skin – otherwise you may use the optical zoom, if present, to focus for a close-up. Use straight on and oblique views for close-ups.
Extra Tips - Use a chaperone if needed; avoid distracting jewelry and clothing; in hairy areas tape or press back to show underlying skin changes. For face shots, eyes should be open. Use measurement tools as appropriate.
4. BEFORE & AFTER SENDING THE CONSULT
Review images for focus and adequate views before the patient leaves.
Send only helpful and clear images to the consultant.
Do not alter images in any way after taken.
Label images, transmitted text and consultant response to become part of a secure, retrievable medical record.
Referral site
Obtains patient consent, history and consult question
Image acquisition
Transmits consult electronically to dermatologist
Medical record keeping
Consulting dermatologist
Receives consult and returns a report to referral site within specified time
Maintains medical record of consult
HIPAA-compliant electronic
transmission

Quick Guide to Store-Forward Teledermatology for Referring Providers © American Telemedicine Association (April 2012)
Hands / Fingernails
Trunk
TELEDERMATOLOGY IMAGING SETS
Show entire anatomic unit (e.g. trunk) if a lesion or rash is within this unit.
Head
AArrmm
Arms
Feet / Toenails
Knees /Elbows
Legs
Axilla Genitals/ Buttocks

Quick Guide to Store-Forward Teledermatology for Referring Providers © American Telemedicine Association (April 2012)
COMPLEMENTARY VIEWS
If condition involves certain locations, then check to see if any complementary views need to be looked at or photographed.
If Involved: Include Look / Ask / ? Include Hands Feet Elbows/Knees Feet Hands Groin Elbows Knees Scalp Knees Elbows Scalp Scalp Face Knees, Elbows Popliteal fossa Antecubital fossa Neck, Face, hands Antecubital fossa Popliteal fossa Neck, Face, hands Nail (any) All nails Oral Mucosa Groin Buttocks Hands & Feet Face (Eyebrows) Scalp Oral Mucosa Genitals
REFERENCES
Krupinski E et al. American Telemedicine Association’s practice guidelines for teledermatology. Telemedicine and e-Health 2008 (April): 14: 289-302. Pak HS, Lappan CM. Basic guide to dermatologic photography. Unpublished document, 2005. Available at: www.americantelemed.org/files/public/membergroups/teledermatology/telederm_DermatologicPhotography.pdf

Quick Guide to Live-Interactive Teledermatology for Referring Providers © American Telemedicine Association (April 2012)
Quick Guide to Live-Interactive Teledermatology for Referring Providers April W. Armstrong, MD, MPH
ATA Teledermatology Special Interest Group April 2012
1. WORK FLOW
Introduce who is present and the role of the coordinator if one is present.
2. EQUIPMENT
A. Videoconferencing Equipment To conduct live-interactive teledermatology, recommendations for videoconferencing units include the following:
H.264 video compression standard or better
H.323 compliant
H.261 video compression standard compatibility
G.711 audio compression standard or better
Live Video resolution 4CIF (704x480) or higher
Content resolution XGA (1024x768) or higher
Capable of connecting at 384kbps running 4CIF @ 30fps B. Video-Format General Examination Cameras Video-format general examination cameras are peripherals attached to the videoconferencing units that allow for close-up examination of skin lesions. Recommendations for video-format general examination cameras include the following:
Standard definition or high-definition
Able to scan, zoom, auto focus, and freeze-frame capture skin lesions
Contains internal lighting source to illuminate skin lesions
Image polarization feature preferred but not generally required C. Connectivity Because connection speed has a profound impact on video image quality, a connection speed of at least 384 kbps between the referral and consultant sites is recommended. Most live-interactive teledermatology programs have transitioned from ISDN to internet protocol (IP). Currently, most high-speed lines have connectivity speeds of at least 1.5 Mbps.
3. CAPTURING VIDEO-BASED IMAGES
Image quality in live-interactive teledermatology can vary significantly depending on a multitude of factors, including connection speed, operational experience of the teledermatology coordinator, and whether freeze frame is used. General tips on capturing high-quality video-based images are detailed below:
Connectivity - Minimum of 384 kbps connection speed between referral and consultant sites is recommended.
Referral Site
Obtains Consent
Specifies consult question
Transmits medical history
Acquires video-based images
Maintains medical records
Consulting Dermatologist
Communicates with patient in real time
Communicates with referral site presenter in real time
Provides consultation report
Maintains medical records
Synchronous, videoconference-based
communication over HIPAA-compliant
broadband transmission

Quick Guide to Live-Interactive Teledermatology for Referring Providers © American Telemedicine Association (April 2012)
Lighting - Because the illumination device on the video-format general examination cameras may not provide sufficient illumination on its own, we recommend additional indoor lighting using fluorescent daylight or full spectrum bulbs.
Views - Hold the camera at a distance initially to show the general distribution of a rash or location of a skin growth before obtaining close-up images. When moving the camera to show the general distribution of a rash, the coordinator should obtain feedback regarding the speed of camera movement from the dermatologist to ensure adequate image quality at the consultant’s site.
Positioning - If the dermatology camera does not contain an image viewer on the camera itself, it is important to position the patient in between the dermatology camera and the videoconference monitor in one line of sight such that the coordinator can easily see whether an image is captured correctly on the video monitor.
Verbalization of Body Regions Being Examined - As the coordinator moves the skin examination camera, he or she needs to continuously verbalize the part of the body that is being captured. This helps to orient the dermatologist to the location of the lesions.
Focus - For capturing close-up images, adjust the camera angle to ensure that the camera is perpendicular to the skin lesions. Hold the camera as still as possible to show the close-up images. Offer to take freeze-frame images if images from live feeds are unclear.
Freeze-frame Capture - Most video-format general examination cameras are equipped with the freeze-frame feature. Using this feature produces still images that are highly useful for diagnosis. It is especially important to use freeze-frame capture when connection speed is low, which can result in degradation of image quality for moving video frames but not necessarily affect still images captured through freeze-frames. Freeze frames allow the dermatologist to appreciate fine surface features of the skin lesions and minimize much of the image degradation that occurs with scanning with the camera.
Other considerations - Avoid distracting jewelry and clothing; in hairy areas, tape or press back to show underlying skin changes; use a chaperone if necessary; use measurement tools as appropriate.
4. BEFORE AND AFTER A LIVE-INTERACTIVE TELEDERMATOLOGY CONSULT A. Before a Live-Interactive Teledermatology Consult
Ensure that the dermatologist has received patient history and referral forms.
Arrive early to establish videoconference connection, connect the peripheral attachments, and check all equipment to ensure proper functioning.
Review the patient’s referral form to identify body areas that will need to be uncovered and imaged for examination.
B. After a Live-Interactive Teledermatology Consult
If the camera has a probe, place a thermometer condom on the probe during patient examination and change the thermometer condom after each patient.
Quick Guide to Live-Interactive Teledermatology for Referring Providers © American Telemedicine Association (April 2012)
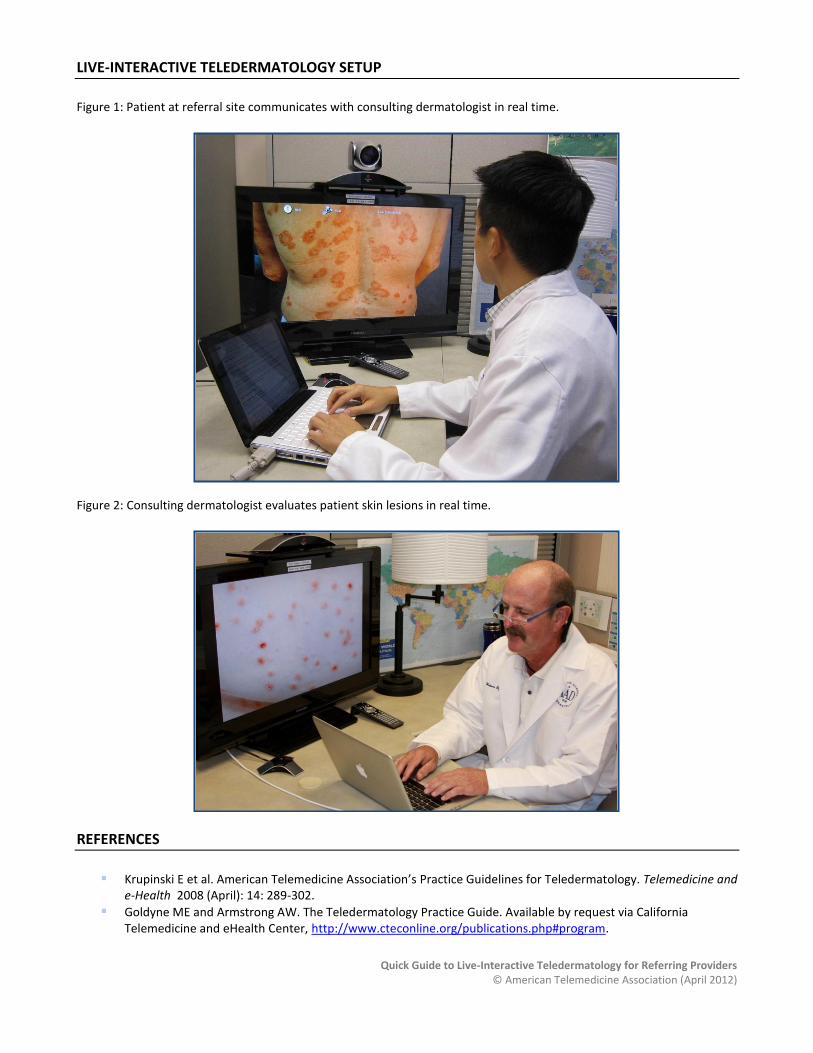
LIVE-INTERACTIVE TELEDERMATOLOGY SETUP
Figure 1: Patient at referral site communicates with consulting dermatologist in real time.
Figure 2: Consulting dermatologist evaluates patient skin lesions in real time.
REFERENCES
Krupinski E et al. American Telemedicine Association’s Practice Guidelines for Teledermatology. Telemedicine and
e-Health 2008 (April): 14: 289-302.
Goldyne ME and Armstrong AW. The Teledermatology Practice Guide. Available by request via California Telemedicine and eHealth Center, http://www.cteconline.org/publications.php#program.