quick consumer manual - alliance laundry...
TRANSCRIPT

Quick Consumer Manual

Thank you for purchasing a Speed Queen® appliance. We value you as a customer. At Speed Queen, leading performance is our daily reality. We seek to deliver an outstanding experience in every aspect of laundry. Your machine was built to last 25 years in your home and Speed Queen support has been built to provide you with the best service in the industry.
Three (3) Screws (Electric Models)
InstallationParts included:
Welcome
1.
2.
3. Gas models – connect gas supply pipe. Gas service to a gas dryer must conform with the local codes and ordinances. Refer to installation instructions, which can be found at speedqueendoc.net
• Tighten all connections securely but do not overtighten to avoid breaking or bending the gas valve bracket.
4. Electric models – connect electrical cord with three-wire or four-wire plug.Refer to installation instructions, which can be found at speedqueendoc.net
5. Wipe out inside of dryer.
6. Plug in the dryer.
7. Start dryer and check that dryer is heating.
Position and level the dryer.• Recommended rear clearance minimum
is 2 in (51 mm) for utility connections and 6 in (152 mm) when venting through rear of unit
Connect exhaust system.• Dryer must be exhausted to the outdoors• Use 4 in (102 mm) rigid duct• Maximum straight duct length = 65 ft
(19.8 m). Each elbow deduct 10 ft (3 m)• Sufficient make-up air must be supplied.
The free area of any opening for outside air must be at least 40 in2 (25806 mm2) per unit
Turn on gas and check all pipe connections (internal and external) for gas leaks by applying a non-corrosive leak detection fluid to the fittings. If bubbles are present then a leak is likely. Retighten connections and recheck for leaks.

6. 4.
7.
1.
5.
(gas models)
(electric models)6.
(electric models)
3.
2.

Electronic Control DryersThe following cycle descriptions will help determine which cycle to choose depending on the type of laundry being dried. The cycle settings may be modified using the Selections and Options.
Auto-Sensing
The Auto-Sensing drying cycle operation is determined by the type of cycle selected as well as the moisture sensing system, which can be set by changing the Dryness setting. Auto-Sensing cycles are Energy Saver cycles that help prevent over-drying. When a wet load is put into the dryer it takes a certain amount of time to reach the desired dryness level. The time will vary with load size, type of fabric, amount of moisture in the load, air flow and the laundry room environment. The estimated time will be shown in the digital display.
Cycle Information
Note: The time shown before starting the cycle is estimated by averaging the last 5 cycles run on the selected cycle/dryness combination.
Heavy DutyDry heavy items such as blankets on this cycle.
Perm PressUse for permanent press items and synthetics.
RegularUse for sturdy items like play or work clothes.
DelicatesDry delicate items on this cycle.

The Favorites keypad allows the user to save nine different cycles, selections and options for later use.1. Press the Favorites keypad. The control will display the settings for the first Favorites cycle. The display will switch between F1 and the
cycle time for the selected cycle.2. Press the keypads for the desired settings.3. Press the Favorites keypad to save the settings.4. The next Favorites cycle, F2, will be displayed. Access saved Favorites cycles by pressing Favorites keypad and then the up and down
arrow keypads.
ManualThere are three manual cycles: Time Dry, Quick Dry and Fluff Up. These cycles will run for the set number of minutes shown on the digital display. The cycle time can be increased or decreased using the up and down arrow keypads. The time and temperature selection may be adjusted manually at any time before or during the cycle.
Automatic Regular/ Delicate CycleUse for sturdy items like play or work clothes and also for delicate items. The type of heat is determined by choosing the proper Fabric Selector option. There are three settings in the Automatic Regular/Delicate cycle: Max Dry, More Dry, and Less Dry.
Timed Dry CycleThis cycle will operate dryer for up to 75 minutes. Cottons and heavyweight items dry best between 50 and 75 minutes, and lightweight items dry best between 20 and 40 minutes.
Automatic Wrinkle Out Cycle (select models)
Use this for items that are slightly wrinkled after sitting in a laundry basket overnight. The cycle has a short heat setting followed by a 15 minute cool down.
Automatic Perm Press/Knits CycleUse for permanent press items and synthetics. The type of heat is determined by selecting the proper Fabric Selector option. There are three settings in the Automatic Perm Press/Knits cycle: More Dry, Less Dry, and Cool Down (select models).
Mechanical Control DryersThe following cycle descriptions will help determine which cycle to choose depending on the type of laundry being dried.
The Favorites Cycle
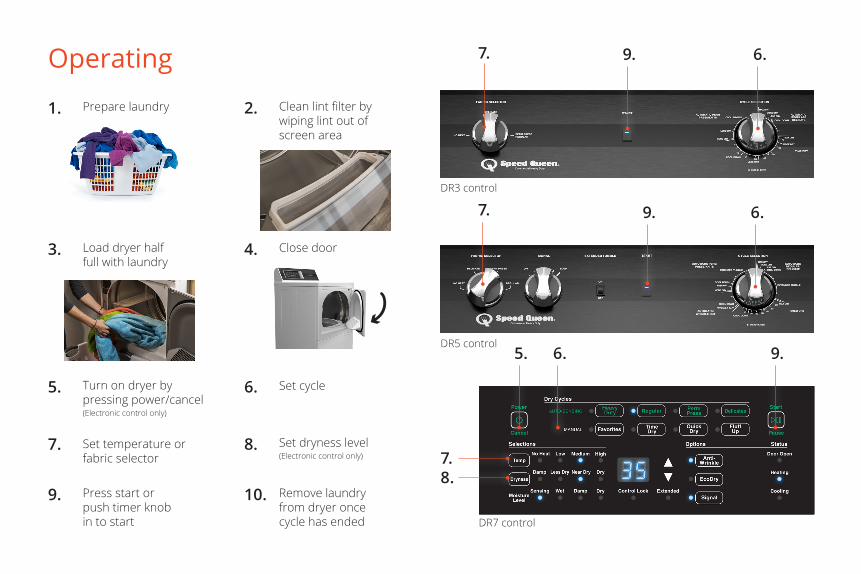
2. Clean lint filter by wiping lint out of screen area
6.7.
7.
5.
7.8.
5. Turn on dryer by pressing power/cancel (Electronic control only)
Operating
1. Prepare laundry
3. Load dryer half full with laundry
4. Close door
6. Set cycle
7. Set temperature or fabric selector
8. Set dryness level (Electronic control only)
9. Press start or push timer knob in to start
DR3 control
DR5 control
DR7 control
6.
10. Remove laundry from dryer once cycle has ended
9.
6.9.
9.

Register
1. Register your product at www.speedqueen.comto take full advantage of the limited warranty.
2. Download full documentation and view installation and operating videos for an immersive experience at Speedqueendoc.net or scan the QR code below.
3. If you wish to receive printed documents at no cost, please complete the order form and return by mail to the address on the form, or email your request to [email protected].
Warranty
3, 5 & 7 Year Warranties, depending on your model.Covers all parts and in-home labor.
Note: This unit includes a limited warranty. Refer to Speedqueendoc.net to download the full warranty bond.
Ord
er F
orm
for
Prin
ted
Doc
umen
tati
on☐
Pl
ease
sen
d m
e a
prin
ted
Inst
alla
tion
Man
ual,
Use
r’s G
uide
, and
War
rant
y Bo
nd.
☐
I und
erst
and
this
car
d do
es n
ot r
egis
ter
my
prod
uct.
I mus
t go
to
w
ww
.spe
edqu
een.
com
to r
egis
ter.
Mod
el N
o.
Seri
al N
o.
Nam
e
Zip
Code
Phon
e N
o.
Emai
l Add
ress
Allo
w 1
-2 w
eeks
for
deliv
ery.
Addr
ess
City
Stat
e

Part No. D517569R1 January 2020 © Published by permission of the copyright owner – DO NOT COPY or TRANSMIT Speed Queen by Alliance Laundry Systems
BU
SINESS R
EPLY MA
ILFIR
ST CLA
SS MA
IL PERM
IT NO
. 489 RIPO
N,W
I
POSTA
GE W
ILL BE PA
ID B
Y AD
DR
ESSEE
NO
POST
AG
EN
EC
ESSA
RY
IFM
AIL
ED
IN T
HE
UN
ITE
D ST
AT
ES
SPEE
D Q
UE
EN
TECH
NIC
AL D
OC
UM
ENTA
TION
SHEPA
RD
STREET
P O B
OX
990R
IPON
WI 54971-9967