quic k -st ar t g ui de f o r t eac her s · quic k -st ar t g ui de f o r t eac her s. table of...
TRANSCRIPT
Quick-Start Guide for Teachers

Table of Contents
1. Before You Begin
2. Registration
3. Creating a Course
4. Batch Registering Students (Recommended)
5. Assigning the Placement test
6. Checking Performance/Grades
7. Take a Tour
8. Need Help?
2
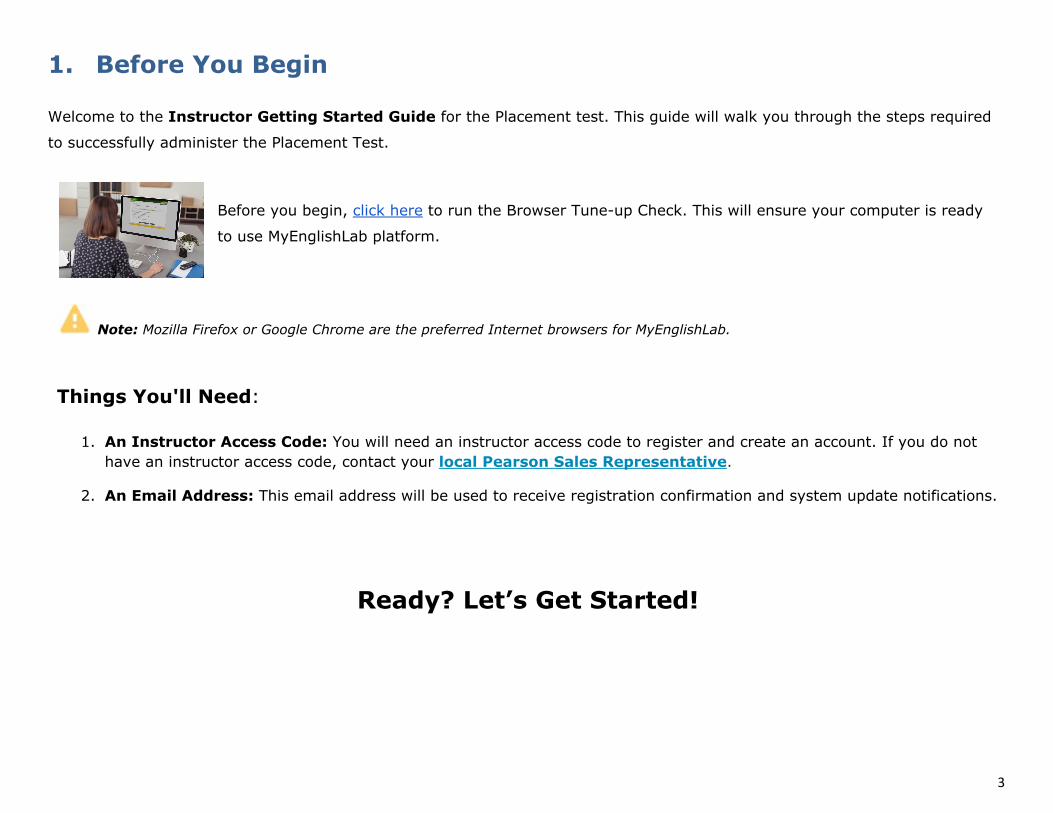
1. Before You Begin
Welcome to the Instructor Getting Started Guide for the Placement test. This guide will walk you through the steps required
to successfully administer the Placement Test.
Before you begin, click here to run the Browser Tune-up Check. This will ensure your computer is ready
to use MyEnglishLab platform.
Note: Mozilla Firefox or Google Chrome are the preferred Internet browsers for MyEnglishLab.
Things You'll Need:
1. An Instructor Access Code: You will need an instructor access code to register and create an account. If you do not have an instructor access code, contact your local Pearson Sales Representative.
2. An Email Address: This email address will be used to receive registration confirmation and system update notifications.
Ready? Let’s Get Started!
3

2. Registration Watch Video
To gain teacher access to the Placement test, you must first create an account. To register, you will need an teacher access code. In this section, we will walk you through the registration process. Registration may take about five minutes.
Note: You will need a teacher access code. If you do not have a teacher access code, please contact your local Pearson Sales Representative .
To register your access code:
1. Go to http://www.myenglishlab.com/register
2. Click on Change Language to select your
preferred language.
3. Enter your Access Code and then click on
Next.
4. Confirm you are registering for the correct
product and then click on Next.
4

5. You can either create a new account or sign-in
if you already have a Pearson account.
A. First time registering?
Click on Create to set up a new Pearson
account.
OR
B. Already have a Pearson Account?
Enter your existing Username and
Password, and then click on Sign In. [Go
to Step 10]
6. Read the License Agreement. Click "I agree to
the license agreement " and then click on
Next.
5
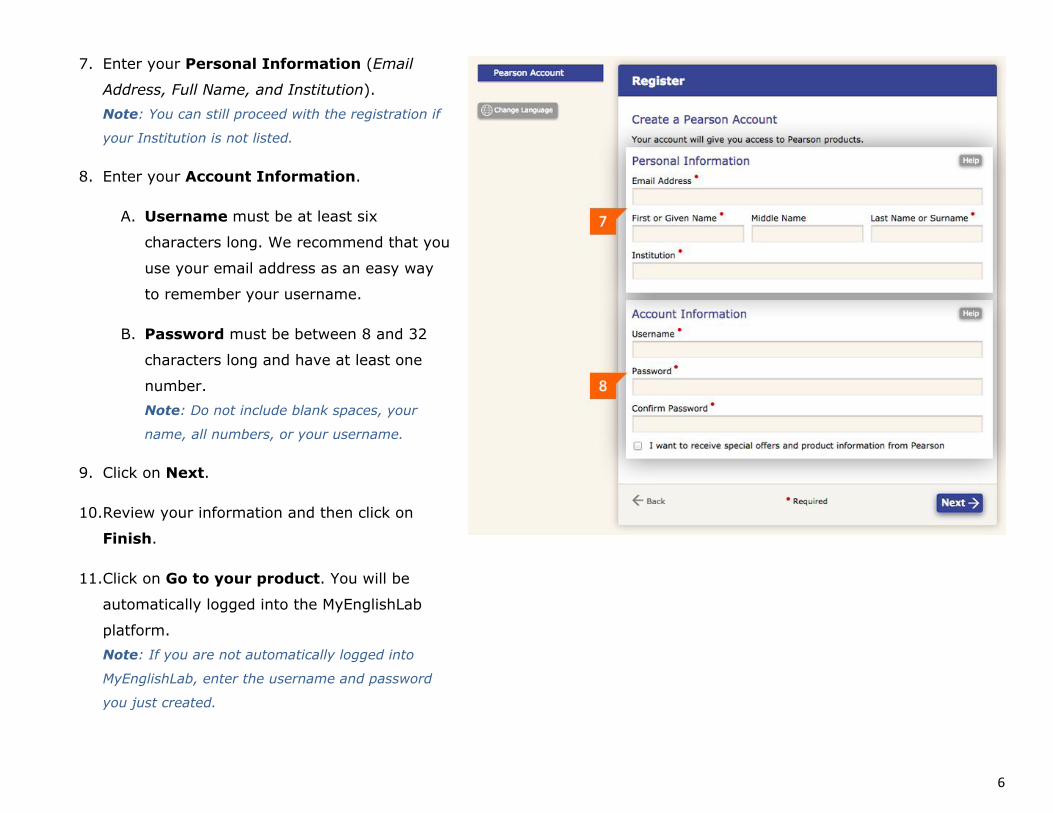
7. Enter your Personal Information (Email
Address, Full Name, and Institution ).
Note : You can still proceed with the registration if
your Institution is not listed.
8. Enter your Account Information.
A. Username must be at least six
characters long. We recommend that you
use your email address as an easy way
to remember your username.
B. Password must be between 8 and 32
characters long and have at least one
number.
Note : Do not include blank spaces, your
name, all numbers, or your username.
9. Click on Next.
10.Review your information and then click on
Finish.
11.Click on Go to your product. You will be
automatically logged into the MyEnglishLab
platform.
Note : If you are not automatically logged into
MyEnglishLab, enter the username and password
you just created.
6

3. Creating a Course
Watch Video
To assign test and monitor performance of your students, they must be part of your course. In this section, we will show you how to create and customize a course, and invite students to join.
Note: The Placement test is a teacher-led products. Students will not be able to take the test in self-study mode. They must be joined to the teacher’s course.
Step 1: Creating a Course
To create a course:
1. Go to http://www.myenglishlab.com/login
Note : We recommend you bookmark this
website.
2. Enter your Username and Password.
3. Click on the Settings tab.
4. Under Course Management, click on
Create a new course.
7

5. Click on New Course and then click on Next. Note : This is the default option for Teachers or Program Administrators creating a new course. For more information about choosing course types, click here .
6. Enter the Course name and Course end date, and then select the product and level from the Product drop-down list.
7. Click on Submit.
8. The course summary page shows the Course name, Course ID, Product, and Course end date. Note : If you do not plan on batch registering students, share the Course ID with students wishing to join your course. Click on Print to
generate a PDF of the course information. This document provides instructions for students wanting to join your course.
8

4. Batch Registering Students (Recommended) Watch Video
Normally, students register themselves using a student access code and join your course using the teacher Course ID. To save time, we highly recommend you batch students yourself. This process will generate accounts for students, and enroll them into your course. Students will simply have to login and take the test.
Note:
● The course size limit is 200 students. Exceeding 200 students may affect the performance of the course Gradebook. ● Batch registration works best for first time/new students. Students with an existing account can self-register as an existing user and
then join the instructor’s course using the Instructor's Course ID. ● If a student is already registered, it is best to give the student the Instructor Course ID to join their instructor’s course.
To batch register students:
1. Click on Settings tab.
2. Under Course Management, locate your course and then click on Edit.
9
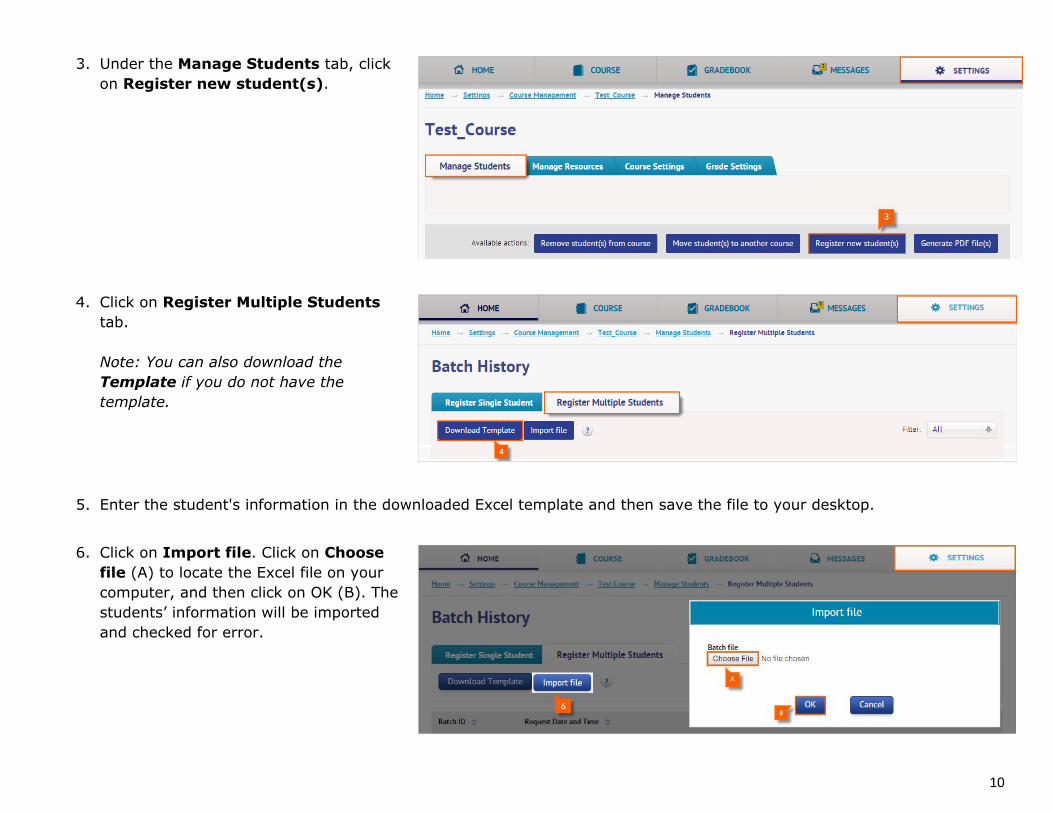
3. Under the Manage Students tab, click on Register new student(s).
4. Click on Register Multiple Students tab. Note: You can also download the Template if you do not have the template.
5. Enter the student's information in the downloaded Excel template and then save the file to your desktop.
6. Click on Import file. Click on Choose file (A) to locate the Excel file on your computer, and then click on OK (B). The students’ information will be imported and checked for error.
10
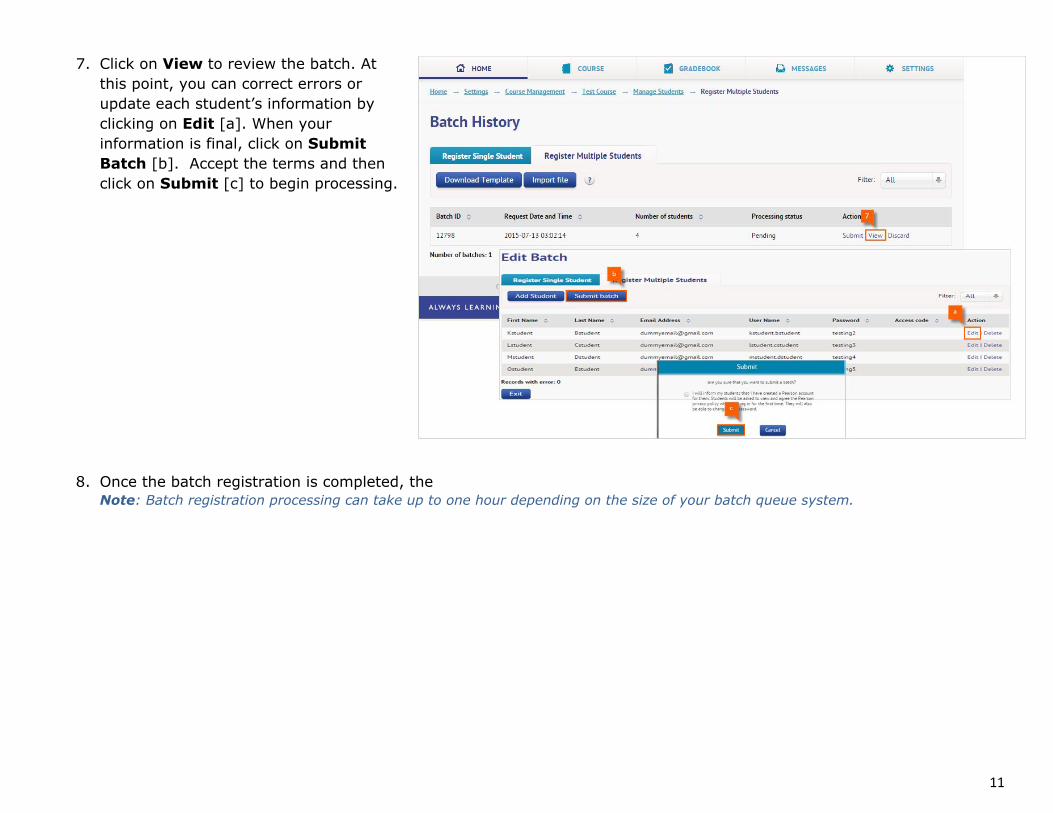
7. Click on View to review the batch. At this point, you can correct errors or update each student’s information by clicking on Edit [a]. When your information is final, click on Submit Batch [b]. Accept the terms and then click on Submit [c] to begin processing.
8. Once the batch registration is completed, the Note : Batch registration processing can take up to one hour depending on the size of your batch queue system.
11

5. Assigning the Placement test
Watch Video
To monitor the performance of your students, you must first assign the test. In this section, we will show you how to assign the test and invite students to join.
Note: The Placement test is a teacher-led products. Students will not be able to take the in self-study mode.
To assign the test:
1. Click on the Course tab.
2. With your Placement test course
selected, select the test you would like
to assign.
Note : We highly recommend assigning the
Equipment Check tool as well. This will
ensure students computer is ready to use
the Placement test.
3. Click on Assign.
12

4. Select the students taking the test.
Note : By selecting the option “Select all
students”, future students joining the
course manually will have access to the
test as well.
5. Set the test due date and enable other
settings if necessary.
Note : Use the Enable timer to set the
default timer on the assignment. Once the
assignment is started, the student will
have a limited amount of time to complete
it.
6. Click on Assign.
13
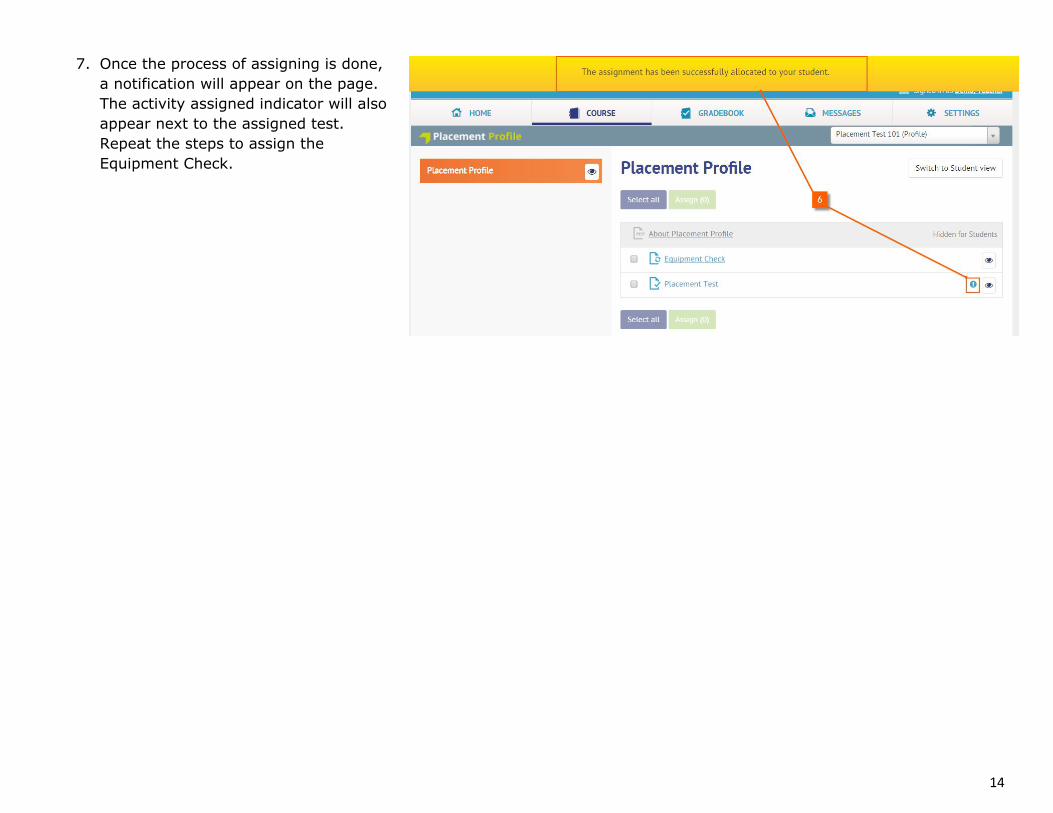
7. Once the process of assigning is done, a notification will appear on the page. The activity assigned indicator will also appear next to the assigned test. Repeat the steps to assign the Equipment Check.
14

6. Checking Performance/Grades
Once a student completes the test, teachers can find student’s test submissions on the Gradebook screens.
Note: By designed, teachers and students are not allowed to view test questions after the test.
To check the grades:
1. Click on the Gradebook tab.
2. Select your course from the Change
course drop-down list.
3. Grades will appear under the
Placement tab.
4. The default view of the Gradebook is
Global Scale of English Score. To
view CERF scores, click on the
drop-down arrow and then select CEFR.
5. To get for detailed information and view
Can Do statements, click on the
Diagnostics tab.
To learn more about Placement test
scoring, click here.
15

7. Take a Tour (General)
HOME
The Home tab has three main sub-tabs under Assignments & Events: To Do List, Calendar, and Recent Activity. You can switch between these tabs at any time.
16

1. Courses: This section lists the top three products you have access to, including courses you have created.
2. View all courses: You can view all courses or products here. You can also drag and drop courses to change the order
they appear on the home page.
3. To Do List: This list shows upcoming assigned activities and calendar events. You can click on View more to expand the
list.You can also see more details by clicking on the arrow.
4. Calendar: The Calendar tab features a familiar way of seeing events and activities associated with all your courses. When
you assign an activity, an entry appears on the calendar on the students' due date. This also appears on the student's
calendar page.
5. Recent Activity: The Recent Activity screen is similar to the To Do List, but gives a view of events and assignments that
have already happened. It also records actions such as changes in due dates or assignments.
6. Filters (Showing/Change course): Allows you to filter the To Do List by course.
7. Edit: Use this button to change the due date or delete an activity.
8. See report: Click on See report to go to the Assignment report screen and see the status of assigned work.
9. Expand details arrow: Click on the arrow to expand the display and view assignment details.
17
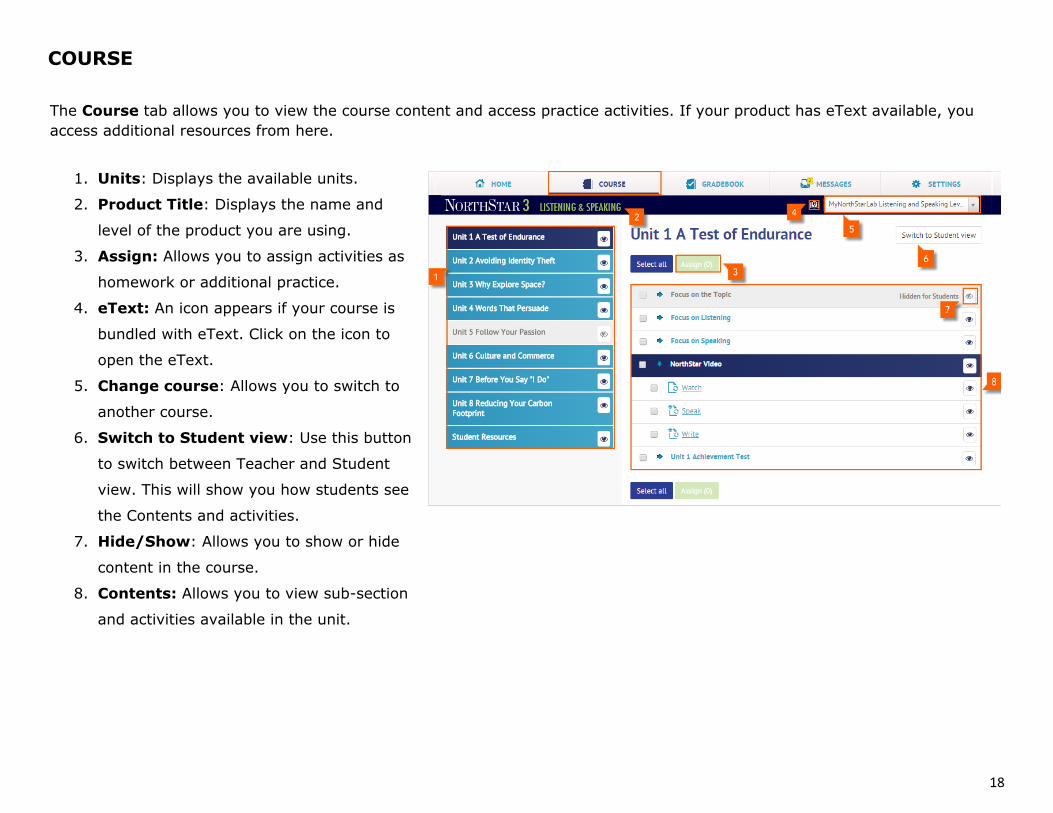
COURSE
The Course tab allows you to view the course content and access practice activities. If your product has eText available, you access additional resources from here.
1. Units: Displays the available units.
2. Product Title: Displays the name and
level of the product you are using.
3. Assign: Allows you to assign activities as
homework or additional practice.
4. eText: An icon appears if your course is
bundled with eText. Click on the icon to
open the eText.
5. Change course: Allows you to switch to
another course.
6. Switch to Student view: Use this button
to switch between Teacher and Student
view. This will show you how students see
the Contents and activities.
7. Hide/Show: Allows you to show or hide
content in the course.
8. Contents: Allows you to view sub-section
and activities available in the unit.
18

GRADEBOOK
Depending on the product, the Gradebook tab allows you to access grades and keep records of students performance.
19

1. Change course: Allows you to switch to another course.
2. Expand details: Allows you to view additional student information, such as number of attempts on activity,time spent on
activities and number of completed activities.
3. Data: Provides course scores and grades obtained by enrolled students.
4. Diagnostics: Allows you to have an instant view of how the students in a course are progressing, both in scores and
behaviors (time spent, number of attempts, etc.)
5. Change view: Allows you to easily see the available views: Practice only, Assignments only, Tests only, Practice &
Tests, and Assignments & Tests.
6. Markers: Allows you to see which activities have been submitted.
7. Filtering/Sorting: Allows you to filter activities by Last attempt, First attempt, Average score, or Highest score.
8. Export: Allows you to export your course Gradebook to Microsoft Excel or Moodle.
9. Student Management: Allows you to see Total Time on Task, which shows how long students have spent completing
activities, and their last login date/time.
20

MESSAGES
The Messages tab allows you to communicate with both students and other instructors connected to the course.
1. New message: Use to initiate email communication with students and other instructors connected to the course.
2. Inbox: Keeps email you have received from other instructors and students.
3. Sent messages: Keeps your previously sent emails.
4. Contact List: Provides information of all the students and teachers you can communication with, allowing you to send messages to one or all students.
21
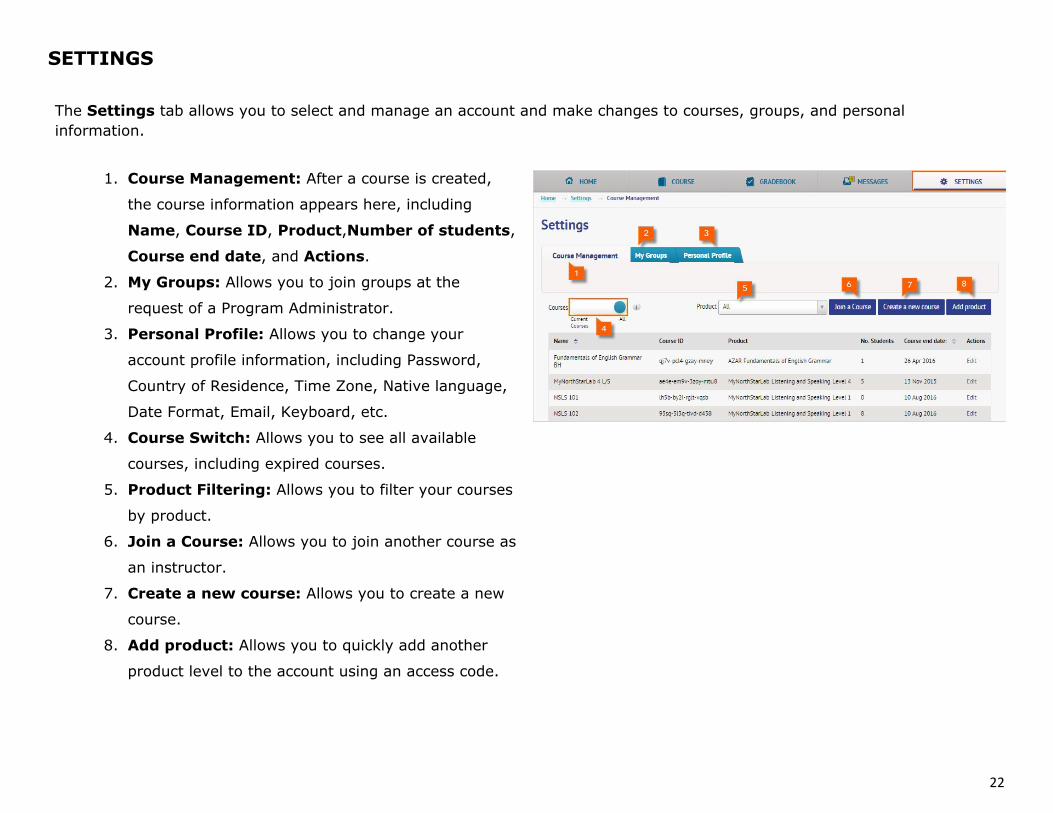
SETTINGS
The Settings tab allows you to select and manage an account and make changes to courses, groups, and personal information.
1. Course Management: After a course is created,
the course information appears here, including
Name, Course ID, Product,Number of students,
Course end date, and Actions.
2. My Groups: Allows you to join groups at the
request of a Program Administrator.
3. Personal Profile: Allows you to change your
account profile information, including Password,
Country of Residence, Time Zone, Native language,
Date Format, Email, Keyboard, etc.
4. Course Switch: Allows you to see all available
courses, including expired courses.
5. Product Filtering: Allows you to filter your courses
by product.
6. Join a Course: Allows you to join another course as
an instructor.
7. Create a new course: Allows you to create a new
course.
8. Add product: Allows you to quickly add another
product level to the account using an access code.
22
8. Need Help?
Visit https://support.pearsonelt.com for help, training, how-do videos, and support.
To learn more about Placement test and scoring, please visit
https://www.pearsonelt.com/tools/digital/placement.html
23