quest® changebase 5.3support-public.cfm.quest.com/8ca939db-2d44-42a6... · quest changebase 5.3.1...
TRANSCRIPT

Getting Started
Quest® ChangeBASE 5.3.1

© 2013 Quest Software®, Inc. ALL RIGHTS RESERVED. This guide contains proprietary information protected by copyright. The software described in this guide is furnished under a software license or nondisclosure agreement. This software may be used or copied only in accordance with the terms of the applicable agreement. No part of this guide may be reproduced or transmitted in any form or by any means, electronic or mechanical, including photocopying and recording for any purpose other than the purchaser’s personal use without the written permission of Quest Software, Inc.
If you have any questions regarding your potential use of this material, contact:
Quest Software World Headquarters LEGAL Dept 5 Polaris Way Aliso Viejo, CA 92656 www.quest.com Email: [email protected]
Refer to our Web site (www.quest.com) for regional and international office information.
TRADEMARKS Quest, Quest Software, the Quest Software logo, Simplicity at Work, Workspace are trademarks and registered trademarks of Quest Software, Inc. For a complete list of Quest Software's trademarks, please see http://www.quest.com/legal/trademark-information.aspx. Other trademarks and registered trademarks are property of their respective owners.
DISCLAIMER The information in this document is provided in connection with Quest products. No license, express or implied, by estoppel or otherwise, to any intellectual property right is granted by this document or in connection with the sale of Quest products. EXCEPT AS SET FORTH IN QUEST'S TERMS AND CONDITIONS AS SPECIFIED IN THE LICENSE AGREEMENT FOR THIS PRODUCT, QUEST ASSUMES NO LIABILITY WHATSOEVER AND DISCLAIMS ANY EXPRESS, IMPLIED OR STATUTORY WARRANTY RELATING TO ITS PRODUCTS INCLUDING, BUT NOT LIMITED TO, THE IMPLIED WARRANTY OF MERCHANTABILITY, FITNESS FOR A PARTICULAR PURPOSE, OR NON-INFRINGEMENT. IN NO EVENT SHALL QUEST BE LIABLE FOR ANY DIRECT, INDIRECT, CONSEQUENTIAL, PUNITIVE, SPECIAL OR INCIDENTAL DAMAGES (INCLUDING, WITHOUT LIMITATION, DAMAGES FOR LOSS OF PROFITS, BUSINESS INTERRUPTION OR LOSS OF INFORMATION) ARISING OUT OF THE USE OR INABILITY TO USE THIS DOCUMENT, EVEN IF QUEST HAS BEEN ADVISED OF THE POSSIBILITY OF SUCH DAMAGES. Quest makes no representations or warranties with respect to the accuracy or completeness of the contents of this document and reserves the right to make changes to specifications and product descriptions at any time without notice. Quest does not make any commitment to update the information contained in this document.
Quest® ChangeBASE Version 5.3.1 Last updated – July 15, 2013

Contents Quest ChangeBASE 5.3.1 - Getting Started
Contents About This Guide ....................................................................................................... 5
Overview ............................................................................................................................... 5 Conventions ................................................................................................................... 5
Setup Information ...................................................................................................... 6 Local Database Setup .......................................................................................................... 6 Remote Database Setup ...................................................................................................... 7
Dashboard Setup (Optional) .......................................................................................... 8 Requirements for Remote Database Setup ................................................................ 10
Virtual Machines ................................................................................................................. 11 Working Directory ............................................................................................................... 12 Recommended Configuration for Optimal Performance .................................................... 13 Deployment to Virtual Machines ......................................................................................... 13
Client ............................................................................................................................ 13 Database ...................................................................................................................... 13
Deployment to Remote Desktop Services/Terminal Services ........................................... 13 Database Backup Requirements ........................................................................................ 14 Recommended Configuration for Multi-User Installations .................................................. 14
Requirements .............................................................................................................. 14 Process Optimization ................................................................................................... 15
Client Side Capture (CSC) (Optional) ................................................................................ 15 CSC System Requirements ......................................................................................... 15
SQL Setup .......................................................................................................................... 16 Assigning Permissions using SQL Server Management Studio ................................. 18 SQL Setup for a Multi-User Environment .................................................................... 22
SQL Setup using Windows Authentication ........................................................................... 22 SQL Setup using a SQL Login .............................................................................................. 23
Pre-Installation Checks ....................................................................................................... 23 Installing ChangeBASE ........................................................................................... 25 Starting ChangeBASE ............................................................................................. 28
Online License .................................................................................................................... 28 Offline License .................................................................................................................... 29 Swapping Licenses ............................................................................................................. 31
Database Setup........................................................................................................ 32 Upgrading ChangeBASE ........................................................................................ 38
Upgrading from ChangeBASE Evaluation ......................................................................... 38 ChangeBASE User Interface .................................................................................. 40
New Project Wizard ............................................................................................................ 40 Project Wizard Step 1: Loading Report Groups .......................................................... 40
Offline Report Group Loading ............................................................................................... 41 Project Wizard Step 2: Loading Packages .................................................................. 42
Browse Dialog ....................................................................................................................... 43
3

Contents Quest ChangeBASE 5.3.1 - Getting Started
Project Wizard Step 3: Setting Up VMs for Repackaging Legacy Imports ................. 45 Project Wizard Steps 4–7 ............................................................................................ 46
The ChangeBASE Workbench ........................................................................................... 46 Packages Panel ........................................................................................................... 47 Reports Panel .............................................................................................................. 48 Summary Panel ........................................................................................................... 48 AppID Feature ............................................................................................................. 48
Reports and Report Groups ................................................................................... 50 Choosing the Right Report Groups .................................................................................... 50 Running Reports ................................................................................................................. 51 Viewing the Assessment Results in the Reports Tab ........................................................ 52 Viewing Assessment Reports ............................................................................................. 52
Fixing Packages ...................................................................................................... 53 Configuring Dashboard (Optional) ......................................................................... 55
Registering the Dashboard Web Application with the IIS Server ................................ 56 Installing and Configuring CSC (Optional) ............................................................ 58
CSC Configuration .............................................................................................................. 58 CSC Manager – Manage Default Parameters ............................................................ 58 Manage Filters ............................................................................................................. 60
Verify CSC Setup................................................................................................................ 61 Web Service................................................................................................................. 61 CSC Agent ................................................................................................................... 62
Important Files and Folders.................................................................................... 64 About Quest Software®, Inc. .................................................................................. 66
Contacting the Quest® ChangeBASE Community ............................................................ 66 Contacting Quest Software® .............................................................................................. 66 Contacting Quest® Support ............................................................................................... 66
4

About This Guide Quest ChangeBASE 5.3.1 - Getting Started
About This Guide Overview This document covers the system requirements and installation procedures needed to help you get up and running with Quest® ChangeBASE (hereafter referred to simply as “ChangeBASE”, and now an integral part of Dell’s Software offering).
Conventions
In order to help you get the most out of this guide, we have used specific formatting conventions:
ELEMENT CONVENTION
Bolded text Interface elements that appear in Quest products, such as menus and commands.
Italic text Used for comments.
Blue text Indicates a cross-reference or hyperlink.
Used to highlight additional information pertinent to the process being described.
Used to provide Best Practice information.
Used to highlight processes that should be performed with care.
+ A plus sign between two keystrokes means that you must press them at the same time.
5
Setup Information Quest ChangeBASE 5.3.1 - Getting Started
Setup Information Before Installing ChangeBASE, you should verify that you have a ChangeBASE license authorization code (or AOK.cbl license file if working in an offline environment).
If you do not have an existing SQL Server environment, you are advised to click Microsoft® SQL Server® 2008 R2 SP2 - Express Edition and then select either of the following With Tools downloads so that you can install SQL Server Management Studio alongside SQL Server Express:
• SQLEXPRWT_x64_ENU.exe
Or
• SQLEXPRWT_x86_ENU.exe
Internet Connectivity Recommended It is highly recommended that an internet connection is available when using ChangeBASE, because the Licensing model, software updates and Plugins are dependent on it. If this is not possible, please contact Quest Software to discuss alternative methods.
You should also ensure that you have met all the requirements that are appropriate to your particular setup, as outlined in the remainder of the document.
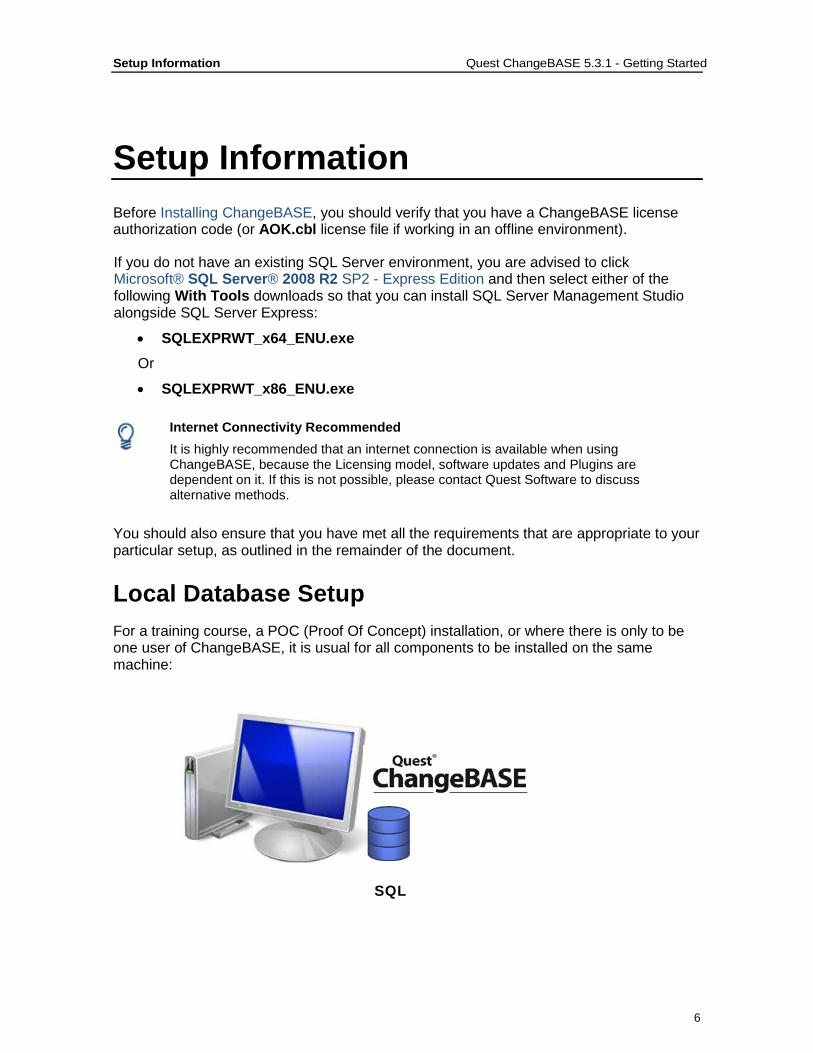
Local Database Setup For a training course, a POC (Proof Of Concept) installation, or where there is only to be one user of ChangeBASE, it is usual for all components to be installed on the same machine:
SQL
6

Setup Information Quest ChangeBASE 5.3.1 - Getting Started
Operating System • Windows XP SP3 • Windows Vista SP2 • Windows 7 • Windows 8 • Windows Server 2003 (inc R2) SP2 • Windows Server 2008 (inc R2) • Windows Server 2012
Minimum Hardware
• 2.5GHz dual core processor or greater • 4GB RAM • 50GB hard disk space • 1024 x 768 display
Software Requirements • Microsoft.NET Framework 3.5 SP1 and 4.0.30319 or later (Full Client) • Microsoft Log Parser 2.2 (For importing folders as packages) • Hypervisors for Legacy Conversion/Repackaging. See Virtual Machines.
Database
Microsoft SQL Server 2008 (inc. R2) - Express, Standard or Enterprise
Remote Database Setup In the event that more than one user connects to the same database, the ChangeBASE client software may be installed on each of the workstations, and the database hosted on a central machine.
7

Setup Information Quest ChangeBASE 5.3.1 - Getting Started
Dashboard Setup (Optional)
Dashboard viewed in Windows Server Environments When viewing Dashboard pages in Windows Server 2012, the ‘Desktop Experience’ Windows feature must be enabled and the ‘IE Enhanced Security Configuration’ (IEESC) setting must be turned off.
When viewing Dashboard pages in Windows Server 2003 and 2008 (including R2), the IEESC setting must be turned off.
Dashboard is installed as part of the ChangeBASE installation by the Server Components feature (via the drop-down option Will be installed on local hard drive):
8
Setup Information Quest ChangeBASE 5.3.1 - Getting Started
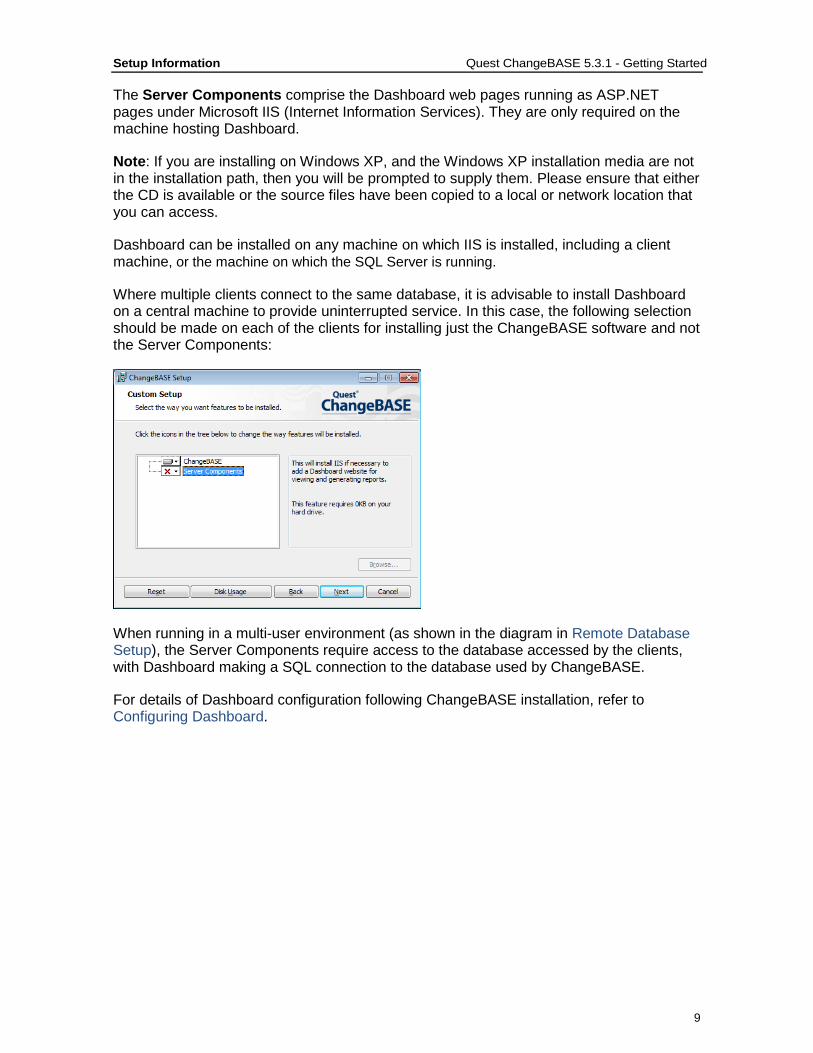
The Server Components comprise the Dashboard web pages running as ASP.NET pages under Microsoft IIS (Internet Information Services). They are only required on the machine hosting Dashboard.
Note: If you are installing on Windows XP, and the Windows XP installation media are not in the installation path, then you will be prompted to supply them. Please ensure that either the CD is available or the source files have been copied to a local or network location that you can access.
Dashboard can be installed on any machine on which IIS is installed, including a client machine, or the machine on which the SQL Server is running.
Where multiple clients connect to the same database, it is advisable to install Dashboard on a central machine to provide uninterrupted service. In this case, the following selection should be made on each of the clients for installing just the ChangeBASE software and not the Server Components:
When running in a multi-user environment (as shown in the diagram in Remote Database Setup), the Server Components require access to the database accessed by the clients, with Dashboard making a SQL connection to the database used by ChangeBASE.
For details of Dashboard configuration following ChangeBASE installation, refer to Configuring Dashboard.
9

Setup Information Quest ChangeBASE 5.3.1 - Getting Started
Requirements for Remote Database Setup
Client
Operating System • Windows XP SP3 • Windows Vista SP2 • Windows 7 • Windows 8 • Windows Server 2003 (inc.
R2) SP2 • Windows Server 2008 (inc.
R2) • Windows Server 2012
Minimum Hardware • 2.5GHz dual core processor
or greater • 4GB RAM • 50GB hard disk space • 1024 x 768 display
Software Requirements • Hypervisors for
Repackaging. See 2.1.3 Virtual Machines.
• Microsoft.NET Framework 3.5 SP1 and 4.0.30319 or later (Full Client)
• Microsoft Log Parser 2.2 (For importing folders as packages)
• Microsoft System CLR Types for SQL Server 2008 x86 (10.0.x)
• Microsoft SQL Server 2008 Shared Management Objects x86 (10.0.x)
Note: Although you will normally be connecting to SQL Server on a remote machine, the above SQL server components must be installed on the client machine. Note that 10.5.x versions will not work. Also, we specifically require the 32-bit installations, even if you are running 64-bit SQL. These are available for download from Microsoft from: http://www.microsoft.com/en-us/download/details.aspx?id=27596
Internet connectivity recommended.
Virtual machines are not supported for ChangeBASE clients.
Dashboard
Operating System • Windows XP SP3 • Windows 7 • Windows 8 • Windows Server 2003 (inc.
R2) SP2 • Windows Server 2008 (inc.
R2) • Windows Server 2012
Note: For Windows XP systems, you will need to have an i386 folder available, or the original media, as the Dashboard software will attempt to install IIS.
Minimum Hardware • 2.5GHz dual core processor
or greater • 4GB RAM • 50GB hard disk space • 1024 x 768 display
Software Requirements • IIS Version 6 or later.
Note: The installer will attempt to install and configure IIS on the machine running the Dashboard web pages. (See note above for XP users).
• Microsoft.NET 4.0 framework on the machine running the Dashboard web pages.
• In order to access all Dashboard functionality, a PDF reader will need to be installed on any machines that connect to it. The latest version of Adobe Reader is recommended.
Database
Operating System • Windows XP SP3 • Windows Vista SP2 • Windows 7 • Windows 8 • Windows Server
2003 (inc. R2) SP2 • Windows Server
2008 (inc. R2) • Windows Server
2012 • 64-bit OS preferred
Recommended Hardware • Intel i7 or other fast
quad-core processor
• 16GB RAM • If using an external
HDD the minimum requirement is eSATA
• Disk space dependent on package count: 8GB per 400 packages.
Database • Microsoft SQL
Server 2008 (inc R2) - Express, Standard or Enterprise
• SQL Server Browser service set to Automatic
• TCP/IP protocol enabled in database
The server may run SQL Server Express, but due to its 1GB of RAM usage restrictions, as well as its database size limits, it is recommended that SQL Express is used for no more than 600 packages.
10

Setup Information Quest ChangeBASE 5.3.1 - Getting Started
Virtual Machines Virtual machines are utilized by ChangeBASE for the repackaging of legacy installers (EXE, VBS, BAT) into MSI, and for the conversion of MSI/EXE into virtual formats.
Repackaging (EXE/BAT/VBS) Hypervisors
• Microsoft Hyper-V • VMware Workstation 9 • VMware Server 2.x • ESX Server 5.1
Operating System • Windows XP SP3 (or later) 32-bit • Windows 7 32-bit Windows Vista is not supported Windows 64-bit is not supported. If 64-bit repackaging is required, then you can use the version of MSI Studio that is bundled with ChangeBASE 5.3.1.
Virtual Hardware
At least 1GB of RAM
Software installed on Virtual Machine • Microsoft.NET Framework 3.5 SP1 Full • VMware Tools for a VMware-based VM • Hyper-V Integration Services for a
Microsoft Hyper-V-based VM • QVMTools
Package Virtualization Hypervisors
As per ‘Repackaging’
Operating System • Windows XP SP3 (or later) 32-bit • Windows 7 32-bit (x86) and 64-bit • Windows Vista is not supported
Virtual Hardware As per ‘Repackaging’
Software installed on Virtual Machine • Microsoft.NET Framework 3.5 SP1 Full • VMware Tools (only if using a
VMware-based VM) • Hyper-V Integration Services for a
Microsoft Hyper-V-based VM • App-V Sequencer 4.6 SP1/5.0 (also
requires Microsoft.NET Framework 4.0 Full and Windows 7 SP1). and/or
• Citrix XenApp Streaming 6.5 0 (also requires Microsoft.NET Framework 4.0 Full Client) and/or
• ThinApp Setup Capture 4.6.1 and/or
• Symantec Workspace Virtualization Admin (Client) 6.1
• Symantec Wise Composer • QVMTools
11

Setup Information Quest ChangeBASE 5.3.1 - Getting Started
Working Directory ChangeBASE uses a Working Directory to store copies of all packages which are imported into the database. The Working Directory is also used to store log files, report files and temporary files. The following should be considered when deciding where the Working Directory will be located:
• The Working Directory must be accessible by both the SQL Server and all ChangeBASE clients.
• The Working Directory must have enough space to store a copy of every package imported into ChangeBASE, with several additional GB for other working files.
• To improve import performance in a multi-user environment, check the option Store Working Data on Local Disk on the Options > Services Tab. This will cache the packages in the local user profile while processing the import of the application, before the files are transferred to the Working Directory.
Local Databases
• Scenario: Only one ChangeBASE
client accessing local database. • Unique Working Directory for each
database. • For DB1, the Working Directory is
C:\CB Working\DB1.
Remote Databases
• Scenario: Multiple ChangeBASE clients
accessing databases remotely. • Shared folder on central server contains
working directories. • UNC path used to define Working
Directory. • For DB1, the Working Directory is
\\PC07\CB Working\DB1.
• Alternatively, each client maps the same
drive letter to the shared folder and this path is used.
12

Setup Information Quest ChangeBASE 5.3.1 - Getting Started
Recommended Configuration for Optimal Performance For optimal performance it is recommended that:
• If you are using VMware Workstation, you use 64-bit Windows for the host machine.
• If you are using 64-bit Windows for the SQL Server machine, you use 64-bit SQL Server.
If you are running below these recommendations, then you should consider increasing the Server Timeout setting in Options > General to give the conversion process more time to complete (the maximum available setting is 90 minutes). Space requirements for the database are 8GB per 400 packages (18GB per 1000). Additionally, twice the space taken up by the portfolio on disk must be allowed for the working package that ChangeBASE keeps in its cache (e.g. a 200GB package portfolio would require an allowance of 400GB).
If you have the Always Analyze option checked for Web Analysis Mode in the Browser Compatibility Tab under Options, then ChangeBASE will import web-based content from every loaded item (MSI files, OS image, CSS files, HTML files). This is the recommended setting if you are loading source folders for Web Data Capture and/or using Client Side Capture (CSC). The recommended setting if you are loading URLs is Web Based Applications Only, so that web content is imported only for websites and web applications.
If you are not using the Browser Compatibility module, you should set Web Analysis Mode to Disabled.
Deployment to Virtual Machines
Client
Whilst it is technically possible to install ChangeBASE inside a Virtual Machine and achieve full functionality, this is not supported due to the intensive processing required.
Database
Where sufficient resources are available, SQL Server may be installed in a virtual environment.
Deployment to Remote Desktop Services/Terminal Services ChangeBASE is not supported in a Remote Desktop Services or Terminal Services environment.
13

Setup Information Quest ChangeBASE 5.3.1 - Getting Started
Database Backup Requirements • It is recommended that the database is installed on a centrally managed server. • Daily incremental backups should be taken, and a full weekly backup should be
taken of all the databases, Working Directories, saved XMLs, and Excel reports. AOK.cbl and WorkBenchSettings.xml should also be backed up on a weekly basis (refer to Important Files and Folders for their location).
• The file server (or folder where the source files are stored) should also be incrementally backed up daily, with a full back up on a weekly basis. The term “source files” is used to describe the MSI files or other installation types along with all source files required for the installation. The source files are required for the complete dependency analysis of the installation packages to analyze API calls, dependent files and file header analysis.
Recommended Configuration for Multi-User Installations
Requirements
File Server • As per Working Directory.
Database • Windows Server 2008 R2 • Virtual OS supported • SQL Server 2008 (Standard or Enterprise) • Quad-core or greater CPU
14

Setup Information Quest ChangeBASE 5.3.1 - Getting Started
• 16GB or greater RAM • Multiple DBs can be per SQL instance or across multiple SQL instances • 8GB database space per 400 packages imported • Max packages per DB: 5000
Dashboard • As per Requirements for Remote Database Setup.
Process Optimization
With the above setup, multiple users can remediate applications in ChangeBASE, provided that:
• applications are imported from UNC paths on the LAN; • the import of applications is split between clients to optimize import timing
(importing applications requires a large amount of processing by clients).
Note: Within ChangeBASE, RAG (Red/Amber/Green) assessment results can only be viewed by the user who ran them. However, the Dashboard can be used by multiple users simultaneously to view assessment results.
Client Side Capture (CSC) (Optional) If you are using Client Side Capture with the Browser Compatibility module, then you should be aware that it requires additional setup and needs to be integrated with third party systems (e.g. the corporate proxy server):
CSC System Requirements
General
• Do not try and install CSC until you have installed ChangeBASE. • The SQL Server hosting the ChangeBASE database should also be used to host
the Client Side Capture database. Refer to SQL Setup.
15

Setup Information Quest ChangeBASE 5.3.1 - Getting Started
A machine must have been designated for the CSC Server role. This can be the same machine as the one used for SQL Server and/or ChangeBASE, or a separate machine.
The machine requirements are as follows:
Client
Operating System • Windows XP SP3 • Windows Vista SP2 • Windows 7 • Windows 8 • Windows Server 2003 (inc. R2) SP2 • Windows Server 2008 (inc. R2) • Windows Server 2012
Minimum Hardware • 2.5GHz dual core processor or greater • 4GB RAM • 50GB hard disk space • 1024 x 768 display
Software Requirements • Microsoft.NET Framework 3.5 SP1 and
4.0.30319 or later (Full Client)
Internet connectivity required
CSC Server
Operating System • Windows XP SP3 • Windows 7 • Windows 8 • Windows Server 2003 (inc. R2) • Windows Server 2008 (inc. R2) • Windows Server 2012
Note: For Windows XP systems, you will need to have an i386 folder available, or the original media, as the CSC installer will attempt to install IIS.
Minimum Hardware • 2.5GHz dual core processor or greater • 4GB RAM • 50GB hard disk space • 1024 x 768 display
Software Requirements • The installer will attempt to install and
configure IIS on the CSC Server (see note above for XP users).
• Microsoft.NET Framework 3.5 SP1 and 4.0.30319 or later (Full Client).
For installation and configuration instructions, refer to Installing and Configuring CSC.
You should seek guidance from Quest Professional Services when setting up Client Side Capture.
SQL Setup It is preferable for the packages database to be created by the ChangeBASE application (refer to Database Setup). If you are also using Client Side Capture setup, it is likewise advisable for the web data capture database to be created by the ChangeBASE CSC Manager.
In both cases, the account which connects to SQL Server (whether via Windows authentication or SQL security) must have the dbcreator server role:
16

Setup Information Quest ChangeBASE 5.3.1 - Getting Started
This will be sufficient for the initial database setup and the day-to-day running of ChangeBASE and Client Side Capture (CSC).
However, where it is necessary for a DBA (Database Administrator) to create the database, the following must be observed:
• The collation setting Latin1_General_CS_AS must be used for ChangeBASE, and the setting Latin1_General_CI_AS must be used for CSC.
• The SQL database user(s) must be set up with the following permissions.
Database role db_datareader Basic database-level permissions must be granted.
Database role db_datawriter Basic database-level permissions must be granted.
Stored procedures
EXECUTE Permissions must be granted to execute stored procedures in the database.
tempdb Create TABLE Create Table permissions must be assigned to the tempDB system database.
Procedures and examples are given in Assigning Permissions using SQL Server Management Studio.
Note: Control of the individual functions within ChangeBASE is managed through the Security Tab in the ChangeBASE options, and not by altering the SQL permissions.
17

Setup Information Quest ChangeBASE 5.3.1 - Getting Started
Important: The user who is performing the initial setup of the tables within the ChangeBASE database, and upgrading them, needs to be assigned the following additional permissions (or alternatively, they can be a Database Owner (dbo)):
Database role db_ddladmin The following database-level permissions must be granted:
ALTER ANY ASSEMBLY, ALTER ANY ASYMMETRIC KEY, ALTER ANY CERTIFICATE, ALTER ANY CONTRACT, ALTER ANY DATABASE DDL TRIGGER, ALTER ANY DATABASE EVENT, NOTIFICATION, ALTER ANY DATASPACE, ALTER ANY FULLTEXT CATALOG, ALTER ANY MESSAGE TYPE, ALTER ANY REMOTE SERVICE BINDING, ALTER ANY ROUTE, ALTER ANY SCHEMA, ALTER ANY SERVICE, ALTER ANY SYMMETRIC KEY, CHECKPOINT, CREATE AGGREGATE, CREATE DEFAULT, CREATE FUNCTION, CREATE PROCEDURE, CREATE QUEUE, CREATE RULE, CREATE SYNONYM, CREATE TABLE, CREATE TYPE, CREATE VIEW, CREATE XML SCHEMA COLLECTION, REFERENCES
Assigning Permissions using SQL Server Management Studio
Unless a local Dashboard instance is being accessed on a Windows XP machine in accordance with Local Database Setup, in which case SQL Authentication must be used, permissions can be assigned for either Windows or SQL Security:
18

Setup Information Quest ChangeBASE 5.3.1 - Getting Started
The detailed procedure encompassing both methods is as follows:
1. Create a new login:
a. Expand the Security folder of the SQL Server.
b. Right-click on Logins and select New Login.
c. If SQL Security is being used, select SQL Server Authentication and go to step 2.
If Windows Security is being used, you need to create a new login for an Active Directory-based user or group. Therefore, select Windows Authentication, and then go to step 1d.
d. Click the Search button and select the Active Directory user or group.
19

Setup Information Quest ChangeBASE 5.3.1 - Getting Started
Note: If the user or group does not appear in the list, ensure that the correct object types are being searched for. In many instances, groups are not enabled by default, resulting in an error message that the object you are looking for cannot be found.
2. Assign role-based permissions to the SQL Databases, as follows:
a. Right-click on the newly created user, and select Properties, followed by User Mapping:
b. Check each database, and associate it with the required permissions in the Database role membership panel.
As a minimum, you must have db_datareader and db_datawriter selected.
c. Close the Properties window and collapse the Security tree.
20

Setup Information Quest ChangeBASE 5.3.1 - Getting Started
3. Assign Execute Permissions to each database, as follows:
a. Click the New Query button at the top of the screen.
b. Select the required ChangeBASE or CSC database from the drop-down menu below the New Query button, e.g.
Important: It is vital that the correct database is selected before you proceed.
c. Assign permissions to the selected database using the following command:
grant execute to "<Database User>" (e.g. "PROD\QDL.RD.ChangeBASE" in the above example).
Important: The "<Database User>" is case sensitive, and the double quotes are mandatory.
Note: For Windows Authentication, the domain ("PROD\" in the above example) needs to be specified.
d. Click Execute on the toolbar.
e. Either repeat from step 3a for the next database, or move to step 4.
4. Assign Create Table permissions to the tempDB system database, as follows:
a. Click the New Query button at the top of the screen.
b. Select the tempDB database from the drop-down menu below the New Query button, e.g.
21

Setup Information Quest ChangeBASE 5.3.1 - Getting Started
c. Assign permissions to the database using the following command:
grant CREATE TABLE to "<Database User>" (e.g. "PROD\QDL.RD.ChangeBASE" in the above example).
Important: The "<Database User>" is case sensitive, and the double quotes are mandatory.
Note: For Windows authentication, the domain ("PROD\" in the above example) needs to be specified.
d. Click Execute on the toolbar.
SQL Setup for a Multi-User Environment
When installing ChangeBASE in a multi-user environment, it is desirable to install Dashboard in one central location, and CSC, if relevant, in another central location.
This method of installation will allow users who do not have ChangeBASE installed to view the reporting results in Dashboard.
It is advisable to have a dedicated machine on which to install Dashboard, and another on which to install CSC, if relevant, in order to provide an uninterrupted service.
The Dashboard and CSC IIS servers require access to the ChangeBASE SQL database. This can be achieved by using either of the following methods:
• Windows authentication, which is the recommended method (refer to SQL Setup using Windows Authentication).
Or
• SQL Security (refer to SQL Setup using a SQL Login).
SQL Setup using Windows Authentication
1. Add the name of the machine hosting Dashboard to the Active Directory group created in Assigning Permissions using SQL Server Management Studio (this machine is "PC01" in the following example):
22

Setup Information Quest ChangeBASE 5.3.1 - Getting Started
2. Follow the procedure in Database Setup and ensure that Use Windows Security is checked when connecting to the database.
SQL Setup using a SQL Login
1. Ensure that you have set up a SQL login on the database with the permissions assigned in Assigning Permissions using SQL Server Management Studio.
2. Follow the procedure in Database Setup and ensure that Use Windows Security is unchecked when connecting to the database.
Pre-Installation Checks 1. If running SQL Server and ChangeBASE on separate machines:
• The SQL Server Browser service must be running, and set to Automatic in the machine where SQL is installed.
• Both “SQL Browser Service” and “SQL Server” must be allowed through your firewall.
• The TCP/IP protocol must be enabled.
Both “TCP/IP” and “SQL Server Browser” can be configured in SQL Server Configuration Manager:
23

Setup Information Quest ChangeBASE 5.3.1 - Getting Started
2. Ensure that the Working Directory location has been considered, and a share created if necessary (refer to Working Directory).
24

Installing ChangeBASE Quest ChangeBASE 5.3.1 - Getting Started
Installing ChangeBASE 1. Run the ChangeBASE installation MSI (Local Administrative privileges are
required), and click Next.
2. Accept the license agreement and click Next.
3. If you require the Dashboard to be hosted on this client you should change the Server Components feature to Will be installed on local hard drive by clicking the drop-down (refer to Dashboard Setup). Otherwise, you should select Entire feature will be unavailable.
25

Installing ChangeBASE Quest ChangeBASE 5.3.1 - Getting Started
4. Click Next, and then Install:
26

Installing ChangeBASE Quest ChangeBASE 5.3.1 - Getting Started
5. Once installation is complete, click Finish.
27

Starting ChangeBASE Quest ChangeBASE 5.3.1 - Getting Started
Starting ChangeBASE Launch ChangeBASE from the Start menu shortcut.
In Windows 7, press the Windows key on your keyboard, then type "cha". On Windows 8 or Windows Server 2012, press the Windows key + "Q", then type "cha". The ChangeBASE shortcut will then appear under Programs.
There are two licensing options when you first launch ChangeBASE: Online or Offline.
Online License It is strongly recommended that you launch ChangeBASE in an online environment so that you can automatically download the latest Plugins from the Quest Server. If you are online at the time of first launching the product, all you need to do is enter your details in the following format:
28

Starting ChangeBASE Quest ChangeBASE 5.3.1 - Getting Started
If a proxy server is used for internet access then you should enter its details in the Proxy Settings dialog:
Clicking OK on the License Setup dialog will trigger ChangeBASE to connect to the authorization server to validate the authorization code and the software will proceed to the database connection wizard.
If you experience issues validating your license online, consider the following:
• Verify that you can access the following URL in a web browser on the machine running ChangeBASE: http://www.aokserver.com/AOKUpgrade/Upgrade.asmx If you can, this shows that the machine has internet connectivity and can access the ChangeBASE license server.
• Try checking/unchecking the Use Proxy option in the Proxy Settings dialog. • Double check that all the proxy server details are correct. • Try adding or removing the Domain name in the Proxy Settings dialog.
If you are still unable to validate your authorization code online, you will need to use an Offline License.
Offline License If the system where you wish to install ChangeBASE has no internet access, or you have problems with authentication via the proxy server, the following procedure will allow you to activate a valid license. However, you will need at least one computer with internet access and, more importantly, one that can see our activation server in the UK. (Some corporate firewalls/proxies have been known to block access if they have not encountered the site before.)
1. Start ChangeBASE. 2. When prompted for License Setup information, enter the following details:
Customer Name Email Address Authorization Code (as supplied by Quest Licensing team)
3. Click the Create Offline License button:
29

Starting ChangeBASE Quest ChangeBASE 5.3.1 - Getting Started
4. A dialog appears with an OK button telling you how to activate the license.
5. In the Explorer window that opens, copy the AOK.cbl and AOK Activation Page URL files to external media (e.g. a USB drive). Leave the Explorer window open for later use.
6. Take the external media to a machine that has internet access. 7. Double click the Activation Page URL on the external media:
30

Starting ChangeBASE Quest ChangeBASE 5.3.1 - Getting Started
8. When prompted, browse to the temporary AOK.cbl file on the external media, double click the AOK.cbl file and click Submit.
9. When prompted to download the new file, save the new AOK.cbl back to the external media (overwriting the temporary copy already there).
10. Take the external media back to the machine running ChangeBASE and copy the new AOK.cbl from the external media onto the machine, overwriting the file already there.
11. Start ChangeBASE. It will pick up the license file downloaded from the server, and then ask for the name of the SQL server.
Swapping Licenses ChangeBASE can only use one license at any one time. There may, however, be a requirement to utilize different licenses, for example when separate licenses have been purchased for Browser Compatibility and MSI Packaging.
Where there is a requirement to switch licenses, proceed as follows:
1. Close ChangeBASE. 2. Browse to the UserData folder:
Windows XP and Windows Server 2003
%USERPROFILE%\Local Settings\Application Data\ChangeBASE\UserData
Windows Vista, 7 and 8
%localappdata%\ChangeBASE\UserData
Windows Server 2008 and 2012
%localappdata%\ChangeBASE\UserData
3. Rename the AOK.cbl and WorkBenchSettings.xml files appropriately – for example, if these files apply to a Browser Compatibility license, append _Browser to their names.
4. Launch ChangeBASE. 5. You will be prompted for a new license code. Enter this and activate it online, or
else browse to the offline license file. 6. ChangeBASE will then start, and prompt you to either create a new database or
attach to an existing one. 7. To swap back to the original license:
a. Close ChangeBASE. b. Rename the newly generated AOK.cbl and WorkBenchSettings.xml files. c. Rename the original license file back to AOK.cbl, and the original
workbench settings file back to WorkBenchSettings.xml. 8. Relaunch ChangeBASE.
It is important to keep a separate WorkBenchSettings.xml file (refer to Important Files and Folders) for use with each different license file. If the same WorkBenchSettings.xml is used for all license files, this could result in packages that are being processed under one license being attributed to, and counted by, a second license; this could in turn affect the future usage of the second license, as it will appear to have consumed more packages than it actually has.
31
Database Setup Quest ChangeBASE 5.3.1 - Getting Started
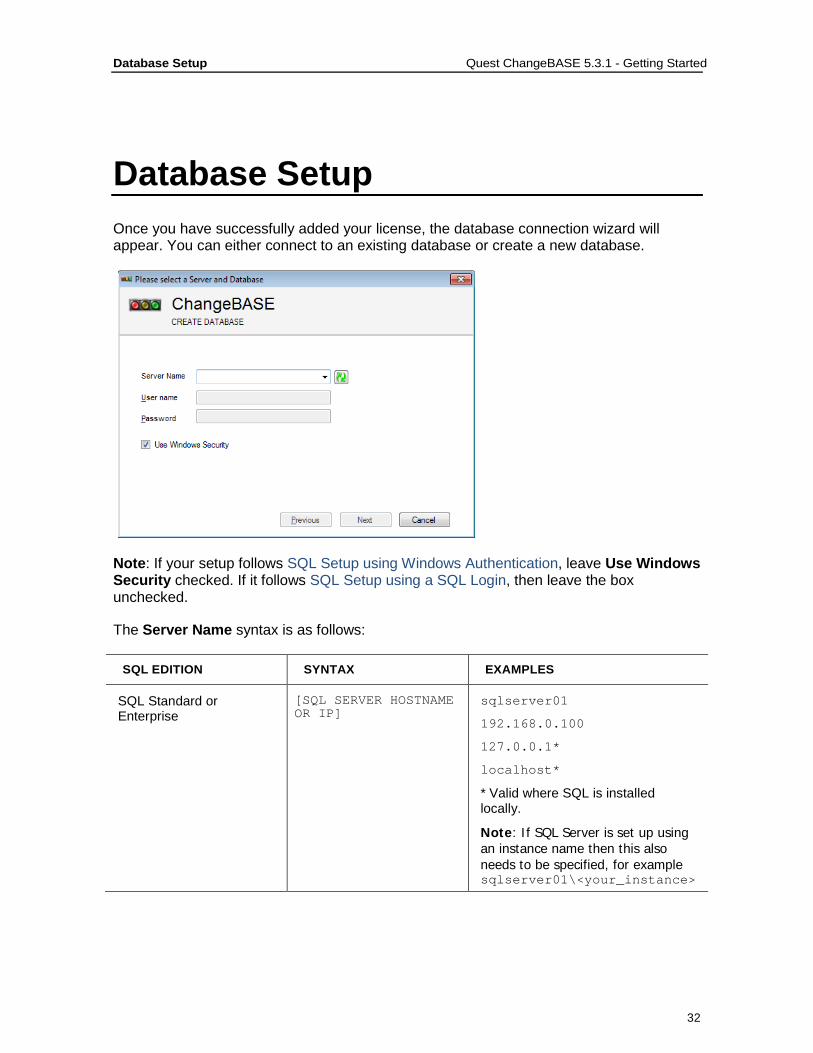
Database Setup Once you have successfully added your license, the database connection wizard will appear. You can either connect to an existing database or create a new database.
Note: If your setup follows SQL Setup using Windows Authentication, leave Use Windows Security checked. If it follows SQL Setup using a SQL Login, then leave the box unchecked.
The Server Name syntax is as follows:
SQL EDITION SYNTAX EXAMPLES
SQL Standard or Enterprise
[SQL SERVER HOSTNAME OR IP]
sqlserver01
192.168.0.100
127.0.0.1*
localhost*
* Valid where SQL is installed locally.
Note: If SQL Server is set up using an instance name then this also needs to be specified, for example sqlserver01\<your_instance>
32

Database Setup Quest ChangeBASE 5.3.1 - Getting Started
SQL Express [SQL SERVER HOSTNAME OR IP]\[SQL INSTANCE]
sqlserver01\SQLEXPRESS
sqlserver01\<your_instance>
192.168.0.100\SQLEXPRESS
127.0.0.1\SQLEXPRESS* localhost\SQLEXPRESS*
.\SQLEXPRESS*
* Valid where SQL is installed locally.
If you want to know the name of your SQL Server instance, open the Services window, and select SQL Server, for example:
The instance name is given in brackets (SQLEXPRESS in the above example). Proceed as follows:
1. Enter the Server Name in accordance with the above notes. 2. If SQL Server has been configured to use SQL Security, uncheck Use Windows
Security and enter the SQL username and password. Otherwise, leave the option checked.
3. Click Next and the SQL connection will be tested.
33

Database Setup Quest ChangeBASE 5.3.1 - Getting Started
If a successful connection has been established to the database server, click Next and move to step 4.
If incorrect credentials were supplied for the database server, the following will be displayed. Click Previous to enter a different user name or password.
If the database server cannot be found, the following will be displayed. Click Previous to enter a different server/instance name.
34

Database Setup Quest ChangeBASE 5.3.1 - Getting Started
If the following requirements have not been met from those listed in Requirements for Remote Database Setup:
• Microsoft System CLR Types for SQL Server 2008 x86 (10.0.x) • Microsoft SQL Server 2008 Shared Management Objects x86 (10.0.x) then you will receive the following error:
4. To connect to an existing database, click the drop-down list and select the database name. To create a new database, enter the required name. Space characters can be used if desired. Click Next.
5. Now the Working Directory must be defined. See Working Directory for more information.
35

Database Setup Quest ChangeBASE 5.3.1 - Getting Started
a. Where a single client connects to the database, a local Working Directory would be used, so click the Browse button and locate it. A typical path would be C:\ChangeBASE Working\Test Database. Then click Next.
b. Where multiple clients connect to the same database, a shared folder accessible through a UNC path is advisable. In this event, check the Specify UNC Path option and type in the UNC path to the Working Directory, for example: \\server01\ChangeBASE Working\Test Database. Then click Next.
36

Database Setup Quest ChangeBASE 5.3.1 - Getting Started
6. If a new database was specified at step 4, the database is created.
7. Click Finish.
8. The ChangeBASE User Interface is displayed.
37

Upgrading ChangeBASE Quest ChangeBASE 5.3.1 - Getting Started
Upgrading ChangeBASE With this release of ChangeBASE, proceed as follows:
1. If you are upgrading from ChangeBASE 4.x or earlier, you must obtain a new license, as licenses from earlier versions will not work.
2. Back up the database (refer to Database Backup Requirements).
3. Ensure that all users close ChangeBASE.
4. Run the ChangeBASE 5.3.1 installation on one client machine (it will uninstall the previous version).
5. Launch ChangeBASE 5.3.1.
6. Comply with the resultant prompt to upgrade the database. You will only need to do this once.
7. If the installation is satisfactory, upgrade the other client machines to ChangeBASE 5.3.1.
8. On any one of the client machines using Dashboard, go to Options > Dashboard > Status and click the Upgrade button.
9. Click the Upgrade button the first time that you select Browse with SCCM.
10. If you are using Virtual Machines for virtualization, upgrade QVMTools within those Virtual Machines, and then take a new snapshot.
11. Click the Upgrade Tab to get the latest Plugins.
It is important prior to the first upgrade that, if you are not a Database Owner (dbo), you have the SQL permissions assigned in SQL Setup, most notably db_ddladmin.
All ChangeBASE clients connecting to a database must have the same version number.
Upgrading from ChangeBASE Evaluation ChangeBASE Evaluation is a fully functioning version of the ChangeBASE Standard edition, offering all the facilities of the fully licensed version with a few minor exceptions:
38

Upgrading ChangeBASE Quest ChangeBASE 5.3.1 - Getting Started
Feature Evaluation Edition Fully Licensed Standard Edition
Multiple Database Support x
Number of Packages 5 As purchased
Duration of license 30 days As purchased
Licensing process Automatic By entering a custom license code
Ability to delete packages x
SCCM Support x
To switch from the Evaluation Edition to the full Version of the product determined by your license), you should:
1. Close ChangeBASE.
2. Uninstall ChangeBASE.
3. Delete the AOK.cbl file from the UserData folder (refer to Important Files and Folders).
4. Re-install ChangeBASE using your newly provided ChangeBASE MSI (that is to say, not the MSI that you used to install ChangeBASE Evaluation).
5. Restart ChangeBASE.
6. You will be prompted for license information, and once this has been authenticated, your existing database will be re-opened.
39

ChangeBASE User Interface Quest ChangeBASE 5.3.1 - Getting Started
ChangeBASE User Interface New Project Wizard The first time that the Workbench is displayed, it opens under the New Project Wizard tab, which takes you through the entire ChangeBASE flow in steps, and illustrates your progress through the flow by ticking each step as it is completed:
Note: If you do not want this wizard to be displayed when you next start ChangeBASE, uncheck the box Display Wizard when I launch ChangeBASE at the bottom of the window.
The hyperlink on the right of each step takes you to the relevant section of the online help.
Project Wizard Step 1: Loading Report Groups
The goal of this step is to load your required reports (Plugins).
1. Click the Select Report Groups button. You are taken to the Upgrade tab in Options.
40

ChangeBASE User Interface Quest ChangeBASE 5.3.1 - Getting Started
2. Select the report groups that you wish to download (you will need to be online):
If you leave Import When Window Closes checked and click OK, then all of your selected plugins will load automatically.
Note: If you find that Plugins fail to run, then you may have the wrong version of Plugins for the version of ChangeBASE that you are running. Ensure that you always have the latest version of the software and that you have the latest Plugins loaded.
Offline Report Group Loading
Where it is not possible to connect to the ChangeBASE server, reports can be loaded offline. To be able to do this, you should request a set of offline report groups from Quest Support. These will be supplied as a set of CBP (ChangeBASE plugin) files.
To load offline plugins simply drag and drop the folder that contains the CBP files onto ChangeBASE, and then click Import.
Note: When working offline, you will not receive any notification when plugins are updated, and updated plugins will have to be requested as offline plugins and then manually imported into ChangeBASE.
41

ChangeBASE User Interface Quest ChangeBASE 5.3.1 - Getting Started
Project Wizard Step 2: Loading Packages
The goal of this step is to load packages into the ChangeBASE database. Once you have loaded your packages, you will be ready to run reports against them.
If you wish to all files types to be imported, uncheck all the file types in the General Tab in the Options window:
Otherwise, you should select the specific extensions of the files that you wish to import.
There are four methods for importing packages:
• Browse Dialog • Drag and Drop • Browse with SCCM • CSV Import
The Wizard concentrates on the Browse Dialog. The other methods are described in the User Guide.
42

ChangeBASE User Interface Quest ChangeBASE 5.3.1 - Getting Started
Browse Dialog
1. After you click on Browse for Packages, the following dialog is displayed:
2. Click Browse button and locate the folder containing the packages that you want to import:
3. ChangeBASE scans the folder and subfolders for any files with the options selected in in the General Tab in the Options window.
4. The total number of files located in the folder structure is displayed in the first row of the Auto Selected column.
5. The right-hand panel lists all located files in the folder structure. Transforms for a specific MSI are listed at the base of the right-hand panel.
Note: By selecting different folders in the left-hand panel you can filter the results to show just the files in the selected folder.
6. Check the files to be imported, and then click OK.
43

ChangeBASE User Interface Quest ChangeBASE 5.3.1 - Getting Started
7. After a brief delay, the selected files are then displayed as ‘pre-loader items’ in ChangeBASE:
Note: You can remove any ‘pre-loader items’ by right-clicking and choosing Delete.
Note: If you want to relocate a package at any time in your file structure, right-click the package and select Open Containing Folder.
8. If an application is to be repackaged using a Virtual Machine (VM), right-click on the application and select Repackaging Configuration (the VM setup that is part of the configuration is dealt with in Project Wizard Step 3: Setting Up VMs for Repackaging Legacy Imports). Then proceed in accordance with the User Guide. However, where ‘pre-loader’ items can be imported directly, click on Import in the Packages Panel to load the associated package(s) into the database.
While the packages are loading, progress bars are displayed next to them. Hovering over a progress bar brings up a tooltip with more detailed progress information, for example:
Overall progress is shown in the status bar at the bottom of the window, for example:
44

ChangeBASE User Interface Quest ChangeBASE 5.3.1 - Getting Started
Project Wizard Step 3: Setting Up VMs for Repackaging Legacy Imports
This step takes you to the Repackaging Options Tab in the Options window, where you can configure up to five VMs (Virtual Machines).
The VMs that you set up will be used to convert those file formats that cannot be read directly by ChangeBASE and which must therefore be repackaged. Refer to the User Guide for more information.
Note: If you do not want to configure ChangeBASE to use Virtual Machines at this point – i.e. if you have no legacy installers to import - check N/A (‘Not Applicable’) on the right of the Project Wizard.
45

ChangeBASE User Interface Quest ChangeBASE 5.3.1 - Getting Started
Project Wizard Steps 4–7
The remaining steps contain links to the User Guide to help you understand ChangeBASE.
The ChangeBASE Workbench If you click on the Packages Tab, or simply start ChangeBASE with the box Display Wizard when I launch ChangeBASE unchecked (refer to New Project Wizard), then the Workbench is displayed. The following is an example of the Workbench for a user running the Ultimate Edition of ChangeBASE:
Notes: • If your license permits you to create and modify your own plugins, the Author
Mode icon and check box are displayed in the lower right corner of the ChangeBASE User Interface:
46

ChangeBASE User Interface Quest ChangeBASE 5.3.1 - Getting Started
This option is only relevant if you have created your own SQL stored procedures and saved them in the selected database. If Author Mode is checked, then, when assessments are carried out, ChangeBASE first looks in the selected database for the SQL stored procedure, and, if a copy is found, executes it. If a copy cannot be found, then the stored procedure saved with the plugin is executed. If Author Mode is not checked, then ChangeBASE always executes the stored procedure saved with the plugin and ignores any copies in the selected database. Further information on Plugin Authoring can be found on the ChangeBASE Community. Go to http://communities.quest.com/community/changebase, search for ‘plugins’, and select Only for ChangeBASE.
• If you wish to hide the left hand panels, click in the top right of the screen. You
can then click to toggle them on again.
• To access the Options window, click in the top right of the screen. The various
tabs that are available are fully described in the User Guide.
• For the latest news on ChangeBASE, click in the top right of the screen.
• For help on ChangeBASE, either press F1 or click the down arrow to the right of and select Help. For the version of ChangeBASE that you are running, click
the same down arrow and click About.
Packages Panel
Browse: This is an alternative to the drag and drop functionality. It enables you to browse to a folder, then scan that folder and subfolders for packages which can be imported into ChangeBASE.
Browse with SCCM: This enables you to browse for packages and programs that are located in a SCCM server or database.
Import: This imports packages (and offline Plugins) into the database to allow automated assessment.
CSV Import: This is a more automated way to load packages. You prepare a CSV file from the BulkCSVImport.csv template supplied at C:\Program Files (x86)\Quest Software\ChangeBASE\ (or wherever ChangeBASE is installed), and provide the details of the packages in this file. ChangeBASE will read the CSV file and load all of the listed packages. Assess: This assesses the packages against the selected report groups.
Fix: This creates fixes for packages where automated fixing is available.
47

ChangeBASE User Interface Quest ChangeBASE 5.3.1 - Getting Started
Virtualize: This converts MSI packages to a Virtual format.
Reports Panel
Refresh Results: This is used to refresh the results tree.
Clear Results: This is used to clear any reporting results from the ChangeBASE interface.
Assessment Results: This allows you to access the HTML reports showing assessment results. You can access several different reports to analyze the status of the packaging project. It is also possible to export the results to CSV format for customized reports and data filtering.
Summary Panel
Packages: The number of packages currently imported into the database.
Reports: The number of reports (Plugins) currently imported into the database.
Rules: The total number of logic checks within all reports (Plugins) imported into the current database.
Scanned Rules: The number of logic checks in the currently selected reports (Plugins).
Issues: The number of issues being displayed currently.
Upgrades Available: The number of new reports (Plugins) available for download. These can be downloaded in the Upgrades Tab in Options.
AppID Feature
This feature provides you with the ability to represent your applications in the exact manner in which they are intended to be deployed. For example, some applications (such as MS Office) are comprised of multiple packages (e.g. MS Office incorporates MS Word, MS Excel, MS Outlook and MS Powerpoint, amongst others). The AppID feature allows you to report on the individual packages, but also show them as a single, overall application. The feature also allows you to represent applications in accordance with your own internal naming conventions.
The AppID(s) column in the main package tree shows the AppIDs that have been assigned to packages, separated by commas where there is more than one AppID associated with a package:
48

ChangeBASE User Interface Quest ChangeBASE 5.3.1 - Getting Started
You can order packages according to those that are associated with AppIDs, by clicking the AppID(s) column header.
For full details of how to maintain AppIDs, refer to the User Guide.
49

Reports and Report Groups Quest ChangeBASE 5.3.1 - Getting Started
Reports and Report Groups Report Groups contain reports (also known as Plugins), which provide automated assessment for a specific technology. For example, the Windows 7 Report Group contains reports that assess packages for Windows 7 compatibility. A report is a group of codified rules that check for a particular issue within a package or packages. ChangeBASE contains over 250,000 rule sets which are grouped into reports of various categories. A report may contain several rule sets; the number varies according to the logic that goes into making up a particular report.
Choosing the Right Report Groups As an example, answer the four questions below about the target environment to which you are going to migrate - this will determine which report groups to select.
QUESTION ANSWER CHANGEBASE REPORT GROUP
Operating System? Windows 7 Windows 7
Windows Server 2008 (inc. R2)
Windows Server 2008
Architecture? 32-bit Windows 32-bit
64-bit Windows 64-bit
Hosted Packages? Yes Virtualization – Citrix XenApp – hosted and MS RDS
No No report group needed
Package Format? Virtual Virtualization – App-V
Virtualization – VMware ThinApp
Virtualization – Symantec Workstation Virtualization
Virtualization – Citrix XenApp streamed
Native No report group needed
Examples:
• You have a client who wants to move to Windows 7 x64 and would like to virtualize their packages with App-V. Select the following Report Groups: • Windows 7 • Windows 64-bit • Virtualization – App-V
• You want to host packages on a Windows 2008 R2 Terminal Server and for delivery as native installers (MSI & Legacy). Select the following Report Groups:
50

Reports and Report Groups Quest ChangeBASE 5.3.1 - Getting Started
• Windows Server 2008 • Windows 64-bit • Virtualization – Citrix XenApp – hosted and MS RDS
Running Reports In order to run reports against a package or number of packages, check one or more reports in the Reports tree that are to be run, and those packages in the Packages tree against which you would like to run the selected reports, as in the example below:
When you select the Assess option, all selected reports will be run against the selected applications. The status is shown in the bottom left of the screen, with a progress bar in the bottom right of the screen.
Note: You can click the red cross to Stop Running Reports at any time.
The time taken to run the reports is based on the size and number of the packages and the complexity of the reports to be run.
51

Reports and Report Groups Quest ChangeBASE 5.3.1 - Getting Started
Viewing the Assessment Results in the Reports Tab The Reports Tab displays the assessment results sorted by the report groups and associated Plugins. This allows you to identify quickly which packages have issues that were flagged by a specific report, for example:
Viewing Assessment Reports The Assessment Results drop-down menu in the Report panel gives access to a number of built-in reports. The reports are generated by checking the packages to be included in the reports, then clicking Assessment Reports and the report name.
Note: A report will only include the checked packages.
Before you can use the Dashboard option at the bottom of the menu, proceed in accordance with Configuring Dashboard.
52

Fixing Packages Quest ChangeBASE 5.3.1 - Getting Started
Fixing Packages Where fixing is available, as indicated by the presence of the cog icon in the Fixes Available column, check the box associated with the issue to be fixed. This will activate the Fix function in the packages view of ChangeBASE. Run the Fix function against one or several fixable issues.
Note: It is generally recommended that you apply fixes to packages using Transform (MST) files.
To specify your MST requirements, select the General Tab:
• Recommended option to add fixes to a new or existing MST:
Deselect Backup MSI before applying Fix and select the Generate Transforms check box and the Roll up Fixes check box if you would like the Fixes to be wrapped up into the standardization Transform. Where multiple Transforms have been applied, the Fixes are always rolled up into the first Transform in the sequence
• Add fixes to a new MST: MSI with standardization Vendor MSI Deselect Backup MSI before applying Fix and select the Generate Transforms check box.
• Add fixes directly to the MSI: Select Backup MSI before applying Fix and deselect the Generate Transforms check box.
• Update the MSI and create a fix MST for the original MSI: If in doubt, deselect Backup MSI before applying Fix and select the Generate Transforms check box and the Roll up Fixes check box. This can safely be used for all types of installation.
53
Fixing Packages Quest ChangeBASE 5.3.1 - Getting Started
The fixing scripts running in the background will use SQL statements to update the Repackaged MSI or the MST for the vendor MSI. There are 3 types of fix available:
• SQL statements to resolve the issues within the MSI file. • The removal of files or registry keys, which should not be included as part of the
installation package. • The inclusion of a Manifest or runtime element to allow the package to run (e.g.
for Control Panel Applet support on Windows 7).
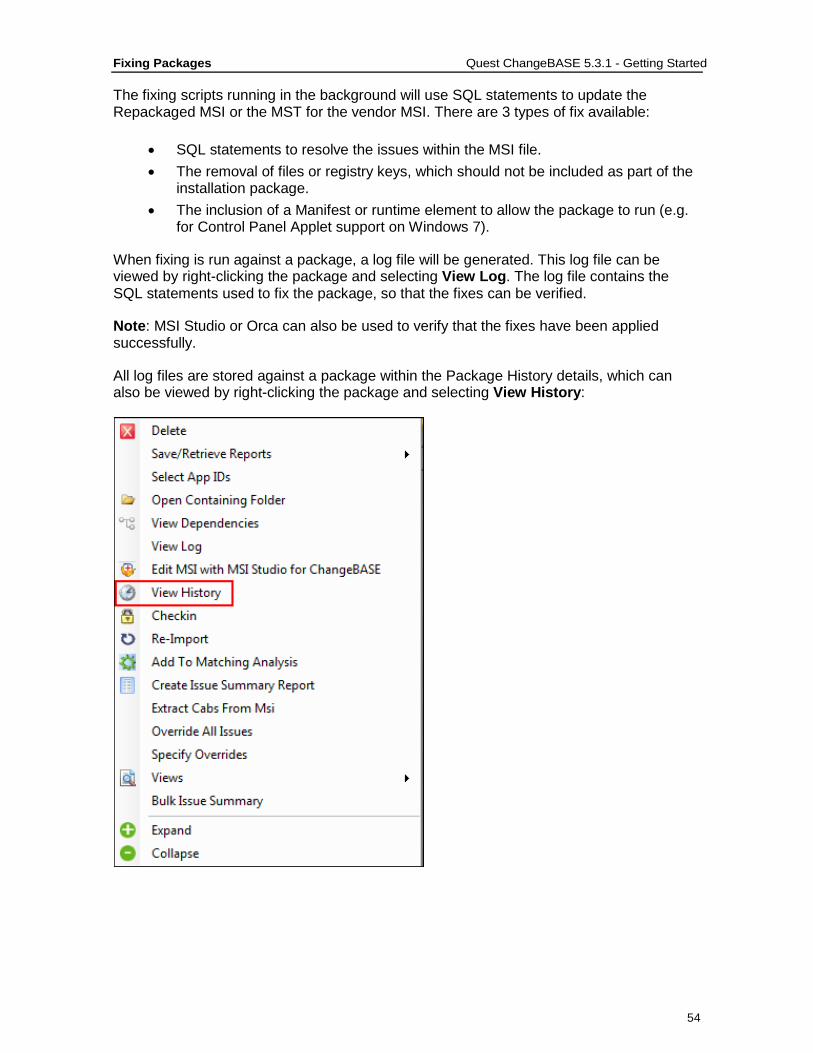
When fixing is run against a package, a log file will be generated. This log file can be viewed by right-clicking the package and selecting View Log. The log file contains the SQL statements used to fix the package, so that the fixes can be verified.
Note: MSI Studio or Orca can also be used to verify that the fixes have been applied successfully.
All log files are stored against a package within the Package History details, which can also be viewed by right-clicking the package and selecting View History:
54

Configuring Dashboard (Optional) Quest ChangeBASE 5.3.1 - Getting Started
Configuring Dashboard (Optional) After ChangeBASE has been installed, it can optionally be configured to integrate with the Dashboard website. To do this, start ChangeBASE and go to the Options screen and select the Dashboard Tab. Initially this will show that the Dashboard is not installed. To install it, simply click the Install button.
After this, the Tab will show the version of Dashboard installed:
55

Configuring Dashboard (Optional) Quest ChangeBASE 5.3.1 - Getting Started
Note: The four Platform tabs enable you to prioritize the Dashboard Migration Groups so that a priority matrix can be used in Best Way Forward reporting (refer to the User Guide).
The Status panel shows whether or not:
• the Dashboard is currently installed in the database;
• the Dashboard processes are enabled;
• the database is registered with the Dashboard web pages.
Note: When new versions of Dashboard are installed, the Dashboard Tab may show that an upgrade option is available. This upgrade should be run at the earliest opportunity.
As long as the Dashboard remains installed and enabled for the database, Dashboard data will be captured into the Dashboard tables in the database. If necessary, the capture process can be stopped by clicking the Disable button. It can then be restarted by clicking Enable.
Note: Any package imports or reports run during the period when Dashboard data capture is disabled, will not be imported into Dashboard.
You can also uninstall Dashboard, which will remove all Dashboard data from the database.
Registering the Dashboard Web Application with the IIS Server
After installing Dashboard, you need to register the application with the IIS Server, as follows:
1. In the Options > Dashboard > Status panel, validate that the URL shows the hostname of the machine where IIS and the Dashboard Server Components have been installed (without any http prefix or any page suffix, e.g. <myServer>/Dashboard).
For a standalone system, the URL will simply be <machine name>/Dashboard.
Important: For a standalone system, you will need to have installed Server Components during the ChangeBASE installation (refer to Installing ChangeBASE). Otherwise, Dashboard registration will fail.
2. Click the Register button.
3. Test the connection by opening up the Dashboard via the Assessment Results menu:
56

Configuring Dashboard (Optional) Quest ChangeBASE 5.3.1 - Getting Started
Dashboard can now be launched from any remote machine, by typing the URL to the Dashboard server:
Note: You can click Unregister to break the link between the web pages and database. This does not delete any Dashboard data from the database: it simply makes that database unavailable to the Dashboard web pages. You simply click the Register button to re-establish the link.
57

Installing and Configuring CSC (Optional) Quest ChangeBASE 5.3.1 - Getting Started
Installing and Configuring CSC (Optional) Important: Before installing Client Side Capture, ensure that you have already installed ChangeBASE, and that you have met the requirements in CSC System Requirements.
When you are ready, simply run CSCInstaller_v1.9a.msi and accept all the defaults.
CSC Configuration
CSC Manager – Manage Default Parameters
1. Run the following program as Administrator: ChangeBASE CSC Manager. The following dialog is displayed:
2. CSC needs to create a database, so, in the blank field, specify the SQL Server
instance name, using the syntax shown in Database Setup, e.g. localhost\sqlexpress, and, below it, enter the required database name.
3. Choose the SQL Security mode by checking or unchecking Use Windows Security… You will need to enter the SQL credentials if you uncheck it. Refer to SQL Setup.
4. Click OK.
5. In CSC Manager, select Tools > Manage Default Parameters.
58

Installing and Configuring CSC (Optional) Quest ChangeBASE 5.3.1 - Getting Started
6. Check Auto-Populate This Field to add the Database Template Location. For example:
where ‘\\EU9068\’ in the above example is your \\<computer name>\.
The CSC Agent (AOKCCControl.exe) uses an Access database to store a local copy of the captured data, prior to uploading it to the CSC Server. The Agent obtains a fresh, empty, copy of this database from the location specified in the Database Template Location field every time it starts. Therefore, this is a mandatory field.
7. Ensure that the Output File Target Location is set appropriately. This is the destination of the uploaded files (refer to CSC Agent).
Note: The extension has to remain as .CSCWEB.
8. Change the Initial Poll Interval and Initial Poll Unit as required. (For example, set them to ‘2’ and ‘Hours’ respectively, for a registered client to contact the CSC Server at two-hourly intervals.)
9. At the bottom of the dialog, you can also set the size of file, in MB, at which the creation of an output file will be triggered.
10. Click OK.
11. If you wish to use a non-default connection string to enable the web service to connect to the CSC database or a non-default storage location for uploaded data, select Tools > Manage Web Service Configuration.
The Folder to store uploaded files… path shows the location where the CSCWEB files (containing the captured web data) will be created. This defaults to the Output File Target Location set above. Modify it as required.
59

Installing and Configuring CSC (Optional) Quest ChangeBASE 5.3.1 - Getting Started
12. Click OK.
Manage Filters
This option allows you to prevent data from particular URLs from being captured (by ‘blacklisting’ them) and/or to ensure that data from particular URLs is included (by ‘whitelisting’ them).
1. Select Tools > Manage Filters, to open the associated dialog:
2. Enter URLs as follows:
• If you enter a string in the URL column and do not check either the Include or Exact box, then CSC will ‘blacklist’ any URL that starts with the entered string (for example, http://www.bbc.co.uk/news without any additional filters will exclude the entire BBC news website).
• If you enter a string in the URL column and tick the Exact box, CSC will exclude any URL that is an exact match for the entered string (for example, http://www.bbc.co.uk/news/10284448/ticker.sjson will exclude only the BBC News ticker feed and not the wider BBC).
• If you enter a string in the URL column and tick the Include box but not the Exact box, CSC will include only URLs that start with the entered string (for
60
Installing and Configuring CSC (Optional) Quest ChangeBASE 5.3.1 - Getting Started
example, http://www.bbc.co.uk/weather will include only the BBC weather site and exclude everything else).
• If you enter a string in the URL column and tick both the Include and Exact boxes, CSC will include only that exact URL (for example, http://www.bbc.co.uk/radio4 will include only the BBC Radio 4 main page and exclude everything else).
3. Click OK to save your entries and clear the dialog.
Verify CSC Setup
Web Service
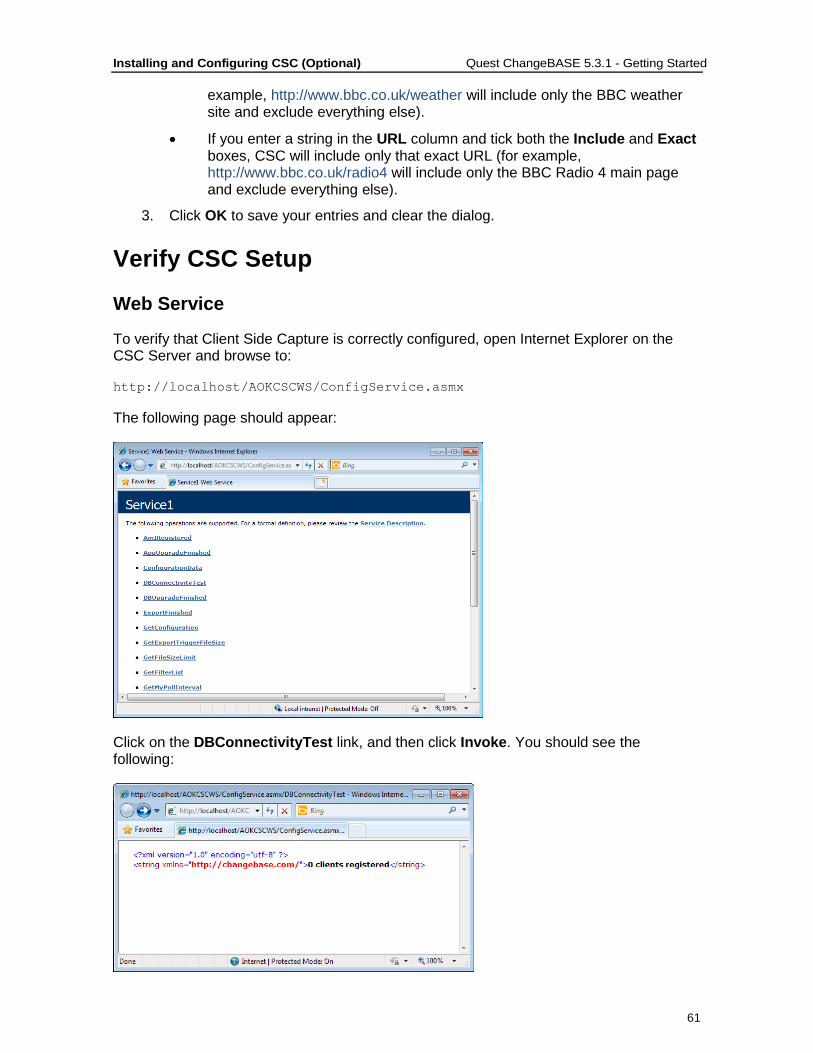
To verify that Client Side Capture is correctly configured, open Internet Explorer on the CSC Server and browse to:
http://localhost/AOKCSCWS/ConfigService.asmx
The following page should appear:
Click on the DBConnectivityTest link, and then click Invoke. You should see the following:
61

Installing and Configuring CSC (Optional) Quest ChangeBASE 5.3.1 - Getting Started
Note: The number of clients registered could be higher than 0 if you have previously set up Client Side Capture.
CSC Agent
The next step is to verify that the CSC Agent can be launched on the CSC Server. You would not normally run the agent on the CSC Server, but this test verifies that the Agent is set up correctly.
1. Click Start, type run and press [Return]. 2. Type \\<ComputerName>\aokcsc_client, e.g.
3. Click OK to open the shared folder containing the CSC Agent files, e.g.
4. Run AOKCCControl.exe.
62

Installing and Configuring CSC (Optional) Quest ChangeBASE 5.3.1 - Getting Started
5. The CSC Agent icon either appears in the system tray:
or it may be hidden in the adjacent notification area.
The CSC Agent has a right-click context menu containing relevant commands:
Start capture: This command causes CSC to start to monitor the incoming web traffic and store it in a local cache. It should be noted that all textual content is removed from the web page before it is stored. This is to ensure that users’ personal data is not compromised.
Stop capture: This command causes CSC to stop monitoring and storing web traffic.
Upload data to Central Server: This command causes CSC to upload its local cache of captured data to the computer designated as the CSC Server. If Start Capture was previously active, then CSC will temporarily stop monitoring web traffic prior to the cache upload, and then resume web traffic monitoring following the upload.
About…: This command displays a screen with information that will be useful in the event of a support requirement.
Exit: Quits the package.
63

Important Files and Folders Quest ChangeBASE 5.3.1 - Getting Started
Important Files and Folders The Quest® ChangeBASE User Guide is included in the ChangeBASE installer. Once you have installed the ChangeBASE software, a shortcut to the User Guide can be found in the ChangeBASE\Documentation folder on the start menu.
The ChangeBASE license and settings files are stored within the user’s profile in a folder called ChangeBASE:
Windows XP, Windows Server 2003
%USERPROFILE%\Local Settings\Application Data\ChangeBASE
Windows Vista, 7 and 8 %localappdata%\ChangeBASE
Windows Server 2008 and 2012
%localappdata%\ChangeBASE
The most significant sub-folder in this location is the UserData folder, which contains the following:
• AOK.cbl, which is the ChangeBASE license file that governs your entitlement to the modules that you have purchased.
• ChangeBASE Activation Page, which is a web link to the page where you can submit a license for activation or re-activation.
• GUIApp.ini, which is the configuration file for automated application virtualization.
• sequences.xml, which contains the information about the last virtualization you performed.
• WorkBenchSettings.xml, which is used to store all the settings configured within the ChangBASE Options.
The other main folder is the Working Directory, which is defined during the initial creation of a database (refer to Working Directory), and is typically located on a network share, so that all users of the solution set have access to the centrally shared information. There is always one Working Directory per database
Each Working Directory contains the following sub-folders:
• The HTML folder, which is no longer used.
• The Logs folder, which is used to store output from virtualization.
• The MSIXML folder, which is no longer used.
• The Packages folder, which contains cached MSIs and MSTs that have been imported into the database.
• The Plugin folder, which contains Plugins that are generated using the Report Generator. This functionality is only available with the Plugin editor.
64

Important Files and Folders Quest ChangeBASE 5.3.1 - Getting Started
• The PluginSource folder, which is the location for any files to be added by a Plugin. It is a local cache for Plugins.
• The Workfiles folder, which is a temporary staging area for system use.
• The WebTmp folder, which is only utilized when importing web data.
• The XMLData folder, which contains a cache of files used by ChangeBASE, such as the latest, viewed CSV and HTML reports.
You can check the location of the Working Directory for a database by right-clicking the associated database Tab in the Workbench, then clicking Properties. Enter the server name, and then click Next as prompted until the Working Directory screen appears:
65

About Quest Software®, Inc. Quest ChangeBASE 5.3.1 - Getting Started
About Quest Software®, Inc. Established in 1987, Quest Software (Nasdaq: QSFT) provides simple and innovative IT management solutions that enable more than 100,000 global customers to save time and money across physical and virtual environments. Quest products solve complex IT challenges ranging from database management, data protection, identity and access management, monitoring, user workspace management to Windows management. For more information, visit www.quest.com.
Contacting the Quest® ChangeBASE Community For the latest hotfixes, release notes and patch news, and the opportunity to become generally involved in the development of ChangeBASE, go to http://communities.quest.com/community/changebase.
Contacting Quest Software® Email [email protected]
Mail Quest Software, Inc. World Headquarters 5 Polaris Way Aliso Viejo, CA 92656 USA
Website www.quest.com
Refer to our Website for regional and international office information.
Contacting Quest® Support Quest Support is available to customers who have a trial version of a Quest product or who have purchased a Quest product and have a valid maintenance contract. Quest Support provides unlimited 24x7 access to our Support Portal at www.quest.com/support
From our Support Portal, you can do the following:
• Retrieve thousands of solutions from our online Knowledge Base • Download the latest releases and service packs • Create, update and review Support cases
View the Global Support Guide for a detailed explanation of support programs, online services, contact information, policies and procedures. The guide is available at: www.quest.com/support.
66