qiaxcel rna handbook - gene-quantification.info · qiaxcel rna handbook qiaxcel rna quality control...
TRANSCRIPT
January 2008
Sample & Assay Technologies
QIAxcel RNA Handbook
QIAxcel RNA Quality Control Kit
For automated quantitative and qualitative
RNA analysis using the QIAxcel system

Trademarks: QIAGEN® (QIAGEN Group).
The QIAxcel RNA Quality Control Kit is intended for research only. Not for use in diagnostic procedures.
© 2008 QIAGEN, all rights reserved.

QIAxcel RNA Handbook 01/2008 3
Contents Kit Contents 4
Storage 5
Quality Control 5
Product Use Limitations 5
Product Warranty and Satisfaction Guarantee 5
Technical Assistance 6
QIAGEN Sample and Assay Technologies 6
Safety Information 7
Introduction 8
Principle and procedure 8
Equipment and Reagents to Be Supplied by User 10
Important Notes 11
Preparing the QIAxcel Gel Cartridge and buffer tray 11
Sample preparation recommendations 13
Method Selection 14
Protocol
Determining RNA Quality and Quantity Using the QIAxcel RNA Quality Control Kit with the QIAxcel System 15
Troubleshooting 18
Appendix A: Data Analysis 19
Aligning the gel image 19
Determination of 28s/18s rRNA ratio 20
RNA Concentration 21
Appendix B: General Remarks on Handling RNA 23
Ordering Information 25
4 QIAxcel RNA Handbook 01/2008
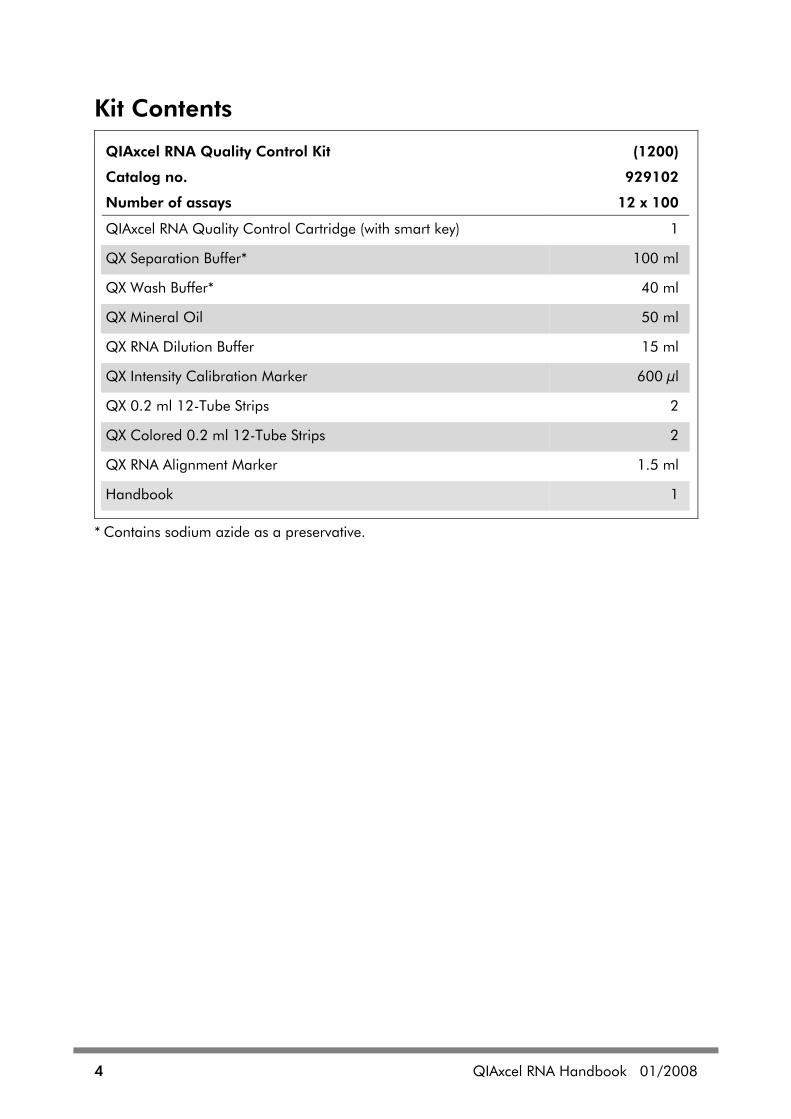
Kit Contents
QIAxcel RNA Quality Control Kit (1200)
Catalog no. 929102
Number of assays 12 x 100
QIAxcel RNA Quality Control Cartridge (with smart key) 1
QX Separation Buffer* 100 ml
QX Wash Buffer* 40 ml
QX Mineral Oil 50 ml
QX RNA Dilution Buffer 15 ml
QX Intensity Calibration Marker 600 µl
QX 0.2 ml 12-Tube Strips 2
QX Colored 0.2 ml 12-Tube Strips 2
QX RNA Alignment Marker 1.5 ml
Handbook 1
* Contains sodium azide as a preservative.
QIAxcel RNA Handbook 01/2008 5
Storage All components QIAxcel RNA Quality Control Kit, including gel cartridges, can be stored dry at room temperature (15–25°C) for up to 6 months.
If being used on a daily basis, store the QIAxcel Gel Cartridge in the QIAxcel instrument in the “Park” position (see page 11).
If only used periodically, store the QIAxcel Gel Cartridge in the cartridge stand with the capillary tips submerged in QX Wash Buffer (see page 11).
For long-term storage, cover the cartridge purge hole with the original purge cap seal and place the cartridge in its original packaging.
Quality Control In accordance with QIAGEN’s ISO-certified Quality Management System, each lot of QIAxcel RNA Quality Control Kits is tested against predetermined specifications to ensure consistent product quality.
Product Use Limitations The QIAxcel RNA Quality Control Kit is intended for research only. Not for use in diagnostic procedures. All due care and attention should be exercised in the handling of the products. We recommend all users of QIAGEN® products to adhere to the NIH guidelines that have been developed for recombinant DNA experiments, or to other applicable guidelines.
Product Warranty and Satisfaction Guarantee QIAGEN guarantees the performance of all products in the manner described in our product literature. The purchaser must determine the suitability of the product for its particular use. Should any product fail to perform satisfactorily due to any reason other than misuse, QIAGEN will replace it free of charge or refund the purchase price. We reserve the right to change, alter, or modify any product to enhance its performance and design. If a QIAGEN product does not meet your expectations, simply call your local Technical Service Department or distributor. We will credit your account or exchange the product — as you wish. Separate conditions apply to QIAGEN scientific instruments, service products, and to products shipped on dry ice. Please inquire for more information.
A copy of QIAGEN terms and conditions can be obtained on request, and is also provided on the back of our invoices. If you have questions about product specifications or performance, please call QIAGEN Technical Services or your local distributor (see back cover or visit www.qiagen.com ).
6 QIAxcel RNA Handbook 01/2008
Technical Assistance At QIAGEN, we pride ourselves on the quality and availability of our technical support. Our Technical Service Departments are staffed by experienced scientists with extensive practical and theoretical expertise in sample and assay technologies and the use of QIAGEN products. If you have any questions or experience any difficulties regarding the QIAxcel RNA Quality Control Kit or QIAGEN products in general, please do not hesitate to contact us. QIAGEN customers are a major source of information regarding advanced or specialized uses of our products. This information is helpful to other scientists as well as to the researchers at QIAGEN. We therefore encourage you to contact us if you have any suggestions about product performance or new applications and techniques.
For technical assistance and more information, please see our Technical Support Center at www.qiagen.com/goto/TechSupportCenter or call one of the QIAGEN Technical Service Departments or local distributors (see back cover or visit www.qiagen.com ).
QIAGEN Sample and Assay Technologies QIAGEN is the leading provider of innovative sample and assay technologies, enabling the isolation and detection of contents of any biological sample. Our advanced, high-quality products and services ensure success from sample to result.
QIAGEN sets standards in:
Purification of DNA, RNA, and proteins
Nucleic acid and protein assays
microRNA research and RNAi
Automation of sample and assay technologies
Our mission is to enable you to achieve outstanding success and breakthroughs. For more information, visit www.qiagen.com .

QIAxcel RNA Handbook 01/2008 7
Safety Information When working with chemicals, always wear a suitable lab coat, disposable gloves, and protective goggles. For more information, please consult the appropriate material safety data sheets (MSDSs). These are available online in convenient and compact PDF format at www.qiagen.com/Support/MSDS.aspx where you can find, view, and print the MSDS for each QIAGEN kit and kit component.
24-hour emergency information
Emergency medical information in English, French, and German can be obtained 24 hours a day from:
Poison Information Center Mainz, Germany
Tel: +49-6131-19240
8 QIAxcel RNA Handbook 01/2008
Introduction The QIAxcel system, when used in conjunction with the QIAxcel RNA Quality Control Kit, provides fully automated quantitative and qualitative analysis of up to 96 samples per run.
The QIAxcel RNA Gel Cartridge provides fast and sensitive analysis of the quality and quantity of total RNA, single-stranded cDNA (fragmented or intact), or cRNA (fragmented or intact). Automated sample loading and analysis reduce manual handling of samples, minimizing the risk of RNA degradation and contamination. The system can detect as little as 5 ng/µl of total RNA and 10 ng/µl of cRNA or single-stranded cDNA.
QIAxcel technology, based on capillary electrophoresis using gel cartridges, provides unmatched resolution, speed, and throughput. QIAxcel Gel Cartridges are reusable, allowing up to 12 x 100 runs to be performed. Preinstalled methods suitable for most applications are provided. Customized methods can also be created — contact QIAGEN Technical Services for more details.
The BioCalculator software supplied with the QIAxcel instrument provides both electropherogram and gel-view profiles of the nucleic acid separation.
QIAxcel DNA High Resolution Kit, QIAxcel DNA Screening Kit, and QIAxcel Large Fragment Kit are also available for use with the QIAxcel system (see “Ordering Information, page 25). These kits allow fast qualitative and quantitative analysis of DNA fragments.
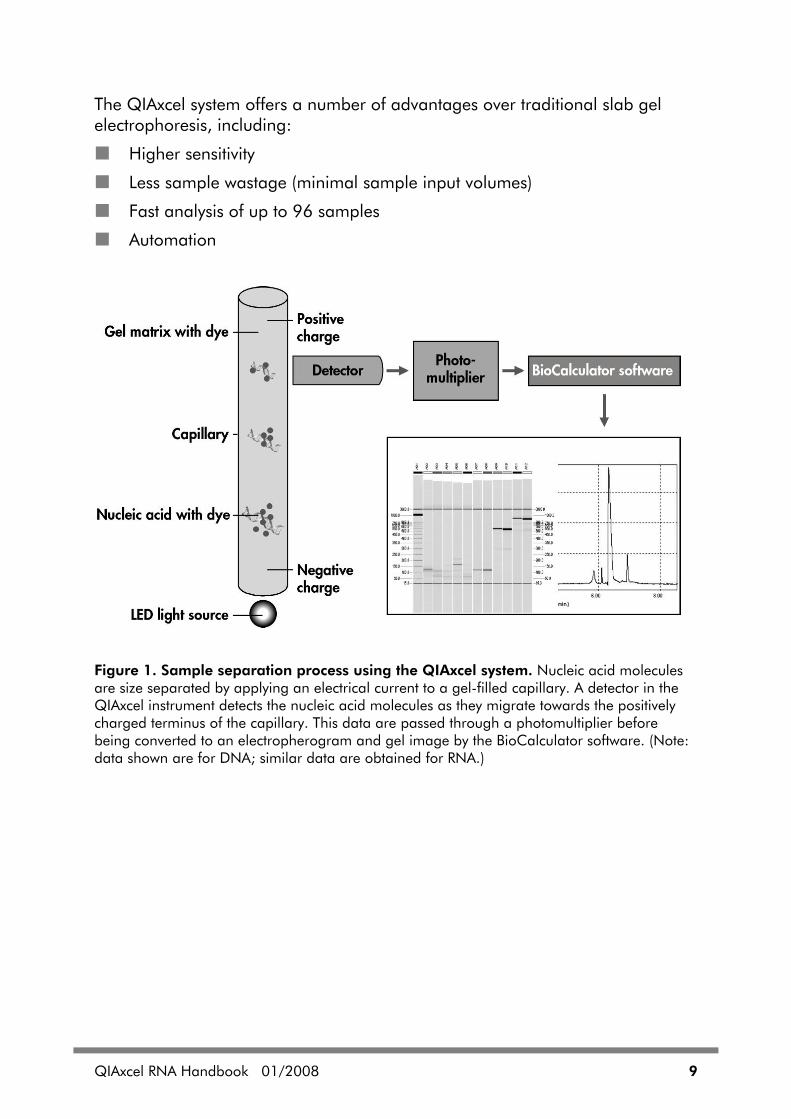
Principle and procedure The QIAxcel system uses capillary gel electrophoresis to enable fast size-based separation of nucleic acids. Unlike traditional agarose gel electrophoresis, the separation is performed in a capillary of a precast gel cartridge. The samples are automatically loaded into an individual capillary and a voltage is applied. The negatively charged nucleic acid molecules migrate through the capillary to the positively charged terminus (Figure 1). As with agarose gel electrophoresis, low-molecular–weight molecules migrate faster than high-molecular–weight molecules. As the molecules migrate though the capillary, they pass a detector which detects and measures the fluorescent signal. A photomultiplier converts the fluorescent signal into electronic data, which are then transferred to the computer workstation for further processing using the BioCalculator software. After processing, the data are displayed as an electropherogram or gel image.
QIAxcel RNA Handbook 01/2008 9
The QIAxcel system offers a number of advantages over traditional slab gel electrophoresis, including:
Higher sensitivity
Less sample wastage (minimal sample input volumes)
Fast analysis of up to 96 samples
Automation
Figure 1. Sample separation process using the QIAxcel system. Nucleic acid molecules are size separated by applying an electrical current to a gel-filled capillary. A detector in the QIAxcel instrument detects the nucleic acid molecules as they migrate towards the positively charged terminus of the capillary. This data are passed through a photomultiplier before being converted to an electropherogram and gel image by the BioCalculator software. (Note: data shown are for DNA; similar data are obtained for RNA.)
10 QIAxcel RNA Handbook 01/2008
Equipment and Reagents to Be Supplied by User When working with chemicals, always wear a suitable lab coat, disposable gloves, and protective goggles. For more information, consult the appropriate material safety data sheets (MSDSs), available from the product supplier.
For all protocols
Pipets with sterile, RNase-free tips
Centrifuge with rotor suitable for 0.2 ml tubes and/or 96-well plates
12-tube strips (e.g., QX 0.2 ml 12-Tube Strip, cat. no. 929703) or 96-well plates
RNA loading buffer (e.g., Sigma, cat. no. 1386)
RNase-free water
Disposable gloves
Note: If working with RNA for the first time, read Appendix B (page 23).
QIAxcel RNA Handbook 01/2008 11
Important Notes
Preparing the QIAxcel Gel Cartridge and buffer tray
Important points before starting
The volume of buffer supplied is sufficient for 100 runs of 12 samples. If required, additional buffers can be purchased separately (see “Ordering Information”, page 25).
The 0.2 ml 12-tube strips containing QX Alignment Marker and QX Intensity Calibration Marker (if required) should fit loosely in the MARKER1 and MARKER2 position (see step 13). Tightly fitting tube strips may cause injection problems and damage the cartridge capillary.
QX Alignment Markers should be replaced every 15–20 runs or 3 days, whichever comes first. Additional markers and buffers may need to be purchased (see “Ordering Information”, page 25).
When not in use, the 12-tube strip containing QX Alignment Marker should be stored at –20°C.
Things to do before starting
If preprepared, the 12-tube strip containing QX Alignment Marker should be equilibrated to room temperature (15–25ºC) and centrifuged briefly before use.
If the QIAxcel Gel Cartridge is being used for the first time, intensity calibration should be performed (see step 12 and the QIAxcel User Manual, section 5.4). This step is not necessary if the QIAxcel Gel Cartridge has already been calibrated, unless it is being used on a different QIAxcel instrument or a different computer is used to operate the instrument.
12 QIAxcel RNA Handbook 01/2008
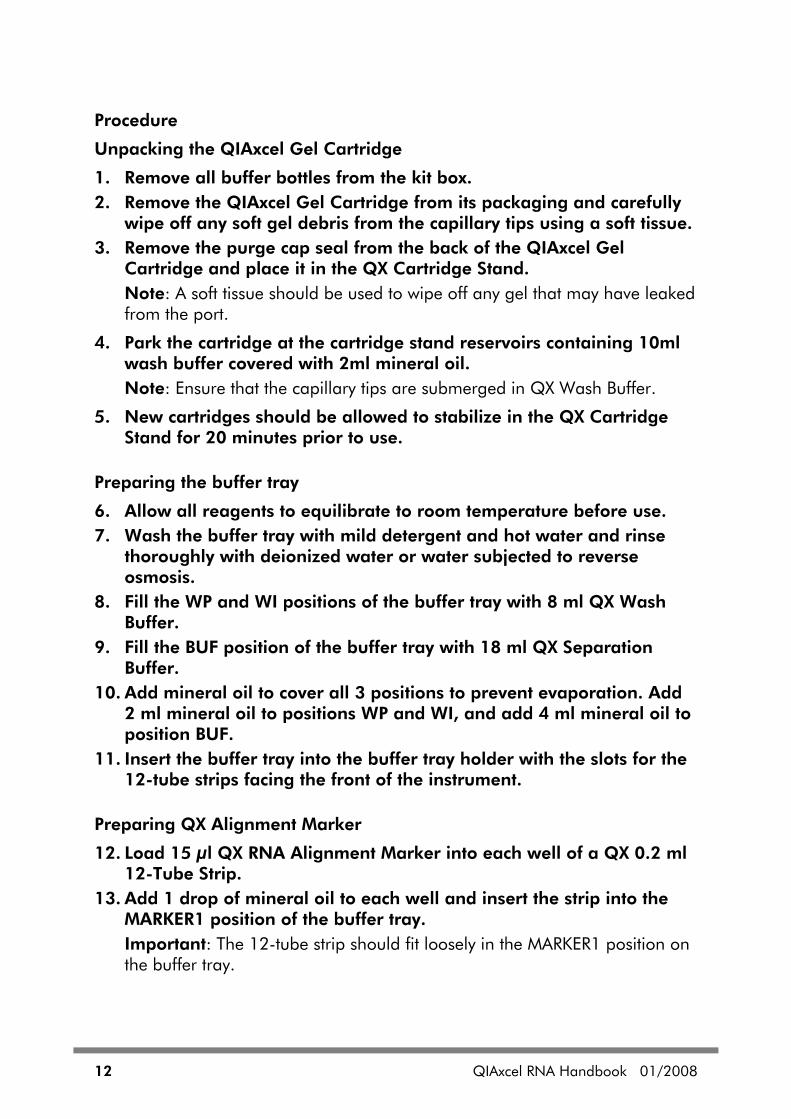
Procedure
Unpacking the QIAxcel Gel Cartridge
1. Remove all buffer bottles from the kit box. 2. Remove the QIAxcel Gel Cartridge from its packaging and carefully
wipe off any soft gel debris from the capillary tips using a soft tissue. 3. Remove the purge cap seal from the back of the QIAxcel Gel
Cartridge and place it in the QX Cartridge Stand. Note: A soft tissue should be used to wipe off any gel that may have leaked from the port.
4. Park the cartridge at the cartridge stand reservoirs containing 10ml wash buffer covered with 2ml mineral oil. Note: Ensure that the capillary tips are submerged in QX Wash Buffer.
5. New cartridges should be allowed to stabilize in the QX Cartridge Stand for 20 minutes prior to use.
Preparing the buffer tray
6. Allow all reagents to equilibrate to room temperature before use. 7. Wash the buffer tray with mild detergent and hot water and rinse
thoroughly with deionized water or water subjected to reverse osmosis.
8. Fill the WP and WI positions of the buffer tray with 8 ml QX Wash Buffer.
9. Fill the BUF position of the buffer tray with 18 ml QX Separation Buffer.
10. Add mineral oil to cover all 3 positions to prevent evaporation. Add 2 ml mineral oil to positions WP and WI, and add 4 ml mineral oil to position BUF.
11. Insert the buffer tray into the buffer tray holder with the slots for the 12-tube strips facing the front of the instrument.
Preparing QX Alignment Marker
12. Load 15 µl QX RNA Alignment Marker into each well of a QX 0.2 ml 12-Tube Strip.
13. Add 1 drop of mineral oil to each well and insert the strip into the MARKER1 position of the buffer tray. Important: The 12-tube strip should fit loosely in the MARKER1 position on the buffer tray.

QIAxcel RNA Handbook 01/2008 13
Installing a QIAxcel Gel Cartridge and smart key
14. Remove the QIAxcel Gel Cartridge from the QX Cartridge Stand. 15. Open the cartridge door and insert the QIAxcel Gel Cartridge into
the QIAxcel system. The cartridge description label should be facing towards the front and the purge hole should be towards the rear of the system.
16. Insert the smart key into the smart key socket. The smart key can be inserted in either direction.
17. Close the cartridge door. The cartridge ID and cartridge type will be displayed automatically in the “Instrument Control” window. Note: The system will not recognize the cartridge and will not operate if the smart key is not inserted.
Intensity calibration
18. Load 15 µl QX Intensity Calibration Marker into each well of a colored QX Colored 0.2 ml 12-Tube Strip and insert it into the MARKER2 position of the buffer tray. Note: If the QIAxcel Gel Cartridge is being used for the first time, intensity calibration should be performed (see the QIAxcel User Manual, section 5.4 for more information). This step is not necessary if the QIAxcel Gel Cartridge has already been calibrated, unless it is being used on a different QIAxcel instrument or a different computer is used to operate the instrument.
Important: The 12-tube strip should fit loosely in the MARKER2 position on the buffer tray.
Sample preparation recommendations The minimum sample volume required for analysis is 10 µl. Less than 0.1 µl of the sample will be loaded onto the QIAxcel Gel Cartridge for analysis.
14 QIAxcel RNA Handbook 01/2008
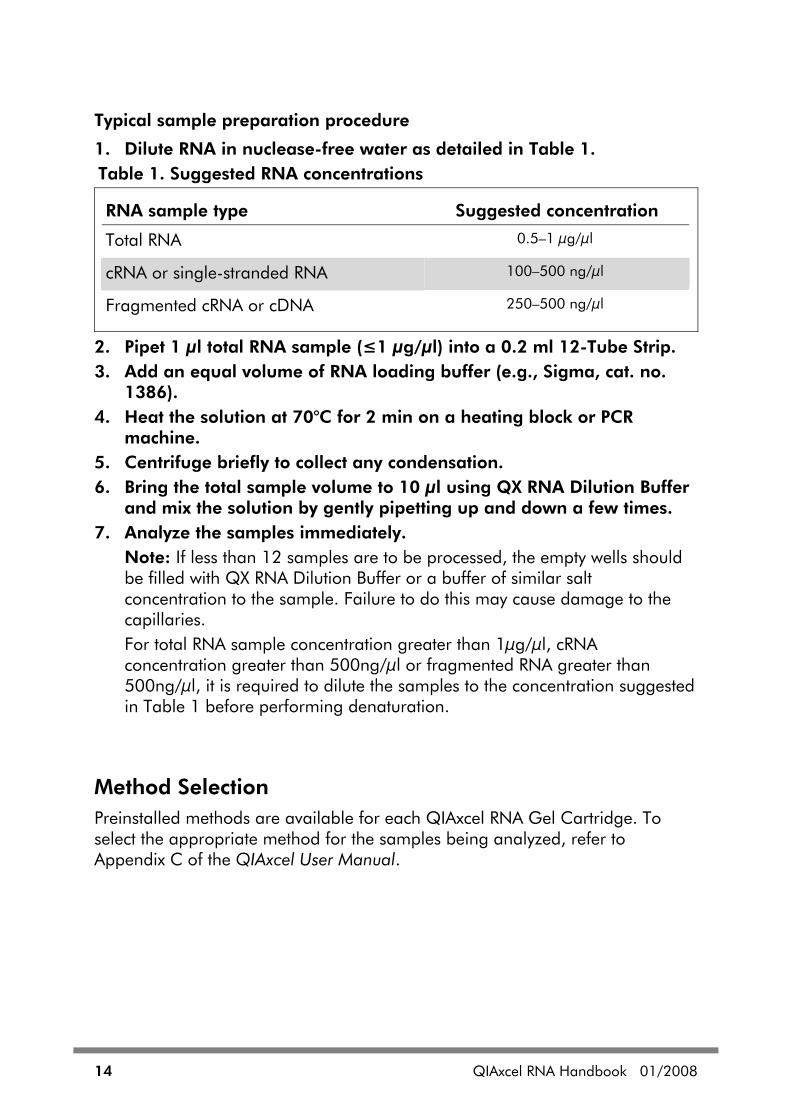
Typical sample preparation procedure
1. Dilute RNA in nuclease-free water as detailed in Table 1. Table 1. Suggested RNA concentrations
RNA sample type Suggested concentration
Total RNA 0.5–1 µg/µl
cRNA or single-stranded RNA 100–500 ng/µl
Fragmented cRNA or cDNA 250–500 ng/µl
2. Pipet 1 µl total RNA sample (≤1 µg/µl) into a 0.2 ml 12-Tube Strip. 3. Add an equal volume of RNA loading buffer (e.g., Sigma, cat. no.
1386). 4. Heat the solution at 70°C for 2 min on a heating block or PCR
machine. 5. Centrifuge briefly to collect any condensation. 6. Bring the total sample volume to 10 µl using QX RNA Dilution Buffer
and mix the solution by gently pipetting up and down a few times. 7. Analyze the samples immediately.
Note: If less than 12 samples are to be processed, the empty wells should be filled with QX RNA Dilution Buffer or a buffer of similar salt concentration to the sample. Failure to do this may cause damage to the capillaries. For total RNA sample concentration greater than 1µg/µl, cRNA concentration greater than 500ng/µl or fragmented RNA greater than 500ng/µl, it is required to dilute the samples to the concentration suggested in Table 1 before performing denaturation.
Method Selection Preinstalled methods are available for each QIAxcel RNA Gel Cartridge. To select the appropriate method for the samples being analyzed, refer to Appendix C of the QIAxcel User Manual.
QIAxcel RNA Handbook 01/2008 15
Protocol: Determining RNA Quality and Quantity Using the QIAxcel RNA Quality Control Kit with the QIAxcel System
Important points before starting
Before beginning the procedure, read “Important Notes” beginning on page 11.
For optimal results, the solution containing the RNA samples should be approximately pH 7–8.
Determine the optimum QIAxcel method for sample analysis (see Appendix C of the QIAxcel User Manual for more details).
Things to do before starting
Ensure samples have been prepared according to the instructions in “Sample preparation recommendations”, page 13.
Ensure that the QIAxcel Gel Cartridge is set up and all reagents have been prepared according to the instructions in “Preparing the QIAxcel Gel Cartridge and buffer tray”, page 11.
Optional: Create a reference marker table before running samples (see (see Appendix A, page 19 for more details). This can be done after the sample run if preferred.
Procedure
1. Switch on the QIAxcel system at the power switch. 2. Switch on the computer and launch the BioCalculator software. 3. Install the QIAxcel Gel Cartridge.
See the QIAxcel User Manual for more details.
4. Load the buffer tray containing the QX Alignment Marker into the buffer tray holder. See the QIAxcel User Manual for more details.
Note: If being used for the first time, the QIAxcel Gel Cartridge will require calibration (see page 13).
Note: QX Alignment Markers should be replaced every 15–20 runs or 3 days, whichever comes first. QX Alignment Marker should be stored at –20°C between uses.
16 QIAxcel RNA Handbook 01/2008
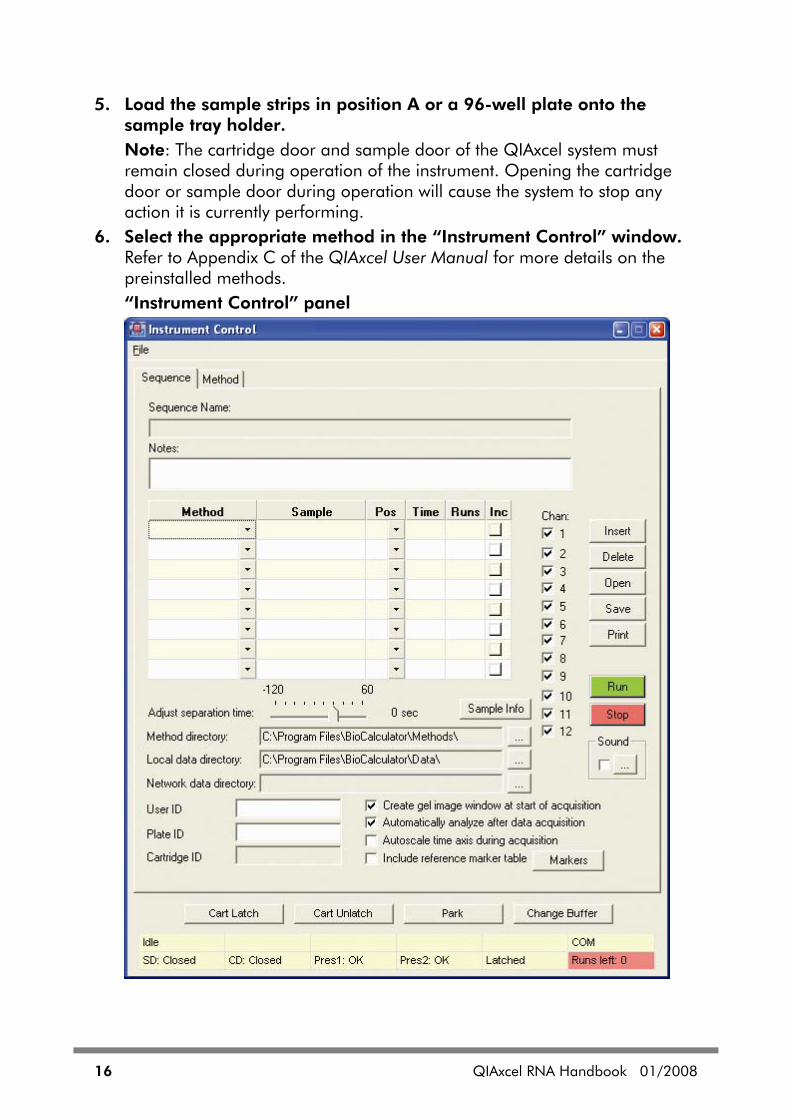
5. Load the sample strips in position A or a 96-well plate onto the sample tray holder. Note: The cartridge door and sample door of the QIAxcel system must remain closed during operation of the instrument. Opening the cartridge door or sample door during operation will cause the system to stop any action it is currently performing.
6. Select the appropriate method in the “Instrument Control” window. Refer to Appendix C of the QIAxcel User Manual for more details on the preinstalled methods. “Instrument Control” panel
QIAxcel RNA Handbook 01/2008 17
7. Enter the sample name, position, and number of runs in the relevant fields of the “Instrument Control” window.
8. In the time column, enter the sample injection time (minimum: 5 s; maximum: 40 s). When left blank, the default settings for the method chosen are used.
9. To perform multiple analyses of the same row, enter the number of repeats in the “Runs” field. To run a 96-well plate, check the Increments box (“Inc”) and enter 8 in the “Runs” field.
Note: The same method and injection time will apply to all runs.
10. Select the data directory where the run should be stored. Note: Subfolders will be created in the data directory by optionally entering User ID and Plate ID in the corresponding dialog box fields.
11. Recommended: Click the “Sample Info” button to enter sample information for each well. Alternatively, sample information previously set up in a spreadsheet can be imported in *.csv file format.
12. Make sure that the separation channels to be used are checked (i.e., if running only a few samples, just check those channels which are to be used). Note: Unused wells should contain QX RNA Dilution Buffer to prevent damage to the channel.
13. Check “Create gel image window at start of acquisition”. 14. Check “Automatically analyze after data acquisition”. 15. Check “Include reference marker table” (optional). 16. Click on the “Marker” button and open the desired RNA
concentration table. 17. Check the status of the QIAxcel system in the “Status Panel”.
Make sure the cartridge door (CD) and sample door (SD) are closed.
Note: The “Status Panel” is at the bottom of the “Instrument Control” window and displays information on the status of the QIAxcel system (see QIAxcel User Manual, for more details).
18. Click “Run” to start sample processing. At the start of the run, a window containing an electropherogram and a gel image will open (see Appendix A, page 19).
18 QIAxcel RNA Handbook 01/2008
Troubleshooting The QIAxcel User Manual contains a troubleshooting guide, which may be helpful in solving any problems that may arise (see QIAxcel User Manual, Section 8). In addition, extensive user information is also provided in the “Help” menu of the BioCalculator software.
The scientists in QIAGEN Technical Services are always happy to answer any questions you may have about either the information and protocols in this handbook or sample and assay technologies (for contact information, see back cover or visit www.qiagen.com ).
QIAxcel RNA Handbook 01/2008 19
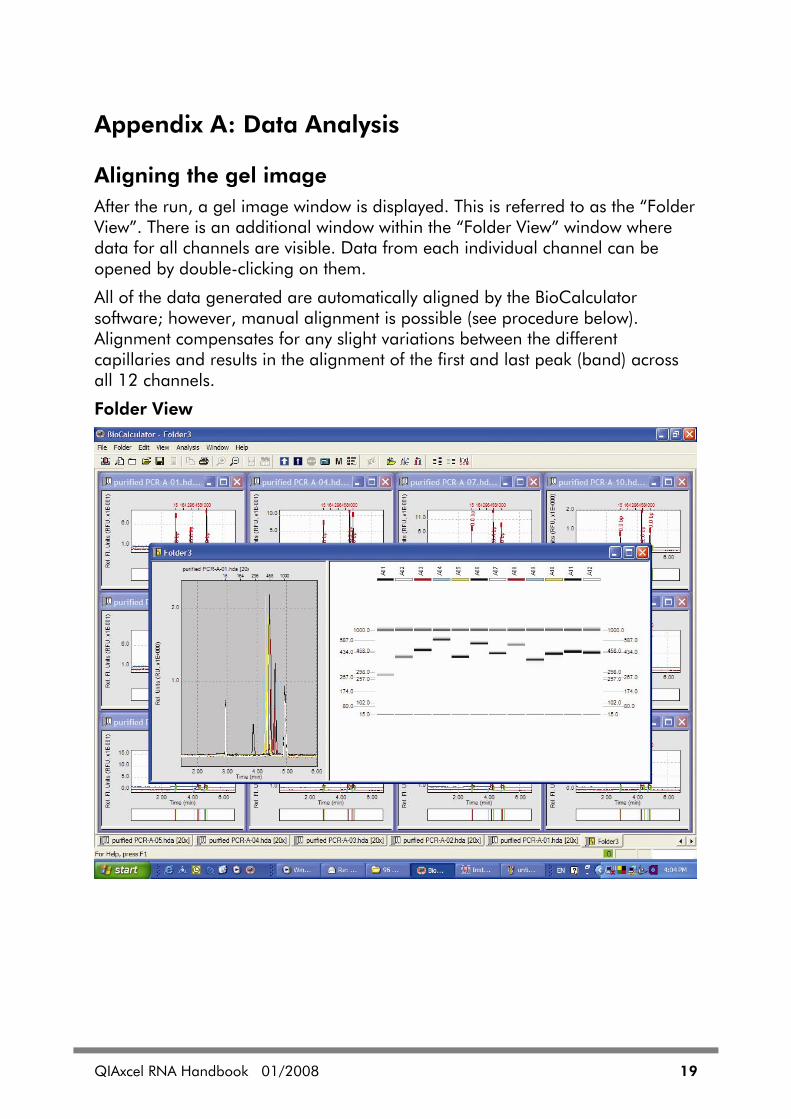
Appendix A: Data Analysis
Aligning the gel image After the run, a gel image window is displayed. This is referred to as the “Folder View”. There is an additional window within the “Folder View” window where data for all channels are visible. Data from each individual channel can be opened by double-clicking on them.
All of the data generated are automatically aligned by the BioCalculator software; however, manual alignment is possible (see procedure below). Alignment compensates for any slight variations between the different capillaries and results in the alignment of the first and last peak (band) across all 12 channels.
Folder View
20 QIAxcel RNA Handbook 01/2008
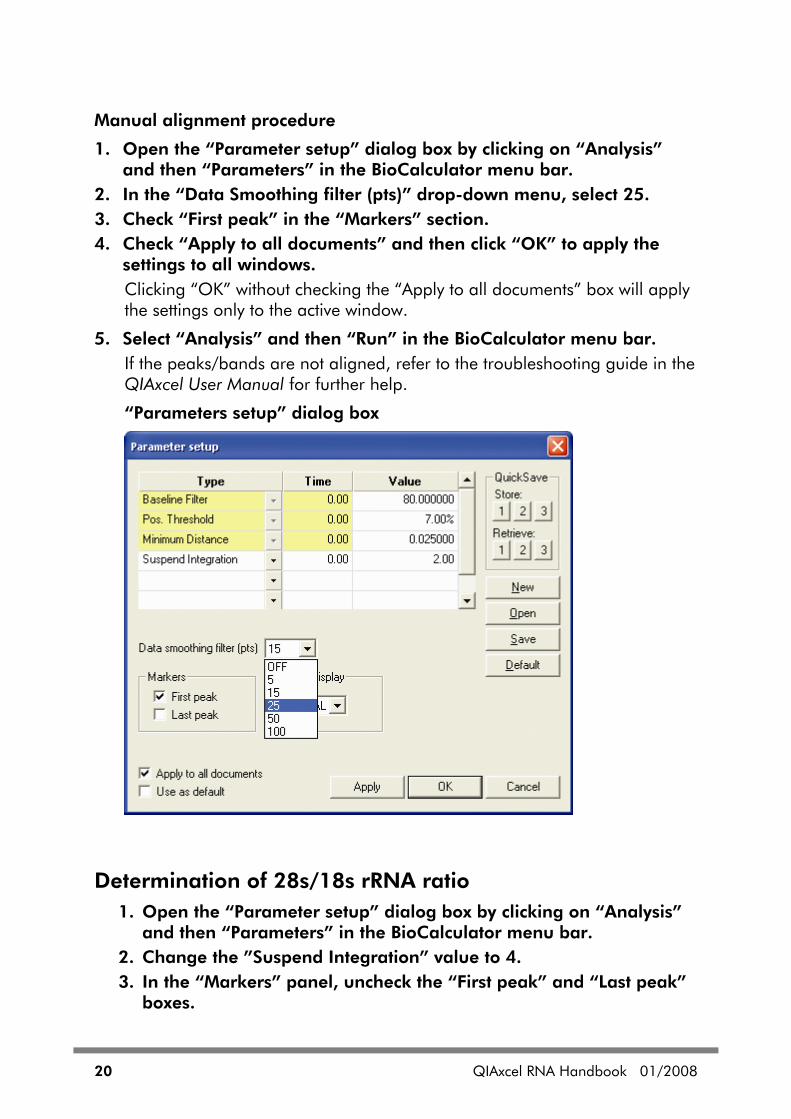
Manual alignment procedure
1. Open the “Parameter setup” dialog box by clicking on “Analysis” and then “Parameters” in the BioCalculator menu bar.
2. In the “Data Smoothing filter (pts)” drop-down menu, select 25. 3. Check “First peak” in the “Markers” section. 4. Check “Apply to all documents” and then click “OK” to apply the
settings to all windows. Clicking “OK” without checking the “Apply to all documents” box will apply the settings only to the active window.
5. Select “Analysis” and then “Run” in the BioCalculator menu bar. If the peaks/bands are not aligned, refer to the troubleshooting guide in the QIAxcel User Manual for further help.
“Parameters setup” dialog box
Determination of 28s/18s rRNA ratio 1. Open the “Parameter setup” dialog box by clicking on “Analysis”
and then “Parameters” in the BioCalculator menu bar. 2. Change the ”Suspend Integration” value to 4. 3. In the “Markers” panel, uncheck the “First peak” and “Last peak”
boxes.

QIAxcel RNA Handbook 01/2008 21
4. In the “Data Smoothing filter (pts)” drop-down menu, select 50 and then click “OK”.
5. Select “Analysis” and then “Run” in the BioCalculator menu bar. The results table will display the RNA ratio. Note: The ratio of rRNA peaks (28S/18S) in total RNA analysis can vary from 0.7 to 2.5 depending on the individual RNA sample. In addition to the ratio, it is recommended that visual analysis should be done to check for RNA degradation. Degraded RNA samples should have multiple peaks between 18S and 28S. Additional peaks should also be evident before the 18S band.
If extraneous peaks are detected, they may be manually excluded from the analysis by right clicking on the peak and selecting “Delete peak” (see QIAxcel User Manual, Appendix D.
“Parameters setup” dialog box
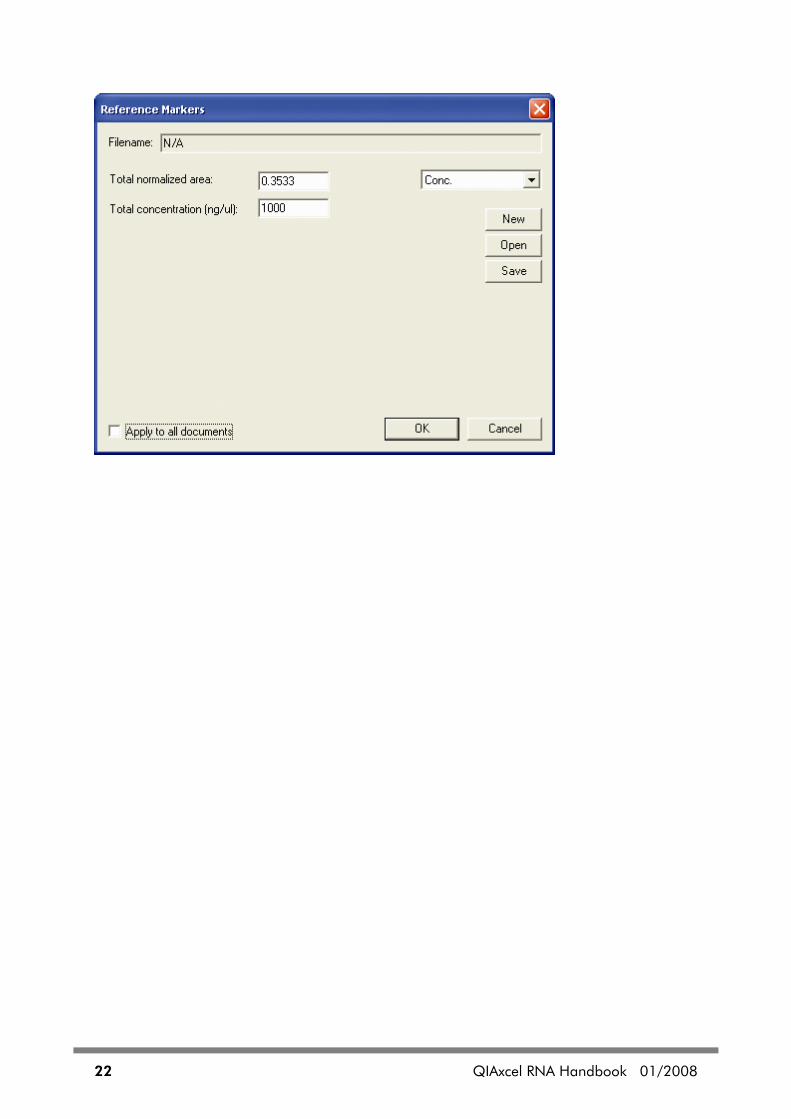
RNA Concentration 1. Open the “Reference Markers” dialog box by clicking on “Analysis”
and then “Reference Markers” in the BioCalculator menu bar. 2. In the drop-down menu change the setting from “OFF” to “Conc.” 3. Two new fields will appear in the dialog box. “Reference Markers” dialog box
22 QIAxcel RNA Handbook 01/2008
QIAxcel RNA Handbook 01/2008 23
4. In the “Total normalized area” field, enter the total normalized area of the known RNA samples such as RNA ladder marker or commercial total RNA. Note: The total normalized area (na) can be entered either in standard form (e.g., 0.3655) or scientific format (e.g., 3.655E-001). The na value for each channel is displayed in the results table.
5. In the “Total concentration (ng/µl) field, enter the total concentration of the known RNA sample.
6. Click “OK” to apply the new settings. 7. Open an individual data file and select “Analysis” and then “Run” in
the BioCalculator menu bar. The RNA concentration will appear in the results table.
Appendix B: General Remarks on Handling RNA
Handling RNA
Ribonucleases (RNases) are very stable and active enzymes that generally do not require cofactors to function. Since RNases are difficult to inactivate and even minute amounts are sufficient to destroy RNA, do not use any plasticware or glassware without first eliminating possible RNase contamination. Great care should be taken to avoid inadvertently introducing RNases into the RNA sample during or after the purification procedure. In order to create and maintain an RNase-free environment, the following precautions must be taken during pretreatment and use of disposable and nondisposable vessels and solutions while working with RNA.
General handling
Proper microbiological, aseptic technique should always be used when working with RNA. Hands and dust particles may carry bacteria and molds and are the most common sources of RNase contamination. Always wear latex or vinyl gloves while handling reagents and RNA samples to prevent RNase contamination from the surface of the skin or from dusty laboratory equipment. Change gloves frequently and keep tubes closed whenever possible. Keep purified RNA on ice when aliquots are pipetted for downstream applications.
Disposable plasticware
The use of sterile, disposable polypropylene tubes is recommended throughout the procedure. These tubes are generally RNase-free and do not require pretreatment to inactivate RNases.
24 QIAxcel RNA Handbook 01/2008
Nondisposable plasticware
Nondisposable plasticware should be treated before use to ensure that it is RNase-free. Plasticware should be thoroughly rinsed with 0.1 M NaOH, 1 mM EDTA* followed by RNase-free water (see ”Solutions”, page 24). Alternatively, chloroform-resistant plasticware can be rinsed with chloroform* to inactivate RNases.
Glassware
Glassware should be treated before use to ensure that it is RNase-free. Glassware used for RNA work should be cleaned with a detergent,* thoroughly rinsed, and oven baked at 240°C for at least 4 hours (overnight, if more convenient) before use. Autoclaving alone will not fully inactivate many RNases. Alternatively, glassware can be treated with DEPC* (diethyl pyrocarbonate). Fill glassware with 0.1% DEPC (0.1% in water), allow to stand overnight (12 hours) at 37°C, and then autoclave or heat to 100°C for 15 minutes to eliminate residual DEPC.
Solutions
Solutions (water and other solutions) should be treated with 0.1% DEPC. DEPC is a strong, but not absolute, inhibitor of RNases. It is commonly used at a concentration of 0.1% to inactivate RNases on glass or plasticware or to create RNase-free solutions and water. DEPC inactivates RNases by covalent modification. Add 0.1 ml DEPC to 100 ml of the solution to be treated and shake vigorously to bring the DEPC into solution. Let the solution incubate for 12 hours at 37°C. Autoclave for 15 minutes to remove any trace of DEPC. DEPC will react with primary amines and cannot be used directly to treat Tris* buffers. DEPC is highly unstable in the presence of Tris buffers and decomposes rapidly into ethanol and CO2. When preparing Tris buffers, treat water with DEPC first, and then dissolve Tris to make the appropriate buffer. Trace amounts of DEPC will modify purine residues in RNA by carbethoxylation. Carbethoxylated RNA is translated with very low efficiency in cell-free systems. However, its ability to form DNA:RNA or RNA:RNA hybrids is not seriously affected unless a large fraction of the purine residues have been modified. Residual DEPC must always be eliminated from solutions or vessels by autoclaving or heating to 100°C for 15 minutes.
* When working with chemicals, always wear a suitable lab coat, disposable gloves, and
protective goggles. For more information, consult the appropriate material safety data sheets (MSDSs), available from the product supplier.
QIAxcel RNA Handbook 01/2008 25
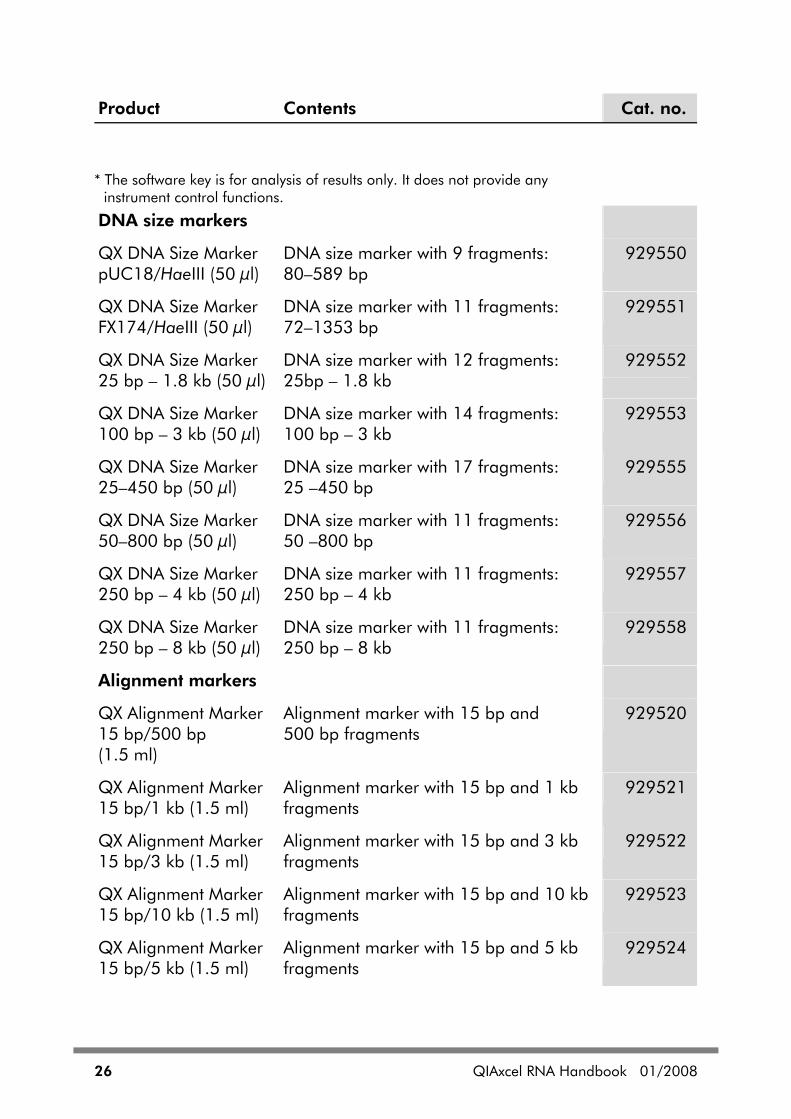
Ordering Information Product Contents Cat. no.
QIAxcel Automated system for fast and fully automated DNA fragment analysis or qualitative and quantitative RNA analysis, BioCalculator software, 1-year warranty on parts and labor
9001421
Warranty PLUS 2, QIAxcel
2- or 3-year warranty, 1 preventive maintenance visit per year, 48-hour (2 working days) priority response, all labor, travel, and repair parts
9241202
QIAxcel Kits
QIAxcel DNA High Resolution Kit (1200)
QIAxcel DNA High Resolution Gel Cartridge, Buffers, Mineral Oil, QX Intensity Calibration Marker, 12-Tube Strips
929002
QIAxcel DNA Screening Kit (2400)
QIAxcel DNA Screening Gel Cartridge, Buffers, Mineral Oil, QX Intensity Calibration Marker, 12-Tube Strips
929004
QIAxcel DNA Large Fragment Kit (600)
QIAxcel DNA Large Fragment Gel Cartridge, Buffers, Mineral Oil, QX Intensity Calibration Marker, 12-Tube Strips
929006
QIAxcel RNA Quality Control Kit (1200)
QIAxcel RNA Quality Control Gel Cartridge, Buffers, Mineral Oil, QX Intensity Calibration Marker, QX Alignment Marker, 12-Tube Strips
929102
Software
Data Review Key (green)
Software key allowing use of BioCalculator analysis software on an additional computer*, for data analysis only
9018391
26 QIAxcel RNA Handbook 01/2008
Product Contents Cat. no.
* The software key is for analysis of results only. It does not provide any
instrument control functions.
DNA size markers
QX DNA Size Marker pUC18/HaeIII (50 µl)
DNA size marker with 9 fragments: 80–589 bp
929550
QX DNA Size Marker FX174/HaeIII (50 µl)
DNA size marker with 11 fragments: 72–1353 bp
929551
QX DNA Size Marker 25 bp – 1.8 kb (50 µl)
DNA size marker with 12 fragments: 25bp – 1.8 kb
929552
QX DNA Size Marker 100 bp – 3 kb (50 µl)
DNA size marker with 14 fragments: 100 bp – 3 kb
929553
QX DNA Size Marker 25–450 bp (50 µl)
DNA size marker with 17 fragments: 25 –450 bp
929555
QX DNA Size Marker 50–800 bp (50 µl)
DNA size marker with 11 fragments: 50 –800 bp
929556
QX DNA Size Marker 250 bp – 4 kb (50 µl)
DNA size marker with 11 fragments: 250 bp – 4 kb
929557
QX DNA Size Marker 250 bp – 8 kb (50 µl)
DNA size marker with 11 fragments: 250 bp – 8 kb
929558
Alignment markers
QX Alignment Marker 15 bp/500 bp (1.5 ml)
Alignment marker with 15 bp and 500 bp fragments
929520
QX Alignment Marker 15 bp/1 kb (1.5 ml)
Alignment marker with 15 bp and 1 kb fragments
929521
QX Alignment Marker 15 bp/3 kb (1.5 ml)
Alignment marker with 15 bp and 3 kb fragments
929522
QX Alignment Marker 15 bp/10 kb (1.5 ml)
Alignment marker with 15 bp and 10 kb fragments
929523
QX Alignment Marker 15 bp/5 kb (1.5 ml)
Alignment marker with 15 bp and 5 kb fragments
929524
QIAxcel RNA Handbook 01/2008 27
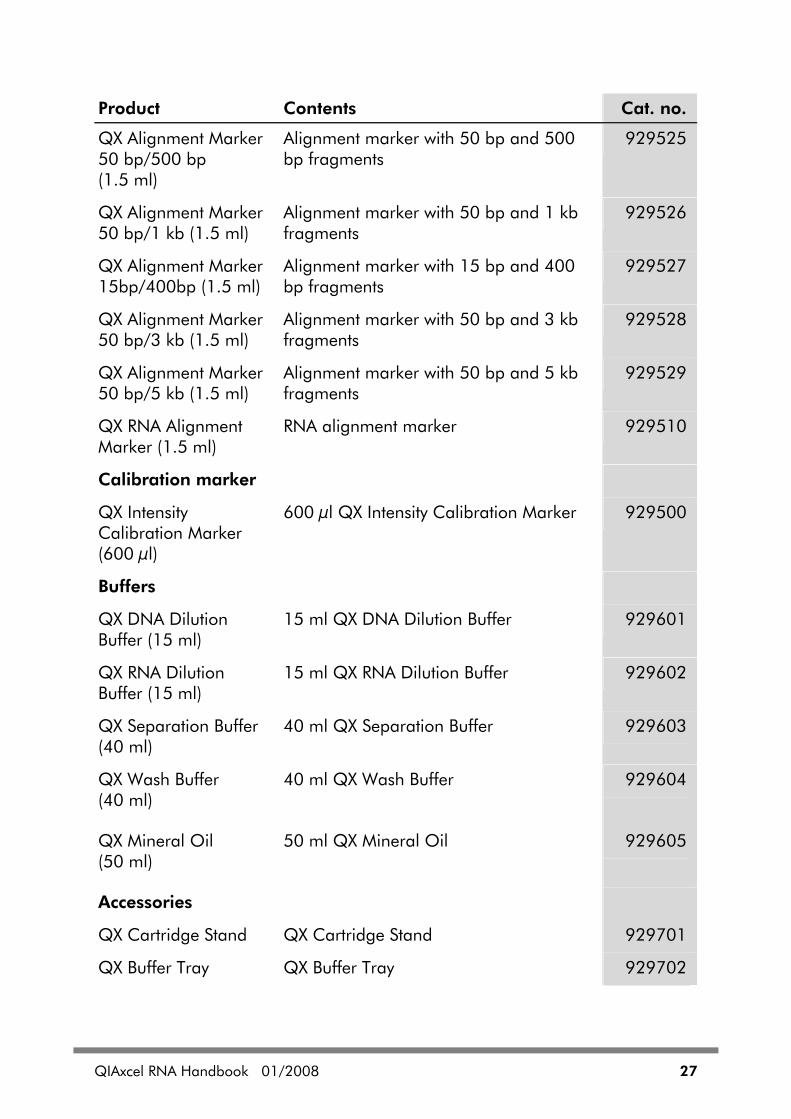
Product Contents Cat. no.
QX Alignment Marker 50 bp/500 bp (1.5 ml)
Alignment marker with 50 bp and 500 bp fragments
929525
QX Alignment Marker 50 bp/1 kb (1.5 ml)
Alignment marker with 50 bp and 1 kb fragments
929526
QX Alignment Marker 15bp/400bp (1.5 ml)
Alignment marker with 15 bp and 400 bp fragments
929527
QX Alignment Marker 50 bp/3 kb (1.5 ml)
Alignment marker with 50 bp and 3 kb fragments
929528
QX Alignment Marker 50 bp/5 kb (1.5 ml)
Alignment marker with 50 bp and 5 kb fragments
929529
QX RNA Alignment Marker (1.5 ml)
RNA alignment marker 929510
Calibration marker
QX Intensity Calibration Marker (600 µl)
600 µl QX Intensity Calibration Marker 929500
Buffers
QX DNA Dilution Buffer (15 ml)
15 ml QX DNA Dilution Buffer 929601
QX RNA Dilution Buffer (15 ml)
15 ml QX RNA Dilution Buffer 929602
QX Separation Buffer (40 ml)
40 ml QX Separation Buffer 929603
QX Wash Buffer (40 ml)
40 ml QX Wash Buffer 929604
QX Mineral Oil (50 ml)
50 ml QX Mineral Oil 929605
Accessories
QX Cartridge Stand QX Cartridge Stand 929701
QX Buffer Tray QX Buffer Tray 929702
28 QIAxcel RNA Handbook 01/2008
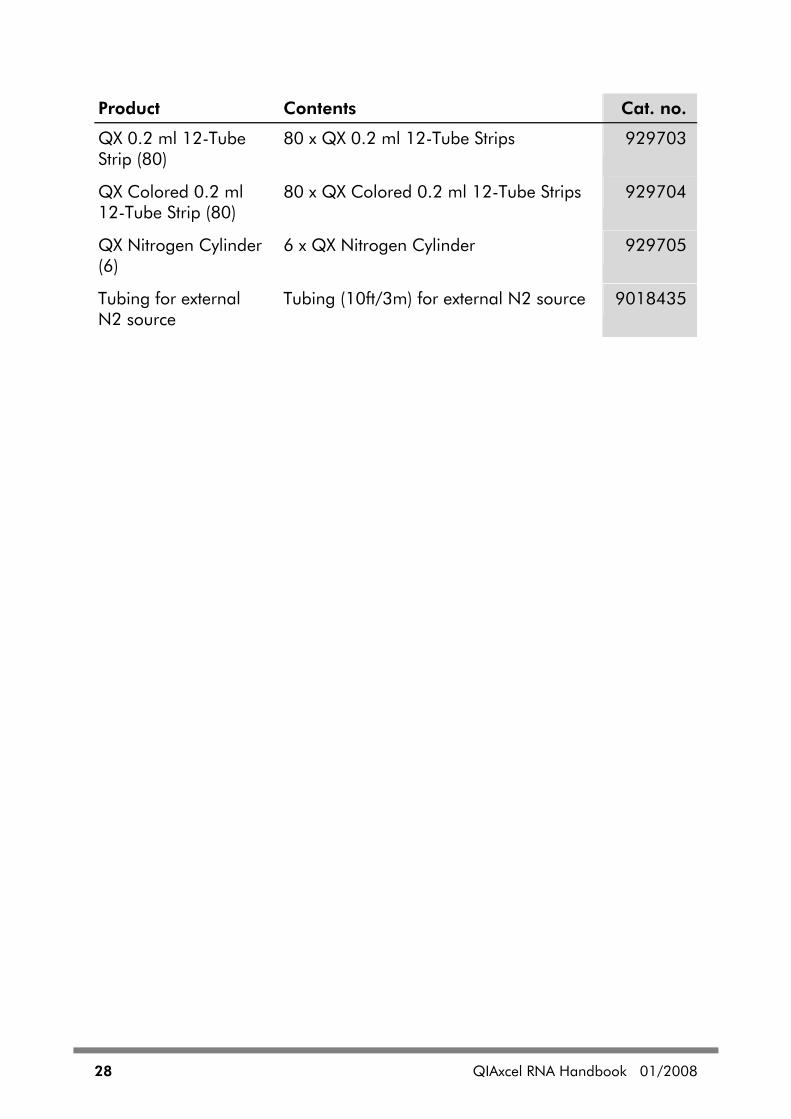
Product Contents Cat. no.
QX 0.2 ml 12-Tube Strip (80)
80 x QX 0.2 ml 12-Tube Strips 929703
QX Colored 0.2 ml 12-Tube Strip (80)
80 x QX Colored 0.2 ml 12-Tube Strips 929704
QX Nitrogen Cylinder (6)
6 x QX Nitrogen Cylinder 929705
Tubing for external N2 source
Tubing (10ft/3m) for external N2 source 9018435

1050315 01/2008 Sample & Assay Technologies
www.qiagen.com
Australia Orders 03-9840-9800 Fax 03-9840-9888 Technical 1-800-243-066
Austria Orders 0800/28-10-10 Fax 0800/28-10-19 Technical 0800/28-10-11
Belgium Orders 0800-79612 Fax 0800-79611 Technical 0800-79556
Canada Orders 800-572-9613 Fax 800-713-5951 Technical 800-DNA-PREP (800-362-7737)
China Orders 021-51345678 Fax 021-51342500 Technical 021-51345678
Denmark Orders 80-885945 Fax 80-885944 Technical 80-885942
Finland Orders 0800-914416 Fax 0800-914415 Technical 0800-914413
France Orders 01-60-920-926 Fax 01-60-920-925 Technical 01-60-920-930 Offers 01-60-920-928
Germany Orders 02103-29-12000 Fax 02103-29-22000 Technical 02103-29-12400
Hong Kong Orders 800 933 965 Fax 800 930 439 Technical 800 930 425
Ireland Orders 1800-555-049 Fax 1800-555-048 Technical 1800-555-061
Italy Orders 02-33430411 Fax 02-33430426 Technical 800-787980
Japan Telephone 03-5547-0811 Fax 03-5547-0818 Technical 03-5547-0811
Luxembourg Orders 8002-2076 Fax 8002-2073 Technical 8002-2067
The Netherlands Orders 0800-0229592 Fax 0800-0229593 Technical 0800-0229602
Norway Orders 800-18859 Fax 800-18817 Technical 800-18712
South Korea Orders 1544 7145 Fax 1544 7146 Technical 1544 7145
Sweden Orders 020-790282 Fax 020-790582 Technical 020-798328
Switzerland Orders 055-254-22-11 Fax 055-254-22-13 Technical 055-254-22-12
UK Orders 01293-422-911 Fax 01293-422-922 Technical 01293-422-999
USA Orders 800-426-8157 Fax 800-718-2056 Technical 800-DNA-PREP (800-362-7737)