python with turtle · in this section, we will draw a triangle infig.2.3, and see the usage of...
TRANSCRIPT

Python with Turtle
Meher Krishna PatelCreated on : Octorber, 2017
Last updated : November, 2017
More documents are freely available at PythonDSP

Table of contents
Table of contents i
1 Introduction 11.1 Downloads . . . . . . . . . . . . . . . . . . . . . . . . . . . . . . . . . . . . . . . . . . . . . . . . . . . . 11.2 Installation . . . . . . . . . . . . . . . . . . . . . . . . . . . . . . . . . . . . . . . . . . . . . . . . . . . . 1
1.2.1 Windows . . . . . . . . . . . . . . . . . . . . . . . . . . . . . . . . . . . . . . . . . . . . . . . . . 11.2.2 Linux . . . . . . . . . . . . . . . . . . . . . . . . . . . . . . . . . . . . . . . . . . . . . . . . . . . 1
1.3 Test the turtle . . . . . . . . . . . . . . . . . . . . . . . . . . . . . . . . . . . . . . . . . . . . . . . . . . . 11.4 More codes . . . . . . . . . . . . . . . . . . . . . . . . . . . . . . . . . . . . . . . . . . . . . . . . . . . . 3
2 Basics 52.1 Introduction . . . . . . . . . . . . . . . . . . . . . . . . . . . . . . . . . . . . . . . . . . . . . . . . . . . . 52.2 Coordinates . . . . . . . . . . . . . . . . . . . . . . . . . . . . . . . . . . . . . . . . . . . . . . . . . . . . 52.3 Drawing triangle and square . . . . . . . . . . . . . . . . . . . . . . . . . . . . . . . . . . . . . . . . . . . 7
2.3.1 Triangle . . . . . . . . . . . . . . . . . . . . . . . . . . . . . . . . . . . . . . . . . . . . . . . . . . 72.3.2 Clear, reset and undo operation . . . . . . . . . . . . . . . . . . . . . . . . . . . . . . . . . . . . . . 92.3.3 Square . . . . . . . . . . . . . . . . . . . . . . . . . . . . . . . . . . . . . . . . . . . . . . . . . . 10
2.4 Pen-up and pen-down . . . . . . . . . . . . . . . . . . . . . . . . . . . . . . . . . . . . . . . . . . . . . . . 112.4.1 Draw letter Z . . . . . . . . . . . . . . . . . . . . . . . . . . . . . . . . . . . . . . . . . . . . . . . 112.4.2 Draw letter X and E . . . . . . . . . . . . . . . . . . . . . . . . . . . . . . . . . . . . . . . . . . . 13
2.5 Practice . . . . . . . . . . . . . . . . . . . . . . . . . . . . . . . . . . . . . . . . . . . . . . . . . . . . . . 142.5.1 Solutions for Fig. 2.11 . . . . . . . . . . . . . . . . . . . . . . . . . . . . . . . . . . . . . . . . . . 14
3 List of commands 17
i

Finish the few duties you have at hand, and then you will have peace.
–Ramakrishna Paramahansa
Chapter 1
Introduction
The tutorial is designed for kids. Here, we will learn several features of Python using Turtle library of Python. The Turtlelibrary is can be used to plot very beautiful shapes, therefore it is a very popular way for introducing the programming to thekids.
1.1 Downloads
The tutorial can be downloaded for offline-reading as well.
Click on the ‘v.latest’ button on the left-bottom of this page, and download the tutorial as ‘html’, ‘PDF’ or ‘epub’ format foroffline-reading.
1.2 Installation
We need to install Python-3 (not Python-2) for this tutorial.
1.2.1 Windows
Download and install Python-3 (not Python-2) from the Python-website.
1.2.2 Linux
Linux operating system, e.g. Ubuntu and Mint, have pre-installed Python-3, but it may not contain ‘turtle library’. To installthe ‘turtle’ library, use following command,
$ sudo apt-get install python3-tk
1.3 Test the turtle
Now, we will check whether everyting is installed correctly or not, for usin g this tutorial,
• First, open the Python shell using following command (without ‘$’ sign). The window with >>> is known as Pythonshell.
$ python
1

1.3. Test the turtle
Warning:
• After running above command, Python 3.x.x should appear as shown below.
Python 3.6.2[...]>>>
• If Python 2.x.x is shown, then use the command ‘python3’ (instead of ‘python’) as shown below. If this is notworking then install Python3 again,
$ python3
• If ‘python3’ command is opening the Python3 shell, then replace all the ‘python’ commands with ‘python3’ of thetutorial,
• Copy and paste the below code in the shell,
Listing 1.1: Code to test the turtle-installation
from turtle import *for i in range(200):
forward(i)left(91)
• The pasted code in the shell will look as below,
>>> from turtle import *>>> for i in range(200):... forward(i)... left(91)...
• Press ‘enter’ now, and a screen will pop-up and ‘turtle’ will start to draw the Fig. 1.1,
Fig. 1.1: Figure generated by Listing 1.1
• Finally close the Turtle and exit from Python shell using quit() command,
2 PythonDSP

Chapter 1. Introduction
>>> quit()
1.4 More codes
Some more codes are added here so that the kids can see the global picture of tutorial,
• Result of Listing 1.2 is shown in Fig. 1.2.
Listing 1.2: Multiple colors
from turtle import *
colors = ['red', 'purple', 'blue', 'green', 'orange']for x in range(150):
pencolor(colors[x % 5])width(x/10 + 1)forward(x)left(59)
Fig. 1.2: Figure generated by Listing 1.2
• Result of Listing 1.3 is shown in Fig. 1.3.
Listing 1.3: Flower of life
from turtle import *
pendown()circle_size = 100for i in range(6):
circle(circle_size)left(60)
• Result of Listing 1.4 is shown in Fig. 1.4.
Listing 1.4: Move back and forward
from turtle import *
for angle in range(0, 360, 20):setheading(angle)forward(100)write(str(angle) + '*')backward(100)
3 Meher Krishna Patel

1.4. More codes
Fig. 1.3: Figure generated by Listing 1.3
Fig. 1.4: Figure generated by Listing 1.4
4 PythonDSP

Desire for nothing except desirelessness. Hope for nothing except to riseabove all hopes. Want nothing and you will have everything.
–Meher Baba
Chapter 2
Basics
2.1 Introduction
In this chapter, we will draw some basic figures e.g. square and triangle etc., with the help of commands in Table 2.1
Table 2.1: List of commands
Command Descriptionpython enter into Python shellimport import library to Python shellgoto(x, y) go to position (x, y)undo() undo last commandclear() clear the screen, but do not move the turtlereset() clear the screen and move turtle to ‘home’ i.e. (0, 0)position() display the current location of turtlepenup() or up() keep pen up (not on paper) i.e. do not drawpendown() or down() keep pen down (on paper) i.e. drawbye() close the turtle-drawing windowquit() quit the Python shellscreensize(width, height) set the size of turtle-drawing window
Important:
1. Keep the screen time as minimum as possible. Try to code everything on the paper first (Fig. 2.1) and then type thecode on screen (if required).
2. We hardly spent 20 minutes on the screen, for this complete chapter. But we spent fair amount of time in writing thecodes on paper and to understand the coordinates (espcially for the Fig. 2.11, where we need to find the coordinates)and .
3. Also, we write the same code several times on the paper, this will help in memorizing the spellings. Also, the kid willget familier with various mathematical terms, which are used in the tutorial.
4. Do not teach everything in one go, e.g. if the kids can not understand the coordinates, then just tell them that these arethe names for the points. By the end of the chapter, they will see the usage of the coordinates. Then spent some timeon the Fig. 2.11.
5. Don’t forget to show the global picture of the turtorial (see Section 1.4)6. Lastly, the kid will start to ask more questions after few days, try to answer those questions.
2.2 Coordinates
First we need to understand the coordinates, to draw the figures using turtle.
5

2.2. Coordinates
Fig. 2.1: Designs of Section 2.3 and Section 2.4
6 PythonDSP

Chapter 2. Basics
Let’s understand the coordinates with the help of an example.
• In Fig. 2.2, a square is shown.• The figure has two axis i.e. ‘x’ and ‘y’.• The coordinates are written as (x, y).• For example, The point ‘C’ has the coordinates (100, 50)• i.e. if we drop a straight line towards ‘x’ axis from point ‘C’ (and parallel to y-axis), then it will cut the x-axis at 100;• Similarly, if we draw a straight toward ‘y’ axis from ‘C’ (and parallel to ‘x’ axis), then it will cut the ‘y’ axis at 50.• Therefore the coordinates of ‘C’ are (100, 50).
Fig. 2.2: Coordinates of a square
Note: The coordinates (0, 0) is known as ‘home’ location in turtle, therefore it is named as ‘H’.
2.3 Drawing triangle and square
In this section, we will learn the ‘goto’, ‘reset’, ‘clear’ and ‘home’ command by drawing a triangle and a rectangle.
2.3.1 Triangle
In this section, we will draw a triangle in Fig. 2.3, and see the usage of commands which are shown in Table 2.1,
• Our aim is to draw the triangle HBJ (i.e. ∆𝐻𝐵𝐽).• Red line shows the path for drawing triangle, i.e. the arrow (or turtle) should move as below,
– H (i.e. 0, 0) is the home location for turtle .– Next, go to location B (100, 0).– Then, go to location J (50, 50).– Finally return back to H, to complete the triangle.
• Open the Python3 shell first using ‘python’ or ‘python3’ command. Note that Python3 shell should be open (notPython2) as discussed in Section 1.
7 Meher Krishna Patel

2.3. Drawing triangle and square
Fig. 2.3: Triangle
$ python
• Now triangle can be drawn using following commands.
Listing 2.1: Draw the triangle
1 >>> from turtle import *2 >>> goto(100, 0) # go to point B3 >>> goto(50, 50) # go to point J4 >>> goto(0, 0) # go back to point H
Explanation Listing 2.1 :
• The first line ‘from turtle import *’, tells the Python to import the turtle library in the Python shell. Thislibrary contains all the functions e.g. ‘goto’ in the listing.
• The ‘goto’ command of Turtle-library is used in Line 2. It tells the turtle to goto to location (100, 0).• The line after # is called comments, which is ignored by the Python-interpretor. In the other words, the
code will work fine if we do not write “# go to point B”.• Similarly, in Lines 3 and 4, turtle is moved to location J and H respectively; and we will have the triangle
as shown in Fig. 2.4.
Note: Do not tell kids (if required) to write comments on the code at this stage, that may confuse them.
Fig. 2.4: Triangle created by Listing 2.1
8 PythonDSP
Chapter 2. Basics
Important:
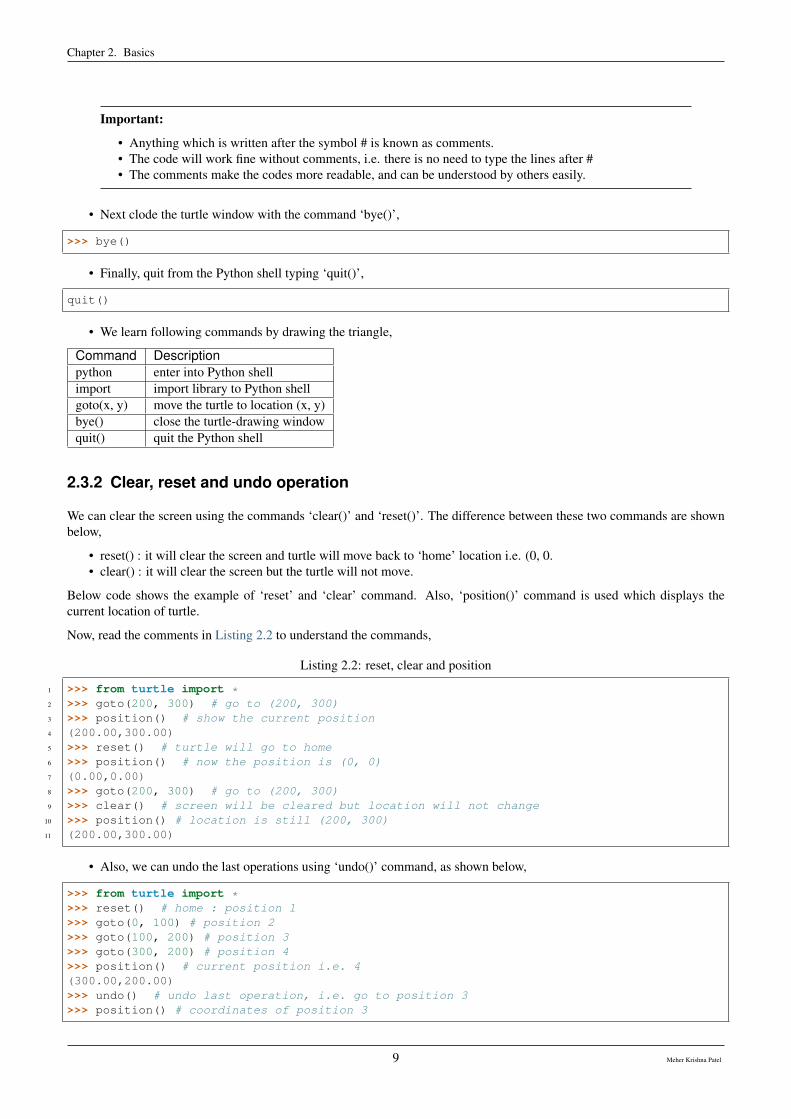
• Anything which is written after the symbol # is known as comments.• The code will work fine without comments, i.e. there is no need to type the lines after #• The comments make the codes more readable, and can be understood by others easily.
• Next clode the turtle window with the command ‘bye()’,
>>> bye()
• Finally, quit from the Python shell typing ‘quit()’,
quit()
• We learn following commands by drawing the triangle,
Command Descriptionpython enter into Python shellimport import library to Python shellgoto(x, y) move the turtle to location (x, y)bye() close the turtle-drawing windowquit() quit the Python shell
2.3.2 Clear, reset and undo operation
We can clear the screen using the commands ‘clear()’ and ‘reset()’. The difference between these two commands are shownbelow,
• reset() : it will clear the screen and turtle will move back to ‘home’ location i.e. (0, 0.• clear() : it will clear the screen but the turtle will not move.
Below code shows the example of ‘reset’ and ‘clear’ command. Also, ‘position()’ command is used which displays thecurrent location of turtle.
Now, read the comments in Listing 2.2 to understand the commands,
Listing 2.2: reset, clear and position
1 >>> from turtle import *2 >>> goto(200, 300) # go to (200, 300)3 >>> position() # show the current position4 (200.00,300.00)5 >>> reset() # turtle will go to home6 >>> position() # now the position is (0, 0)7 (0.00,0.00)8 >>> goto(200, 300) # go to (200, 300)9 >>> clear() # screen will be cleared but location will not change
10 >>> position() # location is still (200, 300)11 (200.00,300.00)
• Also, we can undo the last operations using ‘undo()’ command, as shown below,
>>> from turtle import *>>> reset() # home : position 1>>> goto(0, 100) # position 2>>> goto(100, 200) # position 3>>> goto(300, 200) # position 4>>> position() # current position i.e. 4(300.00,200.00)>>> undo() # undo last operation, i.e. go to position 3>>> position() # coordinates of position 3
9 Meher Krishna Patel

2.3. Drawing triangle and square
(100.00,200.00)>>> undo() # go back 1 more position i.e. position 2>>> position() # coordinates of position 2(0.00,100.00)>>> undo() # go to position 1 i.e. home>>> position() # coordinates of home location(0.00,0.00)
We learn following commands here,
Command Descriptionreset() clear the screen and send turtle to homeclear() clear the screen but do no move the turtleposition() display the current location of turtleundo() undo the last operation
2.3.3 Square
Now, try to make the square �𝐻𝐵𝐷𝐹 in Fig. 2.5 by using the ‘goto’ command. For this turtle will move as this: ‘H–>B–>D–>F–>H’
Fig. 2.5: Square
Listing 2.3 is the code to generate the square. The Fig. 2.6 will be generated by the listing,
10 PythonDSP

Chapter 2. Basics
Listing 2.3: Draw the square
1 >>> from turtle import *2 >>> goto(100, 0) # go to point B3 >>> goto(100, 100) # go to point D4 >>> goto(0, 100) # go to point F5 >>> goto(0, 0) # go to point H
Note: The ‘import’ statement need not to be run again, if it was executed before and we did not quit the Python shell afterthe import.
Fig. 2.6: Square generated by Listing 2.3
2.4 Pen-up and pen-down
The penup() and pendown() commands can be used to drawing and not-drawing the lines on the turtle screen respectively.
When we start the turtle, the pen is at down position by default, therefore it draws the line when we write the goto() command.If we do not want to draw line (but want to move the turtle) then the penup() command should be used as shown in belowexamples.
2.4.1 Draw letter Z
Now we will draw the letter Z using turtle. The turtle movements are shown in Fig. 2.7.
• Note that, for writing the letter Z, we need to go to point F from H, without drawing the line (see blue line in the figure).• This can be done using penup() command as shown in Line 2 of Listing 2.4.• Turtle is moved to point F at Line 3. Since penup() is used at Line 2, therefore the line will not be drawn during this
movement.• Then, in Line 4, pendown() is used, therefore turtle will draw the line again, as shown in next lines.• The figure generated by the listing is shown in Fig. 2.8.
Listing 2.4: Draw the letter Z
1 >>> from turtle import *2 >>> penup() # do not draw lines3 >>> goto(0, 100) # go to point F4 >>> pendown() # start drawing the lines again5 >>> goto(100, 100) # go to point D6 >>> goto(0, 0) # go to point H7 >>> goto(100, 0) # go to point B
11 Meher Krishna Patel

2.4. Pen-up and pen-down
Fig. 2.7: Turtle movement for letter Z
Fig. 2.8: Letter Z by turtle
12 PythonDSP

Chapter 2. Basics
2.4.2 Draw letter X and E
Now, try to draw the letter X and letter E using Turtle.
• The letter X is shown in Fig. 2.9 and the corresponding code is shown in Listing 2.5
Fig. 2.9: Turtle movement for letter X
Listing 2.5: Draw letter X
1 >>> from turtle import *2 >>> penup()3 >>> goto(0, 100) # F4 >>> pendown()5 >>> goto(100, 0) # B6 >>> penup()7 >>> goto(100, 100) # D8 >>> pendown()9 >>> goto(0, 0) # H
• Similarly, The letter E is shown in Fig. 2.10 and the corresponding code is shown in Listing 2.6
Note:
• penup() or up() can be used for keeping the pen-up.• pendown() or down() can be used for keeping the pen-down.• The up() and down() commands are used in Listing 2.6.
Listing 2.6: Draw letter E
1 >>> from turtle import *2 >>> goto(0, 100) # F3 >>> goto(50, 100) # E4 >>> up()5 >>> goto(0, 50) # G6 >>> down()
13 Meher Krishna Patel

2.5. Practice
Fig. 2.10: Turtle movement for letter E
7 >>> goto(50, 50) # J8 >>> up()9 >>> goto(0, 0) # H
10 >>> down()11 >>> goto(50, 0) # A
We saw following commands in this section,
Command Descriptionpenup() or up() keep the pen up i.e. do not drawpendown() or down() keep the pen down i.e. draw
2.5 Practice
1. Draw the letter ‘b’, ‘d’ and ‘N’ using Fig. 2.2.2. Draw the house in Fig. 2.11. Note that, we need to find the coordinates of the missing points as well.
Note:
• At this point, we can explain the Section 2.2 to find the coordinates.• For small screen we need to use the screensize() command, to fit the Fig. 2.11 in screen as shown in Listing 2.7.
2.5.1 Solutions for Fig. 2.11
• Following is the solution with minimum movement of turtle (without overlapping the lines),
14 PythonDSP

Chapter 2. Basics
Fig. 2.11: House
Listing 2.7: Solution for Fig. 2.11
1 >>> from turtle import *2 >>> goto(500, 0)3 >>> goto(500, 400)4 >>> goto(50, 400)5 >>> goto(0, 300)6 >>> goto(0, 0)7 >>> penup()8 >>> goto(50, 400)9 >>> pendown()
10 >>> goto(100, 300)11 >>> goto(100, 0)12 >>> penup()13 >>> goto(0, 300)14 >>> pendown()15 >>> goto(100, 300)16 >>> goto(500, 300)17 >>> screensize(2000, 2000) # increase the screen size to fit the figure
• Below is the another solution,
Note: In Fig. 2.12, total 18 lines are required to complete the design, whereas 16 lines were required in Listing 2.7. We candiscuss this with the kids, so that they will look for all the possibilities while writing the codes.
15 Meher Krishna Patel

2.5. Practice
Fig. 2.12: Solution for Fig. 2.11 with extra penup() commands
16 PythonDSP

Chapter 3
List of commands
Below is the complete list of commands used in this tutorial
Table 3.1: List of commands
Command Descriptionpython enter into Python shell, or execute the python codeimport import library to Python shellgoto(x, y) go to position (x, y)undo() undo last commandclear() clear the screen, but do not move the turtlereset() clear the screen and move turtle to ‘home’ i.e. (0, 0)position() display the current location of turtlepenup() or up() keep pen up (not on paper) i.e. do not drawpendown() or down() keep pen down (on paper) i.e. drawbye() close the turtle-drawing windowquit() quit the Python shellscreensize(width, height) set the size of turtle-drawing window
17