pwia c payroll r - lni.wa.gov · access and navigate through this secured system to file your...
TRANSCRIPT
PWIA CERTIFIED
PAYROLL REPORTS
P r e v a i l i n g W a g e P r o g r a m
3 6 0 . 9 0 2 . 5 3 3 5
P W 1 @ L n i . w a . g o v
Step-by-step instructions
Access and navigate through this secured system to file
your certified payroll reports for public works projects.

PWIA Certified Payroll Report Instructions
Table of Contents
INTRODUCTION .................................................................................................................................................................... 1
FEEDBACK ................................................................................................................................................................................................. 1 ASSISTANCE .............................................................................................................................................................................................. 1
GENERAL REQUIREMENTS FOR CERTIFIED PAYROLL REPORTS ........................................................................ 2
ACCESS CERTIFIED PAYROLL ONLINE .......................................................................................................................... 2
CREATE A WEEKLY CERTIFIED PAYROLL REPORT .................................................................................................. 3
Step 1: Add employees and rates of pay ................................................................................................................................................. 4 Step 2: Enter hours worked and deductions ........................................................................................................................................ 5 Step 3: Review totals and sign..................................................................................................................................................................... 7
CREATE NO WORK PERFORMED REPORT ................................................................................................................... 9
ADD A NEW EMPLOYEE .................................................................................................................................................... 11
CHOOSE EXISTING EMPLOYEES .................................................................................................................................... 13
VIEW MY REPORTS ............................................................................................................................................................ 16
AMEND A REPORT ............................................................................................................................................................. 17
MANAGE MY EMPLOYEES ................................................................................................................................................ 18
MANAGE TEN HOUR WORKDAY (4-10) AGREEMENTS ......................................................................................... 20
Upload 4-10 Agreement .............................................................................................................................................................................. 21
SUBMIT REPORTS TO INTERESTED PARTIES .......................................................................................................... 22
Submit Report to the Awarding Agency .............................................................................................................................................. 22 Submit Report to the Prime Contractor, L&I, or Other Interested Parties ........................................................................... 22
WHY CAN I NOT SEE THE SOCIAL SECURITY NUMBER? ........................................................................................ 23
HOW DO I GO BACK TO SEARCH PROJECTS? ............................................................................................................ 23

PWIA Certified Payroll Report Instructions
1
Introduction
From understanding what information is needed, to submitting to the awarding agency, to storing reports;
certified payroll reports on public work projects are burdensome for all parties. The Department of Labor
& Industries (L&I) wants to help make the process easier for the contractor, prime contractor, and
awarding agency to create, submit, view, and store the weekly reports. The following step-by-step
instructions will help guide you through this new feature now available within your existing PWIA account.
Feedback
Let us know how the system and/or these instructions work for you by completing a three-minute survey.
Your feedback is greatly appreciated and will help us improve the system.
Assistance Contact the Prevailing Wage Program at [email protected] or 360.902.5335 if assistance is needed with
accessing or using the new features.

PWIA Certified Payroll Report Instructions
2
General Requirements for Certified Payroll Reports
Employers on public works projects are required to keep certain records in addition to the pay statement.
Certified payroll records must be kept for each employee on the project and include the following
information:
Full Name,
Address,
Social Security Number,
Trade or Occupation,
Straight-Time Rate,
Hourly Rate of Usual Benefits,
Overtime Hours Worked Each Date and Week,
Ten Hour Workday (4-10) Agreement, and
Actual Rate of Wages Paid
The awarding agency or prime contractor may require you to provide certified payroll records and/or
additional information directly to them. Certified payroll records are only required to be filed with L&I if
requested by L&I or by an interested party. For additional information visit the following links:
RCW 39.12.010(4) – Definitions
WAC 296-127-320 – Payroll
WAC 296-127-014 & WAC 296-127-01410 – Usual Benefits
Usual Benefits Calculation Policy
RCW 49.28.010, RCW 49.28.040, RCW 49.28.050, RCW 49.28.060 – Eight Hour Day
RCW 49.28.065 – Ten Hour Day
Overtime Policy
Access Certified Payroll Online
The new feature has been added to the Prevailing Wage Intent and Affidavit (PWIA) system for contractors.
Do you have an existing PWIA account?
No – Learn how to get started here.
Yes – Log in to your account. The Certified Payroll Actions column has been added to the list of filed
intents for your firm.

PWIA Certified Payroll Report Instructions
3
Create A Weekly Certified Payroll Report
Once your intent has an Approved status for the project, click Create Report under the Certified Payroll
Actions column.
1. Under For the week ending: enter or select the week ending date for the payroll you are entering. A
pop-up calendar will appear.
Important: The ending day of the week (Saturday, Sunday, etc.) is set with the first
report that is entered for the project and may not be changed.
2. If work was performed for the week selected, continue to the next step. Otherwise, go to Create No Work
Performed Report.
3. Select Yes that work was performed during the week and select Confirm. Go to Step 1: Add employees
and rates of pay.

PWIA Certified Payroll Report Instructions
4
Step 1: Add employees and rates of pay
Step 1 allows you to add employees to the project. Once an employee is added to the project, they
will remain on the project for all other reports filed or until removed. Your screen should look
similar to the following illustration:
1. Verify that all employees that worked during the week are shown under Employees on This
Project. Employees shown here have already been selected as working on the project.
If an employee is not shown in this list, see instructions on How Do I Add A New Employee? or
How Do I Choose Existing Employees?
Important: Removing employees removes them from the entire project, NOT
just the week of the report.

PWIA Certified Payroll Report Instructions
5
2. Verify all of the employees’ information is correct. If changes need to be made, select Edit for the
employee, make the changes, and select Save.
3. When all information on this page is correct, select Next: Enter Hours to continue to Step 2:
Enter hours worked and deductions.
Step 2: Enter hours worked and deductions
Step 2 is where you will enter the hours worked by each employee during the selected week for the
project. Any deductions, standard and non-standard, will also be added in this step. Your screen
should look similar to the following illustration:

PWIA Certified Payroll Report Instructions
6
1. Select Edit Hours for an employee. The section will expand to allow input of the employee’s
hours and deductions. The system automatically calculates the Total Hours, Rate of Pay and Gross
Earned based upon hours entered for the week. Your screen should look similar to the following
illustration:
2. Enter hours worked by the employee on the project for the week.
3. Enter total payroll for the employee to include the project and all other wages earned for the
week.
4. Enter all of the employee’s deductions for the week.
Select +Add Another Deduction if the employee has more deductions than the required FICA
and Federal Withholding Tax.
5. Select Save to save the information, close the section, and move to the next employee or step.
6. Repeat Steps 1-5 for all employees. If an employee did not have any project hours for the week,
skip them and move on to the next employee.
7. Once all project hours have been entered for the week, select Next: Review totals to continue to
Step 3: Review totals and sign.
PWIA Certified Payroll Report Instructions
7
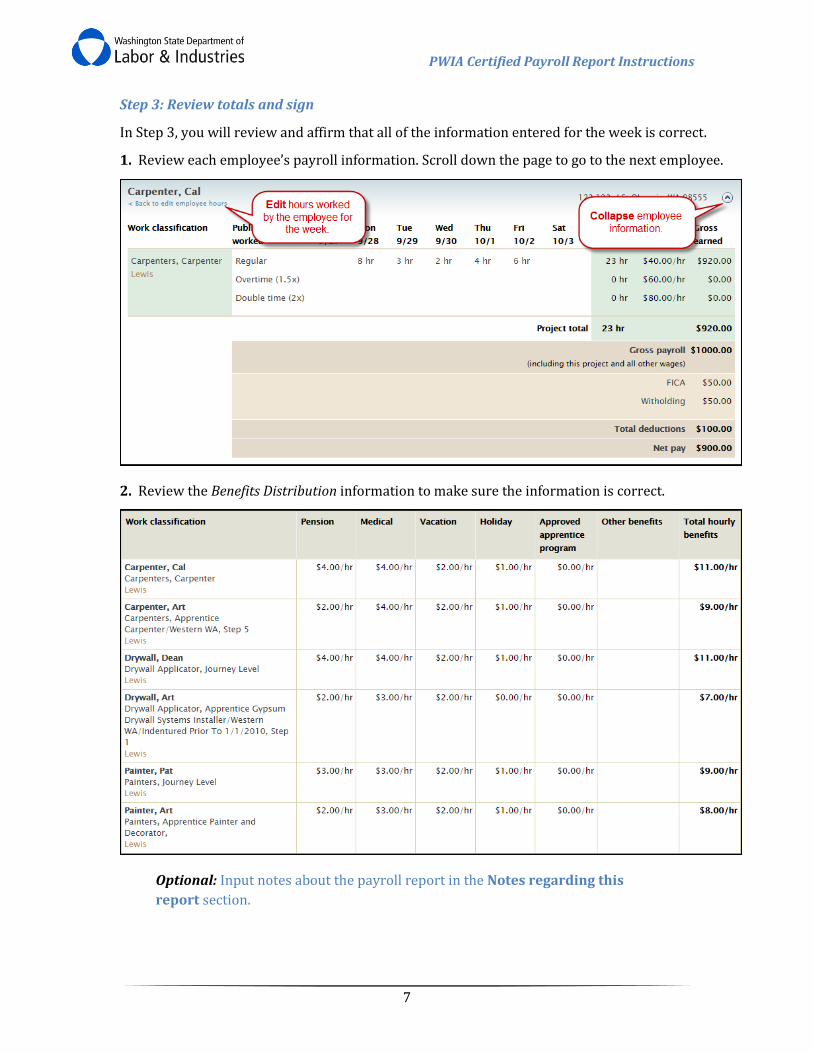
Step 3: Review totals and sign
In Step 3, you will review and affirm that all of the information entered for the week is correct.
1. Review each employee’s payroll information. Scroll down the page to go to the next employee.
2. Review the Benefits Distribution information to make sure the information is correct.
Optional: Input notes about the payroll report in the Notes regarding this
report section.
PWIA Certified Payroll Report Instructions
8
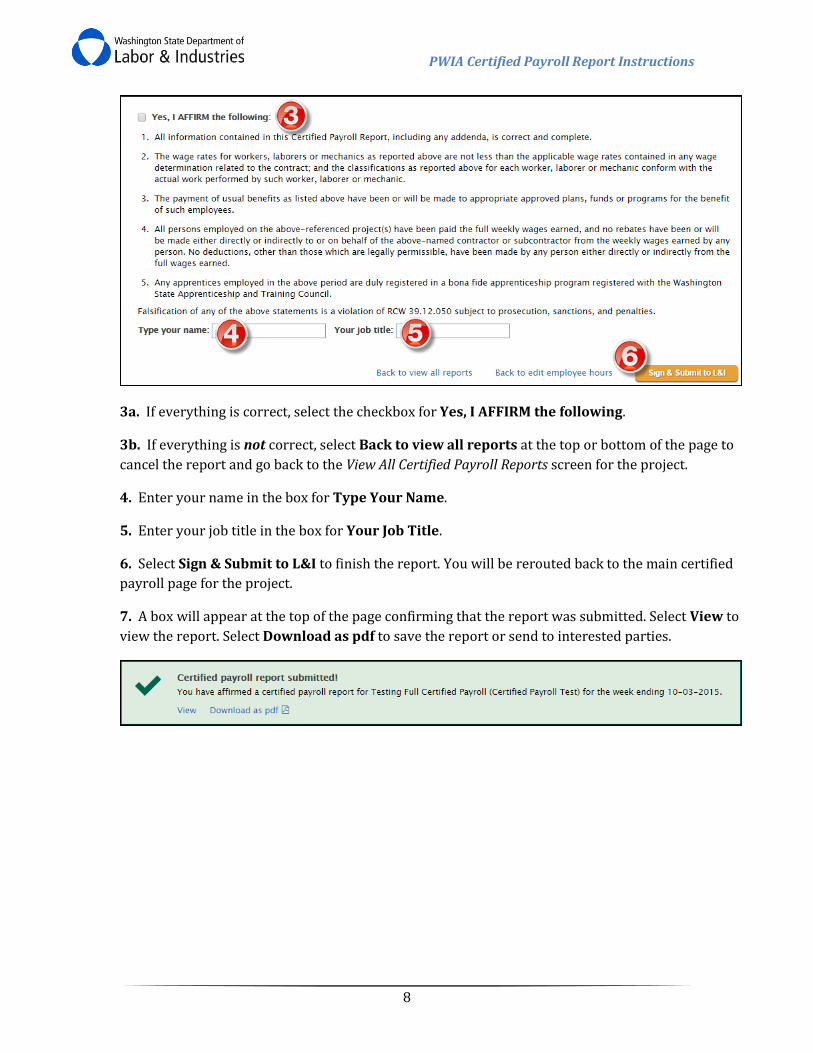
3a. If everything is correct, select the checkbox for Yes, I AFFIRM the following.
3b. If everything is not correct, select Back to view all reports at the top or bottom of the page to
cancel the report and go back to the View All Certified Payroll Reports screen for the project.
4. Enter your name in the box for Type Your Name.
5. Enter your job title in the box for Your Job Title.
6. Select Sign & Submit to L&I to finish the report. You will be rerouted back to the main certified
payroll page for the project.
7. A box will appear at the top of the page confirming that the report was submitted. Select View to
view the report. Select Download as pdf to save the report or send to interested parties.

PWIA Certified Payroll Report Instructions
9
Create No Work Performed Report
Continuing from How Do I Create a Weekly Certified Payroll Report, select No and Confirm.
1. A pop-up box will appear. Edit the period of time that no work was performed and/or select Confirm.
Example: If no work was performed from 9/6/2015 – 9/26/2015, edit the period of
time.
2. Review the Affirm page to make sure that everything is correct for the report.
Optional: Input notes about the payroll report in the Notes regarding this report
section.

PWIA Certified Payroll Report Instructions
10
3a. If everything is correct, select the checkbox for Yes, I AFFIRM the following.
3b. If everything is not correct, select Back to view all reports at the top or bottom of the page to cancel
the report and go back to the View All Certified Payroll Reports screen for the project.
4. Enter your name in the box for Type Your Name.
5. Enter your job title in the box for Your Job Title.
6. Select Sign & Submit to L&I to finish the report. You will be rerouted back to the main certified payroll
page for the project.
7. A box will appear at the top of the page confirming that the report was submitted. Select View to view
the report. Select Download as pdf to save the report or send to interested parties.

PWIA Certified Payroll Report Instructions
11
Add a New Employee
When creating a certified payroll report, you can add employees to your account at any time.
1. Go to Step 1 and select Add a New Employee. The box will expand for you to enter the employee’s
information.
2. Enter the employee’s personal information.
Note: The Social Security Number will show as asterisks once the employee’s
information is saved.
3. Select Yes or No if the employee is in an approved apprentice program. If Yes, two additional fields
(State & Apprentice ID) will appear.
4. Choose the type of work the employee performed on the project in the Trade dropdown box.
5. Choose the county where the work was performed in the County dropdown box.
Important: Only counties selected on the intent for the project are available to select
in the dropdown box.

PWIA Certified Payroll Report Instructions
12
6. Enter the regular wages for the employee. The system will auto-calculate overtime and double time
wages – make sure they are accurate.
7. Enter benefits deducted from the employee’s payroll.
8. Select Add Another Benefit if the employee receives additional benefits from the ones listed. Enter the
benefit information.
As information is entered, the system auto-calculates the minimum wage rate, total benefits, and the total
wage entered for the employee.
PWIA Certified Payroll Report Instructions
13
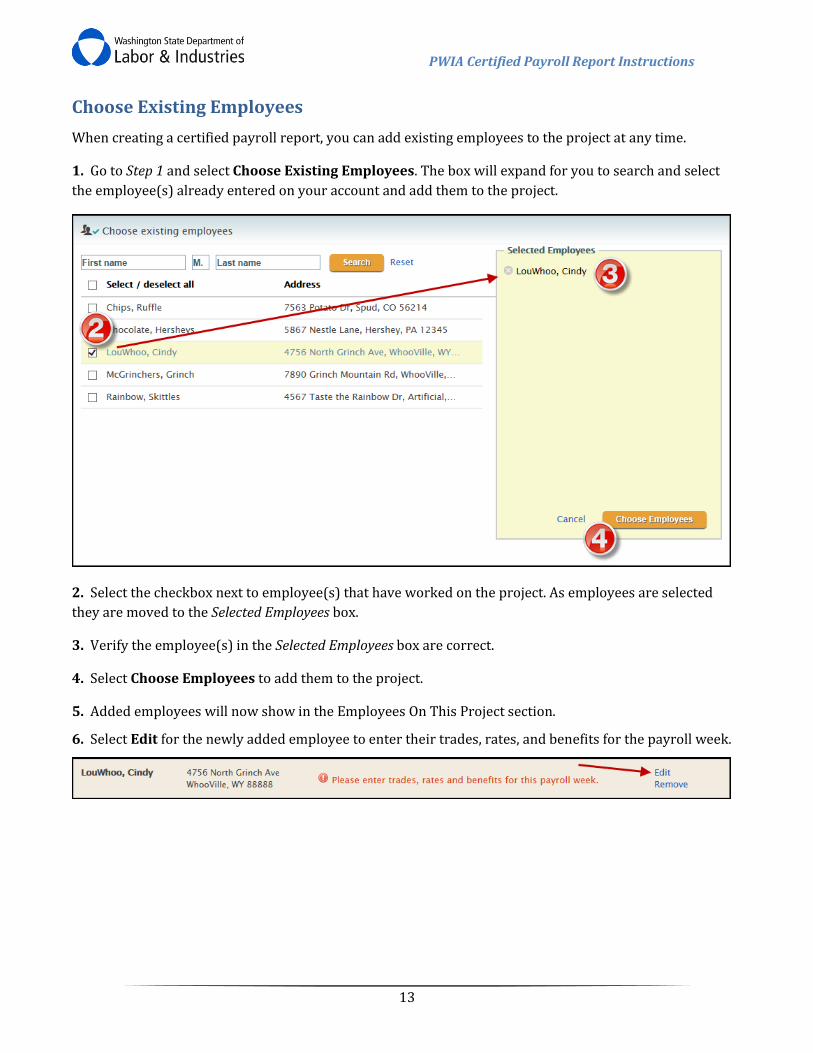
Choose Existing Employees
When creating a certified payroll report, you can add existing employees to the project at any time.
1. Go to Step 1 and select Choose Existing Employees. The box will expand for you to search and select
the employee(s) already entered on your account and add them to the project.
2. Select the checkbox next to employee(s) that have worked on the project. As employees are selected
they are moved to the Selected Employees box.
3. Verify the employee(s) in the Selected Employees box are correct.
4. Select Choose Employees to add them to the project.
5. Added employees will now show in the Employees On This Project section.
6. Select Edit for the newly added employee to enter their trades, rates, and benefits for the payroll week.

PWIA Certified Payroll Report Instructions
14
7. Select Yes or No if the employee is in an approved apprentice program. If Yes, two additional fields
(State & Apprentice ID) will appear.
8. Choose the type of work the employee performed on the project in the Trade dropdown box.
9. Choose the county where the work was performed in the County dropdown box.
Important: Only counties selected on the intent for the project are available to select
in the dropdown box.
10. Enter the regular wages for the employee. The system will auto-calculate overtime and double time
wages – make sure they are accurate.
11. Enter benefits deducted from the employee’s payroll.
12. Select Add Another Benefit if the employee receives additional benefits from the ones listed. Enter
the benefit information.

PWIA Certified Payroll Report Instructions
15
As information is entered, the system will auto-calculate the minimum wage rate, total benefits, and the
total wage entered for the employee.
Repeat steps 6 – 12 for each employee added to the project.

PWIA Certified Payroll Report Instructions
16
View My Reports
Once reports have been started or submitted for a project, they are viewable in the View All Certified
Payroll Reports page for the project.
1. From the main page or View Intent History page, find the approved intent for the project.
2. In the Certified Payroll Actions column, select View All.
3. The project information is in the top section of the page and all filed reports are in the bottom section.
Your screen should look similar to the following illustration:
View different sections of this manual for further instructions on the actions available on this page.
PWIA Certified Payroll Report Instructions
17
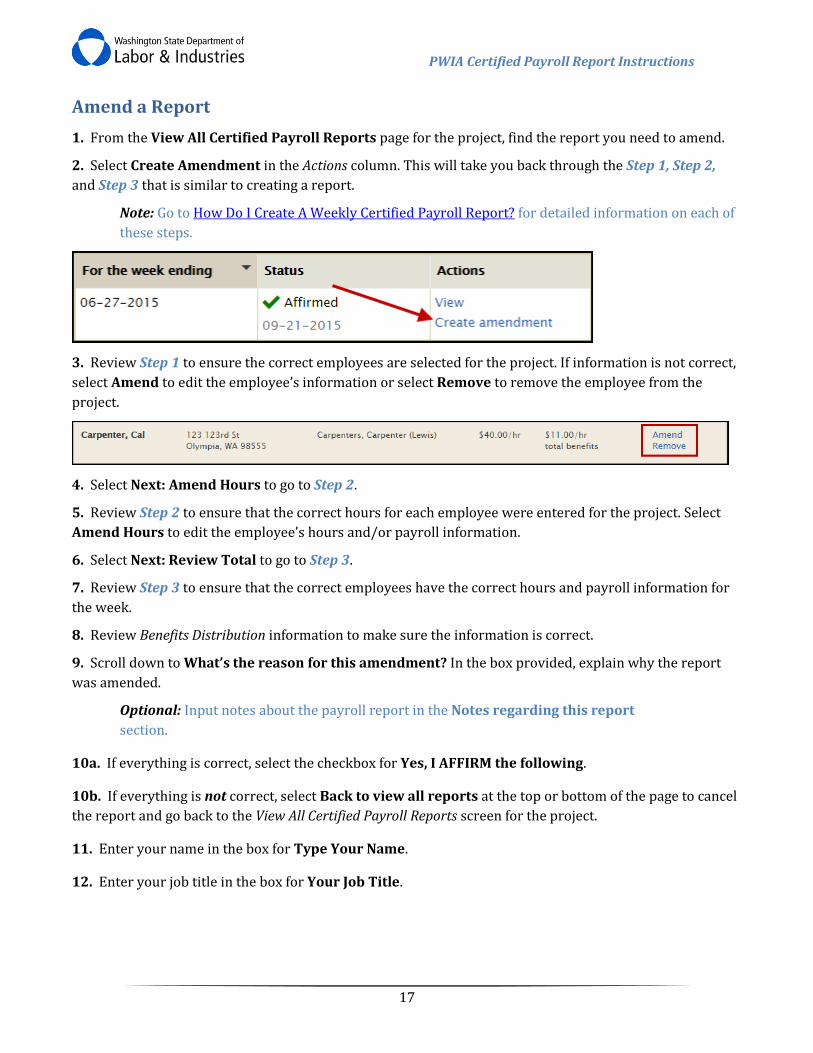
Amend a Report
1. From the View All Certified Payroll Reports page for the project, find the report you need to amend.
2. Select Create Amendment in the Actions column. This will take you back through the Step 1, Step 2,
and Step 3 that is similar to creating a report.
Note: Go to How Do I Create A Weekly Certified Payroll Report? for detailed information on each of
these steps.
3. Review Step 1 to ensure the correct employees are selected for the project. If information is not correct,
select Amend to edit the employee’s information or select Remove to remove the employee from the
project.
4. Select Next: Amend Hours to go to Step 2.
5. Review Step 2 to ensure that the correct hours for each employee were entered for the project. Select
Amend Hours to edit the employee’s hours and/or payroll information.
6. Select Next: Review Total to go to Step 3.
7. Review Step 3 to ensure that the correct employees have the correct hours and payroll information for
the week.
8. Review Benefits Distribution information to make sure the information is correct.
9. Scroll down to What’s the reason for this amendment? In the box provided, explain why the report
was amended.
Optional: Input notes about the payroll report in the Notes regarding this report
section.
10a. If everything is correct, select the checkbox for Yes, I AFFIRM the following.
10b. If everything is not correct, select Back to view all reports at the top or bottom of the page to cancel
the report and go back to the View All Certified Payroll Reports screen for the project.
11. Enter your name in the box for Type Your Name.
12. Enter your job title in the box for Your Job Title.

PWIA Certified Payroll Report Instructions
18
13. Select Sign & Submit to L&I to finish the report. You will be rerouted back to the main certified payroll
page for the project.
14. A box will appear at the top of the page confirming that the report was submitted. Select View to view
the report. Select Download as pdf to save the report or send to interested parties.
Manage My Employees
Once reports have been started or submitted for a project, you have the option to manage your employee
list. This option allows you to add, delete, or edit employees’ information from the main list for your
account.
Important: To edit an employee’s payroll information for the project, go to Step 1:
Add employees and rates of pay on the weekly report.
1. From the main page or View Intent History page, find the approved intent for the project.
2. In the Certified Payroll Actions column, select View All.
3. Select Employees on the right-hand side, below the project information.

PWIA Certified Payroll Report Instructions
19
4. Select View/Edit for an employee to edit their information or select Add Employee to add an employee
to your account.
5. Once information is updated or added, select Save to save the information and go back to the Manage
Employees page.
Note: The Social Security Number will show as asterisks once the employee’s
information is saved.

PWIA Certified Payroll Report Instructions
20
Manage Ten Hour Workday (4-10) Agreements
Agreements with an employee allowing them to work up to 10 hours in a calendar must be kept on file.
Once certified payroll reports have been started or submitted for a project, you have the option to manage
your agreements.
1. From the main page or View Intent History page, find the approved intent for the project.
2. In the Certified Payroll Actions column, select View All.
3. Select Ten Hour Workday (4-10) Agreements on the right-hand side, below the project information.
4. Select View to view previous/existing agreements.
PWIA Certified Payroll Report Instructions
21
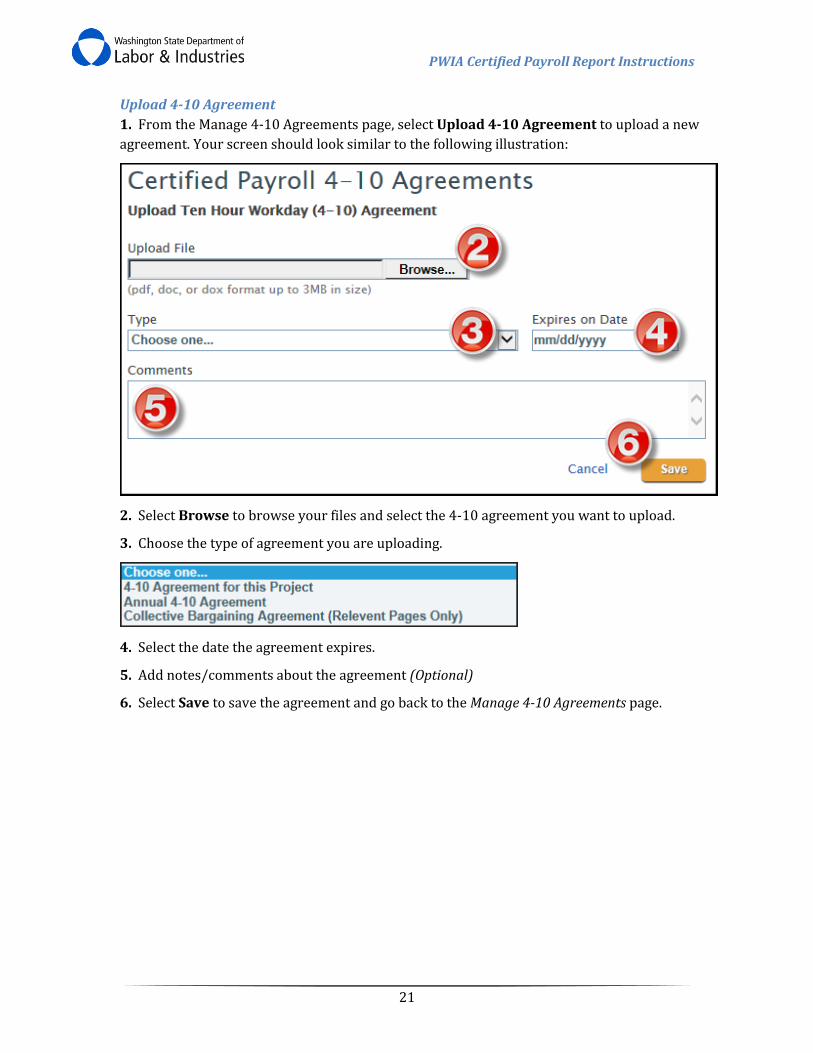
Upload 4-10 Agreement
1. From the Manage 4-10 Agreements page, select Upload 4-10 Agreement to upload a new
agreement. Your screen should look similar to the following illustration:
2. Select Browse to browse your files and select the 4-10 agreement you want to upload.
3. Choose the type of agreement you are uploading.
4. Select the date the agreement expires.
5. Add notes/comments about the agreement (Optional)
6. Select Save to save the agreement and go back to the Manage 4-10 Agreements page.
PWIA Certified Payroll Report Instructions
22
Submit Reports to Interested Parties
Submit Report to the Awarding Agency
As soon as a weekly report is affirmed, the awarding agency can view the report within their
Awarding Agency Portal. If the awarding agency has not set up their account, follow the instructions
in the next section on how to submit the report to them.
Submit Report to the Prime Contractor, L&I, or Other Interested Parties
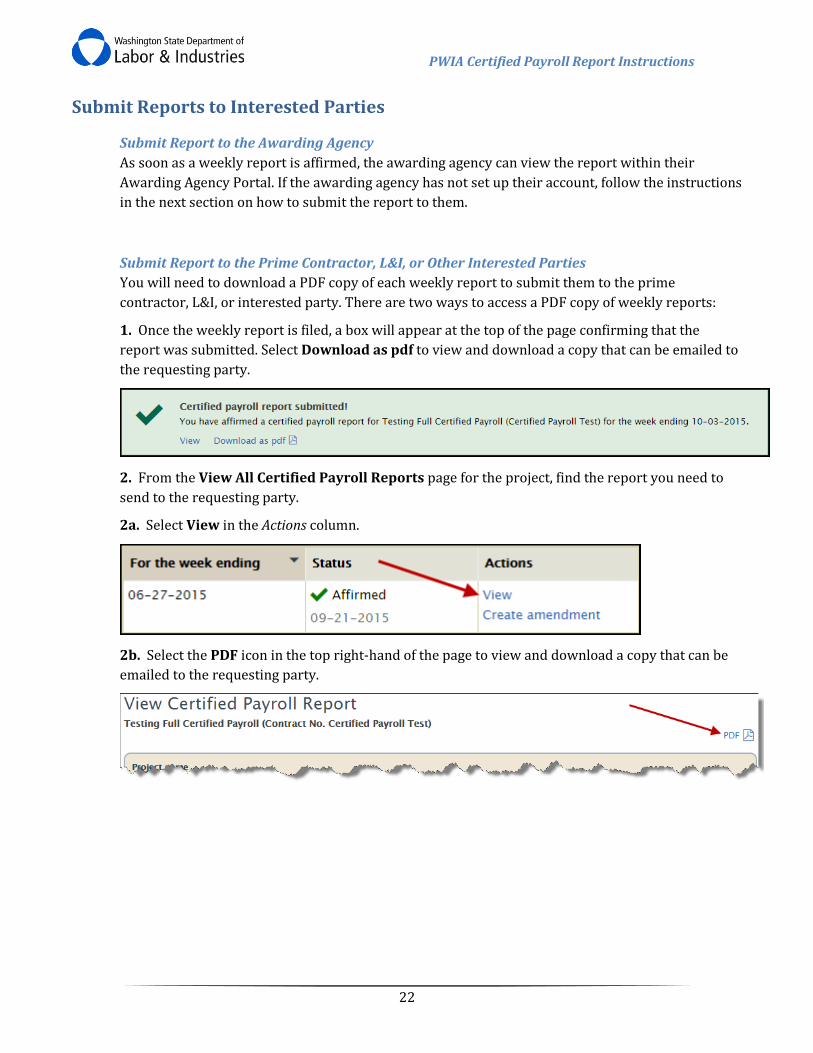
You will need to download a PDF copy of each weekly report to submit them to the prime
contractor, L&I, or interested party. There are two ways to access a PDF copy of weekly reports:
1. Once the weekly report is filed, a box will appear at the top of the page confirming that the
report was submitted. Select Download as pdf to view and download a copy that can be emailed to
the requesting party.
2. From the View All Certified Payroll Reports page for the project, find the report you need to
send to the requesting party.
2a. Select View in the Actions column.
2b. Select the PDF icon in the top right-hand of the page to view and download a copy that can be
emailed to the requesting party.

PWIA Certified Payroll Report Instructions
23
Why Can I Not See the Social Security Number?
To protect the employee’s personal information, their Social Security Number will not be visible once
entered and saved in our system. Asterisks will replace the numbers wherever the SSN is displayed. If you
think the SSN was inputted incorrectly, you will need to re-input the entire SSN to make sure it is correct in
the system.
How Do I Go Back to Search Projects?
Whether you are viewing a project, creating a project, or managing users, you can navigate back to the main
search screen at any time. Select back to… in the top-left hand of any screen to go back to the previous
screen.