pv master operation instructions - goodwe master... · 2019-11-26 · pv master operation...
TRANSCRIPT
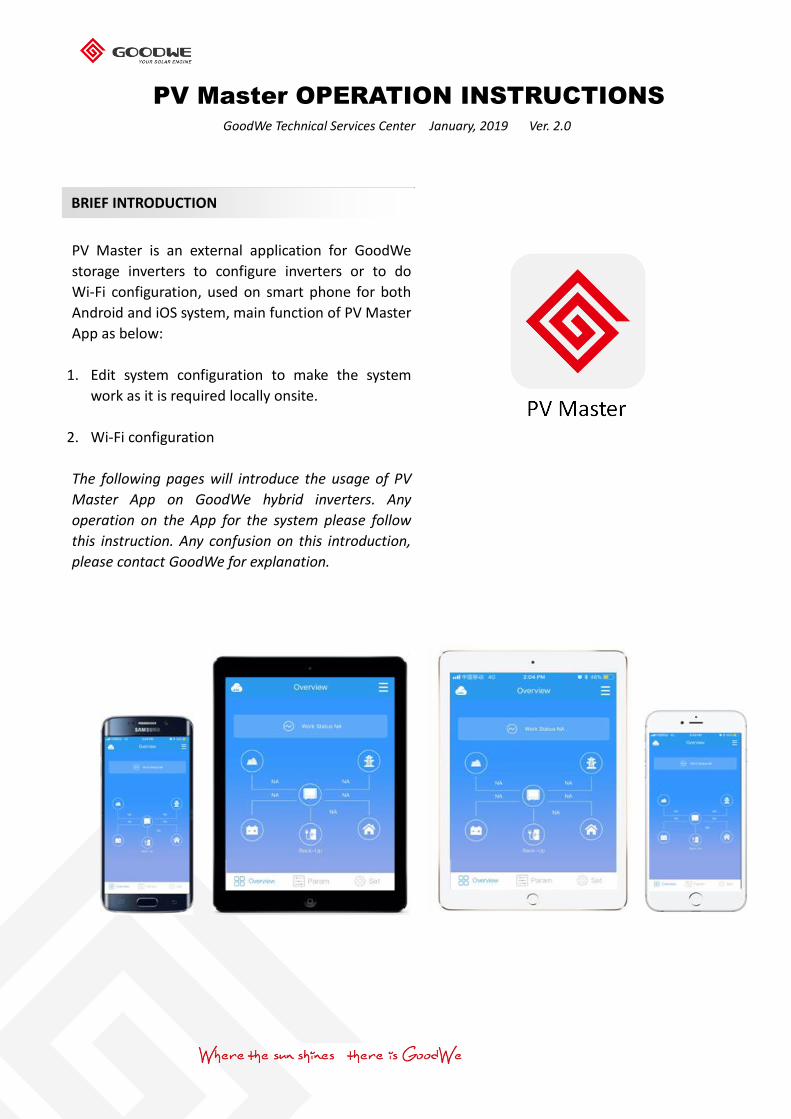
PV Master OPERATION INSTRUCTIONS
GoodWe Technical Services Center January, 2019 Ver. 2.0
PV Master is an external application for GoodWe
storage inverters to configure inverters or to do
Wi-Fi configuration, used on smart phone for both
Android and iOS system, main function of PV Master
App as below:
1. Edit system configuration to make the system
work as it is required locally onsite.
2. Wi-Fi configuration
The following pages will introduce the usage of PV
Master App on GoodWe hybrid inverters. Any
operation on the App for the system please follow
this instruction. Any confusion on this introduction,
please contact GoodWe for explanation.
BRIEF INTRODUCTION
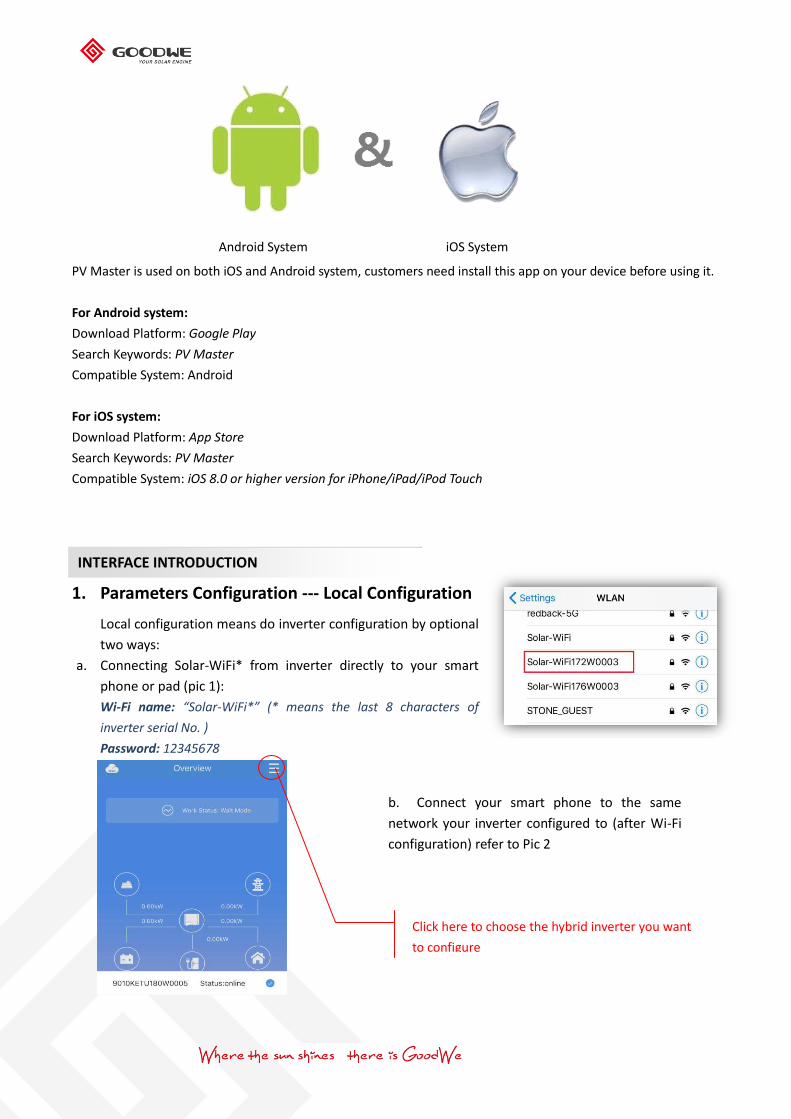
PV Master is used on both iOS and Android system, customers need install this app on your device before using it.
For Android system:
Download Platform: Google Play
Search Keywords: PV Master
Compatible System: Android
For iOS system:
Download Platform: App Store
Search Keywords: PV Master
Compatible System: iOS 8.0 or higher version for iPhone/iPad/iPod Touch
1. Parameters Configuration --- Local Configuration
Local configuration means do inverter configuration by optional
two ways:
a. Connecting Solar-WiFi* from inverter directly to your smart
phone or pad (pic 1):
Wi-Fi name: “Solar-WiFi*” (* means the last 8 characters of
inverter serial No. )
Password: 12345678
Android System iOS System
INTERFACE INTRODUCTION
a. b. Connect your smart phone to the same
network your inverter configured to (after Wi-Fi
configuration) refer to Pic 2
Click here to choose the hybrid inverter you want
to configure

Basic Setting
To select Safety Country, Work Mode and Battery Model (all Compulsive settings)
Click “Login” to enter configuration pages
Please select the right safety country according to
the local grid regulations.
- Scroll up on the page to show more options
- If you did not find your local safety country, please
select “50Hz Grid Default” or “60Hz Grid Default”
according to your local grid frequency
After choose the right Safety Country, Click “Next”
to select Work Mode for your hybrid inverter
Password:
goodwe2010
Select “Safety Country”
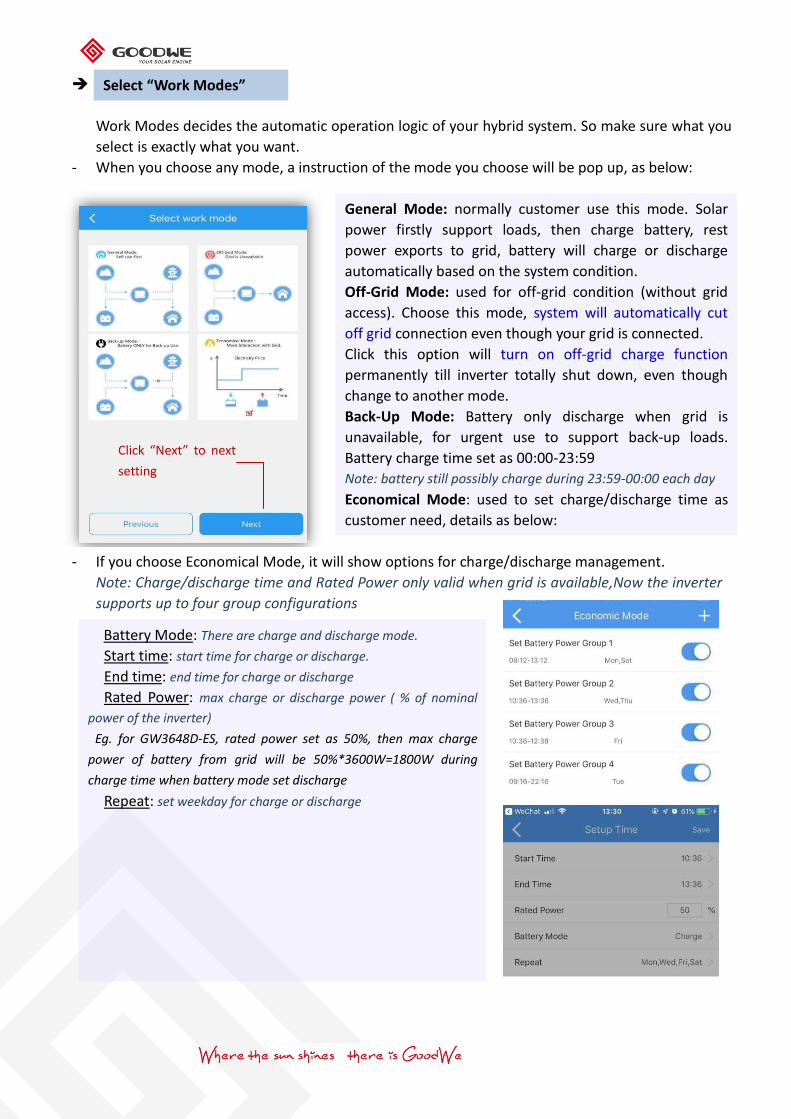
Work Modes decides the automatic operation logic of your hybrid system. So make sure what you
select is exactly what you want.
- When you choose any mode, a instruction of the mode you choose will be pop up, as below:
- If you choose Economical Mode, it will show options for charge/discharge management.
Note: Charge/discharge time and Rated Power only valid when grid is available,Now the inverter
supports up to four group configurations
Select “Work Modes”
General Mode: normally customer use this mode. Solar
power firstly support loads, then charge battery, rest
power exports to grid, battery will charge or discharge
automatically based on the system condition.
Off-Grid Mode: used for off-grid condition (without grid
access). Choose this mode, system will automatically cut
off grid connection even though your grid is connected.
Click this option will turn on off-grid charge function
permanently till inverter totally shut down, even though
change to another mode.
Back-Up Mode: Battery only discharge when grid is
unavailable, for urgent use to support back-up loads.
Battery charge time set as 00:00-23:59
Note: battery still possibly charge during 23:59-00:00 each day
Economical Mode: used to set charge/discharge time as
customer need, details as below:
Battery Mode: There are charge and discharge mode.
Start time: start time for charge or discharge.
End time: end time for charge or discharge
Rated Power: max charge or discharge power ( % of nominal
power of the inverter)
Eg. for GW3648D-ES, rated power set as 50%, then max charge
power of battery from grid will be 50%*3600W=1800W during
charge time when battery mode set discharge
Repeat: set weekday for charge or discharge
Click “Next” to next
setting

NOTE: all the settings must be 100% honest to the battery specifications first
Select “Battery Type”
After set work mode, click “Next” to select battery type
NOTE:
1. For lithium battery, choose wrong battery type will lead to BMS communication failure
2. When choose the battery type, the settings about this battery are all inset, do not have to change
Normally NOT used. This is used only for
previous hybrid inverters with lead-acid
battery to reset discharge voltage back to
default 40V
Used for connecting lithium batteries with
BMS communication, which is not in the list
with capacity of 50Ah or 100Ah
(normally only used for third-party lithium
battery communication )
If your battery is not in the list, please
choose SELF-DEFINE to set detailed
parameters as below
Scroll down to check more parameters
Click “Start” as you choose your
battery, basic setting done
There is explanation for
each option
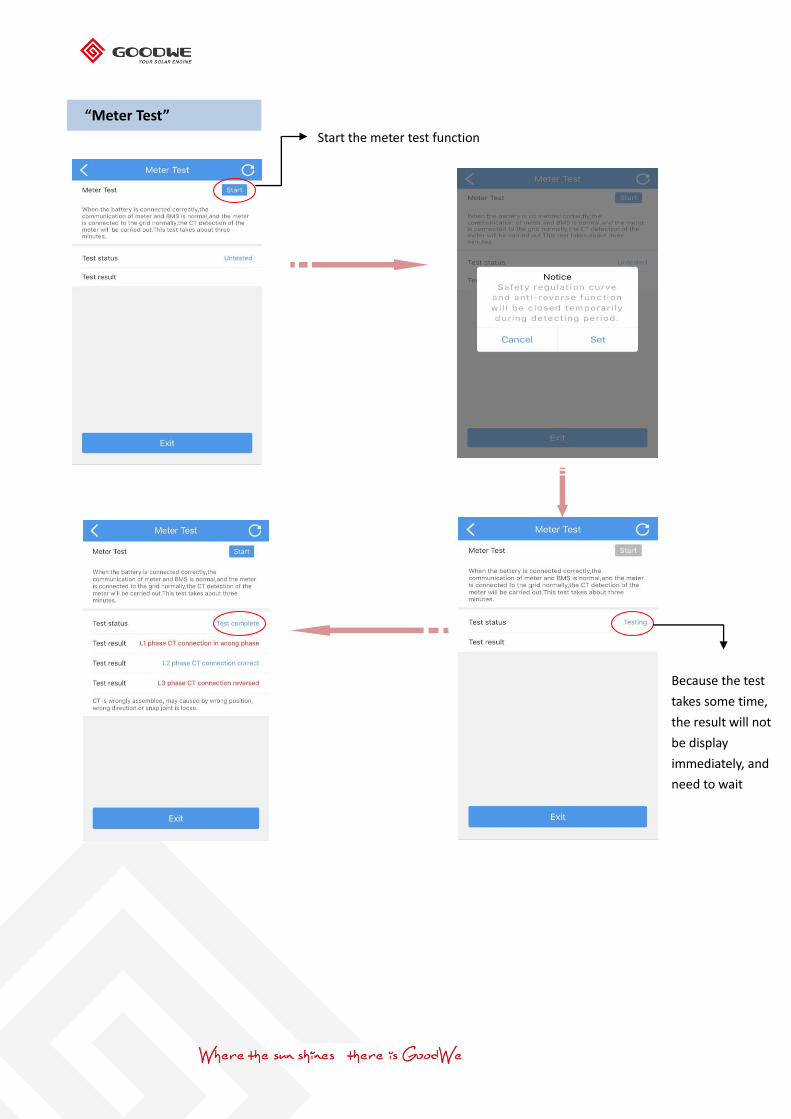
“Meter Test”
Start the meter test function
Because the test
takes some time,
the result will not
be display
immediately, and
need to wait

Advanced Setting
NOTE: Advanced settings are used special use like “Power Limit” & “Back-Up Function”. Normally the password is
only for dealers and installers, so please do not tell end users the password if not necessary
Password:
goodwe2010
Turn on to use if your grid company does not allow
external power feed into grid or customer himself
do not want PV production exported to grid
NOTE: If you use this function and set a Power limit
value, then PV production could be limited if
consumer or battery charge power is low
There is explanation for
each option
Back-Up Supply should always be ON if you have
load on Back-Up side (no matter grid is available or
not)
Off-Grid Output Switch should be ON when grid is
not available to access power on Back-Up side
Power Factor: Only used for adjustment when you
have reactive power load connected to balance
active and reactive power
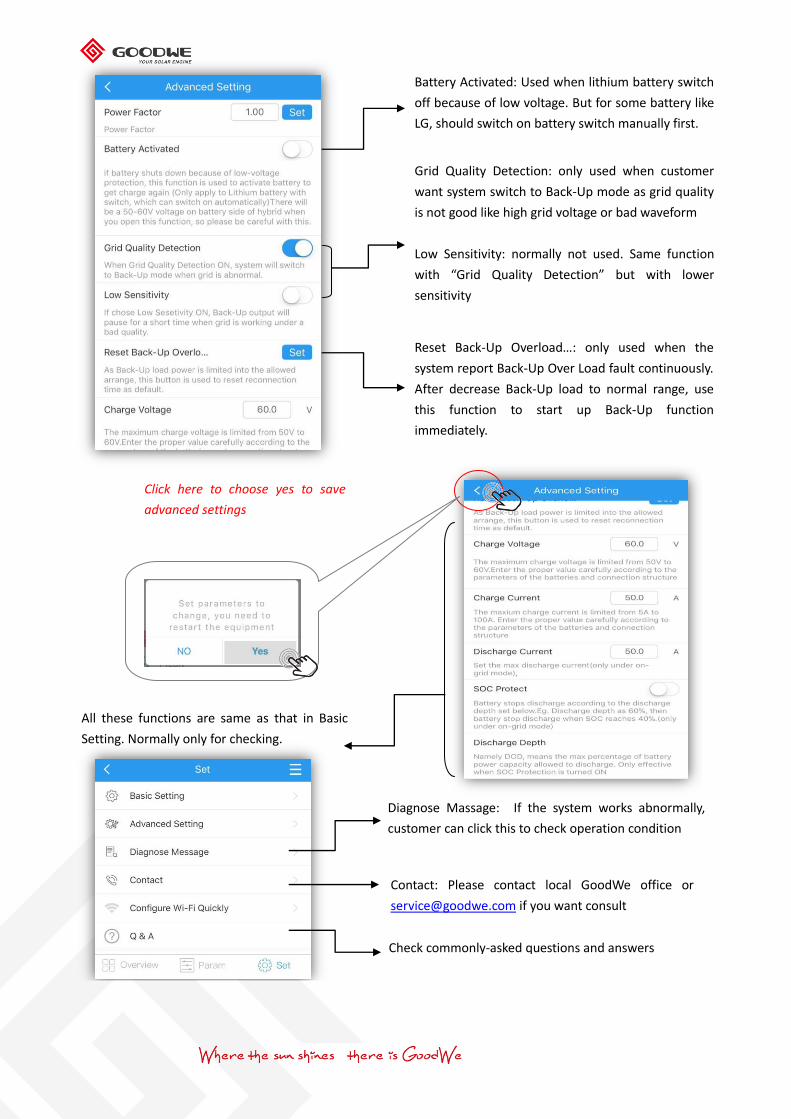
Battery Activated: Used when lithium battery switch
off because of low voltage. But for some battery like
LG, should switch on battery switch manually first.
Grid Quality Detection: only used when customer
want system switch to Back-Up mode as grid quality
is not good like high grid voltage or bad waveform
Low Sensitivity: normally not used. Same function
with “Grid Quality Detection” but with lower
sensitivity
Reset Back-Up Overload…: only used when the
system report Back-Up Over Load fault continuously.
After decrease Back-Up load to normal range, use
this function to start up Back-Up function
immediately.
All these functions are same as that in Basic
Setting. Normally only for checking.
Click here to choose yes to save
advanced settings
Diagnose Massage: If the system works abnormally,
customer can click this to check operation condition
Contact: Please contact local GoodWe office or
[email protected] if you want consult
Check commonly-asked questions and answers

2. Check Parameters of System
The first page is device status page as below:
Note:
The statues and data on this page might be a few minutes delay from the real-time inverter data
By touch the icons on the diagram, it will show the real-time data of each part, as below:
Or Click “Param” to check more parameters
Note: the parameters might be different from that on homepage because of refresh time delay and
different calculation formula
PV Real-Time Data:
- PV Voltage / Current / Power
- E-Day & E-Total
Battery Real-Time Data:
- Battery Operation Status
- Battery Voltage/Current/Power
- Battery SOC
- BMS Communication Status
- Other BMS information
Inverter Data:
- Inverter Serial No.
- Firmware version
- Safety Country
- Inverter Work Status
- Error Messages
Load Data:
- On-Grid Load Power
- Back-Up Load Power
On-Grid Data:
- Grid Power (V/I/Fout)
- Meter Power (PMeter)
- EzMeter Communication
Battery Status: showing real-time battery SOC and work
status including “Charge” or “Discharge”
BMS Status: showing real-time BMS communication status of
lithium battery (“Communication OK” means normal)
SOH: BMS send out this info, showing the health status of
lithium battery – 100% means perfectly healthy
Charge/Discharge Current Limit: showing the real-time
limitation on battery charge/discharge – this determines the
real allowed charge/discharge current for Lithium battery.

3. Auto-Test (for Italy only)
Note:
a. Auto-test option only accessible when you choose “Italy” as safety country
b. Before use Auto-Test, make sure Solar-WiFi signal is connected on your smart phone stably
Auto-Test Operation Process
1. Click Auto-Test ,then inverter will be under auto-test mode
2. Connect AC, the inverter shows on-grid successfully, and output power is zero.
3. Under normal communication condition, the inverter SN, model, firmware version and safety country
(If it’s not Italy, please change it to Italy) will be obtained automatically
Note:
a. “Remote” default set is 1, unable to be modified
b. “Local” default set is 0, which can be set to 0 or 1.
4. If no setting “Remote” and “Local”, then test with the default value.
Testing in order : 59.S1, 59.S2, 27.S1, 81>S2, 81<S2
NOTE: If set “Local” to 1, then testing order would be 59.S1, 59.S2, 27.S1, 81>S2,81<S2
5. If sub test finishes and shows Pass, inverter relay breaks off and reconnect to grid automatically
according to CEI 0-21 requirement. Then start the next testing.
NOTE:
a. After passing Auto-test, testing data will be stored in the album, for future reference.
b. If you quit the test or exit testing screen halfway, test will be terminated.
WARNING:
1. Make sure your smart phone keeps unlocked during Auto-Test, or, the test will stop and fail
2. If the test fails during Auto-Test, inverter will enter wait mode. Will need reconnect Solar-WiFi*
to finish the test or totally power inverter and reboot to try again.
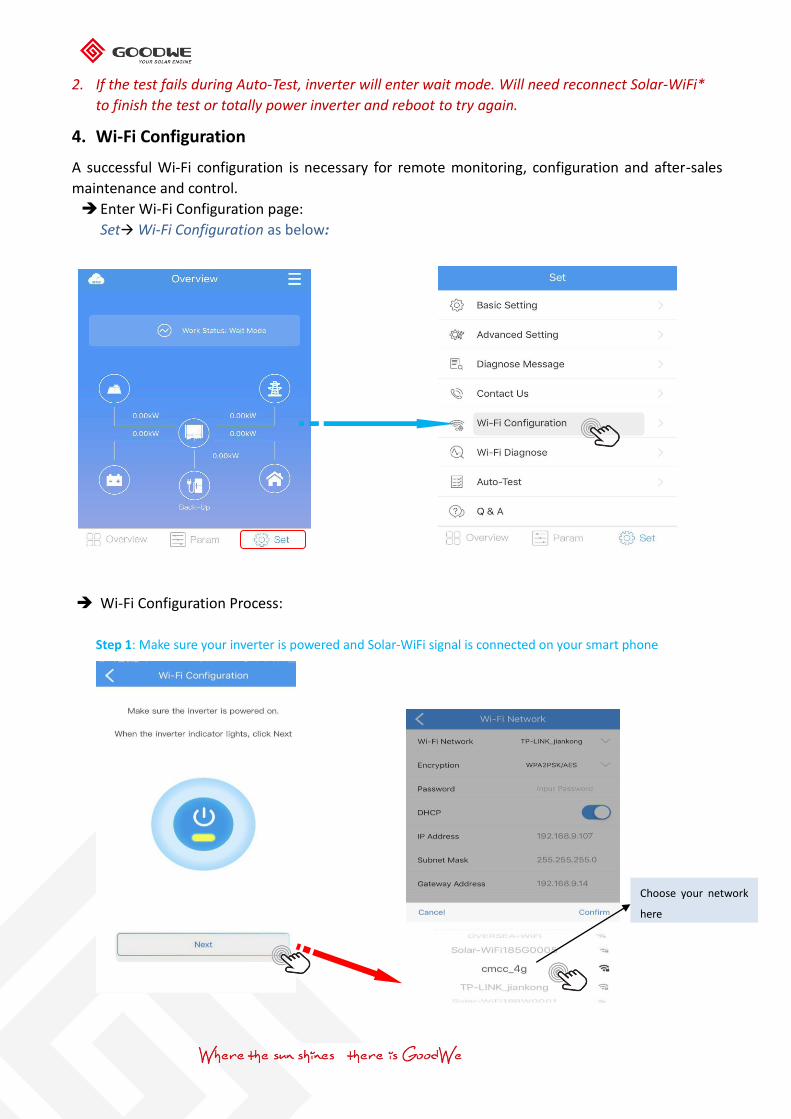
4. Wi-Fi Configuration
A successful Wi-Fi configuration is necessary for remote monitoring, configuration and after-sales
maintenance and control.
Enter Wi-Fi Configuration page:
Set Wi-Fi Configuration as below:
Wi-Fi Configuration Process:
Step 1: Make sure your inverter is powered and Solar-WiFi signal is connected on your smart phone
Choose your network
here
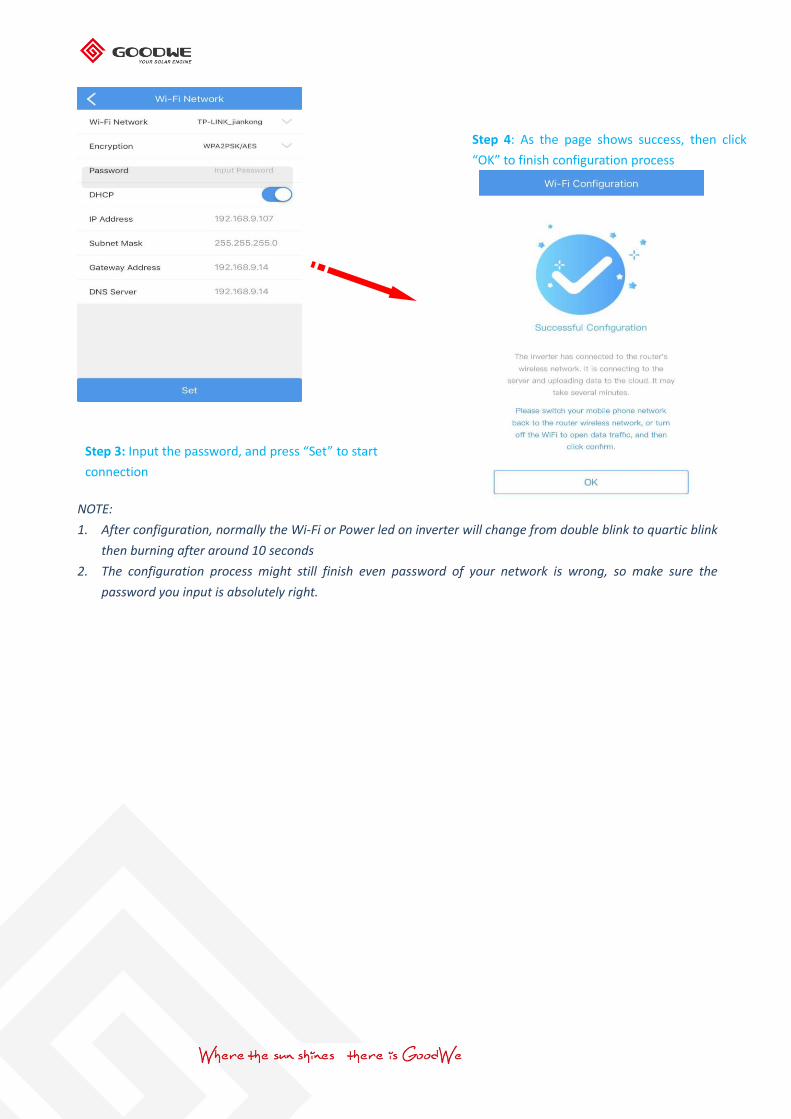
Step 4: As the page shows success, then click
“OK” to finish configuration process
NOTE:
1. After configuration, normally the Wi-Fi or Power led on inverter will change from double blink to quartic blink
then burning after around 10 seconds
2. The configuration process might still finish even password of your network is wrong, so make sure the
password you input is absolutely right.
Step 3: Input the password, and press “Set” to start
connection
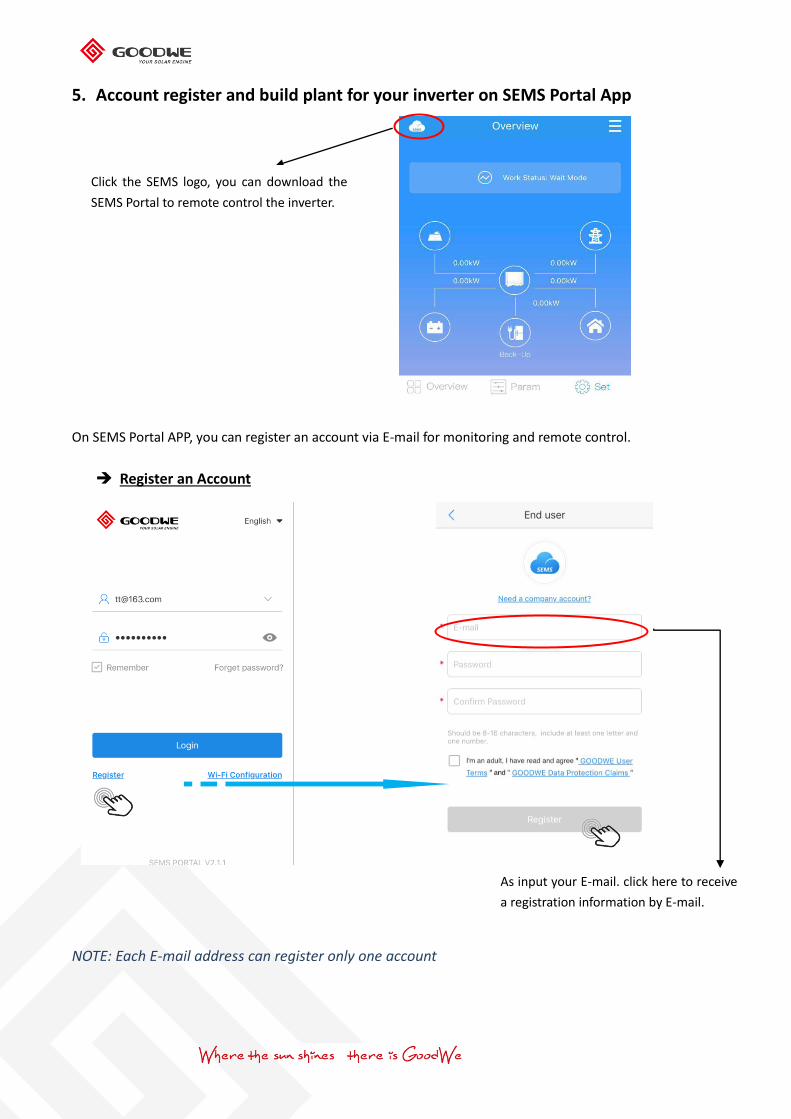
5. Account register and build plant for your inverter on SEMS Portal App
On SEMS Portal APP, you can register an account via E-mail for monitoring and remote control.
Register an Account
NOTE: Each E-mail address can register only one account
As input your E-mail. click here to receive
a registration information by E-mail.
Click the SEMS logo, you can download the
SEMS Portal to remote control the inverter.
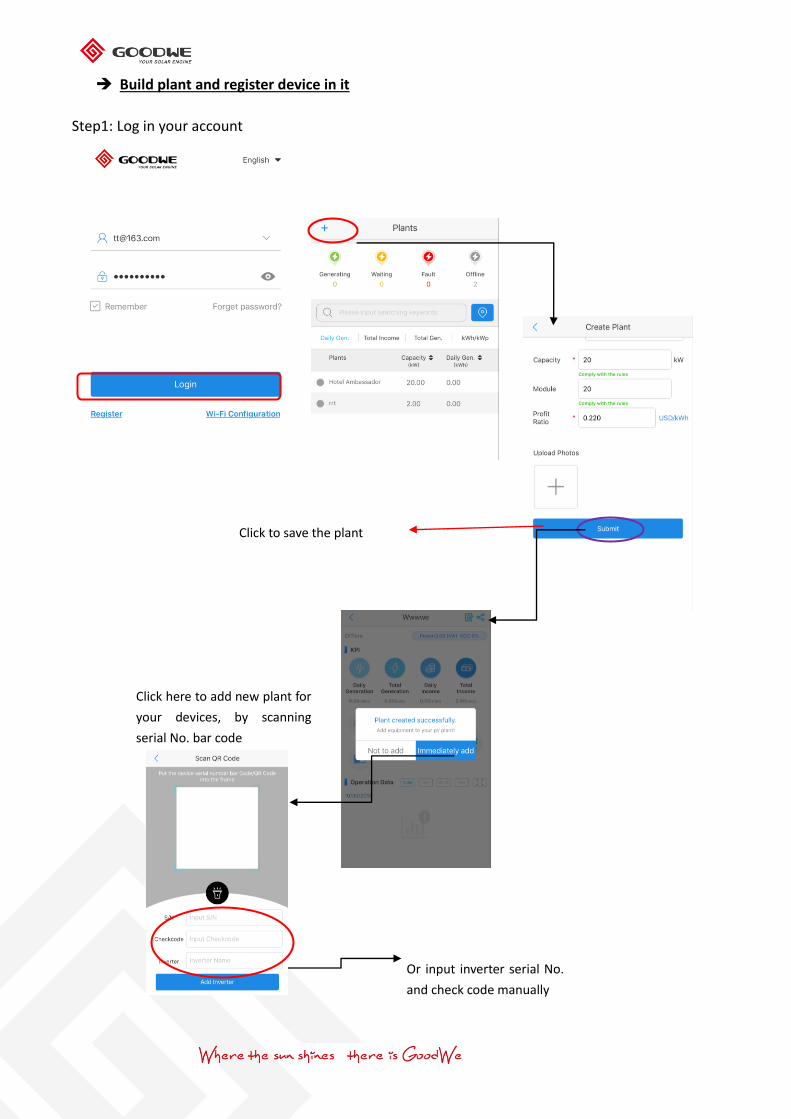
Build plant and register device in it
Step1: Log in your account
Or input inverter serial No.
and check code manually
Click to save the plant
Click here to add new plant for
your devices, by scanning
serial No. bar code

6. Remote Configuration and Monitoring
Remote configuration and monitoring is only accessible for dealer account after Wi-Fi configuration
successfully and build plant on SEMS Portal.
Remote Configuration
Click plant name to find device you want
to configure remotely
Scroll down to see more settings and click “Send”
to save all the settings
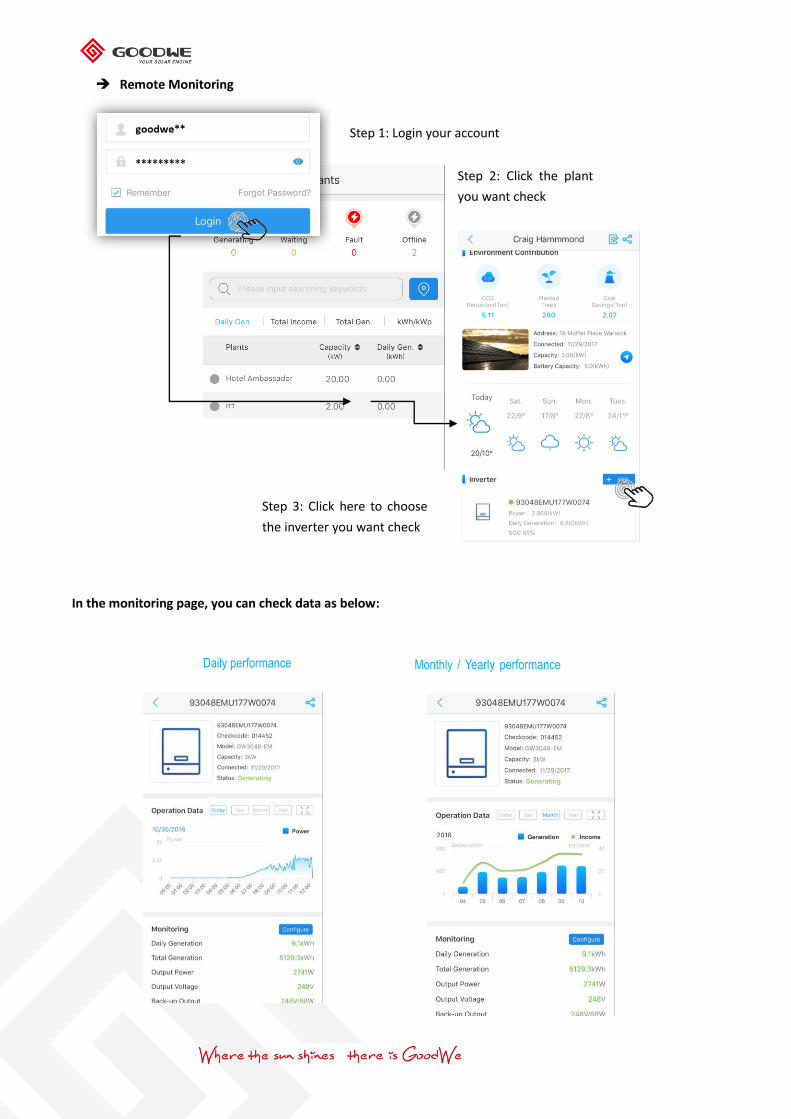
Remote Monitoring
In the monitoring page, you can check data as below:
Step 1: Login your account
Step 2: Click the plant
you want check
Step 3: Click here to choose
the inverter you want check
Daily performance Monthly / Yearly performance
performance