purpose tips to assist with processing
TRANSCRIPT
Last updated: 6/24/2021
Scanning & emailing documents from your devices Tip Sheet
Purpose To provide step-by-step instructions on how to complete a fillable PDF form and scan & e-mail documents to CHC Membership Administration, from your Android or Apple Devices.
Tips to assist with processing 1. Submit a fillable PDF form that is completed with typed text. *preferred*.
o Save all pages of the completed form as one file. o Note: Typed text is easier to process than handwritten text, which can be hard to read
and may result in processing errors or additional processing time. 2. If unable to use fillable PDF form, complete a paper form by hand.
o Scan all pages of the completed form into one file. o Note: Print or block script writing is easier to process than cursive/longhand.
3. Scan all supporting documents in one file.
How to Use Fillable PDF Form (see Appendix for how to access Fillable PDF Forms)
1. Before completing/filling in information, save the form using save as to your desktop or documents. a. Right click on form and click Save As b. Save to your desktop or documents
2. Open the saved form from your computer 3. Complete the form by filling in applicable information 4. Create an electronic signature
a. Note: depending on Adobe version being used, screenshots and/or steps may vary b. Click on Required Signature field
c. Select Use a Signature Creation Device and click Continue d. Select Save to File and click Continue

Last updated: 6/24/2021
e. Fill in required fields: Name and Email Address and click Continue
f. Confirm where Digital ID will be saved and update as necessary g. Create and confirm a password h. Click Save

Last updated: 6/24/2021
i. Confirm information listed is correct and click Continue
j. The Digital Signature just created will appear k. Enter password l. Click on Sign m. Digital Signature will appear with Date stamp including time
5. Once all applicable information has been entered – including all required electronic signature(s) – save completed form to your computer
6. Send completed form via email to [email protected] for processing 7. Tips:
a. Use the latest version of Adobe Reader. Latest version is available from Adobe at http://get.adobe.com/reader/.
b. Mac users: don’t use Preview: Do not use the Preview program to fill in the PDF form. c. Chrome users: Do not use the Chrome PDF viewer program to fill in the PDF form. d. If you cannot see the complete text of what you typed, your text is too long. Shorten
text to fit within field.

Last updated: 6/24/2021
e. How to use Digital Signature after it has been setup i. Note: depending on Adobe version being used, screenshots and/or steps may
vary ii. Click on field within form requiring signature
iii. Confirm applicable Digital ID (digital signature) is selected iv. Click Continue
v. Enter Password previously created vi. Click Sign
vii. Digital Signature will appear on form

Last updated: 6/24/2021
How to Use Document Scanner in the Notes app on iPhone and iPad (for submitting hand-completed forms, and supporting documents) Partial information used from the following source: https://www.imore.com/how-use-document-scanner-iphone-and-ipad
1. Open Notes on your iPhone or iPad. 2. Create a new note. 3. Tap the camera button at the bottom of the screen or above the keyboard.
4. Tap Scan Documents. 5. Line up the document you want to scan. 6. An image will be captured and Retake and Keep Scan options are listed. If you are satisfied by
scan click on Keep Scan.
7. Tap the shutter button if the scanner doesn't automatically scan the document. Repeat this step
for every document you want to scan. 8. Tap Save after you've scanned all of the necessary pages. The button will have a count of how
many pages you scanned.
Last updated: 6/24/2021
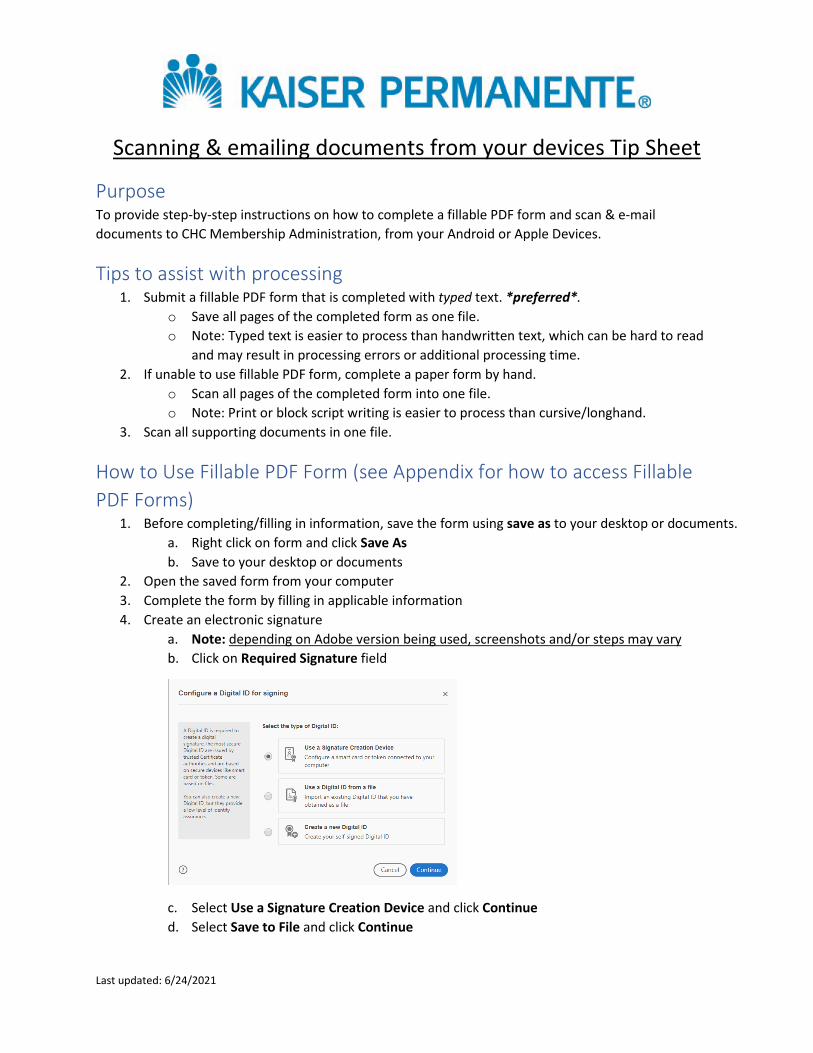
9. The scanned pages will populate in a new note in the Notes app.
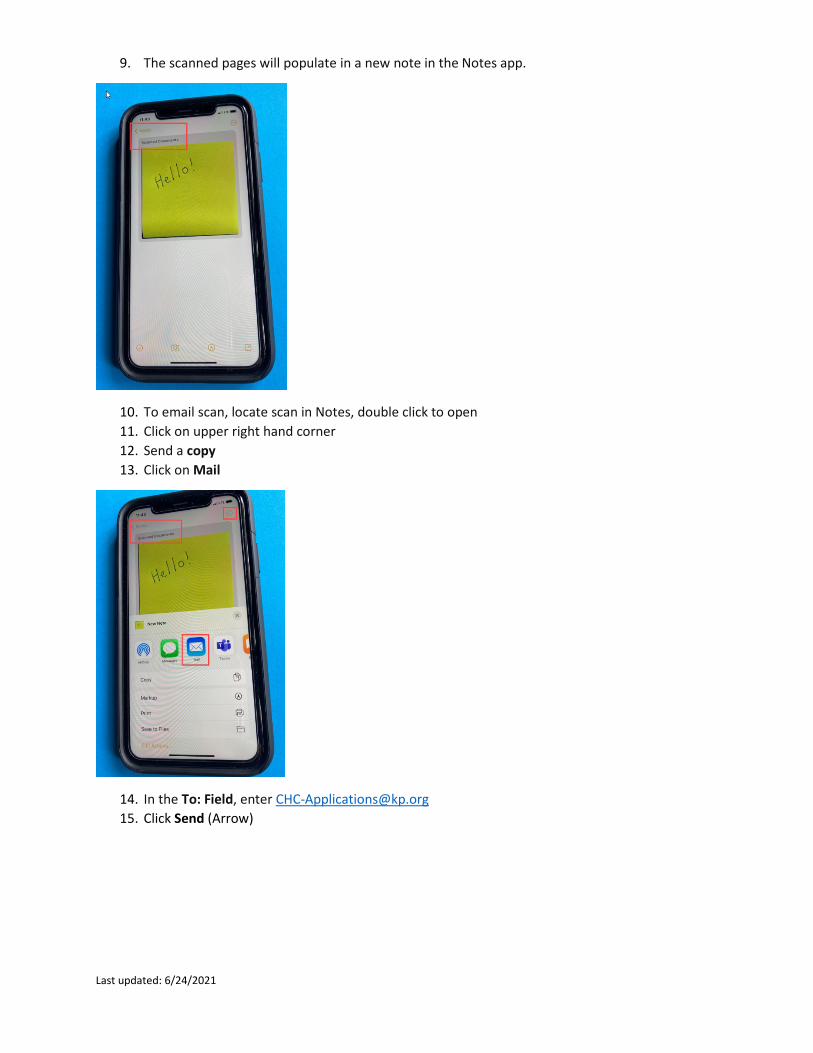
10. To email scan, locate scan in Notes, double click to open 11. Click on upper right hand corner 12. Send a copy 13. Click on Mail
14. In the To: Field, enter [email protected] 15. Click Send (Arrow)

Last updated: 6/24/2021
How to Use Document Scanner in the Notes app on Android Source: https://android.gadgethacks.com/how-to/your-galaxy-has-hidden-document-scanner-built-heres-works-0215282/
1. Open your Camera app and point the phone at a document. As you, the scanner will highlight the document’s borders with a yellow rectangle, along with a “Scan” button on the center.
2. Hit “Scan” when you’re ready, and the document will be stored in the your Android’s Gallery for you to save or share.
3. This feature is enabled by default once you get the One UI 2 update (aka, Android 10). But if you want to double check, head to the Camera app’s settings, choose “Scene optimizer,” then make sure “Document scan” is turned on.
4. Email scanned document to [email protected]

Last updated: 6/24/2021
How to Use Document Scanner in the Notes app on Android using Google Drive Source: https://www.howtogeek.com/209951/the-best-ways-to-scan-a-document-using-your-phone-or-tablet/
1. Scan documents directly into Google Drive by tapping the “+” button in the lower-right corner of the home screen.
2. When the menu slides up from the bottom, select “Scan”.

Last updated: 6/24/2021
3. It may ask for permission to access the phone’s camera. If so, tap on “Allow”.
4. When you are ready to scan your document, fill up the screen with the document as much as you can and tap the blue capture button. You can also shed a little light on the document by tapping the flash icon next to the capture button if your device has a flash. If your device doesn’t have a flash, this option won’t appear.
Last updated: 6/24/2021
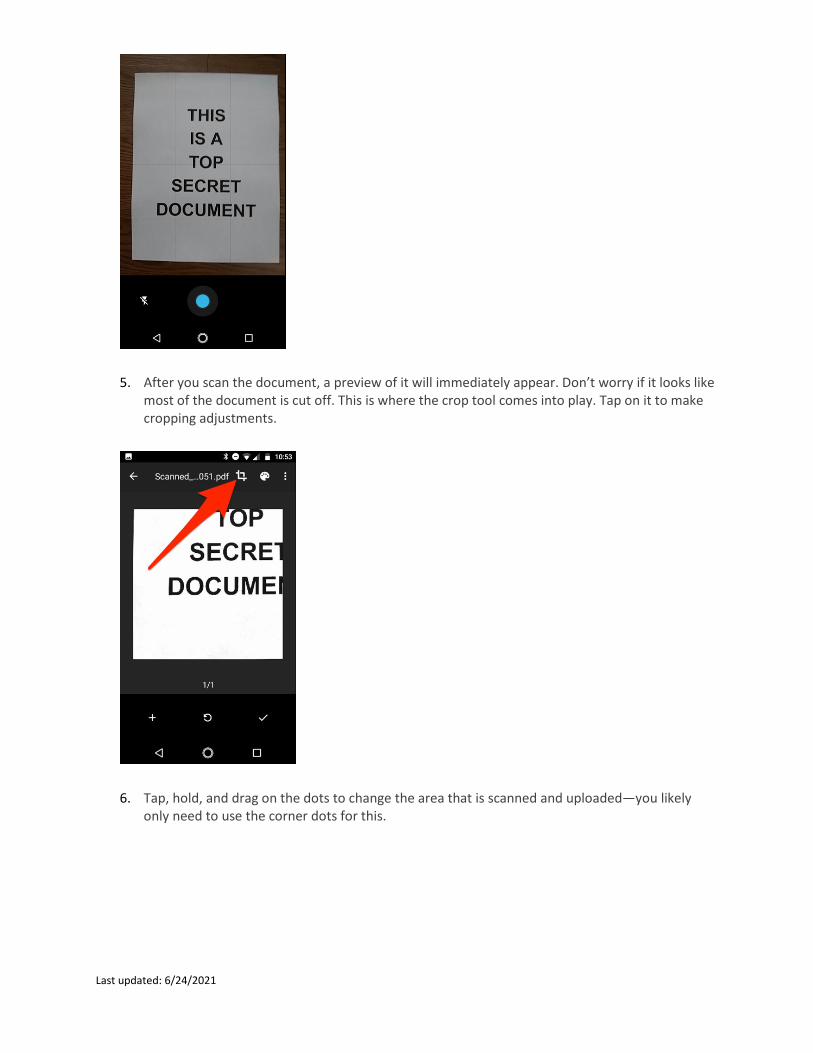
5. After you scan the document, a preview of it will immediately appear. Don’t worry if it looks like most of the document is cut off. This is where the crop tool comes into play. Tap on it to make cropping adjustments.
6. Tap, hold, and drag on the dots to change the area that is scanned and uploaded—you likely only need to use the corner dots for this.

Last updated: 6/24/2021
7. Once finished, tap on the checkmark in the lower-right corner of the screen.
8. You have three options immediately after scanning something:
1. Tap the plus icon to add more pages to the document.
2. To redo a scan, tap the circular arrow in the middle.
3. Tap the checkmark icon to finish and upload the document to Google Drive.

Last updated: 6/24/2021
9. You can also make minor adjustments to your scans as you go. For instance, tapping on the painter’s palette in the top-right corner will allow you to change the scan’s color selection and cater it towards a specific kind of document. By default, the scanner will automatically pick the one it thinks is best.
10. Lastly, the three dots in the upper-right corner will let you delete, rename, and rotate the scan if need be.
Last updated: 6/24/2021
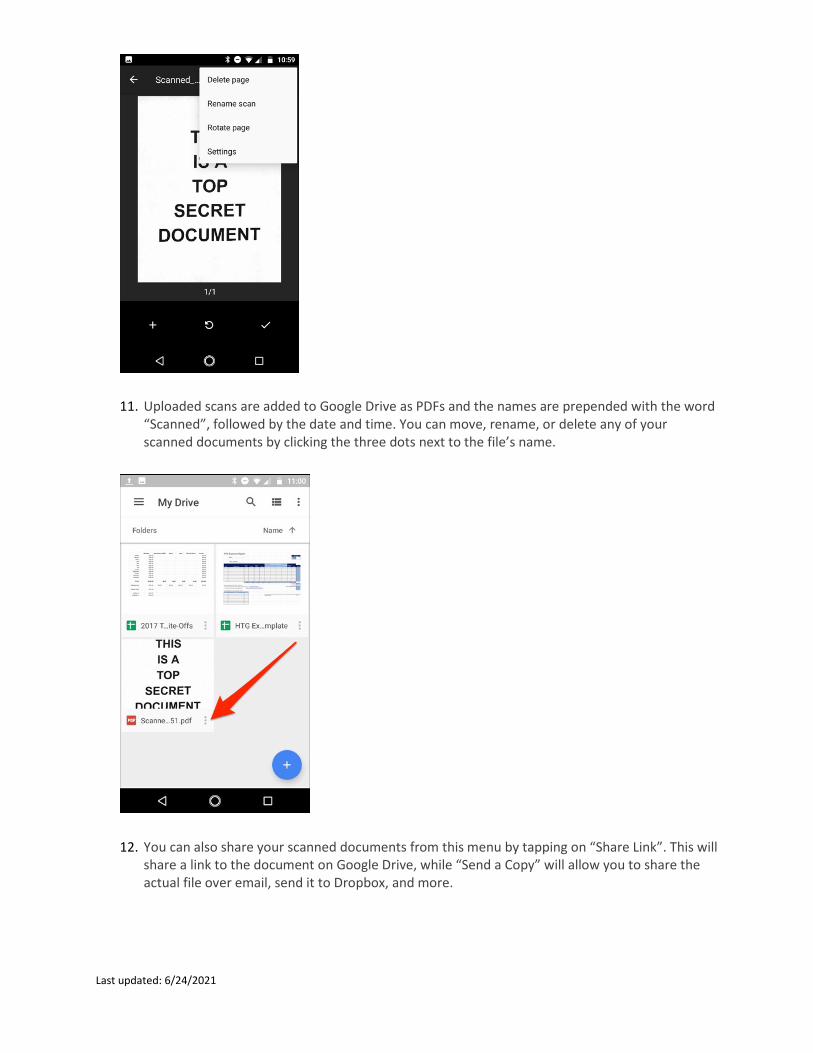
11. Uploaded scans are added to Google Drive as PDFs and the names are prepended with the word “Scanned”, followed by the date and time. You can move, rename, or delete any of your scanned documents by clicking the three dots next to the file’s name.
12. You can also share your scanned documents from this menu by tapping on “Share Link”. This will share a link to the document on Google Drive, while “Send a Copy” will allow you to share the actual file over email, send it to Dropbox, and more.
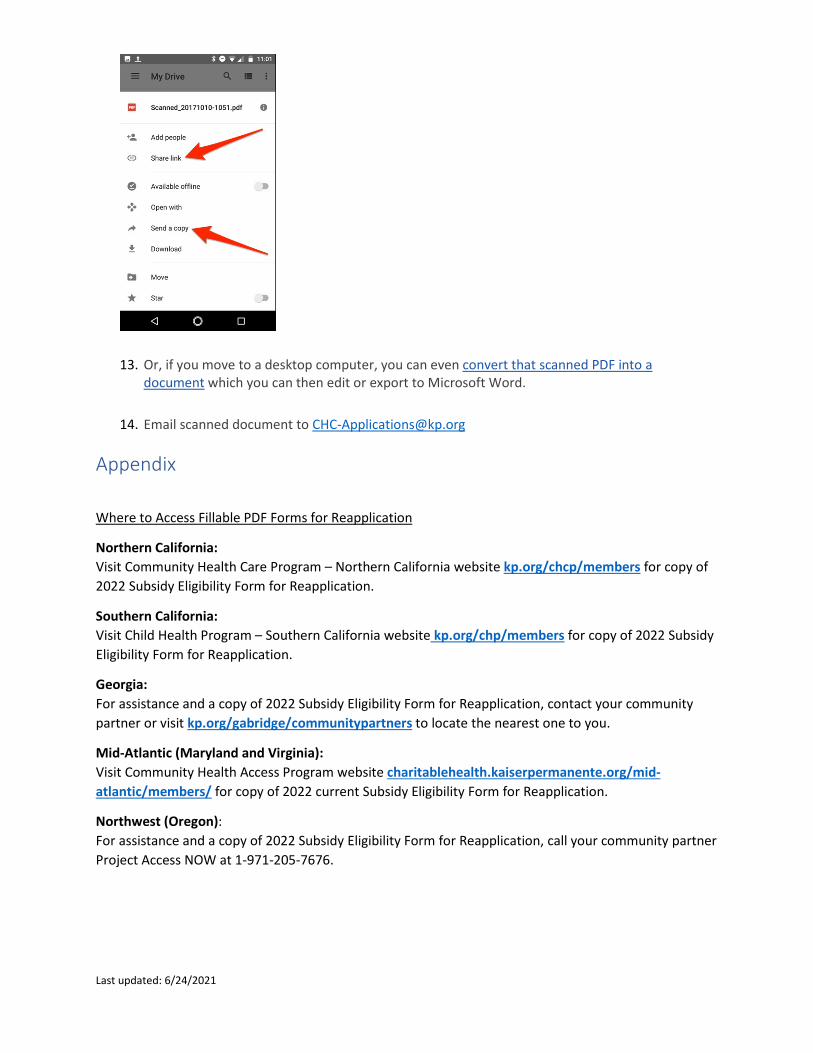
Last updated: 6/24/2021
13. Or, if you move to a desktop computer, you can even convert that scanned PDF into a document which you can then edit or export to Microsoft Word.
14. Email scanned document to [email protected]
Appendix
Where to Access Fillable PDF Forms for Reapplication
Northern California: Visit Community Health Care Program – Northern California website kp.org/chcp/members for copy of 2022 Subsidy Eligibility Form for Reapplication.
Southern California: Visit Child Health Program – Southern California website kp.org/chp/members for copy of 2022 Subsidy Eligibility Form for Reapplication.
Georgia: For assistance and a copy of 2022 Subsidy Eligibility Form for Reapplication, contact your community partner or visit kp.org/gabridge/communitypartners to locate the nearest one to you.
Mid-Atlantic (Maryland and Virginia): Visit Community Health Access Program website charitablehealth.kaiserpermanente.org/mid-atlantic/members/ for copy of 2022 current Subsidy Eligibility Form for Reapplication.
Northwest (Oregon): For assistance and a copy of 2022 Subsidy Eligibility Form for Reapplication, call your community partner Project Access NOW at 1-971-205-7676.