purchasing plan instructions -...
TRANSCRIPT
1
Purchasing Plan Instructions
These instructions describe how to correctly complete the purchasing plan. Begin by downloading the most recent version of the purchasing plan (Version 3.0-C) in the Microsoft Excel format from APD‟s CDC+ Web site at http://apdcares.org/cdcplus/docs/appendix/purchasing-plan.xls. You must have the Microsoft Excel program on your computer to be able to download it. The purchasing plan is occasionally updated to add enhancements. When updating your purchasing plan, always use the most recent version that is on the APD CDC+ Web site. If you do not have access to the Web site, please ask your consultant to give you the most recent version. The Purchasing Plan form can be handwritten and hand calculated; however, the electronic version has built in formulas and drop down boxes that will prevent mathematical errors and calculate estimated taxes where applicable. If completing the purchasing plan electronically in Excel:
o The purchasing plan has been designed to automatically calculate all sections of the plan and to put the totals on the last page so you can see if all sections add up to the monthly budget amount.
o Use your TAB key to move from one area to the next.
o Use the drop down boxes provided.
o Be sure to calculate the additional cost of Emergency Backup‟s (EBUs) by clicking on the box in the top right section of the C1-Budget Detail – SERVICES section of the purchasing plan, entitled “Click Here to Compute EBU Added Cost” after entering all providers on this page.
o A service that is marked CRITICAL (Y) must have all emergency backup providers listed immediately following the primary provider of that critical service.
Purchasing Plan Sections: The purchasing plan consists of 6 Sections. Sections A and B provide information that is necessary for the Area APD liaison to approve your expenditures. Sections C, D, E, and F specify the services and supports to be purchased and identify who will provide them. Please note that the area on the purchasing plan directly below section D (Cash) is used to explain purchases requested in section E (Savings) and for additional information that cannot fit in sections A or B. When using the Excel version of the plan, disregard the page numbers on the tabs at the bottom of the screen. They are used for automatic calculation purposes only. However, after completing the plan, manually enter the page numbers at the bottom of each page as 1 of __, 2 of __, and so forth.
2
The participant or representative is responsible for numbering each purchasing plan page before it is submitted to the consultant. The purchasing plan consists of 6 basic pages that must always be submitted:
Page 1 – Section A – Basic Information
Page 2 – Section B – Needs and Goals
Page 3 – Sections C.1 and C.2 – Services and Supplies
Page 4 – Sections D – Cash
Page 5 – Sections E and F – Savings Plan and OTEs/STEs
Page 6 – Budget Summary and Signatures
ADDITIONAL PAGES: The tabs named “Page 3A” and “Page 3B” are two additional pages provided in the Excel file for participants who need more space to enter all services and supplies in Sections C.1 and C.2. Put an X in the bottom right hand corner of Page 3 to indicate you are going to use Page 3A. Put an X in the bottom right hand corner of Page 3A to indicate you are going to use Page 3B. NOTE: If these pages are used, they are to be inserted directly after Page 3 and the purchasing plan would be numbered consecutively, page 1 of 7 or 1 of 8 through page 7 of 7 or 8 of 8. Numbering your purchasing plan in this manner will ensure that your complete purchasing plan is received as submitted and no pages are missing. The following steps apply whether completing the purchasing plan by hand or using Microsoft Excel.
Page 1, Top: Basic Information 1. Purchasing Plan Effective Date. This will always be the first day of a month.
2. Monthly Budget. Enter the Approved CDC+ Monthly Budget Amount.
3. APD Area. Enter the number of the APD Area in which the participant lives.
4. Participant is on FFI: Yes/No. Enter an “X” in the Yes box if participant is in the
Florida Freedom Initiative. If not, enter an “X” in the No box.
5. Age. Enter the participant‟s age as of the effective date of the purchasing plan.

3
Page 1, Section A: Participant Information 1. Participant Name. PRINT the participant‟s First, Middle Initial (if any) and Last
Name. If typing in Excel, be sure the participant‟s first name is typed in the box above the word “First” and last name is typed in the box above the word “Last” so that the first and last names will automatically be entered at the top of all remaining pages of the purchasing plan.
2. Participant ID #. Enter the participant‟s 7-digit number CDC+ ID Number (from the Budget Authorization Form).
3. Representative Name. If the participant has selected a representative to manage the CDC+ program, PRINT the representative‟s First Name, Middle Initial (if any) and Last Name.
4. Phone #. Enter the phone number of the participant; if the participant has selected
a representative, enter the phone number of the representative.
5. Cell #. Enter the cell phone number of the participant; if the participant has selected a representative, enter the cell phone number of the representative.
Page 1, Reason for Submitting Purchasing Plan
The consultant is responsible for checking all appropriate boxes to indicate the reason the purchasing plan is being submitted. There are only three (3) reasons to submit a purchasing plan. One of the following three boxes and the appropriate boxes below them must be checked:
1. New Start – Check this box when the individual has received a Budget Authorization Form verifying the monthly budget and this is his or her first purchasing plan. The completed and signed Budget Authorization Form must be attached.
2. Purchasing Plan Change – Check this box when there is a change in the participant‟s monthly budget amount and/or there is an addition of a One-Time Expenditure (OTE) or a Short Term Expenditure (STE). The consultant must enter the amount of the new monthly budget on the appropriate line and/or the total amount of all Short-Term and One-Time Expenditures on the correct line.
3. Purchasing Plan Update – Check this box when the participant has revised his or her purchasing plan, but there is no change in budget and no addition of One Time or Short Term Expenditure funds
4
The participant is responsible for completing the items at the bottom of Page 1 (highlighted in yellow and marked with an *) before submitting a revised plan to the consultant. This includes:
Line 11. Enter the page numbers that are revised if this is a plan change or update.
Line 12. Check this box when the participant has selected a new representative and the appropriate boxes below must be checked. Submit an updated Participant Information Update Form with the purchasing plan.
Lines 15-17. Enter the number of Employee packets and Vendor/Independent Contractor (IC) packets that are being submitted with the purchasing plan and the name associated with each packet.
Lines 18-21. Enter the names of any employees or vendors that are no longer going to be working for you. This tells APD staff they can remove the employees‟ or vendors‟ records from the CDC+ database.
Line 22. Enter the total number of pages in the purchasing plan being submitted.
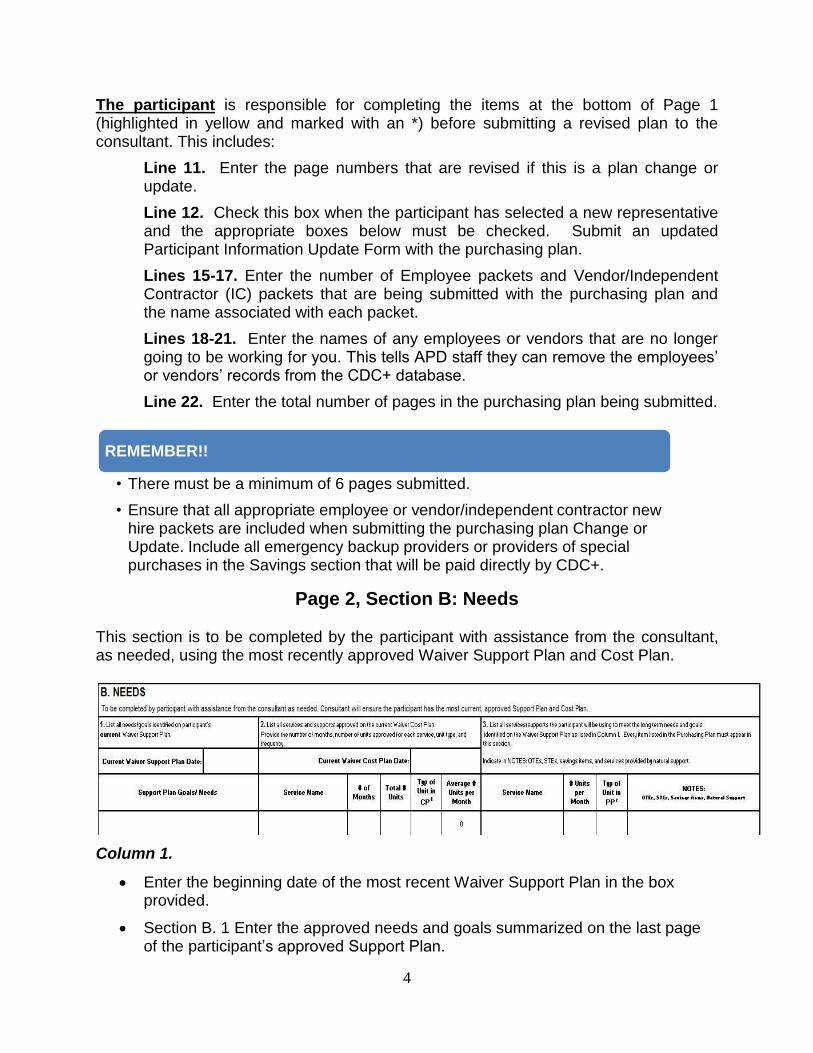
Page 2, Section B: Needs
This section is to be completed by the participant with assistance from the consultant, as needed, using the most recently approved Waiver Support Plan and Cost Plan.
Column 1.
Enter the beginning date of the most recent Waiver Support Plan in the box provided.
Section B. 1 Enter the approved needs and goals summarized on the last page of the participant‟s approved Support Plan.
REMEMBER!!
• There must be a minimum of 6 pages submitted.
• Ensure that all appropriate employee or vendor/independent contractor new hire packets are included when submitting the purchasing plan Change or Update. Include all emergency backup providers or providers of special purchases in the Savings section that will be paid directly by CDC+.
5
Column 2.
Enter the beginning date of the most recent Waiver Cost Plan in the box provided.
Section B.2 - Enter the type of service, the number of months in the cost plan, the type of unit and the total amount of units authorized on the cost plan.
Column 3.
Every item listed in the purchasing plan must appear in this section.
Section B.3 - Enter the number of units for each service the participant is planning to purchase with CDC+ funds to meet the long-term needs and goals identified in the Waiver Support Plan. Indicate in the Notes column all One-Time Expenditures (OTEs), Short-Term Expenditures (STEs), saving items and services provided by natural supports.
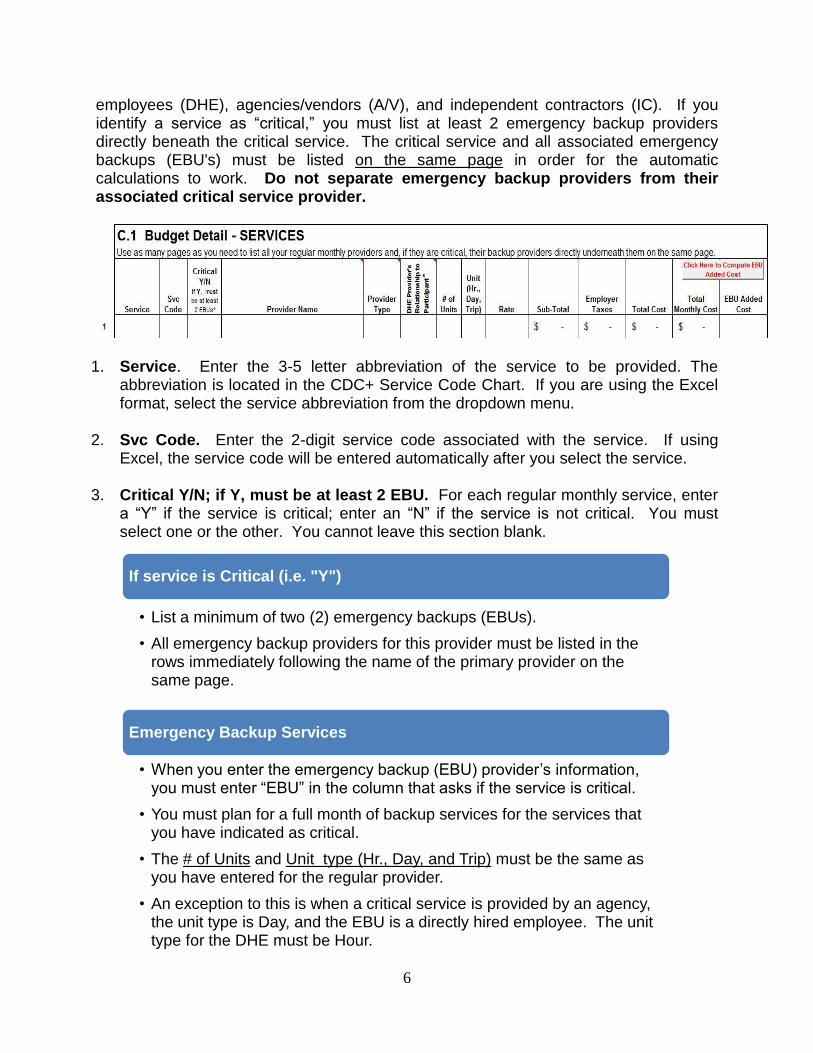
Page 3, Section C. 1: Budget Detail – Services
In this section, list all the approved services that will be purchased on a regular monthly basis to meet the needs and goals identified on the support plan. List all directly hired
Helpful Hint
• If the units approved on the cost plan are in quarter hours, convert the information to hours to assist you as you determine the number of hours that you will need on your purchasing plan.
• Remember there are no quarter hours in CDC+.
• Example: 480 quarter hours per year = 120 hours per year or 10 hours per month.
Helpful Hint
• You must ensure that at least 92% of the number of units of all restricted services approved on the Waiver Cost Plan are budgeted for on the purchasing plan.
• Example: 480 quarter hours of Physical Therapy (PT) is approved on waiver cost plan for the year.
• 480 quarter hours = 120 hours per year, or 10 hours per month.
• 92% of 120 hours of PT for the year = 111 hours per year or 9 hours per month.
• 9 hours must be entered on the purchasing plan.
6
employees (DHE), agencies/vendors (A/V), and independent contractors (IC). If you identify a service as “critical,” you must list at least 2 emergency backup providers directly beneath the critical service. The critical service and all associated emergency backups (EBU's) must be listed on the same page in order for the automatic calculations to work. Do not separate emergency backup providers from their associated critical service provider.
1. Service. Enter the 3-5 letter abbreviation of the service to be provided. The abbreviation is located in the CDC+ Service Code Chart. If you are using the Excel format, select the service abbreviation from the dropdown menu.
2. Svc Code. Enter the 2-digit service code associated with the service. If using Excel, the service code will be entered automatically after you select the service.
3. Critical Y/N; if Y, must be at least 2 EBU. For each regular monthly service, enter
a “Y” if the service is critical; enter an “N” if the service is not critical. You must select one or the other. You cannot leave this section blank.
If service is Critical (i.e. "Y")
• List a minimum of two (2) emergency backups (EBUs).
• All emergency backup providers for this provider must be listed in the rows immediately following the name of the primary provider on the same page.
Emergency Backup Services
• When you enter the emergency backup (EBU) provider‟s information, you must enter “EBU” in the column that asks if the service is critical.
• You must plan for a full month of backup services for the services that you have indicated as critical.
• The # of Units and Unit type (Hr., Day, and Trip) must be the same as you have entered for the regular provider.
• An exception to this is when a critical service is provided by an agency, the unit type is Day, and the EBU is a directly hired employee. The unit type for the DHE must be Hour.
7
4. Provider Name. Enter the legal name of the provider as it appears on the employee‟s IRS Form W-4, the independent contractor‟s IRS Form W-9, or on the Vendor Information Form. Please, do not use abbreviations, nicknames or initials even if that is the way you refer to the provider.
5. Provider Type. The provider will either be a directly hired employee, an agency or vendor, or an independent contractor. You must select one of the following provider types from the drop-down menu (if you use the Excel format) or write it in by hand.
DHE = Directly Hired Employee
A/V = Agency or Vendor
IC = Independent Contractor
6. DHE Provider’s Relationship to Participant. Enter the relationship of a directly hired employee to the participant so that employer taxes are calculated correctly. Enter the correct number (1-5) into this area, as follows:
1 = employee is participant‟s parent or stepparent
2 = employee is participant‟s child under age 21
3 = employee is participant‟s spouse
4 = employee is a person (related or not related) under age 18 who is still in High School
5 = employee is not related to the participant in the ways described in 1-4
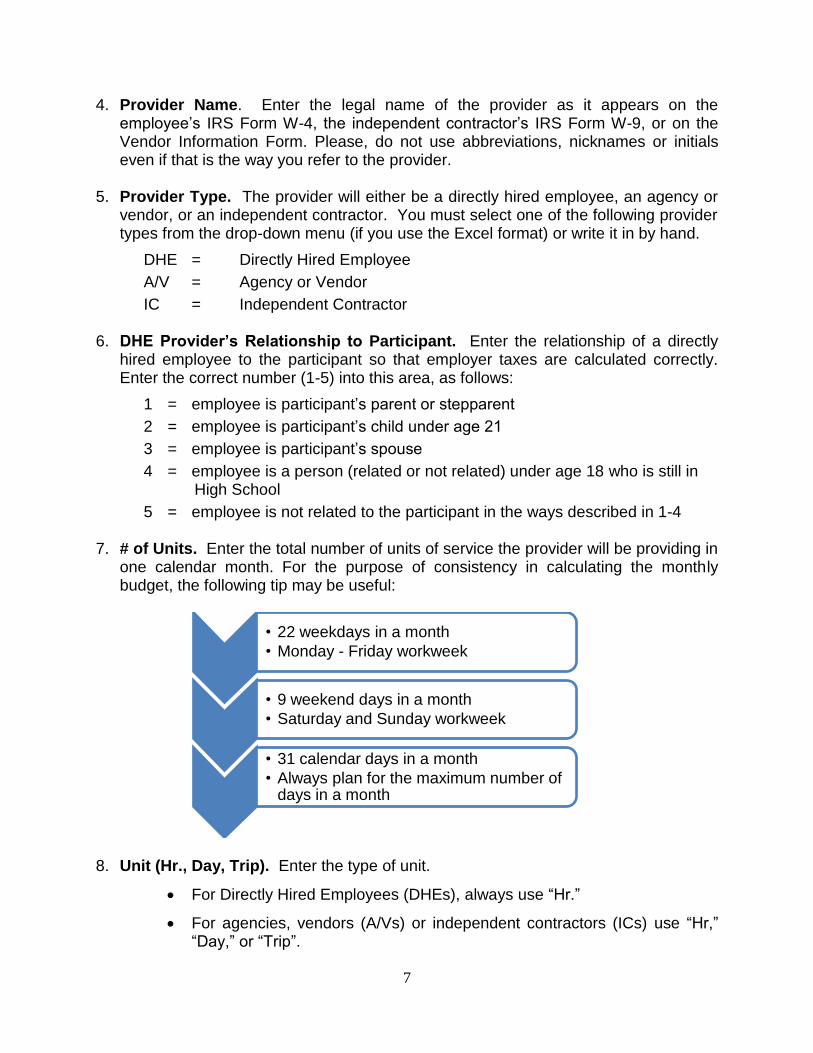
7. # of Units. Enter the total number of units of service the provider will be providing in one calendar month. For the purpose of consistency in calculating the monthly budget, the following tip may be useful:
8. Unit (Hr., Day, Trip). Enter the type of unit.
For Directly Hired Employees (DHEs), always use “Hr.”
For agencies, vendors (A/Vs) or independent contractors (ICs) use “Hr,” “Day,” or “Trip”.
• 22 weekdays in a month
• Monday - Friday workweek
• 9 weekend days in a month
• Saturday and Sunday workweek
• 31 calendar days in a month
• Always plan for the maximum number of days in a month
8
9. Rate. Enter the rate of pay negotiated with each provider as a full unit of service.
10. Sub-Total. In Excel, this amount is automatically calculated. If handwritten, multiply the Rate times the # of Units, and write in the result.
11. Employer Taxes. For all DHEs whose relationship to the participant is 1-4, the
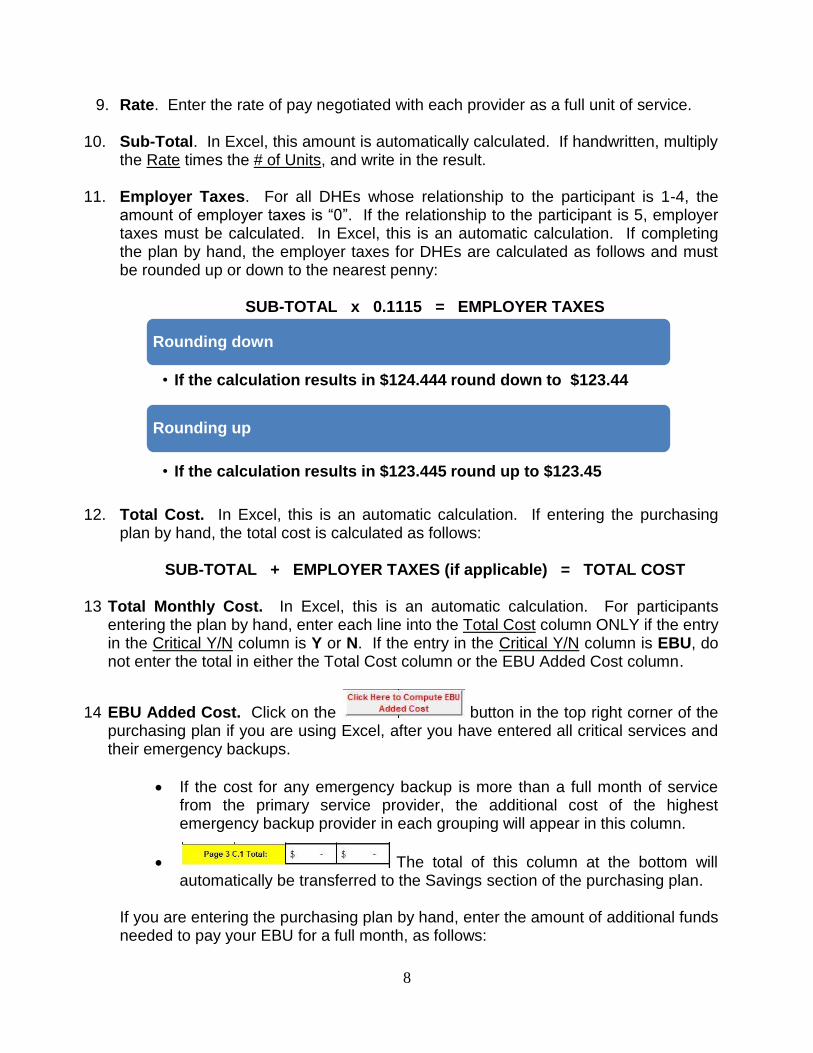
amount of employer taxes is “0”. If the relationship to the participant is 5, employer taxes must be calculated. In Excel, this is an automatic calculation. If completing the plan by hand, the employer taxes for DHEs are calculated as follows and must be rounded up or down to the nearest penny:
SUB-TOTAL x 0.1115 = EMPLOYER TAXES
12. Total Cost. In Excel, this is an automatic calculation. If entering the purchasing
plan by hand, the total cost is calculated as follows:
SUB-TOTAL + EMPLOYER TAXES (if applicable) = TOTAL COST
13 Total Monthly Cost. In Excel, this is an automatic calculation. For participants entering the plan by hand, enter each line into the Total Cost column ONLY if the entry in the Critical Y/N column is Y or N. If the entry in the Critical Y/N column is EBU, do not enter the total in either the Total Cost column or the EBU Added Cost column.
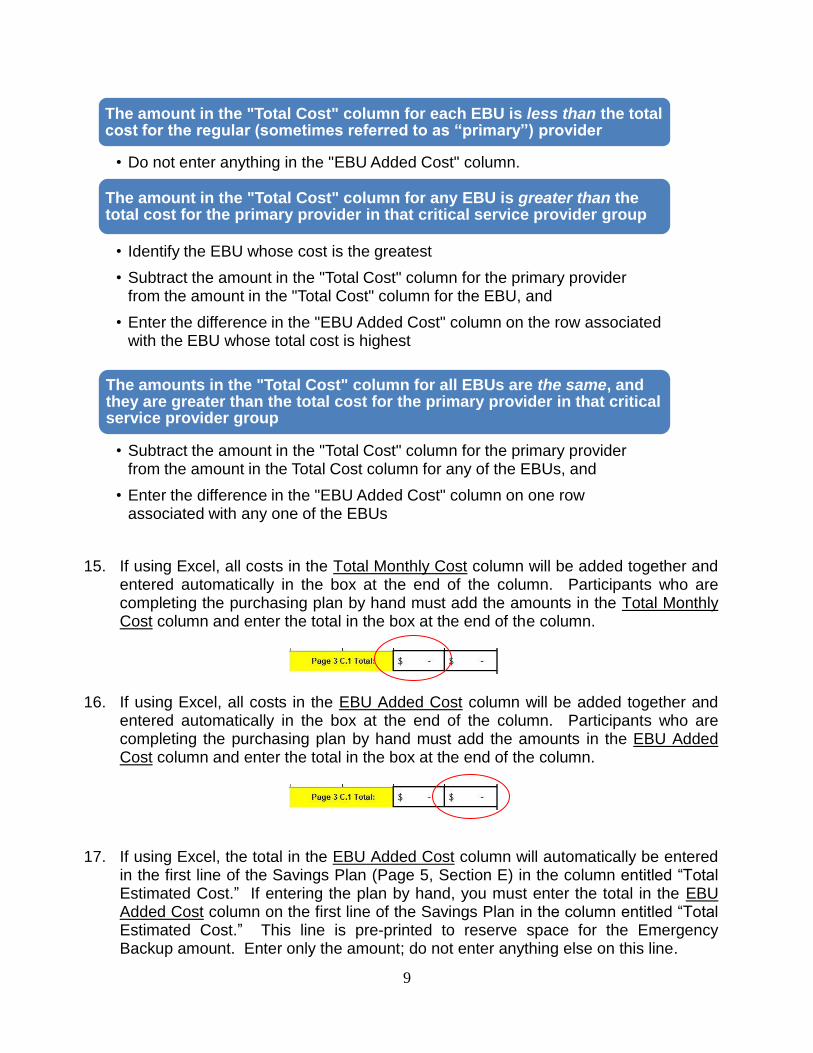
14 EBU Added Cost. Click on the button in the top right corner of the purchasing plan if you are using Excel, after you have entered all critical services and their emergency backups.
If the cost for any emergency backup is more than a full month of service from the primary service provider, the additional cost of the highest emergency backup provider in each grouping will appear in this column.
The total of this column at the bottom will automatically be transferred to the Savings section of the purchasing plan.
If you are entering the purchasing plan by hand, enter the amount of additional funds needed to pay your EBU for a full month, as follows:
Rounding down
• If the calculation results in $124.444 round down to $123.44
Rounding up
• If the calculation results in $123.445 round up to $123.45
9
15. If using Excel, all costs in the Total Monthly Cost column will be added together and
entered automatically in the box at the end of the column. Participants who are completing the purchasing plan by hand must add the amounts in the Total Monthly Cost column and enter the total in the box at the end of the column.
16. If using Excel, all costs in the EBU Added Cost column will be added together and entered automatically in the box at the end of the column. Participants who are completing the purchasing plan by hand must add the amounts in the EBU Added Cost column and enter the total in the box at the end of the column.
17. If using Excel, the total in the EBU Added Cost column will automatically be entered in the first line of the Savings Plan (Page 5, Section E) in the column entitled “Total Estimated Cost.” If entering the plan by hand, you must enter the total in the EBU Added Cost column on the first line of the Savings Plan in the column entitled “Total Estimated Cost.” This line is pre-printed to reserve space for the Emergency Backup amount. Enter only the amount; do not enter anything else on this line.
The amount in the "Total Cost" column for each EBU is less than the total cost for the regular (sometimes referred to as “primary”) provider
• Do not enter anything in the "EBU Added Cost" column.
The amount in the "Total Cost" column for any EBU is greater than the total cost for the primary provider in that critical service provider group
• Identify the EBU whose cost is the greatest
• Subtract the amount in the "Total Cost" column for the primary provider from the amount in the "Total Cost" column for the EBU, and
• Enter the difference in the "EBU Added Cost" column on the row associated with the EBU whose total cost is highest
The amounts in the "Total Cost" column for all EBUs are the same, and they are greater than the total cost for the primary provider in that critical service provider group
• Subtract the amount in the "Total Cost" column for the primary provider from the amount in the Total Cost column for any of the EBUs, and
• Enter the difference in the "EBU Added Cost" column on one row associated with any one of the EBUs
10
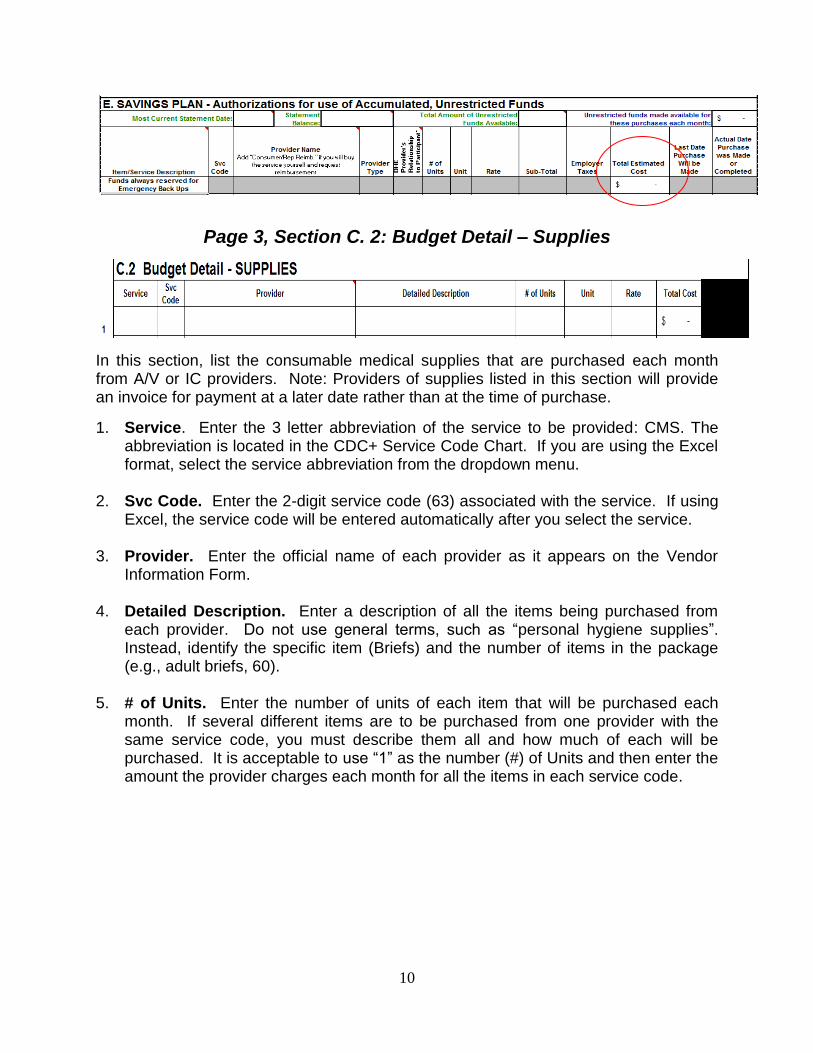
Page 3, Section C. 2: Budget Detail – Supplies
In this section, list the consumable medical supplies that are purchased each month from A/V or IC providers. Note: Providers of supplies listed in this section will provide an invoice for payment at a later date rather than at the time of purchase.
1. Service. Enter the 3 letter abbreviation of the service to be provided: CMS. The abbreviation is located in the CDC+ Service Code Chart. If you are using the Excel format, select the service abbreviation from the dropdown menu.
2. Svc Code. Enter the 2-digit service code (63) associated with the service. If using
Excel, the service code will be entered automatically after you select the service. 3. Provider. Enter the official name of each provider as it appears on the Vendor
Information Form. 4. Detailed Description. Enter a description of all the items being purchased from
each provider. Do not use general terms, such as “personal hygiene supplies”. Instead, identify the specific item (Briefs) and the number of items in the package (e.g., adult briefs, 60).
5. # of Units. Enter the number of units of each item that will be purchased each
month. If several different items are to be purchased from one provider with the same service code, you must describe them all and how much of each will be purchased. It is acceptable to use “1” as the number (#) of Units and then enter the amount the provider charges each month for all the items in each service code.

11
For Example:
OR
6. Unit. Enter the type of unit; e.g., box, package, dozen, item, etc. 7. Rate. Enter the cost of each unit. If several different items are to be purchased
from one provider and “1” is entered as the # of Units, enter the total cost of that group of items in this column.
8. Total Cost. If using Excel, the amount in this column will be automatically
calculated. If completing the plan by hand, multiply the Rate times the # of Units and enter the result.
9. “Total.” If using Excel, the amounts in the Total Cost column will be automatically
added together and the total will be entered in the box at the end of the column
. If completing the plan by hand, add all items in the Total Cost column and enter the total into the box at the end of the column.
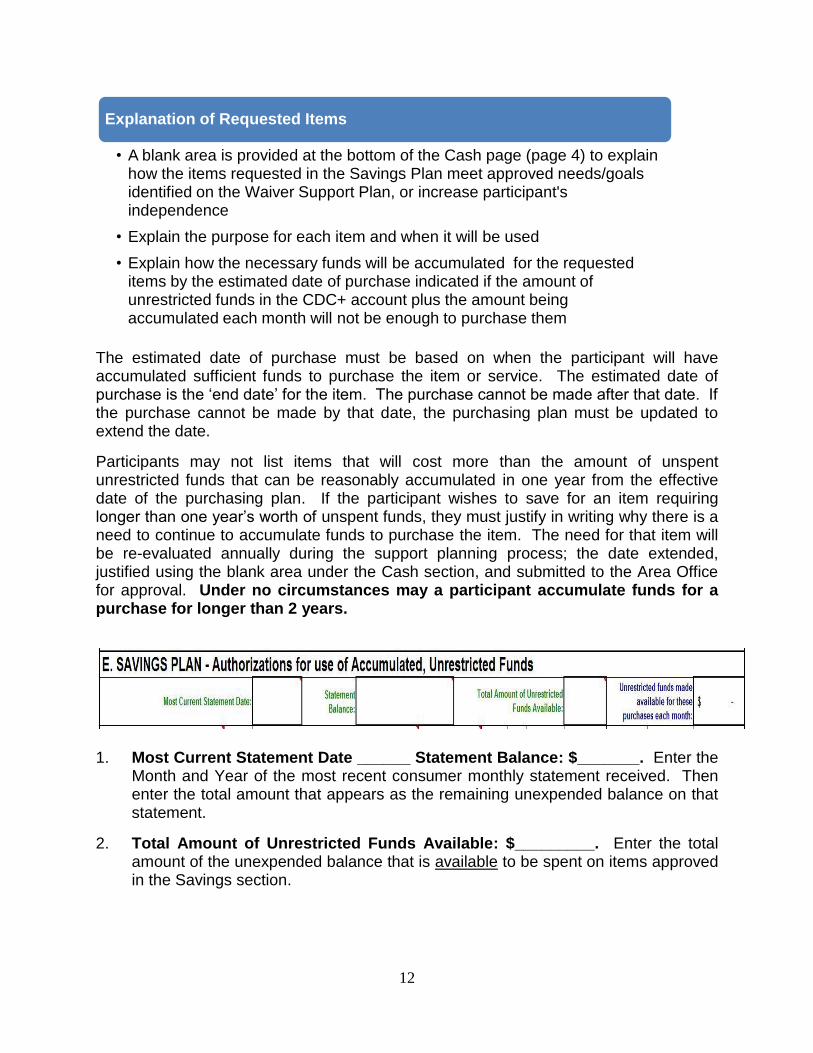
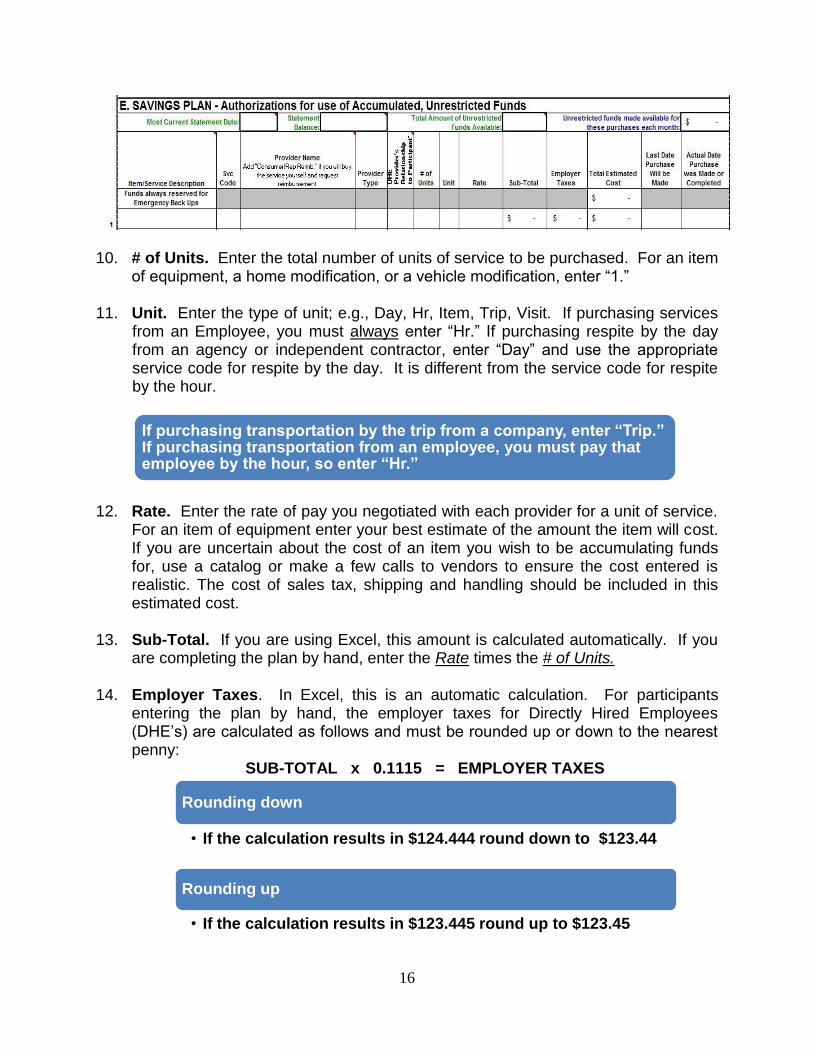
Page 5, Section E: Budget Detail – SAVINGS PLAN The CDC+ Savings Plan must be a well thought-out plan of purchases that must clearly reflect the participant‟s identified needs and goals and be directly related to the participant‟s well-being, improved overall functioning, or increased independence (i.e., to reduce dependence on others).
12
The estimated date of purchase must be based on when the participant will have accumulated sufficient funds to purchase the item or service. The estimated date of purchase is the „end date‟ for the item. The purchase cannot be made after that date. If the purchase cannot be made by that date, the purchasing plan must be updated to extend the date.
Participants may not list items that will cost more than the amount of unspent unrestricted funds that can be reasonably accumulated in one year from the effective date of the purchasing plan. If the participant wishes to save for an item requiring longer than one year‟s worth of unspent funds, they must justify in writing why there is a need to continue to accumulate funds to purchase the item. The need for that item will be re-evaluated annually during the support planning process; the date extended, justified using the blank area under the Cash section, and submitted to the Area Office for approval. Under no circumstances may a participant accumulate funds for a purchase for longer than 2 years.
1. Most Current Statement Date ______ Statement Balance: $_______. Enter the
Month and Year of the most recent consumer monthly statement received. Then enter the total amount that appears as the remaining unexpended balance on that statement.
2. Total Amount of Unrestricted Funds Available: $_________. Enter the total amount of the unexpended balance that is available to be spent on items approved in the Savings section.
Explanation of Requested Items
• A blank area is provided at the bottom of the Cash page (page 4) to explain how the items requested in the Savings Plan meet approved needs/goals identified on the Waiver Support Plan, or increase participant's independence
• Explain the purpose for each item and when it will be used
• Explain how the necessary funds will be accumulated for the requested items by the estimated date of purchase indicated if the amount of unrestricted funds in the CDC+ account plus the amount being accumulated each month will not be enough to purchase them
13
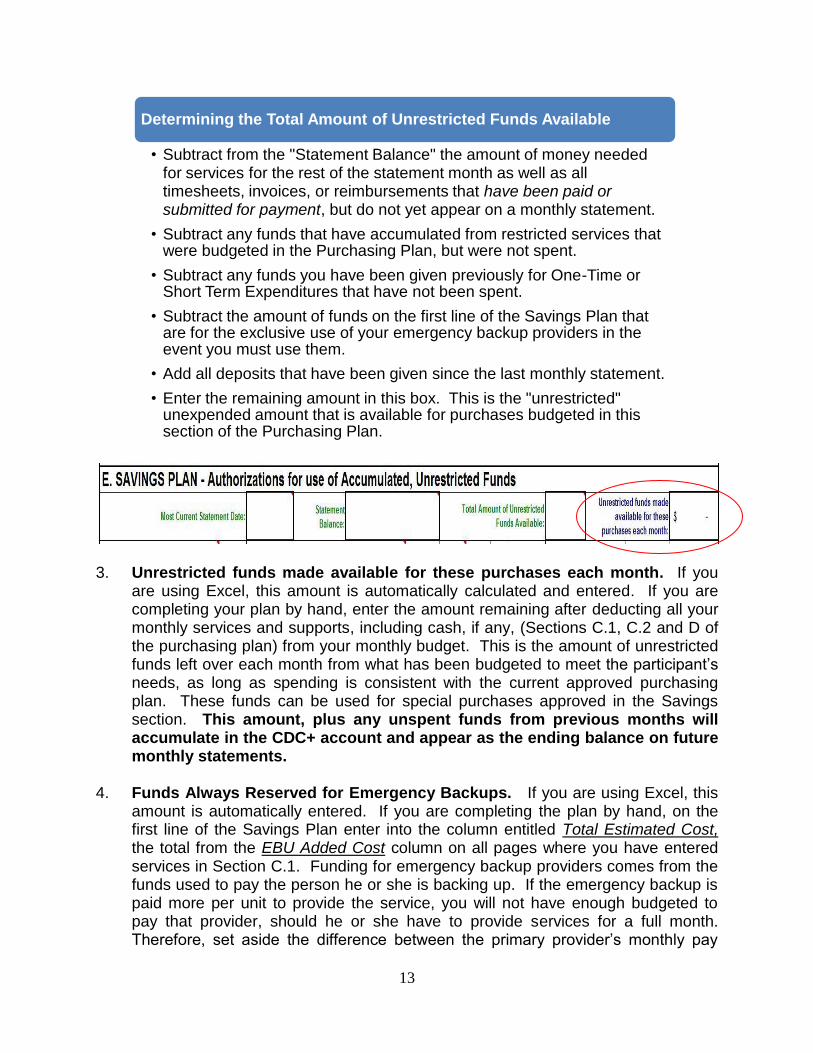
3. Unrestricted funds made available for these purchases each month. If you
are using Excel, this amount is automatically calculated and entered. If you are completing your plan by hand, enter the amount remaining after deducting all your monthly services and supports, including cash, if any, (Sections C.1, C.2 and D of the purchasing plan) from your monthly budget. This is the amount of unrestricted funds left over each month from what has been budgeted to meet the participant‟s needs, as long as spending is consistent with the current approved purchasing plan. These funds can be used for special purchases approved in the Savings section. This amount, plus any unspent funds from previous months will accumulate in the CDC+ account and appear as the ending balance on future monthly statements.
4. Funds Always Reserved for Emergency Backups. If you are using Excel, this
amount is automatically entered. If you are completing the plan by hand, on the first line of the Savings Plan enter into the column entitled Total Estimated Cost, the total from the EBU Added Cost column on all pages where you have entered services in Section C.1. Funding for emergency backup providers comes from the funds used to pay the person he or she is backing up. If the emergency backup is paid more per unit to provide the service, you will not have enough budgeted to pay that provider, should he or she have to provide services for a full month. Therefore, set aside the difference between the primary provider‟s monthly pay
Determining the Total Amount of Unrestricted Funds Available
• Subtract from the "Statement Balance" the amount of money needed for services for the rest of the statement month as well as all timesheets, invoices, or reimbursements that have been paid or submitted for payment, but do not yet appear on a monthly statement.
• Subtract any funds that have accumulated from restricted services that were budgeted in the Purchasing Plan, but were not spent.
• Subtract any funds you have been given previously for One-Time or Short Term Expenditures that have not been spent.
• Subtract the amount of funds on the first line of the Savings Plan that are for the exclusive use of your emergency backup providers in the event you must use them.
• Add all deposits that have been given since the last monthly statement.
• Enter the remaining amount in this box. This is the "unrestricted" unexpended amount that is available for purchases budgeted in this section of the Purchasing Plan.

14
and the backup provider‟s monthly pay. These additional funds are always the first item in the Savings section of the participant‟s account because they are considered essential.
Entering Special Purchases in the Savings Section:
The instructions for entering items in the Savings section are different from the way items are entered into other sections of the purchasing plan.
5. Item/Service Description. Enter the 3-5 letter abbreviation from the Service Code
Chart that best describes the service for which you are accumulating funds. In addition, include a specific description of the desired purchase. For example, if you are requesting to purchase a hoyer lift, enter “EQUIP-hoyer lift.” If you wish to accumulate funds for certain consumable medical supplies, do not enter just “CMS.” You must describe exactly what you wish to purchase. If it is not clear what is being requested, it cannot be approved.
6. Svc Code. Enter the 2-digit service code associated with the service or item (plus
“A”, if appropriate – refer to the Service Code Chart). 7. Provider Name. Enter the legal name of the provider.
a. If you know who the provider will be and that you will be submitting timesheets or invoices to pay the provider, enter the name of the provider as it appears on the W-4 (for DHE), W-9 (IC) or Vendor Information Form (for A/V).
15
b. If you know the provider will be a DHE, but you do not know which of several potential DHEs you might use, enter the name of each potential DHE on a separate line, along with the service code, a share of the total units of service to be provided, and rate of pay, and calculate the total for each DHE. A DHE must be associated with a service code and rate of pay in order to be authorized for payment. You cannot enter “Any,” “Various,” or “Several”. You cannot put a DHE on your purchasing plan unless the DHE has completed an Employee Packet, and you must submit it with the purchasing plan the first time the person is listed on your plan.
c. If you know the provider, and you will pay the provider out of pocket and
request reimbursement, enter the official name of the provider and then “Con/Rep Reimbursement” or “Reimbursement” or words to that effect.
d. If you do not yet know who the provider will be, do not enter the item.
When you do know who the provider will be, you can submit a Purchasing Plan Update or a Purchasing Plan Quick Update in order to add this item or service to the savings section. A completed provider packet must accompany the Purchasing Plan Update or Quick Update if the provider is being listed on the plan for the first time.
8. Provider Type. Enter the correct abbreviation to identify the provider type. Your
provider will be a directly hired employee (DHE), an agency or vendor (A/V), or an independent contractor (IC). It is your responsibility to know what your business relationship is to each of your providers.
9. DHE Provider’s Relationship to Participant. Enter the relationship of a directly
hired employee to the participant so the employer taxes will be calculated correctly. Enter the correct number (1-5) into this area, as follows:
1 = employee is participant‟s parent or stepparent
2 = employee is participant‟s child under age 21
3 = employee is participant‟s spouse
4 = employee is a person (related or not related) under age 18 still in High School
5 = employee is not related to the participant in the ways described in 1-4
The provider type on the purchasing plan must be the same as the provider paperwork submitted with the purchasing plan.
16
10. # of Units. Enter the total number of units of service to be purchased. For an item of equipment, a home modification, or a vehicle modification, enter “1.”
11. Unit. Enter the type of unit; e.g., Day, Hr, Item, Trip, Visit. If purchasing services
from an Employee, you must always enter “Hr.” If purchasing respite by the day from an agency or independent contractor, enter “Day” and use the appropriate service code for respite by the day. It is different from the service code for respite by the hour.
12. Rate. Enter the rate of pay you negotiated with each provider for a unit of service.
For an item of equipment enter your best estimate of the amount the item will cost. If you are uncertain about the cost of an item you wish to be accumulating funds for, use a catalog or make a few calls to vendors to ensure the cost entered is realistic. The cost of sales tax, shipping and handling should be included in this estimated cost.
13. Sub-Total. If you are using Excel, this amount is calculated automatically. If you
are completing the plan by hand, enter the Rate times the # of Units. 14. Employer Taxes. In Excel, this is an automatic calculation. For participants
entering the plan by hand, the employer taxes for Directly Hired Employees (DHE‟s) are calculated as follows and must be rounded up or down to the nearest penny:
SUB-TOTAL x 0.1115 = EMPLOYER TAXES
If purchasing transportation by the trip from a company, enter “Trip.” If purchasing transportation from an employee, you must pay that employee by the hour, so enter “Hr.”
Rounding down
• If the calculation results in $124.444 round down to $123.44
Rounding up
• If the calculation results in $123.445 round up to $123.45
17
15. Total Estimated Cost. In Excel, this is an automatic calculation. For participants entering the plan by hand, the total cost is calculated as follows:
SUB-TOTAL + EMPLOYER TAXES (if applicable) = TOTAL COST
16. Last Date Purchase will be Made. Estimate and enter the date you plan to
purchase the item. This will always be the last day of the month. It is against CDC+ policy for this date to be sooner than you will be able to accumulate the funds to purchase the item. The dates must be reasonable and achievable within a year from the date you first obtain approval to purchase the item or service.
17. Actual Date Purchase was Made or Completed. Enter the date the purchase was made or transaction was completed.
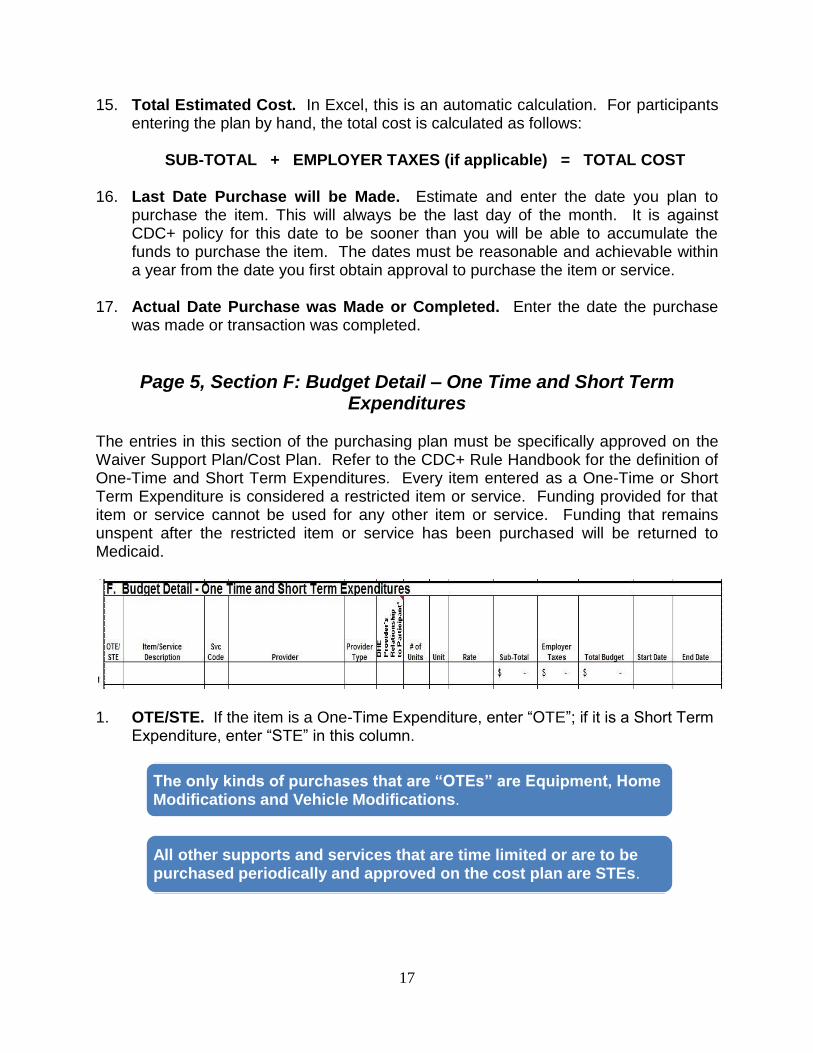
Page 5, Section F: Budget Detail – One Time and Short Term Expenditures
The entries in this section of the purchasing plan must be specifically approved on the Waiver Support Plan/Cost Plan. Refer to the CDC+ Rule Handbook for the definition of One-Time and Short Term Expenditures. Every item entered as a One-Time or Short Term Expenditure is considered a restricted item or service. Funding provided for that item or service cannot be used for any other item or service. Funding that remains unspent after the restricted item or service has been purchased will be returned to Medicaid.
1. OTE/STE. If the item is a One-Time Expenditure, enter “OTE”; if it is a Short Term
Expenditure, enter “STE” in this column.
The only kinds of purchases that are “OTEs” are Equipment, Home Modifications and Vehicle Modifications.
All other supports and services that are time limited or are to be purchased periodically and approved on the cost plan are STEs.
18
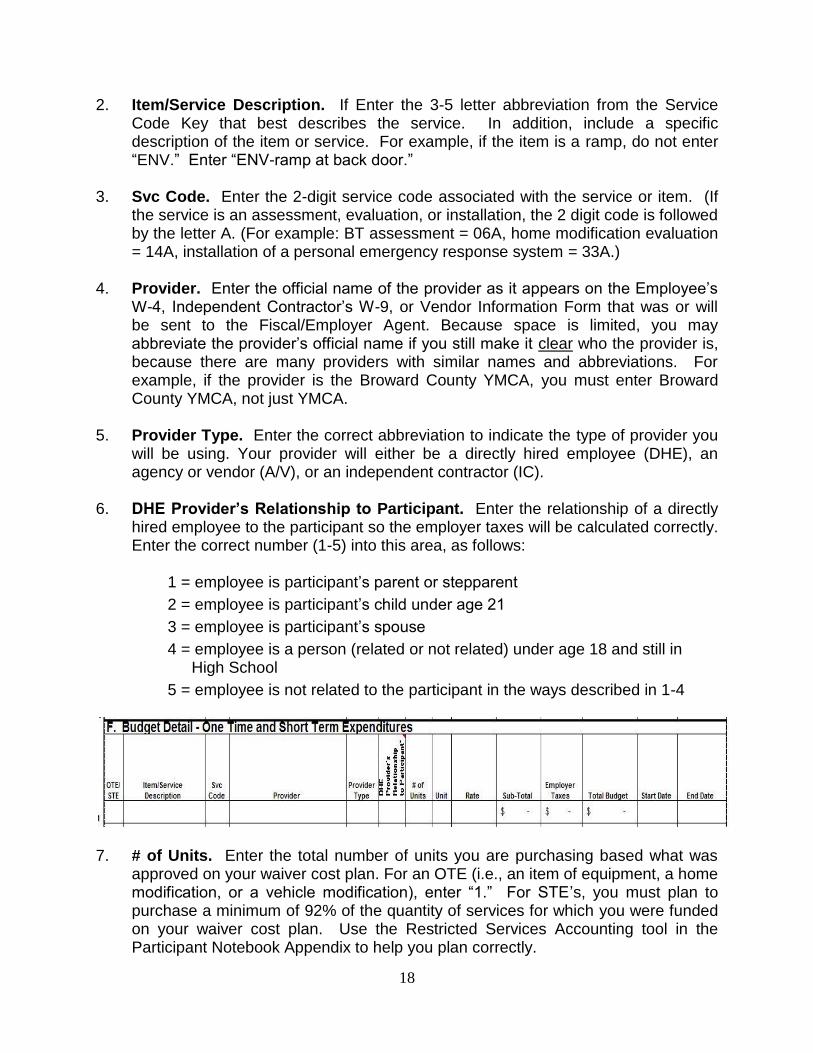
2. Item/Service Description. If Enter the 3-5 letter abbreviation from the Service Code Key that best describes the service. In addition, include a specific description of the item or service. For example, if the item is a ramp, do not enter “ENV.” Enter “ENV-ramp at back door.”
3. Svc Code. Enter the 2-digit service code associated with the service or item. (If
the service is an assessment, evaluation, or installation, the 2 digit code is followed by the letter A. (For example: BT assessment = 06A, home modification evaluation = 14A, installation of a personal emergency response system = 33A.)
4. Provider. Enter the official name of the provider as it appears on the Employee‟s
W-4, Independent Contractor‟s W-9, or Vendor Information Form that was or will be sent to the Fiscal/Employer Agent. Because space is limited, you may abbreviate the provider‟s official name if you still make it clear who the provider is, because there are many providers with similar names and abbreviations. For example, if the provider is the Broward County YMCA, you must enter Broward County YMCA, not just YMCA.
5. Provider Type. Enter the correct abbreviation to indicate the type of provider you
will be using. Your provider will either be a directly hired employee (DHE), an agency or vendor (A/V), or an independent contractor (IC).
6. DHE Provider’s Relationship to Participant. Enter the relationship of a directly
hired employee to the participant so the employer taxes will be calculated correctly. Enter the correct number (1-5) into this area, as follows:
1 = employee is participant‟s parent or stepparent
2 = employee is participant‟s child under age 21
3 = employee is participant‟s spouse
4 = employee is a person (related or not related) under age 18 and still in High School
5 = employee is not related to the participant in the ways described in 1-4
7. # of Units. Enter the total number of units you are purchasing based what was
approved on your waiver cost plan. For an OTE (i.e., an item of equipment, a home modification, or a vehicle modification), enter “1.” For STE‟s, you must plan to purchase a minimum of 92% of the quantity of services for which you were funded on your waiver cost plan. Use the Restricted Services Accounting tool in the Participant Notebook Appendix to help you plan correctly.
19
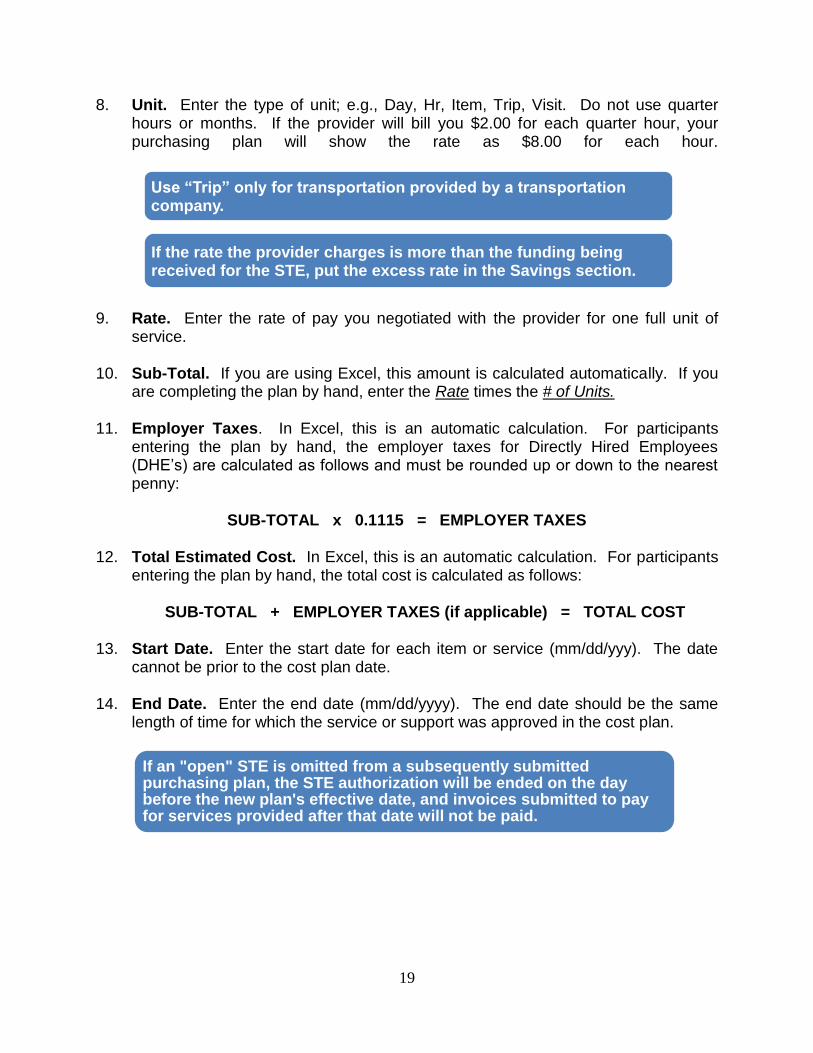
8. Unit. Enter the type of unit; e.g., Day, Hr, Item, Trip, Visit. Do not use quarter hours or months. If the provider will bill you $2.00 for each quarter hour, your purchasing plan will show the rate as $8.00 for each hour.
9. Rate. Enter the rate of pay you negotiated with the provider for one full unit of
service. 10. Sub-Total. If you are using Excel, this amount is calculated automatically. If you
are completing the plan by hand, enter the Rate times the # of Units. 11. Employer Taxes. In Excel, this is an automatic calculation. For participants
entering the plan by hand, the employer taxes for Directly Hired Employees (DHE‟s) are calculated as follows and must be rounded up or down to the nearest penny:
SUB-TOTAL x 0.1115 = EMPLOYER TAXES
12. Total Estimated Cost. In Excel, this is an automatic calculation. For participants
entering the plan by hand, the total cost is calculated as follows:
SUB-TOTAL + EMPLOYER TAXES (if applicable) = TOTAL COST
13. Start Date. Enter the start date for each item or service (mm/dd/yyy). The date cannot be prior to the cost plan date.
14. End Date. Enter the end date (mm/dd/yyyy). The end date should be the same
length of time for which the service or support was approved in the cost plan.
Use “Trip” only for transportation provided by a transportation company.
If the rate the provider charges is more than the funding being received for the STE, put the excess rate in the Savings section.
If an "open" STE is omitted from a subsequently submitted purchasing plan, the STE authorization will be ended on the day before the new plan's effective date, and invoices submitted to pay for services provided after that date will not be paid.

20
Page 5, Top: Budget Summary 1. Authorized Budget Amount. If you are using Excel, this amount is automatically
entered from what you entered as the monthly budget at the top of Page 1. If you are completing the plan by hand, enter the Monthly Budget Amount from Page 1.
2. Planned Expenditures: C – Services/Supplies. If you are using Excel, this
amount is automatically entered. If you are completing the plan by hand, enter the sum of the services and supplies entered in Sections C.1, C.1A, C.1B and Sections C.2, C.2A, C.2B of the purchasing plan.
3. Planned Expenditures: D – Cash. If you are using Excel, this amount is
automatically entered. If you are completing the plan by hand, enter the total amount of all purchases to be made with the monthly cash check, as shown in Section D of the purchasing plan.
4. Planned Expenditures: E – Savings Plan. If you are using Excel, this amount is
automatically entered. If you are completing the plan by hand, enter the amount of the”Unrestricted funds made available for these purchases each month” from Section E of the purchasing plan. This is the amount that is remaining after all monthly supports and services have been budgeted.
5. Total Monthly Expenditures. Enter the sum of the amounts listed above in boxes C, D, and E. This amount must equal the Authorized Budget Amount.
Page 5, Bottom: Signatures 1. Participant or Authorized Representative. The participant or the participant‟s
CDC+ representative must sign and enter the date signed in the appropriate boxes. This signature means the participant or his or her representative developed this plan and that he or she believes it will, at a minimum, meet the participant’s needs defined under the DD/HCBS Waiver as medically necessary. The purchasing plan must be signed by the participant/representative every time it is updated or changed and submitted for approval. A copy of a signature page from a previous purchasing plan will not be accepted. The purchasing plan is not valid without this signature.
2. Print the name of the person who signed in the box underneath the participant/
representative‟s signature.
If the “Unrestricted funds made available for these purchases each month” is a negative amount, there is an error, and you must correct the error before signing the plan.
21
3. Consultant. The participant‟s consultant signs and enters the date signed in the appropriate boxes. This signature means the consultant supports the participant’s plans for obtaining services and that he or she believes those services will, at a minimum, meet the participant’s medically necessary needs as described on the participant’s support plan and cost plan. The purchasing plan must be signed by the consultant every time it is updated or changed and submitted for approval. A copy of a signature page from a previous purchasing plan will not be accepted. The purchasing plan is not valid without this signature.
4. Print the name of the consultant who signed in the box underneath the consultant‟s
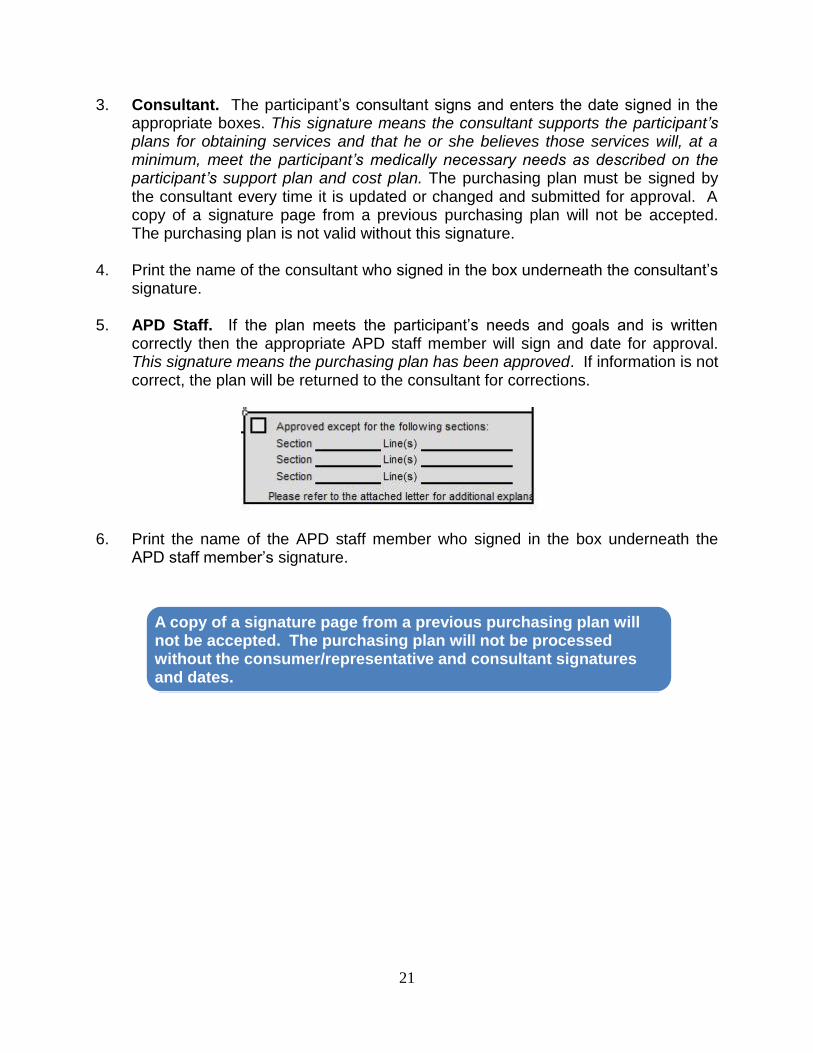
signature. 5. APD Staff. If the plan meets the participant‟s needs and goals and is written
correctly then the appropriate APD staff member will sign and date for approval. This signature means the purchasing plan has been approved. If information is not correct, the plan will be returned to the consultant for corrections.
6. Print the name of the APD staff member who signed in the box underneath the APD staff member‟s signature.
A copy of a signature page from a previous purchasing plan will not be accepted. The purchasing plan will not be processed without the consumer/representative and consultant signatures and dates.