public schools of robeson county / overview - … · web viewthe information contained in the...
TRANSCRIPT

MOAC Access Lesson 8
ADDING BOUND AND UNBOUND CONTROLSA control is an object that displays data, performs actions, and lets you improve the look and usability of a form or report. Access uses three different types of controls: bound, unbound, and calculated. Controls add functionality to a report or form. For example, you can add a logo control to a report to enhance the look of the report or a list box control to allow users to choose from a list of items. You can insert bound, unbound, and calculated controls using the tools in the Controls and Header/Footer groups. The Use Control Wizards button, located in the Controls group, is helpful when creating some of the more complicated controls.
Adding Unbound ControlsAn unbound control does not have a data source; it displays information such as lines, shapes, or pictures. Unbound controls are not connected to a field, but they display information that is important for reports and forms, some of which will appear in report and form header and footer sections, such as titles, dates, and page numbers. You can add both bound and unbound controls using the tools in the Controls group, or you can add unbound controls to the header and footer sections of reports and forms by using the Header/Footer group.
STEP BY STEP L8-1 Add Unbound Controls
GET READY. Before you begin these steps, be sure to turn on and/or log on to your computer and LAUNCH Access.
1. OPEN WingtipInventory from the data files for this lesson.2. SAVE the database as WingtipInventoryXXX (where XXX is your initials).3. Double-click the Toy Summary report in the Navigation Pane.4. On the HOME tab, in the Views group, click the lower half of the View button and select
Design View from the menu. 5. On the DESIGN tab, in the Header/Footer group, click the Logo button. The Insert Picture
dialog box appears.6. Navigate to the data files for this lesson and select Toys .jpg. Click OK. The picture is
inserted in the Report Header section.7. On the DESIGN tab, in the Header/Footer group, click the Title button. The title control with
the title Toy Summary is inserted in the Report Header section. The text in the title is selected.
Access Lesson 8 1

Throughout this lesson you will see information that appears in black text within brackets, such as [Press Enter], or [your e-mail address]. The information contained in the brackets is intended to be directions for you rather than something you actually type word-for-word. It will instruct you to perform an action or substitute text. Do not type the actual text that appears within brackets.8. Key Inventory Summary by Toy and [press the Enter key]. 9. On the DESIGN contextual tab, in the Header/Footer group, click the Date and Time button.
The Date and Time dialog box appears, as shown in Figure 8-3 in the MOAC on page 214. 10.Click OK to accept the default date and time formats. The Date and Time controls are
inserted in the Report Header section of the report, as shown in Figure 8-4 in the MOAC on page 215.
11.On the DESIGN contextual tab, in the Header/Footer group, click the Page Numbers button. The Page Numbers dialog box appears, as shown in Figure 8-5.
12. In the Position section of the Page Numbers dialog box, select the Bottom of Page [Footer] option then click OK. If necessary, scroll to the bottom of the report window. The Page number control is inserted in the Page Footer section near the bottom of the report, as shown in Figure 8-6 in the MOAC on page 216.
13.Click the Save button on the Quick Access Toolbar.
PAUSE. LEAVE the report open to use in the next exercise.
Adding Bound ControlsA bound control uses a field in a table or query as the data source. Bound controls, such as text boxes, display information such as text, dates, numbers, pictures, or graphs from a field in a table or query. You can bind a control to a field by moving it from the Field List pane or by using the Property Sheet.
When you bind a control to a field, you connect it to that field. The easiest way to create a bound control is to double-click or drag a field from the Field List pane to the report. Access creates the appropriate control, binds the control to the field, and creates a label for the control. The control’s label appears on the left, while the control appears on the right, as shown in Figure 8-7.
Access Lesson 8 2

STEP BY STEP L8-2 Add a Bound Control to a Report
USE the database that is open from the previous exercise.1. On the DESIGN contextual tab, in the Tools group, click the Add Existing Fields button.
The Field List pane appears. Click the Show all tables link. The fields for the Inventory table appear, as shown in Figure 8-8 in the MOAC on page 218.
2. Click the ID field and drag it to the right of the Price control, as shown in Figure 8-9.
3. Drag the In Production field to the design grid below the ID control. 4. Click Close on the Field List pane.5. Click the ID field control until you see the orange border with selection handles on the
borders and corners.6. Right-click in the control to display the shortcut menu.7. Select Delete from the menu, as shown in Figure 8-10 in the MOAC on page 219. The
control and label are removed from the design grid. 8. Select the In Production control, right-click, and select Delete from the menu.9. On the DESIGN contextual tab, in the Controls group, click the Text Box button. The mouse
pointer changes to the move pointer with a plus sign (+).10.Position the pointer under the Price control and click to create the text box control as shown
in Figure 8-11 in the MOAC on page 220. If you need to move the control, select it and move the mouse pointer over the selection border until it appears as a four-sided pointer, then click and drag it to the appropriate location. Notice that the word Unbound is shown in
Access Lesson 8 3

the control and the word Text and a number (depending on the number of controls you have created in this session) appear in the label.
11.Select the text box control if it isn’t already selected.12.On the DESIGN contextual tab, in the Tools group, click the Property Sheet button. The
Property Sheet appears.13. In the DATA tab, click the down arrow on the Control Source row and click the In
Production field, as shown in Figure 8-12 in the MOAC on page 220. Notice the control now displays the field name In Production, which means that it is now bound to the control.
14.Click Close on the Property Sheet.15.Click the In Production control label and select the text in the label.16.Key In Production: and then [press Enter]. Your screen should look similar to Figure 8-13
in the MOAC on page 221. 17.Switch to Report view to view your changes. When finished, switch back to Design view.18.Click the Save button on the Quick Access Toolbar.
PAUSE. LEAVE the report open to use in the next exercise.
Adding Calculated ControlsA calculated control is a control that displays the result of a calculation or expression. Calculated controls can display calculations that are vital to the usefulness of a report or form. For example, when your company needs to know the amount of sales dollars generated by each toy in a product line, you can multiply the number of toys sold by the price and display the value in a report or form. Text boxes are the most popular choice for a calculated control because they can display so many different types of data. However, any control that has a Control Source property can be used as a calculated control.
To create a calculated control, you can either key an expression in the Control Source property box or use the Expression Builder , which is a feature that provides names of the fields and controls in a database, lists the operators available, and has built-in functions to help you create an expression.
STEP BY STEP L8-3 Add a Calculated Control
USE the database that is open from the previous exercise.1. On the DESIGN tab, in the Controls group, click the Text Box button.2. Position the mouse pointer on the design grid and drag down and to the right to create and
position a control the size of the one shown in Figure 8-14 in the MOAC on page 222.3. With the control selected, right-click it to display the shortcut menu.4. Select Properties from the menu to display the Property Sheet if it isn’t already displayed.5. On the DATA tab, in the Control Source row, click the Build button. The Expression Builder
dialog box appears.6. In the Expression Categories list, scroll down and double-click In Stock, as shown in Figure
8-15 see below. The In Stock field is inserted in the expression box.
Access Lesson 8 4

7. In the Expression Elements section, click the Operators element, then double-click the * asterisk value in the Expression Values section to select the multiplication operator.
8. In the Expression Elements section, click the Toy Summary element, then find and double-click the Price field in the Expression Categories section.
9. Click OK. The expression appears in the Control Source row of the Property Sheet as well as in the control box in the Detail section of the report, as shown in Figure 8-16 in the MOAC on page 223. 10. Click Close on the Property Sheet.
10.Select the text in the label and key Investment:.11.Switch to Report view and scroll through the report records to view the calculated totals12.Click the Save button on the Quick Access Toolbar.13.CLOSE the report.
PAUSE. LEAVE the report open to use in the next exercise.
Adding Controls Using a WizardIt could take quite a bit of time to figure out how to set all the properties necessary to create option groups and combo and list boxes for a report or form. To speed up this task, Access 2013 includes wizards that help you create some of the more complicated controls. A Control Wizard can help you create controls such as command buttons, list boxes, combo boxes, and option groups. Some of these types of controls can modify underlying table data sources.
STEP BY STEP L8-4 Use the Control Wizard
USE the database that is open from the previous exercise.
Access Lesson 8 5

1. On the CREATE tab, in the Forms group, click the Form Design button. A new, blank form is created, and the Field List pane is displayed. (If it isn’t, click the Add Existing Fields button in the Tools group on the Ribbon).
2. If necessary, click Show all tables link in the Field List pane and then click the expand button next to Inventory to display the fields of the Inventory table.
3. Double-click the Description field to add it to the form.4. Double-click the In Stock field to add it to the form.5. Double-click the Price field to add it to the form.6. Double-click the In Production field to add it to the form.7. Select the In Production control that you just added, right-click it and select Delete from
the shortcut menu.8. On the DESIGN tab, in the Controls group, locate the Use Control Wizards command and
make sure it is turned on, as shown in Figure 8-17. The image to the left of the command should be highlighted.
9. On the DESIGN tab, in the Controls group, locate and click the Combo Box button (hover your mouse pointer over each control button to view its ScreenTip until you find the Combo Box button).
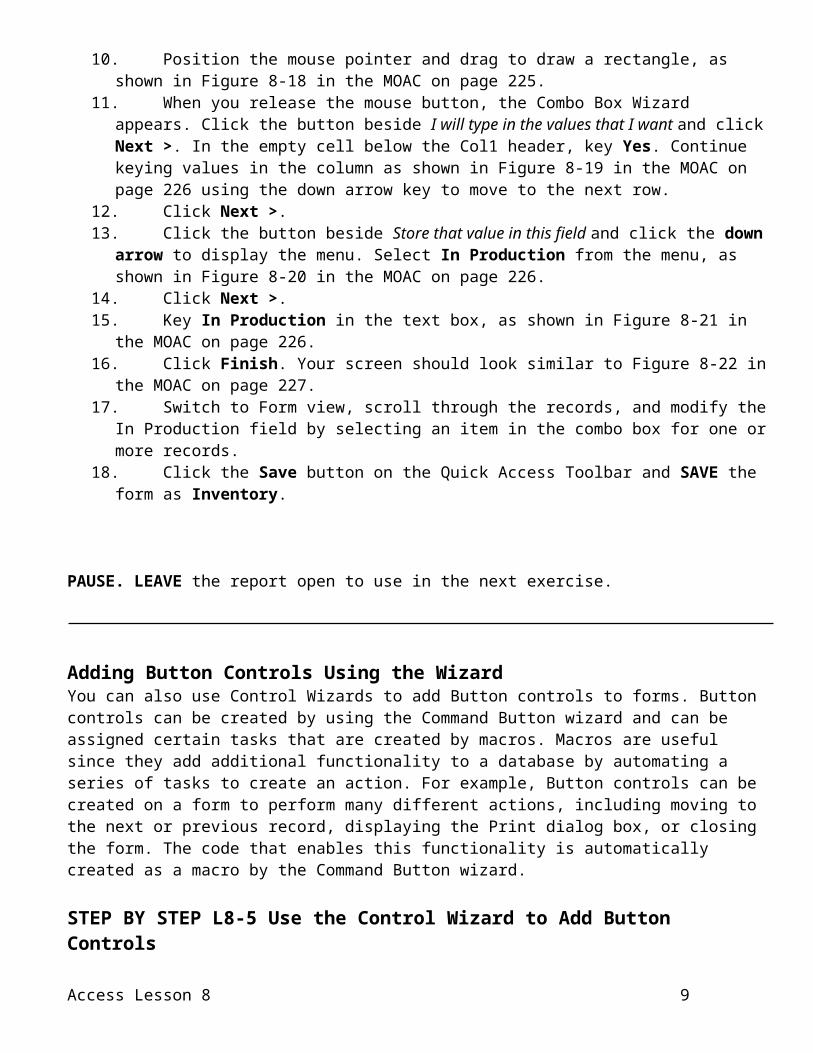
10.Position the mouse pointer and drag to draw a rectangle, as shown in Figure 8-18 in the MOAC on page 225.
11.When you release the mouse button, the Combo Box Wizard appears. Click the button beside I will type in the values that I want and click Next >. In the empty cell below the Col1 header, key Yes. Continue keying values in the column as shown in Figure 8-19 in the MOAC on page 226 using the down arrow key to move to the next row.
12.Click Next >.13.Click the button beside Store that value in this field and click the down arrow to display the
menu. Select In Production from the menu, as shown in Figure 8-20 in the MOAC on page 226.
14.Click Next >.15.Key In Production in the text box, as shown in Figure 8-21 in the MOAC on page 226.16.Click Finish. Your screen should look similar to Figure 8-22 in the MOAC on page 227.17.Switch to Form view, scroll through the records, and modify the In Production field by
selecting an item in the combo box for one or more records.18.Click the Save button on the Quick Access Toolbar and SAVE the form as Inventory.
Access Lesson 8 6

PAUSE. LEAVE the report open to use in the next exercise.
Adding Button Controls Using the WizardYou can also use Control Wizards to add Button controls to forms. Button controls can be created by using the Command Button wizard and can be assigned certain tasks that are created by macros. Macros are useful since they add additional functionality to a database by automating a series of tasks to create an action. For example, Button controls can be created on a form to perform many different actions, including moving to the next or previous record, displaying the Print dialog box, or closing the form. The code that enables this functionality is automatically created as a macro by the Command Button wizard.
STEP BY STEP L8-5 Use the Control Wizard to Add Button Controls
USE the form that is open from the previous exercise.1. Switch to Design view, if necessary.2. On the DESIGN tab, in the Controls group, click the Button button.3. Position the mouse pointer on the design grid and drag down and to the right to create a
control the size of the one shown in Figure 8-23 in the MOAC on page 228. 4. When you release the mouse button, the Command Button Wizard appears. In the
Categories: section, click Form Operations, and in the Actions: section click Close Form, as shown in Figure 8-24.
5. Click Next >.6. On the next screen, keep the default settings to have the button contain the Exit Doorway
picture displayed in the dialog box, as shown in Figure 8-25 in the MOAC on page 229. 7. Click Next >.
Access Lesson 8 7

8. On the final screen, key Exit_Inventory_Form as the default button name, as shown in Figure 8-26 in the MOAC on page 229, and click Finish. (The default button name indicated on your screen may differ depending on how many controls you have previously attempted to include.) 9. Notice that the image on the Button control on the form has changed to the
9. Exit Doorway picture.10.Click the In Production control and move your pointer over the control’s border until it
appears as a four-sided arrow, then drag the control so it is positioned on the form as shown in Figure 8-27 in the MOAC on page 230, if necessary.
11.Click the Save button on the Quick Access Toolbar.12.Click the Button control on the form. On the DESIGN tab, in the Tools group, click the View
Code button, as shown in Figure 8-28 in the MOAC on page 230. The Microsoft Visual Basic for Applications window appears, as shown in Figure 8-29 in the MOAC on page 230. If you’re fluent in Visual Basic for Applications (VBA), you can use this window to add VBA code to customize the function of this control.
13.Click the Close button on the Visual Basic for Applications window to return to Access.14.Switch to Form view and click the newly created Close Form button to close the form. If a
dialog box appears asking you if you want to SAVE the changes to the form, click Yes.
PAUSE. LEAVE the report open to use in the next exercise.
DEFINING CONTROL TAB ORDERWhen you are in Form or Report view, pressing the Tab key moves the selection, or focus, to the next field. Control tab order refers to the order in which the selection, or focus, moves from field to field in a form or report. When entering data in a form, it is helpful to set the control tab order to a sequence that matches the order of the data you are entering. It’s also helpful to set the tab order of a report to a logical field sequence when reviewing report records.
STEP BY STEP L8-6 Define Control Tab Order
USE the database you used in the previous exercise.1. Open the Inventory form in Form view.2. [Press the Tab key] several times to see the order in which the controls are selected each
time you press it. Notice that the tab order begins with the Description field, then moves to the In Stock field, the Price field, the In Production field, and the Close Form button. The tab order then continues to the next record in sequence and through the same fields as before.
3. Switch to Design view.4. On the DESIGN tab, in the Tools group, click the Tab Order button. The Tab Order dialog
box appears, displaying the tab order in the Custom Order list, as shown in Figure 8-30 in the MOAC on page 232. Notice the In Production combo box field is referred to as Combo10 since Access stores this name to use as a coding reference in Visual Basic for Applications. (You may have a different name, depending on how many controls you have had and removed previously on the form.)
5. Click the row selector to the left of the Combo10 field to select it.6. Click and hold the row selector. The mouse pointer changes to a move pointer with an
empty rectangle. Drag up a row and notice the black horizontal line moves with you. Drag up until the black horizontal line is in place at the top of the Description field; release the mouse button. The Combo10 field should be the first item in the list, as shown in Figure 8-31 in the MOAC on page 232.
Access Lesson 8 8
7. Click the Auto Order button. The order of the fields automatically resets based on the order that they appear on the form or report.
8. Click the row selector to the left of the Combo10 field to select it. Click and hold the row selector and drag it up until the black horizontal line is in place above the In Stock field; release the mouse button. The Combo10 field should now be the second item in the list, as shown in Figure 8-32 in the MOAC on page 233.
9. Click OK.10.SAVE the form design.11.Switch to Form view.12. [Press the Tab key] several times to see the new tab order.13.CLOSE the form.
PAUSE. LEAVE the report open to use in the next exercise.
STEP BY STEP L8-9 Format Controls on a Report
USE the database that is open from the previous exercise.1. Open the Toy Summary report and switch to Design view.2. Click the In Stock control. Position the mouse pointer over the resize handle on the right
border. The mouse pointer changes to a double-sided arrow. Using the horizontal ruler at the top of the report as a guide, drag to the left to resize the control until its right side is at the 1 6/8 " mark.
3. In the same manner, reduce the width of the Price control until its right side is at the horizontal ruler’s 4" mark.
4. In the same manner, reduce the size of the Investment control until its right side is at the horizontal ruler’s 21/2" mark and its bottom is at the vertical ruler’s 11/2" mark.
5. Click the Description control to select it.6. On the FORMAT tab, in the Font group, click the Bold button. The Description control
displays bold.7. Click the arrow on the Font Size menu and select 12 from the menu. The font size becomes
12.8. Click the In Stock control to select it. 9. On the FORMAT tab, in the Font group, click the Center button. The In Stock text becomes
centered in the control box. Your report should look similar to Figure 8-34 in the MOAC on page 235.
10.Click the Investment control that contains the formula you entered in an earlier exercise.11.On the FORMAT tab, in the Number group, click the Apply Currency Format command.12.Click the Price control.13.On the FORMAT tab, in the Number group, click the Apply Currency Format command.14.SAVE the report. 15.Switch to Report view to see the changes you’ve made. Notice the text formatting changes
as well as the currency formats for the Investment and Price fields.16.CLOSE the report.17.OPEN the Toys By Quantity In Stock report in Design view.18. In the Report Header section, click the Print Report Button control to select it.19.On the FORMAT tab, in the Control Formatting group, click the Change Shape button to
display the menu. Click the Oval option. The Button control’s shape changes to an oval.20.SAVE and CLOSE the report.
Access Lesson 8 9

PAUSE. LEAVE the report open to use in the next exercise.
STEP BY STEP L8-10 Format the Controls on a Form
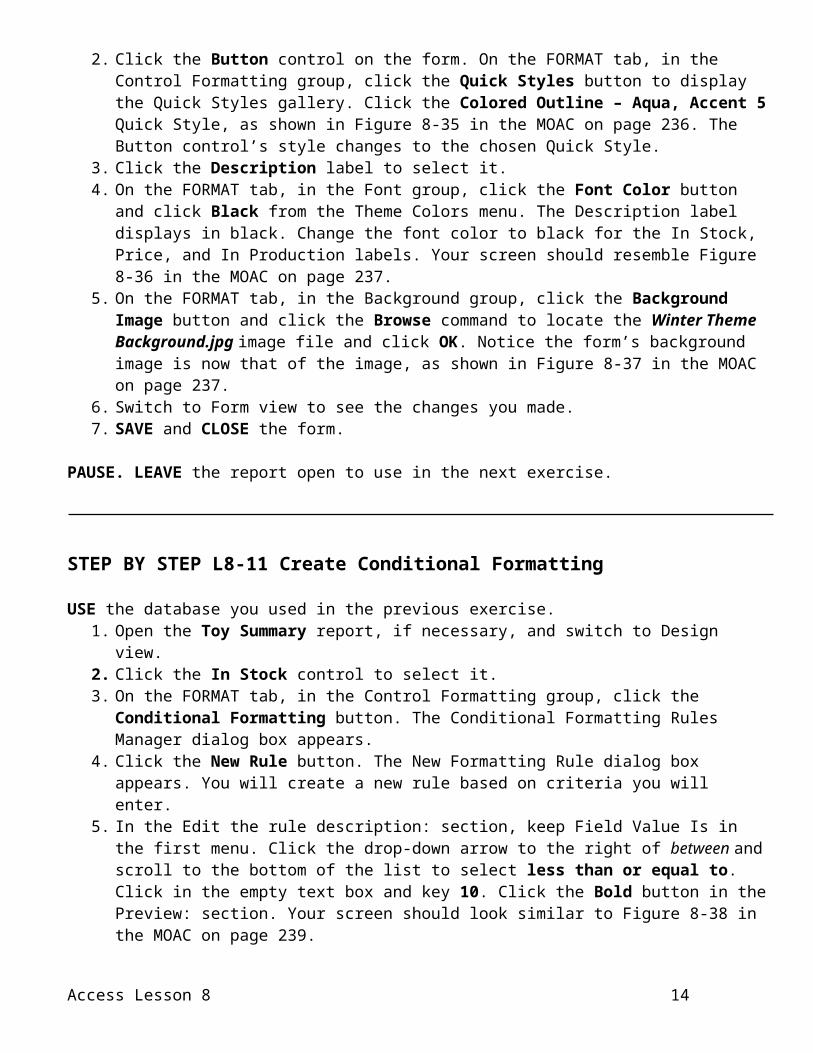
USE the database that is open from the previous exercise.1. Open the Inventory form if it’s not open already, and switch to Design view.2. Click the Button control on the form. On the FORMAT tab, in the Control Formatting group,
click the Quick Styles button to display the Quick Styles gallery. Click the Colored Outline – Aqua, Accent 5 Quick Style, as shown in Figure 8-35 in the MOAC on page 236. The Button control’s style changes to the chosen Quick Style.
3. Click the Description label to select it.4. On the FORMAT tab, in the Font group, click the Font Color button and click Black from
the Theme Colors menu. The Description label displays in black. Change the font color to black for the In Stock, Price, and In Production labels. Your screen should resemble Figure 8-36 in the MOAC on page 237.
5. On the FORMAT tab, in the Background group, click the Background Image button and click the Browse command to locate the Winter Theme Background.jpg image file and click OK. Notice the form’s background image is now that of the image, as shown in Figure 8-37 in the MOAC on page 237.
6. Switch to Form view to see the changes you made.7. SAVE and CLOSE the form.
PAUSE. LEAVE the report open to use in the next exercise.
STEP BY STEP L8-11 Create Conditional Formatting
USE the database you used in the previous exercise.1. Open the Toy Summary report, if necessary, and switch to Design view.2. Click the In Stock control to select it.3. On the FORMAT tab, in the Control Formatting group, click the Conditional Formatting
button. The Conditional Formatting Rules Manager dialog box appears.4. Click the New Rule button. The New Formatting Rule dialog box appears. You will create a
new rule based on criteria you will enter.5. In the Edit the rule description: section, keep Field Value Is in the first menu. Click the drop-
down arrow to the right of between and scroll to the bottom of the list to select less than or equal to. Click in the empty text box and key 10. Click the Bold button in the Preview: section. Your screen should look similar to Figure 8-38 in the MOAC on page 239.
6. Click the down arrow on the Background Color button. A menu of colors appears. Click Red.
7. Click the OK button. A formatting rule for the In Stock field is added to the dialog box, as shown in Figure 8-39. Now, when the report is viewed in Report view, the value for the In Stock field will appear bold and the control background color will appear red if the formatting rule applies.
8. Click OK.9. SAVE the report.
Access Lesson 8 10

10.Switch to Report view and scroll through the records to see the conditional formatting at work.
11.CLOSE the report.
PAUSE. LEAVE the report open to use in the next exercise.
STEP BY STEP L8-12 Arrange Control Layout
USE the database that is open from the previous exercise.1. Click the Inventory table in the Navigation Pane to select it.2. On the CREATE tab, in the Reports group, click the Blank Report button. A new, blank
report is created and the Field List pane is displayed. (If it isn’t, click the Add Existing Fields button in the Tools group on the DESIGN tab.)
3. Double-click the ID field to add it to the report.4. Double-click the Description field to add it to the report.5. Double-click the In Stock field to add it to the report.6. Double-click the Price field to add it to the report.7. [Press and hold the Shift key] and click each of the four controls to select them all. Make
sure you select the controls and not the labels, as shown in Figure 8-42 in the MOAC on page 241.
8. On the ARRANGE tab, in the Table group, click the Stacked button. The controls and labels are arranged in a 2-column stacked layout, as shown in Figure 8-43 in the MOAC on page 242.
9. On the ARRANGE tab, in the Table group, click the Tabular button. The controls and labels are arranged back in a tabular layout, as shown in Figure 8-44 in the MOAC on page 242. Notice the tabular format indented the position of the columns by default.
10.On the ARRANGE tab, in the Table group, click the Stacked button to switch it back to a stacked layout.
11.SAVE the report as Stacked Report and leave it open for use in the next exercise.
Access Lesson 8 11

PAUSE. LEAVE the report open to use in the next exercise.
STEP BY STEP L8-13 Add, Move, and Remove a Control from a Layout
USE the database that is open from the previous exercise.1. Switch to Report Design view, if necessary.2. Click the Show all tables link in the Field List pane, if necessary, to view all the available
fields in the Inventory table. 3. Click the In Production field in the Field List pane. Drag it to the grid and place it in any
location on the design grid to the right of the four controls. Your screen should look similar to Figure 8-45.
4. [Press and hold the Shift key] and select the ID field control. Still [holding the Shift key], select the Description, In Stock, and Price field controls so that all five are selected.
5. On the ARRANGE tab, in the Table group, click the Stacked button. The In Production control is added to the bottom of the stacked layout.
6. With all five controls still selected, click the Control Margins button on the ARRANGE tab in the Position group, and select Narrow from the menu, as shown in Figure 8-46 in the MOAC on page 244. The text within the field controls and labels is formatted by the Narrow option.
7. On the ARRANGE tab, in the Position group, click the Control Padding button and select Medium from the menu, as shown in Figure 8-47 in the MOAC on page 245.
8. Click anywhere on a blank area of the design grid to deselect the field controls, then select the In Production field control and click Select Row in the Rows & Columns group. Notice the In Production label and field control are both outlined in orange. In the Move group on the Ribbon, click the Move Up button three times to move it under the ID label and field control.
Access Lesson 8 12

9. Click and drag the ID control out of the layout. It will not move out of the layout.10.Click anywhere on a blank area of the design grid to deselect the field controls, then [press
and hold the Shift key] and select the Price label and control.11. In the Table group on the Ribbon, click the Remove Layout button.12.Click and drag the Price field control to the right of the ID field control, as shown in Figure 8-
48 in the MOAC on page 245. 13.SAVE the report and switch to Report view to view your changes. 14.CLOSE the report.
PAUSE. LEAVE the report open to use in the next exercise.
STEP BY STEP L8-14 Arrange and Anchor Controls within a Layout
USE the database that is open from the previous exercise.1. Click the Inventory table in the Navigation Pane to select it.2. On the CREATE tab, in the Forms group, click the Form button. A new form containing all
the fields from the Inventory table is created in Layout view. Notice the stacked control layout is the default.
3. Switch to Design view.4. Click the ID control to select it.5. On the ARRANGE tab, in the Merge/Split group, click the Split Horizontally button. Click to
the right of the ID field control and notice the orange border of the new column created after the split.
6. Click the In Production field control and drag it to the right of the ID field control to place it next to it. The In Production label and field control is now in the column. Your screen should resemble Figure 8-49 in the MOAC on page 246. Notice the new additional space automatically created to the right of the other field controls.
7. Click the In Stock field control to select it. [Press and hold the Shift key] and select the In Stock control label. On the ARRANGE tab, in the Move group, click the Move Down button once. The In Stock field control and label move to the bottom of the layout.
8. Click the Description field control to select it. [Press and hold the Shift key] and click the empty space below the Description field control to select the cell. Both the Description field control and cell below should be outlined in orange. On the ARRANGE tab, in the Merge/Split group, click the Merge button. The Description field control and cell have now merged into one, as shown in Figure 8-50 in the MOAC on page 247.
9. Click the In Stock field control to select it. On the ARRANGE tab, in the Rows & Columns group, click the Insert Below button twice. Two empty cells are added under the In Stock control. The In Stock field control should still be selected.
10.On the ARRANGE tab in the Rows & Columns group, click the Select Row button. Both the In Stock label and field control should be selected as well as an empty column created when we dragged the In Production field control to the right of the ID field control.
11.On the ARRANGE tab, in the Move group, click Move Down twice to move the In Stock control to the last cell row at the bottom of the layout, as shown in Figure 8-51 in the MOAC on page 248.
12.Click the Description field control to select it. On the ARRANGE tab in the Position group, click the Anchoring button. The Anchoring menu appears. Click the Stretch Down and Across option, as shown in Figure 8-52 in the MOAC on page 248. The Description field
Access Lesson 8 13
control as well as all the others will now automatically resize to display all their contained text, if necessary, when the Access window is made larger.
13.Click the In Stock field control and increase its height by positioning the pointer over the top-right corner of the control until a diagonal two-sided arrow appears and then clicking and dragging upward until the text is no longer obstructed.
14.Switch to Form view to display the new arrangement of the controls and resize the Access application window (not the form window) to see the controls stretch and shrink in conjunction with the window size.
15.SAVE the form as Modified Inventory Form and CLOSE it.
PAUSE. LEAVE the report open to use in the next exercise.
STEP BY STEP L8-15 Arrange Control Alignment, Size, and Position
USE the database that is open from the previous exercise.1. On the CREATE tab, in the Forms group, click the Form Design button. A new, blank form
is created, and the Field List pane is displayed. (If it isn’t displayed, click the Add Existing Fields button in the Tools group on the DESIGN tab.)
2. Double-click the Description field to add it to the form.3. Double-click the In Stock field to add it to the form.4. Double-click the Price field to add it to the form.5. Double-click the In Production field to add it to the form.6. [Press and hold the Shift key] and click the Description, In Stock, and Price field controls
to select them. The In Production field control should already be selected.7. On the ARRANGE tab, in the Table group, click the Stacked button. The controls and labels
are arranged in a stacked layout.8. Click on a blank space on the design grid then select the In Production field control and
label. 9. On the ARRANGE tab, in the Sizing & Ordering group, click the Size / Space button. In the
Size category on the menu that appears, click the To Fit button. Notice all the field controls and labels are slightly resized in the layout based on the best fit of the text within the In Production field control and label since the layout forces all fields to conform to this action.
10. Select all the controls in the stacked layout (the labels and controls for the Description, In Stock, Price, and In Production controls).
11.On the ARRANGE tab, in the Table group, click the Remove Layout button.12.All the controls and labels should still be selected. On the ARRANGE tab, in the Sizing &
Ordering group, click the Size / Space button. In the Size category on the menu that appears, click the To Fit button. Notice all the field controls independently change their width to best fit their text since they are no longer part of a layout. Your screen should look similar to Figure 8-53 in the MOAC on page 250.
13.With the controls and labels still selected, on the ARRANGE tab, in the Sizing & Ordering group, click the Align button. In the menu that appears, click the Right button. The labels are right-aligned to the controls.
14.Click and drag the ID field from the Field List pane to any blank spot on the design grid above the Description field.
15.Select the ID label and control and in the Sizing & Ordering group, click the Align button. In the menu that appears, click the Right button.
Access Lesson 8 14

16. [Press and hold the Shift key] and click on both the labels and controls for all the controls. In the Sizing & Ordering group, click the Align button. In the menu that appears, click the Left button. All the controls are left-aligned as a group.
17. In the Sizing & Ordering group, click the Align button. In the menu that appears, click the Right button. All the controls are now right-aligned as a group. Your screen should look similar to Figure 8-54 in the MOAC on page 251.
18.Select all the labels and controls, if necessary.19.On the ARRANGE tab, in the Sizing & Ordering group, click the Size/Space button. In the
Spacing category on the menu that appears, click the Equal Vertical button. Notice that the vertical space between the controls is now equal.
20.Click on a blank space on the design grid.21.On the ARRANGE tab, in the Sizing & Ordering group, click the Size / Space button. In the
Grid category on the menu that appears, click the Grid button. The design grid disappears.22.Click the Grid button again. The design grid appears.23.Click on a blank space on the design grid and drag to draw a box around the labels and
controls so they are all selected, or [press and hold the Shift key] and select each label and control.
24.On the ARRANGE tab, in the Sizing & Ordering group, click the Align button. In the menu that appears, click the To Grid button. Notice the control and labels slightly move. The upper-left corners of all the labels are now aligned to their nearest grid points.
25.On the ARRANGE tab, in the Sizing & Ordering group, click the Size / Space button. In the Grid category on the menu that appears, click the Ruler button. The rulers disappear.
26.Click the Ruler button again. The rulers reappear. 27.SAVE the form as Arranged Inventory Form and CLOSE it.
PAUSE. LEAVE the report open to use in the next exercise.
STEP BY STEP L8-16 Adjust Page Margins and Change Page Orientation for Forms and Reports
USE the database that is open from the previous exercise.1. Click the Modified Inventory Form in the Navigation Pane and click the FILE tab.2. On the FILE tab, click the Print button to display the Print menu, as shown in Figure 8-56 in
the MOAC on page 253. 3. Click the Print Preview command. The Print Preview screen appears with a preview of the
form, as shown in Figure 8-57 in the MOAC on page 254. Notice the form’s field borders exceed the width of the right margin.
4. In the Page Layout group, click the Landscape button to display the form in landscape view. Notice some of the form’s field borders still exceed the width of the right margin.
5. In the Page Size group, click the Margins button. On the Margins menu that appears, click the Narrow option. The form’s field borders have been adjusted and are now within the right margin, and the print layout now appears complete. Your screen should resemble the form as shown in Figure 8-58 in the MOAC on page 254.
6. In the Close Preview group, click the Close Print Preview button to return to the Access database screen.
7. Open the Toys By Quantity In Stock report.8. On the HOME tab, in the Views group, click the lower half of the View button and select
Print Preview from the menu. The report is displayed in Print Preview, as shown in Figure
Access Lesson 8 15

8-59 in the MOAC on page 255. Notice the Price field header and data in the last column exceed the width of the right margin.
9. On the PRINT PREVIEW tab, in the Page Size group, click the Margins button and select Narrow from the menu that appears. The Price field header and data are now completely visible.
10.On the PRINT PREVIEW tab, click the Close Print Preview button to return to Report view.11.CLOSE the report.
CLOSE the database.
Access Lesson 8 16