pt-1750book - brotherdownload.brother.com/pub/com/ptouch-pdf/um_pt1750.pdfremove the batteries and...
TRANSCRIPT

User’s Guide• Read this User’s Guide before you start using your P-touch.• Keep this User’s Guide in a handy place for future reference.
1750

INTRODUCTION
Thank you for purchasing the P-touch 1750!
Your new P-touch will allow you to create labels for any need. Its versatility enables you todesign custom labels by choosing from a variety of frame designs and from many characterssizes and styles. In addition, the four tape widths (1/4” (6 mm), 3/8” (9 mm), 1/2” (12 mm),and 3/4” (18 mm)) and variety of tape colors allow you to print personalized labels, usefulfor color-coded filing.
You no longer have to worry about urgent tasks that require professional printing. In theoffice, the factory, the lab and the home, the quality and performance of the P-touch 1750makes it an extremely versatile and practical machine.
Finally, as you may want to refer to this User’s Guide occasionally, we suggest you keep thismanual in a convenient place, as you may wish to refer to it occasionally.
FCC NOTICEThis equipment has been tested and found to comply with the limits for a Class B dig-ital device, pursuant to Part 15 of the FCC Rules. These limits are designed to providereasonable protection against harmful interference in a residential installation. Thisequipment generates, uses, and can radiate radio frequency energy and, if not in-stalled and used in accordance with the instructions, may cause harmful interferenceto radio communications. However, there is no guarantee that interference will notoccur in a particular installation. If this equipment does cause harmful interferenceto radio or television reception, which can be determined by turning the equipmentoff and on, the user is encouraged to try to correct the interference by one or moreof the following measures:-Reorient or relocate the receiving antenna-Increase the separation between the equipment and receiver.-Connect the equipment into an outlet on a circuit different from that to which thereceiver is connected.-Consult the dealer or an experienced radio/television technician for help.-Changes or modifications not expressly approved by Brother Industries, Ltd. couldvoid the user’s authority to operate the equipment.
Patent numbers and patent publication numbers which are related to this productare as below:USP4839742 USP4983058 USP5120147USP4927278 USP5009530USP4976558 USP5069557

1
CONTENTS
Getting Started
GENERAL DESCRIPTION .................................................................................... 2GENERAL PRECAUTIONS................................................................................... 3BATTERIES .......................................................................................................... 4OPTIONAL AC ADAPTER ................................................................................... 5TAPE CASSETTE .................................................................................................. 5ATTACHING LABELS .......................................................................................... 6PRINT HEAD & ROLLERS.................................................................................... 8
For Your Information
POWER KEY........................................................................................................ 9CURSOR KEYS .................................................................................................... 9CODE & SHIFT KEYS......................................................................................... 10SPACE KEY........................................................................................................ 11RETURN KEY..................................................................................................... 12BS KEY .............................................................................................................. 13CLEAR FUNCTION ........................................................................................... 13ACCENT FUNCTION ........................................................................................ 14SYMBOL FUNCTION........................................................................................ 15SIZE FUNCTION ............................................................................................... 17STYLE FUNCTION ............................................................................................ 18UNDERLINE FUNCTION .................................................................................. 19FRAME FUNCTION........................................................................................... 20BIG SIZE FUNCTION ........................................................................................ 21TAPE MARGIN FUNCTION .............................................................................. 23MIRROR PRINTING FUNCTION....................................................................... 24PRINT KEY & FEED FUNCTION........................................................................ 25NUMBERING FUNCTION ................................................................................ 25REPEAT PRINTING FUNCTION ........................................................................ 27MEMORY FUNCTIONS..................................................................................... 28TROUBLESHOOTING....................................................................................... 31ERROR MESSAGE LIST ...................................................................................... 32SPECIFICATIONS .............................................................................................. 34ACCESSORIES ................................................................................................... 35

2
TOP VIEW
BOTTOM VIEW
Getting Started
GENERAL DESCRIPTION
Tape compartmentcover
LCD displayKeyboard
Tape cutter lever
AC adapterconnector
Tape exit slot
Battery compartment cover
3
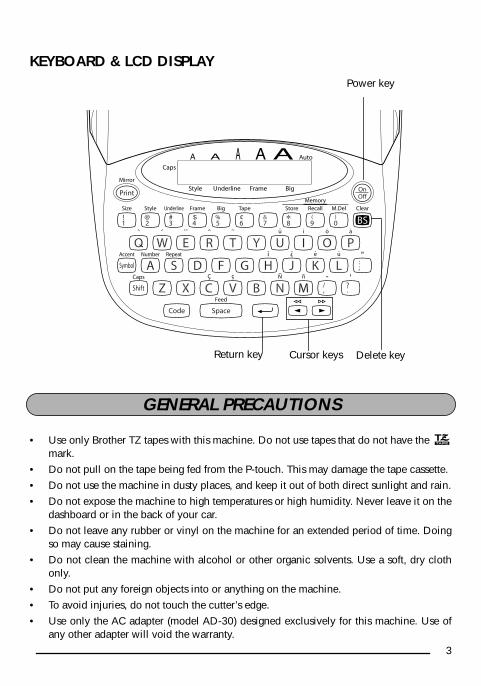
KEYBOARD & LCD DISPLAY
• Use only Brother TZ tapes with this machine. Do not use tapes that do not have the mark.
• Do not pull on the tape being fed from the P-touch. This may damage the tape cassette.
• Do not use the machine in dusty places, and keep it out of both direct sunlight and rain.
• Do not expose the machine to high temperatures or high humidity. Never leave it on thedashboard or in the back of your car.
• Do not leave any rubber or vinyl on the machine for an extended period of time. Doingso may cause staining.
• Do not clean the machine with alcohol or other organic solvents. Use a soft, dry clothonly.
• Do not put any foreign objects into or anything on the machine.
• To avoid injuries, do not touch the cutter’s edge.
• Use only the AC adapter (model AD-30) designed exclusively for this machine. Use ofany other adapter will void the warranty.
S
Power key
Return key Cursor keys Delete key
GENERAL PRECAUTIONS

4
• Do not try to disassemble the AC adapter.
• When the machine is not being used for a long period of time and it is not necessary tokeep the text files stored in the memory, disconnect the AC adapter, and remove the bat-teries to prevent them from leaking and damaging the machine.
• When the AC adapter is connected, unplugging the adapter from the electrical outletbefore unplugging it from the machine can delete all text files in the memory, even if bat-teries are installed.
• Use six AA batteries in this machine.
• To prevent damage during shipment, a clear protective sheet is placed over the LCDpanel. Remove this clear protective sheet before beginning use.
This lightweight and portable machine can be used anywhere by installing six (6)
AA batter-ies
. When you change the batteries, always replace all six at the same time.
To change the batteries:
1
Remove the battery compartment cover onthe back of the machine.
2
If batteries are already installed, removethem.
3
Insert six new AA batteries, making surethat they face the correct direction.
4
Attach the battery compartment cover.
☞
Be sure to insert the new batterieswithin five minutes of removing the old ones, otherwise the text shown in thedisplay and any text files stored in the memory will be lost (unless the machineis plugged into an AC outlet with the AC adapter).
BATTERIES

5
The AC adapter (model AD-30) allows you to use this machine wherever there is an electri-cal outlet.
To connect the optional AC adapter:
1
Insert the plug on the adapter cord into theconnector marked DC IN 7.0V on the rightside of the machine.
2
Insert the plug on the adapter into the near-est standard electrical outlet.
☞
Only use the AC adapter designedexclusively for this machine.Remove the batteries and disconnectthe AC adapter if you do not intendto use this machine for an extendedperiod of time. When the power isdisconnected, all text shown in thedisplay and stored in the memory will be lost.It is recommended that you use the AC adapter when printing large fonts on 3/4
″
(18-mm)-wide tape since this operation can quickly drain the batteries.
A single TZ tape cassette is supplied with this unit. However, since TZ tape cassettes areavailable for this machine in a wide variety of colors and sizes, it is possible to make distinc-tive color-coded and stylized labels.
In addition, this machine has been designed to allow you to change the tape cassettesquickly and easily.
To change the tape cassette:
1
Lift open the tape compartment cover. The installed cassette is also released.
2
If a tape cassette is already installed, remove it by pulling it straight up.
3
If the ink ribbon in the other tape cassette is loose, use your finger to wind the toothedwheel in the direction of the arrow on the cassette until there is no slack in the ribbon.Also, make sure that the end of the tape feeds under the tape guides.
☞
If you are using a new tape cassette provided with a stopper, be sure to removethe stopper.
OPTIONAL AC ADAPTER
TAPE CASSETTE
6
4
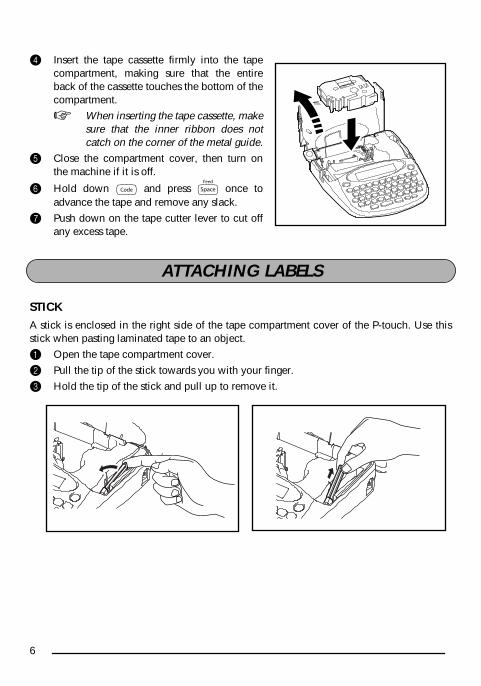
Insert the tape cassette firmly into the tapecompartment, making sure that the entireback of the cassette touches the bottom of thecompartment.
☞
When inserting the tape cassette, makesure that the inner ribbon does notcatch on the corner of the metal guide.
5
Close the compartment cover, then turn onthe machine if it is off.
6
Hold down
f
and press
g
once toadvance the tape and remove any slack.
7
Push down on the tape cutter lever to cut offany excess tape.
STICK
A stick is enclosed in the right side of the tape compartment cover of the P-touch. Use thisstick when pasting laminated tape to an object.
1
Open the tape compartment cover.
2
Pull the tip of the stick towards you with your finger.
3
Hold the tip of the stick and pull up to remove it.
ATTACHING LABELS

7
LAMINATED TAPE
The enclosed stick enables you to easily remove the backing from labels printed on lami-nated tapes.
1
Hold the tape in your left hand, with the printed surface facing up, and hold the stick inyour right hand.
2
Pass the tape halfway through the long narrow hole in the stick.
3
Turn the stick three-quarters of a turn towards you and pull the stick away from you asshown below.
4 Peel off the label backing.
FABRIC TAPEFabric tape is used to attach a piece of fabric printed with your text onto garments using aniron. After printing the text onto fabric tape and cutting off the label using scissors, place thelabel on an ironed garment at the location where you wish to attach it in such a way that theprinted text can be read correctly. Cover the label with another piece of cloth and use aniron set to a medium-high temperature (320 to 356 ˚F (160 to 180 ˚C)) to press down firmlyfor 10 to 15 seconds. For more details, refer to the instructions included with the fabric tapecassette.
GH
ABCDEF
ABCDEF

8
Occasionally, specks of dust or dirt become attached to the machine’s print head and rollers.This is particularly likely when you are using the unit outdoors or in a very dusty environ-ment. If a section of the print head is covered with dust, a blank horizontal streak mayappear through the label text. Therefore, as with a tape recorder, the machine’s head mayneed to be cleaned from time to time.
To clean the print head and rollers:1 Turn off the machine.
2 Open the tape compartment cover, then remove the tape cassette if one is installed.The print head and rollers are located in the tape compartment.
3 Print head: Use a dry cotton swab to gently wipe the print head with an up-and-downmotion.Rollers: Use a dry cotton swab to wipe each roller with an up-and-down motion whilerotating them with your finger.
4 Install a tape cassette, close the tape compartment cover, and then try printing again.
5 If dust still remains, repeat steps 3 and 4 using a cotton swab dipped in isopropyl(rubbing) alcohol.
If none of the above works, contact your service representative.
☞ Cleaning can also be done by using the optional print head cleaning cassette (TZ-CL4).
PRINT HEAD & ROLLERS
Print head Print head
Rollers Cotton swab

9
The power key ( b ) is located in the top right-hand corner of the keyboard. If batterieshave been installed or the machine has been plugged in using the optional AC adapter, theprevious session’s information is displayed when the machine is turned on. This featureallows you to stop work on a label, turn off the machine, and return to it later without havingto re-enter the text.
☞ If you press any key during the opening message, you can skip the message.The machine will automatically turn off if no key is pressed within 5 minutes. The machine’sinternal memory stores the current session’s information and displays it when you turn onthe machine again.
To turn on the machine:
● Press b. The previous session’s information appears in the LCD display.
To turn off the machine:
● Press b. The current session’s information is stored in the internal memory.
The machine’s LCD display shows one row of 15 characters; however, the text that you cre-ate can be up to 60 characters long. You can review and edit your text by using the cursorkeys to move the cursor so that different parts are shown in the display.
LEFT CURSOR KEY
To move the cursor one character to the left:● Press < once.
To move the cursor several characters to the left:● Hold down < until the cursor moves to the desired position.
To move the cursor to the beginning of the text line:● Hold down f and press <.
For Your Information
POWER KEY
CURSOR KEYS

10
RIGHT CURSOR KEY
To move the cursor one character to the right:● Press > once.
To move the cursor several characters to the right:● Hold down > until the cursor moves to the desired position.
To move the cursor to the end of the text line:● Hold down f and press >.
Most characters can be entered simply by pressing their keys. However, to use special func-tions or to enter capital letters, accented characters and some symbols, the following specialkeys are necessary.
CODE KEY
To use a function printed above a key:● Hold down f and press the key immediately below the desired function.
EXAMPLE
SHIFT KEY
To type in a capital letter or a symbol printed in the top left-hand corner of a key:● Hold down e and press the key of the desired letter or symbol.
To start the Feed function:
● Hold down f and press g once.
CODE & SHIFT KEYS
FEED

11
EXAMPLE
The Caps mode is similar to holding down e. It allows you to type capital letters continu-ously.
To type in many capital letters:1 Hold down f and press e. The Caps indicator on the left side of the display lights
up.
2 Press the keys of the desired letters or symbols.
3 To exit Caps mode, hold down f and press e. The Caps indicator goes off.
The Space key ( g ) lets you add blank spaces between characters in your text. It is differ-ent from the right cursor key ( > ), which just moves the cursor without adding blankspaces.
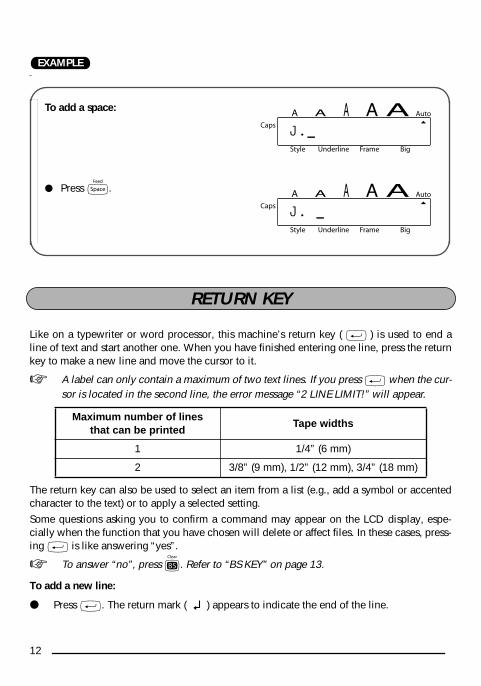
To add a space:
● Press g.
To type in “%”:
● Hold down e and press 5.
5
5%
SPACE KEY
12
EXAMPLE
Like on a typewriter or word processor, this machine’s return key ( h ) is used to end aline of text and start another one. When you have finished entering one line, press the returnkey to make a new line and move the cursor to it.
☞ A label can only contain a maximum of two text lines. If you press h when the cur-sor is located in the second line, the error message “2 LINE LIMIT!” will appear.
The return key can also be used to select an item from a list (e.g., add a symbol or accentedcharacter to the text) or to apply a selected setting.
Some questions asking you to confirm a command may appear on the LCD display, espe-cially when the function that you have chosen will delete or affect files. In these cases, press-ing h is like answering “yes”.
☞ To answer “no”, press c. Refer to “BS KEY” on page 13.
To add a new line:
● Press h. The return mark ( ) appears to indicate the end of the line.
To add a space:
● Press g.
Maximum number of lines that can be printed
Tape widths
1 1/4” (6 mm)
2 3/8” (9 mm), 1/2” (12 mm), 3/4” (18 mm)
J.
J.
RETURN KEY

13
To select an item from a list:● Press h.
To answer “yes”:● Press h.
The delete key ( c ) allows you to remove characters to the left of the cursor’s current posi-tion. It differs from the left cursor key ( < ), which only moves the cursor without deletingany characters.
The delete key can also be used to quit most functions and return to the previous displaywithout changing the text.
Some questions asking you to confirm a command may appear on the LCD display, espe-
cially when the function that you have chosen will delete or affect files. In these cases, press-
ing c is like answering “no”.
☞ To answer “yes”, press h. Refer to “RETURN KEY” on page 12.
To delete one character:1 Press < or > to position the cursor below the character immediately to the right of
the character that you wish to delete.
2 Press c once.
To quit a function without changing your text:
● Press c to return to your text.
To answer “no”:
● Press c.
When clearing the display before entering new text, the Clear function can be used tochoose whether all of the text is erased.
☞ The Clear function only deletes the text. The format functions (Size, Style, Underline,Frame, Big size, Tape margin, and Mirror printing) do not return to the default set-tings, but stay as they are.
To delete all of the text:1 Hold down f and press c.
2 All of the text will be deleted.
BS KEY
CLEAR FUNCTION

14
EXAMPLE
The Accent function can also be used to add accented characters to your text.
The accented characters are grouped according to the capital or small letter that they arecombined with. The following accented characters are available:
To clear the text:
1 Hold down f and press c.
Letters Accented characters Letters Accented characters
a à á ä â ã æ I Í Ï Î
A À Á Ä Â Ã Æ n ñ
c ç N Ñ
C Ç o ó ö ô õ
e è é ë ê e O Ó Ö Ô Õ
E È É Ë Ê E u ù ú ü û
i í ï î U Ù Ú Ü Û
Reynolds Tel:(5
ACCENT FUNCTION
˜
15
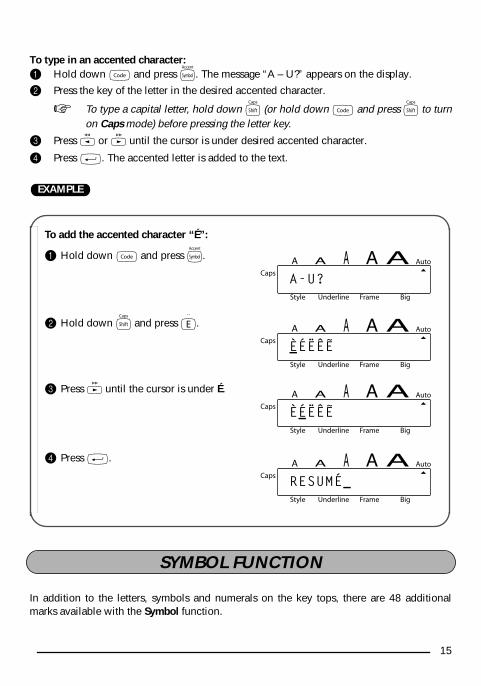
To type in an accented character:1 Hold down f and press d. The message “A – U?” appears on the display.
2 Press the key of the letter in the desired accented character.
☞ To type a capital letter, hold down e (or hold down f and press e to turnon Caps mode) before pressing the letter key.
3 Press < or > until the cursor is under desired accented character.
4 Press h. The accented letter is added to the text.
EXAMPLE
In addition to the letters, symbols and numerals on the key tops, there are 48 additionalmarks available with the Symbol function.
To add the accented character “É”:
1 Hold down f and press d.
2 Hold down e and press E.
3 Press > until the cursor is under É.
4 Press h.
A-U?
ÈÉËÊE
ÈÉËÊE
RESUMÉ
SYMBOL FUNCTION

16
The following symbols are available:
To type in a symbol:
1 Press d. The message “1-4?” appears on the display.
2 Press a key 1 to 4 to choose the set that contains the desired symbol.
3 Press < or > until the cursor is under the desired symbol.
4 Press h. The symbol appears in the text.
EXAMPLE
Group Symbol
1 Æ æ ° + × ÷ = _ ˜ [ ] ® ©
2 § 2 32 3 4
3
4
To add the symbol “ ”:
1 Press d.
2 Press 3.
3 Press > until the cursor is under .
4 Press h.
TM
☞ ☞ ♥ ★
1-4?
DANGER
17
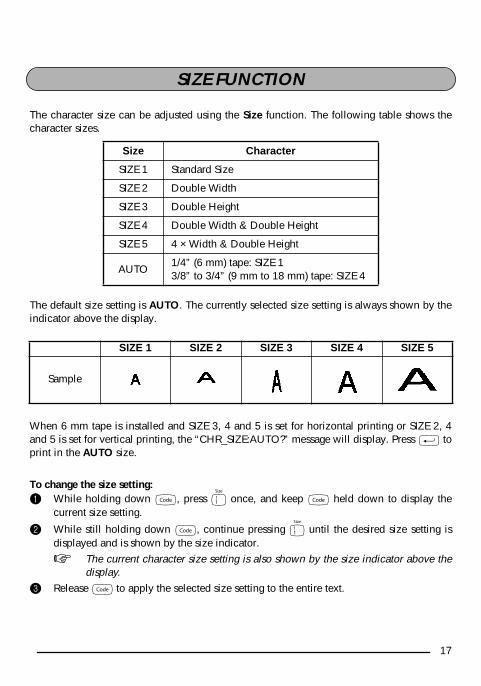
The character size can be adjusted using the Size function. The following table shows thecharacter sizes.
The default size setting is AUTO. The currently selected size setting is always shown by theindicator above the display.
When 6 mm tape is installed and SIZE 3, 4 and 5 is set for horizontal printing or SIZE 2, 4and 5 is set for vertical printing, the “CHR_SIZE:AUTO?” message will display. Press h toprint in the AUTO size.
To change the size setting:1 While holding down f, press 1 once, and keep f held down to display the
current size setting.
2 While still holding down f, continue pressing 1 until the desired size setting isdisplayed and is shown by the size indicator.
☞ The current character size setting is also shown by the size indicator above thedisplay.
3 Release f to apply the selected size setting to the entire text.
Size Character
SIZE 1 Standard Size
SIZE 2 Double Width
SIZE 3 Double Height
SIZE 4 Double Width & Double Height
SIZE 5 4 × Width & Double Height
AUTO1/4” (6 mm) tape: SIZE 13/8” to 3/4” (9 mm to 18 mm) tape: SIZE 4
SIZE 1 SIZE 2 SIZE 3 SIZE 4 SIZE 5
Sample
SIZE FUNCTION

18
EXAMPLE
You can choose from nine different character styles to apply to your text.
☞ Characters printed using the smaller sizes may be difficult to read if certain style set-tings (e.g., ITALIC+SHADOW) are selected.
The following style settings are available:
NORMAL, OUTLINE, BOLD, SHADOW, ITALIC,
ITALIC+OUTLINE, ITALIC+BOLD, ITALIC+SHADOW, VERTICAL
The default style setting is NORMAL. The style indicator at the bottom left of the displayshows the current style setting when any setting other than NORMAL is selected.
Refer to Reference at the end of this section for samples of the available settings.
To change the style setting:1 While holding down f, press 2 once, and keep f held down to display the
current style setting.
2 While still holding down f, continue pressing 2 until the desired style setting isdisplayed.
3 Release f to apply the selected style setting to the entire text.
To select SIZE3:
1 While holding down f, press 1once, and keep f held down.
2 While still holding down f, continue
pressing 1 until SIZE3 is displayed.
3 Release f.
AUTO
SIZE3
STYLE FUNCTION

19
EXAMPLE
REFERENCE
You can emphasize your text by underlining it.
The default underline setting is OFF. In this case, “TEXT” will show on the display. When theUnderline function is set to UNDERLINE, the Underline indicator on the bottom of the dis-play lights up.
☞ The underline and frame settings can not be made at the same time.
To select the ITALIC+SHADOW style setting:
1 While holding down f, press 2once, and keep f held down.
2 While still holding down f, continue
pressing 2 until ITALIC+SHADOW is
displayed.
Style Sample Style Sample
NORMALITALIC + OUTLINE
OUTLINEITALIC + BOLD
BOLDITALIC +
SHADOW
SHADOW VERTICAL
ITALIC
NORMAL
ITALIC+SHADOW
UNDERLINE FUNCTION

20
To turn on or off the Underline function:1 While holding down f, press 3 once, and keep f held down to display the
current underline setting.
2 While still holding down f, continue pressing 3 until the desired underline settingis displayed.
☞ The Underline indicator lights up when the UNDERLINE setting is selected.3 Release f to apply the selected underline setting to the entire text.
EXAMPLE
With the Frame function, you can choose from various frames and highlights to design amore decorative or emphasized label.
The following Frame settings are available:TEXT, ROUND, WOODEN, POINTING, CANDY
The default frame setting is TEXT; however, other settings are also available. When any set-ting other than TEXT is selected, the Frame indicator on the bottom of the display lights up.
☞ The underline and frame settings can not be made at the same time.Refer to Reference at the end of this section for samples of the available settings.
To change the frame setting:1 While holding down f, press 4 once, and keep f held down to display the
current frame setting.
To select the UNDERLINE setting:
1 While holding down f, press 3once, and keep f held down.
2 While still holding down f, continue
pressing 3 until UNDERLINE is dis-
played.
3 Release f.
TEXT
UNDERLINE
FRAME FUNCTION
21
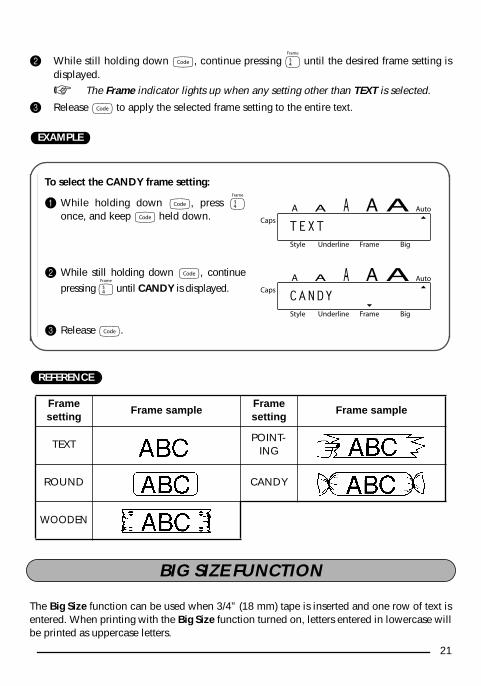
2 While still holding down f, continue pressing 4 until the desired frame setting isdisplayed.
☞ The Frame indicator lights up when any setting other than TEXT is selected.
3 Release f to apply the selected frame setting to the entire text.
EXAMPLE
REFERENCE
The Big Size function can be used when 3/4” (18 mm) tape is inserted and one row of text isentered. When printing with the Big Size function turned on, letters entered in lowercase willbe printed as uppercase letters.
To select the CANDY frame setting:
1 While holding down f, press 4once, and keep f held down.
2 While still holding down f, continue
pressing 4 until CANDY is displayed.
3 Release f.
Frame setting
Frame sampleFrame setting
Frame sample
TEXTPOINT-
ING
ROUND CANDY
WOODEN
TEXT
CANDY
BIG SIZE FUNCTION

22
The default setting is OFF. When you turn the Big Size function ON, the Big indicator willlight up in the bottom right of the display.
☞ If you change any of the Size, Style, Underline, or Frame settings after making the BigSize setting, the Big Size font will automatically return to the default value and Size,Style, Underline, or Frame settings will take precedence.If the Big Size setting is made when tape other than 3/4” (18 mm) is inserted, the mes- sage “CHR_SIZE:AUTO?” will display. Press
h
to print in the
AUTO
size.
To change the Big Size setting:
1 Insert the 3/4” (18 mm) tape cassette and enter one row of text.
2 While holding down f, press 5 once, and keep f held down to display thecurrent setting.
3 While still holding down f, press 5 to make the ON setting.
☞ The Big indicator lights up when the ON setting is made.4 Release f to apply the selected setting to the entered text.
EXAMPLE
OFF ON
To select the Big Size ON setting:
1 While holding down f, press 5once, and keep f held down.
2 While still holding down f, continue
pressing 5 until ON is displayed.
3 Release f.
BIG:OFF
BIG:ON

23
TAPE MARGIN FUNCTION
The Tape margin function allows you to adjust the size of the margins on the left and rightsides of your text.
The default tape margin setting is FULL; however, three other settings are also available.
☞ After printing using the NARROW and HALF tape margin settings, push down on thetape cutter lever to cut off the label, then use scissors to cut along the printed dots (:)to center the text within the label.
To change the tape margin setting:1 While holding down f, press 6 once, and keep f held down to display the cur-
rent tape margin setting.
2 While still holding down f, continue pressing 6 until the desired tape margin set-ting is displayed.
3 Release f to apply the selected tape margin setting to the entire text.
EXAMPLE
FULL(1” (25 mm margins))
NONE(1/12” (2 mm margins))
NARROW(1/6” (4 mm margins))
HALF(1/2” (12 mm margins))
To select the HALF tape margin setting:
1 While holding down f, press 6once, and keep f held down.
2 While still holding down f, continue
pressing 6 until HALF is displayed.
3 Release f.
FEED:FULL
FEED:HALF

24
MIRROR PRINTING FUNCTION
With this function, you can print your text so that the characters can be read from the tapeside of the tape. If mirror-printed labels are attached to glass or some other clear material,they can be read correctly from the opposite side.
☞ When using the Mirror printing function, the text should be printed on clear tape.The default mirror printing setting is OFF.
To turn on or off the mirror printing setting:1 While holding down f, press a once, and keep f held down to display the
current mirror printing setting.
2 While still holding down f, continue pressing a until the desired mirror printingsetting is displayed.
3 Release f to apply the selected mirror printing setting to the entire text.
EXAMPLE
MIRROR : ON
To select the ON mirror printing setting:
1 While holding down f, press aonce, and keep f held down.
2 While still holding down f, continue
pressing a until ON is displayed.
3 Release f.
MIRROR:OFF
MIRROR:ON

25
PRINT KEY & FEED FUNCTION
After you have entered your text and chosen the desired format settings, you are ready toprint.
To print a label:
● Press a once. The message “PRINTING” is displayed.
To feed the tape:● Hold down f and press g once. 1” (25 mm) of tape is fed out.
To cut the tape:● Push down on the tape cutter lever.
☞ In order to prevent damaging the tape, do not try to cut it while printing or feed-ing. Pushing down on the tape cutter lever too far may break it.
EXAMPLE
This function can be used to print many copies of the same text while increasing a certainnumber in the text by 1 after each label is printed.
To use the Numbering function:1 Press < or > to position the cursor below the number that you wish to increase.
2 Hold down f and press A. The message “NUMBER:1–9?” appears in the display.
3 Press the number key ( 1 to 9 ) of the last number that is to be printed.
☞ To cancel the Numbering, hold down f and press A (or press just c ).
4 Press a (or h) to begin printing the labels.
To make a label using the NONE tape margin setting:
1 Press a once.
2 Hold down f and press g once.
3 Push down on the tape cutter lever.
PRINTING
NUMBERING FUNCTION

26
5 Press down on the tape cutter lever to cut the tape, and then use scissors to cut alongthe printed dots to separate the labels.
EXAMPLE
To print three labels with numbers 1, 2 and 3:
1 Position the cursor below “1”.
2 Hold down f and press A.
3 Press 3.
4 Press a (or h ).
5 Press in the tape cutter lever to cut the tape, then use scissors to cut along the
cutting guide to separate the labels.
STUDIO 1
NUMBER:1-9? 1
NUMBER:1-9? 3
PRINTING
✂ ✂✂

27
REPEAT PRINTING FUNCTION
This function allows you to print up to 9 copies of the same text.
To use the Repeat printing function:1 Hold down f and press S. The message “REPEAT:1-9?” appears in the display.
2 Press the number key ( 1 to 9 ) of the number of labels that you want.
☞ To cancel the Repeat printing, hold down f and press S (or press just c).
3 Press a (or h ) to begin printing the labels.
4 Press down on the tape cutter lever to cut the tape, and then use scissors to cut alongthe printed dots to separate the labels.
EXAMPLE
To print three copies of a label:
1 Hold down f and press S.
2 Press 3.
3 Press a (or h ).
4 Press in the tape cutter lever to cut the tape, then use scissors to cut along the
cutting guide to separate the labels.
REPEAT:1-9? 1
REPEAT:1-9? 3
PRINTING
✂ ✂✂

28
MEMORY FUNCTIONS
You can use the memory to store your most frequently used text files. The text remains in the
memory, even after all characters are removed from the display using the Clear function
(holding down f and pressing c ).
When each file is stored, it is given a number to make recalling it easier. Up to 9 text files orabout 300 characters can be stored in the memory. Each stored text file can have a maxi-mum of 60 characters.
Since a copy of the stored text file is recalled when the Recall function is used, the text canbe edited or printed without changing the originally stored file. When a file is no longerneeded or more space is necessary, the Memory delete function can be used to delete it.
☞ When inserting new batteries, be sure to insert the new ones within five minutes ofremoving the old ones, otherwise any text files stored in the memory will be lost(unless the machine is plugged into an electrical outlet with the AC adapter).
STORING TEXTTo store a text file:1 Hold down f and press 8. The message “STORE:1–9?” appears on the display.
☞ If 300 characters have already been stored, the error message “MEMORY FULL!”appears in the display. If this occurs, an existing text file must be deleted beforethe new one can be stored.
2 Press the key ( 1 to 9 ) of the file number where you wish to store the text. The textis stored under the selected file number and the text previously shown in the displayreappears.
☞ If a file is already stored under the selected file number, the message “OVER-WRITE?” appears in the display and you must decide whether or not to over-write it (delete it from the memory and store the new one).
To quit the Store function without storing the text, hold down f and press8 (or press just c ).
To overwrite the stored file with the new one:● Press h to delete the previously stored file and store the new one under the selected
number.
☞ To go back and choose another file number without overwriting the text file,press c, and then press the key of a different file number.
RECALLING TEXTTo recall a text file:1 Hold down f and press 9. The message “RECALL:1–9?” appears on the display.

29
2 Press the key ( 1 to 9 ) of the file number containing the text that you wish to recall.The text stored under the selected file number is shown.
☞ To quit the Recall function without recalling text, hold down f and press 9(or press just c ).
3 Press h. Any text previously entered in the display is erased and the text storedunder the selected file number is recalled into the display.
DELETING A FILETo delete a text file:1 Hold down f and press 0. The message “M.DEL:1-9?” appears on the display.
2 Press the key ( 1 to 9 ) of the file number containing the text that you wish todelete. The text stored under the selected file number is shown.
☞ To cancel the Memory delete function without deleting the text file, hold downf and press 9 (or press just c ).
3 Press h to delete the text file that was selected.
EXAMPLE
To store text under file number 4:
1 Hold down f and press 8.
2 Press 4.
3 Press h.
STORE:1-9?
4?
John Smith
30
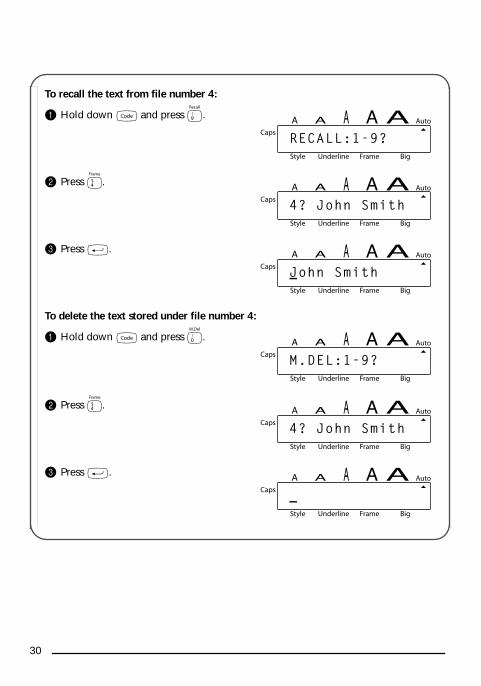
To recall the text from file number 4:
1 Hold down f and press 9.
2 Press 4.
3 Press h.
To delete the text stored under file number 4:
1 Hold down f and press 0.
2 Press 4.
3 Press h.
RECALL:1-9?
4? John Smith
John Smith
M.DEL:1-9?
4? John Smith

31
TROUBLESHOOTING
Problem Remedy
1. The display stays blank after you have turned on the machine.
• Check that the AC adapter is connected correctly.
• If you are using batteries, check that they are correctly inserted.
• If the batteries are low, replace them with new ones.
2. The machine does not print or the printed characters are blurred.
• Check that the tape cassette has been inserted properly.
• If the tape cassette is empty, replace it with a new one.
• Make sure that the tape compartment cover has been closed.
3. The text files that you stored in the memory are no longer there.
If the batteries are low, replace them with new ones.
4. The printed characters are not formed properly.
If you are using batteries, they may be low. Try using the AC adapter or replace the batteries with new ones.
5. A blank horizontal line appears through the printed label.
Clean the print head as explained on page 8.
6. Striped tape appears. You have reached the end of the tape. Replace the tape cassette with a new one.
7. The machine has “locked up” (i.e., nothing happens when a key is pressed, even though the machine is on.)
Turn off the machine, and then while hold-
ing down f and R, press b to turn
the machine back on.
Finally, release f and R.
☞ The text and formats in the displayand all text files stored in the mem-ory are erased.

32
ERROR MESSAGE LIST
Error Message Cause Remedy
2 LINE LIMIT! This message appears if two
lines already exist when you
press h.
Limit the number of lines to
two.
BATTERY WEAK! This message appears when the
installed batteries become weak.
Replace the batteries or use
the AC adapter.
BUFFER EMPTY! • This message appears if you
try to print, but no text has
been entered.
• Enter text before printing.
• This message appears if you
hold down f and press
A, but no text has been
entered in the display.
• Enter some text before
starting the function.
• This message appears if you
hold down f and press
S, but no text has been
entered in the display.
• Enter some text before
starting the function.
• This message appears if you
hold down f and press
8, but no text has been
entered in the display.
• Enter some text before
starting the function.
BUFFER FULL! This message appears if you try
to enter a character, symbol,
accent, return or space after 60
characters have already been
entered.
Delete some existing text so
that more text can be
entered.
CHANGE ADAPTER This message appears if a high-
voltage adapter is being used.
Remove the high-voltage
adapter and connect the
adapter designed exclusively
for this machine.

33
CUTTER ERROR! This message appears if the
tape cutter lever is pressed
down while a label is being
printed.
Release the tape cutter lever.
INVAL. CHRS! This message appears if the
cursor is not below a number
when you hold down f and
press A.
Move the cursor below a
number before holding down
f and press A.
LINE LIMIT! This message appears if the
number of lines in the text is
greater than the maximum
number of lines possible for
the installed tape.
Reduce the number of lines
or install a tape of greater
width.
MEMORY FULL! This message appears if you try
to store a text file after 300
characters have already been
stored in the memory.
Delete an unwanted file to
make room for the new one.
NO FILES! This message appears if you try
to recall or delete a text file
from the memory when none
are stored.
Store a text file first.
NO TAPE! This message appears if you try
to print a label or feed the tape
when no tape cassette is
installed.
Install a tape cassette and try
again.
TOO SMALL! This message appears if the
number that is set to be printed
using the Numbering function
is less than the number above
the cursor.
Press the key of a number
that is greater than the
number in the text.
Error Message Cause Remedy

34
SPECIFICATIONS
HARDWARE
SOFTWARE
Input Device: Keyboard - 49 keys
LCD: 7 × 5 dots15 characters × 1 line11 indicators
Print Tape: Pressure-sensitive, Adhesive-based26’ 3” (8 m) longFour widths available:
1/4” (6 mm)3/8” (9 mm)1/2” (12 mm)3/4” (18 mm)
Power Supply: Six AA batteries (AA/SUM-3/AM3/R6/LR6) or optional AC adapter Auto power-off if no key is pressed for 5 minutes
Print Head: 64 dot / 180 dpi
Dimensions: 6 9/10” (W) × 7 9/10” (D) × 2” (H)(176 × 201.5 × 52 mm)
Weight: 1.4 lbs (650 g) (without a tape cassette and batteries installed)
Buffer Size: Maximum 60 charactersMaximum two lines
Memory Size: 300 characters
Character Size: Six sizes (AUTO, SIZE1, SIZE2, SIZE3, SIZE4, SIZE5) + Big (only when 3/4” (18 mm) tape installed)
Print Styles: Normal, Outline, Bold, Shadow(each can be combined with Italic), and Vertical

35
ACCESSORIES
● SuppliesObtain tape cassettes from your nearest authorized dealer. Use only Brother TZ tapes with this machine. Brother cannot be held responsible fortrouble caused by the use of unauthorized supplies. Do not use tapes that do not havethe mark.
Stock No. DescriptionQTY/
PACKAGEPRICE
3/4” (18mm)-wide laminated tapes
TZ-141 Black characters on clear adhesive 1 $20.99TZ-145 White characters on clear adhesive 1 $20.99TZ-241 Black characters on white adhesive 1 $20.99TZ-242 Red characters on white adhesive 1 $20.99TZ-243 Blue characters on white adhesive 1 $20.99TZ-344 Gold characters on black adhesive 1 $24.99TZ-345 White characters on black adhesive 1 $23.99TZ-441 Black characters on red adhesive 1 $20.99TZ-541 Black characters on blue adhesive 1 $20.99TZ-545 White characters on blue adhesive 1 $23.99TZ-641 Black characters on yellow adhesive 1 $20.99TZ-741 Black characters on green adhesive 1 $20.99TZ-B41 Black characters on fluorescent orange adhesive 1 $24.99TZ-M41 Black characters on clear (matte) adhesive 1 $23.99
TZ-S241Industrial (strong adhesive) black characters on white adhesive
1 $21.99
1/2” (12mm)-wide laminated tapes
TZ-131 Black characters on clear adhesive 1 $16.99TZ-231 Black characters on white adhesive 1 $17.99TZ-232 Red characters on white adhesive 1 $17.99TZ-335 White characters on black adhesive 1 $20.99
TZ-S231Industrial (strong adhesive) black characters on white adhesive
1 $18.99
3/8” (9mm)-wide laminated tapes
TZ-121 Black characters on clear adhesive 1 $14.99TZ-221 Black characters on white adhesive 1 $16.99

36
Special tapes
Options
TZ-325 White characters on black adhesive 1 $18.99TZ-421 Black characters on red adhesive 1 $16.99
TZ-S221Industrial (strong adhesive) black characters on white adhesive
1 $17.99
1/4” (6mm)-wide laminated tapes
TZ-111 Black characters on clear adhesive 1 $12.99TZ-211 Black characters on white adhesive 1 $14.99TZ-315 White characters on black adhesive 1 $17.99
TZ-S211Industrial (strong adhesive) black characters on white adhesive
1 $15.99
Stock No. DescriptionQTY/
PACKAGEPRICE
TZ-SE4Black characters on 3/4” (18 mm) security adhe-sive
1 $29.99
TZ-FA3 Blue characters on 1/2” (12 mm) fabric adhesive 1 $24.99
Stock No. DescriptionQTY/
PACKAGEPRICE
AD-30 AC adapter 1 $24.99TZ-CL4 Print head cleaning cassette 1 $20.99
Stock No. DescriptionQTY/
PACKAGEPRICE

P-TOUCH ACCESSORY ORDER FORMDear Customer:This order form is provided for your convenience should your retailer not stock the item(s)needed. To order by mail, send this completed form along with proper payment to theaddress below OR credit card holders: Call toll-free 1-888-879-3232, fax completed orderform to 1-800-947-1445, or visit our web site at http://www.brothermall.com. Please referto the Accessories listing in your User's Guide for stock no. and price.
* Prices subject to change without notice.
Stock No. Description Price Quantity Total
Subtotal
Name: Accessory Subtotal: $
Address: AZ, CA, CO, CT, FL, GA, IL, LA, MA,MD, MI, MN, MO, NC, NJ, NV, NY,OH, PA, TN, TX, VA, WAresidentsadd applicable sales tax
City:
State/Zip: $
Daytime Phone:
Shipping/Handing Options
SEND ORDER FORM TO: Please choose one:
Brother International Corp.Attn: Consumer Accessory Div.P.O. Box 341332Bartlett, TN38184-1332
• Standard ($5.00)
• 2nd day air freight ($8.75) Mandatory for alldeliveries outside of the continental U.S.(Alaska, Hawaii, Puerto Rico, Virgin Islands& Canada)
• All other overseas orders ($25.00) $
TOTAL DUE (US dollars) $
Method of payment (Check one)
( ) Visa ( ) MasterCard ( ) Discover ( ) American Express ( ) Check/Money Order
Account Number
Expiration Date
Signature
✂


BROTHER CONTACT INFORMATION
Service Center Locations
If you need a local service center, please call 1-800-284-HELP (4357) to locate the authorized service center closest to you.
Note: Be sure to call the Service Center before your visit.Service centers do not provide operational assistance. See “Operational Assistance.”
Operational Assistance
For technical and operational assistance you may call Brother Customer Service at:Voice 1-877-4-Ptouch, or Fax 1-901-379-1210
Assistance on the Internet
For product information and downloading the latest drivers: http://www.brother.comFor purchasing accessories and certain Brother products: http://www.brothermall.com
Accessories and Supplies
To order Brother accessories or supplies by Visa, MasterCard, Discover or American Express you may call toll tree 1-888-879-3232, or complete the order form in your user’s
guide and fax both sleds of the form to 1-800-947-1445
For purchasing accessories on the Internet: http://www.brothermall.com
To order by mail or pay by check, please complete the accessory order form and mail it along with payment to:
Brother International Corporation
Attn: Consumer Accessory Division
P.O. Box 341332
Bartlett, TN 38184-1332
Fax-Back System
Brother Customer Service has installed an easy to use Fax-Back System so you can get instant answers to common technical questions and product information for all Brother
products.
This system is available 24 hours a day, 7 days a week. You can use the system to send the information to any fax machine, not just the one you are calling from.
Please call 1-800-521-2846 and follow the voice prompts to receive faxed instructions on how to use the system and an index or Fax-Back subjects.


GUIA DE INSTRUCCIONES
INTRODUCCIÓN
Gracias por adquirir una P-touch 1750.
Su nueva P-touch le permitirá diseñar y crear etiquetas para cualquier tipo de aplicación. Suversatilidad le permitirá crear etiquetas personales seleccionando distintos diseños de mar-cos y muchos tamaños y estilos de caracteres. Además, los cuatro diferentes anchos de cinta(1/4
″
(6 mm), 3/8
″
(9 mm), 1/2
″
(12 mm) y 3/4
″
(18 mm)) y la variedad de los colores de lacintas le hará posible imprimir etiquetas personales, útiles para relleno con código de col-ores.
Ya no hay por qué preocuparse por tareas urgentes que requieren impresión profesional. Enla oficina, la fábrica, el laboratorio, o en casa, la calidad y el rendimiento de la P-touch 1750la convierten en una máquina muy versátil y práctica.
Para terminar, puesto que esta guía del usuario le será de gran utilidad, le aconsejamos quela guarde en un lugar a mano para poder consultarla en cualquier momento.
AVISO DE LA FCC
Este equipo ha sido probado y cumple con los límites de un aparato digital de la ClaseB, siguiendo el apartado 15 de las normas de la FCC. Estos límites están pensados paraproporcionar una protección razonable contra interferencias nocivas dentro de unainstalación residencial. Este equipo podría interferir de forma nociva con comunica-ciones por radio si no se instala y utiliza siguiendo las instrucciones. No obstante, noexiste ninguna garantía de que no vayan a suceder interferencias en una instalaciónconcreta. Si este equipo causara interferencias nocivas con la recepción de radio otelevisión, lo cual puede determinarse poniendo el equipo en ON u OFF, se recomien-da que el usuario intente corregir dichas interferencias mediante una de las siguientesmedidas:
- Reoriente o ponga la antena receptora en otro lugar.- Aumente la separación entre el equipo y el receptor.- Conecte el equipo en una toma de un circuito diferente de la que esté conectadael receptor.
- Consulte a su distribuidor o a un técnico experimentado de radio/televisión.- Los cambios o modificaciones no aprobadas expresamente por Brother Indus-tries, Ltd. podrán anular la autorización que el usuario tiene para utilizar elequipo.
A continuación se indican los números de patente y de publicación de patente rela-cionados con este producto:
USP4839742 USP4983058 USP5120147USP4927278 USP5009530USP4976558 USP5069557

1
ÍNDICE
PRECAUCIONES GENERALES .............................................................................2
PILAS ...................................................................................................................2
ADAPTADOR DE CA OPCIONAL .......................................................................3
CASETES DE CINTA.............................................................................................4
COLOCACIÓN DE ETIQUETAS...........................................................................5
CABEZAL DE IMPRESIÓN Y RODILLOS..............................................................6
TECLA DEL CURSOR...........................................................................................7
TECLAS CODE Y SHIFT .......................................................................................7
TECLA DE RETORNO..........................................................................................8
TECLA DE BORRADO (BS) ..................................................................................9
FUNCIÓN DE REPOSICIÓN (CLEAR) ..................................................................9
FUNCIÓN DE ACENTOS...................................................................................10
FUNCIÓN DE SÍMBOLOS .................................................................................10
FUNCIÓN DE TAMAÑO...................................................................................11
FUNCIÓN DE ESTILO .......................................................................................11
FUNCIÓN DE SUBRAYADO.............................................................................12
FUNCIÓN DE MARCOS....................................................................................13
FUNCIÓN DE TAMAÑO GRANDE ...................................................................13
FUNCIÓN DE CINTA ........................................................................................14
FUNCIÓN DE IMPRESIÓN DE ESPEJO ..............................................................15
FUNCIÓN DE LA TECLA DE IMPRESIÓN Y AVANCE .......................................15
FUNCIÓN DE NUMERACIÓN ..........................................................................16
FUNCIÓN DE IMPRESIÓN REPETIDA...............................................................16
FUNCIONES DE LA MEMORIA .........................................................................17
SOLUCIÓN DE PROBLEMAS ............................................................................19
LISTA DE MENSAJES DE ERROR........................................................................20
ESPECIFICACIONES...........................................................................................22
ACCESORIOS ....................................................................................................23

2
PRECAUCIONES GENERALES
• Con esta máquina emplee sólo cintas TZ Brother. No emplee cintas que no tengan lamarca .
• No tire de la cinta que se alimenta desde la P-touch. Podría dañar el casete de cinta.
• No utilice la máquina en lugares polvorientos, y manténgala alejada de la luz solardirecta y la lluvvia.
• No exponga la máquina a altas temperaturas ni humedad. No la deje nunca en eltablero de instrumentos ni en la parte trasera de su automóvil.
• No deje nada que sea de goma o vinilo encima de la máquina durante períodos prolon-gados. Podría producir manchas.
• No limpie la máquina con alcohol ni con otros solventes orgánicos. Emplee solamenteun paño suave y seco.
• No ponga ningún objeto encima ni dentro de la máquina.
• Para evitar daños, no toque el borde de la cuchilla.
• Cuando inserte pilas nuevas, asegúrese de hacerlo antes de que transcurran cinco minu-tos desde el momento en que extrae las pilas gastadas, porque de lo contrario se perde-rían todos los archivos de texto (a menos que la máquina esté enchufada a una toma deCA con el adaptador de CA).
• Emplee sólo el adaptador de CA (modelo AD-30) exclusivamente diseñado para estamáquina. El empleo de otro cancelaría la garantía.
• No intente desmontar el adaptador de CA.
• Cuando la máquina no se utilice durante períodos prolongados de tiempo y no seanecesario conservar los archivos de texto en la memoria, desenchufe el adaptador deCA, y saque las pilas para evitar fugas de las mismas que podrían ser causa de daños enla máquina.
• Cuando el adaptador de CA esté enchufado en la máquina, si se desenchufa el adapta-dor de la toma de CA se correrá el riesgo de perder todos los archivos de texto de lamemoria, aunque las pilas estén insertadas.
• En esta máquina, emplee seis pilas del tamaño AA.
• Para evitar daños durante el transporte, el panel LCD está cubierto con una lámina deprotección transparente.Retire esta lámina de protección transparente antes de empezar a utilizarlo.
Esta máquina ligera y portátil puede utilizarse en cualquier lugar instalando seis (6)
pilas AA
.Cuando cambie las pilas, reemplace siempre las seis pilas al mismo tiempo.
PILAS

3
Para cambiar las pilas:
1
Extraiga la cubierta del comparti-miento de las pilas de la parte posteriorde la máquina.
2
Si ya hay pilas instaladas, extráigalas.
3
Inserte seis pilas AA nuevas, asegurán-dose de que quedan orientadas en ladirección correcta.
4
Coloque la cubierta del comparti-miento de las pilas.
☞
Asegúrese de insertar las pilasnuevas antes de que transcurran cinco minutos desde que se extraen las pilasgastadas, porque de lo contrario el texto que se visualiza en la pantalla y losarchivos de texto almacenados en la memoria se perderían (a menos que lamáquina esté enchufada a una toma de CA con el adaptador de CA).
El adaptador de CA (modelo AD-30) le permite emplear esta máquina siempre que dis-ponga de una toma de corriente eléctrica.
Para conectar el adaptador de CA opcional:
1
Inserte la clavija del adaptador en elconector que tiene la marca DC IN 7.0Val lado derecho de la máquina.
2
Inserte la clavija del adaptador de CA enla toma de corriente más cercana.
☞
Emplee sólo el adaptador de CAdiseñado exclusivamente paraesta máquina.
Extraiga las pilas y desconecte eladaptador de CA si no se pro-pone utilizar la máquina duranteperíodos de tiempo prolongados.Cuando se desconecta la alimentación, se pierden el texto que se muestra enla pantalla y el que está almacenado en la memoria.
Se recomienda emplear el adaptador de CA para imprimir tipos de caracteresgrandes y códigos de barras con cintas de 18 mm (3/4”) porque esta opera-ciónes pueden gastar las pilas con rapidez.
ADAPTADOR DE CA OPCIONAL

4
Un casete de TZ se suministra con la unidad. Sin embargo, para esta máquina hay dispo-nibles una amplia gama de casetes de cinta TZ de distintos colores y tamaños, es posiblecrear etiquetas diferentes codificadas por colores o tamaños.
Para cambiar el casete de cinta:
1
Levante la cubierta del compartimiento dela cinta para abrirla. Se libera tambiénentonces el casete instalado.
2
Si ya hay un casete instalado, extráigalotirando del mismo recto hacia arriba.
3
Si la cinta entintadora del otro casete seafloja, utilice un dedo para bobinar larueda dentada en el sentido de la flechade dicho casete hasta tensar la cinta. Ade-más, cerciórese de que el extremo de lacinta esté debajo de las guías de la misma.
☞
Si está utilizando un casete de cintanuevo provisto de retén, cercióresede extraer éste.
4
Inserte firmemente el casete de cinta en el compartimiento de la cinta asegurándosede que toda la parte posterior del casete está en contacto con la inferior del compar-timiento.
☞
Cuando inserte el casete de cinta, asegúrese de que la cinta interior no estéenganchada en la esquina de la guía metálica.
5
Cierre la cubierta del compartimiento y conecte la alimentación de la máquina siestaba desconectada.
6
Mantenga pulsada
f
y presione
g
una vez para que la cinta avance y asíquede con la tensión óptima.
7
Presione la palanca de la cuchilla de la cinta para cortar la cinta sobrante.
VARILLA
En el lado derecho de la tapa del compartimiento de la cinta de la P-touch hay una vari-lla. Utilícela para pegar cinta laminada en un objeto.
CASETES DE CINTA
COLOCACIÓN DE ETIQUETAS

5
1
Abra la tapa del compartimiento de la cinta.
2
Empuje la punta de la varilla hacia usted con el dedo.
3
Tome la varilla por la punta y tire de ella hacia arriba para sacarla.
CINTA LAMINADA
La varilla suministrada permite que, en las cintas laminadas, usted pueda extraer facilmenteel papel del dorso de la etiqueta.
1
Tome la cinta con la mano izquierda, con la superficie impresa arriba, y tome la varillacon la mano derecha.
2
Pase la mitad de la cinta por el orificio estrecho largo de la varilla.
3
Gire tres cuartos de vuelta la varilla hacia usted y separe la varilla de usted como semuestra abajo.
4
Pele el papel del dorso de la etiqueta.
CINTAS DE TELA
La cinta de tela se emplea para adherir un trozo de tela impresa con el texto en prendar de vestirempleando una plancha. Después de imprimir el texto en la cinta de tela y de haber cortado laetiqueta empleando unas tijeras, coloque la etiqueta sobre una prenda planchada en la posiciónel la que desee ponerla de modo que el texto impreso pueda leerse correctamente. Cubra la eti-queta con otra tela y emplee un ajuste de la plancha de temperatura medio-alta (320 a 356˚F(160 a 180 ˚C)) para presionar con firmeza durante 10 a 15 segundos. Para más detalles, con-sulte las instrucciones suministradas con el casete de cinta de tela.
GH
ABCDEF
ABCDEF

6
CABEZAL DE IMPRESIÓN Y RODILLOS
De vez en cuando, motas de polvo o suciedad se adhieren al cabezal de impresión y a losrodillos de la máquina. Suele suceder cuando se emplea la unidad en exteriores o en lugarescon mucho polvo. Si alguna parte del cabezal de impresión está cubierta de polvo, es posi-ble que aparezca una franja horizontal blanca por el texto de la etiqueta.
Por lo tanto, al igual que con las grabadoras de cintas, el cabezal de la máquina deberá lim-piarse de vez en cuando.
Para limpiar el cabezal de impresión y los rodillos:
1 Desconecte la alimentación de la máquina.
2 Abra la cubierta del compartimiento de la cinta, extraiga el casete, si está dentro. Elcabezal de impresión y los rodillos están situados dentro del compartimiento de lacinta.
3 Cabezal de impresión: Emplee un palillo con punta de algodón seco para frotar concuidado el cabezal de impresión con movimiento hacia arriba y abajo.Rodillos: Emplee un palillo con punta de algodón seco para frotar cada rodillo conmovimiento hacia arriba y abajo mientras los gira con el dedo.
4 Pruebe de nuevo la impresión.
Si todavía queda polvo:
5 Repita el paso 3 empleando un palillo con cabeza de algodón humedecido en alcoholisopropílico (limpieza).
Si no funciona nada de lo de arriba, póngase en contacto con el representante de servicio.
☞ La limpieza también puede hacerse utilizando el casete de limpieza de cabezales deimpresión opcional (TZ-CL4).
Cabezal de impresión Cabezal de impresión
Rodillos Palillo de cabeza de algodón

7
TECLA DEL CURSOR
El visualizador de LCD de esta máquina muestra uno fila de 15 caracteres; sin embargo, eltexto que usted cree puede tener hasta 60 caracteres de longitud. Podrá revisar y editar eltexto empleando las teclas del cursor para moverlo y que muestre las distintas partes en elvisualizador.
TECLA DEL CURSOR IZQUIERDA Para mover el cursor un carácter hacia la izquierda:
● Presione < una vez.
Para mover el cursor varios caracteres hacia la izquierda:
● Mantenga presionado > hasta que el cursor se mueva a la posición deseada.
Para mover el cursor al principio de la línea de texto:
● Mantenga presionado f y presione <.
TECLA DEL CURSOR DERECHAPara mover el cursor un carácter hacia la derecha:
● Presione > una vez.
Para mover el cursor varios caracteres hacia la derecha:
● Mantenga presionado > hasta que el cursor se mueva a la posición deseada.
Para mover el cursor al final de la línea de texto:
● Mantenga presionado f y presione >.
La mayoría de los caracteres pueden introducirse simplemente presionando sus teclas. Sinembargo, para emplear funciones especiales o para introducir letras en mayúsculas, caracte-res acentuados y algunos símbolos, se requieren las siguientes teclas especiales.
TECLA CODEPara emplear una función impresa encima de la tecla:
● Mantenga presionado f y presione la tecla que está inmediatamente debajo de la función deseada.
TECLAS CODE Y SHIFT

8
TECLA SHIFTPara escribir una letra mayúscula o un símbolo impreso en la esquina superior izquierda dela tecla:
● Mantenga presionado e y presione la tecla de la letra o símbolo deseado.
El modo Caps (mayúsculas) es similar a mantener presionada e. Le permite escribir letrasmayúsculas continuamente.
Para escribir muchas letras mayúsculas:
1 Mantenga presionado f y presione e. El indicador de Caps, de la izquierda delvisualizador, se encenderá.
2 Presione las teclas de las letras o símbolos deseados.
3 Para salir del modo Caps, mantenga presionado f y presione e. Se apagará elindicador de Caps.
Al igual que en una máquina de escribir o procesador de texto, la tecla de retorno ( h ) deesta máquina se emplea para poner fin a una línea de texto y empezar otra. Cuando hayaterminado de introducir una línea, presione la tecla de retorno para hacer una línea nueva ymover al cursor a la misma.
☞ Una etiqueta sólo puede contener un máximo de dos líneas de texto. Si presiona hcuando el cursor está situado en la segundo línea, aparecerá el mensaje de error “2LINE LIMIT!”.
La tecla de retorno también podrá utilizarse para seleccionar un ítem de una lista (p. ej., aña-dir un símbolo o un carácter acentuado al texto) o para aplicar un ajuste seleccionado.
Es posible que aparezcan en el visualizador de LCD algunas preguntas para que confirme uncomando, especialmente cuando la función que usted ha seleccionado es para borrar oafectar archivos. En estos casos, si presiona h es como si respondiera “sí”.
☞ Para contestar “no”, presione c. Consulte la descripción de la TECLA DEBORRADO (BS) de la página 9.
Número máximo de líneas que pueden imprimirse
Anchuras de cinta
1 1/4” (6 mm)
2 3/8” (9 mm), 1/2” (12 mm), 3/4” (18 mm)
TECLA DE RETORNO

9
TECLA DE BORRADO (BS)
La tecla de borrado ( c ) le permite eliminar caracteres situados a la izquierda de la posi-ción actual del cursor. Se diferencia de la tecla del cursor izquierda ( < ) que sólo mueveel cursor sin borrar ningún carácter.
La tecla de borrado también puede utilizarse para abandonar la mayor parte de funciones yvolver a la visualización anterior sin cambiar el texto.
Es posible que aparezcan en el visualizador de LCD algunas preguntas para que confirme un
comando, especialmente cuando la función que usted ha seleccionado es para borrar o
afectar archivos. En estos casos, si presiona c es como si respondiera “sí”.
☞ Para contestar “no”, presione h. Consulte la descripción de la TECLA DERETORNO de la página 8.
Para borrar un carácter:
1 Presione < o > para situar el cursor debajo del carácter que está inmediatamente ala derecha del carácter que usted desea borrar.
2 Presione c una vez.
Si borra la visualización antes de introducir nuevo texto, la función Reposición podrá utili-zarse para elegir si se desea borrar todo el texto.
☞ La función Borrar solamente borrará texto. Las funciones de formato (Tamaño, Estilo,Subrayado, Marco, Tamaño grande, Margen de la cinta, y Impresión de espejo) novolverán a sus ajustes iniciales, sino que seguirán como estén.
Para borrar todo el texto y reponer todos los formatos a sus ajustes iniciales:
1 Mantenga presionado f y presione c.
2 Se borrará todo el texto.
FUNCIÓN DE REPOSICIÓN (CLEAR)

10
FUNCIÓN DE ACENTOS
La función de acentos también podrá utilizarse para añadir caracteres acentuados al texto.
Los caracteres acentuados se agrupan de acuerdo con la letra mayúscula o minúscula con laque se combinan. Hay disponibles los siguientes caracteres acentuados:
Para escribir un carácter acentuado:
1 Mantenga presionado f y presione d. Aparecerá el mensaje “A-U?” en el visuali-zador.
2 Presione la tecla de la letra acentuada deseada.
☞ Para escribir una letra mayúscula, mantenga pulsada e (o mantenga pulsadaf y presione e para pasar al modo de mayúsculas) antes de pulsar la teclade la letra.
3 Presione < o > hasta que el cursor se coloque debajo del carácter acentuadodeseado.
4 Presione h. La letra acentuada se añadirá al texto.
Además de letras, de los símbolos y los números de las teclas, hay 48 marcas adicionalescon la función de símbolos.
Los siguientes símbolos están disponibles:
Para escribir un símbolo:
1 Presione d. Aparecerá el mensaje “1-4?” en el visualizador.
2 Presione una tecla de 1 a 4 para elegir el juego que contenga el símbolo deseado.
LetrasCaracteres acentuados
LetrasCaracteres acentuados
a à á ä â ã æ I Í Ï Î
A À Á Ä Â Ã Æ n ñ
c ç N Ñ
C Ç o ó ö ô õ
e è é ë ê e O Ó Ö Ô Õ
E È É Ë Ê E u ù ú ü û
i í ï î U Ù Ú Ü Û
˜
FUNCIÓN DE SÍMBOLOS

11
3 Presione < o > hasta que el cursor se coloque debajo del símbolo deseado.
4 Presione h. El símbolo aparecerá en el texto.
El tamaño de los caracteres puede ajustarse empleando las funciones de tamaño (Size). Latabla siguiente indica los tamaños de caracteres.
El ajuste del tamaño de ajuste inicial es AUTO. El tamaño y el ancho actualmente seleccio-nados siempre se indican con los indicadores de encima del visualizador.
Cuando se instale cinta de 6 mm y esté ajustado SIZE 3, 4 y 5 para impresión horizontal oSIZE 2, 4 y 5 para impresión vertical, se visualizará el mensaje “CHR_SIZE:AUTO?”. Pre-sione h para imprimir en el tamaño AUTO.
Para cambiar el ajuste del tamaño:
1 Manteniendo presionada f, pulse una vez 1, y mantenga presionada f para
hacer que se visualice el tamaño actualmente ajustado.
2 Siguiendo manteniendo presionada f, continúe presionando 1 hasta que se visualice
el tamaño actualmente ajustado mediante el indicador del mismo.
☞ El ajuste del tamaño actual también se mostrará en el indicador de tamañosituado sobre el visualizador.
3 Para aplicar el ajuste de tamaño seleccionado a todo el texto, suelte f.
Podrá seleccionar entre doce estilos de caracteres distintos que podrá aplicar a su texto.
☞ Los caracteres que se imprimen utilizando los tamaños más pequeños pueden resultar difíci-les de leer si se seleccionan ciertos ajustes de estilos (por ejemplo, (ITALIC+SHADOW).
Tamaño Carácter
SIZE 1 Tamaño base
SIZE 2 Dos veces más ancho que el tamaño base
SIZE 3 Dos veces más alto que el tamaño base
SIZE 4 Cuatro veces más ancho que el tamaño base
SIZE 5 Cuatro veces más alto que el tamaño base
AUTOCinta de 1/4” (6 mm): SIZE 1Cinta de 3/8” a 3/4” (9 mm a 18 mm): SIZE 4
FUNCIÓN DE TAMAÑO
FUNCIÓN DE ESTILO
12
Hay disponibles los siguientes ajustes de estilos:
NORMAL
OUTLINE (perfilado) ITALIC+OUTLINE (cursiva y perfilado)
BOLD (negrilla) ITALIC+BOLD (cursiva y negrilla)
SHADOW (sombreado) ITALIC+SHADOW (cursiva y sombreado)
ITALIC (cursiva) VERTICAL
El ajuste de estilo predeterminado es NORMAL. El indicador de estilo de la parte inferiorderecha del visualizador mostrará el ajuste de estilo actual cuando seleccione un estilo queno sea NORMAL.
Consulte el apartado de Referencia, al final de esta sección, para ver muestras de los ajustesdisponibles.
Para cambiar el ajuste del estilo:
1 Manteniendo presionada f, pulse una vez 2, y mantenga presionada f parahacer que se visualice el estilo actualmente ajustado.
2 Siguiendo manteniendo presionada f, continúe presionando 2 hasta que se visualiceel estilo actualmente ajustado mediante el indicador del mismo.
3 Para aplicar el ajuste de estilo seleccionado a todo el texto, suelte f.
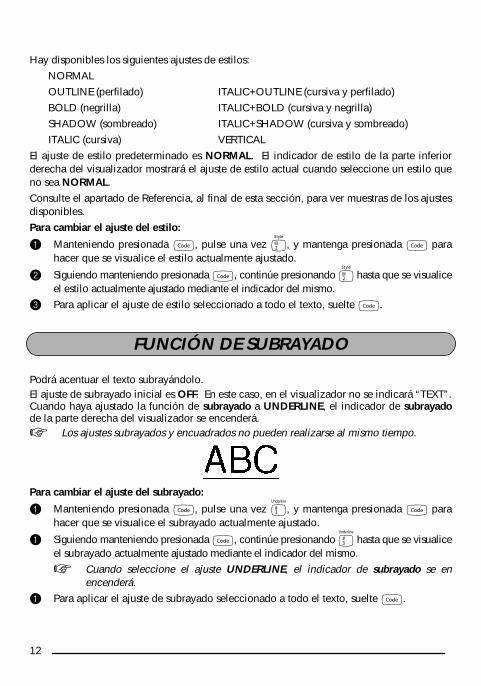
Podrá acentuar el texto subrayándolo.El ajuste de subrayado inicial es OFF. En este caso, en el visualizador no se indicará “TEXT”.Cuando haya ajustado la función de subrayado a UNDERLINE, el indicador de subrayadode la parte derecha del visualizador se encenderá.☞ Los ajustes subrayados y encuadrados no pueden realizarse al mismo tiempo.
Para cambiar el ajuste del subrayado:
1 Manteniendo presionada f, pulse una vez 3, y mantenga presionada f parahacer que se visualice el subrayado actualmente ajustado.
1 Siguiendo manteniendo presionada f, continúe presionando 3 hasta que se visualiceel subrayado actualmente ajustado mediante el indicador del mismo.
☞ Cuando seleccione el ajuste UNDERLINE, el indicador de subrayado se enencenderá.
1 Para aplicar el ajuste de subrayado seleccionado a todo el texto, suelte f.
FUNCIÓN DE SUBRAYADO
13
FUNCIÓN DE MARCOS
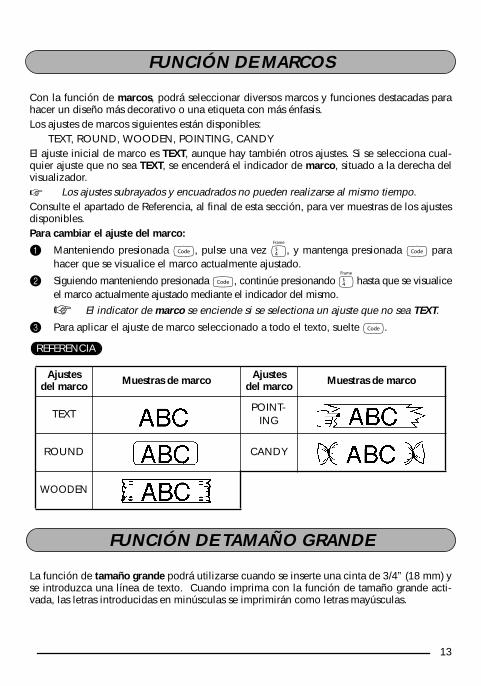
Con la función de marcos, podrá seleccionar diversos marcos y funciones destacadas parahacer un diseño más decorativo o una etiqueta con más énfasis.Los ajustes de marcos siguientes están disponibles:
TEXT, ROUND, WOODEN, POINTING, CANDYEl ajuste inicial de marco es TEXT, aunque hay también otros ajustes. Si se selecciona cual-quier ajuste que no sea TEXT, se encenderá el indicador de marco, situado a la derecha delvisualizador.☞ Los ajustes subrayados y encuadrados no pueden realizarse al mismo tiempo.Consulte el apartado de Referencia, al final de esta sección, para ver muestras de los ajustesdisponibles.Para cambiar el ajuste del marco:
1 Manteniendo presionada f, pulse una vez 4, y mantenga presionada f parahacer que se visualice el marco actualmente ajustado.
2 Siguiendo manteniendo presionada f, continúe presionando 4 hasta que se visualiceel marco actualmente ajustado mediante el indicador del mismo.
☞ El indicator de marco se enciende si se selectiona un ajuste que no sea TEXT.
3 Para aplicar el ajuste de marco seleccionado a todo el texto, suelte f.
REFERENCIA
La función de tamaño grande podrá utilizarse cuando se inserte una cinta de 3/4” (18 mm) yse introduzca una línea de texto. Cuando imprima con la función de tamaño grande acti-vada, las letras introducidas en minúsculas se imprimirán como letras mayúsculas.
Ajustes del marco Muestras de marco Ajustes
del marco Muestras de marco
TEXTPOINT-
ING
ROUND CANDY
WOODEN
FUNCIÓN DE TAMAÑO GRANDE

14
El ajuste inicial es OFF. Cuando ajuste la función de tamaño grande a ON, el indicador detamaño grande se encenderá en la parte inferior izquierda del visualizador.
☞ Si cambia cualquiera de los ajustes de Tamaño, Estilo, Subrayado, o Cuadro despuésde haber ajustado el tamaño grande, éste volverá automáticamente al valor inicial, ytendrán preferencia los ajustes de Tamaño, Estilo, Subrayado, o Cuadro.Si ajusta el tamaño grande cuando haya una cinta que no sea de 3/4” (18 mm) inser-
tada, se visualizará el mensaje “CHR_SIZE:AUTO?”. Presione
h
para imprimir enel tamaño
AUTO
.
Para cambiar el ajuste de Tamaño grande
1 Inserte el casete de cinta de 3/4” (18 mm) e introduzca una fila de texto.
2 Manteniendo presionado f, presione una vez 5, y mantenga presionado hpara que se visualice el ajuste actual.
3 Manteniendo presionado f, presione 5 para realizar el ajuste ON.
☞ Cuando realice el ajuste ON, se encenderá el indicador de tamaño grande.4 Para aplicar el ajuste seleccionado al texto introducido, suelte f.
La función de margen cinta le permite ajustar el tamaño de los márgenes de los ladosizquierdo y derecho del texto.El ajuste inicial de margen cinta es FULL, aunque hay también disponibles otros tres ajustes.
☞ Después de imprimir empleando los ajustes de margen cinta NARROW, y HALF, pre-sione la palanca de la cuchilla de la cinta para cortar la etiqueta, y emplee entoncesunas tijeras para cortar a lo largo de los puntos (:) impresos para centrar el texto den-tro de la etiqueta.
OFF ON
FULL (márgenes de 25 mm (1”))
NONE (márgenes de 2 mm (1/12”)))
NARROW (márgenes de 4 mm (1/6”))
HALF (márgenes de 12 mm (1/2”))
FUNCIÓN DE CINTA

15
Para cambiar el ajuste de la cinta:
1 Manteniendo presionada f, pulse una vez 6, y mantenga presionada f parahacer que se visualice la cinta actualmente ajustado.
2 Siguiendo manteniendo presionada f, continúe presionando 6 hasta que se visualicela cinta actualmente ajustado mediante el indicador del mismo.
3 Para aplicar el ajuste de la cinta seleccionado a todo el texto, suelte f.
Con esta función, podrá imprimir el texto de modo que los caracteres puedan leerse desde ellado del adhesivo de la cinta. Si se adhieren etiquetas con impresión de espejo a un vidrio, oen otro material transparente, podrán leerse correctamente desde el lado opuesto.
☞ Cuando emplee la función de impresión de espejo, el texto se imprimirá en cintatransparente.
El ajuste inicial para la impresión de espejo es OFF.
Para activar o desactivar la impresión de espejo:
1 Manteniendo presionada f, pulse una vez a, y mantenga presionada f parahacer que se visualice la impresión de espejo actualmente ajustado.
2 Siguiendo manteniendo presionada f, continúe presionando a hasta que se visualicela impresión de espejo actualmente ajustado mediante el indicador del mismo.
3 Para aplicar el ajuste de la impresión de espejo seleccionado a todo el texto, sueltef.
Después de haber introducido el texto y de haber seleccionado los ajustes del formatodeseado, estará preparado para la impresión. Para imprimir una etiqueta:
● Presione una vez a. Se visualizará “PRINTING”.
Para hacer avanzar la cinta:● Mantenga presionado a y presione g una vez. La cinta avanzará 25 mm (1”)
hacia afuera.
MIRROR : ON
FUNCIÓN DE IMPRESIÓN DE ESPEJO
FUNCIÓN DE LA TECLA DE IMPRESIÓN Y AVANCE

16
Para cortar la cinta:● Presione la cinta sobre la palanca de la cuchilla.
☞ Para evitar daños en la cinta, no trate de cortarla durante la impresión ni el avance. Sipresiona demasiado la palanca de la cuchilla, puede romperse.
Esta función podrá utilizarse para imprimir muchas copias del mismo texto aumentando en 1cierto número en el texto después de haber impreso cada etiqueta.Para utilizar la función de numeración:1 Presione < o > para colocar el cursor debajo del número que desee aumentar.
2 Mantenga pulsada f y presione A. En el visualizador aparecerá el mensaje“NUMBER:1-9?”.
3 Presione una tecla numérica ( 1 a 9 ) correspondiente all último número que deseeimprimir.
☞ Para abandonar la función de numeración sin imprimir, mantenga pulsada fy después presione A (o presione simplemente c).
4 Para comenzar la impresión de etiquetas, presione a (o h ).
5 Para cortar la cinta, presione la palanca del cortador de la misma, y después utiliceunas tijeras para cortar a lo largo de los puntos a fin de separar las etiquetas.
Esta función le permite imprimir hasta 9 copias del mismo texto. Para emplear la función de impresión repetida:1 Mantenga presionado f y presione S. Aparecerá el mensaje “REPEAT:1-9?” en el
visualizador.
2 Presione la tecla numérica ( 1 a 9 ) correspondiente al número de etiquetas quedesee.
☞ Para abandonar la función de impresión repetida sin imprimir, mantenga pul-sada f y después presione S (o presione simplemente c).
3 Presione a (o f ) para empezar a imprimir las etiquetas.
4 Presione la palanca de la cuchilla de la cinta para cortar la cinta, y emplee luego unastijeras para cortar a lo largo de los puntos impresos para separar las etiquetas.
FUNCIÓN DE NUMERACIÓN
FUNCIÓN DE IMPRESIÓN REPETIDA

17
FUNCIONES DE LA MEMORIA
Usted podrá utilizar la memoria para almacenar sus archivos de texto más frecuentementeutilizados. El texto permanecerá en la memoria, incluso después de haberlo eliminado delvisualizador utilizando la función de borrado (manteniendo presionada f y presionandoc).
Cuando almacena cada archivo, a éste se le asignará un número para poder invocarlo fácil-mente. En la memoria podrá almacenar hasta 9 archivos de texto, o aproximadamente 300caracteres. Cada archivo de texto almacenado podrá tener un máximo de 60 caracteres.Como, cuando se invoque un archivo de texto con la función de invocación, se invocaráuna copia del archivo almacenado, el texto podrá editar o imprimirse sin cambiar el archivooriginalmente almacenado. Cuando ya no necesite un archivo o cuando ya no lo necesite,podrá utilizar la función de borrado de la memoria. ☞ Cuando tenga que insertar nuevas pilas, hágalo antes de cinco minutos de haber
extraído las viejas, ya que de lo contrario los archivos de texto almacenados en lamemoria se perderían (a menos que la máquina esté enchufada en un tomacorrientede la red con el adaptador de alimentación de CA).
ALMACENAMIENTO DE TEXTOPara almacenar un archivo de texto:1 Mantenga pulsada f y presione 8. En el visualizador aparecerá el mensaje
“STORE:1-9?”.
☞ Si ya están almacenados 300 caracteres, en el visualizador aparecerá el mensajede error “MEMORY FULL!”. Cuando ocurra esto, tendrá que borrar un mensajeexistente antes de podere almacenar otro nuevo.
2 Presione la tecla ( 1 a 9 ) correspondiente al número de archivo en el que deseealmacenar texto. El texto se almacenará en el número de archivo seleccionado y eltexto previamente mostrado en el visualizador desaparecerá.
☞ Si ya hay un archivo almacenado con el número de archivo seleccionado, en elvisualizador aparecerá el mensaje “OVERWRITE?”, y usted tendrá que decidirentre reescribir o borrar tal archivo.
Para abandonar la función de almacenamiento del texto, mantenga pulsadaf y presione 8 (o simplemente presione c).

18
Par reescribir un archivo almacenado con otro nuevo:● Presione h para borrar el archivo previamente almacenado y almacenar el nuevo
con el número seleccionado.
☞ Para retroceder y elegir otro número de archivo sin reescribir el archivo de texto,presione c, y después presione una tecla numérica correspondiente a unnúmero de archivo diferente.
INVOCACIÓN DE TEXTOPara invocar un archivo de texto:1 Mantenga pulsada f y presione 9, En el visualizador aparecerá el mensaje
“RECALL:1-9?”.
2 Presione la tecla ( 1 a 9 ) correspondiente al número de archivo que desee invocar.Aparecerá el texto almacenado con el número de archivo seleccionado.
☞ Para abandonar la función de invocación sin invocar texto, mantenga pulsadaf y presione 8 (o presione simplemente c).
3 Presione h. Cualquier texto previamente introducido en el visualizador se borrará yel texto introducido en el número de archivo seleccionado se invocará en el visualiza-dor.
BORRADO DE UN ARCHIVOPara borrar un archivo de texto:1 Mantenga pulsada f y presione 9. En el visualizador aparecerá el mensaje
“M.DEL:1-9?”.
2 Presione la tecla ( 1 a 9 ) correspondiente al número de archivo que desee borrar.En el visualizador aparecerá el texto almacenado con el número de archivo seleccio-nado.
☞ Para abandonar la función borra de la memoria sin borrar el archivo de texto,mantenga pulsada f y presione 0 (o presione simplemente c).
3 Para borrar el archivo de texto seleccionado, presione h.

19
SOLUCIÓN DE PROBLEMAS
Problema Remedio
1. El visualizador se queda en blanco des-pués de haber conectado la alimenta-ción de la máquina.
• Compruebe que el adaptador de CA estécorrectamente enchufado.
• Si está empleando pilas, compruebe queestén correctamente insertadas.
• Si las pilas están gastadas, reemplácelaspor otro nuevo.
2. La máquina no imprime o los caracte-res impresos quedan borrosos.
• Compruebe que el casete de cinta sehaya insertado correctamente.
• Si el casete de cinta está vacío, reemplá-celo por otro nuevo.
• Asegúrese de que la cubierta del casetede cinta se haya cerrado.
3. Los archivos de texto almacenados enla memoria ya no están ella.
Si las pilas están gastadas, reemplácelas porotro nuevo.
4. Los caracteres impresos no se formancorrectamente.
Si está empleando pilas, quizás estén gasta-das. Pruebe utilizando el adaptador de CA oreemplace las pilas por otras nuevas.
5. Aparece una línea horizontal en blancoa través de la etiqueta impresa.
Limpie el cabezal de impresión como se haexplicado en la página 6.
6. Aparecen franjas. Se ha terminado la cinta. Reemplace elcasete de cinta por otro nuevo.
7. La máquina se ha “bloqueado” (es decir,no ocurre nada cuando se pulsa una teclaaunque la máquina está encendida.)
Apague la máquina, y después, mientras
mantiene pulsadas f y R, pulse bpara volver a encenderla.
Finalmente, suelte f y R.
☞ El texto y los formatos que aparecenen el visualizador y todos los archivosde texto almacenados en la memoriase borrarán.

20
LISTA DE MENSAJES DE ERROR
Mensaje de error Causa Remedio
2 LINE LIMIT! Este mensaje aparece si ya exis-ten cuatro líneas dos presiona h.
Límite el número de líneas a dos.
BATTERY WEAK! Este mensaje aparece cuando las pilas instaladas están gastadas.
Reemplace las pilas o emplee el adaptador de CA.
BUFFER EMPTY! • Este mensaje aparece si intenta imprimir, pero sin haber intro-ducido texto.
• Introduzca texto antes de la impresión.
• Este mensaje aparece si man-
tiene pulsada f y presiona
A, pero sin haber introdu-
cido texto en el visualizador.
• Introduzca algo de texto antes de iniciar la función.
• Este mensaje aparece si man-
tiene pulsada f y presiona
S, pero sin haber introdu-
cido texto en el visualizador.
• Introduzca algo de texto antes de iniciar la functión.
• Este mensaje aparece si man-
tiene pulsada f y presiona
8, pero sin haber introdu-
cido texto en el visualizador.
• Introduzca algo de texto antes de iniciar la functión.
BUFFER FULL! Este mensaje aparece si intenta introducir un carácter, símbolo, acentos, retorno, o un espacio cuando ya se han introducido 60 caracteres.
Borre algo del texto existente para poder introducir más texto.
CHANGE ADAPTOR
Este mensaje aparece si se está empleando un adaptador de alta tensión.
Extraiga el adaptador de alta ten-sión y conecte el adaptador de 9,0V CA 1,2 A.
CUTTER ERROR! Este mensaje aparecerá si pre-siona la palanca del cortador de cinta mientras esté imprimién-dose una etiqueta.
Suelte la palanca del cortador de cinta.

21
INVAL. CHRS! Este mensaje aparecerá si el cur-
sor está al final del texto cuando
mantenga pulsada f y pre-
sione A.
Mueva el cursor hasta debajo del
número manteniendo pulsada
f y presione A.
LINE LIMIT! Este mensaje aparece si el número de líneas del texto es mayor que el número máximo de líneas posible para la cinta insta-lada.
Reduzca el número de líneas o instale una cinta más ancha.
MEMORY FULL! Este mensaje aparecerá si intenta almacenar un archivo de texto después de haber almacenado ya 300 caracteres en la memoria.
Borre un archivo que no desee para dejar espacio para el nuevo.
NO FILES! Este mensaje aparece si intenta llamar o borrar un archivo de texto de la memoria cuando real-mente no hay ninguno almace-nado.
Almacene primero un archivo de texto.
NO TAPE! Este mensaje aparecerá si intenta imprimir una etiqueta o alimentar cinta cuando haya casete de cinta instalado.
Instale un casete de cinta y pruebe de nuevo.
TOO SMALL! Este mensaje aparecerá si el número ajustado para imprimirse utilizando la función de numera-ción es inferior al situado sobre el cursor.
Presione la tecla correspondiente a un número superior al del texto.
Mensaje de error Causa Remedio

22
ESPECIFICACIONES
HARDWARE
SOFTWARE
Dispositivo de entrada: Teclado de 49 teclas
LCD: 7 × 5 puntos15 caracteres × 1 línea11 indicadores
Cinta de impresión: Sensible a la presión, base adhesiva, 8 m (26´3”) de longitudCuatro anchos disponibles:
6 mm (1/4”)9 mm (3/8”)
12 mm (1/2”)18 mm (3/4”)
Alimentación: Seis pilas AA (AA/SUM-3/AM3/R6/LR6) o adaptador de CA opcionalDesconexión automática de la alimentación si no se pulsa ninguna tecla durante 5 minutos
Cabezal de impresión: 64 puntos / 180 dpi
Dimensiones: 176 (An) × 201.5 (Prf) × 52 (Al) mm(6 9/10” × 7 9/10” × 2”)
Peso: 650 g (1.4 lbs) (sin casete de cinta ni pilas instalados)
Tamaño de la memoria intermedia:
Máximo de 60 caracteresMáximo de dos líneas
Tamaño de la memoria: 300 caracteres
Tamaño de caracteres: Seis tamaños (AUTO, SIZE1, SIZE2, SIZE3, SIZE4, SIZE5) + Grande (sólo cuando se haya instalado cinta de 18 mm (3/4’’))
Estilos de impresión: Normal, perfilado, negrilla, sombreado (todos pueden combi-narse con cursiva), y Vertical

23
ACCESORIOS
● Accesorios de consumoAdquiera los casetes de cinta en el distribuidor autorizado que le quede más cerca. Emplee sólo cintas Brother TZ con esta máquina. Brother no puede hacerse responsa-ble por los problemas causados por el empleo de accesorios de consumo no autoriza-dos. No emplee cintas que no tengan la marca .
N.º de producto Descripción CANT./
PAQUETE PRECIO
Cintas laminadas de 18 mm (3/4”)
TZ-141 Caracteres negros sobre adhesivo transparente 1 $20.99TZ-145 Caracteres blancos sobre adhesivo transparente 1 $20.99TZ-241 Caracteres negros sobre adhesivo blanco 1 $20.99TZ-242 Caracteres rojos sobre adhesivo blanco 1 $20.99TZ-243 Caracteres azules sobre adhesivo blanco 1 $20.99TZ-344 Caracteres dorados sobre adhesivo negro 1 $24.99TZ-345 Caracteres blancos sobre adhesivo negro 1 $23.99TZ-441 Caracteres negros sobre adhesivo rojo 1 $20.99TZ-541 Caracteres negros sobre adhesivo azul 1 $20.99TZ-545 Caracteres blancos sobre adhesivo azul 1 $23.99TZ-641 Caracteres negros sobre adhesivo amarillo 1 $20.99TZ-741 Caracteres negros sobre adhesivo verde 1 $20.99
TZ-B41Caracteres negros sobre adhesivo naranja fluores-cente
1 $24.99
TZ-M41 Caracteres negros sobre adhesivo claro (MATE) 1 $23.99
TZ-S241Caracteres negros industriales (adhesivo fuerte)sobre adhesivo blanco
1 $21.99
Cintas laminadas de 12 mm (1/2”)
TZ-131 Caracteres negros sobre adhesivo transparente 1 $16.99TZ-231 Caracteres negros sobre adhesivo blanco 1 $17.99TZ-232 Caracteres rojos sobre adhesivo blanco 1 $17.99TZ-335 Caracteres blancos sobre adhesivo negro 1 $20.99
TZ-S231Caracteres negros industriales (adhesivo fuerte)sobre adhesivo blanco
1 $18.99
Cintas laminadas de 9 mm (3/8”)
TZ-121 Caracteres negros sobre adhesivo transparente 1 $14.99TZ-221 Caracteres negros sobre adhesivo blanco 1 $16.99

24
Cintas especiales
Opcións
TZ-325 Caracteres blancos sobre adhesivo negro 1 $18.99TZ-421 Caracteres negros sobre adhesivo rojo 1 $16.99
TZ-S221Caracteres negros industriales (adhesivo fuerte)sobre adhesivo blanco
1 $17.99
Cintas laminadas de 6 mm (1/4”)
TZ-111 Caracteres negros sobre adhesivo transparente 1 $12.99TZ-211 Caracteres negros sobre adhesivo blanco 1 $14.99TZ-315 Caracteres blancos sobre adhesivo negro 1 $17.99
TZ-S211Caracteres negros industriales (adhesivo fuerte)sobre adhesivo blanco
1 $15.99
N.º de producto
DescripciónCANT./
PAQUETEPRECIO
TZ-SE4Caracteres negros sobre cinta de seguridad de 18 mm (3/4”)
1 $29.99
TZ-FA3Caracteres azulese sobre cinta de tela de 12 mm (1/2”)
1 $24.99
N.º de producto
DescripciónCANT./
PAQUETEPRECIO
AD-30 Adaptador de CA 1 $24.99TZ-CL4 Casete de limpieza del cabezal de impresión 1 $20.99
N.º de producto Descripción CANT./
PAQUETE PRECIO

Printed in USAUSP000084